

Hitachi DZMV380E, DZMV380EAU, DZMV380ESWH, DZMV380EUK, DZMV380ESW User Manual

DZMV380E
DZMV350E
English
Français
DZMV350E DZMV380E
Instruction manual
T o obtain the best performance and ensure years of
trouble-free use, please read this instruction
manual completely.

Important Information
English
For Your Safety
The power switch turns the DVD video camera/recorder on and off, leaving the date/time feature unaffected. If the camera/
recorder is to be left unattended for a long period of time, turn it off .
WARNING :TO PREVENT FIRE OR SHOCK HAZARD, DO NOT
EXPOSE THIS UNIT TO RAIN OR MOISTURE.
WARNING :TO PREVENT FIRE OR SHOCK HAZARD, USE THE
The DVD video camera/recorder and AC adapter/
charger have the following caution marks.
CAUTION
RISK OF ELECTRIC SHOCK
DO NOT OPEN
CAUTION:
RECOMMENDED ACCESSORIES ONLY.
Precautions
WARNING: Many television programs and films
are copyrighted. In certain circumstances, copyright law may apply to private in-home
videotaping of copyr ig h t ed materials.
The liquid crystal display (L C D) panel is made
by highly precise technology. More than 99.99%
of its picture elements (pixels) ar e effective, but
some (less than 0.01%) may appear as colored
bright dots. This does not indicate a fault as the
LCD panel st retc hes the limits of cu rrent
technology.
Identifications of caution marks
This symbol warns the user that
uninsulated voltage within the unit
may have sufficient magnitude to cau se
electric shock. Therefore, it is dangerous
to make any kind of contact with any
inside part of this unit.
This symbol alerts the user that
important literature concerning the
operation and maintenance of this unit
has been included. Therefore, it shoul d
be read carefully to avoid any problems.
WARNING: To prevent risk of injury or damage to
your DVD video cam e ra/recorder and the AC
adapter/charger, use only the DZ-BP14S/DZBP14SW battery and D Z-ACS1 AC adapter/
charger.
CLASS 1
LASER PRODUCT
CAUTION
This product contains a laser diode of higher
class than 1. To ensure continued safety, do
not remove any covers or attempt to gain
access to the inside of the product. Refer all
servicing to qualified personnel.
2
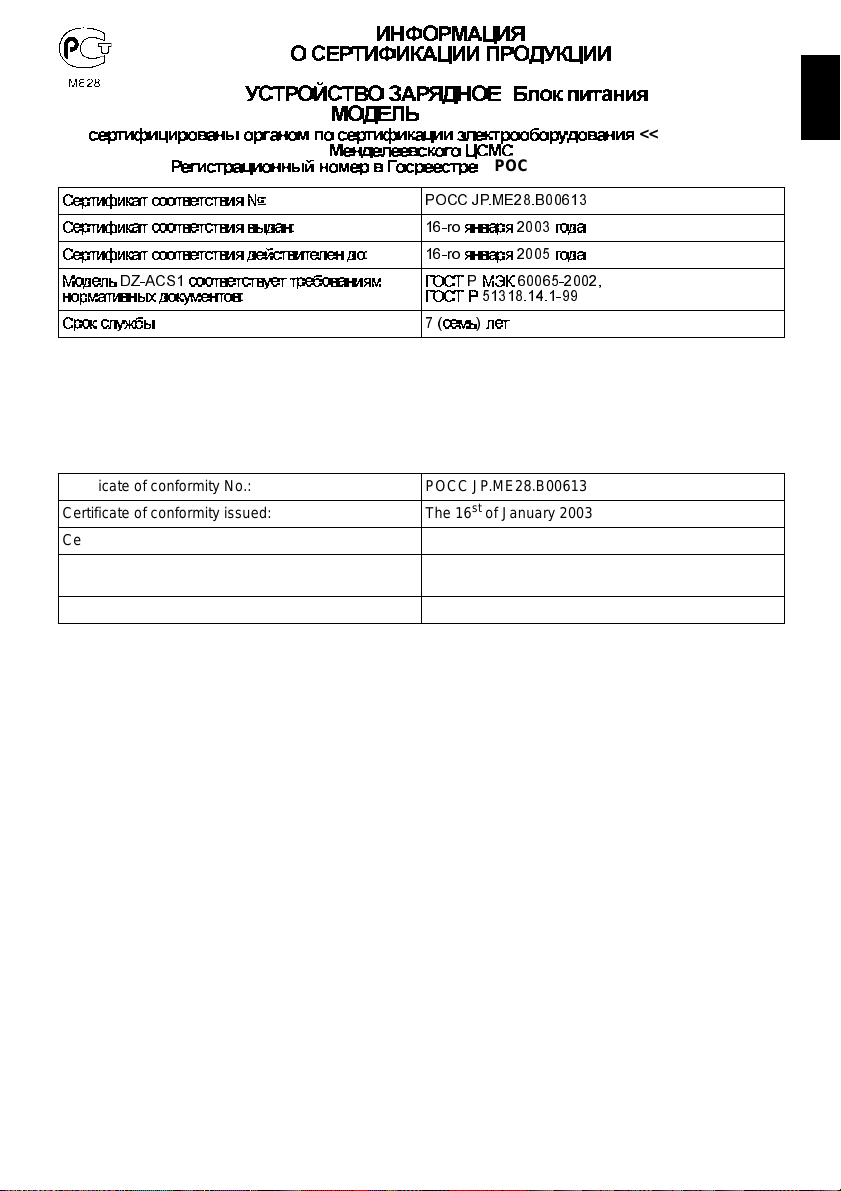
(
– POCC RU.0001.11ME28)
INFORMATION ON PRODUCT CERTIFICATION
AC ADAPTER / BATTERY CHARGER
MODEL DZ-ACS1
(Registration number in State Register - POCC RU.0001.11ME28)
Certificate of conformity No.: POCC JP.ME28.B00613
Certificate of conformity issued: The 16
Certificate of conformity valid till: The 16
Model DZ-ACS1 complies with requirements of
normative documents:
Life cycle 7 (seven) years
certified by “MENTEST” of Mendeleevsky CSMS
st
of January 2003
th
of January 2005
GOST R IEC 60065-2002,
GOST R 51318.14.1-99
<<MEHTECT>>
English
3

IMPORTANT SAFEGUARDS
English
In addition to the careful attention devoted to quality standards in the manufacture of your video product, safety is a major
factor in the design of every instrument. But, safety is your responsibility too.
This page lists important information that will help to assure your enjoyment and proper use of DVD video camera/recorder
and accessory equipment. Please read it carefully before operating your video product and keep it in a handy place for
future reference.
1 Read and Follow Instructi ons — All the safety and
INSTALLATION
operating instructions should be read before the video
product is operated. Follow all operating and use
instructions.
2 Retain Instructions — The safety and operating
instructions should be retained for future reference.
3 He ed Warnings — Comply with all warnings on the
video product and in the operating instructions.
4 Power Sources — This video product should be
operated only from the type of power source indicated
on the marking label. If you are not sure of the type of
power supply to your home, consult your video dealer
or local power company. For video products intended
to operate from battery power, or other sources, refer
to the operating instructions.
5 Overloading — Do not overload wall outlets and
extension cords as this can result in a risk of fire or
electric shock. Overloaded AC outlets and extension
cords are dangerous, and so are frayed power cables,
damaged or cracked wire insulation and broken plugs.
They may re sult in a sh ock or fir e hazard. Pe riodicall y
examine the cord and have it replaced by your service
technician if appearance indicates damage or
deteriorated insulation.
6 Power-Cord Protection — Power-supply cords
should be routed so that they are not likely to be
walked on or pinched by items placed upon or against
them, paying particular attention to cords at plugs,
convenience receptacles, and the point where they
exit from the appliance.
7 Ventilation — Slots and openings in the cabinet are
provided for ventilation to ensure reliable operation of
the video product and to protect it from overheating.
These openings must not be blocked or covered. The
openings should never be blocked by placing the
video product on a bed, sofa, rug, or other similar
surface. This video product should never be placed
near or over a radiator or heat register. This video
product should not be placed in a built-in i nstallation
such as a bookcase or rack unless proper ventilation
is provided or the video product manufacturer’s
instructions have been followed.
8 Attachments — Do not use attachments unless
recommended by the video product manufacturer as
they may cause hazards.
Caution: Maintain electrical safety. Powerline operated
equipment or accessories connected to this unit should
bear the UL listing mark or CSA certification mark on the
accessory itself and should not have been modified so as
to defeat the safety features. This will help avoid any
potential hazard from electric shock or fire. If in doubt,
contact qualified service personnel.
9 Water and Moisture — Do not use this video product
near water — for example, near a bath tub, wash bowl,
kitchen sink, or laundry tub, in a wet basement, or near
a swimming pool, and the like.
10 Accessories — Do not place this video product on an
unstable cart, stand, tripod, bracket, or table. The
video product may fall, causing serious injury to a child
or adult, and serious damage to the appliance. Use
only with a cart, stand, tripod, bracket, or table
recommended by the manufacturer, or sold with the
video product. Any mounting of the product should
follow the manufacturer’s instructions, and should use
a mounting accessory recommended by the
manufacturer.
11 An appliance and cart combination
should be moved with care. Quick
stops, excessive force, and uneven
surfaces may cause the appliance
and cart combination to overturn.
4

12 Power Lines — An outside antenna system should
not be located in the vicinity of overhead power lines
or other electric light or power circuits, or where it can
fall into such power lines or circuits. When installing an
outside antenna system, extreme care should be
taken to keep from touching or approaching such
power lines or circuits as contact with them might be
fatal. Installing an outdoor antenna can be hazardous
and should be left to a professional antenna installer.
USE
13 Cleaning — Unplug this video product from the wall
outlet before cleaning. Do not use liquid cleaners or
aerosol cleaners. Use a damp cloth for cleaning.
14 Object and Liquid Entry — Never push objects of
any kind into this video product through openings as
they may touch dangerous voltage points or short-out
parts that could result in a fire or electric shock. Never
spill liquid of any kind on the video product.
15 Lightning — For added protection for this video
product during a lightning storm, or when it is left
unattended and unused for long periods of time,
unplug it from the wall outlet and disconnect the
antenna or cable-system. This will prevent damage to
the video product due to lightning and power-line
surges.
16 Servicing — Do not attempt to service this video
SERVICE
product yourself as opening or removing covers may
expose you to dangerous voltage or other hazards.
Refer all servicing to qualified service personnel.
17 Conditions Requiring Service — Unplug this video
product from the wall outlet and refer servicing to
qualified service personnel under the following
conditions.
a. When the power-supply cord or plug is damaged.
b. If liquid has been spilled, or objects have fallen
into the video product.
c. If the video product has been exposed to rain or
water.
d. If the video product does not operate normally by
following the operating instructions. Adjust only
those contro ls that are cov ered by the oper ating
instructions. Improper adjustment of other
controls may result in damage and will often
require extensive work by a qualified technician
to restore the video product to its normal
operation.
e. If the video product has been dropped or the
cabinet has been damaged.
f. When the video product exhibits a distinct change
in performance — this indicates a need for
service.
18 Replacemen t Part s — When repl aceme nt par ts are
required, have the service technician verify that the
replacements he uses have the same safety
characteristics as the original parts. Use of
replacements specified by the video product
manufacturer can prevent fire, electric shock or other
hazards.
19 Safety Check — Upon completion of any service or
repairs to this video product, ask the service
technician to perform safety checks recommended by
the manufacturer to determine that the video product
is in safe operating condition.
20 Heat — The product should be situated away from
heat sources such as radiators, heat registers, stoves,
or other products (including amplifiers) that produce
heat.
English
5

Cautions When Using
English
Handle the liquid crystal display (LCD) with care:
• The LCD is a very delicate display device: Do not press its surface with force, hit it or prick it with a sharp
object.
• If you push the LCD surface, unevenness in display may occur. If unevenness does not disappear soon,
turn the DVD video cam e ra/recorder off, wait for a few moment s, and the n turn it on again.
• Do not place the DVD video camera/recorder with the open LCD screen down.
• Close the LCD monitor when not using the DVD video camera/recorder.
Liquid crystal display and viewfinder:
• The LCD screen and viewfinder are the products of highly pr ecise technology . Among the total number
of pixels (approx. 120,000 pixels for LCD monitor and approx. 1 10,000 pixels for viewfinder), 0.01% or
less pixels may be missing (black dots) or may remain lit as colored dots (red, blue, green). This shows
the limitations of th e current technol ogy , and does not indicate a fault that will inter fere with r ecording.
• The LCD screen and viewfinder will be slightly dimmer than usual when the DVD video camera/
recorder is at low temperature, as in cold areas, or im mediately after power is turne d on. Normal
brightness will be restored when the temperature inside the DVD video camera/recorder rises.
Hold the DVD video camera/recorder correctly:
• Do not hold the viewfinder or LCD monitor when lifting the DVD video camera/recorder: The
viewfinder or LCD monitor could detach and the DVD video camera/recorder may fall.
Do not subject the DVD video camera/recorder to impact:
• This DVD video camera/record er is a precision machine. Ta ke great care that you do not strike it against
a hard object or let it fa ll.
• Do not use the DVD video camera/reco rder on a tripod in a place where it is subject to sever e vibrations
or impact.
No sand or dust!
• Fine sand or d ust en t e rin g t he DVD video camera/recorder or AC adapter/cha rger could cause
malfunctions or defects.
No water or oil!
• Water or oil entering the DVD video camera/recorder or AC adapter/charger could cause electric shock,
malfunctions or defects.
6

Heat on surface of product:
• The surface of the DVD video camera/reco rder will be sligh tly warm, but this does not indicate a fault.
Screen on connected TV:
• Never leave the disc navigation scr een, still i mage or camera im age displayed on your TV to which t he
DVD video came ra/recorder is connected: Doing so coul d result in displayed im ag e ret en t ion or
phosphor degradat ion of TV screen.
Be careful of ambient temperature:
• Using the DVD video camera/recorder in a place where the temperature is over 40°C o r under 0°C will
result in abnormal recording/playback.
• Take car e that the temperature of this DVD video camera/r ecorder , when connected to PC, does not rise
excessively (reference for usage: app rox. 30 minut e s at ab out 30ºC).
• Do not leave the D V D video camera/recorder on beach sa nd or in a clos ed vehicle where the
temperature is very high for a long time: This could cause malfunctions.
Do not point directly at the sun:
• If direct sunlight strikes the lens or viewfinder, the DVD video ca mera/rec ord er could malf unction or
a fire could occu r.
• Do not leave the DVD video camera/recor der with the LCD screen exposed to direct sunlight: This could
cause malfunctions.
Do not use the DVD video camera/recorder near TV or radio:
• This could cause noise to appear on the TV screen or in radio broadcasts.
Do not use the DVD video camera/recorder near strong radio waves or magnetism:
• If the DVD video camera/recorder is used near strong radio waves or magnetism, such as near a radio
wave tower or electric appliances, noise could enter video and a u dio that are being recorded. During
playback of normally recorded video and audio, noise may also be present in picture and sound.
At worst the DVD video camera/recor d e r could ma lfunction.
Do not expose the DVD video camera/recorder to soot or steam:
• Thick soot or steam could damage the DVD video camera/recorder case or cause malfunctions.
Do not use the DVD video camera/recorder near corrosive gas:
• Using it in a place where ther e is dense exhaust gas ge nerated by gasoline or diesel engines, or corrosiv e
gas such as hydrogen sulfide, could corro de the battery connecting terminals, which could result in l oss
of power.
Do not use the DVD video camera/recorder near ultrasonic humidifier:
• With some water in humidifier, calcium and other chemicals dissolved in water could scatter in the air,
and white particle s coul d adher e to the opti cal h ead of the D VD video camera/ r ecor der, which co uld
cause it to operate abnormally.
Do not expose the DVD video camera/recorder to insecticide:
• Insecticide entering the DVD video camera/r ecorder could dirty lens in laser pickup block, so the DVD
video camera/reco rder might not operate nor mally . T urn the DVD video camera/r ecorder off and co ver
it with vinyl she e t, e tc . be fore using insecticide .
Do not use a generally available 8 cm CD lens cleaner:
• Cleaning the lens is not necessary when using this DVD video camera/rec order in the usual way.
• Using 8 cm CD lens cleaner could cause this DVD video camera/recorder to be faulty.
English
7

Be careful of moisture condensation:
• When you move the DVD video camera/record er between places where the difference in t emperatures
English
is great - such as entering a lodge from a ski slope or going out of a cooled room or vehicle - condensation
(vapor in air warmed or cooled to water droplets) could occur on the lens and/or inside the DVD video
camera/recorder. If condensation occurs, do not open the cover of disc or card insertion block if possible.
If condensation occurs on the lens, wipe it off wit h a soft, dry cloth. Even if the external surface of DVD
video camera/recorder ha s d ried, condensation may remain inside: Turn the DVD video camera/
recorder off and leave it in a dry place for at least 1- 2 ho urs b efore us in g it ag ain .
Do not use the DVD video camera/recorder for a long uninterrupted period of time:
• This DVD video camera/recorder cannot be used for a long time continuously as a surveillance camera/
monitor. If you use the DVD video camera/recorder for a long continuous period of time, the
temperature of DVD video camera/r ecorder could exceed a limit and the r ecording/playback operation
could be slowed down: In this case, turn it off and wait for a while before using it again.
Do not turn the DVD video camera/recorder off while the ACCESS/PC ind icator or CARD
ACCESS indicator is lit or blinking:
• The ACCESS/PC or CARD ACCESS indicator is lit or blinking
to show that data is being written to disc or card, or being read
from it. At this time, do not do any of the following, so as not
to damage the data:
− Remove battery
− Disconnect AC adapter/charger
− Plug or unplug PC connec tio n ca ble
− Remove disc or card
− Subject DVD video camera/recorder to severe vibrations or
impact.
− Violently open or close the LCD monitor
If you turn the DVD video camera/recorder off while the ACCESS/PC or CARD ACCESS indicator is lit
or blinking, turn it on agai n with th e dis c or c ard loaded in i t: Repair o f t he disc or car d wi ll be ex ecuted
automatically (see page 147).
CARD
ACCESS
indicator
ACCESS/PC
indicator
Do not wipe the DVD video camera/recorder case with benzene or thinner:
• The coating of case could peel off or the case surface could deteriorate.
• When using a chemical cleaning cloth, follow the instructions.
Also read the instructions attached with optional accessories:
• For optional acc e ssories, observe the cautio ns and fol low instruction manuals att ac h ed .
8

Cautions When Storing
Do not leave the DVD video camer a/recorde r in a plac e where the temper ature is ver y
high for a long period of time.
• The temperature inside a closed vehi cle or trunk can become very high in a hot season. If you leave the
DVD video camera/r ecor der in such a pla ce, it co uld malfuncti on or the cas e could be da maged. Also ,
do not expose the DVD video camera/recorder to direct sunlight or place it near a heater.
Do not store the DVD v ideo camera/record er in a place w here the humidity is h igh or in
a dusty place:
• Dust entering the DVD video camera/recorder could cause malfunc tions. I f the humidity is hi gh, the
lens could be moldy , and the DVD video camera/recorder could become inoperable. It is recommended
that you put the DVD video camera/recorder with desiccant in a box when storing it in a closet, etc.
Do not store the DVD video camera/recorder in a place subjec t to strong magnetism or
intense vibrations:
• This could cause malfunctions.
Detach the battery from the DVD video camera/recorder and store it in a cool place:
• Leaving the battery attached or storing it at high temperature could shorten its life.
English
9

Suggestions and Restrictions
English
Make a trial recording:
• Always make a trial recording before doing actual recording to make sure that recording is normal. The
data that have not been stor ed normally b ecause of a defec t in the DVD video camera /recor der cannot
be restored.
It is recommended that you use DVD-RAM disc from which recorded contents can be deleted for trial
recording.
Do not use the DVD video camera/recorder for professional applications:
• This DVD video camera/recorder is designed and produced for home-use recording and playback.
The recorded contents cannot be compensated for:
• Hitachi cannot compensate for any damages caused when recording is not made normally or recorded
contents cannot be played back because of a defect in the DVD video camera/r ecorder , disc or card. Also,
Hita c hi cannot be respo n sible for yo ur recorded vi deo an d audi o.
• If you or a third party make a mistake when handling this DVD video camera/recorder, disc, card, etc.,
the recorded contents may be lost. We cannot be r esponsible for compens ation for damage due to loss
of recorded contents.
Copyright:
• Data recorded on the disc or card in this DVD video camera/recorder using other digital/analog media
or devices are protected by the copyright a ct a nd canno t be used witho ut permissi on of the owner of
copyright, except for personal enjo yment. Be aware that recording i s restricted for some demonstrations,
performances and exhibitions, even for personal enjoyment.
10

Read This First
T o guide you, we’ v e included following six chapters.
• The section on “Setups” explains how to set up
the DVD video camera/rec order , battery , and set
the date/time.
• The section on “Basic Techniques” explains the
basic operation of this DVD video camera/
record er - recording of mov ies, s till im ages,
external input, and playback of recorded images.
• The section on “Advanced Techniques” explains
settings on this DVD video camera/recorder for
more advanced usage.
• The section on “Disc Navigation” explains
editing with Disc Navigation: Refer to this
section when finalizing DVD-R disc and
initializing DVD-RAM disc.
• The section on "Installing Software" explains the
con ten ts o f pro vid ed C D-R OM a nd h ow t o in sta ll
the software included.
• “Subsidiary Infor mation” includes an
introduction to products sol d separately, proper
cleaning, and troubleshooting.
With this DVD video camera/recorder you can view the picture being recorded or the playback picture
whether on the LCD monitor or in the viewfinder . Opening or closing the LCD monitor switches the pic ture
to appear on the LCD monitor or in the viewfinder . The following text describes the operatio n assuming that
the viewfinder is used as a major monitor device.
We want this manu al to be a s helpful a s possible,
so it includes two easy ways to find the informatio n
you need:
• A quick index for the information you use most
often (this page).
• A detailed table of contents directing you to
specific informatio n qu ic kly (se e p age 14-16).
Get to know your DVD video camera/recorder by
using this manual, and get to know Hitachi. We
appreciate your business.
Quick Index
Available Discs................................................23
Recording Movie..............................................51
Immediately Checking Recorded Scene ......... 66
Connecting to a TV..........................................71
Functions Available with Disc Navigation........97
Installing Software .........................................130
English
Microsoft
Professional, and Windows
Intel
IBM
Manufactured under license from Dolby Laboratories.
“Dolby” and the double- D sym b ol are trademarks of Dolby Laboratori e s.
Other company names and produc t nam e s li st ed are trad e m arks or brand names belonging to each
individual co mp any.
SD logo is a trad e m ark.
®
, Windows®, Windows® 98, Windows® 98 Second Edition, Windows® Me, Windows® 2000
®
, Pentium® Processor, and Celeron® Processor are registered trademarks of Intel Corporation.
®
and PC/AT® are registered trademarks of International Business Machines Corporation.
®
XP are registered trademarks of Micro s oft Cor pora tion.
11
Introduction
English
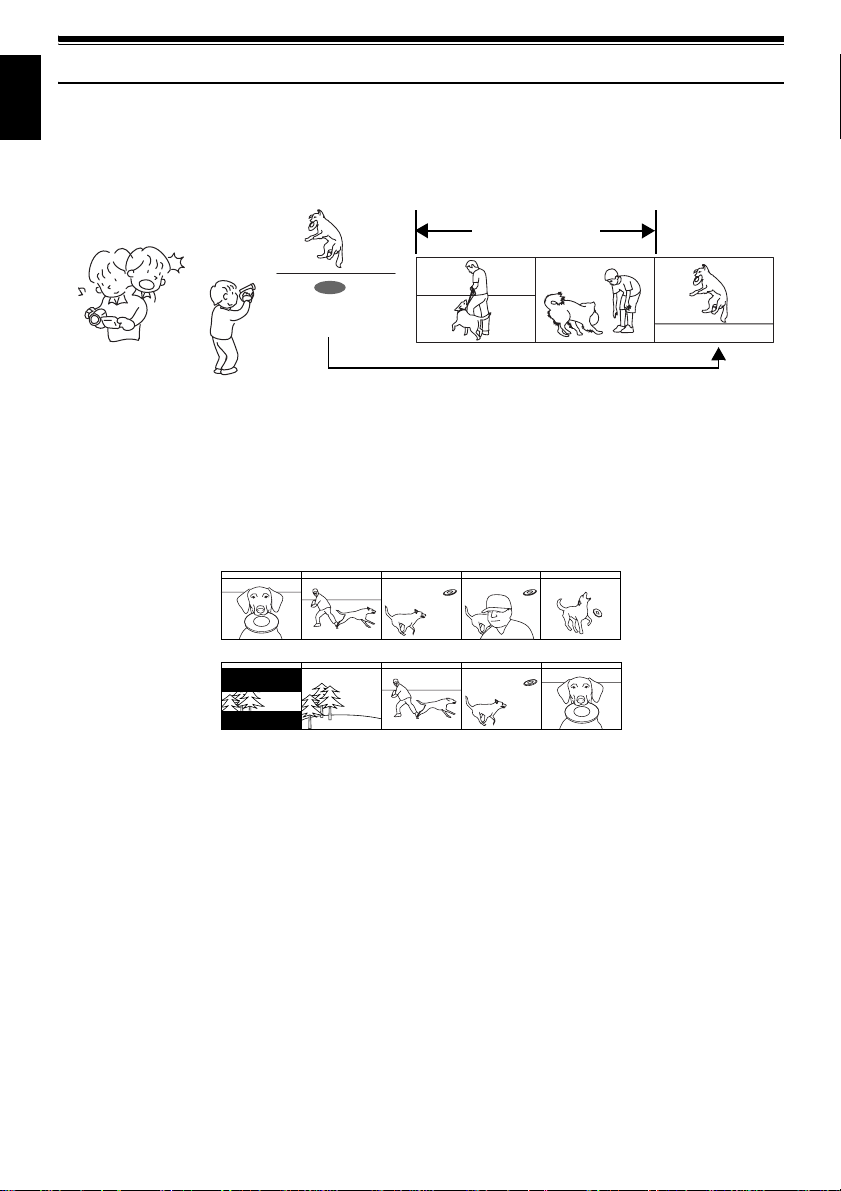
●You can record even during playback
Unlike tape devices, you do not need to sear ch for the recor ding star t position or loca te the beginning of
blank portion.
You can start recording during playback: New recording will not overwrite any previously recorded data.
Recorded scenes
If you stop playback midway and start recording, overwrite will not occur.
●You can immediately play back desired recorded scenes
You do not n eed to rewind , unlike recorders using tape.
You can select any scene you want and immediately play it back (using Disc Navigation function).
●Use Disc Navigation to create your original movie
Y ou can delete unnecessary scenes, move any scenes, etc., and create your origi nal movie work (PlayList).
Before editing
After editing
12

●You can easily edit scenes, which is
quite difficult with tape
Using this DVD video camera/recorder, you can
collect scenes of your child, for example, o n play list
of Disc Navigation function and create an original
movie: Then simply play back the play list and dub
it on VCR. It is also easy to make any number of
identical tape s.
Up to now, you had to
repeatedly press
buttons
With DVD, you can simply
play back this DVD video
camera/recorder, and
press the record button on
VCR.
●Create original DVDs on PC
You can use a DVD-R disc to create an original
DVD, using the provided software CD-ROM.
The created DVD di sc can b e played back on DVD
player, DVD-ROM drive, etc.
Original DVD being
created
Playback of DVD
English
13

Table of Contents
English
Important Information .........................................2
For Your Safety .................................................. 2
Precautions ........................................................ 2
IMPORTANT SAFEGUARDS ............................4
Cautions When Using......................................... 6
Cautions When Storing.......................................9
Suggestions and Restrictions ........................... 10
Read This First ................................................. 11
Introduction.......................................................12
Table of Contents....... ................. ................. .... 14
Checking Provided Accessories ....................... 17
Names of Parts.................................................18
About This Manual............................................ 22
Discs and Cards ............................................... 23
AVAILABLE DISCS...............................................23
INFORMATION ON DVD-R DISC .........................24
EXAMPLES OF DISCS THAT CANNOT BE USED
ON THIS DVD VIDEO CAMERA/RECORDER: .24
HANDLING DISCS................................................25
AVAILABLE CARDS..............................................26
Storage Capacity on Disc or Card....................27
RECORDABLE TIME OF MOVIE (VIDEO)...........27
RECORDABLE STILLS (PHOTOS) ON DISC ......28
RECORDABLE STILL (PHOTOS) ON CARD.......28
Features of DVD Video Camera/Recorder....... 29
VERSATILE FUNCTIONS AVAILABLE ................29
RECORDING ON DISC.........................................31
RECORDING MOVIE AND STILL.........................31
IMMEDIATE REVIEWING OF
RECORDED IMAGE...........................................32
EDITING IN VARIOUS WAYS ON DVD VIDEO
CAMERA/RECORDER ALONE..........................32
USING WITH VARIOUS DEVICES .......................32
Setups
Setting Up the DVD Video Camera/Recorder... 33
HOLDING DVD VIDEO CAMERA/RECORDER ...33
ATTACHING LENS CAP .......................................33
ATTACHING SHOULDER STRAP........................34
INSERTING BATTERY INTO
REMOTE CONTROL ... ..... ...... ..... ..... ..... .............35
REMOVING BATTERY FROM
REMOTE CONTROL ... ..... ...... ..... ..... ..... .............35
Setting Up the Battery.......................................37
CHARGING BATTERY..........................................37
ATTACHING BATTERY TO DVD VIDEO CAMERA/
RECORDER.......................................................38
REMOVING BATTERY .........................................38
BATTERY REMAINING LEVEL INDICATOR........40
EFFICIENT USE OF BATTERY ............................40
USING DVD VIDEO CAMERA/RECORDER
WITH AC ADAPTER/CHARGER........................41
Inserting and Removing Disc............................ 42
INSERTING DISC ........................................ ..... ....42
REMOVING DISC ........................................ ..... ....44
Inserting and Removing Card........................... 45
Basic Techniques
Basic Handling of DVD Video Camera/
Recorder........................................................46
TURNING DVD VIDEO CAMERA/RECORDER
ON AND OFF .....................................................46
VIEWING SUBJECT THROUGH VIEWFINDER...47
VIEWING IMAGE ON LCD MONITOR SCREEN..47
CLOSING LCD MONITOR....................................48
Setting Date and Time...................................... 49
CHANGING DISPLAY FORMAT OF
DATE AND TIME................................................50
Recording Movie............................................... 51
USING EXTERNAL MICROPHONE .....................53
Recording Stills................................................. 54
Zooming............................................................56
MACRO RECORDING..........................................57
RECORDING SUBJECTS FOR STRONGER
WIDE-ANGLE OR TELEPHOTO EFFECT ........57
Manually Focusing Subject............................... 58
FOCUSING DURING RECORDING .....................58
Adjusting Exposure Manually........................... 60
Compensating for Backlight.............................. 61
Using Full Au t o Fu n ction ......................... ......... 62
On-Screen Information ..................................... 63
INFORMATION DISPLAY DURING
RECORDING .....................................................63
Playing Back............. ................................ ........ 66
IMMEDIATELY CHECKING RECORDED
SCENE...............................................................66
PLAYBACK FROM START OF DISC OR CARD..67
SEARCH PLAYBACK OF MOVIE.........................67
FRAME ADVANCE/FRAME BACK/SLOW
PLAYBACK OF MOVIE......................................67
SKIP PLAYBACK OF MOVIE................................68
PLAYING BACK STILLS.......................................68
JUMPING TO SPECIFIED POINT (GO TO) .........69
On-Screen Information Display ........................ 70
INFORMATION DISPLAY DURING PLAYBACK..70
Playback on Other Devices.............................. 71
CONNECTING TO A TV .......................................71
VIEWING ON TV SCREEN...................................72
Playback on D V D Pl a ye r .............. ............. .. ..... 73
Playback on DVD Video Recorder/Player ........ 73
Removing and Replacing from/in Round DVD
Holder ............................................................ 74
HOW TO REMOVE DISC .....................................74
REPLACING DISC IN ROUND DVD HOLDER.....75
14

WHEN THE HINGE OF ROUND DVD HOLDER
COMES OFF ......................................................75
DISC CLEANING...................................................75
Advanced Techniques
Understanding Flow of Menu............................ 76
Setting Up Camera Functions...........................78
SELECTING SHOOTING MODE TO MATCH
THE SUBJECT
(SWITCHING PROGRAM AE MODE)................78
ADJUSTING COLOR (WHITE BALANCE)............79
USING THE ELECTRONIC IMAGE STABILIZER
(EIS)....................................................................81
MAGNIFYING SUBJECT IMAGE (DIG. ZOOM) ...82
REDUCING WIND NOISE DURING
RECORDING (MIC.FILTER) ..............................83
SWITCHING TO 16:9 MODE .............................. .. 84
Setting Up Record Functions............................ 85
SWITCHING MOVIE QUALITY (VIDEO MODE)...85
SWITCHING QUALITY OF STILL IMAGE
(QUALITY)..........................................................86
SELF-TIMER .........................................................87
SETTING ON-SCREEN DISPLAY OUTPUT
ON OR OFF (OSD OUTPUT).............................88
LCD Setup........................................................ 89
SETTING BRIGHTNESS OF LCD SCREEN
(BRIGHTNESS)..................................................89
SETTING COLOR DENSITY OF LCD SCREEN
(COLOR LEVEL) ................................................89
Initial Settings...................................................90
SWITCHING OPERATING SOUND ON OR OFF
(BEEP)................................................................90
TURNING DVD VIDEO CAMERA/RECORDER OFF
AUTOMATICALLY (POWER SAVE)..................90
TURNING RECORD LED ON OR OFF
(RECORD LED)..................................................91
CHANGING DISPLAY LANGUAGE
(LANGUAGE) .....................................................91
RESETTING MENU SETTINGS TO DEFAULTS
(RESET) .............................................................92
Disc Navigation
Using Disc Navigation.......................................93
STARTING DISC NAVIGATION............................93
TERMINATING DISC NAVIGATION .....................95
PLAYING BACK FROM DISC NAVIGATION
SCREEN.............................................................95
SELECTING MULTIPLE SCENES........................96
SELECTING CONSECUTIVE SCENES
TOGETHER........................................................96
Disc Navigation Menu................ ....................... 97
FUNCTIONS AVAILABLE WITH DISC
NAVIGATION......................................................97
UNDERSTANDING FLOW OF DISC NAVIGATION
MENU.................................................................98
Scene................................................................ 99
DELETING SCENES (DELETE) .... .......................99
CHANGING IMAGES FOR THUMBNAILS
(EDIT - THUMBNAIL) .......................................101
PLAYING BACK BY SKIPPING SCENES
(EDIT - SKIP)..... ..... ..... .....................................102
ADDING SPECIAL EFFECTS (EDIT - FADE) ....103
ARRANGING ORDER OF SCENES
(EDIT - MOVE).................................................104
COMBINING MULTIPLE SCENES
(EDIT - COMBINE)...........................................105
DIVIDING MOVIES (EDIT - DIVIDE)...................106
COPYING STILLS ON DVD-RAM DISC
TO CARD (COPY)................ ..... ..... ...... ..... ....... 107
LOCKING SCENES ON CARD (LOCK)..............108
DESIGNATING SCENES TO BE PRINTED
(DPOF).............................................................109
SELECTING SCENES USING MENU SCREEN
(SELECT).........................................................110
DISPLAYING INFORMATION USING MENU
SCREEN (DETAIL) ..........................................111
Program.......................................................... 112
WHAT IS “PROGRAM”? .....................................112
SWITCHING TO THUMBNAIL DISPLAY OF
SPECIFIC DATE (SWITCH).............................112
PLAYING BACK PROGRAM (PLAY)..................113
CHANGING TITLE OF PROGRAM (TITLE) .......113
Play List........................... ................ ............... 115
WHAT IS “PLAY LIST”?......................................115
CREATING NEW PLAY LIST (CREATE)............115
SWITCHING TO DISPLAY OF EACH PLAY LIST
(SWITCH).........................................................116
PLAYING BACK A PLAY LIST (PLAY) ...............117
ADDING SCENES TO PLAY LIST (EDITING PLAY
LIST).................................................................118
DELETING SCENES FROM PLAY LIST
(EDITING PLAY LIST)......................................119
ADDING SCENES USING SUBMENU FOR
EDITING (EDITING PLAY LIST)......................119
DELETING SCENES USING SUBMENU FOR
EDITING (EDITING PLAY LIST)......................120
SELECTING SCENES USING SUBMENU FOR
EDITING (EDITING PLAY LIST)......................120
ARRANGING ORDER OF SCENES (MOVE).....121
CHANGING TITLE OF PLAY LIST (TITLE)........122
DELETING PLAY LIST (DELETE)......................122
Go To.............................................................. 123
TOP (END)..........................................................123
Disc or Card Management.............................. 124
VERIFYING REMAINING FREE SPACE ON
DISC OR CARD (CAPACITY)..........................124
PROTECTING DISC FROM WRITING
(PROTECT DISC) ............................................124
INITIALIZING DVD-RAM DISC OR CARD
(FORMAT DISC/FORMAT CARD).................... ..125
UPDATING CONTROL INFORMATION OF
DVD-RAM DISC...............................................126
FINALIZING DVD-R DISC...................................127
Others............................................................. 128
DISPLAYING MOVIES OR STILLS
INDEPENDENTLY (CATEGORY)....................128
PLAYING BACK SCENES REPEATEDLY
(REPEAT PLAY) ..............................................128
SLIDE SHOW (CONTINUOUS PLAYBACK OF
STILLS) ............................................................129
English
15

Installing Software
Contents on Provided CD-ROM ..................... 131
English
INSTALLING USB DRIVER.................................133
INSTALLING UDF DRIVER
(DVD-RAM DRIVER)........................................ 1 35
INSTALLING DVD-MovieAlbumSE.....................137
INSTALLING MyDVD ..........................................139
Creating DVD Video on PC from
DVD-RAM Disc Recorded on
DVD Video Camera/Recorder...................... 141
Subsidiary Information
Cleaning.......................................................... 143
Changing Setting of Demonstration................ 144
No DVD Video Camera/Recorder Operation -
Check the Following:.................................... 145
Trouble Messages..........................................147
Troubleshooting..............................................154
System Reset.................................................161
Major Specifications................... ..................... 162
Introduction to Optional Accessories.............. 164
CAMERA ACCESSORIES..................................164
POWER SUPPLY................................................164
INFORMATION ON SQUARE ADAPTER...........164
Index............................................................... 165
Be sure to read the following before opening
the package of CD-ROM..............................168
16

Checking Provided Accessories
Make sure that you have all the following accessories in package:
Battery (model DZ-BP14S):
Portable power supply for this DVD video
camera/recorder. Charge it before use.
Power cable:
Connect between household AC outlet and
AC adapter/charger.
AV/S out pu t cabl e:
Used when viewing the picture pla yed back
on the DVD video camera/recorder on TV
screen, or output video to another video
device.
AC adapter/charger (model DZ-ACS1):
Used to power the DVD video camera/
recorder from AC outlet, or charge battery.
Infrared remote control
(model DZ-RM3W):
Use to control the DVD video camera/
recorder from a distance.
Shoulder strap:
Attach to the DVD video camer a/recorder t o
hang it from shoulder.
DC power cord:
When powering the DVD video camera/
recorder from household AC outlet, use this
cord to connect the DVD video camera/
recorder and AC adapter/charger.
Lithium battery (model CR2025):
To power the remote control.
WARNING: Keep
this battery away
from children. If
swallowed, consult
a physician
immediately for
emergency
treatment.
Lens cap and lens cap string:
Attach the lens cap when not recording, to
protect the lens.
English
8 cm DVD-R disc (in Round DVD Holder):
To record video (movie) on this DVD video
camera/recorder
PC connection cable:
Ferrite co re:
In order to control radio noise emission,
attach this to external microphone cable if
you are using the external microphone.
Software CD-ROM:
Use this CD-ROM when connecting the DVD
video camera/recorder to PC.
17
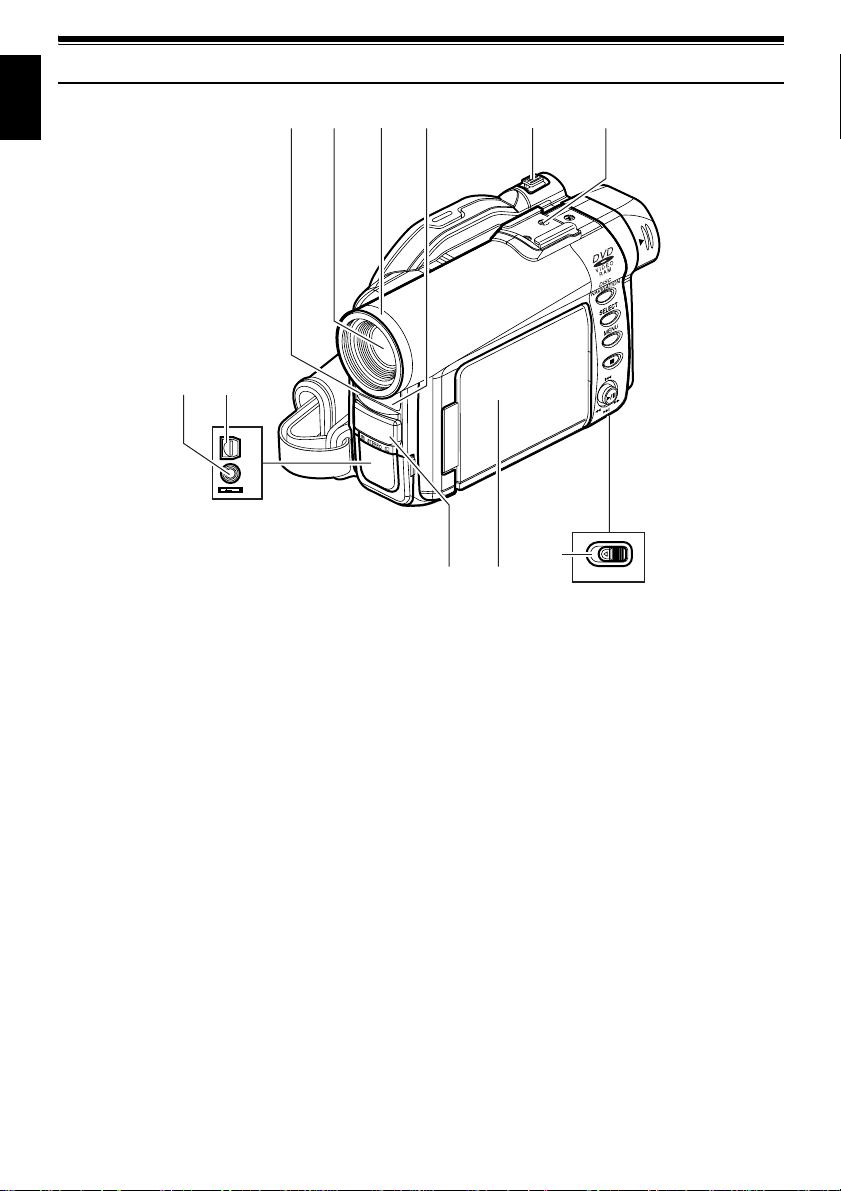
Names of Parts
English
7
(Inside the cover)
1234 5 6
8
A/V
MIC
11
910
BATTERY EJECT
(Bottom)
1 Recording indicator (P. 91)
The red indi cator will light during record ing.
2 Optical 10× zoom lens (P. 56)
3 Lens hood (P. 57)
Always remove this lens hood when us in g
generally available tele-conversion or wideconversion lens.
4 Infrared receiver (P. 36)
When the remote control is used to oper ate the
DVD video camera/recorder, this receiver will
receive the infrared signal.
5 Zoom lever (P. 56)
Push the lever to the T side for telephoto, or to
the W side for wide-angle.
6 Accessory shoe (only for DZ-MV380E)
Slide the cover to r emove it, and then attach the
optional video flash, etc., here. (See the
instruction manual of device to be attached for
details.)
18
7 External microphone jack (P . 53)
8 AV output jack (P. 71)
9 Stereo microphone (P. 53)
10 2.5” type liquid crystal display (inside) (P . 47)
11 BATTERY EJECT switch (P. 38)
The BATTERY EJECT switch is located on the
bottom of this DVD video camera/recorder:
Slide it when removing the battery.
12 13 14 1715
ACCESS/PC
DISC EJECT
R
E
C
18 19 20 2221
16
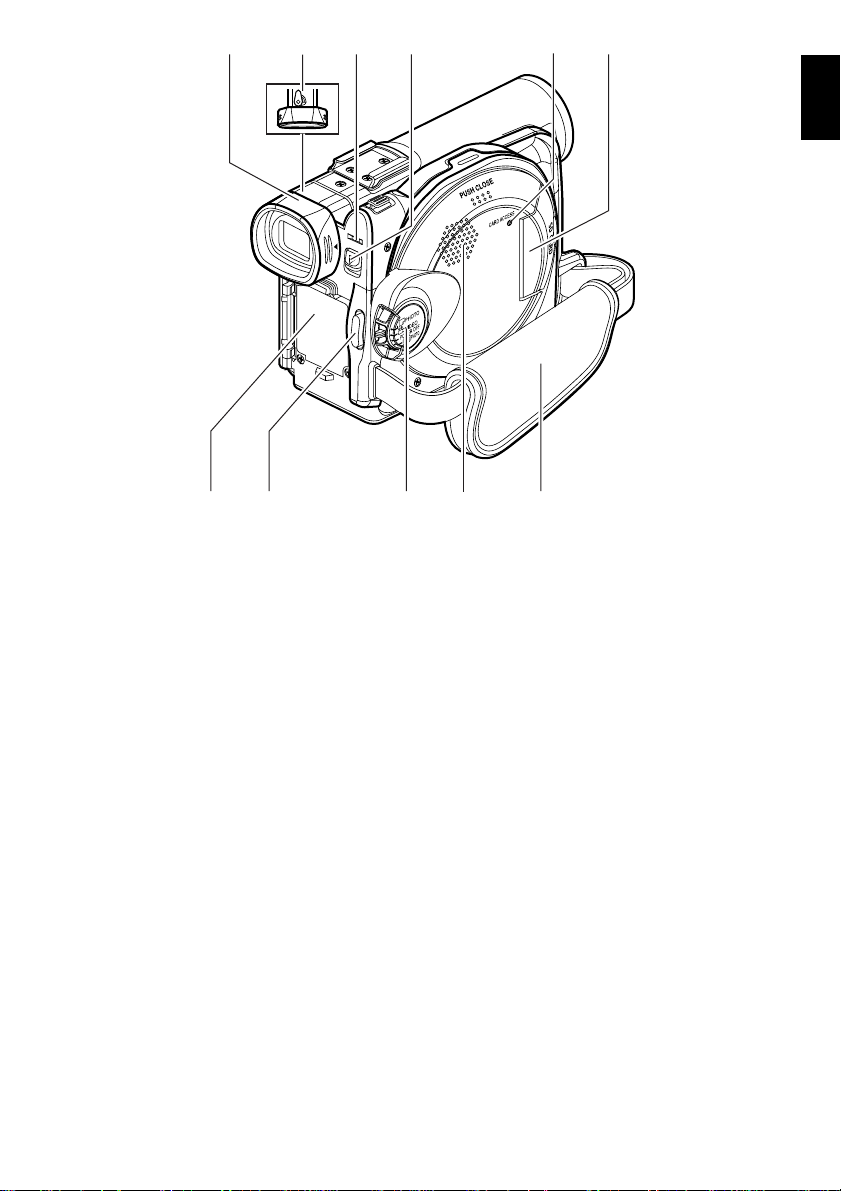
English
12 Viewfinder (P. 47)
13 Diopter control (P. 47)
To adjust the focus of image appearing in the
viewfinder. (Pull out the viewfinder.)
14 ACCESS/PC indicator (P. 8, 51, 54)
Will blink or light while the DVD video camera/
recorder is operating.
15 DISC EJECT button (P. 42)
Press down and release this button to open the
disc guide.
16 CARD ACCESS indicator (P. 8, 54)
17 Card insertion block (P. 45)
18 Battery attachment platform (P. 38)
19 Record button (REC) (P. 51)
20 Power switch (P. 46, 51, 54)
21 Speaker (P. 66)
22 Hand strap (P . 33)
19
23 24 25 26 27 28 29
English
3531 32 33 3430
23 FULL AUTO button (P. 62)
To switch the DVD video camer a /recorder to
full automatic
24 FOCUS button (P. 58)
To switch between manual focus and autofocus.
25 EXPOSURE button (P. 60)
Press this button to adjust the exposure.
26 BLC (backlight compensation) button
(P. 61)
Press this button when subject is being li ghted
from rear.
27 DISC NAVIGATION button (P. 93)
28 SELECT button (P. 96)
29 MENU button (P. 49, 77, 99)
Press this button to displa y the menu for setting
camera functions and Disc Navigation.
The camera menu will appear even if disc is not
loaded.
30 Screen display button (DISPLAY) (P . 70)
Press this button to displa y the details of image
being played back or camera setting status, or
switch the display off.
31 Volume control buttons (VOL)/
(P. 58, 60, 66)
T o adjust the volume of sound from speaker, etc.
32 RESET button (P. 161)
T o reset all setti ngs to defaults (status when the
DVD video camera/recorder was shipped from
the facto r y ).
33 PC connection terminal (TO PC)
34 Joystick (P. 49, 66, 77)
Move the joystick to select a scene or menu item;
then play back the scene or pause it.
35 Stop/cancel button (P. 22, 66, 95)
To end playback or cancel setting of menu.
buttons
20
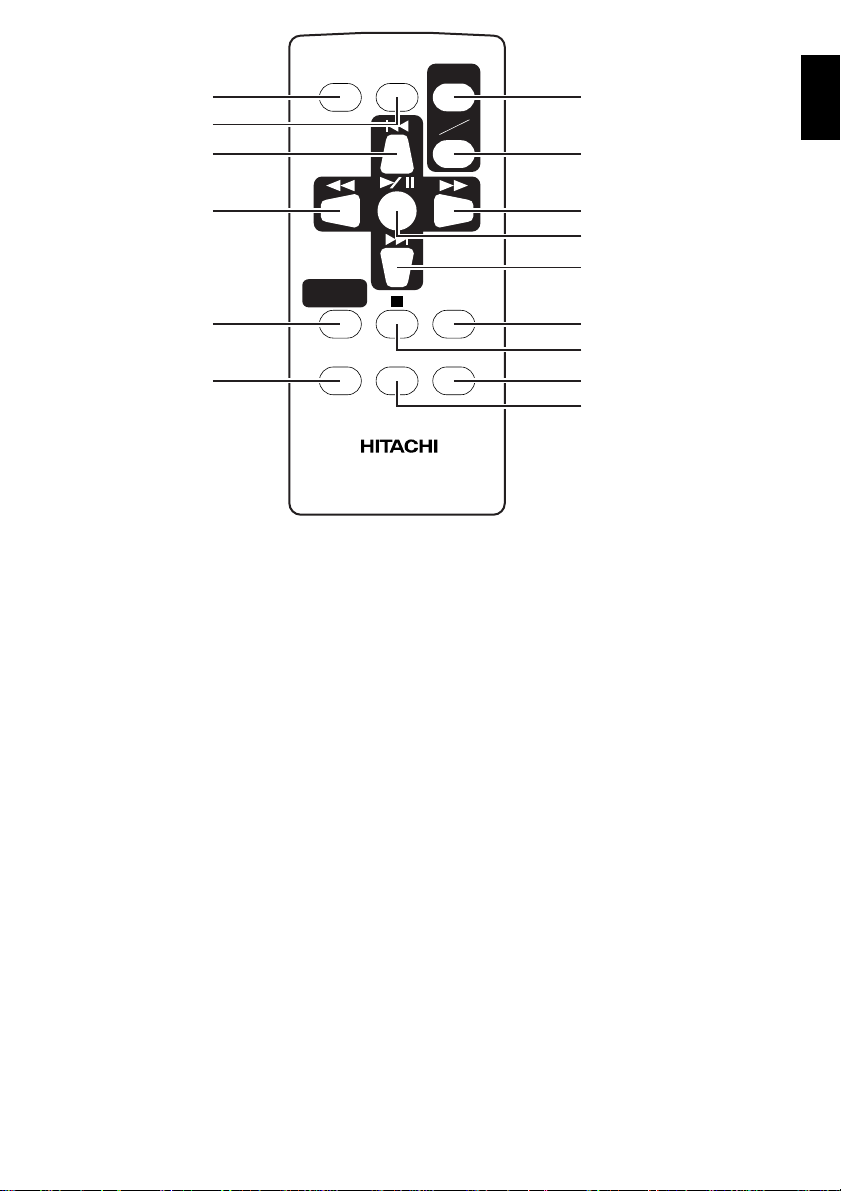
36
37
38
REC
DIGIT AL
ZOOM
ZOOM
T
W
42
English
43
39
NAVIGATION
40
41
36 REC button (P. 51)
37 DIGITAL ZOOM button (P. 82)
38 Reverse skip button (P. 68)
39 Reverse search button (P. 67)
40 DISC NAVIGATION button (P. 93)
41 MENU button (P. 49, 78, 100)
DISC
MENU
DZ-RM3W
44
45
46
DISPLA Y
47
DELETESELECT
48
49
50
42 ZOOM T button (P. 56)
43 ZOOM W button (P. 56)
44 Forward search button (P. 67)
45 Play/pause button (P. 66)
46 Forward skip button (P. 68)
47 DISPLAY button (P. 70)
48 Stop button (P. 22, 66, 95)
49 DELETE button (P. 99)
50 SELECT button (P. 96)
* The buttons on remote control will function the same as those on DVD video camera/recorder.
21

About This Manual
English
●Displays in this manual
Understand that the di splays are differ ent from those you wil l actually see in the v iewfinder or on the LCD
screen.
●Notation of cancel button
Press the stop/cancel button to stop your operation midway, or return the menu screen to the prec eding
one. The expression “press the
button” will be used in this text.
●, and marks beside headings
Some functions of this DVD video camer a/r ecor der are una vaila ble with di sc or ca r d used. Ref er to the
marks at right above each function to identify whether the disc or card is compati b le with the function.
Refer to these marks and identify the functions and operation t o match the di sc or card you use.
●Illustrations in this manual
Although the external ap p e arances of DZ-MV350E and D Z-M V 380E are different, the method of
operating both models is identical.
The illustrations of DZ-MV350E are used for the explanation in this text.
22
Discs and Cards
The following table lists the storage media (discs and cards) that can be used on this DVD video camera/
recorder and the functions which are available with them:
Function DVD-RAM disc DVD-R disc
Recording movie ∴∴×
Recording still ∴
Deleting recorded image ∴
Editing on this DVD video
camera/recorder
Playback on DVD player
Playback on DVD-RAM
recorder
*1: Can be played back on some DVD players.
*2: Must be finalized on this DVD video camera/recorder before DVD-R disc can be played back on DVD player or DVD
recorder (See P. 73). May not be playable on some DVD players.
*3: Can be played back on some DVD-RAM recorders.
∴
*1
×
∴
×
×
××
*2
∴
*2
∴
SD memory card/
Multimedia card
∴
∴
×
*3
×
∴: Functions available; ×: Not available
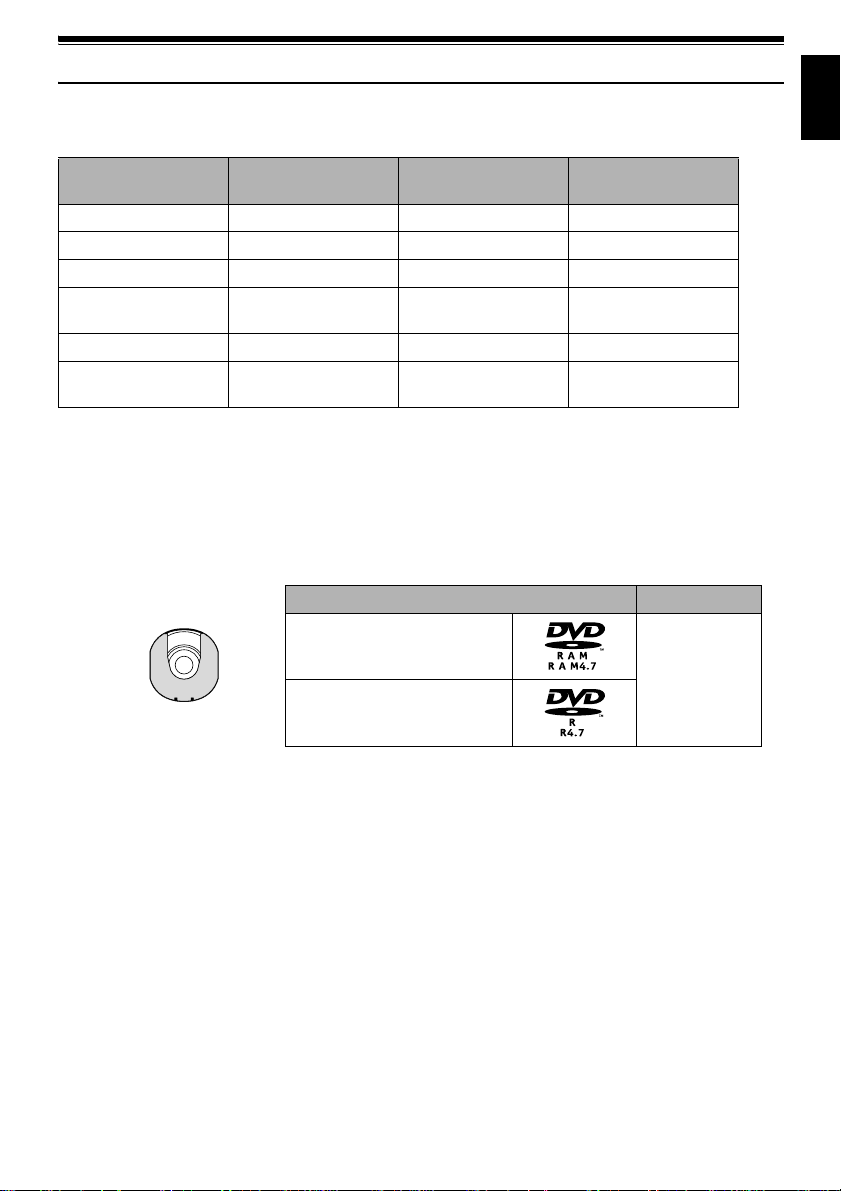
AVAILABLE DISCS
Usable discs and logos Shape
DVD-RAM Ver. 2.1 (8 cm)
In Round DVD
DVD-R
[for General Ver. 2.0 (8 cm)]
Holder
English
This DVD video camera/recorder uses 8 cm DVDRAM discs and 8 cm DVD- R d isc s for camcorder
use.
Discs remo ved from Round DVD H older cannot be
used on this DVD video camera/recorder: Use
them only in the holder.
Note:
• It is recommended that you use Hitachi Maxell discs,
since their compatibility with this DVD video camera/
recorder has been confirmed. Using a disc other than
those made by Hitachi Maxell may not allow the DVD
video camera/recorder to deliver optimum performance.
• It is necessary to initialize an unformatted disc. When an
unformatted disc is inserted into the DVD video camera/
recorder, a message will appear: Initialize the disc
following the instructions on screen (P. 125).
• The Round DVD Holder cannot be used on the following
DVD video camera/recorders:
- DZ-MV100E
- DZ-MV200E
- DZ-MV230E
- DZ-MV270E
- Other DVD video camera/recorders that use square
type adapters.
• Image data edited on PC and certain types of image data
may not be visible on this DVD video camera/reco rder.
• The image data recorded on another device may not be
playable on this DVD video c amera/recorder.
23

INFORMATION ON DVD-R DISC
English
Y ou ca nnot record a still on DVD-R di s c, or delet e
any recorded images or data.
For optimum r e cording on DVD-R disc , t h is D VD
video camera/recorder writes control data to the
disc in order to automatically make a djustments
when it is inserted and ejected accompanying
recording. If the disc has no area to be written for
adjustment, recording may not be possible. To
prevent this, do not insert or eject a DVD-R disc
accompanying recording more than 50 times. The
DVD video camera/recorder will not perform
“write adjustment” when the DVD video camera/
recorder is turned on again, from off, for recording
with the disc in it, or when no reco rding is made,
even if the disc is removed and then reinserted.
●Finalizing DVD-R disc
Before using the 8 cm DVD-R disc provided on this
DVD video camera/recorder on a DVD player or
DVD video recorder that is c o m p at ib le with 8 cm
DVD-R disc, the disc must b e finalized on this DVD
video camera/recorde r. For the finalizing
procedure of 8 cm DVD-R disc, refer to “Finalizing
DVD-R Disc” (P. 127).
Note:
• Do not insert a DVD-R disc recorded on this DVD video
camera/recorder but not finalized, into a recordable
device, such as a DVD video recorder: The recorded data
may be damaged.
• DVD-R discs edited and finalized on PC or those finalized
on another DVD video recorder may not be playable on
this DVD video camera/recorder, depending on the
editing software used or recorded status of DVD-R disc.
EXAMPLES OF DISCS THAT CANNOT BE USED ON THIS DVD VIDEO CAMERA/
RECORDER:
• DVD-RAM (2.6 GB) Ver. 1.0 • DVD-ROM • MO
• DVD-R (3.9 GB) Ver. 1.0 • DVD-Video • MD
• DVD-R (4.7 GB) for Aut horing V er . 2.0 • CD-R • iD
• DVD-RW • CD-RW • Floppy disk
• DVD+RW • CD • Discs other than those with diameter
• DVD+R • LD • CD-ROM
of 8 cm
Note:
Discs recorded on PC or DVD video recorder may not be playable on this DVD video camera/recorder: If so, message
“This disc cannot be used.” will appear. Also, blue thumbnails will appear (Fig. 1* on page 25), or normal playback will
not be possible.
24
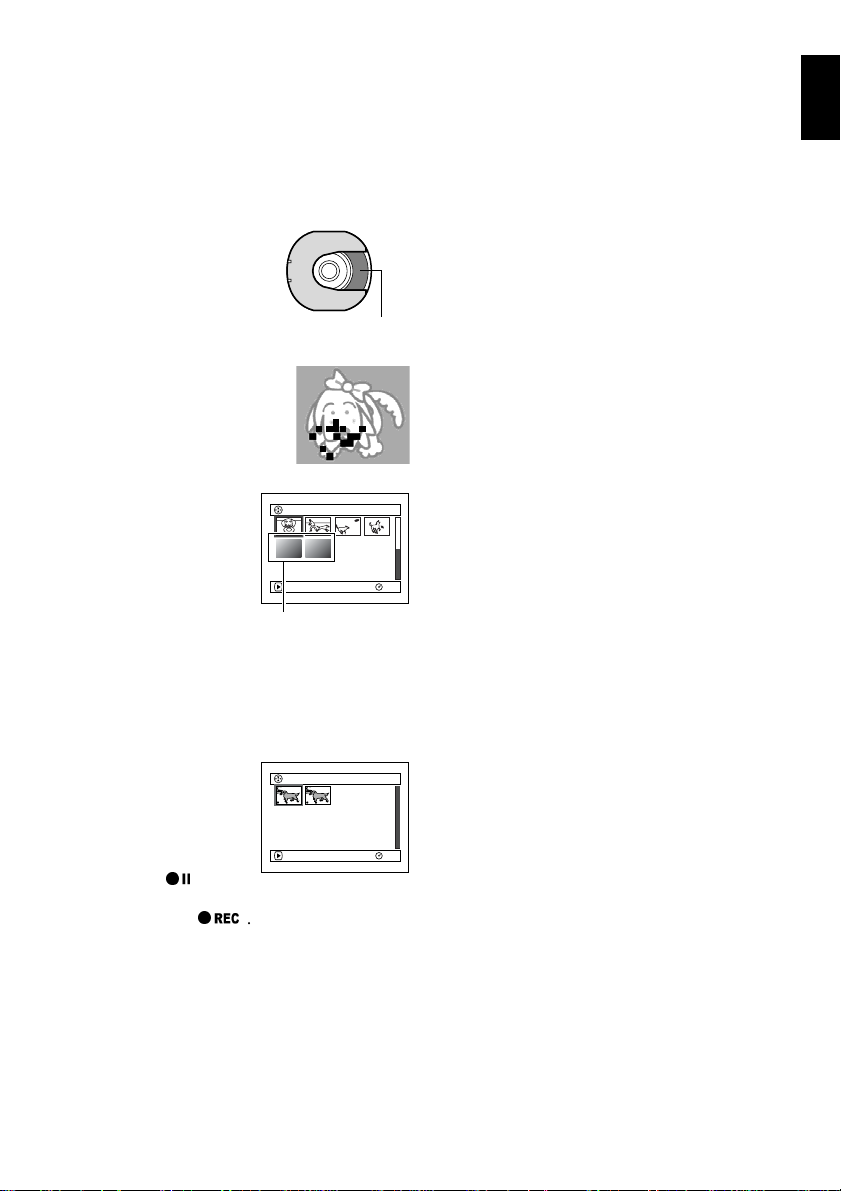
HANDLING DISCS
Block noise
●Using discs
DVD-RAM and DVD-R discs are very delic a t e
recording media. Carefully read the following
cautions and observe them:
• When using disc on this DVD video camera/
recorder , be sure to keep it in Round DV D Holder.
• Always use a brand new disc when recording
important material.
• Be sure n ot to touch the disc
exposed portion, and be
careful that no dirt adheres to
it.
• If there is dust, scratch, di rt on
disc or if it is warped, the
following phenomena may occur:
− Block noise in playback
image
− Momentary stop of playback
image
− Sound in t e rrup t e d du ring
playback, or abnormal sound
− Blue thumbnail
display* (Fig. 1)
− Disc cannot corre ctly be
recognized
− Delay between video
and audio
Even if disc is normal, the
above phenomena may
occasionally occur. While the ACCESS/PC
indicator is lit, do n ot subject disc to vibrations or
impact, and avoid using DVD video camera/
recorder at extremely high or low temperatur es,
or in environment where condensation is likely
to occur.
• When reco rding images ,
the DVD video camera/
record er may avoid t he
portions of disc where
recording is not possible ,
due to dust, scratches, etc.
[It will pause
at such a
portion and automatically
restart recording (
).]
This will cause recording
to be interrupted for sev e ral seconds to several
minutes, and multiple thumbnails will be created
by one recording session as shown above. In this
case, the recordable time on disc will decrease.
• Be careful when removing the disc since the
metal of removal slot of DVD video camera/
recorder, and disc itself, may be hot.
Do not touch
001/ 006All Programs
PLAY
Fig.1
*
PLAY
(Recording one scene
may produce multiple
thumbnails.)
RAM
001 / 002All Programs
RAM
●Storing discs
• When stor in g di sc, insert it in Round DVD
Holder into pla st ic case.
• Be careful that no condensation occurs on disc .
• Do not place disc in following places:
− Direct sunlight for a long time
− Where humidity is high or in dusty place
− While t here is heat from a h e at e r, etc.
Note:
• See page 75 when cleaning the removed disc.
• See page 74 for how to handle disc removed from Round
DVD Holder.
• See page 74 for how to set the disc removed from Round
DVD Holder or another disc correctly in Round DVD
Holder.
English
25

AVAILABLE CARDS
English
SD memory card
and multimedia
card can be used
on this DVD video
camera/recorder.
• When the erasure prevention switch on SD
memory card is locked, no recording, deletion or
editing will be p ossible on the card.
●Handling card
• Do not use cards other than
the designated ones.
• Be sure to use a bran d new
card w hen rec ording v ital
images.
• Do not touch the card
terminal or allow it to touch
metal.
• Do not paste anything other
than exclusive lab e l on label pasting port ion.
• Do not subject card to impact, bend or drop it.
• Do not disassemble card or modify it.
• Do not expose card to water.
• Do not use or store card in the following places:
− Where the temperature is high, such as in
vehicle at high temperatures, under burning
sun or near a heater.
− Where humidity is high, or in dusty place
Terminal
Erasure prevention
switch
Locked status
• It is recommended that you create a backup file
for valuable data on hard disk of PC.
• Do not do the following, or the data on car d may
be damaged or lost:
− Do not remove the card or turn DVD video
camera/recorder off during reading or writing
of data
− Do not use DVD video camera/recorder in a
place subject to static electricity or electrical
noise
Note:
• This DVD vi deo camer a/r eco rde r can play back ima ge
data recorded on other digital cameras conforming to the
DCF (Design rule for Camera File system) standard. The
range of image data playable on this DVD video camera/
recorder is that with pixels from 80 horizontal × 60 vertical
to 4000 horizontal × 3000 vertical.
• DCF is an integrated image file format of digital cameras:
Image files can be used on all digital devices conforming
to DCF.
• Image data edited on PC and certain types of image data
may not be visible on this DVD video camera/reco rder.
• The image data recorded on another device may not be
playable on this DVD video c amera/recorder.
26

Storage Capacity on Disc or Card
RECORDABLE TIME OF MOVIE (VIDEO)
The recordable time will vary depending o n the
recording quality: See page 85 for the setting of
recording quality.
Movie recordable time on one disc (on single side)
(when recording only movies)
Recording
quality
XTRA Approx. 18 min *1No recording
FINE Approx. 30 min
STD Approx. 60 min *3Approx. 60 min
*1:Variable bit recording (recording of more than 18
minutes may be possible because the transfer rate
varies automatically between approx. 3-10 Mbps)
*2:Transfer rate: Approx. 6 Mbps
*3:Transfer rate: Approx. 3 Mbps
DVD-RAM DVD-R
Disc used
possible
*2
Approx. 30 min
*2
*3
:
Note
• No movi e can be reco rd ed on SD mem or y card or
multimedia card.
• The movie quality mode can be changed for recordings
on DVD-RAM disc, but not on DV D-R disc.
• If you record in XTRA mode at high t emp era tu res fo r a
long time, the DVD video camera/recorder will get hot
and the maximum transfer rate will be limited to approx.
6 Mbps.
• If a disc recorded in XTRA mode is used at high
temperatures, norma l playback may be impossible: Tur n
the DVD video camera/ rec ord er o ff onc e, wait unt il t he
ambient temperatur e becomes lower , and t hen operate
it again.
English
27

RECORDABLE STILLS (PHOTOS) ON DISC
English
●Number of recordable stills on one
side of disc: Up to 999
If the disc still has free space after recor d ing 999
stills on it, movies can also be recorded on it.
RECORDABLE STILL (PHOTOS) ON
CARD
The number of recordable st ills will vary
depending on the recording quality: See page 86
for the setting of recording quality.
For DZ-MV350E
Capacity
8 MB
16 MB
32 MB
64 MB
128MB
256 MB
512 MB
Approx. 45 Approx. 95 Approx. 190
Approx. 100 Approx. 200 Approx. 400
Approx. 220 Approx. 440 Approx. 880
Approx. 440 Approx. 880 Approx. 1,760
Approx. 880 Approx. 1,760 Approx. 3,520
Approx. 1,760 Approx. 3,520 Approx. 7,040
Approx. 3,520 Approx. 7,040 Approx. 14,080
For DZ-MV380E
Capacity
8 MB
16 MB
32 MB
64 MB
128MB
256 MB
512 MB
(The numbers of recordable stills above are only for
reference)
Approx. 8 App rox. 14 Approx. 20
Approx. 22 Approx. 35 Approx. 50
Approx. 50 Approx. 80 Approx. 110
Approx. 100 Approx. 160 Approx. 220
Approx. 200 Approx. 320 Approx. 440
Approx. 400 Approx. 640 Approx. 880
Approx. 800 Approx. 1,280 Approx. 1,760
Recording quality
FINE NORM ECO
Recording quality
FINE NORM ECO
:
Note
• Cards used on other devices can be used on this DVD
video camera/recorder.
• No movie or music data recorded on card can be
checked, viewed or heard on this DVD video camera/
recorder. In addition, no such a data file can be displayed
on this DVD video camera/recorder.
• Use the remaining display function to check the
remaining free space on disc before use. See “Verifying
Remaining Free Space on Disc or Card (Capacity)” on
page 124.
• Some still data recorded on this DVD video camera/
recorder may not be playable on another device.
●Still recording quality
The pixel size of JP EG stills that can be recorded on
this DVD video cam e ra/recorder is as follows:
DZ-MV350E: 640 × 480 pixels
DZ-MV380E: 1,280 × 960 p ixels
Although still images are recorded on DVD-RAM
dis c on ly i n th e FIN E mo de, the qua lity mod e ca n be
chosen when recordin g st ills on card.
The following table shows the file size and qualit y
of one JPEG still recorded on card:
Quality
FINE Approx.
NORM Approx.
ECO Approx.
* See page 162 for the number of recordable stills.
Note:
No still can be recorded on DVD-R disc.
File size
DZ-MV350E DZ-MV380E
128 KB
64 KB
32 KB
Approx.
512 KB
Approx.
384 KB
Approx.
256 KB
Application
When image
quality is
prioritized
Standard
When number
of stills is
prioritized
(quality will be
slightly inferior)
28

Features of DVD Video Camera/Record er
VERSATILE FUNCTIONS AVAILABLE
This DVD video camera/recor der has numerous useful functions. However , the functions that can be used
will vary depending on whether DVD-RAM disc, DVD-R disc or card is used.
Use the functions, following the table below:
Camera Functions:
Function
Camera Functions Setup
Record Functions Setup
Date Setup
LCD Setup
Initial Setup
Program AE
White Bal.
EIS
Dig.Zoom
MIC.Filter
16:9
VIDEO Mode
Quality
Self Timer
OSD Output
Date Mode
Date Set
Brightness
Color Level
Beep
Power Save
Record LED
Language
Demo Mode
Reset
Disc/Card used
DVD-RAM DVD-R CARD
∴∴∴
∴∴∴
∴∴×
∴∴∴
∴∴×
∴∴∴
∴∴*1×
××∴
∴ × ∴
∴∴∴
∴∴∴
∴∴∴
∴∴∴
∴∴∴
∴∴∴
∴∴∴
∴∴∴
∴∴∴
∴∴∴
∴∴∴
∴: Available; ×: Unavailable
(*1 Except for XTRA mode)
Reference
page
78
79
81
82
83
84
85
86
87
88
50
49
89
89
90
90
91
91
144
92
English
29

Disc Navigation Functions:
English
Scene Delete
PlayList Switch
Program Switch
Go To Top
Disc Capacity
Others Category All
Function
Edit Thumbnail
Copy
Select Start → Current
Detail
Play
Create
Edit
Title
Delete
Play
Title
End
Protect Disc
Format Disc
Update Control Info.
Finalize Disc
Repeat Play On
Skip
Fade
Combine
Divide
Move
Current → End
All
VIDEO
PHOTO
Off
Disc used
DVD-RAM DVD-R
∴ ×
∴ ×
∴ ×
∴ ×
∴ ×
∴ ×
∴ ×
∴ ×
∴∴
∴∴
∴∴
∴∴
∴ ×
∴ ×
∴ ×
∴ ×
∴ ×
∴ ×
∴∴
∴∴
∴ ×
∴∴
∴∴
∴ ×
∴ ×
∴ ×
∴ ×
× ∴
∴ ×
∴ ×
∴ ×
∴∴
∴∴
∴: Available; ×: Unavailable
Reference
page
99
101
102
103
105
106
104, 121
107
110
110
110
111
116
117
115
118 - 121
122
122
112
113
113
123
123
124
124
125
126
127
128
128
128
128
128
30
 Loading...