


English
DZMV350E SW DZMV350EAU
DZMV350ESWH DZMV350EUK
Instruction manual
Toobtainthebestperformanceandensureyearsof
trouble-free use, please read this instruction
manual completely.
Pycckий

Important Information
English
For Your Safety
ThepowerswitchturnstheDVDvideocamera/recorderonandoff,leavingthedate/timefeatureunaffected.Ifthecamera/
recorderis to be leftunattendedfor a long periodof time,turn it off .
WARNING : TO PREVENT FIRE OR SHOCK HAZARD, DO NOT
EXPOSE THIS UNIT TO RAIN OR MOISTURE.
WARNING : TO PREVENT FIRE OR SHOCK HAZARD, USE THE
The DVD video camera/recorder and AC adapter/
charger have the following caution marks.
CAUTION
RISK OF ELECTRIC SHOCK
DO NOT OPEN
RECOMMENDED ACCESSORIES ONLY.
CAUTION: TO REDUCE THE RISK OF
ELECTRIC SHOCK, DO NOT OPEN.
NO USER-SERVICEABLE PARTS INSIDE.
REFER SERVICING TO QUALIFIED SERVICE
PERSONNEL.
Precautions
WARNING: Many television programmes and
films are copyrighte d. In certain circumstances,
copy-right law may apply to private in-home
videotaping of copyr ig h t ed materials.
The liquid crystal display (LCD) panel is made
by highly precise technology. More than 99.99%
of its picture elements (pixels) ar e effective, but
some (less than 0.01%) may appear as coloured
bright dots. This does not indicate a fault as the
LCD panel st retc hes the limits of current
technology.
Identifications of caution marks
This symbol warns the user that
uninsulated voltage within the unit
may have sufficient magnitude to cau se
electric shock. Therefore, it is dangerous
to make any kind of contact with any
inside part of this unit.
This symbol alerts the user that
important literature concerning the
operation and maintenance of this unit
has been included. Therefore, it shoul d
be read carefully to avoid any problems.
WARNING: T o prevent risk of injury or damage to
your DVD video cam e ra/recorder and the AC
adapter/charger, use only the DZ-BP14S/DZBP14SW battery and DZ-ACS1 AC adapter/
charger.
CLASS 1
LASERPRODUCT
CAUTION
This product contains a laser diode of higher
class than 1. To ensure continued safety, do
not remove any covers or attempt to gain
access to the inside of the product. Refer all
servicing to qualified personnel.
2

Important for United Kingdom (for DZ-MV350E(UK))
The mains lead on t his equipment is supplied with a moulded plug incorporating a fu se , the value of
which is indic ated on the pin face of the plug .
Should the fuse need to be replaced, an ASTA or BSI approved BS 1362 fuse must be used of the same
rating. If the fuse cover is detachable never use the plug with the cover omitted. If a replacement fuse
cover is required, ensur e it is of the same colour as that visible on the pin face of the plug. Fuse covers are
available from your dealer.
DO NOT cut off the mains plug fro m this equipment. If the plug fitted is not suitabl e for the power points
in your home or the cable is too short t o reach a power point, then obta in an appropriate safety appr oved
extension lead or consult your dealer.
If there is no alternative to cutting o ff the mains plug, ensur e that you dispose of it immediately, havi ng
first removed the fuse, to avoid a possible shock hazard by inadvertent connection to the mains supply .
IMPORTANT
The wires in the main s le ad are coloured in accordance with the following code:
Blue= Neutral, Brown=Live
As these colours may not correspond with the coloured markings identifying the terminals in your
plug, proceed as follows:
The wire coloured BL UE must be connected to t he terminal marked with the letter N or colour ed BLUE
or BLACK.
The wire coloured BROWN must be connected to the terminal marked with the letter L or coloured
BROWN or RED. On no account connect either of these wires to the terminal marked E or by the earth
symbol or coloured green or green and yellow.
English
3

IMPORTANT SAFEGUARDS
English
Inaddition to thecareful attention devotedto quality standardsinthemanufacture ofyourvideo product,safetyisamajor
factor in the design of every instrument. But, safety is your responsibility too.
Thispagelistsimportant informationthatwillhelptoassureyourenjoyment and properuseofDVDvideocamera/recorder
and accessory equipment. Please read it carefully before operating your video product andkeep it in a handyplace for
future reference.
1 Read and Follow Instructions— All thesafetyand
INSTALLATION
operatinginstructions should be read beforethevideo
product is operated. Follow all operating and use
instructions.
2 Retain Instructions — Thesafety and operating
instructions should be retained for future reference.
3 Heed Warnings — Comply with all warnings on the
video product and in the operating instructions.
4 Power Sources — This video product should be
operated only from the typeofpowersourceindicated
onthe markinglabel. If youare not sureofthe type of
mainssupplyto your home, consultyourvideodealer
orlocal power company. Forvideo products intended
to operate from battery power,orother sources, refer
to the operating instructions.
5 Overloading — Do not over load wall outlets and
extension cords as this can result in a risk of fire or
electric shock. Overloaded AC outletsand extension
cords are dangerous, andso are frayed mains leads,
damagedorcrackedwireinsulationandbroken plugs.
Theymay result in a shockorfirehazard. Periodically
examine the cord and have itreplacedbyyourservice
technician if appearance indicates damage or
deteriorated insulation.
6 Mains Lead Protection — Mains leads should be
routed so that they are not likely to be walked on or
pinchedbyitems placed uponoragainstthem,paying
particular attention to leads at plugs, convenience
receptacles, and the pointwhere they exit from the
appliance.
7 Ventilation — Slots and openings in thecabinetare
provided for ventilationtoensure reliableoperationof
the videoproduct and to protect it from overheating.
Theseopenings must notbeblockedorcovered. The
openings should never be blocked by placing the
video product on a bed,sofa, rug, or other similar
surface. This video productshould never be placed
near or over a radiator or heat register. This video
product should not be placed in a built-in installation
such as a bookcase or rack unless proper ventilation
is provided or the video product manufacturer’s
instructions have beenfollowed.
8 Attachments — Do not use attachments unless
recommended by the video productmanufacturer as
they may cause hazards.
Caution: Maintain electrical safety. Powerlineoperated
equipment or accessories connected to this unit should
bear the UL listing mark or CSA certificationmark on the
accessory itselfand should not have been modified soas
to defeat thesafety features. This will help avoid any
potential hazard from electric shock or fire. If in doubt,
contact qualified service personnel.
9 Waterand Moisture — Do not usethisvideoproduct
near water — for example, near a bath, wash bowl,
kitchen basin, or laundry tub, in a wet basement, or
near a swimming pool, and the like.
10 Accessories — Do not placethisvideoproductonan
unstable cart, stand, tripod, bracket, or table. The
videoproductmayfall,causing seriousinjurytoachild
or adult, and serious damage to the appliance. Use
only with a cart, stand,tripod,bracket, or table
recommended by the manufacturer, or sold with the
video product. Any mounting of the product should
followthemanufacturer’sinstructions, andshoulduse
a mounting accessory recommended by the
manufacturer.
11 An applianceand cart combination
should be moved with care. Quick
stops,excessive force,anduneven
surfaces may cause the appliance
and cart combination to overturn.
4

12 Power Lines — An outside antenna system should
not be located in the vicinityof overhead power lines
or other electriclight or powercircuits,or whereitcan
fallintosuchpower linesorcircuits. Wheninstallingan
outside antenna system, extreme care should be
taken to keep from touchingor approaching such
power lines or circuits as contact with them might be
fatal. Installing an outdoor aerial can be hazardous
and should be left to a professional aerial installer.
USE
13 Cleaning — Unplugthis video product from the wall
outletbeforecleaning. Do not use liquidcleanersor
aerosol cleaners. Use a damp cloth for cleaning.
14 Object and Liquid Entry — Never push objects of
any kind into this video product through openings as
theymay touch dangerousvoltage points orshort-out
partsthatcould result in afireorelectricshock. Never
spill liquid of any kind on the video product.
15 Lightning — For added protection for this video
product during a lightning storm, or when it is left
unattended and unused for long periods of time,
unplugit from the walloutletand disconnecttheaerial
or cable-system. This will prevent damage to the
video productdue to lightning and power-linesurges.
16 Servicing — Do not attempt to service this video
SERVICE
productyourselfasopeningorremovingcoversmay
expose you to dangerous voltage or other hazards.
Refer all servicing to qualified service personnel.
17 Conditions RequiringService — Unplug thisvideo
product from the wall outlet and refer servicing to
qualified service personnelunder the following
conditions.
a. When the mains lead or plug is damaged.
b. If liquid has been spilled, or objects have fallen
into the video product.
c. If the video product hasbeen exposed to rain or
water.
d. Ifthe videoproductdoesnot operatenormallyby
following the operatinginstructions. Adjust only
those controlsthat arecovered bythe operating
instructions. Improper adjustment of other
controls may result in damage and will often
require extensive work by a qualified technician
to restore the video product to its normal
operation.
e. Ifthe video producthas beendropped or the
cabinet has been damaged.
f. Whenthe videoproductexhibitsadistinctchange
in performance — this indicates a needfor
service.
18 Replacement Parts — When replacement parts are
required, have the service technician verify that the
replacements he uses have the samesafety
characteristics as the original parts. Use of
replacements specified by the videoproduct
manufacturer canprevent fire,electric shockorother
hazards.
19 Safety Check — Upon completion of any service or
repairs to this video product, ask the service
technician toperform safety checks recommendedby
the manufacturerto determinethat the video product
is in safe operating condition.
20 Heat — The product should be situated away from
heatsourcessuchasradiators,heatregisters,stoves,
or other products(includingamplifiers) thatproduce
heat.
English
5

Cautions When Using
English
Handle the liquid crystal display (LCD) with care:
• The LCD is a very delicate display device: Do not press its surface with force, hit it or prick it with a sharp
object.
• If you push the LCD surface, unevenness in display may occur. If unevenness does not disappear soon,
turn the DVD video cam e ra/recorder off, wait for a few moments, and then turn it on ag ain.
• Do not place the DVD video camera/recorder with the open LCD screen down.
• Close the LCD monitor when not using the DVD video camera/recorder.
Liquid crystal display and viewfinder:
• The LCD screen and viewfinder are the products of highly preci se technology . Among the t otal number
of pixels (approx. 120,000 pixels for LCD monitor and approx. 1 10,000 pixels for viewfinder), 0.01% or
less pixels may be missing (black dots) or may remain lit as coloured dots (red, blue, green). This shows
the limitations of th e current technol ogy , and does not indicate a fault that will inter fere with r ecording.
• The LCD screen and viewfinder will be slightly dimmer than usual when the DVD video camera/
recorder is at low temperature, as in cold areas, or im mediately after power is turned on. Normal
brightness will be restored when the temperature inside the DVD video camera/recorder rises.
Hold the DVD video camera/recorder correctly:
• Do not hold the viewfinder or LCD monitor when lifting the DVD video camera/recorder: The
viewfinder or LCD monitor could detach and the DVD video camera/recorder may fall.
Do not subject the DVD video camera/recorder to impact:
• This DVD video camera/recorder is a precision machine. T ake gr eat care that you do not strike it against
a hard object or let it fa ll.
• Do not use the DVD video camera/recor der on a tripod in a place where it is subject to sever e vibrations
or impact.
No sand or dust!
• Fine sand or dust entering the DVD video camera/recorder or AC adapter/charger could cause
malfunctions or defects.
Nowateroroil!
• Water or oil entering the DVD video camera/recorder or AC a dapter/charger could cause electric shock,
malfunctions or defects.
6

Heat on surface of product:
• The surface of the DVD video camera/recor der will be sligh tly warm, but this does not in dicate a fault.
Screen on connected TV:
• Never leave the disc navigation scr een, still ima ge or camera image displayed on your TV to which the
DVD video came ra/recorder is connected: Doing so could result in displayed image ret en t ion or
phosphor degradat ion of TV screen.
Be careful of ambient temperature:
• Using the DVD video camera/recorder i n a place where the temper ature is over 40°C or under 0°C will
result in abnormal recording/playback.
• Take car e that the temperature of this DVD video camera/rec order , when connected to PC, does not rise
excessively (reference for usage: app rox. 30 minut e s at ab out 30ºC).
• Do no t leave the DVD vid eo camera/recorder on beach sand or in a closed vehicle wh e r e the
temperature is very high for a long time: This could cause malfunctions.
Do not point directly at the sun:
• If direct sunlight strikes the lens or vi ewfinder, the DVD video camer a/rec order c ould malfuncti on or
a fire could occu r.
• Do not leave the DVD video camera/recor der with the LCD screen exposed to direct sunlight: This could
cause malfunctions.
Do not use the DVD video camera/recorder near TV or radio:
• This could cause noise to appear on the TV screen or in radio broadcasts.
Do not use the DVD video camera/recorder near strong radio waves or magnetism:
• If the DVD video camera/recorder is used near strong radio waves or magnetism, such as near a radio
wave tower or electric appliances, noise could enter video and a u dio that are being recorded. During
playback of normally recorded video and audio, noise may also be present in picture and sound.
At worst the DVD video camera/recor d e r could ma lfunction.
Do not expose the DVD video camera/recorder to soot or steam:
• Thick soot or steam could damage the DVD video camera/recorder case or cause malfunctions.
Do not use the DVD video camera/recorder near corrosive gas:
• Using it in a place where there is dense exhaust gas generated by petrol or diesel engines, or corro sive
gas such as hydrogen sulfide, could corro de the battery connecting terminals, which could result in l oss
of power.
Do not use the DVD video camera/recorder near ultrasonic humidifier:
• With some water in humidifier, calcium and other chemicals dissolved in water could scatter in the air,
and white particles could adher e to the op tical h ead of the DVD video camer a/r ecor der, which could
cause it to operate abnormally.
Do not expose the DVD video camera/recorder to insecticide:
• Insecticide entering the DVD video camera/recorder could dirty the lens in laser pickup block, and in
such a case the DVD video camera/re corder might not operate no rmally . Turn the DVD vide o camera/
recorder off and cover it with vinyl sheet, etc. before using insecticide.
Do not use a generally available 8 cm CD lens cleaner:
• Cleaning the lens is not necessary when using this DVD video camera/recorder in the usual way.
• Using 8 cm CD lens cleaner could cause this DVD video camera/recorder to be faulty.
English
7

Be careful of moisture condensation:
• When you move the DVD video camera/recorder between places where the dif ference in temperat ures
English
is great - such as entering a lodge from a ski slope or going out of a cooled room or vehicle - condensation
(vapour in air warmed or cooled to wa ter droplets ) could occur on the l ens and/or inside th e DVD video
camera/recorder. If condensation occurs, do not open the cover of disc or card insertion block if possible.
If condensation occurs on the lens, wipe it off wit h a soft, dry cloth. Even if the external surface of DVD
video camera/recorder has dried, condensation may remain inside: Turn the DVD video camera/
recorder off and leave it in a dry place for at least 1- 2 ho urs b efore us in g it ag ain .
Do not use the DVD video camera/recorder for a long uninterrupted period of time:
• This DVD video camera/recorder cannot be used for a long time continuously as a surveillance camera/
monitor. If you use the DVD video camera/recorder for a long continuous period of time, the
temperature of DVD video camera/r ecorder could exceed a limit and the r ecording/playback operation
could be slowed down: In this case, turn it off and wait for a while before using it again.
Donotturn the DVDvideocamera/recorderoffwhilethe ACCESS/PC indicatororCARD
ACCESS indicator is lit or blinking:
• The ACCESS/PC or CARD ACCESS indicator is lit or blinking
to show that data is being written to disc or card, or being read
from it. At this time, do not do any of the following, so as not
to damage the data:
− Remove battery
− Disconnect AC adapter/charger
− Plug or unplug PC connection cable
− Remove disc or card
− Subject DVD video camera/recorder to severe vibrations or
impact.
− Violently open or close the LCD monitor
If you turn the DVD video camera/recorder off while the ACCESS/PC or CARD ACCESS indicator is lit
or blinking, turn it on agai n with th e dis c or c ard loaded in i t: Repair o f t he disc or car d wi ll be ex ecuted
automatically (see page 147).
CARD
ACCESS
indicator
ACCESS/PC
indicator
Do not wipe the DVD video camera/recorder case with benzene or thinner:
• The coating of case could peel off or the case surface could deteriorate.
• When using a chemical cleaning cloth, follow the instructions.
Also read the instructions attached with optional accessories:
• For optional acc e ssories, observe the cautions and follow inst ruct ion manuals attached.
8

Cautions When Storing
Do not leave the DVD video camera/recorder in a place where the temperatureis very
high for a long period of time.
• The temperature inside a closed vehicle or boot can become very high in a hot season. If you leave the
DVD video camera/r ecor der in such a pla ce, it co uld malfuncti on or the cas e could be da maged. Also ,
do not expose the DVD video camera/recorder to direct sunlight or place it near a heater.
Do notstore theDVD videocamera/recorder ina placewhere the humidityis highor in
a dusty place:
• Dust entering the DVD video camera/recorder could cause malfunctions . If the humidi ty is high, th e
lens could be mouldy, and the DVD video camer a/recorder could become inoperable. It is
recommended that you put the DVD video camera/r ecorder wi th desiccant in a bo x when storing it i n
a closet, etc.
Do notstore theDVD videocamera/recorder ina placesubject tostrong magnetismor
intense vibrations:
• This could cause malfunctions.
Detach the battery from the DVD video camera/recorder and store it in a cool place:
• Leaving the battery attached or storing it at high temperature could shorten its life.
English
9

Suggestions and Restrictions
English
Make a trial recording:
• Always make a trial recording before doing actual recording to make sure that recording is normal. The
data that have not been stor ed normally b ecause of a defec t in the DVD video camera /recor der cannot
be restored.
It is recommended that you use DVD-RAM disc from which recorded contents can be deleted for trial
recording.
The recorded contents cannot be compensated for:
• Hitachi cannot compensate for any damages caused when recording is not made normally or recorded
contents cannot be played back because of a defect in the DVD video camera/r ecorder , disc or card. Also,
Hita c hi cannot be responsible for your recorded video and audio .
• If you or a third party make a mistake when handling this DVD video camera/recorder, disc, card, etc.,
the recorded contents may be lost. We cannot be r esponsible for compens ation for damage due to loss
of recorded contents.
Copyright:
• Data recorded on the disc or card in this DVD video camera/recorder using other digital/analog media
or devices are protected by the copyright a ct a nd canno t be used witho ut permissi on of the owner of
copyright, except for personal enjo yment. Be aware that recording i s restricted for some demonstrations,
performances and exhibitions, even for personal enjoyment.
Do not use the DVD video camera/recorder for professional applications:
• This DVD video camera/recorder is designed and produced for home-use recording and playback.
10

Read This First
To guide you, we've included following six chapters.
•
The section on “Setups” explains how to set up
the DVD video camera/rec order , battery , and set
the date/time.
• The section on “B asic Techniques” explains the
basic operation of this DVD video camera/
recorder-recording of movies, still images,
external input, and playback of recorded images.
• The section on “Advanced T echniques” explains
settings on this DVD video camera/recorder for
more advanced usage.
• The section on “Disc Navigation” explains
editing with Disc Navigation: Refer to this
section when finalising DVD-R disc and
initialising DVD-RAM disc.
• The section on "Installing Software" explains the
conten ts of pro vided CD- R OM and how t o install
the contained software included.
• “Subsidiary In formation” includes an
introduction to products sol d separately, proper
cleaning, and troubleshooting.
With this DVD video camera/recorder you can view the picture being recorded or the playback picture
whether on the LCD monitor or in the viewfinder . Opening or closing the LCD monitor switches the pic ture
to appear on the LCD monitor or in the viewfinder . The following text describes the operation assuming th at
the viewfinder is used as a major monitor device.
Wewant thismanual to be as helpfulas possible,
soitincludestwoeasywaystofindtheinformation
you need:
A quick index for the information you use most
•
often (this page).
• A detailed table of contents directing you to
specific informatio n qu ic kly (se e p age 14-16).
Get to know your DVD video camera/recorder by
using this manual, and get to know Hitachi. We
appreciate your business.
Quick Index
Available Discs ................................................23
Recording Movie.............................................. 51
Immediately Checking Recorded Scene ......... 66
Connecting to a TV..........................................71
Functions Available with Disc Navigation........ 97
Installing Software ......................................... 130
English
Microsoft®, Windows®, Windows® 98, Windows® 98 Second Edition, Windows® Me, Windows® 2000
Professional, and Windows
®
, Pentium® Processor, and Celeron® Processor are registered trademarks of Intel Corporation.
Intel
®
and PC/AT® are registered trademarks of International Business Machines Corporation.
IBM
Manufactured under license from Dolby Laboratories.
“Dolby” and the double- D sym b ol are trademarks of Dolby Laboratories.
Other company names and produc t nam e s li st ed are trad e m arks or brand names belonging to each
individual company.
SD logo is a trad e m ark.
®
XP are registered trademarks of Micro s oft Cor pora tion.
11

Introduction
English
●You can record even during playback
Unlike tape devices, you do not need to sear ch for the recor ding star t position or loca te the beginning of
blank portion.
You can start recording during playback: New recording will not overwrite any previously recorded data.
Recorded scenes
Ifyoustop playback midwayandstartrecording, overwrite willnotoccur.
●You can immediately play back desired recorded scenes
You do not n eed to rewind, unlike recorder s using tape.
You can select any scene you want and immediately play it back (using Disc Navigation function).
●Use Disc Navigation to create your original movie
Y ou can delete unnecessary scenes, move any scenes, etc., and create your origi nal movie work (PlayList).
Before editing
After editing
12

●Youcan easily edit scenes,whichis
quite difficult with tape
Using this DVD video camera/recorder, you can
collect scenes of your child, for example, o n play list
of Disc Navigation function and create an original
movie: Then simply play back the play list and dub
it on VCR. It is also easy to make any number of
identical tape s.
Up to now, you hadto
repeatedly press
buttons
With DVD, you can simply
play back thisDVD video
camera/recorder,and
press the record buttonon
VCR.
●Create original DVDs on PC
You can use a DVD-R disc to create an original
DVD, using the provided software CD-ROM.
The created DVD di sc can b e played back on DVD
player, DVD-ROM drive, etc.
Original DVD being
created
Playback of DVD
English
13

Table of Contents
English
Important Information ......................................... 2
For Your Safety ..................................................2
Precautions ........................................................2
IMPORTANT SAFEGUARDS ............................4
Cautions When Using.........................................6
Cautions When Storing.......................................9
Suggestions and Restrictions...........................10
Read This First.................................................11
Introduction....................................................... 12
Table of Contents.............................................14
Checking Provided Accessories....................... 17
Names of Parts .................................................18
About This Manual ............................................ 22
Discs and Cards...............................................23
AVAILABLE DI SCS ...............................................23
INFORMATION ON DVD-R DISC.........................24
EXAMPLES O F DISCS THAT CANNOT BE
USED ON THIS DVD VIDEO CAMERA/
RECORDER:......................................................24
HANDLING DISCS................................................25
AVAILABLE CARDS..............................................26
Storage Capacity on Disc or Card ....................27
RECORDABLE TIME OF MOVIE (VIDEO) ...........27
RECORDABLE STILLS (PHOTOS) ......................28
Features of DVD Video Camera/Recorder .......29
VERSATILE FUNCTIONS AVAILABLE ................29
RECORDING ON DISC.........................................31
RECORDING MOVIE AND STILL.........................31
IMMEDIATE REVIEWING OF
RECORDED IMAGE...........................................32
EDITING IN VARIOUS WAYSON DVD VIDEO
CAMERA/RECORDER ALONE..........................32
USING WITH VARIOUS DEVICES.......................32
Setups
Setting Up the DVD Video Camera/Recorder...33
HOLDING DVD VIDEO CAMERA/ RECORDER ..33
ATTACHING LENS CAP.......................................33
ATTACHING SHOULDER STRAP........................34
INSERTING BATTERY INTO
REMOTE CONTROL..........................................35
REMOVING BATTERY FROM
REMOTE CONTROL..........................................35
Setting Up the Battery....................................... 37
CHARGING BATTERY..........................................37
ATTACHING BATTERY TO DVD VIDEO
CAMERA/RECORDER.......................................38
REMOVING BATTERY .........................................38
BATTERY REMAINING LEVEL INDICATOR........40
EFFICIENT USE OF BATTERY............................40
USING DVD VIDEO CAMERA/RECORDER
WITH AC ADAPTER/CHARGER.......................41
Inserting and Removing Disc............................ 42
INSERTING DISC.................................................42
REMOVING DISC.................................................44
Inserting and Removing Card...........................45
Basic Techniques
Basic Handling of DVD Video Camera/
Recorder........................................................ 46
TURNING DVD VIDEO CAMERA/RECORDER
ON AND OFF.....................................................46
VIEWING SUBJECT THROUGH VIEWFINDER...47
VIEWING IMAGE ON LCD MONITOR SCREEN..47
CLOSING LCD MONITOR....................................48
Setting Date and Time......................................49
CHANGING DISPLAY FORMAT OF
DATE AND TIME................................................50
Recording Movie............................................... 51
USING EXTERNAL MICROPHONE.....................53
Recording Stills.................................................54
Zooming............................................................56
MACRO RECORDING..........................................57
RECORDING SUBJECTS FOR STRONGER
WIDE-ANGLE OR TELEPHOTO EFFECT ........57
Manually Focusing Subject............................... 58
FOCUSING DURING RECORDING.....................58
Adjusting Exposure Manually ........................... 60
Compensating for Backlight.............................. 61
Using Full Auto Function .................................. 62
On-Screen Information .....................................63
INFORMATION DISPLAY DURING
RECORDING .....................................................63
Playing Back..................................................... 66
IMMEDIATELY CHECKING RECORDED
SCENE...............................................................66
PLAYBACK FR OM START OF DISC OR CARD ..67
SEARCH PLAYBACK OF MOVIE.........................67
FRAME ADVANCE/FRAME BACK/SLOW
PLAYBACK OF MOVIE......................................67
SKIP PLAYBACK OF MOVIE................................68
PLAYING BACK STILLS.......................................68
JUMPING TO SPECIFIED POINT (GO TO) .........69
On-Screen InformationDisplay ........................ 70
INFORMATION DISPLAY DURING PLAYBACK..70
Playback on Other Devices .............................. 71
CONNECTING TO A TV .......................................71
VIEWING ON TV SCREEN...................................72
PLAYBACK ON DVD PLAYER.............................73
REMOVING AND REPLACING FROM/IN
ROUND DVD HOLDER......................................74
HOW TO REMOVE DISC.....................................74
REPLACING DISC IN ROUND DVD HOLDER.....75
WHEN THE HINGE OF ROUND DVD HOLDER
COMES OFF......................................................75
DISC CLEANING ..................................................75
14

Playback on DVD Video Recorder/Player ........ 76
Advanced Techniques
Understanding Flow of Menu............................ 77
Setting Up Camera Functions........................... 79
SELECTING SHOOTING MODE TO M ATCH
THE SUBJECT
(SWITCHING PROGRAMME AE MODE)..........79
ADJUSTING COLOUR (WHITE BALANCE).........80
USING THE ELECTRONIC IMAGE
STABILISER (EIS)..............................................82
MAGNIFYING SUBJECT IMAGE (DIG. ZOOM) ...83
REDUCING WIND NOISE DURING
RECORDING (MIC.FILTER) ..............................84
SWITCHING TO 16:9 MODE................................84
Setting Up Record Functions............................ 85
SWITCHING MOVIE QUALITY (VIDEO MODE)...85
SWITCHING QUALITY OF STILL IMAGE
(QUALITY)..........................................................86
SELF-TIMER .........................................................87
SETTING ON-SCREEN DISPLAY OUTPUT
ON OR OFF (OSD OUTPUT).............................88
LCD Setup........................................................89
SETTING BRIGHTNESS OF LCD SCREEN
(BRIGHTNESS)..................................................89
SETTING COLOUR DENSITY OF LCD SCREEN
(COLOR LEVEL)................................................89
Initial Settings................................................... 90
SWITCHING OPERATING SOUND ON OR
OFF (BEEP)........................................................90
TURNING DVD VIDEO CAMERA/RECORDER OFF
AUTOMATICALLY (POWER SAVE) ..................90
TURNING RECORD LED ON OR OFF
(RECORD LED)..................................................91
CHANGING DISPLAY LANGUAGE
(LANGUAGE) .....................................................91
RESETTING MENU SETTINGS TO DEFAULTS
(RESET) .............................................................92
Disc Navigation
Using Disc Navigation.......................................93
STARTING DISC NAVIGATION............................93
TERMINATING DISC NAVIGATION.....................95
PLAYING BACK FROM DISC NAVIGATION
SCREEN.............................................................95
SELECTING MULTIPLE SCENES........................96
SELECTING CONSECUTIVESCENES
TOGETHER........................................................96
Disc Navigation Menu.......................................97
FUNCTIONS AVAILABLE WITH DISC
NAVIGATION......................................................97
UNDERSTANDING FLOW OF
DISC NAVIGATION MENU ................................98
Scene................................................................ 99
DELETING SCENES (DELETE) ...........................99
CHANGING IMAGES FOR THUMBNAILS
(EDIT - THUMBNAIL).......................................101
PLAYING BACK BY SKIPPING SCENES
(EDIT - SKIP)....................................................102
ADDING SPECIAL EFFECTS (EDIT - FADE).....103
ARRANGING ORDER OF SCENES
(EDIT - MOVE).................................................104
COMBINING MULTIPLE S CENES
(EDIT - COMBINE)...........................................105
DIVIDING MOVIES (EDIT - DIVIDE)...................106
COPYING STILLS ON DVD-RAM DISC
TO CARD (COPY)............................................107
LOCKING SCENES ON CARD(LOCK)..............108
DESIGNATING SCENES TO BE PRINTED
(DPOF).............................................................109
SELECTING SCENES USING MENU
SCREEN (SELECT).........................................110
DISPLAYING INFORMATION USING MENU
SCREEN (DETAIL) ..........................................111
Programme..................................................... 112
WHAT IS “PROGRAMME”?................................112
SWITCHING TO THUMBNAIL DISPLAY OF
SPECIFIC DATE (SWITCH).............................112
PLAYING BACK PROGRAMME (PLAY) ............113
CHANGING TITLE OF PROGRAMME (TITLE) ..113
Play List .......................................................... 115
WHAT IS “PLAY LIST”?......................................115
CREATING NEW PLAY LIST (CREATE)............115
SWITCHING TO DISPLAY OF EACH PLAY LIST
(SWITCH).........................................................116
PLAYING BACK A PLAY LIST (PLAY) ...............117
ADDING SCENES TO PLAY LIST
(EDITING PLAY LIST)......................................118
DELETING SCENESFROM PLAY LIST
(EDITNG PLAY LIST).......................................119
ADDING SCENES USING SUBMENU FOR
EDITING (EDITING PLAY LIST)......................119
DELETING SCENES USING SUBMENU FOR
EDITING (EDITING PLAY LIST)......................120
SELECTING SCENESUSING SUBMENU FOR
EDITING (EDITING PLAY LIST)......................120
ARRANGING ORDER OF SCENES (MOVE).....121
CHANGING TITLE OF PLAYLIST (TITLE) ........122
DELETING PLAY LIST (DELETE)......................122
Go To..............................................................123
TOP (END)..........................................................123
Disc or Card Management.............................. 124
VERIFYING REM AINING FREE SPACE
ON DISC OR CARD (CAPACITY) ...................124
PROTECTING DISC FROM WRITING
(PROTECT DISC) ............................................124
INITIALISING DVD-RAM DISC OR CARD
(FORMAT DISC/FORMAT CARD)......................125
UPDATING CONTROL INFORMA TIONOF
DVD-RAM DISC...............................................126
FINALISING DVD-R DISC ..................................127
Others............................................................. 128
DISPLAYING MOVIES OR STILLS
INDEPENDENTLY (CATEGORY)....................128
PLAYING BACK SCENES REPEATEDLY
(REPEAT PLAY) ..............................................128
SLIDE SHOW (CONTINUOUS PLAYBACK OF
STILLS) ............................................................129
English
15

Installing Software
Contents on Provided CD-ROM ..................... 131
English
INSTALLING USB DRIVER.................................133
INSTALLING UDF DRIVER
(DVD-RAM DRIVER)........................................135
INSTALLING DVD-MovieAlbumSE .....................137
INSTALLING MyDVD ..........................................139
Creating DVD Video on PC from
DVD-RAM Disc Recorded on
DVD Video Camera/Recorder...................... 141
Subsidiary Information
Cleaning.......................................................... 143
Changing Setting of Demonstration................144
No DVD Video Camera/Recorder
Operation - Check t he Following:................. 145
Trouble Messages.......................................... 1 47
Troubleshooting.............................................. 154
System Reset.................................................161
Major Specifications........................................ 162
Introduction to Optional Accessory................. 164
POWER SUPPLY................................................164
INFORMATION ON SQUARE ADAPTER...........164
Index...............................................................165
16
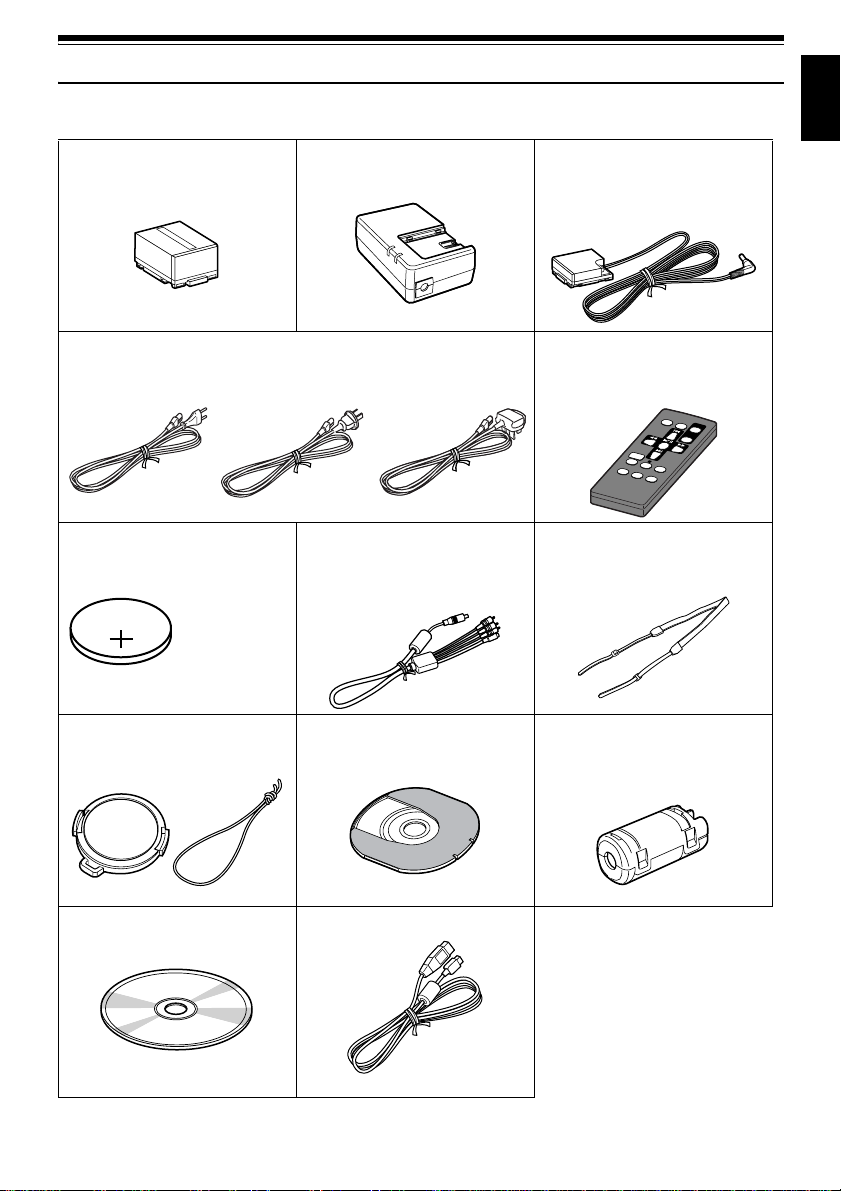
Checking Provided Accessories
Make sure that you have all the following accessories in package:
Battery (model DZ-BP14S):
Portable power supply for this DVDvideo
camera/recorder. Charge it before use.
Mains lead:
Connect between household AC outlet and AC adapter/charger.
for DZ-MV350E (SW) for DZ-MV350E (AU)
Lithium battery (model CR2025):
To power the remote control.
WARNING: Keep
this battery away
from children. If
swallowed,consult
a physician
immediately for
emergency
treatment.
AC adapter/charger (model DZ-ACS1):
Used to power the DVD video camera/
recorder from ACoutlet, or charge battery.
for DZ-MV350E (UK)
andDZ-MV350E(SWH)
AV/S output cable:
Used when viewing the picture playedback
on the DVD video camera/recorder on TV
screen, or output video to another video
device.
DC power cord:
When powering the DVD video camera/
recorderfromhouseholdACoutlet,use this
cord to connect the DVD video camera/
recorder and AC adapter/charger.
Infrared remote control
(model DZ-RM3W):
Use to control the DVD video camera/
recorder from a distance.
Shoulder strap:
AttachtotheDVDvideocamera/recorderto
hang it from shoulder.
English
Lens cap and lens cap string:
Attach the lens cap when not recording, to
protect the lens.
Software CD-ROM:
UsethisCD-ROMwhenconnecting theDVD
video camera/recorder to PC.
8 cm DVD-R disc (in Round DVD Holder):
To record video (movie) on this DVD video
camera/recorder
PC connection cable:
Ferrite core:
In order to control radio noise emission,
attach this to external microphone cable if
you are using the external microphone.
17

Names of Parts
English
7
(Inside the cover)
1234 5 6
8
A/V
MIC
11
910
BATTERY EJECT
(Bottom)
1 Recording indicator (P. 91)
The red indicator will light during recording.
2 Optical 10× zoom lens (P. 56)
3 Lens hood (P. 57)
Always remove this lens hood when using
generally available tele-conversion or wideconversion lens.
4 Infrared receiver (P. 36)
When the remote control is used to oper ate the
DVD video camera/recorder, this receiver will
receive the infrared signal.
5 Zoom lever (P. 56)
Push the lever to the T side for telephoto, or to
the W side for wide-angle.
6 Accessory shoe
18
7 External microphone jack (P. 53)
8 AV output jack (P. 71)
9 Stereo microphone (P. 53)
10 2.5” type liquid crystal display (inside)(P. 47)
11 BATTERY EJECT switch (P. 38)
The BATTERY EJECT switch is located on the
bottom of this DVD video camera/recorder:
Slide it when removing the battery.

12 13 14 1715
ACCESS/PC
DISC EJECT
R
E
C
18 19 20 2221
16
English
12 Viewfinder (P. 47)
13 Dioptre control (P. 47)
To adjust the focus of image app earing in the
viewfinder. (Pull out the viewfinder.)
14 ACCESS/PC ind icator (P. 8, 51, 54)
Will blink or light while the DVD video camera/
recorder is operating.
15 DISC EJECT b utton (P. 42)
Press down and release this button to open the
disc guide.
16 CARD ACCESS indicator (P.8, 54)
17 Card insertion block ( P. 45)
18 Battery attachment platform (P. 38)
19 Record button (REC) (P. 51)
20 Power switch (P. 46, 51, 54)
21 Speaker (P. 66)
22 Hand strap (P. 33)
19

23 24 25 26 27 28 29
English
3531 32 33 3430
23 FULL AUTO button (P. 62)
To switch the DVD video camer a/recorder t o
full automatic
24 FOCUS button (P. 58)
To switch between manual focus and autofocus.
25 EXPOSURE button (P. 60)
Press this button to adjust the exposure.
26 BLC (backlight compensation) button
(P. 61)
Press this button when subject is being li ghted
from rear.
27 DISC NAVIGATION button (P. 93)
28 SELECT button (P. 96)
29 MENU button (P. 49, 77, 99)
Press this button to displa y the menu for setting
camera functions and Disc Navigation.
The camera menu will appear even if disc is not
loaded.
30 Screen display butto n (DISPLAY) (P. 70)
Press this button to displa y the details of image
being played back or camera setting status, or
switch the display off.
31 Volume control buttons (VOL)/buttons
(P. 58, 60, 66)
T o adjust the volume of sound from speaker , etc.
32 RESET button (P. 161)
T o reset all setti ngs to defaults (status when the
DVD video camera/recorder was shipped from
the facto r y ).
33 PC connection terminal (TO PC)
34 Joystick (P. 49, 66, 78)
Move the joystick to select a scene or menu item;
then play back the scene or pause it.
35 Stop/cancel button (P. 22, 66, 95)
To end playback or cancel setting of menu.
20
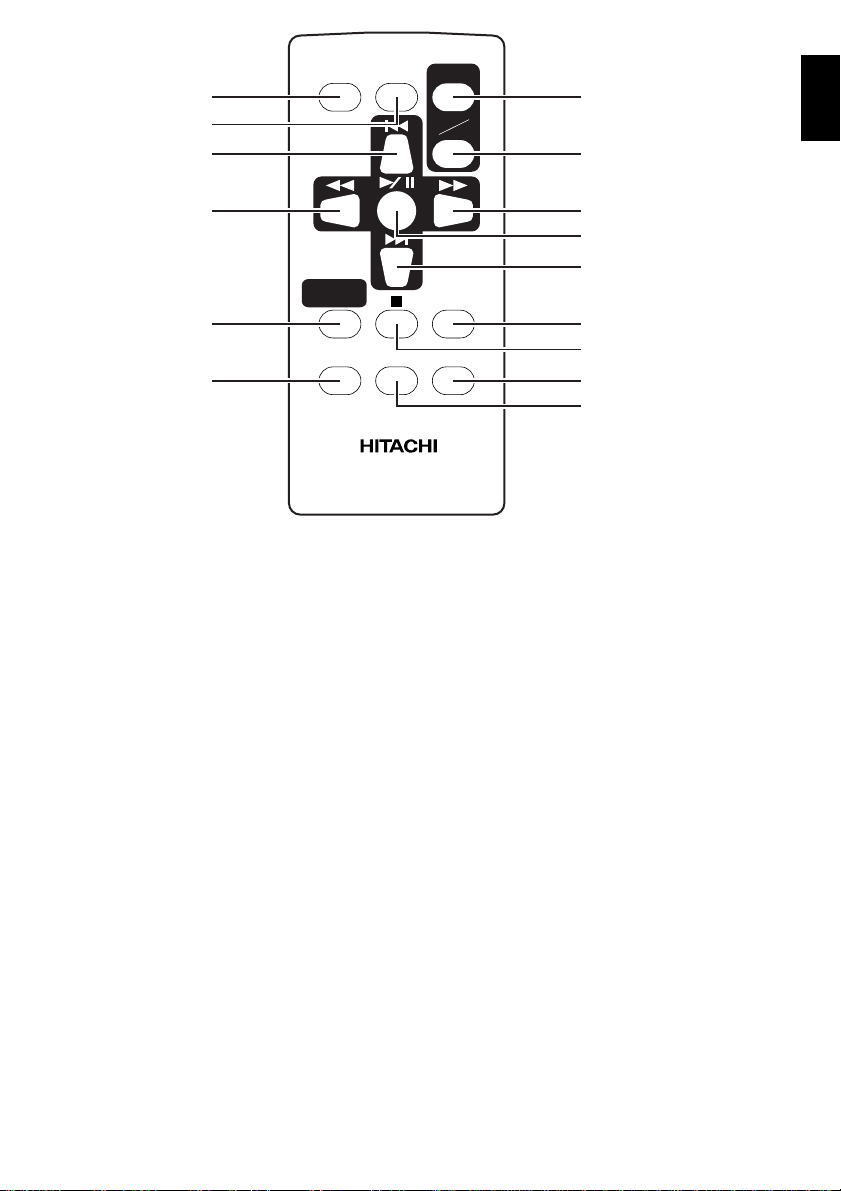
36
37
38
REC
DIGIT AL
ZOOM
ZOOM
T
W
42
English
43
39
NAVIGATION
40
41
36 REC button (P. 51)
37 DIGITAL ZOOM button (P. 83)
38 Reverse skip button (P. 68)
39 Reverse search button (P. 67)
40 DISC NAVIGATION button (P. 93)
41 MENU button (P. 49, 79, 100)
DISC
MENU
DZ-RM3W
44
45
46
DISPLA Y
47
DELETESELECT
48
49
50
42 ZOOM T button (P. 56)
43 ZOOM W button (P. 56)
44 Forward search button (P. 67)
45 Play/pause button (P. 66)
46 Forward skip button (P. 68)
47 DISPLAY button (P. 70)
48 Stop button (P. 22, 66, 95)
49 DELETE button (P. 99)
50 SELECT but ton (P. 96)
* The buttons on remote control will function the same as those on DVD video camera/recorder.
21

About This Manual
English
●Displays in this manual
Understand that the di splays are differ ent from those you wil l actually see in the v iewfinder or on the LCD
screen.
●Notation of cancel button
Press the stop/cancel button to stop your operation midway, or return the menu screen to the preceding
one. The expression “press the button” will be used in this text.
●, and marks beside headings
Some functions of this DVD video camer a/r ecor der are una vaila ble with di sc or ca r d used. Ref er to the
marks at right above each function to identify whether the disc or card is compatible with the function.
Refer to these marks and identify the functions and operation t o match the di sc or card you use.
22

Discs and Cards
The followingtable liststhe storagemedia (discs andcards) that canbe used onthis DVD video camera/
recorder and the functions which are available with them:
Function DVD-RAM disc DVD-R disc
Recording movie ∴∴×
Recording still ∴
Deleting recorded image ∴
Editing onthisDVDvideo
camera/recorder
Playback on DVD player
Playback on DVD-RAM
recorder
*1: CanbeplayedbackonsomeDVDplayers.
*2: Must be finalisedonthis DVDvideo camera/recorderbefore DVD-R disc canbe playedback on DVDplayer orDVD
recorder (See P. 73). May notbe playable on some DVD players.
*3: CanbeplayedbackonsomeDVD-RAMrecorders.
∴
*1
×
∴
×
×
××
*2
∴
*2
×
SD memory card/
Multimedia card
∴
∴
×
*3
×
∴: Functions available; ×: Not available
AVAILABLE DISCS
Usable discs and logos Shape
DVD-RAM Ver. 2.1 (8 cm)
In Round DVD
DVD-R
[for General Ver. 2.0 (8 cm)]
Holder
English
This DVD video camera/recorder uses 8 cm DVDRAM discs and 8 cm DVD- R d isc s for camcorder
use.
Discs remo ved from Round DVD H older cannot be
used on this DVD video camera/recorder: Use
them only in the holder.
Note:
• It is recommended that you use Hitachi Maxell discs,
since their compatibility with this DVD video camera/
recorder has been confirmed. Using a discother than
those made by Hitachi Maxell may notallow the DVD
video camera/recorderto deliver optimum performance.
• Itisnecessary to initialise an unformatteddisc.When an
unformatted disc is inserted into the DVDvideocamera/
recorder, a message will appear: Initialise the disc
following the instructionson screen (P. 125).
• TheRound DVD Holdercannot be usedon the following
DVD video camera/recorders:
- DZ-MV100A/E
- DZ-MV200E
- DZ-MV208E
- DZ-MV230E
- DZ-MV238E
- DZ-MV270E
- Other DVD video camera/recorders that use square
type adapters.
• Imagedataedited on PC and certaintypesofimagedata
may not be visible on this DVD video camera/recorder.
• The image data recorded on another device maynot be
playable on this DVD video camera/recorder.
23

INFORMATION ON DVD-R DISC
English
Y ou ca nnot record a still on DVD-R di s c, or delet e
any recorded images or data.
For optimum r e cording on DVD-R disc , t h is D VD
video camera/recorder writes control data to the
disc in order to automatically make adjustments
when it is inserted and ejected accompanying
recording. If the disc has no area to be written for
adjustment, recording may not be possible. To
prevent this, do not insert or eject a DVD-R disc
accompanying recording more than 50 times. The
DVD video camera/recorder will not perform
“write adjustment” when the DVD video camera/
recorder is turned on again, from off, for recording
with the disc in it, or when no recording is mad e ,
even if the disc is removed and then reinserted.
●Finalising DVD-R disc
Before using the 8 cm DVD-R disc provided on this
DVD video camera/recorder on a DVD player or
DVD video recorder that is c o m p at ib le with 8 cm
DVD-R disc, the disc must be finalised on this DVD
video camera/recorde r. For the finalising
procedure of 8 cm DVD-R disc, refe r to “Finalising
DVD-R Disc” (P. 127).
Note:
• Do not insert a DVD-Rdisc recordedon this DVD video
camera/recorder but not finalised, into a recordable
device,suchasaDVD videorecorder:Therecordeddata
may be damaged.
• DVD-Rdiscseditedandfinalisedon PC orthosefinalised
on anotherDVD videorecorder may not be playableon
this DVD video camera/recorder, depending on the
editing software used or recordedstatus of DVD-R disc.
EXAMPLESOFDISCS THATCANNOTBEUSEDONTHISDVDVIDEOCAMERA/
RECORDER:
• DVD-RAM (2.6 GB) Ver. 1.0 • DVD-ROM • MO
• DVD-R (3.9 GB) Ver. 1.0 • DVD-Video • MD
• DVD-R (4.7 GB) for Autho ring V er . 2.0 • CD-R • iD
• DVD-RW • CD-RW • Floppy disk
• DVD+RW • CD • Discs other than those with diameter
• DVD+R • LD • CD-ROM
of 8 cm
24

HANDLING DISCS
●Using discs
DVD-RAM and DVD-R discs are very deli cate
recording media. Carefully read the following
cautions and observe them:
• When using disc on this DVD video camera/
recorder , be sure to keep it in Round DV D Holder.
• Always use a brand new disc when recording
important material.
• Be su re not to touch the dis c
exposed portion, and be
careful that no dirt adheres to
it.
• If there is dust, scratch, dirt on
disc or if it is warped, the
following phenomena may occur:
− Block noise in playback
image
− Momentary stop of playback
image
− Sound interrupted during
playback, or abnormal sound
− Grey Disc Navigation screen
− D isc cannot correctly be recognise d
− Delay between video and audio
Even if disc is normal, the above phenomena may
occasionally occur. While the ACCESS/PC
indicator is lit, do n ot subject disc to vibrations or
impact, and avoid using DVD video camera/
recorder at extremely high or low temperatur es,
or in environment where condensation is likely
to occur.
• When recording images ,
the DVD video camera/
record er may avoid the
portions of disc where
recording is not possible ,
due to dust, scratches, etc.
[It will pause / at such a
portion and automatically
restart recording (0).]
This will cause recording
to be interrupted for sev e ral seconds to several
minutes, and multiple thumbnails will be created
by one recording session as shown above. In this
case, the recordable time on disc will decrease.
• Be careful when removing the disc since the
metal of removal slot of DVD video camera/
recorder, and disc itself, may be hot.
Do not touch
Block noise
001 / 002All Programs
PLAY
(Recording one scene
may produce multiple
thumbnails.)
RAM
●Storing discs
• When storing disc, insert it in Round DVD
Holder into pla st ic case.
• Be careful that no condensation occurs on disc.
• Do not place disc in following places:
− Direct sunlight for a long time
− Where humidity is high or in dusty place
− While there is heat from a heater, etc.
Note:
• See page 75 when cleaning the removed disc.
• Seepage74forhowtohandle disc removed fromRound
DVD Holder.
• Seepage74forhow to set the discremovedfromRound
DVD Holder or another disc correctly in Round DVD
Holder.
English
25

AVAILABLE CARDS
English
SD memory card
and multimedia
card can be used
onthisDVDvideo
camera/recorder.
• When the erasure prevention switch on SD
memory card is locked, no recording, deletion or
editing will be p ossible on the card.
●Handling card
• Do not use cards other than
the designated ones.
• Be sure to use a brand new
card w hen recordi ng vital
images.
• Do not touch the card
terminal or allow it to touch
metal.
• Do not paste anything other
than exclusive lab e l on label pasting portion.
• Do not subject card to impact, bend or drop it.
• Do not disassemble card or modify it.
• Do not expose card to water.
• Do not use or store card in the following places:
− Where the temperature is high, such as in
vehicle at high temperatures, under burning
sun or near a heater.
− Where humidity is high, or in dusty place
Terminal
Erasure prevention
switch
Locked status
• It is recommended that you create a backup file
for valuable data on hard disk of PC.
• Do not do the following, or the data on card may
be damaged or lost:
− Do not remove the card or turn DVD video
camera/recorder off during reading or writing
of data
− Do not use DVD video camera/recorder in a
place subject to static electricity or electrical
noise
Note:
• This DVD video camera/recorder can play back image
datarecorded on other digital camerasconformingtothe
DCF(Design rule for Camera File system)standard.The
range of imagedata playableonthis DVD videocamera/
recorderisthatwithpixelsfrom 80horizontal×60vertical
to 4000 horizontal × 3000 vertical.
• DCFisanintegrated image file format of digitalcameras:
Image files canbeusedonall digital devicesconforming
to DCF.
• Imagedataedited on PC and certaintypesofimagedata
may not be visible on this DVD video camera/recorder.
• The image data recorded on another device maynot be
playable on this DVD video camera/recorder.
26

Storage Capacity on Disc or Card
RECORDABLE TIME OF MOVIE (VIDEO)
The recordable time will vary depending on the
recording quality: See page 85 for the setting of
recording quality.
Movie recordable time on one disc (on single side)
(when recording only movies)
Recording
quality
XTRA Approx. 18 min*1No recording
FINE Approx. 30 min
STD Approx. 60 min*3Approx. 60 min
*1:Variable bit recording (recording of more than 18
minutesmay be possible because the transfer rate
variesautomaticallybetween approx. 3-10 Mbps)
*2:Transfer rate: Approx. 6 Mbps
*3:Transfer rate: Approx. 3 Mbps
DVD-RAM DVD-R
Disc used
possible
*2
Approx. 30 min
*2
*3
:
Note
• No movie can be recorded on SD memory card or
multimedia card.
• Themoviequalitymode can be changedforrecordings
on DVD-RAM disc, but not on DVD-R disc.
English
27

RECORDABLE STILLS (PHOTOS)
English
●Recordable stills on one DVD-RAM
disc (single side) (when recording
only still): Up to 999
If the disc still has free space after recor d ing 999
stills on it, movies can also be recorded on it.
●Recordablestills on oneblank card:
The number of recordable st ills will vary
depending on the recording quality: See page 86
for the setting of recording quality.
Capacity
8MB
16 MB
32 MB
64 MB
128MB
256 MB
512 MB
(The numbers of recordable stills above are only for
reference)
Approx. 45 Approx. 95 Approx. 190
Approx. 100 Approx. 200 Approx. 400
Approx. 220 Approx. 440 Approx. 880
Approx. 440 Approx. 880 Approx. 1,760
Approx. 880 Approx. 1,760 Approx. 3,520
Approx. 1,760 Approx. 3,520 Approx. 7,040
Approx. 3,520 Approx. 7,040 Approx. 14,080
Recording quality
FINE NORM ECO
Note
:
• Cards used onother devices can be used on this DVD
video camera/recorder.
• No movie or music data recorded on card can be
checked, viewed or heard on thisDVD video camera/
recorder.Inaddition,nosuchadatafilecanbedisplayed
on this DVD video camera/recorder.
• Use the remainingdisplay function to check the
remaining freespaceondisc beforeuse. See “Verifying
Remaining Free Space on Disc or card (Capacity)” on
page 124.
• Some still data recorded on this DVD video camera/
recorder may not be playable on anotherdevice (for
example, on a devicethat limits the maximumnumber of
recognisable stills to 999).
• NostillcanberecordedonDVD-Rdisc.
28

Features of DVD Video Camera/Record er
VERSATILE FUNCTIONS AVAILABLE
This DVD video camera/recor der has numerous useful functions. However , the functions that can be used
will vary depending on whether DVD-RAM disc, DVD-R disc or card is used.
Use the functions, following the table below:
Camera Functions:
Function
Camera Functions Setup
Record Functions Setup
Date Setup
LCD Setup
Initial Setup
Program AE
White Bal.
EIS
Dig.Zoom
MIC.Filter
16:9
VIDEO Mode
Quality
Self Timer
OSD Output
Date Mode
Date Set
Brightness
Color Level
Beep
Power Save
Record LED
Language
Demo Mode
Reset
Disc/Card used
DVD-RAM DVD-R CARD
∴∴∴
∴∴∴
∴∴×
∴∴∴
∴∴×
∴∴∴
∴∴*1×
××∴
∴ × ∴
∴∴∴
∴∴∴
∴∴∴
∴∴∴
∴∴∴
∴∴∴
∴∴∴
∴∴∴
∴∴∴
∴∴∴
∴∴∴
∴: Available; ×: Unavailable
(*1 Except for XTRA mode)
Reference
page
79
80
82
83
84
84
85
86
87
88
50
49
89
89
90
90
91
91
144
92
English
29

Disc Navigation Functions:
English
Scene Delete
PlayList Switch
Program Switch
Go To Top
Disc Capacity
Others Category All
Function
Edit Thumbnail
Copy
Select Start → Current
Detail
Play
Create
Edit
Title
Delete
Play
Title
End
Protect Disc
Format Disc
Update Control Info.
Finalize Disc
Repeat Play On
Skip
Fade
Combine
Divide
Move
Current → End
All
VIDEO
PHOTO
Off
Disc used
DVD-RAM DVD-R
∴ ×
∴ ×
∴ ×
∴ ×
∴ ×
∴ ×
∴ ×
∴ ×
∴∴
∴∴
∴∴
∴∴
∴ ×
∴ ×
∴ ×
∴ ×
∴ ×
∴ ×
∴∴
∴∴
∴ ×
∴∴
∴∴
∴ ×
∴ ×
∴ ×
∴ ×
× ∴
∴ ×
∴ ×
∴ ×
∴∴
∴∴
∴: Available; ×: Unavailable
Reference
page
99
101
102
103
105
106
104, 121
107
110
110
110
111
116
117
115
118 - 121
122
122
112
113
113
123
123
124
124
125
126
127
128
128
128
128
128
30

Card Navigation Functions:
Function Reference page
Delete 99
Lock 108
Scene
Go To
Card
Slide Show
DPOF 109
Select Start → Current 110
Current → End 110
All 110
Detail 111
Top 123
End 123
Capacity 124
Format Card 125
All 129
DPOF 129
RECORDING ON DISC
Y ou can use both 8 cm DVD-RAM and DVD-R discs
on this DVD vide o camera/r ecord er for rec ording.
The recorded v ideo and audio will be stor ed on an
8 cm DVD-RAM disc or 8 cm DVD-R disc.
Using disc allows you to record without
overwriting previo us reco rding s, and also to store
your valuable recordings for as long as need be
while retaining clarity.
With disc you can immediately access recording
and playback, in contrast to videotape, which must
be fast-forwarded or rewound.
English
In addition, simply loading a DVD-RAM disc into
a PC equipped with DVD-RAM drive and DVD
vide o recording software c ompatib l e with 8 cm
DVD-RAM allows you to easily view the r ecorded
disc.
You can fi nalise a recorded DVD-R disc on this
DVD video camera/recorder so that you can play it
back on a DVD player or DVD video recorder that
is compatible with 8 cm DVD-R disc (however , the
finalised DVD-R disc may not be usable on some
DVD players).
RECORDING MOVIE AND STILL
The DVD video camera/recorder can record
movies of events and sports, in the same way as
with conventional camcorders.
It can also record stills on a DVD-RAM disc or card,
as with a digital still camera. With CCD of 800,000
pixels, high-quality movies and stills (on DVDRAM disc only) can be recorded. When recording
movies, subject images can be zoomed up to 240
times; when re cord ing stil ls, subj ect image s can be
zoomed up to 40 times. Movies and stills can be
recorded on the same disc, by simply switching the
recording mode (power switch). However, if you
use a DVD-R disc, a still image cannot be recorded.
(If the DVD video camera/recorder is connected to
PC, the DVD video camera/recorder can capture
still images, suc h as JPEG data.)
31

IMMEDIATE REVIEWING OF RECORDED IMAGE
English
You can check the recorded movie or still in the
viewfinder or on the LCD screen.
EDITING IN VARIOUS WAYS ON DVD VIDEO CAMERA/RECORDER ALONE
This DVD video camera/recorder is provided with
a useful editing/playback tool. Disc Navigation
allows you to easily attach a title or special video
effect to the recorded movie or still. With Disc
Navigation, you can arrange the playback order
and edit multiple images to play them back
continuously . You can create an entire movie on this
DVD video camera/recorder alone, without
inputting video to a PC for editing.
USING WITH VARIOUS DEVICES
Connect this DVD video camera/ recor der to yo ur
TV and you can enjoy the playbac k pi ct ure with
your family and friends o n the l ar ge TV scr een; or
connect it to a video printer (generally available) to
print the recorded image. You can also transfer
recorded movies and stills (for DVD-RAM disc or
card) to PC.
32

Setups
This secti onexplains preparationsfor recording -setting up the DVD video camera/recorder and
battery.
Setting Up the DVD Video Camera/Recorder
HOLDING DV D VIDEO CAMERA/ RECORDER
Insert your right hand from the bottom of DVD
video camera/recorder up t o the b ase of y our
thumb.
Put your hand in a
position where you can
easily operate the REC
button and the Zoom
lever.
Adjust the length of
hand strap so that the
DVD video camera/
record er is stable when
you press the REC button with your thumb.
Note:
Do not adjust the handstrap whileholding the DVD video
camera/recorder: Doing this could cause the DVD video
camera/recorder to fall and be damaged.
ATTACHING LENS CAP
Pass the provided string through the hole in the len s cap and atta ch it to the hand strap of DVD video
camera/recorder.
Caution:
Do not lift the DVD video camera/recorder by
holding the viewfinder or LCD monitor: If the
viewfinderorLCDmonitorcomesoff, theDVDvideo
camera/recorder will fall.
English
1Use the string to attach the cap to the DVD video
camera/recorder.
Note:
• Always keep the lens cap on when not using the DVD
video camera/recorder, to protect the lens.
• Whenrecording, attach thelenscaptothe hand strapby
hooking the tab insidethe cap ontostrapforcomfortable
shooting.
2Push the both sides of cap inward and attach it
over the lens.
Push and fit
33

ATTACHING SHOULDER STRAP
English
Besuretopassthroughthe2slots.
Pass the shoulder strap through
the shoulder strapattachments.
34

INSERTING BATTERY INTO REMOTE CONTROL
Insert the provided lithium battery into remote control.
1Slide the cove r to remove it.
2Insert the lithium battery with the positive
terminal facing up.
Batterystopper
3Slide the cover to close it.
Note:
The life of lithium battery is approximately oneyear. If the
batteryisdischarged,nooperationispossible with remote
control: Replace the battery.
REMOVING BATTERY FROM REMOTE CONTROL
1While pushing the battery stopper, slide the
battery out.
While pushing
batterystopper
Batterystopper
English
Warning:
• KEEP THE BATTERYAWAY FROM CHILDREN AND
PETS.
• IF SWALLOWED CONSULT A PHYSICIAN
IMMEDIATELY FOR EMERGENCY TREATMENT.
• BATTERY MAY EXPLODE IF NOT HANDLED
PROPERLY.DONOTRECHARGE,DISASSEMBLEOR
DISPOSE OFIN FIRE.
:
Note
• Replace the battery with a Hitachi Maxell, Sony,
Panasonic, Sanyo, T oshiba CR2025, or Duracell
DL2025.Use ofanother battery may presentariskoffire
or explosion.
• Disposeof battery safely inaccordance withlocal laws.
Do not dispose of infire.
• Do not short circuit the battery.
• Do not hold the battery with the metallic tweezers.
• Keep the battery in a dark, cool, dry place.
35

●Using Remote Control
Point the remote control to the infrared receiver on
English
the DVD video camera/recorder. The remote
controllable distance is up to 5 m.
10˚
15˚
10˚
m
5
.
x
o
r
p
p
A
Infrared
receiver
15˚
Note:
• When using the remote control, make sure that the
infrared receiver on DVD video camera/recorder is not
exposed to directsunlightor any intense light. If the
infrared receiver is subject to light stronger than the
infraredlightfrom remotecontrol,theDVDvideocamera/
recorder cannot be operated by remote control.
• If there is an obstacle betweenthe remote control and
infraredreceiver on DVD video camera/recorder,remote
control may not be possible.
• The DVD videocamera/recorder uses the “VCR2”
remote control codeofHitachiVCRs.Ifyouuse a Hitachi
VCR,etc.withremotecontrolcodesetto“VCR2”,aVCR
placed near the DVDvideo camera/recorder will alsobe
operated bythe remotecontrol: To prevent this, change
the remote control code of theVCR.
36

Setting Up the Battery
TheDZ-BP14S batteryprovided withthis DV D video camera/recorderhasnot beencharged at purchase
time: Charge it before using the DVD video camera/recorder.
Note:
• Be sure to use the DZ-BP14S/DZ-BP14SW battery for the DVD video camera/recorder: Using other batteries could
cause the DVD video camera/recorder to malfunction, or result in fire.
• Be sure to use the DZ-ACS1 AC adapter/charger to charge the battery: Using other chargers could cause electric
shock or fire.
• Charge the battery at temperatures of 10-30°C.
CHARGING BATTERY
Use the provided AC adapter/charger to charge the battery.
1Connect the mains lead to AC adapter/charger.
2Plug the mains lead into AC outlet.
The CHARGE indicator on AC ad apter/charger
will light.
POWER a nd
CHARGEindicators
AC adapter/charger
3Attach the battery to AC adapter/charger.
Note:
When charginga battery,unplug theDC powercord from
the DC output jack on AC adapter/charger.
Battery
Mains lead
English
●Battery charged status
Y ou can find out the charged s tatus of battery b y checking the CHARGE indicator on A C adapter/char ger:
Charge status CHARGEindicator
During charge Lit
Charge complete Goes out
Note:
See “Troubleshooting” on page 154 when the CHARGE
indicator blinks.
37

ATTACHING BATTERY TO DVD VIDEO CAMERA/RECORDER
English
1Fit the battery to the battery attachment
platform on this DVD v ideo camera/recorder
and slide it upward un t il a c lick is heard.
Terminal
must
face up.
Note:
• Make sure that the battery is in the correct orientation.
• Make surethat the battery is securely attached:
Incomplete attachment could cause the battery to fall,
resulting in damage.
REMOVING BATTERY
After using the DVD video camera/recorder, remove the battery from it.
1Slide the BA TTERY EJECT switch on the bot tom
of DVD video camer a/recorde r: The battery can
be removed.
2
1
Note:
• For safety,be sure to turn the DVD video camera/
recorder off before attaching or removing the battery.
• Be careful not to drop the removed battery.
• Ifthe battery remains attached, minute level current will
floweveniftheDVDvideocamera/recorderisoff,and the
battery will discharge.
38

●Recordable time with fully charged
battery (with no zoom operation,
etc.)
The reference for DVD video camer a/ recorder
recordable time with fully charged battery is
between 40 and 60 mi nutes:
Video
quality
mode
*
XTRA
FINE When using
STD When using
* The time inXTRA mode is only for reference:It varies
depending on recording contents.
When using
viewfinder
When using
LCD monitor
viewfinder
When using
LCD monitor
viewfinder
When using
LCD monitor
DVD-RAM
disc
125 min
100 min
125 min 125 min
100 min 100 min
145 min 145 min
115 min 115 min
DVD-R disc
(approx.)
−
−
Withoutanyextraordinaryoperation,such
as zooming:
The continuou s ly rec ordab le time of DVD video
camera/recorder in the above table shows the time
available when the DVD video camer a/recorder i s
in the recording mode without using any other
function after recording is started. In act ual
recording, the battery will discharge 2-3 times
faster than this referenc e, since the REC button and
zoom are being operated, and playbac k is
performed. Assume that the reco rdable time with a
fully charged battery is between 40 and 60 minutes,
and prepare the number of batter ies to allow for the
time you are planning to r ecord on the DVD vid eo
camera/recorder.
Note that the battery discharges faster in cold
places.
●The time taken for charging the
battery is 165 minutes at 25ºC
Note:
• See page 154 when charging is not possible.
• The chargetime will vary depending on the battery
remaininglevel.
• During and after charging, the battery will be warm, but
this does not indicate a fault.
• If the following phenomena appear, the battery may be
dead: Replace it.
- Charging does not start within 10 seconds (the
CHARGE indicator does not light).
- The battery cannot becharged upto 75% if more than
9 hours has elapsed after charging started.
- Thebatterycannotbefullychargedifmorethan5 hours
has elapsed after it was charged to 75%.
• Chargethebatteryatambienttemperature10°Cto30°C:
Charging at temperatures other than this range could
damage the battery.
English
39

BATTERY REMAINING LEVEL INDICATOR
English
When the battery is used to power the DVD video camera/r ecorder, the battery remaining level appears
in the viewfinder or on the LCD screen as follows:
Fully charged Nearly empty
(Blinks)
White portion shows remaining level
Note:
The remaininglevel indicator“*” may be displayed for an extended period, and“+”or“,” may be displayed for
a shorter period.
EFFICIENT USE OF BATTERY
Charge battery immediately before using DVD
video camera/recorder:
The battery will slig htly discharge even if it is
detached from the DVD video camera/r ecorder . If
the battery is left attached to DVD video camera/
recorder, it will consume a slight amount of power.
Therefore, it is recommended that you charge the
battery shortly before using the DVD video
camera/recorder, usually on the day before you
plan to use it.
However , since the battery used for this DVD video
camera/recorder is free from the memory effect,
you do not need to completely discharge the
battery before charging it.
WhennotusingtheDVDvideocamera/recorder
for an extended period:
It is recommended that you fully charge the batter y
once a year, attach it to DVD video camera/
recorder and use it up; th en remove the battery and
store it in a cool place aga in .
Store in cool, dark place:
When you a r e not using the DVD video camera/
recorder, remove the battery and store it in a cool,
dark place. If you store it in a place where the
temperature is high, the battery life will be
shortened. Be especially sure not to store the
battery in an environment (in a clos ed vehicle) over
60°C: Neglecting this could damage the battery.
Battery life:
The battery life varies greatly depending on the
ambient environment and how often the DVD
video camera/recor der is used. If the usable time of
DVD video camera/recorder with a fully charged
battery is noticeabl y s ho r t, the battery is probabl y
dead: Purchase a new one.
Power save and discharge of battery:
It is recommended that you turn the DVD video
camera/recorder off in status other than recording,
since even during recor ding pause battery power is
consumed at the same level as during recording.
If, when you specify Power Save On, the recording
pause status continue s for approxi m ately 5
minutes, the DVD video camera/recorder will
automatically turn off.
To set or release power save , se e “Turning DVD
Video Camera/Recorder Off Automatically
(Power Save)” on page 90.
40

USING DVD VIDEO CAMERA/RECORDER WITH AC ADAPTER/CHARGER
It is recommended that you use the AC adapter/char ger to power the DVD video camera/rec order from
household AC outlet when you perform settings on it, play back or edit images, or use it indoors.
Note:
Be sure to use the specified AC adapter/charger(DZ-ACS1) to powerthe DVDvideo camera/recorder. Using other AC
adapter/chargers could cause electric shock or result in fire.
Mains lead
To AC outlet
AC adapter/charger
DC power cord
English
1Connect the mains lead to AC adapter/charger.
2Plug the mains lead into AC outlet.
3Plug one end of DC power cord into the DC
output jack on AC adapter/charger.
4Attach the other end of DC power cord to the
battery attachment platform on DVD video
camera/recorder.
Note:
• The AC adapter/charger can be used aroundthe world.
AnACplugadapterisrequiredinsomeforeigncountries.
If you need one purchase itfrom your Hitachi distributor.
• If the CHARGE indicator does not light when the AC
adapter/charger isplugged intoACoutlet, unplug itfrom
the AC outlet, wait afew moments, and then plug it into
the AC outlet again.If the CHARGE indicator still does
notlight, the AC adapter/chargermay be faulty. Unplugit
from the AC outlet and consult your dealer.
(for DZ-MV350E (SW) only)
AC 100-120V
AC Plug Adapter (notsupplied)
41

Inserting and Removing Disc
English
INSERTING DISC
1Press down the DISC EJECT button once and
release it.
A few moments after th e ACCESS/PC indicator
blinks, the cover of disc insertion block will open
slightly.
2Gently open the cover by hand until it stops.
3Insert the disc, in Round DVD Holder, into the
disc guide until it stops.
Note that the recording/playback surface of
disc must face the inside of DVD video camera/
recorder. The orientation for inserting the disc
into the disc guide is also predetermined : Load
the disc correctly, referring to the figure below.
DISC EJECT
button
Disc cover
PUSH CLOSE portion
• Thediscexposedportionmustfaceinthesamedirection
as the lens, as shown in figure.
• Therecording/playbacksidemust face the inside (DVD
video camera/recorder).
Disc
guide
If the disc is not corr ectly inserted, the cover will not
close. Never try to forcibly close the cover: Th is
could cause damage. Reinsert the disc properly.
Correct
orientation
Incorrectorientation
Incorrect
orientation
4Push the section marked “PUS H CLOSE” on
the cover of disc insertion block, to close the
cover.
5Turn the DVD video camera/recorder on
( VIDEO or PHOTO).
When “DISC ACCESS” disappears, the DVD
video camera/recorder is ready for recording.
●Identifying recording/playback
sides of disc:
Single sided disc:
The recording/playback side
is opposite to the printed label.
Double-sided disc:
The recording/playback side
of “SIDE A” is opposite to the
“SIDE A” marked side .
The recording/playback side
of “SIDE B” is the “SIDE A”
marked side.
“SIDE A” mark
The oppositeside is
the “SIDE A”
recording/playback
side.
42

Note:
• Disccannotbe inserted or removedunlessthebattery or
ACadapter/charger is connected to DVD videocamera/
recorder.
• See page 75 for how to set disc in Round DVD Holder.
• If there is some delay before recording starts, referto
page 145.
• Thedisc insertionorientation ispredetermined: Forcibly
inserting a disc in wrong orientationcould damage the
DVD video camera/recorder or Round DVD Holder of
disc.
• Ifthediscis notcorrectlyinserted,thecoverwillnotclose.
Never try to forcibly close the cover: This could cause
damage. Reinsert the disc properly.
• Ifasingle-sideddiscisinsertedintoDVDvideocamera/
recorder with theprintedlabel facing the inside,an error
messagewillappear.Removethediscand reinsertit with
its recording/playback side facing the inside. See
“Trouble Messages” on page 147.
●When using b rand-new DVD-R disc
Recognition of the disc will
start.
The messages on the right
will appear in sequence by
pressing the button
between messages.
Whenrecordingonthis
DVD video camera/
recorder:
When final message
“Format the disc now? ”
appears, choose “YES ” an d
then press the button.
The disc will be
automatically formatted.
When formatting is
complete, “DVD-R disc,
Video mode cannot be
changed” will appear (See
page 150): Press the
button to erase the message.
Once formatted, a DVD-R
disc can no longer be
changed to a disc for PC, even if it has not been
record ed on this DVD video camera/ recorder.
Note:
Seepage85formoviequalitymode.
For
m
at Disc
Disc is not formatted.
If it formats, it becomes
possible to use for camera.
NEXT
CANCEL
Format Disc
Howeve r, when you re cord
f rom PC connect ion
terminal,
please do not format.
NEXT
CANCEL
m
at Disc
For
Format the disc now?
YES NO
ENTER
English
When recording data from PC:
While the above messages are being displayed,
press the button, or when message “Format the
disc now?” appears, choose “NO” and then press
the button.
However, if data from PC has not yet been
recorded, the disc can be made usable on this DVD
video camera/recorder. When inserting the disc
into this DVD video camera/recorder, the same
message will appear: If you wish to use it on this
DVD video camera/recorder, choose “YES”.
Note:
Do not initialise a disc on which you wish to recor d data
created using the application (MyDVD) of PC.
43

REMOVING DISC
English
1Set the power switch to
“POWER OFF” to turn the
DVD video came ra/
recorder off.
2Press down the DISC
EJECT butto n once and
release it.
In a moment, the cover of
disc insertion bloc k will
open slightly.
3Gently open the cover unti l
it stops.
When the cover is f ully
open, the disc wi ll slightly
come out from the disc
guide, and stop.
DISC EJECT
Note:
• Itis recommendedthatyou turn the DVDvideocamera/
recorder offwhen inserting or removing disc, in order to
prevent faulty operation.
• Evenafter the DVDvideocamera/recorderisturned on,
the disc can beremoved unless itis in recording status.
Hold downthe DISC EJECT button for approximately 2
seconds, and then release it to remove the disc (The
DISCEJECTindicatorontheLCDscreenwillblink.).Itis
recommended that you turn the DVD videocamera/
recorder off before insertingorremoving disc to prevent
misoperation.
• Donotdetachthebatteryor AC adapter/chargeruntilthe
DVD video camera/recorder is completely turned off.
• Donot insertanything other thanthe 8 cm DVD-RAM or
DVD-R disc intothedisc insertion block:Doing so could
cause malfunctions.
• Set the power switch to “POWEROFF” to turn theDVD
video camera/recorder off.
• When inserting or removing the disc, be careful not to
touch the inside of DVDvideo camera/recorder
(especially, the lens of laser pickup).
• Wheninserting orremoving thedisc,connect a charged
battery or ACadapter/charger tothe DVD videocamera/
recorder: The disc cover will not open unless the DVD
video camera/recorderis powered.
4Remove the
disc.
Hold the top
of Round
DVD
Holder as
shown in the
illustration an d g e ntly pull it out.
Note:
Be carefulnot to touch the disc exposed portion when
removing the disc.
Hold disc
around this
portion.
5Gently push the section
indicated “PUSH CLOSE”
on the cover of disc insertion
block, to close the cover.
44

Inserting and Removing Card
Beforeinsertingorremovingcard,setthepowerswitchto“POWEROFF”toturntheDVDvideocamera/recorder
off.
1Open the cover of card
insertion block with power
turned off .
Removing Card
Push the centre of card
edge: The card will come
out so that it can be held
by fingers.
2Insert card with its
terminal inw a rd u ntil it
locks.
3Close the cover of card
insertion block.
English
45

Basic Techniques
English
This section explains aboutrecording of movies andstill images, and also basic settings on DVD video
camera/recorder.
Basic Handling of DVD Video Camera/Recorder
TURNING DVD VIDEO CAMERA/RECORDER ON AND OFF
While holding down the red butto n at the centr e of
power switch, s e t the switch according to each
record ing funct ion:
Set to “ PHOTO”:
To record still on DVDRAM disc
Set to “ VIDEO”:
To record movie on DVDRAM or DVD-R disc
Set to “POWER OFF”:
The DVD video camera/
record er will turn off.
Set to “ PHOTO”:
To record still on SD
memory card or
multimedia card
Power ON status
During playback, set the power switch to “
VIDEO” or “ PHOTO” when u sing dis c, or s et it
to “ PHOTO” when using card.
T urn the switch while holding down the red button
at the centre of sw it ch.
Note:
• OnceyouturntheDVDvideocamera/recorderontolet
it recognise thedisc, you canimmediatelyrecord or play
back by turningthe DVD video camera/recorder on
again.However,ifyouremovethedisc,replaceit, or ifthe
date changesafter poweris turnedon, it will takesome
timeforthe DVD video camera/recordertostartbecause
it must recognise the disc again (See page 145).
• ItwilltakesometimefortheDVDvideo camera/recorder
to display the Disc Navigation screen after power is
turned on.
• If you turn the DVD video camera/recorderon, the
ACCESS indicator willlightorblinkto show that theDVD
video camera/recorder is recognising the disc or card:
During this time, nooperation, such as recording,canbe
performed.
Afterseveralseconds,the ACCESS indicator will go out,
and operating the DVD video camera/recorder will be
possible.
CARD ACCESS
indicator
ACCESS/PC
indicator
• When the DVD videocamera/recorderis turnedon, the
self-diagnosis function will work and a message may
appear. In this case, refer to “Trouble Messages” on
page 147 and take corrective action.
• WhiletheACCESS/PCorCARDACCESSindicatorislit
or blinking, do not violently open or close the LCD
monitor.
46
Power switch

VIEWING SUBJECT THROUGH VIEWFINDER
1Pull out the viewfinder.
Dioptrecontrol
2T urn the dioptre contr ol knob to adjust the focus
to suit your eyesight.
Note:
• If the LCD monitor is open approximately 90°, the
viewfinder will be off.
• Focusing will not be correct unlessthe viewfinder is
pulled out.
Pull out the viewfinder.
VIEWING IMAGE ON LCD MONITOR SCREEN
If you open the LCD monitor, you can monitor subject image on the LCD screen.
1Open the LCD monitor.
The LCD monitor has a po rtion where you can
hook your finger . Hook the finger there to open
the monitor.
●Range where the LCD monitor can
be moved
The LCD monitor can be opened up to
approximately 90°.
If the LCD monitor is open 90°, it can be tilted with
the screen down as much as 90°, and can also be
tilted with screen up an d tur ned up to 180° so the
screen faces in the same direction as the lens.
90°
(Bottom)
English
Hook your finger
If the LCD monitor is turned 180° so the scr een faces
in the same direction as the lens during recording,
subject image will also appear in the vi ewfinder as
an mirror image (left/right rever se d).
Tilt the LCD monitor to adjust its vertical angle so
that you can see the screen easily.
Note:
• Be sureto open the LCD monitor approximately90°
before changing its vertical angle.
• Donot recordfora prolongedtime with theLCD monitor
turned approximately180
video camera/recorderbody:Doing this couldcause the
DVDvideocamera/recorder andLCDmonitortobecome
hot.
°inclosecontactwiththeDVD
90˚
180˚
47

CLOSING LCD MONITOR
English
Before closing the LCD monitor, be sure to reset it at
right angles to the DVD video camera/recorder.
Replace the LCD monitor on the DVD video
camera/recorder with the LCD screen facing
inward until a click is heard.
Note:
• Be sure to return the LCD monitor at right angles to the
DVDvideocamera/recorderbeforeclosingitorreplacing
it on the DVD video camera/recorder with its screen
facing outside. If the LCD monitor is tilted, it cannot be
closed to the DVD videocamera/recorder.
• IftheLCD monitorisnotsecurelylockedtotheDVDvideo
camera/recorder, noimage will appear in the viewfinder.
48

Setting Date and Time
Set the current date and time so that the date and time you make a recording can be recorded correctly.
The following procedure can also be used to correct the date and time you have already set.
Tilt up/down and to left/right
to select, and thenpress
to designate.
1Turn the DVD video camera/recorder on.
2Press the MENU button.
The menu screen will
appear.
3Use the joystick to choose
“Date Setup” and then
“Date Set”.
4Tilt the joystick to right.
The figure for the day will
be selected.
[The digit that is
highlighted first depends
on the date display format
(set up in Date Mode): The digit on the left end
of the date display will be first highlighted.]
Note:
Aftersettingthefigurefortheday,tiltthejoysticktoright
toselect the digitto be set.Ifyou pressthe
after selecting the figure for the day, the screen for
verifying the set date will appear instead of screen for
setting month, year or time.
Camera Funct i ons Setup
m
AE : Sp o r t s
Progra
W
hi te Bal. : Auto
EIS :On
Dig. Z
oom
: 40x
IC.F i l te r :Off
M
16:9 :O
ENTER RETURN
Da te Se t up
Da te Mode
Da t e Se t 1 / 1/ 2003
ENTER RETURN
Da te Se t up
Da te Mode
Da t e Se t 1 / 1/ 2003
ENTER RETURN
button
ff
5Tilt the joystick to left or
right to select the digit
Da te Se t up
you want to set in
sequence.
Tilt the joystick up or
RAM
down to select the
number for current date/time, and then repea t
step 5 to set the current date and time.
Note:
To stop date/time setting midway, press the button.
6After setting the current
0:00
RAM
date and time, press the
button.
Da te Set
The screen for verifying
the set date will appear.
7If the displayed date and time ar e correct, use the
0:00
RAM
joystick to choose “YES”, and then press the
button.
The date and time wil l be set, and the DVD video
camera/recorder will enter the r ecording pause
status.
Choosing “NO” will restore the men u sc reen.
Note:
This DVD video camera/recorder incorporates a
rechargeable batterytostorethedateandtimein memory.
Ifthisbuilt-inbatteryisexhausted, thedate and time will be
reset. To prevent this, connect theAC adapter/charger to
DVD video camera/recorder every 3 months, and leave
them for at least 24 hours with the DVD video camera/
recorder turned off: The built-in battery will be charged.
Da te Mode
Da t e Se t 30/ 9 / 2003
ENTER RETURN
3 0 / 9/ 2003 1 7 :00
Date set up?
YES NO
ENTER
17:00
RAM
RAM
English
49

CHANGING DISPLAY FORMAT OF DATE AND TIME
English
Y ou ca n sel ect o ne of three date display formats: day/mont h/year or month /day/ye ar, year/month/
day. Associated with the selected date display, the time display format will also change as follows:
Display format Example of display
D/M/Y
M/D/Y
Y/M/D
17:00
30/9/2003
5:00PM
9/30/2003
PM5:00
2003/9/30
1Press the MENU button.
The menu screen will appear.
2Use the joystick to choose
“Date Mode” on the
“Date Setup” menu
screen, and then press the
buttom.
The options will appear
on the right of “Date Mode”: The mark will be
attached to the currently selected option.
Da te Se t up
Da te Mode
Da t e Se t
ENTER RETURN
D/M/ Y
M/D/ Y
Y/M/D
3Use the joystick to select
the desired date display
Da te Se t up
format, and then pres s the
button.
The menu screen for
ENTER RETURN
setting date will be
restored, and the “Date Mode” has been
RAM
changed as you designated.
4Press the MENU button to switch of f the men u
screen.
Note:
If the date display format has been changed, the display
formatduringplaybackaswellasduringrecordingwillalso
be changed (See page 63).
Da te Mode
Da t e Se t
M/D/ Y
RAM
50

Recording Movie
Insert a recordable DVD-RAM or DVD-R disc into this DVD video camera/recorder.
English
ACCESS/PC
indicator
Pressing REC
once will start
recording;
pressing it
onceagainwill
temporarily
stop recording.
Power switch
1Turn the DVD camera/recorder on.
Set the power switch to “ VIDEO” to turn the
DVD video camera/recorder on.
After the ACCESS/PC indicator goes out,
perform the subsequent operation:
2Check the subject on the screen (viewfinder or
LCD).
If using the viewfinder, pull it out.
3Press the REC button.
The “/” mark in the viewfinder or on the LCD
screen will change to the “0” mark, and
recording will start.
During recording, the recording indicator on the
front of DVD video camera/recorder will light.
Pressing REC again during recording will set the
DVD video camera/recorder to the recording
pause status.
Note:
• See page 145 when recording movie is not possible.
• See page 145 if it takes some time before recording is
possible.
• See page 63 for on-screen information display.
• It is recommended that you use DVD-RAM disc from
which recorded contents can be deleted.
• Sound is recorded from the stereo microphone on the
front ofDVD video camera/recorder:Takecare thatthis
microphone is not blocked.
• YoucanpresstheRECbuttonimmediately aftertheDVD
video camera/recorder enters the recording pause
status,butnofurther recording canbemadewhile“DISC
ACCESS”isbeingdisplayed. Recording will restart after
the message disappear.
• Take care that power is not interrupted while the
ACCESS/PC ind icator is blinking.
• Theminimum recordabletimeofmovie is approximately
3 seconds.
• See page 91 for setting of Record LED (recording
indicator) On/Off.
• For various functions available during recording, see
“Setting Up Camera Functions” on page 79.
• Hitachi cannot be responsible for video and audio that
cannot be recordedor edited becauseof anydefect.
• The power switch can be changed over even during
recording, but the operation will not be changed.
• Each time the DVD video camera/recorder enters the
recording pausestatus, the counter displaywill be reset
to “0:00:00”.
• WhenusingDVD-R disc, donotperformthefollowing, or
data on the discmay not be read:
- Using another device, doing additional recording on
DVD-R disc recorded on this DVD video camera/
recorder
- Using this DVD video camera/recorder, doing
additional recording on DVD-R disc recorded on
anotherdevice
4When recording is fini shed, turn the DVD video
camera/recorder off.
51

●Powersaveanddischargeofbattery
If, when “Power Save: On” is specified, the DVD
English
video camera/recorde r is left in the recording
pause status for approximately 5 minutes, it will
automatically turn off.
To restart re cording, set the power switch to
“POWER OFF”, and then set it to “ VIDEO”.
To set or release power save, see “Turning DVD
Video Camera/Recorder Off Automatically
(Power Save)” on page 90.
It is recommended that you specify “Power Save:
On”, since even during recording pause battery
power is consumed at the same level as during
recording. Especially when power save has been
released, turn the DVD video camera/r ecorder off
when not in use.
52

USING EXTERNAL MICROPHONE
Connect external microphone (generally available) to the external microphone jack of this DVD video
camera/recorder . Clearer sound can be recorded. T urn on the switch on microphone and start recording.
For details on microphone, see “Major Specifications” on page 162.
To external
microphone jack
A/V
MC
Note:
• If the AV/S output cable is plugged in, you cannot use external microphone:Unplug the A V/S output cable to use the
external microphone.
• This DVD video camera/recorder cannot use a plug-in power type microphone (power supplied from camcorder).
●Attaching Ferrite Core
Although no ferrite core is attached in the il lustrations of the cables in text, be sure to attach the provided
core to the external microphone cable using the following procedure:
English
1Open the cover of ferrite core.
2Attach the core to extern al mi cro phone cable at
a position approximately 5 cm from its end.
5cm
3Close the cover of core, taking care that it does
not catch the external microphone ca bl e.
53

English
Recording Stills
Note:
Recordingofstillimagesis possibleonDVD-RAMdiscand
card.
ACCESS/PC
indicator
Power switch
CARD
ACCESS
indicator
1Turn the DVD camera/recorder on.
When using DV D- RAM disc:
Set the power switch to “ PHOTO”.
When using card :
Set the power switch to “ PHOTO”.
After the ACCESS indicator goes out, perform
the subsequent operation:
Still recording mode
Number of recordable stills
(When using DVD-RAM disc)
REM
999
17:00
30/ 9/2003
2Check the subject on the screen (viewfinder or
LCD).
3Press the REC button.
The DVD video camera/rec order automatically
focuses on the subject at the ce n t re of screen
(when auto focus is selected ).
The screen will be bl ack, and t hen the r ec ord ed
still will be displayed. When the “/” mark
appears, you can proceed with the next
recording; while “DISC ACCESS” or “CARD
ACCESS” is bein g displayed, you cannot
proceed with the next recording.
4Set the power switch to “POWER OFF” to turn
the DVD video camera/recorder off.
Note:
• See“Stillrecordingquality”on page 55fordetailsofstills
on card.
• Donotoperatethepowerswitchorremovethecard while
the ACCCSS/PC or CARD ACCESS indicatoris lit or
blinking: Doing so may damage the card or the data on
card.
Still recording mode
Number of recordable stills
54
REM
FINE
(When using card)
30/ 9/2003
999
17:00

●Still recording quality
The DVD video c amera/r ecor der can r ecor d JPEG
stills of 640×480 pixels.
Although still images are recorded on DVD-RAM
disc only in the FINE mode, the quality mode can be
chosen when recordin g st ills on card.
[Still recording quality on card]
Quality File size Application
FINE Approx. 128 KB Whenimagequality
NORM Approx.64 KB Standard
ECO Approx. 32 KB When number of
* See page 162 for the number of recordable stil ls.
is prioritized
stills is prioritised
(quality will be
slightly inferior)
Note:
• The DVD video camera/recorder automatically sets the
shutterspeed between 1/800and1/30second(between
1/800 and 1/10 second if Program AE has been set to
Low Light) depending on the subject brightness.
• Duringrecording ofstills, the electronic image stabilizer
will not function.
• See “Switching Quality of StillImage (Quality)” on
page 86 if you want to change the still quality mode.
English
55

English
Zooming
This DVD video camera/recorder allows you to record using optical 10-power zoom and digital zoom.
Move the zoom leve r t o “T ” control side, and the
subject image will gradually become telescopic:
Move the zoom lever to “W” control side, and the
image will wide n.
If Dig. Zoom 40× or 240× is specified, moving the
zoom lever to “T” control side will engage the
digital zoom midway (See page 83).
Recordinginwide
area
Note:
• Thesettingof digital zoom 240×is effectiveonly during
movierecording. If you set zoomto 240×whenrecording
still, the digital zoom will be up to 40×.
• Whena subjectiszoomed, it may be momentarilyout of
focus.
• Whendigital zoom is engaged, the image qualitywill be
rougher.
• Ifthe zoom ratiois frequently changed at shortintervals,
the recorded im agewill be unclear.
Zoom Out
In case of still recording
In case of movie recording
1 × 10 × 40 × 240 ×
Zooming
Digital zoom range
Recording
enlargedimage
FINE
30/ 9/2003
Zoom In
0:00:00
REM
3 0 MIN
17:00
56

MACRO RECORDING
Use the macro function when r ecor ding a small obj ect fr om c lose-up posit ion: You can shoot the subject
as close as approximately 2 cm from the lens surface, magnifying the image to fill the screen.
1Aim the DVD video camera/recorder at the
subject, and press the zoom lever to “W” control
side.
Note:
• Zoom can beused, but the subject may not be focused,
depending on the distance to the subject. In this case,
move the zoom to "W" control sideto focus.
• Theamount of lighttends to beinsufficient during macro
recording:If the subjectimageis too dark,useadditional
lighting.
RECORDING SUBJECTS FOR STRONGER WIDE-ANGLE OR TELEPHOTO
EFFECT
Use generally a vailable tele-conversion lens or wide-conversion lens with filter diameter of 30.5 mm.
Remove the lens hood on the top surface of lens, and then attach the conversion lens over the lens.
Conversion lensLens hood
English
(Remove)
Note:
The four corners of screen maybe dim dependingon the
conversion lens used.
(Attach)
57

English
Manually Focusing Subject
The DVD video camera/recorder measures the distance to a subject viewed at the centre of screen and
automatically focuses on it. If it is difficult to automatically focus the subject, adjust the focus m anually.
FOCUSING DURING RECORDING
This DVD video cam era/recorder automatically focuses a subjec t at th e c e ntre of sc reen (aut o-focus).
When the DVD video camera/recorder is turned on, auto-focus will always be set.
Focusing range
You can swit ch t he d isp lay mode of on-screen information :
• On T (tele) side: approximately 1 m from lens surface to infinity
• On W (wide) side: approximately 2 cm from lens surface to infinity
1Press the FOCUS button during recording.
“MF” will appear on the screen.
Manual Focus icon
2Press the zoom lever down to “T” control side to
zoom in on subject.
3Use the buttons to adjust the focus, while
viewing the image in the viewfinder or on the
LCD screen.
Adjust with and
buttons
Note:
• Pressing FOCUS will alternate between manual focus
andautofocus.Withautofocus,noindicationwillappear
on the screen.
• Be sureto zoom in on your subject before manually
focusingonit.Ifyoubringthesubjectintofocusatthe“W”
control side, focuswill be faultywhen you turnthe zoom
lever to the “T” control side to zoom in on the subject.
• Manual focus is released when the DVD video camera/
recorder is turned off. When you turn the DVD video
camera/recorder on next time, auto focus will be
restored.
58

Manually focus the following objects, which may not be automatically focused.
Objects not in
the centre of
screen
Objects
moving rapidly
Object behind
glass with
waterdroplets,
dirt on it
Objects with
little variation
in brightness,
such as white
wall
Objects lit by
neon sign,
spotlight, etc.
whichglaresor
emits strong
light
Nightview
Objects that
are far and
near at the
same time
Dark objects
English
59

English
Adjusting Exposure Manually
This DVD video camera/recorder measures the subject brightness and automatically adjusts the
exposure. You can also adjust the exposure manually.
1Press the EXPOSURE button during recording.
The exposure indicator will appear on the
screen.
0:00:00
REM
Exposure indicator
FINE
2Use the buttons to adjust the exposure,
while viewing the image in the viewfinder or on
the LCD screen.
3 0 MIN
17:00
30/ 9/2003
Note:
• Pressing EXPOSURE will alternate between manual
adjustment andautoexposure.Withauto exposure,no
indication will appear on the screen.
• The exposuresetting will return to Auto when the DVD
video camera/recorder is turned off.
Adjust with
and buttons
60

Compensating for Backlight
Whensubjectislightedfromrear,thisfunctionwillcompensateforlightingsothatthesubjectisnottoo dark.
1Press the BLC button during recording.
0:00:00
REM
Backlight correction icon
3 0 MIN
English
FINE
30/ 9/2003
The backlight correction icon will appear.
17:00
Note:
• PressingtheBLCbuttonwillalternatebetweenbacklight
setting between on and off.
• The backlightsetting will automatically return to “off”
when the DVD video camera/recorder is turned off.
61

English
Using Full Auto Function
Pressing the FULL AUTO button will fully automate the camera functions.
1Press the FULL AUTO button.
The following settings will reset to defaults:
Function When setting ful l auto
Program AE Auto
White balance Auto
Exposure Auto
Backlight compensation Off
Focus Auto
EIS On
MIC.Filter Off
62

On-Screen Information
Various types of information will appear in the viewfinder or on the LCD screen during recording.
INFORMATION DISPLAY DURING RECORDING
123456 7
9
10
11
12
13
FINE
14
The above screen is an example for explanation: It is
different fromthe actualdisplay.
10
DISC ACCESS
REC
0:00:00
REM
6 3 MIN
17:00
30/
9/2003
1. Recording mode
:Movie
:Still
2. Program AE (only in movie recording mode)
No display: Auto
- :Sports
. :Portrait
/ : Spotlight
0 :Sand & Snow
1 :Low Light
3. White balance
No display: Auto
3 :Set
4 : O utdoor
5 :Indoor
4. Backlight compensation
No display: Backlight compensation OFF
8 : Backlight compensation ON
5. Manual focus
No display: Autofocus
: : Manual focus
6. Microphone filter (only in movie recording
mode)
No display: Microphone filter OFF
; : Microphone filter ON
7. Self-timer (only in still recording mode)
No display: Self-timer OFF
< : Self-timer ON (count is from 10
8
8. Recording status
15
16
17
18
19
0 :During recording
/ : During recording paus e
No display
9. Electronic image stabiliser (EIS) (only in movie
recording mode)
No display: EIS OFF
seconds)
*1
9 :EIS ON
10.Zoom
(Digital Zoom: Off)
!
(Digital Zoom: 40×)
(Digital Zoom: 240×, only in movie
recording mode)
11. Exposure cor rection
12.Warning message
13.Disc/Card type
:DVD-RAM
:DVD-R
: DVD-RAM (write-protected)
: DVD-R disc already finalised on this
: DVD-R disc finalised on a device
DVD video camera/recorder
other than this DVD vide o cam era/
recorder
: SD memory card or multimedia card
: Locked SD memory card
No display
*2
English
63

14.
Movie recording quality (only when using disc)
XTRA : Highest quality (only when using
English
FINE : High quality
STD : Standard
Still recording quality (only when using card)
FINE : High quality
NORM : Standard
ECO : Number of recordable stills is
DVD-RAM disc)
prioritised
15.Movie recording time (only in movie recording
mode)
16.Remaining space on disc/card
REM XX MIN*4: Remaining recordable minutes
*5
REM XX
during movie recording
:Number of remaining
recordable still images during
still recording
17.Rema ining battery le vel
B(full charge)
C
D
E
(low remaining charge)
18.Brightness/Colour density of LCD screen or
Volu me
:
The volume can be adjusted during external
input and playback.
*3
19.Current date/time
*1 When no disc or card is in the DVD video camera/recorder, or disc has not yet been initialised, a write-protected
disc or locked card, or a disc or card with no remaining space, has been inserted.
*2 When a disc or card that cannot be used in this DVD video camera/recorder is inserted
*3 No remaining time or number will be displayed with a protected disc or locked card, or finalised DVD-R disc.
*4 In XTRA mode, possiblerecordingtime may be longer than the displayed time.
*5 Thedisplayed number of recordable stills is forreference: The decreasing number may not becorrect, depending
on recording conditions (not displayed with a DVD-R disc).
64

●Switching the information display mode
You can swit ch t he d isp lay mode of on-screen information :
Press the DISPLAY button.
The full and minimum display modes will alternate.
• Full display mode : All t y p e s of in formation will appear.
• Minimum display mode: The recording mode (s e e 1 on
page 63) and recording status (see 8 on page 63) will appear. If
the DVD video came ra/recorder has warning information, a
warning message will appear.
Note:
The DVD video camera/recorder does not record the date and time as a partof image.However, thisinformation during
recording will be recorded with imageas data which can be checked on Disc Navigation screen during playback (See
“Information Display During Playback” on page 70).
●Display when recording an image of yourself
When recording with t he LCD screen facin g the same directio n as the lens, the
operating status will appear, and in addition, the battery remaining level will
blink when the battery has almost no remaining charge.
The following ope rating status indicator will light or b link to give warning
message to user . The message can be checked when returning th e LCD monitor
180° to the original status from the status in which the LCD screen was facing
the same direction as the lens.
English
:The disc has almost no free space.
:Write-protected disc or locked card is loaded.
Operatingstatus/
warning message
:You are attempting to record a still on DVD-R
No display :Disc or card that cannot be used has been loaded.
disc.
Battery remaining
level
:The disc or card is full, or you are attempting to
record a copy-guarded image.
Note:
• Ifthe LCD screenis set facing the sa me direction as thelens, the LCDscreen will displaya mirror image(left and right
reversed).
• If the LCD screen is set facing the same direction as the lens, you can alsoview subject image in the viewfinder.
• Although you canswitchto themanualfocus, exposureand on-screen display modes even during recordingwith LCD
screen facing the same direction as lens, theywill not appear on the screen.
65

Playing Back
English
IMMEDIATELY CHECKING RECORDED SCENE
You can check your recording immediately on the spot.
Tilt up/down and to left/
righttoselect,andthen
todesignate.
press
1Press button in the recording pause st atus.
The DVD video camera/r ecor der will enter the
playback mode, and the scene you have
recorded last will be played back.
When playback is finished, the DVD video
camera/recorder will enter the pause status at
the last image o n d isc.
If the pl ayback pause status continu es for as long
as 5 minutes, the DVD video camera/recorder
will automatically ret urn to the recording pause
status.
Note:
• If the LCD monitor is open during playback of movie,
playbacksoundwillbeheardfromthespeaker.Adjustthe
sound volume using the volume controlbuttons (
• To temporarilystop playback, press the button.
Press the
• Evenifyou stop playbackmidwayandimmediately start
recordingagain,thenewimagewillberecordedafterthe
lastsceneondiscor card (thepreviousimageswillnotbe
overwritten).
• Whenplayingbackastill with a large numberofpixelson
card,“Playback.”willappear, anditwilltakesometimefor
the still to appear.
• Depending on the amount of data to be played back, it
may take some time for the playback image to appear.
• Donotoperatethepowerswitchorremovethecard while
the ACCCSS/PC or CARD ACCESS indicatoris lit or
blinking: Doing so may damage the card or the data on
card.
buttonagain to restartplayback.
, ).
2Press the button.
Playback will stop, and recor d ing pause status
will be restored.
66

PLAYBACK F ROM START OF DISC OR CARD
Use the Go To function (P. 69) or Disc Navigation
function (P . 93) to play back from the start of disc or
card.
SEARCH PLAYBACK OF MOVIE
During playback, tilt the j oystick to right or left and
hold it: Search playback will start.
Tilt and hold: Scenes will be visually scanned
forward
Tilt and hold: Scenes will be visually scanned
backward
Release the joystick when you find the desired
image: Normal playback will start from that point.
Note:
• When you skip or search scenes from playback or
playback pause, the screen will be dark briefly.
• See page 145 if search playback does not operate
normally.
FRAME ADVANCE/FRAME BACK/SLOW PLAYBACK OF MOVIE
During playback pause, tilt the joystick: Frame
advance, frame back or slow playback will start.
Tilt once : Picture will advance one frame.
Tilt once : Picture will go back one frame.
Tilt and hold : Forward slow playback
Tilt and hold : Reverse slow playback
After frame advance, frame back or slow playba ck,
the DVD video camera/recorder will enter the
playback pause status.
Note:
• Inforward slow, a rapidly movingsubject image may be
distorted.
• The intervalsfor playing back frames in frameadvance/
frame back/slow playback are as follows:
Frameadvance and forward slow:Approx.0.03second
Frame back and reverse slow:Approx. 0.5 second
• No sound will be heard during search playback or slow
playback.
English
67

SKIP PLAYBACK OF MOVIE
English
During playback, tilt the joystick up or down to
locate the start of desi red sce ne.
Tilt once : To skip to the first image of the
Tilt once : To return to the first image of
Tilt and hold : To continuously locate the
Tilt and hold : To continuously locate the
scene following the one being
played back, and start
playback.
the scene being played back,
and start playback.
beginnings of scenes, starting
from the scene following the
scene being played back. When
the desired image appears,
release the joystick: Playback
will start from that point.
beginnings of scenes
backward, starting from the
scene preceding the scene
currently being played back.
When the desired image
appears, release the joystick:
Playback will start from that
point.
PLAYING BACK STILLS
Tilt the joystic k up or down during playback to
quickly play back stills in sequence.
Tilt once: To display stills one by one forward
Tilt once: To display stills one by one backward
Portion being played back
Tilt up twice Tilt up once Tilt down once Tilt downtwice
Scene 1 Scene 2 Scene3
Portion being played back
Tilt up once
Scene 1 Scene 2 Scene 3
Tiltingupthe joystickataportionseveralseconds from
the start of scene being played back will return tothe
start of the scene preceding that being played back.
Note:
• Ifyou perform skip playback duringplayback pause,the
DVD video camera/recorderwill enter the playback
pause status at the beginning of the located scene.
• Tilting down in the last scene on disc will set the DVD
video camera/recorder to the playback pause status at
the last image.
• Seepage145ifskip playbackdoesnotoperatenormally.
Tilt down once
Tilt down twice
[When using disc]
Releasing the joystick will start continuous
playback.
[When using card]
When the joystick is released, the photo at that
point will be displayed, and then the DVD vi deo
camera/recorder will enter the playback pause
status.
Set the slide show function for continuous display
(P. 129).
68

JUMPING TO SPECIFIED POINT (GO TO)
1Press the MENU button
during play back.
2Choose the option (point
you want to go to), and
then press the button.
Go To
Top
End
Spec i f y
ENTER RETURN
RAM
●Specifying the point to view
1Choose “Specify” in step 2 abo ve, and then press
the button.
The screen for specifying the point to go to will
appear.
Positionof currently
played back image
Go to
TOP ENDCURRENT
Cursor
0:00:00 0:24:240:03:26
TOP END
Totalrecordingtimeof
all selected scenes
0:03:26
GO TO
Cursor position
ENTER
CANCEL
2Use the joystick to select the desired time of
chosen point.
:To select the start.
:To select the end.
:·Press once: To move the cursor in 10-
·Hold down: To move the cursor in 1-
(When the start ofscene is selected)
Cursor at currentimage position.
Cursor at (GO TO) position.
second units (1-still uni t s
for card)
minute units (10-still units
for card)
Go to
TOP
0:00:00 0:24:240:03:26
GO TO
TOP END
0:00:00
ENTER
ENDCURRENT
CANCEL
Top :To go to the start, and enter playback
pause.
End :T o go to the end of last scene, and enter
playback pause.
Specify : To go to a specified point and enter
playback pause. See the following for
details.
3Press the button to enter the selection.
The DVD video camera/r eco r der wil l go t o the
specified point and enter the playback pause
status.
T o cancel the “Go T o” procedure midway , pr ess the
button before going to the specified point.
Note:
• IfmultiplescenesareselectedusingtheDiscNavigation
function orSELECT button,choosing “Top” will jump to
the beginning of selected scenes (P. 123).
• When multiple scenes are selected, the totaltime of
selected sceneswill appear in the “total recording time”
display.
• When card is loaded, the numberof stills will appear.
• The cursor may not move at same-pitch intervals.
English
69

English
On-Screen Information Display
INFORMATION DISPLAY DURING PLAYBACK
Various types of information on recording will be superimpose d on playback image you are viewing.
No display Playback information
●Switching the information display
mode
Press the DISPLAY button: You can switch the
display mode of on-screen information.
When using disc:
Recording mode
Programmeor PlayList
When using card:
Scene No. File name Lock
Recording mode
*1
Scene No.
00606 0:00:16
ProgrammeNo. or Play List No.
003 100—0003
*1
Repeat play
RAM
Disc type
*2
Playback operation
*5
Playback
operation
Counter
*4
*5
*5
DPOF
Slide show
*6
display
*1
(VIDEO) or (PHOTO);
Only (PHOTO) with card.
*2
Programme or Play List
*3
Number of programme or play list being played
Recording date/time
back (not displayed when all p rogrammes are
being played back)
*4
Refer to “Disc/Card type” on page 63.
*5
:W ill appear when each function is specified
“On”
*6
# : Standard playback
$ :Playback pause
% :Forward search playback
& :Reverse search playback
' :Forward skip playback
( :Reverse skip playback
) :Forward frame advance
* :Reverse frame back
Refer to “Playing Back” beginning on page 66 for
*3
how to operate.
The “,” mark will appear on the first image on
disc.
The “+” mark will appear on the last image on
disc.
• Recording date/time display: Shows the date/
*5
time when recording was star ted . Even when
playback starts, the date/time display wil l not
advance.
• No display: No information will a p p e ar.
However , when the mode of playback operatio n
*6
is switched, the symbol will appear for approx. 3
seconds.
70
Note:
See “Using Disc Navigation” on page 93 and later for
explanation on programme and play list.

Playback on Other Devices
VIDEOAUDIO
LR
VIDEOAUDIO
This section explains about playback on another AV device, such as TV.
CONNECTING T O A TV
Use the provided AV/S output cable to connect the DVD video camera/recorder to a TV as follows:
To AV output jack
AV/S output cable
(provided)
* If your TV has an S-VIDEO inputjack, you can connect the S-VIDEO
plug to it.
Note:
• Using S-VIDEO will deliver clearer playback status.
• Before connecting, make sure thatthe volume on TV is
turneddown:Forgetting thismaycausehowlingfromthe
TV speakers.
Stereo Type with
S-VIDEO Jack
S-VIDEO VIDEOAUDIO
LR
Red
• Insertthe AV/S output cableplugs into jacks straight:
Obliquely inserting them could damage the jacks.
StereoType
To S-VIDEOinput jack*
White
Yellow
Monaural Type
Yellow
Red
YellowWhite
To video/
audio input
jacks
English
Red
White
White
71

VIEWING ON TV SCREEN
English
1Turn the TV on and set the input selector to
“VCR” whichever applicable Video input.
Refer to the TV instruction manual for how to
switch the TV input.
2Turn the DVD video camera/recorder on.
The image that the DVD video camera/record er
is seeing will appear on the TV screen.
You can also monitor the image on the LCD
screen or viewfi nder of t he DVD video camer a/
recorder .
3Perform playback, recording o r editing.
Y ou can perform playback, editing or editing on
Disc Navigation while checking on TV screen.
Note:
• Adjust the volume ofsound on TV.
• Theinfrared remotecontrol is usefulwhenoperating the
DVD videocamera/recorderwhile viewingan image on
TVscreen.However,ifyou useaHitachiVCR,theremote
controlmayinadvertently operatetheVCRifitisnearthe
DVD video camera/recorder. To prevent this, set the
remote control code of the VCR to a position otherthan
“VCR2”.
• Information that the DVD video camera/recorder is
recording will appear on the TV screen: You can also
displayonlypartof informationor switch off the display.
Refer to “Setting On-Screen Display OutputOn or Off
(OSD Output)” on page 88, and press the DISPLAY
buttontoswitchthedisplaystatus.
• When copy-guarded disc is played back, no image will
appear on TV screen.
• Ifyou use TVwith wide mode(aspect ratio16:9) and set
the TV to the wide mode, theentire Disc Navigation
display may not be displayed on the TV screen. If this
happens, release the wide modesetting on TV (see the
TV instruction manual for releasing the wide mode).
72

PLAYBACK ON DVD PLAYER
Y ou can play back finalised DVD-R discs on DVD players or other devices that conform to 8 cm DVD-R
disc. However, DVD-R discs may not be usable on all those devices.
1Finalise a reco rded DVD-R disc.
You ne ed to f inal ise a disc to play it back on D VD
player: See page 127.
No further data can be recorded on finalised
disc.
Note:
Use this DVD video camera/recorder to finalise the
DVD-R disc recorded on the DVD video camera/
recorder.
2Remove the disc from Round DVD Holder.
See “Removing and Replacing from/in Round
DVD Holder” on page 74.
3Insert the disc into the DV D player and play it
back.
See the instruction manual for DVD player .
Note:
DVD-RdiscsrecordedonthisDVDvideocamera/recorder
canbeplayed back on otherDVDplayers, but playbackon
all DVD players is notguaranteed.
Playback maynot be possible on some DVD players, or it
may depend on the recorded status of DVD-R discs: In
such cases,play backthe DVD-Rdisc on this DVD video
camera/recorder.
English
73

REMOVING AND REPLACING FROM/IN ROUND DV D HOLDER
English
Y ou can remove DVD-RAM or DVD-R disc used on this DVD video camera/recorder from Round DVD
Holder and use the uncovered disc on DVD player , DVD-RAM recor der, drive for PC, etc., which conforms
to 8 cm DVD-RAM or 8 cm DVD-R. Removing disc from Round DVD Holder may vary with the disc
maker: See the disc instruction sheet. The following explains the disc in Round DVD Holder made by
Hitachi Maxell.
It is recommended that you do not remove the disc from Round DVD Holder until camera recording is
finished, in order to avoid getting dirt on disc.
Note:
Using discs removed fromholders on variousdevicesmay notalways be possible.
HOW TO REMOVE DISC
1Hold the Round DVD
Holder with SIDE A
facing up. While pushing
the two release levers in
the direction of arrows (1)
marked on holder , slowly
open SIDE A of the holder
in the direction of arrows
(2), taking care not to dro p
the disc.
Release
levers
1
SIDE A mark
2
2
Do not open
more than 90°.
90°
1
recording/playback
surface, hold the disc edge
and centre hole to remove
it.
2Without touching the
74

REPLACING DISC IN ROUND DVD HOLDER
1Open SIDE A of the Round DVD Holder, and
replace the disc in the holder with the SIDE A
mark or label surface facing up, taking car e not
to touch th e disc surface.
3
OPEN marks
SIDEAmarkside
or label surface
SIDE A
mark
3
2Close SIDE A of the Round DVD Holder, and
push it to lock the release levers at positions (3).
WHEN THE HINGE OF ROUND DVD HOLDER COMES OFF
1Push the hinged portion of the holder piece
marked SIDE A with thumb and middle finger ,
and warp it in the direction of arrows (4).
SIDEAmarkside
Hinged portions
4
Approx.90°
2Fit the hinged portion of the other ho lder pi ece
into the warped hinge portion.
Note:
• Handle the disccarefully so that no scratch, dirt,
fingerprint or dust adheres to the recording/playback
surface.
• When not usingthe Round DVD Holder,store it in case:
Do not leave a bare holder as is.
• Becareful ofdropor impact:Ifyou drop the Round DVD
Holder, thedisc may pop out.
• Do notsubject the Round DVD Holder to force.
English
DISC CLEANING
Use a soft, dry cloth to lightly wipe off any dust, dirt, etc. adhering to disc, as s hown in t he figure. Never
use solvent. Do not use thinner, water, anti-static spray, etc. to clean disc.
Use soft cloth to clean
from inner to outer
circumference inaxial
direction.
75

English
Playback on DVD Video Recor der/Player
YoucanuseaDVDvideorecorderorDVDplayerthatconformstoDVD-RAM to p lay backDVD-RAMdiscs
recorded on this DVD video camera/recorder
1Remove the disc from Round DVD Holder.
2Insert the disc into the DVD video recor der /
player and play it back.
See the instruction manual for DVD video
recorder/player.
Note:
• Donotinserta DVD-Rdiscthathasnotbeenfinalisedinto
aDVD videorecorder:The recordedimagedata may be
damaged.
• When playing back discon another device, the Disc
Navigation display will be different from the one on this
DVD video camera/recorder.
76

Advanced Techniques
This section explains about various settings to further extend the usefulness of this DVD video camera/
recorder.
Understanding Flow of Menu
Press the MENU button during reco rding pause: The “Camera Functions Setup” menu screen will a ppear.
Tilt the j oystick up, do wn, to l eft o r right to se lect a men u ite m, and then press the button to choose
the option.
The screens used here t o explain are disp layed when DVD-RAM disc is used. Some ite ms will not appear
when a DVD-R disc or card is used, or when no disc or card is inserted.
<Interpreting screen for setting>
Displayofselected
setup item
Selectionof setup items
: Camera
FunctionsSetup
: Record Functions
Setup
: Date Setup
:LCDSetup
: InitialSetup
Functions settable
Camera Funct i ons Setup
Program AE
W
hi te Bal.
EIS
Dig. Zoo
MIC.Fi l ter
16:9
ENTER RETURN
Guide display
m
Auto
Spo r t s
Portrait
Spo t l i ght
Sand&Snow
Low Li ght
RAM
Options settable
Display of disc orcard
being used (P. 63)
English
77

●Flow of Menu
Refer to page indicated for details of each functio n.
English
Camera Functions Setup
Camer a Funct ions Setup
ENTER RETURN
Program AE :
W
hi te Bal. :
EIS :
Dig. Zoom :
MIC.Fi l ter :
16:9 :O
Au t o
Au t o
On
40x
Of f
Program AE (P. 79)
White balance (P. 80)
EIS (P. 82)
Digital zoom (P. 83)
ff
Microphone filter (P. 84)
RAM
16:9 (P. 84)
Date Setup
Dat e Setup
Da t e Mode : D/M/Y
Da t e Se t
ENTER RETURN
Display format (P. 50)
Date setting (P. 49)
RAM
Recording Functions Setup
Record Funct ions Setup
V IDEO Mod e : F I NE
Self Timer : Of f
OSD Ou t pu t : On
ENTER RETURN
Movie quality (P. 85)
[The quality m ode will
appear when using card
(P. 86)]
Self-timer (P. 87)
RAM
On-screen inform at ion
display output (P. 88)
LCD Setup
Brightness
Col or Level
ENTER RETURN
Initial Setup
Initial Setup
Beep : O n
w
er Save : Of f
Po
Record LED : On
Language : Engl i sh
Demo Mode : Auto
Reset
ENTER RETURN
Brightness (P. 89)
Colour density (P. 89)
RAM
Beep (P. 90)
Power save (P. 90)
Recording LED (P. 91)
Language selection (P. 91)
Demo mode (P. 144)
RAM
Reset (P. 92)
You can use the joystick on DVD video camera/recorder to select various setting options in menu and
designate them.
Press the MENU button.
LCD Setup
Camer a Funct ions Setup
Program AE :
W
hi te Bal. :
EIS :
Dig. Zoom :
MIC.Fi l ter :
16:9 :O
ENTER RETURN
Auto
Auto
On
40x
Of f
ff
or
RAM
or
Camera Funct ions Setup
Program AE
W
hi te Bal.
EIS
Di g . Zoom
MIC.Fi l ter
16:9
ENTER RETURN
Auto
Spo r t s
Por t r a i t
Spo t l i gh t
Sand&Snow
Low L ight
RAM
Record Funct ions Setup
V IDEO Mod e F I NE
Self Timer
OSD Ou t pu t
ENTER RETURN
RAM
Press the button directly to choose an option from menu.
Toreturn to the screen one before, press the
Pressing the MENU button again will cause the menu screen to
disappear.
Note:
• Pressing the MENU button during recording will not work.
• The menu screen will disappear when it is left for approx. one minute without any operation.
78
button.

Setting Up Camera Functions
SELECTING SHOOTING MODE TO MATCH THE SUBJECT
(SWITCHING PROGRAMME AE MODE)
This DVD video camera/recorder automatically sets the shutter speed and aperture according to the
subject brightness for optimum recording: You can also specify one of six modes depending on the subject
conditions, recording environment or purpose of filming.
1Press the MENU button, use the joystick to
choose “Program AE” on the “Camera
Functions Setup” screen, and then press the
button.
The options will appear on the right of “Program
AE”.
English
2Use the joystick to
choose the des ired
option, and then press
the button: The
selected option will be
set.
Selected AE mode
Camera Funct ions Setup
Program AE
W
hi te Bal.
EIS
Dig. Zoo
m
MIC.Fi l ter
16:9
ENTER RETURN
FINE
30/ 9/2003
Auto
Spo r t s
Portrait
Spo t l i gh t
Sand&Snow
Low L ight
RAM
0:00:00
REM
3 0 MIN
17:00
3Press the MENU button to end the setting.
The menu screen will disappear.
Note:
• You can check the selected AE modeby the on-screen
information display. However, nothing will appear in the
Auto mode.
• Theshootingmodesetasabovewillbe stored inmemory
even if the DVDvideo camera/recorder is turned off.
Tiltup/downand to left/right to
select, and thenpress
designate.
to
, Auto : The camera/recorder automatically
judges the subject and surrounding environment
for optimum recording.
Sports : Reduces blurring when recording
rapidly moving subjects such as in golf or tennis.
If the Sports mode is used under a fluorescent light,
the image may flicker: In this case, use the Auto
mode for recording.
Portrait : Makes a subject, such as a person or a
creature, stand out from a blurred background.
Spotlight : Prevents overexposure of subject
portrait face, etc. when strong light strikes the
subject, as in a wedding or on stage.
Sand & Snow : Prevents underexposure of
subject portrait face, etc. in a place where reflect ion
of light is intense, such as at the seaside in
midsummer or on a ski slop e .
LowLight: Allows user to record in a dark place
even with decreased lighting: However, an afterimage will app e ar with a moving subje ct.
Note that the Low Light mode cannot be us ed when
the recording quality mode is STD.
If there is difficulty in automatically focusing
subject image, adjust t h e focus manually.
79

ADJUSTING COLOUR (WHITE BALANCE)
English
This DVD video camera/recorder automatically
adjusts the tint to ma tc h the conditions of subject .
However, it may not allow user to deli ver natural
tint, depending on the weather or status of light
source. In this case, change the white balance
setting according to the situation.
Note:
• Thewhite balancemode canbe confirmedusing the on-
screen information.
• Thewhite balance setting willbestored in memoryeven
when the DVD video camera/recorder is turned off.
Mode Setting content
Auto White balance always
Set Youcanmanually adjust
automatically adjusted
white balance to match
the light source or
situation
Outdoor Torecord in fine weather
Indoor To record under
incandescent light,
halogen light or bulbcolour type fluorescent
light
1Press the MENU button,
choose “White Bal.” on
the “Camera Functions
Setup” menu screen, and
then press the
button.
On-screen
display
None
!
#
Camera Funct ions Setup
Program AE
W
hi te Bal.
EIS
Di g . Zoo
m
MIC.Fi l ter
16:9
ENTER RETURN
"
2Choose the desired
option, and then press the
button.
FINE
White balance mode
0:00:00
REM
30/ 9/2003
3Press the MENU button to end the setting.
Aut o
Set
Out door
Indoor
3 0 MIN
17:00
RAM
80

●Setting white balance manually
1Point the DVD video
camera/r ecorder at a
white object so that it
fills the screen. Use
an object that is not
transparent.
2Press the MENU
button, choose “White
Bal.”, “Set”, and then
press the button.
(White shirt or thick paper)
Camera Funct ions Setup
Program AE
W
EIS
Di g . Zoo
MIC.Fi l ter
16:9
ENTER RETURN
hi te Bal.
Aut o
Set
m
Out door
Indoor
3Press the button: The
“!“ indicator wil l
change from blinking to a
steady light: The steady
light indicates that the
white balance setting is
Set EXIT
complete.
4Press the button to end
the setti ng.
RAM
Note:
• Thewhitebalancesetusingthe“Set”optionwillbestored
in memory until it is reset.
• Do not use a coloured object when setting the white
balance: The appropriate tint cannot be set.
FINE
0:00:00
REM
30/
9/2003
English
RAM
3 0 MIN
17:00
81

USING THE ELECTRONIC IMAGE STABILISER (EIS)
English
This DVD video camera/recor der is equipped with an elect ronic image stabiliser f unction: When you use
zoom to record a magnified subject image, it will correct fuzziness in the recorded image.
1Press the MENU button,
choose “EIS” on the
“Camera Functions
Setup” menu screen, and
then press the
button.
Camera Funct i ons Setup
m
AE
Progra
W
hi te Bal.
EIS
Dig .Z
oom
MIC.Fi l ter
16:9
ENTER RETURN
On
Of f
RAM
2Choose the “On” or “Off”, and then press the
button.
3Press the MENU button to end the setting.
●Checking EIS On or Off
You can check EIS On or Off by the on-screen
information display.
0:00:00
REM
EIS
FINE
After recording with EIS set to “Off”, it is
recommended that you retur n the setti ng to “ On”
and then turn the DVD video camer a/recorder o ff,
unless you norm ally record with “Off” setting.
This function is e ffec ti ve on ly during movie
recording: It will not work during still recording.
Note:
• TheEIS settingwillbe stored inmemory evenwhen the
DVD video camera/recorder is turned off.
• Although you can switch EIS between on and offduring
still recording, the setting will be effective only during
movie recording.
• Itisrecommended thatyouspecify“EIS Off” when using
the DVD video camera/recorder on a desk or tripod.
• When “EIS On” is specified, there will be a slight
difference between the actual movement and the
movement on screen.
• Grosscamera shakemaynotbe entirely corrected even
if “EIS On”is specified.
• EIS may not operate correctly when the tele or wide-
conversion lens (generally available) is used.
3 0 MIN
17:00
30/ 9/2003
82

MAGNIFYING SUBJECT IMAGE (DIG. ZOOM)
When the zoom lever is moved to “T” control side with Dig. Zoom 40× or 240× specified, digital zoom will
automatically kick in when optical 10× zoom range is exceeded. Y ou can set the digital zoom to 40× or 240×
for movie record ing, or 40× for stil l recording.
Dig. Zoom “240×”, “40×” or “Off” setting will be
1Press the MENU button,
choose “Dig. Zoom” on
the “Camera Functions
Setup” menu screen, and
then press the
button.
Camera Funct i ons Setup
m
AE
Progra
W
hi te Bal.
EIS
Dig .Z
oom
MIC.Fi l ter
16:9
ENTER RETURN
240x
40x
Of f
2Choose the desired magnification, and then
press the button.
3Press the MENU button to end the setting.
Moving the zoom lever will display the digital
zoom bar.
0:00:00
REM
3 0 MIN
stored in memory even if the D VD vi deo ca mer a /
record er is turned off.
Note:
• You can check whether Dig. Zoom is “240×”, “40×” or
RAM
“Off” by pressing the DISPLAYbuttonand reviewingthe
on-screeninformation.
• You canalso use the DIGITAL ZOOMbutton onremote
control to switch the digital zoom setting: Pressing the
button during movierecording will switch thesetting
between “Off”, “40×” and “240×”: Pressing the button
during still recordingwillswitch between “Off”and “40×”.
• When using card, zooming only up to 40× is possible,
even when “240×” or “40×” has been chosen.
• Ifthepowerswitch is set to “ PHOTO”withDVD-RAM
disc loaded, zooming only up to 40x is possible, even
when “240×” has been chosen.
English
When Dig. Zoom is "Off"
W
When Dig. Zoom is "On"(40x)
When Dig. Zoom is "On"(240x)
(only in movie recording)
W
T
Digital zoom range
Digital zoom range
FINE
TW
T
17:00
30/ 9/2003
83

REDUCING WIND NOISE DURING RECORDING (MIC.FILTER)
English
When recording sound from the microphone built into this DVD video camera/recorder, you can reduce
wind noise in recor ding.
If “MIC.Filter: ON” is specified, the low-frequency components in the sound picked up by microphone
will be cut off during recording: Thi s makes it easier to hear the target voice or sound during playback.
1Press the MENU button,
choose “MIC.Filte r” on
the “Camera Functions
Setup” menu screen, and
then press the
button.
Camera Funct ions Setup
Program AE
W
hi te Bal.
EIS
Dig . Zoo
m
MIC.Fi l ter
16:9
ENTER RETURN
On
2Choose “On”, and then press the button.
Note:
• Youcanalsousetheon-screendisplayto confirm thatthe
MIC.Filter has been set.
• The MI C.Filtersetting will be storedin memory even
RAM
recording.
when the DVD video camera/recorder is turned off.
• The MIC.Filter function will work only during movie
• The microphone filter function works only with the built-
inmicrophone:Itwill not function when using anexternal
microphone (P.53).
3Press the MENU button
to end the setting.
FINE
Microphone filter icon
SWITCHING TO 16:9 MODE
If you intend to play back recorded images on a wide-scr een TV, it is recommended that you switch the
screen size to 16:9 mode.
1Press the MENU button,
choose “16:9” on the
“Camera Functions
Setup” screen, and then
press the button.
2Choose “On”, and then
press the button.
Camera Funct ions Setup
Program AE
W
EIS
Di g . Zoo
MIC.Fi l ter
16:9
ENTER RETURN
Camera Funct ions Setup
Program AE
W
EIS
Di g . Zoo
MIC.Fi l ter
16:9
ENTER RETURN
hi te Bal.
hi te Bal.
30/ 9/2003
m
m
0:00:00
REM
3 0 MIN
17:00
Of f
On
RAM
On
RAM
Note:
The black bands that appearacross thetop and bottom of
screen will not berecorded. If you recordin the 16:9 mode
and play back on a TV other than wide-screen TV, the
portionsmaskedbytheblack bands will also be displayed.
Usethe black bandsasaguidefor recording whenplaying
back on a wide-screen TV.
3Press the MENU button
to end the setting.
Black bands will appear
across the top and bo ttom
of screen.
84

Setting Up Record Functions
SWITCHING MOVIE QUALITY (VIDEO MODE)
Choose the movie quality from “XTRA” (only with DVD-RAM disc), “FINE” and “S T D”.
It is recommended that you record critical subjects in the “XTRA” or “FINE” when you are using a DVDRAM disc, or in the “FINE” with a DVD-R disc.
1Press the MENU button,
choose “VIDEO Mode”
on the “Record Functions
Setup” menu screen, and
then press the
button.
Record Funct ions Setup
V IDEO Mode
Se l f Timer
OSD Ou t p u t
ENTER RETURN
XTRA
FINE
STD
2Choose the desired quality mode, and then press
the button.
3Press the MENU button to end the setting.
0:00:00
REM
Movie quality
FINE
17:00
30/ 9/2003
Note:
• Themovie qualitysetting will be stored inmemory even
when the DVD video camera/recorder is turned off.
• The “VIDEO Mode” setting will not change even if the
DVD-RAM disc is replaced with a DVD-R disc, or vice
RAM
versa. However, if “XTRA”has been setwith DVD-RAM
disc, “FINE” will be set when th e disc is changed.
• When using DVD-R disc, you cannot switch the movie
quality while recording on the disc: The DVD video
camera/recorder will be automatically set to the mov ie
quality first used with thedisc for recording.
• The moviequality setting is effective onlyduring movie
recording: Switching the movie quality will not work
during still recording.
3 0 MIN
English
85

Block-like noise may appear in recorded image, or the outline of subject image is distored under the
recordi ng conditions list ed below: Pan the DVD v ideo camera/r ecorder as slowly as possible. (Bl ock noise
English
is likely to appear in the “STD”):
• If there is a co mplicated pattern in backg rou n d (as in following figure on left)
• If the DVD video camera/recorder is moved excessively or quickly
• If subject is moving rapidly even when the DVD video camera/recorder is not moving
(Imagewhenblock-like noiseoccurs) (Image withoutblock-likenoise)
SWITCHING QUALITY OF STILL IMAGE (QUALITY)
You can swit ch the still recording quality only wh e n u sing card.
It is recommended that you use “FINE” when recording vital images.
1Press the MENU button,
choose “Quality ” on the
“Record Functions
Setup” menu screen, and
then press the
button.
Record Funct ions Setup
Quality
Se l f Timer
OSD Ou t p u t
ENTER RETURN
FINE
NORM
ECO
3Press the MENU button
to end the s etting.
2Choose the option you want, and then press the
button.
Note:
Thestillqualitysettingwillbe stored in memory even when
the DVD video camera/recorder is turned off.
REM
999
NORM
Still recording quality
17:00
30/ 9/2003
86

SELF-TIMER
Y ou can record stills of yourself alone or with your family, friends, etc., using the self-timer function, as
with ordinary cameras. A still will be recorded approximately 10 seconds after the REC button is pressed.
1Press the MENU button,
choose “Self Timer” on
the “Recor d Functions
Setup” menu screen, and
then press the
button.
Record Funct ions Setup
V IDEO Mode
Se l f Timer
OSD Ou t p u t
ENTER RETURN
On
Of f
4Press the REC button.
The recording indicator at the front of DVD
video camera/recorder will blink.
RAM
The self-timer indicator will start to count down,
and recording will commence approximately 10
seconds later.
2Select “On”, and then press the button.
Note:
The self-timer will be set.
3Press the MENU button to end the setting.
10
Self-timerrecording
REM
30/ 9/2003
17:00
• You can also check that self-timer has been set by
reviewing the on-screen information.
• To releasetheself-timermode,choose“Off”on the menu
screen or turn DVD video camera/recorder off.
• To suspend self-timer,presstheRECbuttonagainbefore
recordingstarts,or pressthe
• When the RECbutton ispressed, the markon LCD
999
screen will be pink. It will also change in the same way
when recording with the LCD screen facing the same
direction as the lens.
button.
English
87

SETTING ON-SCREEN DISPLAY OUTPUT ON OR OFF (OSD OUTPUT)
English
If you connect this DVD video camera/r ecorder to a TV to view ima ges on TV screen, you can switch o ff
the on-screen information (displayed in the viewfinder or on the LCD screen) from the TV screen.
1Press the MENU button,
choose “OS D Output” on
the “Recor d Functions
Setup” menu screen, and
then press the
button.
Record Funct ions Setup
V IDEO Mode
Se l f Timer
OSD Ou t p u t
ENTER RETURN
On
Of f
RAM
2Choose “On” or “Off”, and pr ess the button.
LCD screen or viewfinder
“On” setting
0:00:00
REM
3 0 MIN
FINE
17:00
30/ 9/2003
TV screen TV screen
FINE
3Press the MENU button to end the setting.
Note:
• The“OSD Output” setting willbestored in memoryeven
when the DVD video camera/recorder is turned off.
• Even if “Off” is chosen, the on-screen information will
appear during playback. See page 70 for playback onscreen information display.
• Evenaftertheon-screeninformationisremovedfromthe
TV screen, it will still appearin the viewfinder or on the
LCD screen.
0:00:00
REM
3 0 MIN
17:00
30/ 9/2003
“Off” setting
88

LCD Setup
This functionallows you to adjust the brightness andcolour density of LCD scre en during recording and
playback.
SETTING BRIGHTNESS OF L CD SCREEN (BRIGHTNESS)
2Use the joystick for adjustment.
: The screen becomes dimmer
: The screen becomes brighter
English
3Press the MENU button
Tilt up/down and to left/
right to select, and then
press
todesignate.
1Press the MENU button,
choose “Brightness” on
LCD Setup
the “LCD Setup” menu
screen, and then press the
button.
Bri ghtness
Co l o r L e v e l
ENTER RETURN
RAM
The brightness
adjustment bar will appear on the screen.
SETTING COLOUR DENSITY OF LCD SCREEN (COLOR LEVEL)
1Choose “Color Level” on
the “LCD Setup” menu
screen, and then press the
button.
The colour density
adjustment bar will
appear on the screen.
LCD Setup
Bri ghtness
Co l o r Le v e l
ENTER RETURN
RAM
2Use the joystick for adjustment.
: For lighter colour
: For dense r colour
to end the s etting.
Note:
Thebrightnesssettingwillbestoredinmemoryevenwhen
the DVD video camera/recorder is turned off.
3Press the MENU button.
Note:
The colour level setting will be stored in memory even
when the DVD video camera/recorder is turned off.
LCD Setup
Bri ghtness
Co l o r L e v e l
Brightness
adjustmentbar
LCD Setup
Bri ghtness
Co l o r Le v e l
Colour density
adjustment bar
ENTERADJ UST
RAM
ENTERADJ UST
RAM
89

English
Initial Settings
SWITCHING OPERATING SOUND ON OR OFF (BEEP)
This DVD video camera/recorder will emit a sound when the power switch is changed over, the REC
button is pressed to rec ord a movie, or other operations are engaged. If you do not need operating sound,
you can switch it off.
2Select “On” or “Off”, and then p ress the
Setting Content
On Beep is heard
Off No beep is heard
1Press the MENU button,
choose “Beep” on the
“Initial Setup” me nu
screen, and then press the
button.
Initial Setup
Beep
Power Save
Record LED
Language
Demo Mode
Reset
ENTER RETURN
On
Of f
RAM
TURNING DVD VIDEO CAMERA/RECORDER OFF AUTOMATICALLY
(POWER SAVE)
This DVD video camera/recorder i s equipped with power save functi on. Specify “Powe r Save: On”: If
the DVD video camera/recorder is lef t in the recording pause status without being operated for 5 minutes,
it will automatically turn off to prevent the battery from discharging needlessly.
Setting Content
On Toengage power save
Off To cancel power save
1Press the MENU button,
choose “Power Save” on
the “Initial Setup” menu
screen, and then press the
button.
Initial Setup
Beep
Power Save
Record LED
Language
Demo Mode
Reset
ENTER RETURN
On
Of f
RAM
button.
3Press the MENU button to end the setting.
Note:
The“Beep”settingwillbestoredinmemoryevenwhenthe
DVD video camera/recorder is turned off.
Note:
• To turn the DVD video camera/recorder on again from
automatic off activated by the power save function, set
the power switch to“POWER OFF”, andthenset it to “
VIDEO”, “ PHOTO” or “ PHOTO”
• ThePower Save settingwillnotappear in theon-screen
information display.
• The Power Save setting will be stored in memory even
when the DVD video camera/recorder is turned off.
2Select “On” or “Off”, and
then press the button.
3Press the MENU button to end the setting.
90

TURNING RECORD LED ON OR OFF (RECORD LED)
You can switch off the recordin g in dicator on the front of DVD video camera/recorde r e v e n d u ring
recording.
Setting Content
On
Off
Therecording indicator will lightredtoshow that the DVDvideocamera/recorderis recording.
The recording indicator will not light even during recording.
2Select “On” or “Off”, and then p ress the
button.
English
Recording indicator
3Press the MENU button to end the setting.
Note:
• TheRecord LED setting willnotappear in the on-screen
information display.
• The Record LED setting will be stored in memory even
1Press the MENU button,
choose “Record LED” on
the “Initial Setup” me n u
screen, and then press the
button.
Initial Setup
Beep
Power Save
Record LED
Language
Demo Mode
Reset
ENTER RETURN
On
Of f
RAM
when the DVD video camera/recorder is turned off.
• Specify “Record LED: Off” when recording a subject
behind a glass or water tank that reflects light: The
reflected light of the recording indicator will not be
recorded.
• When using theself-timer function, the recording
indicator will blink when the REC buttonis pressed
regardless of whether Record LED is On or Off.
CHANGING DISPLAY LANGUAGE (LANGUAGE)
You can change the language used to display the menu and informat ion.
The following shows that English is changed to French.
1Press the MENU button,
choose “Language” on
the “Initial Setup” me n u
screen, and then press the
button.
“English” has been set.
2Select “Français”, an d
then press the
button.
In itial Setup
Beep
Engl ish
Power Save
Fr ança i s
Record LED
Language
Español
Demo Mode
Deu t sch
Reset
ENTER RETURN
Configuration Ini tiale
Beep
Power Save
LED Enrg.
Langue
Fr ança i s
Mode Démo
Régl Défaut
ENTRER RETOUR
Italiano
3Press the MENU button to end the setting.
Note:
The language settingwillbe stored inmemory even whe n
the DVD video camera/recorder is turned off.
RAM
RAM
91

RESETTING MENU SETTINGS TO DEFAULTS (RESET)
English
Y ou can restore menu settings to defaults (initial settings at the factory (P . 161) ). (Note, however, that the
date/time, brightness and colour dens ity of LCD monitor will not be reset.)
1Press the MENU button,
choose “Reset” on the
“Initial Setup” me nu
screen, and then press the
button.
The screen for verifying
reset will appear.
2If you are sure that you
wish to reset, use the
joystick to choose “YES”,
and then press the
button.
The setting items have
now been reset to defaults.
Initial Setup
Beep
Power Save
Record LED
Language
Demo Mode
Reset
ENTER RETURN
Reset
Reset?
YES NO
ENTER
3Press the MENU button to end the setting.
Note:
Tocancel resettingmidway,choose “NO” on the screenfor
verification in step 2 or press the
RAM
RAM
button.
92

Disc Navigation
Using Disc Navigation
STARTING DISC NAVIGATION
Disc Navigation is a tool for editing scenes recorded on this DVD video camera/recorder.
Here is a n explanation o n “scene” and “programme”, s o that you will b e able to make m ost use of Disc
Navigation function.
The screens in this instruction manual are ba sically those that will appear when DVD-RAM disc is used:
Some items will not appear when DVD-R disc or card is used, but the operation is the same.
Note:
Do not proceed with a following step while the disc is
being recognised or the ACCESS/PC indicator is
blinking.
1Press the DISC NAVIGATION button.
The Disc Navigation screen (sh own on page 94)
will appear.
●Thumbnail:
This refers to a reduced image that helps to distinguish recorded scenes quickly. Immediately recording
is finished, the first image of the rec orded scene wil l be used as a thumbnail of the scene: The thumbnail
can be changed later on this DVD video camera/recorder.
English
●Scene:
Movie (video): One scene refers to ima ges reco rded fr om one pr ess of the R EC button until record ing is
Still (photo): One scene refe rs to a photo r eco rded by pressing the REC button.
temporarily stopped by pressing RE C agai n .
93

The following screen will appear when DVD-RAM dis c is used: Some display components will not appear
when DVD-R disc or card is used.
English
Thumbnail
*1
001/ 014All Programs
Cursor
Stillimage icon
Operationguide
*1 The displayed thumbnail will be the first image thatyou recorded.
*2 Scene number refers to display number on thumbnail display screen.
*3 No still icon will appear for card.
*4 The operation guide will vary depending on the operation status of DVD video camera/recorder.
*5 Appears when 13 scenes or more have been recorded.
*6 “ R” appears for DVD-R disc. “ ” will appear for card.
:
Note
• The background colour of screen allows you to identify
whether disc or card is in DVD video camera/recorder.
- Purple: When disc is inserted
- Green: When card is inserted
• Pressing the DISPLAY button willdisplay the recording
date/timeofthesceneonwhichthecursoris placed in the
space for operating guide.Pressing DISPLAY again will
displaythe operating guide.
• Ifno disc or cardis inserted,the Disc navigationscreen
cannot be displayed even by pressing the DISC
NAVIGATION button.
*3
*4
PLAY
RAM
• If the following disc or card is inserted, the Disc
Navigation screenwill appear or some message will be
displayed:
- Write-protected disc
- Locked card
- Finalised DVD-R disc
• Donot leave the discnavigation screendisplayed on TV
to which theDVD video camera/recorder is connected:
Doing so could damage the TV screen, possibly by
burning.
Selected scene number*2/
Number of all scenes
Current page position
Bar graph
Disc type icon
*6
• Each time Disc Navigation is started with a DVD-R disc
inserted, message“Creating Thumbnail ...” will appear.
After the message appears, the Disc Navigationscreen
will appear.
*5
94

TERMINATING DISC NAVIGATION
1Press the DISC NAVIGATION button.
Disc Navigation will be terminated and the
DVD video camera/recorder will enter the
recording pause status.
You can also press the button to end Disc
Navigation.
PLAYING BACK FROM DISC NAVIGATION SCREEN
1Press the DISC NAVIGATION button.
2Use the joystick to select the desired scene.
The selected scene will be framed: This is called
a “cursor”.
001/014All Programs
Up or Down
PLAY
●When playback ends:
The DVD video camera/
recorder will enter the
playback pause status at the
last image of last scene.
Pressing the or DISC
NAVIGATION button will
restore the Disc Navigation
screen.
When the playback pause status continues for as
long as 5 minutes, the D isc Navi gation sc r een will
automatically be restored.
●Playing back stills
A still will be displayed for approx. 3 seconds.
When playing back stills on card, playback will
stop after each still playback.
RAM
Left or Right
Playback pause
PLAY
PLAY
3Press the button.
Playback will start from the selected scene.
Note:
Tiltingthe joystick toleft or rightwillmove the cursorto
the preceding or following scene.
Tiltingit up ordownwill move topreceding or following
page.
007/014All Programs
RAM
Note:
• Press the button to temporarily stop playback.
• If you press the button after playback of the last
• Pressing the button will always restorethe Disc
• WithplaybackonDiscNavigation,youcanselect desired
• Whenplayingbackastill with a large numberofpixelson
again will start from that point.
Pressing
sceneon disc finishes,playback will start againfromthe
beginning of disc.
Navigation screen.
scenes for playback and skip unnecessary scenes.
card,“Playback.”willappear, anditwilltakesometimefor
the still to appear.
001/014All Programs
RAM
0:00:00
REM
3 0 MIN
17:00
FINE
30/ 9/2003
English
95

SELECTING MULTIPLE SCENES
English
1Press the DISC NAVIGATION button.
2Use the joystick to select the desired scene.
3Press the SELECT button once:
The selected scene will be framed in red and
yellow.
SELECTING CONSECUTIVE SCENES TOGETHER
Repeat steps 2 and 3 to randomly select multiple
scenes.
T o cancel a selected scene, select the scene to be
cancelled, and then press the SELECT button.
T o cancel all selected scenes, pr ess the button.
Note:
Although scenes can be randomly selected, playback
will always start from the lowest scene number.
1Press the DISC NAVIGATION button.
2Use the joystick to select
the desired scene.
PLAY
Yellow frame
3Hold down the SELECT
button for at least one
second:
The selected scene will be
doubly framed in yellow
and blue.
PLAY
Double frames in
yellow and blue
4Use the joystick to select
the last scene in the range
you want, and then press
the button:
The thumbnails of scenes
in the specified range will
be framed in red, and
then selected.
PLAY
Red
frame
Whenscenesuptothis
point are selected
Note:
• You can know thestatus of scenes from the coloursof
005 / 014All Programs
RAM
005 / 014All Programs
RAM
005 / 014All Programs
RAM
cursor and bargraph:
Cursor Bar graph Status of scenes
Yellow Blue
Blue Blue
Red Red
• Pressingthe buttonafter selecting sceneswillplay
back only the selected scenes from the beginning of
each.
• Youcanalsoselectscenesinreversefromthelastscene
in the range.
• To release multiple selection, press the SELECT or
buttonafter step 4.
• Upto999 scenes canbe selected forbothdisc and card.
Current cursor position
Range of scenes being
selected
Scenes already selected
96

Disc Navigation Menu
FUNCTIONS AVAILABLE WITH DISC NAVIGATION
Disc Navigation allows you to do the following:
Availablefunction Disc or card used Contents
Deletion of scenes
Editing of scenes
Scene information
display
Setting of title
Creation of play list
Disc or Cardinitialisation
Copy from disc to card
Disc finalisation
Repeat play
Slide show
Remaining display
(Capacity)
Disc protection
Scene lock
DPOF setting
You can delete unnecessary scenes. 99
Youcan attachfade andskip to a scene,
combine scenes, or divide one scene.
You can display information on one
sceneormultiplescenes,suchasimage
quality, recording time, etc.
Youcansetdesiredtitlestoplaylistsand
programmes.
You can create an original movie by
changing the combination of scenes.
You can initialise a DVD-RAM disc or
card so that it can be used on this DVD
video camera/recorder.
You can copy photos recorded on DVDRAM disc to card.
You can use this DVD video camera/
recorder to finalise any DVD-R disc
recorded on it so that the disc can be
viewed on DVD player, etc.
You can repeatedly play back
programmes and scenes.
You can play back stills continuously. 129
The remaining recordablemovietime or
number of recordable stills is displayed.
You can protect the DVD-RAM disc to
prevent deletionor editing by mistake.
You canlock any scene so thatit willnot
bedeleted by mistake:Essentialscenes
are thereby protected, and recording
another still is possible.
Youcanset the number of printsforeach
scene.
English
Reference
page
101 - 106
111
113,122
115
125
107
127
128
124
124
108
109
97

UNDERSTANDING FLOW OF DISC NAVIGATION MENU
English
Press the MENU button on the Disc Navigation scr een: The menu scr eens for Disc Navi gation and menu
screens for disc and card will appear.
See pages 77-78 and 94 for how to inte rpret t he sc reen .
Refer to pages indicated for details of settings.
●When using DVD-RAM disc
Scene
Play list Top (P.123)
Program
Delete (P.99)
Edit (P.101)
Copy (P .107)
Select (P.110)
Detail (P.111)
Switch (P.116)
Play (P.117)
Create (P.115)
Edit (P.118 - 121)
Title (P.122)
Delete (P.122)
Switch (P.112)
Play (P.113)
Title (P.113)
Thumbnail (P.101)
Skip (P.102)
Fade (P.103)
Combine (P.105)
Divide (P.106)
Move (P.104)
Start → Current (P.110)
Current → End (P.110)
All (P .110)
Go To
Disc
Others
ETC
End (P.123)
Capacity (P.124)
Protect Disc (P.124)
Format Disc (P.125)
Update Control Info. (P.126)
Category (P.128)
Repeat Play (P.128)
●When using DVD-R disc
Scene
Select (P.110)
Detail (P.111)
Start → Current (P.110)
Current → End (P.110)
All (P .110)
Program
Go To
Switch (P.112)
Play (P.113)
Top (P.123)
End (P.123)
●When using card
Scene
Go To
Card
Delete (P.99)
Lock (P.108)
DPOF (P.109)
Select (P.110)
Detail (P.111)
Top (P.123)
End (P.123)
Capacity (P.124)
Format Card (P.125)
98
Disc
Others
ETC
Start → Current (P.110)
Current → End (P.110)
All (P .110)
Slide Show
Capacity (P.124)
Finalize Disc (P.127)
Repeat Play (P.128)
All (P.129)
DPOF (P.129)

Scene
DELETING SCENES (DELETE)
1Press the DISC NAVIGATION button.
2Select the scene to be
deleted.
All Programs
3Press the MENU button.
PLAY DESELECT ALL
Scenetobedeleted
4Choose “Delete” on the
“Scene” menu screen,
and then press the
button.
5The “Delete Scene”
screen will appear: If you
are sure you want to delete the selected scene,
press the button.
If you want to change the scene to be deleted,
you can change it on this screen.
6The screen for verifying
deletion will appear:
Choose “YES”, and then
press the button.
Choose “NO” to cancel
deletion.
After Yes or No setting, the “Delete Scene”
screen will be restored.
Repeat steps 5 and 6 to del e te ot h e r scenes.
Scene
Delete
Ed i t
Copy
Sel ect
De t a i l
ETC
ENTER RETURN
Dele te Sc ene
3 0 / 9/ 2003
Scene No.005
Delete scene?
YES NO
ENTER
17 : 00:00
005/014
RAM
RAM
7Press the button to quit.
Note:
• Ifyou point the cursor atthe scene to bedeletedon"All
Programs"screen,andthenpresstheDELETE button on
remote control, the screen in step 5 will appear.
• If you delete all data on discor card, initialisingthe disc
or card will be recommended (See page 125).
• Ifevenone play listhasbeen created,message“Same
scenes on PlayList w ill be deleted. Delete scenes?”will
appear before deletingscene(s). This message will
appear even if the scene(s) to be deleted is notused in
the corresponding play list. In this case, choose “YES”
and then press the
• If the time of deleted scenes (stills) is quite sho rt, the
remaining free space ofdiscmaynot increase inthedisc
or card remaining indicator.
• Thelockedscenes on cardcannotbedeleted (See page
108).
button.
Delete Scene 005/013
ENTER E X IT
RAM
English
99

●Editing using submenu
Press the MENU button befor e pressin g the button in step 5 (See page 99): The submenu will appear.
English
Ed i t
Exi t
De l e t e
ENTER RETURN
RAM
Se l e c t
Start– Cur rent
Cu r r ent – End
All
ENTER RETURN
RAM
Go To
Top
End
ENTER RETURN
RAM
Edit Exit.......................To restore the Disc Navigation screen
Delete .................. To delete selected scenes
Select Start
→Current.... To select scenes from the start to the one that the cursor is o n at the
moment
→End..... To select scenes from the scene the cursor is on to the end
Current
All ........................To select all scenes
Go To Top....................... To move the cursor to the first scene
End....................... To move the cursor to the last scene
Pressing the button will restore the screen in step 5.
Note:
Although the submenu screen willappear foreach setting, somemenu itemsmay not appear,depending on the setting.
100
 Loading...