

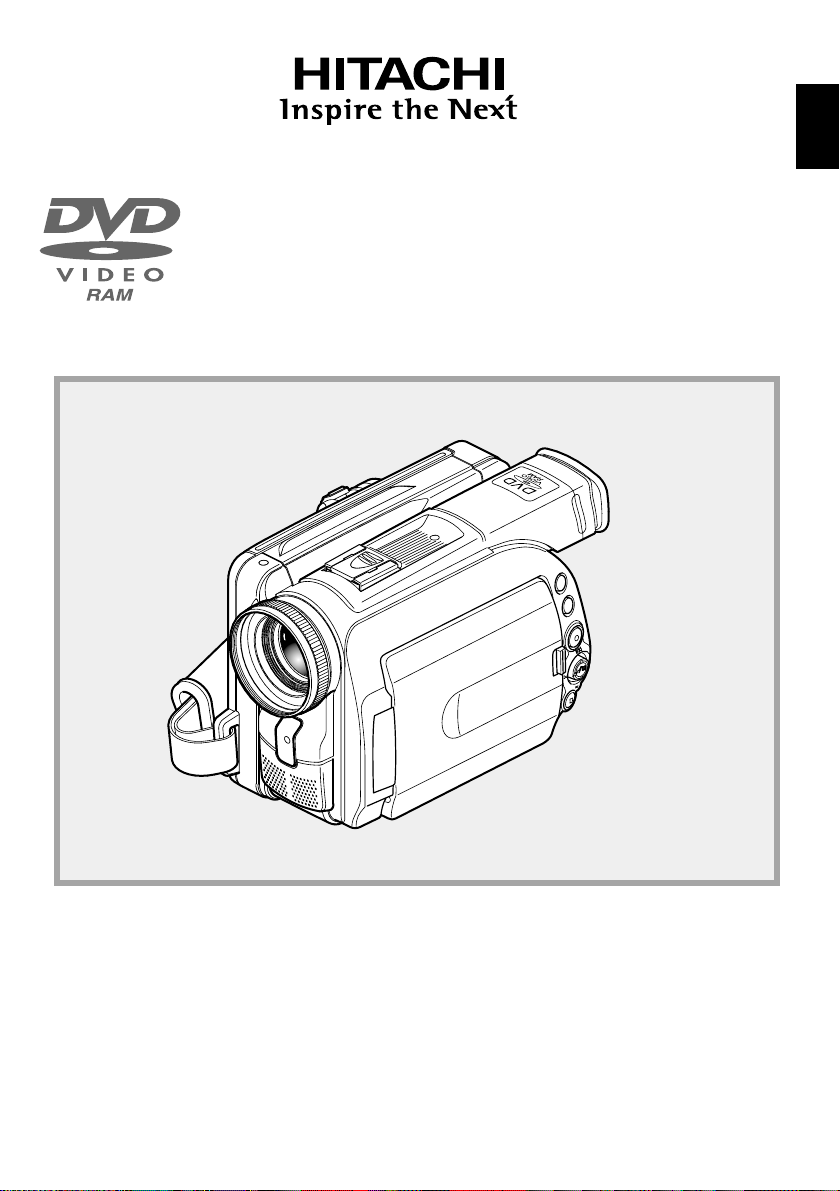
ENGLISH
DEUTSCH
DZMV270E
FRANÇAIS
Instruction manual
To obtain the best performance and ensure years of trouble-free use, please read this instruction manual
completely.
1

Important Information
For Your Safety
The power switch turns the DVD video camera/recorder on and off, leaving the date/time feature
ENGLISH
unaffected. If the camera/recorder is to be left unattended for a long period of time, turn it off .
WARNING : TO PREVENT FIRE OR SHOCK HAZARD, DO NOT
EXPOSE THIS UNIT TO RAIN OR MOISTURE.
WARNING : TO PREVENT FIRE OR SHOCK HAZARD, USE THE
RECOMMENDED ACCESSORIES ONLY.
The DVD video camera/recorder and AC adapter
have the following caution marks.
CAUTION
RISK OF ELECTRIC SHOCK
DO NOT OPEN
CAUTION: TO REDUCE THE RISK OF
ELECTRIC SHOCK, DO NOT OPEN.
NO USER-SERVICEABLE PARTS INSIDE.
REFER SERVICING TO QUALIFIED SERVICE
PERSONNEL.
WARNING: Many television programs and films
are copyrighted. In certain circumstances, copyright law may apply to private in-home videotaping
of copyrighted materials.
This Class B digital apparatus complies with
Canadian ICES-003.
The liquid crystal display (LCD) panel is
made by highly precise technology. More
than 99.99% of its picture elements (pixels)
are effective, but some (less than 0.01%) may
appear as colored bright dots. This does not
indicate a fault as the LCD panel stretches
the limits of current technology.
Identifications of caution marks
This symbol warns the user that
uninsulated voltage within the unit
may have sufficient magnitude to cause
electric shock. Therefore, it is dangerous to make any kind of contact with
any inside part of this unit.
This symbol alerts the user that important literature concerning the operation
and maintenance of this unit has been
included. Therefore, it should be read
carefully to avoid any problems.
WARNING: To prevent risk of lnjury or
domage to your DVD video camera/
recorder and the AC adapter, use only
the speclfled batterles and AC adapter.
Batterles; DZ-BP14(R) and DZ-BP28,(The
DZ-BP14(R) is supplied with this DVD
video camera/recorder)
AC adapter; DZ-ACE1
CLASS 1
LASERPRODUCT
CAUTION
This product contains a laser diode of
higher class than 1. To ensure continued
safety, do not remove any covers or attempt to gain access to the inside of the
product. Refer all servicing to qualified personnel.
2

Warning: This device complies with Part 15 of the FCC Rules. Operation is subject to the following
two conditions: (1) This device may not cause harmful interference, and (2) this device must accept
any interference received, including interference that may cause undesired operation.
Note: This equipment has been tested and found to comply with the limits for a Class B digital
device, pursuant to Part 15 of the FCC Rules. These limits are designed to provide reasonable
protection against harmful interference in a residential installation. This equipment generates, uses,
and can radiate radio frequency energy and, if not installed and used in accordance with the instructions, may cause harmful interference to radio communications. However , there is no guarantee that interference will not occur in a particular installation. If this equipment does cause harmful
interference to radio or television reception, which can be determined by turning the equipment off
and on, the user is encouraged to try to correct by one or more of the following measures:
• Reorient or relocate the receiving antenna.
• Increase the separation between the equipment and receiver.
• Connect the equipment into an outlet on a circuit different from that to which the receiver is
connected.
• Consult the dealer or an experienced radio/TV technician for help.
Caution to the user: Changes or modifications not expressly approved by the manufacturer void
the user’s authority to operate the equipment.
Microsoft, MS, MS-DOS, Windows and Windows NT are registered trademarks of Microsoft
Corporation.
Manufactured under license from Dolby Laboratories.
“Dolby” and double-D symbol are trademarks of Dolby Laboratories.
Other company names and product names listed are trademarks or brand names belonging to each
company.
ENGLISH
3

IMPORTANT SAFEGUARDS
In addition to the careful attention devoted to quality standards in the manufacture of your video product, safety is a major factor in the
design of every instrument. But, safety is your responsibility too.
This page lists important information that will help to assure your enjoyment and proper use of DVD video camera/recorder and accessory
equipment. Please read it carefully before operating your video product and keep it in a handy place for future reference.
ENGLISH
INSTALLATION
Read and Follow Instructions — All the safety and op-
1
erating instructions should be read before the video product is
operated. Follow all operating and use instructions.
Retain Instructions — The safety and operating instruc-
2
tions should be retained for future reference.
Heed Warnings — Comply with all warnings on the video
3
product and in the operating instructions.
Polarized Plug — This video product is equipped with a
4
polarized alternating-current line plug (a plug having one blade
wider than the other). This plug will fit into the power outlet
only one way. This is safety feature. If you are unable to
insert the plug fully into the outlet, try reversing the plug. If
the plug should still fail to fit, contact your electrician to replace your obsolete outlet. To prevent electric shock do not
use this polarized plug with an extension cord, receptacle or
other outlet unless the blades can be fully inserted without
blade exposure. If you need an extension, use a polarized
cord.
Power Sources — This video product should be operated
5
only from the type of power source indicated on the marking
label. If you are not sure of the type of power supply to your
home, consult your video dealer or local power company. For
video products intended to operate from battery power, or other
sources, refer to the operating instructions.
Overloading — Do not overload wall outlets and extension
6
cords as this can result in a risk of fire or electric shock. Overloaded AC outlets and extension cords are dangerous, and so
are frayed power cables, damaged or cracked wire insulation
and broken plugs. They may result in a shock or fire hazard.
Periodically examine the cord and have it replaced by your
service technician if appearance indicates damage or deteriorated insulation.
Power-Cord Protection — Power-supply cords should be
7
routed so that they are not likely to be walked on or pinched
by items placed upon or against them, paying particular attention to cords at plugs, convenience receptacles, and the point
where they exit from the appliance.
Ventilation — Slots and openings in the cabinet are pro-
8
vided for ventilation to ensure reliable operation of the video
product and to protect it from overheating. These openings
must not be blocked or covered. The openings should never
be blocked by placing the video product on a bed, sofa, rug, or
other similar surface. This video product should never be
placed near or over a radiator or heat register. This video product should not be placed in a built-in installation such as a bookcase or rack unless proper ventilation is provided or the video
product manufacturer’s instructions have been followed.
Attachments — Do not use attachments unless recom-
9
mended by the video product manufacturer as they may cause
hazards.
Caution: Maintain electrical safety. Powerline operated equipment
or accessories connected to this unit should bear the UL listing
mark or CSA certification mark on the accessory itself and should
not have been modified so as to defeat the safety features. This
will help avoid any potential hazard from electric shock or fire. If in
doubt, contact qualified service personnel.
Water and Moisture — Do not use this video product
10
near water — for example, near a bath tub, wash bowl, kitchen
sink, or laundry tub, in a wet basement, or near a swimming
pool, and the like.
Accessories — Do not place this video product on an un-
11
stable cart, stand, tripod, bracket, or table. The video product
may fall, causing serious injury to a child or adult, and serious
damage to the appliance. Use only with a cart, stand, tripod,
bracket, or table recommended by the manufacturer, or sold
with the video product. Any mounting of the product should
follow the manufacturer’s instructions, and should use a mounting accessory recommended by the manufacturer.
An appliance and cart combination
12
should be moved with care. Quick
stops, excessive force, and uneven surfaces may cause the appliance and cart
combination to overturn.
4

Power Lines — An outside antenna system should not be
13
located in the vicinity of overhead power lines or other electric
light or power circuits, or where it can fall into such power
lines or circuits. When installing an outside antenna system,
extreme care should be taken to keep from touching or approaching such power lines or circuits as contact with them
might be fatal. Installing an outdoor antenna can be hazardous and should be left to a professional antenna installer.
USE
Cleaning — Unplug this video product from the wall outlet
14
before cleaning. Do not use liquid cleaners or aerosol cleaners. Use a damp cloth for cleaning.
Object and Liquid Entry — Never push objects of any
15
kind into this video product through openings as they may
touch dangerous voltage points or short-out parts that could
result in a fire or electric shock. Never spill liquid of any kind
on the video product.
Lightning — For added protection for this video product
16
during a lightning storm, or when it is left unattended and unused for long periods of time, unplug it from the wall outlet
and disconnect the antenna or cable-system. This will prevent damage to the video product due to lightning and powerline surges.
SERVICE
Servicing — Do not attempt to service this video product
17
yourself as opening or removing covers may expose you to
dangerous voltage or other hazards. Refer all servicing to qualified service personnel.
Conditions Requiring Service — Unplug this video prod-
18
uct from the wall outlet and refer servicing to qualified service
personnel under the following conditions.
a. When the power-supply cord or plug is damaged.
b. If liquid has been spilled, or objects have fallen into the
video product.
c. If the video product has been exposed to rain or water.
d. If the video product does not operate normally by follow-
ing the operating instructions. Adjust only those controls
that are covered by the operating instructions. Improper
adjustment of other controls may result in damage and
will often require extensive work by a qualified technician
to restore the video product to its normal operation.
e. If the video product has been dropped or the cabinet has
been damaged.
f. When the video product exhibits a distinct change in per-
formance — this indicates a need for service.
Replacement Parts — When replacement parts are re-
19
quired, have the service technician verify that the replacements
he uses have the same safety characteristics as the original
parts. Use of replacements specified by the video product
manufacturer can prevent fire, electric shock or other hazards.
Safety Check — Upon completion of any service or repairs
20
to this video product, ask the service technician to perform
safety checks recommended by the manufacturer to determine that the video product is in safe operating condition.
Heat — The product should be situated away from heat
21
sources such as radiators, heat registers, stoves, or other products (including amplifiers) that produce heat.
ENGLISH
5
ИHФOPMAЦИЯ
O CEPTИФИКAЦИИ ПPOДУКЦИИ
Блоки питaния <<HITACHI>> модeли VM-ACE5E cepтифициpовaны оpгaном по cepтификaции
ENGLISH
элeктpообоpyдовaния <MEHTECT> Meндeлeeвcкого ЦCMC
(Peгиcтpиpовaнный номep в Гоcpeecтpe – POCC RU.0001.11ME28)
CETEBOЙ AДAПTEP – ЗAPЯДHOE УCTPOЙCTBO
MOДEЛИ DZ-ACE1И
cepтифициpовaн оpгaном по cepтификaции элeктpообоpyдовaния
(Peгиcтpaционный номep в Гоcpeecтpe – POCC RU.001.11ME28)
Cepтификaт cоотвeтcтвия №:
Cepтификaт cоотвeтcтвия выдaн:
Cepтификaт cоотвeтcтвия дeйcтвитeлeн до:
Mодeль DZ-ACE1 cоотвeтcтвyeт тpeбовaниям
ноpмaтивныx докyмeнтов:
Cpок cлyжбы
<<MEHTECT>> Meндeлeeвcкого ЦCMC
INFORMATION ON PRODUCT CERTIFICATION
AC ADAPTER
MODEL DZ-ACE1
certified by “MENTEST” of Mendeleevsky CSMS
(Registration number in State Register – POCC RU.0001.11ME28)
Certificate of conformify No,:
Certificate of conformity lssued:
Certificate of conformity vaild till:
Model DZ-ACE1 complies with requirements of
normative documents:
Life cycle
POCC JP.ME28.B13985
The 21st of January 2002
The 18th of January 2005
GOST 12.2.006-87
GOST R 51318.14.1-99
7 (seven) years
6

Read This First
To guide you, we’ve included following six chapters.
• The section on “Setups” explains how to set up
the DVD video camera/recorder, battery pack,
and set the date/time.
• The section on “Basic Techniques” explains the
basic operation of this DVD video camera/recorder – recording of movies and still images and
playback of recorded images.
• The section on “Advanced T echniques” explains
settings on this DVD video camera/recorder for
more advanced usage.
• The section on “Using Disc Navigation” explains
editing with Disc Navigation: Refer to this section when finalizing DVD-R disc and initializing DVD-RAM disc.
• The section on “Connecting to Other Devices”
explains how to connect to TV, another AV device and PC, and how to operate after connections.
•“Subsidiary Information” includes an introduc-
tion to products sold separately, proper cleaning, and troubleshooting.
With this DVD video camera/recorder you can view the picture being recorded or the playback
picture whether on the LCD monitor or in the viewfinder. Opening or closing the LCD monitor
switches the picture to appear on the LCD monitor or in the viewfinder. The following text describes the operation assuming that the viewfinder is used as a major monitor device.
We want this manual to be as helpful as possible,
so it includes two easy ways to find the information you need:
• A quick index for the information you use most
often (this page).
• A detailed table of contents directing you to specific information quickly (page 8~9).
Get to know your DVD video camera/recorder
by using this manual, and get to know Hitachi. We
appreciate your business.
Quick Index
Charging Battery
Recording Movie
Immediately Checking Recorded Scene
Functions Available with Disc Navigation
Connecting to a TV and Viewing
Connecting to Your PC
...........................................
..........................................
................
.................................
....
ENGLISH
31
42
...
44
68
91
95
7

Table of Contents
Important Information................................ 2
For Your Safety ............................................ 2
IMPORTANT SAFEGUARDS ......................4
Read This First ..............................................7
ENGLISH
About This Manual ................................... 10
Checking Provided Accessories......... 1 1
Names of Parts ......................................... 1 2
Viewing Demonstration.......................... 1 6
Features of DVD video camera/re-
corder ........................................................... 1 7
Versatile Functions Available ..................... 17
Recording on Disc ..................................... 18
Recording Movie and Still .......................... 18
Immediate Reviewing of Recorded
Image......................................................... 18
Editing in Various Ways on DVD video
camera/recorder Alone .............................. 18
Using with Various Devices ....................... 18
Cautions When Using .................................... 19
Cautions When Storing ................................. 22
Suggestions and Restrictions ....................... 22
Discs ................................................................ 23
Removing and Replacing Disc from/in
Cartridge or Caddy ..................................... 24
Disc Storage Capacity................................ 26
Setups
Setting Up the DVD video camera/
recorder........................................................... 27
Holding DVD video camera/recorder ......... 27
Attaching Shoulder Strap ........................... 27
Attaching Lens Cap ................................... 28
Attaching Ferrite Cores.............................. 28
Inserting Batteries into Remote Control .... 29
Setting Up the Battery ................................... 30
Attaching Battery to DVD video camera/
recorder ..................................................... 30
Removing Battery ...................................... 30
Charging Battery ........................................ 31
Battery Remaining Level Indicator............. 33
Using DVD video camera/recorder with AC
Adapter ........................................................... 34
Setting Date and Time ................................... 35
Changing Display Format of Date
and Time .................................................... 36
Inserting and Ejecting Disc ............................ 37
Inserting Disc............................................. 37
Removing Disc .......................................... 39
Basic Techniques
Basic Handling of DVD video camera/
recorder........................................................... 40
Turning DVD Video Camera/
Recorder On .............................................. 40
Opening LCD Monitor ............................... 40
LCD Screen Brightness Adjustment.......... 41
Closing LCD Monitor ................................. 41
Viewing Subject through Viewfinder ......... 41
Recording Movie ............................................ 42
Using External Microphone ....................... 42
Recording Stills .............................................. 43
Playing Back ................................................... 44
Immediately Checking Recorded Scene.... 44
Skip Playback ............................................. 44
Search Playback......................................... 45
Frame Advance/Frame Back/
Slow Playback............................................ 45
Searching for Point You Wish to View by
Specifying It (Go To)................................... 46
Zooming.......................................................... 47
Focusing When Recording Movie ............. 48
Macro Recording ....................................... 48
Manually Focusing Subject during Movie
Recording........................................................ 49
Adjusting Exposure Manually ....................... 50
On-Screen Information .................................. 51
Information Display During Recording ....... 51
Information Display During Playback ......... 53
Advanced Techniques
Setting Up Camera Functions ....................... 54
Selecting Shooting Mode to Match the
Subject (Switching Program AE Mode) ..... 54
White Balance (Auto/Hold) ........................ 55
Using the Electronic Image Stabilizer
(EIS) ........................................................... 56
Switching Digital Zoom Off ....................... 57
Switching to 16:9 Mode ............................ 58
Setting Up Record Functions ........................ 59
Switching Movie Quality Mode ................. 59
Input Selection........................................... 60
Changing Method for Recording Stills ....... 61
Self-Timer................................................... 62
Switching On-Screen Display Output On or
Off ............................................................. 63
Initial Settings................................................. 64
Switching Operating Sound On or Off....... 64
Setting or Releasing Power Save .............. 64
Turning Record LED On or Off................... 65
Changing Display Language ...................... 65
Initializing All Settings to Defaults................ 66
8

Disc Navigation
Before Using Disc Navigation ....................... 67
Structure of Data Recorded On This DVD
Video Camera/Recorder............................. 67
Using Disc Navigation ................................... 68
Functions Available with
Disc Navigation .......................................... 68
Starting Disc Navigation and Interpreting
Navigation Screen...................................... 70
Playing Back Scenes.................................. 71
Selecting Random Scenes......................... 71
Selecting Consecutive Scenes Together ... 71
Understanding Flow of Disc Navigation
Menu ............................................................... 72
Program .......................................................... 73
Switching to Thumbnail Display of Specific
Date (Selecting Program)........................... 73
Playing Back Program ................................ 73
Changing Title of Program ......................... 74
Play List ........................................................... 75
Creating New Play List .............................. 75
Switching Play List (Switching to Display of
Each Play List) ........................................... 76
Playing Back A Play List............................. 76
Adding Scenes to Play List ........................ 77
Deleting Scenes from Play List ................. 78
Editing Play List (Adding Scenes Using
Menu) ........................................................ 78
Editing Play List (Deleting Scenes Using
Menu) ........................................................ 79
Editing Play List (Selecting Scenes Using
Menu) ........................................................ 79
Changing Title of Play List.......................... 80
Deleting Play List ....................................... 80
Scene............................................................... 81
Deleting Scenes ........................................ 81
Adding Special Effects (Fade) .................... 82
Combining Multiple Scenes....................... 84
Dividing Movies ......................................... 84
Arranging Order of Scenes (Move) ............ 85
Playing Back by Skipping Scenes (Skip) .... 86
Selecting Scenes Using Menu Screen ...... 86
Displaying Information Using Menu
Screen ....................................................... 87
Disc Management .......................................... 88
Verifying Remaining Free Space on Disc
(Capacity) ................................................... 88
Initializing DVD-RAM Disc ......................... 88
Updating Control Information .................... 89
Finalizing Disc ............................................ 90
Playing Back Scenes Repeatedly (Repeat
Play) ........................................................... 90
Connecting to Other Devices
Viewing on TV Screen.................................... 91
Connecting to a TV .................................... 91
Viewing on TV Screen................................ 92
Recording Image from Other AV Devices .... 93
Connecting to Other AV Device................. 93
Recording Image from Other Camcorder or
AV Device .................................................. 94
Cautions when connecting DVD video
camera/recorder to PC ................................... 95
Capturing Data for PC .................................... 96
Using DZ-WINPC3(W) PC kit ..................... 96
Using Disc on PC ....................................... 98
Subsidiary Information
Cleaning .......................................................... 99
If dust adheres to viewfinder lens ............. 99
Trouble Messages ........................................ 100
Troubleshooting ........................................... 105
System Reset ................................................ 110
Major Specifications .................................... 111
Introduction to Optional Accessories ......... 112
Camera Accessories ................................ 112
Power Supplies........................................ 112
Miscellaneous.......................................... 112
Index.............................................................. 113
ENGLISH
9
About This Manual
● Photographs in this manual:
Photographs taken using digital still camera are used for explanation of images that appear in the viewfinder or on the LCD screen in this manual. Understand that they look different from those you will
ENGLISH
actually view in the viewfinder or on the LCD screen.
● About joystick:
Y ou can tilt it up, down, to left or right, or press its
center: The way you move it will determine the
results. Normally, move the joystick up, down to
left or right to select a menu item or scene, and then
press the center to enter the selection.
Operation Notation in this manual
button
● Notation of cancel button:
Press the stop/cancel button to stop your operation midway, or return the menu screen to the preceding
one. The expression “press the button” will be used in this text.
● and marks beside headings:
This DVD video camera/recorder has some functions available only with DVD-RAM disc, or operation
only necessary for DVD-R disc. Refer to these marks and identify the functions and operation to match
the disc you use.
10
Checking Provided Accessories
Make sure that you have all the following accessories in package:
Battery (model DZ-BP14(R)):
Portable power supply for this DVD
video camera/recorder. Charge it
before use.
Infrared remote control
(model DZ-RM2W):
Use to control the DVD video
camera/recorder from a distance.
Shoulder strap:
Attach to the DVD video camera/
recorder to hang it from shoulder.
Ac adapter (model DZ-ACE1):
Connect this device to the DVD
video camera/recorder to power it
from AC outlet.
2 “AA” batteries:
To power the remote control.
Lens cap and lens cap string:
Attach the lens cap when not
recording, to protect the lens.
Power cable:
Connect between household AC
outlet and AC adapter.
AV input/output cable:
Used when viewing the picture
played back on the DVD video
camera/recorder on TV screen or
input or output video from/to
another video device.
2 Ferrite cores:
Attach these to the S-VIDEO cable,
and the external microphone cable
if you are using one.
ENGLISH
8 cm DVD-R disc: 8 cm DVD-RAM disc (Sample): USB device driver CD-ROM:
You will need this CD-ROM when
using the optional DZ-WINPC3(W)
PC kit with the DVD video
camera/recorder.
Instruction manual for CD-ROM:PC connection cable:
11
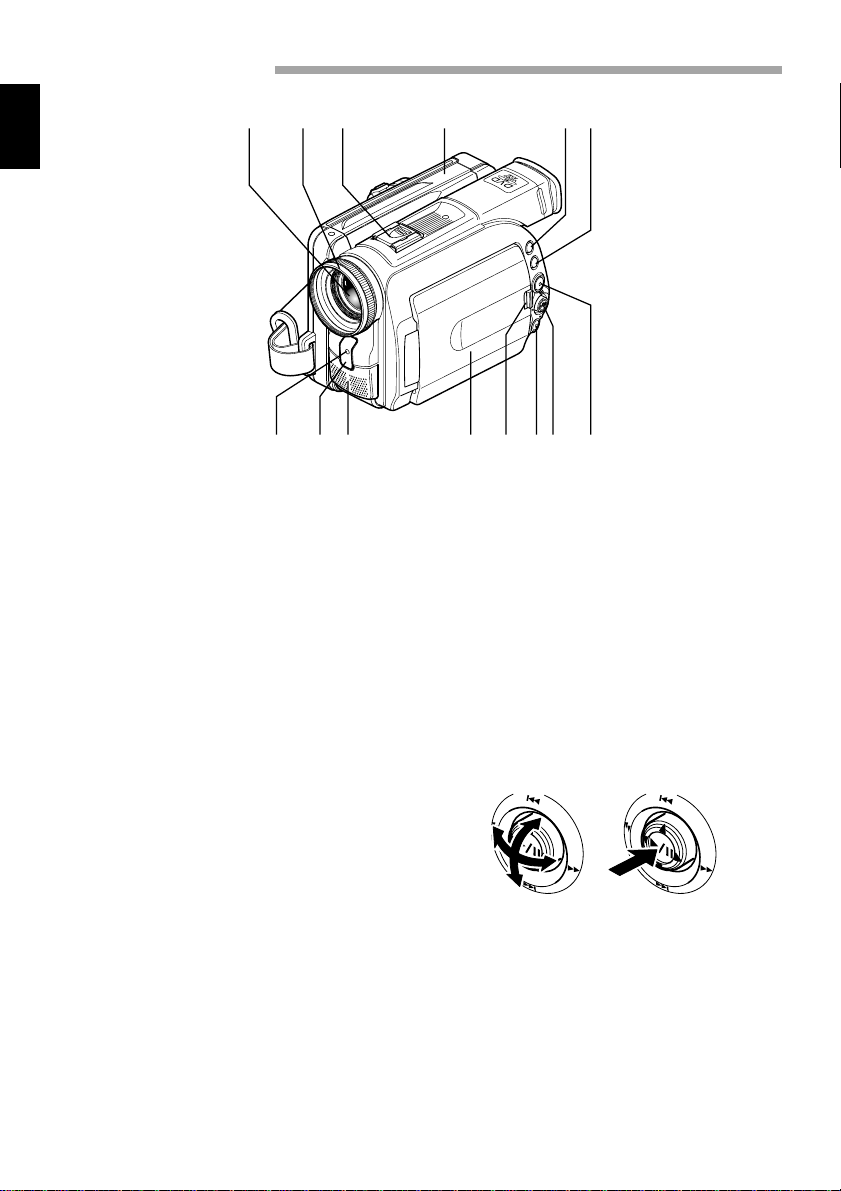
Names of Parts
ENGLISH
123 4 56
789 !"#$%
1 Optical 12x zoom lens (p. 47)
2 Lens hood (p. 48)
3 Accessory shoe (p. 40, 43)
Slide the cover to remove it, and
then attach the optional video flash,
etc., here. (See the instruction
manual of device to be attached for
details.)
4 Disc guide (p. 37)
5 SELECT button (p. 71)
6 MENU button (p. 35, 72)
Press this button to display the
menu for setting camera functions
and Disc Navigation.
The camera menu will appear even
if disc is not loaded.
7 Recording indicator (p. 65)
The red indicator will light during
recording.
8 Infrared receiver (p. 29)
When the remote control is used to
operate the DVD video camera/
recorder, this receiver will receive
the infrared signal.
12
9 Stereo microphone (p. 42)
! 3.5" type liquid crystal display
(inside) (p. 40)
" OPEN button (p. 40)
Press this button and hold it while
opening the liquid crystal display
(LCD).
# Stop/cancel button (p. 16, 44)
To end playback or set menu.
$ Joystick (p. 10)
Move the joystick to select a scene
or menu item, and play back
scenes.
% DISC NAVIGATION button (p. 70)
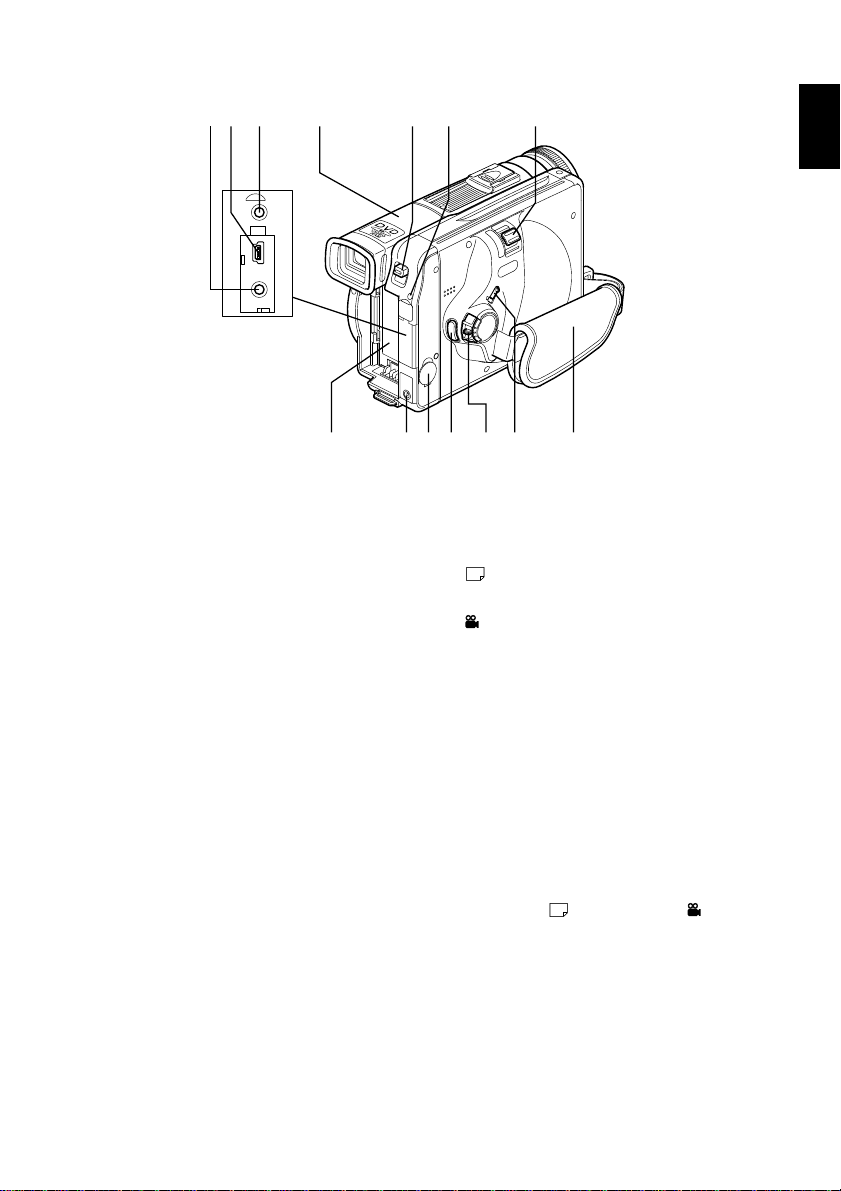
&( ) ~ + -
TO PC
A
/
V
,
=./:;
<>
ENGLISH
&*AV input/output jack (p. 91)
(*PC connection terminal (TO PC)
(p. 95)
)*External microphone jack (p. 42)
~ Viewfinder (p. 41)
+ DISC EJECT button (p. 37)
Press down this button to open the
disc guide.
, CHARGE/ACCESS indicator
(p. 21, 31)
Will blink or light during char ging,
or while the DVD video camera/
recorder is operating.
- Zoom lever (p. 47)
Push the lever to the T side for telephoto, or to the W side for wideangle.
Battery attachment platform (p. 30)
.
/ DC cord connection terminal
(DC IN 8.4V) (p. 31)
: S-VIDEO input/output jack (p. 91)
; Record button (REC) (p. 42)
< Power switch (p. 42, 43)
PHOTO : To record still
images
VIDEO : To record a movie
POWER OFF: To turn of f the DVD
video camera/re-
corder
Press the red button at the center of
power switch and turn it only when
turning power on: It is not necessary
to press the button when setting the
switch to “POWER OFF”.
The power switch cannot be
changed over during recording.
For playback, set the power switch
to either “
PHOTO” or “ VIDEO”.
= LOCK switch (p. 42)
T o lock the recording mode, so that
the VIDEO mode is not switched
to the PHOTO mode by mistake.
> Hand strap (p. 27)
*Inside the cover
13
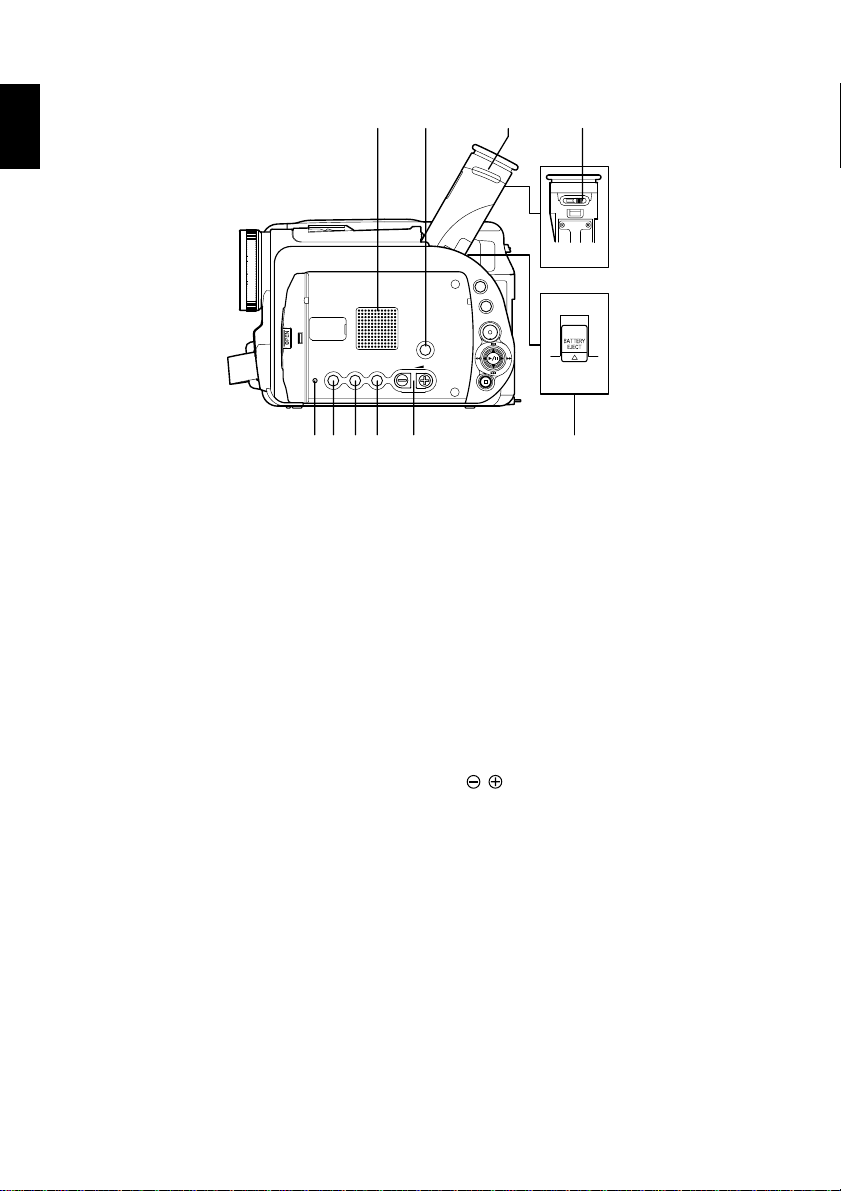
ENGLISH
?@ \
SELECT
MENU
DISC
DISPLAY
LCD
BRIGHT
RESET
EXPOSURE FOCUS
VOL.
NAVIGATION
[
{]^_
? Speaker (p. 44)
The sound accompanying a movie
being played back will be heard
from here.
@ Screen display button (DISPLAY)
(p. 52)
Press this button to display the details of image being played back or
camera setting status, or switch the
display off.
[ Eyecup (p. 41, 97)
\ Diopter control (p. 41)
To adjust the focus of image appearing in the viewfinder.
] RESET button (p. 110)
To reset all settings to defaults.
|
}
^ LCD BRIGHT button (p. 41)
Press this button to start LCD
screen brightness adjustment.
_ EXPOSURE button (p. 50)
Press this button to adjust the exposure.
{ FOCUS button (p. 49)
To switch between manual focus
and auto-focus.
| Volume control buttons (VOL)/
buttons (p. 41, 44)
T o adjust the volume of sound from
speaker, etc.
} BATTERY EJECT button (p. 30)
To release the battery.
14

V
0
1
2
3
4
DISPLAY REC
DIGITAL
ZOOM
DISC
NAVIGATION
DZ-RM2W
ZOOM
SELECT
MENU
DELETE
5
6
7
8
9
!
"
#
$
ENGLISH
V DISPLAY button (p. 52)
0 DIG. ZOOM button (p. 57)
1 DISC NAVIGATION button (p. 70)
2 REVERSE SEARCH button (p. 45)
3 STOP button (p. 16, 44)
4 FORWARD SKIP button (p. 44)
5 REC button (p. 42)
6 ZOOM T button (p. 47)
7 ZOOM W button (p. 47)
8 SELECT button (p. 71)
9 REVERSE SKIP button (p. 44)
! MENU button (p. 54, 72)
" PLAY/PAUSE button (p. 44)
# FORW ARD SEARCH button (p. 45)
$ DELETE button (p. 78)
* The buttons on remote control will
function the same as those on DVD
video camera/recorder.
15

Viewing Demonstration
This DVD video camera/recorder has versatile functions, including special effects.
Before using the DVD video camera/recorder, view the demonstration to see what it can do.
Referring to step 2 on page 31, connect the DVD video camera/recorder, AC adapter and power
ENGLISH
cable to power the DVD video camera/recorder from AC outlet.
Press the MENU button.
1
Choose “Initial Setup”, “Demo Mode”, and
2
then press the button.
The options will appear on the right of “Demo
Mode”: The mark will be attached to the
currently selected option.
Joystick
MENU
button
Use the joystick to choose “Start”, and then
3
press the button.
The demonstration will start: View it in the
viewfinder or on the LCD screen.
To stop the demonstration midway, press the
button.
The demo mode will end when the DVD video
camera/recorder is turned off or the DISC
EJECT button is pressed down.
Note: If you choose “Auto” in step 3, the demon-
stration will automatically start approximately three
minutes after the DVD video camera/recorder is
turned on.
Note: If a disc is loaded in the DVD video camera/recorder , the demonstration will not start even
if “Auto” has been set.
Note: When connecting the power cable to the
DVD video camera/recorder, the pin of power
cable cannot be completely inserted into the DC
IN 8.4V jack, but this does not indicate a malfunction. Do not insert the power cable with undue
force: Doing so could result in malfunction.
Note: The demonstration function will not work
when the DVD video camera/recorder is connected to PC.
Note: While the demonstration is being given, the
recording indicator will blink.
16
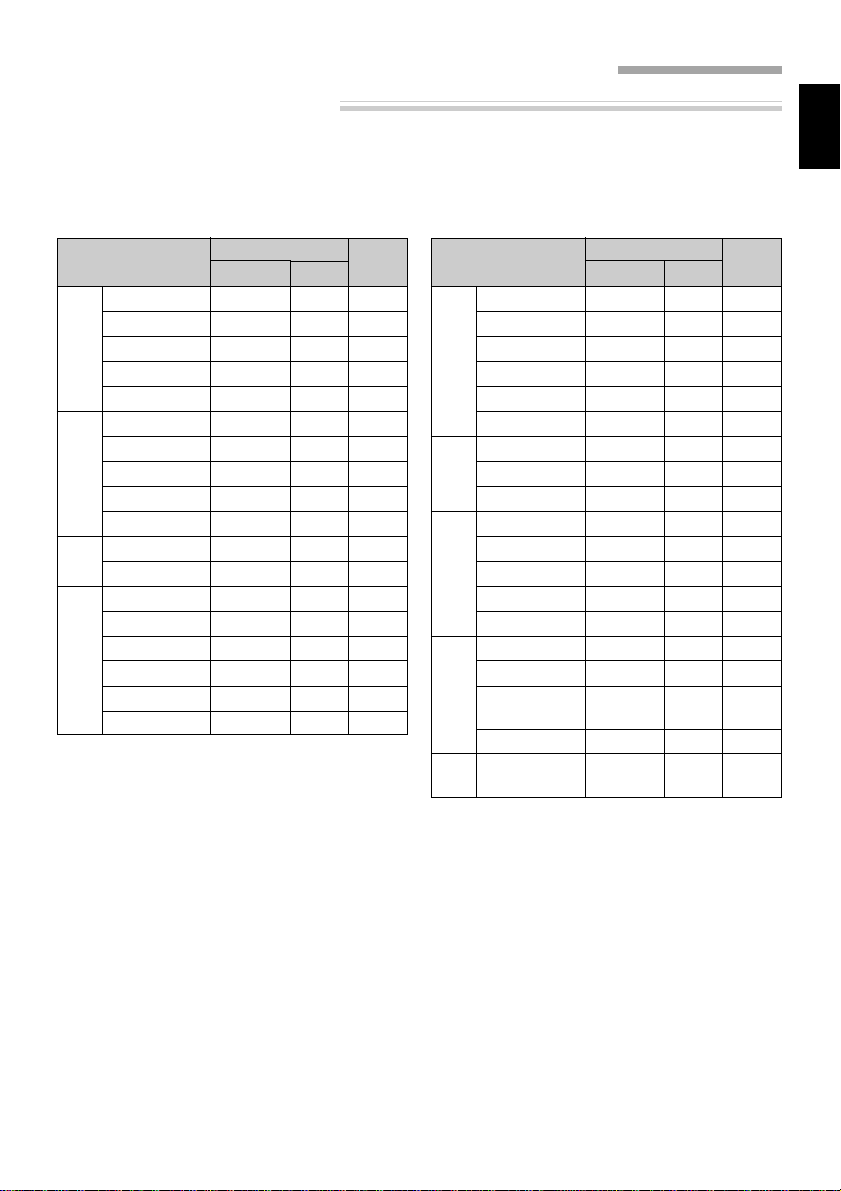
Features of DVD video camera/recorder
Versatile Functions Available
This DVD video camera/recorder has numerous useful functions. However, the functions that can be
used will vary depending on whether DVD-RAM or DVD-R disc is used.
Use the functions, following the table below:
ENGLISH
Camera Functions:
Function
Program AE
White Bal.
EIS
Setup
Dig.Zoom
Camera Functions
16:9
VIDEO Mode
Input Source
Photo Input
Setup
Self Timer
Record Functions
OSD Output
Date Mode
Date
Date Set
Setup
Beep
Power Save
Record LED
Language
Demo Mode
Initial Setup
Reset
DVD-RAM
\: Available; X: Unavailable
(* Except for XTRA mode)
Disc used
DVD-R
\
\
\
\
\
\
\
\
\
\
\
\
\
\
\
\
\
\
\
\
\
\
\
\*
\
X
X
\
\
\
\
\
\
\
\
\
Reference
page
54
55
56
57
58
59
60
61
62
63
36
35
64
64
65
65
16
110
Disc Navigation Functions:
Function
Switch
Play
Create
Edit
Play List
Title
Delete
Switch
Play
Title
Program
Delete
Edit
Skip
Scene
Select
Detail
Capacity
Format Disc
Update
Disc
Control Info.
Finalize Disc
Repeat Play
Others
Disc used
DVD-RAM
\
\
\
\
\
\
\
\
\
\
\
\
\
\
\
\
\
X
\
DVD-R
X
X
X
X
X
X
\
\
X
X
X
X
\
\
\
X
X
\
\
Reference
page
76
76
75
78
80
80
73
73
74
81
82
86
86
87
88
88
89
90
90
17

Recording on Disc
Y ou can use both 8 cm DVD-RAM and DVD-R discs
on this DVD video camera/recorder for recording.
The recorded video and audio will be stored on an
8 cm DVD-RAM disc or 8 cm DVD-R disc.
ENGLISH
Using disc allows you to record without
overwriting previous recordings, and also to store
your valuable recordings for as long as need be
while retaining clarity.
With disc you can immediately access recording
and playback, in contrast to videotape, which must
be fast-forwarded or rewound.
Recording Movie and Still
The DVD video camera/recorder can record movies of events and sports, in the same way as with
conventional camcorders.
It can also record stills on a DVD-RAM disc, as with
a digital still camera. With CCD of 1,160,000 pixels,
high-quality movies and stills (on DVD-RAM disc
only) can be recorded. In both recordings of movie
and still (on DVD-RAM disc only), zooming up to
240 times is possible using the 12 power optical
Immediate Reviewing of Recorded Image
You can check the movie or still recorded in the
viewfinder or on the LCD screen.
In addition, simply loading a DVD-RAM disc into a
PC equipped with DVD-RAM drive and DVD video
recording software compatible with 8 cm DVD-RAM
allows you to easily view the recorded disc.
You can finalize a recorded DVD-R disc on this
DVD video camera/recorder so that you can play
it back on a DVD player or DVD recorder that is
compatible with 8 cm DVD-R disc (however, the
finalized DVD-R disc may not be usable on some
DVD players).
zoom multiplied by the 20 power digital zoom.
Movies and stills can be recorded on the same disc,
by simply switching the recording mode (power
switch). However, if you use a DVD-R disc, a still
image cannot be recorded. (If the DVD video camera/recorder is connected to PC, the DVD video
camera/recorder can capture still images, such as
JPEG data.)
Editing in Various Ways on DVD video camera/recorder Alone
This DVD video camera/recorder is provided with
a useful editing/playback tool. Disc Navigation
allows you to easily attach a title or special video
effect to the recorded movie or still. W ith Disc Navigation, you can arrange the playback order and edit
multiple images to play them back continuously.
You can create an entire movie on this DVD video
camera/recorder alone, without inputting video to
a PC for editing.
Using with Various Devices
Connect this DVD video camera/recorder to your
TV and you can enjoy the playback picture with
your family and friends on the large TV screen; or
connect it to a video printer (generally available)
to print the recorded image. You can also transfer
recorded movies and stills (for DVD-RAM disc
only) to PC, using the optional PC kit (DZWINPC3(W)).
18

Cautions When Using
Handle the liquid crystal display (LCD) with
care:
• The LCD is a very delicate display device: Do
not press its surface with any force, hit it, or
puncture it with a sharp object.
• If you push the LCD surface, unevenness in the
display may occur. If unevenness does not disappear soon, turn the DVD video camera/recorder off, wait for a while, and then turn it on
again.
• Do not place the DVD video camera/recorder
with the open LCD screen down.
• Close the LCD monitor when not using the DVD
video camera/recorder.
• Do not hold by the LCD monitor as this could
cause a malfunction.
• Open the LCD monitor by 90° before changing
its direction. If you attempt to invert its direction before opening it completely , it could cause
a malfunction.
• Do not disassemble the LCD monitor as this
might cause a malfunction.
• When opening the LCD monitor, be car eful that
no water droplets adhere to the monitor screen
and that no water or dust enters the DVD video
camera/recorder as it could cause a malfunction.
Liquid Crystal Display and viewfinder:
• The LCD screen and viewfinder will be slightly
dimmer than usual when the DVD video camera/recorder is at low temperature, as in cold
areas, or immediately after power is turned on.
The normal brightness will be restored when the
temperature inside the DVD video camera/recorder rises.
Hold the DVD video camera/recorder
correctly:
• Do not hold the viewfinder or LCD monitor
when lifting the DVD video camera/recorder:
The viewfinder or LCD monitor may become
detached and the DVD video camera/recorder
could fall.
Also, do not grasp the top of DVD video camera/recorder when lifting it: It could easily be
dropped.
Do not subject the DVD video camera/
recorder to impact:
• This DVD video camera/recorder is a precision
machine: Take great care that you do not strike
it against a hard object or allow it to fall.
• Do not use the DVD video camera/recorder on
a tripod in a place where it is subject to severe
vibrations or impact.
No sand or dust!
• Fine sand or dust entering the DVD video camera/recorder or AC adapter could cause it to
malfunction.
No water or oil!
• Water or oil entering the DVD video camera/
recorder or AC adapter could cause a short-circuit or other malfunctions.
Heat on surface of product:
• The surface of the DVD video camera/recorder
will be slightly warm, but this does not indicate
a fault. Be careful when touching the bottom of
the DVD video camera/recorder , since it will be
hot.
Be careful of ambient temperature:
• Using the DVD video camera/recorder in a place
where the temperature is over 40 °C or under
0 °C will not allow it to make normal recording/playback.
• When using the DVD video camera/recorder
connected to PC, operate it at room temperature.
If you use the DVD video camera/recorder
where the temperature is high for an extended
period of time, it will overheat and may not operate normally.
• Do not leave the DVD video camera/recorder
in a closed vehicle where the temperature is very
high for a long time: This could cause malfunctions.
Do not point directly at the sun:
• If direct sunlight strikes the lens or viewfinder,
the DVD video camera/recorder could malfunction or burn in CCD or viewfinder.
• Do not leave the DVD video camera/recorder
with the LCD screen exposed to direct sunlight:
This could cause malfunctions.
ENGLISH
19

Do not use the DVD video camera/
recorder near TV or radio:
• This could cause noise to appear on the TV
screen, or interference could enter radio broadcasts.
ENGLISH
Do not use the DVD video camera/
recorder near strong radio waves or
magnetism:
• If the DVD video camera/recorder is used near
strong radio waves or magnetism, such as near
radio wave tower or electric appliances containing motors, noise could enter video and audio
that are being recorded. During playback of normally recorded video and audio, noise could also
enter the picture and sound. At worst the DVD
video camera/recorder could malfunction.
Do not expose the DVD video camera/
recorder to soot or steam:
• Heavy soot or steam could damage the DVD
video camera/recorder case or cause malfunctions.
Do not use the DVD video camera/
recorder near corrosive gas:
• Using it in a place where there is dense exhaust
gas generated by gasoline and diesel engines,
or corrosive gas such as hydrogen sulfide, could
corrode the battery connecting terminals, which
could result in loss of power.
Do not use the DVD video camera/
recorder near ultrasonic humidifier:
• With some water in humidifier , calcium and others dissolved in water could scatter in the air,
and white particles could adhere to the optical
head of the DVD video camera/recorder , which
could cause it to operate abnormally.
Be careful of moisture condensation:
• When you move the DVD video camera/recorder between places where the difference in
temperatures is great, such as entering a lodge
from a ski slope, or going out of a cooled room
or vehicle, condensation (vapor in air warmed
or cooled to water droplets) could occur on the
lens and/or inside the DVD video camera/recorder. If condensation occurs, do not open the
cover of disc insertion block if possible. If condensation occurs on the lens, wipe it off with a
soft, dry cloth. Even if the external surface of
the DVD video camera/recorder has dried, condensation may remain inside. Turn the DVD
video camera/recorder off and leave it in a dry
place for at least 1-2 hours before using it again.
Do not use the DVD video camera/
recorder for a long uninterrupted period of
time:
• This DVD video camera/recorder is designed
and produced for home-use recording and playback. Do not use it for an extended time continuously, e.g., as a surveillance camera/monitor.
• If you use the DVD video camera/recorder for
a long uninterrupted period of time, the temperature of DVD video camera/recorder may
exceed the limit and the recording/playback
operation could be slowed down. If this occurs,
turn it off and wait for a while before using it
again.
Be careful when removing the disc:
• When the DVD video camera/recorder is used
for a long period of time, the temperature of disc
will be high: Wait for a few moments before removing the disc after the DVD video camera/
recorder is turned off.
Do not expose the DVD video camera/
recorder to insecticide:
• Insecticide entering the DVD video camera/recorder could dirty the optical head, and the DVD
video camera/recorder may not operate normally . T urn the DVD video camera/r ecorder off
and cover it with vinyl sheet, etc. before using
insecticide.
20

Do not turn the DVD video camera/
recorder off while the CHARGE/ACCESS
indicator is blinking:
• The CHARGE/ACCESS indicator is blinking to
show that data is being written to disc, or being
read from it. Do not do any of the following so
as not to damage the data:
• Disconnect AC adapter.
• Plug or unplug PC connection cable.
• Remove disc.
• Subject disc to severe vibrations or impact.
If the DVD video camera/recorder is turned off
while the CHARGE/ACCESS indicator is blinking, turn it on again with the disc cartridge or
caddy loaded in it: Repair of the disc will be executed.
CHARGE/ACCESS indicator
Note: The CHARGE/ACCESS indicator will blink in
red while the disc is being accessed, and it will
blink or light in red during charging.
Do not wipe the DVD video camera/
recorder case with benzene or thinner:
• The coating of case could peel off or the case
could deteriorate.
• When using chemical cleaning cloth, follow the
instructions.
Also read the instructions attached with
optional accessories:
• For optional accessories, follow the cautions and
instruction manuals attached.
Use the AC adapter only in a
well-ventilated, open space:
• Do not use the AC adapter in a narrow space
where flow of air is blocked, or where it is very
near any object or inside any object: Ignoring
this will increase heat inside the AC adapter
which could cause fire, burns, electric shock or
fault.
ENGLISH
21

Cautions When Storing
Do not leave the DVD video camera/
recorder in a place where the temperature is very high for a long period of time:
ENGLISH
• The temperature inside a closed vehicle or trunk
becomes very high in the hot season. If you leave
the DVD video camera/recorder in such a place,
it could malfunction or the case could be damaged. Also, do not expose the DVD video camera/recorder to direct sunlight or place near a
heater.
Do not store the DVD video camera/
recorder in a place where the humidity is
high or in a dusty place:
• Dust entering the DVD video camera/recorder
could cause malfunctions. If the humidity is
high, the lens could become moldy , and the DVD
video camera/recorder could be unusable. It is
recommended that you put the DVD video camera/recorder with desiccant in a box when storing it in a closet, etc.
Suggestions and Restrictions
Make a trial recording:
• Be sure to make a trial recording before an actual take to make sure that recording is normal.
Data that was not stored normally because of a
defect in the DVD video camera/recorder cannot be restored.
• It is recommended that you use DVD-RAM disc
for trial recording, since a recording stor ed on it
can be deleted.
Do not store the DVD video camera/
recorder in a place subject to strong
magnetism or intense vibrations:
• This could cause malfunctions.
Detach the battery from DVD video
camera/recorder and store it in a cool
place:
• Leaving the battery attached or storing it at high
temperature could shorten its life.
Copyright:
• The data recorded on the disc in your DVD video
camera/recorder through other digital/analog
media or devices are protected by the copyright
act and cannot be used without permission of
the owner of copyright, except for personal enjoyment. Note that, even for personal enjoyment,
recording is prohibited for some demonstrations, performances and exhibitions.
The recorded contents cannot be compensated for:
• Hitachi will not compensate for any damages
caused when a recording is not made normally
or the recorded contents cannot be played back
because of a defect in the DVD video camera/
recorder or disc. Also, Hitachi will not be r esponsible for your recorded video and audio.
22

Discs
● Available Discs
Usable discs and logos
DVD-RAM Ver. 2.1
(8 cm)
DVD-R [for General
Ver. 2.0 (8 cm)]
This DVD video camera/recorder can use 8 cm
DVD-RAM discs and 8 cm DVD-R discs for
camcorder use.
An uncovered disc cannot be used on this DVD
video camera/recorder: It must be left in a cartridge
or caddy for 8 cm disc.
Note: It is recommended that you use Hitachi
Maxell discs because their compatibility with this
DVD video camera/recorder has been confirmed.
Using a disc other than that made by Hitachi
Maxell may not allow the DVD video camera/recorder to deliver optimum performance.
● Information on DVD-R disc
For optimum recording on DVD-R disc, the DVD
video camera/recorder writes control data to the
disc in order to make adjustment when it is inserted
and ejected accompanying recording.
However, repeating this adjustment many times
may cause the disc to become unrecordable: Do not
insert or eject the disc accompanying recording
more than 50 times.
Examples of discs that cannot be used on
this DVD video camera/recorder:
Discs other than those with diameter of 8 cm, DVDRAM (2.6 G) V er. 1.0, DVD-R (3.9 G) Ver . 1.0, DVDR (4.7 G) for Authoring Ver. 2.0, DVD-RW,
DVD+RW, DVD+R, DVD-Video, DVD-ROM, CDR, CD-RW , CD, CD-ROM, MO, MD, iD, LD, floppy
disk, etc.
● Initializing (formatting) DVD-RAM
Discs
This DVD video camera/recorder can use DVDRAM discs for AV formatted in accordance with
the UDF 2.01 file system : No recording can be made
on an unformatted disc.
See “Initializing DVD-RAM Disc” on page 88 for
the initializing procedure.
● Finalizing DVD-R Disc
Before using the 8 cm DVD-R disc recorded on this
DVD video camera/recorder on a DVD player or
DVD recorder that is compatible with 8 cm DVDR disc, the disc must be finalized on this DVD video
camera/recorder . For the finalizing pr ocedure of 8
cm DVD-R disc, refer to “Finalizing Disc” (p. 90).
● When using DVD-R disc
If you finalize a recorded DVD-R disc, you can play
it back on devices that are compatible with 8 cm
DVD-R disc, or (on) computers* with DVD-ROM
drive, DVD-R drive or DVD-RAM drive.
• Although most DVD-R discs recorded on this
DVD video camera/recorder are compatible for
playback on other DVD players, playback of all
DVD-R discs cannot be guaranteed.
Depending on the DVD player, DVD-R disc, or r ecording conditions, playback may not be possible.
In such cases, use this DVD video camera/recorder
to play back the DVD-R disc.
* To play back the finalized DVD-R disc on PC,
you will need DVD playback software. The DVD
playback software “Power DVD XP” is supplied
with the optional DZ-WINPC3(W).
● Handling Disc
If you use a DVD-RAM disc or DVD-R disc to which
dirt or dust adheres, recognition of the disc may not
be possible when it is inserted into this DVD video
camera/recorder. Also, the DVD video camera/recorder may stop during recording or playback, or
noise/disturbance of image may occur during playback.
The same phenomenon may appear if condensation
occurs because of abrupt change in temperature.
• If an error message appears on the LCD screen
while this DVD video camera/recorder is being
used, turn off the DVD video camera/recorder
once, and then turn it on again (P.101).
• If an error message appears when the DVD
video camera/recorder is being used in an environment where the temperature is high or it is
used continuously , turn off the DVD video camera/recorder, and after a while turn it on again.
• If an error message appears when the DVD
video camera/recorder is being used in an environment where the temperature is low, leave
it powered for several minutes, turn it off, and
then on again.
• When the disc is used for an extended period of
time, the temperature will increase because of
the heat inside the DVD video camera/recorder:
Be careful when removing the disc.
• Normally, do not remove the disc from the cartridge or caddy, and do not open the shutter of
cartridge or caddy.
ENGLISH
23

Note: Most generally available 8 cm discs can be
removed from cartridges or caddies if they are for
video cameras; However, before removing disc
from cartridge or caddy, read the instruction sheet
provided with the disc or consult the disc maker.
Take care with the following when handling the
removed disc:
ENGLISH
•Be sure not to touch disc surfaces.
•Be careful not to drop the disc removed from
cartridge or caddy.
•Be sure not to bend the disc.
•Do not leave the disc outside the cartridge or
caddy.
•Do not subject the disc to heat.
•Do not write on disc with a ball-point pen or pen-
cil. (With one-side recordable disc, writing on the
label surface is possible with a pen that does not
scratch the surface. No writing of any kind is possible on both-side recordable disc.)
•Be sure not to wipe disc surfaces with thinner,
water or anti-static agent.
Use dry, soft cloth to lightly wipe off dust or dirt
that adheres to the disc. Never use solvents to
clean the disc.
Note: If the disc is removed from cartridge or
caddy and the data stored by this DVD video
camera/recorder is rewritten on devices other
than this DVD video camera/recorder, recording
or playback may not be normal, or Disc Navigation may not operate normally, when the disc replaced in cartridge or caddy is used on this DVD
video camera/recorder again.
Note: The cartridge or caddy protects the surfaces of disc on which high-density recording is
possible. Once removed from cartridge or caddy,
the disc can be replaced in the cartridge or caddy
and used with this DVD video camera/recorder,
but be sure to observe the following:
•Before replacing the disc in cartridge or caddy,
make sure that disc surfaces are not scratched,
and that no dirt or fingerprint adheres to them.
•Do not record, edit or delete on the disc when
scratches, dirt or fingerprints cannot be removed
even if disc surface is cleaned.
•When replacing the DVD-RAM disc in cartridge,
insert it until a click is heard.
• Be careful not to allow condensation.
• T o store disc cartridge or caddy, insert in plastic
case provided.
Do not place the disc cartridge or caddy in the following places:
• Where exposed to direct sunlight for a long
time.
• Where the humidity is high, or in dusty place.
• Where exposed to heat from heater, etc.
• Where there may be condensation.
● About Stored Data
If you handle or use the disc incorrectly, the recorded data may be lost. Hitachi cannot be responsible for damages from loss of recorded data.
Removing and Replacing Disc from/in Cartridge or Caddy
The DVD-RAM disc used with this DVD video camera/recorder can be removed from the cartridge or
caddy and used with DVD-RAM drives, DVD players and DVD recorders that are compatible with 8 cm
DVD-RAM discs. The finalized DVD-R disc can also be removed from the cartridge or caddy and used
with DVD players and DVD recorders that are compatible for 8 cm DVD-R discs. Refer to the disc instruction sheet for details on how to remove disc from cartridge or caddy.
Perform the following to remove the disc:
● With disc packed in cartridge
Removing the disc
Release the lock pins of cartridge. The two lock pins
1
are at the bottom left corners of sides A and B.
Lock pins
Use a fine tipped pen to slide the lock pin in the
direction of arrow 1, and then turn it in the direction of arrow 2 to release it.
24
While pushing the release levers from both sides
2
inward, hold the center of disc tray and pull it
out to the front.

● With disc packed in caddy
Removing the disc
Insert your finger
1
into the hole in the
center of disc and
lightly lift it up (in
the direction of arrow 1).
Hold the disc at its edge and center hole, and
2
remove it in the direction of arrow 2.
Replacing the disc in caddy
Hold the disc at its
1
edge and center hole
with the recording
surface down.
Insert the disc under
2
the claws at the disc
hold portion from
the direction of arrow 3.
Gently push the disc
in until it is completely stored.
claws
Replacing the disc in cartridge
Insert the disc into cartridge.
1
S
I
D
E
A
Indication of side
mark facing up
Fit in the disc tray until a click is heard.
2
Write-protect tabs
The cartridge has write-protect tabs to prevent
overwriting on recorded data. Make sure that the
write-protect tab is set to the side where recording
is possible.
PROTECT A
Tab for side B
Recording possible
Recording not possible
Note: When recording special events, be sure to
use a new disc which has never been removed
from cartridge or caddy.
Note: Writing similar to recording is performed
even with simple editing or deletion. Make sure that
editing or deletion has been securely performed
with the disc removed from cartridge or caddy.
Note: If there are dust, scratches or dirt on the
surface of disc, block noise may appear in image
or sound may be interrupted. Take great care
when handling discs so that no dirt or fingerprints
adheres to them.
Note: This DVD video camera/recorder has a
function that allows recording, avoiding portions
of the disc with dust, scratches or dirt [The DVD
video camera/recorder sets to pause (
and automatically restarts recording (
will interrupt recording for several seconds to several minutes, and multiple thumbnails will be created (see p. 67) in one recording as shown in the
figure. In this case, the recordable time will decrease.
Tab for side A
PROTECT A
PROTECT A
) status
)]. This
ENGLISH
25

Disc Storage Capacity
The movies and stills that can be recorded on an 8 cm disc used in this DVD video camera/recorder ar e
as follows: Prepare discs according to the scheduled recording time and conditions.
● DVD-RAM disc storage capacity
ENGLISH
Recordable time of movies on
DVD-RAM disc
Movie quality mode
XTRA (VBR*1)
FINE (MPEG2,
approx. 6 Mbps)
STD (MPEG2,
approx. 3 Mbps)
*
When recording only movies (containing video and
audio)
*
The total recordable time is half on each side
of disc.
1
*
VBR stands for Variable Bit Rate.
Recordable time
approx. 36-120
minutes(varies depend-
ing on the subject)
approx. 60 zminutes
approx. 120 minutes
Number of recordable stills on
DVD-RAM disc
Up to 999 stills per side (when recording only stills)
If the disc still has free space after recording 999
stills, movie can be recorded.
● Recordable time on DVD-R disc
Movie quality mode
FINE (MPEG2,
approx. 6 Mbps)
STD (MPEG2,
approx. 3 Mbps)
• When using DVD-R disc, no still image can be
recorded on this DVD video camera/recorder.
• When using DVD-R disc, the recording quality
mode first used for recording on that disc is a
fixed mode: It cannot be changed on that disc.
Recordable time
approx. 30 minutes/side
approx. 60 minutes/side
26
Setups
This section explains preparations for recording - setting up the DVD video camera/recorder and
battery pack.
Setting Up the DVD video camera/recorder
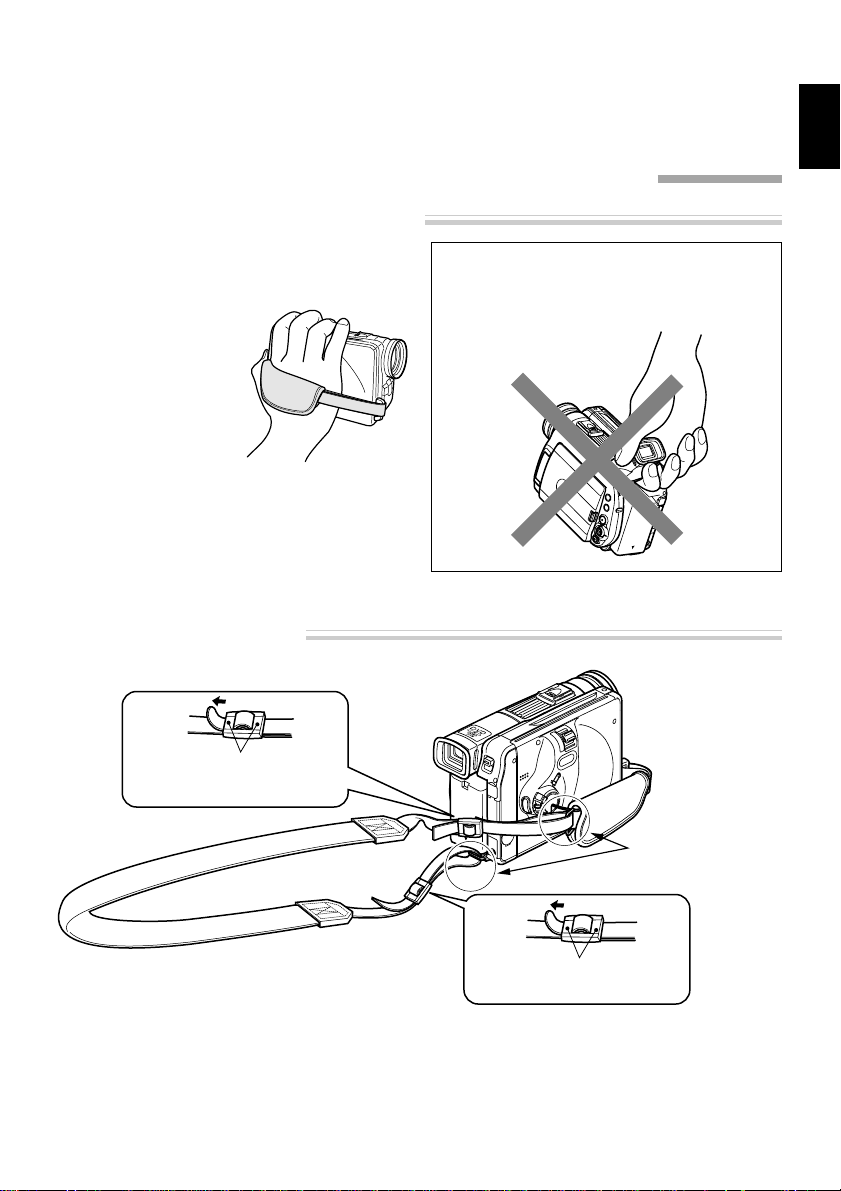
Holding DVD video camera/recorder
Insert your right hand from the bottom of DVD
video camera/recorder up to the base of your
thumb.
Put your hand in a position where you can
easily operate the REC
button and the Zoom
lever.
Adjust the length of
hand strap so that the
DVD video camera/recorder is stable when
you press the REC button with your thumb.
Note: Do not adjust the hand strap while holding
the DVD video camera/recorder: Doing this could
cause the DVD video camera/recorder to fall and
be damaged.
Attaching Shoulder Strap
Caution: Do not lift the DVD video camera/re-
corder by holding the viewfinder or LCD monitor: If the viewfinder or LCD monitor comes off,
the DVD video camera/recorder will fall.
ENGLISH
Be sure to pass through
the 2 slots.
Pass the shoulder strap
through the shoulder
strap attachments.
Be sure to pass through
the 2 slots.
27

Attaching Lens Cap
Pass the provided string through the hole in the lens cap and attach it to the hand strap of DVD video
camera/recorder.
Use the string to attach the cap to the DVD video
1
ENGLISH
camera/recorder.
Push the both sides of cap inward and attach it
2
over the lens.
Note: Always keep the lens cap on when not using the DVD video camera/recorder, to protect
the lens.
Note: When recording, attach the lens cap to the
hand strap by hooking the tab inside the cap onto
strap for comfortable shooting.
Attaching Ferrite Cores
Although the cores are not attached in the illustrations of the cables in text, be sure to attach the
ferrite core (provided) to the S-VIDEO cable using the following procedure (the ferrite core was attached to the AV output cable at the factory):
(Ferrite cores reduce radio interference with your radio and TV.)
Open the cover of ferrite core.
1
Attach the core to the S-VIDEO cable at a posi-
2
tion approximately 5 cm from its end.
Close the cover of core, taking care that it does
3
not catch the S-VIDEO cable.
Note: If you use an external microphone when
recording, attach the ferrite core (provided) to the
cable at a position approximately 5 cm from its
end: Wind the microphone cable round the core
once in the same way as for the S-VIDEO cable.
Using external microphone in modes other than
camera recording is not recommended.
28
5 cm

Inserting Batteries into Remote Control
Insert two AA (LR06) batteries (provided) into the remote control to power it.
Open the battery compartment lid on the back
1
of remote control and insert the batteries.
Close the lid.
2
Note: If the batteries are discharged, pressing any
button on remote control cannot operate the DVD
video camera/recorder: Replace the batteries.
ENGLISH
● Using Remote Control
Point the remote control to the infrared receiver on
the DVD video camera/recorder. The remote controllable distance is up to 5 m.
10
15
10
15
Approx. 5 m
Note: When using the remote control, make sure
that the infrared receiver on DVD video camera/
recorder is not exposed to direct sunlight or any
intense light. If the infrared receiver is subject to
light stronger than the infrared light from remote
control, the DVD video camera/recorder cannot
be operated by remote control.
Note: If there is an obstacle between the remote
control and infrared receiver on DVD video camera/recorder , remote control may not be possible.
Note: The DVD video camera/recorder uses the
“VCR2” remote control code of Hitachi VCRs. If
you use a Hitachi VCR, etc. with remote control
code set to “VCR2”, a VCR placed near the DVD
video camera/recorder will also be operated by
the remote control: To prevent this, change the
remote control code of the VCR.
29
Setting Up the Battery
The DZ-BP14(R) battery pack provided with this DVD video camera/recorder has not been charged at
purchase time: Charge it before using the DVD video camera/recorder.
ENGLISH
Note: Be sure to use the specified battery DZ-BP14(R)/DZ-BP16 (sold separately) or DZ-BP28 (sold separately) for the DVD video camera/recorder: Using other batteries could cause the DVD video camera/
recorder to malfunction, or result in fire.
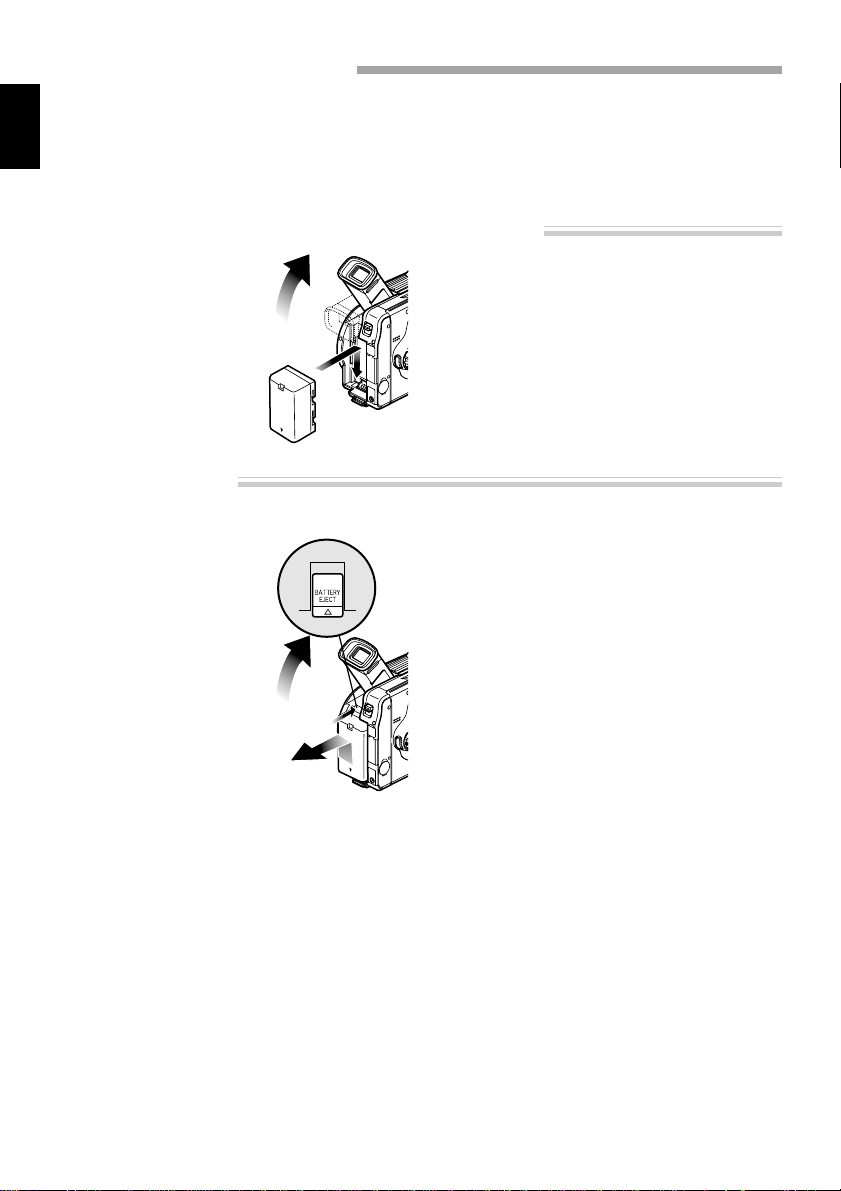
Attaching Battery to DVD video camera/recorder
Raise the view-
1
finder.
Align the top of bat-
2
tery with the top
surface of battery attachment platform
of DVD video camera/recorder.
Removing Battery
After using the DVD video camera/recorder, remove the battery from it.
Set the power switch
1
to “POWER OFF” to
turn the DVD video
camera/recorder
off.
Raise the view-
2
finder.
While fitting the battery onto the DVD video
3
camera/recorder , slide it downward until a click
is heard.
Note: Make sure that the battery is securely attached: Incomplete attachment could cause the
battery to fall, resulting in damage.
While holding the BATTERY EJECT button
3
above the battery attachment platform, sllide the
battery upward to remove it.
Note: For safety, be sure to turn the DVD video
camera/recorder off before attaching or removing the battery.
Note: If the battery remains attached, minute
level current will flow even if the DVD video camera/recorder is off, and the battery will discharge.
30

Charging Battery
Use the provided AC adapter to charge the battery.
Attach the battery pack to the DVD video cam-
1
era/recorder.
Connect the AC adapter between the DC IN 8.4V
2
jack on DVD video camera/recorder and an AC
outlet.
The CHARGE/ACCESS indicator will blink in
green and charging will start.
CHARGE/ACCESS
indicator
Note: Charge the battery in the temperature
range of 10 °C - 30 °C.
Note: Make sure that the battery is securely installed: Incomplete attachment could cause the
battery to fall and be damaged.
Note: If the power switch is set to “
PHOTO”, charging will not be performed.
“
Note: When connecting the power cable to the
DVD video camera/recorder, the pin of power
cable cannot be completely inserted into the DC
IN 8.4V jack, but this does not indicate a malfunction. Do not insert the power cable with undue
force: Doing so could result in malfunction.
Power cable
AC adapter
● Battery pack charged status
You can realize the charged status of battery by checking the CHARGE/ACCESS indicator:
Charged status CHARGE/ACCESS indicator
0-50% Blinks once per 1-2 seconds
51-75% Blinks twice per 1-2 seconds
76% or more Blinks three times per 1-2 seconds
Fully charged Remains lit
ENGLISH
VIDEO” or
31

● Continuously recordable time on
DVD video camera/recorder with
fully charged battery
The reference for DVD video camera/recorder recordable time with fully charged battery is between
ENGLISH
40 and 60 minutes [with model DZ-BP14(R)/DZBP16 (sold separately)] or between 70 and 100 minutes (with model DZ-BP28 (sold separately)):
Battery
When using
viewfinder
(in XTRA mode*)
When using
LCD monitor
(in XTRA mode*)
When using
viewfinder
(in FINE mode)
When using
LCD monitor
(in FINE mode)
When using
viewfinder
(in STD mode)
When using
LCD monitor
(in STD mode)
* The time in XTRA mode is only for reference: It
varies depending on recording contents.
DZ-BP14(R)/
DZ-BP16(Sold
separately)
DVD-
DVD-R
RAM
115 min
95 min
115 min
95 min
125 min
110 min
—
—
110 min
90 min
120 min
105 min
DZ-BP28
(Sold separately)
DVD-
RAM
185 min
160 min
185 min
160 min
210 min
180 min
(approx.)
DVD-R
—
—
180 min
155 min
205 min
175 min
Without any extraordinary operation, such
as zooming:
The continuously DVD video camera/recorder recordable time in the above table shows the time
available when the DVD video camera/recorder is
in the recording mode without using any other
function after recording is started. In actual recording, the battery will discharge 2-3 times faster than
this reference, since the REC button and zoom are
being operated, and playback is performed. Assume that the recordable time with a fully charged
battery is between 40 and 60 minutes [with model
DZ-BP14(R)/DZ-BP16 (sold separately)] or between 70 and 100 minutes (with model DZ-BP28
(sold separately)), and prepare the type and
number of batteries to allow for the time you are
planning to record on the DVD video camera/recorder.
Note that the battery discharges faster in cold
places.
● The time taken for charging the
battery is as follows (at 25 °C)
DZ-BP14(R)/DZ-BP16
(sold separately)
170 min
Note: During and after charging, the battery will
be warm, but this does not indicate a fault.
Note: If the following phenomena appear, the
battery may be dead: Replace it.
– Charging does not start within 10 seconds (the
CHARGE/ACCESS indicator does not light)
– The battery cannot be charged up to 75% if
more than 9 hours has elapsed after charging
started.
– The battery cannot be fully charged if more
than 5 hours has elapsed after it was charged
to 75%.
Note: Charge the battery at ambient temperature 10°C to 30°C: Charging at temperatures other
than this range could damage the battery.
DZ-BP28
(sold separately)
270 min
32

Battery Remaining Level Indicator
When the battery is used to power the DVD video camera/recorder , the battery remaining level appears
in the viewfinder or on the LCD screen as follows:
Fully charged Nearly empty
(Blinks)
White portion shows
remaining level
Handling the dead battery
• Do not dispose of the dead battery: Let
a rechargeable battery recycling cooperative store take charge of it.
Charge
marker
Using charge marker
• For a charged battery, slide the charge
marker knob at rear so that the charge
marker (●) is visible: Uncharged batteries can thus be easily identified.
ENGLISH
Note: Be sure to use the specified battery (DZBP14(R)/DZ-BP16 (sold separately) or DZ-BP28 (sold
separately)). Using other batteries could cause
faulty DVD video camera/recorder operation, or
possibly a fire.
Note: If a charged battery is stored, it will discharge
on its own; therefore, it is recommended that you
charge the battery shortly before using the DVD
video camera/recorder , such as on the day before
you plan to use it. You do not need to completely
discharge the battery before charging it.
Note: When you are not using the DVD video camera/recorder, remove the battery and store it in a
dark, cool place. If you store it in a place where the
temperature is high, the battery life will be shortened. Especially be sure not to store the battery in
an environment (in a closed vehicle) over 60 °C:
Neglecting this could damage the battery.
Note: It is recommended that you fully charge the
battery once a year, attach it to the DVD video
camera/recorder and use it up; then remove the
battery and store it in a cool place again.
Note: The battery can be repeatedly charged
and used, but will eventually be dead: The battery life varies greatly depending on the ambient
environment and how often the DVD video camera/recorder is used. If the usable time of DVD
video camera/recorder with a fully charged battery is noticeably short, the battery is probably
dead: Purchase a new battery.
33

Using DVD video camera/recorder with AC Adapter
V
It is recommended that you use the AC adapter to power the DVD video camera/recorder from
household AC outlet when you perform settings on it, play back or edit images, or use it indoors. And
be sure to use the AC adapter to power the DVD video camera/recorder when finalizing a disc.
ENGLISH
Note: Be sure to use the specified AC adapter to power the DVD video camera/recorder. Using other AC
adapters could cause electric shock or result in fire.
CHARGE/ACCESS
indicator
Set the power switch to “POWER OFF” to turn
1
the DVD video camera/recorder off.
Connect the AC adapter between the DC IN 8.4V
2
jack on DVD video camera/recorder and an AC
outlet.
Power cable
AC adapter
Note: The AC adapter can be used around the
world. An AC plug adapter is required in some foreign countries. If you need one purchase it from
your Hitachi distributor.
Note: If the CHARGE/ACCESS indicator does not
light when the AC adapter is plugged into AC
outlet, unplug it from the AC outlet, wait a few moments, and then plug it into the AC outlet again. If
the CHARGE/ACCESS indicator still does not light,
the AC adapter may be faulty. Unplug it from the
AC outlet and consult your dealer.
AC 100-120
AC Plug Adapter(not supplied)
34

Setting Date and Time
Set the current date and time correctly so that the date and time you make a recording can be
recorded correctly.
Setting the correct date and time will allow you to store the correct information on recording.
(The following procedure can also be used to correct the date and time you have already set.)
MENU
button
Joystick
Power switch
ENGLISH
Set the power switch to “ VIDEO” or
1
“ PHOTO” to turn the DVD video camera/
recorder on.
Press the MENU button.
2
The menu screen will appear.
Use the joystick to
3
choose “Date Setup”
and then “Date Set”.
Press the button.
4
The figure for the day will be selected.
[The digit that is highlighted first depends on
the date display format
(set up in Date Mode):
The digit on the left end
of the date display will
be first highlighted.]
Note: After setting the figure for the day, tilt the
joystick to right to select the digit to be set. If you
press the
the day, the screen for verifying the set date will
appear instead of screen for setting month, year
or time.
button after selecting the figure for
Tilt the joystick to left or
5
right to select the digit
you want to set in sequence.
Tilt the joystick up or
down to select the
number for current
date/time, and then repeat step 5 to set the current date and time.
After setting the current
6
date and time, press the
button.
The screen for verifying
the set date will appear.
If the displayed date and time are correct, use
7
the joystick to choose “YES”, and then press the
button.
The date and time will be set, and the DVD video
camera/recorder will enter the recording pause
status.
Choosing “NO” will restore the menu screen.
Note: This DVD video camera/recorder incorporates a rechargeable battery to store the date and
time in memory. If this built-in battery is exhausted,
the date and time will be reset. To prevent this,
connect the AC adapter to DVD video camera/
recorder , and leave them for at least 24 hours with
the DVD video camera/recorder turned off: The
built-in battery will be charged.
35

Changing Display Format of Date and Time
You can select one of three date display formats: day/month/year, month/day/year or year/month/
day. Associated with the selected date display, the time display format will also change as follows:
ENGLISH
Press the MENU button.
1
The menu screen will appear.
Use the joystick to
2
choose “Date Mode”
on the “Date Setup”
menu screen, and then
press the button.
The options will appear on the right of “Date
Mode”: The mark will be attached to the currently selected option.
Display format
D/M/Y
M/D/Y
Y/M/D
Example of display
17:30
25/5/2002
5:30PM
5/25/2002
PM5:30
2002/5/25
Use the joystick to se-
3
lect the desired date
display format, and
then press the button.
The menu screen for setting date will be restored,
and the “Date Mode” has been changed as you
designated.
Press the MENU button to switch off the menu
4
screen.
Note: If the date display format has been
changed, the display format during playback as
well as during recording will also be changed (see
p. 53).
36

Inserting and Ejecting Disc
Inserting Disc
With this DVD video camera/recorder the recorded video and audio are stored on DVD-RAM* or DVD-R disc.
* When using an uninitialized DVD-RAM disc, it must be formatted (see p. 88).
Make sure that the
1
DVD video camera/
recorder is turned off.
Set the power switch to
“POWER OFF”.
Press down the DISC
2
EJECT button.
The cover of disc
insertion block (hand
strap) will slightly
open.
Gently open the
3
cover by hand
until it stops.
Power switch
DISC EJECT button
How to set both-side recordable disc
•The actual recording surface of side [A] is op-
posite to that on which “SIDE A” is marked. If
you view the image recorded on side [A] on
another device, set the disc in it with indication “SIDE A” facing up.
Side A
A
indication of
disc
Laser
Actual
recording
surface
•The cartridge has a fixed orientation when it
is inserted into the DVD video camera/recorder: Insert it correctly referring to the illustration shown below.
To record on side [B], turn the cartridge over.
ENGLISH
Insert the disc, in cartridge or caddy, into the
4
disc guide.
Set a both-side recordable disc into the disc guide
so that the label of side on which you want to
record faces the hand strap.
How to set one-side recordable disc
•Set the disc with the label side up in the caddy ,
and then insert the caddy correctly referring
to the illustration shown below.
The caddy has a mark: Insert it with this
mark forward.
37

Gently push the section indicated “PUSH/
5
CLOSE” on the cover of disc insertion block
(hand strap), to close the cover.
ENGLISH
Turn the DVD video camera/recorder on.
6
Set the power switch to “ VIDEO” or “
PHOTO”: An image will appear in the viewfinder and disc recognition will start.
Note: If the disc is forcibly inserted from the wrong
direction, the DVD video camera/recorder , or cartridge or caddy could be damaged.
Note: When using a one-sided recordable disc,
insert it with the recording surface facing the inside of DVD video camera/recorder.
● When using DVD-RAM disc
The subject image will appear in the viewfinder or
on LCD screen, and the DVD video camera/recorder will start to recognize the disc. Subsequently ,
the DVD video camera/recorder will enter the recording pause status.
Recording
pause
(In case of movie)
● When using DVD-R disc
Recognition of the disc will
start.
When you use a brand-new
disc, the messages on the
right will appear in sequence by pressing the
button between messages.
When recording on
this DVD video camera/recorder:
When message “Format the
disc now?” appears, choose
“YES” and then press the
button. The disc will
be automatically formatted
for use on this DVD video
camera/recorder.
After formatting, message
“DVD-R disc, Video mode
cannot be changed” will
appear (see page 26): Press
the button to erase the
message.
Once formatted, a DVD-R disc can no longer be
changed to a disc for PC, even if it has not been
recorded on this DVD video camera/recorder.
When recording data from PC:
While the above messages are being displayed,
press the button, or when message “Format the
disc now?” appears, choose “NO” and then press
the button.
However, if data fr om PC has not yet been recorded,
the disc can be made usable on this DVD video camera/recorder . When inserting the disc into this DVD
video camera/recorder , the same message will appear: If you wish to use it on this DVD video camera/recorder, choose “YES”.
38
Note: It will take more time than usual after the
disc is inserted before recording can begin in the
following cases:
– When the cover of disc insertion block is open
– When the date changes (first recording of a day)
– When the temperature has changed greatly
from the previous recording status
– When a disc with scratches, dirt or fingerprints is
inserted
Note: If the following discs are inserted, the Disc
Navigation screen will appear or some message
will be displayed:
– Disc with little remaining free space
– Write-protected disc
– Finalized DVD-R disc
– Disc recorded on another device
– Unknown type of disc

Removing Disc
Set the power switch to “POWER OFF” to turn
1
the DVD video camera/recorder off.
A click will be heard, which means that the disc
is unlocked and can be removed.
Push down the DISC EJECT button.
2
The cover of disc insertion block (hand strap)
will open slightly.
Gently open the cover until it stops.
3
When the cover is fully open, the disc will
slightly come out from the disc guide, and stop.
Note: Do not remove the disc with the battery
attachment platform of DVD video camera/recorder facing down: Disc could fall out.
Remove the disc.
4
Hold the disc by its sides as shown in the illustration and gently pull it out.
Note: Be careful when removing the disc, since
the temperature at the shutter will be very high.
Gently push the section indicated “PUSH/
5
CLOSE” on the cover of disc insertion block
(hand strap), to close the cover.
PUSH
CLOSE
Note: Even after the DVD video camera/recorder
is turned on, the disc can be removed unless it is in
recording status. Press down the DISC EJECT button and hold it for at least 2 seconds: A click will
be heard and the disc will be unlocked. Push down
the DISC EJECT button once again to remove the
disc. (The DISC EJECT indicator on the LCD screen
will change from white to pink at this time.) It is
recommended that you turn the DVD video camera/recorder off before inserting or ejecting disc
to prevent misoperation.
Note: Do not insert anything other than the 8 cm
DVD-RAM disc or DVD-R disc into the disc insertion
block: Doing so could cause malfunctions.
Note: Set the power switch to “POWER OFF” to
turn the DVD video camera/recorder off. Do not
remove the battery to turn the camera/recorder
off: If you do so, the disc cannot be removed. If
the disc cannot be removed, use the AC adapter ,
etc. to power the DVD video camera/recorder.
Set the power switch to “
OFF” to make sure by the sound that the disc is
unlocked, and then remove the disc.
Note: If you push down the DISC EJECT button,
the disc will not come out until it completely stops
rotating. After the lock release sound is heard, wait
for a few moments and then push down the DISC
EJECT button again.
VIDEO”, then “POWER
ENGLISH
39

Basic Techniques
This section explains about recording of movies and still images, and also basic settings on DVD video
camera/recorder.
ENGLISH
Basic Handling of DVD video camera/recorder
Turning DVD Video Camera/Recorder On
While holding down the red button at the center
of power switch, turn the switch to set it to
“ VIDEO” or “ PHOTO”.
Note: When power is turned on, the self-diagnosis
function of DVD video camera/recorder may work,
and some message may appear. If any message
appears, refer to “Trouble Messages” (p. 100).
Power switch
Opening LCD Monitor
If you open the LCD monitor, you can monitor subject image on the LCD scr een. If the monitor is open,
the viewfinder will be off.
Press the OPEN button to open the LCD monitor .
The LCD monitor can be opened up to approximately 90°.
If the LCD monitor is open 90°, it can be tilted
with screen down as much as 90°, and can also
be tilted with screen up and turned up to 180° so
the screen faces in the same direction as the lens.
Tilt the LCD monitor to adjust its vertical angle
so that you can see the screen easily.
OPEN button
90°
Note: Be sure to open the LCD monitor approximately 90° before changing its vertical angle.
Note: Do not record for a prolonged time with the
LCD monitor turned approximately 180 ° in close
contact with the DVD video camera/recorder
body: Doing this could cause the DVD video camera/recorder and LCD monitor to become hot.
40
180°
90°

LCD Screen Brightness Adjustment
Press the LCD BRIGHT button.
1
The “BRIGHT” indicator will light on the scr een.
(The indicator will go out in approximately 5
seconds.)
BRIGHT indicator
Use the button to adjust the brightness.
2
Pressing will change the brightness of LCD
screen and also move the position of “BRIGHT”
bar scale.
Closing LCD Monitor
B
efore closing the LCD monitor, be sure to reset it
at right angles to the DVD video camera/recorder.
Replace the LCD monitor on the DVD video
camera/recorder with the LCD screen facing
inward until a click is heard.
Note: Be sure to return the LCD monitor at right
angles to the DVD video camera/recorder before
closing it or replacing it on the DVD video camera/recorder with its screen facing outside. If the
LCD monitor is tilted, it cannot be closed to the
DVD video camera/recorder.
Note: If the LCD monitor is not securely locked to
the DVD video camera/recorder, no image will
appear in the viewfinder.
LCD BRIGHT button
button
ENGLISH
Viewing Subject through Viewfinder
Adjust the angle of viewfinder as you like, and
fit your eye to the eyecup.
If the image is blurred, you can adjust the focus.
Adjust the diopter control under the eyecup so
that the subject image can be seen clearly.
Note: If the LCD monitor is open, the viewfinder
will be off.
Diopter control
41

Recording Movie
Insert a recordable DVD-RAM or DVD-R disc into this DVD video camera/recorder.
Note: When recording in a dark place, it is recommended that you use the optional video light
ENGLISH
CHARGE/ACCESS
indicator
Set the power switch to “ VIDEO”.
1
REC button
LOCK switch
Power switch
Once the DVD video camera/recorder starts to
recognize the disc, the CHARGE/ACCESS indicator will light.
When recognition is finished, the CHARGE/
ACCESS indicator will go out.
Press the REC button.
2
The “ ” mark in the viewfinder or on the LCD
screen will change to the “ ” mark, and recording will start.
During recording, the recording indicator on the
front of DVD video camera/recorder will light.
Pressing REC again during recording will set the
DVD video camera/recorder to the recording
pause status.
When recording is finished, set the power switch
3
to “POWER OFF” to turn the DVD video camera/recorder off.
(model DZ-LD9). Refer to the instruction manual of
video light for details.
Note: Press down the LOCK switch above the
power switch to lock movie recording: The power
switch will lock and thereafter will not move to
“
PHOTO” by mistake.
Note: Sound is recorded from the stereo microphone on the front of DVD video camera/recorder:
Take care that this microphone is not blocked.
Note: You can press the REC button immediately
after recording is finished, but no further recording
will be made while “DISC ACCESS” is being displayed.
Recording will restart after the message disappears.
Note: If a very bright subject is recorded, stripe-like
lights may appear above and below the subject.
Note: Take care that power is not interrupted
while the CHARGE/ACCESS indicator is blinking.
Note: The minimum recordable time of movie is
approximately 3 seconds.
Note: See page 65 for setting of Record LED (recording indicator) On/Off.
Note: For various functions available during recording, see “Setting Up Camera Functions” on page 54.
Note: Hitachi cannot be responsible for video
and audio that cannot be recorded or edited because of any defect.
Note: The power switch can be changed over
even during recording, but the operation will not
be changed.
●
Power save and discharge of battery
If, when “Power Save: On” is specified, the DVD video
camera/recorder is left in the r ecording pause status for
approximately 5 minutes, it will automatically turn of f.
To restart recording, set the power switch to
“POWER OFF”, and then set it to “ VIDEO”.
To set or release power save, see “Setting or Releasing Power Save” on page 64.
It is recommended that you specify “Power Save: On”,
since even during recording pause battery power is
consumed at the same level as during recording. Especially when power save has been released, turn the
DVD video camera/recorder off when not in use.
Using External Microphone
Connect external microphone (generally available) to the external microphone jack of this DVD video
camera/recorder . Clearer sound can be r ecorded. Turn on the switch on microphone and start recording.
For details on microphone, see “Major Specifications” on page 111.
To external
microphone jack
42

Recording Stills
This DVD video camera/recorder can record two types of still image on disc - a still to be viewed on TV
(MPEG image of 704×576 pixels) and a still to be used on PC (JPEG image of 1280 × 960 pixels).
Note: Recording of still images is possible only on DVD-RAM disc.
ENGLISH
Set the power switch to “ PHOTO” to turn
1
the DVD video camera/recorder on.
Once the DVD video camera/recorder starts to
recognize the disc, the CHARGE/ACCESS indicator will light.
When recognition is finished, the CHARGE/
ACCESS indicator will go out.
Make sure that appears on the screen (viewfinder or LCD).
Still recording mode
Number of recordable stills
Note: If the power switch is set to “ PHOTO”,
the LOCK switch cannot be moved. Do not try to
force it: Doing so could cause a fault.
Check the subject on the screen (viewfinder or
2
LCD).
Press the REC button.
3
The DVD video camera/recorder automatically
focuses on the subject at the center of screen
(when auto focus is selected).
The screen will be black, and then the recorded
still will be displayed.
When message "DISC ACCESS" disappears, recording of still will be complete.
Set the power switch to “POWER OFF” to turn
4
the DVD video camera/recorder off.
Note: When the power switch is set to “ PHOTO”,
flickering may occur in image on the LCD screen.
● Image quality
Still image
JPEG
1,280 × 960
The quality of still recording cannot be switched.
MPEG
704 × 576
External input
still image
JPEG
640 × 480
MPEG
704 × 576
(pixels)
● Setting Video Flash (sold separately)
When recording still images in a dark place, or
when the subject is lit from rear , it is recommended
that you use the optional Video Flash (model DZFLH3). Refer to the instruction manual of Video
Flash for details.
Setting
of Video
Flash
Auto
On-screen
information
(No
display)
On
Off
Note: Dark subjects may not be in clear focus even
if the Video Flash is used. It is recommended that
you light a subject when recording in a dark place.
Note: The DVD video camera/recorder automatically sets the shutter speed between 1/800 and 1/
30 second (between 1/800 and 1/10 second if Program AE has been set to Low Light) depending on
the subject brightness.
Note: During recording of stills, the electronic image stabilizer will not function.
Manner for
emitting light
Automatically emits
light in dark place or in
a place lit from rear.
Always emits light regardless of brightness
No light emission
43

Playing Back
Immediately Checking Recorded Scene
You can check your recording immediately on the spot.
ENGLISH
Speaker
buttons
Press button in the recording pause status.
1
button
Joystick
The DVD video camera/recorder will enter the
playback mode, and playback will start from the
first image of the scene you have recorded last.
When playback is finished, the DVD video camera/recorder will enter the pause status at the
last image on disc.
Skip Playback
During playback, tilt the joystick up or down
to locate the start of desired scene.
Tilt once :To return to the first image of
Tilt once :T o skip to the first image of the
Tilt and hold:To continuously locate the be-
Tilt and hold:To continuously locate the be-
the scene being played back,
and start playback.
scene following the one being
played back, and start playback.
ginnings of scenes, starting
from the scene preceding the
scene being played back. When
the desired image appears, release the joystick: Playback will
start from that point.
ginnings of scenes, starting
from the scene following the
scene being played back. When
the desired image appears, release the joystick: Playback will
start from that point.
Press the button.
2
Playback will stop, and recording pause status
will be restored.
Note: When the LCD monitor is opened, playback
sound will be heard from the speaker. Adjust the
sound volume using the volume control buttons
(
, ).
Note: To temporarily stop playback, press the
button. Press the button again to restart playback.
Note: Even if you stop playback midway and immediately start recording again, the new image
will always be recorded after previously recorded
images (these images will not be overwritten).
Note: When playback is finished, the
appear at the last image. If the DVD video camera/recorder is left without being operated, it will
return to the recording pause status after approximately 5 minutes.
Note: If the
mark is being displayed, playback will start from
the first scene recorded on disc.
Tilt up twice Tilt up once Tilt down once Tilt down twice
Scene 1 Scene 2 Scene 3
Portion being played back
Tilt up once Tilt down once Tilt down twice
Scene 1 Scene 2 Scene 3
Tilting up the joystick at a portion several
seconds from the start of scene being played back
will return to the start of the scene preceding that
being played back.
Note: If you perform skip playback during playback pause, the DVD video camera/recorder will
enter the playback pause status at the beginning
of the located scene.
Note: Tilting down
set the DVD video camera/recorder to the playback pause status at the last image.
Note: If the temperature inside the DVD video
camera/recorder is high, it may not operate normally. In such a case, turn the DVD video camera/recorder off, wait for a while, and then turn it
on again.
button is pressed while the
Portion being played back
in the last scene on disc will
mark will
44

Search Playback
During playback, tilt the joystick to left or right
and hold it: Search playback of scenes will
start.
: Scenes will be visually scanned forward
: Scenes will be visually scanned backward
Release the joystick when you find the desired
image: Normal playback will start from that
point.
Note: When you skip or search scenes from playback or playback pause, the screen will be dark
briefly.
Note: If the temperature inside the DVD video
camera/recorder is high, it may not operate normally. In such a case, turn the DVD video camera/recorder off, wait for a while, and then turn it
on again.
Frame Advance/Frame Back/Slow Playback
During playback pause, tilt the joystick to left
or right : Frame advance, frame back or slow
playback will start.
Tilt once :Picture will advance one frame.
Tilt once :
Tilt and hold :Forward slow playback
Tilt and hold :Reverse slow playback
Picture will go back half a second.
Note: In forward slow, a rapidly moving subject
image may be distorted.
Note: In reverse slow, the image will be rougher.
Note: No sound will be heard during search play-
back or slow playback.
ENGLISH
45

Searching for Point You Wish to View by Specifying It (Go To)
You can specify any point that you want to view in order to search for it.
Press the MENU button
1
during playback or
ENGLISH
playback pause.
The “Go To” menu
screen will appear.
Use the joystick to choose the option (point you
2
want to go to), and then press the button.
Top : To go to the start of first scene on disc
End : To go to the end of last scene on disc,
Specify : To go to a specified point and enter
(scene 1), and enter playback pause.
and enter playback pause.
playback pause. See the following for
details.
● Specifying the point to view
Choose “Specify” in step 2 above, and then pr ess
1
the button.
The screen for specifying the point to go to will
appear.
Position of currently
played back image
Cursor
Cursor position
* If no particular scene is selected, the total time of
all scenes recorded on disc will appear.
Use the joystick to select the desired time of cho-
2
sen point.
: To select the start of first scene on disc.
: To select the end of last scene on disc.
: To move the cursor toward the end of
last scene on disc in one-minute units.
: To move the cursor toward the start of
first scene on disc in units of a minute.
Total recording time of
all selected scenes *
46
(When the start of scene is selected)
Press the button to enter the selection.
3
The DVD video camera/recorder will go to the
specified point and enter the playback pause
status.
T o cancel the “Go T o” procedur e midway , pr ess the
button before going to the specified point.
Note: The cursor may not move at same-pitch intervals.

W
T
Zooming
This DVD video camera/recorder can optically zoom in on subject up to 12 powers, digitally multiplied
by 20 powers for movie recording and 4 powers for still recording.
Move the zoom lever down to “T” control side,
and the subject image will gradually become
telescopic: Move the zoom lever up to “W” control side, and the image will widen.
If Dig. Zoom 48x or 240x is specified, moving
the zoom lever down to “T” control side will
engage the digital zoom midway (see page 57).
Note: The setting of digital zoom 240x is effective
only during movie recording. If you specify 240x in
the still recording mode, the digital zoom will automatically be set to 48x.
Note: When a subject is zoomed, it may be momentarily out of focus.
Note: When digital zoom is engaged, the image
quality will be rougher.
Note: If the zoom ratio is frequently changed at
short intervals, the recorded image will be unclear.
Recording in
wide area
Zoom Up
Digital zoom range
Recording
enlarged
image
ENGLISH
1 x 12 x 13 x 48 x 240 x
Zoom back
* For movie only
*
47

Focusing When Recording Movie
This DVD video camera/recorder automatically focuses a subject at the center of screen (auto-focus).
When the DVD video camera/recorder is turned on, auto-focus will always be set.
ENGLISH
Focusing range
You can switch the display mode of on-screen information:
• On T (tele) side: approximately 1 m from lens surface to infinity
• On W (wide) side: approximately 1 cm from lens surface to infinity
● How to install conversion lens (optional)
The installation screw diameter of this lens is 37 mm.
Lens hood Conversion lens
(To remove)
Remove the lens hood from the DVD video cam-
1
era/recorder.
Note: Be careful not to lose the lens hood.
Note: If the optional tele-conversion lens (DZ-TL1) is attached over the lens, the range where a subject is
focused at T end (telephoto side) will be from approximately 5 m to infinite.
Note: If the optional tele-conversion lens (DZ-TL1) is attached over the lens, the four corners of screen will
be darker (vignetting) on W (wide-angle) side when a subject is zoomed in.
Remove the lens cap from the conversion lens
2
and screw it all the way into the filter screw of
the DVD video camera/recorder.
(To attach)
Macro Recording
Use the macro function when recording a small object from close-up position: You can shoot the subject
as close as approximately 1 cm from the lens surface, magnifying the image to fill the screen.
im the DVD video camera/recorder at the sub-
A
ject, and press down the zoom lever to “W” control side.
Note: Zoom can be used, but the subject may
not be focused, depending on the distance to the
subject.
Note: The amount of light tends to be insufficient
during macro recording: If the subject image is too
dark, use additional lighting.
48

W
T
Manually Focusing Subject during Movie Recording
The DVD video camera/recorder measures the distance to a subject viewed at the center of screen and
automatically focuses on it. If you want to record by adding special effects or focusing on a subject image
off the center of screen, adjust the focus manually.
Press the FOCUS button in the recording pause
1
status.
“MF” will appear on the screen.
Manual Focus icon
Press the zoom lever down to “T” control side
2
to zoom in on subject.
Use the buttons to adjust the focus, while
3
viewing the image in the viewfinder or on the
LCD screen.
FOCUS button
Note: Pressing FOCUS will alternate between
manual focus and auto focus. With auto focus, no
indication will appear on the screen.
Note: Be sure to zoom up to your subject only
when manually focusing on it. If you bring the subject into focus at the wide-angle position, focus
will be incorrect when you zoom up to the subject.
Note: Manual focus is released when the DVD
video camera/recorder is turned off. When you
turn the DVD video camera/recorder on next time,
auto focus will be restored.
buttons
ENGLISH
Manually focus the following objects, which may not be automatically focused (see p. 48):
Objects not
in the
center of
screen
Objects
moving
rapidly
Object
behind
glass with
water
droplets, dirt
on it
Objects with
little
variation in
brightness,
such as
white wall
Objects lit by
neon sign,
spotlight, etc.
which glares
or emits
strong light
Night view
Objects that
are far and
near at the
same time
Dark objects
49

Adjusting Exposure Manually
This DVD video camera/recorder measures the subject brightness and automatically adjusts the exposure.
Y ou can also adjust the exposure manually when the subject is lit fr om rear or for special ef fects r ecording.
ENGLISH
Press the EXPOSURE button in the recording
1
pause status.
The exposure indicator
will appear on the
screen.
Exposure indicator
Use the buttons to adjust the exposure,
2
while viewing the image in the viewfinder or
on the LCD screen.
Press the REC button to start recording.
3
EXPOSURE button
Note: Pressing EXPOSURE will alternate between
manual adjustment and auto exposure. With auto
exposure, no indication will appear on the screen.
Note: The exposure setting will return to Auto
when the DVD video camera/recorder is turned
off.
buttons
50

On-Screen Information
Various types of information will appear in the viewfinder or on the LCD screen during recording and
playback.
Information Display During Recording
Recording mode
: Movie
: Still (with DVD-
RAM disc only)
: External input still
(field) (with DVDRAM disc only)
: External input still
(frame) (with DVDRAM disc only)
When operating zoom
(When digital zoom is 48×)
(When digital zoom is 240×)
(only in movie recording mode)
Exposure correction
Disc type
:DVD-RAM
:DVD-R
:DVD-RAM (write-protected)
:DVD-R (write-protected)
: DVD-R disc already finalized on this DVD
video camera/recorder
:DVD-R disc finalized on a device other than
No display****
this DVD video camera/recorder
Movie recording mode
XTRA : Highest quality (only when using
DVD-RAM disc)
FINE :High quality
STD :Standard
Electronic image stabilizer (EIS) (only in movie recording mode)
No display : EIS OFF
Program AE (only in movie recording mode)
No display :Auto
: EIS ON
White balance
No display : Auto
WB : Hold
Manual focus
No display:Autofocus
MF :Manual focus
:Sports
:Portrait
:Spotlight
:Sand & Snow
:Low Light
External flash [when Video Flash
(sold separately) is attached] (only in
still recording mode)
No display :Emits light automatically
:Always emits light
:No light emission
Self-timer (only in still recording mode)
No display :Self-timer OFF
Remaining speace on disc*
REM XX MIN :Remaining record-
REM XX** : Number of remain-
Remaining battery level
(full charge)
(low remaining charge)
Current date/time
Brightness of LCD screen/Volume
BRIGHT
VOLUME
Warning message
:Self-timer ON (count is
from 10 seconds)
External input
LINE IN :AV input
S LINE IN :S-VIDEO input
Operating status
REC : During recording
During recording pause
:
No display***
Movie recording time
(only in movie recording
mode)
able minutes during
movie recording
ing recordable still
images during still
recording
:Brightness of LCD screen
:Volume
ENGLISH
* No remaining time will be displayed with a write-protected disc or finalized DVD-R disc.
** The displayed number of recordable stills is for reference: The decreasing number may not be correct, depend-
ing on recording condition (not displayed with a DVD-R disc).
*** When no disc is in the DVD video camera/recorder, or disc has not yet been initialized, write-protected disc or
disc with no remaining space has been inserted.
**** Will not appear when a disc that cannot be used in this DVD video camera/recorder is inserted.
51

● Switching the information display mode
You can switch the display mode of on-screen information:
Press the DISPLAY button.
ENGLISH
• Full display mode: All types of information will appear.
• Minimum display mode: Only the recording mode, status
display and warning will appear.
The full and minimum display modes will alternate.
Note: The DVD video camera/recorder does not record the
recording date/time as a part of image. However, this information when recording will be recorded with image as data which
can be checked on Disc Navigation screen during playback.
(See “Information display during playback” on page 53.)
● Display when recording an image of yourself
When recording with the LCD screen facing the same
direction as the lens, only the operating status and battery remaining level will appear , and the battery remaining level will appear only when the battery has almost
no remaining charge.
The following operating status indicator will blink to
give warning message to user. The message can be
checked when returning the LCD monitor 180° to the
original status from the status in which the LCD screen
was facing the same direction as the lens.
No display :Disc that cannot be used has been loaded.
:The disc has almost no free space.
:Write-protected disc is loaded.
: You are attempting to record a still on
DVD-R disc.
: The disc is full, or you are attempting to
record a copy-guarded image.
DISPLAY button
Operating status/
warning message
Battery
remaining
level
Note: If the LCD screen is set facing the same direction as the lens, the LCD screen will display a mirror image (left and right reversed).
Note: If the LCD screen is set facing the same direction as the lens, you can also view subject image in the
viewfinder.
52

Information Display During Playback
V arious types of information on recording will be superimposed on playback image you are viewing in
the viewfinder or on the LCD screen.
↓
→ →
No display
Playback information
● Switching the information display
mode
Press the DISPLA Y button: Y ou can switch the dis-
play mode of on-screen information.
Recording mode*
Scene No.
Program No. or Play List No. *
Program or Play List *
1
Repeat play*
Playback operation*
Disc type*
5
Counter
4
2
6
3
display
Recording date/time
*1 VIDEO or PHOTO
*2 Program or Play List
*3Number of program or play list being played
back (not displayed when all programs are being played back)
*4Refer to “Disc type” on page 51.
5
*
: Will appear when “Repeat play :On” is
specified
6
*
: Standard playback
: Playback pause
: Forward search playback
: Reverse search playback
: Forward skip playback
: Reverse skip playback
: Forward frame advance
: Reverse frame back
Refer to “Playback” beginning on page 44 for
how to operate.
The “ ” mark will appear on the first image on
disc.
The “ ” mark will appear on the last image on
disc.
ENGLISH
• Playback information display: Shows the status
of DVD video camera/recorder during playback.
• Recording date/time display: Shows the date/
time when recording was started.
• No display: No information will appear. How-
ever, when the mode of playback operation is
switched, the symbol will appear for approx. 3
seconds.
53

Advanced Techniques
This section explains about various settings to further extend the usefulness of this DVD video camera/
recorder.
ENGLISH
Setting Up Camera Functions
Selecting Shooting Mode to Match the Subject
(Switching Program AE Mode)
This DVD video camera/recorder automatically sets the shutter speed and aperture according to the
subject brightness for optimum recording: You can also specify one of six modes depending on the subject conditions, recording environment or purpose of filming.
Press the MENU button in the recording pause
1
status.
The menu screen will appear.
Use the joystick to
2
choose “Program AE”
on the “Camera Functions Setup” screen, and
then press the button.
Joystick
MENU button
The options will appear
on the right of “Program
AE”.
Use the joystick to
3
choose the desired option, and then press the
button: The se-
lected option will be set.
You can check the selected AE mode by the onscreen information display. However, nothing
will appear in the Auto mode.
Selected AE mode
Press the MENU button.
4
The menu screen will disappear.
Note: The shooting mode set as above will be
stored in memory even if the DVD video camera/
recorder is turned off.
54
Auto : The camera/recorder automatically
judges the subject and surrounding environment for optimum recording.
Sports : Reduces blurring when recording
rapidly moving subjects such as in golf or
tennis.
Portrait : Makes a subject, such as a
person or a creature, stand out from a
blurred background.
Spotlight : Prevents overexposure of
subject portrait face, etc. when strong light
strikes the subject, as in a wedding or on
stage.
Sand & Snow : Prevents underexposure of
subject portrait face, etc. in a place where
reflection of light is intense, such as at the
seaside in midsummer or on a ski slope.
Low Light : Allows user to record in a dark
place even with decreased lighting: However, an after-image will appear with a
moving subject.
However, note that the Low Light mode
cannot be used when the recording quality
mode is STD.

White Balance (Auto/Hold)
With this DVD video camera/recorder you can switch the white balance between Auto and Hold.
Mode
Auto
Hold
1
The menu screen will appear.
2
Details of setting
White balance is
always adjusted
automatically.
White balance
at the time
when “Hold” is
selected is held.
Press the MENU button in the recording pause
status.
Use the joystick to
choose “White Bal.” on
the “Camera Functions
Setup” screen, and then
press the button.
Options will be displayed on the right of “White
Bal.”.
The mark will be attached to the currently selected option.
On-screen display
no display
WB
Use the joystick to select
3
“Auto” or “Hold”, and
then press the but-
ton.
If White Balance is set to
“Hold”, “WB” will ap-
pear on the screen.
White balance mode
Press the MENU button.
4
The menu scree will disappear.
The white balance setting will always be “Auto”
when the DVD video camera/recorder is turned
off.
ENGLISH
55

Using the Electronic Image Stabilizer (EIS)
This DVD video camera/recorder is equipped with an electronic image stabilizer function: When you
use zoom to record a magnified subject image, it will correct fuzziness in the recorded image.
Press the MENU button in the recording pause
ENGLISH
1
status.
The menu screen will appear.
Use the joystick to
2
choose “EIS” on the
“Camera Functions
Setup” screen, and then
press the button.
The options will appear
on the right of “EIS”.
Use the joystick to
3
choose the desired option, and then press the
button: The se-
lected option will be set.
Press the MENU button.
4
The menu screen will disappear.
● Checking EIS On or Off
You can check EIS On or Off by the on-screen information display.
EIS
After recording with EIS set to “Off”, it is recommended that you return the setting to “On” and
then turn the DVD video camera/recorder off, unless you normally record with “Off” setting.
This function is effective only during movie recording: It will not work during still recording.
Note: The EIS setting will not change if the DVD
video camera/recorder is turned off.
Note: Although you can switch EIS between on
and off during still recording, the setting will be ef-
fective only during movie recording.
Note: It is recommended that you specify “EIS
Off” when using the DVD video camera/recorder
on a desk or tripod.
Note: When “EIS On” is specified, there will be a
slight difference between the actual movement
and the movement on screen.
Note: Gross camera shake may not be entirely
corrected even if “EIS On” is specified.
Note: EIS may not operate correctly when the
conversion lens (optional) is used.
56

Switching Digital Zoom Off
When the zoom lever is moved down to “T” control side with Dig. Zoom 48x or 240x specified, digital
zoom will automatically kick in when optical 12x zoom range is exceeded. You can set the digital zoom
to 48x or 240x for movie recording, or 48x for still recording.
Press the MENU button in the recording pause
1
status.
The menu screen will appear.
Note: Pressing MENU during recording will not display the menu screen.
Use the joystick to
2
choose “Dig. Zoom” on
the “Camera Functions
Setup” screen, and then
press the button.
Options will be displayed on the right of “Dig.
Zoom”.
The mark will be attached to the currently selected option.
Use the joystick to
3
choose “Off”, and then
press the button.
Press the MENU button.
4
The menu screen will disappear.
When Dig. Zoom is “Off”
W
When Dig. Zoom is “On” (48x)
When Dig. Zoom is “On” (240x)
(only in movie recording mode)
W
T
TW
Digital zoom range
T
Digital zoom range
Dig. Zoom “240x”, “48x” or “Off” setting will
be stored in memory even if the DVD video cam-
era/recorder is turned off.
Note: The subject image will be slightly rougher
in the digital zoom range.
Note: Y ou can check whether Dig. Zoom is “240x”,
“48x” or “Off” by pressing the DISPLAY button and
reviewing the on-screen information.
Note: You can also use the DIGITAL ZOOM but-
ton on remote control to switch the digital zoom
setting: Pressing the button in the movie recording
mode will switch the setting between “Off”, “48x”
and “240x”: Pressing the button in still recording
mode will switch between “Off” and “48x”.
ENGLISH
57

Switching to 16:9 Mode
If you intend to play back recorded images on a wide-screen TV, it is recommended that you switch the
screen size to 16:9 mode.
Press the MENU button in the recording pause
ENGLISH
1
status.
The menu screen will appear.
Use the joystick to
2
choose “16:9” on the
“Camera Functions
Setup” screen, and then
press the button.
Use the joystick to
3
choose “On”, and then
press the button.
Press the MENU button..
4
The menu screen
will disappear.
Black bands will
appear across the top
and bottom of screen.
Note: The black bands that appear across the
top and bottom of screen will not be recorded. If
you record in the 16:9 mode and play back on a
TV other than wide-screen TV , the portions masked
by the black bands will also be displayed. Use the
black bands as a guide for recording when play-
ing back on a wide-screen TV.
58

Setting Up Record Functions
Switching Movie Quality Mode
Choose the movie quality from “XTRA” (only with DVD-RAM disc), “FINE” and “STD”.
However, it is r ecommended that you recor d critical subjects in the “XTRA” or “FINE” mode when you
are using a DVD-RAM disc, or in the “FINE” mode with a DVD-R disc.
ENGLISH
Press the MENU button in the recording pause
1
status.
The menu screen will appear.
Use the joystick to
2
choose “VIDEO Mode”
on the “Record Functions Setup” screen, and
then press the button.
Options will be displayed on the right of
“VIDEO Mode”.
The mark will be attached to the currently selected option.
Block-like noise may appear in recorded image, or the outline of subject image is distored under the
recording conditions listed below: Pan the DVD video camera/recorder as slowly as possible. (Block
noise is likely to appear in the “STD” mode):
•If there is a complicated pattern in background
•If the DVD video camera/recorder is panned or tilted greatly or rapidly
•If subject is moving rapidly even when the DVD video camera/recorder is not moving (as in following
figure on left)
Use the joystick to select
3
the desired quality
mode, and then press
the button.
Press the MENU button.
4
The menu screen will disappear.
Movie quality mode
Note: The “VIDEO Mode” setting will not change
even after the DVD video camera/recorder is
turned off. However, if “XTRA” has been set with
DVD-RAM disc, “FINE” will be set when the disc is
changed.
(Image when block-like noise occurs)
(Image without block-like noise)
59

● Recordable times in each movie
quality mode (on one side of disc)
Quality
mode
ENGLISH
XTRA*
FINE
STD
The recordable times are only for reference.
* The recordable times will vary depending on
recording contents.
DVD-RAM
approx. 18~60 min
approx. 30 min
approx. 60 min
Disc used
DVD-R
—
approx. 30 min
approx. 60 min
Note: When using DVD-R disc, you cannot switch
the movie quality mode during recording on the
disc: The DVD video camera/recorder will be automatically set to the quality mode first used with
the disc for recording.
Note: The setting of movie quality mode is effective only during movie recording: Switching the
mode will not work during still recording.
Input Selection
If you wish to input an image from another device to this DVD video camera/recorder, you must first
switch the setting on the DVD video camera/recorder.
Refer to the explanation starting from page 93 on how to connect the DVD video camera/recorder to
other devices or record images input from them.
CAMERA
LINE
Press the MENU button in the recording pause
1
status.
The menu screen will appear.
Use the joystick to choose “Input Source” on the
2
“Record Functions Setup” menu screen, and
then press the button.
The options will appear on the right of “Input
Source”: The mark will be attached to the currently selected option.
Usually select this option.
To view image from another device on this DVD video camera/recorder
Select the desired option
3
and then press the
button: The selected option will be set.
Press the MENU button.
4
The menu screen will
disappear.
Note: The “Input Source” setting will return to
“CAMERA” whenever the DVD video camera/re-
corder is turned off.
60

Changing Method for Recording Stills
You can record stills of externally input images on a DVD-RAM disc in the Frame or Field mode. The
DVD video camera/recorder can record an external image with little movement by specifying "Frame",
but "Field" is recommended for recording image with movement.
Mode
Frame
Does not suit recording of frequently moving video subjects, despite high image quality. Frame suits recording of less moving video.
Details of setting
On-screen display
ENGLISH
Field
1
2
Suitable for recording of frequently moving video subjects.
Press the MENU button in the recording pause
status.
The menu screen will appear.
Use the joystick to
choose “PHOT O Input”
on the “Record Functions Setup” screen, and
then press the button.
The options will appear
on the right of “PHOTO
Input”: The mark will
be attached to the currently selected option.
Use the joystick to se-
3
lect the desired option,
and then press the
button.
The selected option will
be set.
You can check the still
recording format of external input image by
reviewing the onscreen information.
Still external input mode
Press the MENU button.
4
The menu screen will disappear.
61

Self-Timer
You can record stills of yourself alone or with your family, friends, etc., using the self-timer function, as
with ordinary cameras. A still will be recorded appr oximately 10 seconds after the REC button is pressed.
Press the MENU button.
1
ENGLISH
The menu screen will appear.
Use the joystick to
2
choose “Self Timer” on
the “Record Functions
Setup” screen, and then
press the button.
Options will be displayed on the right to “Self
Timer”.
The mark will be attached to the currently selected option.
Use the joystick to select
3
“On”, and then press the
button.
Press the MENU button.
4
The menu screen will disappear.
You can also check that self-timer has been set
by reviewing the on-screen information.
Self-timer recording
Press the REC button.
5
The recording indicator at the front of DVD
video camera/recorder will blink.
The self-timer indicator will start to count down,
and recording will commence approximately 10
seconds later.
Note: To release the self-timer mode, choose
“Off” on the menu screen or turn DVD video camera/recorder off.
Note: To suspend self-timer, press the REC button
again before recording starts, or press the
ton.
Note: When the REC button is pressed, the
mark on LCD screen will be pink. It will also change
in the same way when recording with the LCD
screen facing the same direction as the lens.
but-
62

Switching On-Screen Display Output On or Off
If you connect this DVD video camera/recorder to a TV and operate it while watching the TV screen,
you can switch off the on-screen information (displayed in the viewfinder or on the LCD monitor) from
the TV screen. (See “Viewing on TV Screen” on page 92.)
Press the MENU button.
1
The menu screen will appear.
Choose “OSD Output” on the “Record Functions
2
Setup” menu screen, and then press the
button.
The options will appear on the right of “OSD
Output”: The mark will be attached to the currently selected option.
LCD screen or viewfinder
“On” setting “Off” setting
Choose the desired option and press the
3
button.
Press the MENU button.
4
The menu screen will disappear.
The “OSD Output” setting will not change even
if the DVD video camera/recorder is turned off.
Note: Even if “Off” is chosen, the on-screen infor-
mation will appear during playback. See page 52
for playback on-screen information display.
Note: Even after the on-screen information is removed from the TV screen, it will still appear in the
viewfinder or on the LCD screen.
ENGLISH
TV screen
TV screen
63

Initial Settings
Switching Operating Sound On or Off
This DVD video camera/recorder will emit sound when the power switch is changed over , the REC button
ENGLISH
is pressed, or other operations are engaged. If you do not need operating sound, you can switch it off.
Press the MENU button.
1
The menu screen will appear.
Use the joystick to
2
choose “Beep” on the
“Initial Setup” menu
screen, and then press
the button.
Use the joystick to
3
choose “On” or “Off”,
and then press the
button.
Press the MENU button.
4
The menu screen will disappear.
The options will appear on the right of “Beep”:
The mark will be attached to the currently selected option.
Note: The “Beep” setting will not change even if
the DVD video camera/recorder is turned off.
Setting or Releasing Power Save
This DVD video camera/recorder is equipped with power save function. Specify “Power Save: On”: If
the DVD video camera/recorder is left in the recording pause status without being operated for 5 minutes, it will automatically turn off to prevent the battery from discharging needlessly.
Press the MENU button.
1
The menu screen will appear.
Use the joystick to
2
choose “Power Save”
on the “Initial Setup”
menu screen, and then
press the button.
The options will appear on the right of “Power
Save”: The mark will be attached to the currently selected option.
Use the joystick to
3
choose “On” or “Off”,
and then press the
button.
Press the MENU button.
4
The menu screen will disappear.
Note: The power save setting information does
not appear in the on-screen display, and this setting will not change when the DVD video camera/recorder is turned off.
Note: If you want to use up the battery when you
have no intention of using the DVD video camera/recorder for a long time, specify “Power Save:
Off”.
Note: To turn the DVD video camera/recorder on
again from automatic off activated by the power
save function, set the power switch to “POWER
OFF”, and then set it to “
VIDEO” or “ PHOTO”.
64

Turning Record LED On or Off
You can switch off the recording indicator on the front of DVD video camera/recorder even during
recording.
On
The recording indicator will light red to show that the DVD video camera/recorder is
recording.
Off
The recording indicator will not light even during recording.
Recording indicator
Press the MENU button.
1
The menu screen will appear.
Use the joystick to
2
choose “Record LED”
on the “Initial Setup”
menu screen, and then
press the button.
The options will appear
on the right of “Record
LED”: The mark will
be attached to the currently selected option.
Use the joystick to
3
choose “On” or “Off”,
and then press the
button: The selected
option will be set.
Press the MENU button.
4
The menu screen will disappear.
The Record LED setting will not appear on the onscreen information display , and will not change even
if the DVD video camera/recorder is turned off.
Note: Specify “Record LED: Off” when recording
subject behind a glass or water tank that will reflect the recording indicator light.
Note: When using the self-timer function, the recording indicator will blink when the REC button is
pressed regardless of whether Record LED is On or
Off.
ENGLISH
Changing Display Language
You can change the language used to display the menu and information.
The following shows that English is changed to French.
Press the MENU button.
1
The menu screen will appear.
Use the joystick to
2
choose “Language” on
the “Initial Setup”
menu screen, and then
press the button.
The options will appear on the right of “Lan-
guage”: The mark will be attached to “English”.
Use the joystick to
3
choose “Français”, and
then press the button: The display language will be changed
to French.
Press the MENU button.
4
The menu screen will disappear.
The language setting will not change even if the
DVD video camera/recorder is turned off.
65

Initializing All Settings to Defaults
You can restore all camera menu settings to defaults (initial settings at the factory). (The date and
time will not be reset.)
Press the MENU button.
ENGLISH
1
The menu screen will appear.
If you are sure that you wish to reset, use the
3
joystick to choose “YES”, and then press the
button.
Use the joystick to
2
choose “Reset” on the
“Initial Setup” menu
screen, and then press
the button.
The “Reset” verification screen will appear.
All the setting items have now been reset to defaults.
Press the MENU button.
4
The menu screen will disappear.
Note: To cancel resetting midway, choose “NO”
on the screen for verification in step 2 or press the
button.
66

10:30
21:30
14:45 16:30 18:00
Disc Navigation
This section explains about how to edit recorded images using the Disc Navigation function.
Before Using Disc Navigation
Disc Navigation is a tool for editing scenes recorded on this DVD video camera/recorder.
Here is an explanation on “scene” and “program”, so that you will be able to make most use of Disc
Navigation function.
Structure of Data Recorded On This DVD Video Camera/Recorder
Video recorded using this DVD video camera/recorder will be stored on disc in units of scene, in the
order of recording.
•Movie: One scene refers to images recorded between each press of the REC button until recording is
•Still: One scene refers to a still recorded by pressing REC button.
The recorded scenes are collected as "programs" on each recording date.
All programs
Thumbnails
temporarily stopped by pressing REC again.
Program No. 1
Recorded on 3rd May, 2002
Scene
9:00
16:30
* Times on each scene show when recordings were started.
* Numbers 1–? show the order in which recordings were made.
11:30
14:00
16:00
Program No. 10
Recorded on 27th May, 2002
•••
ENGLISH
Scenes of one program are lined up in the order of
recording. Usually , when the button is pressed
immediately after recording, the last scene of the
last program on disc (scene ? of program No. 10
in the above diagram) will be played back.
To view previously recorded scenes (scenes 1->
in the above diagram), you can use the skip and
search playback functions to find any desired scene.
By using the Disc Navigation function, you can
easily find any desired scene, since you can specify
a program or a scene.
You can also fade the image recorded on the DVD
video camera/recorder , and rearrange the order of
scenes.
Note: Thumbnails (first images of recorded
scenes) are displayed from the top left of screen,
and up to 12 thumbnails can appear on one
screen. If there are 13 scenes or more recorded,
tilt down the joystick and hold it to display 13th
and any later scenes as thumbnails.
Note: “Scene No.” is not inherent to that scene,
but is a serial number of thumbnails being displayed. Therefore, the Scene No. when all programs are displayed may be different from that
for the same scene when a specific program is
displayed.
Note: Disc Navigation thumbnail screen, skip and
title attached to each scene, and special effects
(fade) are original functions of this DVD video camera/recorder. They will not operate on devices
other than this DVD video camera/recorder.
Note: Even though thumbnails may not appear,
depending on the recording conditions,playback
of the images may be possible.
67

Using Disc Navigation
Functions Available with Disc Navigation
Disc Navigation allows you to do the following:
ENGLISH
● Selecting scene(s) (Select)
You can select a scene from all programs or a specific program and start playback from that scene.
You can also select adjacent multiple scenes and
play back only the selected scenes.
● Switching/playing back program
(Switch/Play)
You can select one program to be viewed from all
programs and play it back.
● Changing title
You can change titles of programs and play lists.
● Editing scene(s)
Y ou can delete unnecessary scenes, skip scenes you
do not want to play back, or arrange the order of
scenes for playback.
You can also divide a scene on play list or arrange
scenes on play list.
● Displaying information on scenes
(Detail)
Y ou can get the information on movie quality mode,
recording time, etc. of a scene or adjacent multiple
scenes.
● Displaying remaining free space
on disc (Capacity)
You can display how much free space the disc being driven has.
●
Settings on disc ( )
Y ou can check the remaining free space of disc being used, and initialize an unformatted disc.
Y ou can also update the control information of disc.
When a DVD-R disc is loaded, only the remaining
free space on disc can be checked.
● Finalizing disc
If you wish to view a DVD-R disc that was recorded
with this DVD video camera/recorder on other devices that are compatible with 8 cm DVD-R disc,
the recorded DVD-R disc must be finalized.
● Repeat playback
If “Repeat Play: On” is specified, all programs, or
any selected program or scene, will be repeatedly
played back.
68

● Create and Edit Play List
Y ou can display all programs or a specific pr ogram, select scenes, and create up to 99 original stories (up
to 999 scenes in 99 play lists).
Program various scenes in a play list to create your own original movie (play list, p. 75).
Only the data will be stored in play list. If you create, edit or delete a play list, the original scenes will not
be erased from the disc.
Since scenes are not duplicated, the disc capacity will not decrease.
Example: To select scenes from program No. 1
and program No. 10 and create a play list
Program No. 1
(recorded on 3rd May, 2002)
9:00
11:30 14:00 16:00 10:30
Program No. 10
(recorded on 27th May, 2002)
14:45 16:30 18:00
ENGLISH
16:30
21:30
↓
Play list created
69

Starting Disc Navigation and Interpreting Navigation Screen
DISC NAVIGATION
button
ENGLISH
button
Note: Do not proceed with a following step while
the disc is being recognized or the CHARGE/ACCESS indicator is blinking.
Press the DISC NAVIGATION button.
1
The thumbnails for all programs will appear.
Note: The DISC NAVIGATION button will not work
without a disc inserted.
Press the DISC NAVIGATION button.
2
Disc Navigation will be terminated and the DVD
video camera/recorder will enter the recording
pause status.
You can also press the button to end Disc
Navigation.
Thumbnail
Cursor
Y ou can know the status of scenes from the colors
of cursor and bar graph:
Blue
Red
Bar graph
Blue
Blue
Red
Cursor
Yellow
Tilt the joystick to right when the yellow cursor
is in the scene at the bottom right corner of
thumbnail display screen, or tilt down the joystick when the yellow cursor is in any scene on
the bottom row: The following 12 thumbnails
(following page) will appear.
Note that when the following pages cannot be
displayed, you are on the last page.
Tilt the joystick to left when the yellow cursor is
in the scene at the top left corner, or tilt up the
joystick when the yellow cursor is in any scene
on the top row: The preceding 12 thumbnails
(preceding page) will appear.
Note that when the previous pages cannot be
displayed, you are on the first page.
Note: Tilting up or down the joystick and holding
it will continuously change the page in units of 12
thumbnails.
Note: Each time Disc Navigation is started with a
DVD-R disc inserted, message “Creating Thumbnail ...” will appear. After the message appears,
the thumbnail display screen will appear.
Note: If the following discs are inserted, the Disc
Navigation screen will appear or some message
will be displayed:
– Write-protected disc
– Finalized DVD-R disc
Status of scenes
Current cursor position
Range of scenes being
selected
Scenes already selected
Selected scene number/
Number of all scenes
Bar graph
(current page
position **)
Still image icon
Operating guide* and recording date/
time of scene being selected
* The operating guide will vary depending on the current status of DVD video camera/recorder.
** When there are two or more thumbnail display pages.
70
Disc type icon

Playing Back Scenes
Press the DISC NAVIGATION button.
1
The thumnails for all programs will appear.
Use the joystick to select a scene.
2
The selected scene will be framed. This is called
a “cursor”.
Press the button.
3
Playback will start from the selected scene, and
continue to the last scene on disc.
● When playback finishes:
The mark will appear in the last image on disc,
and after approx. 5 minutes the thumbnail screen
will be restored.
Selecting Random Scenes
Use the joystick to select a scene.
1
Press the SELECT button once.
2
The selected scene will be framed in red.
● Playback of still images (with
DVD-RAM disc only):
Still images will be displayed for approx. 3 seconds.
Note: Press the button to temporarily stop
playback. Pressing
point.
Note: If you press the
of the last scene on disc finishes, playback will start
again from the first image of first scene on disc.
Note: Pressing the
thumbnail screen.
Note: You can select scenes randomly and play
them back. See below for how to select scenes.
Repeat steps 1 and 2 to
randomly select multiple scenes.
To cancel a selected
scene, select the scene to
be canceled, and then
press the SELECT button.
To cancel all selected
scenes, press the button.
again will start from that
button after playback
button will always restore the
ENGLISH
Selecting Consecutive Scenes Together
Use the joystick to select the first scene.
1
Hold down the SELECT button for at least one
2
second.
The selected scene will be double-framed in yellow and blue.
Use the joystick to select the last scene in the range
3
you want, and then press the button.
The scenes in the specified range will be framed
in red, and then selected.
Note: Although scenes can be randomly selected, playback will always start from the lowest
scene number.
Note: To release all the selected scenes, press the
button.
Note: You can also select scenes in reverse from
the last scene in the range.
Note: To release multiple selection, press the SELECT or
button after step 3.
71

Understanding Flow of Disc Navigation Menu
Press the DISC NAVIGATION button and then the MENU button: The menu screens for Disc Navigation
and Disc management will appear.
For details on each menu item, see pages explaining each separate function.
ENGLISH
<When using DVD-RAM disc>
Play List Switch (p. 76)
Play (p. 76)
Create (p. 75)
Edit (p. 78)
Title (p. 80)
Delete (p. 80)
Program Switch (p. 73)
Play (p. 73)
Title (p. 74)
Scene Delete (p. 81)
Edit Fade (p. 82)
Combine (p. 84)
Divide (p. 84)
Move (p. 85)
Skip (p. 86)
Select (p. 86)
Detail (p. 87)
<When using DVD-R disc>
Program Switch (p. 73)
Play (p. 73)
Scene Select (p. 86)
Detail (p. 87)
Disc Capacity (p. 88)
Format Disc (p. 88)
Update Control Info. (p. 89)
Others Repeat Play (p. 90)
Disc * Capacity (p. 88)
Finalize Disc (p. 90)
Others Repeat Play (p. 90)
* Will not appear when a finalized disc is loaded.
72

Program
Switching to Thumbnail Display of Specific Date (Selecting Program)
Since the scenes recorded on this video camera/recorder ar e collected as “programs” for each r ecor ding
date, selecting a program will allow you to display only the scenes on a specific date.
ENGLISH
Press the DISC NAVIGATION button.
1
Press the MENU button.
2
The Disc Navigation menu screen will appear .
Use the joystick to
3
choose “Switch” on the
“Program” menu
screen, and then press
the button.
Playing Back Program
You can play back only the selected program.
Press the DISC NAVIGATION button and then
1
the MENU button.
The Disc Navigation menu screen will appear.
Use the joystick to select
4
the program to be displayed, and then press
the button.
The Disc Navigation
screen will be restored,
and the thumbnails of
the selected program
will appear.
Note: If you press the button to stop program
selection midway, the original screen (thumbnail
select screen) will be restored.
Note: The dates displayed on the program select
screen will be in the Date Mode used when the
first scenes of programs were recorded, and the
date displays D/M/Y, M/D/Y and Y/M/D may be
mixed.
Use the joystick to select
3
the program to be
played back, and then
press the button.
Use the joystick to
2
choose “Play” on the
“Program” menu
screen, and then press
the button.
Playback will start from
the first scene of the selected program.
73

Changing Title of Program
The recording date/time has initially been attached to any program: You can change the recording date/
time to any desired title.
Press the DISC NAVIGATION button and then
ENGLISH
1
the MENU button.
The Disc Navigation menu screen will appear.
Use the joystick to
2
choose “Title” on the
“Program” menu
screen, and then press
the button.
The “Program Title”
screen will appear.
Use the joystick to select
3
the program whose title
you want to change, and
then press the button.
The screen for entering
a title will appear.
Use the joystick to select
4
a letter and then press
the button: The selected letter will be entered.
Repeat this procedure to create a title.
Note: If you wish to delete the letter for title, press
the
button once: The input letter will be deleted.
Holding down the stop button will delete all letters
in the TITLE column. You can also use the DELETE
button on remote control to delete any input letters.
Note: To cancel the setting of title, choose “NO”
on the screen for verifying the entered title: The
screen for verifying cancellation of title setting will
appear. To cancel title setting, choose “YES”.
● Characters available for entering
title
You can select characters from the “capital letter”,
“small letter” and “symbol” input modes.
With step 4, select the input mode and then press
the button, or press the DISPLAY button on
the DVD video camera/recorder.
Input mode
After entering the title,
5
use the joystick to
choose “Enter” and then
press the button.
The screen for verifying
the entered title will appear: Choose “YES” and
then press the button.
After the following message appears, the thumbnail display screen of the
program whose title was
set will be restored.
Choosing “NO” or
pressing the button
will restore the screen
for inputting a title.
74

Play List
Creating New Play List
Use play list to edit recorded scenes.
Use the joystick to select a scene to be pro-
1
grammed in a play list.
When selecting multiple scenes, refer to “Selecting Consecutive Scenes T ogether” or “Selecting
Random Scenes” on page 71.
With the created play list, you can also add
scenes recorded on another day or unnecessary
scenes afterwards.
Press the MENU button.
2
The Disc Navigation menu screen will appear.
Use the joystick to
3
choose “Create” on the
“Play List” menu screen,
and then press the
button.
The “Create Play List”
screen will appear.
A new play list including the selected scenes
will be created, and a
thumbnail of the created
play list will appear.
Note: If the scene added to play list had skip or
fade setting, that information will also be added
to the play list.
Note: The time when the play list was created will
appear in the title bar.
Note: If you have selected multiple scenes, you
can stop the creation of play list midway by pressing the
created with the scenes up to the point where the
Note: If free space available on disc is insufficient,
creation of new play list may not be possible: Delete unnecessary scenes.
button. In this case, the play list will be
button was pressed.
ENGLISH
75

Switching Play List (Switching to Display of Each Play List)
If multiple play lists are stored on disc, you can switch the thumbnail display for each play list or switch
to the thumbnail display of all programs.
Press the MENU button.
ENGLISH
1
The Disc Navigation menu screen will appear.
Use the joystick to
2
choose “Switch” on the
“Play List” menu screen,
and then press the
button.
The “Switch Play List”
screen will appear.
Playing Back A Play List
Press the MENU button.
1
The Disc Navigation menu screen will appear.
Use the joystick to
2
choose “Play” on the
“Play List” menu screen,
and then press the
button: The “Start Play
List” screen will appear .
Select the play list you
3
wish to display, and
then press the button.
The thumbnail screen of
the selected play list will
appear.
Note: To display the thumbnails of all programs
(all recorded scenes), choose “All Programs” on
the “Switch Program” screen.
Use the joystick to select the play list, and then
3
press the button.
The selected play list will be played back from
the first scene. T o cancel playback midway , press
the button: The thumbnail screen of the play
list being played back will appear.
Note: If “Repeat Play On” is specified, the play
list will be repeatedly played back (see page 90).
76

Adding Scenes to Play List
You can later add scenes to the created play list.
Display the thumbnails of scenes to be added to
1
the play list, and then press the MENU button.
See “Switching to Thumbnail Display of Specific
Data (Selecting Program)” on page 73 for how
to display the thumbnails.
The Disc Navigation menu screen will appear.
Use the joystick to choose “Edit” on the “Play
2
List” menu screen, and then press the button: The “Edit Play List” screen will appear.
Use the joystick to select
3
the play list to which
you wish to add scenes,
and then press the
button.
The thumbnails of the
program that was displayed in step 1 will appear in the upper row,
and the thumbnails of
selected play list will appear in the lower row.
Note: If the DISPLAY
button is pressed
when the thumbnails
are displayed, the recording date/time of
the selected scene
will appear across
the bottom of
screen. Press DISPLA Y
to restore the previous screen.
Recording date/time
Tilt the joystick down
4
to move the cursor to the
lower row, and tilt it to
left or right to select the point where the
scene is to be inserted.
Insertion position
Scene to be copied
Tilt the joystick up to move the cursor to the
5
upper row , and tilt it to left or right to point
the cursor to the scene to be added.
T o select multiple scenes, refer to “Selecting Consecutive Scenes ” or “Selecting Random Scenes”
on page 69.
Press the button to copy the scene: The
6
screen showing that the scene is being copied
will appear.
While multiple scenes are being copied, copying can be cancelled at any time by pressing the
button: The scenes up to the point where the
button was pressed will be added.
After adding scenes is completed, the edited
play list of thumbnails will appear.
Note: Pressing in steps 3-5 will display the screen
for verifying an exit from “Edit Play List”. Choose
“YES” to exit the edition of play list. Choosing “NO”
will restore the “Edit Play List” screen.
Note: Pressing the
fication will restore the thumbnail display screen.
Note: If you press the MENU button in step 5, the
menu screen for editing play list will appear. You
can also use this menu to add scenes. (See page
78.)
button on the screen for veri-
ENGLISH
77

Deleting Scenes from Play List
Display the “Edit Play
1
List” menu screen of the
play list to be edited.
ENGLISH
Perform steps 1 – 3 on
page 77.
From the play list in
2
lower row , point the cursor to the scene you
want to delete.
T o select multiple scenes,
refer to “Selecting Consecutive scenes T ogether”
or “Selecting Random
Scenes” on page 71.
3
Editing Play List (Adding Scenes Using Menu)
You can use the menu screen to add scenes to a created play list.
Display the “Edit Play List” menu screen of the
1
play list to be edited.
Perform steps 1-3 on page 77.
Select the scenes to be
2
added from the upper
row.
4
If you are sure that you wish to delete the scene,
press the button: The screen being deleted
will appear.
When multiple scenes are being deleted, you can
stop deletion midway: Press the button.
The scenes up to the point where the button
was pressed will be deleted.
Note: Place the cursor on scene to be deleted,
and then press the DELETE button on remote control: You can also delete the scene.
Choose “Add”, and
then press the button.
The selected scenes will
be added to the end of
play list to be edited.
Note: The selected scenes will be added in the
insertion position.
Scene to be added
Press the MENU button.
3
The menu screen for editing play list will appear.
78
Insertion position

Editing Play List (Deleting Scenes Using Menu)
If, by mistake, you insert undesired scenes to the play list to be edited in “Editing Play List (Adding
Scenes using Menu)” on page 78, or if there are unnecessary scenes in the play list to be edited, you can
delete the scenes without exiting the screen for editing play list.
Display the “Edit Play
1
List” menu screen of the
play list to be edited.
Perform steps 1-3 on
page 77.
Move the cursor to the play list to be edited in
2
lower row, and select the scene(s) to be deleted.
Press the MENU button.
3
The menu screen for editing play list will appear.
Choose “Delete” on the
4
“Edit” menu screen, and
then press the button.
The selected scene(s)
will be deleted.
Note: If all scenes on play list are deleted, the play
list itself will also be deleted.
Editing Play List (Selecting Scenes Using Menu)
You can specify the range of scenes when adding or deleting consecutive multiple scenes to/from play
list. This “Select” menu item is useful when selecting consecutive multiple scenes in items for adding or
deleting scenes using menu on page 78.
ENGLISH
Display the “Edit Play
1
List” menu screen of the
play list to be edited.
Perform steps 1-3 on
page 77.
Specify the first scene of
2
those you wish to select,
and then press the
MENU button.
The menu screen for editing play list will appear.
Choose “Curr ent→End”
3
or “Start→Current” on
the “Select” menu
screen, and then press
the button.
79

Changing Title of Play List
The play lists have serial numbers in the order you have created them. At any time you can change the
title of play list, which was the recording date/time set on this DVD video camera/recorder.
Press the MENU button.
ENGLISH
1
The Disc Navigation menu screen will appear.
Use the joystick to
2
choose “Title” on the
“Play List” menu screen,
and then press the
button.
The “PlayList Title”
screen will appear.
See “Changing Title of
Program” on page 74 for
how to enter a title.
Deleting Play List
Press the MENU button.
1
The Disc Navigation menu screen will appear.
Use the joystick to
2
choose “Delete” on the
“Play List” menu screen,
and then press the
button: The “Delete Play
List” screen will appear .
After entering the title,
3
use the joystick to choose
“Enter”, and then press
the button.
The screen for verifying
registration of title will
appear.
Note: The registered title can be changed at any
time using the same procedure.
The screen for verifying
deletion of play list will
appear.
If you are sure that you wish to delete the play
4
list, use the joystick to choose “YES”, and then
press the button.
Use the joystick to select
3
the play list you wish to
delete, and then press
the button.
80
The selected play list will be deleted, and the
original screen will be restored.
Note: If you choose “NO” on the screen for veri-
fying deletion of play list, deletion will be canceled,
and the original screen will be restored.
Note: Pressing the
fication will restore the thumbnail display screen.
Note: Even if you delete a play list, the original
scenes stored on disc will not be deleted.
button on the screen for veri-

Scene
Deleting Scenes
Use the joystick to select the scene to be deleted,
1
and then press the MENU button.
Use the joystick to choose “YES”, and then press
3
the button.
ENGLISH
The Disc Navigation menu screen will appear.
Use the joystick to
2
choose “Delete” on the
“Scene” menu screen,
and then press the
button.
The screen for verifying
deletion will appear.
The message “Deleting...” → “Finished” will ap-
pear and the selected scene will be deleted, after which the thumbnail display screen will be
restored.
T o cancel deletion, choose “NO”, and then press
the button while the screen for verification
is being displayed.
Note: Pressing the button on the screen for verification will restore the thumbnail display screen.
Note: If you wish to delete multiple scenes, select
them referring to “Selecting Consecutive Scenes
Together” or “Selecting Random Scenes” on page
71.
Note: If you delete all data on disc, initializing the
disc will be recommended (see p. 88).
Note: If even one play list has been created, message “Same scenes on PlayList will be deleted. Delete scenes?” will appear before deleting scene(s).
This message will appear even if the scene(s) to
be deleted is not used in the corresponding play
list. In this case, choose “YES” and then press the
button to delete the scene(s).
Note: If the time of deleted scenes (stills) is quite
short, the remaining free space of disc may not
increase in the time remaining indicator.
81

Adding Special Effects (Fade)
When switching scenes, you can add fading to the beginning and/or end of scene.
There are three types of special effects:
White: Fades in from white screen, fades out to white screen
ENGLISH
Fade In
Fade Out
Wipe: Fades in from black screen to vertical direction of screen, Fades out from vertical
direction of screen to black screen
Fade In
Fade Out
B/W: Fades in from Black and White screen to color screen, Fades out from color
screen to Black and White screen
Fade Out
82
Fade In

Select the scene for adding special effects and
1
press the MENU button.
The Disc Navigation menu screen will appear.
After the proceeding message appears, the
thumbnail display screen will be restored.
The scenes for which special effects have been
set will be attached with marks “ ”, “ ”.
Use the joystick to
2
choose, “Scene”, “Edit”,
“Fade”, and then press
the button.
The fade setting screen
will appear.
The options will appear
under IN and OUT: The
mark will be attached
to the currently selected
option.
Use the joystick to select
3
the special effects for
“IN” and “OUT”, choose
“Enter”, and then press
the button.
“In” effect
“Out” effect
Note: Setting fade will also fade the sound.
Note: Fading can also be set to either “IN” or
“OUT”.
Note: Any registered fade can be changed at
any time using the same procedure as above.
Note: Fade can also be added to on-screen information displayed during playback.
Note: If the playback time of scene is short, fade
will cut off midway.
Note: If you set fade-in and fade-out to a still image or a movie with recording time of no more
than 3 seconds, only fade-in will be valid.
Note: No fade effect will operate if you start playback in the recording pause status.
Note: If you locate the start of a scene by skipping, the image at the start of the scene will appear for a moment, and then fade will operate.
Note: The fade effect will not function during
frame advance, frame back, slow playback or
search playback.
Note: Pressing the
fication will restore the thumbnail display screen.
button on the screen for veri-
ENGLISH
83

Combining Multiple Scenes
You can combine multiple scenes into one.
Be sure to select consecutive multiple scenes when combining.
Use the joystick to select the scenes to be com-
ENGLISH
1
bined, referring to “Selecting Consecutive Scenes
Together” on page 71, and then press the MENU
button.
The Disc Navigation menu screen will appear.
Use the joystick to
2
choose, “Scene”, “Edit”,
“Combine”, and then
press the button.
The screen for verifying
combination of scenes
will appear.
If you are sure that you
3
wish to combine the
scenes, use the joystick
to choose “YES”, and
then press the button.
The selected movies will be combined into one,
and the thumbnail display screen will be restored: The first scene before combination will
appear as a thumbnail.
Note: Still images cannot be combined.
Note: If you choose “NO” on the screen for veri-
fying combination, combination will be canceled.
Note: To restore the separated status of a combined scene, divide it.
Note: With special effects, the "in" effect of the
first scene in the selected range and the "out" effect of the last scene will be chosen.
Note: If you combine scenes from different programs (different recording dates), a message that
prompts you to update the control information will
appear when power is turned on and Disc Navigation is first started (see page 101). Note that if
you choose “YES” for this message, the combined
scenes will be split into separate scenes.
If you choose “NO” for this message, the scenes
will be combined, but the same message will appear each time Disc Navigation is started. To prevent this, when combining scenes from different
programs, create a new play list and combine the
scenes on it.
Note: Pressing the
fication will restore the thumbnail display screen.
button on the screen for veri-
Dividing Movies
Y ou can divide a scene into two parts. To delete unnecessary portion of scene, first divide the scene, and
then delete the unnecessary portion. You can also cut out a part of scene and use it in the play list.
Use the joystick to select the scene to be divided,
1
and then press the MENU button.
The Disc Navigation menu screen will appear.
Use the joystick to
2
choose, “Scene”, “Edit”,
“Divide”, and then
press the button.
The “Select Division
Point” screen will appear, and playback of the
selected scene will start.
84
When you reach the
3
point where you want to
divide the scene, press
the SELECT button.
The screen for verifying
division of scene will
appear.
If you are sure that you
4
wish to divide the scene,
use the joystick to
choose “YES”, and then
press the button.
The scene will be divided at the specified point,
and the thumbnail display screen will be restored, with the divided thumbnails, appearing
side by side.
Status bar of scene being
played back

Note: The status bar of scene being played back
can be switched off or on by pressing the DISPLA Y
button.
Note: If you choose “NO” on the screen for veri-
fying division in step 4, division will be canceled.
Note: Search and frame advance are useful
when designating division points.
Note: If you press the MENU button while the
scene to be divided is being played back in step
2, the DVD video camera/recorder will enter the
playback pause status, and the “Go To” menu will
appear. You can jump to the first image, end image or any specified point of the scene. (See
“Searching for Scene You Wish to View by Specifying It (Go To)” for details on “Go To”.) You can
divide the scene at the point you have jumped
to.
Note: If a special effect has been added to the
original scene, the “In” effect will be added to the
first half of scene, and the “Out” effect, to the latter half.
Note: The division point may drift before or after
the designated point by approximately 0.5 seconds.
Note: Since a scene with a skip set cannot be
played back, no division point can be specified:
Release the skip for the scene before dividing it.
Note: If the division point is at a still, a message
will appear, but no division will be made.
Note: If the division point is at the start or end of a
scene, a message will appear, but no division will
be made.
Note: A scene of 0.5 seconds or less cannot be
divided.
Note: If free space available on disc is insufficient,
division will not be possible: Delete unnecessary
scenes.
Note: Pressing the
fication will restore the thumbnail display screen.
Arranging Order of Scenes (Move)
You can move scenes within a play list to arrange the order as you want.
ENGLISH
button on the screen for veri-
Select the scene to be moved, and then press the
1
MENU button.
The Disc Navigation menu screen will appear.
Use the joystick to
2
choose “Scene”, “Edit”,
“Move”, and then press
the button.
The “Select Insert Point”
screen will appear, and
the “I” mark will appear.
Insertion position
Move the “ ” mark to
3
the position where you
wish to move the scene,
and then press the
button.
The screen for verifying movement of scene will
appear.
If you are sure that you wish to move the scene,
4
choose “YES”, and then press the button.
The message for movement will appear, and
then the thumbnail display screen will be restored.
Note: To move consecutive multiple scenes together, select scenes referring to “Selecting Consecutive Scenes Together” or “Selecting Random
Scenes” on page 71.
Note: Choosing “NO” on the screen for verifying
movement in step 4 will cancel movement.
Note: Still images can also be moved.
Note: Pressing the
fication will restore the thumbnail display screen.
button on the screen for veri-
85

Playing Back by Skipping Scenes (Skip)
You can specify “Skip” for scenes you do not want to play back: The selected scenes will be skipped.
Use the joystick to select a scene to be skipped,
1
and then press the MENU button.
ENGLISH
The Disc Navigation menu screen will appear.
Use the joystick to
2
choose “Scene”, “Skip”,
“Set”, and then press the
button.
The message showing that skip is being set will
appear, and the thumbnail display screen will
be restored.
A skip mark “ ”
will be attached to the
scene for which skipping has been set.
Skip mark
● Releasing Skip
Select the scene set to be skipped, and choose “Cancel” in step 2: The skip mark will disappear and
skipping of the scene will be released.
Note: If you wish to release skipping for multiple
scenes, select them referring to “Selecting Con-
secutive Scenes Together” or “Selecting Random
Scenes” on page 71.
Selecting Scenes Using Menu Screen
Using the Disc Navigation menu screen, you can simultaneously select consecutive scenes: This function
is useful when there are numerous scenes.
Use the joystick to select the first scene to be se-
1
lected.
Press the MENU button.
2
The Disc Navigation menu screen will appear.
Use the joystick to choose “Select” on the
3
“Scene” menu screen, and then press the
button.
Note: If you select “Start→Current” in step 4, the
scenes from the first scene on disc to the one specified will be selected.
Scene that the
cursor is on
Use the joystick to choose “Current→End”, and
4
then press the button.
The scenes from the one specified to the last
scene on disc will be selected.
86
Choose “Current→End”:
To select the scenes from
the one that the cursor is
on to the last scene on disc.
Choose “Start→Current”:
To select the scenes from
the first scene on disc to the
one that the cursor is on.

Displaying Information Using Menu Screen
You can display various information for a scene: the recording mode, recording date/time and length,
special effects and movie quality mode.
Use the joystick to select the scene whose infor-
1
mation you wish to know, and then press the
MENU button: The Disc Navigation menu
screen will appear.
Use the joystick to
2
choose “Scene”, “Detail”, and then press the
button.
The detailed information
on the scene will appear.
Pressing the button
will restore the thumbnail display screen.
Note: Tilting the joystick
to right will display information on the following
scene; tilting the joystick
to left will display information on the preceding
scene.
If you have selected multiple scenes, the information shown below will appear.
Pressing the button will restore the thumbnail display screen.
*
**
***
(When using DVD-RAM disc)
*
With DVD-R disc, the quality mode (FINE or STD)
selected first will appear.
**
Number of scenes whose quality mode is unknown:
This will appear when the disc has a scene recorded
on a device other than this DVD video camera/
recorder , only if the disc has a scene whose mode
is unknown.
Also, this will not appear when a DVD-R disc is used.
***
This will not appear with DVD-R disc, since no still
image can be recorded on it.
Note: If multiple scenes have been selected, the
total recording time of the selected scenes will appear.
ENGLISH
87

Disc Management
Verifying Remaining Free Space on Disc (Capacity)
ENGLISH
You can find out how long you will be able to record on one side of disc.
Press the MENU button.
1
The Disc Navigation menu screen will appear.
Use the joystick to choose “Capacity” on the
2
“Disc” menu screen, and then press the
button.
The screen for checking “Capacity” will appear .
*
**
(When using DVD-RAM disc)
*
With DVD-R disc: The quality mode first used for recording with disc will appear.
**
With DVD-R disc: This will not be displayed.
Press the button.
3
The Disc Navigation screen will be restored.
Note: With a write-protected disc, the remaining
space will always be displayed as “0”.
Note: The displayed remaining free space is only
for the side being currently recorded.
Initializing DVD-RAM Disc
If you want to erase all data on a recorded disc and reuse it, you can initialize it rather than deleting the
data: Initialization is useful in this case since it takes less time than deleting all data.
Press the MENU button.
1
The Disc Navigation menu screen will appear.
Use the joystick to
2
choose “Format Disc”
on the “Disc” menu
screen, and then press
the button.
The screen for verifying “Format Disc” will appear.
If you are sure that you wish to format the disc,
3
use the joystick to choose “YES”, and then press
the button.
When initializing one side of the disc is complete, the DVD video camera/recorder will return to the recording pause status.
Note: When initializing the other side of disc, turn
it over and start again from step 1.
Note: Choosing “NO” in step 3 will cancel initiali-
zation.
Note: Initializing a disc will delete all the recorded
contents on disc: Be careful not to delete data by
mistake.
Note: Be sure to use the AC adapter when initializing disc so that the DVD video camera/recorder
is not turned off midway. If initialization is interrupted by power off, the disc will not be initialized
correctly, or it may be damaged.
Note: It may not be possible to initialize a disc with
many scratches or dirt: Such a disc cannot be used.
Note: If you use a brand-new DVD-R disc, message “Disc is not formatted” will appear: Initialize
the disc, following the subsequent messages (see
page 103).
Note: Pressing the
fication will restore the thumbnail display screen.
button on the screen for veri-
88

Updating Control Information
Disc Navigation in this DVD video camera/recorder manages information on scenes, such as skip, fade
and thumbnails, in a specified manner. If you use another device to edit the video data r ecor ded on this
DVD video camera/recorder, and then use the data again with Disc Navigation in this video camera/
recorder , the contr ol information must be updated: It will be automatically updated each time the pages
on the thumbnail display screen are turned. This is useful when you have edited many scenes using
another device, since the control information can be updated all at once using Disc Navigation.
Press the MENU button.
1
The Disc Navigation menu screen will appear.
Use the joystick to
2
choose “Update Control Info.” on the “Disc”
menu screen, and then
press the button.
The screen for verifying
“Update Control Info.”
will appear.
If you are sure that you wish to update the con-
3
trol information, use the joystick to choose
“YES”, and then press the button.
Note: Be sure to use the AC adapter when updating the control information so that the DVD
video camera/recorder is not turned off midway.
If updating of control information is interrupted by
power off, the control information will not be updated correctly.
Note: Even if the control information on disc is updated, the disc may no longer be usable on this
DVD video camera/recorder.
Note: It may take time to update the control information if the disc has many recorded scenes.
Note: Pressing the
fication will restore the thumbnail display screen.
button on the screen for veri-
ENGLISH
The message for proceeding will appear, and
then the Disc Navigation menu screen will be
restored.
A black screen may appear while the message
for updating is displayed.
If you choose “NO” on the screen for verifying
updating of control information, updating will
be canceled.
89

Finalizing Disc
If you wish to play back the contents recorded on this DVD video camera/recorder using a DVD player,
etc. that is compatible with 8 cm DVD-R disc, finalize the disc following the procedure below:
Press the MENU button.
ENGLISH
1
The Disc Navigation menu screen will appear.
Use the joystick to
2
choose “Finalize Disc”
on the “Disc” menu
screen, and then press
the button.
The disc will be finalized.
If you are sure that you
3
wish to finalize the disc,
use the joystick to
choose “YES”, and then
press the button.
When finalizing the other side of disc, turn the
disc over, and r epeat the above pr ocedure from
step 2.
Note: You can play back a finalized DVD-R disc
on a compatible DVD player by specifying “DVD
video” (the program will be registered on the DVD
menu as a title).
Note: No recording can be done on any DVD-R
disc that has been finalized.
Note: If the disc in the DVD video camera/recorder has already been finalized, you cannot
choose “Finalize Disc”.
Note: Be sure to use the AC adapter when finalizing disc. Finalization cannot be executed using
a battery pack. If finalization is interrupted by
power off, the disc will not be finalized correctly,
or it may be damaged.
Note: The time required to finalize disc that appears on the “Finalize Disc” screen is only for reference.
Note: The shorter the recording time on disc, the
longer it will take to finalize it.
Note: Pressing the
fication will restore the thumbnail display screen.
Playing Back Scenes Repeatedly (Repeat Play)
Press the MENU button.
1
The Disc Navigation menu screen will appear.
Use the joystick to
2
choose “Repeat Play” on
the “Others” menu
screen, and then press
the button.
The options will appear
on the right of “Repeat
Play”: The mark will
be attached to the currently selected option.
Use the joystick to choose “On”, and then press
3
the button:
Repeat Play has now been set.
Choosing “Off” will cancel Repeat Play.
When Repeat Play is set:
If one scene has been selected: When playback
of the last scene is finished, playback of all scenes
will repeat from the first scene.
If the range for playback has been specified:
Playback of the scenes in that range will repeat.
Note: Press the button to terminate playback.
However , the Repeat Play setting will not be cancelled.
Note: Still images can also be played back repeatedly.
Note: The Repeat Play setting is cancelled whenever the DVD video camera/recorder is turned off
or DISC EJECT button is pressed.
button on the screen for veri-
90

Connecting to Other Devices
This section explains about the connections to another A V device, such as TV, and how to transfer data
in DVD video camera/recorder to PC.
Viewing on TV Screen
Connect this DVD video camera/recorder to a TV and you can play back the recorded video or
monitor the video being recorded on the TV screen. This is also useful when editing or playing back
with Disc Navigation.
Connecting to a TV
Use the provided AV input/output cable to connect the DVD video camera/recorder to a TV as follows:
ENGLISH
S-VIDEO cable
To S-VIDEO
input/output jack *
To AV input/output jack
AV input/output cable
(provided)
* If your TV has an S-VIDEO input jack, the connection using S-VIDEO cable will be possible.
Note: Using an S-VIDEO cable to connect the
DVD video camera/recorder to a TV will deliver
clearer playback pictures.
Note: Before connecting, make sure that the volume on TV is turned down: Forgetting this may
cause howling from the TV speakers.
Stereo Type with
S-VIDEO Jack
S-VIDEO VIDEOAUDIO
LR
To S-VIDEO
input jack *
Note: Insert the AV input/output cable plugs into
jacks straight: Obliquely inserting them could damage the jacks.
Note: Disconnect the S-VIDEO cable before removing the disc.
Stereo Type Monaural Type
VIDEOAUDIO
LR
Input jacks
S-VIDEO VIDEO AUDIO
Yellow
VIDEOAUDIO
LR
To video/
audio
input jacks
WhiteRed
91

Viewing on TV Screen
Use the provided AV input/output cable to connect the DVD video camera/recorder to a TV as follows:
Turn the TV on and set the input selector to
1
“VCR” whichever applicable Video input.
ENGLISH
Refer to the TV instruction manual for how to
switch the TV input.
Set the power switch to “ VIDEO” or
2
“ PHOTO” to turn the DVD video camera/
recorder on.
The image that the DVD video camera/recorder
is seeing will appear on the TV screen. You can
also monitor the image on the LCD screen or
viewfinder of the DVD video camera/recorder.
Perform playback or recording.
3
T urn down TV volume in recor d mode, or feedback could result.
Note: The infrared remote control is useful when
operating the DVD video camera/recorder while
viewing an image on TV screen. However, if you
use a Hitachi VCR, the remote control may inadvertently operate the VCR if it is near the DVD video
camera/recorder. To prevent this, set the remote
control code of the VCR to a position other than
“VCR2”.
Note: Information that the DVD video camera/
recorder is recording will appear on the TV screen:
You can also display only part of information or
switch off the display. Refer to “Switching OnScreen Display Output On or Off” on page 63, and
press the DISPLAY button to switch the display status.
Note: When copy-guarded disc is played back,
no image will appear on TV screen.
Note: If you use TV with wide mode (aspect ratio
16:9) and set the TV to the wide mode, the Disc
Navigation screen may malfunction. If this happens, release the wide mode setting on TV (see
the TV instruction manual for releasing the wide
mode).
92

Recording Image from Other AV Devices
Y ou can transfer any image recorded on videotape, etc. to the DVD video camera/recorder via the
AV input/output jack, and record it on disc.
Connecting to Other AV Device
Use the AV input/output cable (provided) to connect the DVD video camera/recorder to other AV device as follows:
ENGLISH
S-VIDEO cable
To S-VIDEO
input/output jack *
To AV input/output jack
AV input/output cable
(provided)
* If the AV device has an S-VIDEO output jack, the connection using S-VIDEO cable will be possible.
Note: If you operate the DVD video camera/recorder connected to another device, always
power the camera/recorder from AC outlet using
the AC adapter.
Note: In case of camera recording with this DVD
video camera/recorder, do not connect the AV
input/output cable to the output jacks of any other
device: If you do this, sound from the other device may leak to this DVD video camera/recorder.
To S-VIDEO
output jack *
Note: If you use a Hitachi VCR, it will be operated
by the remote control provided with the DVD video
camera/recorder. When recor ding an image from
a Hitachi VCR, change the remote control code
of the VCR to other than “VCR2”.
Note: If you increase the volume of speaker in this
DVD video camera/recorder when recording an
externally input image, noise may occur in the
image that is being recorded. To prevent this, reduce the speaker volume when recording an externally input image.
Output jacks
S-VIDEO VIDEO AUDIO
Yellow
LR
To video/
audio
output jacks
WhiteRed
93

Recording Image from Other Camcorder or AV Device
Set the input selection
1
on the DVD video camera/recorder to “LINE”.
ENGLISH
Switch the input referring to “Input Selection” on page 60.
Turn on the connected device, and start play-
2
back of picture.
The picture will appear on the LCD screen or
viewfinder of this DVD video camera/recorder .
Press the REC button.
3
Recording will start on this DVD video camera/
recorder.
The operation of this line-input recording is the
same as for recording movie (video).
Note: Still images can also be recorded on DVDRAM disc. See “Changing Method for Recording
Stills” on page 61 for details, and “Recording Stills”
on page 43 for how to record still images.
Note: The “Input Source” setting will return to
“CAMERA” whenever DVD video camera/re-
corder is turned off.
Note: Recording of most images is prohibited by
the copy-guard signal to protect the copyright,
except for images recorded on camcorders for
personal enjoyment. These images cannot be recorded on this DVD video camera/recorder:
Typical copyright protected images include those
of DVD video, LD, prerecorded videotape, rental
videotape, digital satellite broadcast, etc.
Note: If a video signal that cannot be read by
this DVD video camera/recorder is present - even
in images recorded on camcorder for personal enjoyment without copy-guard signal - the input image may not be recorded normally.
Note: If the input signal is interrupted by switching the channel on TV or switching the signal using
video selector, normal recording cannot be performed.
94

Cautions when connecting DVD video
camera/recorder to PC
Do not plug in or unplug any cables when
you are using PC to access the disc in the
DVD video camera/recorder:
• If you plug in or unplug the PC connection cable or power cable while the CHARGE/ACCESS
indicator is blinking, the data on disc may be
damaged.
The mode for connection to PC does not
function in the following cases:
• When DVD video camera/recorder is turned off.
• When no disc is in DVD video camera/recorder .
The icon displayed on PC will be CD-ROM
in the following cases:
• When a DVD-RAM disc or DVD-R disc is not
set in DVD video camera/recorder.
• When an unformatted DVD-RAM disc or a disc
other than UDF formatted is in DVD video camera/recorder.
• When a DVD-R disc is not finalized.
The mode for connection to PC may not
function in the following cases:
• When a DVD-RAM disc formatted on a device
other than this DVD video camera/recorder is
inserted.
• When DVD video camera/recorder is connected
via USB HUB.
• When a USB device other than this DVD video
camera/recorder is connected to the same USB
bus.
The PC connection cable must be unplugged and then plugged in again when
using the mode for connection to PC in the
following cases:
• When the connected PC is set to suspended status.
The following cannot be performed on this
DVD video camera/recorder when it is
connected to PC:
• Camera operation, using button on DVD video
camera/recorder.
• Power off, using the power switch.
The following functions are not supported:
• Writing ordinary file other than AV data.
• Writing and reading to/from the disc in DVD
video camera/recorder at the same time.
• Compression of drive or disc utility program.
• Writing to disc, using an application other than
that provided in PC kit.
• Formatting disc from PC.
In addition, take note of the following:
• The recording mode, playback status, special
effects, or title displayed on this DVD video camera/recorder, will not be transferred to PC.
• The volume name of the DVD-RAM disc initialized on this DVD video camera/recorder will
be displayed on PC as “Dvd_camera”; the volume name of the DVD-RAM disc initialized on
a device other than this DVD video camera/recorder will conform to the specifications of the
previous initializing device.
• Do not use the DVD video camera/recorder in
an environment of high temperatures for an extended period of time.
• Use an unformatted DVD-R disc to record data
from PC on this DVD video camera/recorder.
• When recording data from PC on DVD-RAM
disc using this DVD video camera/recorder, always use a brand-new DVD-RAM disc or a
DVD-RAM disc formatted on this DVD video
camera recorder.
ENGLISH
95

Capturing Data for PC
You can capture the data recorded on this DVD video camera/recorder and transfer it to PC.
ENGLISH
Using DZ-WINPC3(W) PC kit
Using the DZ-WINPC3(W) optional PC kit, you can capture the data of images recorded on this DVD
video camera/recorder and transfer it to your PC*.
Y ou can also write video data edited on the PC to disc. See the instruction manual of DZ-WINPC3(W) PC
kit for details.
* There are numerous types of PC, including those personally assembled. Hitachi will occasionally
update compatibility information on Internet for PCs with which the PC kit can be operated: See
“Conditions for using DZ-WINPC3(W) PC kit” (shown below), the catalog and information on Internet,
to find out whether or not the PC kit can be used with your PC.
● Conditions for using DZ-WINPC3(W)
PC kit
T o connect the DVD video camera/r ecorder to PC
using the DZ-WINPC3(W) PC kit, the PC must satisfy the following conditions:
• Windows® 98, 98 Second Edition, Me, 2000 Pro-
fessional, or XP
• IBM PC/AT compatible
• USB port (the USB2.0 port is necessary to trans-
fer data at a higher speed)
• CD-ROM or DVD-ROM drive equipped
● PC kit should include the following:
• PC connection cable
• Device driver software for the DVD video cam-
era/recorder (not used with DZ-MV270E)
• UDF2.01 file system (InstantWrite)
• Software using still images (Photo Explorer Lite)
• Video editing/DVD writing software (DVD
Movie Factory SE for DVDCAM)
• DVD playback software (PowerDVD XP)
96

● Connecting DVD video camera/recorder to PC via PC connection cable
Use the PC connection cable supplied with the DZ-WINPC3(W) optional PC kit to connect the DVD
video camera/recorder to a PC that has been turned off, as shown in the following illustration:
To PC connection terminal
ENGLISH
Note: Use the USB device driver provided with the
DVD video camera/recorder, not with the DZWINPC3(W).
Note: When connecting this DVD video camera/
recorder to PC, you can also use a mini-USB B connector 5-pin type cable that is compatible with
USB2.0 (generally available), as well as the PC connection cable.
Note: The PC connection cable does not supply
power to the DVD video camera/recorder. Use the
AC adapter to power the DVD video camera/recorder.
Note: The PC connection cable supplied with the
DZ-WINPC3(W) optional PC kit is to be exclusively
used with the DVD video camera/recorder: A generally available USB cable cannot be used.
Note: Before connecting DVD video camera/recorder to PC, disconnect any other cables, such
as AV input/output cable, from the DVD video
camera/recorder.
Note: If you connect this DVD video camera/recorder to PC, nothing will appear in the viewfinder
or on the LCD screen. The CHARGE/ACCESS indicator will blink only while the disc is being
accessed.
Note: If you wish to transfer data recorded on
DVD-R disc with this DVD video camera/recorder
to PC, finalize the DVD-R disc (see page 90).
Note: After transferring the data on disc to PC,
keep the original disc as your backup.
Note: When capturing for PC the video data input from another A V device and recorded on disc
in DVD video camera/recorder, note that data
may not be played back correctly.
Note: The DVD video camera/recorder connected to PC should be used at normal room temperature.
Note: Note that Hitachi does not guarantee operation in the following cases:
•If connection is made using a cable other than
that supplied with the DZ-WINPC3(W) PC kit
Note: Connect the DVD video camera/recorder
to PC and use it at room temperature.
Note: Take care that the temperature of this DVD
video camera/recorder, when connected to PC,
does not rise excessively (reference for usage:
approx. 30 minutes at about 30°C.
Note: If you use a PC equipped with DVD-RAM
drive, change the provided UDF file system to the
UDF2.01 file system included in the DZ-WINPC3(W)
PC kit.
Note: If the DVD video camera/recorder is connected to the USB1.1 port of PC, the data transfer
speed will be lower than when it is connected to
USB2.0 port.
97

Using Disc on PC
If your PC is compatible with the disc used, you can immediately use a disc removed from the cartridge
or caddy on PC.
● Making use of recorded still
ENGLISH
images (with DVD-RAM disc only)
Still images are stored in the “DCIM”–“100HPNX1”
folder of disc as JPEG images (1280 × 960 pixels)*.
Use the still images on an application that is compatible with JPEG data.
* Stills from another AV device are JPEG images
(640 × 480 pixels).
● Making use of recorded movies
• When using DVD-RAM disc
Movies will be recorded conforming to DVD
video recording standard.
The DVD-RAM disc can be used on PCs that satisfy the following conditions:
- Compatible with 4.7 GB DVD-RAM disc
- Equipped with DVD-RAM(RAM/R) drive that
is compatible with 8 cm disc
- UDF2.01 file system installed
When playing back or editing a DVD-RAM disc
on the PC, use the application software that conforms to the DVD video recording standard.
• When using DVD-R disc
Movies will be recorded conforming to DVDvideo standard.
The DVD-R disc can be used on PCs that are
equipped with one of the following drives:
- DVD-ROM drive compatible with 8 cm disc
- DVD-RAM(RAM/R) drive compatible with 8
cm disc
- DVD-R/RW drive compatible with 8 cm disc
When playing back or editing a DVD-R disc on
the PC, use the application software that conforms to the DVD-video standard.
Note: If you wish to write the images edited on
PC to a brand-new DVD-R disc, do not format the
new disc on this DVD video camera/recorder.
Note: If you wish to use a DVD-R disc recorded
on this DVD video camera/recorder directly on PC,
finalize the disc on the DVD video camera/recorder (see page 90).
Note: Writing of the images edited on PC to DVDRAM or DVD-R disc may not be possible, depending on the combination of PC and DVD-RAM or
DVD-R disc.
98

Subsidiary Information
Cleaning
Be sure to set the power switch to “POWER OFF” before cleaning this DVD video camera/recorder.
● Cleaning LCD screen and lens
Use dry, soft cloth to wipe dirt off. When cleaning
the LCD screen, be careful not to use force, scratch
it, or subject it to impact: Doing such could cause a
defect in the screen, result in display unevenness,
or damage the LCD monitor.
● Do not use benzene or thinner to
clean DVD video camera/recorder case
The coating of case could peel off or the case could
deteriorate. Wipe off dirt on the case with a moist
cloth which has been completely wrung out. When
using chemical cleaning cloth, follow instructions
for use.
If dust adheres to viewfinder lens
Use a cotton swab to wipe it off. Do not use force when rubbing the lens: Doing so could damage it.
Push up the tab on the back of viewfinder to
1
remove the lens block of viewfinder.
Use a soft object, such as a cotton swab, to
2
clean the lens in viewfinder.
Push up this
portion.
Reattach the lens block.
3
Check the orientation of lens block and slowly
fit it in until a click is heard.
ENGLISH
99

Trouble Messages
A message may appear while you are operating the DVD video camera/recorder. If a message appears, refer to the following table and take appropriate corrective action.
ENGLISH
Message Cause & Troubleshooting
(1) Error has occurred.
Please restart.
(2) Error has occurred.
Please reinsert a disc.
(3) Error has occurred.
Error code No. xxxx.
Please read the
manual.
(4) ERROR xxxx
Control Information Error.
Disc error.
No more scenes. Play
List was deleted.
Write protected.
Check disc cartridge.
Battery is almost
empty. Replace it.
Cannot combine. Select multiple scenes.
Cannot combine.
Deselect PHOTO
scenes.
Scenes over limit. Cannot divide scenes.
Scenes over limit. Cannot add scenes.
Error has occurred. Try to restart the DVD video camera/recorder using the following methods:
(1) Turn power off, remove the battery pack or AC
adapter and reattach it, and then turn power on again.
(2) Turn power off, and reinsert the disc. Then turn power
on again.
(3) Take note of the number (xxxx), and then consult
your dealer.
Condensation might have occurred: Use the DVD
video camera/recorder only after it has dried.
(4) Try to repair using methods (1) and (2) above. If the
message still appears, take note of the number (xxxx)
and consult your dealer.
Mismatch may occur between the recorded image
and scene information.
Update the control information.
Disc may be dirty.
Remove the disc and wipe off fingerprints, dust, etc.
before reusing it, or use another disc.
Disc may be dirty.
Remove the disc and wipe off fingerprints, dust, etc.
before reusing it, or use another disc.
Mismatch in recording information may be caused by
editing done on some device other than this DVD video
camera/recorder.
Initialize the disc or use another disc.
All scenes are deleted from the play list.
Release write-protect of the cartridge. If the message
still appears, the disc may be software protected from
a device other than this DVD video camera/recorder.
To release this case, use a device that has executed
software-protect.
Replace with a charged battery, or use AC adapter
to power the DVD video camera/recorder.
Select a range of at least 2 scenes to be combined,
and then combine them.
Select only movies and combine them.
The number of entered scenes has reached the limit
that can be entered.
Delete several scenes.
The number of scenes entered in play list has reached
the limit that can be entered.
Delete several scenes.
Reference
page
30, 34,
37
20
89
23
23
88
79
25
31, 34
84
84
78, 79
78, 79
100
 Loading...