


MODEL DS 9DVA
− 1 −
1. REPAIR GUIDE
Be sure to remove the batteries from the main body before servicing. Inadv ert ent t r iggering of t he switch
with the battery connected w ill r esult in a danger of accidental turning of the motor.
1-1. Precautions in Disassembly and Reassembly
The
[Bold]
numbers in the description below correspond to the item numbers in the parts list and exploded
assembly diagram for the Model DS 9DVA.
1-1-1. Disassembly
(1) Remove the Housing (B)
[33]
.
Remove the seven Tapping Screws (W/Flange) D3 x 16
[28]
secured to the driver unit. Gently open
the Housings (A) and (B)
[33]
while holding their battery loading sections.
(2) With the Housing (B)
[33]
removed, all the internal parts, assembled or separate, can be taken out as
they are.
Lift the entire contents from the Housing (A)
[33]
while holding the Motor
[27]
and Cap
[6]
.
(3) Remove the Drill Chuck
[2]
. (See Fig. 4.)
(a) Turn the Motor
[27]
counterclockwise (when viewed from the rear) and remove it from the Rear Case
[17]
. Remove the Shift Knob
[39]
from the Shift Arm
[18]
. Take care not to remove the Shift Arm
[18]
from the Rear Case
[17]
in this operation.
(b) Mount the motor spacer (an accessory of the Special Repair Tool J-292) to the assembly of the Drill
Chuck
[2]
, Cap
[6]
, Front Case
[11]
and Rear Case
[17]
and then mount it to the Special Repair Tool
J-292 clamped in the vise as illustrated in Fig.4. In t his oper ation, check that the pinion press-fitted
in the Special Repair Tool J-292 and the Planet Gear (A)
[23]
are engaged properly.
(c) Turn the Cap
[6]
clockwise (when viewed from the front) until it can turn no further. In this posit ion
the drill mark “
” on the Cap
[6]
is positioned to the Shift Arm
[18]
side. Secure the Slide Ring
Gear
[19]
to the Front Case
[11]
side with the Shift Arm
[18]
.
(d) Turn the sleeve of the Drill Chuck
[2]
counterclockwise (when viewed from the front) to fully open the
jaws of the Drill Chuck
[2]
. Turn the Special Screw M6 x 23
[1]
clockwise and remove it. (Note that
the Special Screw is left-hand threaded.)
(e) Fit the hexagonal bar wrench for M10 into the Drill Chuck
[2]
as illustrated in Fig. 4 and remove the
Chuck by turning the bar wrench counterclockwise.

− 2 −
Fig. 4
(4) Disassembly of the gear unit.
Remove the Shift Arm
[18]
from the Rear Case
[17]
, then remove the four Screw Sets D3 x 12
[4]
connecting the Front Case
[11]
and the Rear Case
[17]
. Remove the Washer (A)
[16]
, the Planet Gear
(C) Set
[15]
, Carrier [
14]
, Ring Gear
[13]
and Steel Ball
[12]
from the Front Case
[11]
in order. Take
care not to lose the six Steel Balls
[12]
in this operation.
(5) Disassembly of the clutch unit.
Remove the two Screw Sets D3 x 12
[4]
, then remove the Plate
[5]
, Cap
[6]
, Clutch Plate
[7]
, Spring
[8]
, Spring Holder
[9]
and Thrust Plate
[10]
.
(Note) Do not remove the Front Case
[11]
.
(6) Disassembly of the power supply unit.
(Note) Do not disconnect the three FET internal wires soldered to the DC-Speed Control Swit ch
[36]
.
Disassembly of the Motor
[27]
, DC-Speed Control Switch
[36]
, Motor Spacer
[26]
and Fin
[43]
removed
in step (3) can be carried out in the following procedure.
Disconnect the Internal Wires
[35]
and
[38]
of the Motor
[27]
with a soldering iron.
With one Bind Screw M3 x 7
[42]
removed, the FET (Field Effect Transistor) of DC-Speed Control
Switch
[36]
and the Fin
[43]
can be taken apart.
Remove the two Machine Screws M4 x 6
[30]
and take the Motor
[27]
and the Motor Spacer
[26]
apart.
When removing the Internal Wires
[35]
and
[38]
of the Motor
[27]
from the DC-Speed Control Switch
[36]
, be sure to remove the two Machine Screws M3 x 5
[34]
securing the flag-shaped terminal. (See
Fig.5.)
Rear Case
[17]
Slide Ring Gear
[19]
Drill Chuck
[2]
Special Repair Tool (J-292)
Shift Arm
[18]
Hexagonal bar wrench
Vise
Front Case
[11]
Cap
[6]
M6 x 23
[1]
Special Screw

− 3 −
1-1-2. Reassembly
Reassembly can generally be carried out as the reverse of the disassembly procedure, with some items to
be noted as follows.
(1) Reassembly of the power supply unit
(a) Be sure to perform wiring connections as indicated in the wiring diagram (Fig.5).
Fig. 5
(Note) Do not deform the bendable legs of the FET attached to the DC-Speed Control Switch
[36]
.
(b) Pay attention to the polarity of t he Mot or
[27]
when soldering the Internal Wires
[35]
and
[38]
to the
Motor
[27]
. The red marking side of the Motor
[27]
is positive. (See Fig.6.)
(Note) When installing the Motor Spacer
[26]
to the Motor
[27]
, align the negative terminal of the
Motor
[27]
with the marking on the Motor Spacer
[26]
and tighten with the Machine Screw
M4 x 6
[30]
and the Spring Washer M4
[31]
.
(c) Apply grease (Hitachi Motor Grease No.29) to the pinion pressed into the Motor
[27]
.
Fig. 6
Negative side
Marking
[26]
[27]
Red marking
Positive side
Motor Spacer
[26]
Motor
[27]
Internal Wire(Red)
[35]
DC-Speed Control Switch
[36]
Internal
Wire(Black)
[38]
Machine Screw
M4 x 6
[30]
Spring Washer M4
[31]
Machine Screw M3 x 5
[34]
Flag-shaped terminal
Terminal
Housing(B) side
Terminal
Housing(A) side
Fin
[43]
Bind Screw M3 x 7
[42] [42]
Terminal Support(A)
[41]

− 4 −
(2) Reassembly of the clutch unit
(a) Apply grease (Hitachi Motor Grease No.29) to the sliding portion of t he Front Case
[11]
and Clutch
Plate
[7]
and the stepped portion of the Cap
[6]
.
(b) Reassemble the Screw
[4]
through the Front Case
[11]
as follows.
(i) When installing the Clutch Plate
[7]
into the Front Case
[11]
, align the projection on the Front
Case
[11]
with the notch of the Clutch Plate
[7]
. (See Fig.8.)
Fig. 7
Fig. 8
(ii) When installing the Cap
[6]
to the assembly reassembled in step (i), be careful of the position of
the numbers on the Cap
[6]
and the notch of the Clutch Plate
[7]
. The indication ”1” of the Cap
[6]
must be on the opposite side of the notch of the Clutch Plate
[7]
. (See Fig.7.)
(3) Reassembly of the gear unit
(a) Apply grease (Hitachi Motor Grease No.29) to the meshing parts of the gear.
(b) Install the parts series from the Steel Ball
[12]
to the Washer (B)
[25]
into the assembly reassembled
in step (2). (See Fig.9.)
(i) Note the direction of the groove when installing t he Slide Ring Gear
[19]
so that the groove is on
the Motor
[27]
side.
(ii) Install the Front Case
[11]
and the Rear Case
[17]
together with the marking on the Front Case
[11]
aligned with the marking on the Rear Case
[17]
. (See Fig.11.)
"1"
Sliding portion
Notch
Stepped portion
[9]
[7]
[6] [11]
[10]
[8][5]
[4]
Pro
j
ection
Notch

− 5 −
Fig. 9
(iii)Install the Washer (B)
[25]
in the Rear Case
[17]
with the projection of the Washer (B)
[25]
engaged with the recess in the Rear Case
[17]
, and turn the Washer (B)
[25]
clockwise until it
can turn no further. (See Fig. 10.)
Fig.10
(c) Install the Shift Arm
[18]
into the assembly reassembled in step (b).
(i) With the ridge at the Shift Arm
[18]
set on the Motor
[27]
side, first install them on the unmarked
side of the assembly reassembled in step (b). Then insert the projection on the Shift Arm
[18]
into the hole in the Rear Case
[17]
and make sure that the projection is fitted into the recess in
the Slide Ring Gear
[19]
mounted within the Rear Case
[17]
. (See Fig. 11.)
Recess
Projection
[25]
Projection
Groove
[25][24][23][22][21][20][19]
[4] [18]
[17][16][15][14][13][12][11]

− 6 −
Fig. 11
(d) Install the Drill Chuck
[2]
.
Instal the Drill Chuck
[2]
with the Special Repair Toll (J-292) and secure it with the Special Screw
M6 x 23
[1]
.
(e) Install the Shift Knob
[39]
into the assembly reassembled in step (d).
When installing the Shift Knob
[39]
into the Shift Arm
[18]
, note that the ”LOW” mark on the Shift
Knob
[39]
is on the Motor
[27]
side with the Shift Arm
[18]
engaged with the recess in the Shift Knob
[39]
.
(f) I nst all the assembly reassembled in step (1) and the assembly reassembled in step (e) together.
(See Fig.12.)
Fit the projection on the Motor Spacer
[26]
into the recess in the Rear Case
[17]
while making sure
that the marking on the assembly from step (e) is aligned with the marking on the Motor Spacer
[26]
,
and turn the Motor Spacer
[26]
clockwise when viewed from the rear of the Motor
[27]
until it can
turn no further. During installation, make sure that the pinion pressed into the Motor
[27]
and the
Planet Gear (A)
[23]
mesh properly.
Fig. 12
Projection
Recess
[18]
Marking
Ridge
[18]
Hole
Recess

− 7 −
(4) Installation of the assembly reassembled in step (3) into the Housing (A) and (B)
[33]
.
(a) Install the Pushing Button
[37]
into the Housing (B)
[33]
. (See Fig.13.)
(b) Install the assembly reassembled in step (3) into the Housing (A)
[33]
. Note that the projections on
the Front Case
[11]
and the Motor Spacer
[26]
are engaged in the recess in the Housing (A)
[33]
.
(See Fig.14.)
(c) Set the assembly reassembled in step (b) to the Housing (B)
[33]
and secure it with the seven
Tapping Screws (W/Flange) D3 x 16
[28]
.
(d) Verify proper operation of the Cap
[6]
.
When the assembly procedure up to step (c) is completed, make sure that the number “1” on the Cap
[6]
and the drill mark “
” are in alignement with the triangle mark on the Housings (A) and
(B)
[33]
. If the number “1” on the Cap
[6]
or drill mark “
” cannot reach the triangle mark on the
Housing (A) and (B)
[33]
, correctly re-install the Cap
[6]
referring to step (2) (b) as it is improperly
installed.
Fig. 13 Fig. 14
[33]
[33]
[37]
Projection
Recess

− 8 −
(5) Other precautions in reassembly
(a) When the assembly procedure is completed, make sure that the turning direction of t he Dr ill Chuck
[2]
corresponds to the position of the Pushing Button
[37]
. When the Pushing Button
[37]
is pressed
from the (R)-marked side, the Drill Chuck
[2]
should turn clockwise when viewed from the rear
(opposite side of the Chuck
[2]
). Also make sure that the turning speed of the Drill Chuck
[2]
switches between “HIGH” and “LOW” by switching the Shift Knob
[39]
.
Make sure that the run-out of the Drill Chuck
[2]
holding a 9 mm dia. test bar is below 0.8 mm at a
distance of 80 mm from the chuck end.
(b) Tightening torque of each screw is given below.
Machine Screw M3 x 5
[34]
:3 - 4 kgf-cm
Bind Screw M3 x 7
[42]
:5 - 8 kgf-cm
Machine Screw M4 x 6
[30]
: 11 - 19 kgf-cm
Screw Set D3 x 12
[4]
: 6 - 10 kgf-cm
Drill Chuck
[2]
: 180 - 220 kgf-cm
Special Screw M6 x 23
[1]
: 40 - 50 kgf-cm
Tapping Screw D3 x 16
[28]
: 11 - 19 kgf-cm
1-2. Precautions in Disassembly and Reassembly of Battery Charger
Please refer to the Technical Data and Service Manual for precautions in disassembly and reassembly of
the Battery Charger UC 14YF.
− 9 −
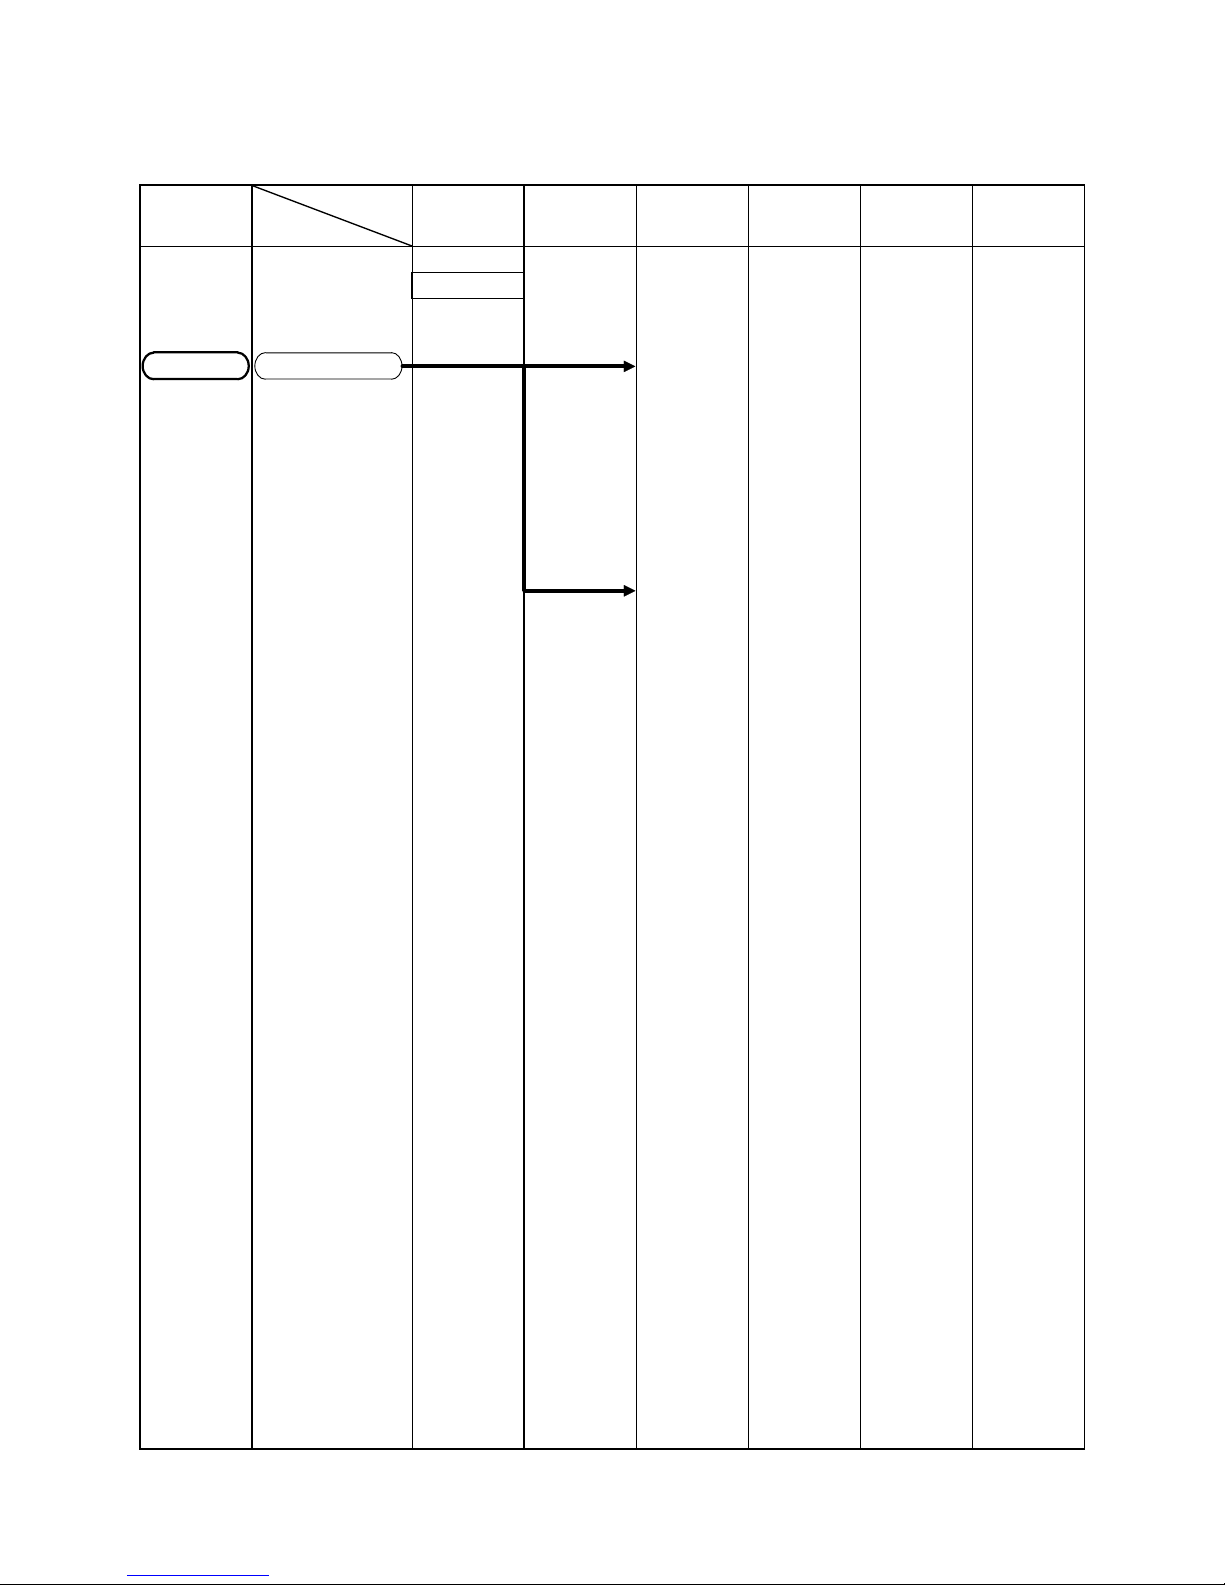
2. STANDARD REPAIR TIME (UNIT) SCHEDULES
MODEL
Variable
Fixed
10 20 30 40 50 60 min.
(Gear Box Ass’y)
Front Case
Ring Gear
Carrier
First Ring Gear
Planet Gear (A)
Set
Pinion (B)
Pinion (C)
Slide Ring Gear
Planet
Gear (C)Set
Rear Case
Work Flow
Housing
(A),(B) Set
Motor
Cap
DC-Speed
Control Switch
Shift Arm
Fin
Spring
Keyless Chuck
General Assembly
DS 9DVA
 Loading...