

CORDLESS DRIVER DRILL
AKKU-BOHRSCHRAUBER
PERCEUSE-VISSEUSE À BATTERIE
TRAPANO-AVVITATORE A BATTERIA
SNOERLOZE
BOOR-SCHROEFMACHINE
TALADRO ATORNILLADOR
SIN CABLE DE CONEXION
Two speed Variable speed
DN 7DT DN 7DV
DN 7DT
Read through carefully and understand these instructions before use.
Diese Anleitung vor Benutzung des Werkzeugs sorgfältig durchlesen und verstehen.
Lire soigneusement et bien assimiler ces instructions avant usage.
Prima dell’uso leggere attentamente e comprendere queste instruzioni.
Deze gebruiksaanwijzing s.v.p. voor gebruik zorgvuldig doorlezen.
Leer cuidadosamente y comprender estas instrucciones antes del uso.
Handling instructions
Bedienungsanleitung
Mode d’emploi
Instruzioni per l’uso
Gebruiksaanwijzing
Instrucciones de manejo
Parts are subject to possible
modification without notice due to
improvements.
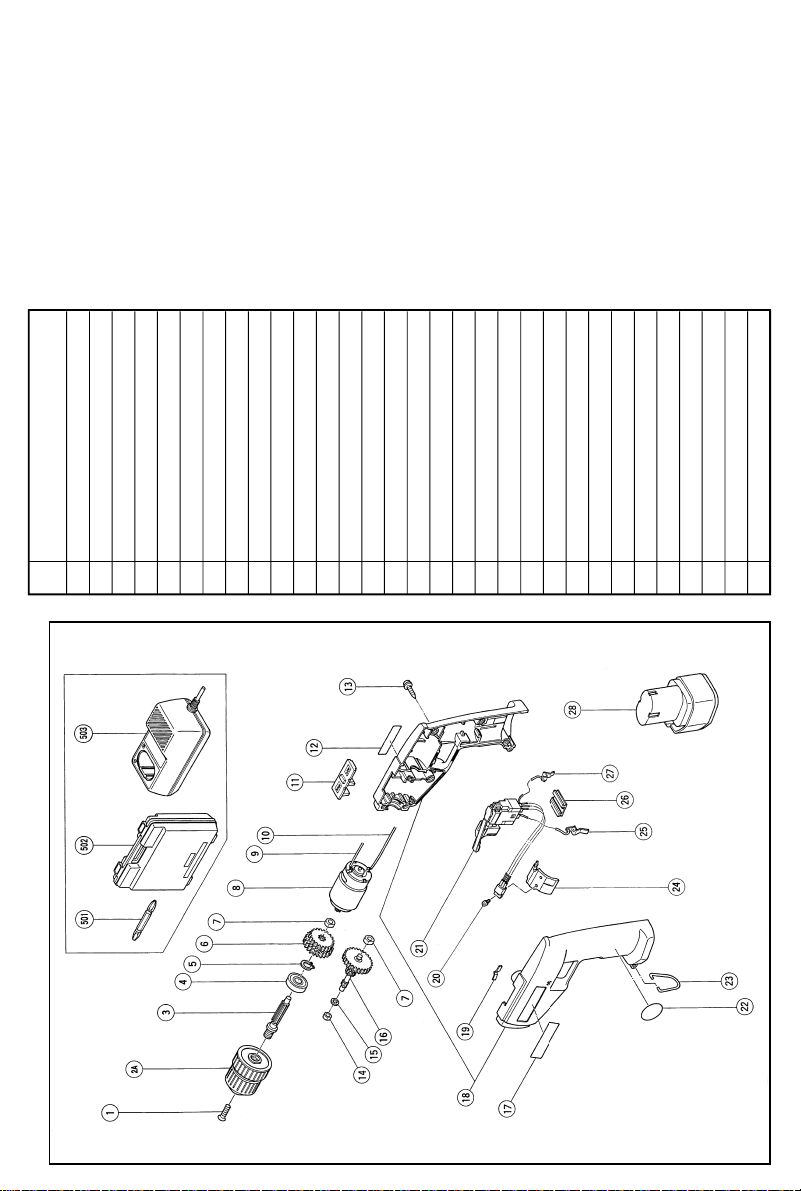
The drawing and the list are parts
structural drawing and parts list of
model DN7DV.
For model DN7DT refer to the
drawing and the list.
Part Name
1 Flat Hd. Screw (Left Hand) M5 × 17
3 Spindle
4 Ball Bearing (6000VVCMPS2S)
5 Retaining Ring for D10 Shaft
6 Final Gear
7 Metal
8 Motor
Item
2A Drill Chuck 10TLRA-N
No.
9 Internal Wire (B) (Red) 90L
10 Internal Wire (B) (Black) 40L
11 Shift Knob
12 Name Plate
13 Tapping Screw (W/Washer) D3 × 16
14 Metal D4 × 6
15 Washer M4
16 Second Pinion
17 HITACHI Label
Machine Screw (W/Sp. Washer) M3 × 5
18 Housing (A). (B) Set
19 Shift Spring
20
21 DC-Speed Switch
22 Mark Plate
23 Hook
24 Fin
25 Terminal
26 Terminal Support
27 Terminal
28 Battery EB7
501 + Driver Bit No.2 65L
502 Case
503 Charger (Model UC7SB)
The exploded assembly drawing should be used only for authorized service center.
DN7DV
1
12
11
10
13
2
1
2
5
4
3 4
8
7
1
9
5 6
15
L
14
15
R
3
1
2
17
LOW
6
7 8
1
18
HIGH
16
16
L
19

English Deutsch Français
q
Rechargeable battery Batterie Batterie rechargeable
w
Latch Verriegelung Taquet
e
Pull out Herausziehen Extraire
r
Insert Einsetzen Insérer
t
Handle Handgriff Poignée
y
Push Drücken Pousser
u
Insert Einsetzen Insérer
i
Pilot lamp Kontrollampe Lampe-témoin
Hole for connecting the
o
rechargeable battery rechargeable
Ring Ring Anneau
!0
Sleeve Manschette Manchon
!1
Tighten Anziehen Serrer
!2
Loosen Lösen Desserrer
!3
Selector lever Wählhebel Levier-sélecteur
!4
!5
and L marks
R
!6
Shift knob Wählknopf Bouton de décalage
!7
Low speed Kleine Geschwindigkeit Petite vitesse
!8
High speed Große Geschwindigkeit Grande vitesse
!9
Trigger switch Schalter Déclencheur
Anschlußloch für Batterie
und L Zeichen Repères R et
R
Trou pour connecter la batterie
L
Italiano Nederlands Español
q
Batteria ricaricabile Oplaadbare accu Batería recargable
w
Fermo Vergrendeling Cierre
e
Estarre Uitnemen Extraer
r
Inserire Insteken Insertar
t
Impugnatura Handgreep Asidero
y
Spingere Drukken Presionar
u
Inserire Inbrengen Insertar
i
Lampada spia Kontrolelampje Lámpara piloto
Foro di collegamento della Opening voor aansluiting van Orificio para conectar la batería
o
batteria ricaricabile oplaadbare accu recargable
Anello Ring Anillo
!0
Collare Klembus Manguito
!1
Stringere Aandraaien Apretar
!2
Allentare Losdraaien Aflojar
!3
Levetta Keuzeschakelaar Palanca selectora
!4
!5
e L segno
R
!6
Manopola d‘intercambio Verstelknop Perilla de cambio
!7
Bassa velocità Lage snelheid Baja velocidad
!8
Alta velocità Hoge snelheid Alta velocidad
!9
Grilletto dell‘interruttore Trekschakelaar Interruptor de gatillo
en L-markeringen Marcas R y
R
L

English
GENERAL OPERATIONAL PRECAUTIONS
1. Keep work area clean. Cluttered areas and benches
invite accidents.
2. Avoid dangerous environment. Don’t expose power
tools and charger to rain. Don’t use power tools
and charger in damp or wet locations. And keep
work area well lit. Never use power tools and
charger near flammable or explosive materials. Do
not use tool and charger in presence of flammable
liquids or gases.
3. Keep children away. All visitors should be kept
safe distance from work area.
4. Store idle tools and charger. When not in use,
tools and charger should be stored in dry, high
or locked-up place-out of reach of children. Store
tools and charger in a place where the temperature is less than 40°C.
5. Don’t force tool. It will do the job better and safer
at the rate for which it was designed.
6. Use right tool. Don’t force small tool or attachment to do the job of a heavy duty tool.
7. Wear proper apparel. Do not wear clothing or
jewelry. They can be caught in moving parts.
Rubber gloves and footwear are recommended
when working outdoor.
8. Use eye protection with most tools. Also use face
or dust mask if cutting operation is dusty.
9. Don’t abuse cord. Never carry charger by cord or
yank it to disconnect from receptacle. Keep cord
from heat, oil and sharp edges.
10. Secure work. Use clamps or a vise to hold work.
It’s safer than using your hand and it frees both
hands to operate tool.
11. Don’t overreach. Keep proper footing and balance
at all times.
12. Maintain tools with care. Keep tools sharp at all
times, and clean for best and safest performance.
Follow instructions for lubricating and changing
accessories.
13. When the charger is not in use, or when being
maintained and inspected, disconnect its power
cord from the AC outlet.
14. Remove chuck wrenches and wrenches. Form habit
of checking to see that wrenches are removed
from tool before turning it on.
15. Avoid accidental starting. Don’t carry tool with
finger on switch.
16. To avoid danger, always use only the specified
charger.
17. Use only original HITACHI replacement parts.
18. Do not use power tools for applications other than
those specified in the Handling Instructions.
19. To avoid personal injury, use only the accessories
or attachment recommended in these handling
instructions or in the HITACHI catalog.
20. Let only the authorized service facility do the
repairing. The Manufacturer will not be responsible for any damages or injuries caused by repair
by the unauthorized persons or by mishandling
of the tool.
21. To ensure the designed operational integrity of
power tools and charger, do not remove installed
covers or screws.
22. Always use the charger at the voltage specified
on the nameplate.
23. Do not touch movable parts or accessories unless
the power source has been disconnected.
24. Always charge the battery before use.
25. Never use a battery other than that specified. Do
not connect a usual dry cell, a rechargeable battery
other than that specified or a car battery to the
power tool.
26. Do not use any transformer that has a booster.
27. Do not charge the battery from an engine electric
generator or DC power supply.
28. Always charge indoors. Because the charger and
battery heat slightly during charging, charge the
battery in a place not exposed to direct sunlight;
where the humidity is low and the ventilation
good.
29. Before starting to work in a high place, pay attention to the activities below to make sure there
are no people below.
30. Use the exploded assembly drawing on this
handling instructions only for authorized servicing.
PRECAUTIONS FOR CORDLESS DRIVER DRILL
1. Always charge the battery at a temperature of 10 –
40°C. A temperature of less than 10°C will result
in over charging which is dangerous. The battery
cannot be charged at a temperature higher than
40°C. The most suitable temperature for charging
is that of 20 – 25°C.
2. Do not use the charger continuously.
When one charging is completed, leave the charger
for about 15 minutes before the next charging of
battery.
3. Do not charge the battery for more than 1 hour.
The battery will be fully charged in about 1 hour
and charging should be stopped when 1 hour has
elapsed from commencement. Disconnect the
charger power cord from the AC outlet.
4. Do not allow foreign matter to enter the hole for
connecting the rechargeable battery.
5. Never disassemble the rechargeable battery and
charger.
6. Never short-circuit the rechargeable battery. Shortcircuiting the battery will cause a great electric
current and overheat. It results in burn or damage
to the battery.
7. Do not dispose of the battery in fire.
If the battery is burnt, it may explode.
8. When drilling in wall, floor or ceiling, check for
buried electric power cord, etc.
9. Bring the battery to the shop from which it was
purchased as soon as the post-charging battery
life becomes too short for practical use. Do not
dispose of the exhausted battery.
10. Using an exhausted battery will damage the
charger.
11. Do not insert object into the air ventilation slots
of the charger.
Inserting metal objects or inflammables into the
charger air ventilation slots will result in electrical
shock hazard or damaged charger.
3

English
SPECIFICATIONS
POWER TOOL
Model DN7DT DN7DV
No-load speed (Low/High) 280/700/min. 0 – 280/0 – 700/min.
Drilling
Capacity
Driving
Rechargeable battery (EB7) Ni-Cd battery, 7.2 V
Weight 1.2 kg
Sound presser level Not exceed 70 dB (A)
Vibration level Not exceed 2.5 m/S
CHARGER
Model UC7SB
Charging time Approx. 1 hour (at 20°C)
Charging voltage 7.2 V
Weight 1.0 kg
STANDARD ACCESSORIES
Wood 15 mm
Metal Steel: 10 mm, Aluminum: 10 mm
Wood screw 5.1 mm (diameter) x 35 mm (length)
Tapping screw 4 mm (diameter) x 20 mm (length)
2
DN7DT (1HCK)
DN7DV (1HCK)
1 Plus driver bit (No. 2) ...................................................................... 1
2 Charger (UC7SB) ............................................................................. 1
3 Plastic case ....................................................................................... 1
Standard accessories are subject to change without notice.
OPTIONAL ACCESSORIES ......(sold separately)
1. Battery (EB7)
4
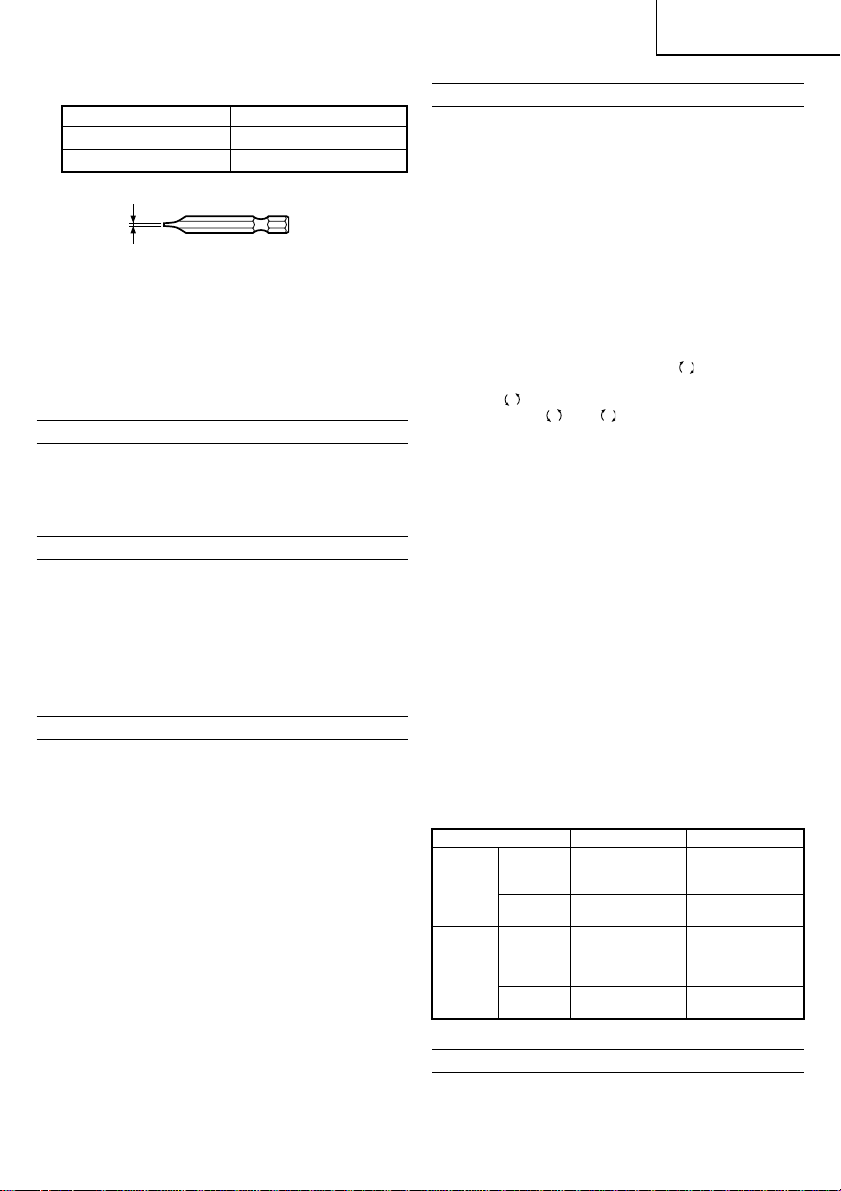
2. Plus Driver Bit
1
2
Bit No. Screw size
No. 1 2 – 2.5 mm
No. 2 3 – 5 mm
No. 3 6 – 8 mm
Bit No.
3
English
3. Minus Driver Bit
a Screw size
0.8 mm 4 mm
1 mm 5 – 6 mm
a
4. Drill bit for steel
Diameter, 2 mm, 5 mm, 6 mm.
5. Drill bit for wood
Diameter, 10 mm, 13 mm.
Optional accessories are subject to change without
notice.
APPLICATIONS
䡬 Driving and removing of machine screws, wood
screws, tapping screws, etc.
䡬 Drilling of various metals.
䡬 Drilling of various woods.
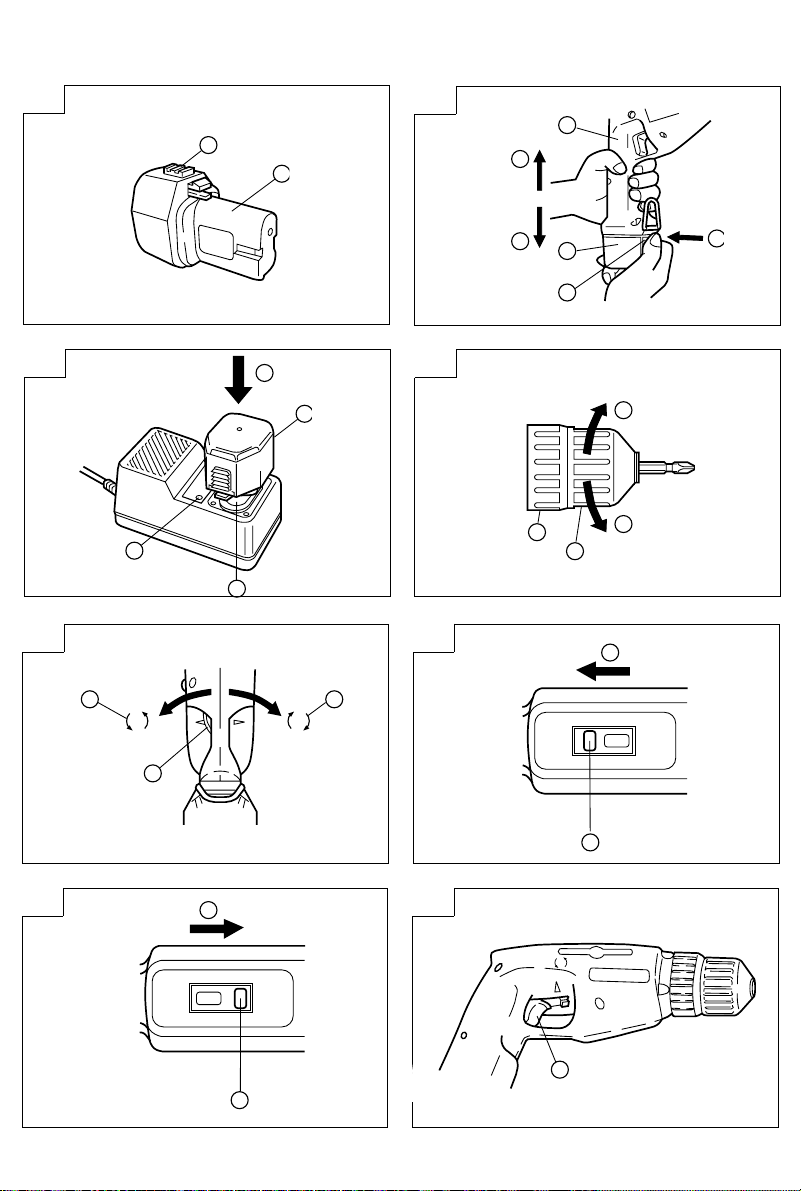
BATTERY REMOVAL/INSTALLATION
1. Battery removal
Hold the handle tightly and push the battery latch
to remove the battery (see Figs. 1 and 2).
CAUTION
Never short-circuit the battery.
2. Battery installation
Insert the battery while observing its polarities (see
Fig. 2).
CHARGING
Before using the driver drill, charge the battery as follows.
1. Insert the battery in the charger.
Position the battery so that the nameplate faces
toward the nameplate of the charger and press in
the battery until it comes into contact with the
bottom plate. (See Figs. 1 and 3.)
2. Connect the charger power cord to the AC outlet.
Connecting the power cord will turn on the charger
(the pilot lamp lights).
CAUTION
If the pilot lamp does not light, pull out the power
cord from the AC outlet and check the battery
mounting condition.
About 1 hour is required to fully charge the battery
at a temperature of about 20°C. The pilot lamp goes
off to indicate that the battery is fully charged.
CAUTION
If the battery is heated due to direct sunlight, etc.,
just after operation, the charger pilot lamp may
not light. At that time cool the battery first, then
start charging.
3. Disconnect the charger power cord from the AC
outlet.
4. Hold the charger tight and pull out the battery.
PRIOR TO OPERATION
1. Mounting and dismounting of the bit.
(1) Mounting the bit
After inserting a driver bit, etc. into the keyless drill
chuck, firmly grasp the ring and tighten the sleeve
by turning it toward the right (in the clockwise
direction as viewed from the front). (See Fig. 4)
䡬 If the sleeve becomes loose during operation, tighten
it further. The tightening force becomes stronger
when the sleeve is tightened.
(2) Dismounting the bit
Firmly grasp the ring and loosen the sleeve by
turning it toward the left (in the counter-clockwise
direction as viewed from the front). (See Fig. 4)
2. Confirm that the battery is mounted correctly.
3. Check the rotational direction.
When the selector lever is set to
clockwise when viewed from the drill rear. When
, the drill rotates
R
set to L, the drill rotates counterclockwise. (See
Fig. 5) (The
body)
and R marks are provided on the
L
CAUTION
䡬 When the trigger switch is depressed, the se-
lector lever cannot be moved. Always release
the trigger switch to move the selector lever.
4. Change rotation speed
Operate the shift knob to change the rotational
speed. Move the shift knob in the direction of the
arrow. (See Figs. 6 and 7)
When the shift knob is set to “LOW”, the drill
rotates at a low speed. When set to “HIGH”, the
drill rotates at a high speed. If the shift knob cannot
be moved smoothly, clasp the drill chuck by hand
and rotate the spindle slightly.
CAUTIONS
䡬 When changing the rotational speed with the
shift knob, confirm that the switch is off. Changing the speed while the motor is rotating will
damage the gears.
䡬 To mesh the gears, certainly move the shift knob
so that the “LOW” or “HIGH” mark can fully be
seen. (See Figs. 6 and 7)
5. Change the speed depending upon uses.
Table 1
USES LOW SPEED HIGH SPEED
Drilling
Driving
Wood
Metal —
Tapping
screw, &
machine
screw
Wood
screw
In case the
diameter is over
13 mm
Driving machine
screws in general
In case screw size
is over 3.5 mm
In case the
diameter is 13
mm or below.
Use a drill bit for
steel
—
—
HOW TO USE
CAUTIONS
䡬 While operating the driver drill, take care not to lock
the motor.
5

English
䡬 If the motor is locked, immediately turn the power
off.
If the motor is locked for a while, the motor or
battery may be burnt.
䡬 A buzzing noise is produced when the motor is
about to rotate. This is only a noise, not a machine
failure. (DN7DV only.)
1. Switch operation
䡬 When the trigger switch is depressed, the tool rotates.
When the trigger is released, the tool stops. (Fig.
8)
䡬 The rotational speed of the drill can be controlled
by varying the amount that the trigger switch is
pulled. Speed is low when the trigger switch is
pulled slightly and increases as the switch is pulled
more. (DN7DV only).
MAINTENANCE AND INSPECTION
1. Inspecting the tool
Since use of a dull tool will degrade efficiency and
cause possible motor malfunction, sharpen or replace the tool as soon as abrasion is noted.
2. Inspecting the mounting screws
Regularly inspect all mounting screws and ensure
that they are properly tightened. Should any of the
screws be loose, retighten them immediately. Failure to do so could result in serious hazard.
3. Cleaning on the outside
When the driver drill is stained, wipe with a soft
dry cloth or a cloth moistened with soapy water.
Do not use chloric solvents, gasoline or paint thinner, for they melt plastics.
4. Storage
Store the driver drill in a place in which the temperature is less than 40°C and out of reach of
children.
IMPORTANT
Correct connection of the plug
The wires of the mains lead are coloured in accordance
with the following code:
Blue: –Neutral
Brown: –Live
As the colours of the wires in the mains lead of this
tool may not correspond with the coloured markings
identifying the terminals in your plug proceed as follows:
The wire coloured blue must be connected to the
terminal marked with the letter N or coloured black.
The wire coloured brown must be connected to the
terminal marked with the letter L or coloured red.
Neither core must be connected to the earth terminal.
NOTE
This requirement is provided according to BRITISH
STANDARD 2769: 1984.
Therefore, the letter code and colour code may not be
applicable to other markets except United Kingdom.
The noise emitted by this power tool is measured in
accordance with IEC 59 (CO) 11, IEC 704, DIN 45 635
Part 21, NFS 31-031 (84/537/EEC for concrete breakers).
The sound pressure level at the workplace can exceed
85 dB (A); in this case noise protection for the operator
is required.
NOTE
Due to HITACHI’s continuing program of reserch and
development, the specifications herein are subject to
change without prior notice.
This appliance is produced to conform to the requirements of B. S. 800: 1977*.
* This requirement is applicable to appliances for
UNITED KINGDOM.
6

Deutsch
ALLGEMEINE VORSICHTSMASSNAHMEN
1. Den Arbeitsplatz stets sauber halten. Unaufgeräumte Arbeitsplätze und Werkbänke erhöhen die
Unfallgefahr.
2. Gefährliche Umgebungen vermeiden. Die Maschi-
ne und das Ladegerät keiner Feuchtigkeit aussetzen oder an nassen Stellen benutzen.
Achten Sie auf einen hellen, wenn erforderlich gut
beleuchteten Arbeitsplatz. Maschine und Ladegerät
niemals in der Nähe von brennbaren oder explosiven Materialien, Flüssigkeiten oder Gasen verwenden.
3. Außer Reichweite von Kindern halten. Nicht an
der Arbeit beteiligte Personen sollten einen Sicherheit-sabstand einhalten.
4. Unbenutztes Werkzeug und Ladegerät an einen
trockenen und verschlossenen Ort wegräumen;
außerhalb der Reichweite von Kindern aufbewahren.
Die Temperatur sollte weniger als 40°C betragen.
5. Das Werkzeug nicht überlasten. Es arbeitet sich
besser und sicherer bei angemessenen Geschwindigkeiten und Belastungen.
6. Das richtige Werkzeug zur Arbeit verwenden. Erwarten Sie nicht, daß ein zu kleines Werkzeug
oder Zubehör die Arbeit einer Hochleistungsmaschine verrichtet.
7. Achten Sie auf die richtige Kleidung. Lose oder
zu weite Kleidung bzw. und/oder Schmuck (z.B.
Ketten, Ringe, usw.) könnten sich in rotierenden
oder bewegenden Teilen verfangen. Schutzhandschuhe und Arbeitsschutzschuhe sind bei
denArbeiten zu tragen.
8. Vergessen Sie nicht bei Arbeiten mit Werkzeugen
eine Sicherheitsbrille zu tragen, ebenfalls, wenn
erforderlich eine Gesichts-oder Staubmaske.
9. Schonen Sie das Anschlußkabel. Tragen Sie nie-
mals das Ladegerät am Kabel und ziehen Sie nicht
daran, um den Stecker von der Steckdose zu
trennen.
Das Kabel gegen übermäßige Hitze, Öl und scharfe Kanten schützen.
10. Das zu bearbeitende Werkstück gut sichern. Zwin-
gen oder Schraubstock für die Befestigung des
Werkstücks benutzen. Es erhöht die Sicherheit und
schafft freie Hände zur Bedienung des Werkzeugs
.
11. Verschaffen Sie sich einen festen Stand, er garantiert Sicherheit und optimales Gleichgewicht bei
der Arbeit.
12. Das Werkzeug in gutem Zustand behalten. Stets
sauber halten, pflegen und warten, damit es immer
die beste Leistung bringt. Beachten Sie die Anweisungen für Schmieren oder eventuelle Auswechselungen.
13. Wird das Ladegerät nicht benutzt oder einer Prü-
fung unterzogen, entfernen Sie den Stecker aus
Ihrem Wechselstro-manschluß.
14. Spannschlüssel und/oder Bohrfutterschlüssel vor
dem Gebrauch des Werkzeugs aus der Maschine
entfernen .
15. Zufälliges Einschalten vermeiden. Das Werkzeug
nicht mit dem Finger am Schalter tragen.
16. Um Gefahren zu vermeiden, verwenden Sie nur
das vorgeschriebene Ladegerät.
17. Nur Original-HITACHI-Ersatzteile verwenden.
18. Das Werkzeug und Ladegerät nicht anders als in
der Gebrauchsanweisung vorgeschrieben verwenden.
19. Die Benutzung von Zubehör und Sonderzubehör,
die nicht im HITACHI-Katalog oder in der
Bedienungsanleitung aufgeführt sind, erhöhen das
Risiko von Verletzungen.
20. Reparaturen sollten nur in autorisierten HITACHIService-Werkstätten durchgeführt werden.
Der Hersteller haftet nicht für Schäden und Unfälle, die auf unautorisierte Fachkräfte oder auf
den Mißbrauch des Werkzeugs zurückgeführt
werden können.
21. Um den ursprünglichen Zustand des Werkzeugs
und Ladegerätes zu erhalten, entfernen Sie keine
Hinweisschilder, Abdeckungen oder Schrauben.
22. Nehmen Sie das Ladegerät immer nur mit der auf
dem Typenschild vorgeschriebenen Spannung in
Gebrauch.
23. Bewegliche Teile und Zubehöre nicht berühren,
wenn das Werkzeug nicht vom Netz abgetrennt
ist.
24. Immer vor der Benutzung die Batterie aufladen.
25. Nur die vorgeschriebene Batterie verwenden.
Keine gewöhnlichen Trockenbatterien oder AutoBatterien, für das Elektro-Werkzeug verwenden.
26. Keinen Transformator mit Puffersatz verwenden.
27. Die Batterie nicht an einem elektrischen Generator
oder einer Gleichstromversorgung aufladen.
28. Die Batterie immer drinnen aufladen. Da sich beim
Laden Ladegerät und Batterie erwärmen, an einem Ort aufladen, der nicht direkter Sonnenbestrahlung ausgesetzt und trocken ist.
29. Wenn an hochliegenden Stellen gearbeitet
wird,(z.B. Gerüst, Treppe) vergewissern Sie sich
vor Arbeitsbeginn, daß sich under Ihnen keiner im
Arbeits-bzw. Gefahrenkreis aufhält.
30. Die detaillierte Bestandsteilzeichnung, die der
Bedienungsanleitung beigefügt ist, ist nur für die
autorisierte Service-Werkstätte bestimmt.
VORSICHTSMASSNAHMEN FÜR DEN
AKKU-BOHRSCHRAUBER
1. Die Batterie immer bei einer Temperatur von 10 –
40°C laden. Laden bei einer Temperatur die nied-
riger als 10°C ist wird gefährliche Überladung
verursachen. Die Batterie kann nicht bei einer
Temperatur über 40°C geladen werden. Die beste
Temperatur zum Laden wäre von 20 – 25°C.
2. Das Ladegerät nicht fortlaufend laden.
Nach Beendung einer Ladung, lassen Sie das Ladegerät ungefähr 15 Minuten ruhen bevor die nächste Batterieladung unternommen wird.
3. Die Batterie nicht länger als eine Stunde laden.
Sie wird ungefähr in einer Stunde vollgeladen sein
und deshalb sollte die Ladung nach einer Stunde
vom Anfang der Ladung ab angehalten werden.
Das Ladekabel vom Wechselstromausgang trennen.
4. Keine Fremdkörper durch das Anschlußloch der
Batterie eindringen lassen.
5. Niemals die Batterie und das Ladegerät auseinan-
dernehmen.
6. Niemals die Batterie kurzschließen.
Kurzschluß der Batterie verursacht eine zu große
Stromzufuhr und Überhitzung, wodurch Durchbrennen oder Schaden beider Batterie entsteht.
7. Die Batterie nicht ins Feuer werfen. Sie könnte
dabei explodieren.
8. Beim Bohren von Wand, Boden oder Decke, nach-
prüfen ob keine versenkten Kabel, usw. vorhanden
sind.
9. Bringen Sie die Batterie zum Geschäft, wo Sie ihn
gekauft haben sobald die Lebensdauer der Batte-
7
 Loading...