

Page 1

© 1998, 1999 Hitachi Koki
Imaging Solutions, Inc.
1757 Tapo Canyon Rd.
Simi Valley, CA 93063
March 1999
335545-002, Revision C
Quick Reference
Guide
Page 2

© 1998, 1999 Hitachi Koki Imaging Solutions, Inc. All rights reserved.
No part of this document ma y be rep roduced witho ut the expre ssed permis sion of
Hitachi Koki Imaging Solutions, Inc.
The material in this document is for informational purposes and is subject to change
without notice. Hitach i Koki Imaging Solutions, Inc. ass umes no responsibility for
errors or omissions in this document. No liability is assumed for any damages
resulting from the use of the information it contains.
TRADEMARK
Hitachi Koki Imaging Solutions, Inc., Digital Document Server, DDS, DDS 32, DDS
40, DDS 32/40, ScanCen ter, and their associated logo marks, are trademarks of
Hitachi Koki Imaging Solutions, Inc.
Hitachi and the Hitachi logo are trademarks of Hitachi, Ltd. All rights reserved.
NOTICE TO USER
In an effort to meet the demands of a rapidly changing technology, the manufacturer
is continually developing new features and functions to meet your changing printing
or printer needs. A s a result, this manual may not exactly reflect future changes
made to the product. Please be sure to consult all manual updates or addenda when
using this product’s documentation.
Page 3

Table of Contents
Printer Features. . . . . . . . . . . . . . . . . . . . . . . . . . . . . . . . . . . . . . . . . . . . . . . . . . . .1
Menu Structure. . . . . . . . . . . . . . . . . . . . . . . . . . . . . . . . . . . . . . . . . . . . . . . . . . . .2
Tray Locations . . . . . . . . . . . . . . . . . . . . . . . . . . . . . . . . . . . . . . . . . . . . . . . . . . . .3
Paper Orientation . . . . . . . . . . . . . . . . . . . . . . . . . . . . . . . . . . . . . . . . . . . . . . . . . .4
Loading Special Media. . . . . . . . . . . . . . . . . . . . . . . . . . . . . . . . . . . . . . . . . . . . . .4
Adding Paper to Tray 1, 2, or 3 . . . . . . . . . . . . . . . . . . . . . . . . . . . . . . . . . . . . . . .5
Adding Paper to Tray 4 or 5. . . . . . . . . . . . . . . . . . . . . . . . . . . . . . . . . . . . . . . . . .6
Adding Paper to the Multi-Purpose Tray (MPT) . . . . . . . . . . . . . . . . . . . . . . . . . .6
Loading Envelopes into the Optional Envelope Feeder. . . . . . . . . . . . . . . . . . . . .7
Replacing the EP Cartridge . . . . . . . . . . . . . . . . . . . . . . . . . . . . . . . . . . . . . . . . . .9
Zone Locations. . . . . . . . . . . . . . . . . . . . . . . . . . . . . . . . . . . . . . . . . . . . . . . . . . .10
Removing Jams from Zone A. . . . . . . . . . . . . . . . . . . . . . . . . . . . . . . . . . . . . . . .11
Removing Jams from Zone B. . . . . . . . . . . . . . . . . . . . . . . . . . . . . . . . . . . . . . . .12
Removing Jams from Zone C. . . . . . . . . . . . . . . . . . . . . . . . . . . . . . . . . . . . . . . .13
Removing Jams from Zone D. . . . . . . . . . . . . . . . . . . . . . . . . . . . . . . . . . . . . . . .14
Removing Jams fom Zone E. . . . . . . . . . . . . . . . . . . . . . . . . . . . . . . . . . . . . . . . .14
Removing Jams fom Zone F. . . . . . . . . . . . . . . . . . . . . . . . . . . . . . . . . . . . . . . . .14
Removing Jams fom Zone G . . . . . . . . . . . . . . . . . . . . . . . . . . . . . . . . . . . . . . . .15
Removing Jams fom Zone H . . . . . . . . . . . . . . . . . . . . . . . . . . . . . . . . . . . . . . . .15
Removing Jams from the MPT. . . . . . . . . . . . . . . . . . . . . . . . . . . . . . . . . . . . . . .16
Removing Jams from the Envelope Feeder . . . . . . . . . . . . . . . . . . . . . . . . . . . . .16
Status Messages . . . . . . . . . . . . . . . . . . . . . . . . . . . . . . . . . . . . . . . . . . . . . . . . . .17
Status Messages for Fax. . . . . . . . . . . . . . . . . . . . . . . . . . . . . . . . . . . . . . . . . . . .18
Error Messages . . . . . . . . . . . . . . . . . . . . . . . . . . . . . . . . . . . . . . . . . . . . . . . . . .19
Warning Messages . . . . . . . . . . . . . . . . . . . . . . . . . . . . . . . . . . . . . . . . . . . . . . . .21
Table of Contents i
Page 4

ii Table of Contents
Page 5
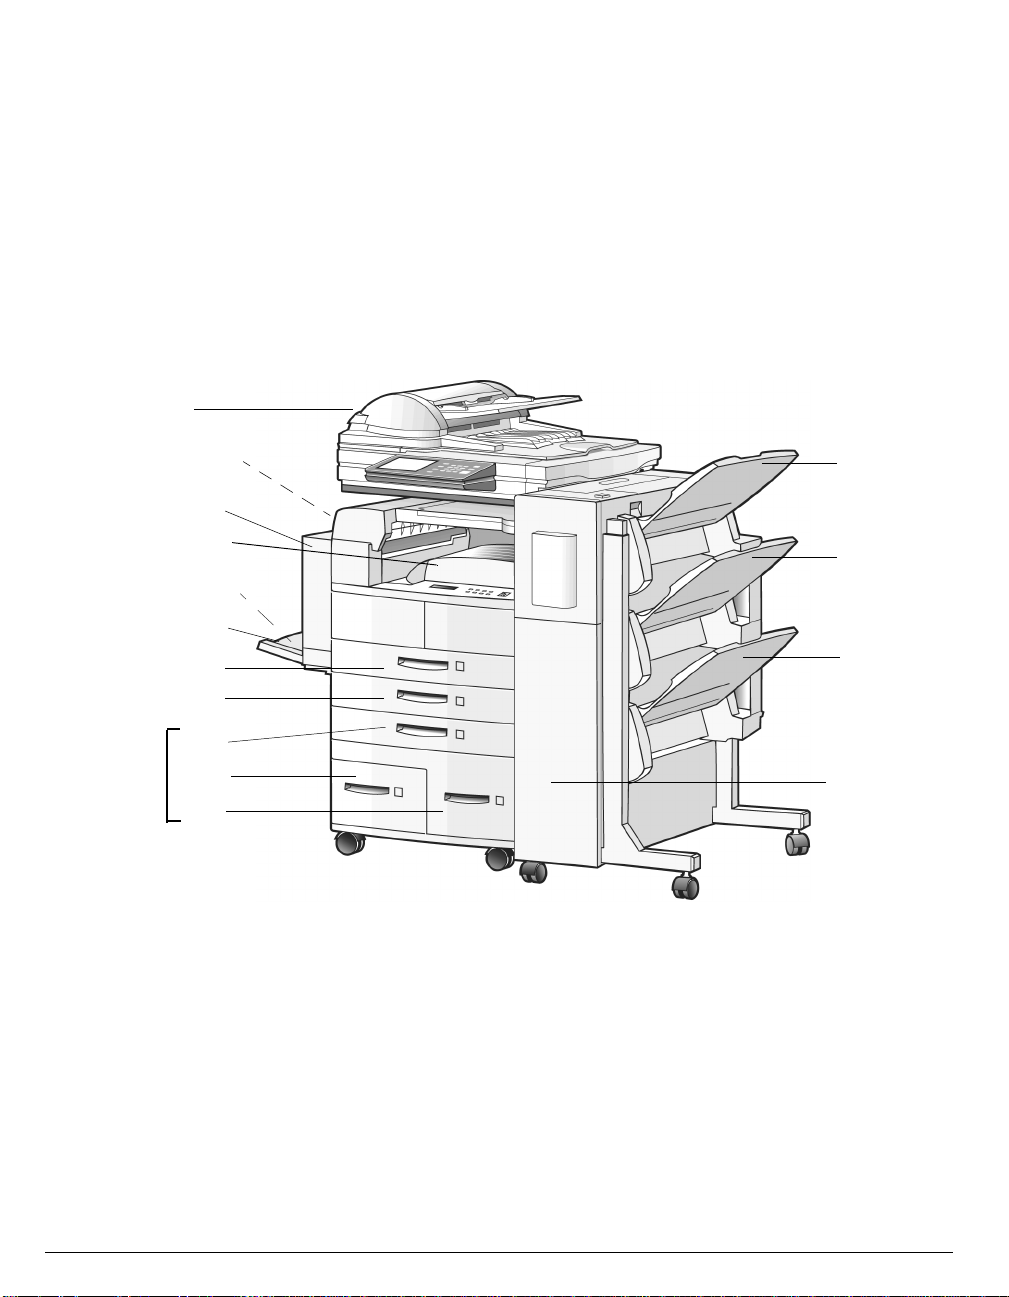
Printer Features
ScanCenter
Face-Up Tray
(Not Shown)
Trayless Duplex
Face-Down Tray
Envelope Feeder
(Not Shown)
Multi Purpose Tray
Tray 1
Tray 2
Tray 3
HCF
Tray 4
Tray 5
Bin 1
Bin 2
Bin 3
Finisher
Quick Reference Guide
1
Page 6

Menu Structure
Print menu
Status page
Demo page
Summary page
PS font page
PCL font page
*Fax journal page
Disk directory
Configuration
Paper source
Auto
Tray 1
Tray 2
*Tray 3
*Tray 4
*Tray 5
*Multipurpose
Media size
Media type
*Envelope
Com10
Monarch
DL
C5
Custom
Paper output
Face down tray
Face up tray
*Finisher
Job offset
Enable
Disable
Duplex
No
Tumble
Yes
Collate
Enable
Disable
Copies
1 - 99
Configuration (Continued)
Wait timeout
Energy save time
Edge to edge
Best fit
Parallel menu
Emulation
Auto detect
PostScript
PCL
Hex dump
Mode
1284
Centronics
*Network menu
Enter IP address
Subnet mask
Gateway IP addr
PCL menu
Font source
Internal
Soft font
Font number
Font point size
Font pitch
Lines per page
Symbol set
Paper orient.
PostScript menu
Job timeout
Print errors
Enable
Disable
*Fax menu
Send & receive
Send only
Receive only
*If installed.
2
Quick Reference Guide
Page 7
Tray Locations
Envelope Feeder
(Not Shown)
Multi Purpose
Tray
Tray 1
Tray 2
Tray 3
Tray 4 Tray 5
Quick Reference Guide
3
Page 8
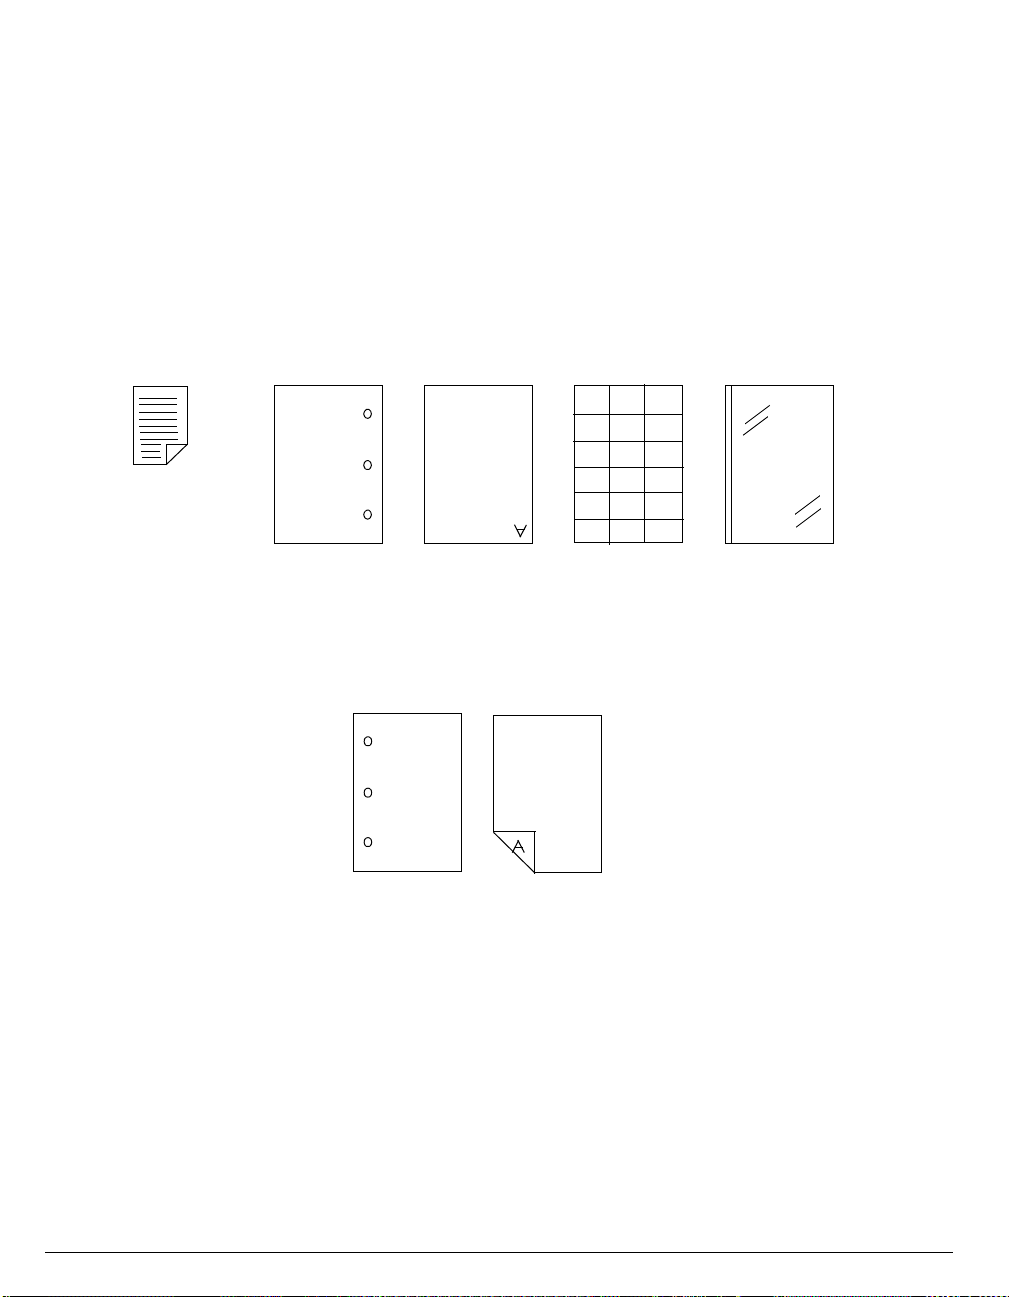
Paper Orientation
Each tray has an instruction label for loading p aper. Refer to this label for correct orientation.
Loading Special Media
For simplex printing:
• Pre-punched paper is loaded with the holes on the right.
• Letterhead is loaded face up and upside down, as shown in the figure below.
• Labels are loaded face up and upside down, as shown in the figure below.
• Striped transparencies are loaded face up with the strip on the left.
Simplex Printing Orientation
TOP
For duplex printing
• Pre-punched paper is loaded with the holes on the left.
• Letterhead is loaded face down and upside down, as shown in the figure below.
Duplex Printing Orientation
Note:
When using the product specific Win 3.1, 95, and NT 4.0 drivers, duplex printing on pre-punched
and letterhead paper is possible without having to change the way the paper is loaded by setting
the driver to print on the reverse side of the paper first. Refer to Online Help for further
information.
4
Quick Reference Guide
Page 9

Adding Paper to Tray 1, 2, or 3
(Tray 3 when High Capacity Feeder (HCF) Installed).
1
2
1. Pull out the tray until it stops.
2. Gently lift up the guide and slide it until it stops.
Note:
Skip this step if you are not changing paper size.
3. While pressing down the gray handle, slide the guide until it stops.
4
5a
3
5b
6
4. Place the paper in the tray between the guides.
5. Adjust the guides to the paper width and length.
6. Push the tray in until it latches.
Note:
The paper stack height should not exceed the limit mark as shown in the illustration for step 4.
Adjust the guides to allow the pap er to lie flat betw een them. Impr operly adj usted guides can ca use
the paper to curl and jam.
Be sure the guide stop is locked firmly in the guide hole on the tray.
Quick Reference Guide
5
Page 10

Adding Paper to Tray 4 or 5
1
2
1. Open the tray.
2. Insert paper into the compartment and adjust the guide to the correct paper length.
Note:
The paper stack should not exceed the limit mark.
3. Push the tray in until it latches.
Adding Paper to the Multi-Purpose Tray (MPT)
1
23
3
4
1. Pull out the extension tray to the desired length.
2. Place paper along the right side of the feeder.
3. Adjust the paper guide to slightly touch the paper stack.
4. Insert the paper stack as far into the printer as it can go.
6
Quick Reference Guide
Page 11

Loading Envelopes into the Optional Envelope Feeder
1
2
3
1. Make sure the envelopes are not stuck together and all flaps are closed.
2. Lift the envelope weight and insert envelopes with the long-leading edge first and the flap-side up.
3. Slide the guide so that it slightly touches the edge of the envelope stack.
Note:
Envelopes should not exceed the limit mark
.
Do not add envelopes while printing or paper jams may result.
Quick Reference Guide
7
Page 12

Replacing the EP Cartridge
1
High Temperature Label
4
2
3
1. Open the upper left cover.
2. Open the front cover.
3. Remove the EP Cartr idge b y sli ding i t out unti l th e o range handle can b e li fted. Holding the handle ,
completely remove the cartridge.
4. Remove the new EP Cartridge from the packing assembly and pull out the protective paper sheet
from the drum shutter.
Warning!:
Do not touch the fuser area (where the high temperature label is located). Burns may result.
8
Quick Reference Guide
Page 13

5
8
6
7
5. Hold the EP Cartridge horizontally and shake it 5 or 6 times to evenly distribute the toner inside.
Note:
Uneven toner distribution may degrade print quality. If the toner has not been properly freed by
shaking the cartrid ge, a noise may be h ear d when t urning on the print er and the EP Cartrid ge may
be damaged.
6. While holding the orange handle with one hand, gently push the cartridge all the way into the
printer.
Caution:
Do not touch any parts inside the printer. Make sure the cartridge is seated properly.
7. Gently pull out the sealing tape straight out from the cartridge as indicated by the arrow.
Note:
If the tape is pulled out at an angle, it may break.
8. Close the front and upper left covers.
Quick Reference Guide
9
Page 14

Zone Locations
• Zone A includes the output tray, the upper left cover, the fuser area, and Trays 1, 2 and 3.
• Zone B area includes the middle left cover area, and Trays 1, 2 and 3.
• Zone C includes the lower left cover and Trays 4 and 5.
• Zone D refers to the Trayless Duplex unit.
• Zone E refers to the docking cover area.
• Zone F refers to the horizontal transport area.
• Zone G refers to the Finisher top cover area.
• Zone H refers to the Finisher exit cover area.
Zone A
(Inner)
Zone D
Zone B
Zone C
Zone E
Zone F
Zone G
Zone H
10
Quick Reference Guide
Page 15

Removing Jams from Zone A
1
Printer without Trayless Duplex
2a
Printer with Trayless Duplex
2b
1. Open the upper left cover. Remove any paper found.
2. If the Trayless Duplex is installed, first open the Trayless Duplex, then open the left cover.
If the Envelope feeder is installed, remove it first, before attemptin g to clear the j am.
4
3
6
4
High Temperature Label
7
5
3. If the leading edge of the pape r is alr eady in the paper output tray, pull the paper in th e dir ec ti on of
the arrow.
4. If paper is jammed in this area, pull in th e direction of the arrow.
5. For paper in the fuser area, pull out car ef ully without touching the fuser. If paper is difficult to pull
out, turn the knob con ti nuou sly in the direction of the arrow unti l the pa per can be pulled out easily.
6. Close the upper left cover.
7. Open the tray being used and remove any jam found.
8. Close the tray. (Not shown.)
Warning!
Do not touch the fuser area (where the high temperature label is located). Burns may result.
Quick Reference Guide
11
Page 16

Removing Jams from Zone B
1
2
4
1. Open the middle left cover.
2. Pull the paper out in the direction of the arrow.
3. Open the tray being used and remove any jam found.
4. Close the tray and the upper left cover.
3
12
Quick Reference Guide
Page 17

Removing Paper Jams from Zone C
1
2
3
1. Open the lower left cover.
2. Pull paper in the direction of the arrow.
3. Close lower left cover.
4
5
4. Pull out Trays 4 and 5. Check the paper feed area and rem ove any paper found.
5. Check the tray area. Remove any jammed paper in the direction of the arrow. Push the tray back
into the printer.
Quick Reference Guide
13
Page 18

Removing Jams from Zone D
1
2
1. Open the Trayless Duplex.
2. Open the cover inside the Trayless Duplex.
3. Remove any paper jam by pulling in the direction of the arrow.
4. Close the Trayless Duplex. (Not shown).
Removing Jams from Zone E
1
1. Lift the handle of the docking cover and remove any paper found.
Removing Jams from Zone F
3
1
1. Open the cover of the horizontal transport and remove any paper found.
2. Close the horizontal transport cover. (Not shown).
Note:
On some configurations, the finisher may have to be moved to allow access to this zone.
14
Quick Reference Guide
Page 19

Removing Jams from Zone G
1. Open the top cover of the Finisher and remove any paper found.
2. Close the top cover.
Removing Jams from Zone H
1
1. Slightly lift up the exit cover and remove any paper found.
Quick Reference Guide
1
15
Page 20

Removing Jams from the MPT
1
2
1. Remove the jammed paper by pulling it out in the direction of the arrow.
2. Remove all paper and load the stack again.
Removing Jams from the Envelope Feeder
1
1. Remove the envelope feeder.
2. Remove any paper jam found.
3. Reinstall the envelope feeder.
2
3
16
Quick Reference Guide
Page 21

St at us Me ss ages
These messages indicate printer status. If actions are required, the appropriate actions are
provided.
Display Description/Action
Ready
Job in progress
Processing The printer is processing print job data.
Waiting for data The printer is waiting for data from the user system.
Printing copy xxx of xxx
Offline
Composing status page
Energy save mode
Control panel locked
Control panel unlocked
Canceling job Confirmation for a job that was canceled.
Internal self test
All printer hardware and software modules are functioning and the
printer is ready to receiv e data from the host.
The printer has received and process ed the enti re job, but p rinting is
not finished.
When printing multiple copies (using DpC), this indicates the current
copy count of the printing progr ess.
The online key was pressed while the printer was online and no job
was in process.
The print status key was pressed while the printer was offline and
the printer is now in the process of print configuration pages.
The fuser energy saving tim eout durati on has been reac hed and the
printer has gone into the energy saving mode.
The control panel keys are locked and an attempt was made to activate a printer function using the keys.
The control panel keys have been unlocked from the operator
control panel or by a network command.
Displayed during the power-up cycle, while going through a powerup self-test sequence.
Lifting tray x The tray is moving into the feed position.
Warming up Displayed during the power-up cycle.
Printing xxx
Install tray xxx yyy Load tray xxx with paper size yyy.
Install tray zzz Load manual feed with paper size zzz.
Load MPT/ENV xxx (yyy)
Out of toner
replace EP Cart.
EP cartridge
not in position
Finisher door open Check the Finisher to be sure all doors are closed.
Quick Refere nce Gui de
Printing the status page, demo page, summary page, font page,
FAX log page, FAX journal page.
Load manual feed with paper size xxx, feed direction yyy (SEF and
LEF).
Replace EP Cartridge.
Reposition EP Cartridge.
17
Page 22

Status Messages for Fax
These messages indicate the status of Fax operations.
Display Description/Action
FAX dialing Dialing is in process.
FAX no dial tone Dialing failed.
FAX ringing Call is being placed.
FAX no answer Call is not being answered.
FAX connected Fax has been transmitted.
FAX disconnecting Transmission failed.
FAX sending Fax is being sent.
FAX receiving Fax is being received.
No station ID Recipient is not identified.
FAX cover sheet Cover sheet is in process.
FAX receive err An error occurred. Request another Fax.
FAX transmit err Transmission error occurred. Resend the Fax.
18
Quick Reference Guide
Page 23

Error Messages
Display Description/Action
Paper Jam
Clear Zone A
Paper Jam
Clear Zone A,B
Paper Jam
Clear Zone B
Check Zone A (Face-down tray, upper left cover, fuser area, and Trays
1, 2, and 3) for a paper jam. Open the upper left cover and remove any
paper found (see
remove the paper without touching the fuser (see
Check Zone A (described above) and Zone B (middle left cover area
and Trays 1, 2, and 3) for a paper jam. Remove any paper found. (See
page 5-9
Check Zone B (middle left cover area and Trays 1, 2, and 3). Open the
upper left cover and remove any paper found. (See
and
5-12
page 5-9
.)
). If the paper is in the fuser area, carefully
page 5-10
page 5-12
).
.)
Paper Jam
Clear Zone B,C
Paper Jam
Clear Zone C
Paper Jam
Clear Zone D
Paper Jam
Clear Zone E
Paper Jam
Clear Zone E,F
Paper Jam
Clear Zone F
Paper Jam
Clear Zone G
Paper Jam
Clear Zone G,H
Paper Jam
Clear Zone H
Paper jam
Clear MPT / Env
Check Zone B (described above) and Zone C (lower left cover and
Trays 4 and 5) for a paper jam. Remove any paper found.
(See
pages 5-12
Check Zone C (lower left cover and Trays 4 and 5) for a paper jam.
Remove any paper found. (See
Check Zone D (Trayless Duplex area) for a paper jam. Remove any
paper found. (See
Check Zone E (docking cove r area) for a paper jam. Remove an y paper
found. (See
Check Zone E (described above) and Zone F (the horizontal transport
area). Remove any paper found. (See
Check Zone F (the h orizontal tra nsport are a). Remove any pa per found.
(See
page 5-18
Check Zone G (Finisher top cover area) for a paper jam. Remove any
paper found. (See
Check Zone G (described abo ve) and Zone H (Finisher ex it cover area).
Remove any paper found. (See
Check Zone H (Finisher exit cover area) for a paper jam. Remove any
paper found. (See
Check the MPT and Envelope Feeder for a paper jam. Remove any
paper found. (See
and
page 5-16
page 5-18
.)
page 5-19
page 5-19
pages 5-20
5-14
.)
.)
.)
.)
.)
page 5-14
page 5-19
and
4-21
.)
page 5-18
.)
.)
.)
Out of toner
replace EP Cart.
EP cartridge
not in position
EP cartridge
mismatch
EP cartridge
failure
Quick Refere nce Gui de
Prepare a new EP Cartridge.
Reposition EP Cartridge.
Replace EP Cartridge.
Re-do printing operation. If the EP Cartridge fails again, replace it.
19
Page 24

Display Description/Action
EP end of life
replace EP Cart.
Tray # open Check for and close the specified tray. (# = tray number 1 through 5.)
Finisher gate is open Check for and close Finisher gate.
Finisher transport open Check for and close Fini sher transport.
Finisher Front door open Check for and close Fini sher front door.
Finisher Top door open Check for and close Finisher top door.
Finisher
Compiler open
Finisher
Docking open
Left high
door open
Left middle
door open
Left low
door open
Duplex module
door open
Lifting Tray #
Paper out tray #
XXX
Face Down Tray
paper full
Replace EP Cartridge.
Check for and close Finisher compiler.
Check for and close Finisher docking.
Check for and close left high door.
Check for and close left middle door.
Check for and close left low door.
Check for and close Trayless Duplex door.
The lifter in the specified tray is raising the paper stack so that the top
sheet is in the feed position. (# = tray number 1 through 5.)
# = tray number 1 through 5.
XXX = Media type (The following abbreviations are used, transpar.,
trans.-pp, preprint, letterhead).
Remove paper from the Face-down tray.
Finisher
all bins full
Finisher bin # full Remove paper from specified bin. (# = bin number 1 through 3.)
Call Operator
Duplex fail
Call Operator
Finisher fail
Call Operator
Tray # Fail
Configuration changed
cycle power
20
Remove paper from all the Finisher bins.
Power printer off then on. If n ot cle ared, call your s ervic e represen tative .
This can result if you have removed the paper from the Compiler tray
before it has reached the bin. Power printer off, then on. If it has not
cleared, call your service representative.
Power printer off then on. If not cleared, call your service representative.
(# = tray number 1 through 5.)
Cycle printer power.
Quick Reference Guide
Page 25

Display Description/Action
Call for Service
XXX
Install Tray XXX Install specified tray. (Install XXX = Media type.)
MPT/ENV
not installed
A problem has been detected that requires service. Call for service.
If both the MPT and ENV are not installed, the printer stays in error
state and does not function. The MPT or ENV must be reinstalled
before the error can be cleared.
Warning Messages
Display Description/Action
Paper out tray #
XXX
Face Down Tray paper full Remove paper from the Face-down tray.
Finisher all bins full Remove paper from all the Finisher bins.
Finisher bin # full Remove paper from specified bin. (# = bin number 1 through 3.)
Tray # open Check for and close specified tray. (# = tray number 1 through 5.)
Staple Cartridge
not installed
Finisher out of staples Replace staple cartridge.
Toner low replace EP Cart. Prepare a new EP Cartridge.
Load specified media Into specified tray. # = tray number 1 through 5.
XXX = Media type (The following abbreviations are used, transpar.,
trans.-pp, preprint, letterhead).
Install staple cartridge.
Call Operator. Tray #
fail.
Quick Refere nce Gui de
Power printer off then on. If not cleared, call your service representative.
(# = tray number 1 through 5.)
21
Page 26

22
Quick Reference Guide
 Loading...