

Page 1

© 1998, 1999 Hitachi Koki
Imaging Solutions, Inc.
1757 Tapo Canyon Rd.
Simi Valley, CA 93063
March 1999
335547-002, Revision B
32/40 PPM
User’s Guide
Page 2

© 1998, 1999 Hitachi Koki Imaging Solutions, Inc. All rights reserved.
No part of this document may be reproduced without the expressed permission of
Hitachi Koki Imaging Solutions, Inc.
The material in this doc ument is for info rmational purpos es and is subject to change
without notice. Hitachi Koki Imaging Solutions, Inc. assumes no responsibility for errors
or omissions in thi s doc ume nt. No lia bi li ty i s a ssu m ed fo r an y d ama ges re su lti ng fro m
the use of the information it contains.
TRADEMARKS
Hitachi Koki Imaging Solutions, Inc., Digital Document Server, DDS, DDS 32, DDS 40,
DDS 32/40, ScanCenter
Koki Imaging Solutions, Inc.
Hitachi
Microsoft Windows, Windows NT, and Windows 95
Corporation.
Centronics
UNIX
exclusively through X/Open Company Ltd.
PCL, PCL 5e,
PostScript
Ethernet
Macintosh
All other trademarks are the property of their owners.
and the
is a registered trademark in the United States and other countries, licensed
is a registered trademark of Xerox Corporation.
Hitachi logo
is a trademark of Centronics Data Computer Corporation.
and
is a registered trademark of Adobe Systems, Inc.
is a trademark of Apple Computer, Incorporated.
, and their associated logo marks, are tr ademarks of Hita chi
are trademarks of Hitachi, Ltd. All rights reserved.
are trademarks of Microsoft
LaserJet
are trademarks of Hewlett-Packard Company.
NOTICE TO USER
In an effort to meet the demands of a rapidly changing technology, the manufacturer is
continually deve loping new features and functions to meet your changin g printing or
printer needs. As a result, this manual may not exactly reflect future changes made to
the product. Please be sure to consult all manual updates or addenda when using this
product’s documentation.
Page 3

About This Manual
This manual provi des easy access to the inform ation you need t o operate the 32/40 PPM
(Pages Per Minute) Digital Printer/Copier laser printer.
NOTE
:
This user’s guide is intended to be viewed online.
If you are viewing it online, please refer to the bookmarks on the left to
locate information on s pec if ic topics. Click on the arrows to see expanded
topic lists. Click on the same arrow to reduce the list size.
Throughout the book, click on page references to go to the page number
cited. For example, for information on Customer Support, click on the
following reference: (see page -iv)
To find out about a specific topic, refer to :
■ Chapter 1: Printer Overview -- For printer components and features.
■ Chapter 2: Using the Operator Control Panel -- To access and use the menus,
liquid crystal display (LCD) window and input keys.
Preface
■ Chapter 3: Printing and Paper Handling -- For media recommendations and
paper handling procedures .
■ Chapter 4: Using the Fax -- To enable and operate the Fax modem.
■ Chapter 5: Solving Printer Problems -- To identify and solve printing problems.
■ Chapter 6: Care and Maintenance -- To keep the printer in good working condi-
tion.
■ Appendix A: Safety Information -- For Safety information and printer character-
istics, including environmental and electrical requirements.
■ Appendix B: Specifications-- For printer specifications.
■ Appendix C: Using Printer Monitor -- To monitor print jobs and printer status.
■ Appendix D: Status and Error Messages -- To find out about the system status
and error messages, and Remote Diagnostics.
■ Glossary -- For definitions of terms and acronyms
■ Index -- For specific page references.
i
Page 4

For More Information
Refer to related documents for more details about printer installation, applications,
maintenance and accessories, as follows:
Online documents:
■ to find out how to set up the printer on your network, refer to the P rint Server
Module (PSM) Virtual Printer Technology User’s Guide.
■ to find out about the ScanCenter operations, refer to the ScanCenter User’s Guide.
Related publications:
■ Read Me First
■ Quick Reference Card
■ Getting Started
■ ScanCenter Quick Reference Card
■ Printer Service M anual
■ Controller Service Manual
■ ScanCenter Service Manual
■ Illustrated P arts List (IP L)
■ Programming Guide
Audience
This manual i s written for tho se persons responsible for operating the printer. A basic
understanding of computer equipment and its operations is required.
ii
Page 5

Manual Conventions
The following conventions are used in this manual:
■ Bold and Italics are used sparingly for emphasis.
■ Information you enter:
■ Key Names (o r Labels): Look Like This.
■ System messages: Look Like This.
■ Variable user information: Looks Like This.
Looks Like This.
Pay particular at tenti on to Notes, Ca utions an d Warnings. These alert you t o cri tical information, as follows:
NOTE
:
Provides important additional information.
CAUTION
!
Alerts you to an operating procedure, practice, or condition that, if not
strictly observed, might result in damage to the equipment.
WARNING!
Alerts you to an operating procedure, practice, or condition that, if not
strictly observed, can result in safety hazards to personnel, severe injury,
or loss of life.
iii
Page 6

Customer Support
For Technical support and other printer information, call:
U.S. and Canada
In-Warranty Technical Support: 805-578-4455
Out-of-Warranty Technical Support: 900-407-3783
On-Site Repair Services: 800-887-8848
Depot Repair Services: 888-372-6659
Fax Document-On-Demand: 805-578-9255
Computer Bulletin Board: 805-578-9251
Web Site: http://www.hitachi-hkis.com
Europe: + 353 1-803-6500
Pacific Rim: 61 2-9975-5866
Or, your local Company Representative or Distributor.
Supplies Ordering
For ordering printer supplies, call:
U.S. or Canada: 1-800-232-2141
Europe: +353-1-803-6500
Australia or New Zealand: 1-800-023-185
Singapore: 65-741-8948
Or, your local Company Representative or Distributor.
Spare Parts Ordering
Contact your local Company Representative or Distributor.
Disclaimer
In an effort to meet the de mands of a rapi dly cha nging t echnol ogy, the manufacturer is
continually developing new features and functi ons to meet your changing printing or
printer needs. As a result, this manual may not exactly reflect future changes made to
the product. Please be sure to consult all manual updates or addenda when using this
product’s documentation.
iv
Page 7

Table of Contents
Preface
About This Manual . . . . . . . . . . . . . . . . . . . . . . . . . . . . . . . . . . . . . . . . . . . . . . . . . . . . . . . . . . . .i
For More Information . . . . . . . . . . . . . . . . . . . . . . . . . . . . . . . . . . . . . . . . . . . . . . . . . . . . . . i i
Audience . . . . . . . . . . . . . . . . . . . . . . . . . . . . . . . . . . . . . . . . . . . . . . . . . . . . . . . . . . . . . . . . . . . ii
Manual Conventions . . . . . . . . . . . . . . . . . . . . . . . . . . . . . . . . . . . . . . . . . . . . . . . . . . . . . . . . . .iii
Customer Support. . . . . . . . . . . . . . . . . . . . . . . . . . . . . . . . . . . . . . . . . . . . . . . . . . . . . . . . . . . . .iv
Supplies Ordering . . . . . . . . . . . . . . . . . . . . . . . . . . . . . . . . . . . . . . . . . . . . . . . . . . . . . . . . .iv
Spare Parts Ordering . . . . . . . . . . . . . . . . . . . . . . . . . . . . . . . . . . . . . . . . . . . . . . . . . . . . . . .iv
Disclaimer . . . . . . . . . . . . . . . . . . . . . . . . . . . . . . . . . . . . . . . . . . . . . . . . . . . . . . . . . . . . . . . . . .iv
Chapter 1. Printer Overview
What This Chapter Provides . . . . . . . . . . . . . . . . . . . . . . . . . . . . . . . . . . . . . . . . . . . . . . . . . . .1-1
Printer Features . . . . . . . . . . . . . . . . . . . . . . . . . . . . . . . . . . . . . . . . . . . . . . . . . . . . . . . . . . . . .1-2
Fonts . . . . . . . . . . . . . . . . . . . . . . . . . . . . . . . . . . . . . . . . . . . . . . . . . . . . . . . . . . . . . . . . . .1-4
Printer Languages and Emulations . . . . . . . . . . . . . . . . . . . . . . . . . . . . . . . . . . . . . . . . . .1-4
Printer Software and Utilities . . . . . . . . . . . . . . . . . . . . . . . . . . . . . . . . . . . . . . . . . . . . . .1-4
Interfaces (I/O) Configurations . . . . . . . . . . . . . . . . . . . . . . . . . . . . . . . . . . . . . . . . . . . . .1-4
Printer Options . . . . . . . . . . . . . . . . . . . . . . . . . . . . . . . . . . . . . . . . . . . . . . . . . . . . . . . . . .1-5
Base Printer Components. . . . . . . . . . . . . . . . . . . . . . . . . . . . . . . . . . . . . . . . . . . . . . . . . . . . . .1-6
Printer Options. . . . . . . . . . . . . . . . . . . . . . . . . . . . . . . . . . . . . . . . . . . . . . . . . . . . . . . . . . . . . .1-8
Printer Drivers and Utilities. . . . . . . . . . . . . . . . . . . . . . . . . . . . . . . . . . . . . . . . . . . . . . . . . . .1-10
Operator Control Panel . . . . . . . . . . . . . . . . . . . . . . . . . . . . . . . . . . . . . . . . . . . . . . . . . . . . . .1-10
Inside the Printer . . . . . . . . . . . . . . . . . . . . . . . . . . . . . . . . . . . . . . . . . . . . . . . . . . . . . . . . . . .1-11
Start-Up Procedures. . . . . . . . . . . . . . . . . . . . . . . . . . . . . . . . . . . . . . . . . . . . . . . . . . . . . . . . .1-12
Connecting the Power Cord . . . . . . . . . . . . . . . . . . . . . . . . . . . . . . . . . . . . . . . . . . . . . . .1-12
Powering Up the Printer . . . . . . . . . . . . . . . . . . . . . . . . . . . . . . . . . . . . . . . . . . . . . . . . . .1-14
Printing Status Pages . . . . . . . . . . . . . . . . . . . . . . . . . . . . . . . . . . . . . . . . . . . . . . . . . . . .1-15
Chapter 2. Using the Operator Control Panel
What This Chapter Provides . . . . . . . . . . . . . . . . . . . . . . . . . . . . . . . . . . . . . . . . . . . . . . . . . . .2-1
Operator Control Panel Display, LEDs and Keys . . . . . . . . . . . . . . . . . . . . . . . . . . . . . . . . . . .2 -2
Liquid Crystal Display . . . . . . . . . . . . . . . . . . . . . . . . . . . . . . . . . . . . . . . . . . . . . . . . . . . .2-2
Input Keys . . . . . . . . . . . . . . . . . . . . . . . . . . . . . . . . . . . . . . . . . . . . . . . . . . . . . . . . . . . . . .2-2
Input Key Definitions . . . . . . . . . . . . . . . . . . . . . . . . . . . . . . . . . . . . . . . . . . . . . . . . . .2-3
Canceling a Print Job from the OCP . . . . . . . . . . . . . . . . . . . . . . . . . . . . . . . . . . . . . .2-3
Status Indicators . . . . . . . . . . . . . . . . . . . . . . . . . . . . . . . . . . . . . . . . . . . . . . . . . . . . . .2-4
Table of Contents i
Page 8

Using the Menus . . . . . . . . . . . . . . . . . . . . . . . . . . . . . . . . . . . . . . . . . . . . . . . . . . . . . . . . . . . .2-5
Menu Structure . . . . . . . . . . . . . . . . . . . . . . . . . . . . . . . . . . . . . . . . . . . . . . . . . . . . . . . . . .2-6
Print Menu . . . . . . . . . . . . . . . . . . . . . . . . . . . . . . . . . . . . . . . . . . . . . . . . . . . . . . . . . . . . 2-15
Configuration . . . . . . . . . . . . . . . . . . . . . . . . . . . . . . . . . . . . . . . . . . . . . . . . . . . . . . . . . .2-19
Parallel menu . . . . . . . . . . . . . . . . . . . . . . . . . . . . . . . . . . . . . . . . . . . . . . . . . . . . . . . . . . 2-21
Network menu . . . . . . . . . . . . . . . . . . . . . . . . . . . . . . . . . . . . . . . . . . . . . . . . . . . . . . . . .2-22
PCL menu . . . . . . . . . . . . . . . . . . . . . . . . . . . . . . . . . . . . . . . . . . . . . . . . . . . . . . . . . . . . .2-22
PostScript menu . . . . . . . . . . . . . . . . . . . . . . . . . . . . . . . . . . . . . . . . . . . . . . . . . . . . . . . .2-24
Fax Menu . . . . . . . . . . . . . . . . . . . . . . . . . . . . . . . . . . . . . . . . . . . . . . . . . . . . . . . . . . . . .2-24
How to Change a Menu Setting . . . . . . . . . . . . . . . . . . . . . . . . . . . . . . . . . . . . . . . . . . . .2-25
Special Key Sequences . . . . . . . . . . . . . . . . . . . . . . . . . . . . . . . . . . . . . . . . . . . . . . . . . . . . . .2-27
Chapter 3. Printing and Paper Handling
What This Chapter Contains . . . . . . . . . . . . . . . . . . . . . . . . . . . . . . . . . . . . . . . . . . . . . . . . . . .3-1
Paper Path (Base Configuration) . . . . . . . . . . . . . . . . . . . . . . . . . . . . . . . . . . . . . . . . . . . . . . . . 3-2
Paper Path (With Options Installe d) . . . . . . . . . . . . . . . . . . . . . . . . . . . . . . . . . . . . . . . . . . . . . 3-3
Paper Sizes, Paper Types and Printer Input Trays. . . . . . . . . . . . . . . . . . . . . . . . . . . . . . . . . . .3-4
The following paper sizes are available only on the 40 PPM printer.. . . . . . . . . . . . . . . . . . . .3-5
Paper . . . . . . . . . . . . . . . . . . . . . . . . . . . . . . . . . . . . . . . . . . . . . . . . . . . . . . . . . . . . . . . . . . . . .3-6
Paper Weights . . . . . . . . . . . . . . . . . . . . . . . . . . . . . . . . . . . . . . . . . . . . . . . . . . . . . . . . . .3-6
Unacceptable Paper . . . . . . . . . . . . . . . . . . . . . . . . . . . . . . . . . . . . . . . . . . . . . . . . . . . . . .3-6
Unacceptable Paper Size . . . . . . . . . . . . . . . . . . . . . . . . . . . . . . . . . . . . . . . . . . . . . . . . . .3-7
Storing Paper . . . . . . . . . . . . . . . . . . . . . . . . . . . . . . . . . . . . . . . . . . . . . . . . . . . . . . . . . . .3 -7
Paper Orientation. . . . . . . . . . . . . . . . . . . . . . . . . . . . . . . . . . . . . . . . . . . . . . . . . . . . . . . . . . . .3-8
Simplex Printing . . . . . . . . . . . . . . . . . . . . . . . . . . . . . . . . . . . . . . . . . . . . . . . . . . . . . . . . .3-8
Duplex Printing . . . . . . . . . . . . . . . . . . . . . . . . . . . . . . . . . . . . . . . . . . . . . . . . . . . . . . . . . 3-8
Printable Area . . . . . . . . . . . . . . . . . . . . . . . . . . . . . . . . . . . . . . . . . . . . . . . . . . . . . . . . . . . . . .3-9
Loading Paper . . . . . . . . . . . . . . . . . . . . . . . . . . . . . . . . . . . . . . . . . . . . . . . . . . . . . . . . . . . . .3-10
Setting Paper Sizes . . . . . . . . . . . . . . . . . . . . . . . . . . . . . . . . . . . . . . . . . . . . . . . . . . . . . .3-10
Adding Paper to Tray 1, 2, and 3 (If Installed) . . . . . . . . . . . . . . . . . . . . . . . . . . . . . . . .3-11
Adding Paper to Trays 4 or 5 . . . . . . . . . . . . . . . . . . . . . . . . . . . . . . . . . . . . . . . . . . . . . .3-14
Adding Paper to the Multi Purpose Tray . . . . . . . . . . . . . . . . . . . . . . . . . . . . . . . . . . . . .3-15
Using Transparencies . . . . . . . . . . . . . . . . . . . . . . . . . . . . . . . . . . . . . . . . . . . . . . . .3-17
Using the Envelope Feeder (Option) . . . . . . . . . . . . . . . . . . . . . . . . . . . . . . . . . . . . . . . . . . . .3-18
Tips for Envelope Printing . . . . . . . . . . . . . . . . . . . . . . . . . . . . . . . . . . . . . . . . . . . . . . . . 3-18
Loading Envelopes into the Envelope Feeder . . . . . . . . . . . . . . . . . . . . . . . . . . . . . . . . .3-19
Using Trayless Duplex (Two-Sided) Printing Option. . . . . . . . . . . . . . . . . . . . . . . . . . . . . . .3-20
Tips for Trayless Duplex Printi ng . . . . . . . . . . . . . . . . . . . . . . . . . . . . . . . . . . . . . . . . . .3-20
Binding Options . . . . . . . . . . . . . . . . . . . . . . . . . . . . . . . . . . . . . . . . . . . . . . . . . . . . . . . .3-21
Selecting the Binding Options from the Drivers . . . . . . . . . . . . . . . . . . . . . . . . . . . . 3-21
Accessing the Binding Options fr om the OCP . . . . . . . . . . . . . . . . . . . . . . . . . . . . .3-21
Using the Finisher (Option). . . . . . . . . . . . . . . . . . . . . . . . . . . . . . . . . . . . . . . . . . . . . . . . . . .3-24
Stapling Positions . . . . . . . . . . . . . . . . . . . . . . . . . . . . . . . . . . . . . . . . . . . . . . . . . . . . . . .3-24
Finisher Stapling Positions . . . . . . . . . . . . . . . . . . . . . . . . . . . . . . . . . . . . . . . . . . . . . . . .3-25
ii Table of Contents
Page 9

Staple Positions . . . . . . . . . . . . . . . . . . . . . . . . . . . . . . . . . . . . . . . . . . . . . . . . . . . . . . . . . . . .3-26
Selecting Stapling Positions From the Printer Drivers . . . . . . . . . . . . . . . . . . . . . . . . . .3-27
Selecting Stapling Positions From the Operator Control Panel . . . . . . . . . . . . . . . . . . . .3-29
Digital printCopy Feature . . . . . . . . . . . . . . . . . . . . . . . . . . . . . . . . . . . . . . . . . . . . . . . . . . . .3-31
Print Request Exceptions. . . . . . . . . . . . . . . . . . . . . . . . . . . . . . . . . . . . . . . . . . . . . . . . . . . . .3-32
Chapter 4. Using the Fax
What This Chapter Contains . . . . . . . . . . . . . . . . . . . . . . . . . . . . . . . . . . . . . . . . . . . . . . . . . . .4-1
Fax Options . . . . . . . . . . . . . . . . . . . . . . . . . . . . . . . . . . . . . . . . . . . . . . . . . . . . . . . . . . . . . . . .4-2
Enabling and Disabling Fax. . . . . . . . . . . . . . . . . . . . . . . . . . . . . . . . . . . . . . . . . . . . . . . . . . . .4-3
Setting Up Fax . . . . . . . . . . . . . . . . . . . . . . . . . . . . . . . . . . . . . . . . . . . . . . . . . . . . . . . . . . . . . .4-4
Faxing a Document . . . . . . . . . . . . . . . . . . . . . . . . . . . . . . . . . . . . . . . . . . . . . . . . . . . . . . . . . .4-5
Using the Phone Book . . . . . . . . . . . . . . . . . . . . . . . . . . . . . . . . . . . . . . . . . . . . . . . . . . . . . . . .4-8
Creating a Phone Book File . . . . . . . . . . . . . . . . . . . . . . . . . . . . . . . . . . . . . . . . . . . . . . .4-10
Recipient Information . . . . . . . . . . . . . . . . . . . . . . . . . . . . . . . . . . . . . . . . . . . . . . . . . . . .4-11
Using QuickFax . . . . . . . . . . . . . . . . . . . . . . . . . . . . . . . . . . . . . . . . . . . . . . . . . . . . . . . . . . . .4-12
Chapter 5. Solving Printer Problems
What This Chapter Contains . . . . . . . . . . . . . . . . . . . . . . . . . . . . . . . . . . . . . . . . . . . . . . . . . . .5-1
Power-on Problems . . . . . . . . . . . . . . . . . . . . . . . . . . . . . . . . . . . . . . . . . . . . . . . . . . . . . . . . . .5-2
Print Quality Problems. . . . . . . . . . . . . . . . . . . . . . . . . . . . . . . . . . . . . . . . . . . . . . . . . . . . . . . .5-3
Typical Causes of Paper Jams . . . . . . . . . . . . . . . . . . . . . . . . . . . . . . . . . . . . . . . . . . . . . . . . . .5-7
Removing Paper Jams . . . . . . . . . . . . . . . . . . . . . . . . . . . . . . . . . . . . . . . . . . . . . . . . . . . . . . . .5-7
Zone Locations . . . . . . . . . . . . . . . . . . . . . . . . . . . . . . . . . . . . . . . . . . . . . . . . . . . . . . . . . .5-8
Removing Jams from Zone A . . . . . . . . . . . . . . . . . . . . . . . . . . . . . . . . . . . . . . . . . . . . . .5-9
Removing Jams from Zone B . . . . . . . . . . . . . . . . . . . . . . . . . . . . . . . . . . . . . . . . . . . . . .5-12
Removing Jams from Zone C . . . . . . . . . . . . . . . . . . . . . . . . . . . . . . . . . . . . . . . . . . . . . .5-14
Removing Jams from Zone D . . . . . . . . . . . . . . . . . . . . . . . . . . . . . . . . . . . . . . . . . . . . . . 5 -16
Removing Jams from Zone E . . . . . . . . . . . . . . . . . . . . . . . . . . . . . . . . . . . . . . . . . . . . . .5-18
Removing Jams from Zone F . . . . . . . . . . . . . . . . . . . . . . . . . . . . . . . . . . . . . . . . . . . . . .5-18
Removing Jams from Zone G . . . . . . . . . . . . . . . . . . . . . . . . . . . . . . . . . . . . . . . . . . . . . . 5 -19
Removing Jams from Zone H . . . . . . . . . . . . . . . . . . . . . . . . . . . . . . . . . . . . . . . . . . . . . . 5 -19
Removing Jams from the Multi Purpose Tray . . . . . . . . . . . . . . . . . . . . . . . . . . . . . . . . .5-20
Removing Jams from the Envelope Feeder . . . . . . . . . . . . . . . . . . . . . . . . . . . . . . . . . . .5-21
Calling for Service. . . . . . . . . . . . . . . . . . . . . . . . . . . . . . . . . . . . . . . . . . . . . . . . . . . . . . . . . .5-22
Chapter 6. Care and Maintenance
What This Chapter Contains . . . . . . . . . . . . . . . . . . . . . . . . . . . . . . . . . . . . . . . . . . . . . . . . . . .6-1
Cleaning. . . . . . . . . . . . . . . . . . . . . . . . . . . . . . . . . . . . . . . . . . . . . . . . . . . . . . . . . . . . . . . . . . .6-2
Clean the Exterior of the Printe r . . . . . . . . . . . . . . . . . . . . . . . . . . . . . . . . . . . . . . . . . . . . .6-2
Check the Interior of the Printer . . . . . . . . . . . . . . . . . . . . . . . . . . . . . . . . . . . . . . . . . . . . .6-3
Table of Contents iii
Page 10

Replacing the EP Cartridge . . . . . . . . . . . . . . . . . . . . . . . . . . . . . . . . . . . . . . . . . . . . . . . . . . . .6-4
Handling the EP Cartridge . . . . . . . . . . . . . . . . . . . . . . . . . . . . . . . . . . . . . . . . . . . . . . . . .6-4
Storing the EP Cartridge . . . . . . . . . . . . . . . . . . . . . . . . . . . . . . . . . . . . . . . . . . . . . . . . . .6-4
When to Replace the EP Cartridge . . . . . . . . . . . . . . . . . . . . . . . . . . . . . . . . . . . . . . . . . . .6-5
Replacing the EP Cartridge . . . . . . . . . . . . . . . . . . . . . . . . . . . . . . . . . . . . . . . . . . . . . . . .6-6
Replacing Staples. . . . . . . . . . . . . . . . . . . . . . . . . . . . . . . . . . . . . . . . . . . . . . . . . . . . . . . . . . .6-10
Replacing the Battery in the Fax Cartridge . . . . . . . . . . . . . . . . . . . . . . . . . . . . . . . . . . . . . . .6-13
Installing a SIMM . . . . . . . . . . . . . . . . . . . . . . . . . . . . . . . . . . . . . . . . . . . . . . . . . . . . . . . . . .6-15
Appendix A. Safety Information
General. . . . . . . . . . . . . . . . . . . . . . . . . . . . . . . . . . . . . . . . . . . . . . . . . . . . . . . . . . . . . . . . . . . A-1
Laser Safety for U.S.A. and Canada . . . . . . . . . . . . . . . . . . . . . . . . . . . . . . . . . . . . . . . . . . . . A-1
Laser Safety for 220-240 Volt Models . . . . . . . . . . . . . . . . . . . . . . . . . . . . . . . . . . . . . . . . . . A-1
Laser Safety for Japan . . . . . . . . . . . . . . . . . . . . . . . . . . . . . . . . . . . . . . . . . . . . . . . . . . . . . . . A-2
Certifications . . . . . . . . . . . . . . . . . . . . . . . . . . . . . . . . . . . . . . . . . . . . . . . . . . . . . . . . . . . . . . A-2
FCC Notice (100 - 120 Volt Models Only) . . . . . . . . . . . . . . . . . . . . . . . . . . . . . . . . . . . A-2
Canadian Certification . . . . . . . . . . . . . . . . . . . . . . . . . . . . . . . . . . . . . . . . . . . . . . . . . . . A-2
VCCI Notice (Japan) . . . . . . . . . . . . . . . . . . . . . . . . . . . . . . . . . . . . . . . . . . . . . . . . . . . . A-2
Declaration of Conformity. . . . . . . . . . . . . . . . . . . . . . . . . . . . . . . . . . . . . . . . . . . . . . . . . . . . A-3
220-240 Volt Models . . . . . . . . . . . . . . . . . . . . . . . . . . . . . . . . . . . . . . . . . . . . . . . . . . . . A-3
When Installing and Relocating the Printer. . . . . . . . . . . . . . . . . . . . . . . . . . . . . . . . . . . . . . . A-4
Power Specifications . . . . . . . . . . . . . . . . . . . . . . . . . . . . . . . . . . . . . . . . . . . . . . . . . . . . A-4
Using Power Plugs . . . . . . . . . . . . . . . . . . . . . . . . . . . . . . . . . . . . . . . . . . . . . . . . . . . . . . A-4
Using Power Cords . . . . . . . . . . . . . . . . . . . . . . . . . . . . . . . . . . . . . . . . . . . . . . . . . . . . . A-4
Positioning the Printer Safely . . . . . . . . . . . . . . . . . . . . . . . . . . . . . . . . . . . . . . . . . . . . . . A-6
Environmental Limit . . . . . . . . . . . . . . . . . . . . . . . . . . . . . . . . . . . . . . . . . . . . . . . . . . . . A-6
When Operating the Printer. . . . . . . . . . . . . . . . . . . . . . . . . . . . . . . . . . . . . . . . . . . . . . . . . . . A-7
When Replacing the Battery in the Fax Cartridge. . . . . . . . . . . . . . . . . . . . . . . . . . . . . . . . . . A-8
Fax Certification for U.S.A. and Canada. . . . . . . . . . . . . . . . . . . . . . . . . . . . . . . . . . . . . . . . . A-9
Customer Information for U.S.A. . . . . . . . . . . . . . . . . . . . . . . . . . . . . . . . . . . . . . . . . . . A-9
Customer Information for Canada . . . . . . . . . . . . . . . . . . . . . . . . . . . . . . . . . . . . . . . . . A-10
Customer Information for Europe . . . . . . . . . . . . . . . . . . . . . . . . . . . . . . . . . . . . . . . . . A-11
Appendix B. Specifications
What This Appendix Contains. . . . . . . . . . . . . . . . . . . . . . . . . . . . . . . . . . . . . . . . . . . . . . . . . B-1
Specifications. . . . . . . . . . . . . . . . . . . . . . . . . . . . . . . . . . . . . . . . . . . . . . . . . . . . . . . . . . . . . . B-2
Base Printer . . . . . . . . . . . . . . . . . . . . . . . . . . . . . . . . . . . . . . . . . . . . . . . . . . . . . . . . . . . B-2
I/O Configurations . . . . . . . . . . . . . . . . . . . . . . . . . . . . . . . . . . . . . . . . . . . . . . . . . . . . . . B-4
Consumables . . . . . . . . . . . . . . . . . . . . . . . . . . . . . . . . . . . . . . . . . . . . . . . . . . . . . . . . . . B-4
Printable Area . . . . . . . . . . . . . . . . . . . . . . . . . . . . . . . . . . . . . . . . . . . . . . . . . . . . . . . . . . B-5
Paper sizes specific to the 40 PPM printer . . . . . . . . . . . . . . . . . . . . . . . . . . . . . . . . . . . . B-6
Paper Capacities . . . . . . . . . . . . . . . . . . . . . . . . . . . . . . . . . . . . . . . . . . . . . . . . . . . . . . . . B-6
iv Table of Contents
Page 11

Appendix C. Using Printer Monitor
What This Section Contains. . . . . . . . . . . . . . . . . . . . . . . . . . . . . . . . . . . . . . . . . . . . . . . . . . . C-1
What Is Printer Monitor? . . . . . . . . . . . . . . . . . . . . . . . . . . . . . . . . . . . . . . . . . . . . . . . . . . . . . C-2
Printer Monitor Features . . . . . . . . . . . . . . . . . . . . . . . . . . . . . . . . . . . . . . . . . . . . . . . . . . . . . C-3
Using Printer Monitor . . . . . . . . . . . . . . . . . . . . . . . . . . . . . . . . . . . . . . . . . . . . . . . . . . . . . . . C-5
User Interface . . . . . . . . . . . . . . . . . . . . . . . . . . . . . . . . . . . . . . . . . . . . . . . . . . . . . . . . . . C-5
Maximized Main Screen . . . . . . . . . . . . . . . . . . . . . . . . . . . . . . . . . . . . . . . . . . . . . . C-5
Logging Events . . . . . . . . . . . . . . . . . . . . . . . . . . . . . . . . . . . . . . . . . . . . . . . . . . . . . . . . . C-9
User Notification . . . . . . . . . . . . . . . . . . . . . . . . . . . . . . . . . . . . . . . . . . . . . . . . . . . . . . C-10
Appendix D. Status and Error Messages
What This Chapter Contains . . . . . . . . . . . . . . . . . . . . . . . . . . . . . . . . . . . . . . . . . . . . . . . . . . D-1
Printer Status, Error & Warning Messages . . . . . . . . . . . . . . . . . . . . . . . . . . . . . . . . . . . . . . . D-2
Power Up Test Messages . . . . . . . . . . . . . . . . . . . . . . . . . . . . . . . . . . . . . . . . . . . . . . . . . D-3
Status Messages . . . . . . . . . . . . . . . . . . . . . . . . . . . . . . . . . . . . . . . . . . . . . . . . . . . . . . . . D-4
Status Messages for Fax . . . . . . . . . . . . . . . . . . . . . . . . . . . . . . . . . . . . . . . . . . . . . . . D-5
Error Messages . . . . . . . . . . . . . . . . . . . . . . . . . . . . . . . . . . . . . . . . . . . . . . . . . . . . . . . . . D-6
Warning Messages . . . . . . . . . . . . . . . . . . . . . . . . . . . . . . . . . . . . . . . . . . . . . . . . . . . . . . D-8
Remote Service Diagnostics Overview . . . . . . . . . . . . . . . . . . . . . . . . . . . . . . . . . . . . . . . . . . D-9
Table of Contents v
Page 12

vi Table of Contents
Page 13

What This Chapter Provides
This chapter describes the parts and functions of the printer.
■ Printer Features (see page 1-2)
■ Base Printer Components (see page 1-6)
■ Printer Options (see page 1-8)
■ Printer Drivers and Utilities (see page 1-10)
■ Operator Control Panel (see page 1-10)
■ Inside the Printer (see page 1-11)
■ Start-up Procedures (see page 1-12)
❒ Connecting the Power Cord (see page 1-12)
❒ Powering Up the Printer (see page 1-14)
Chapter 1
Printer Overview
❒ Printing Status Pages (see page 1-15)
NOTE
:
When viewing this user’s guide online, click on the page references in
parentheses below to go to the page numbers cited.
Printer Overview 1-1
Page 14
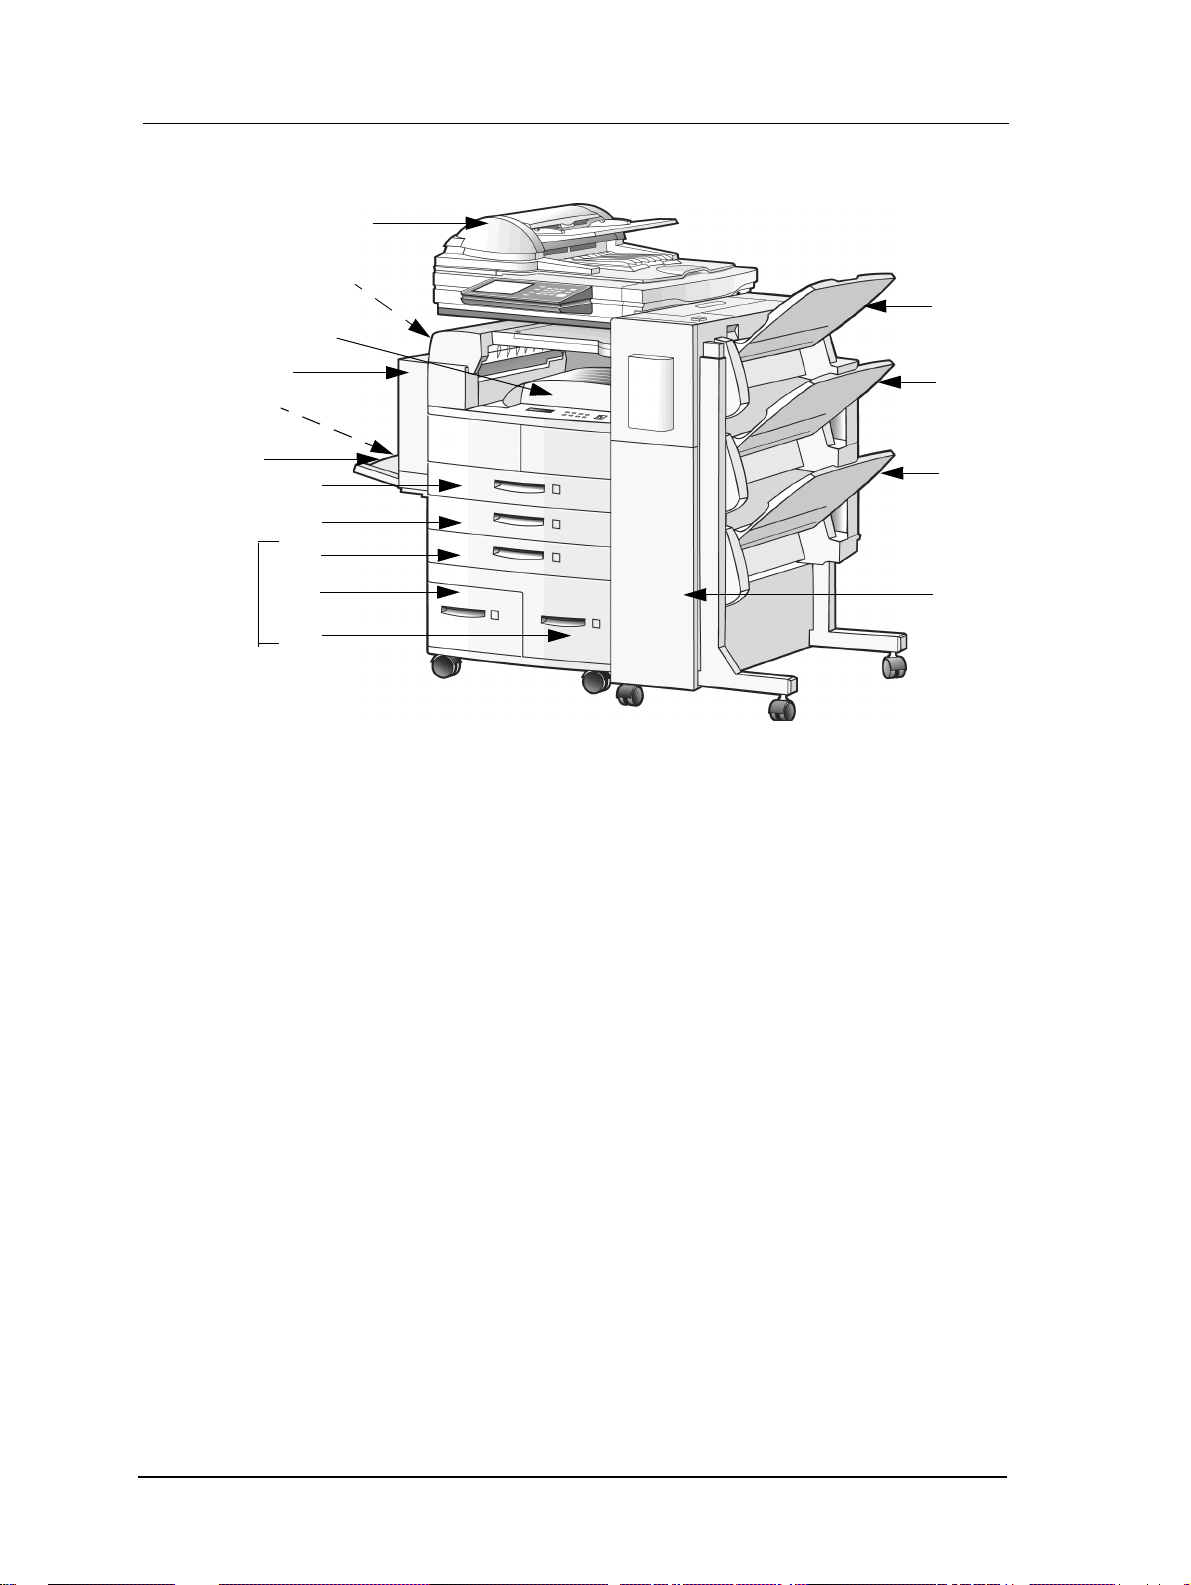
Printer Features
ScanCenter
Face-up Tray
(Not Shown)
Face-down Tray
Bin 1
Trayless Duplex
Envelope Feeder
(Not Shown)
MPT
Tray 3
HCF
Tray 4
Tray 5
The 32/40 PPM print er is a high- speed, shared- use laser p rinter appli cable to a medi umduty printing environment. It incorporates a wide variety of features:
■ High-speed and high-quality printing.
Bin 2
Bin 3
Tray 1
Tray 2
Finisher
❒ Printing speed is up to 32 A4/Letter (Long Edge Feed) Pages Per Minute
(PPM) in Simplex mode or up to 15.5 A4/Letter PPM (31 images per minute)
in Duplex mode for the 32 PPM printe r.
Printing speed is up to 40 A4/Letter (Long Edge Feed) Pages Per Minute
(PPM) in Simplex mode or up to 15.5 A4/Letter PPM in (31 images per
minute) Duplex mode for the 40 PPM printer.
❒ The printin g output i s at a resol ut ion of 600 dot s per inc h (dp i), assu ring ra zor-
sharp graphic and text output, even at very small point sizes.
■ Flexible Paper Source and Delivery.
❒ The printer comes standard with two 500-sheet universal paper cassettes.
❒ On the paper output options, the printer allows for delivery to the Face-down
tray, Face-up tray, and Finisher.
■ Multi Purpose Tray (MPT) -- for automatically printing small jobs: 50 (17 lb or
64 g/m
2
(including bond, postcard, overheads, labels, and odd-sized print media).
■ Digital printCopy (DpC) -- for printing of multiple collated document sets without
multiple file tr ansfers.
❒ The DpC disk has mul ti ple purposes (for example, it can be used to store Post-
Script and PCL fonts).
1-2 Printer Overview
bond sheets + 190 g/m2 postcard) or manually feeding single sheets
Page 15

■ Ergonomic operation.
❒ The easy-to-read display clearly shows the operation status of the printer.
❒ Ergonomically shaped front-panel buttons are used to control all functions.
■ All-in-one EP Cartridge (contains toner, developer, and photosensitive drum) for
consistent high-quality printing and easy maintenance.
■ High-volume printing.
❒ The two standard paper cassettes with approximately 500 sheet capacity each
and the Multi Purpose Tray (MPT) with a 50 sheet capacity.
❒ High Capacity Feeder (HCF) option adds up to 2500 additional sheets.
❒ Together they allow continuous printing of up to 3550 sheets.
■ Supports a wide-range of media types (copier, bond, letterhead, special applica-
tion, recycled, 17 lb / 64 g/m
2
lb bond, overhead tr ansparencie s, labels, envelopes,
and Japanese postcard) and sizes (see Chapter 3).
■ Face-down jogging.
■ Supports pre-punched paper in Simplex and Duplex modes.
■ Virtual Printer Technology (VPT) for network printers allowing one physical
printer to function as multiple printers with different ope rating parameters.
■ Supports the ScanCenter for walk-up copying.
Printer Overview 1-3
Page 16

Fonts
■ 35 scalable resident PostScript typefaces.
3 resident PCL5e fonts.
■ 4
■ 31 resident PCL5e sym bol sets.
Printer Languages and Emulations
■ PostScript Level 2 by Adobe Systems.
■ Adobe PCL5e/PJL (HP LaserJet 5Si emulation).
■ Auto Detect for automatic emulation switching between PostScript and PCL5e.
■ Adobe Hex Dump.
Printer Software and Utilities
T o find out how to i nstal l and use th e dri vers and util iti es, r efer to the inser t t hat comes
with the CD-ROM.
■ Proprietary D rivers with printer status monitoring capabilities for:
❒ Windows 3.1 PostScript / PCL / PostScript Fax.
❒ Windows 95 PostScript / PCL / PostScript Fax.
■ Windows NT 4.0 PostScript / PCL / PostScript Fax.
■ Windows NT 3.51 drivers for PostScript and PCL.
■ Macintosh MacOS 7.X / 8.X support for PostScript.
■ PrintWatch with Remote Service Diagnostics for Windows 3.1, Windows for
Workgroups 3.11, Windows 95, Windows NT 3.51, and Windows NT 4.0.
■ Printer Monitor Utilities for Windows 3.1, Windows for Workgroups 3.11, and
Windows 95.
■ OpenVMS utilities.
■ UNIX utilities.
For information about networking installation and software, see the Print Server
Module (PSM) Virtual Printer Technology User’s Guide.
Interfaces (I/O) Configurations
■ Bi-directional IE EE 1284C Par allel i nterf ace wi th Comp atibi lity, Nibble and Byte
Mode support.
■ Ethernet or Token Ring interface (opt ions).
■ External connector for ScanCenter connection (option).
1-4 Printer Overview
Page 17

Printer Options
The following options are available for your printer:
■ Trayless Duplex unit: for two-sided printing.
■ High Capacity Feeder (HCF): contains 3 trays for high volume printing, with a
capacity of up to 2500 sheets.
■ Face-Up Tray: for face-up paper delivery. Mounts to the edge of the Trayless
Duplex or print engine. Holds 200 sheets (20 lb or 75 g/m
■ Finisher: for Stack, Job Offset, or Staple print jobs with a 2010 (unstapled, face-
down) sheet (17 lb / 64 g/m
■ Envelope Feeder: with a 100 envelope capacity plus 57 lb (190 g/m
■ Fax/modem: for sending and receiving PostScript or CCITT group 3 fax mes-
2
bond or A4/Letter 20 lb or 75 g/m2 bond) capacity.
2
bond).
2
) postcard.
sages.
■ Ethernet or Token Ring interface port.
■ ScanCenter: for walk-up copying.
Printer Overview 1-5
Page 18
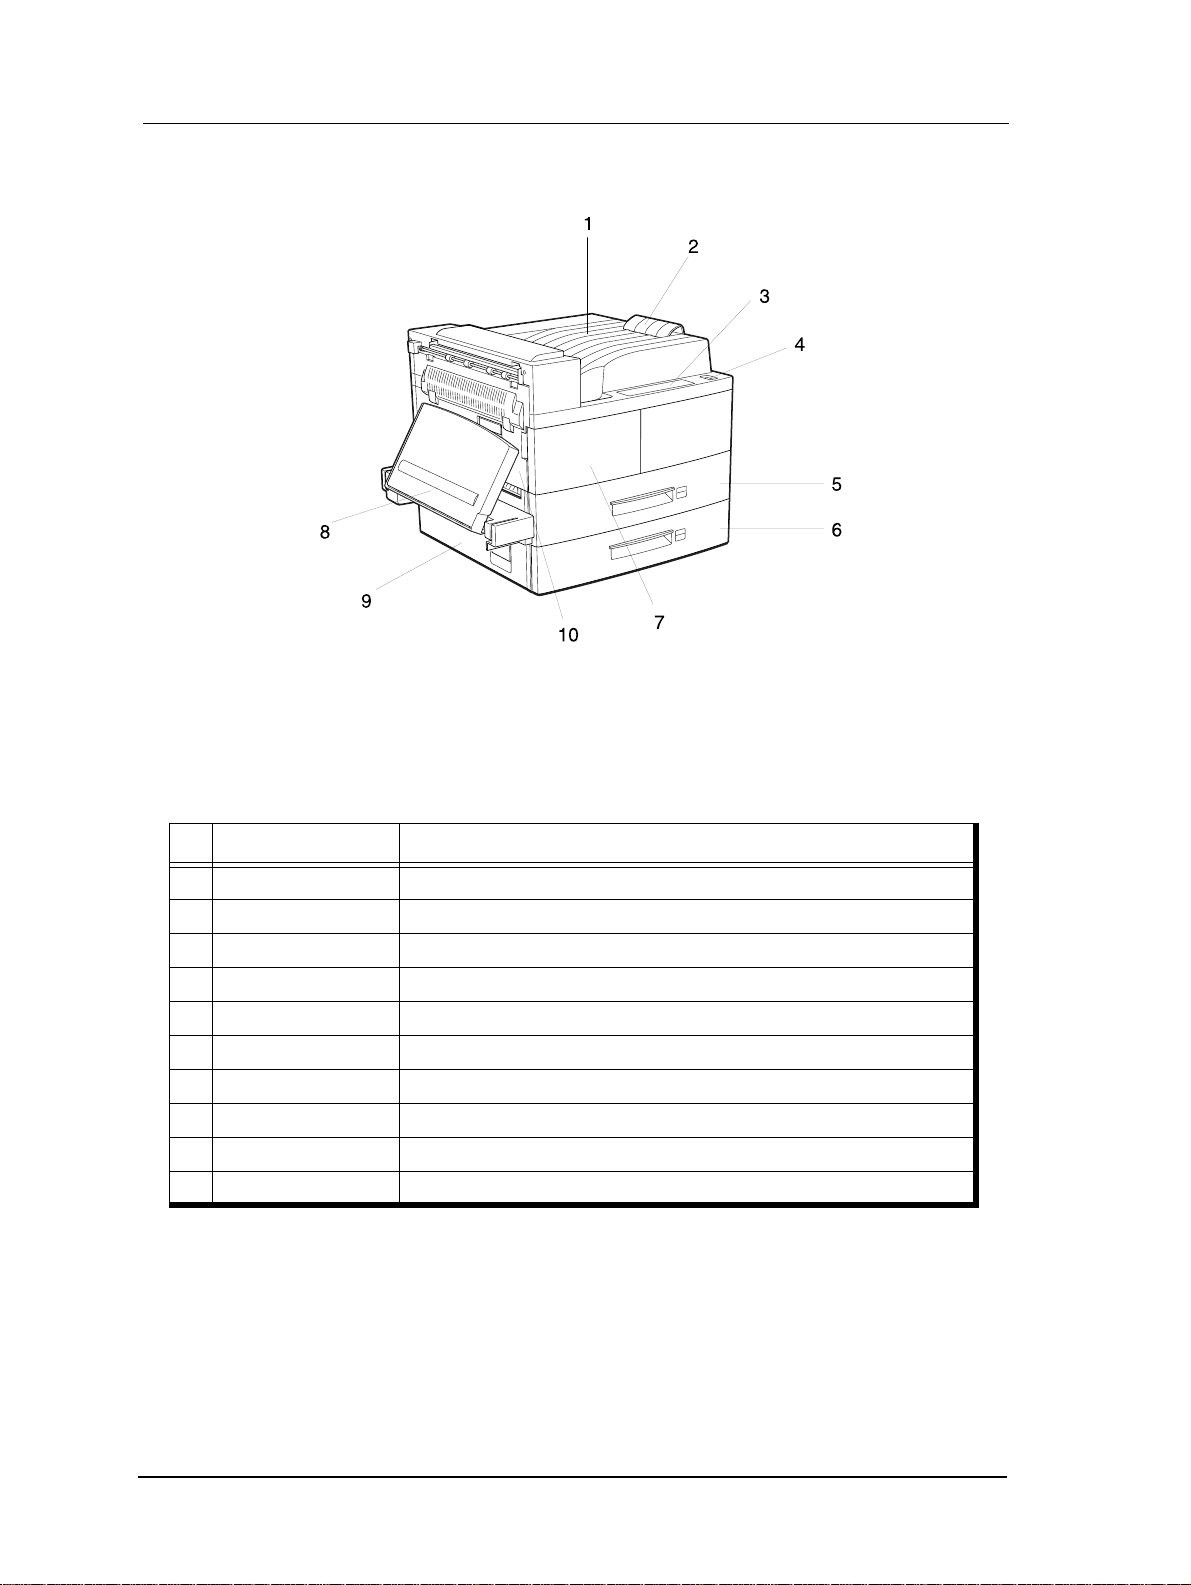
Base Printer Components
Base Printer, Front View
No. Part Function
1 Face-down tray Collects printed sheets, face down, jogging.
2 Paper stop Stops printed sheets so they collect properly.
3 Operator control panel Controls required for operation of the printer.
4 Power switch Turns the printer on an d off.
5 Tray 1 Holds up to 500 sheets of paper.
6 Tray 2 Holds up to 500 sheets of paper.
7 Front cover Provides access to the EP Cartridge inside the printer.
8 MPT Accepts both standard and non-standard paper sizes for printing.
9 Lower left cover For clearing paper jams.
10 Upper left cover Open this cover to clear pap er jams or when replac ing the EP Cartridg e.
1-6 Printer Overview
Page 19
6
7
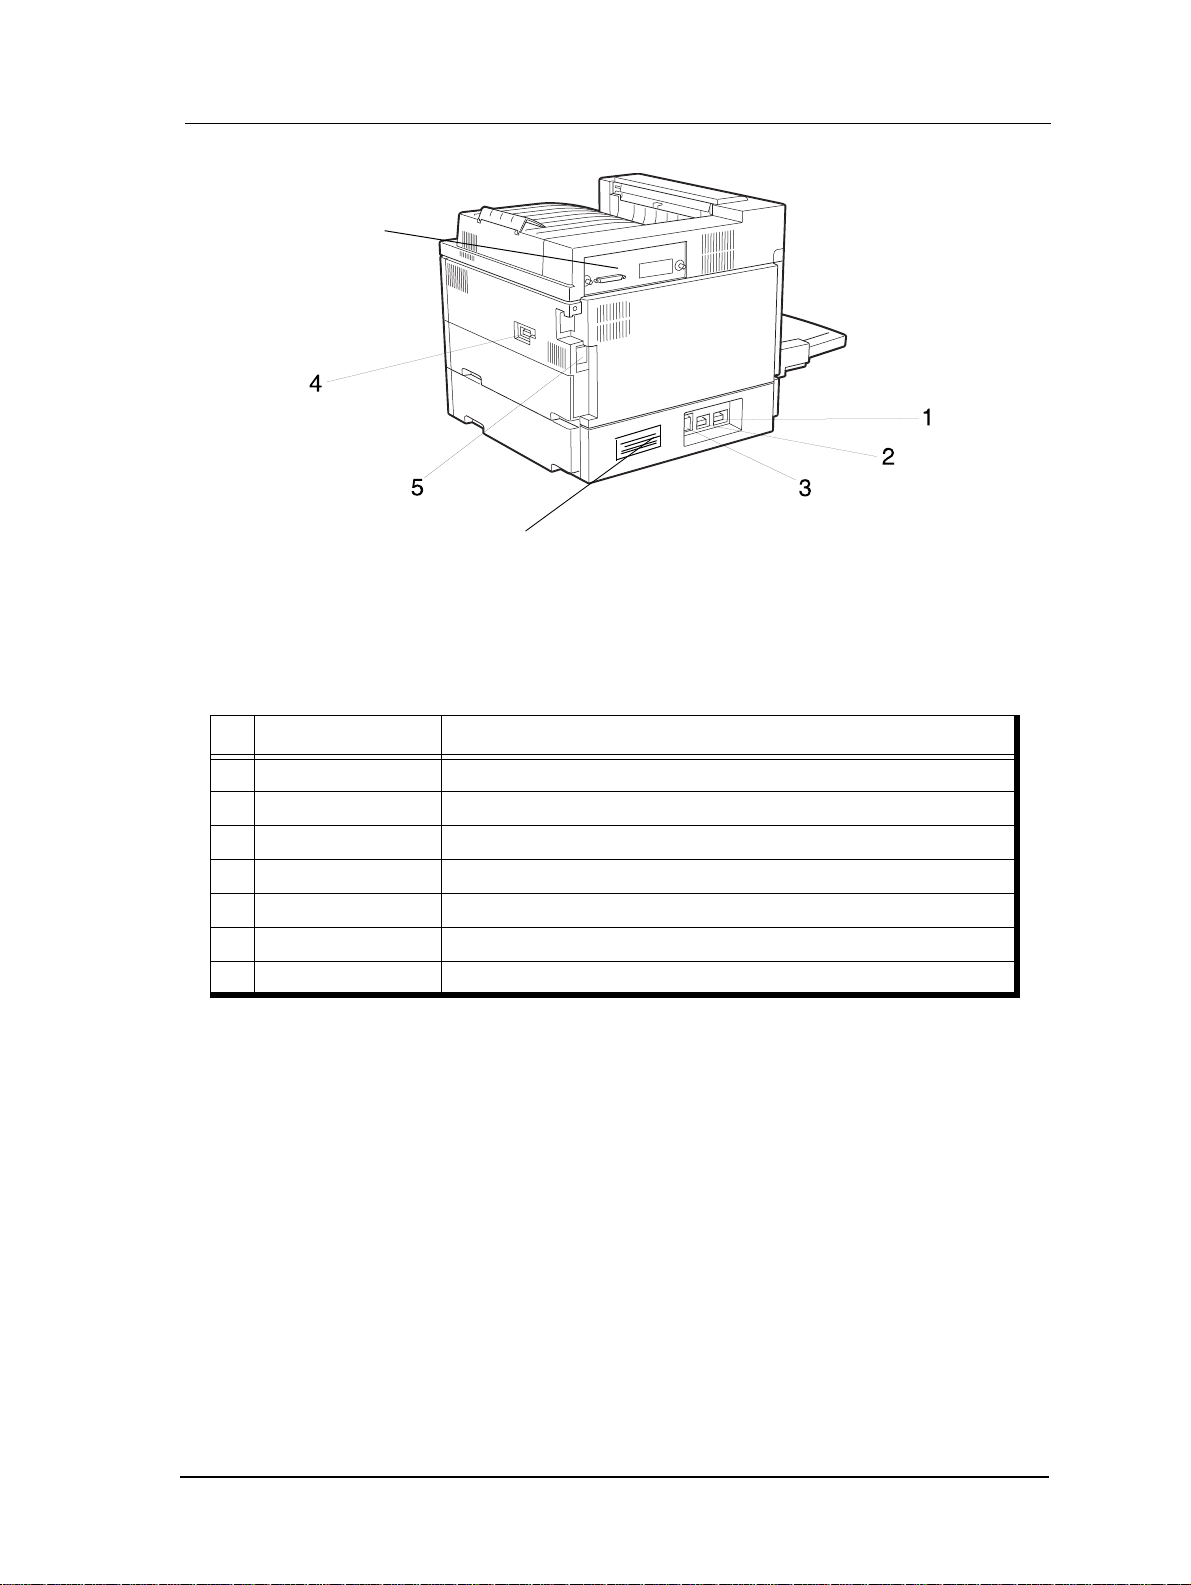
Base Printer, Rear View
No. Part Function
1 Duplex connector Connects to the optional Trayless Duplex unit.
2 Output connector Connects to the optional Finisher.
3 Tray connector Connects to the optional HCF.
4 Power cord receptacle Connects to an AC power source.
5 AC power source Supplies power to the optional Finisher.
6 Controller Connects to networks and ports.
7 Serial Number Identifies the printer.
Printer Overview 1-7
Page 20

Printer Options
5
6
Printer With Finisher
2
3
1
4
Printer Without Finisher
No. Part Function
1 Finisher (Option) High capacity stacker/stapler for automatic stapling of printed sheets.
2Bin 1
Receives printed paper3Bin 2
4Bin 3
5 Envelope Feeder (Option) Holds up to about 100 envelopes.
6 HCF One 500-sheet universal tray and two 1000-sheet Letter/A4 trays.
NOTE
:
HCF is required with the Finisher to achieve the proper engine height.
1-8 Printer Overview
Page 21
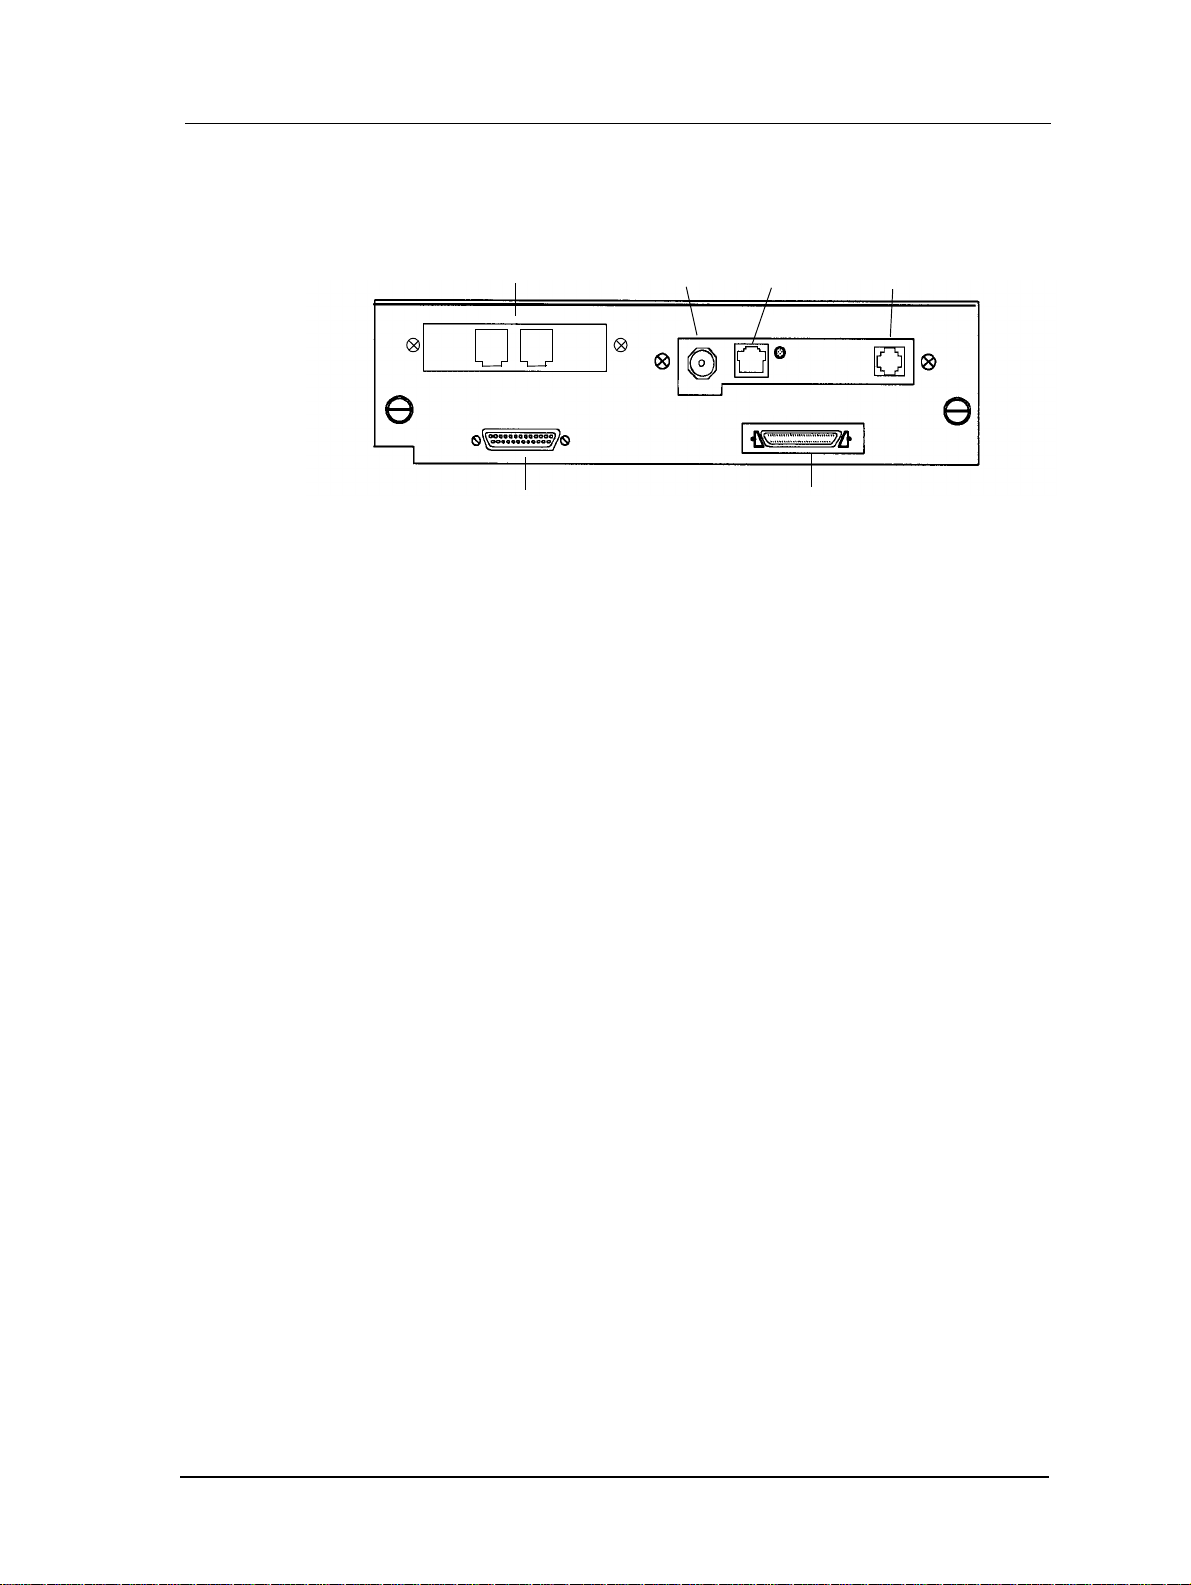
Fax
10Base2 10BaseT
Management Port
ScanCenter
■ The Fax modem must be installed to use Fax options (see Chapter 4).
IEEE 1284C Parallel
When the printe r is con figured with a Fax option , ther e are t wo phone jac ks on
the I/O plate at the rea r of the pri nter . The j acks are labe led LINE and P HONE.
To connect the Fax, use the procedures in Getting Started.
■ Your printer can have two interface ports for connection to your workstation:
❒ (Standard) IEEE 1284C parallel shie lded cable, not more than 10 feet.
The printer comes with the bi-directional parallel mode enabled (defa ult).
Bi-directional parallel mode is compatible with standard PC Centronics paral-
lel mode. It provides two-way communication between your workstation and
printer and allows printer messages to be displayed on your computer screen.
❒ (Optional) Ethernet or Token Ring interface port (located at the rear of the
printer).
Printer Overview 1-9
Page 22

Printer Drivers and Utilities
Printer drivers a nd utilities enable you to access printer features from the appli cations.
These drivers and utilities support most popular hardware and operating systems, including:
■ Windows 95
■ Windows NT 4.0
■ Windows NT 3.51
■ Windows 3.1 and Windows for Workgroups 3.11
■ Macintosh
■ Unix and VMS
■ PrintWatch with Windows 3.1, Windows 95, Windows NT 3.51, and
Windows NT 4.0.
■ Printer Monitor with Windows 95, and Windows 3.1.
NOTE
:
For the latest inf ormation on how to in stall a nd use the p rinter dr ivers and
utilities, refer to the README files and the text insert that come with the
CD-ROM.
For information on using the printer drivers and utilities once they are
installed, click Help.
Operator Control Panel
The Operator Control Panel (OCP) is your physical interface to the printer’s
features and functions. From the control panel, you can monitor the printer’s
operating status and configure the specific printer functions.
For information about the OCP, see Chapt er 2. For an illustration of the operator control
panel display, LEDs, and keys, see page 2-2.
NOTE
:
The Print Driver settings will override the printer’s default settings.
1-10 Printer Overview
Page 23
Inside the Printer
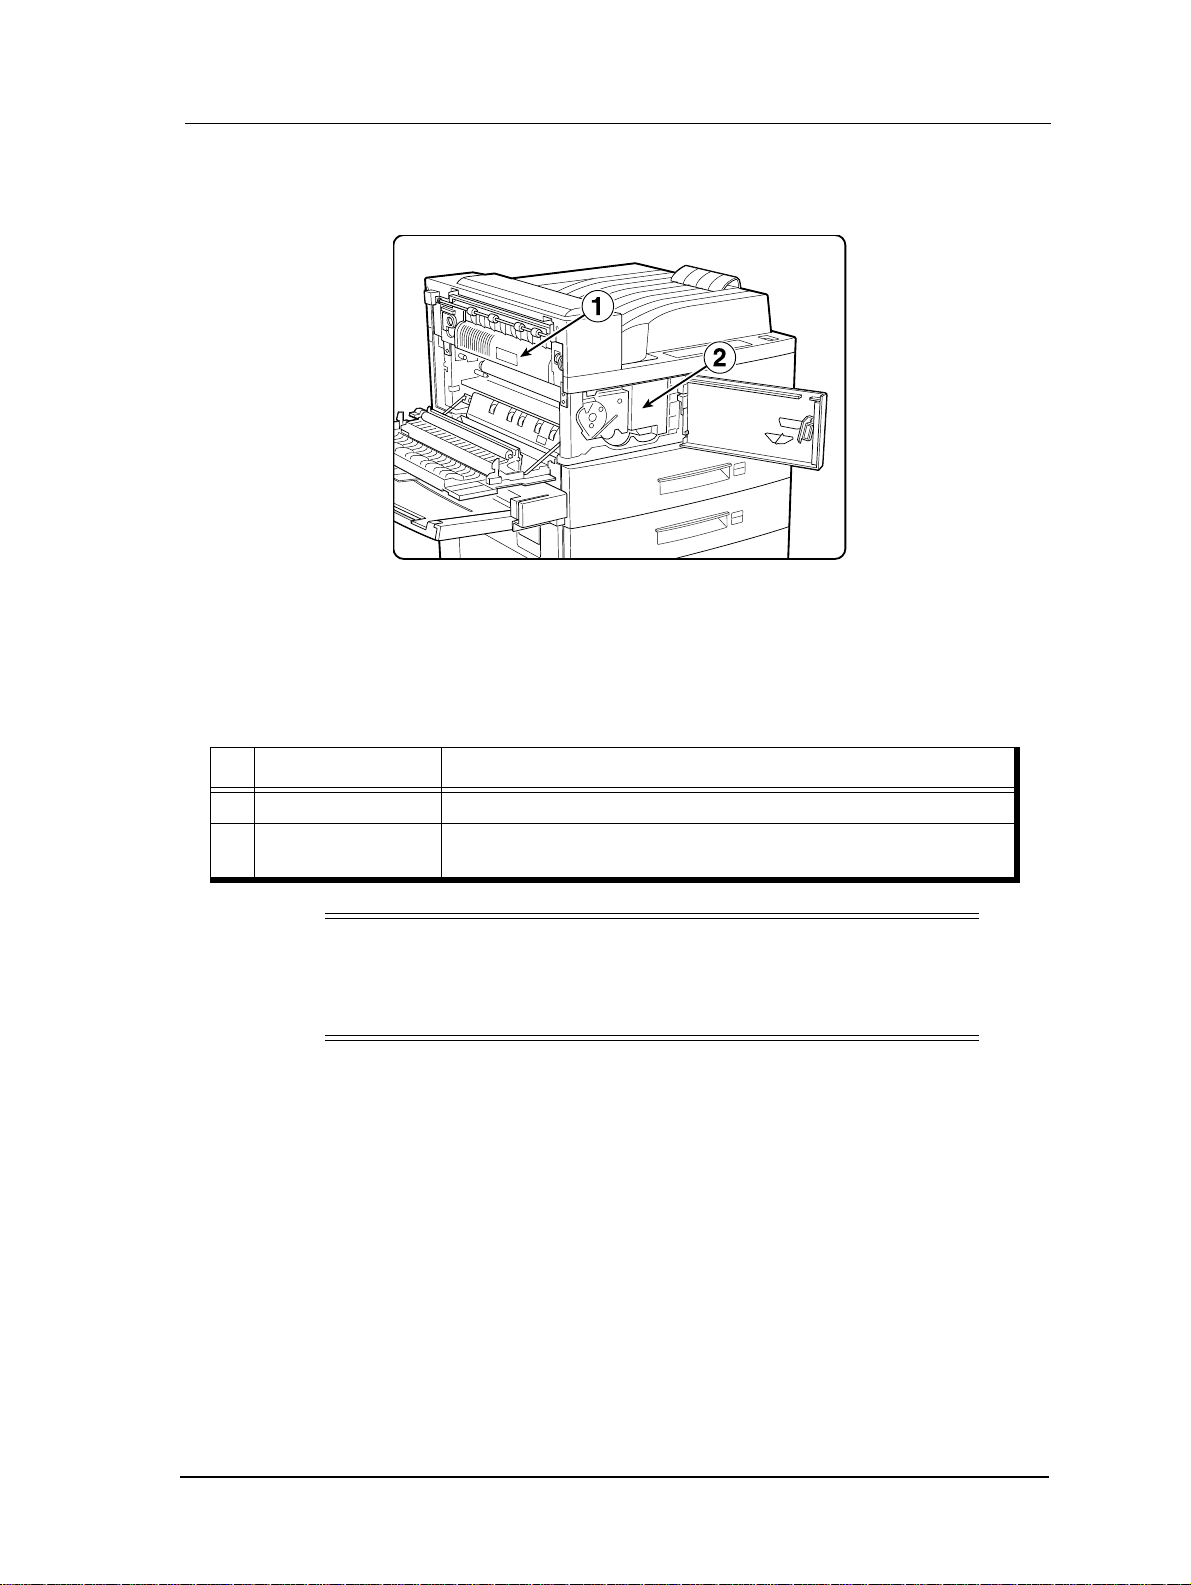
Fuser and EP Cartridge Locations
No. Part Function
1 Fus er Fuses toner onto the paper.
2 EP Cartridge
CAUTION
Integrated cartridge contains the toner developer and the photosensitive drum.
!
The fuser becomes hot in operation. If a paper jam occurs in the fuser
area, power off and wait until the fuser cools which can take up to 40
minutes.
Printer Overview 1-11
Page 24

Start-Up Procedures
Your system capabilities and equipment requirements vary depending on the options
you install. When performing the following tasks, it is important that you use specific
procedures.
■ For options on unpacking and installation information, see the instructions pack-
aged with the options.
■ For procedures on re pla ci ng cons umabl es such as the EP Cartridge, staples, and a
battery, and to add SIMMS, see Chapter 6.
Connecting the Power Cord
Before you connect the printer to an AC power source, read the safety precautions in
Appendix A.
WARNING!
Do not plug the printer into an AC power source with incorrect voltage.
1-12 Printer Overview
Page 25

To connect the printer to an AC power source:
1. Insert the power cord into the AC connecto r on the rear, left-side of the printer.
Rear, Left-side View
2. Verify that the power switch on the printer is set to 0 (off). Then, insert the plug of
the power cord into the AC power source.
U.S.A. Only Shown
Printer Overview 1-13
Page 26
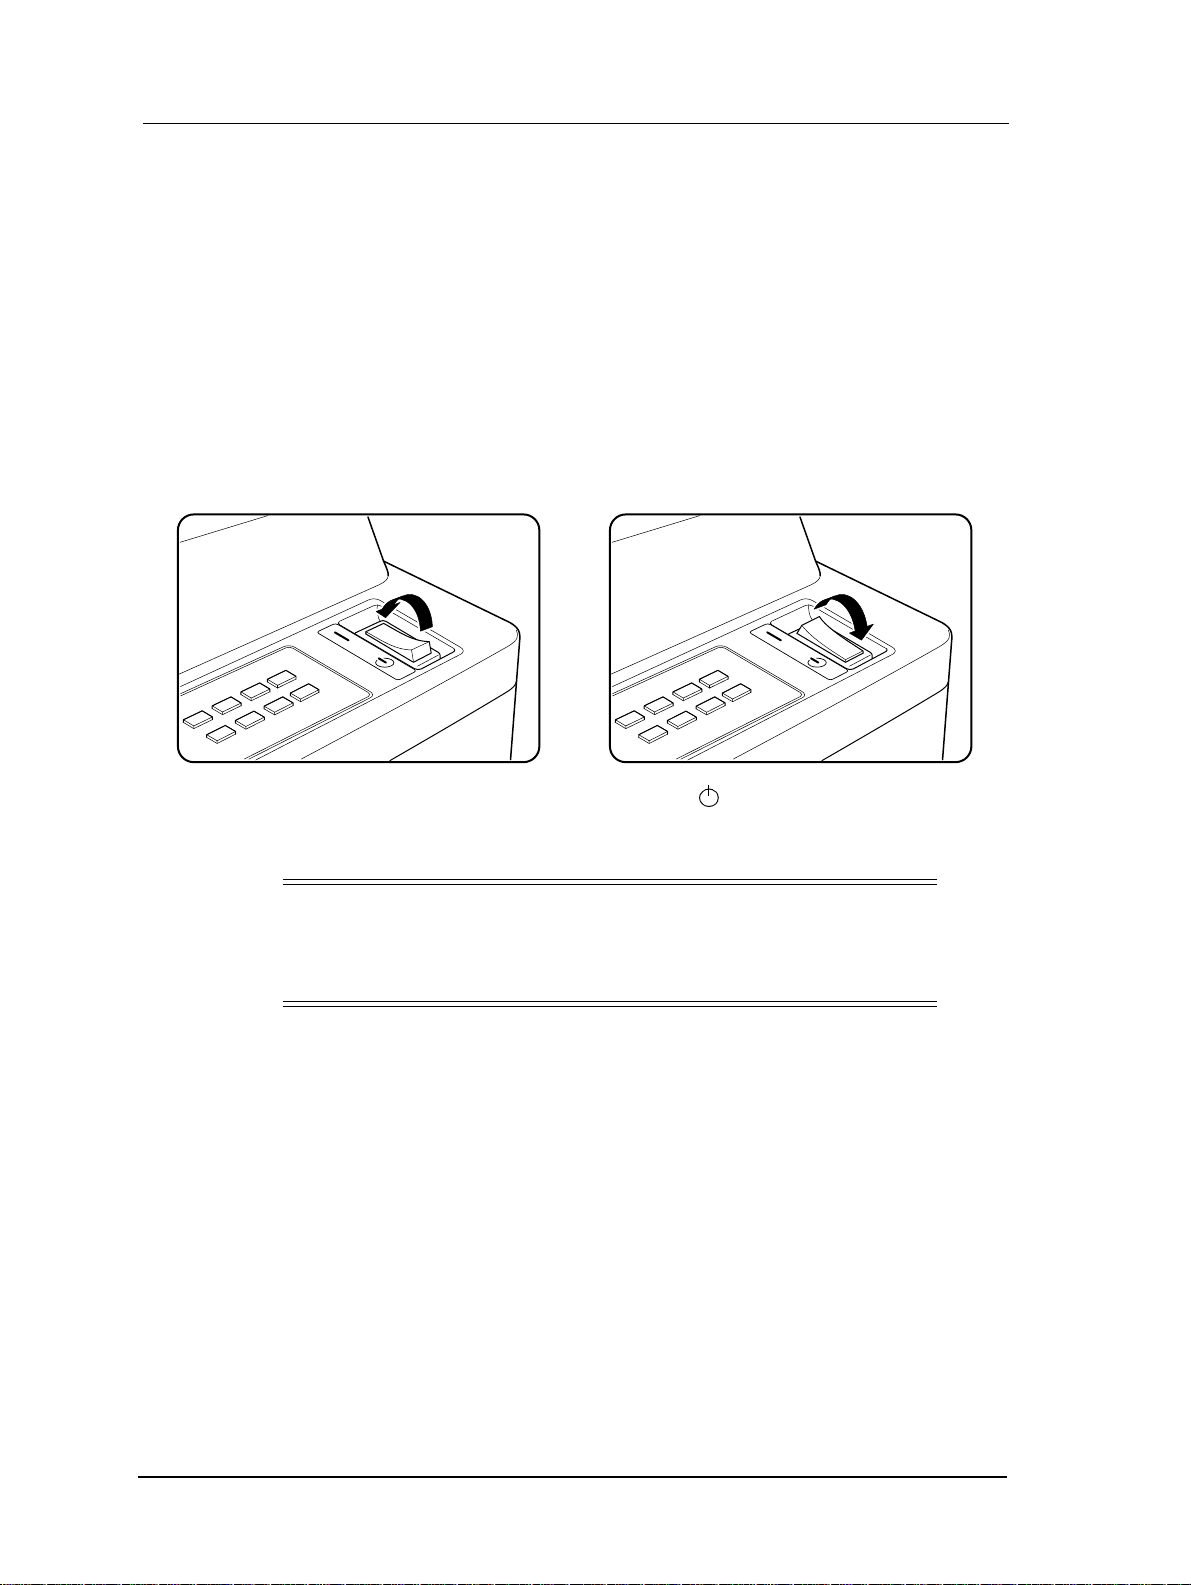
Powering Up the Printer
After you connect your printer, you can power up.
1. Turn on any devic es conne cted t o t he pri nter (for examp le, the c omputer and Scan -
Center).
2. Turn on the printer by setting the power switch to position
A sequence of messages are displayed at the OCP. When the installati on is
complete, the OCP displays
Ready.
l.
l = ON = OFF
.
NOTE
:
If the installat ion i s not s uccess ful , an error message is displayed. Turn off
the printer, and check the setup and installation. For procedures, see
Getting Sta rted or the instructions that come with your options.
1-14 Printer Overview
Page 27

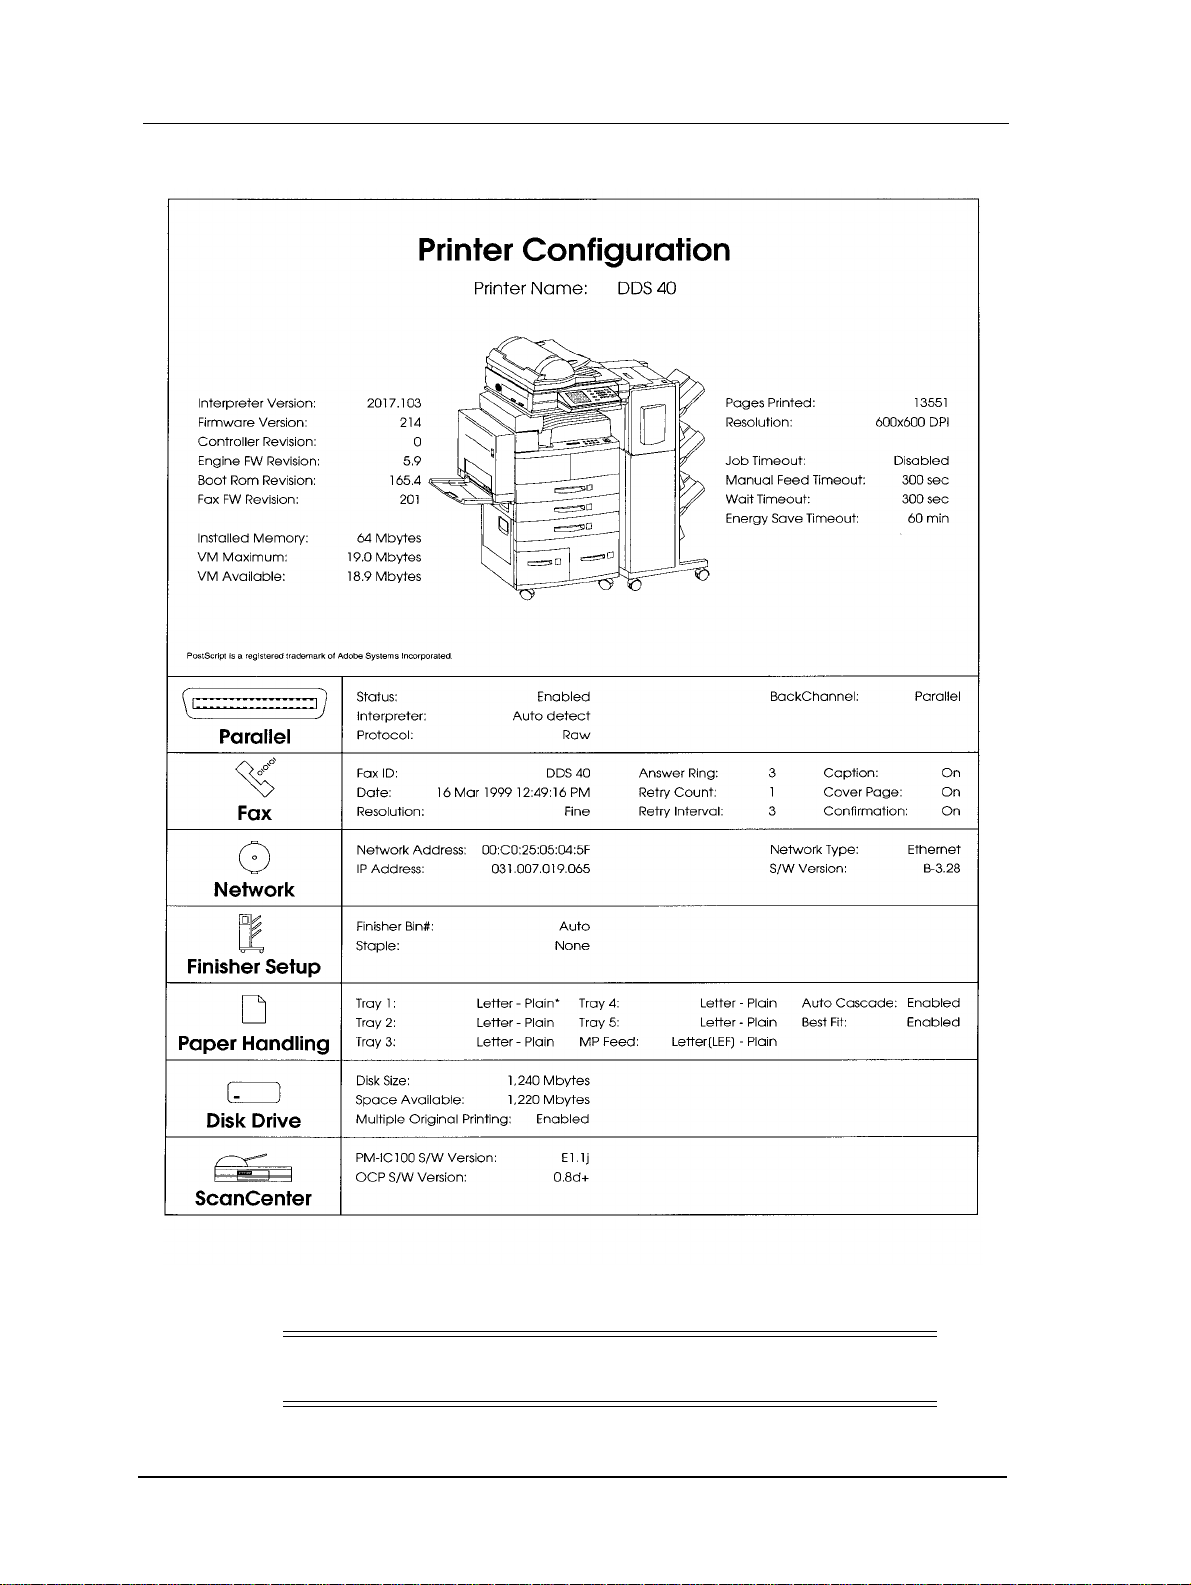
Printing Status Pages
To find out your current printer configuration:
1.
Press the Online key to place the printer offline.
2.
Press the Print Status key to print the following pages:
❒ Printer Configuration.
When the Fax is installed, the date on the Printer Configuration status page
reverts to January 1, 1992 if one of the following conditions occur:
a. the battery is new or has just been repl aced and, therefore, requires the date
and time to be set,
or
b. the battery has expired and needs to be replaced.
(To replace the battery, see the procedure in Chapter 6.)
❒ Menu Configuration
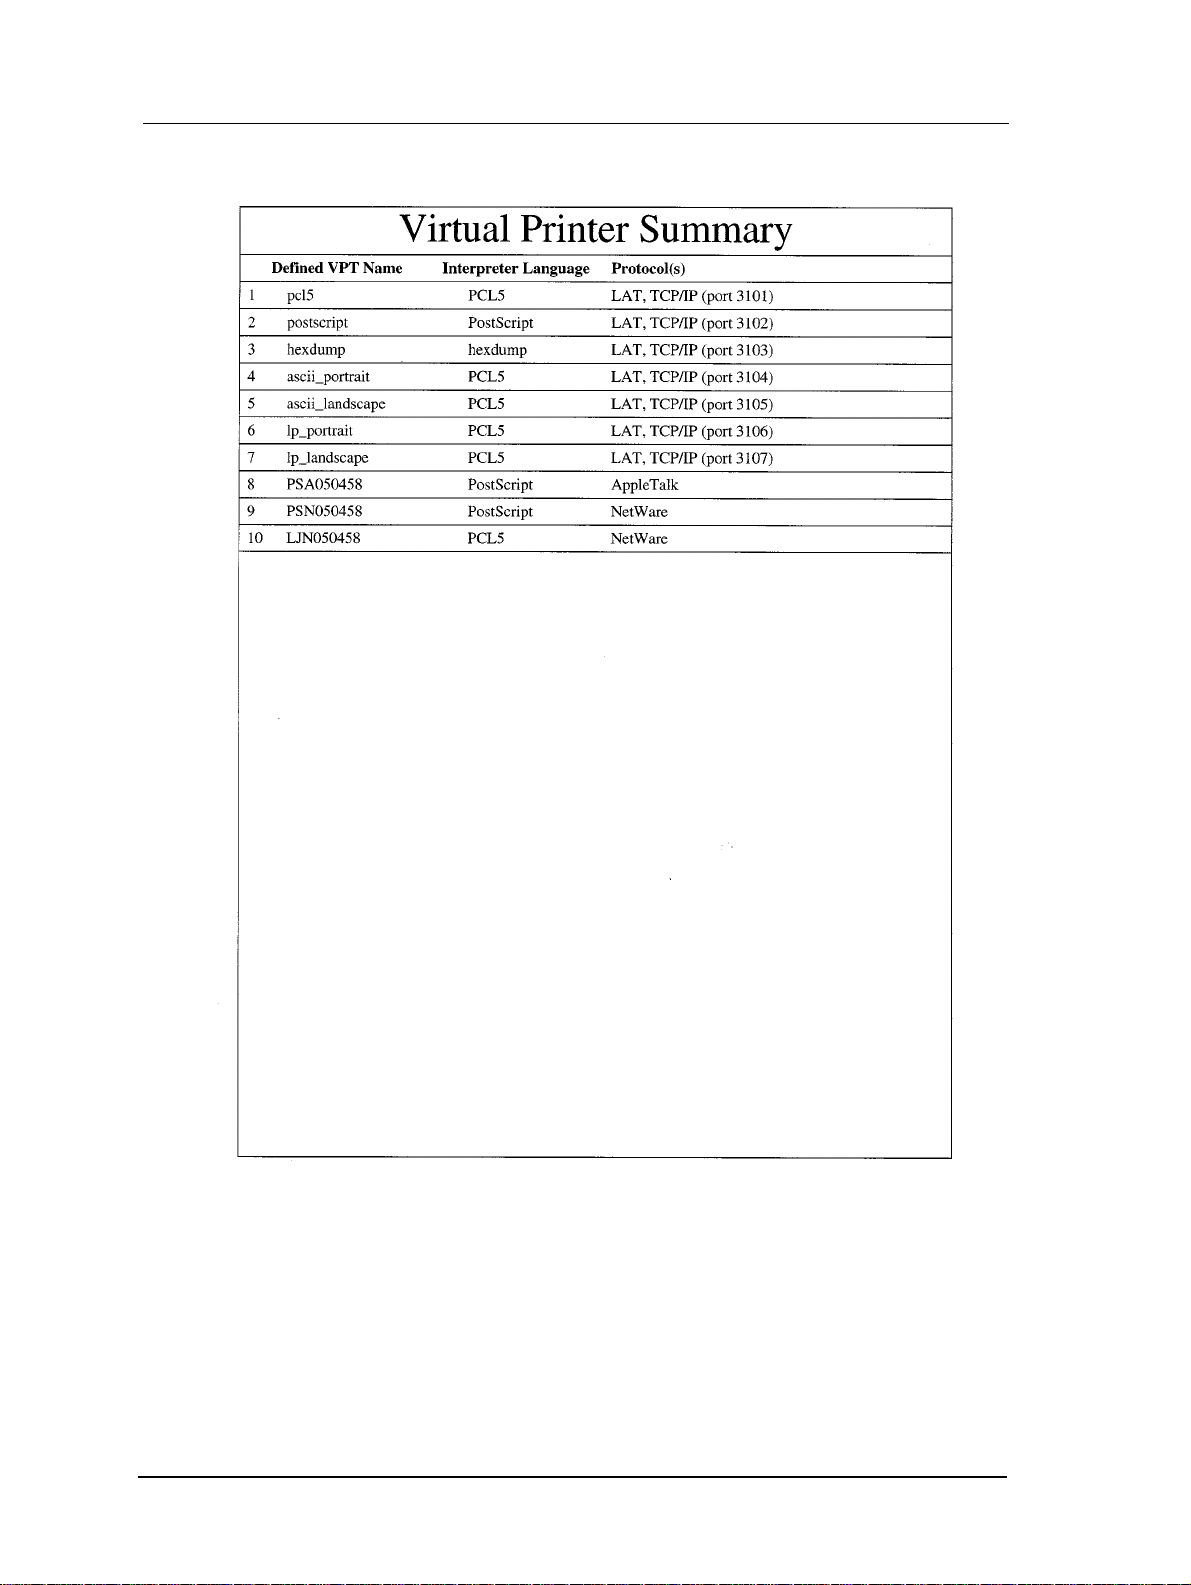
❒ Virtual Printer Summary (prints only if a network card is installed.)
❒ PCL Emulation Default Configuration
3.
When printing is complete, the printer automatically returns to Ready.
Printer Overview 1-15
Page 28
* = The current engine-selected tray.
NOTE
:
The display for the options appears if the options are installed.
1-16 Printer Overview
Page 29
✔ = User selected or default setting.
NOTE
:
The display for the options appears if the options are installed.
Printer Overview 1-17
Page 30
1-18 Printer Overview
Page 31

Printer Overview 1-19
Page 32

1-20 Printer Overview
Page 33

Using the Operator Control Panel
What This Chapter Provides
This chapter describe s the use of the opera tor control pa nel (OCP). It provi des information on accessing the menus and changing the printer settings using the OCP. You can
change the default settings to fit your particular printi ng requirements.
NOTE
:
When viewing this user’s guide online, click on the page references in
parentheses below to go to the page numbers cited.
This section includes the following information:
■ Operator Control Panel Display, LEDs, and Keys (see page 2-2)
■ Input Key Definitions (see page 2-3.)
■ Canceling the Job from the OCP (see page 2-3.)
■ Status Indicators (see page 2-4.)
Chapter 2
■ Using the Menus (see page 2-5)
■ How to Change a Menu Setting (see page 2-25)
■ Special Key Sequences (see page 2-27)
Using the Operator Control Panel 2-1
Page 34

Operator Control Panel Display, LEDs and Keys
The operator control pan el is your interface t o the printer’s features and functions. From
the control panel, you can:
■ monitor the printer’s operating status (or status of jobs in process).
■ change the printer’s settings and defaults to suit specific situations.
FORM
ONLINE
ONLINE NEXT MENU
FEED
FF
ERROR
DATA
Status / Indicator
LEDs
Liquid Crystal Display
The alphanumeric Liquid Crystal Display (LCD) displays menu items and error messages, as well as operating stat us messages. Th e LCD displays two-line mess ages of up
to 16 alphanumeric charac ters each.
Input Keys
The input keys are used to control the printer, and select menu items and printer settings. The functions of each key are described below.
LCD
Operator Control Panel
c
CANCEL
i
STATUS
Input Keys
PREVIOUS ENTERPRINT
2-2 Using the Operator Control Panel
Page 35

Input Key Definitions
Key Labels Press to:
ONLINE
FORM FEED
NEXT view the next menu item (in Offline mode).
MENU view the first menu item (in Offline mode).
CANCEL clear the current print job.
PRINT STATUS
PREVIOUS scroll down the menu structure or to return to a previous menu item.
ENTER accept the selection on the display.
■ The printer is normally in the Online (ready) mode. To take the printer offline,
set the printer to the Offline mode or switch it back to Online. After the
printer is taken Offline, a few pages may still print.
eject an unterminated PCL page from the printer when you see the
DA TA indicator blinking sl ow ly. The printer must be offline when the key
is pressed.
print the statu s pag e showin g the cu rrent conf igurati on. The p rinter must
be Offline whe n the key is pressed, and will retur n to an d remain Online
after the status pages are printed.
press Online.
■ To view the first menu item, press the menu key. To move to other menu selec-
tions, use the scroll keys, Next (forward) and Previous (back).
■ When you want to select an item, press Enter.
Canceling a Print Job from the OCP
You can only cancel a job that is c urrently pri nting. Be sure to c ancel the job in the host
print queue first, before canceling the job at the OCP.
Wait till the printer has printed the first page before canceling from the OCP. If you
press Cancel at the OCP, when the printer has just started to pr ocess the job, you may
see this message:
“No jobs to cancel”
Wait till the job processes furthe r, and then press Cancel again.
To successfully cancel the currently printing job, press Cancel after setting the printer
to the Offline mode. When you press Cancel, the following message appears:
ENTER = abort job
ONLINE = cancel
Press Enter to abor t the job. You will see a “Confir med” message on the OCP, when the
job has been aborted. W ait for abo ut 20 to 30 seconds, unt il the Data LED stops displaying the green light. This indicates that all the data has been purged from the printer.
Press the Online key to set the printer to the Ready mode.
Using the Operator Control Panel 2-3
Page 36

If you pressed Cancel by mistake and wish to continue printing the job, select Online,
to resume printing the canceled job at the
ENTER = abort job
ONLINE = cancel
prompt on the OCP. Press the Online key to place the pr inte r on t he Ready mode. Your
document will be printed beginning with the last page that was printed when you
pressed the Cancel key.
Status Indicators
The Light Emitting Diode (LED) st atus indic ators sig nify the pr inter’s status. The state
of the status indicators is either off, on, or blinking.
LED Name State Description
Green light The printer is Online and ready.
ONLINE
ERROR Amber light
DA TA
Blinking
Off The printer is Offline.
Green light
Blinking
Off The printer is not receiving any data or it is idle.
Blinks slowly if the printer is taken Offline when there
is a job in the printer.
An error condition has occurred in the printer and it
needs correction.
The printer is waiting for more data associated with
the page that is currently being processed.
The printer’s host interface is actively rec eiving data
or there is an unterminated PCL page.
2-4 Using the Operator Control Panel
Page 37

Using the Menus
To navigate through the menus:
1.
Press the Online key to go offline if the printer is online.
2.
Press the Menu key to enter the menus.
3.
Press the scroll keys, Next (forward) and Previous (back) to go throug h the menus.
The following top level menus will be displayed.
❒ PRINT MENU
❒ CONFIGURATION
❒ PARALLEL MENU
❒ NETWORK MENU (only if the Network Card is installed)
❒ PCL PRINT MENU
❒ POSTSCRIPT MENU
❒ FAX MENU (only if the Fax is installed)
4.
Press the Enter key to se lect a menu or to move from one digit to the next.
5.
Press the scroll keys, Next (forward) and Previous (back) to go through the menu s
and to increment/decrement numerical values such as number of copies or to
change time-out value s. To accept a valu e a nd save it as an entry , p res s the
key. To abort the entry, press the Menu key.
Online
6.
Press the Enter key to select a menu item or a displayed value.
7.
Press the Menu key to go up one level, press it again to go up another level.
8.
When you are asked if spec ific changes made to t he men u should be perman ent or
temporary,
❒ Press the Enter key to permanently save any changes made to the menu.
OR
❒ Press the Online key to temporarily save any changes made to the menu set-
tings. These changes are lost when the printer is turned off or reset (warm
start).
Using the Operator Control Panel 2-5
Page 38

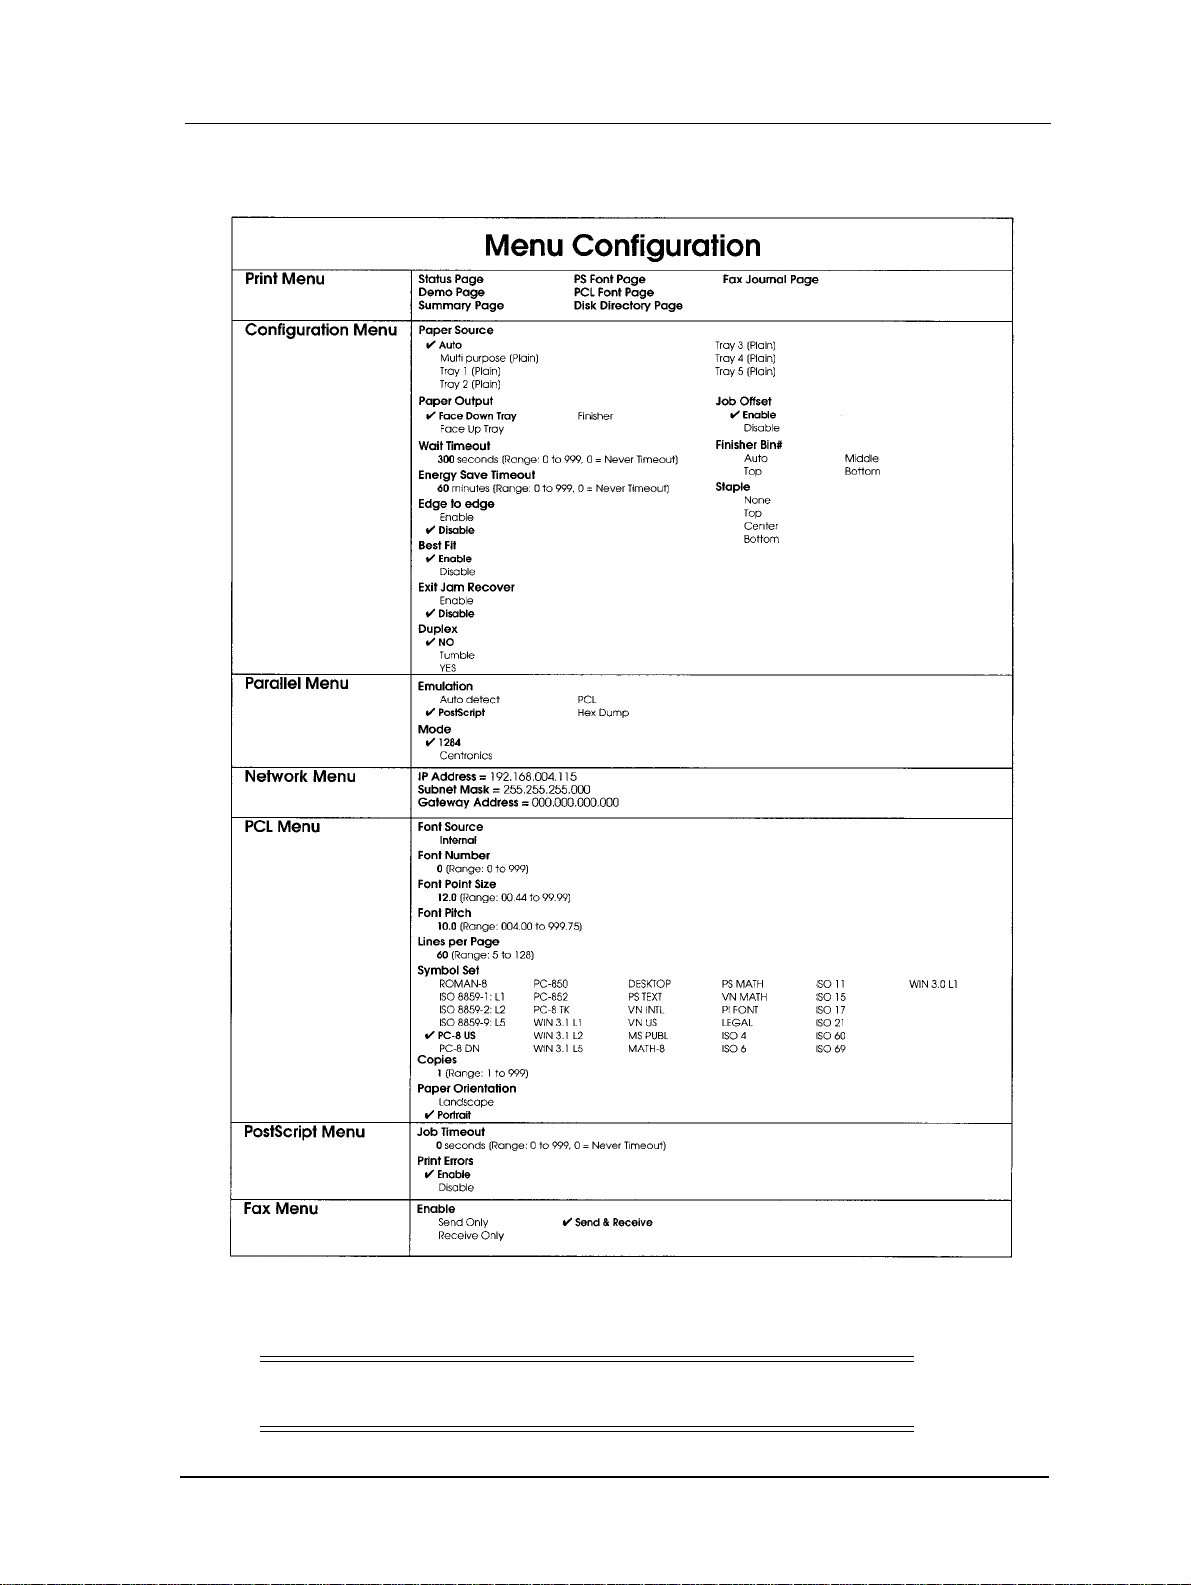
Menu Structure
The menu structure is illustrated in the following pages. The first level of the menu
structure runs across the top of the pages. Second menu levels run down the length of
the pages under the first level menu box.
NOTE
US Factory defaults appear in bold. Defaults specific to Europe are in
bold and italic.
:
When the
Menu key is first presse d, one of the first le vels of the menu struc ture appears.
press the:
■ Enter key to select the displayed menu.
■ Next key to go to the next menu selection.
■ Previous key to return to the last menu item.
2-6 Using the Operator Control Panel
Page 39

Print menu
St atus page
Demo page
Summary page
PS font page
PCL font page
Fax journal*
Disk directory
*Only if a Fax Card is installed.
Using the Operator Control Panel 2-7
Page 40

Configuration
Paper source
Auto
Tray 1
Tray 2
Tray 3*
Tray 4*
Tray 5*
Multi purpose*
Media size
Plain
Prepunched
Transparency**
Transparency-pp**
Preprinted
Letterhead
Bond
Recycled
Color
Special
Other
Letter (LEF)
Letter (SEF)
Statement (LEF)
A3 (SEF)
Folio (SEF)
A4 (SEF)
A4 (LEF)
B4(SEF)
Ledger (SEF)
Legal (SEF)
SuperB
B5 (LEF)
Executive (LEF)
A5 (LEF)
Hagaki***
Oufuku Hagaki
A6
Pa-Kai****(SEF)
Gletter****(LEF)
Juoruku-Kai****(LEF)
Dai Pa-Kai****(SEF)
C6 (Env)****(LEF)
F4(SEF)****
Custom
Feed edge
Length
(Continued
on next page)
*Only if installed.
**Not available for T rays 3, 4, and 5.
***Items and Japanese Postcard formats.
****Applicable to the 40 PPM Printer only.
2-8 Using the Operator Control Panel
Envelope*
Media type
COM10
Monarch
C5
DL
Custom size
Plain
Bond
Recycled
Color
Prepunched
Letterhead
Preprinted
Special
Other
Transparency
Transparency-pp
Label
Feed edge
<Numbers>
Length
<Numbers>
Page 41

Configuration
(Continuation)
Paper output
Face down tray
Face up tray*
Finisher*
Job offset
Duplex*
Collate
Copies
Wait timeout
Enable
Disable
No
Tumble
Yes
Enable
Disable
1
...99
000...300...999
Bin
Staple
Auto
Top
Middle
Bottom
None
Top
Center
Bottom
*Only if installed.
Energy save time
000...060...999
Edge to edge
Enable
Disable
Best fit
Enable
Disable
Using the Operator Control Panel 2-9
Page 42

Parallel menu
Network menu
Emulation
Mode
Enter IP address
Auto dete ct
PostScript
PCL
Hex dump
1284
Centronics
000.000.000.000
Subnet mask
Gateway IP addr
2-10 Using the Operator Control Panel
000.000.000.000
000.000.000.000
Page 43

PCL menu
Font source
Font number
Font point size**
Font pitch***
Lines per page
Internal
Soft font*
000...999
004.00...
00.44...10.00...99.99
12.00
...999.75
5...60...128
(Continued on next page)
*Only shows if there is at least one soft font in memory.
**Only shows if selected font has variabl e spaci ng. Increases in increments of 0.25 .
***Only shows if selected font has fixed spacing. Increases in increments of 0.01.
Using the Operator Control Panel 2-11
Page 44

PCL menu
(Continuation)
Symbol set
PC-8 US
PC-8 Dan/Nor.
PC-850
PC-852
PC-8 Turkish
Windows 3.1 Ltn1
Windows 3.1 Ltn2
Windows 3.1 Ltn5
Desktop
PostScript Text
Ventura Inter.
Ventura US
Microsoft Pub.
Math-8
PostScript Math
Ventura Math
PI Font
Legal
ISO-4 UK
ISO-6 ASCII
ISO11 Swedish:N
ISO-15 Italian
ISO-17 Spanish
ISO-21 German
ISO-60 Nor.
ISO-69 French
Window 3.0 Ltn1
Roman-8
ISO 8859-1 Ltn1
ISO 8859-2 Ltn2
ISO 8859-9 Ltn5
Paper orient.
2-12 Using the Operator Control Panel
Landscape
Portrait
Page 45

PostScript menu
Job timeout
000...999
Print errors
Enable
Disable
Using the Operator Control Panel 2-13
Page 46

Fax menu*
Back to Print
menu
Send & receive
Send only
Receive only
*Only if installed.
2-14 Using the Operator Control Panel
Page 47

Print Menu
To print a sample page:
1. Press the Online key to place the printer offline.
2. Press the
3. Press the Next (forward) or Previous (back) key until the desired page is dis-
played; then press Enter.
4. Press the Next (forw ard) or Previous (back) key until the Print menu is displayed;
then press Enter.
5. Press the Enter key to print the desired page.
The printer automatically r eturns to the online state after printing one of these page s.
The next time you select the Print menu, the previous item selected is displayed. To
print a differ ent item, you must select it from the Print menu.
Menu key.
Status page
This selection is the same as pressing the
Print Status
key (see Chapter 1).
Demo page
This menu option allows you to print specifications.
Summary page
From this menu option, you print a printer information page.
PS font page
The Resident PostScript Fonts pa ge lis ts the print er’s resident PostScript Fonts. A s ample follows: to print the PS font page, use the procedur e above, selecting PRINT MENU
for Step 3 and PS FONT PAGE for Step 4.
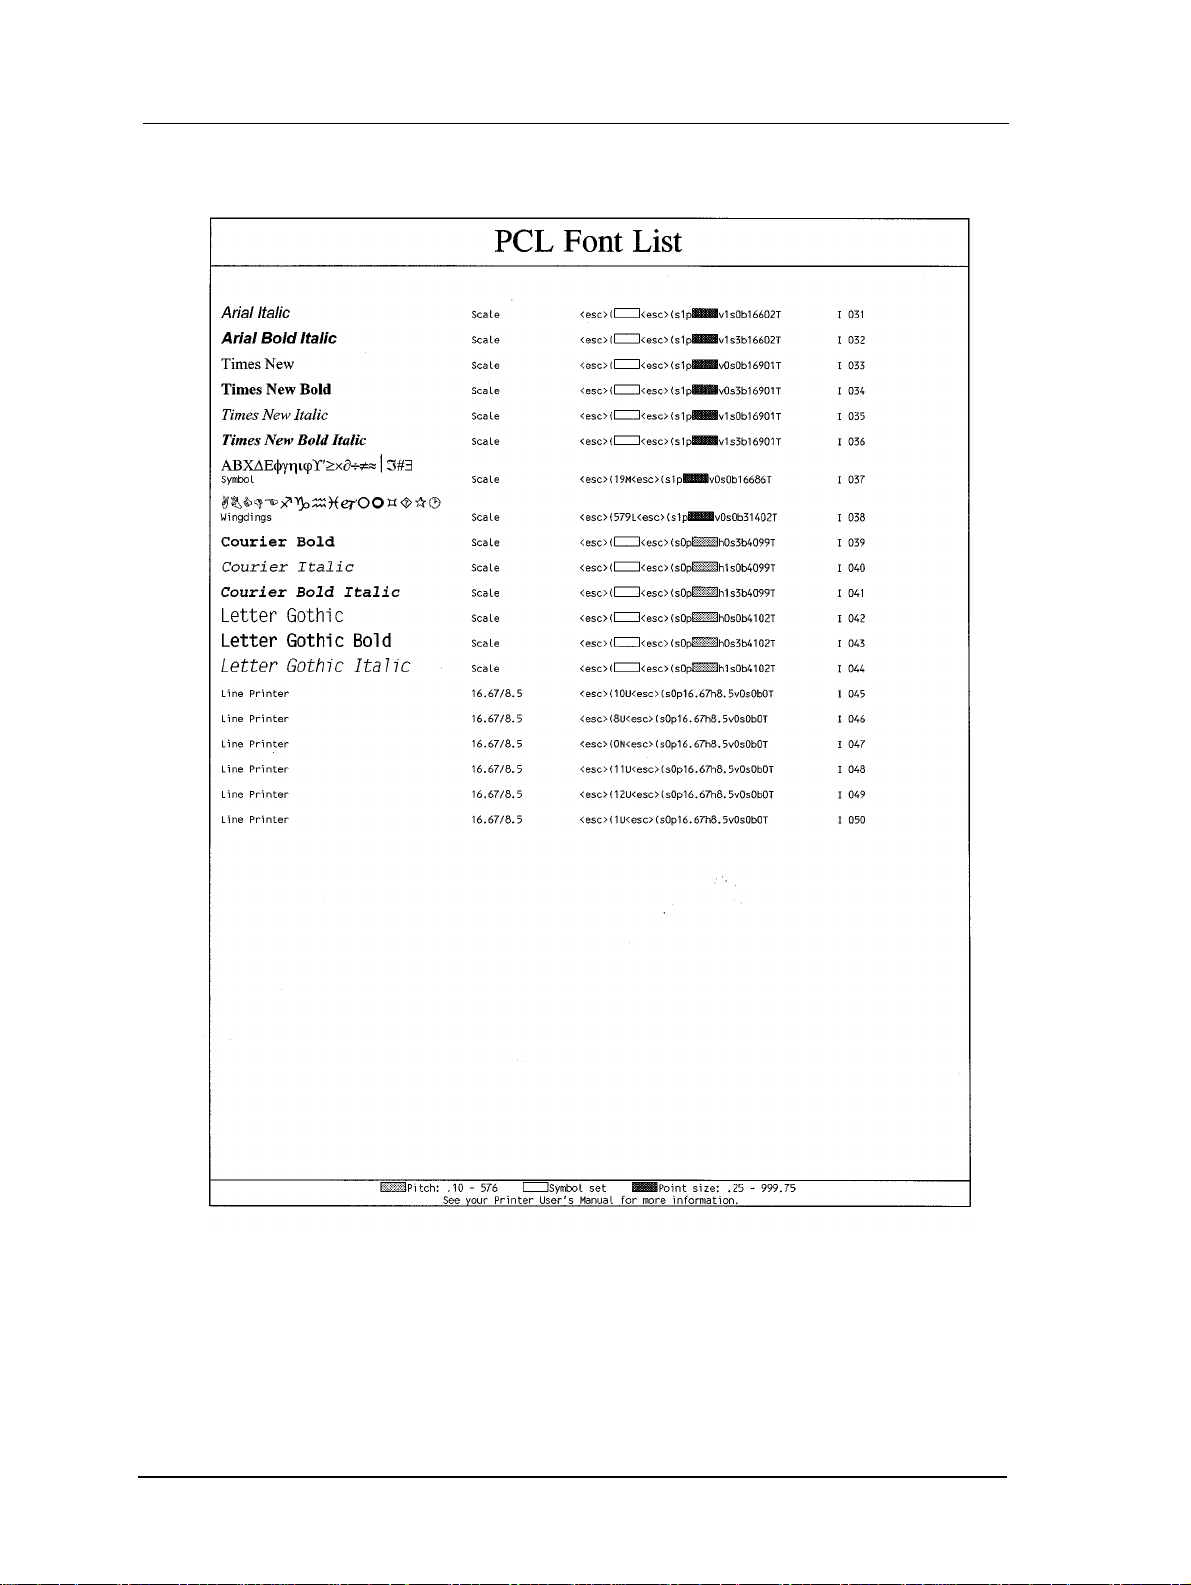
PCL font page
The PCL Font Page lists the pri nter’s internal PCL scalable typefaces and bitmap fonts,
as well as any soft (downloaded) fonts and disk-resident fonts. A sample follows: to
print the PCL font pag e, us e the procedure above, selecting PRINT MENU for Step 3
and PCL FONT PAGE for Step 4.
Fax journal
This option allows you to pr int a Fax Activi ty Page. Thi s is onl y avail able if the Fax is
installed.
Disk directory
From this option, you print a list of all files located on the internal hard disk.
Using the Operator Control Panel 2-15
Page 48

Resident PostScript Fonts Page
2-16 Using the Operator Control Panel
Page 49

PCL Font Page (page 1)
Using the Operator Control Panel 2-17
Page 50
PCL Font Page (page 2)
2-18 Using the Operator Control Panel
Page 51

Configuration
The settings you configure in these menus become defaults. However, the settings in
the individual files that are printed, over-ride the Configuration menu settings, for the
job.
Paper source
From the Paper Source menu, you can select either Auto or a single Paper Cassette including the Mult i P urpose Tray (MPT) or Envelope Feeder as the default paper source
for the printer. When Auto Cascading is enabl ed, and if you have not spec ified a tra y or
pagesize, the job i s printed from the trays i n the casca ding sequence, starting f rom T ray
1. Any tray that matches in page size and media type o f the job requested is part of the
cascade sequence. The MPT tray is not part of the cascade sequence unless it was the
last tray used. The job will st art prin ting fr om the source th at matches th e reques ted paper size and type. If no paper exactly matches the size and type, then the printer will
either print o n t he closest match (default) or request the correct size. When the curren t
paper source runs out of paper , the pri nter will re-examin e all the paper sourc es starting
at the current tray to find a match.
Multi purpose
Paper names and sizes f or the MPT are displayed in t he Pa per Source MPT menu with
Short Edge Feed ( SEF) or Long Ed ge Feed (LEF) to indicat e the d irect ion o f the paper
that is fed into the printer.
When the MP T or Envelope (Envelo pe Feeder) is selecte d as the paper source, the print er-selected paper size MUST match the physical paper size needed for the print job.
The factory default pap er size for the MP T is linked with the Country Code. If the Country Code is set to U.S.A., the de fault MP T and paper si ze is Letter . For all other Country
Codes, the default MPT is A4.
Leave the MPT or the Envelope Feeder empty when you request a job using manual
feed. Load paper in the tray only when the OCP prompts you to.
Envelope
If the Envelope Feeder is connected to the printer, you may select the envelope size
from the available selections in the Envelope menu: COM10, Monarch, C5, DL, and
Custom size. The factor y def ault envelope size is linked with the Countr y Code . I f t he
Country Code is set to U.S.A., the default is COM10. For all other countries, it is DL.
NOTE
:
You can either install the MPT or the Envelope Feeder, but not both. The
printer does not operate if you have not installed either a MPT or an
Envelope Feeder. Be sure to power off the printer, before switching from
the MPT to the Envelope Feeder, or vice versa.
Paper output
This option allows you to select the default output tray and various stapling options.
Using the Operator Control Panel 2-19
Page 52

Job offset
This option allows you to enable or disable the Job Offset function.
NOTE
:
Refer to the section on Menu Structure in this Chapter for information on
factory defaults for all the options. The defaults are indicated in Bold.
Duplex
The default is No. At the Duplex menu, you must select Yes if you wish to perform
Trayless Duplex printing. If you select Yes, it is implemented for PCL and PostScript
print jobs. Your pages then print two-sided with the tops placed back-to back.
If you select Tumble from the Duplex menu, your pages print two-sided, with the top
of page 1 placed back-to back with the bottom of page 2. The image on the back page
is turned 180
o
from the image on the front.
Collate
If this option is se t t o Enable when multiple copies are requested (a s s elected from the
Copies menu or from within the job), each page of the document is printed one time
until the docu ment set is complete. The document set is then reprinted as many times
as needed to produce the required number of copies. If set to Disable when multiple
copies are requested, each page of the document will be printed the requested number
of times before the next page is printed.
Copies
The number of copies set up can range from 1 to 99 (default is 1).
Wait timeout
The Wait Timeout setting can be varied from 0 to 999 seconds in increments of 1 second. The default is 300 seconds. This is the length of time in seconds that the printer
waits to receive additional characters from the host before the job is aborted.
Energy save time
T o conser ve ener gy and we ar and te ar on the fuser, a timeout can be set from th e menu.
If no print jobs have been sent for the dura tion of the timeo ut, the fuse r and fans will be
turned off. The setting can range from 60 to 999 minutes (Default is 30 minutes).
Edge to edge
This option allows you to pri nt fr om edge to edge of the paper. The defau lt is d is abl ed
(off). Most jobs do not require the option. To enable the option:
1. Use the Drivers to enable it on a job by jo b basis. (For inf ormati on on the Drive rs,
refer to the Online Help.) Or,
2. Select Enabled at the OCP, if you are not using the Drivers.
2-20 Using the Operator Control Panel
Page 53

If the option is enabled, in most cases the output is identical to normal (Edge-to-Edge
disabled) print jobs except that the image may be slightly shifted off the page. As a result, toner c ould s pill o nto t he dr um o utsid e of th e phys ical marki ng regio n for a p art icular page. This could create streaks on the succeeding pages, especially if those pages
are larger than the previous ones.
NOTE
Edge to Edge printing may result in degradation of print quality and
performance (speed) and may a lso affect the reliability of the print engine.
Best fit
Enabled is the defaul t. If enabled, the printer selects the page size and media type that
are closest to those requested, and then scales the image to print on that page.
If disabled, the printer stops printing while waiting for the correct media size and type.
If you have enabled Best Fit for a matching media type and paper size, and the tray
becomes empty, the OCP prompts you to add paper to the tray. The printer does not
scale the image to pri nt on an other pa per size, but prin ts the requeste d job on the newl y
added paper.
Parallel menu
:
Emulation
The Emulation menu has four selections:
■ Auto detect
■ PostScript
■ PCL
■ Hex dump
Auto Detect provides automatic emulation (printer type) sensing between PostScript
and PCL. A print job t h at th e printer does not recognize as a Post Scr ipt f ile defaults to
PCL. This lets your ap pli ca ti ons send PostScript or PCL files to the sa me port without
needing to change emulation in the menu.
The Hex Dump emulation can be used as a programming aid. The Hex Dump mode
prints the hexadecimal equivalent of the incoming data.
Mode
You can select IEEE 1284C or Centronics Parallel (default).
■ IEEE 1284C is bi-directional and should work in most system configurations.
■ Setting the p ort to Centron ics Parallel mode is for compatibility purpo ses only.
Using the Operator Control Panel 2-21
Page 54

Network menu
The menu allows you to select from these options:
Enter IP address
Subnet mask
Gateway IP addr (address)
NOTE
Do not change the IP ad dr ess, Sub net mask, or Gateway IP a ddr ess. The se
should only be changed by the System Administrator.
To find out the IP address, Subnet mask, or Gateway IP address, refer to
your System Administrator.
PCL menu
The PCL menu lets you select the font source, font type, and font characteristics for
PCL5e which is the emulation for PCL as used in the HP LaserJet 5Si. It also allows
you to change the symbol set or the orientation.
Font source
:
Internal fonts are the fonts that are shipped with the printer. Soft fonts are those downloaded to the printer. The PCL resident fonts can be selected if font source is set to Internal. The default font source is Internal.
Font number
Font numbers are prin ted on the PCL font page and ar e needed fo r select ing fo nts from
within a pr int job.
Font point size
If the font indicated by the PCL Font Source and PCL Font Number is a scalable typeface with proportion al spaci ng, you can select a point s ize. The de fault is 1 2.00 and the
range is 004.00 to 999.75.
Font pitch.
If the font indicat ed by PCL Font Source and PCL Font Number is a scalable typeface
with fixed spacing, you can select a font pitch. The default is 10.00 and the range is
00.44 to 99.99.
Lines per page
PCL Lines Per Page menu item is used to set t he number of line s printed per pag e. The
default is 60.
2-22 Using the Operator Control Panel
Page 55

Symbol set
The following table wi ll help you select symbol set s from the control panel or wh en using PCL5e commands.
Control Panel Display Symbol Set Symbol Set ID
PC-8 US PC-8 10U
PC-8 DANISH/NORWEG PC-8 Danish/Norwegian 11U
PC-850 PC-850 12U
PC-852 PC-852 17U
PC-8 TURKISH PC-8 9T
WINDOWS 3.1 LATIN 1 Windows 3.1 Latin (ANSI) 19U
WINDOWS 3.1 LATIN 2 Windows 3.1 Latin 2 9E
WINDOWS 3.1 LATIN 5 Windows 3.1 Latin 5 5T
DESKTOP Desktop 7J
POSTSCRIPT TEXT PS Text 10J
VENTURA INTERNAT’L Ventura International 13J
VENTURA US Ventura US 14J
MICROSOFT PUBLISH’G Microsoft Publishing 6J
MATH-8 Math-8 8M
POSTSCRIPT MATH PostScript Math 5M
VENTURA MATH Ventura Math 6M
PI FONT Pi Font 15U
LEGAL US Legal 1U
ISO-4 UK ISO 4 United Kingdom 1E
ISO-6 ASCII ISO-6 ASCII 0U
ISO11 SWEDISH:NAMES ISO-11 Swedish: names 0S
ISO-15 ITALIAN ISO-15 Italian 0I
ISO-17 SP ANISH ISO-17 Spanish 2S
ISO-21 GERMAN ISO-21 Ge rma n 1G
ISO-60 NORWEGIAN ISO-60 Norwegian 0D
ISO-69 FRENCH ISO-69 French 1F
WINDOWS 3.0 LATIN 1 Windows 3.0 Latin 1 9U
ROMAN-8 Roman-8 8U
ISO 8859-1 LATIN 1 ISO 8859-2 Latin 1 ECMA-94
Latin 1
ISO 8859-2 LATIN 2 ISO 8859-2 Latin 2
ISO 8859-9 LATIN 5
ISO 8859-9 Latin 5
0N
2N
5N
Using the Operator Control Panel 2-23
Page 56

Paper orient. (orientation)
You can choose the print orientation (portrait or landscape) to use. This selection controls the placement of the text on the physical page and is not affected by paper feed
orientation.
Portrait Orientation Landscape Orientation
PostScript menu
Job timeout
This is a time limit for a PostScript job to execute from start to fi nish. The setting can
range from 0 to 999 seconds. The default is 0 for infinite timeout.
Print errors
When the Print Error s function is enable d, errors occurring during a PostScript pr int job
will print. This is useful for troublesho oting a Post Script print j ob problem. The default
is Disabled.
Fax Menu
The Fax menu only appears if a Fax modem is installed in or connected to the printer.
The Fax menu lets you perform the following actions (see Chapter 4):
Send and Receive
Set to send out or receive faxes.
Send Only
Select to only send outgoing faxes. (Incoming calls will not be answered.)
Receive Only
Select to only receive incoming faxes.
2-24 Using the Operator Control Panel
Page 57

How to Change a Menu Setting
The following example d escribes how to change t he paper so urce from T r ay 1 to Multi
purpose. It als o describes how to change the defa ult paper size f rom Ledger (Short Ed ge
Feed) to Letter (Long Edge Feed).
1. Press the Online key to set the printer offline.
2. Press the Menu key to enter the menu structure.
3. Press the
4. Press Enter to access the Paper Source submenu.
NOTE
The asterisk indicates the option is selected.
5. Press the
6. Press Enter.
7. Press the Enter key to select the Me dia si ze. The def ault or las t sel ected pap er si ze
for Multi purpose is displayed.
Next (forward) key until the Configuration menu appears.
Configuration
Paper Source
Paper Source
Tray 1
:
key or the Previous key until the Multi purpose is displayed.
Next
Paper Source
Multi purpose
Multi purpose
Media size
Media size
Ledger (SEF)
8. Press the Next key until Letter is displayed and press Enter to select it.
Media size
Letter (LEF)
9. Press Menu. Media size for Multi purpose is displayed.
Multi purpose
Media size
10.Press the Next key until Media type appears and then press Enter to select the
media type from the available options.
Multi purpose
Using the Operator Control Panel 2-25
Page 58

Media type
11. Press the Next key until Plain appears and then press Enter to select it.
12.When finished, press the Online key to exit the menu. The following two mes-
sages are alternately displayed:
Save Setting?
Online=Temporary
or
Save Setting?
Enter=Permanent
13.Press the Online key to temporarily save the MPT as the paper source and Letter
for the default paper size. If you press the Enter key, Letter becomes the permanent default paper size for the MPT.
2-26 Using the Operator Control Panel
Page 59

Special Key Sequences
To choose the country language for the messages that are displayed on the operator
control panel, there are special OCP key sequences that you may use. The language
selections are shown in the tabl e below. (Country names are displayed in English. Any
change also alters the display language.) The abbreviations you find include: CN =
Cancel; FF = Form Feed; MN = Menu; EN = Enter; PS = Print Status;
Purpose/Key Strokes OCP Line 1 OCP Line 2
USA
CANADA
ENGLAND
FRANCE
Select the Country Settings
Country Default =
↑ CN
Restore factory defaults
Enter = Restore Online = Cancel
↑ ↑ FF
SPAIN
ITALY
GERMANY
JAPAN
SWEDEN
DENMARK
FINLAND
NORWAY
↑ = Next.
Set the display language
↑ MN
Restore display language
↑ FF
Lock the OCP
↑ ↑ EN
Unlock the OCP*
↑ ↑ ↑
Select the ne twork code set
↑ ↑ PS
*Rebooting the printer also unlocks the OCP.
ENGLISH
FRANCAIS
ESP ANOL
ITALIANO
Display Language
Factory Defaults
Control Pa nel Locked
Control Pa nel Unlocked
Network Code Set Network filename on disk.
DEUTCH
SVENSKA
DANSK
SUOMI
NORSK
Display of the l ang uag e in NVRAM
to be restored.
NOTE
:
The printer restores the factory default parameters and sets the display
language, whenever you change the Country Code.
Using the Operator Control Panel 2-27
Page 60

2-28 Using the Operator Control Panel
Page 61

Printing and Paper Handling
What This Chapter Contains
This chapter discusses paper handling and printing functions, including:
NOTE
:
When viewing this user’s guide online, click on the page references in
parentheses below to go to the page numbers cited.
■ Paper path (base configuration) (see page 3-2)
■ Paper path (with options installed) (see page 3-3)
■ Paper sizes and printer input trays (see page 3-4)
■ Paper weights and storage (see page 3-6)
■ Paper orientation (see page 3-8)
■ Printable area (see page 3-9)
Chapter 3
■ Loading paper into Trays 1, 2, 3, 4, 5, and the MPT (see page 3-11)
■ Using the Envelope Feeder (option) (see page 3-18)
■ Using the Trayless Duplex (two-sided) printing (option) (see page 3-20)
■ Using the Finisher (option) (see page 3-24)
■ Using the Digital printCopy feature (option) (see page 3-31)
■ Print request exceptions (see page 3-32)
Printing and Paper Handling 3-1
Page 62

Paper Path (Base Configuration)
Understanding how the paper travels inside the printer helps you better handle paper
loading and paper jams. Figure 3-1 shows the printer in its standard configuration.
1. The paper is pulled out of a paper cassette or the MPT.
2. The image is transferred from the photosensitive drum inside the EP Cartridge to
the paper.
3. The toner on the paper is fixed by the fuser.
4. The paper emerges onto the Face-down tray.
Fuser
EP Cartridge
MPT
Figure 3-1. Base Printer Configuration
3-2 Printing and Paper Handling
Page 63

Paper Path (With Options Installed)
Figure 3-2 shows the prin ter with the opti onal HCF , Fini sher , Trayl ess Duplex unit, and
Face-up Tray installed.
1. The paper is pulled out of a paper cassette or the MPT.
2. The image is transferred from the photosensitive drum in the EP Cartridge.
3. The toner on the paper is fixed by the fuser.
4. The paper is output as follows:
❒ For Face-up tray: face up.
❒ For Face-down tray: face down.
❒ For Finisher: fa ce down, offset, stapled (if enabled).
Finisher
Face-Up Tray
Trayless Duplex
Unit
MPT
Face-Down Tray
Fuser
EP Cartridge
Tray 4
Tray 5
Tray 1
Tray 2
Tray 3
HCF
Fuser
EP Cartridge
HCF
Figure 3-2. Printer With Options Installed
Printing and Paper Handling 3-3
Page 64

Paper Sizes, Paper Types and Printer Input Trays
This table shows which p aper s iz es c an be used with the 32 PPM printer’s input trays.
Paper Size
A6 (SEF) 105.0 149.0
A5 (LEF) 149.0 210.0
A4 (SEF) 210.0 297.0
A4 (LEF) 297.0 210.0
A3 (SEF) 297.0 420.0
B5 (LEF) 182.0 257.0
B4 (SEF) 257.0 364.0
STATEMENT (LEF) 140.0 216.0
LETTER (SEF) 216.0 279.0
LETTER (LEF) 279.0 216.0
LEDGER (SEF) 279.0 432.0
EXECUTIVE (LEF) 184.0 267.0
FOLIO (SEF) 216.0 330.0
LEGAL (SEF) 216.0 356.0
SE mmLE
mm
Tray 1 Tray 2
HCF
(Tray 3)
HCF
(Tray 4)
HCF
(Tray 5)MPTray
Envelope
Feeder
Trayless
Duplex
»
»»» » »
»»» » »
»»»»»» »
»»» » »
»»»»»» »
»»» » »
»»»
»»» » »
»»»»»» »
»»» » »
»»»»»» »
»»» » »
»»» » »
COM 10 105.0 241.0
MONARCH 98.0 191.0
DL 110.0 220.0
C5 162.0 229.0
UNIVERSAL 1 mm
or 0.05 in. increments
UNIVERSAL
ENVELOPE 1 mm or
0.05 in. increments
SUPER B 297.0 431.0
PAPER (BOND)
OVERHEAD TRANS-
PARENCIES
LABELS
JAPANESE POSTCARD (Hagaki)
(Oufuku hagaki)
100.0 to
297.0
98.0
to 162.0
100
148
148.0 to
431.0
191.0
to 229.0
148
200
»
»
»
»
»
»
»»
»»»»»» »
»» »
»
»
3-4 Printing and Paper Handling
Page 65

The following paper sizes are available only on the 40 PPM printer.
Paper Size
Pa-Kai 267 389
C6 Env 162 114
Gletter 266.7 215.9
F4 210 330
Dai Pa-Kai 275 395
Juuoroku Kai
(16vo)
SE mmLE
mm
275 198
Tray 1 Tray 2
HCF
(Tray 3)
HCF
(Tray 4)
HCF
(Tray 5)MPTray
»»
»
»»
»»
»»
»»
Envelope
Feeder
Trayless
Duplex
Printing and Paper Handling 3-5
Page 66

Paper
T o obtain goo d print q uality, use the recommended pape r and properl y positi on it in th e
correct trays. For the desired paper orientation, see the labels on the trays.
Paper Weights
The printer accepts the following paper weights:
■ 17-28 lb (64-105 g/m
feeder (HCF) option.
■ 17-28 lb (64-105 g/m
(MPT).
■ 17-24 lb (64-90 g/m
Unacceptable Paper
Avoid using the following media as they cause paper jams and print quality problems.
■ Excessively thick or thin paper
■ Paper that has already been printed (preprinted letterhead is allowed)
■ Wrinkled, torn, or bent paper
2
) via all paper trays, i ncluding the 2,500-sh eet high capac ity
2
) A6 + 190 g/m2 postcard via the Multi Purpose Tray
2
) via the Trayless Duplex option.
■ Moist or wet paper
■ Curled paper
■ Paper with an electrostatic charge
■ Glued paper
■ Paper with special coating
■ Colored paper with surface tr eatment
■ Paper unable to withstand temperature of 302°F (150° C)
■ Thermal paper
■ Carbon paper
■ Paper with paper fasteners, ribbons, tape, etc. attached
■ Heavily textured paper
■ Label stock with exposed backing sheets
3-6 Printing and Paper Handling
Page 67

Unacceptable Paper Size
Avoid using the following paper custom sizes in Trays 1, 2 or 3, as this may heat the
engine excessively, causing the plastic parts of the fuser to melt or get deformed.
Width: 182mm (7.16 inches) ~216mm (8.5 inches) and
Length: 210mm (8.25 inches) ~ 216mm (8.5 inches) or
420mm (16.5 inches) ~ 432mm (17 inches)
CAUTION
Do not install paper si zes in Trays 1, 2 or 3 that are not displayed in the
Paper Size table to avoid causing serious damage to the engine.
Storing Paper
Store the paper properly to avoid print quality problems and paper jams.
■ Store paper horizont all y, in a flat, dry lo cation to avoid wrinkle, bending, curl, et c.
■ Store paper away from direct sunlight.
■ Store any unused paper in its original packing.
!
Printing and Paper Handling 3-7
Page 68

Paper Orientation
Each tray has a label showi ng th e proper orientation of paper. Refer to this label when
loading paper.
■ In most situations, using the Media Type selection through the Driver will handle
the image rotation automatically.
■ In other cases, Duplex printing on pre-punched and letterhead paper is possible
without having to change the way paper is loaded if you set the Drivers that ship
with this product to print on the reverse side of the paper first. The Reverse Sides
button is available from the Document folder in the Drivers Window.
Refer to Online Help.
Simplex Printing
■ Load letterhead face up and upside down (text) as shown in the figure below.
■ Load pre-punched paper with holes on the right.
■ Load labels face up and upside down.
■ Load striped transparencies face up and with the stripe on the left.
Simplex Printing Orientation
Duplex Printing
■ Load letterhead face down and upside down (text) as shown in the figure below.
■ Load pre-punched paper with holes on the left.
3-8 Printing and Paper Handling
Duplex Printing Orientation
Page 69

Printable Area
■ Normal printing
Printable Area
4 mm
4 mm
■ Edge to edge printing
Printable Area
When you request edge to edge (wide) printing, the printing area is from edge to edge
on all sides of a sheet of paper . Also, poor print quality , dirty pri nting on the reverse si de
or along the edge may result. For print quality problems, see Chapter 5.
Printing and Paper Handling 3-9
Page 70

Loading Paper
When the display on the operati on panel indicat es no paper, add paper to the indicated
paper source.
■ Fan paper before inserting it into the trays.
■ Do not overload the tray.
■ Always load paper of the same size.
Setting Paper Sizes
To set the paper size, use the guides as shown:
1. When you set paper in the trays, a lign the fo ur corne rs of the pap er and place stack
between the guides.
NOTE
:
Do not stack the paper above the limit mark.
2. Adjust the guide to the paper width and length.(See page 3-13.)
3-10 Printing and Paper Handling
Page 71

Adding Paper to T ray 1, 2, and 3 (If Installed)
1. Pull out the tray until it stops.
2. Gently lift up the guide and slide it until it stops.
NOTE
:
Skip this step if you are not changing paper size.
Printing and Paper Handling 3-11
Page 72

3. While pressing down the gray handle, slide the guide until it stops.
4. Place the paper in the tray between the guides.
NOTE
:
Do not stack the paper above the limit mark.
3-12 Printing and Paper Handling
Page 73

5. Adjust the guides to the paper width and length.
Adjust guides to the correct width
NOTE
:
Adjust guides to the correct length
Adjust the guides to the correct paper size; otherwise, paper may be
transported incorrectly and may result in paper jams.
6. Push the tray in until it latches.
Printing and Paper Handling 3-13
Page 74

Adding Paper to Trays 4 or 5
The following procedure shows Tray 5 as an example.
1. Open the tray.
2. Adjust the guide to the correc t paper length a nd insert paper into the tray.
NOTE
:
Do not stack the paper above the limit mark.
3. Close the tray.
3-14 Printing and Paper Handling
Page 75

Adding Paper to the Multi Purpose Tray
1. Pull out the extension tray to the desired length.
2. Place paper along the right edge of the feeder.
Printing and Paper Handling 3-15
Page 76

3. Adjust the paper guide to slightly touch the paper stack.
4. Insert the paper stack as far as into the printer as it can go.
5. When you finish printing from the MPT, remove any remaining paper from the
tray and push back the extension tray.
3-16 Printing and Paper Handling
Page 77

Using Transparencies
About 20 sheets of Letter/A4 size transparencies can be loaded into the MPT at one
time. The transpar encies must be able to withstand the he at gene rated by the fusing assembly (374
NOTE
To print transparencies, only use Trays 1 and 2, or the MPT.
To load transpa rencies:
■ Before loading a st ack of tran sparen ci es int o the MPT , f an them a nd the n t ap them
on a flat surface to align the edges.
■ When handling transparencies, hold the edges and avoid touching the print side.
■ Using the OCP, set the media type to Transparency.
■ Adjust the paper guides to the width of the transparency stack.
■ Slide the transpar enc ies into the printer as far as they go wit h the print side facing
up in Tray 1/2 or print side facing down in the MPT.
ο
F / 190οC) without damage.
:
CAUTION
!
The transparencies must not exceed the paper limit mark.
Do not scratch or dirty the print side of the transparencies with
fingerprints.
Remove each transparency as soon as it is delivered to the output tray to
prevent curling and jams.
Printing and Paper Handling 3-17
Page 78

Using the Envelope Feeder (Option)
The optional Envelope Feeder allows the printer to print a large number of envelopes
at one time. The maximum envelope stack height is 2.87 in. (73 mm) or about 100 envelopes. The acceptable s ize of t he enve lopes r anges from 3.8 7 in. x 7.5 into 6.93 in. x
10.24 in. (98.4 x 190.5 mm to 176 x 260 mm), including the standard envelope sizes:
■ COM 10 (104.8 x 241.3 mm)
■ Monarch size (98 x 191 mm )
■ DL size (110 x 220mm)
■ C5 size (162 x 229 mm)
■ B5 size (182 x 257 mm)
■ C6 size (for 40 PPM printer o nly) (162 x 114 mm)
Envelope Feeder Option
NOTE
:
The MPT must be removed before you can install and use the Envelope
Feeder.
Trayless Duplex printing is not available from the Envelope Feeder.
Tips for Envelope Printing
■ Do not reuse envelopes that have already caused a paper jam.
■ Load one size of envelope at a time into the Envelope Feeder.
■ Add envelopes only when the Envelope Feeder is empty.
3-18 Printing and Paper Handling
Page 79

Loading Envelopes into the Envelope Feeder
1. Stack the envelopes, making sure they are not stuck together and all flaps are
closed.
2. L ift the envelop e weight and insert the envelopes with the long-leading e dge first
and the flap-side up.
3. Slide the guide so that it slightly touches the edges of the envelope stack.
CAUTION
Envelopes should not exceed the limit mark.
Do not add envelopes while printing or paper jams may result.
!
Printing and Paper Handling 3-19
Page 80

Using Trayless Duplex (Two-Sided) Printing Option
Y ou can print on both side s of a page once the T ray less Duplex u nit (opti on) is ins talled.
Check the Duplex box from the Document secti on of the Drivers dialog box or choo se
Yes to Duplex at the OCP Configuration menu to print pages two-sided, with the tops
placed back to back. The paper weights you can use with Trayless Duplex printing
range from
17 lb (64 g/m
For a list of supported paper sizes , refer to “Paper Sizes, Paper Types and Printer Input
Trays” on page 3-4.
NOTE
If the Trayless Duplex unit is not installed, all duplex and tumble (s ee next
page for more infor mation on “tumble” ) r eques ts ar e ignored and the jobs
are printed in the simplex mode.
Tips for Trayless Duplex Printing
For Trayless Duplex printing, use paper that is opaque enough to block out what is
written on the oppos ite side. If yo u use transparen t paper , the prin ted data from one side
of the page will show through t o the other side. For best re sults, tes t a small qua ntity to
make sure the opacity is acceptable.
2
) to 24 lb (90 g/m2).
:
NOTE
:
You cannot use Trayless Duplex printing for envelopes, labels, postcards,
or transparencies. These are automatically printed in simplex mode.
3-20 Printing and Paper Handling
Page 81

Binding Options
The printer provides you with two options for binding. You can bind as a book or as a
Clipboard by using either the OCP or the Drivers.
Selecting the Binding Options from the Drivers
The two binding options are:
The Book option in Windows 3.1 and 95. This is also r eferred t o as th e
Long Side option for Port rait Orientatio n and Short Side for Landsca pe
orientation in the Windows NT 3.51 and NT 4.0 operating systems.
The Clipboard option in Windows 3.1 and 95. This is also
referred to as the Short Side option for Portrait orientation and the Long
Side option for Landscape orientation in the Wind ows NT 3.51 and NT
4.0 operating sys tems. The f igures on the rig ht display Duplex b inding
options for P ortrait orientation.
Use the following steps to select binding options:
■ Click the Properties button in the Print Setup dialog box to view the Drivers
dialog box.
■ Click the Document folder.
■ Check the Duplex option.
■ Click the Book or the C lipboard buttons, based on the binding option you need.
Accessing the Binding Options from the OCP
Use the following steps to select binding options from the OCP:
■ Move to the Configuration Menu.
■ Press the Enter button for Duplex.
■ Press Enter for Tumble if you want the document bound on the short edge. If you
do not select Tumble, the document is bound on the l ong edg e. The de fault d uplex
binding is long edge.
Printing and Paper Handling 3-21
Page 82

Binding Orientation Portrait
AB
Back Page Front Page
Back Page
Binding
S Top to bottom binding
STumble
Referred to as:
■ Clipboard, an option in the Windows 3.1,
and 95 Drivers dialog box.
■ Short Side, an option in the Windows NT
3.51 and 4.0 Drivers dialog box.
Referred to as:
Binding
S Left or right binding
■ Book, an option in the Windows 3.1 and
S Non-tumble
95 Drivers dialog box.
■ Non-Tumble, an option in the Macintosh
Layout or Options dialog box.
■ Long Side, an option in the Windows NT
3.51 and 4.0 Drivers dialog box.
B
Front Page
■ Tumble, an option in the Macintosh Lay-
out or Options dialog box.
3-22 Printing and Paper Handling
Page 83

Binding Orientation Landscape (continued)
Back Page
Back Page
Binding
S Top to bottom binding
Referred to as:
STumble
■ Clipboard, an option in the Windows 3.1,
and 95 Drivers dialog box.
■ Long Side, an option in the Windows NT
3.51 and 4.0 Drivers dialog box.
■ Tumble, an option in the Macintosh
Driver’s Page Layout or Options dialog box.
B
Front Page
AB
Back Page Front Page
Binding
Left to right binding
S Left or right binding
S Non-tumble
Referred to as:
■ Book, an option in the Windows 3.1, and
95 Drivers dialog box.
■ Short Side, an option in the Windows NT
3.51 and 4.0 Drivers dialog box.
■ Non-tumble, an option in the Macintosh
Driver’s Page Layout or Options dialog box.
Printing and Paper Handling 3-23
Page 84

Using the Finisher (Option)
The Finisher provid es face-down jogging, face-down stapling, an d face-down stackin g.
With a total output capacity of 2010 sheets, it includes three output bins with the
following capacities:
■ Letter/A4 (20 lb B ond): 670 unstapled sheets, or 100 stapled sets of any size.
■ Other sizes: 335 unstapled sheets, or 100 stapled sets of any size.
The Finisher attaches to the right side of the printer engine and requires the HCF for
operation and height a lignment. The options it provides are sel ectable from the opera tor
control panel and the Drivers on a job by job basis. (See page 3-27.)
Stapling Positions
Except for transparencies, labels, postcards and envelopes, all supported media types
can be printed as duplex and/or stapled.
Stapling is supported only:
■ in the three Fi nisher bins.
■ along the trailing edge of the print job .
Y ou select t he stapli ng positi on at the OCP or through the Driv ers. If stapling i s request ed for a job that con tains more than 50 sheets, t he printe r prin ts the ent ire job c orrectl y,
but does not staple it. Also, if stapling is requested on a single-page job, the page will
not be stapled.
NOTE
:
To operate properly, the staple cartridge must be installed, even if it does
not contain any staples or the job is not requesting staples.
The table below shows which paper s izes can be used with th e Finisher’s opt ions. Also,
the following illustrations provide the stapling positions.
3-24 Printing and Paper Handling
Page 85

Finisher Stapling Positions
Stapling is available for the following paper sizes:
Paper Size
(SEF)
A4
A4 (LEF)
A3 (SEF)
LETTER (SEF)
B4 (SEF)
LETTER (LEF)
B5 (LEF)
LEDGER (SEF)
LEGAL (SEF)
EXECUTIVE (LEF)
A5 (LEF)
FOLIO (SEF)
INVOICE (LEF)
NOTE
:
SEF means Short Edge Feed, or Short Edge First.
LEF means Long Edge Feed, or Long Edge First.
For illustrations, see “Staple Positions” on page 3-26.
Envelopes cannot be sent to the Finisher.
You cannot staple envelopes, transparencies, labels, and postcards.
Printing and Paper Handling 3-25
Page 86

Staple Positions
These are the stapling positions provided by the Drivers.
Position Portrait Page Landscape Page Comments
Top Left
Top Right
Top Center
A A
A
A
A
A
The staples on A4 (LEF)
and A3 paper sizes wil l be
o
at 45
angles (not straight
as shown.)
SEF pages only
Left Center
Right Center
3-26 Printing and Paper Handling
A
LEF pages only
LEF pages on ly
A
SEF pages only
Left Center is shown.
Right Center (not shown)
staples on the opposite
side.
Page 87

Selecting Stapling Positions From the Printer Drivers
This is an example procedure demonstrating how to set the printer Drivers to deliver a
stapled print job with the staples in the position you choose.
To set up a one-copy Duplex (two-sided) print job on plain, letter paper, in
Portrait orientat ion that is stapled on the Left Center and collated, press the Properties
button in the Print Setup screen to access the Driver Document dialog box, then:
1. In the Paper Type field, select Plain from the available options.
2. In the Paper Size field, select Letter from the available options. Your selected
paper size is displayed on the upper-right side of the dialog box.
3. In the Paper Source field, select Autoselect from the available options.
4. In the Orientation field, select Portra it from the av ailable options.
5. In the Duplex field, select Book from the available options.
6. In the Copies field, enter 1.
7. In the Output Tray field, select A utoselect from the available options.
Printing and Paper Handling 3-27
Page 88

8. In the Stapling field, select the desired stapling position from the available
options, which vary depen ding on the pa per size an d orienta tion sele cted. A visua l
confirmation of the stapling location is provided in the Driver window.
The example uses the Left Center Stapling position.
NOTE
:
If the Stapling icon is Green, there are staples in the staple cartridge.
If it is Red, it is e mpty. The icon appears on the dial og b ox onl y if you cl ick
the Refresh button. The Refresh button is available only if you are
connected to a network.
9. Select (check) the Collate field.
10.If you want to use Printer Monitor, select the Monitor Job Status field.
3-28 Printing and Paper Handling
Page 89

Selecting Stapling Positions From the Operator Control Panel
The Finisher has three stapling positions selectable at the OCP Configuration menu:
Top
Feed Direction
Top
Center
Bottom
LEF SEF
NOTE: The Center staple position uses 2 staples.
On A3 and A4 LEF sheets, the Bottom position staples at 45o.
Center
Bottom
LEF
SEF
Portrait
Landscape
Y ou may select the position of the staple s relative to the image orie ntation on the printed
page. For example, th e plac ement of a sta ple on a Long Edg e Fe ed (LEF) pag e may be
T op Ce nter, yet the same physical pl acement on a Sh ort Edge F eed (SEF ) p age may be
Left Center.
T o set the pr inter OCP to de li ver a s taple d pri nt job wit h the s taple s in t he positi on you
choose, first you select the paper source and paper size from the OCP, as follows:
1. Press the Online key to set the printer offline.
2. Press the Menu key to enter the menu structure.
3. Press the
Next (forward) or Previous (back) key until the Configuration menu
appears.
Configuration
Paper Source
NOTE
:
The asterisk indicates that the option is the default.
4. Press Enter. The Paper Source menu values appear.
Paper Output
Face down tray
5. Press Next until Finisher is displayed and then press Enter to select it.
Paper Output
Finisher
6. Press Enter to display the Finisher options.
Finisher
Bin
7. Press Next until the Staple option is displayed. Select Staple and press Enter.
Finisher
Staple
Printing and Paper Handling 3-29
Page 90

8. Press Next until th e Stapli ng position s are displa yed. Selec t the staple position and
press Enter.
Staple
Center
NOTE
:
You may also set your stapling positi ons from the Drivers Document
dialog box. (See page 3-27.)
3-30 Printing and Paper Handling
Page 91

Digital printCopy Feature
The Digital printCopy (DpC) option:
■ Allows you to print multiple, collated copies of a document with one single data
transfer of the Job to the printer.
NOTE
:
A DpC feature is activated whenever multiple copies are requested by the
Driver or application. In Windows 3.1 only, if the application provides a
“collate” feature, the option needs to be turned off in order for DpC to
function.
■ A DpC job starts printing when the first page in a Simplex Job (or the first two
sides of a Duplex Job) has been spooled to the disk.
■ DpC is supported through al l Interfaces and is supported for PostScript Fax Jobs.
■ You can switch between collated and noncollated copies on a job-by-job basis,
using the Collate button from the Drivers dialog box.
■ If the size of the print Job e xceeds the DpC disk c apaci ty, a function called Chun k-
ing is invoked. With Chunking, print data is s pooled until the DpC dis k is fu ll. The
Job is, therefore, printed in chunks, with all collated copies of the first chunk followed by all collated copies of the next chunk in succession.
■ Concurrency is supported. While printing a DpC Job, other DpC Jobs, Fax Jobs
and Scanner Jobs can be received, processed and spooled to disk.
Printing and Paper Handling 3-31
Page 92

Print Request Exceptions
When the print job can not be del ivered to the requested output device, the pr inter redirects the job to t he appropr iate one . The tabl e below sh ows the pr int request e xceptions
only. Other print jobs are processed as requested.
Request Output
Trayless Duplex Simplex
Staple Unstapled
If the tray is not i ns tall ed , t he job is flushed. If the tray
Specifie d tray
Specifie d size
Specifie d type
has an error , the printer waits until the error condition
is cleared before printing. This is applicable to both
PostScript and PCL
Scale to the best fit available paper, or choose to be
notified to load paper or print on closest availa ble size
(may be clipped).
Use Best fit enabled, where th e printer p icks the p age
type that is closest to the requested page type in the
list of priority, and scales the job to print on that page
or choose to be notified.
Specifie d bin full
For Trayless Duplex and for an envelope, SuperB or
custom paper size
For Trayless Duplex and the label or transparency
media types
Stapling, Jogging, with media types, label and transparencies.
For staples when staple cartridge runs out
For Face-up and any finisher options
For Face-up and jogging Does not jog.
NOTE
:
Cascades to next bin or no tifies op erator to e mpty the
bin.
Use the requ ested size and print the job in simplex.
Pull from correct source and print the job in simplex.
Will not be stapled and jogged.
A warning is issued. The job will print to the
requested Finisher bin unless the staple ca rtridge has
been removed, in which case the job will be sent to
the Face-down tray.*
The finishing options are honored and the face-up
request is ignored.
*The Face-down tray does not support stapling.
3-32 Printing and Paper Handling
Page 93

What This Chapter Contains
This chapter explains how to use the Fax application.
NOTE
:
When viewing this user’s guide online, click on the page references in
parentheses below to go to the page numbers cited.
The topics include:
■ Fax Options (See page 4-2.)
■ Enabling and Disabling fax (See page 4-3.)
■ Setting up Fax (See page 4-4.)
■ Faxing a Document (See page 4-5.)
■ Using the Phone Book (see page 4-8
Chapter 4
Using the Fax
■ Using QuickFax (see page 4-12))
NOTE
:
Fax is not available in PCL.
Using the Fax 4-1
Page 94

Fax Options
The Fax application al lows you to enab le the pr inter to send a schedul ed fax job i n two
fax formats as follows:
■ Normal: fax to a remote Fax machine using the CCITT Group 3 Fine or Standard
(G3) format.
■ Postscript: fax to another DDS printer in the Postscript format.
PostScript Fax provide s a means of transf erring the document in a PostS cript fo rmat to
another DDS type printer. A document exactly like the one th at woul d appear at the lo cal printer is produc ed at the remot e printer. Postscript Fax supports a high resolution.
It also supports printing functions such as stapling, duplexing, collation, and Digital
printCopy (DpC) on the remote printer.
Select the fax for mats using the Format field of t he Recipient di alog box. The Recipi ent
dialog box is explained in the following sections.
You can use the cover page and delayed faxing features with both formats.
NOTE
Y o u can use Fa x fr om the Dr ivers onl y if you have enabled Fax S ending on
the OCP (see Chapter 2 for more details.)
:
4-2 Using the Fax
Page 95

Enabling and Disabling Fax
To enable Fax using the Drivers,
1. Click on the Fax check box in the Document folder of the printer driver.
When you are in the application, the word Fax is appended onto the driver setup
dialog box title bar.
2. Once Fax is enabled, all documents are faxed rather than printed.
Fax Check Box
NOTE
:
If Fax is enabled and you choose to print rather than fax, enter the Fax
menu and leave the recipients field blank. To print, click Send. You can
also press the Cancel button to print instead of faxing.
Check the Local Copy box in the Fax dialog box, to print a copy of the
faxed document at the printer that has sent the fax request.
To disable Fax,
1. Click on the Fax check box to clear it.
2. Once the Fax check box is disabled, all the documents are printed.
Using the Fax 4-3
Page 96

Setting Up Fax
The Fax Settings dialog box allows you to enter the send er’s details and to main tain the
phone book. The sender’ s settings a ppear on the cov er page. To access the Fax Settings
dialog box,
1. Click the Properties button from Printer Setup.
2. Click the Fax Settings button to open the Fax Settings folder.
The settings you enter are st or ed as the defa ult val ues on your system and can be used
across applicati ons. To fax a document, the pr inte r driv er must fi rs t be ena bled f or Fax
via the Document folder, Fax check box.
4-4 Using the Fax
Page 97

Faxing a Document
Once the Fax check box is enabled in the Document folder of the Drivers window, all
printed documents are processed by the Fax subsystem and sent to any selected recipients. If no recipients are selected, or if you press the Cancel button, the document is
printed.
After selecting OK to print a job from an application, the main Fax dialog box is displayed as shown in the fi gure below. In this dialog box, you may select recipients and
configure all aspects of the Fax operation, including delivery dates and time.
Using the Fax 4-5
Page 98

To Fax,
1. Select recipients from the displayed phone book list by clicking the check box to
the left of the recipient’s name, or manually supply an address via the Q uickFax
menu. (See “To send a Fax using QuickFax,” o n page 4-12.) The system supports
multiple phone books. I f the curr ent pho ne book i s not suita ble, yo u may pre ss th e
PhoneBook button to se lect another.
NOTE
:
If no recipient names are displayed in the phone book and if the New
Recipient button is grayed out , then you must cr eate a new phone book l ist.
(See “Creating a Phone Book File” on page 4-10.)
2. Optionally, you can choose to include a cover page in the Cover page dialog box
that opens when you click the Cover Page button in the Fax dialog box. Select a
cover page from a list which includes the printer’s default cover page, any user
supplied custom file s or none. The c over page a llows you to add text as a memo t o
be included on the cover page present below the sender and recipient information.
3. Optionally, you can delay the delivery time. The Delay button di splays a dialog
box from which you select the date and time for delivery.
4. If all the information is correct, click on the Send button and the document is
transferred to the printer for delivery.
5. The Fax settings remain constant across all applicat ions. If you wish to change the
fax settings, clic k the Options butt on. A dialog box similar to the Fax Sett ings dia-
log box appears. This information is used in the generation of the cover page.
4-6 Using the Fax
Page 99

Creating a Custom Cover Page
■ Create your custom cover page document in any word processing application.
Save the file.
■ Click Print. The Print Setup dialog appears.
■ Click Properties. The Drivers window appears.
■ Click the Job Options folder.
■ Select Fax Cover Sheet from the ‘Out put to’ fiel d. The Save as dial og box appears
allowing you to save the cover page as a postscript file with a *.ps extension.
NOTE
:
Refer to the ONLINE HELP for information on using “template strings”
in the cover page.
Using the Fax 4-7
Page 100

Using the Phone Book
You can manage a list of recipient a ddresses in one or many phone books, f or outgoi ng
faxes. Once you selec t a phone book, you can create new recipients or groups of recipients, and modify or delete existing ones.
The phone book can be edited from the:
■ Phone Book Button in the Fax Settings folder of the Drivers window.
(See page 4-4.)
■ Fax dialog box while sending a Fax. (See page 4-5.) The Phone Book portion of
the Fax dialog box, is shown below.
■ Standalone Phone Book application. Click this icon from the
Printing System folder to open the Phone Book dialog box.
■ Use the check box next to the re cipient to select one or more re cipients. If no
recipient is selected, the document will be printed, not faxed.
■ Use the View By drop box to change the phone book display. View By allows you
to view the list of recipients and sort them by either first name, last name, or company name (shown below).
■ Click the Show radio button to display all phone book entr ies or only those
selected for the current Fax.
■ Click Find to find a recipient.
■ Click New Recipient to add new phone book entries. The Recipient dialog box
opens when you click this button.
■ Click New Group to add new groups of entries.
■ Click Select Phone Book to select a phone book. If none is selected, you must
enter the directory location for the Phone Book.
■ Select phone book entries to enable the Edit or Delete buttons to use to modify or
remove specified entr ies.
4-8 Using the Fax
 Loading...