

Page 1

Publishing Finisher
User’s Guide
© 2004 Ricoh Printing Systems America, Inc.
2635-A Park Center Drive
Simi Valley, CA 93065
October 2004
337466-003, Revision A
Page 2

© 2004 Ricoh Printing Systems America, Inc. All rights reserved.
No part of this document may be reproduced without the express permission of Ricoh
Printing Systems America, Inc.
The material in this document is for informational purposes and is subject to change
without notice. Ricoh Printing Systems America, Inc., assumes no responsibility for
errors or omissions in this document. No liability is assumed for any damages resulting
from the use of the information it contains.
TRADEMARK
Digital Document Publisher, DDP, DDP 70, DDP 70e, DDP 92, DDP 184, and their
associated logo marks are trademarks of Ricoh Printing Systems America, Inc. All
rights reserved.
All other terms and product names may be trademarks or registered trademarks of their
respective owners, and are hereby acknowledged.
NOTICE TO USER
In an effort to meet the demands of a rapidly changing technology, the manufacturer is
continually developing new features and functions to meet your changing printing or
printer needs. As a result, this manual may not exactly reflect future changes made to
the product. Please be sure to consult all manual updates or addenda when using this
product’s documentation.
Page 3

Safety Precautions
- The signal word WARNING indicates a potentially hazardous situation which, if not
avoided, could result in death or serious injury.
- The signal word CAUTION indicates a potentially hazardous situation which, if not
avoided, may result in damage of machines. It may also be used to alert against unsafe
practices.
- Read and understand all safety instructions with signal words such as WARNING and
CAUTION. If safety instructions are ignored, personal injury may result.
- All equipment shall be locked out or tagged out to protect against accidental or
inadvertent operation when such operation could cause injury to personnel. Do not
attempt to operate any switch, valve, or other energy isolating device where it is locked
or tagged out.
- Do not operate the machines when any covers are removed.
- Keep your hands and fingers off any moving parts during operation. Moving parts can
cause severe personal injury.
- Some of the drawings in this manual show the machine uncovered for explaining the
detail or inside of machine.
iii
Page 4

iv
Page 5

CONTENTS
Safety Precautions ......................................................................................................iii
1. How the Publishing Finisher Works ...................................... 1
1-1 Making Booklets ..................................................................................................1
1-2 Transport Sheets to the Advanced Finisher .........................................................2
1-3 Sheet Folding and Punching Options...................................................................3
2. Machine Description ............................................................... 5
2-1 Unit Description................................................................................................. 5
2-2 Staple Section / Sheet Accumulate Section ........................................................6
2-3 Sheet Inserter 1,2 ................................................................................................ 7
2-4 Booklet Stacker ...................................................................................................8
3. Making Booklets ..................................................................... 9
3-1 Power On ............................................................................................................. 9
3-2 Sheet Preparation .................................................................................................9
3-3 Booklet Stacker Preparation ................................................................................ 11
3-4 Printer Preparation ...............................................................................................11
3-5 Submit Print Job................................................................................................... 11
3-6 Remove Booklets .................................................................................................12
4. Troubleshooting ....................................................................... 13
4-1 Error Messages .................................................................................................... 13
4-2 Removing Jammed Sheets ................................................................................... 16
4-2-1 Interface Section .............................................................................................16
4-2-2 Sheet Inserter 1,2 ............................................................................................ 17
4-2-3 Sheet Entrance Section ................................................................................... 17
4-2-4 Staple Section .................................................................................................18
4-2-5 Fold Section For Stapled Sheets ..................................................................... 19
4-2-6 Trim Section ...................................................................................................20
4-2-7 Finisher Delivery Section ...............................................................................21
4-2-8 Transport Gate Section ................................................................................... 21
4-2-9 Delivery Path of Sheet Inserter 1,2 ................................................................22
v
Page 6

4-3 When Sheet Jams Occur Frequently .................................................................... 23
4-4 When Cover or Guide is Open............................................................................. 24
4-5 When Staples Run Out ......................................................................................... 25
4-6 When Staple is Jammed .......................................................................................27
4-7 When Trimming Trash Box Is Full...................................................................... 28
4-8 When Fold Line is Not Aligned ........................................................................... 28
4-9 When the Fold and Stitch Line Are Not Aligned ................................................29
4-10 When the Fore-edge is Not Trimmed Completely............................................. 29
4-11 When the Fore-edge is Not Trimmed At All .....................................................29
4-12 When the Sheet is Not Folded ........................................................................... 29
5. Cleaning .................................................................................... 31
5-1 Cleaning the Sheet Transport Path....................................................................... 31
Appendix ...................................................................................... 33
A-1 Specifications ......................................................................................................33
A-2 Consumables ....................................................................................................... 34
vi
Page 7
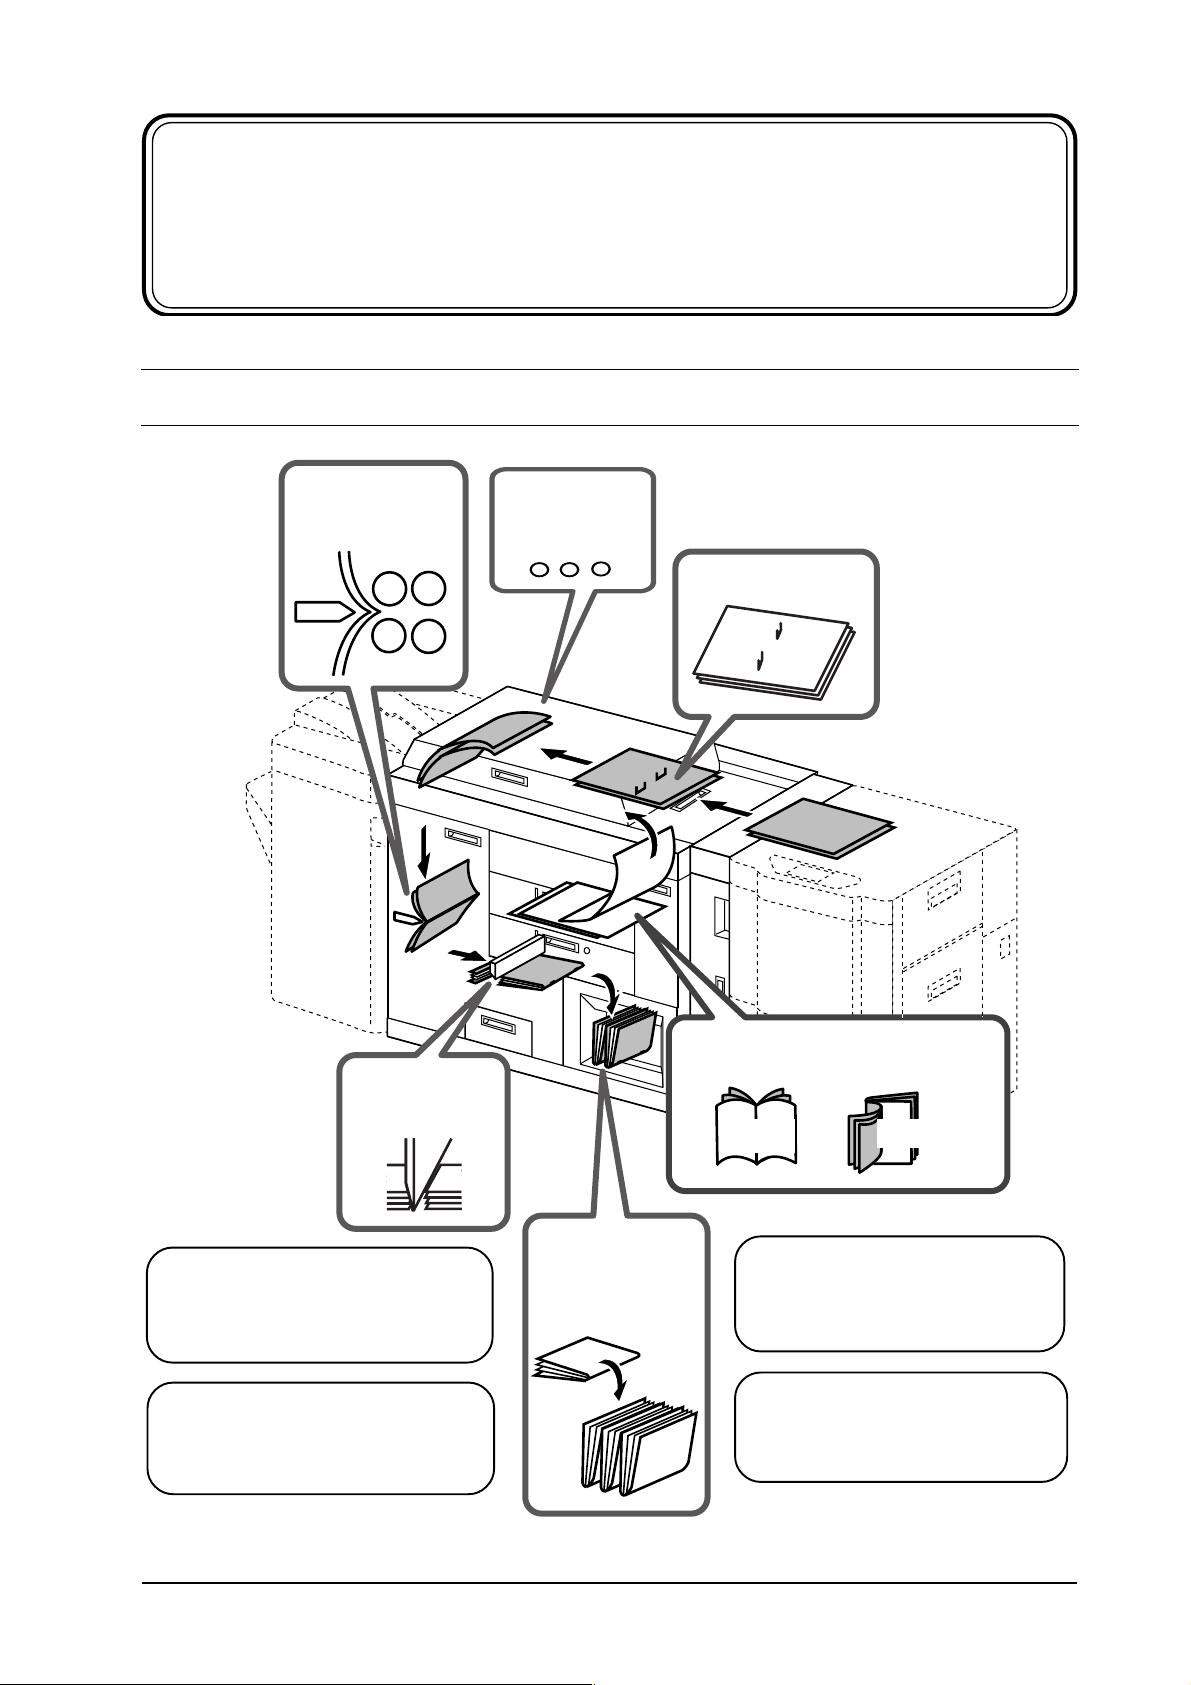
1. How the Publishing Finisher Works
This section shows how the Publishing Finisher works.
1-1 Making Booklets
4. Fold stapled
sheets in half.
5. Trim fore-edge
of booklet.
1
3. Punch sheets
(optional).
2. Staple stacked
sheets.
1. Insert cover or insert sheet into
stacked sheets.
Cover
Insert Sheet
Definition
Staple
To staple in the middle of sheets.
Definition
Insert sheet
A sheet inserted into stacked sheets.
1
Unstapled sheets can be folded with DDP 92 only.
6. Stack finished
booklet.
Definition
Fold
To fold stapled sheets in half.
Definition
Trim
To cut the fore-edge of a booklet.
1
1
Page 8

1-2 Transport Sheets to the Advanced Finisher
Printed sheets that will not be made into
booklets are transported to the Advanced
Finisher.
2
Page 9
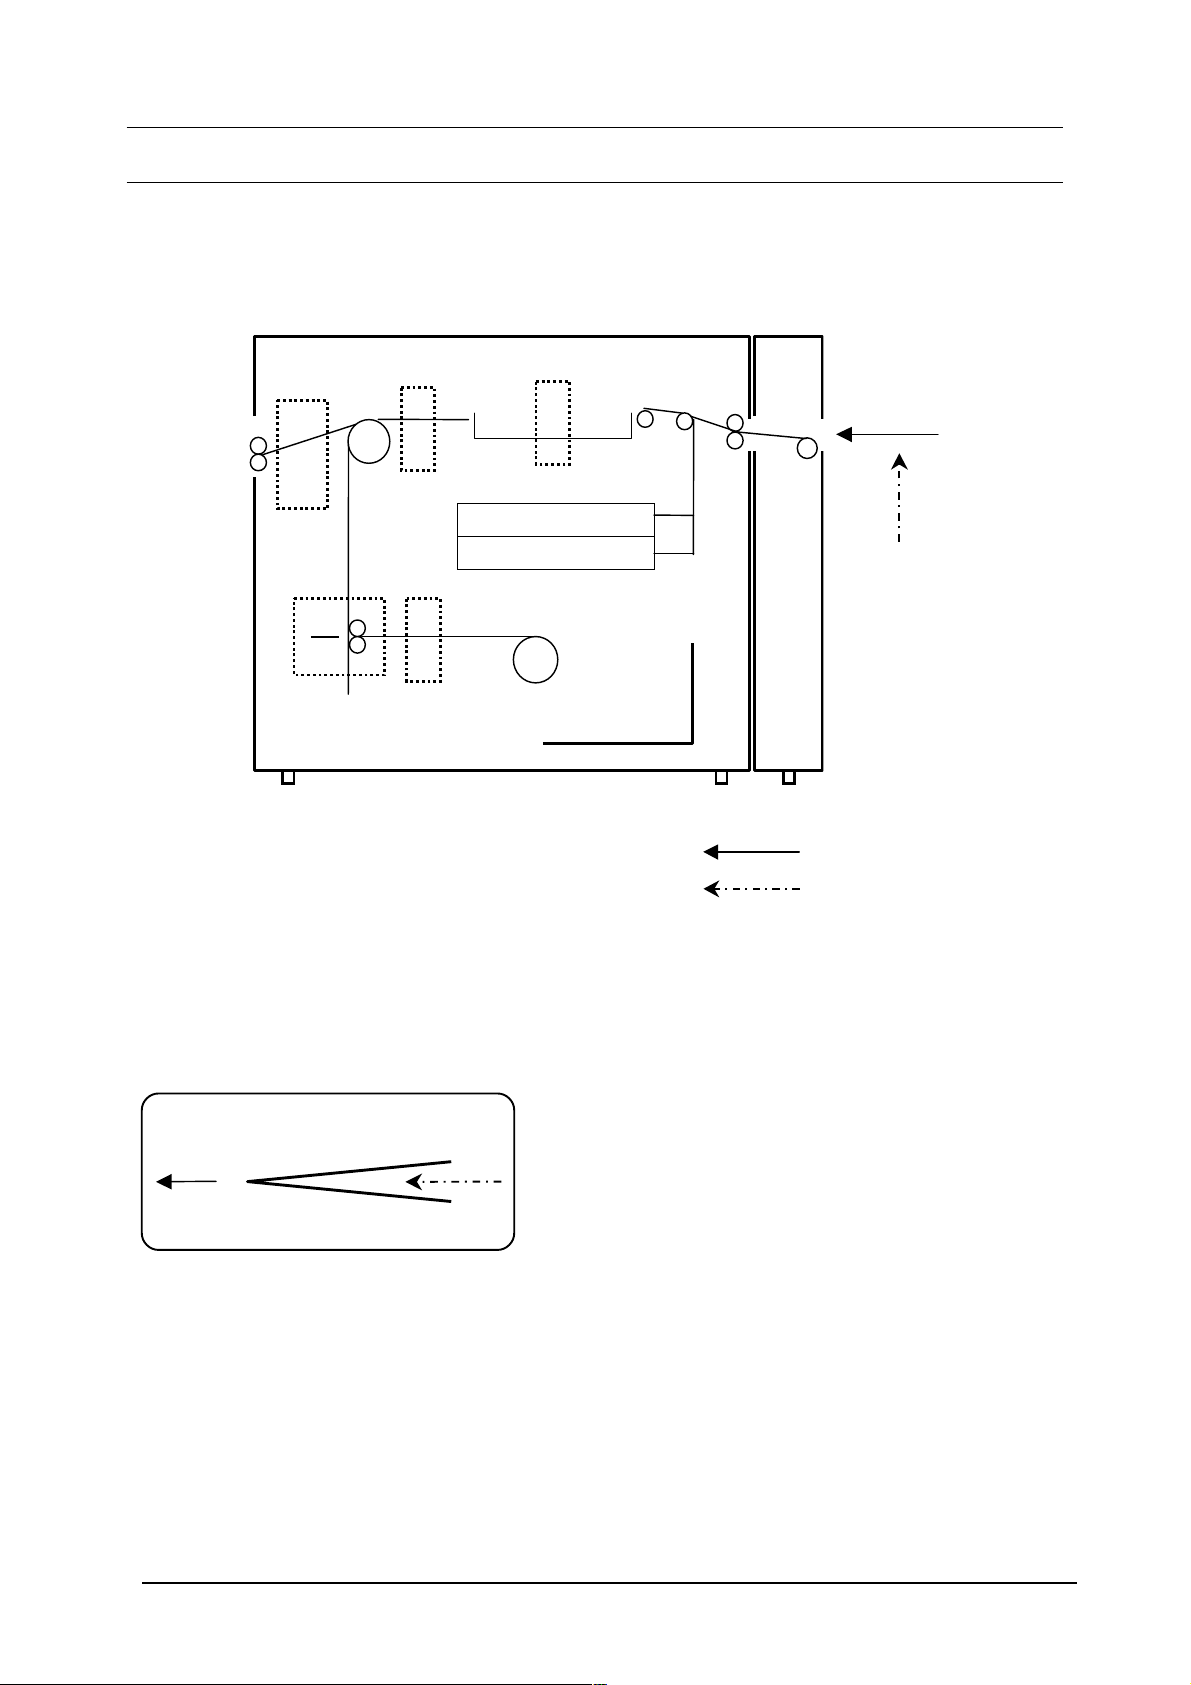
1-3 Sheet Folding and Punching Options
The diagram below shows the location of the
folding and punching options,
sheet paths of the Publishing Finisher.
as well as the
Fold
Center
Fold
Punch
Trim
Staple
Sheet from printer
Sheet Inserter 1
Sheet Inserter 2
Booklet Stacker
Sheet feed direction.
Printing surface.
The folding capability of the Publishing
Finisher is illustrated below.
Center Fold
3
Page 10

4
Page 11

2. Machine Description
This section shows and describes the parts of the Publishing Finisher.
2-1 Unit Description
Transport Gate Section
Single sheets are sent to the Advanced
Finisher and stapled booklets are
transported to the fold section.
Fold Section for Stapled Sheets
The stapled sheets are folded.
Sheet Accumulate Section
Sheets from the printer are
accumulated and arranged.
Staple Section
A set of sheets is stapled.
Sheet Entrance Section
The sheets delivered from the
printer are received.
Sheet Inserter 1,2
The insert sheets are fed to the sheet
accumulate section and merged with the
sheets from the printer.
Trim Section
The fore-edge of the booklet
is trimmed.
Booklet Stacker
The trimmed booklets are
stacked.
Interface Section
This section connects the printer and
Publishing Finisher. The sheets from the
printer are transported to the Publishing
Finisher.
5
Page 12
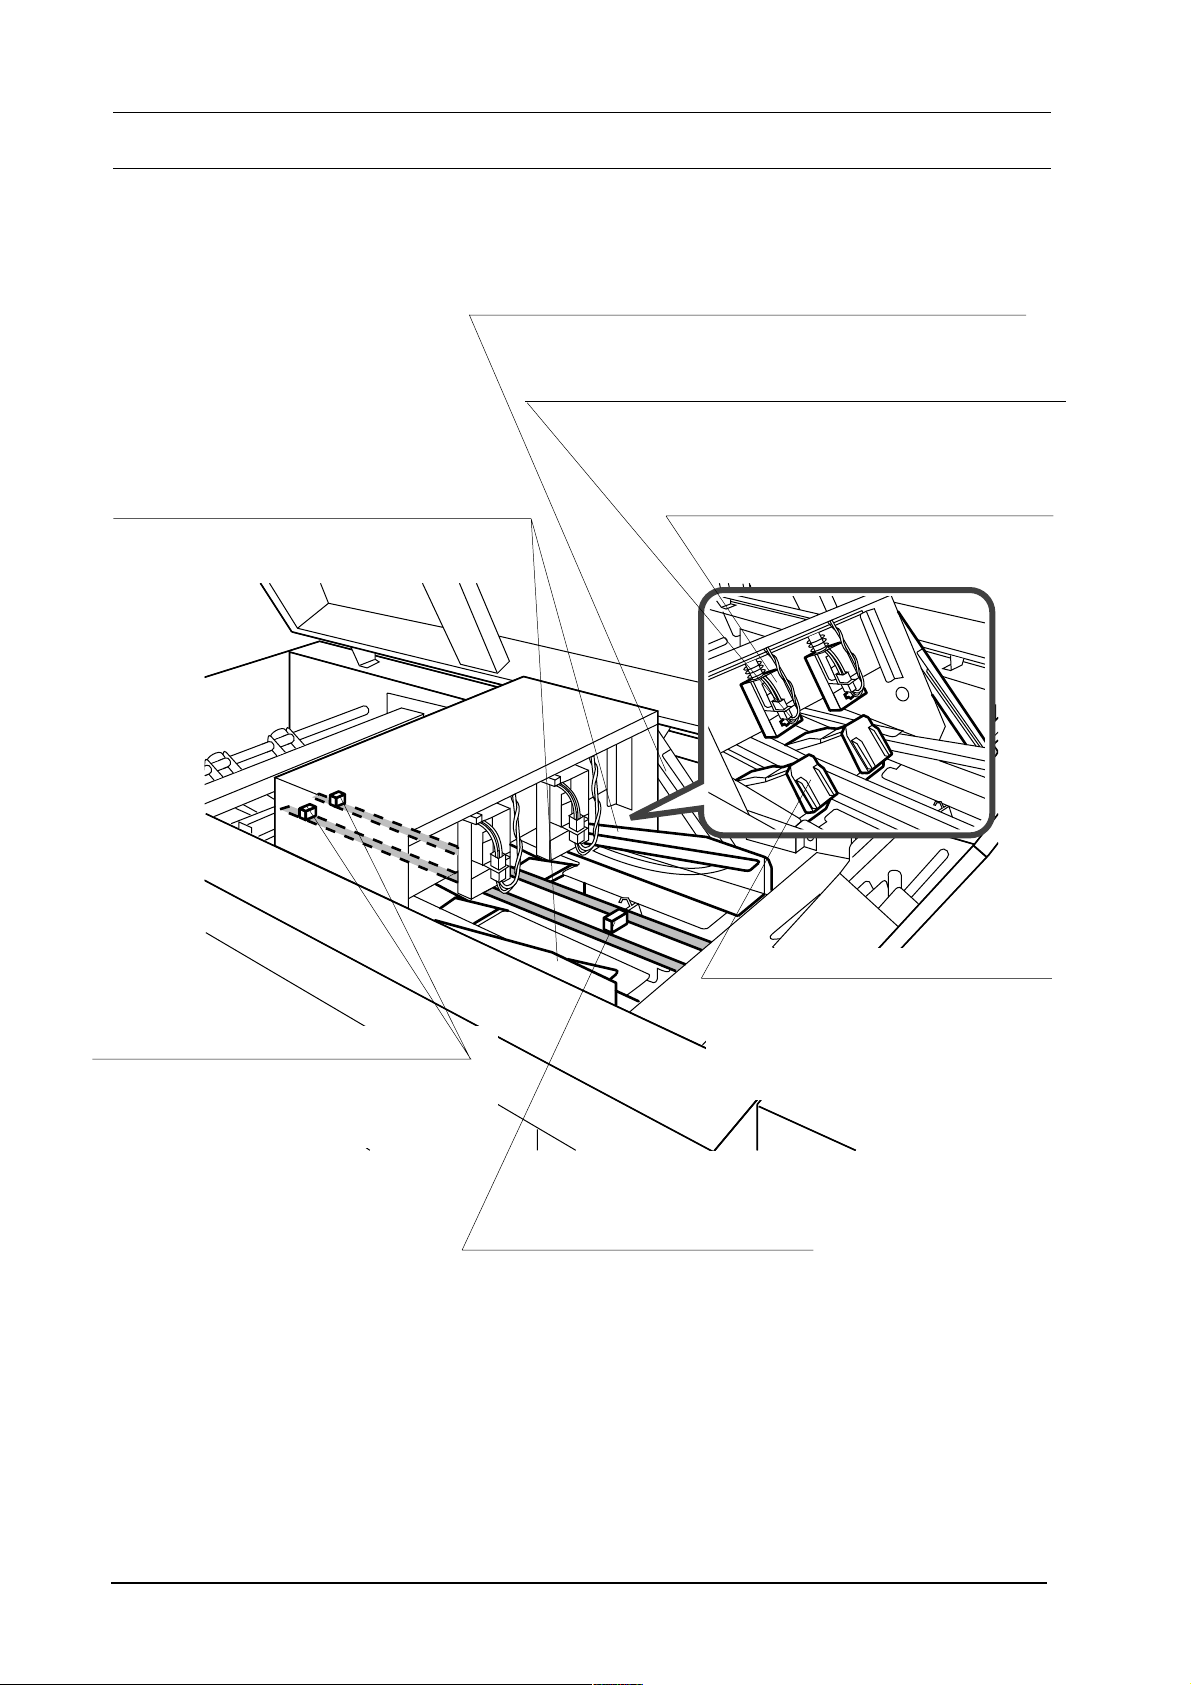
2-2 Staple Section / Sheet Accumulate Section
Stay
This stay is used to hold the staple section when it is tilted.
Staple Eject Lever
This lever is used to remove a staple jammed
inside of the clincher.
Jog Guide (Operation side and drive side)
Jog sheets at top and bottom sides.
Head Stoppers
These stoppers are used to jog
accumulated sheets.
Clincher
This clincher is used to press the
staples stitched out from the booklet.
Staple Cartridge
There are 5,000 staples in the
cartridge. When the cartridge is
empty, it can be replaced.
Transport Hook
This stopper is a pair with the head
stoppers and is used to jog sheets in
the sheet accumulate section.
6
Page 13
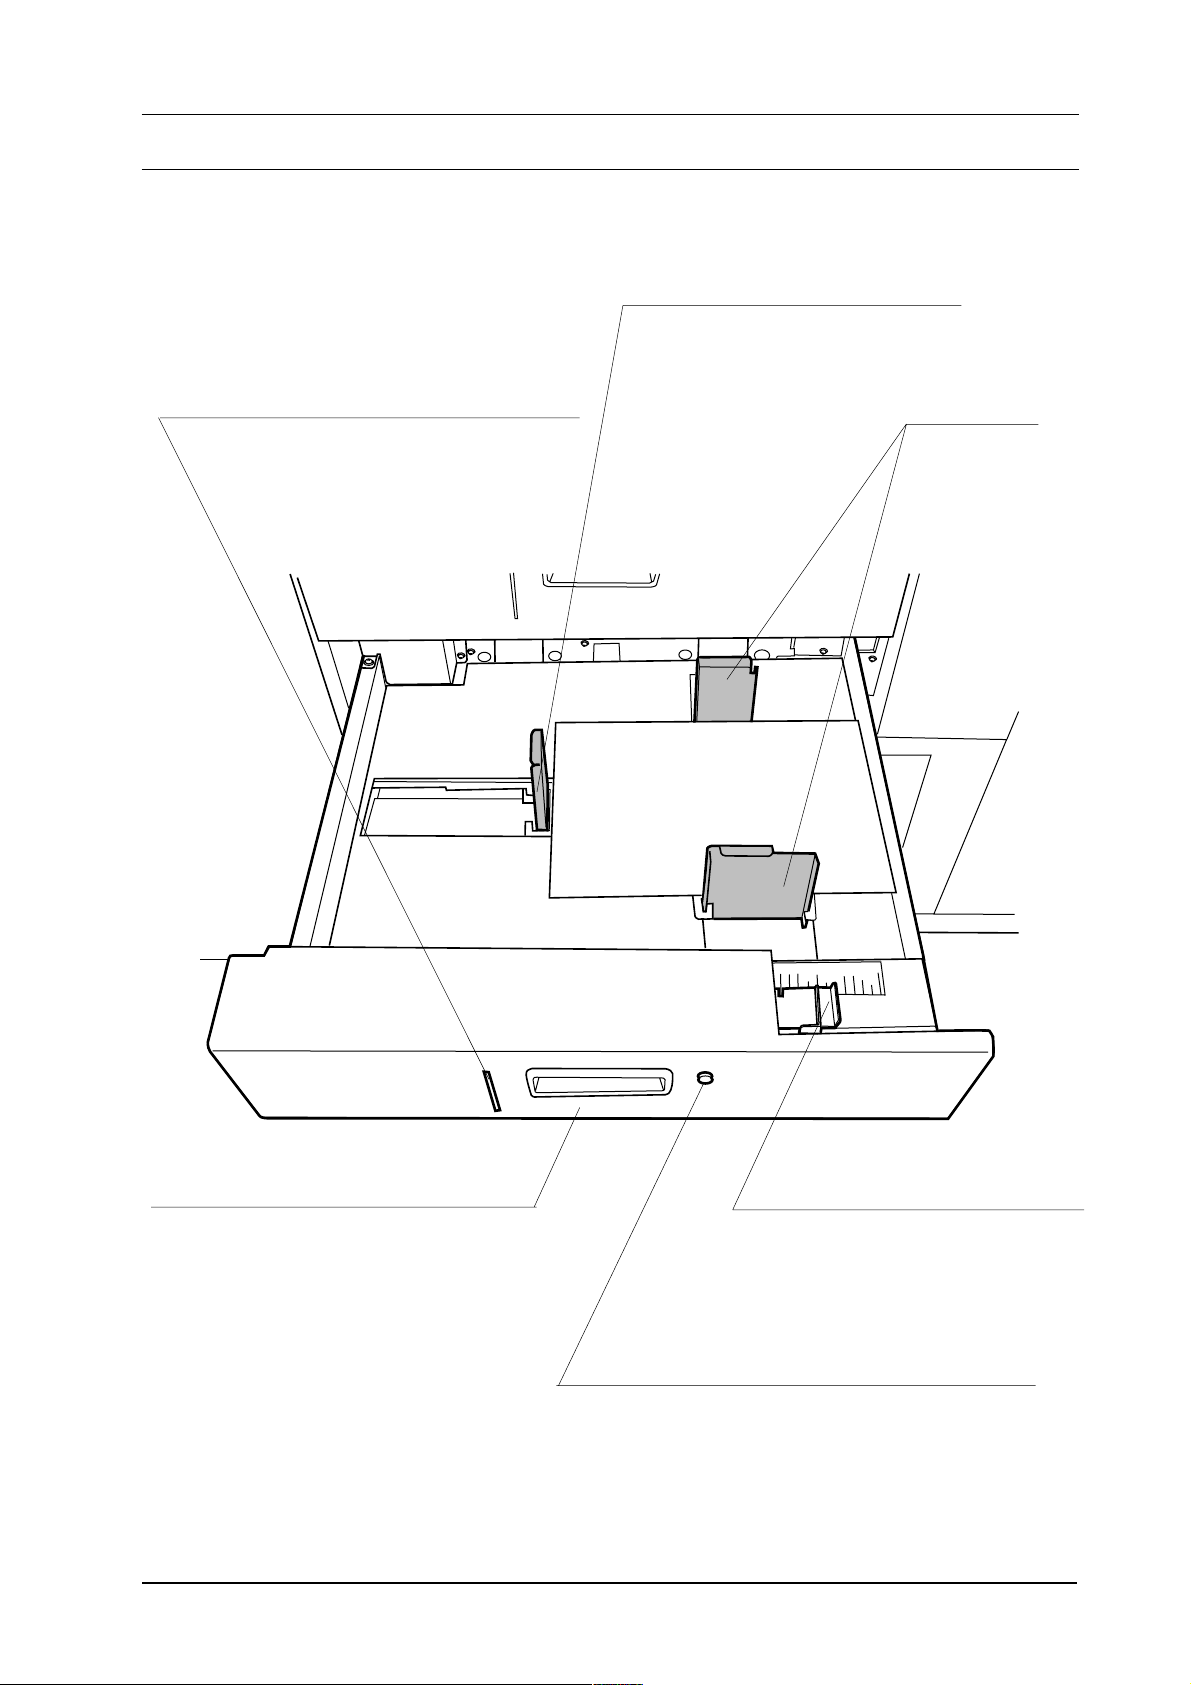
2-3 Sheet Inserter 1,2
End Fence
This is set according to sheet size.
Sheet Level Check Window
This window is used to check the level of
sheets in the sheet inserter.
Side Guide
Sheet Inserter 1,2
This tray is used to feed the cover or insert
sheets. The sheets in this tray must be the
same size as the sheets fed in the printer.
Sheet Size Lever
This lever is set according to the sheet
size in the sheet inserter.
Feeding Lamp
This lamp illuminates when sheets in the sheet
inserter tray are feeding or are ready to be fed. The
sheet inserter tray cannot be opened.
7
Page 14

2-4 Booklet Stacker
Stopper
This stopper is used to stack the trimmed
booklets.
Stopper Release Lever
Push the stopper release lever to move the stopper
to the left.
8
Page 15

3. Making Booklets
This section shows how booklets are made.
3-1 Power On
Turn on the printers power switch.
-This turns on power to the Publishing
Finisher and Advanced Finisher.
Power switch
Advanced Finisher
Publishing Finisher
Printer
3-2 Sheet Preparation
The following sheet sizes and weights can
be fed from the sheet inserter trays.
Sheet Size
A4
7.3" x 10.5" (185.4 x 266.7 mm)
8.5" x 11" (215.9 x 279.4 mm)
8.5" x 14" (215.9 x 355.6 mm)
11" x 17" (279.4 x 431.8 mm)
11" x 8.5" (279.4 x 215.9 mm)
Maximum size (Width X Length)
12" x 18" (305 x 457 mm)
Minimum size (Width X Length)
7.2" x 10.1" (182 x 256.5 mm)
, A3 , B4
Make sure the feeding lamp is not
illuminated.
-Do not open the sheet inserter
tray while the feeding lamp is on.
Open the sheet inserter tray.
Feeding Lamp
Sheet Inserter Tray
Insert sheet weight range
16 lb. to 53 lb.
9
Page 16

3-2 Sheet Preparation
Fan sheets well and set sheets in tray.
3
-Do not load sheets higher than
the Max line on side guide.
Max Line
Set side guides and end fence according
to sheet size.
4
Side Guide
End Fence
Side Guide
Set sheet size lever according to sheets
set on inserter tray.
5
-Pinch sheet size lever and slide it left or
right to the appropriate size.
Sheet Size Lever
- The Publishing Finisher trays
and the Printer trays must both
be set for either a Standard/
Special setting or a Custom
setting.
In some instances the paper size
settings in the Publishing
Finisher trays and the Printer
trays do not match. For
example: Letter (SEF) can be
selected in the Publishing
Finisher trays, but there is no
Letter (SEF) setting in the
Printer paper trays. In this case,
the Printer paper tray should be
set at the Special (triangle)
setting and Letter (SEF) should
be selected from the Printer
menu on the OCP or WEB page.
In this type of situation, it is
never correct to use the Custom
setting on the OCP or WEB
page.
10
Page 17

Close sheet inserter tray completely.
6
Sheet Inserter Tray
11
Page 18

3-3 Booklet Stacker Preparation
Push the stopper release lever and move
the stopper to the far left.
Stopper
Stopper Release Lever
3-4 Printer Preparation
See the documentation for the printer.
3-5 Submit Print Job
Submit print job from the printer.
-The printed sheet is delivered to
Publishing Finisher to be stapled,
folded, trimmed, and stacked side by
side in the booklet stacker.
12
Page 19

3-6 Remove Booklets
When the booklet stacker is full, the printer
and Publishing Finisher stop operating. An
explanatory message is displayed on the
printer.
Remove the booklets from the booklet
stacker.
Booklets
[Booklet Stacker]
Push the stopper release lever and move
the stopper to the far left.
Stopper
Stopper Release Lever
13
Page 20

4. Troubleshooting
This section provides troubleshooting guidelines.
4-1 Error Messages
OCP Line 1
Invalid Booklet Clear Paper Path Clear paper path. The system cannot create the
Invalid Booklet Cancel Job Correct the error or
Call for Service Exxx Contact your
Out of PF Rear
Out of PF Front
Inserter 1 Open C lose Tray E025 Close tray. Insert tray 1 is open.
Inserter 2 Open C lose Tray E026 Close tray. Insert tray 2 is open.
Booklet Staker
Paper Full
Trimm ing Trash
Box Full
Trimm ing Trash
Bo x No t S et
PF Front Cover R
Open
PF Front Cover L
Open
PF Front Cover C
Open
PF Top C over L
Open
PF Top C over R
Open
Entrance Paper
Guide Open
Inserter Guide 1
Open
Staple
Staple
Rem ove Paper E027 Rem ove paper. Stacker 4 is full.
Clean Trash Box E028 Rem ove trash. The trimming trash box is full.
Check Trash Box E02F Set trash box The trash box is not set in the
Close Cover E030 Close cover. Front Cover R of the Publishing
Close Cover E031 Close cover. Front Cover L of the Publishing
Close Cover E032 Close cover. Front Cover C of the Publishing
Close Cover E033 Close cover. Top Cover L of the Publishing
Close Cover E034 Close cover. Top Cover R of the Publishing
Close Guide E035 Close guide. The guide of entrance path 1 in the
Check Guide E036 Close guide. The upper guide of the inserter in
OCP Line 2
Error
Code
cancel job.
authorized Service
Technician and
provide the error code
displayed on the OCP.
E01B Replace the staple
cartridge.
E01C Replace the staple
cartridge.
Remedy
booklet. The remaining paper
needs to be removed.
The system cannot create the
booklet. Job needs to be canceled.
Any Call for Service error message
requires a service call for problem
resolution. Exxx is the error code.
The staples in the rear stapler of the
Publishing Finisher have run low.
The staples in the front stapler of
the Publishing Finisher have run
low .
Publishing Finisher.
Finisher is open.
Finisher is open.
Finisher is open.
Finisher is open.
Finisher is open.
Publishing Finisher is open.
the Publishing Finisher is open.
Description
13
Page 21

A pap
4-1 Error Messages
Inserter G uid e 2
Open
Fold ing Guid e 1
Open
Fold ing Guid e 2
Open
Paper in
Co n n e ctin g Un it
Paper in PF
Entrance
Paper in PF Stapler Rem ove Pa per E075 R em ove pa per. A paper in the stapler entrance path
Paper in PF Stapler Rem ove Pa per E076 R em ove pa per. A paper in the stapler unit of the
Paper in PF Folder Rem ove P aper E077 Remove paper. A paper in the folding unit of the
Paper in PF
Trimmer
Paper in PF Exit Rem ove Pa per E079 R em ove pa per. A paper in the exit path of the
Paper in PF
Puncher
Paper in PF
Inserter 1
Paper in PF
Inserter 2
Paper Jam PF
Stapler
Pape r Jam Inse rter 1 Rem ove Pa per E1E0 Rem o ve paper. A paper was not fed from insert
Pape r Jam Inse rter 1 Rem ove Pa per E1E1 Rem o ve paper. A double feeding occurred in insert
Pape r Jam Inse rter 1 Rem ove Pa per E1E2 R em ove paper. A paper jam occurred in insert tray
Pape r Jam Inse rter 2 Rem ove Pa per E1E5 Rem o ve paper. A paper was not fed from insert
Check G uide E 037 Close guide. The lower guide of the inserter in
Check G uide E 038 Close guide. The upper guide of the folding
Check G uide E 039 Close guide. The lower guide of the folding unit
Rem ove Pa per E073 R em ove pa per. A paper in the connecting unit of
Rem ove Pa per E074 R em ove pa per. A paper in the entrance path of the
Rem ove Pa per E078 R em ove pa per. A paper in the trimm ing unit of the
Rem ove Pa per E07A Rem ove paper. A paper in the punching of the
Rem ove Pa per E07B R em ove paper. A paper in inserter path 1 of the
Rem ove Pa per E07C R em ove paper. A paper in inserter path 2 of the
Rem ove Pa per E1D 4 Rem ove paper.
the Publishing Finisher is open.
guide in the Publishing Finisher is
open.
in the P u b lis h in g F i nis he r is o p en .
the Publishing Finisher needs to be
removed.
Publishing Finisher needs to be
removed.
of the Publishing Finisher needs to
be removed.
Publishing Finisher needs to be
removed.
Publishing Finisher needs to be
removed.
Publishing Finisher needs to be
removed.
Publishing Finisher needs to be
removed.
Publishing Finisher needs to be
removed.
Publishing Finisher needs to be
removed.
Publishing Finisher needs to be
removed.
er jam occ urred on the stapler
tray .
tray 1.
tray 1.
1.
tray 2.
14
Page 22

4-1 Error Messages
Pa pe r Jam Inserter 2 Rem ove Paper E 1E6 Rem ove paper. A double feeding occurred in insert
Pa pe r Jam Inserter 2 Rem ove Paper E 1E7 Rem ove paper. A paper jam occurred in insert tray
Paper Jam
Connecting Unit
Paper Jam PF
Entrance
Paper Jam PF
Stapler
Paper Jam PF
Stapler
Paper Jam PF
Folder
Paper Jam PF
Trimmer
Paper Jam PF E xit R em ove Paper E 1F0 R em ove paper. The paper did not get to the exit
Paper Jam PF
Puncher
Paper Jam
Connecting Unit
Paper Jam PF
Entrance
Paper Jam PF
Stapler
Paper Jam PF
Stapler
Paper Jam PF
Folder
Paper Jam PF
Trimmer
Paper Jam PF E xit R em ove Paper E 1F8 R em ove paper. A paper jam occurred in the exit
Paper Jam PF
Puncher
Rem ove Paper E 1EA R em ove paper. The paper did not get to the
Rem ove Paper E 1EB Rem ove paper. The paper did not get to the
Rem ove Paper E 1EC Rem ove paper. The paper did not get to the stapler
Rem ove Paper E 1ED R em ove paper. The paper did not get to the stapler
Rem ove Paper E 1EE R em ove paper. The paper did not get to the folding
Rem ove Paper E 1EF Rem ove paper. T he paper did not get to the
Rem ove Paper E 1F1 R em ove paper. The paper did not get to the
Rem ove Paper E 1F2 R em ove paper. A paper jam occurred in the
Rem ove Paper E 1F3 R em ove paper. A paper jam occurred in the
Rem ove Paper E 1F4 R em ove paper. A paper jam occurred in the stapler
Rem ove Paper E 1F5 R em ove paper. A paper jam occurred in the stapler
Rem ove Paper E 1F6 R em ove paper. A paper jam occurred in the folding
Rem ove Paper E 1F7 R em ove paper. A paper jam occurred in the
Rem ove Paper E 1F9 R em ove paper. A paper jam occurred in the
tray 2 .
2.
connecting unit of the Publishing
Finisher.
entrance path of the Publishing
Finisher.
entrance of the Publishing Finisher.
unit of the Publishing Finisher.
unit of the Publishing Finisher.
trim m ing u nit o f th e P u blis hin g
Finisher.
path of the Publishing Finisher.
punching unit of the P ublishing
Finisher.
connecting unit of the Publishing
Finisher.
connecting unit of the Publishing
Finisher.
entrance of the Publishing Finisher.
unit of the Publishing Finisher.
unit of the Publishing Finisher.
trim m ing u nit o f th e P u blis hin g
Finisher.
path of the Publishing Finisher.
punching unit of the P ublishing
Finisher.
15
Page 23

4-2 Removing Jammed Sheets
4-2-1 Interface Section
Open Front Cover R.
Front Cover R
Open the entrance paper guide and
remove the sheet.
Entrance Paper Guide
Close the guide and cover.
-Close the entrance paper guide
completely after removing sheet.
-If the sheet jam message does not
disappear, a sheet is still jammed in
the other section. Remove the sheet.
16
-Open the delivery section of the
printer and remove the sheet.
Printer Side
Page 24

4-2 Removing Jammed Sheets
4-2-2
Sheet Inserter 1,2
Remove the sheet inserter tray.
Sheet Inserter Tray
4-2-3 Sheet Entrance Section
Open Top Cover R and remove the
sheet.
Top Cover R
Remove the jammed sheet inside the
sheet inserter.
Sheet
Replace the sheet inserter tray.
Close the cover.
17
Page 25

4-2 Removing Jammed Sheets
4-2-4 Staple Section
Open Top Cover L and Top Cover R.
Remove the jammed sheet.
Top Cover L
Top Cover R
Sheet
Close the top covers.
18
Page 26

4-2 Removing Jammed Sheets
4-2-5 Fold Section For Stapled Sheets
Open Front Cover L.
Front Cover L
Open guide 6,7 and remove sheets.
Close the guides.
-Close guides 6 ,7 completely after
removing sheet.
Close the cover.
-If sheet jams occur frequently,
the gap set between guides may
be too thin. Refer to Section 4-3.
Guide 6
Guide 7
19
Page 27

4-2 Removing Jammed Sheets
4-2-6 Trim Section
Open Front Cover L.
Front Cover L
-If the jammed sheet cannot be removed
or the transport belt comes off while
removing the sheet, follow the procedure
below to pull out the trim section. Be
very careful and do not touch the knife.
CAUTION
-Do not touch the trim section when it
is pulled out. The knife is very sharp
and can cause severe personal injury.
Remove the jammed sheet.
Sheet
Stopper
1) Remove stopper fixing screws.
2) Slowly pull out the trim section.
3) Remove jammed sheet or attach
transport belt.
4) Slowly push the trim section to original
position.
5) Attach stopper fixing screws.
Transport Belt
Knife
Close the cover.
20
Trim Section
Page 28

4-2 Removing Jammed Sheets
4-2-7 Finisher Delivery Section
Open Top Cover L.
Top Cover L
Open guide 8 and remove sheet.
4-2-8 Transport Gate Section
Open Top Cover L.
Top Cover L
Open guides 4, 5 and remove sheet.
-Close guide 8 completely after
removing sheet.
Guide 8
Close the cover.
-Close guides 4, 5 completely after
removing sheet.
Guide 5 Guide 4
Close the cover.
21
Page 29

4-2 Removing Jammed Sheets
4-2-9 Delivery Path of Sheet Inserter 1,2
Open Front Cover C.
Open guide 1,2 and remove sheet.
-Close guide 1,2 completely after
removing sheet.
Guide 1
Guide 2
Close the cover.
Front Cover C
22
Page 30

4-3 When Sheet Jams Occur Frequently
If sheet jams occur frequently in the fold
section for stapled sheets, the gap set between
guides may be too thin.
Open Front Cover L.
Guide 6
-If the sheets do not move smoothly,
pull out the trimmings box and turn
the guide adjust knob clockwise to
widen the gap between guides.
Front Cover L
Open guide 6 and place sheets between
the guides to check that the sheets pass
between the guides smoothly.
Guide 6
Trimming Trash Box
Guide Adjust Knob
23
Page 31

4-4 When Cover or Guide is Open
Symptom
Cover or guide is open.
1) Front Cover C
2) Front Cover L
3) Top Cover L
4) Top Cover R
5) Trimming trash box
6) Sheet Inserter Tray 1,2
7) Front Cover R
8) Entrance paper guide
Remedy
Close the cover or guide that is open.
3
4
6
2
5
6
8
1
7
24
Page 32

4-5 When Staples Run Out
Follow the steps below to replace the staple
cartridge.
Open Top Cover L.
Top Cover L
Lift the staple unit.
-Staple unit is held with stay 3.
Pull up on the staple cartridge.
-Approximately10 staples will be
left in the staple cartridge. They
cannot be used.
Staple Cartridge
Stay 3
Staple Unit
-When the staple unit interferes with
the jog guides, widen the jog guides
outward handling near the fulcrum
shaft.
Push the staples to the end of the cartridge.
Otherwise, the stapling function will not
work immediately.
End of the Cartridge
25
Page 33

4-5 When Staples Run Out
Push the new staple cartridge in until it
clicks.
Staple Cartridge
Place the staple unit back to the original
position.
1) Hold up staple unit with one hand.
2) Pull up stay 3 with the other hand.
3) Lower staple unit to original position.
Stay 3
Staple Unit
26
Close the cover.
Page 34

4-6 When Staple is Jammed
Follow the proedure below to remove a
jammed staple.
Open Top Cover L.
Top Cover L
Lift the staple unit.
-The staple unit is held with stay 3.
Stay 3
Press the staple eject lever and remove
any jammed staples.
[Staple Unit]
Staple Eject Lever
Place staple unit back to the original
position.
Staple Unit
Place a sheet under the unit to catch any
falling staples.
Sheet
1) Hold up staple unit with one hand.
2) Pull up stay 3 with the other hand.
3) Lower staple unit to original position.
Stay 3
Staple Unit
Close the cover.
27
Page 35
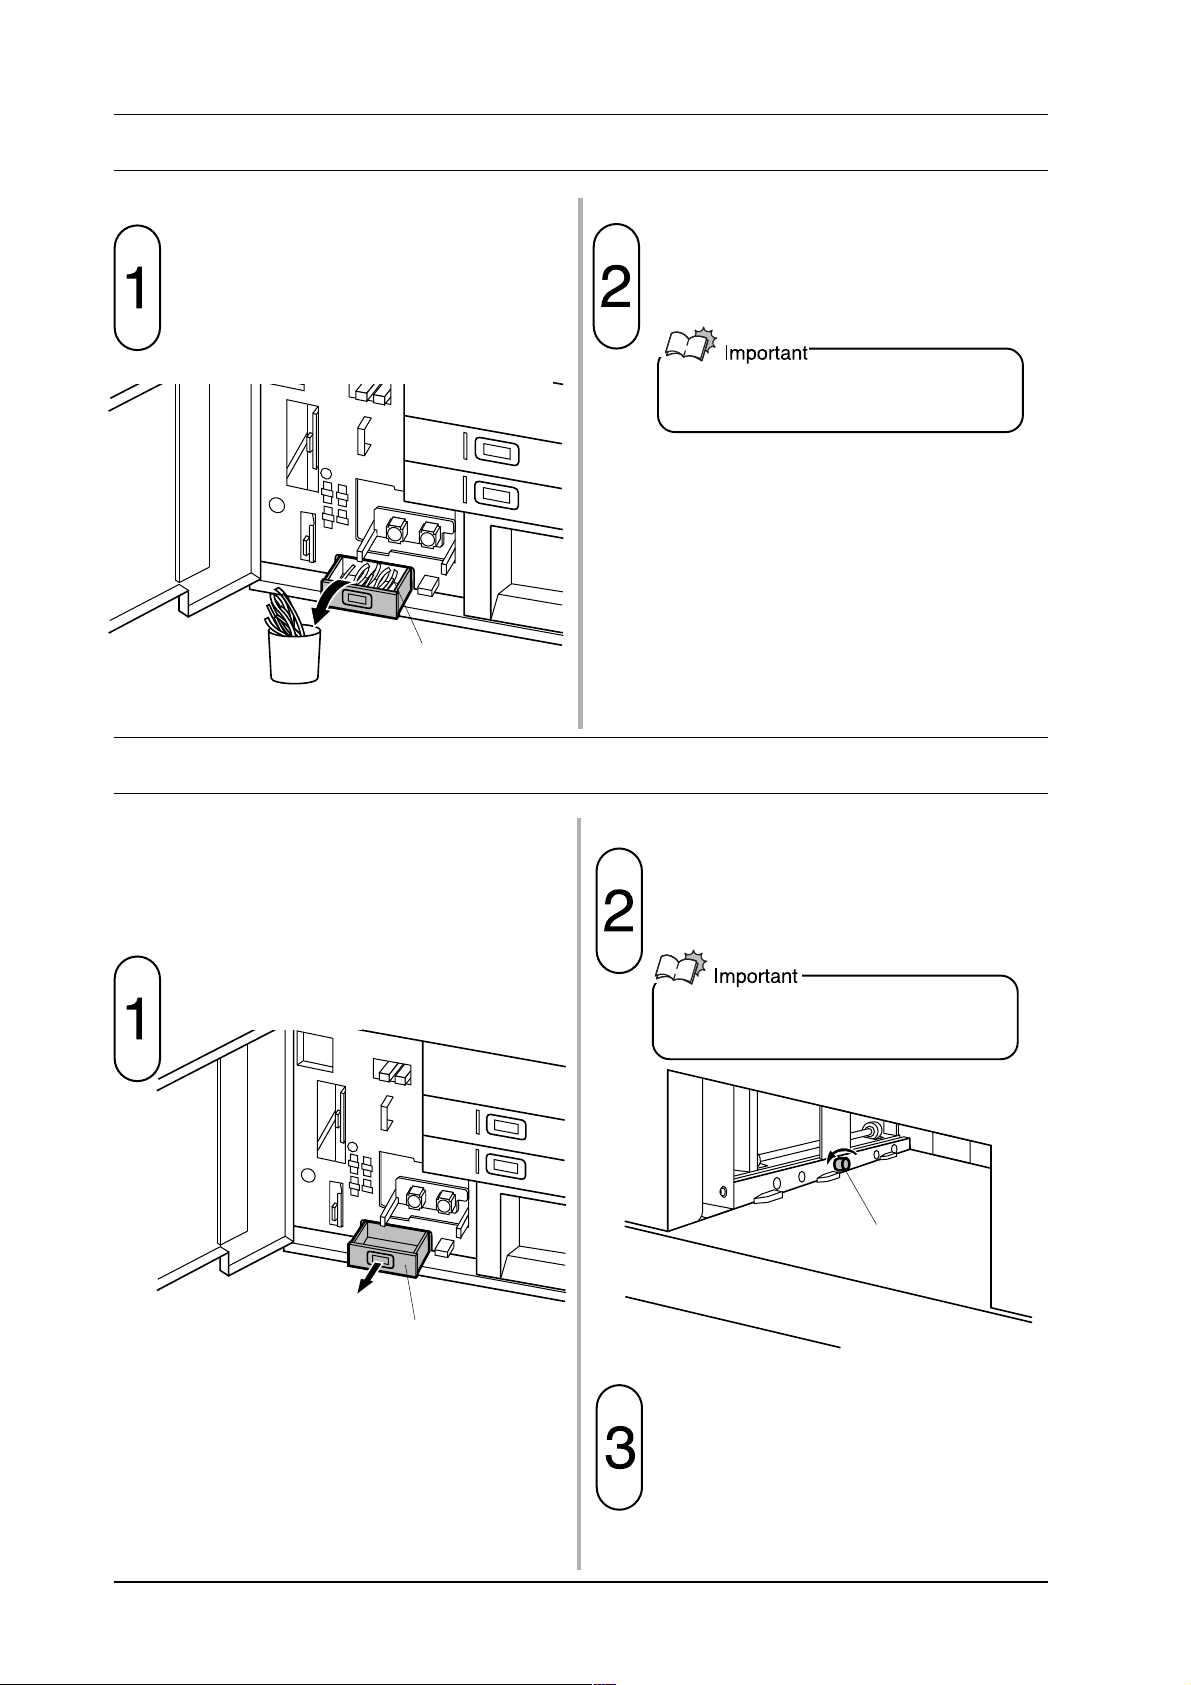
4-7 When Trimming Trash Box Is Full
Pull out the trimming trash box and
remove the trash.
Trimming Trash Box
4-8 When Fold Line is Not Aligned
Push the trimming trash box back to its
original position.
-Push the trimming trash box back
firmly and completely.
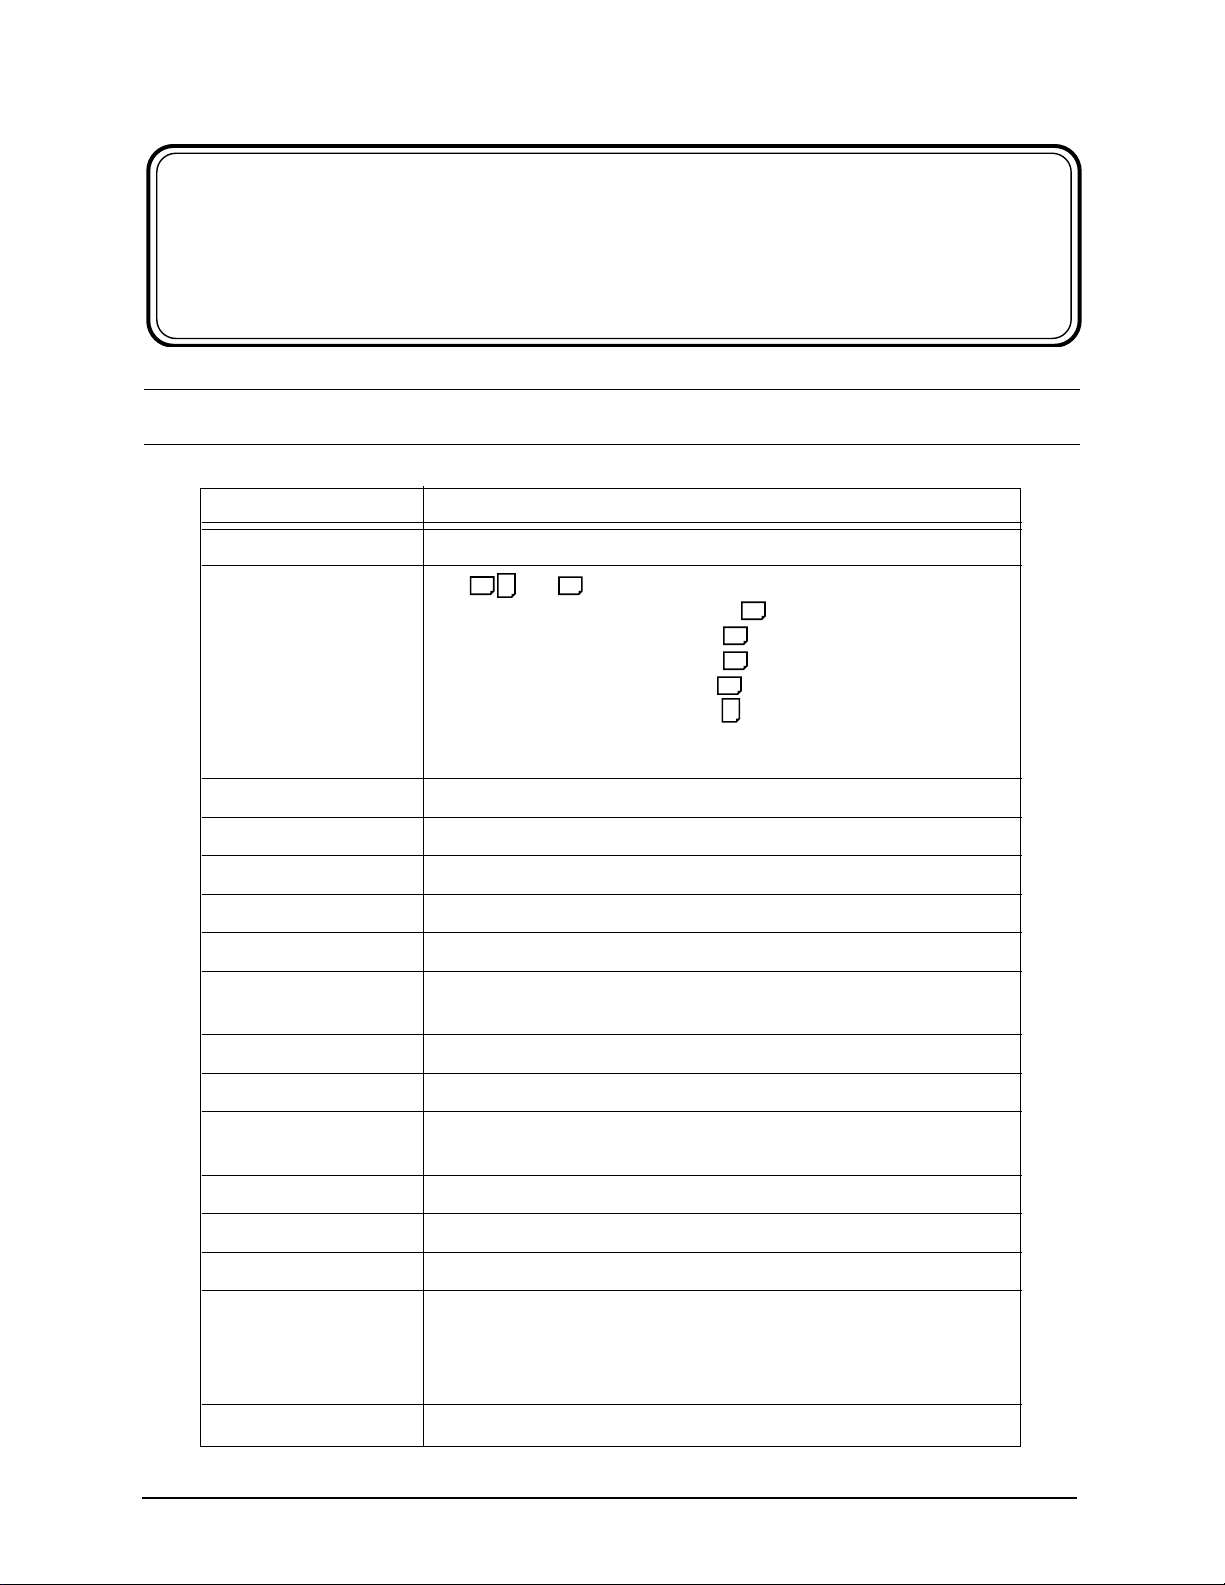
The fold line will not align properly if the gap
between the guides is too wide. Follow the
procedure below to reduce the size of the gap.
Pull out the trimming trash box.
Trimming Trash Box
Turn the guide adjust knob counterclockwise to reduce the gap between the
guides.
-Do not make the gap too small as
this can cause sheets to jam.
Guide Adjust Knob
Push the trimming trash box back firmly
and completely.
28
Page 36

4-9 When the Fold and Stitch Line Are Not Aligned
Adjustments may be necessary based on sheet
quality, direction, and thickness.
Adjust the fold position at printer set up.
4-10 When the Fore-edge is Not Trimmed Completely
The trimming length is set shorter than the
fore-edge of the booklet.
Adjust the trimming length at printer set
up.
If the problem is not cleared, the
knives might be dulled. Please call
your service representative.
4-11 When the Fore-edge is Not Trimmed At All
The trimming function is not selected.
Select the trimming function at printer
set up.
If the problem is not cleared, the
knives might be dulled. Please call
your service representative.
4-12 When the Sheet is Not Folded
The booklet thickness is over 2 mm.
Use sheets within specification and make
booklet thickness within 2 mm.
29
Page 37

30
Page 38

5. Cleaning
This section shows how to clean the Publishing Finisher.
5-1 Cleaning the Sheet Transport Path
CAUTION
-Do not use thinner, alcohol or benzin
for cleaning.
Open the cover or door necessary to
access the area to clean.
Guide 8
Guide 6
Open the guide and clean the sheet
transport path with soft and dry cloth.
- When the sheet transport path is not
cleaned with dry cloth, clean it with
cloth soaked alcohol or detergent and
wipe moisture with dry cloth.
Guide 5
Staple Section
Trim Section
Entrance Paper Guide
Guide 1
31
Page 39

32
Page 40
Appendix
This appendix shows specifications and consumables.
A-1 Specifications
Item Specification
Function Folding, Stapling, and Trimming
Sheet Size A4 , A3 ,
7.3" x 10.5" (185.4 x 266.7 mm) ,
8.5" x 11" (215.9 x 279.4 mm) ,
8.5" x 14" (215.9 x 355.6 mm) ,
11" x 17" (279.4 x 431.8 mm) ,
11" x 8.5" (279.4 x 215.9 mm) ,
Maximum 12" (width) x 18" (length) (305 x 457 mm)
Minimum 7.2" x 7.2" (182 x 182 mm)
Sheet Weight 16 to 24 lb (60 to 90 g/m2)
Insert Sheet Weight 16 to 53 lb (60 to 198.8 g/m2)
Tray Pile Height Maximum 50 mm (2.0)/Less than 90 g/m2 450 sheets
Trimming Width Less than 13 mm (0.5)
Production Speed Up to 800 booklets per hour
Stack Amount Maximum 250 mm (9.8)
Stapling and folding/100 booklets (80 g/m2, 5 sheets)
Staple Distance 120 mm (4.7) (fixed)
Staple Cartridge 5,000 staples
Sensors Sheet jam, sheet inside, sheet misfeed, full stack, low staple,
empty staple, cover open, guide open, trimming trash box full
Noise Level 70 dBA
Dimensions 1,268 mm x 670 mm x 1,081 mm (W x D x H)
Weight 270 kg (Publishing Finisher only)
Power Single phase 200 V / 50 Hz (4.7 A)
Single phase 220 V / 60 Hz (4.9 A)
Single phase 230 V / 50 Hz (4.6 A)
Single phase 240 V / 60 Hz (4.6 A)
Ambient Temperature 10 to 32 degrees Celsius
33
Page 41

The table below lists the maximum number of
sheets allowed per booklet. Specifications are
given for booklets without insert sheets and
booklets with one 53 lb insert sheet.
Number of Sheets Number of Sheets
Paper Weight (no insert sheets) (with 53 lb insert sheet)
16 lb (60 g/m2) 20 sheets 16 sheets
17 lb (64 g/m2) 19 sheets 15 sheets
18 lb (64 g/m2) 18 sheets 14 sheets
19 lb (64 g/m2) 17 sheets 14 sheets
20 lb (64 g/m2) 16 sheets 13 sheets
21 lb (64 g/m2) 15 sheets 12 sheets
22 lb (64 g/m2) 14 sheets 12 sheets
23 lb (64 g/m2) 14 sheets 11 sheets
24 lb (90 g/m2) 13 sheets 11 sheets
Note for DDP 92 only: When folding stacked sheets (not stapled sheets),
the maximum number of sheets is 3.
A-2 Consumables
Staple Cartridge 2 pc
Knife (U) (M072808-01) 1 pc
Knife (L) (M072822-03) 1 pc
Double Feed Stop Plate (A924697-00) 2 pc
34
 Loading...