

Page 1

RICOH Printing Systems DDP Server
DDP Server
User’s Guide
Read and keep this manual.
• Read safety instructions carefully and
understand them before starting your
operation.
• Keep this manual at hand for reference.
SOFHA GmbH
Version 2.1
N905303
Page 2

Copyright © 2001-2004 SOFHA GmbH
Version 2.1, 10 Dec. 2004
SOFHA, POD Server, ProfiRIP, and SOFHA DocuFLOW are
registered trademarks of SOFHA GmbH, Germany.
DocXPLORER is a trademark of SOFHA GmbH, Germany.
All other company and product names are (registered) trademarks
of the respective owners.
While every effort has been made to ensure the accuracy of
information contained in this document, SOFHA GmbH shall not
be held responsible for any inaccuracies it may contain.
All specifications are subject to change without notice.
Page 3
Safety Summary
The hazard warnings which appear on the warning labels on the
machine or in the manual have one of the following alert headings
consisting of an alert symbol and a signal word, DANGER,
WARNING, or CAUTION.
This is the safety alert symbol. It is used to alert you to potential
DANGER: indicates an imminently hazardous situation which, if not
WARNING: indicated a potentially hazardous situation which, if not
CAUTION: indicates a hazardous situation which, if not avoided, will or
CAUTION: Indicates a potentially hazardous situation which, If not avoided,
personal Injury hazards. Obey all safety messages that follow this
symbol to avoid possible Injury or death.
avoided, will result in death or serious injury.
avoided, can result in death or serious injury.
can result in minor or moderate injury, or serious damage of
product.
may result in property damage.
General Safety Guidelines
Before operating the machine, read the following instructions
carefully:
• Follow all the operating procedures provided in this
manual.
• Pay special attention to and follow all the hazard
warnings on the machine and in the manual. Failure to
do so can cause injury to yourself or damage to the
machine.
• Do not perform any operation or action in any way
other than as provided in this manual. When in doubt,
call the designated field engineer.
• Keep in mind that the hazard warnings in this manual or
on the machine cannot cover every possible case, as it is
impossible to predict and evaluate all circumstances
beforehand.
Be alert and use your common sense.
Page 4

Safety Precautions
To avoid an electric shock, personal injury and/or damage of the
DDP Server carefully observe the following safety precautions:
WARNING: Check the Supply Voltage
Check the local supply voltage before plugging the DDP Server
power cord into the electrical outlet. If the supply voltage does not
match the range which is indicated on the rating label, do not
connect the DDP Server to the mains supply and contact your local
dealer for support.
WARNING: Do Not Open the Enclosure
The DDP Server enclosure may not be opened except by a
qualified service technician. The service technician must switch the
DDP Server off and unplug the mains supply before opening the
enclosure.
WARNING: Connect the Network Ports Properly
The network ports are intended for connecting the DDP Server to
an Ethernet network and to the front and rear engines only. Do not
attempt to connect any of the network ports to a telecommunication
network, i.e. to a telephone line.
CAUTION: Keep Mobile Phones Away
Do not operate a mobile phone close to the DDP Server. It may
disturb proper operation of the DDP Server.
Page 5

WARNING: Use Recommended Batteries Only
The DDP Server contains a Lithium battery. The battery may
explode if incorrectly replaced. Do not short-circuit the battery. Do
not dispose of the battery in fire. Do not attempt to disassemble the
battery. Keep the battery out of reach of children. If the battery is
exchanged by a service technician, only one of the following
battery types must be used:
Duracell Inc. DL2032, DL2032D
EEMB Co. Ltd. CR2032
Eveready Battery Co. Inc. CR2032
FDK Energy Co. Ltd. CR2032, CR2032
CR2032
V
,
T
Hitachi Maxell Ltd. CR2032, CR2032A
Matsushita Electric Industrial Co Ltd. CR2032, CR-2032
Mitsubishi Electric Corp. CR2032
Philips Lighting B.V. CR2032
Radioshack Corp. CR2032
Rayovac Corp. CR2032
Renata S.A. CR2032
Sanyo Energy (USA) Corp. CR2032, CR2032/1
Shun Wo (HK) Enterprise Development Co. CR2032
Sony Fukushima Corp. CR2032
Toshiba Battery Co. Ltd. CR2032
Varta Microbattery GmbH CR2032
Varta Gerätebatterie GmbH CR2032
Vic-Dawn Enterprise Co. Ltd. CR2032
Wuhan Lixi n g (T o rc h ) P o w e r Source Co. L t d . CR2032
Dispose of used batteries according to the manufacturer’s
instructions.
Page 6

Preface
Welcome to DDP Server!
DDP Server is a hardware / software system for efficient printing
in the network office environment. It consists of:
• ProfiRIP – a controller which turns a RICOH DDP184
into a network ready printer
• SOFHA DocuFLOW – Print on Demand features like
custom queues, archive jobs, job merging, and load
balancing.
• ProfiNET – the networking features that enable the
network communication between the user’s computer
and DDP Server
• ProfiWEB – the Internet features such as Internet
printing and web management
• Printer Driver – a printer driver providing advanced
printing capabilities including imposition and forms
overlay in an intuitive graphical user interface
• Printer Installer – a Windows utility for easy installation
of multiple printers
• SMAP – an application for direct printing of PostScript,
PDF, PCL, TIFF, and ASCII files
• DocXPLORER – a monitoring and control application
for managing multiple DDP Servers in a network
• Database Print Manager – a variable data printing
application for efficiently printing a template document
with records from a database
Page 7

About this manual
The following manuals are provided for DDP Server:
• DDP Server User’s Guide (this manual). It contains
information about:
• Hardware setup
• Software installation and setup
• Basic description of printing
• Basic description of controller and job management
• Overview of DDP Server applications
• Printer Driver Plug-in Reference Guide – describes how
to use the DDP Server printing and finishing features
• ProfiWeb Reference Guide – describes controller and
job management using the web browser
• DocXPLORER Reference Guide – describes controller
and job management using DocXPLORER
• Database Print Manager Reference Guide – describes
variable data printing using Database Print Manager
The reference guides are stored in machine readable form (PDF
format) on the DDP Server CD-ROM. You may print them for use
with your DDP Server.
The following additional information is available:
• Adobe PS printer driver help – this can be called from
the printer driver
• ATM (Adobe Type Manager) help – this can be called
from ATM
The following conventions are used in this manual:
• User interface elements, like window captions, menu
elements, buttons are denoted
• Some user interface elements are denoted by a path like
RIP details » General » Others may see job details.
In expressions like this, the single elements describe the
menu (optional), the menu element, the tab sheet in the
dialog, and the button or field label.
in this style.
Page 8

Page 9

Contents
Safety Summary.................................................................................................................iii
General Safety Guidelines .......................................................................... iii
Safety Precautions............................................................................................... iv
Preface............................................................................................................................... vi
About this manual............................................................................................................. vii
Hardware Installation 1
Package Contents.................................................................................................................1
Hardware Overview.............................................................................................................2
Supported Devices...............................................................................................................6
Cable Connections...............................................................................................................6
DDP Server Setup and Management 8
Network setup......................................................................................................................8
Problem handling: Initialize Disk........................................................................................9
Software Installation 10
CD Contents ......................................................................................................................10
Installing the DDP Server Software...................................................................................11
Windows..............................................................................................................12
Macintosh............................................................................................................13
Installing the Printer Driver...............................................................................................14
Windows..............................................................................................................14
Installable Options – Windows............................................................................17
Macintosh............................................................................................................20
Installable Options - Macintosh...........................................................................21
Installation under MacOS X................................................................................22
Installing Adobe Type Manager and Fonts........................................................................24
Installing Printer Fonts........................................................................................24
Using DDP Server 25
Printing ..............................................................................................................................25
Windows..............................................................................................................25
Macintosh............................................................................................................31
Supported network protocols.............................................................................................34
Hot folders...........................................................................................................34
Drag and Drop Printing using SMAP................................................................................35
Managing the DDP Server using the web browser............................................................37
DocXPLORER Overview..................................................................................................39
Database Print Manager Overview....................................................................................40
Appendix 41
System Event Messages.....................................................................................................41
Job Check Messages..........................................................................................................46
End User License Agreement for DDP Server ..................................................................49
End User License Agreement Adobe Systems Incorporated.............................................51
CE Declaration of Conformity...........................................................................................55
Glossary 57
DDP Server User's Guide Contents • i
Page 10

ii • Contents DDP Server User's Guide
Page 11
Hardware Installation
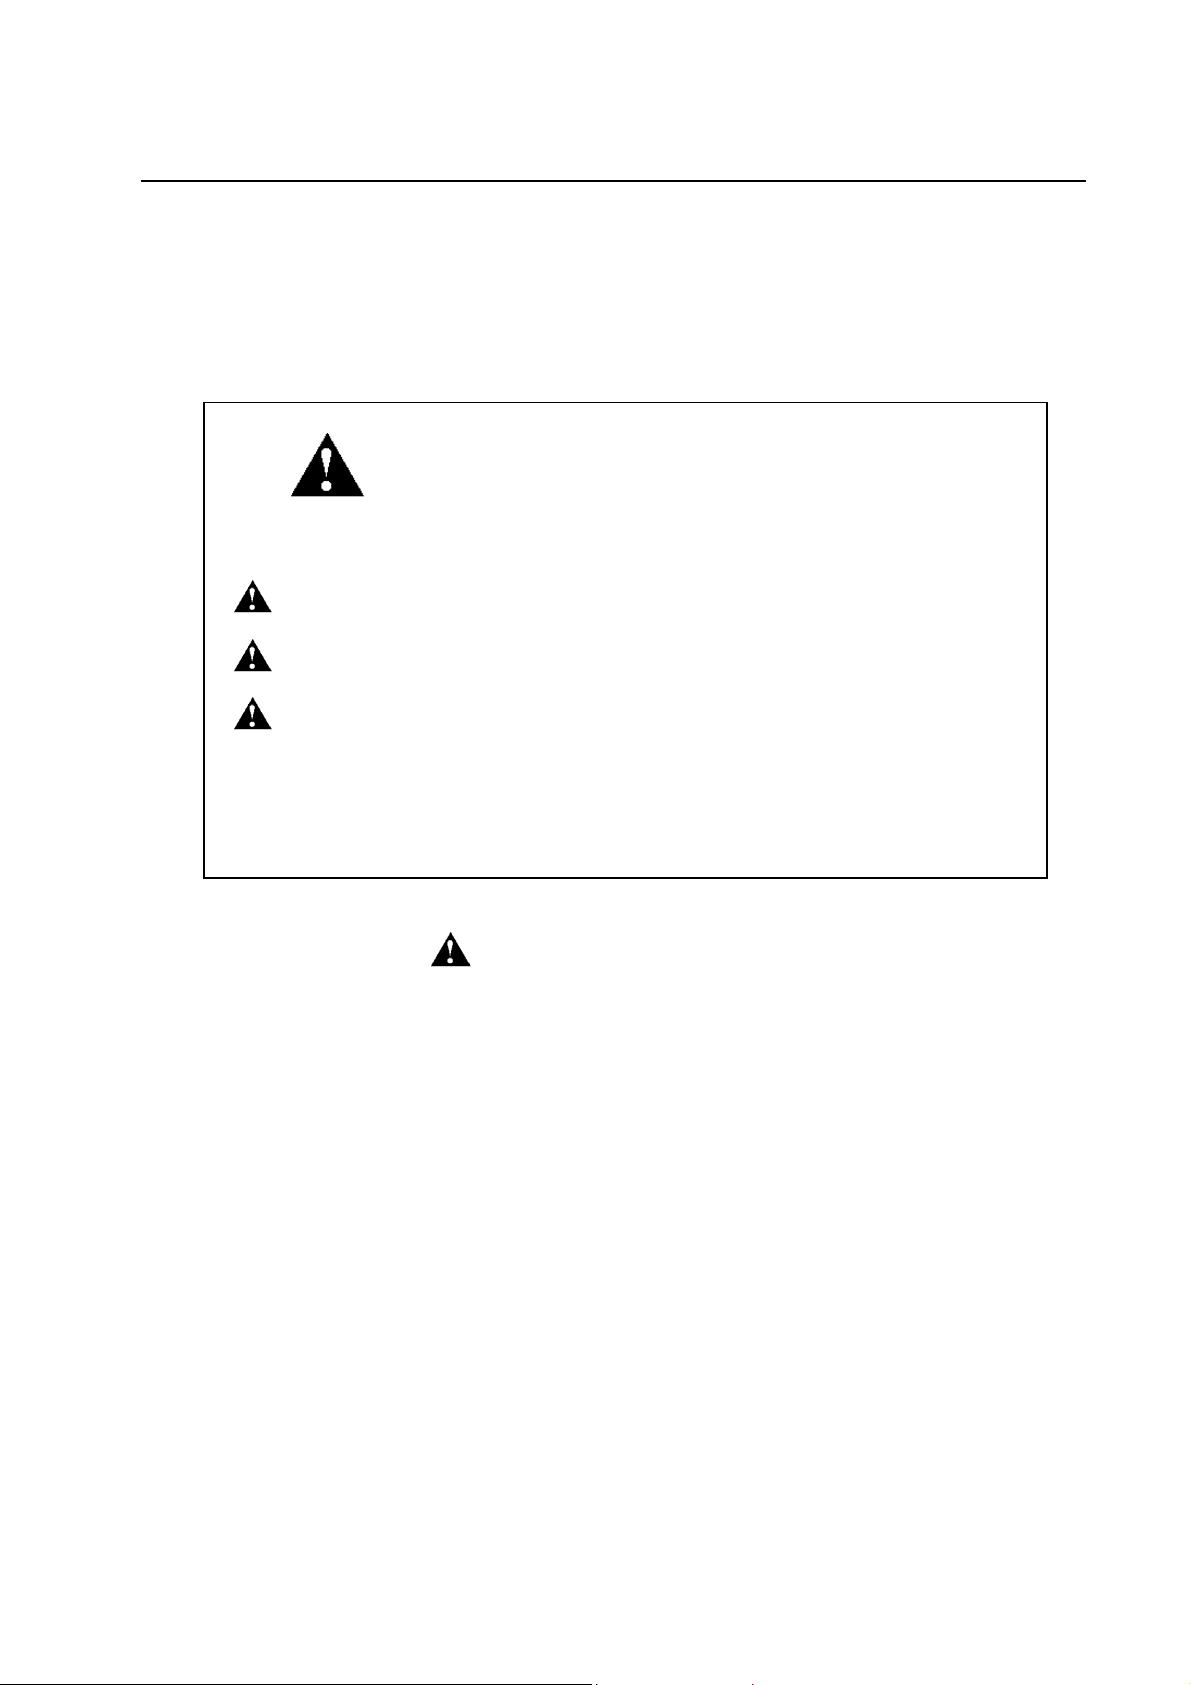
Package Contents
The DDP Server ships in a box which contains the DDP Server,
protected by two cushions and a plastic bag, and a small
accessories box at the side.
Do not unpack the DDP Server before it has the same temperature
as its environment. If the DDP Server was exposed to extreme
temperature conditions, wait a few hours before opening the plastic
bag. Otherwise water may condense and damage electronic
components inside the DDP Server.
Keep all packaging materials. Always use the original packaging
for storage or transportation of the DDP Server.
Package contents
DDP Server User's Guide Hardware Installation • 1
Page 12
When unpacking the DDP Server, use the packing list below to
check if all parts listed are contained in the package:
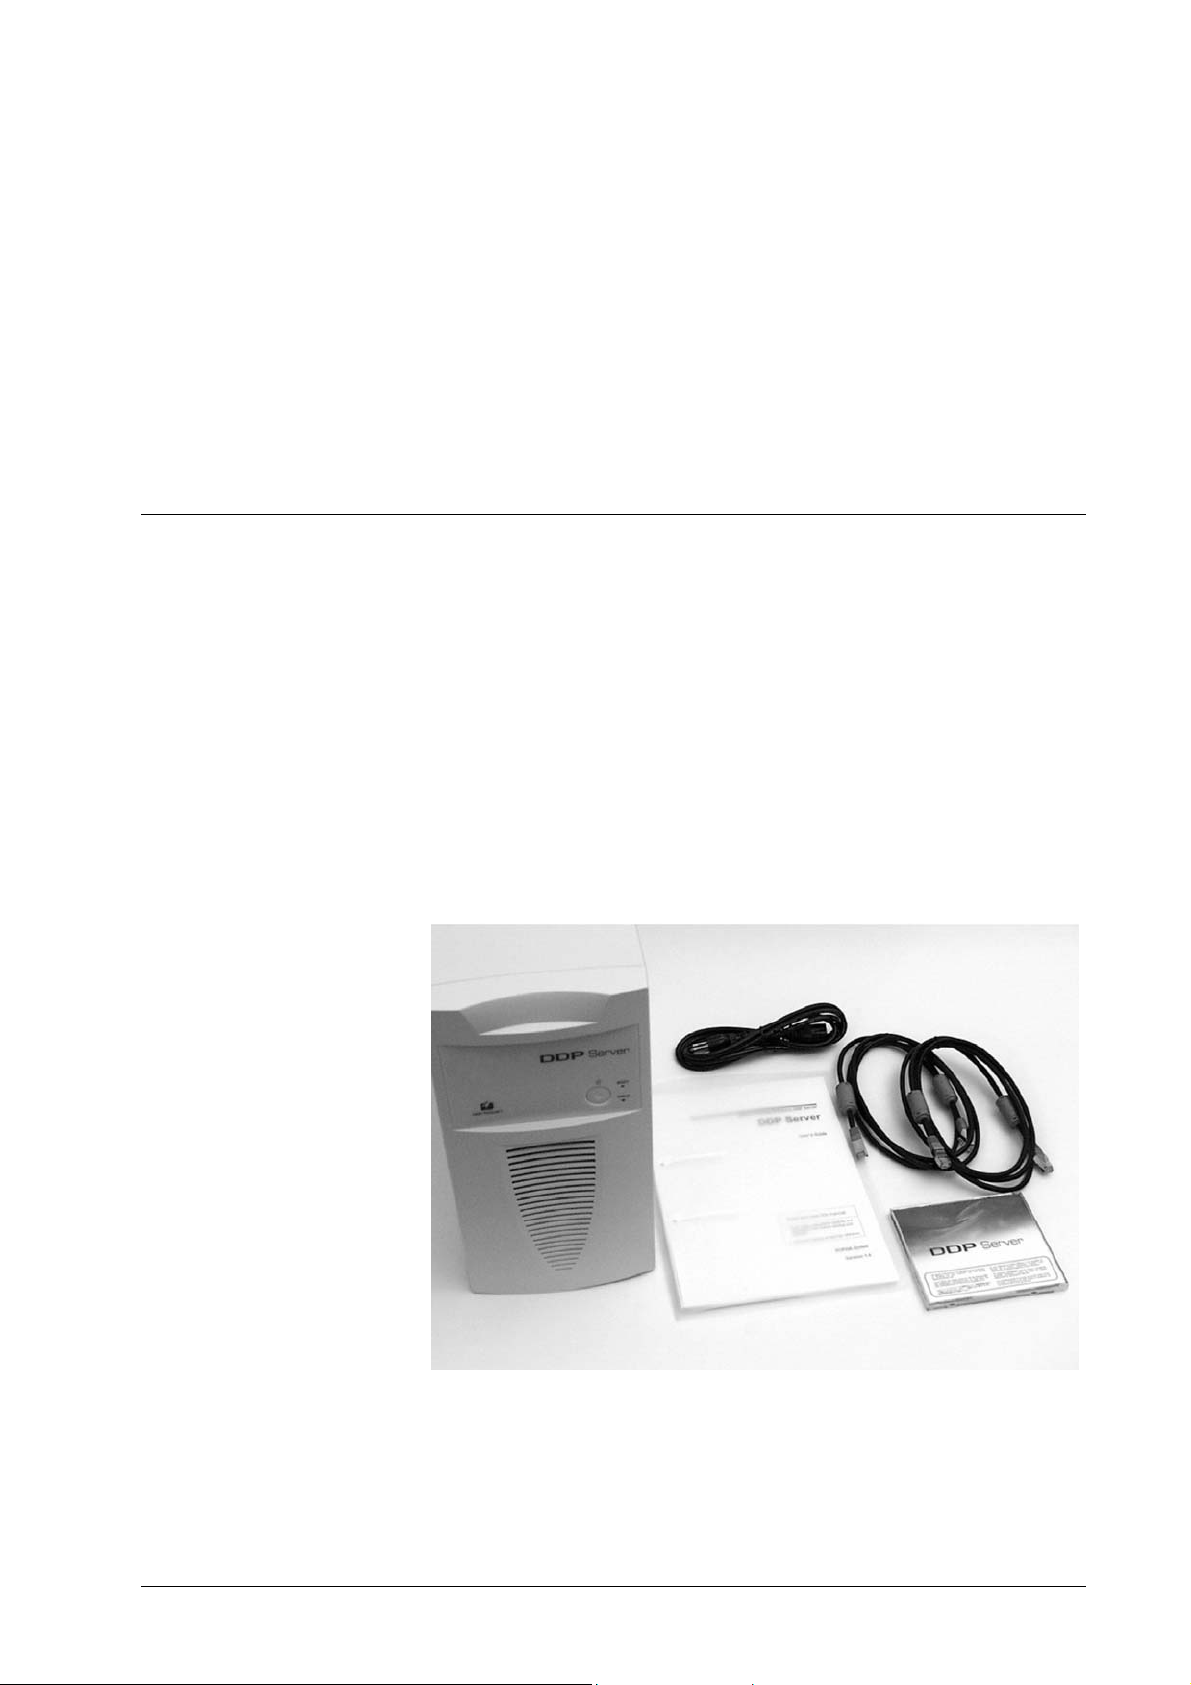
Hardware Overview
The DDP Server is essentially controlled from the network.
Nonetheless, two control lights are provided on an operator panel
at the front. They are useful to control the basic operation of the
DDP Server. The operator panel also contains the standby button
for switching the DDP Server on or off. For saving energy while
the DDP Server is not used, DDP Server provides an additional
power switch at the rear.
• DDP Server – the controller, ready to use
• Power cord – to connect the DDP Server to a power
outlet
• 2 Ethernet cables with color markings – to connect the
DDP Server to the front (red) and rear (blue) engines of
the DDP184
• Split ferrite core – to be attached to the network cable
for EMI suppression
• CD-ROM – containing driver and management software
for DDP Server
• User’s Guide – this manual
Furthermore, a small button is provided at the rear for special
functions. This is only needed for setup and maintenance purposes.
DDP Server front side
2 • Hardware Installation DDP Server User's Guide
Page 13

The elements on the front side have the following functions:
• Standby button: This button allows you to power on or
shut down the DDP Server.
To power on or shut down the DDP Server, press this
button shortly. A regular shut down includes closing
the job and queue database.
When the DDP Server is running, you may force power
down by holding the standby button for more than 4
seconds. However, you should force power-down only
if the DDP Server does not react otherwise, as in this
way the database is not closed and loss of the stored
data may result. For the same reason, do not switch off
the DDP Server by means of the power switch at the
rear before performing a regular shutdown using the
standby button.
• READY control light (green) with the following
meanings:
Constant – DDP Server is idle
Blinking – DDP Server is busy
• ERROR control light (yellow) with the following
meanings:
Constant – data transfer to printer
The following special states are also shown by the control lights:
DDP Server Initialisation – both blinking
DDP Server Shutdown – both constant
DDP Server User's Guide Hardware Installation • 3
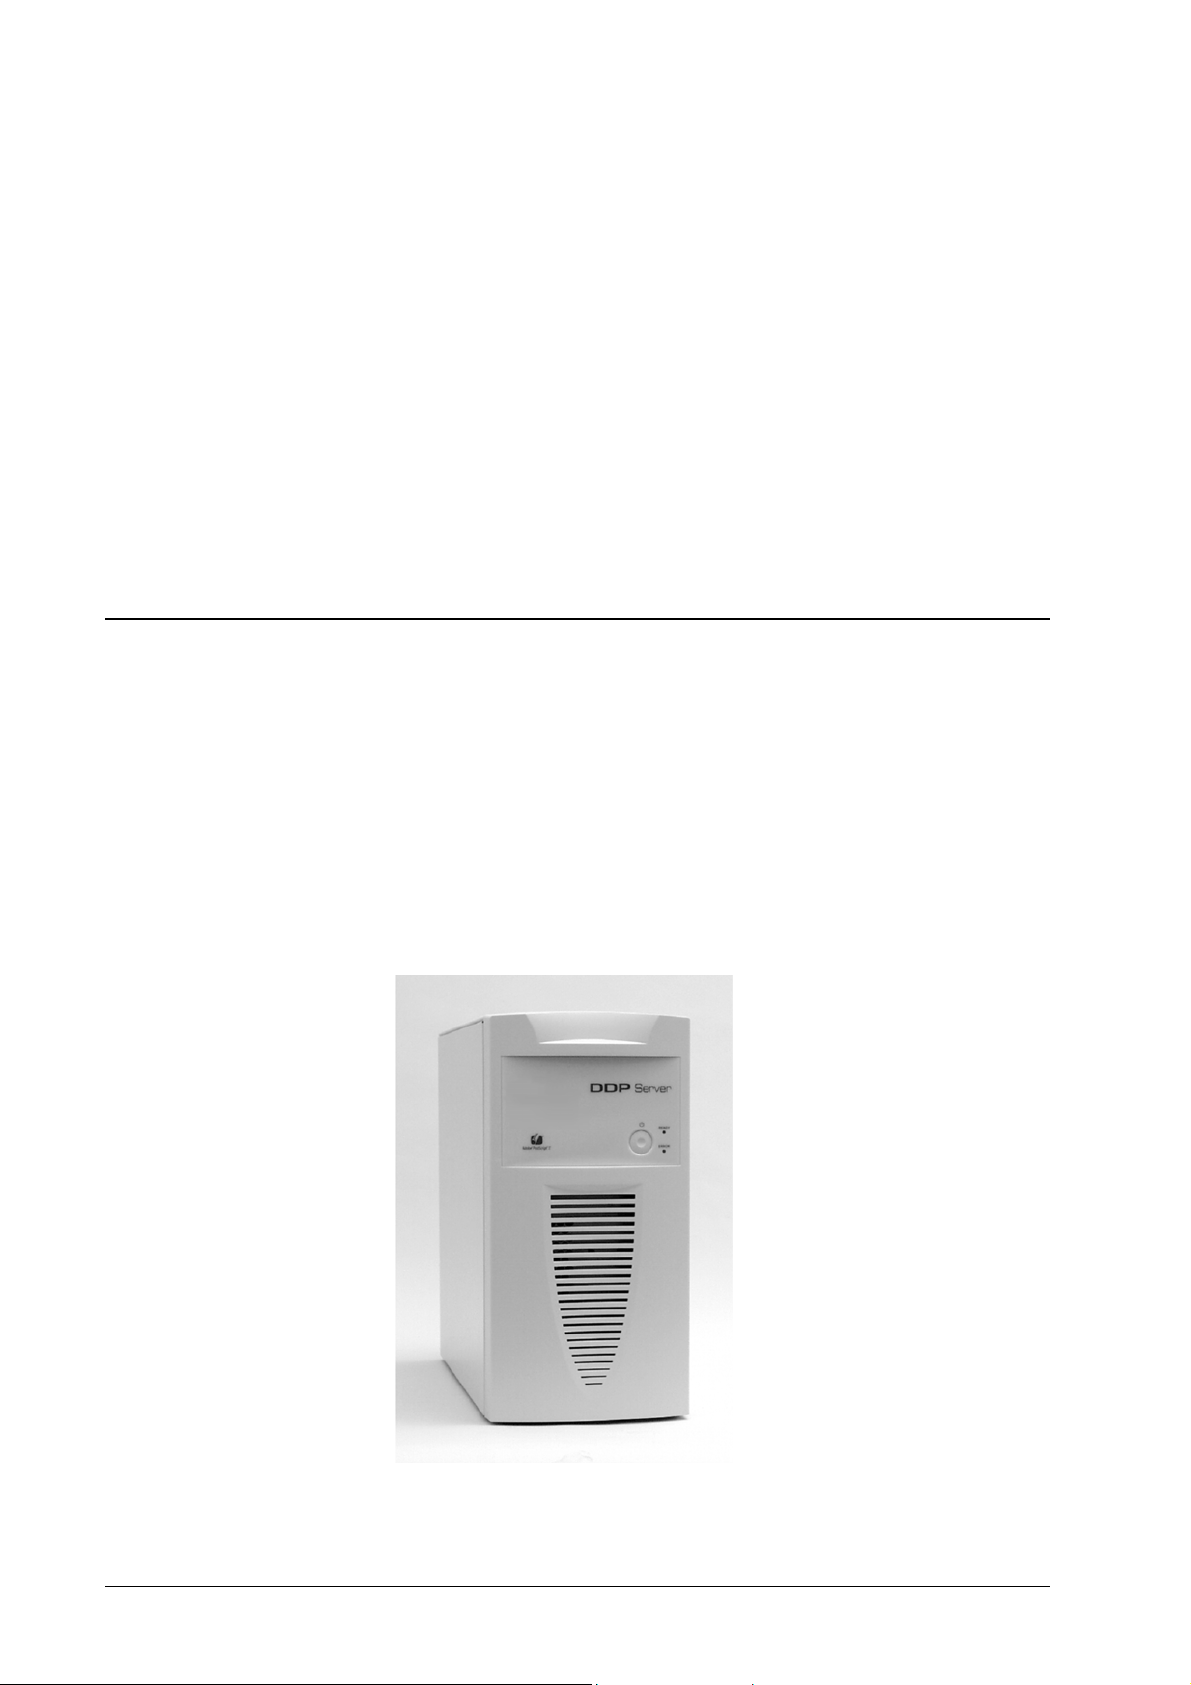
Page 14
DDP Server rear side
DDP Server connectors
4 • Hardware Installation DDP Server User's Guide
Page 15

The elements on the rear side have the following functions:
• Power switch – this switch disconnects the power
supply’s standby circuitry from mains and therefore
saves energy while the DDP Server is not used.
CAUTION: Never switch off the DDP
Server by means of the power switch before performing
a regular shutdown using the standby button. Otherwise
the database is not closed and loss of the stored data
may result.
• CAUTION: INIT DISK button ( ) – this
button allows you to re-initialize the DDP Server
database. This function should be used only by the DDP
Server administrator and only with special care, as it
deletes all job and queue data on the DDP Server.
To re-initalize the database hold the INIT DISK button
while the DDP Server is booting until several beep
sounds have occurred. Then release the INIT DISK
button.
Initializing the DDP Server database using the INIT
DISK button is equivalent to executing both the
Factory Defaults function and the Initialize Disk
function described below.
If the INIT DISK button is pressed during normal
operation of the DDP Server, it prints the self test page.
• Ethernet interfaces – to connect the DDP Server to an
Ethernet network and to the DDP184 engines. The data
rate will automatically be adjusted to 10 Mbit/s or 100
Mbit/s, depending on the network capabilities. Control
lights are provided for activity/link status and 10/100
data rate.
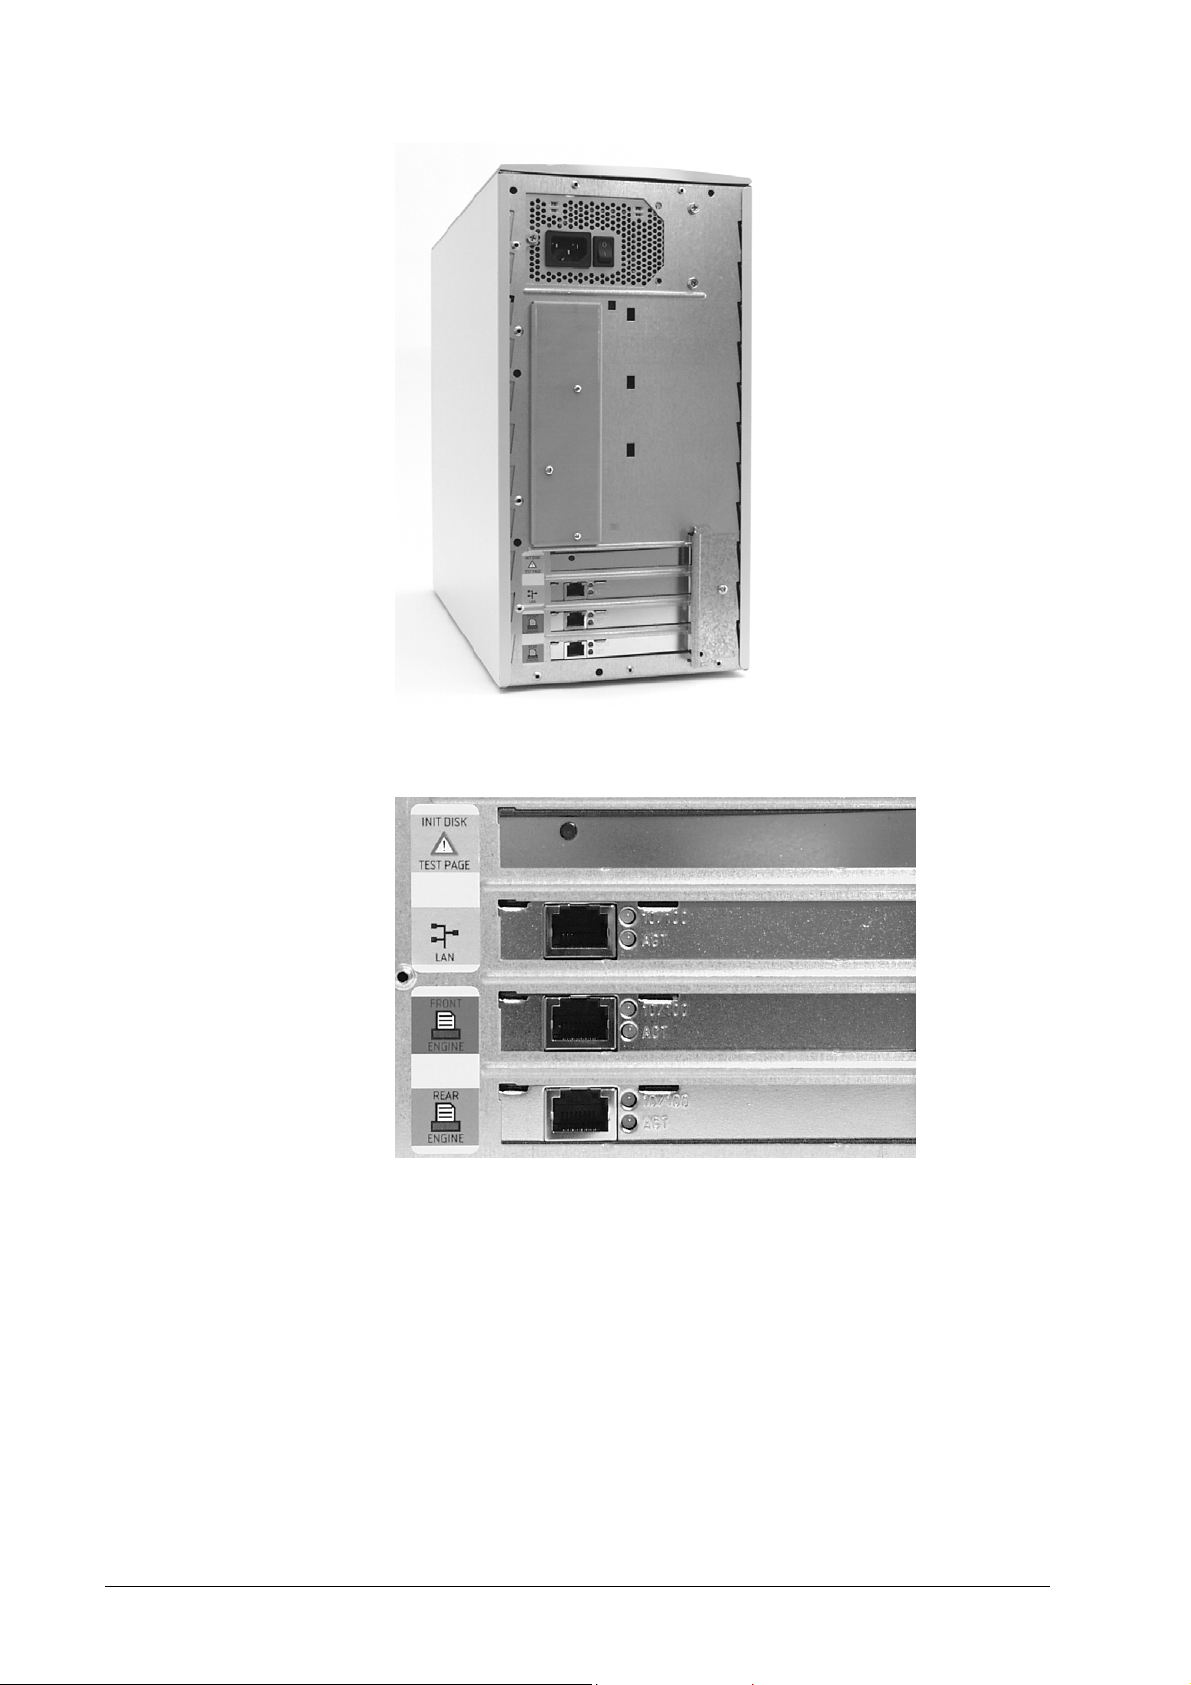
The DDP Server has three Ethernet interfaces:
• to connect the DDP Server to the client
network
• (red) to connect the DDP Server to the front
engine
• (blue) to connect the DDP Server to the rear
engine
Please refer to „Cable Connections“ in this manual for
further details.
DDP Server User's Guide Hardware Installation • 5
Page 16

Supported Devices
The following hardware is supported by the DDP Server:
The following optional accessory is supported:
Cable Connections
To setup the DDP Server for operation, connect the cables as
described below:
• DDP184
• High capacity feeder: HCF
• Finishers: FS-108H, FS-108HBM, PF-2
• Sheet inserter: PI-108H
• Container stackers: CS-1, CS-2
• Power – Check the local supply voltage before plugging
the DDP Server power cord into the electrical outlet.
WARNING: If the supply voltage does not
match the range which is indicated on the rating label
on the rear, do not connect the DDP Server to the mains
supply and contact your local dealer for support.
If your local supply voltage matches the rating of the
DDP Server, connect one end of the power cord to the
DDP Server and the other end to the electrical outlet.
Note that the DDP Server will always be in standby
mode, consuming a small amount of electrical power, as
long as it is connected to the electrical outlet and the
power switch at the rear is set to the “On” (“|“) position.
• Engines – Connect the DDP Server to the DDP184
engine by means of the enclosed Ethernet crosslink
cables.
WARNING: Do not attempt to connect any
of the engine ports to a communication network
(telephone line).
CAUTION: Do not use other crosslink cables
than those which are supplied with the DDP Server.
Failure to do so may result in increased EMI emission
which may interfere with other electronic equipment.
Connect the Ethernet outlet with red marking to the
front engine.
Connect the Ethernet outlet with blue marking to the
rear engine.
• Network – Use a Cat. 5 Ethernet patch (or drop) cable
to connect the DDP Server to a 100BaseTX (100Mbit/s)
6 • Hardware Installation DDP Server User's Guide
Page 17

or 10BaseT (10 Mbit/s) Ethernet network. Such cables
have a „Cat. 5“ marking and RJ-45 connectors at each
end.
CAUTION: Attach the split ferrite core which is
supplied with the DDP server to the network cable.
Make sure to attach it as close as possible to the plug at
the DDP Server. Failure to do so will result in increased
EMI emission which may interfere with other electronic
equipment.
Connect the Ethernet outlet labeled with a network
symbol (
) to the network.
WARNING: Do not attempt to connect the
Ethernet port to a communication network (telephone
line).
Pay attention to the fundamental rules of Ethernet
cabling, such as star topology, maximum cable length
and limited number of hubs/switches/routers.
The smallest possible Ethernet network consists of only
two stations: the DDP Server and a computer. In this
case, the hub may be replaced by a special „crosslink“
cable which directly links the DDP Server with the
computer. In case of a direct connection, the receive and
transmit wire pairs must be crossed inside the cable.
Therefore, a standard patch or drop cable cannot be
used.
A network cable is not included in the DDP Server
package. Ethernet patch cables and crosslink cables are
available from computer vendors.
DDP Server User's Guide Hardware Installation • 7
Page 18

DDP Server Setup and Management
Network setup
For the initial setup of the DDP Server, you must configure its
Communication settings.
In the initial setting of DDP Server at the factory shipment, it is not
configured for DHCP but the following IP Address is assigned.
Initial IP Address :
When DHCP needs to be configured at the time of installation,
perform “Initialize Disk” described in the next section. By
initializing disk, the DDP Server is configured for DHCP, a
protocol which allows to assign network settings to network
devices from a DHCP server.
If you want the DDP Server to use DHCP, your network must
contain an appropriately configured DHCP server.
If you do not have a DHCP server in your network, you can assign
network settings to the DDP Server using the built-in “quick”
DHCP Server of DocXPLORER. See DocXPLORER Reference
Guide.
To check the network settings, you can print the settings page.
While the DDP Server is running, press the INIT DISK button on
the rear side of the DDP Server.
CAUTION: While the DDP Server is booting, pressing and holding
the INIT DISK button performs the INIT DISK function (see
below) .
After setting up communications settings, you can manage the
DDP Server using DocXPLORER or the ProfiWEB interface.
192.0.0.192
8 • DDP Server Setup and Management DDP Server User's Guide
Page 19

Problem handling: Initialize Disk
If the DDP Server shows severe problems (does not boot), you can
re-initialize the DDP Server’s hard disk. This function clears the
job and queue database.
CAUTION: This function should be used only to recover from
severe problems and only by the administrator of the DDP Server.
Jobs and queues or lost during this function.
To re-initialize the database, press and hold the INIT DISK button
while the DDP Server is booting until you hear several beeps. Then
release the INIT DISK button.
Initializing the DDP Server by the INIT DISK button performs the
following functions:
• Factory Defaults:
Reset communication settings
Reset administrator password
• Initialize disk:
Delete and initialize the job and queue database
CAUTION: The Initialize Disk function performs several
reboots. Do not power off the DDP Server during this period, as it
may render the DDP Server unusable.
DDP Server User's Guide DDP Server Setup and Management • 9
Page 20
Software Installation
CD Contents
The DDP Server client software is delivered on a hybrid Windows
and Macintosh CD-ROM.
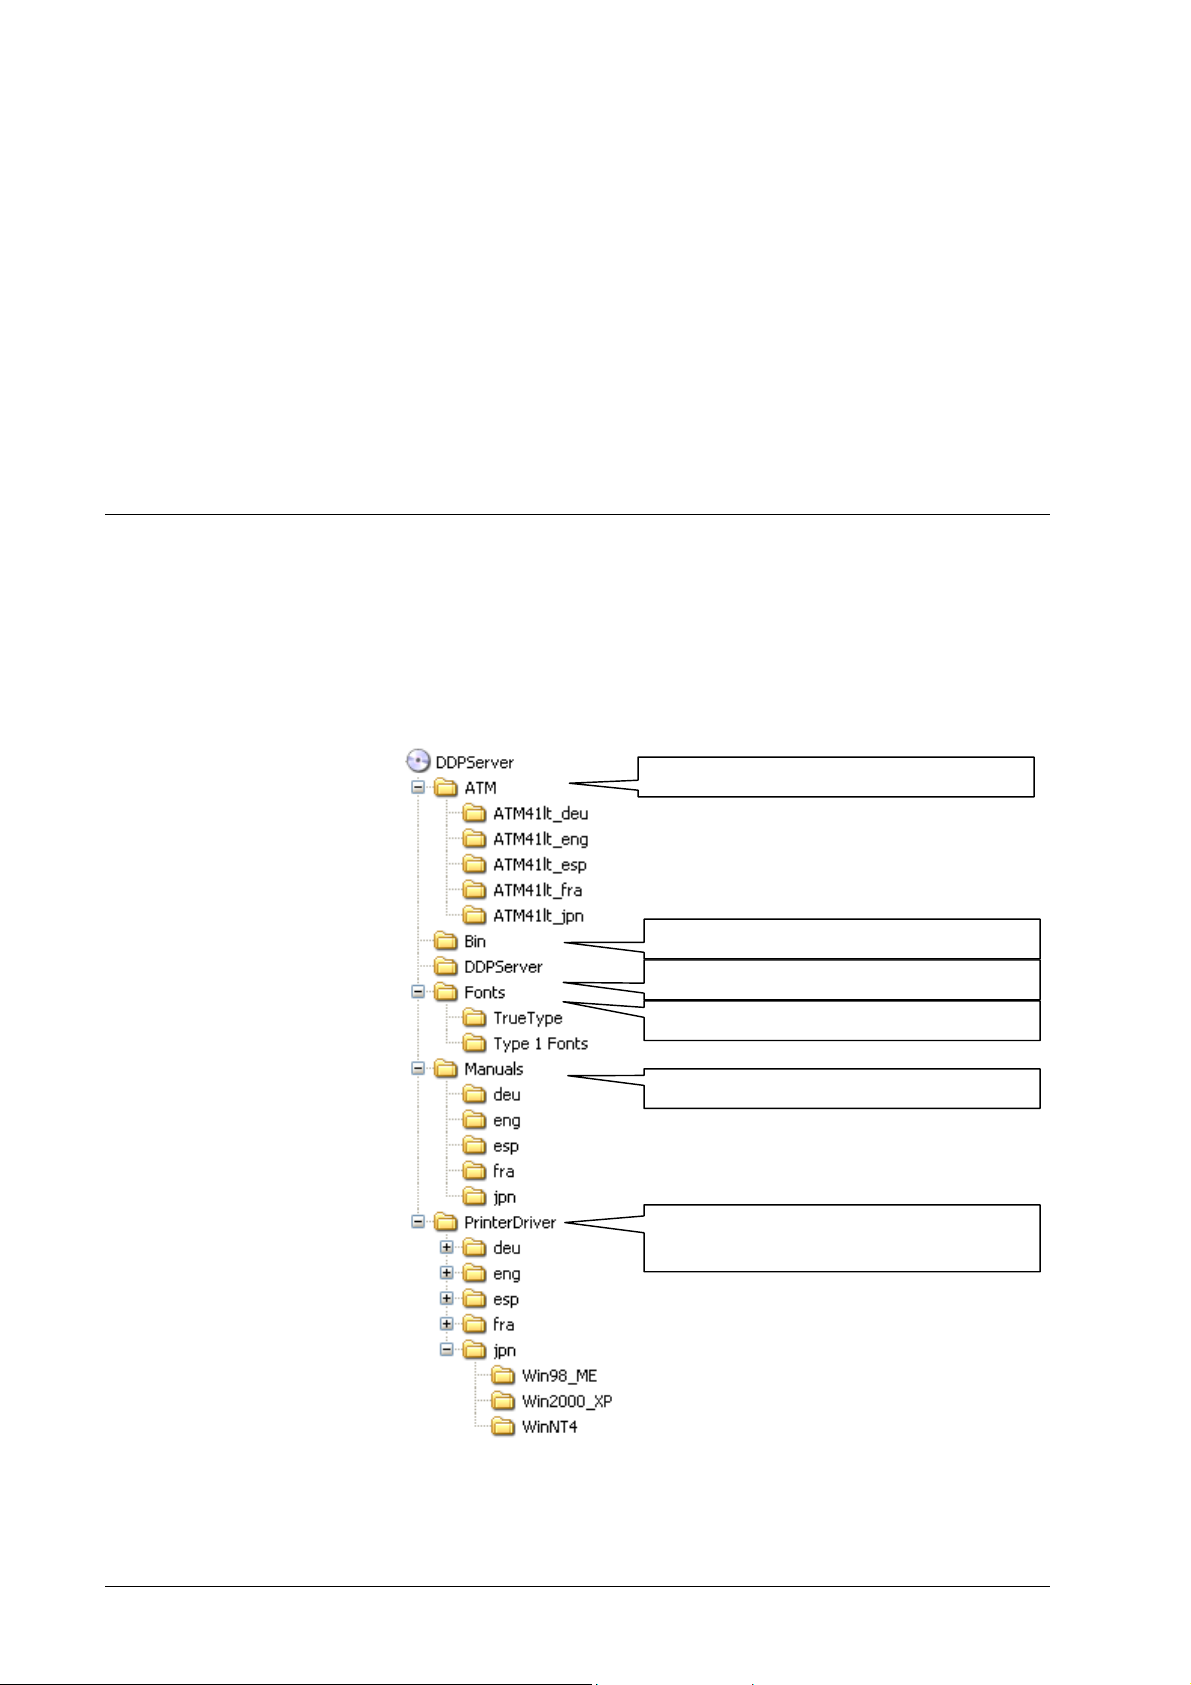
The contents and folder structure of the CD-ROM is shown in the
graphics below.
ATM – Adobe Type Manager Light v. 4.1
Bin – DemoShield startup application
Client software for DDP Server
Fonts – True Type fonts and Type 1 fonts
Manuals – DDP Server User Manuals
Printer Driver – Driver files for printer
installation from CD-ROM
10 • Software Installation DDP Server User's Guide
Page 21

The DDP Server User’s Guide is stored as a PDF file in the
Manuals folder. You may print it for use with the DDP Server. For
printing a PDF file you need Adobe Acrobat Reader which is
available from http://www.adobe.com.
Windows printer drivers for Windows 98/ME, Windows NT,
Windows 2000, and Windows XP are contained in the
corresponding folders for each language. If you want to install only
Windows printers, you can choose the printer files directly from
the CD-ROM. In this way you will not need to reboot your PC.
The ATM folder contains the Adobe Type Manager Light which
supports usage of Type 1 fonts. ATM has a separate installer.
The Fonts folder contains screen fonts for use with ATM.
Installing the DDP Server Software
The software on the CD-ROM is localized in several languages.
Launch the corresponding installer from the start application
(Windows) or from the language folders (Macintosh) to get the
software installed in your language. Follow the installation
instructions.
The installer installs the following software on your computer:
• Printer Installer (Windows only) – supports easy
installation of several Windows printers at a time
• SMAP – direct printing of PostScript, PDF, PCL, and
TIFF files.
• DocXPLORER – a monitoring and control application
for managing multiple DDP Servers in a network
• Database Print Manager – a variable data printing
application for efficiently printing a template document
with records from a database
The printer driver software consists of the Adobe PostScript printer
driver, the PCL printer driver (Windows only), and a plug-in which
provides specific functions for DDP Server with a graphical user
interface.
For Windows, the printer driver software is contained in folders
ordered by language and Windows version. Depending on
available space, you may copy the printer driver files to your
computer, or leave them on the CD-ROM. They are needed when
installing a printer.
On Macintosh, the generic part of the printer driver is installed by
the Adobe Installer, AdobePS, and the DDP Server specific part is
installed by the DDP Server Installer.
DDP Server User's Guide Software Installation • 11
Page 22
DDP Server provides a web interface (ProfiWEB) for viewing and
managing the RIP status and the job and queue database. The web
interface can be accessed using standard web browsers.
To uninstall the software under Windows, launch the Installer from
the CD-ROM, or select
and click
Remove. The software should be uninstalled before you
Control panel » Software » DDP Server,
install a new version.
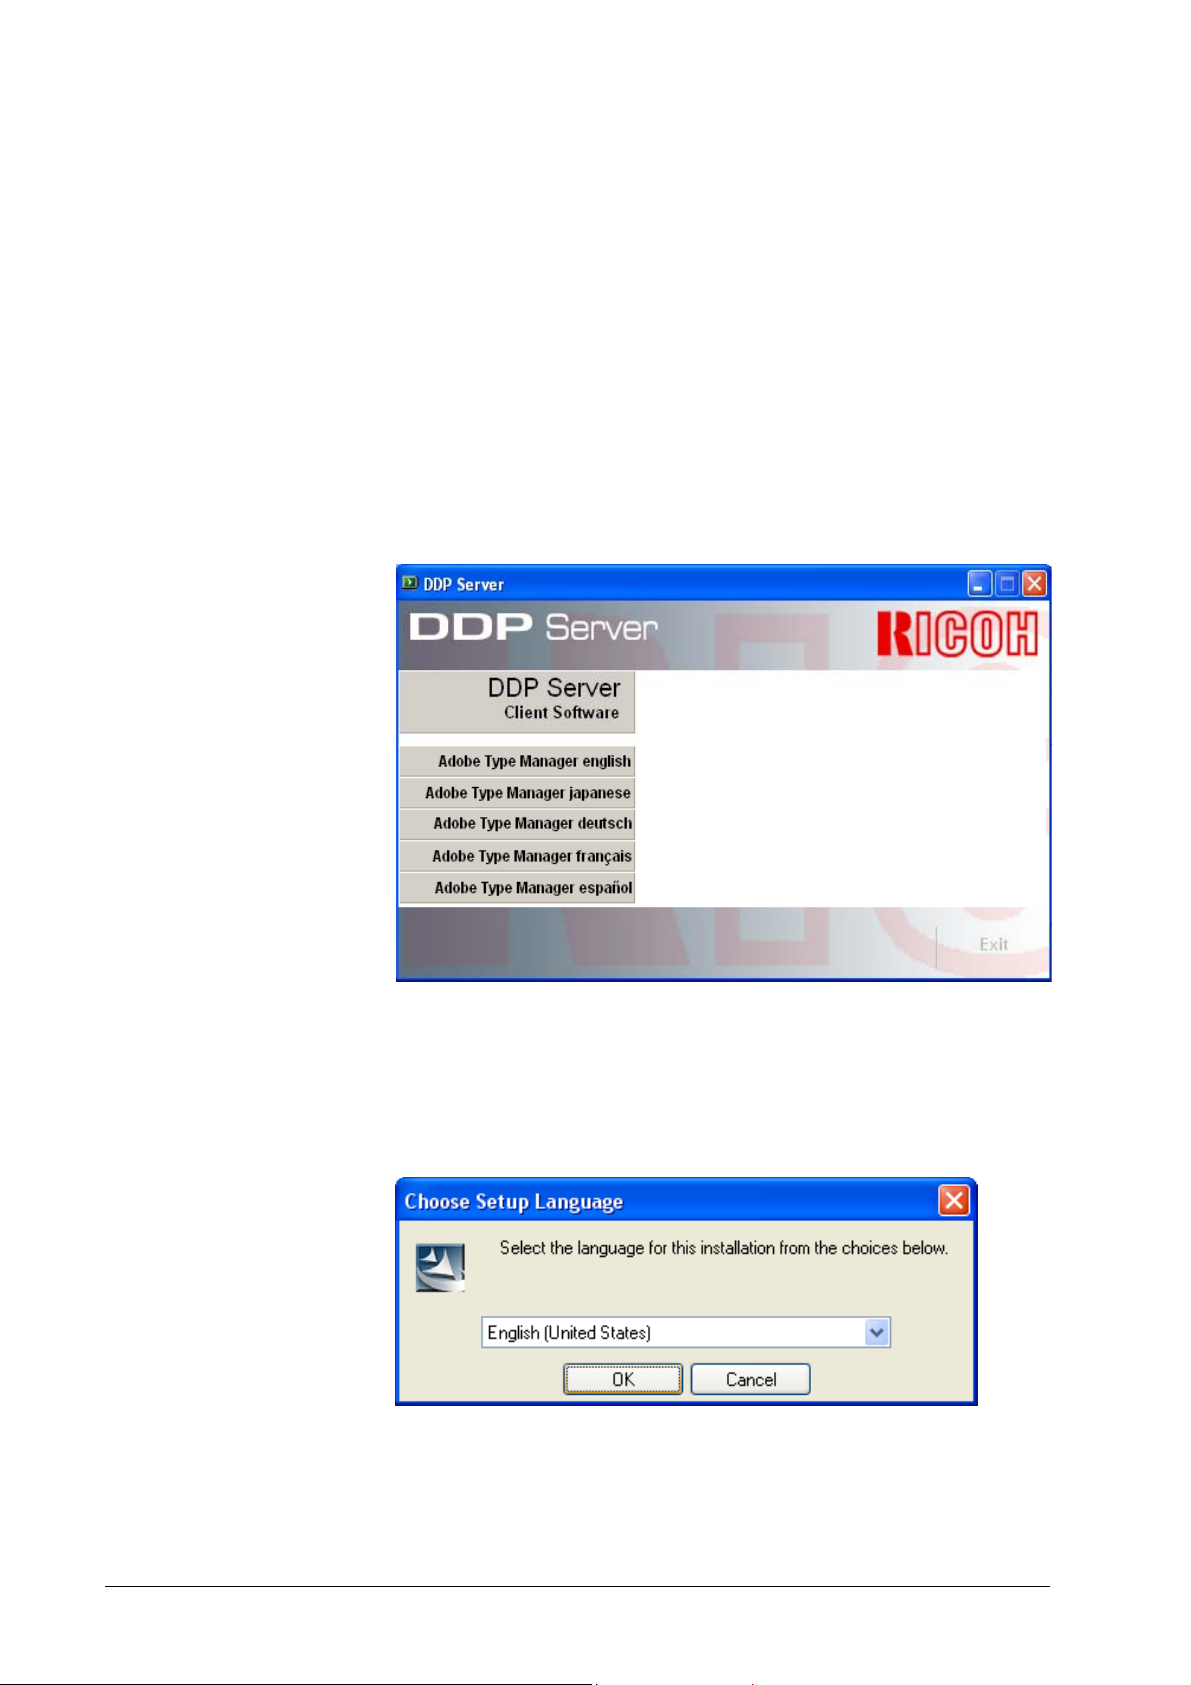
Windows
The startup application is automatically launched when you insert
the CD-ROM. You can also double click start.exe in the root folder
of the CD-ROM.
Click on
Client Software to launch the DDP Server Installer.
You may also start the installation by double clicking setup.exe in
the DDPServer folder.
In the Installer, select the language for the software to be installed.
Then follow the instructions given by the Installer.
12 • Software Installation DDP Server User's Guide
Page 23

If you want to install Database Print Manager, please observe the
following installation order:
1. Adobe Acrobat
2. DDP Server
It is important to stick to this order, because DDP Server needs to
install a plugin for Adobe Acrobat. If you are warned during the
installation that the corresponding folder has not been found,
cancel the installation and install Adobe Acrobat. If you have
installed DDP Server before Adobe Acrobat, uninstall DDP Server
and install it again after installing Adobe Acrobat.
When you install Adobe Acrobat, please respect the corresponding
licence conditions.
The following MS Word template is installed with DDP Server:
• DFL_Forms.dot – this extends the Tools menu by a
function to preview forms within an MS Word document.
If this fails because you have not installed MS Word,
you need not care.
To uninstall the software, launch the Installer from the CD -ROM,
or launch
Control panel » Software » DDP Server, then select
Remove. The software should also be uninstalled before installing
a new version of the software.
Macintosh
The CD-ROM contains one folder for each supported language.
Open the folder of your choice.
DDP Server User's Guide Software Installation • 13
Page 24
Double click the DDP Server icon to install the DDP Server
software. Follow the instructions given by the Installer.
Double click the AdobePS icon to install the generic part of the
Adobe PostScript driver, and follow the installation instructions.
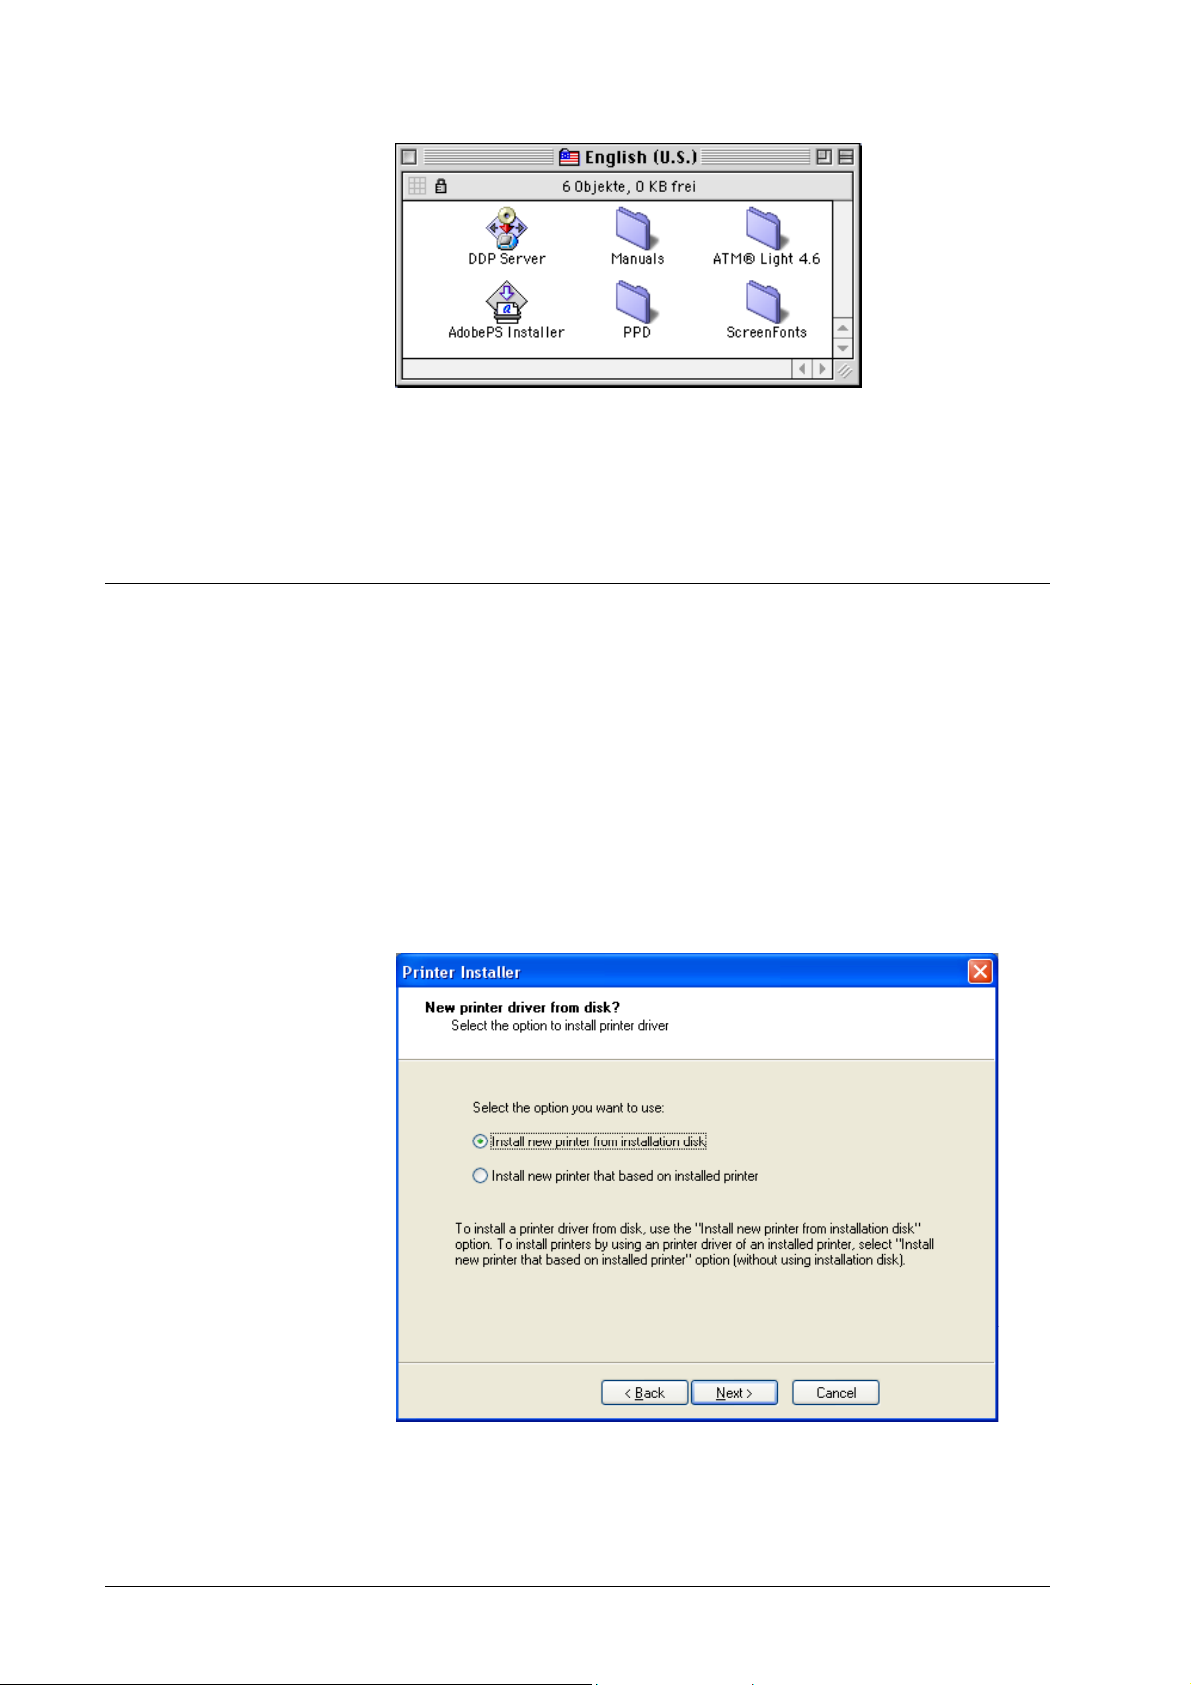
Installing the Printer Driver
Windows
The DDP Server Printer Installer is an easy-to-use application to
install Windows printers. It allows you to install several printers at
a time, one for each queue defined on your DDP Server.
From the factory, the DDP Server has a Normal and a Hold queue.
The administrator can add more custom queues.
Launch
Printer Installer from the Start menu and click Next.
For the first installation of a DDP Server as a printer select the first
option and click
14 • Software Installation DDP Server User's Guide
Next.
Page 25
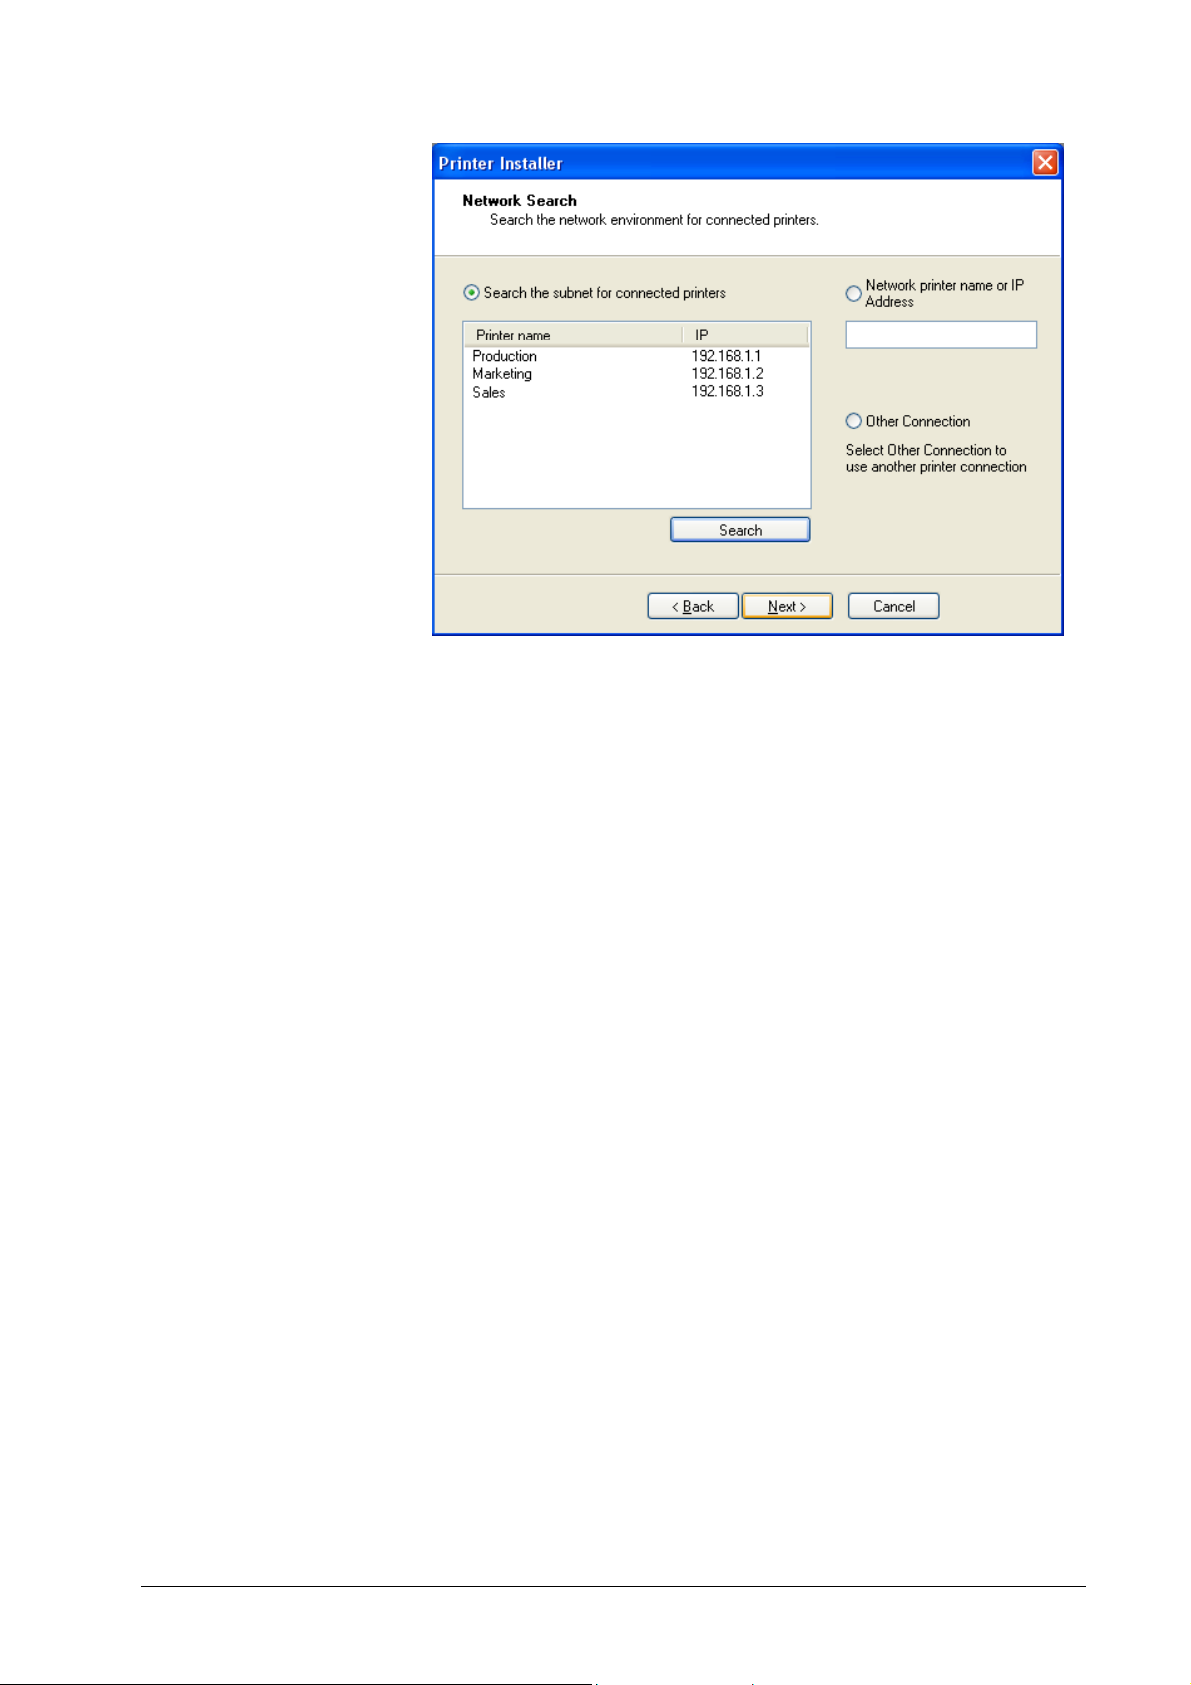
Printer Installer shows you a list of DDP Servers found in the
current network segment.
Choose one DDP Server for installation and click
Next.
If the DDP Server is behind a gateway, you have to take one of the
other options.
• Find a specific DDP Server by network name
• Find a specific DDP Server by IP address.
• Find a specific DDP Server queue by UNC, e.g.
\\DDPServer\Normal.
Note: If your network uses DNS, the administrator should make
sure that the network name assigned to the DDP Server matches
the network name stored in the DNS.
Note: The Printer Installer does not find an NT Print Server by its
Search function. Specify the printer by entering a UNC, or use the
Windows “Add Printer” function instead.
If you have chosen one of the found DDP Servers for installation,
Printer Installer shows you a list of queues defined on the DDP
Server.
DDP Server User's Guide Software Installation • 15
Page 26

Check the boxes to select at least one queue for installation and
click
Next.
Printer Installer shows you a list of printer models to be installed. If
no model is shown, click
Browse to select an .inf file in the printer
driver folder for your operating system. Select the folder
corresponding to your operating system (Windows 98/ME,
Windows NT, Windows 2000, Windows XP).
Select a printer model and click
16 • Software Installation DDP Server User's Guide
Next.
Page 27

Note: During printer installation, Windows 2000 and Windows XP
may show a warning about a missing digital signature. You should
continue the installation anyway.
Note: The Printer Installation may overwrite an existing older
version of the AdobePS printer driver. In general this is
recommended, as AdobePS printer drivers are designed for
downward compatibility. You may want to check the driver
versions in the versions file on the CD-ROM.
After the printer installation, the printer can be selected from the
print dialog of your application.
Alternatively to the Printer Installer, you can install a printer using
Add Printer function which is available in the Start menu »
the
Settings » Printers
dialog. When prompted for a printer model
description, select the printer driver folder installed with the DDP
Server software, or the printer driver folder from the CD-R OM.
The Add Printer function allows you to install a printer without
rebooting your PC.
Installable Options – Windows
The installable options tailor the user interface of the printer driver
on your PC and prevent the accidental selection of attributes which
are not supported by the DDP Server. The installable options
determine which optional accessories are available (high capacity
feeder, sheet feeder, finisher). To make the optional accessories
available in the printer driver plugin you must enable the
corresponding installable options.
Standard printer driver:
If your application uses the standard printer driver (as most
applications do), the installable options are configured in the
printer driver plug-in. The printer driver plug-in determines the
installable options automatically when it is opened the first time
and a DDP Server is connected. You can also instruct it to autodetect the installable options.
To create jobs for a DDP Server with other options installed, e.g.,
in a master-client configuration, you may also configure the
installable options in the printer driver plug-in manually.
Configure Automatically to let the printer driver plug-in
Click
auto-detect the installable options. Select an option to change its
value manually.
DDP Server User's Guide Software Installation • 17
Page 28

Non-standard printer driver:
If your application uses its own printer driver, like, e.g.,
Pagemaker, you must edit the installable options in the Windows
printer.
To edit the installable options for a Windows printer on
NT/2000/XP
a printer and right click on it to select
, open Start menu » Settings » Printers. Then select
Properties.
Windows
18 • Software Installation DDP Server User's Guide
Page 29

Then select the
Device Settings tab. This allows you to change the
installable options.
To edit the installable options for a Windows printer on
Windows 98/ME, open Start menu » Settings » Printers. Then
select a printer and right click on it to select Properties.
DDP Server User's Guide Software Installation • 19
Page 30

Then select the
Device Options tab. This allows you to change the
installable options.
Macintosh
Before you can install a printer, you must install the Adobe printer
driver software. To install the Adobe printer driver software,
launch the
instructions.
The AdobePS Installer installs only the generic Adobe printer
driver. The DDP Server specific printer driver software (PPD and
plug-in) is installed by the
install a printer you must have installed both AdobePS and DDP
Server.
To install a printer, open the
zones are enabled in your network, select the zone entered for your
DDP Server. The list of found PostScript printers shows one printer
for each queue defined on your DDP Server – at least Normal and
Hold. The printer names are made up from the network name of the
DDP Server and the queue name.
AdobePS Installer. Then follow the installation
DDP Server Installer. Before you can
Chooser and select AdobePS. If
20 • Software Installation DDP Server User's Guide
Page 31

Select a printer from the list of PostScript printers and click
Create. This will create a desktop printer for the selected DDP
Server queue.
The printer installation automatically selects a PPD matching the
DDP Server. If you are prompted for a PPD, you may not have
installed the DDP Server specific printer driver software befo re. In
this case, install the DDP Server software, then install the desktop
printer.
Note: Do not create a desktop printer for the Direct queue of the
DDP Server. It should be used only for font downloading.
Installable Options - Macintosh
You may want to edit the printer’s installable options. The
installable options tailor the user interface of the printer driver on
your Macintosh and prevent the selection of attributes which are
not supported by the DDP Server. The installable options
determine which optional accessories are available (high capacity
feder, sheet feeder, finisher). To make the optional accessories
available in the printer driver plugin you must enable the
corresponding installable options.
The installable options are determined automatically during printer
installation.
To create jobs for a DDP Server with other options installed, e.g.,
in a master-client configuration, you may also configure the
installable options in the printer driver manually.
DDP Server User's Guide Software Installation • 21
Page 32
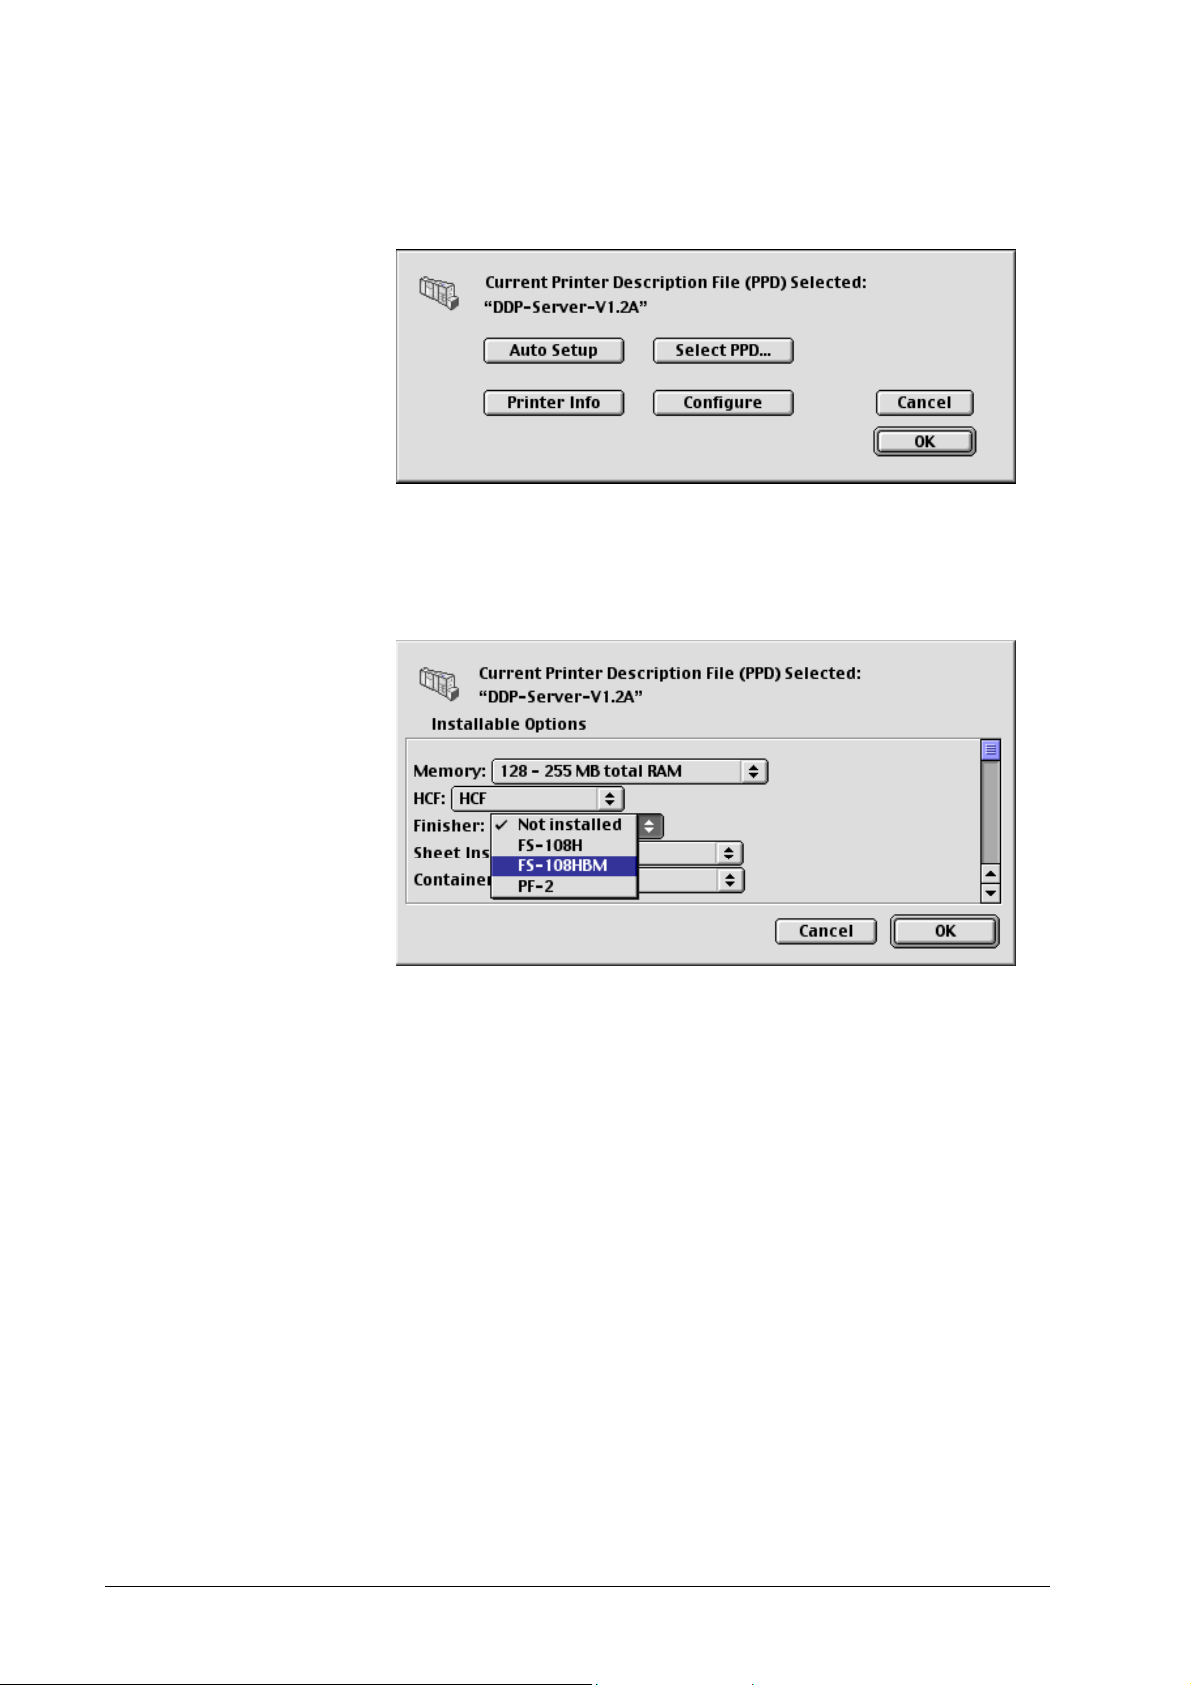
To edit the installable options, select the printer in the Chooser,
and click
Setup.
In the Setup dialog, click
Configure. This allows you to change the
installable options.
To auto-detect the installable options, click
Setup dialog.
Installation under MacOS X
Auto Setup in the
The printer driver can be installed and used in MacOS X Native
mode or under the built-in MacOS 9. However, the printer driver
plug-in can be used only under MacOS 9.
To install the printer driver under MacOS 9, select
Preferences » Startup Disk
, then select MacOS 9 and reboot,
System
then install the DDP Server software and the AdobePS driver. This
will allow you to print from applications running in Classic mode
and to use the printer driver plug-in.
To install a printer in MacOS X (10.2) Native mode, open
PrintCenter, then select Add printer. In the Add Printer dialog,
select Connection by AppleTalk, then select the AppleTalk zone
and the printer. Then select
22 • Software Installation DDP Server User's Guide
Printer model » Other …. In the
Page 33

Choose file dialog, choose the DDP Server PPD. Click OK to
confirm the PPD. Then click
Add to install the printer.
This will allow you to print using PrintCenter. PrintCenter does not
work with the printer driver plug-in, you must select options from
the PPD.
To configure a printer, open
of installed printers. Select
PrintCenter. This shows you the list
Printer » Show info. In the info dialog,
select Installable options. This allows you to change the installable options.
DDP Server User's Guide Software Installation • 23
Page 34

Installing Adobe Type Manager and Fonts
Adobe Type Manager (ATM) is a tool for displaying and printing
PostScript Type 1 fonts. ATM displays PostScript fonts on screen
(and lets you print them on non-PostScript printers). You can use
ATM to add or remove PostScript fonts to or from your system.
The CD-ROM includes ATM Light. The ATM DeLuxe version can
be purchased separately from Adobe. It allows to organize font sets
efficiently.
To install ATM, double click the setup.exe in the ATM folder of
the CD-ROM and follow the installation instructions.
The user documentation for ATM is contained in the ATM folder
of the CD-ROM.
After installing ATM, you can install fonts from the Fonts folder
on the CD-ROM.
Installing Printer Fonts
PostScript Fonts can be installed on the DDP Server using
DocXPLORER. See the DocXPLORER Reference Guide.
Note: If you use a vendor supplied font downloader on the
Macintosh, download fonts only to the Direct Queue of the DDP
Server. Do not use the print queues of the DDP Server (Normal,
Hold etc.) for downloading fonts.
24 • Software Installation DDP Server User's Guide
Page 35

Using DDP Server
Printing
After a document has been created in an application, it can be
printed on a DDP Server. For transmission to the DDP Server, the
document is converted to PostScript, a page description language
with powerful features to represent text, graphics and image
elements in print ready format, or to PCL, a simpler page
description language (Windows only).
Most layout applications contain a document setup or page setup
dialog where the size, orientation, and margins of the document
pages can be determined.
Printing the document is initiated in the Print dialog, which calls
the Printer Driver to generate a PostScript or PCL data stream, the
job. The PostScript or PCL data stream represents the elements on
the document pages. It is amended by detailed instructions for
processing, the job ticket.
The job ticket is set up partly in the printer driver, partly in the
DDP Server plug-in for the driver. The job ticket contains
information like page size and orientation, number of copies, tray
selection, imposition and finishing modes, overlay and email
notification.
Once created, the job is sent to a queue on the DDP Server. A DDP
Server contains at least two queues, the Normal queue for spooling
and printing jobs, and the Hold queue where jobs can be stored for
later retrieval. Additional queues with custom settings can be
defined by the administrator. A queue on the DDP Server is
represented by a printer on Windows or a desktop printer on
Macintosh.
Windows
Before you can print a document, you must determine its size and
orientation. Usually, the size and orientation of a newly created
document are determined as A4 or Letter and portrait. You can
DDP Server User's Guide Using DDP Server • 25
Page 36

change size and orientation, e.g. in MS Word, in the Page Setup
dialog, in the Paper Format panel.
To print a document, select the Print dialog, usually by
Print
.
File »
Print dialog may look differently in different applications.
The
Usually you can select at least the following options:
• The Windows printer which corresponds to the target
queue on the DDP Server
• The range of pages to be printed
• The number of copies to be printed
Some applications like MS Word offer a Collate option. Do not
check this option to get sorted sets of documents, as it will produce
them in a more inefficient way.
To select more print options, click the
Properties button. Under
Windows 2000 and Windows XP, this opens the following dialog:
26 • Using DDP Server DDP Server User's Guide
Page 37

Properties dialog allows you to select the following options:
The
• Layout » Orientation – the orientation selected here
must match the orientation of the document.
• Paper/Quality » Paper source – select the tray to be used
for printing.
The two options for Autoselect have the following
meaning:
• Autoselect tray: No information about tray selection
is included in the job ticket. Tray selection is
determined by the queue executing the job.
• Autoselect: Auto tray selection is included in the job
ticket. This may override the settings of the queue
executing the job.
DDP Server User's Guide Using DDP Server • 27
Page 38

To select the paper size and other parameters, click the Advanced
button:
28 • Using DDP Server DDP Server User's Guide
Page 39

Under Windows 98 and Windows ME, clicking
the following dialog:
Properties opens
Paper size, paper orientation, and paper source can be selected
within the Paper panel.
For other options within the printer driver, refer to the help
provided by the printer driver.
To change printer driver options specific to the DDP Server, select
DDP Server tab sheet in the Properties dialog. This will show
the
the DDP Server printer driver plug-in.
DDP Server User's Guide Using DDP Server • 29
Page 40

DDP Server printer driver plug-in allows you to determine the
The
following options:
• Layout – this comprises imposition (e.g. booklet) and
finishing options.
• Cover sheet – select front and back cover sheets.
• Trays – select trays for individual job pages.
• Color – select color separation parameters.
• Screening – this comprises raster frequency and angle.
• Image shifting – this allows you to position a document
on paper which is bigger than the document.
• Forms – select forms for overlay printing.
• Workflow – this comprises creation of forms and
archive jobs, job delegation and splitting settings, and
email notification.
• Installable options – this allows you to configure
installable options.
For more details about the printer driver plug-in, refer to the Printer
Driver Plug-in Reference Guide.
30 • Using DDP Server DDP Server User's Guide
Page 41
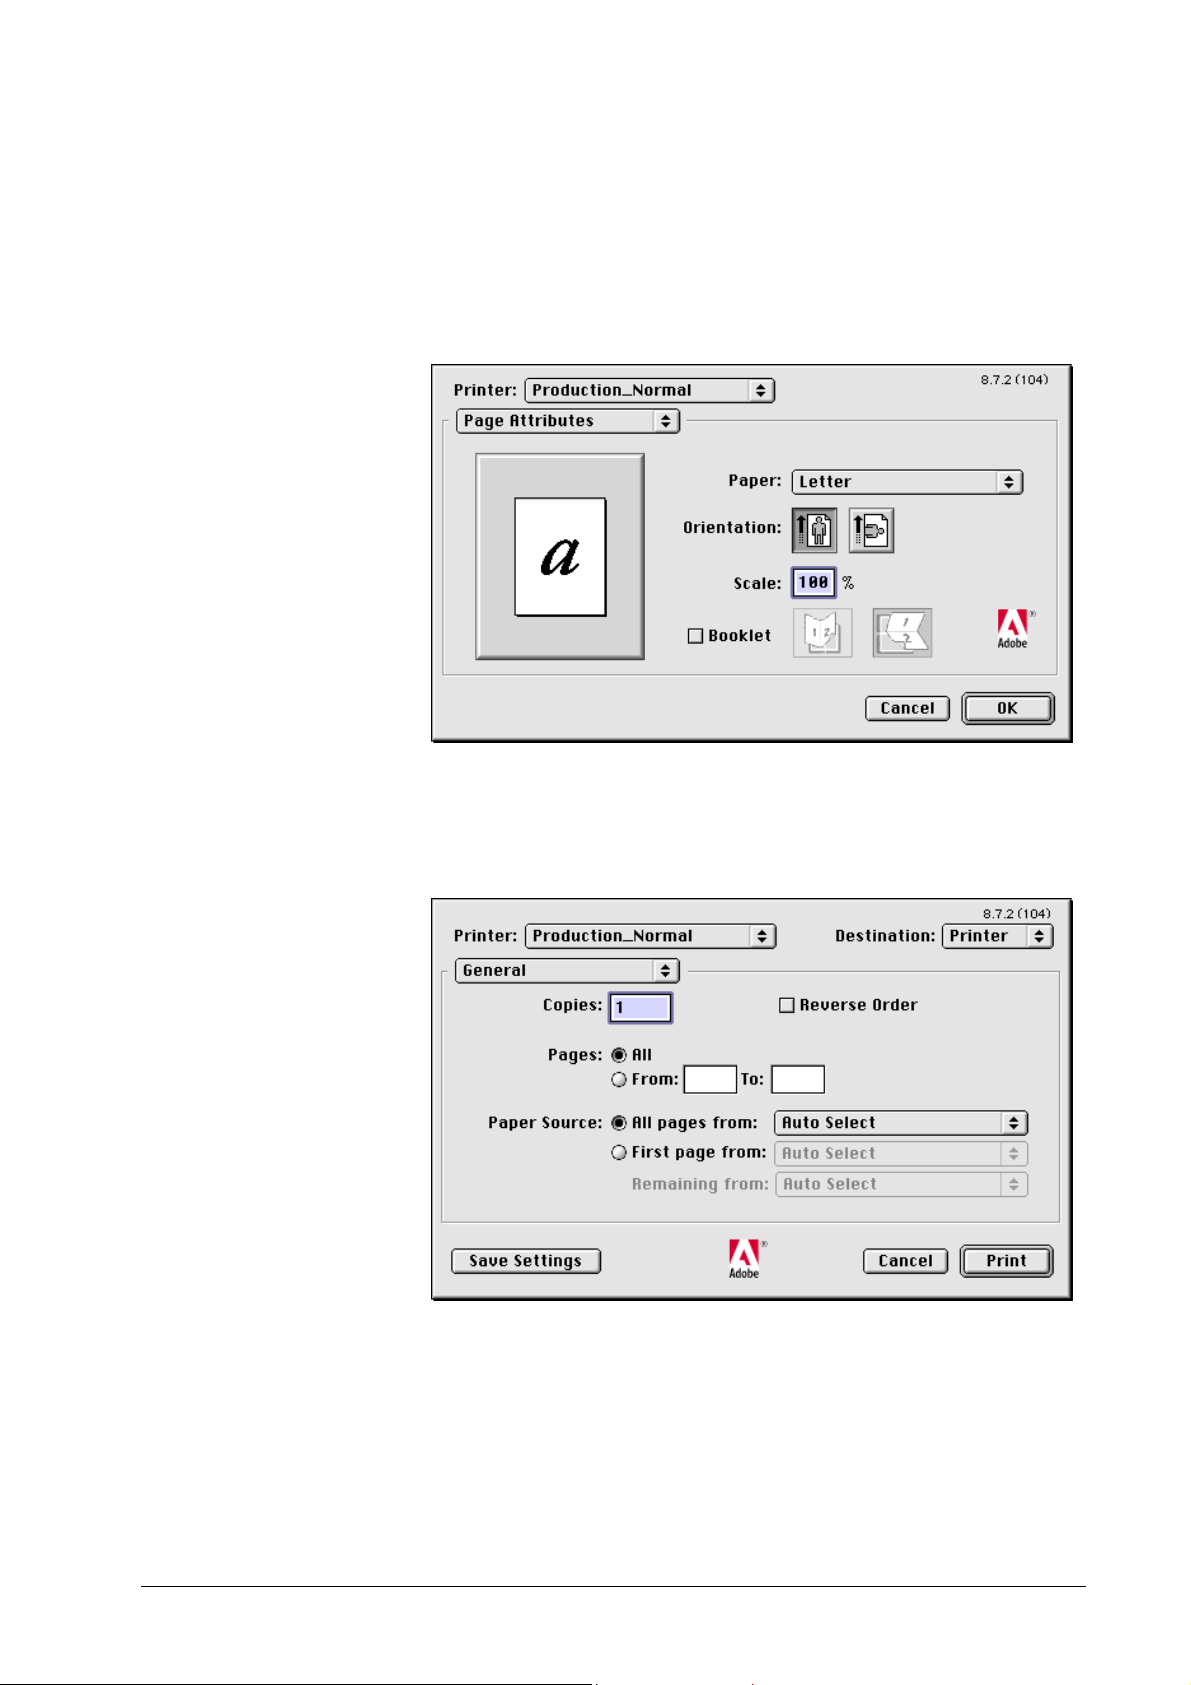
Macintosh
Before you can print a document, you must determine its size and
orientation. Usually, the size and orientation of a newly created
document are determined as A4 or Letter and portrait.
You can change size and orientation in the
Page Setup dialog.
To print a document, select the Print dialog, usually by
Print
.
File »
In each panel of the Print dialog you can select the printer which
corresponds to the target DDP Server.
DDP Server User's Guide Using DDP Server • 31
Page 42

On opening, the Print dialog shows the General panel. Within this
panel, you can select the following options:
• The range of pages to be printed
• The number of copies to be printed
• The tray to be used for printing.
The two options for Autoselect have the following
meaning:
• Autoselect tray: No information about tray selection
is included in the job ticket. Tray selection is
determined by the queue executing the job.
• Autoselect: Auto tray selection is included in the job
ticket. This may override the settings of the queue
executing the job.
• Collate – do not check this option as it will be ignored.
By default, sorting is on. Check the Group option in the
Layout panel if you want non-sorted prints.
To select more print options and change printer driver options
specific to the DDP Server, click on General and select a different
printer driver panel, e.g. the Layout panel.
DDP Server panels available from the DDP Server printer
The
driver plug-in are listed below.
• DDP Server Layout – this comprises imposition (e.g.
booklet) and finishing options.
• DDP Server Cover sheets – select front and back cover
sheets.
32 • Using DDP Server DDP Server User's Guide
Page 43

• DDP Server Trays – select trays for individual job
pages.
• DDP Server Color – select color separation parameters
• DDP Server Screening – this comprises raster frequency
and angle.
• DDP Server Image shifting – this allows you to position
a document on paper which is bigger than the
document.
• DDP Server Forms – select forms for overlay printing.
• DDP Server Workflow – this comprises creation of
forms and archive jobs, auto print settings, job
delegation and splitting settings, and email notification.
For more details about the printer driver plug-in, refer to the Printer
Driver Plug-in Reference Guide.
DDP Server User's Guide Using DDP Server • 33
Page 44

Supported network protocols
DDP Server supports the following network protocols:
Printing:
• NetBIOS (over TCP/IP)
• lpr
• Port 9100 (including limited back channel function)
Direct ports for port numbers > 9100 can be associated
with custom queues. See the DocXPLORER Reference
Guide about how to associate a direct port with a queue.
• IPP
• EtherTalk
Other protocols:
• HTTP (ProfiWEB)
• SNMP (status monitoring via host resources MIB and
printer MIB)
• DHCP
Hot folders
Hot folders are provided for NetBIOS and ftp.
NetBIOS: The DDP Server publishes a share named “hotfolder”.
In this share there is a writable subfolder for each queue.
If you have a file whose type is supported with direct printing (PS,
PDF, PCL, TIFF, or ASCII), you can copy it there, e.g. by drag and
drop or by the Windows command line:
copy myfile.pdf \\myrip\hotfolder\myqueue
This submits myfile.pdf to the queue myqueue on the RIP myrip.
ftp: The DDP Server provides an ftp site with a login for user “ftp”
or “anonymous” and any password (e.g. empty). The folder
“queue” contains a writable subfolder for each queue.
You can put files of a supported file type into a queue as follows:
ftp -A myrip (-A = anonymous login)
cd queue/myqueue
bin (only necessary if your file contains nonprintable chars)
put myfile.pdf
bye
This submits myfile.pdf to the queue myqueue on the RIP myrip.
34 • Using DDP Server DDP Server User's Guide
Page 45

Drag and Drop Printing using SMAP
The following file types are accepted as direct input by the DDP
Server:
• PostScript
• PDF
• PCL 5e/5c
• TIFF
• ASCII (must be enabled by the administrator)
Direct printing on Windows:
Drag the file on the SMAP link installed on the desktop.
SMAP shows a list of Windows printers. Select one which is asso-
ciated with a print queue of the DDP Server. The file is sent
(without modification) to the selected printer.
Alternatively: Launch SMAP from the Start menu. Select a
Windows printer from the list of printers. D rag one or more files
into the list of files. Click
Download to send the files to the printer.
Direct printing on the Macintosh:
Drag the file on the SMAP alias. The file is sent (without
modification) to SMAP’s default printer. (On the first invocation of
SMAP you will have to select a default printer.)
Alternatively: Launch SMAP. Select a printer from the printers
popup. Drag one or more files into the list of files. Click
to send the files to the printer.
The following preferences can be set for SMAP on the Macintosh:
• Automatically start printing – files will be downloaded
immediately when dragged on the SMAP alias or into the
list of files.
• Quit when done – SMAP will quit after the download.
These settings are recommended when SMAP is used for drag and
drop printing to the default printer.
You can also configure SMAP for drag and drop printing to
different printers:
• Make sure SMAP is configured for Automatically start
printing
and Quit when done.
Download
• Copy the SMAP program (not the alias), one copy for each
target printer.
• Name the program copies according to the target printers.
DDP Server User's Guide Using DDP Server • 35
Page 46

• Launch each program copy and select the target printer.
Drag and drop to this program copy will then print to the
selected printer.
No job settings can be selected during direct printing. The job will
be executed on the DDP Server with the settings entered for the
queue.
Note: SMAP for Macintosh requires CarbonLib version 1.5 or
higher. You can obtain CarbonLib from the support pages on
http://www.apple.com.
36 • Using DDP Server DDP Server User's Guide
Page 47

Managing the DDP Server using the web browser
The DDP Server can be managed through the web browser
interface.
The web browser interface is the light version of the stand alone
application DocXPLORER which is described in the next section.
To view the web browser interface, enter the name or IP address of
the DDP Server into the location field of your web browser and
click the Enter key.
The web browser interface shows a window consisting of two
frames, of which the left frame allows you to select different
dialogs in the right frame.
The web browser interface provides the following dialogs:
• Queues and jobs – this shows the list of queues.
Select:
• to view the details of the selected queue.
• to edit the details of the selected queue.
• to view the list of jobs of the selected queue.
DDP Server User's Guide Using DDP Server • 37
Page 48

Within the job list, select:
• to view the details of the selected job.
• to edit the details of the selected job.
• to preview the job (if applicable).
• to print the job (if applicable).
• Active jobs – this shows the list of active (interpreting
or printing) jobs.
• Finished jobs – this shows the list of finished jobs. The
job details allow to inspect execution results and error
messages if applicable.
• Archive – the list of pre-rasterized jobs.
• Forms – the list of installed forms.
• Accounting – this shows accounting data about finished
jobs (only if activated by the administrator).
• RIP status – this shows general information,
communication settings, and other settings of the
selected DDP Server.
• Engine status – this shows information about the
connected printer.
• Help – this shows the online help for the web browser.
• Login / logout – this allows you to login as
administrator or as a normal user. Administrator status
is required to change DDP Server settings. Normal user
login is required, e.g. to edit job settings.
For login/logout to work, your browser must accept
cookies.
• Language – this allows to select the language for the
web browser user interface.
For language selection to work, your browser must
accept cookies.
For further information, consult the ProfiWEB Reference Guide.
38 • Using DDP Server DDP Server User's Guide
Page 49

DocXPLORER Overview
DocXPLORER allows users to monitor and control a cluster of
DDP Servers in a network.
DocXPLORER provides the following functions for a DDP Server:
• Monitoring and control for multiple DDP Servers in a
network
• Load balancing between several DDP Servers by
delegation and job splitting
• Custom queues – user defined queues providing
different print profiles
• Support for extended printer driver functions like forms
overlay and archive jobs
• Job merging – creating new jobs by merging bitmaps of
pre-rasterized jobs
As a normal user, you can use DocXPLORER to submit and
monitor jobs, edit the job ticket, and perform special functions like
job merging and feedback.
As an administrator, you can configure DDP Servers, especially for
load balancing, setup queues to provide different printing profiles
and collect accounting data to charge back users.
The DocXPLORER interface includes a cluster topology overview,
showing jobs and queues lists and detailed views of jobs, queues
and DDP Servers. The left panel of the main window shows a
navigable tree overview of the network with DDP Servers and
queues. The right panels shows lists of DDP Servers, queues and
jobs, depending on what is selected on the left panel. Detail dialogs
allow users to view and edit details of selected DDP Servers,
queues, or jobs, depending on their access rights.
DocXPLORER performs continuous monitoring of all viewed
objects. The status of the DDP Servers, queues, and jobs in the
main window is regularly updated to reflect their changes. This is
performed without placing an extra burden on network traffic.
For further information, consult the DocXPLORER Reference
Guide.
DDP Server User's Guide Using DDP Server • 39
Page 50

Database Print Manager Overview
Database Print Manager (DPM) is a variable data printing solution,
and a product within the DocuFLOW
®
family of print applications.
It is designed to be simple to install and operate, compatible with
widely used word processing and database applications, and a
constructive document tool for digital office, production, print for
pay and graphic design users.
Using DPM enables you to personalize documents by performing
text and image substitution. It automatically inserts variable data
such as customer names, addresses, sentences and pictures within
documents based on the DPM template.
template consists of static elements (text, graphics and images),
A
and tags («tag») that represent placeholders for variable data.
personalized document is the result of merging the template
A
and the variable data. These documents have varying content and
static content. This provides for a variable look and message for
each document.
Real world applications that use personalized documents include
direct mailings, brochures, transactional documents such as
invoices, tickets and coupons, handbooks, manuals and any
document that requires custom content. Personalized documents
are important to relationship marketing and other business
communication activities. DPM is a workflow tool designed to
enhance output productivity and be easy to use for any document
application.
DPM works together with other DocuFLOW applications such as
e-Forms and imposition management. You can take personalized
documents and add a job ticket, overlay a company logo or a
business address using the e-Forms capability, or submit a
personalized document to a special finishing queue. In this way,
you have the option to leverage other DocuFLOW features to
further enhance your printing results.
To design templates DPM works with any software application
such as Microsoft Word and Quark QuarkXPress.
For further information, consult the Database Print Manager
Reference Guide.
40 • Using DDP Server DDP Server User's Guide
Page 51

Appendix
System Event Messages
DDP server maintains a log of system events. System events
include, for example, RIP startup, email notification configuration
problems, paper empty, and paper jam.
Events are divided into severity classes whose handling can be
configured separately:
• Info – e.g., RIP startup
• Consumables warning – e.g., paper nearly empty
• Warning – e.g., hard disk nearly full
• Consumables error – e.g., paper empty
• Error – e.g., hard disk full
• Fatal error – severe system failures
The system event log can be inspected via DocXPLORER or
ProfiWEB. DDP Server can be configured to notify the
administrator by e-mail on occurrence of a system event.
Code Severity Text Explanation
ADMIN_LOGIN Info Admin Login The administrator has logged in.
ADMIN_-
LOGOUT
ADMIN_PW_-
CHANGED
BOOT_UP Info Boot up The DDP Server has booted.
Info Admin Logout The administrator has logged out.
Info Admin password
changed
The administrator password has been changed.
DDP Server User's Guide Appendix • 41
Page 52

Code Severity Text Explanation
p
j
p
p
p
BOOT_UP_DB_CHECK_ERROR
Error Database check:
inconsistency
repaired
The database check on bootup has found and
repaired an inconsistency.
This message indicates that the DDP Server has
not been shut down properly.
Action: Always shut down the DDP Server by
shortly pressing the standby button on the front
anel or by the DocXPLORER shutdown
function.
BOOT_UP_FILE_CHECK_ERROR
Error File system
check:
inconsistency
The file system check on bootup has found and
repaired an inconsistency.
During this event, booting may take longer time.
repaired
CALL_SERVICE Fatal Call Service The printer has reported a Service Call
DB_INCON-
SISTENCY_JOB_LOST
Warning Database check:
ob record lost
The database check on bootup has detected loss
of a job record.
This message indicates that the DDP Server has
not been shut down properly.
Action: Always shut down the DDP Server by
shortly pressing the standby button on the front
anel or by the DocXPLORER shutdown
function.
DB_INCONSISTENCY_REPAIRED
DB_INCONSISTENCY_SOURCEFILE_LOST
Warning Database check:
inconsistency
repaired
Warning Database check:
source file lost
The database check on bootup has detected an
inconsistency which has been repaired.
This message indicates that the DDP Server has
not been shut down properly.
Action: Always shut down the DDP Server by
shortly pressing the standby button on the front
anel or by the DocXPLORER shutdown
function.
The database check on bootup has detected loss
of a job source file.
This message indicates that the DDP Server has
not been shut down properly.
Action: Always shut down the DDP Server by
shortly pressing the standby button on the front
anel or by the DocXPLORER shutdown
function.
42 • Appendix DDP Server User's Guide
Page 53

Code Severity Text Explanation
N
p
DNS_DOES_NOT_KNOW_RIP
DNS_NOT_FOUND
DUP_APPLETALK_NAME
Warning DNS does not
know RIP name /
address
The specified DNS (domain name server) does
not know the combination of name and address
entered for the DDP Server.
As a result, e-mail notification and access to the
DDP Server by a web browser may fail.
Action: Check the name / address entered in the
DDP Server and in the domain name server.
Error DNS not found The DDP Server could not find the specified
DNS (domain name server)
.
Action: Check the cable connections. Check the
DNS address entered under RIP details –
communication settings.
Warning Duplicate
AppleTalk name
The AppleTalk name of the DDP Server has a
duplicate in the network.
Due to the AppleTalk protocol, the DDP Server
will rename itself automatically until the next
reboot.
Action: To avoid identification problems, assign
a distinct name to each DDP Server.
EMAIL_PROBLEM
Error Email notification
failed
otification of the administrator or job owner
by email failed.
Action: Check the mail server address, the DNS
address entered for the DDP Server, and the
email address to be used for notification.
ENGINE_POWER_OFF
LOST_CONNECTION_TO_SLAVE
PAPER_EMPTY Consum.
Fatal Printer power off The connected engine was disconnected or
owered off.
Error Lost connection
to client
The connection to a DDP Server entered as
client was lost while a job was processed by a
client.
Paper empty A paper tray has run empty.
Error
Action: Refill paper.
PAPER_JAM Error Paper jam A paper jam has occurred.
Action: Clear the paper jam.
PAPER_NEARLY_-
Consum.
Warning
Paper nearly
empty
A paper tray is nearly empty.
Action: Refill paper.
EMPTY
PRINTER_-
NOT_READY
DDP Server User's Guide Appendix • 43
Error Printer not ready The printer is not ready for a temporary reason
(e.g. door open).
Page 54

Code Severity Text Explanation
RIP_HDD_FULL Fatal Hard disk full The hard disk is full. In general, printing will be
no more possible.
The hard disk partition monitored by this
message comprises job sources and archive jobs.
In general, archive jobs take up the most space.
Action: Clear some archive jobs to recover disk
space.
RIP_HDD_NEARLY_FULL
Warning Hard disk nearly
full
The hard disk is nearly full.
The hard disk partition monitored by this
message comprises job sources, archive jobs,
and fonts. In general, archive jobs take up the
most space.
Action: Clear some archive jobs to recover disk
space.
SERIAL_NUMBER_MISMATCH
Fatal Serial number
mismatch
The check of the DDP Server’s serial number
has failed.
Action: Call your service technician.
SHUTDOWN Info Shutdown The DDP Server was shut down.
SOFTWARE_-
UPGRADE
Info Software upgrade A software upgrade has been performed
successfully.
Action: You may check the new version number
on the Settings Page or in the RIP Details
dialog.
SOFTWARE_-
UPGRADE_ERROR
Error Software upgrade
failed
A software upgrade has failed. The DDP Server
is still working with the previous system
software version.
Action: Check if the upgrade file is complete
and intact. Check the MD5 sum which comes
with the upgrade.
Retry the software upgrade. The file may not
have been downloaded completely.
Check if the DDP Server executes jobs
correctly. If not, perform the Init Disk function,
then retry the upgrade.
STAPLES_-
EMPTY
STAPLES_-
NEARLY_-
Consum.
Error
Consum.
Warning
Staples empty The staple box is em pty.
Action: Replenish staples.
Staples nearly
empty
The staple box is nearly empty.
Action: Replenish staples.
EMPTY
44 • Appendix DDP Server User's Guide
Page 55

Code Severity Text Explanation
p
SYSTEM_-
Fatal RIP was
CRASH_DETECTED
TONER_EMPTY Consum.
Error
TONER_-
NEARLY_-
Consum.
Warning
EMPTY
WASTEPAPERB
OX_FULL
Consum.
Error
The DDP Server was not correctly shut down,
shutdown by
power off
but power was disconnected.
In general, the DDP Server survives
disconnecting power. However, disconnecting
ower may lead to a corrupted file system or
database.
Action: Always shut down the DDP Server by
the button at the front panel, form the
DocXPLORER, or the web server.
If the power off has lead to a DDP Server
malfunction, perform the Init Disk function.
Toner empty Toner is empty.
Action: Replenish toner.
Toner nearly
empty
Waste basket of
Trimmer is full
Toner is nearly empty.
Action: Replenish toner.
The waste basket of the trimmer is full.
Action: Empty the waste basket.
WASTEPAPERBOX_NEARLY_FULL
Consum.
Warning
Waste basket of
Trimmer is nearly
full
The waste basket of the trimmer is nearly full.
Action: Empty the waste basket.
DDP Server User's Guide Appendix • 45
Page 56

Job Check Messages
Job check messages are created during processing of each job.
They can be inspected via DocXPLORER or ProfiWEB in the Job
Details » Logging dialog. Each job can be configured to notify the
user by e-mail on occurrence of a job error.
Code Text Explanation
FoldingTooManyPages
NoColorMatchNoSep
NoColorMatchSep
NoMatchFaceUpFolding
Too many pages for
folding.
Print color does not
match engine
colors.
Print colors do not
match engine
colors.
Face up printing is
not allowed with
folding.
The job has too many pages for folding.
Action: Check the DDP184 documentation for limits on
folding.
Select stapling with folding. Folding without stapling is
allowed only for a few pages.
The print color selected for “no separation” does not match
the current engine colors.
Action: Configure the engine with the color required by
the job.
Run the job with “Don’t enforce color matching”. Note
that MICR is always enforced.
The print colors selected by the job do not match the
current engine colors.
Action: Configure the engine with the colors required by
the job.
Run the job with “Don’t enforce color matching”. Note
that MICR is always enforced.
The selected job settings, face up and folding, do no
match.
Action: Reset settings to default and enter matching
settings.
NoMatchFaceUpStapling
NoMatchFolding
MixedPageSize
46 • Appendix DDP Server User's Guide
Face up printing is
not allowed with
stapling.
Folding setting does
not allow mixed
paper sizes.
The selected job settings, face up and stapling, do no
match.
Action: Reset settings to default and enter matching
settings.
The selected job settings, half fold and mixed paper size,
do no match.
Action: Reset settings to default and enter matching
settings.
Page 57

Code Text Explanation
N
NoMatchFolding
Stapling
NoMatchLayoutMixedPageSize
NoMatchLayoutStapling
NoMatchOutputTrayMixedPageSize
NoMatchStapleMixedPageSize
Folding and
stapling settings do
not match
Layout setting does
not allow mixed
paper sizes.
Layout and stapling
settings do not
match
Output tray setting
does not allow
mixed paper sizes.
Staple setting does
not allow mixed
paper sizes.
The selected job settings do no match, e.g. half fold and
side staple.
Action: Reset settings to default and enter matching
settings.
The selected job settings do no match, e.g. booklet and
mixed paper size.
Action: Reset settings to default and enter matching
settings.
The selected job settings do no match, e.g. booklet and
corner stapling.
Action: Reset settings to default and enter matching
settings.
The selected output tray does not allow mixed paper sizes.
Mixed paper sizes are supported only with output to the
elevator tray and the sample tray.
Stapling does not allow mixed paper sizes.
Action: Select either stapling or mixed paper sizes.
NoMatchTrimmingFolding
Trimming and
folding settings do
not match
NoTrayMatch No tray matches
given paper size and
orientation.
NoTrayMatchBkcov
No tray matches
paper size and
orientation for back
cover.
NoTrayMatchFolding
No tray matches
folding setting.
Trimming is allowed only with half folding.
o tray matches the page size of the document. For auto
select tray, the page size of the document must be
available (exactly) in at least one tray. Rotation to LEF or
SEF is performed automatically.
Action: Load a tray with paper of the document page size.
If you want to print on paper which does not match the
document page size, select the corresponding tray
explicitly.
The paper in the tray selected for the back cover does not
match the paper size and orientation of the document.
Action: Select a tray for the back cover with paper of the
same size and orientation as it is used for the document.
The restrictions given by the selected folding left no tray
for the given paper size. Half folding requires SEF paper.
Action: Load a tray with SEF paper and the page size of
the document.
DDP Server User's Guide Appendix • 47
Page 58

Code Text Explanation
p
p
NoTrayMatchFrcov
NoTrayMatchHinse
NoTrayMatchHtray
NoTrayMatchLayout
No tray matches
paper size and
orientation for front
cover.
No tray matches
given insert page
size and orientation.
No tray matches
page size and
orientation for
specific page.
No tray matches
layout setting.
The paper in the tray selected for the front cover does not
match the paper size and orientation of the document.
Action: Select a tray for the front cover with paper of the
same size and orientation as it is used for the document.
The paper in the tray selected for an insert page does not
match the paper size and orientation of the document.
Action: Select a tray for the insert page with paper of the
same size and orientation as it is used for the document.
The paper in the tray selected for a specific document page
does not match the paper size and orientation of the whole
document.
Action: Select a tray for the specific document page with
aper of the same size and orientation as it is used for the
whole document.
The restrictions given by the selected layout left no tray
for the given paper size. E.g. booklet always requires SEF
aper.
Action: Load a tray with paper of a size and orientation
matching the page size of the document and the selected
layout.
NoTrayMatchStapling
No tray matches
stapling setting.
PageSizeTooBig Maximum page size
exceeded.
StaplingTooManyPages
WrongParamsColorSep
Too many pages for
stapling.
Invalid color
separation
parameters.
The restrictions given by the selected stapling left no tray
for the given paper size. E.g. long edge stapling requires
LEF paper.
Action: Load a tray with paper of a size and orientation
matching the page size of the document and the selected
stapling.
The document’s page size exceeds the maximum page
size.
Action: Make sure the document has a supported page
size.
The document’s number of pages exceeds the allowed
number of pages for stapling.
Action: Check the DDP184 documentation for limits on
stapling.
Select subsets in the DocXPLORER or Web browser Job
details » Layout dialog to get the document stapled in
subsets.
The selected settings for color separation do not match.
Action: Reset settings to default and enter matching
settings.
48 • Appendix DDP Server User's Guide
Page 59

End User License Agreement for DDP Server
IMPORTANT: Please read this Agreement before using the
software indicated above!
NOTE: In addition to the provisions of the SOFHA GmbH End
User License Agreement, the Adobe Systems Inc. End User
License Agreement (English only), which you find on page 51, is
applicable to some parts of the DDP Server product software.
This End User License Agreement (”EULA”) is a legal agreement
between you (either individual or a single corporate entity) and
SOFHA GmbH, Gesellschaft für Soft- und Hardware (SOFHA),
manufacturer of the products, which contain software products of
SOFHA itself as well as those of third parties (”Suppliers”) used
for ”DDP Server” (”System”) pursuant to the license granted by the
Suppliers to SOFHA (all of these software products are referred to
as ”Software”):
YOU MAY NOT USE, COPY, MODIFY OR TRANSFER THIS
SOFTWARE OR RELATED DOCUMENTATION EXCEPT AS
EXPRESSLY PROVIDED IN THIS AGREEMENT.
LICENSE. The Software and the documentation, if any, are
licensed, not sold. You have a nonexclusive and nontransferable
right to use the Software and related documentation. The Software
is licensed for use with a single System only.
COPYRIGHT. You agree that you neither own nor hereby acquire
any claim or right of ownership to the Software and related
documentation or to any related intellectual property. You own
only the physical media on which the Software and related
documentation are recorded or fixed. The Software and related
documentation are owned by SOFHA or its Suppliers. You agree to
use your best efforts to protect the Software and related
documentation from unauthorized duplication or use. SOFHA and
its Suppliers reserve all rights not expressly granted to you.
LIMITATIONS ON USE. You may not sublicense the Software or
related documentation, or assign, delegate or otherwise transfer this
license, or otherwise transfer or distribute copies of the Software or
related documentation to others. Any attempt to make such
sublicense, assignment, or transfer by you is void. You may not
modify or translate the Software or related documentation without
the prior written consent of SOFHA. You may not reverse
engineer, disassemble, or decompile the Software or otherwise
attempt to recreate its source code.
TERM AND TERMINATION. This license is effective until
terminated. You may terminate this license at any time by
destroying the Software and related documentation and the
authorized backup copy. This license is terminated immediately if
you make any unauthorized copies of the Software or related
documentation, or otherwise fail to comply with the terms and
DDP Server User's Guide Appendix • 49
Page 60

conditions of this agreement. You agree that upon such termination
you will destroy all copies of the Software and related
documentation.
PRODUCT SUPPORT. For product support for the software,
please contact the local RICOH dealer or RICOH Branch from
whom you purchased the System.
LIMITED WARRANTY. SOFHA warrants the media on which
the Software and related documentation is furnished to be free from
defects in materials and workmanship for ninety (90) days
from the
date of its purchase. SOFHA does not warrant that the Software
will meet your requirements or operate free from error.
EXCEPT FOR THIS LIMITED WARRANTY, SOFHA
PROVIDES THE SOFTWARE AND RELATED
DOCUMENTATION ”AS IS” WITHOUT WARRANTY OF
ANY KIND, EITHER EXPRESSED, IMPLIED OR
STATUTORY, INCLUDING BUT NOT LIMITED TO THE
IMPLIED WARRANTY OF MERCHANTABILITY AND
FITNESS FOR A PARTICULAR PURPOSE.
Some jurisdictions do not allow the exclusion of implied
warranties, so the above exclusion may not apply to you. This
warranty gives you specific legal rights and you may also have
other rights which vary by jurisdiction.
LIMITATION OF REMEDIES. If the Software and related
documentation and media fail to perform as warranted, your sole
and exclusive remedy shall be to return the media to the local
RICOH dealer or RICOH branch from whom you purchased the
System, postage prepaid, along with a copy of your receipt.
Your local RICOH dealer or RICOH Branch will, at its sole option
(i) replace the Software or media with Software or media which
conforms to the warranty, or (ii) correct the error.
IN NO EVENT SHALL SOFHA OR ITS REPRESENTATIVES
OR SUPPLIERS BE LIABLE FOR ANY SPECIAL,
INCIDENTAL OR CONSEQUENTIAL DAMAGES
(INCLUDING, BUT NOT LIMITED TO LOST PROFITS, LOST
BUSINESS OR LOST OPPORTUNITY) ARISING OUT OF
YOUR USE OR INABILITY TO USE THE SOFTWARE, EVEN
IF SOFHA OR ITS REPRESENTATIVES OR SUPPLIERS
HAVE BEEN INFORMED OF THE POSSIBILITY OF SUCH
DAMAGES.
Some jurisdictions do not allow the exclusion or limitation of
incidental or consequential damages so the above limitation or
exclusion may not apply to you.
LIMITED LIABILITY. The liability of SOFHA and Suppliers for
any claims arising out of this License, regardless of the form of
action, shall not exceed 500 € (Euro).
GOVERNING LAW. This agreement shall be governed and
interpreted in accordance with the laws of Germany.
50 • Appendix DDP Server User's Guide
Page 61

End User License Agreement Adobe Systems Incorporated
This package may contain the following materials provided by
Adobe Systems Incorporated (“Adobe”) to Licensor: software
included as part of the printing system, including PostScript
software and other Adobe software (“Printing Software”), the
digitally-encoded machine-readable outline data encoded in the
special format and in the encrypted form (“Font Programs”), other
software which runs on a computer system for use in conjunction
with the Printing Software (“Host Software”), and related
explanatory written materials (“Documentation”). The term
“Software” shall be used to describe Printing Software, Font
Programs and/or Host Software and also includes any upgrades,
modified versions, additions, and copies of the Software.
Licensor grants to Licensee a non-exclusive sublicense to use the
Software and Documentation, provided that Licensee agrees to the
following:
2. NOTICE TO U.S. END USERS. The Software is being
licensed to Licensee under the terms of this license agreement.
If Licensee declines to accept such terms, it is free to return the
Software for a full refund of the license fee paid by Licensee
for the Software, if any, provided Licensee does so before
accepting the Software (in the manner provided by Licensor.)
®
2. PRINTING SOFTWARE. Licensee may use the Printing
Software and accompanying Font Programs
2. on a single output device where the device contains an
embedded controller; OR (ii) for Printing Software which
resides on a host computer, on up to the number of central
processing units (“CPUs”) authorized in a CPSI Application
Appendix for imaging to the licensed output device(s), solely
for Licensee’s own internal business purposes.
2. ROMAN FONT PROGRAMS. In addition to the license for
Font Programs set forth in Paragraph 2 (“Printing Software”) of
this Exhibit, Licensee may use Roman Font Programs and
Adobe Type Manager
versions of letters, numerals, characters and symbols
(“Typefaces”) on up to five (5) computers for use with the
Printing Software. Licensee may take a copy of a Roman Font
Program Licensee has used for a particular file to a commercial
printer or other service bureau, and such service bureau may
use the Roman Font Program to process the file, provided such
service bureau has informed Licensee that it has purchased or
been granted a license to use that particular Roman Font
Program.
®
to reproduce weights, styles, and
DDP Server User's Guide Appendix • 51
Page 62

2. HOST SOFTWARE. Licensee may install the Host Software in
a single location on a hard disk or other storage device on one
computer or such greater number of computers authorized in a
CPSI Application Appendix (“Permitted Number of
Computers”), and, provided that the Host Software is
configured for network use, install and use the Host Software
on a single file server for use on a single local area network for
either (but not both) of the following purposes: (i) permanent
installation onto a hard disk or other storage device on up to the
Permitted Number of Computers; or (ii) use of the Host
Software over such network, provided the number of different
computers on which the Host Software is used does not exceed
the Permitted Number of Computers. Licensee may make one
backup copy of the Host Software, provided Licensee’s backup
copy is not installed or used on any computer. The primary user
of each computer on which the Host Software is installed or
used may also install the Host Software on one home or
portable computer. However, the Host Software may not be
used on the secondary computer by another person at the same
time the Host Software on the primary computer is being used.
Notwithstanding the above restrictions, Licensee may install Adobe
Driver Software on any number of computers for use with one ore
more printing systems running the Printing Software.
2. Licensee may assign its rights under this license agreement to a
Licensee of all of Licensee’s right and interest to such Software
and Documentation provided Licensee transfers to Licensee all
copies of such Software and Documentation and Licensee
agrees to be bound by all of the terms and conditions of this
license agreement. Trademarks, if used by Licensee, shall be
used in accordance with accepted trademark practice, including
identification of the trademark owner’s name.
6. The Software and Documentation are owned by Licensor and its
suppliers, and its structure, organization and code are the valuable
trade secrets of Licensor and its suppliers. The Software and
Documentation are also protected by United States Copyright Law
and International Treaty provisions. Licensee must treat the
Software and Documentation just as Licensee would any other
copyrighted material, such as a book. Licensee may not copy the
Software or Documentation, except as set forth herein. Any copies
of the Software that Licensee is permitted to make pursuant to this
license agreement must contain the same copyright and other
proprietary notices that appear on or in the Software. Licensee
agrees not to modify, adapt or translate the Software and
Documentation.
7. Licensee agrees that it will not attempt to alter, disassemble,
decrypt, reverse engineer or decompile the Software, provided
however, that to the extent local law grants Licensee the right to
decompile the Software in order to obtain information necessary to
52 • Appendix DDP Server User's Guide
Page 63

render the Software interoperable with other software, Licensee
shall first request prior written approval from Licensor who with
the concurrence of the supplier of the Software may impose such
reasonable conditions, including, but not limited to, a reasonable
fee, on such use to ensure that owners’ proprietary rights in the
Software are protected.
8. Title to and ownership of the Software and Documentation and
any reproductions thereof shall remain with Licensor and its
suppliers.
9. Trademarks shall be used in accordance with accepted trademark
practice, including identification of the trademark owner’s name.
Trademarks can only be used to identify printed output produced
by the Software. Such use of any trademark does not give Licensee
any rights of ownership in that trademark. The Trademarks are the
property of the trademark owners identified by Licensor.
10. Except as stated above, this license agreement does not grant
Licensee any intellectual property rights in the Software.
11. If this package contains, or, in connection with the acquisition
of Host Software contained in this package Licensee receives, two
or more operating environment versions of the Host Software (e.g.,
Macintosh
®
and Windows
®,
two or more language translation
versions of the Host Software, the same Host Software on two or
more media (e.g., diskettes and a CD-ROM), and/or Licensee
otherwise receives two or more copies of the Host Software,
Licensee’s use of such versions shall not exceed the aggregate uses
permitted herein for a single version of the Host Software.
12. Licensee may not rent, lease, sublicense, lend or transfer
versions or copies of the Software Licensee does not use, or
Software contained on any unused media, except as part of the
permanent transfer of all Software and Documentation as described
above. If Licensee acquires a Software upgrade, Licensee no longer
has a license to use the previous version, and all copies thereof,
including copies installed on computers, must be destroyed.
13. NEITHER LICENSOR NOR ANY OF ITS
REPRESENTATIVES MAKES OR PASSES ON TO LICENSEE
OR ANY OTHER THIRD PARTY ANY WARRANTY OR
REPRESENTATION ON BEHALF OF LICENSOR’S THIRD
PARTY SUPPLIERS, INCLUDING BUT NOT LIMITED TO
ANY IMPLIED WARRANTIES OF MERCHANTIABILITY,
FITNESS FOR A PARTICULAR PURPOSE OR
NONINFRINGEMENT.
14. IN NO EVENT WILL LICENSOR OR ITS SUPPLIERS BE
LIABLE TO LICENSEE FOR ANY CONSEQUENTIAL,
INCIDENTAL OR SPECIAL DAMAGES, INCLUDING ANY
LOST PROFITS OR LOST SAVINGS, EVEN IF LICENSOR
HAS BEEN ADVISED OF THE POSSIBILITY OF SUCH
DAMAGES, OR FOR ANY CLAIM BY ANY THIRD PARTY.
DDP Server User's Guide Appendix • 53
Page 64

Some states or jurisdictions do not allow the exclusion or limitation
of incidental, consequential or special damages, so the above
limitations may not apply to Licensee.
15. This License Agreement will be governed by the laws of
Germany. This license agreement will not be governed by the
United Nations Convention on license agreements for the
International Sale of Goods, the application of which is expressly
excluded. If any part of this license agreement is found void and
unenforceable, it will not affect the validity of the balance of the
license agreement, which shall remain valid and enforceable
according to its terms. Licensee agrees that the Software will not be
shipped, transferred or exported into any country or used in any
manner prohibited by German export law, the United States Export
Administration Act or any other export laws, restrictions or
regulations. This license agreement shall automatically terminate
upon failure by Licensee to comply with its terms. This license
agreement may only be modified in writing signed by an
authorized officer of SOFHA.
16. NOTICE TO GOVERNMENT END USERS: The Software is
a “commercial item,” as that term is defined at 48 C.F.R. 2.101
(OCT 1995), consisting of “commercial computer software” and
“commercial computer software documentation,” as such terms are
used in 48 C.F.R. 12.212 (SEPT1995). Consistent with 48 C.F.R.
12.212 and 48 C.F.R. 227.7202-1 through 227.7202-4 (JUNE
1995), all U.S. Government End Users acquire the Software with
only those rights set forth herein.
17. Licensee is hereby notified that Adobe Systems Incorporated, a
Delaware corporation located at 345 Park Avenue, San Jose, CA
95110-2704 (“Adobe”) is a third-party beneficiary to this license
agreement to the extent that this license agreement contains
provisions which relate to Licensee’s use of the Software, the Font
Programs, the Typefaces and the trademarks licensed hereby. Such
provisions are made expressly for the benefit of Adobe and are
enforceable by Adobe in addition to Licensor.
Adobe and PostScript are registered trademarks of Adobe Systems
Incorporated. Macintosh is a registered trademark of Apple
Computer, Inc. Windows is a registered trademark of Microsoft
Corporation.
54 • Appendix DDP Server User's Guide
Page 65

CE Declaration of Conformity
Declaration of Conformity
We hereby declare that the designated product/model conforms to the relevant fundamental EC directives
for safety and electromagnetic compatibility (EMC) which are listed below. The product complies to the
standards below and therefore carries the CE mark. This declaration becomes invalid if any modification
to the product is made without our written approval.
Konformitätserklärung
Hiermit erklären wir die Übereinstimmung des bezeichneten Produkts/Typs mit den einschlägigen
grundlegenden EU-Richtlinien für Sicherheit und elektromagnetische Verträglichkeit (EMV), we lche unten
genannt sind. Das Produkt erfüllt die unten genannten Normen und trägt deshalb das CE-Zeichen. Diese
Erklärung verliert durch Änderungen am Produkt, welche nicht von uns schriftlich autorisiert wurden, ihre
Gültigkeit.
Déclaration de Conformité
Nous reconnaissons par la présente que le produit/modèle indiqué est conforme aux directives
fondamentales de la Communauté Européenne suivantes concernant la sécu rité et la compatibilité
électromagnétique (CEM). Le produit remplit les normes mentionnées ci-dessous et porte de ce fait le
signe CE. Cette déclaration perd sa validité dès lors qu’une transformation du produit est effectuée sans
notre autorisation écrite.
Dichiarazione di conformità
Viene qui dichiarata la conformità del prodotto/modello indicato con le Direttive fondamentali UE vigenti in
materia di sicurezza e compatibilità elettromagnetica (CEM), le quali sono indicate qui di seguito. Il
prodotto soddisfa le Norme qui di seguito indicate, ed è pertanto contrassegnato con il marchio CE. La
presente dichiarazione perde di validità qualora vengano apportate al prodotto modifiche ch e non siano
state esplicitamente autorizzate in forma scritta dal suo costruttore.
Declaración de conformidad
Por la presente se declara la conformidad del producto/modelo indicado con las correspondientes
normas básicas de la EU para la seguridad y compatibilidad electromagnética (CEM) que ab ajo se
nombran. El producto cumple las abajo citadas normas y lleva por ello el símbolo CE. Esta declara ción
pierde su validez si se efectuaran cambios en el producto que no hubieran sido autorizados por nosotros.
Product
Produkt · Produit · Prodotto · Producto
Model
Typ · Type · Modello · Tipo
EC Directives
EU-Richtlinien · Directives CE
Direttive CE · Directivas UE
Standards
Normen · Normes
Norme · Normas
EMC EN 55022:1998 (Class A)
Manufacturer
Hersteller · Fabricant
Costruttore · Fabricante
Date of Issue
Ausstellungsdatum · Date d’émission
Data di emissione · Fecha de emisión
Authorized Officer
Bevollmächtigter · Fondé de pouvoir
Incaricato responsabile · Apoderado
Raster Image Processor
ProfiRIP DDP
Low-Voltage Directive
EMC Directive
73/23/EEC
89/336/EEC
Safety DIN EN 60950 (VDE0805):2001-12
EN 60950:2000
IEC 60950(ed.3):1999+corr.2000 modif.
EN 55024:1998
EN 61000-3-2:1995+A1:1998+A2:1998
EN 61000-3-3:1995
SOFHA GmbH
Gustav-Meyer-Allee 25, 13355 Berlin, Germany
March 31, 2003
Alexander Biller
Manager Product Services
DDP Server User's Guide Appendix • 55
Page 66

Page 67

Glossary
Term/Abbreviation Explanation
Accounting
Active jobs
Administrator
Archive queue
ASCII
Auto select tray
Bitmap
Booklet
Client
Cluster Printing
Providing the administrator with execution and consumables
usage data for executed jobs, e.g. number and type of printed
pages, print time, errors.
A virtual queue showing the jobs which are currently
interpreted or output.
User with special rights to configure a DDP Server. See user.
A virtual queue of jobs rasterized for later feedback, merging,
overlay, and printing.
An encoding for text.
A method to select a paper tray matching the job’s
requirements, e.g. by page size and finishing options.
Image data produced by the RIP for output on the printer, or for
preview of forms or archive jobs.
Layout of the pages of a document on the printed sheets such
that the result can be center folded and then read as a booklet.
A DDP Server configured for load balancing. The client takes
over jobs from a master for execution.
s. load balancing.
Copy splitting
DDP Server
Delegation
DHCP
DDP Server User's Guide Glossary • 57
Dividing a print job into subsets by reducing its copy count, e.g.
duplicating a 500 copies job into 2 jobs with 250 copies each.
Printer controller. DDP Server turns a digital prin ter into a
network printer which supports custom queues, archive
printing, forms overlay, job merging, and cluster printing.
Sending a job to another DDP Server for execution. Delegation
aims at reaching a balanced load between all DDP Servers
involved. Delegated jobs are tracked such that their history can
be displayed at the master.
Dynamic Host Configuration Protocol. A network protocol
used for assigning IP numbers to network devices (server,
workstation, printer).
Page 68

Term/Abbreviation Explanation
DNS
DocuFLOW
DocXPLORER
Domain name server
Download
Electronic stationery
EtherTalk
Failed job
Feedback
See domain name server.
s. SOFHA DocuFLOW
Monitoring and control application of SOFHA DocuFLOW.
DocXPLORER allows to manage a network of DDP Servers
together with the queues and jobs on them.
A network device mapping network names on IP addresses. A
domain name server can also refer to a mail server by providing
its MX record.
Sending a job or font to the DDP Server. Download can be
performed via drag and drop using SMAP or the
DocXPLORER.
s. form
A network protocol used in Macintosh environments for
printing and file sharing.
A job whose execution raised an error, e.g. paper jam or paper
tray mismatch. Failed jobs may be recovered from the Finished
queue.
Obtaining a bitmap from the DDP Server. Bitmaps are available
for jobs rasterized for later printing and for forms. Bitmaps are
available as thumbnails, full screen resolution, or full page
resolution.
Finished jobs
Finishing
Form
Forms queue
Font
Gateway
Hold queue
HTTP
A virtual queue showing jobs which have finished execution.
Job details are still available for all jobs in this queue.
Post printing operations, e.g. stapling, folding.
A job which can be used to simulate preprinted paper
(electronic stationery). Printing a document with a form results
in printing the document pages over the form pages. Final prints
may select a tray with offset printed paper instead of the form.
A virtual queue containing jobs which can be applied as PS
overlay to other jobs.
Set of typographically designed characters. Typical font types
are TrueType and Type 1 (PostScript) fonts. Fonts may be
available as screen fonts (for display) and as printer fonts (for
high resolution output).
s. router
A queue with jobs stored for later submission to a print queue.
Hypertext transfer protocol. A network protocol used for
communicating linked pages in local networks and the internet.
HTTP is provided by the web server on the DDP Server.
Imposition
Instructions on how the pages of a job are laid out on the
printed sheets, e.g. duplex or booklet.
58 • Glossary DDP Server User's Guide
Page 69

Term/Abbreviation Explanation
IP
IP number
IPP
Job
Job setting
Job splitting
Job ticket
Load Balancing
Internet protocol. The lower layer of the TCP/IP protocol.
A unique number used to identify a network device (e.g. server,
workstation, printer) in a network. An IP number consists of 4
integers between 0 and 255 (eight bits), e.g. 128.3.3.21. IP
numbers may be valid world wide or only in the local network.
Internet Printing protocol. A network protocol used for printing
in local networks and over the internet. IPP can use HTTP for
job transport.
Document in print ready format plus job ticket.
Job ticket attribute defined in a job. Job settings may be set in
the printer driver and edited in the job details dialog of the
DocXPLORER. Job settings may be overridden by queue
settings.
s. page splitting, copy splitting
Instructions for printer specific handling of a job, e.g. for
imposition, forms inclusion, or owner notification.
Using two or more DDP Servers to share print load among
several printers. Sharing is achieved by delegation, page
splitting and copy splitting.
Master
MX record
Name server
NetBIOS
Netmask
Owner
Page
Page description
language
A DDP Server configured for load balancing. The master
accepts jobs from clients and sends (delegates) them to the
clients (including itself) for execution. Typically, in a load
balancing configuration, users send jobs only to the master. A
DDP Server can be master and client at the same time.
Mail exchange record provided by a domain name server. The
MX record refers to a mail server accepting email for a specific
domain.
See domain name server.
A network protocol used in Windows environments for printing
and file sharing.
A 4 number tuple (like an IP number) specifying a subnet for
searches and broadcasts. E.g. the netmask 255.255.0.0 specifies
the first 16 bit of an IP number as subnet address.
The person or user account who submitted the job.
1. document page (in the application)
2. printed page (on paper)
Language for expressing document content on a printer
instruction level. E.g. PostScript, PDF, PCL.
Page splitting
Dividing a print job into packets by pages, e.g. page 1-10 and
11-20 of a 20 page job. Finishing options like booklet layout or
staple mode apply to each packet individually.
DDP Server User's Guide Glossary • 59
Page 70

Term/Abbreviation Explanation
PCL
PDF
PostScript
PPD
Print pages (number of)
Print queue
ProfiRIP
Purge
Printer command language. A page description language used
for HP printers. PCL5e supports black and white printing,
PCL5c supports color printing.
Portable document format. PDF differs from PostScript by
being less device dependent, page independent and easily to
view on many platforms.
Page description language (PDL) with a rich feature set for
mapping text, graphics and images on raster devices like
printers and film recorders.
PostScript Printer Description. A file on the workstation which
specifies printer capabilities and how the printer driver can map
them on printer commands.
Number of document pages times number of copies.
A queue with jobs waiting for execution.
Printer controller of DDP Server.
Deleting old jobs to recover database and job space. Purging
may be applied to job sources if they are still available, to
accounting records, and to job tickets.
Queue
Queue setting
Reboot
RIP
Router
Sample page
Sheet
A container for jobs. DDP Server provides print queues and
hold queues. The administrator may define any number of print
and hold queues.
On the user’s workstation, queues may be visible as MS
Windows printers, or as Macintosh desktop printers.
Job ticket attributes defined in a queue. They may be defined to
take priority over job settings.
Restarting and initialising a DDP Server
Raster image processor. A device for turning instructions in a
page description language (PDL) into bitmaps suitable for
output on a printer. E.g. ProfiRIP
A network device connecting a subnet to other networks.
Predefined job in the hold queue showing configuration data on
the DDP Server. There are sample pages for settings (Settings
page) and for fonts (Fonts page).
Sheet of printed paper. In duplex printing, two pages are printed
on one sheet. In booklet printing, 2 document pages are mapped
on one printed page and 4 document pages are printed on one
sheet.
SMTP
Simple mail transfer protocol. SMTP is used by the DDP Server
to send email notifications about job execution to the owner.
60 • Glossary DDP Server User's Guide
Page 71

Term/Abbreviation Explanation
SNMP
SOFHA DocuFLOW®
Subnet
TCP/IP
UNC
User
Simple network management protocol. A network protocol
used for monitoring and configuring network devices, e.g.
printers. The DDP Server configuration can be monitored by
SNMP.
Software extending the SOFHA ProfiRIP office printing
system. Comprises custom queues, archive printing, forms
overlay, job merging, and cluster printing.
1. A set of IP numbers sharing a number of leading bits
2. A segment of a network separated from the rest of the
network by a gateway
A network protocol used for communication in local area
networks and the internet.
Universal Naming Convention – a method to name network
devices in a Windows environment
User with simple printing rights on a DDP Server. See
administrator.
DDP Server User's Guide Glossary • 61
 Loading...