

Page 1

RICOH Printing Systems DDP Server
DocXPLORER
Reference Guide
SOFHA GmbH
Version 2.1
N905304
Page 2

Preface
Welcome to DocXPLORER!
DocXPLORER is the monitoring and control application of the DDP Server
printing system.
DocXPLORER is described in the following manuals:
• DDP Server User'’s Guide – describing the installation and giving
an overview of all DDP Server components
• DocXPLORER Reference Guide – this manual
The DocXPLORER reference guide is stored in machine readable form (PDF
format) on the DDP Server CD-ROM. You may print it for use with your DDP
Server.
The following conventions are used in this manual:
• Dialogs and functions to be selected by the user are referenced in
this style.
• Some user interface elements are denoted by a path. For example,
RIP » Details » Communication settings refers to the dialog
panel obtained by selecting the menu RIP, the menu item Details,
and, in the resulting dialog, the panel Communication settings.
• Functions available to the administrator only, and not to the normal
user, are marked at the beginning of the corresponding sections.
Copyright © 1999 - 2004 SOFHA GmbH, Germany.
Version 2.1, 1 Dec. 2004
SOFHA, POD Server, ProfiRIP, SOFHA DocuFLOW, and Doc XPLORER are
registered trademarks of SOFHA GmbH, Germany.
Adobe, Acrobat and PostScript are registered trademarks of Adobe Systems
Incorporated in the U.S.A. and other countries.
Microsoft and Windows are registered trademarks of Microsoft Corporation in
the U.S.A. and other countries.
AppleTalk, Macintosh and MacOS are trademarks of Apple Computer, Inc.,
registered in the U.S.A. and other countries.
All other company and product names are (registered) trademarks of the
respective owners.
While every effort has been made to ensure the accuracy of information
contained in this document, SOFHA GmbH shall not be held responsible for any
inaccuracies it may contain.
All specifications are subject to change without notice.
Page 3

Contents
Preface................................................................................................................................ ii
General 1
DocXPLORER Overview....................................................................................................1
Getting started – User..........................................................................................................2
Getting started – Admin.......................................................................................................2
User / administrator mode....................................................................................................2
User tasks.............................................................................................................................3
Administrator tasks..............................................................................................................3
Queue types .........................................................................................................................3
Job types..............................................................................................................................4
Job ownership......................................................................................................................4
Forms...................................................................................................................................5
User interface operations.....................................................................................................6
Tasks 7
Discovering DDP Servers....................................................................................................7
Naming a DDP Server.........................................................................................................7
Managing fonts....................................................................................................................8
Load Balancing....................................................................................................................9
Job Splitting.......................................................................................................................10
Accounting.........................................................................................................................11
Reboot / Shutdown ............................................................................................................12
Defining and managing queues..........................................................................................12
Printing jobs.......................................................................................................................13
Job Tracking......................................................................................................................13
Handling failed jobs...........................................................................................................14
Defining forms...................................................................................................................14
Applying forms..................................................................................................................15
Creating and handling archive jobs....................................................................................15
Functions 17
Tree view display...............................................................................................................17
RIP list display...................................................................................................................18
Queue list display ..............................................................................................................19
Job list display...................................................................................................................21
Job operations....................................................................................................................22
RIP details..........................................................................................................................24
RIP details – General.........................................................................................................24
RIP details – Communication............................................................................................26
RIP details – Engine Communication................................................................................27
RIP details – Media type/color mapping ...........................................................................28
RIP details – Accounting...................................................................................................28
RIP details – Event logging...............................................................................................29
Queue details .....................................................................................................................30
Job details ..........................................................................................................................32
Job details – Print settings ................................................................................................. 32
Job details – Page settings .................................................................................................39
Edit RIP list .......................................................................................................................39
DocXPLORER Reference Guide Contents • i
Page 4

DHCP Server.................................................................................................................... 40
Preferences........................................................................................................................ 41
Admin login / logout......................................................................................................... 41
Color Management ........................................................................................................... 41
Font Management............................................................................................................. 43
Load Balancing................................................................................................................. 44
Accounting........................................................................................................................ 45
Event Logging...................................................................................................................46
Reboot / Shutdown............................................................................................................ 46
Download Job................................................................................................................... 47
Feedback and preview....................................................................................................... 47
Job merging ...................................................................................................................... 49
Export / import archive jobs ............................................................................................. 50
Glossary 51
ii • Contents DocXPLORER Reference Guide
Page 5

General
DocXPLORER Overview
DocXPLORER allows users to monitor and control a cluster of DDP Servers in a
network.
As a normal user, you can use DocXPLORER to submit and monitor jobs, edit
the job ticket, and perform special functions like merging jobs, and feedback.
As an administrator, you can configure DDP Servers , especially for load
balancing, setup queues to provide different printing profiles and collect
accounting data to charge back users.
The DocXPLORER interface includes a cluster topology overview, showing jobs
and queues lists and detailed views of jobs, queues and DDP Servers. The left
panel of the main window shows a navigable tree overview of the network with
DDP Servers and queue s. The right panels shows lists of DDP Servers, queues
and jobs, depending on what is selected on the left panel. Detail dialogs allow
users to view and edit details of selected DDP Servers, queues, or jobs,
depending on their access rights.
DocXPLORER performs continuous monitoring of all viewed objects. The status
of the DDP Servers, queues, and jobs in the main window is regularly updated to
reflect their changes. This is performed without placing an extra burden on
network traffic.
DocXPLORER Reference Guide General • 1
Page 6

Getting started – User
To install DocXPLORER on Windows, run the setup application on the CDROM. On Macintosh, run the Installer from the CD-ROM.
On Windows, launch DocXPLORER from the Start menu. On Macintosh,
launch DocXPLORER from the folder ch osen during installation.
If you are using DocXPLORER in a network without gateways, DocXPLORER
shows you all available DDP Servers.
If your network contains gateways, and you want to access DDP Servers outside
your own network segment, you have to set up a list of DDP Servers which
DocXPLORER should look for. See Discovering DDP Servers.
Getting started – Admin
To make a DDP Server available in your network, you should perform the
following tasks:
• Assign communication settings (name and IP address) to the DDP
Server.
See Naming a DDP Server.
• Define queues.
See Defining and managing queues.
• Configure load balancing, if you want several DDP Servers to
share the printing load.
See Load balancing.
• Install forms.
See Defining Forms.
User / administrator mode
DocXPLORER can be operated in user or in administrator mode. Several
functions are available to administrators only. To obtain administrator status for
a DDP Server, select the RIP » Admin login function and enter the
administrator password. To return to the normal user status, select the RIP »
Admin logout function.
Only one user can be administrator of a DDP Server at any time. You can
acquire administrator rights via DocXPLORER or via the web browser.
DocXPLORER has priority over the web browser. An administrator login by
DocXPLORER cancels an existing web browser login.
The administrator can change the administrator password by the RIP » Change
Password function. The administrator password is empty by factory default. It
is reset to empty when the Factory defaults function is perf ormed.
Functions available only to the administrator are marked by the prefix
“Administrator” for the corresponding section.
2 • General DocXPLORER Reference Guide
Page 7

User tasks
The following functions are provided to all users:
Administrator tasks
The following functions are provided only to an administrator:
• View DDP Server settings
• View available fonts
• View the load balancing configuration
• View queue settings
• Submit / create jobs
• Change /copy / move / view / merge own jobs
• Copy / view jobs owned by other users (this may be restrict ed, see
RIP » Details » General » Others can see jobs)
• Create forms
• Change DDP Server settings
• Download / manage fonts
Queue types
• View and obtain accounting data
• Configure load balancing
• Reboot / Shutdown
• Create / change / delete queues
• Change / copy / view jobs owned by other users, including
assigning another owner to a job
DDP Server provides the user print queues and hold queues.
Print queue
Print queues are queues where jobs are submitted for execution. Jobs submitted
to print queues are executed in FIFO (first in first out) order. The order of job
execution may deviate from FIFO if queues have been set up with different
priorities, e.g. high or low.
Print queues can have a printing profile associated with them. The print settings
of a queue define how its jobs are printed and finishe d. Each attri b ut e of the
queue’s print settings can be defined to take priority over the jobs’ settings. For
example, in a queue with staple mode set to corner and queue priority, each job
will be corner stapled, regardless of the job’s setting applied in the printer driver.
Hold queue
Hold queues are permanent containers for jobs. Jobs are not executed until
moved from the hold queue to a print queue. Jobs in a hold queue can be
submitted to a print queue at any time.
DocXPLORER Reference Guide General • 3
Page 8

Job types
The administrator can define any number of print and h old queues. This can be
used to provide different printing profiles according to the user group’s needs.
Both print and hold queues can be installed as Wi nd o ws or M aci nt osh prin t ers.
This allows easy and direct access to a queue with specified settings.
Visibility of queues in the network can be restricted by the administrator. This
can be used to enforce that jobs are printed to a hold queue and must be
explicitly released by the administrator using DocXPLORER. See Queue »
Details » Visible in the network.
DDP Server supports several different processing types for jobs:
Job ownership
•
•
printing to a hold queue. Jobs submitted to a hold queue are stored
for later submission to a print queue.
•
performed from the Workflow panel of the printer driver.
Rendered bitmaps can be retrieved from the Archive queue. See
Creating and Handling Archive Jobs.
•
the Workflow panel of the printer driver. Forms can be included
for overlay printing in other jobs in the Forms panel of the printer
driver. See Defining Forms and Applying Forms.
The owner of a job is the person or user account which printed the job.
Printing
Storing in a hold queue: this is performed by
Archiving as rendered bitmap: this can be
Establishing as form: this can be performed from
Owner’s (or administrator’s) view of a job
The owner of a job has the right to perform all possible operations on the job, i.e.
change, delete, copy, and view the job.
4 • General DocXPLORER Reference Guide
Page 9
Any other user’s view of a job
The access rights of other users are determined by the administrator. In the RIP
» Details » General dialog, the administrator may allow or disallow that users
view other users’ job details. This means that all viewing operations are allowed
or forbidden on other users’ jobs .
Forms
Viewing a job comprises seeing the job in a job list, viewing its details, viewing
its rendered bitmap, viewing the job log, and copying (resubmitting) the job.
When a job is copied by a common user, this user becomes the owner of the job.
This allows to account the job to the person who has made the copy. If a job is
copied by the administrator, the owner is retained.
A form is a single-page job which can be used instead of preprinted paper
(electronic stationery). For example, a form may contain a company letterhead
or logo.
Printing a document with a form results in printing the document pages over the
form pages (PS overlay) or merging the document page bitmaps with the form
bitmaps (bitmap overlay). To print the final version of a job, you may select a
tray with offset printed paper instead of the form.
Forms can be created from any software application, e.g. MS Word . Form s are
created by printing the document with Destination = Form in the Workflow
panel of the printer driver, or by selecting Destination = Form in the Job »
Details dialog.
Forms are applied from the Forms panel of the printer driver, or by selecting
Use PS overlay = … or Use bitmap overlay = … in the Job » Details dialog.
Applying a form can also be associated with a queue. Printing to the queue will
then apply the form.
DocXPLORER Reference Guide General • 5
Page 10

User interface operations
The graphical user interface with its explorer-like main window provides
intuitive access to all operations. Selected objects (DDP Servers, queues, jobs,
and pages) show applicable operations in context menus and through tool bar
buttons.
The following keyboard operations are supported: Enter to confirm and leave a
dialog, Escape to cancel a dialog, Tab to step through the input fields of a dialog.
Note: On Macintosh menus, the shortcut key is named “Meta”. “Meta” refers to
the command key. “Backspace” refers to the key which, e.g., in the Finder is
used to delete files.
Copying operations can be performed by drag and drop. Drag and drop can be
used in the DocXPLORER to move jobs between queues or to submit jobs from
Microsoft Windows Explorer or Macintosh Finder. Just drag a file with a
supported type (PostScript, PDF, PCL, TIFF, ASCII) from the Windows
Explorer or Finder to a queue.
All list displays in the main window of DocXPLORER can be sorted by each
column simply by clicking on the column header. For print queues, the default
sorting order for job lists, execution order, can be restored by the Job » Print
order command.
6 • General DocXPLORER Reference Guide
Page 11

Tasks
Discovering DDP Servers
DocXPLORER discovers DDP Servers in the current network segment automatically by regular broadcast calls. Broadcast is performed continuously, so newly
found DDP Servers are displayed immediately with in your DocXPLORER tree
without any further specific user action. If your network contains no gateways,
DocXPLORER finds all DDP Servers by itself.
If you want DocXPLORER to find DDP Servers in another network segment,
e.g. beyond a gateway, you have to establish a list of DDP Servers. Select the
DocXPLORER » Edit RIP list dialog. This dialog allows you to enter DDP
Servers by name or by IP number. You need to build the DDP Server list only
once; it will be stored for future sessions.
Naming a DDP Server
Administrator:
The default network protocol supported by a DDP Server is TCP/IP. However, a
new DDP Server added to the network with factory settings has no IP address.
There are two ways to assign an IP address to a new DDP Server:
• Using an existing DHCP server in the network. The RIP looks for
• By simulating a DHCP server with the DocXPLORER.
You can change name and IP address of a RIP in the RIP details » Communication settings dialog tab sheet. This tab sheet allows you also to configure other
attributes: NetBIOS workgroup, AppleTalk zone and domain name server.
one after booting.
See DHCP Server.
DocXPLORER Reference Guide Tasks • 7
Page 12
Managing fonts
If you relocate the RIP to another network, you can direct the RIP to use DHCP
again by turning on the Use DHCP flag in the RIP details » Communications
settings tab sheet.
If the DDP Server’s communication settings have been accidentally lost, you can
restore them to DHCP by the Initialize Disk function. See DDP Server User’s
Guide.
Administrator (users can view fonts):
Font Management allows you to download fonts to the DDP Server and to view
the list of available fonts. Fonts can be downloaded temporarily to memory or
permanently to disk.
Use the RIP » Font Management dialog to download or view the list of fonts.
8 • Tasks DocXPLORER Reference Guide
Page 13

Load Balancing
On Windows systems, fonts are usually sent with the PostScript job. So
downloading fonts makes sense if you configure your Windows printer not to
send fonts. In this case, fonts downloaded on the RIP save download time for
jobs.
On Macintosh, available printer fonts are queried before sending a job. So fonts
downloaded on the RIP save download time for jobs.
In a hard disk based system like DDP Server, it is generally better to download
fonts to disk. Fonts downloaded to memory will be lost after rebooting the DDP
Server.
Font downloading on the Macintosh uses a direct channel which in the chooser
appears as an additional print queue. You should, however, not use this for
printing jobs, as some job ticket options are not available through the direct
channel.
Note: Certain fonts, e.g. some Japanese Macintosh fonts, cannot be installed
using DocXPLORER as they use proprietary protection mechanisms. Use the
font installer supplied with the font instead.
Administrator (users can view the configuration):
Load balancing means using two or more DDP Servers to share print load among
several printers. In a load balancing configuration one DDP Server is configured
as master while a number of other DDP Servers are configured as clients. The
master can then delegate jobs to the clients. Since all DDP Servers are able to be
both master and client you can choose any of them to be master and you can
change the configuration at any time. Although it is possible to define more than
one master at a time it does not make sense and may be confusing.
To configure load balancing, select the RIP » Load Balancing dialog.
In a load balancing configuration print jobs are typically only sent to the master
DDP Server. The jobs are delegated to the next available DDP Server in the
cluster automatically where they are printed with exactly the same settings as if
they would be printed at the master. All accounting and logging information is
collected by the master DDP Server and can be found in it's accounting and
finished jobs dialogs.
Job delegation is usually performed by round robin, i.e. for each job the next
available client is determined and the job is sent to it. Delegation of many small
jobs may be customized by “multiple job delegation”. With multiple job delegation enabled, the switch to the next available client will only be performed after a
specified number of pages.
DocXPLORER Reference Guide Tasks • 9
Page 14
Job Splitting
If your job has been split into smaller packets (see Job Splitting) then each
packet may be delegated to another DDP Server in the cluster.
If you wish your job not to be delegated to a client but printed at the master then
you can set the job feature “Delegation” to “Off”.
In a load balancing configuration it makes sense to hide all client queues by
setting the queue feature “Visible in Network” to “No”.
If you have defined a number of print queues with special settings (like Layout is
Booklet or Staple Mode is Corner) at the master then you don't need to define
these queues at the clients as well. Typically, no additional queues are defined at
the client DDP Servers.
To avoid malfunction make sure that the same fonts and forms are available on
all DDP Servers in the cluster.
Delegation is not supported for jobs submitted via a direct port.
To optimize load balancing, jobs can be automatically split into packets.
Splitting a job into several packets and delegating the packets to different DDP
Servers yields a more even distribution of the overall load, and allows to shorten
the time until the individual job is completely executed.
Job splitting can be applied independently of load b a lancing.
Jobs can be split by pages or by copies:
Page splitting is achieved by dividing a print job into subsets by pages, e.g. page
1-100 and 101-200 of a 200 page job.
Copy splitting is achieved by duplicating a print job with reduced copy count,
e.g. duplicating a 500 copies job into 2 jobs with 250 copies each.
Job splitting can be selected in the Workflow panel of the printer driver plugin,
or in the Job » Details » Workflow dialog panel. Together with the splitting
mode, a splitting limit must be entered, which defines the maximum packet size.
Copy splitting packets will be sized (approximately) equally. E.g. with copy
splitting limit = 100, a 210 copies job will be split into 3 packets of 70 copies.
10 • Tasks DocXPLORER Reference Guide
Page 15

Accounting
Page splitting packets will be sized to the limit, except the last packet which is
sized to the rest.
Page splitting can also be used to divide a booklet into portions which can be
handled by the finisher. E.g. to print a 150 page document as booklet, select page
splitting with a limit of 64 pages. This will create three booklets which fit into
the booklet printing limit of 64 pages (= 16 sheets).
Job splitting is not supported for jobs submitted via a direct port.
Administrator (users can view own data):
During processing, the DDP Server collects accounting data about each job. Call
the RIP » Accounting dialog to view accounting data for all jobs.
The accounting dialog shows you a list of finished jobs with details like download time, RIP and print duration, pages printed, and finishing options.
You can export the accounting records to your workstation for further
processing, e.g. billing. Click Save to save the accounting data in tab separated
values (.tsv) format, for easy import into spreadsheet applications.
Accounting data can be deleted by clicking Purge and Purge all (for selected or
all jobs). This deletes the job entries completely from the DDP Server job
database.
DocXPLORER Reference Guide Tasks • 11
Page 16
Reboot / Shutdown
Administrator:
You can reboot or shut down the DDP Server from the DocXPLORER using the
RIP » Reboot or the RIP » Shutdown command. This performs an operating
system level restart or software controlled power off of the DDP Server.
You can also shut down the DDP Server by pressing the standby button at the
DDP Server’s front panel. This function performs a software controlled power
off which you can recognize by repeated beep tones from the RIP after a few
seconds of waiting.
Avoid turning off the power of the DDP Server by the rear side power switch or
by disconnecting the power cable, as this may cause data loss.
Defining and managing queues
Administrator:
DDP Server provides print queues and hold queues.
To create a queue, select the Queue » New queue command.
Select print queue or hold queue as queue type. This cannot be changed
afterwards. Select the queue in the main window and select the Queue » Details
dialog to set the queue attributes.
After its definition, the queue will be visible in the DocXPLORER. Visibility as
Windows printer queue and as Macintosh printer can be switched on or off as a
queue attribute.
12 • Tasks DocXPLORER Reference Guide
Page 17

Printing jobs
To install a queue as a printer on a Windows workstation, run the DDP Server
Printer Installer.
To delete a queue, select the Queue » Delete queue command. After a
confirmation, this deletes the queue and all jobs contained in it. There is no
recovery for deleted queues.
To manage a queue, select the queue in the main window and select the Queue »
Details dialog. For a print queue, you can edit general settings like queue name,
visibility or priority, as well as printing attributes like staple, duplex and form
application.
Hold queues do not provide print settings. Print settings are activated only by
submitting a job to a print queue. However, jobs submitted to a hold queue can
have their own job settings and these can be edited by the user.
After creating, deleting, or renaming a queue or changing its visibility, you
should reboot the DDP Server to make the changes effective for the printing
protocols, i.e. NetBIOS, lpr, and EtherTalk.
See Queue list display.
There are several ways to submit a job for printing:
1. Call the Print dialog of your application. On Windows, job settings
can be edited in the properties dialog, and its DDP Server tab sheet.
On Macintosh, job settings can be edited in the DDP Server
extensions of the printer dialog. This creates a job ticket.
Job Tracking
The print target of the print dialog may be a print queue or a hold
queue. Print queues are for execution in FIFO order . Hold queues
are for storing print jobs permanently.
Job settings are stored with the job as a job ticket. They will be
applied on execution of the job, unless the corresponding queue
settings are set to override job settings.
2. Copy a job from a hold queue to a print queue. This can be done by
drag and drop.
3. Download a file with a supported type (PostScript, PDF, PCL,
TIFF, ASCII). To do so, select a queue, then select the Queue »
Download Job function.
4. Copy a job from the Windows Explorer or Macintosh Finder. Files
of a supported type can be submitted by drag and drop directly
from the Windows Explorer or Finder.
Tracking allows you to monitor the processing status and events of a job during
its lifetime. After a job is submitted to a print queue, it stays there waiting for
execution, then moves to the Active queue while it is processed, then moves to
the Finished queue. At any time you can select the job and select the Job »
Details dialog. The Logging tab sheet will show you all processing events
occurred up to now. If there were errors, there will be an explanatory message.
The event log of a job can also be viewed from the RIP » Accounting dialog.
DocXPLORER Reference Guide Tasks • 13
Page 18

Handling failed jobs
Jobs may fail, e.g. because the requested paper size is not available. Failed jobs
are marked with an error status in the list of finished jobs.
Failed jobs can be copied to a print queue for resubmission. It may be necessary
to edit the job ticket (e.g. change requested paper tray), or to change the DDP
Server’s engine configuration (e.g. supply right paper size) before resubmission.
The job sources necessary for resubmission are automatically purged following
criteria defined by the administrator, e.g. by available space. So resubmission
may not be possible after a while, although the job is still visible in the list of
finished jobs.
Defining forms
A form is a one page job which can be used instead of preprinted paper
(electronic stationery). For example, a form may contain the company letterhead
or logo.
Forms are created by printing the form document with appropriate settings.
There are three ways:
1. In the Windows printer dialog, select Properties » DDP Server »
Workflow. Then set the attribute Destination = Form. Then submit
the job for printing.
2. In the Macintosh printer dialog, select DDP Server Workflow.
Then set the attribute Destination = Form. Then submit the job for
printing.
3. In the DocXPLORER, select the job, select the Job » Details
command and, in Workflow tabsheet, set the attribute Destination =
Form. Then submit the job to a print queue.
In all of the three cases, after job execution its preview appears in the Forms
queue of DocXPLORER and in the Forms panel of the printer driver.
For the creation of the form, job ticket attributes for tray selection and finishing
are ignored.
Administrator:
To define a queue with the new form, create a queue or select an existing queue,
select Queue » Details, then select the Forms tab sheet and set the attribute
PS Overlay or Bitmap Overlay to the desired form.
Note: Forms cannot be created by downloading a PDF file, even to a queue
which is setup to create forms. To create a form from a PDF file, open it in
Adobe Acrobat and print it as described above.
14 • Tasks DocXPLORER Reference Guide
Page 19
Applying forms
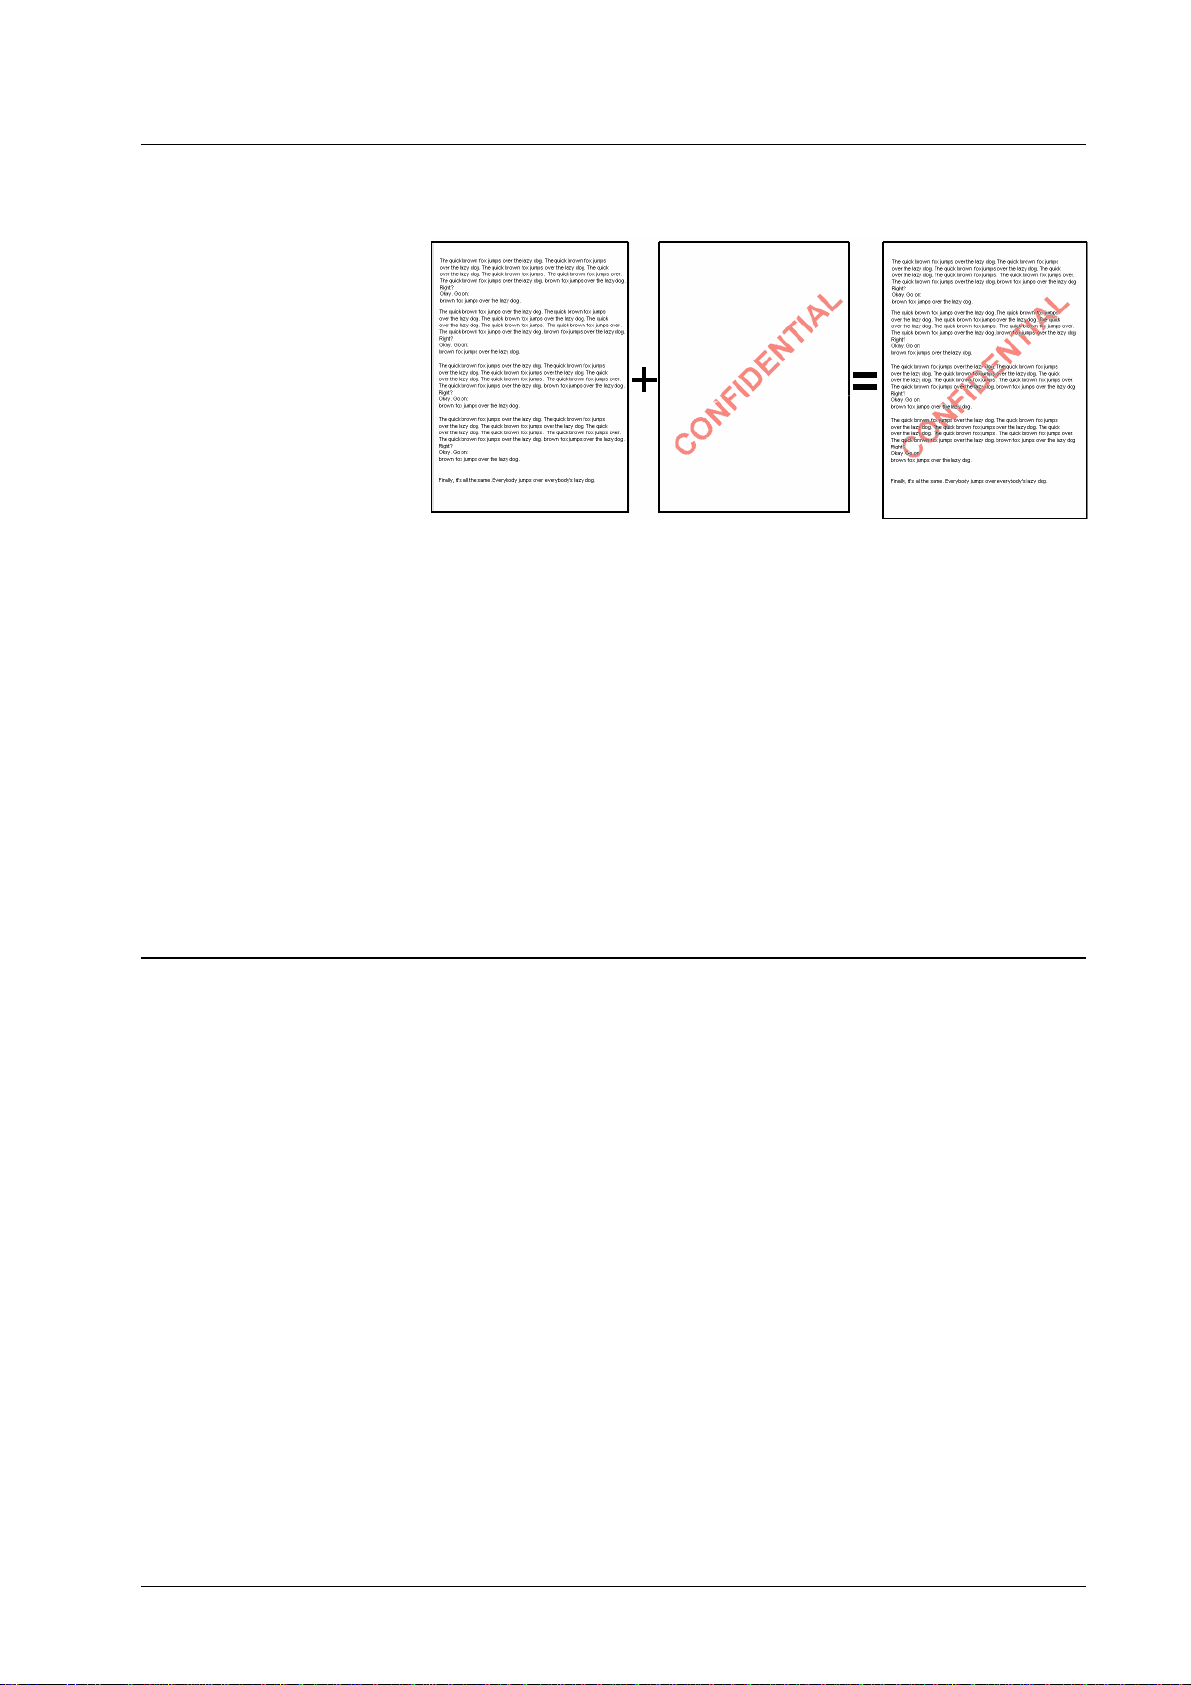
Your document + form to apply = result
Forms can be applied from the Forms panel of the printer driver dialog. In the
Windows printer dialog, select Properties » DDP Server » Forms. In the
Macintosh printer dialog, select DDP Server Forms. Check the Merge
Document with form field.
To preview a form in the DocXPLORER, select the form in the Forms queue
and select the Job » Feedback command. This shows you a thumbnail view of
the form. To obtain a full screen resolution preview, select one of the File » Save
… commands.
To apply a form in the DocXPLORER, select the job and select the Job »
Details command. In the Forms tab sheet, select PS Overlay = <desired form>
or Bitmap Overlay = <desired form>.
To apply a form to specific pages of your job, select Job » Details » Page
Specific » PS Overlay or Bitmap Overlay and enter the desired page numbers.
See Job Details – Print Settings.
Creating and handling archive jobs
The following job operations cause the DDP Server to store a bitmap with a job:
• Archiving as a rendered bitmap – this is achieved by selecting in
the printer driver or in the Job » Details dialog: Destination =
Archive.
The DDP Server produces print resolution bitmaps. The resulting
job is available in the Archive queue. The bitmaps can be used to
print the job without new execution or to merge jobs.
The bitmaps can be viewed by selecting the job and selecting the Job »
Feedback command. The DDP Server first shows thumbnail views of the
available bitmaps. If you select a bitmap, you can download it by the File » Save
or the File » Save as command. You can download all bitmaps of the job by the
File » Save job or the File » Save job as command. The resulting bitmaps are in
full screen resolution for forms and in print resolution for archive bitmaps.
Archive jobs can be printed by selecting the Job » Print function. This opens the
job details dialog and, after possible changes, submits the job for printing. Not
all job ticket attributes can be changed for an archive job to be printed, because
some attributes, like screening, or booklet half size, work on the PostScript
interpreter.
Archive jobs can be prepended or appe nded to another job. Prepending can be
used, e.g., to add a cover page in front of your document. Appending can be
DocXPLORER Reference Guide Tasks • 15
Page 20

used, e.g., to add terms and conditions at the end of your document. Use the
Job » Details » Forms » Prepend or Append function to add an archive job to
your document. See Job Details – Print Settings.
Archive jobs can be merged by selecting the
Merging.
Job » Merge function. See Job
16 • Tasks DocXPLORER Reference Guide
Page 21

Functions
Tree view display
The network tree view on the left side of the main window shows DDP Servers
and their queues in your network. See Discovering DDP Servers about how to
get all the DDP Servers in your network displayed.
The tree view can be browsed by clicking on the +/- marks to open and close
subtrees. On the Macintosh, click the triangles or double-click the DDP Server
icons. Corresponding to the object selected in the tree view, the following
objects are shown in the right panel:
• Network: RIP list
• RIP: Queue list
• Queue: Job list
To edit or view details of any object in the tree view, select the object by
clicking on it, and select the RIP / Queue / Job » Details dialog.
The following virtual queues show jobs with special status. They are only
available in the network tree view and cannot be manipulated by users:
• Active jobs – jobs currently being i nt e r pret ed or output.
• Finished jobs – jobs which have finished executi on . T he Fini shed
jobs queue shows only printed or failed jobs. Forms and archive
jobs are shown in the Forms or Archive queue, respectively.
DocXPLORER Reference Guide Functions • 17
Page 22
RIP list display
• Archive – jobs whose bitmaps are archived for reprinting or
feedback to the client workstation.
• Forms – jobs to be applied as forms from other jobs
The above mentioned virtual que ues should not be confused with print or hold
queues. They are not available as NetBIOS, lpr, or EtherTalk queues. The
unqualified term “queue” always refers to a print or hold queue.
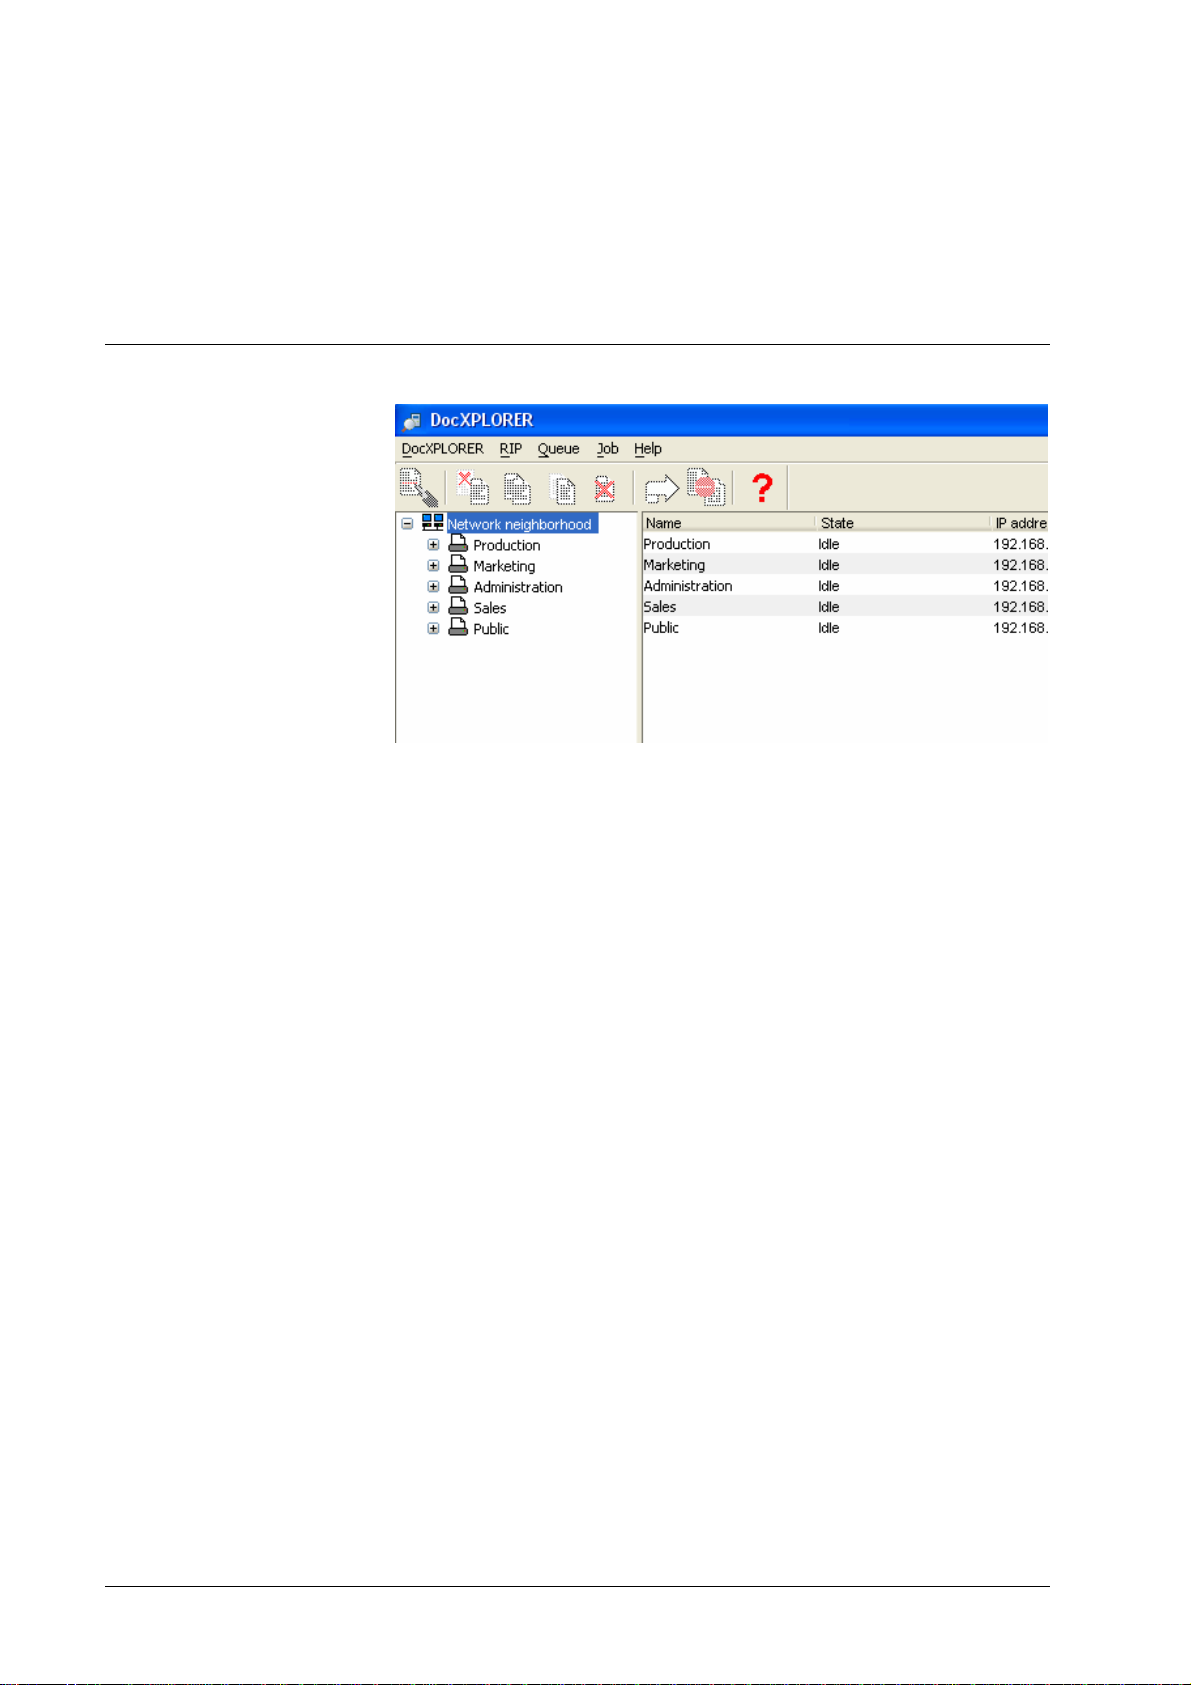
The RIP list on the right side of the main window is used to monitor the activity
and the load of the DDP Servers in the network. See Discovering DDP Servers
about how to get all the DDP Servers in your network displayed.
The RIP list shows the following attributes for each found DDP Server:
• Name, state, IP address, jobs, pages, comment, model
Pages is the sum of the print pages of all jobs in all running print queues of the
DDP Server. Print pages of jobs in hold queues or stopped queues are not
counted. The number of print pages of a job is the number of its document pages
times the number of its copies.
Note: The number of print pages is not shown for PDF jobs.
To edit or view details of any DDP Server in the list, select the row in the list by
clicking on it, and select the RIP » Details dialog.
The RIP list can be sorted by each column simply by clicking on the column
header. E.g. to sort by number of outstanding jobs, click on the jobs column
header.
18 • Functions DocXPLORER Reference Guide
Page 23
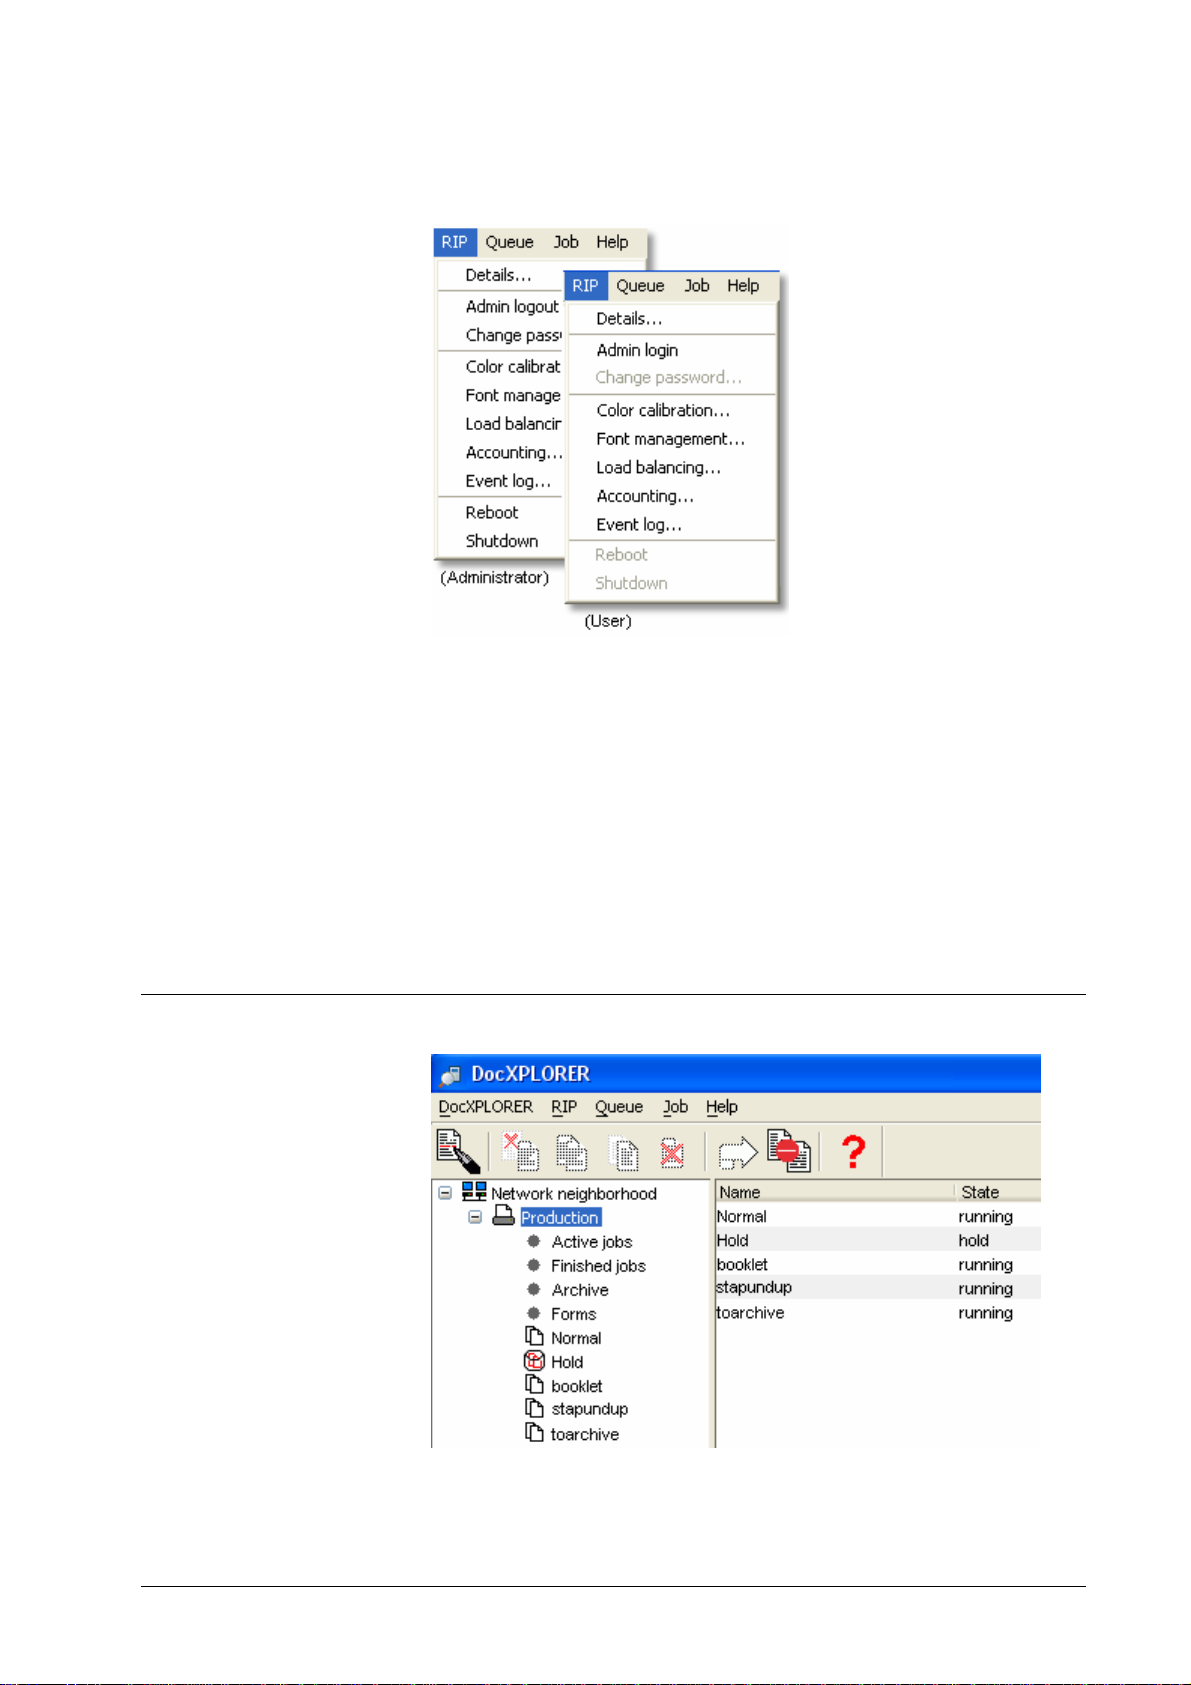
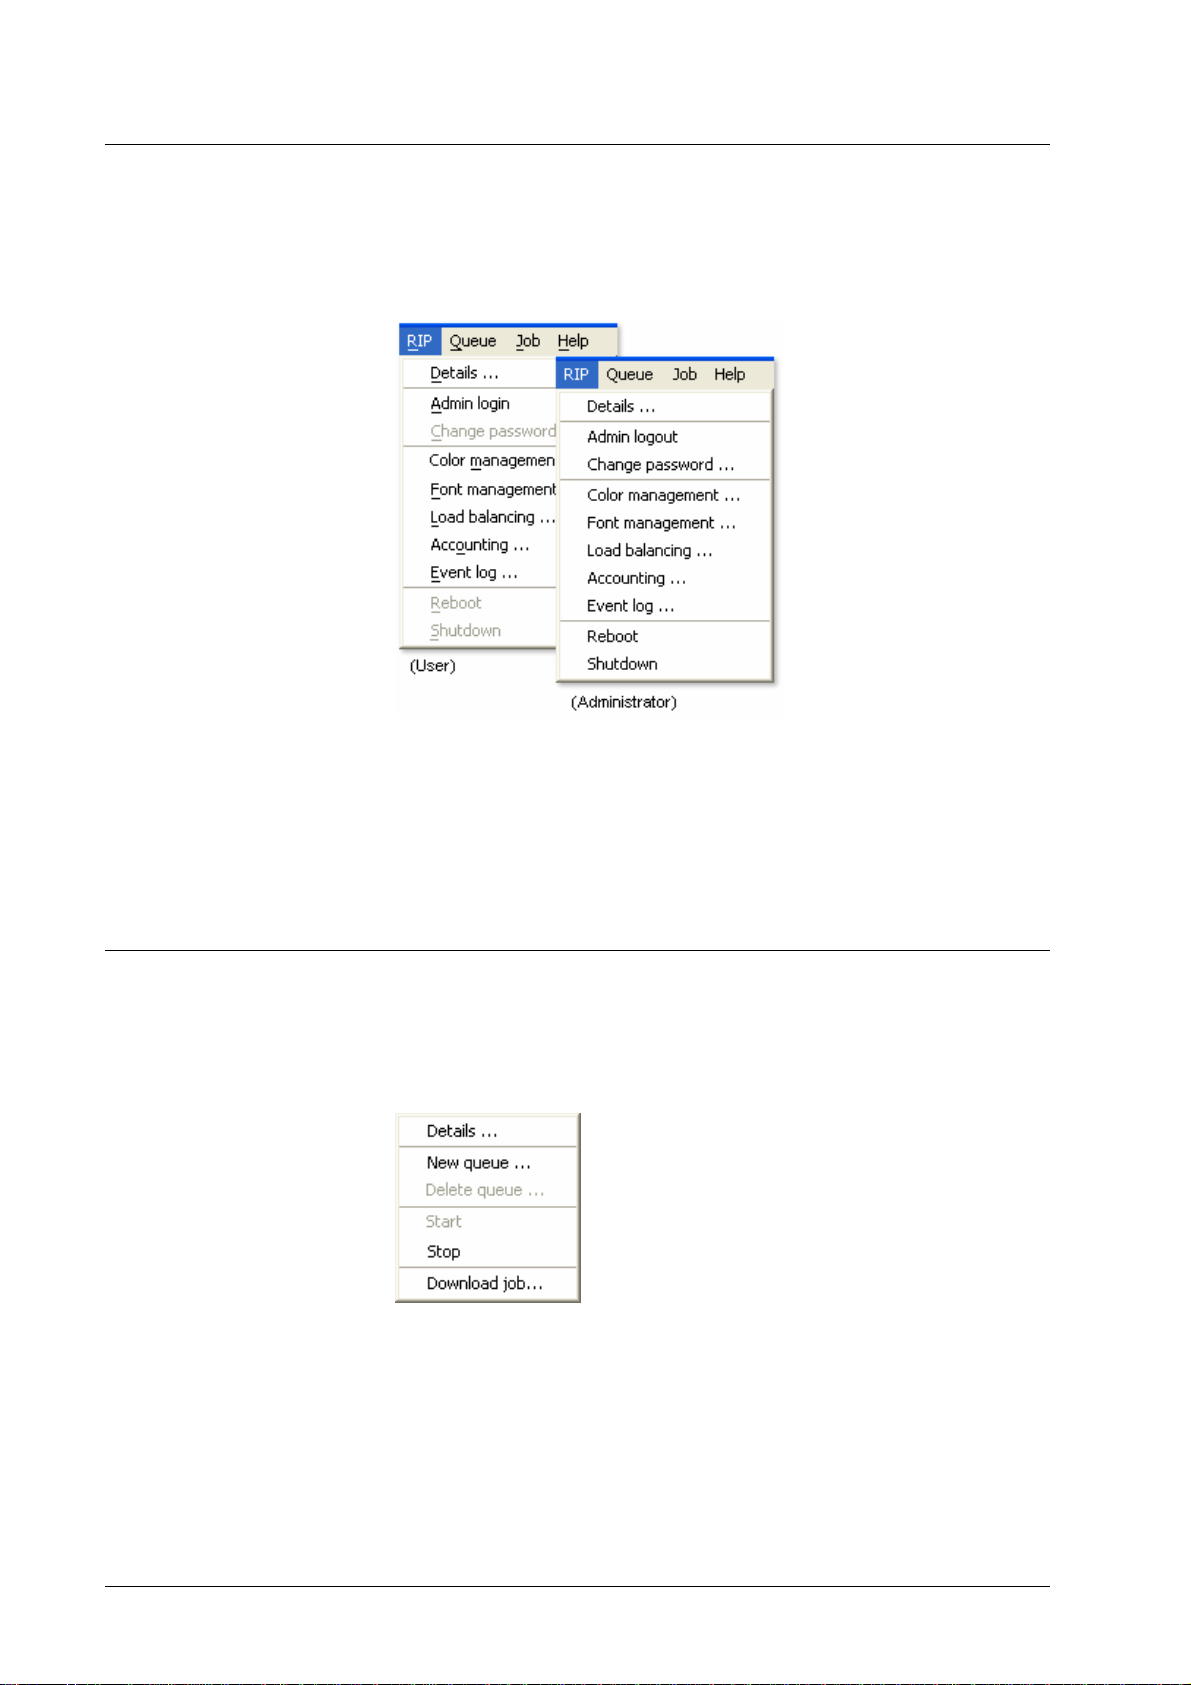
The operations available for RIPs are shown in the screenshot below ( some
entries are admin-only accessible and therefore greyed out for users without
sufficient permissions.):
• RIP details – display RIP properties and change RIP settings
• Admin login / logout
Queue list display
• Color management – color calibration curves
• Font management – display and download fonts on the RIP
• Load balancing – define master / client configuration
• Accounting – show accounting log
• Event log – show event log
• Reboot / shut down
DocXPLORER Reference Guide Functions • 19
Page 24
The queue list on the right side of the main window is used to monitor the
activity and the load of the queues on a selected DDP Server. It shows the
following attributes for each queue:
• Name, status, jobs, pages, comment
Pages is the sum of the print pages of all jobs in the respective queue.
In the active job list, print pages shows which page/copy is currently printed.
E.g., P:25,C:3 means that page 25 of the third copy is printed.
To edit or view details of any queue in the list, select the row in the list by
clicking on it, and select the Queue » Details dialog.
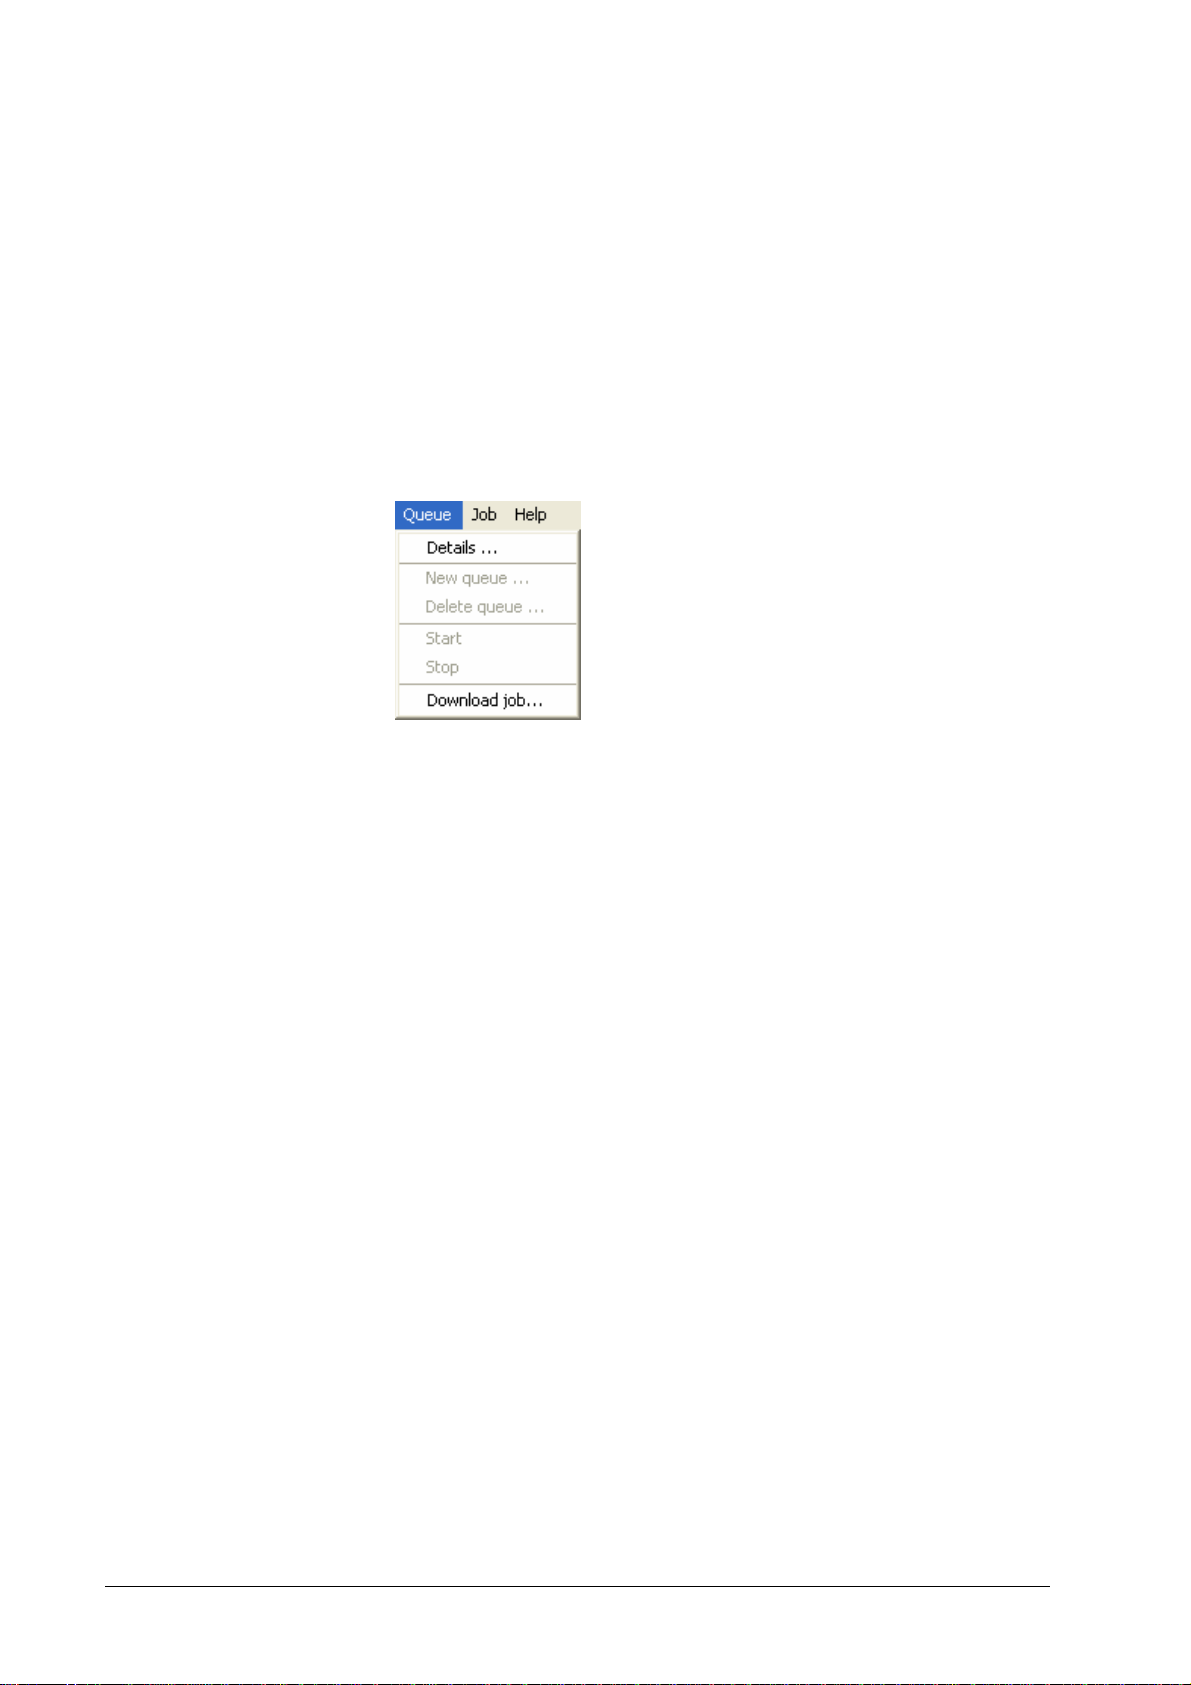
The operations available for queues are shown in the screenshot below (grey
entries are accessible only with administrator rights granted).
• Queue details – display queue properties and change queue settings
• New queue – the queue is created either as hold or as print queue
• Delete queue – this deletes the queue and all jobs in it, after
confirmation
• Start queue – resume processing jobs after stop
• Stop queue – stop processing jobs
• Download job – select a job for download to the selected queue
To make the creation or deletion of a queue effective for NetBIOS, lpr, and
EtherTalk, the DDP Server should be rebooted.
The queue list can be sorted by each column simply by clicking on the column
header. E.g. to sort by number of outstanding pages, click on the pages column
header.
20 • Functions DocXPLORER Reference Guide
Page 25
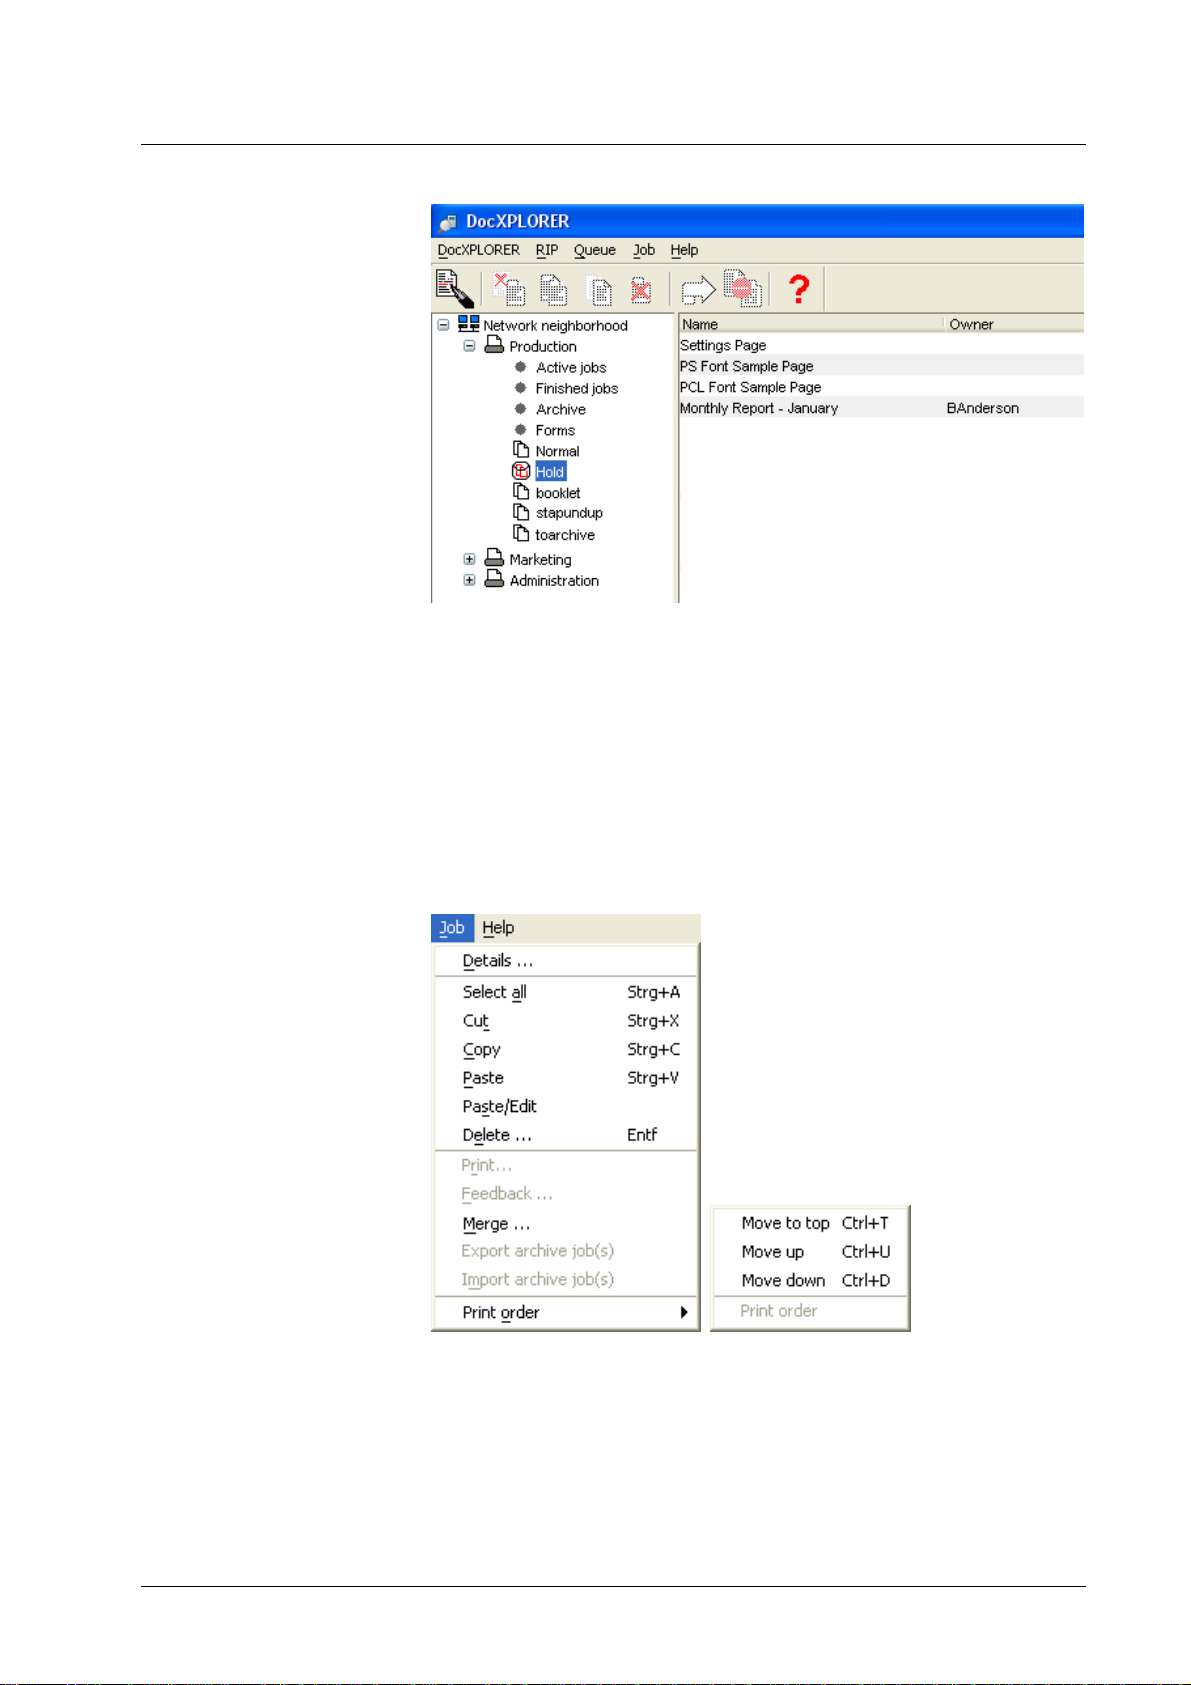
Job list display
The job list on the right side of the main window is used to monitor the
execution of jobs. It shows the following attributes for each job:
• Name, owner, source, pages, state, comment
Pages is the number of document pages in the job. Copies is the number of
copies of the job.
The job list allows you to select single or multiple jobs. The operations available
for jobs are shown in the screenshot below (Print, Feedback, and Page
numbering are available only for archive jobs):
• Edit job details – this shows the job ticket and allows the owner or
administrator to change it.
• Copy job(s) from one queue to another queue – the jobs are
submitted to the target queue and left in the source queue.
DocXPLORER Reference Guide Functions • 21
Page 26

• Copy+edit job(s) – the jobs are submitted to the target queue and
the job tickets of the target jobs are edited.
• Move job(s) from one queue to another queue – the jobs are
submitted to the target queue and deleted from the source queue.
• Delete job(s) – this deletes the selected job(s)
• Cancel job – this cancels execution of the selected active job.
• Print – this is only applicable to archive jobs; it opens the job
details dialog and, after possible changes, submits the job for
printing
• Feedback – this shows a thumbnail preview of a job in the archive
or forms queue; see Feedback and Preview
• Merge – this creates a new job from the bitmaps of two jobs
selected in the archive queue; see Job Merging
• Change job execution order – this function moves the selected
job to another position in the selected print queue and change s the
execution order accordingly
See Job operations about how to call the above functions.
The target queue for copying and moving can be a print or hold queue either on
the same or on another DDP Server.
The functions Edit (change) job details, Delete job, Move job, Change
execution order, Cancel job are available only to the job owner or the
administrator.
Job operations
Viewing job functions are available either to all users or only to the job owner /
administrator depending on RIP » Details » General » Others can see jobs.
The job list can be sorted by each column simply by clicking on the column
header. E.g. to sort by owner, click on the owner column header. The default
sorting order for job lists, execution order, can be restored by selecting the Job »
Print Order command.
You may add a comment about the job in the job details tab. For example, the
comment can include job instructions such as number of copies, finishing
options, etc.
To select a function on a job or set of jobs, perform the following steps:
1. Drag and drop operations:
• Copy job(s): select the job and drag it to the target queue.
• Copy+edit job(s): select the job and drag it to the target queue with
the Shift modifier held.
• Move job(s): select the job and drag it to the target queue, on
Windows with the CTRL modifier key held, on Macintosh with the
option key held.
• Change job execution order: drag the job in the job list (in
execution order) to another position in the job list. The execution
order is changed accordingly.
2. Menu operations:
• Copy job(s): select the job, select the Job » Copy command, select
the target queue, select the Job » Paste command.
22 • Functions DocXPLORER Reference Guide
Page 27

• Copy+edit job(s): select the job, select the Job » Copy command,
select the target queue, select the Job » Paste/Edit command.
(Paste/Edit is available only after Copy.)
• Move job(s): select the job, select the Job » Cut command, select
the target queue, select the Job » Paste command.
• Edit job details: select the job and select Job » Details.
• Delete job(s): select the job and select Job » Delete.
• Cancel job: select the job in the active queue and select Job »
Abort.
• Change job execution order: select the job and select Job » Print
Order » Move to top / Move up / Move down.
• Feedback: select the job and select Job » Feedback. (Archive jobs
only)
• Merge: select the jobs and select Job » Merge.(Archive jobs only)
See Job list display.
DocXPLORER Reference Guide Functions • 23
Page 28

RIP details
The RIP details provide information about the DDP Server and the connected
printer. It can be changed only by the administrator. The following information
is provided:
• General – see RIP details - General
• Communication – see RIP details - Communication
• Engine communication – see RIP details – Engine
Communication
• Accounting – see RIP details - Accounting
• Engine – this shows the following engine attributes: vendor, model,
revision, status, error message, memory, etc.
• Paper – this shows information about the installed paper trays:
paper size, paper quantity in tray, paper type (if available),
comment.
• Options – this shows information about the installed finishing
options, e.g. stapler.
• Job Purging – this contains directives for purging jobs. Jobs are
distinguished as normal (successfully executed) and failed jobs.
Purging strategies may be by age, by amount (number of jobs), or
on request of the administrator.
RIP details – General
• Event Logging – see RIP details – Event Logging
• Event Purging – this contains directives for purging event records.
Purging strategies may be by age, by amount, or on request of the
administrator.
24 • Functions DocXPLORER Reference Guide
Page 29

This tab sheet of the RIP details dialog comprises the following attributes: serial
number, system software version, current time, administrator status, etc. They
can be changed only by the administrator.
The administrator can check the Synchronize box; this causes the DDP Server to
take over the current time from the client workstation when the dialog is left with
OK.
The Comment field is displayed as the RIP comment in the RIP list of the main
window.
The Others can see jobs field indicates the rule for access to job details by other
users than their owner. The following operations are distinguished:
• Edit (change) job details, delete jobs, move jobs, cancel jobs,
change execution order – these operations are only available to the
job owner or the administrator.
• Show job details, copy job, feedback, display of job name and
comment in the job list – these operations are available depending
on the Others can see jobs field: if it is enabled, these operations
are available to all users; if it is disabled, these operations are
available only to the owner and the administrator. In particular,
with the feature disabled, normal users see only their own jobs in
the job list.
The Autoselect tray field indicates if automatic tray selection is performed by
the DDP Server or by the printer.
The ASCII Printing field indicates if ASCII text jobs are accepted for printing.
If it is enabled, jobs of unknown type (not PostScript, PDF, PCL, or TIFF) will
be printed as ASCII text.
The RIP default page size defines the page size for jobs which do not contain a
page size command. It applies to the sample pages (settings and font sample
pages) and may apply to jobs created by other printer drivers. (Jobs created by
the DDP Server printer driver always contain a page size).
The RIP default page size may be A4 or Letter. It is applied together with the
queue default page size (see Queue Settings).
The Unit of media weight field indicates how media weights requested in
PostScript jobs created by other drivers are interpreted: as g/m² or as lb bond.
See Job details – Page settings.
DocXPLORER Reference Guide Functions • 25
Page 30

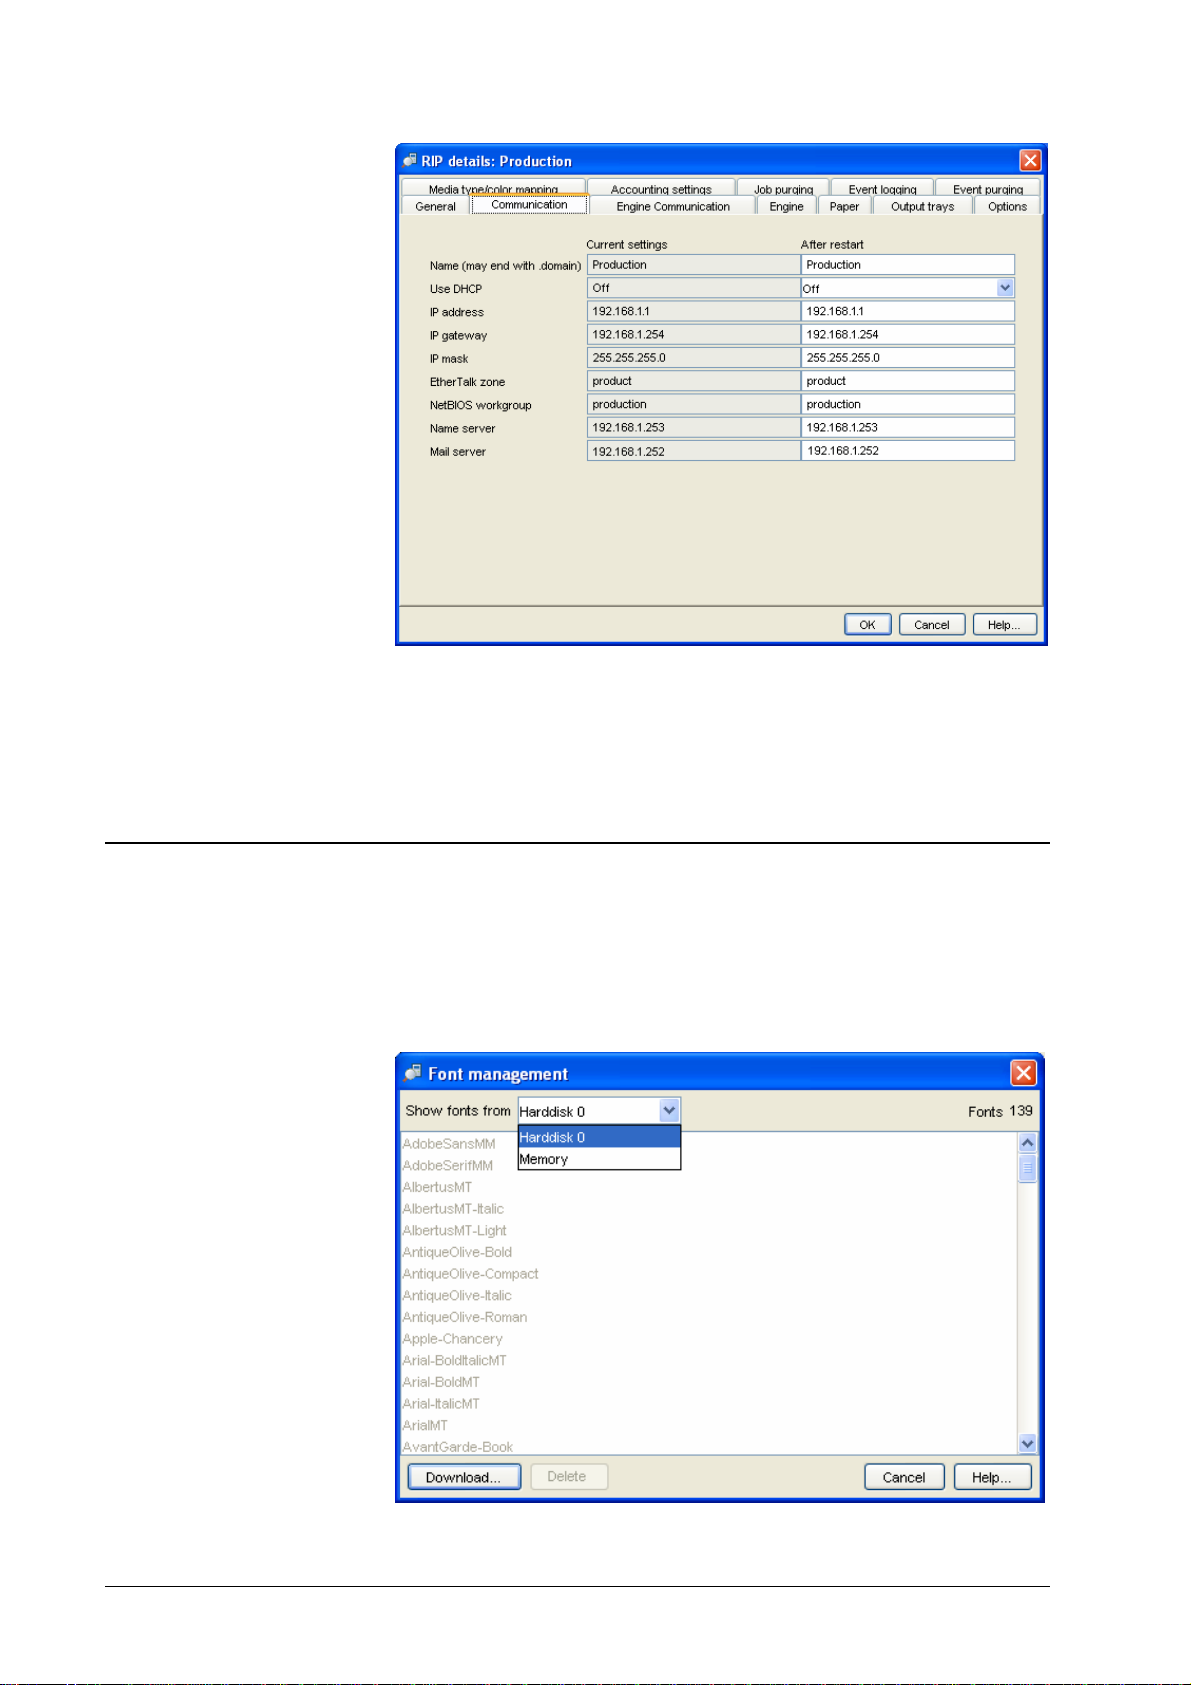
RIP details – Communication
This tab sheet of the RIP details dialog shows the current and planned communication settings. They can be changed only by the administrator. Planned
communication settings will be applied after the next reboot of the DDP Server.
Communication comprises the following attributes:
• Printer name – the host name used for TCP/IP, NetBIOS, lpr, and
EtherTalk. The host name may be entered with fully qualified
domain name.
If a Domain Name Server (DNS) is used in the network, the combi-
nation of printer name and IP address should match the entry made
in the DNS.
• DHCP flag – if this flag is enabled, the DDP Server looks for a
DHCP server when it boots to obtain communication settings.
DHCP usage is factory default.
• IP address
• IP Gateway – maybe empty if there is no gateway
• IP subnet mask
• EtherTalk Zone
• NetBIOS Workgroup
• Domain name server (DNS) IP address
• Mail server name or IP address
If the DDP Server shall perform email notification, a mail server must be
specified which accepts the email notifications. This can be done by entering the
mail server address directly, or by entering the DNS address. If none of them is
supplied, job ticket requests for email notification will be ignored.
If a DNS only is supplied, the printer name must be entered with a fully qualified
domain name. Also, the DNS should contain an MX record for the domain
26 • Functions DocXPLORER Reference Guide
Page 31

referring to the mail server. This enables the DDP Server to look up the mail
server at the DNS.
For email notification, the DDP Server must be announced to the mail server as a
possible client.
RIP details – Engine Communication
This tab sheet of the RIP details dialog shows the current and planned engine
communication settings. They can be changed only by the administrator. Planned
engine communication settings will be applied after the next reboot of the DDP
Server. Engine communication comprises the following attributes:
• Front engine communication:
RIP IP address – the IP address of the network card in the RIP
which is connected to the front engine.
Front engine IP address
Subnet mask – the subnet mask used for communication between
RIP and front engine.
• Rear engine communication:
RIP IP address – the IP address of the network card in the RIP
which is connected to the rear engine.
Rear engine IP address
Subnet mask – the subnet mask used for communication between
RIP and rear engine.
DocXPLORER Reference Guide Functions • 27
Page 32
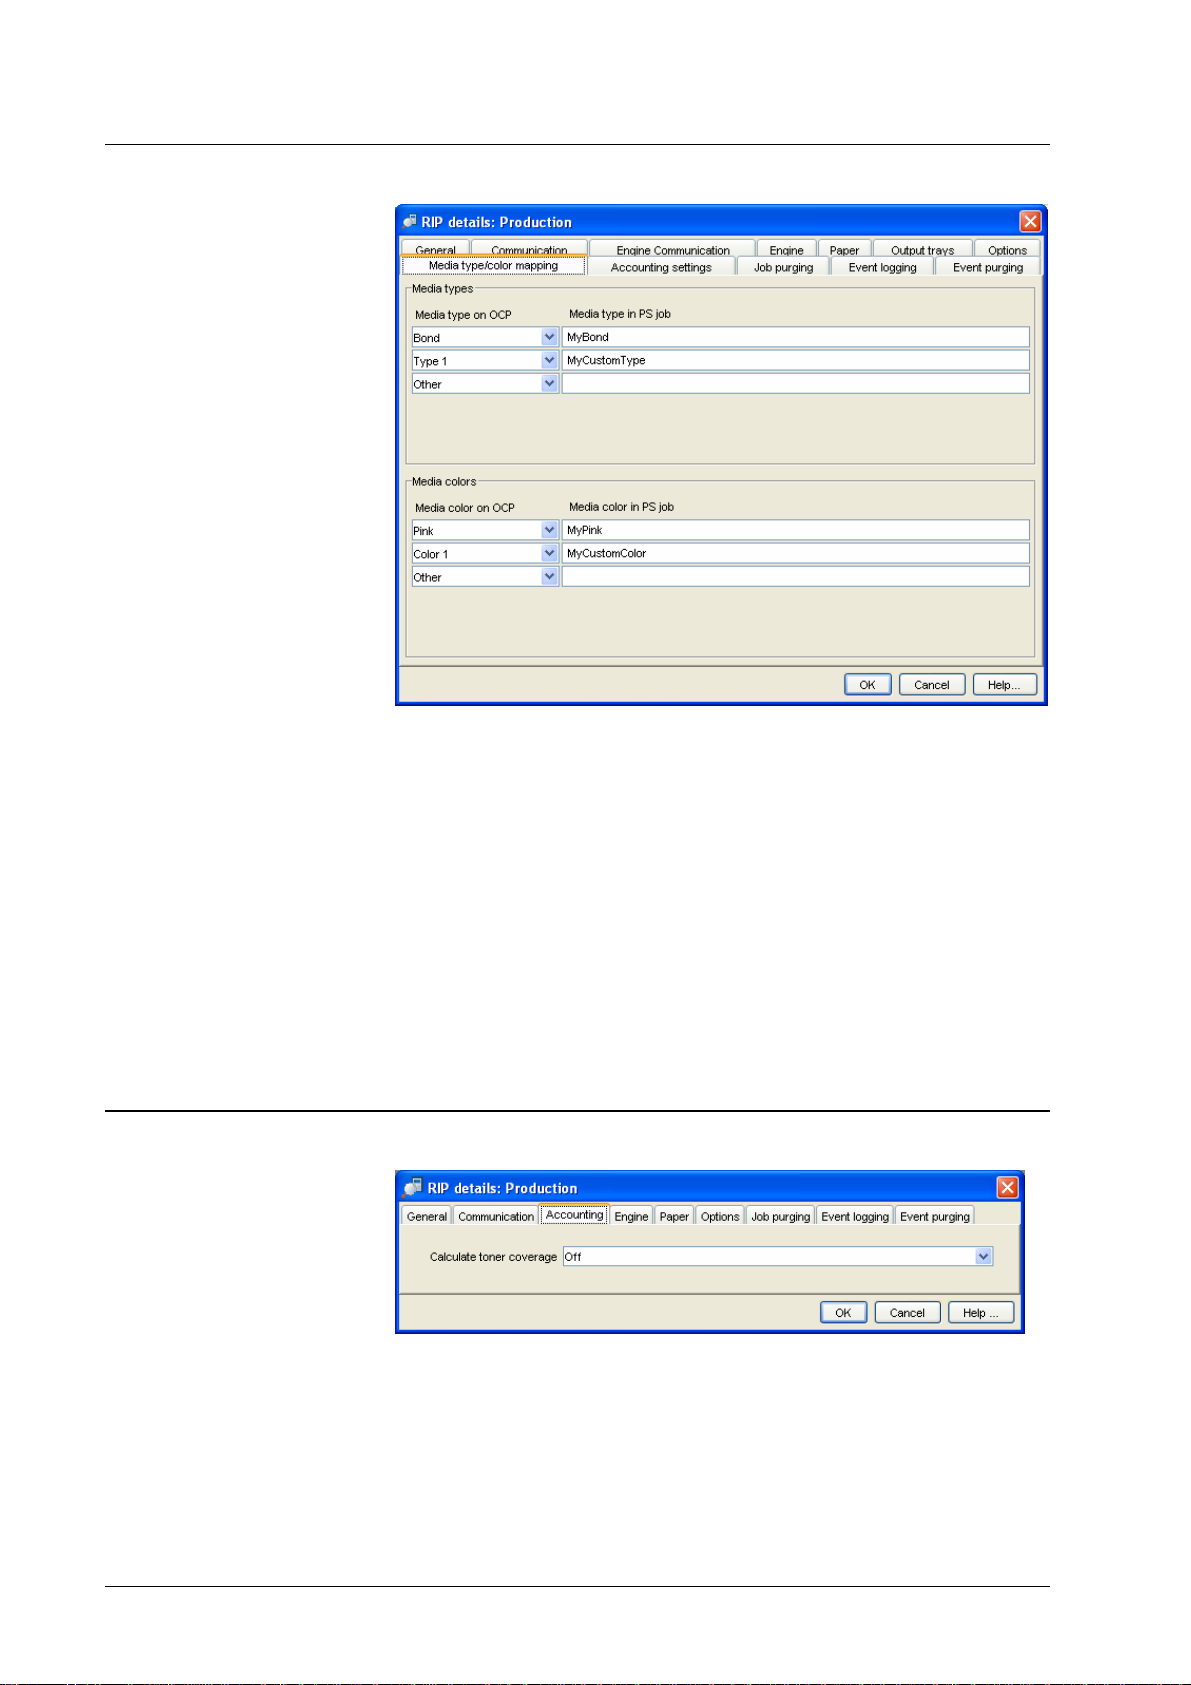
RIP details – Media type/color mapping
This dialog allows the administrator to define how non-standard media types and
colors are handled by DDP Server. Non-standard media types and colors can be
contained in PostScript jobs created by other dri vers.
The right column shows the media types contained in your job. The left column
shows the media types actually printed.
E.g. to print a PostScript Job which selects the media type MyBond on the DDP
Server media type Bond, select Bond in the left column and enter MyBond in the
right column.
E.g. to print a PostScript Job which selects the media color MyCustomColor1
contained in PostScript jobs by the DDP Server custom media color Color1,
select Color1 in the left column and enter MyCustomColor1 in the right column.
See also Job details – Page settings.
RIP details – Accounting
This dialog allows the administrator to configure the accounting.
The following option can be enabled.
• Calculate toner coverage – determines if toner coverage shall be
calculated after rendering a job.
28 • Functions DocXPLORER Reference Guide
Page 33
The results of toner coverage are shown in the DDP Server’s
accounting log.
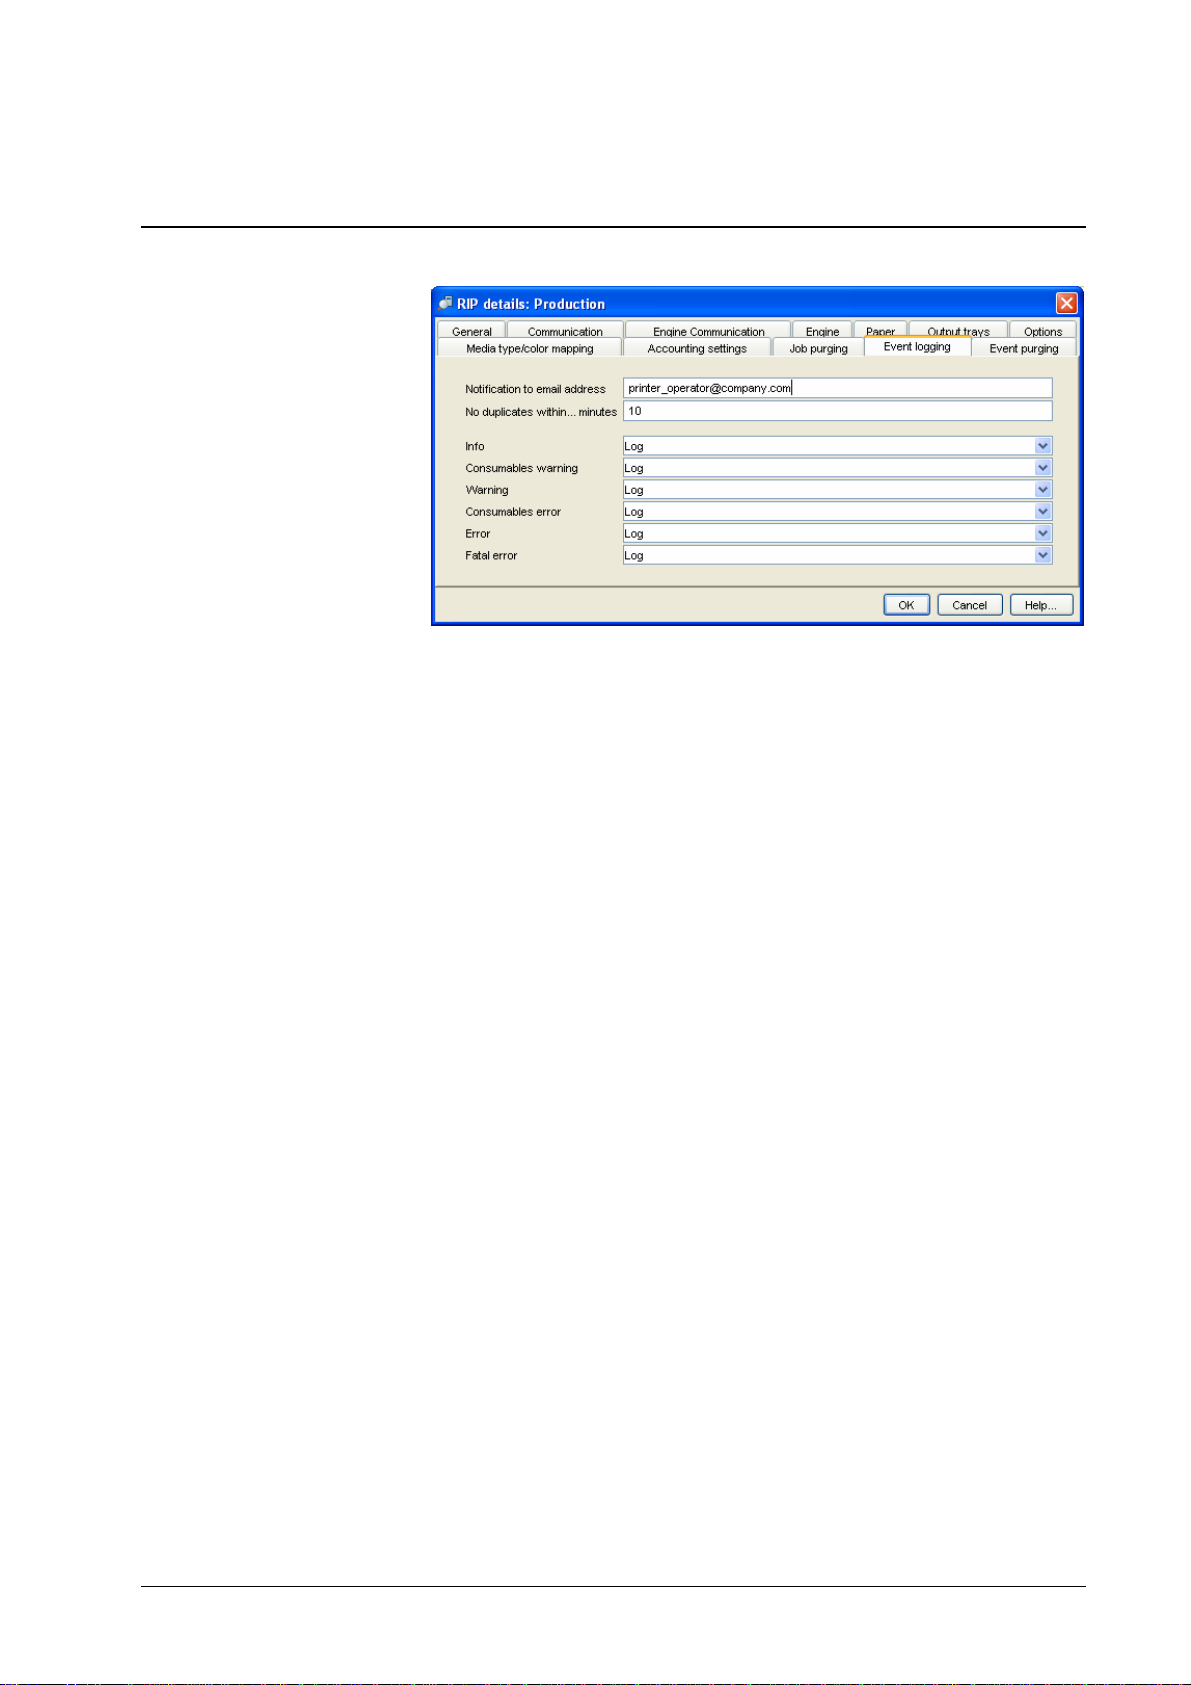
RIP details – Event logging
This dialog allows the administrator to configure how events on the RIP and on
the printer are logged. Events which can be logged include, for example, RIP
startup, email notification configuration problems, paper empty, and paper jam.
Events are divided into classes whose handling can be configured separately:
• Info – e.g., RIP startup
• Consumables warning – e.g., paper nearly empty
• Warning – e.g., hard disk nearly full
• Consumables error – e.g., paper empty
• Error – e.g., hard disk full
• Fatal error – severe system failures
For each event class, the following actions can be chosen:
• None
• Log – the event is logged in the database for later lookup by the
administrator
• Log and Notify – the event is logged and an email is sent to the
specified email address
If the DDP Server shall perform email notification, a mail server
must be specified which accepts the email notifications from the
RIP. See RIP Details – Communication.
For certain events, which can occur in fast repetition, like “printer door open”, a
timeout period can be specified. This suppresses duplicate email notifications for
the same event within the given period.
The event log can be viewed in the RIP » Event logging dialog.
Automatic purging of events can be configured in the RIP details » Event
purging dialog. Event purging may be performed
• by age – events are purged automatically when they exceed a
specified age,
DocXPLORER Reference Guide Functions • 29
Page 34
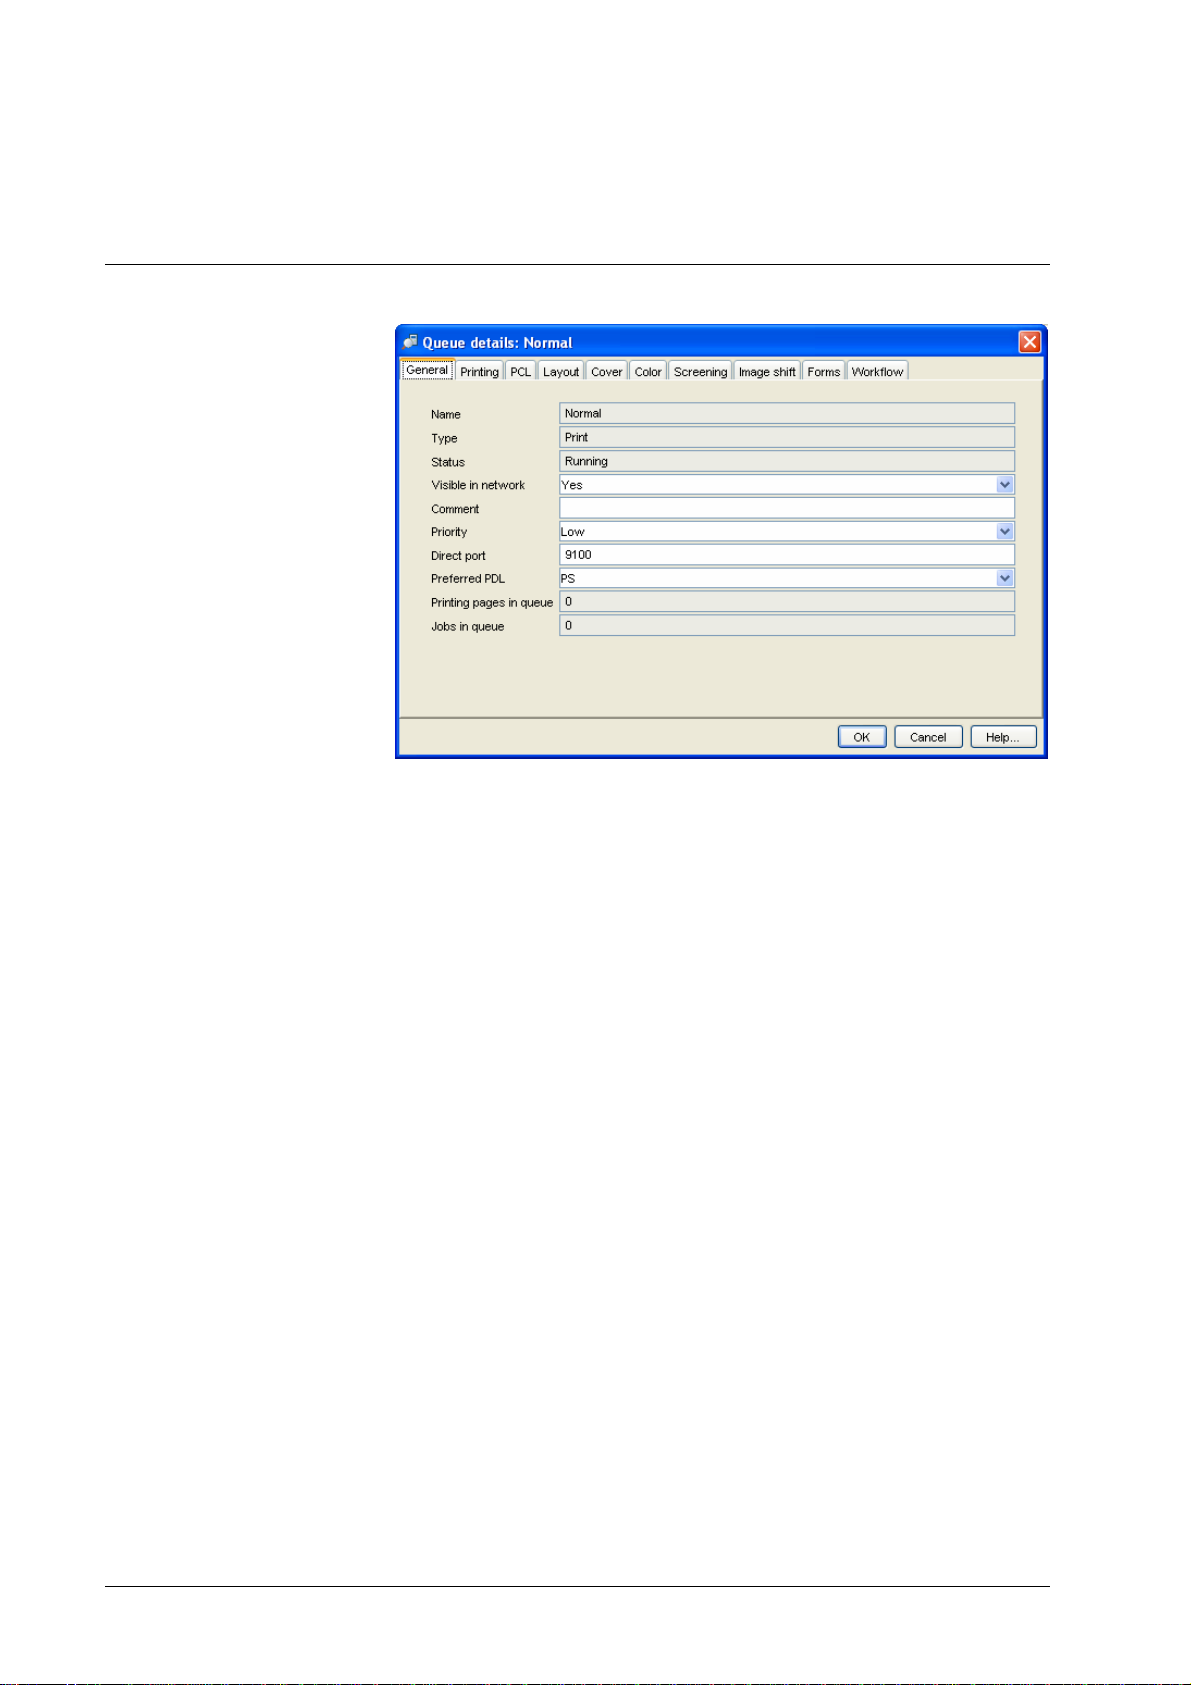
Queue details
• by amount – events are purged automatically when their number
exceeds a specified value, or
• manually – only on administrator request.
The queue details provide information about a queue. The following information
is provided:
• General – this comprises the following attributes:
• Name – the name is used with the DDP Server name to form
NetBIOS, lpr, and EtherTalk queue names..
• Type – this may be print or hold. Print queues execute jobs
submitted to them. Hold queues store them for later retrieval.
• Status – for print queues, this may be running, stopping,
stopped. See Queue list display.
• Visible in network – this determines if the queue is visible as a
NetBIOS, lpr, and EtherTalk queue. If it is not visible, jobs can
be only submitted to it via the DocXPLORER
To make a change of visibility effective for NetBIOS, lpr, and
EtherTalk, the DDP Server should be rebooted.
• Comment – this field is displayed in the queue list of the main
window.
• Priority – this determines a priority for jobs within this queue.
There are three different priority levels. Jobs from queues with
higher priority are chosen for execution with higher priority
• Job size limit – this specifies a limit of print pages for each job
submitted to the queue. If the limit is exceeded, the job is
moved to the normal queue.
Note: Job size limit is not enforced for PDF jobs.
• Direct port – specifies a direct port to be associated with the
queue (only for print queues). Port numbers must be in the
30 • Functions DocXPLORER Reference Guide
Page 35

range 9100 to 9999. By factory default, the Normal queue is
associated with port 9100.
When a job is printed to the direct port of a queue, the queue
settings are used to initialize the job state. I.e., if the job
contains no setting for an attribute, the corresponding queue
setting is applied. This allows to use queues as print profiles
for direct ports.
• Preferred PDL – this selects the preferred PDL (printer
description language: PostScript or PCL) for the direct port of
this queue. This allows to setup different queues for direct
printing of PostScript or PCL.
For direct ports, jobs must have the selected preferred PDL,
i.e. only PostScript for a direct PostScript port, and only PCL
for a direct PCL port.
For spooled ports (NetBIOS, lpr, EtherTalk), the job’s PD L
will be sensed automatically if possible. If the PDL cannot be
auto-sensed, and ASCII printing is ON, the job is treated as
ASCII. If the PDL cannot be auto-sensed, and ASCII printing
is OFF, the job type is set according to the preferred PDL of
the queue.
• Print pages in queue – the sum of the print pages of all jobs in
the queue.
• Jobs in queue – the number of jobs in the queue.
• Default page size defines a page size for each PCL job which
does not contain a page size command. Such jobs cannot be
created with the DDP Server printer driver, but o nl y with o t her
printer drivers. Default page size can be: the R IP defa ul t pa ge
size, any supported page size, or a custom page size.
• Printing, PCL, Layout, Cover, Color, Screning, Forms, Workflow (only for
print queues) – these tab sheets comprise settings for printing and finishing.
Print and finishing settings correspond to the settings available as job
settings and in the printer driver.
Settings can be specified with job priority or queue priority. For each
attribute with queue priority and each attribute where the corresponding job
setting is empty, queue settings are applied immediately prior to job
execution.
DocXPLORER Reference Guide Functions • 31
Page 36
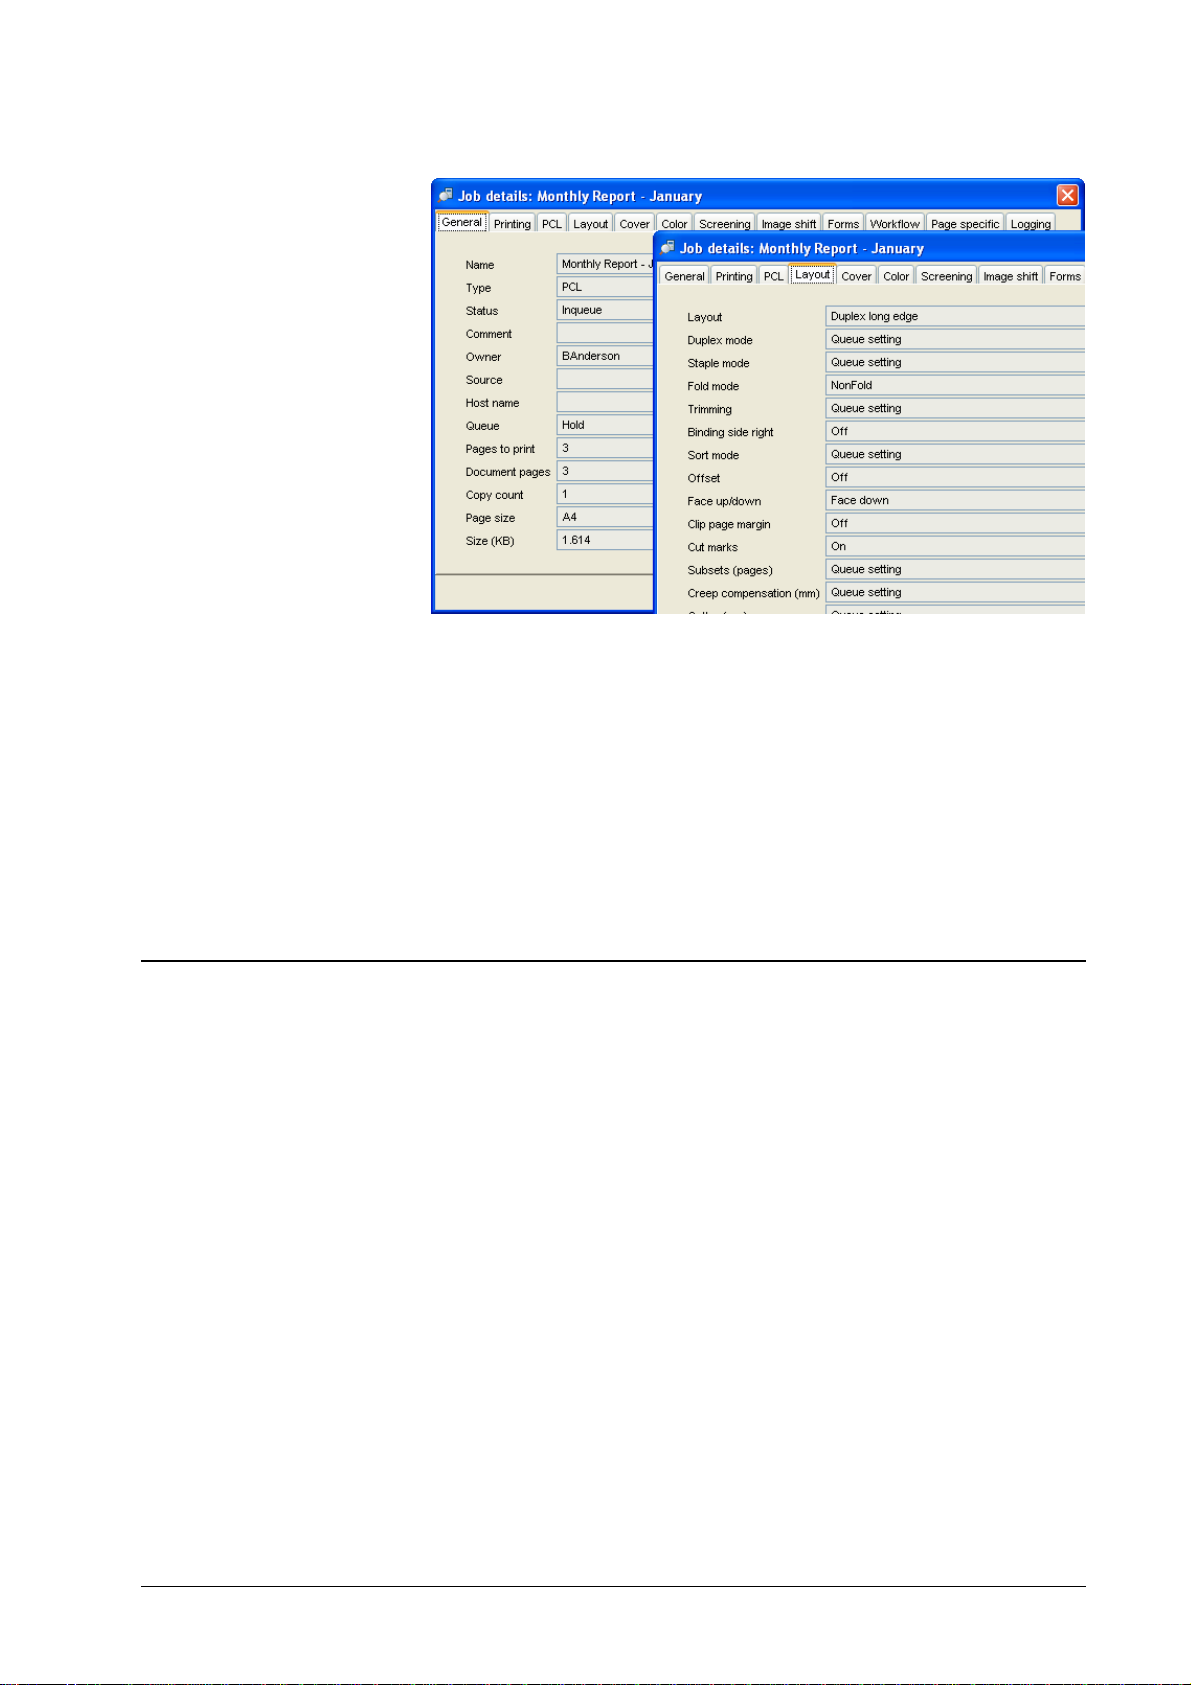
Job details
The job details provide information about a job. The following information is
provided:
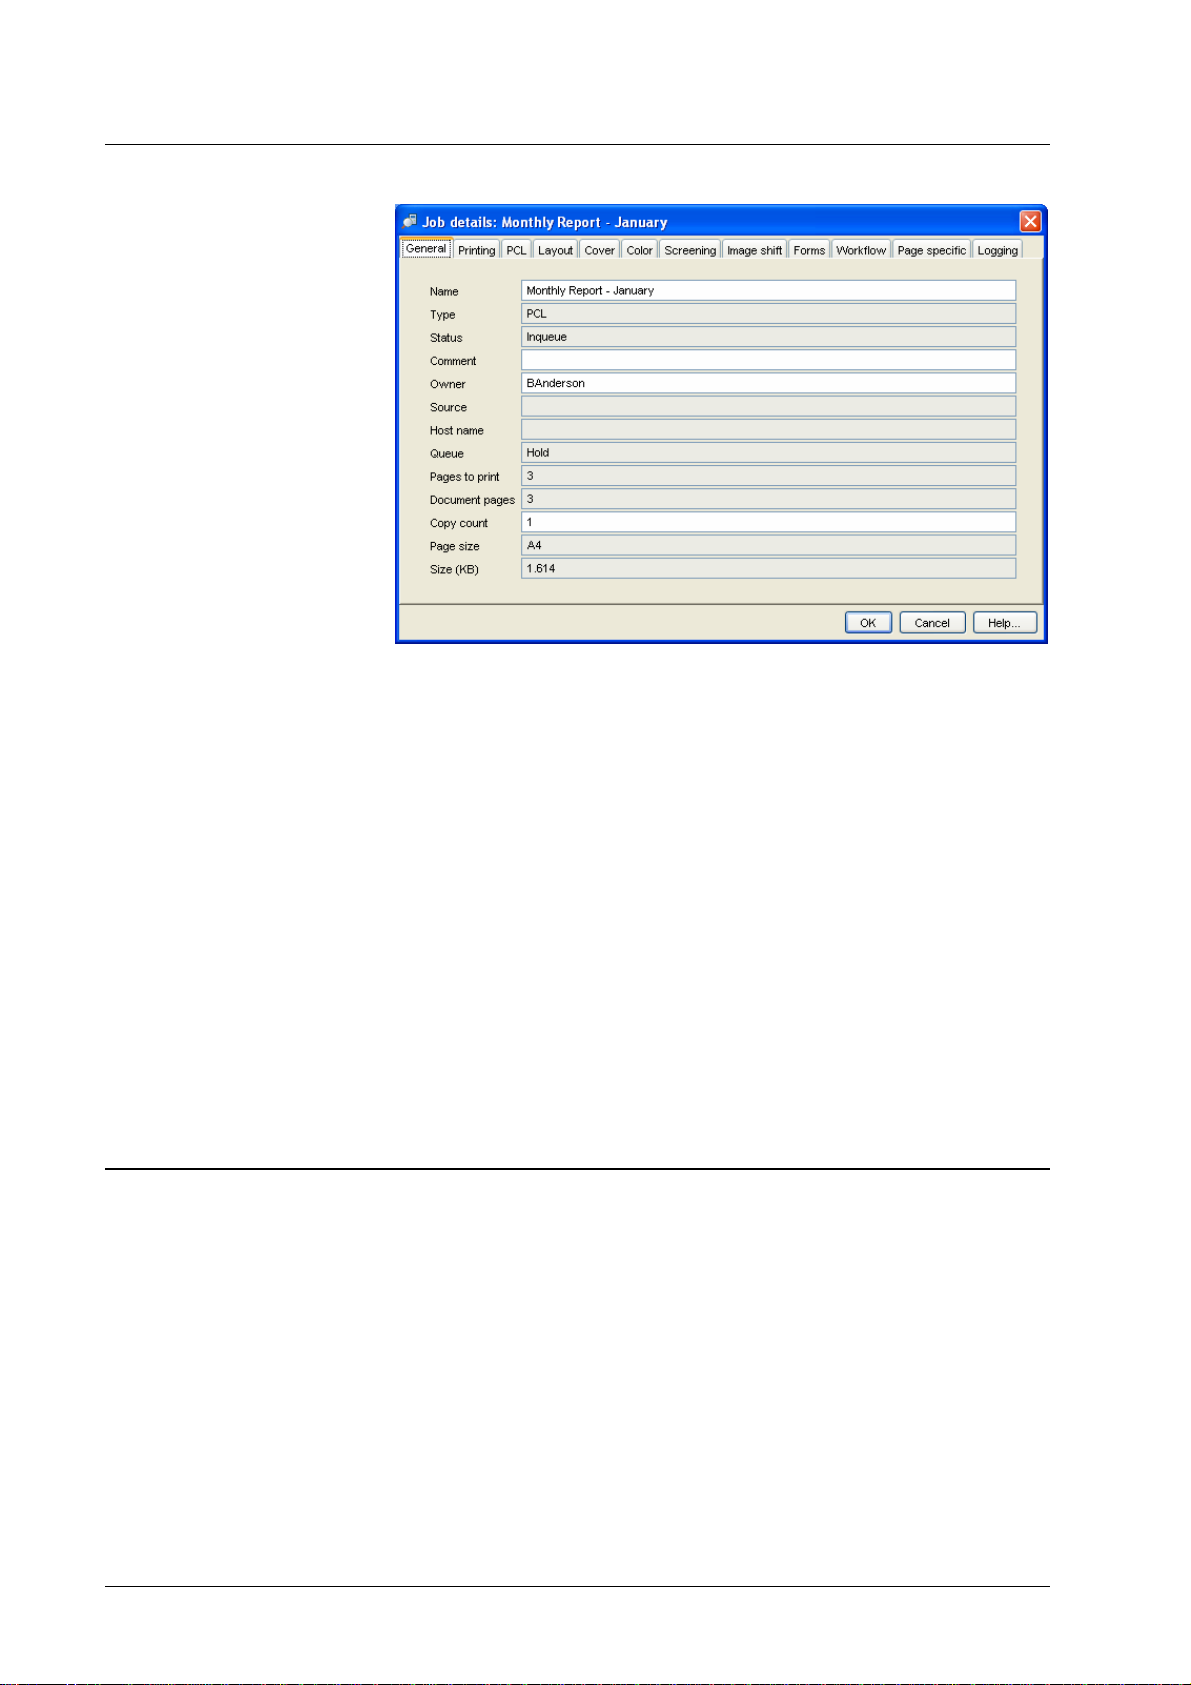
• General – this comprises the following attributes: job name, source, owner,
type, status, comment, document pages, copy count, page size, size in KB.
If the Owner field is empty, the job can be edited, deleted or moved by any
user.
The Comment field is displayed in the job list (under the same condition as
the job name).
• Job specific print settings – see Job details – Print settings.
• Page specific print settings – see Job details – Page settings.
• Logging – this is a list of events during the processing of the job. Relevant
events are: Download, create by copy, start RIP, start print, end print,
delegate, finish, finish with error. In certain cases, additional information
about the event is provided, e.g. target of delegation, packet number within a
split job, or an explanation of how the completed job executed, such as
finish with error.
Job details – Print settings
This dialog contains print settings which can be applied to a job as a whole.
Print settings are described in detail in the help for the printer driver plug-in.
The dialog comprises the following attributes:
32 • Functions DocXPLORER Reference Guide
Page 37
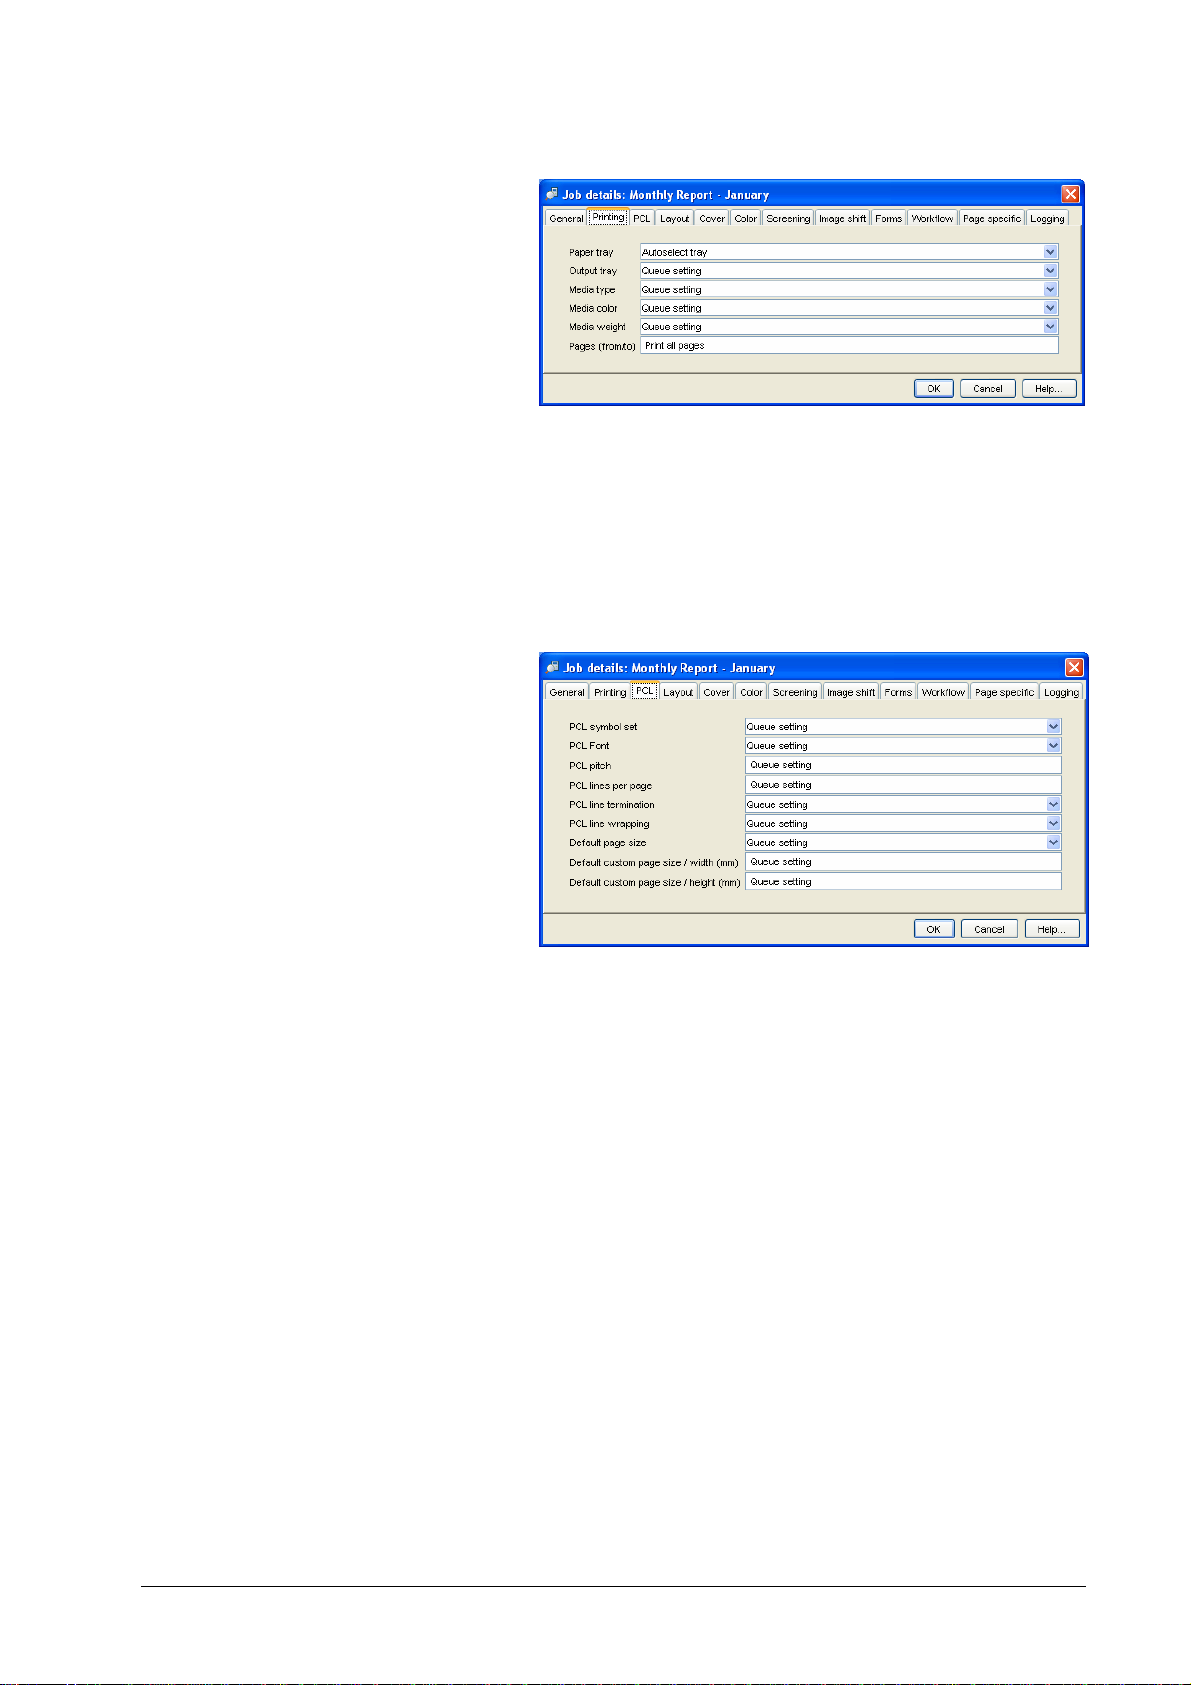
• General printing options:
• Paper tray – paper trays can be specified explicitly, by
autoselect tray, or by media type/color/weight. In this case,
the best matching tray is selected.
• Output tray – selects the tray for paper output of the job.
• Pages from/to – allows a contiguous subset of pages to be
entered for printing, e.g. 3-10
The value “all pages” may be entered as “1-0”.
• PCL/ASCII:
The features in this panel allow you to control the printing of
ASCII files directly submitted to DDP Server. ASCII files are
handled by the PCL interpreter, therefore PCL features below can
be applied to them.
The PCL features below can be entered as job settings or as queue
settings. However, they cannot be entered in the printer driver, and
in general, they are applied only to ASCII files. This is because
printer drivers usually include their own settings for these features
with a PCL job.
• Symbol set – selects the symbol set (character encoding)
• Font – selects a font. The actual font selection is based
primarily on the symbol set, and only then on the given font.
• Lines per page – selects the number of lines per page. Note
that, e.g., 60 lines per page result in a different number of lines
per inch on A4 paper than on A3 paper.
• Pitch – selects the number of characters per inch (pitch)
• CR/LF mapping – selects the line end handling. In PCL and in
Windows text files, the sequence CR/LF (carriage return + line
feed) constitutes a line end.
DocXPLORER Reference Guide Functions • 33
Page 38
Select No change to print Windows text files.
Select Add LF after CR to print text files from the Macintosh
(line end = CR).
Select Add CR before LF+FF to print text files from Unix
systems (line end = LF).
Select Add LF, add CR to combine both options.
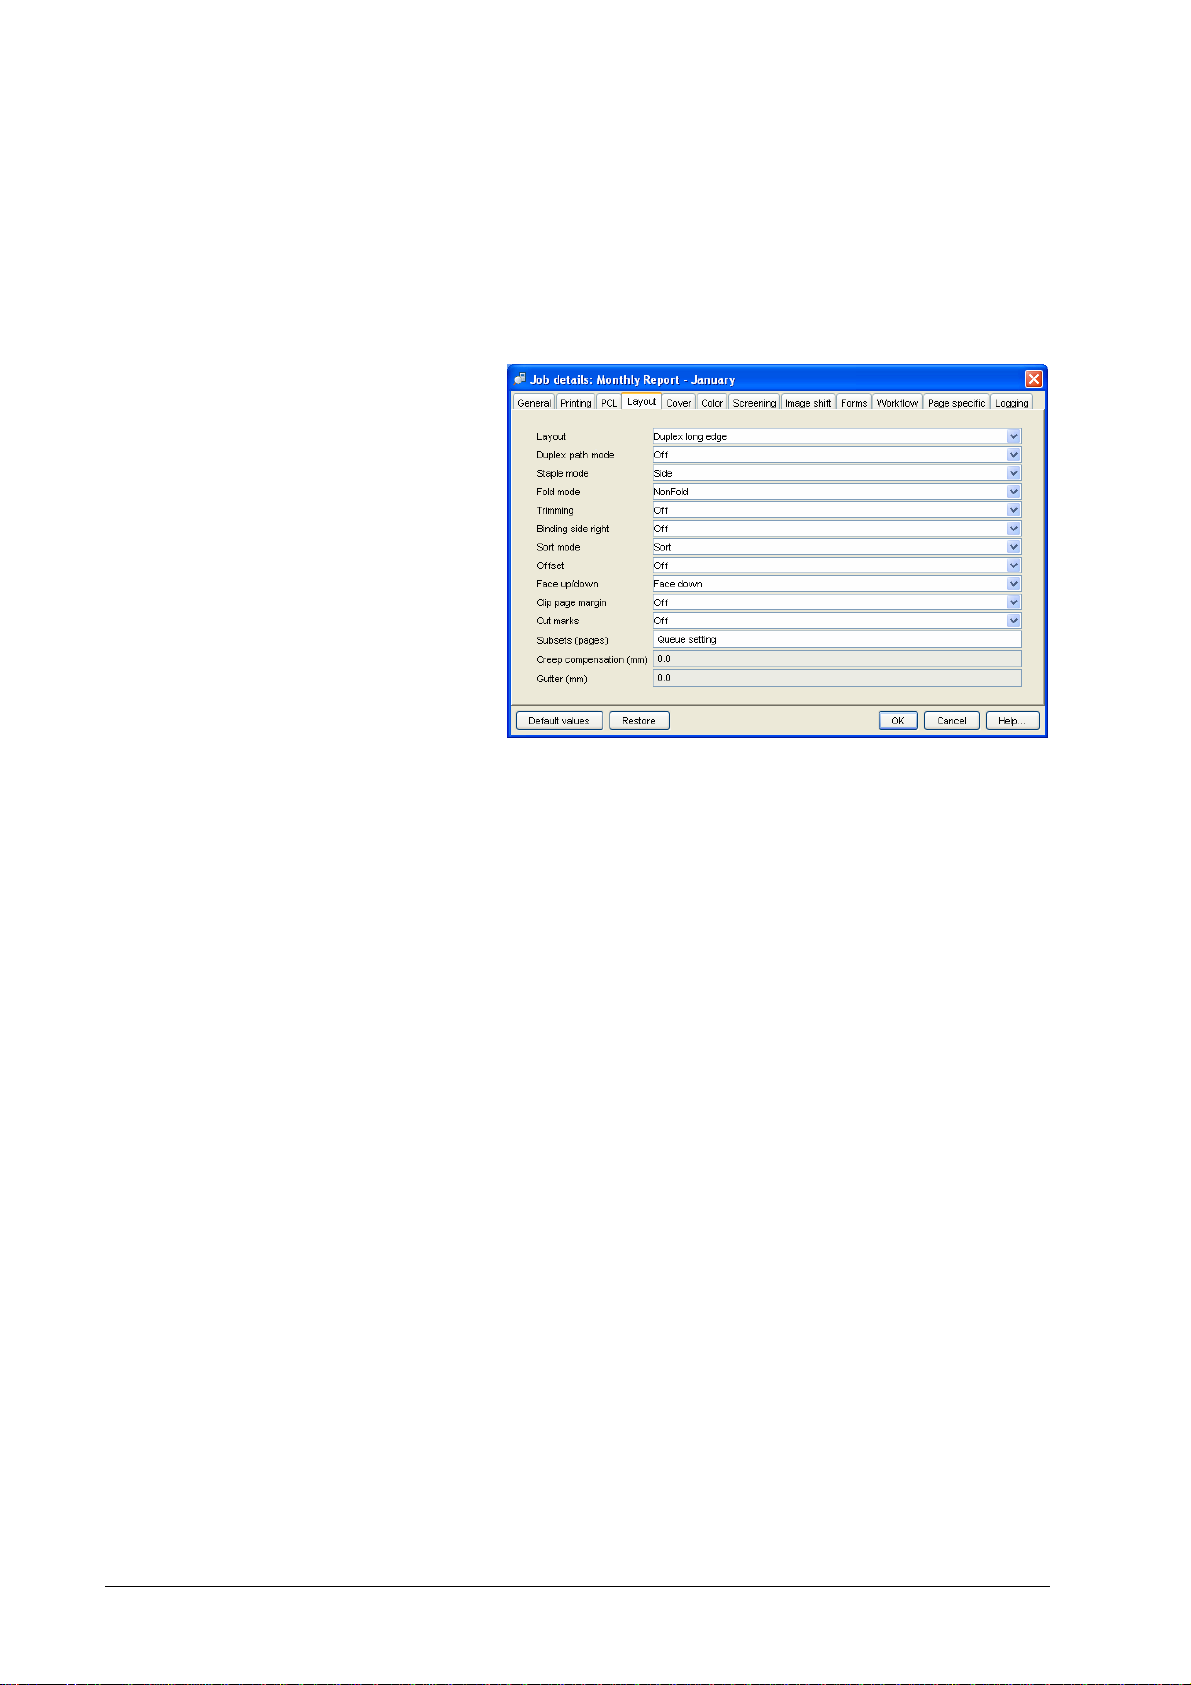
• Layout and finishing:
• Layout – defines how document pages are mapped on printed
sheets, e.g. duplex or as booklet.
• Duplex path – determines that the job is printed using the
duplex path even if it is simplex.
Printing a simplex job on the duplex path means that the job is
printed with empty back pages. For small jobs which alternate
between simplex and duplex (e.g. job 1 duplex, job 2 simplex,
job 3 duplex), this speeds up printing because the paper path
need not be changed between jobs.
If the job uses media types or media sizes for which duplex
printing is not supported, this setting will be ignored. See your
DDP184 documentation.
• Staple mode – selects the staple mode
• Fold mode – selects the folding mode
• Trim mode – selects if booklets are trimmed
• Binding side right - selects if booklet folding and finishing
options (stapling and punching) should be applied to the right
side.
• Sort mode – selects if documents are output sorted or grouped
• Offset – selects if copies are offset in the output tray
• Face up – selects if copies are output face up
• Clip page margin – selects if page are printed edge to edge or
clipped by a margin.
• Cut marks – selects if cut marks are printed around the
document.
34 • Functions DocXPLORER Reference Guide
Page 39

• Subsets (pages) – specifies that the job is divided into subsets
• Creep compensation – compensates f o r creep, i.e. the effect
• Gutter – determines a fixed margin to be applied between the
• Cover sheets:
of the given number of pages, and that all finishing operations
are applied separately to each subset.
E.g. subsets = 5 together with layout = duplex and staple =
corner means that a new sheet is started every 5 pages and that
stapling is applied every 3 sheets.
Subsets = 0 means no special handling.
This feature supports, e.g. that in a mail merge or DPM job,
finishing is applied to each individual letter, not the whole job.
Also it can be used to divide booklets such that they fit the
page limit of the booklet maker.
that outer pages of a booklet do not line up with the inner
pages when they are folded
two document pages of an imposition
• Color:
• Overhead transparencies – selects the creation of
transparencies
• Front cover sheet – selects the insertion of a front cover sheet
from the selected tray
• Front cover tray – selects the tray to be used for the front cover
sheet
• Back cover sheet – selects the insertion of a back cover sheet
from the selected tray
• Back cover tray – selects the tray to be used for the back cover
sheet
• Header page – selects the insertion of a separator page with
info about owner, job name, and print time
DocXPLORER Reference Guide Functions • 35
Page 40

• Text/graphics separation mode – selects if no separation, or
• Image separation mode – selects if no separation, or spot color
• Separation color – indicates which color is used for separation.
• Print colors – indicates which colors are expected to be present
• Enforce color matching – selects if print colors must match
• Tolerance – selects how many color values near the separation
• Non-separation color – selects the color to be printed in the
• Overprint – selects that objects lying on top of others are
• Screening:
spot color separation, or mixing color separation is applied.
separation, or mixing color separation is applied.
on the engines.
engine colors exactly when a job is printed.
color shall be mapped on the reference color.
case of no separation.
rendered with overprinting, i.e. without erasing the lower
object. This technique can be used to avoid blank areas at
adjacent edges of overlapping objects.
• Contrast – increases or decreases the contrast in the result
page.
• Density – increases or decreases the density in the result page.
• Screen angle – sets the screen angle
• Screen frequency – sets the screen frequency
• Image shifting:
36 • Functions DocXPLORER Reference Guide
Page 41
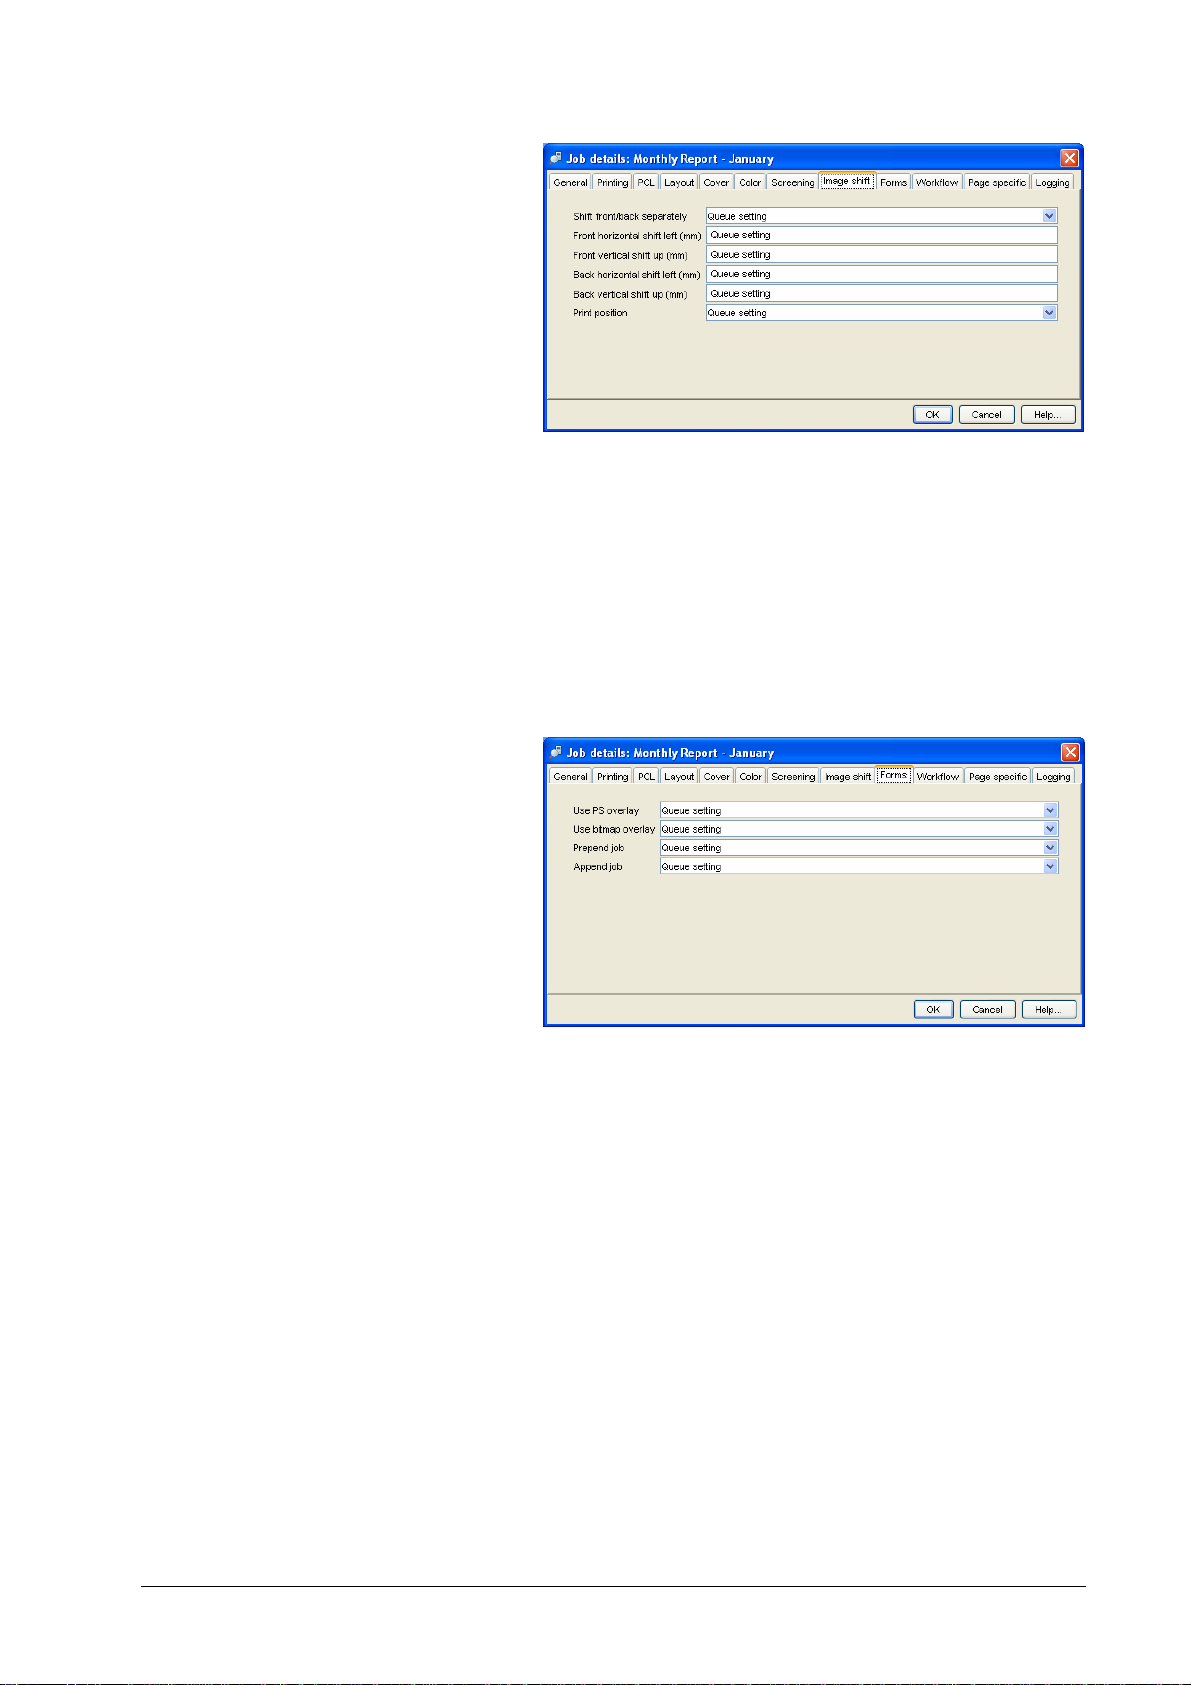
• Forms:
• Shift Front/Back separately – allows you to enter separate
shifting values for front and back or let the fr ont val ues apply
also to the back.
• Horizontal / vertical front – allows you to specify horizontal or
vertical shifting on the image on the front page of the paper.
• Horizontal / vertical back – allows you to specify horizontal or
vertical shifting on the image on the back page of the paper.
• Print position – allows to align the document with one side or
one corner of the paper.
• PS overlay – selects a form for PS overlay (execution of the
form job before each page or the selected pages of the main
job)
• Bitmap overlay – selects a form for bitmap overlay (merging
the bitmap of the form with the bitmaps of each page or the
selected pages of the main job)
• Prepend job – selects an archive job for adding in front of the
main job
• Append job – selects an archive job for adding at the end of the
main job
DocXPLORER Reference Guide Functions • 37
Page 42

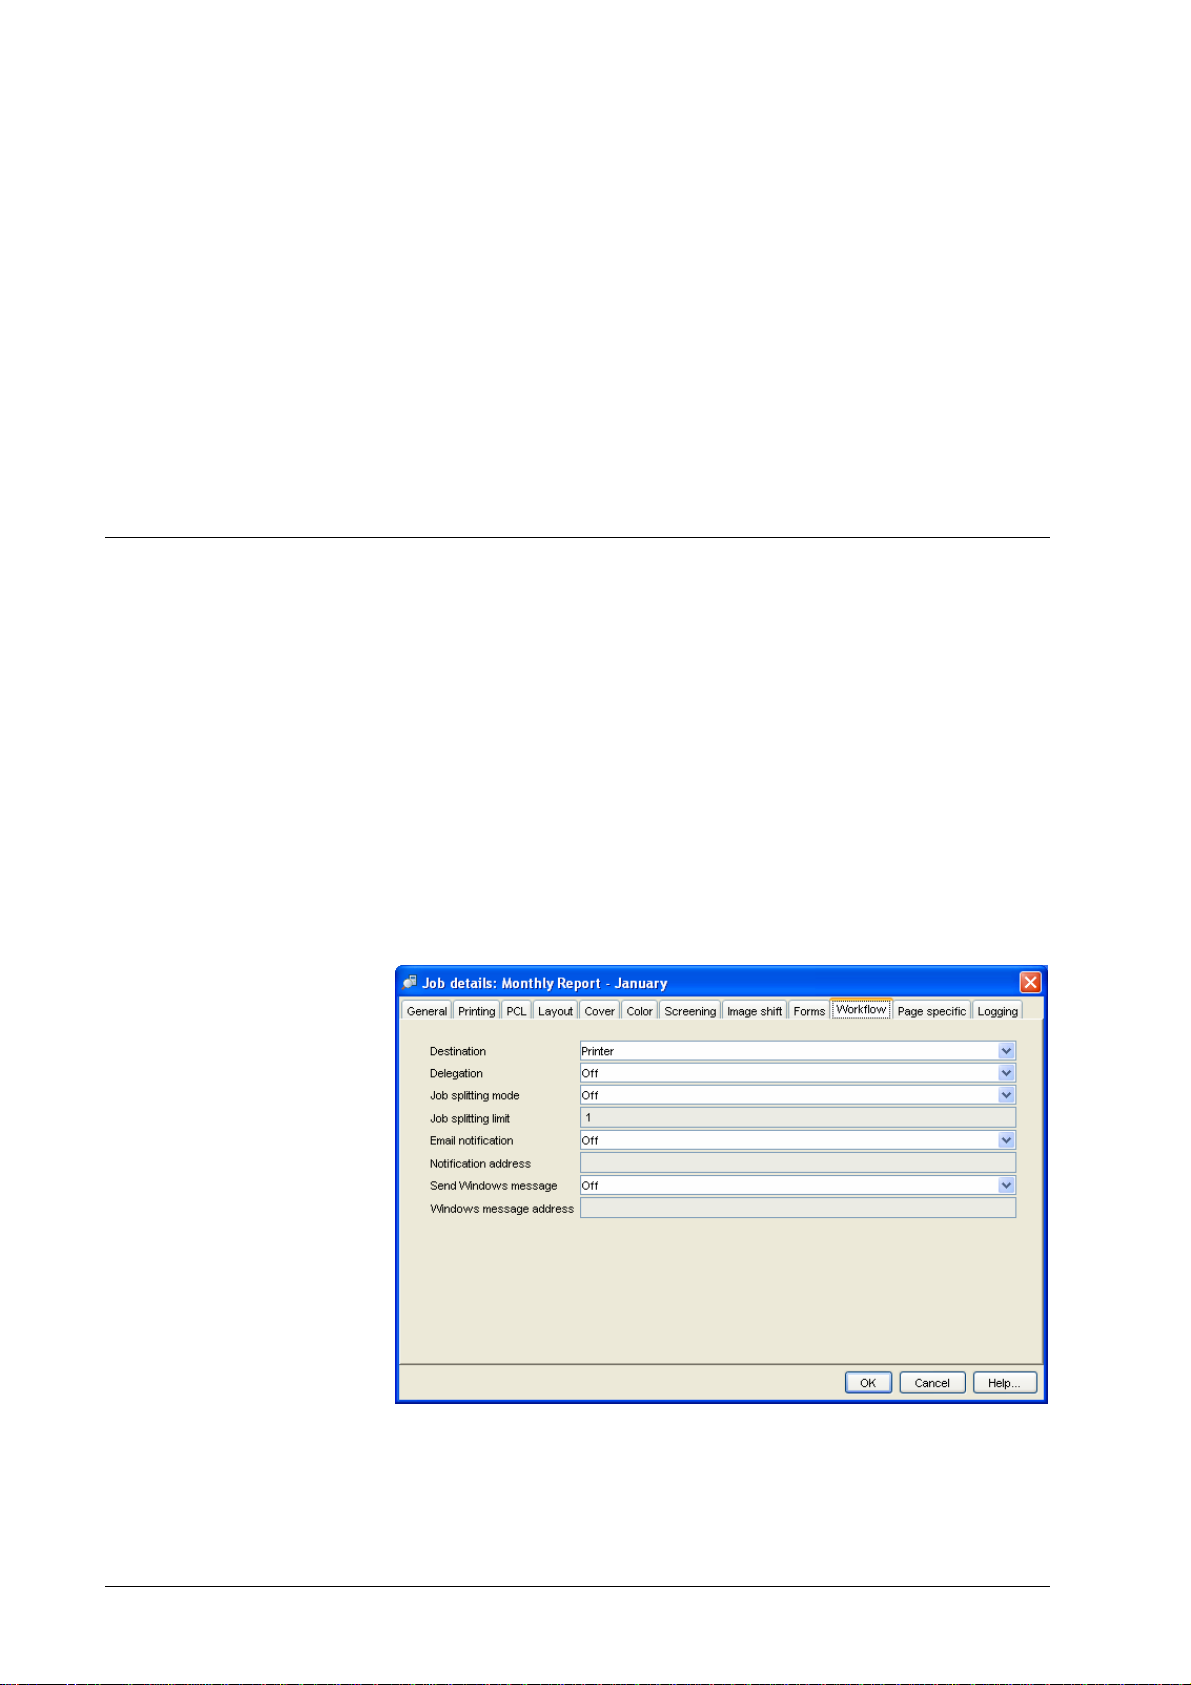
• Workflow:
• Destination – this may be printer, form, archive, or archive and
• Delegation – if delegation is off, the job is not considered for
• Splitting – the amount of job splitting can be configured as
printer. See Job Types.
delegation in the context of load balancing.
page splitting and copy splitting :
Page splitting is achieved by dividing a print job into subsets
by pages, e.g. page 1-100 and 101-2 00 of a 200 page job.
Page splitting limit indicates the maximum number of pages
for each partial job. E.g. a page splitting limit of 100 means
that bigger jobs are divided into subsets of max. 100 pages.
Copy splitting is achieved by duplicating a print job with
reduced copy count, e.g. duplicating a 500 copies job into 2
jobs with 250 copies each.
Copy splitting limit indicates the maximum number of copies
for each partial job. E.g. a copy splitting limit of 100 means
that bigger jobs are duplicated with a reduced copy count of
max. 100.
• E-mail notification – the mode and address for notification
when a job is finished.
• Windows message – sends a Windows message to the given
client PC when a job is finished
38 • Functions DocXPLORER Reference Guide
Page 43

Job details – Page settings
This dialog contains print settings which can be applied to single pages of a job.
Page settings are described in detail in the help for the printer driver plug-in.
The dialog comprises the following attributes:
• Print pages – page numbers specify that the given page s sh al l be drawn fr om
the tray specified in the same row, e.g. pages 18-25,37-39 from tray 3 or
pages 31 to 33 from a tray containing Bond paper with a weight of 130-133
g/m² (35 lb bond)
Edit RIP list
• Insert before pages – page number specify that an empty sheet shall be
inserted before the selected pages
• Jog before pages – determines that paper is offset in the output tray before
each specified page
DocXPLORER Reference Guide Functions • 39
Page 44

DHCP Server
The DocXPLORER » Edit RIP list dialog allows you to tell DocXPLORER to
look for DDP Servers which it would other wi s e not fi n d. Doc XPLORER finds
DDP Servers in the network via a broadcast call. However, by this method, it can
find only DDP Servers in your current network segment. With the RIP list, it can
find DDP Servers also outside your current network segment (even worldwide as
far as firewalls do not prohibit the communication). Use
• Add to add a DDP Server to the list. You may enter a DDP Server
by name or by IP number.
• Remove to remove a selected DDP Server from the list.
Note that this RIP list is only local to your PC. It does not affect any RIP in the
network.
Administrator:
By factory default, a DDP Server is configured to obtain an IP address via
DHCP. DHCP is a network protocol used for assigning IP addresses to network
devices.
For the first setup of a new RIP, your client PC and the RIP have to be in the
same network segment (i.e. no gateways between). This is because their first
communication requires a broadcast. Later you may place them in different
network segments.
To assign an IP address to a RIP via DocXPLORER, select the DocXPLORER
» DHCP server dialog.
Enter subnet mask and router IP address to be used for communication with the
RIP. To ensure RIP discovery, take your PC’s network settings for subnet mask.
If there is no router, enter your PC’s IP address.
Click Add to enter IP address and hostname for the RIP.
Click Start. This offers the IP address in your network. The status of this IP
address is shown as offered.
Switch on the RIP. If the RIP is configured for using DHCP, it takes the name
and IP address. After the RIP has consumed the IP address, the address is deleted
from the DocXPLORER’s display of free IP addresses.
40 • Functions DocXPLORER Reference Guide
Page 45

Preferences
To ensure that the new IP address is correctly transmitted, do not close the
DHCP Server dialog until the RIP has shown up in the DocXPLORER’s RIP
list.
If the RIP has obtained an IP address from a common DHCP server, this address
will be set temporarily according to the lease time setting of the DHCP server.
After After expiring, the process of obtaining has to be repeated. If the RIP has
obtained an IP address from DocXPLORER, it will be kept permanently.
See also Naming a DDP Server.
Call the DocXPLORER » Options dialog to set preferences for the behaviour of
the DocXPLORER. In this dialog, you can
• select the language for the user interface
• select the application for previewing jobs. This may be any
application which can read and display TIFF files. The default
application for previewing is the application associated with the .tif
filetype on Windows, and the PictureViewer on Macintosh. See
Feedback and Preview.
Admin login / logout
The DocXPLORER can be operated in administrator mode or in user mode.
Several functions are available only to the administrator. See Administrator
tasks. Other functions are only available to normal users. See User tasks.
To obtain administrator status, select the RIP » Admin login function and enter
the administrator password. Only one administrator can be logged in at any time.
To return to normal user status, select the RIP » Admin logout function.
The administrator password is empty by factory default. It is reset to empty when
the Factory defaults function is called. The administrator can change the
administrator password by the RIP » Change Password function.
In normal user mode, the user’s name is retrieved from the operating system. On
Windows it is taken from the network login or Windows login. On Macintosh it
is taken from the main user entered for file sharing. In general, these names
match the owner included in PostScript jobs on printing which in turn is used to
determine the owner in the DDP Server.
Color Management
Administrator (users can view colors):
This dialog shows the available engine colors and allows to edit/view their
calibrations.
In a mechanical sense, calibration is the process of setting a device to known
color conditions. A device is well calibrated if, for a given set of tints, the
measured tonal values match the requested values. Calibration can be used to
DocXPLORER Reference Guide Functions • 41
Page 46

emulate a particular device behaviour, or to compensate for changes in the
environment.
In the DDP Server, calibration is performed by adjusting the raster output to
match desired tonal values. The process of calibration is controlled by a RIP
object named “calibration”. A calibration maps the tonal values of one color
component on new tonal values. In the following, calibration means this RIP
object.
To view the available engine colors, select RIP » Color Management. This
shows the list of colors.
To edit or view a calibration, select a color and select Calibration. This shows
the calibration of the selected color.
A calibration is given by a number of base points with respective mapped values.
100% stands for 100% coverage of the respective color. 0% stands for white.
You can enter base points in two ways:
• Enter a pair of values in the fields on the dialog's left side. The tab
key allows you to step through the fields.
To delete a base point / value pair, clear the field with the base
point and move the cursor to another field.
• Click in the area with the curve on the dialog's right side.
To add a base point click somewhere in the curve area. Drag the
point to the desired location. The curve will change appropriately.
To change a base point, click on it and drag it to a new location.
To delete a base point, click on it and drag it outside the curve area.
To save a calibration, click OK. To discard your changes, click Cancel.
42 • Functions DocXPLORER Reference Guide
Page 47

Calibrations can be exported and imported by selecting Export or Import. This
creates or reads a text file. To get a sample file, add some base points to a
calibration and export it. You can edit the text file manually or create a new one
with a calibration tool. A calibration file may contain up to 25 base point / value
pairs.
Calibration is applied during the rasterization of a job. For color jobs, it is
applied after color separation.
For archive jobs, calibration is applied when their bitmaps are created.
Therefore, the calibration of an archive job may become invalid if the engine
colors are changed later.
Font Management
Administrator (users can view fonts):
To view and manage the available fonts on a DDP Server, select the DDP Server
and select the RIP » Font Management dialog. This dialog shows the lists of
available fonts. Choose Harddisk or Memory to view the corresponding list.
User installed fonts can be deleted from the hard disk by selecting the font and
clicking the Delete button. System fonts cannot be deleted and are therefore
shown in grey.
To download new fonts to hard disk or memory, click the Download button.
This leads to the Font Download dialog.
DocXPLORER Reference Guide Functions • 43
Page 48
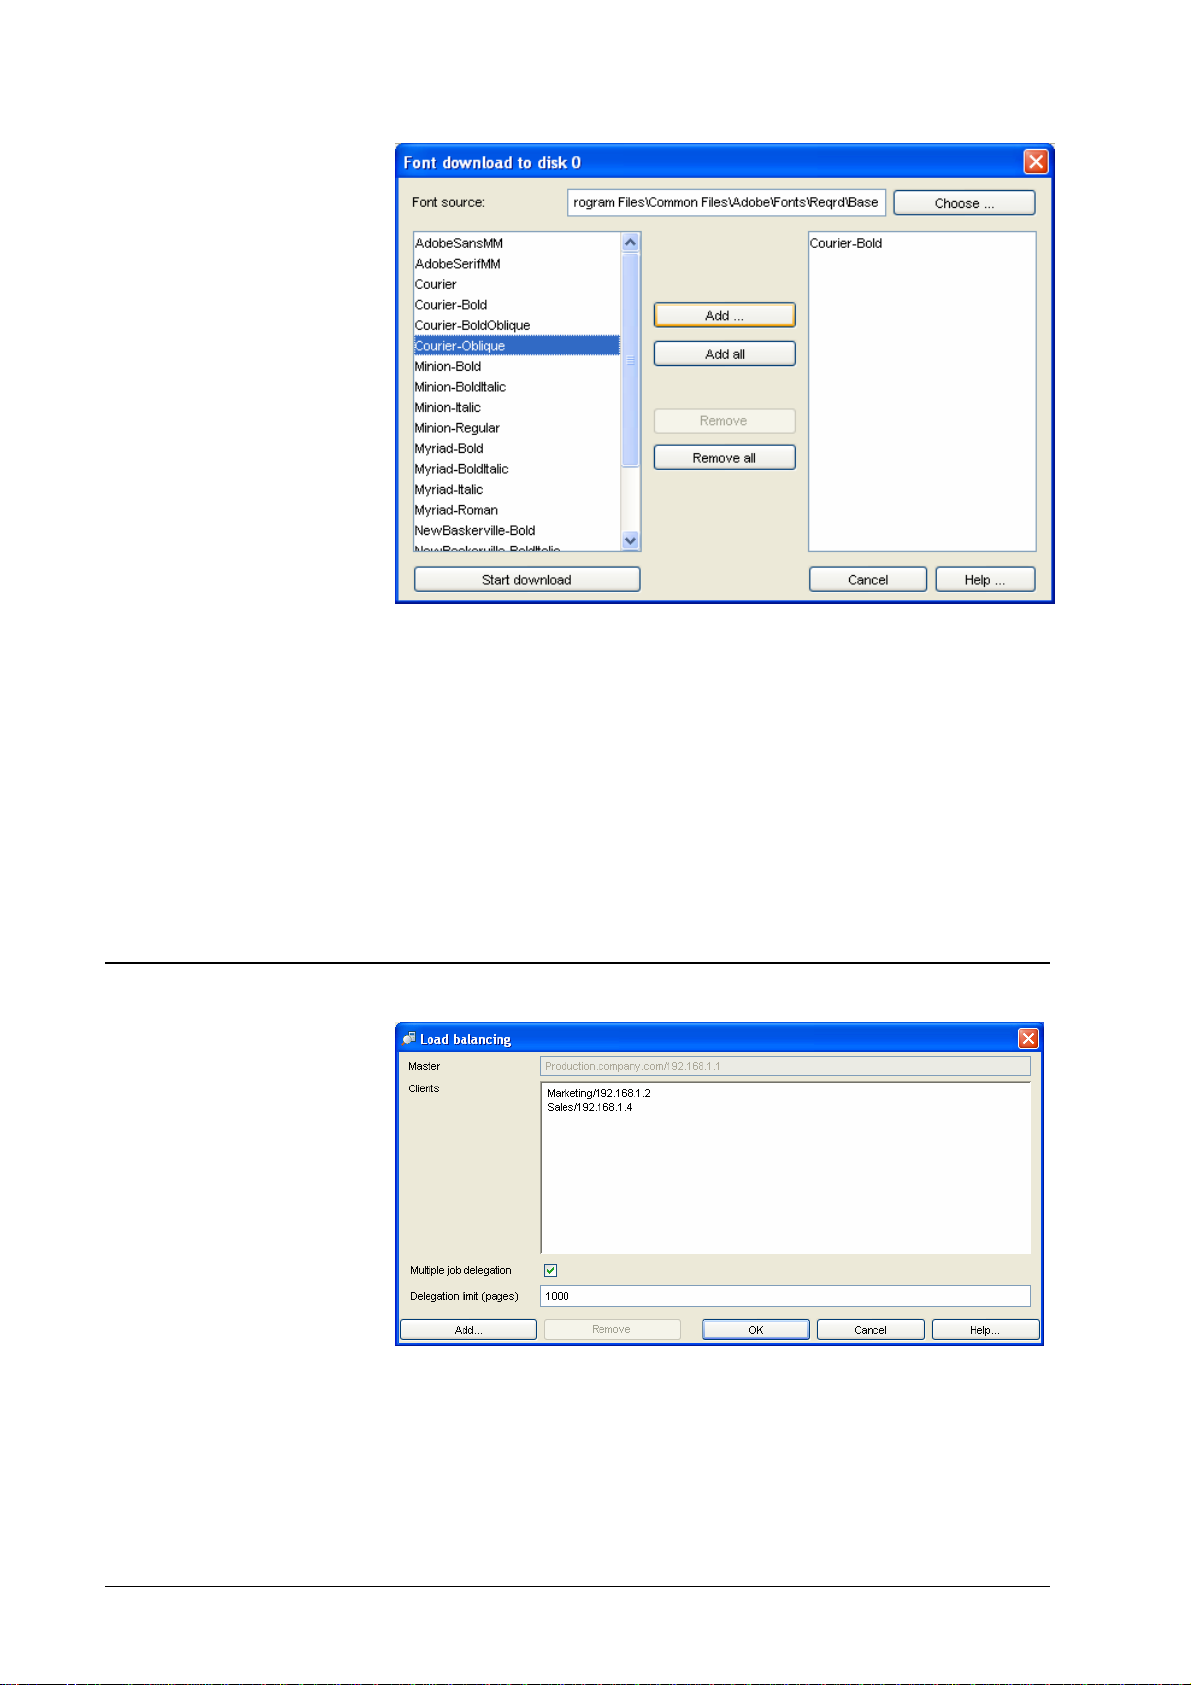
Load Balancing
The Font Download dialog allows you to browse to a folder with fonts. It
contains two panels:
1. Fonts available in the currently selected folder,
2. Fonts elected for downloading.
To elect fonts from the left panel for downloading, select one or more of them
and click Add, or click Add all. To cancel the election, select one or more of
them in the right panel and click Remove, or click Remove all. This does not
delete the fonts, but only cancels the election for downloading.
To perform the download of the fonts in the right panel, click the Start
Download button. During the dow nl oad a progress bar is shown.
Administrator (users can view the load balancing configuration):
To view and configure load balancing, select a DDP Server and select the RIP »
Load Balancing dialog.
44 • Functions DocXPLORER Reference Guide
Page 49
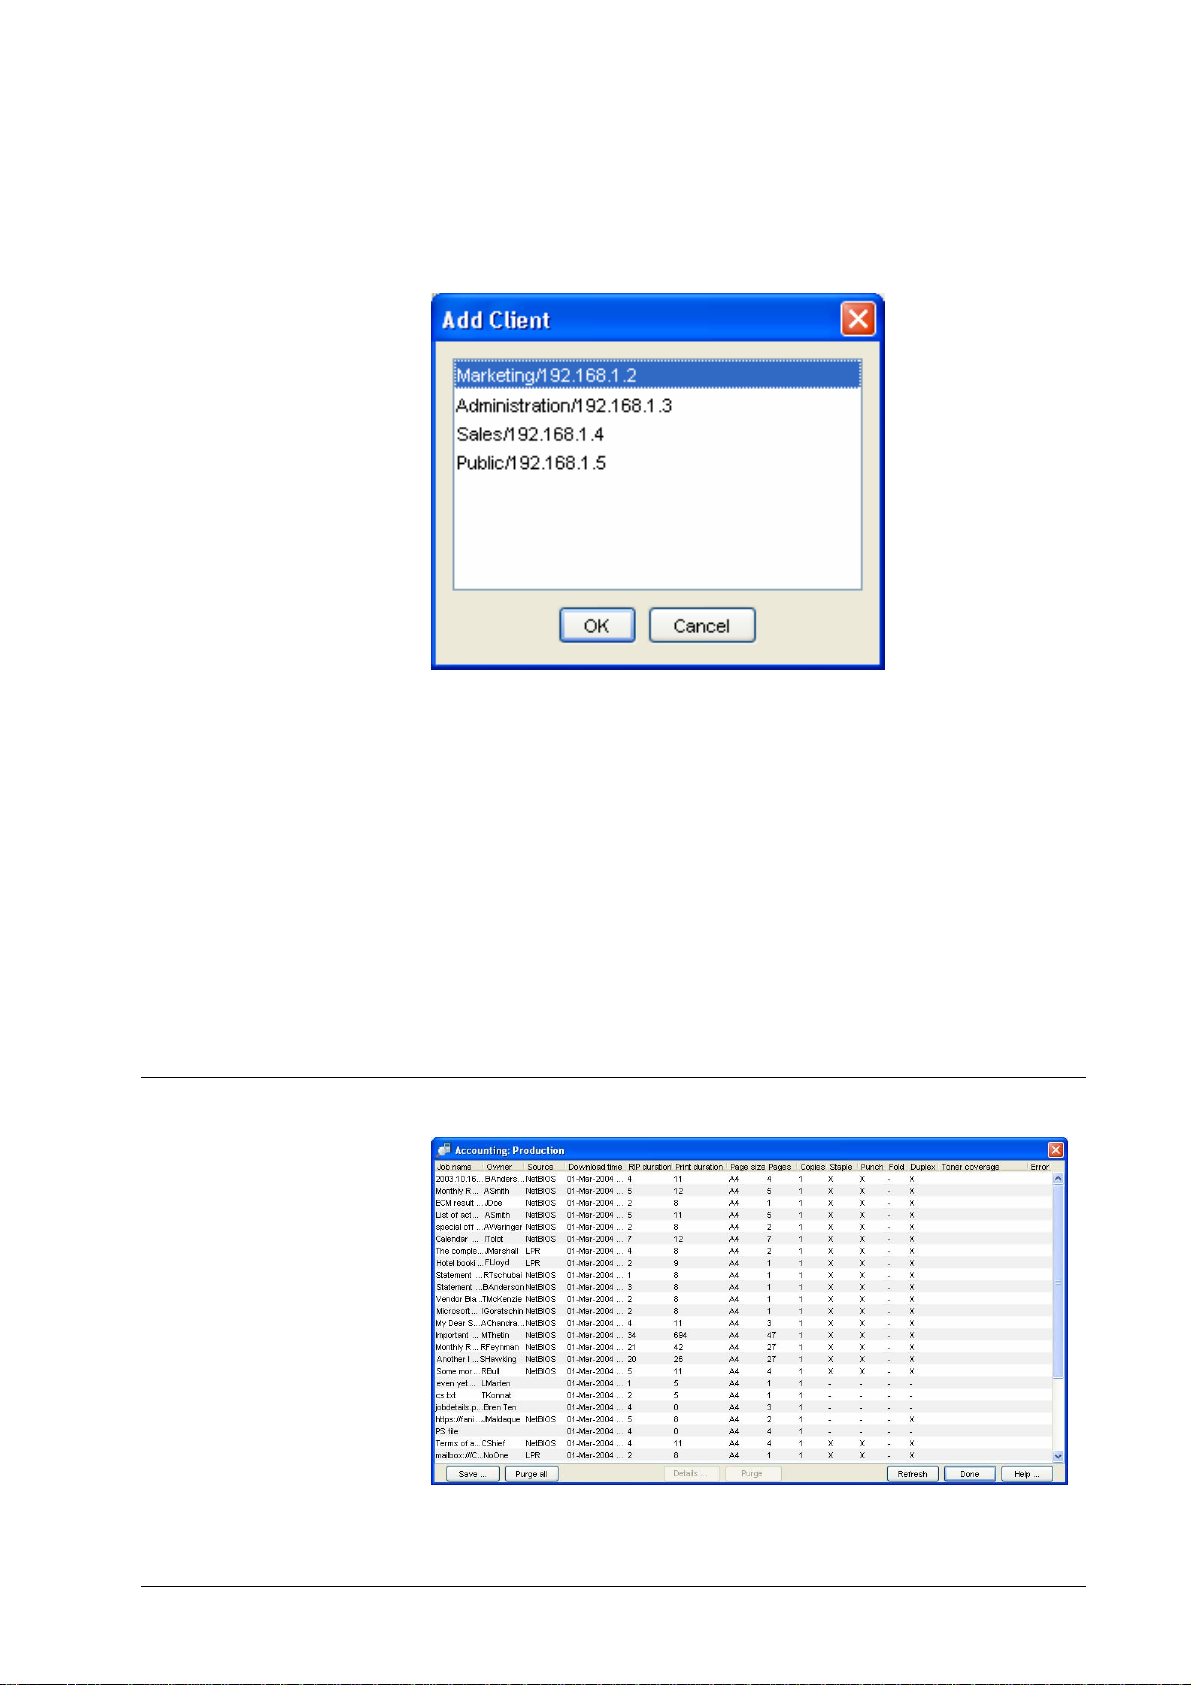
Load balancing can be configured by designating a DDP S e rver as master and
assigning it other DDP Servers as clients. This tells the master DDP Server to
share its printing load with its clients.
A DDP Server is configured as master by assigning clients to it:
• Add client – this assigns another DDP Server as client to the
master.
Accounting
• Remove client – this unassigns the selected client from the master.
Multiple job delegation selects that the switch to the next available client will
only be performed after the given number of pages has bee n dele gat ed to the
previous client. This can be used to enforce that many small jobs are delegated to
the same DDP Server without switching in-between. Availability of the DDP
Server is not checked in this case. Also rerouting of failed jobs is not performed.
Job splitting can be configured in the Job » Details » Workflow dialog panel by
changing the Job Splitting attribute.
The processing log of a delegated or split job can be viewed in the Job » Details
» Logging dialog panel.
DocXPLORER Reference Guide Functions • 45
Page 50
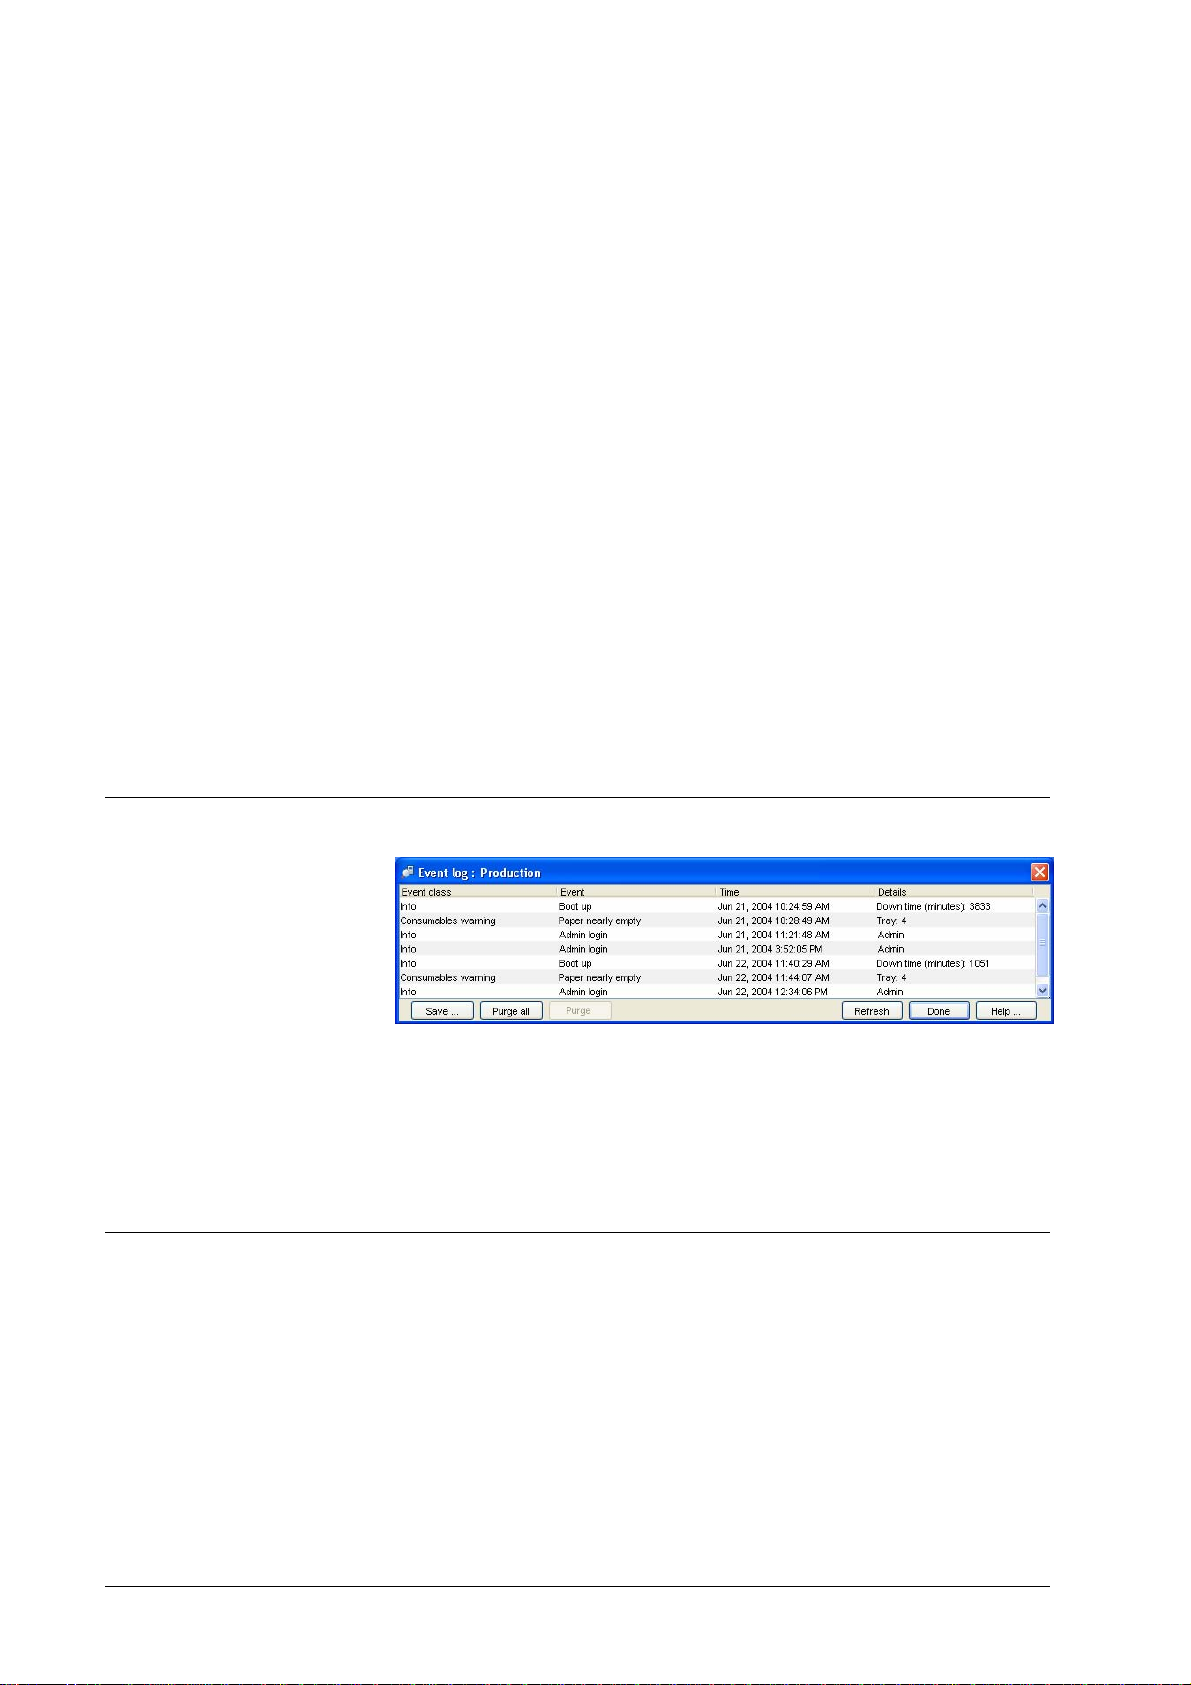
Administrator (users can view their own data):
During processing, the DDP Server collects accounting data about each job.
Enter the RIP » Accounting command to view accounting data for all jobs.
The accounting dialog shows a list of finished jobs with the following attributes:
name, owner, download time, RIP duration, print duration, document pages,
copies, page size, finishing options.
The following operations are available on a selected or all accounting records:
• Details – this shows the event log for the selected job
• Save – this saves the accounting records to the client workstation.
The records are saved in tab separated values format, so they can
be imported to a spreadsheet application.
• Purge – this deletes the accounting record for the selected job(s).
Recovery is not possible.
• Purge all – this deletes the accounting records for all displayed
jobs. Recovery is not possible.
• Refresh – this updates the list of accounting records.
For accounting purposes, jobs stay in the database after execution. If a job has
been executed successfully, its source is deleted. If a job has failed, e.g. because
a paper tray was not available, its source is kept. The job can then be
resubmitted by copying it from the finished queue to a print queue. Finished
jobs can be deleted explicitly, or are purged automatically following the rule
given in RIP » Details » Purging.
Event Log
This dialog shows the log of DDP Server and printer events. The recording of
events can be configured in the RIP details » Event Log dialog.
The Event log dialog allows to manually purge the event log. To purge the event
log completely, click Purge all. To purge the event log partially, select an event
and click Purge. This will purge the selected events and all older events.
Reboot / Shutdown
Administrator:
You can reboot or shut down the DDP Server from the DocXPLORER using the
RIP » Reboot or the RIP » Shutdown command. This performs an operating
system level restart or software controlled power off of the DDP Server.
You can also start or shut down the DDP Server with the standby button at its
front panel. When the DDP Server is running, t hi s but t o n p e rf orms a software
controlled power off which you can recognize by repeated beep tones from the
RIP after a few seconds waiting.
46 • Functions DocXPLORER Reference Guide
Page 51
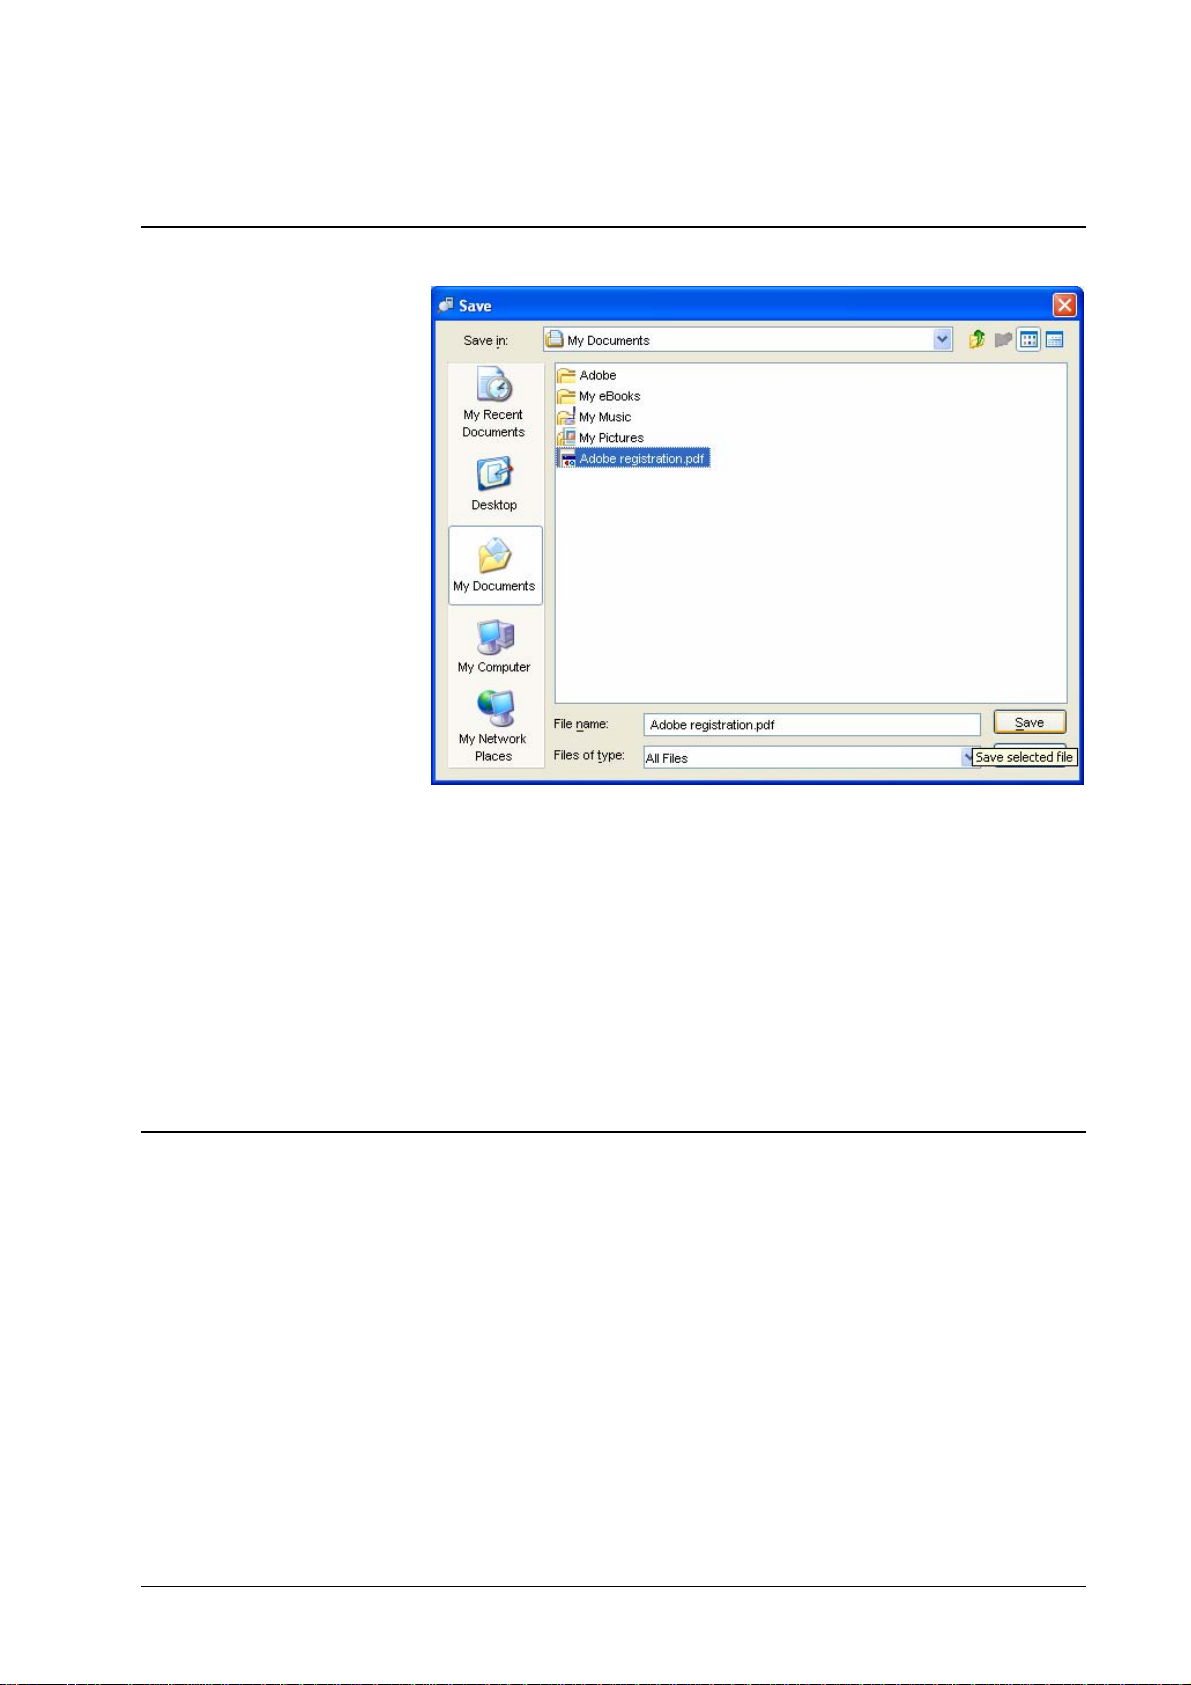
Download Job
Avoid turning the power off by the power switch on the back side of the DDP
Server or by disconnecting the power cable, as this may cause data loss.
PostScript, PDF, PCL, TIFF, and ASCII jobs on the client workstation can be
submitted to the currently selected queue by the Queue » Download Job
function. Jobs of these types can also be submitted to a queue by drag and drop
from the Windows Explorer or Macintosh Finder to the target queue.
During the download a progress bar is shown.
To get a PDF or TIFF file printed with specific options, download it to a queue
with these settings.
Note: A downloaded PDF, PCL, or TIFF file cannot be used to create a form. To
create a form from a PDF file, print it from Adobe Acrobat. To create a form
from a TIFF file, print it from an imaging application.
Feedback and preview
The Job » Feedback function can be applied to the following job types:
• Jobs in the Archive queue – these are jobs with a print resolution
• Jobs in the Forms queue – these are jobs which can be applied for
bitmap created by printing with Destination = archive.
overlay printing within another job. DocXPLORER supplies a full
screen resolution bitmap for them which you can paste into your
application document to check matching of content with form.
DocXPLORER Reference Guide Functions • 47
Page 52
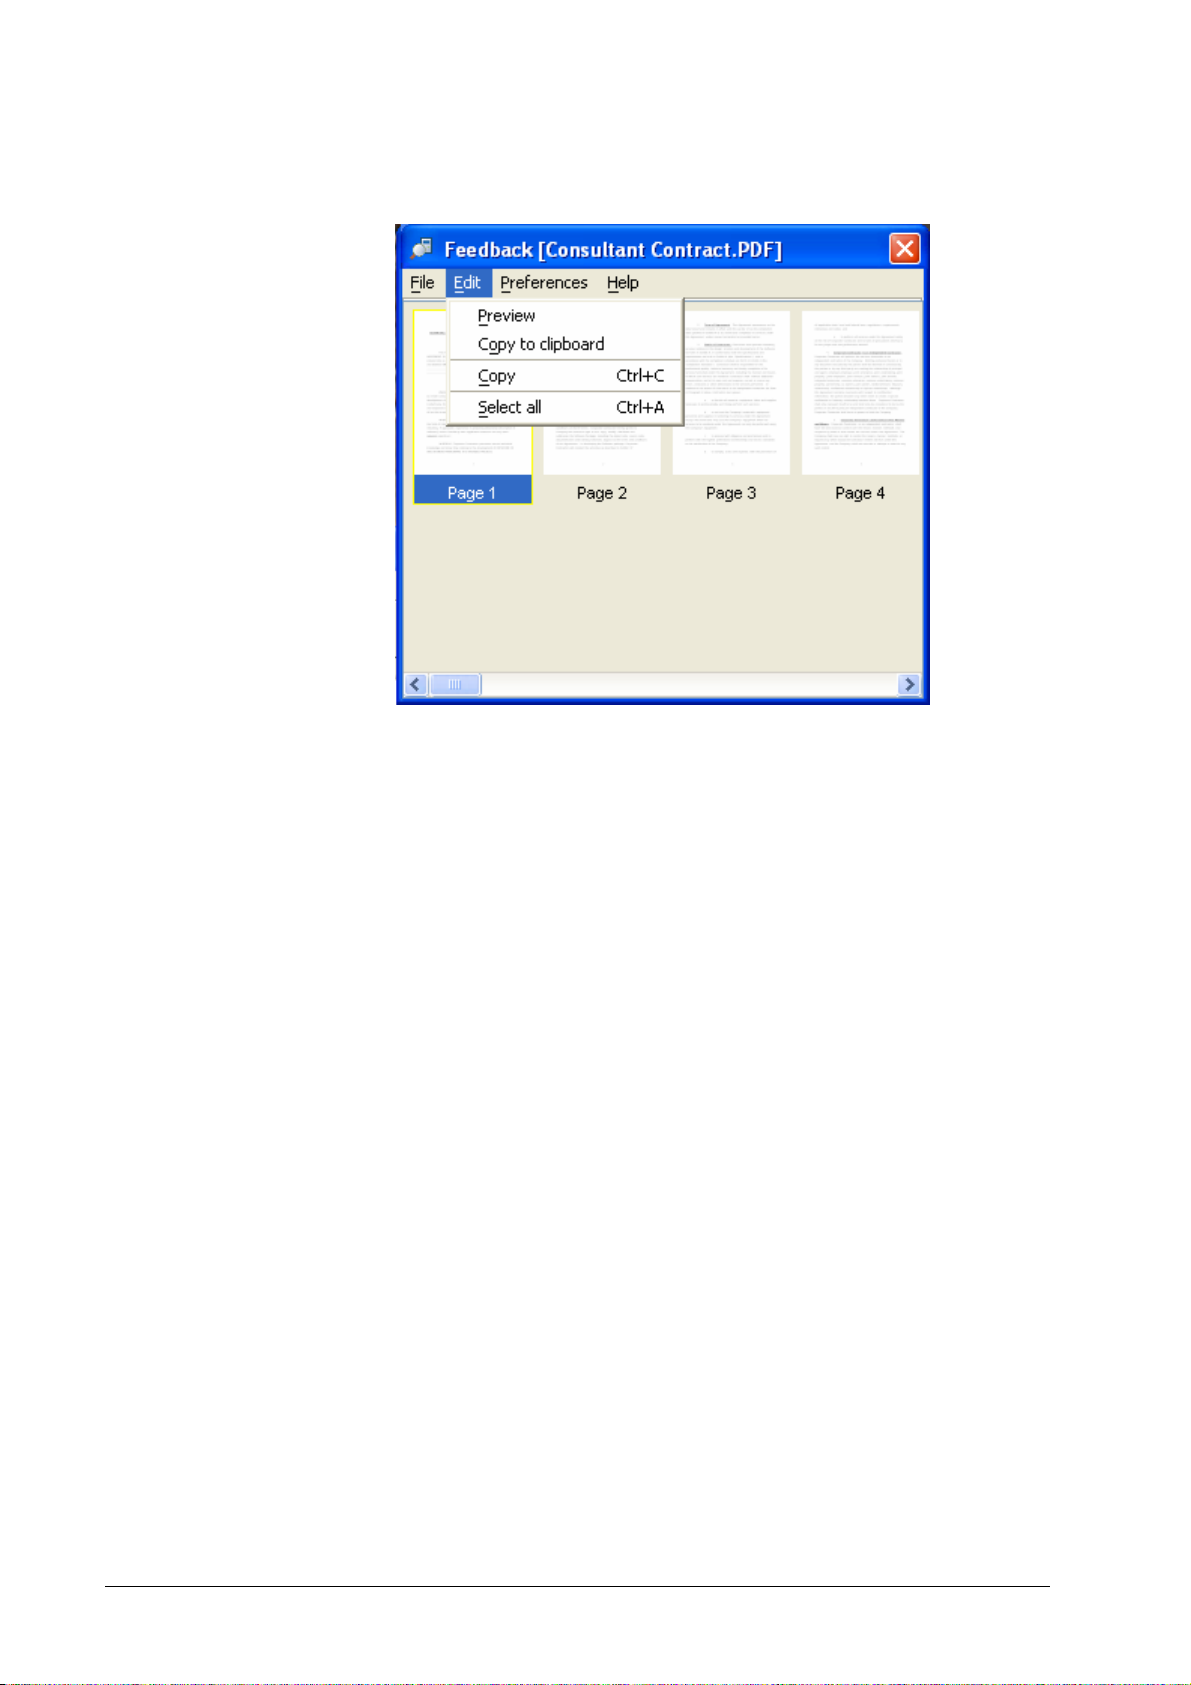
For each job in the Archive or Forms queue, the Job » Feedback command can
be called. This function show thumbnails for the images in the selected job. It
offers the following operations:
• Preview – this previews the selected page in your browser or a
program which you have selected for previewing. See Preferences.
• Copy to clipboard – this copies the selected page (in screen
resolution) to the clipboard such that it can be inserted in another
application.
• Copy – this copies the selected page to DocXPLORER’s internal
clipboard such that it can be inserted into a merge window (see
section Job Merging).
• Select all – selects all pages
• Save page – this saves the selected page to the client workstation
with a default filename.
• Save job – this saves each page of the job. If multipage is on, the
job is saved as one multipage TIFF file with a user specified
filename. If multipage is off, each page of the job is saved as one
TIFF file with a user specified filename, extende d by page number.
• Multipage – selects the multipage mode for saving a job. See
above.
• Resolution – selects the resolution for saving a job or page. Screen
resolution is 75 dpi, full resolution is 600 dpi.
• Compression – selects the compression mode for saving a job or
page.
48 • Functions DocXPLORER Reference Guide
Page 53
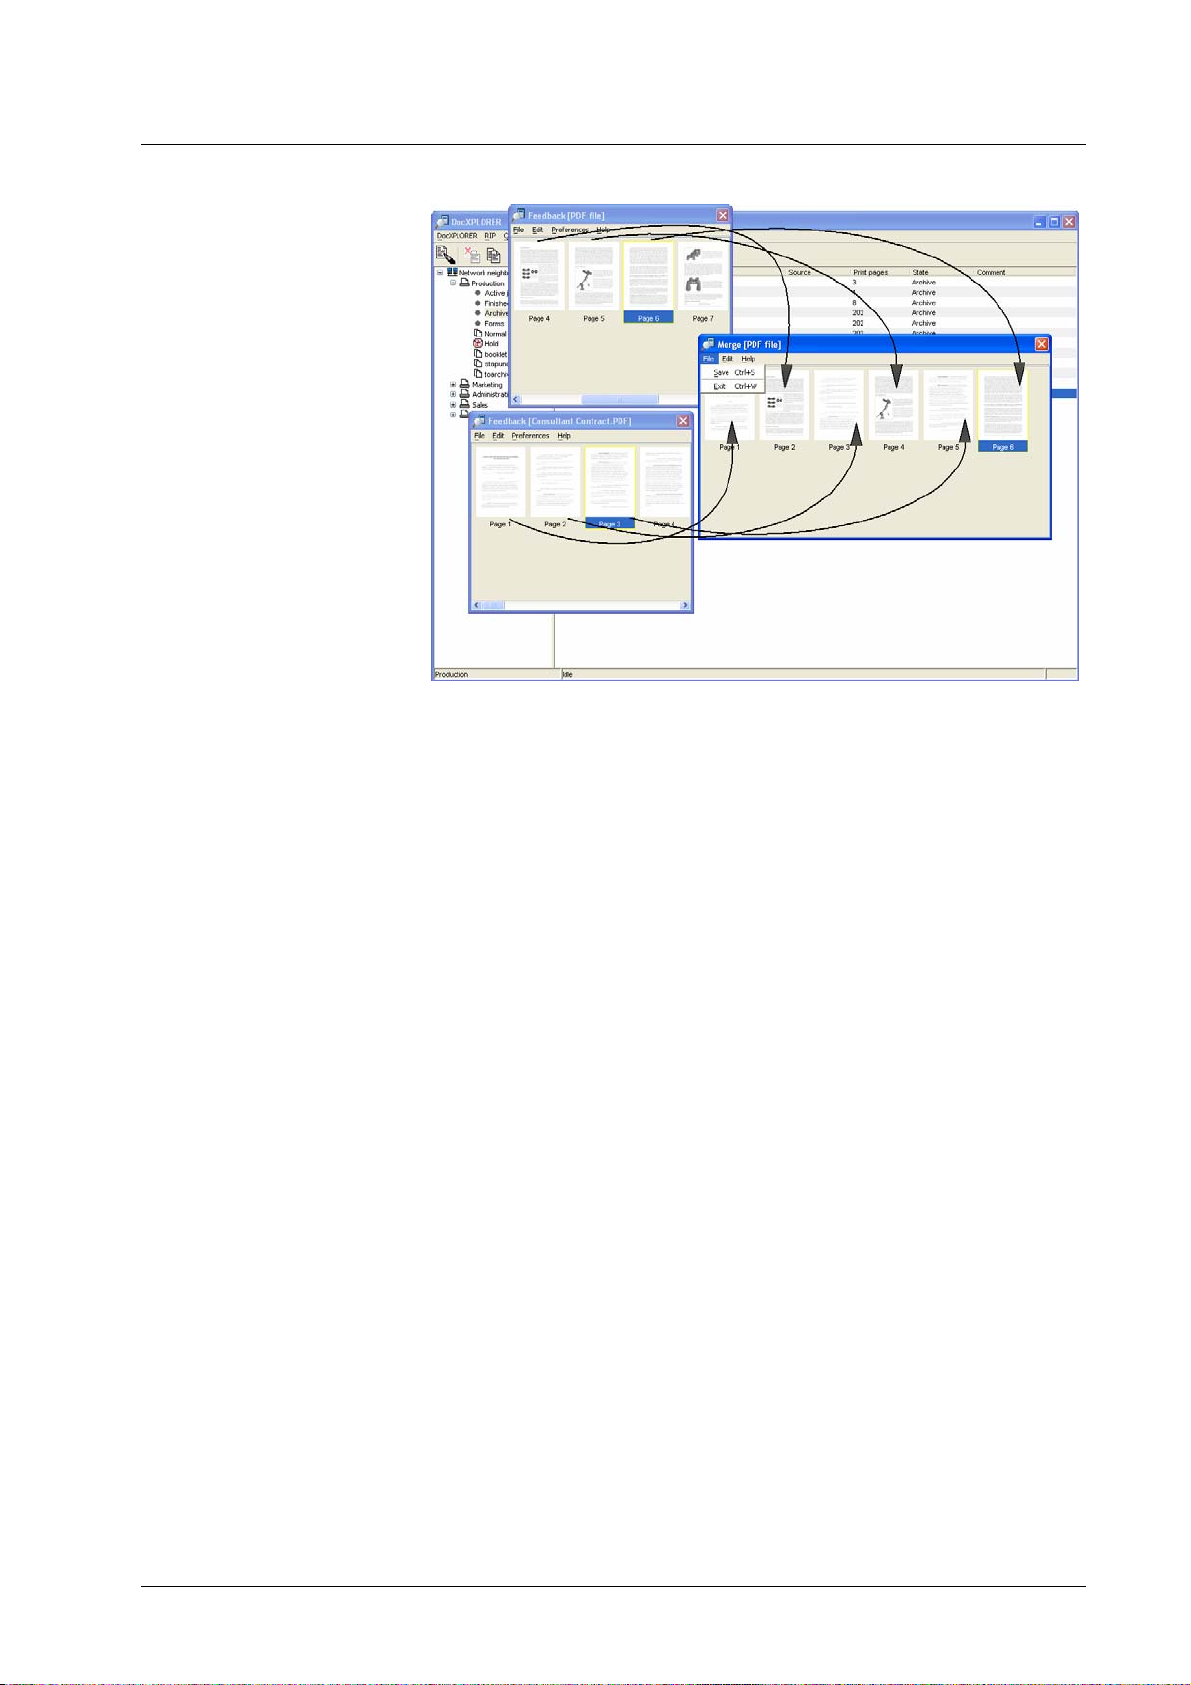
Job merging
Jobs in the Archive Queue can be merged. Merging produces a new job from the
bitmaps of several existing jobs. To merge jobs, select a job from the Archive
Queue and select the Job » Merge function, or select Job » Merge to start with
an empty job.
To add pages from other jobs, select one or more jobs from the Archive queue,
then select Job » Feedback. After this you have one merge window and one or
more feedback windows.
The merge window shows you the pages of the resulting job. To add pages to the
result job, drag them from any feedback window into the result window. To add
pages before the first or after the last page of the result job, drag them and hold
the cursor close to the left or right edge of the result window. This will scroll the
result window to the first or last page.
To move pages within the result window, drag them to the desired location. To
delete pages, select them and hit the Delete button. To insert an empty page,
select the page preceding it and select Edit » Insert blank page.
To save the result job, select Save. You will be prompted for a result job name.
To close the dialog, select Close.
The resulting job can be printed from the Archive Queue by selecting it and
selecting the Job » Print command.
Note: Archive jobs with different resolutions cannot be merged.
Note: It is possible to merge jobs with different page sizes. However, the
resulting merged jobs will have restrictions concerning layout and finishing.
DocXPLORER Reference Guide Functions • 49
Page 54
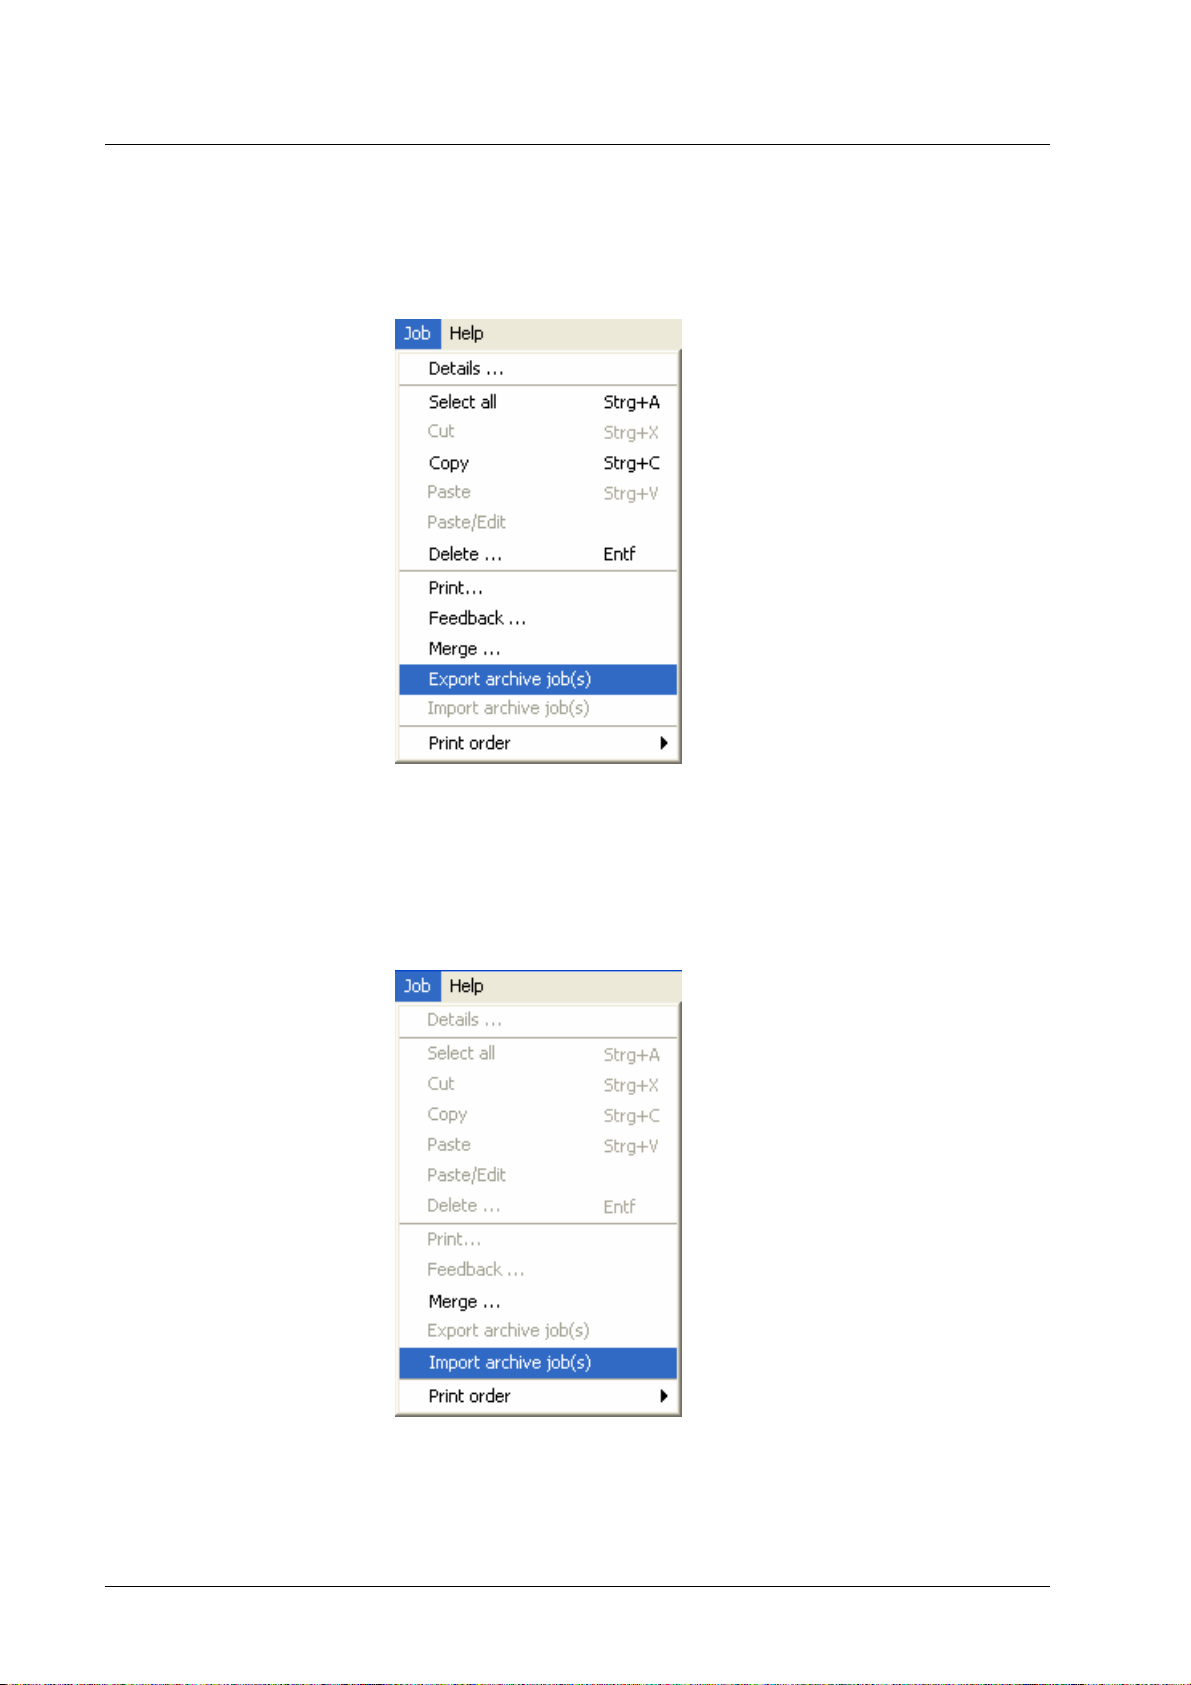
Export / import archive jobs
Archive jobs can be exported and imported again. This can be used to backup
archive jobs on external media.
To export archive jobs, select one or more (or all) archive jobs, then select Jobs
» Export archive job(s).
You will be prompted for a folder where each archive job is stored as one TIFF
file. The TIFF files can be viewed by an image viewing application. For color
jobs, the planes of each page will be shown separately in this case. Each TIFF
file contains the job settings of the archive job.
To import one or more archive jobs, select the archive, then select Jobs »
Import archive job(s).
You will be prompted to select one or more TIFF files. Select only TIFF files
which have been exported from DDP Server before. These files will be restored
with their job settings as new archive jobs.
50 • Functions DocXPLORER Reference Guide
Page 55

Glossary
Term/Abbreviation
Accounting
Active jobs
Administrator
Archive queue
ASCII
Auto select tray
Bitmap
Booklet
Client
DocXPLORER
Cluster Printing
Copy splitting
Explanation
Providing the administrator with execution and consumables usage data for
executed jobs, e.g. number and type of printe d pages, print time, errors. DDP
Server provides raw accounting data for individual processing.
A virtual queue showing the jobs which are currently interpreted or output.
User with special rights to configure a DDP Server. See user.
A virtual queue of jobs rasterized for later feedback, merging, and printing.
An encoding for text.
A method to select a paper tray matching the job’s requirements, e.g. by
page size and finishing options.
Image data produced by the RIP output on the printer, for job merging and
overlay, and for preview.
Layout of the pages of a document on the printed sheets such that the result
can be center folded and then read as a booklet.
A DDP Server configured for load balancing. The client takes over jobs
from a master for execution.
Monitoring and control application for DDP Server. DocXPLORER allows
to manage a network of RIPs together with the queues and jobs on them.
s. load balancing.
Dividing a print job into subsets by reducing its copy count, e.g. duplicating
a 500 copies job into 2 jobs with 250 copies each.
Delegation
DHCP
DNS
DocuFLOW
Document page
Domain name server
Download
dpi
Electronic stationery
DocXPLORER Reference Guide Glossary • 51
Sending a job to another DDP Server for execution. Delegation aims at
reaching a balanced load between all DDP Servers involved. Delegated jobs
are tracked such that their history can be displayed at the master.
Dynamic Host Configuration Protocol. A network protocol used for
assigning IP numbers to network devices (server, workstation, printer).
See domain name server.
s. SOFHA DocuFLOW
s. page
A network device mapping network nam es on IP ad dresses. A domain name
server can also refer to a mail server by providing its MX record.
Sending a job or font to the DDP Server. Download can be performed in the
DocXPLORER by menu command or via drag and drop.
Dots per inch – measuring unit for printer resolution.
s. form
Page 56

Term/Abbreviation
Explanation
EtherTalk
Failed job
Feedback
FIFO
Finished jobs
Finishing
Font
Form
Forms queue
A network protocol used in Macintosh environments for printing and file
sharing.
A job whose execution raised an error, e.g. paper jam or paper tray
mismatch. Failed jobs may be recovered from the Finished queue.
Obtaining a bitmap from the DDP Server. Bitmaps are available for jobs
rasterized for later printing and for forms. Bitmaps are available as
thumbnails, full screen resolution and size, or full page resolution and size.
First in first out – the normal processing order of a queue
A virtual queue showing jobs which have fini she d e xec ut i on . (Jo bs executed
successfully with destination form or archive are stored in the Forms or
Archive queue, respectively.)
Post printing operations, e.g. stapling, punching, folding.
Set of typographically designed characters. Typical font types are TrueType
and Type 1 (PostScript) fonts. Fonts may be available as screen fonts (for
display) and as printer fonts (for high resolution output).
A one page job which can be used to simulate preprinted paper (electronic
stationery). Printing a document with a form results in printing the document
pages over the form pages. Final prints may select a tray with offset printed
paper instead of the form.
A virtual queue containing jobs which can be applied as PS overlay to other
jobs.
Gateway
Hold queue
HTTP
Imposition
IP
IP number
Job
Job setting
Job size limit
Job splitting
Job ticket
s. router
A queue with jobs stored for later submission to a print queue.
Hypertext transfer protocol. A network protocol used for communicat i ng
linked pages in local networks and the internet. HTTP is provided by the
web server on the DDP Server.
Instructions on how the pages of a job are laid out on the printed sheets, e.g.
duplex or booklet.
Internet protocol. The lower layer of the TCP/IP protocol.
A unique number used to identify a network device (e.g. server, workstation,
printer) in a network. An IP number consists of 4 integers between 0 and
255 (eight bits), e.g. 128.3.3.21. IP num bers may be valid world wide or
only in the local network.
Document in print ready format plus job ticket.
Job ticket attribute defined in a job. Job settings may be set in the printer
driver and edited in the job details dialog of the DocXPLORER. Job settings
may be overridden by queue settings.
Maximum number of print pages (document pages times copies) allowed for
the jobs in a particular print queue.
s. page splitting, copy splitting
Instructions for printer specific handling of a job, e.g. for imposition, forms
inclusion, or owner notification.
KB
Limit
Load Balancing
K-Byte (1024 Bytes).
s. job size limit
Using two or more DDP Servers to share print load among several printers.
Sharing is achieved by delegation, page splitting an d copy splitting.
52 • Glossary DocXPLORER Reference Guide
Page 57

Term/Abbreviation
Explanation
Log
lpi
Master
MX record
Name server
NetBIOS
Netmask
Owner
Page
List of events produced by the execution of a job, e.g. submission, start
printing, end printing, errors. Available as finished job data or accounting
data.
Lines per inch – measuring unit for raster frequency.
A DDP Server configured for load balancing. The master accepts jobs from
clients and sends (delegates) them to the clients (including itself) for
execution. Typically, in a load balancing configuration, users send jobs only
to the master. A DDP Server can be master and client at the same time.
Mail exchange record provided by a domain name server. The MX record
refers to a mail server accepting email for a specific domain.
See domain name server.
A network protocol used in Windows environments for printing and fil e
sharing.
A 4 number tuple (like an IP number) specifying a subnet for searches and
broadcasts. E.g. the netmask 255.255.0.0 specifies the first 16 bit of an IP
number as subnet address.
The person or user account who submitted the job.
1. document page (in the application)
2. printed page (on paper)
In duplex printing, two pages are printed on (both surfaces of) one sheet. In
booklet printing, two document pages are mapped on one printed page, and
4 document pages make up one sheet.
Page splitting
PCL
PDF
PDL
PostScript
PPD
Print page
Print pages (number of)
Print queue
Priority
ProfiRIP
Dividing a print job into packets by pages, e.g. page 1-10 and 11-20 of a 20
page job. Finishing options like booklet layout or staple mode apply to each
packet individually.
Printer command language. A page description language used for HP
printers. PCL5e supports black and white printing, PCL5c supports color
printing.
Portable document format. PDF differs from PostScript by being less device
dependent, page independent and easily to view on many platforms.
Page description language. Language for expressing document content on a
printer instruction level. E.g. PostScript, PDF.
Page description language (PDL) with a rich feature set for mapping text,
graphics and images on raster devices like printers and film recorders.
PostScript Printer Description. A file on the workstation which specifies
printer capabilities and how the printer driver can map them on printer
commands.
s. page, print pages (number of)
Number of document pages times number of copies.
A queue with jobs waiting for execution.
The priority of a queue allows to schedule their jobs for faster or slower
execution. Typically used to schedule smaller jobs for faster execution.
Printer controller of DDP Server.
Purge
Deleting old jobs to recover database and job space. Purging may be applied
to job sources if they are still available, to accounting records, and to job
tickets.
DocXPLORER Reference Guide Glossary • 53
Page 58

Term/Abbreviation
Explanation
Queue
Queue setting
Reboot
RIP
RIP list
Router
Sample page
Settings page
Sheet
A container for jobs. DDP Server provides print queues and hold queues.
The administrator may define any number of print and hold queues.
On the user’s workstation, queues may be visible as MS Windows printers,
or as Macintosh desktop printers.
Job ticket attributes defined in a queue. They may be defined to take priority
over job settings, i.e. the attributes of jobs executed in the queue.
Restarting and initialising a DDP Server
Raster image processor. A device for turning instructions in a page
description language (PDL) into bitmaps suitable for output on a digital
printer. E.g. DDP Server
The list of RIPs currently monitored by the DocXPLORER. RIPs may be
found by broadcast call in the local subnet, or from the edited RIP list of the
DocXPLORER.
A user edited list of RIPs outside the local subnet, which the DocXPLORER
should monitor.
A network device connecting a subnet to other networ ks.
Predefined job in the hold queue showing configuration data on the DDP
Server. There are sample pages for settings (Settings page) and for fonts
(Font sample page).
See sample page.
Sheet of printed paper; in duplex printing, two pages are printed on one
sheet.
SMTP
SOFHA DocuFLOW®
Subnet
TCP/IP
Tracking
User
Simple mail transfer protocol. SMTP is used by the DDP Server to send
email notifications about job execution to the owner.
Print on Demand Software for the ProfiRIP. Comprises custom queues,
archive printing, forms overlay, job merging, and cluster printing.
1. a set of IP numbers sharing a number of leading bits
2. a segment of a network separated from the rest of the network by a
gateway
A network protocol used for comm uni cati on i n local a rea ne t wo rks and the
internet.
Collecting the processing history of a delegated job for display at the master.
User with simple printing rights on a DDP Server. See administrator.
54 • Glossary DocXPLORER Reference Guide
 Loading...