

Page 1

© 2004 Ricoh Printing Systems America, Inc.
2635-A Park Center Drive
Simi Valley, CA 93065
October 2004
338187-001 Revision A
PCL
Programming
Guide
Page 2

© 2004 Ricoh Printing Systems America, Inc. All rights reserved.
No part of this document may be reproduced without the express permission of Ricoh
Printing Systems America, Inc.
The material in this document is for informational purposes and is subject to change
without notice. Ricoh Printing Systems America, Inc., assumes no responsibility for
errors or omissions in this document. No liability is assumed for any damages resulting
from the use of the information it contains.
TRADEMARK
Digital Document Publisher, DDP, DDP 70, DDP 70e, DDP 92, and their associated
logo marks are trademarks of Ricoh Printing Systems America, Inc. All rights reserved.
All other terms and product names may be trademarks or registered trademarks of their
respective owners, and are hereby acknowledged.
NOTICE TO USER
In an effort to meet the demands of a rapidly changing technology, the manufacturer is
continually developing new features and functions to meet your changing printing or
printer needs. As a result, this manual may not exactly reflect future changes made to
the product. Please be sure to consult all manual updates or addenda when using this
product’s documentation.
Page 3

Table of Contents
Chapter 1. Fonts and Forms Installer
Overview . . . . . . . . . . . . . . . . . . . . . . . . . . . . . . . . . . . . . . . . . . . . . . . . . . . . . . . . . . . . . . . . . . 1-1
Supported Font Formats . . . . . . . . . . . . . . . . . . . . . . . . . . . . . . . . . . . . . . . . . . . . . . . . . . .1-2
Supported Macro Formats . . . . . . . . . . . . . . . . . . . . . . . . . . . . . . . . . . . . . . . . . . . . . . . . . 1-2
Files Created During Installation . . . . . . . . . . . . . . . . . . . . . . . . . . . . . . . . . . . . . . . . . . . .1-2
Overlay Macro . . . . . . . . . . . . . . . . . . . . . . . . . . . . . . . . . . . . . . . . . . . . . . . . . . . . . . . . . . 1-3
Network Issues . . . . . . . . . . . . . . . . . . . . . . . . . . . . . . . . . . . . . . . . . . . . . . . . . . . . . . . . . .1-3
Access Rights . . . . . . . . . . . . . . . . . . . . . . . . . . . . . . . . . . . . . . . . . . . . . . . . . . . . . . . . . . .1-3
PCL Fonts Dialog. . . . . . . . . . . . . . . . . . . . . . . . . . . . . . . . . . . . . . . . . . . . . . . . . . . . . . . . . . . .1-3
Edit Installed Font Dialog . . . . . . . . . . . . . . . . . . . . . . . . . . . . . . . . . . . . . . . . . . . . . . . . . . . . .1-6
PCL Fonts Install Dialog . . . . . . . . . . . . . . . . . . . . . . . . . . . . . . . . . . . . . . . . . . . . . . . . . . . . . .1-9
Missing Font Information Dialog. . . . . . . . . . . . . . . . . . . . . . . . . . . . . . . . . . . . . . . . . . . . . . .1-11
PCL Macros Dialog . . . . . . . . . . . . . . . . . . . . . . . . . . . . . . . . . . . . . . . . . . . . . . . . . . . . . . . . .1-11
Edit Installed Macro Dialog . . . . . . . . . . . . . . . . . . . . . . . . . . . . . . . . . . . . . . . . . . . . . . . . . . .1-14
Install PCL Macros Dialog. . . . . . . . . . . . . . . . . . . . . . . . . . . . . . . . . . . . . . . . . . . . . . . . . . . .1-16
Macro Information Dialog . . . . . . . . . . . . . . . . . . . . . . . . . . . . . . . . . . . . . . . . . . . . . . . . . . . .1-17
Configure Dialog . . . . . . . . . . . . . . . . . . . . . . . . . . . . . . . . . . . . . . . . . . . . . . . . . . . . . . . . . . .1-18
Chapter 2. HP PCL5e Language Printer Commands
About PCL5e . . . . . . . . . . . . . . . . . . . . . . . . . . . . . . . . . . . . . . . . . . . . . . . . . . . . . . . . . . . . . . .2-1
PC-DOS Application Escape Character Commands . . . . . . . . . . . . . . . . . . . . . . . . . . . . .2-2
Using PCL5e Printer Escape Sequences . . . . . . . . . . . . . . . . . . . . . . . . . . . . . . . . . . . . . . 2-2
Combining Escape Sequence Commands . . . . . . . . . . . . . . . . . . . . . . . . . . . . . . . . . .2-3
Escape Sequences Syntax . . . . . . . . . . . . . . . . . . . . . . . . . . . . . . . . . . . . . . . . . . . . . .2-3
HP PCL5e Escape Code Sequences . . . . . . . . . . . . . . . . . . . . . . . . . . . . . . . . . . . . . . . . . . . . . .2-4
Job Controls . . . . . . . . . . . . . . . . . . . . . . . . . . . . . . . . . . . . . . . . . . . . . . . . . . . . . . . . . . . . 2-4
Alphanumeric ID . . . . . . . . . . . . . . . . . . . . . . . . . . . . . . . . . . . . . . . . . . . . . . . . . . . . . . . .2-7
Page Controls . . . . . . . . . . . . . . . . . . . . . . . . . . . . . . . . . . . . . . . . . . . . . . . . . . . . . . . . . . .2-8
Paper Size . . . . . . . . . . . . . . . . . . . . . . . . . . . . . . . . . . . . . . . . . . . . . . . . . . . . . . . . . . .2-8
Page Length . . . . . . . . . . . . . . . . . . . . . . . . . . . . . . . . . . . . . . . . . . . . . . . . . . . . . . . . .2-8
Orientation . . . . . . . . . . . . . . . . . . . . . . . . . . . . . . . . . . . . . . . . . . . . . . . . . . . . . . . . . .2-9
Output Bin . . . . . . . . . . . . . . . . . . . . . . . . . . . . . . . . . . . . . . . . . . . . . . . . . . . . . . . . .2-10
Paper Source . . . . . . . . . . . . . . . . . . . . . . . . . . . . . . . . . . . . . . . . . . . . . . . . . . . . . . .2-12
Character Text Path Direction . . . . . . . . . . . . . . . . . . . . . . . . . . . . . . . . . . . . . . . . . .2-14
Margin Controls . . . . . . . . . . . . . . . . . . . . . . . . . . . . . . . . . . . . . . . . . . . . . . . . . . . . .2-14
Perforation Skip . . . . . . . . . . . . . . . . . . . . . . . . . . . . . . . . . . . . . . . . . . . . . . . . . . . . .2-14
Horizontal Column Spacing . . . . . . . . . . . . . . . . . . . . . . . . . . . . . . . . . . . . . . . . . . . .2-14
Vertical Line Spacing . . . . . . . . . . . . . . . . . . . . . . . . . . . . . . . . . . . . . . . . . . . . . . . . .2-14
Cursor Controls . . . . . . . . . . . . . . . . . . . . . . . . . . . . . . . . . . . . . . . . . . . . . . . . . . . . . . . . .2-15
iii
Page 4
Vertical and Horizontal Movement . . . . . . . . . . . . . . . . . . . . . . . . . . . . . . . . . . . . . . 2-15
Push/Pop Position . . . . . . . . . . . . . . . . . . . . . . . . . . . . . . . . . . . . . . . . . . . . . . . . . . . 2-15
End-of-Line Termination . . . . . . . . . . . . . . . . . . . . . . . . . . . . . . . . . . . . . . . . . . . . . . 2-16
Font Selection . . . . . . . . . . . . . . . . . . . . . . . . . . . . . . . . . . . . . . . . . . . . . . . . . . . . . . . . . . 2-16
Symbol Set Selection . . . . . . . . . . . . . . . . . . . . . . . . . . . . . . . . . . . . . . . . . . . . . . . . 2-17
Font Spacing and Pitch . . . . . . . . . . . . . . . . . . . . . . . . . . . . . . . . . . . . . . . . . . . . . . . 2-18
Font Character Size and Style . . . . . . . . . . . . . . . . . . . . . . . . . . . . . . . . . . . . . . . . . 2-18
Font Character Stroke Weight . . . . . . . . . . . . . . . . . . . . . . . . . . . . . . . . . . . . . . . . . . 2-19
Secondary Font Character Size and Style . . . . . . . . . . . . . . . . . . . . . . . . . . . . . . . . . 2-19
Typeface Selection . . . . . . . . . . . . . . . . . . . . . . . . . . . . . . . . . . . . . . . . . . . . . . . . . . 2-20
Primary/Secondary Font Selection . . . . . . . . . . . . . . . . . . . . . . . . . . . . . . . . . . . . . . 2-20
Auto Underline . . . . . . . . . . . . . . . . . . . . . . . . . . . . . . . . . . . . . . . . . . . . . . . . . . . . . 2-21
Transparent Print . . . . . . . . . . . . . . . . . . . . . . . . . . . . . . . . . . . . . . . . . . . . . . . . . . . . 2-21
Text Parsing . . . . . . . . . . . . . . . . . . . . . . . . . . . . . . . . . . . . . . . . . . . . . . . . . . . . . . . . 2-21
Font Management . . . . . . . . . . . . . . . . . . . . . . . . . . . . . . . . . . . . . . . . . . . . . . . . . . . . . . 2-22
Soft Font Creation . . . . . . . . . . . . . . . . . . . . . . . . . . . . . . . . . . . . . . . . . . . . . . . . . . . 2-22
PCL Vector Graphics Switching/Set-up . . . . . . . . . . . . . . . . . . . . . . . . . . . . . . . . . . . . . 2-23
Raster Graphics . . . . . . . . . . . . . . . . . . . . . . . . . . . . . . . . . . . . . . . . . . . . . . . . . . . . . . . .2-23
Print Model . . . . . . . . . . . . . . . . . . . . . . . . . . . . . . . . . . . . . . . . . . . . . . . . . . . . . . . . . . . . 2-24
Imaging . . . . . . . . . . . . . . . . . . . . . . . . . . . . . . . . . . . . . . . . . . . . . . . . . . . . . . . . . . . 2-24
Logical Operation . . . . . . . . . . . . . . . . . . . . . . . . . . . . . . . . . . . . . . . . . . . . . . . . . . . 2-25
Pixel Placement . . . . . . . . . . . . . . . . . . . . . . . . . . . . . . . . . . . . . . . . . . . . . . . . . . . . . 2-25
Rectangle Dimensions . . . . . . . . . . . . . . . . . . . . . . . . . . . . . . . . . . . . . . . . . . . . . . . . 2-25
Rectangle Area Fill . . . . . . . . . . . . . . . . . . . . . . . . . . . . . . . . . . . . . . . . . . . . . . . . . . 2-26
Macro Controls . . . . . . . . . . . . . . . . . . . . . . . . . . . . . . . . . . . . . . . . . . . . . . . . . . . . . . . . .2-26
Miscellaneous Controls . . . . . . . . . . . . . . . . . . . . . . . . . . . . . . . . . . . . . . . . . . . . . . . . . . 2-26
HP 4000 Series Emulation PCL5e Command Summary . . . . . . . . . . . . . . . . . . . . . . . . . 2-27
HP 4000 Series Emulation PJL Environment Variables Summary . . . . . . . . . . . . . . . . . 2-34
HP 4000 Series Emulation PJL Differences . . . . . . . . . . . . . . . . . . . . . . . . . . . . . . . . . . 2-37
JOB Command and Parameters . . . . . . . . . . . . . . . . . . . . . . . . . . . . . . . . . . . . . . . . . . . . 2-37
PJL Environment Variable Differences . . . . . . . . . . . . . . . . . . . . . . . . . . . . . . . . . . . . . . 2-38
COPIES Environment Variable . . . . . . . . . . . . . . . . . . . . . . . . . . . . . . . . . . . . . . . . . 2-38
CLIP Environment Variable . . . . . . . . . . . . . . . . . . . . . . . . . . . . . . . . . . . . . . . . . . . 2-38
CMAPTBL Environment Variable . . . . . . . . . . . . . . . . . . . . . . . . . . . . . . . . . . . . . . 2-38
DOCPASSWORD Environment Variable . . . . . . . . . . . . . . . . . . . . . . . . . . . . . . . . 2-39
FINISH Environment Variable . . . . . . . . . . . . . . . . . . . . . . . . . . . . . . . . . . . . . . . . . 2-40
FITTOMEDIA Environment Variable . . . . . . . . . . . . . . . . . . . . . . . . . . . . . . . . . . . 2-40
FOLD Environment Variable . . . . . . . . . . . . . . . . . . . . . . . . . . . . . . . . . . . . . . . . . . 2-40
JOBOFFSET Environment Variable
MEDIASOURCE Environment Variable . . . . . . . . . . . . . . . . . . . . . . . . . . . . . . . . . 2-41
OUTBIN Environment Variable
PAPER Environment Variable . . . . . . . . . . . . . . . . . . . . . . . . . . . . . . . . . . . . . . . . . 2-43
PDFORIENTATION Environment Variable . . . . . . . . . . . . . . . . . . . . . . . . . . . . . . 2-43
QTY Environment Variable . . . . . . . . . . . . . . . . . . . . . . . . . . . . . . . . . . . . . . . . . . . 2-43
TRIM Environment Variable . . . . . . . . . . . . . . . . . . . . . . . . . . . . . . . . . . . . . . . . . . . 2-44
File System Command . . . . . . . . . . . . . . . . . . . . . . . . . . . . . . . . . . . . . . . . . . . . . . . . 2-44
iv
Page 5

HP 4000 Series Emulation PJL Command Summary . . . . . . . . . . . . . . . . . . . . . . . . . . .2-45
HP-GL/2 Differences . . . . . . . . . . . . . . . . . . . . . . . . . . . . . . . . . . . . . . . . . . . . . . . . . . . .2-46
Disk Storage and Management of PCL Fonts and Macros . . . . . . . . . . . . . . . . . . . . . . .2-46
The PJL File System Interface . . . . . . . . . . . . . . . . . . . . . . . . . . . . . . . . . . . . . . . . . . . . .2-46
Naming Disk Fonts and Forms . . . . . . . . . . . . . . . . . . . . . . . . . . . . . . . . . . . . . . . . .2-46
Format of Disk Fonts and Forms . . . . . . . . . . . . . . . . . . . . . . . . . . . . . . . . . . . . . . . .2-47
Example: Using the File System Commands . . . . . . . . . . . . . . . . . . . . . . . . . . . . . . . . . .2-47
Storing a Font on the Printer’s Hard Disk . . . . . . . . . . . . . . . . . . . . . . . . . . . . . . . . .2-47
Storing a Form on the Printer’s Hard Disk . . . . . . . . . . . . . . . . . . . . . . . . . . . . . . . .2-47
Removing Files from the Printer’s Hard Disk . . . . . . . . . . . . . . . . . . . . . . . . . . . . . .2-47
Using PCL Fonts and Macros Stored on Disk . . . . . . . . . . . . . . . . . . . . . . . . . . . . . . . . .2-47
The Alphanumeric ID Command . . . . . . . . . . . . . . . . . . . . . . . . . . . . . . . . . . . . . . . .2-48
Example: Using a Disk Font or Macro . . . . . . . . . . . . . . . . . . . . . . . . . . . . . . . . . . . . . . .2-49
Selecting Disk Fonts . . . . . . . . . . . . . . . . . . . . . . . . . . . . . . . . . . . . . . . . . . . . . . . . .2-49
Selecting Disk Macros . . . . . . . . . . . . . . . . . . . . . . . . . . . . . . . . . . . . . . . . . . . . . . . .2-50
Removing Font and Macro Associations . . . . . . . . . . . . . . . . . . . . . . . . . . . . . . . . . .2-50
Chapter 3. Using the Startup File
Overview . . . . . . . . . . . . . . . . . . . . . . . . . . . . . . . . . . . . . . . . . . . . . . . . . . . . . . . . . . . . . . . . . . 3-1
Procedure to Install and Test a Soft Font . . . . . . . . . . . . . . . . . . . . . . . . . . . . . . . . . . . . . . . . . .3-2
Procedure to Install and Test a Macro . . . . . . . . . . . . . . . . . . . . . . . . . . . . . . . . . . . . . . . . . . . .3-2
Startup File Examples . . . . . . . . . . . . . . . . . . . . . . . . . . . . . . . . . . . . . . . . . . . . . . . . . . . . . . . . 3-3
Example 1: Loading a Single Font into RAM . . . . . . . . . . . . . . . . . . . . . . . . . . . . . . . . . .3-3
Example 2: Testing the Postnet Font . . . . . . . . . . . . . . . . . . . . . . . . . . . . . . . . . . . . . . . . .3-3
Example 3: The Startup File . . . . . . . . . . . . . . . . . . . . . . . . . . . . . . . . . . . . . . . . . . . . . . . .3-3
Changing the Startup File . . . . . . . . . . . . . . . . . . . . . . . . . . . . . . . . . . . . . . . . . . . . . .3-3
Deleting the Startup File . . . . . . . . . . . . . . . . . . . . . . . . . . . . . . . . . . . . . . . . . . . . . . .3-4
Example 4: Loading a Single Macro into RAM . . . . . . . . . . . . . . . . . . . . . . . . . . . . . . . . .3-4
Example 5: Testing the Graybar Macro . . . . . . . . . . . . . . . . . . . . . . . . . . . . . . . . . . . . . . . 3-4
Example 6: The Startup File . . . . . . . . . . . . . . . . . . . . . . . . . . . . . . . . . . . . . . . . . . . . . . . .3-4
Index
v
Page 6

vi
Page 7

Overview
Through the Fonts and Forms Installer you can download, edit, and delete fonts and
macros. The Fonts and Form Installer is accessed from the Windows printer driver:
Fonts folder for fonts or Forms and Watermarks folder for macros.
In order to use a font or a macro (form), it must first be installed on either the host or
on the printer’s hard disk. The accessibility of the fonts/macros depends on their
installed location. Host installed fonts/macros are visible only to a user on that host.
Printer disk fonts/macros are visible to all network users that have the Fonts and Forms
Installer on their system and have access to the Global Printer Information File.
Additionally, once fonts/macros have been installed on the host, they can be
downloaded to the printer’s RAM to improve performance.
Installed PCL fonts appear as printer-resident fonts in applications. Windows may
substitute an appropriate screen font for the selected printer font, but the printed
document will contain the real font.
Chapter 1
Fonts and Forms Installer
Installed macros appear in the printer driver’s Forms and Watermarks folder and can be
selected as overlay macros.
When selecting a font or macro for use in an application, be aware that its location has
an impact on performance. A font or macro can reside in three different locations:
n
Host
n
Printer hard disk
n
Printer RAM
Host - Host based fonts and macros are downloaded to the printer along with each print
job that requests the use of that font or form. Print time may increase because of the
extra overhead of having to download the font or form in addition to the print job itself.
However, you are guaranteed that this font is available to your print job because it is
essentially part of your print job.
Printer Hard Disk - Fonts and forms installed on the printer’s hard disk provide the
advantage of being visible to all users in a network environment. Eliminating the need
to download also helps printing speed, but there is still some overhead as fonts and
forms must be uploaded to printer RAM.
Printer RAM - Printer memory based fonts and forms provide the best performance.
However, they are subject to deletion if the printer’s power is turned off, and, therefore,
there is a possibility that they may not be available when requested. Fonts and forms
must first be installed on the host or the printer’s hard disk in order to download them
to printer memory. Printer memory-resident fonts and forms are visible only to the host
that performed the download. In a network environment, they are not be visible to other
users.
Fonts and Forms Installer 1-1
Page 8

Supported Font Formats
PCL Bitmap Fonts - The Fonts and Forms Installer recognizes PCL bitmap font files.
PCL Scalable Fonts - Scalable font files are recognized only when accompanied by
AutoFont support files. AutoFont support files are included with scalable soft font
products. You may have to install the soft font product before the Fonts and Forms
Installer recognizes these fonts.
Supported Macro Formats
Any file containing a valid PCL macro definition is supported. PCL macros can be
created from any document by selecting the “PCL Macro” output in the Job Options
folder of the Windows printer driver (Page Description Language must be set to PCL5e
in the Advanced folder).
Files Created During Installation
The Fonts and Forms Installer creates a Printer Font Metric (PFM) file for each font
installed. For host installed fonts, the PFM is created in the directory where the font is
installed (e.g., C:\Mercury\Fonts\PCL).
For printer disk fonts installed from your system, the PFM is created in your Mercury
PCL fonts directory (i.e., C:\Mercury\Fonts\PCL) and then copied to the same directory
in which the selected Printer Information File resides (so there are two copies of this
file).
When an Update is performed, PFM files for printer disk fonts not installed from your
system are copied from the directory in which the selected Printer Information File
resides to your Mercury PCL fonts directory. All copies of a PFM file for a given font
are deleted when the font is deleted.
When you select a Printer Information File that was created by the system
administrator, a copy of this file is created in your Mercury PCL fonts directory with
the same name but with a .LOC extension. The Fonts and Forms Installer does not
provide any means for deleting this local copy of the Printer Information File.
NOTE:
No additional files are created for macros.
PFM File - Windows printer drivers rely on Printer Font Metric (PFM) files for a
description of printer fonts.
GLUE.TXT File - GLUE.TXT is a file included with scalable soft font products that
describes each font in the product and links each font file to its associated Tagged Font
Metric (TFM) file. TFM files are used by the Fonts and Forms Installer to create PFM
files. See your font product documentation for additional information.
1-2 Fonts and Forms Installer
Page 9

Overlay Macro
An overlay macro is a PCL macro that is called at the end of each page of a print job.
It can be used to place a logo on the page or to print forms.
Network Issues
Downloading, Editing, and Deleting Printer Disk Fonts and Macros - If you have the
appropriate access rights and you attempt to download, edit, or delete a printer disk font
or macro, and the Fonts and Forms Installer determines that the Printer Information File
and its local copy are different, a message informs you that the action has been denied
and an update is performed automatically. You can then attempt the download, edit, or
delete again.
Printer Information File - Be sure to use Universal Naming Convention (UNC) names
when selecting the Printer Information File
Access Rights
Access rights are implemented to limit the operations that can be performed on printer
disk fonts and macros that many users may rely upon. To attain access rights, use the
Hidden Key (Ctrl > Shift) when clicking Install on the Install PCL Fonts Dialog box.
Contact your system administrator for additional information.
. (For example: \\myfileserver\public\filename.)
PCL Fonts Dialog
The PCL Fonts dialog includes the basic tools for the installation and management of
printer fonts. In addition to displaying the names and locations of fonts installed using
the Fonts and Forms Installer, it provides functions for downloading, editing, deleting,
updating, and installing fonts.
Fonts and Forms Installer 1-3
Page 10
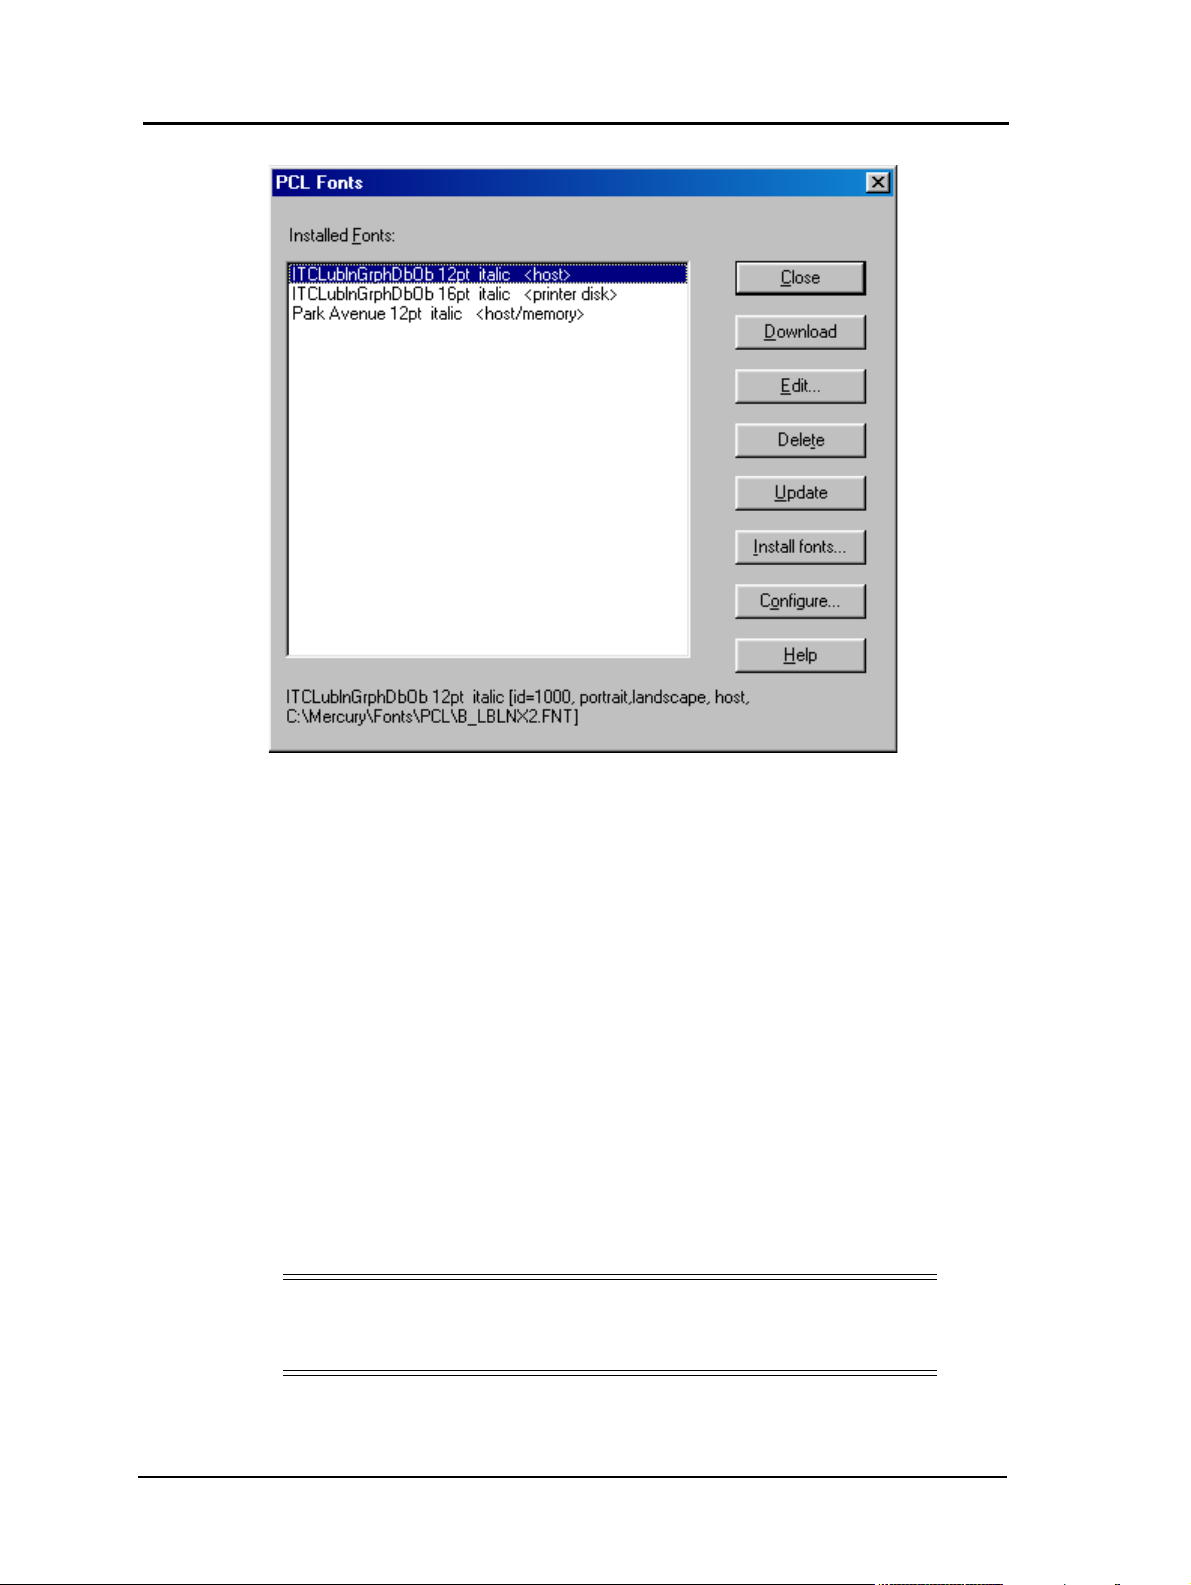
Installed Fonts - The Installed Fonts lists the names and locations of all fonts installed
using the Fonts and Forms Installer (if no Printer Information File has been selected via
the Configure dialog, only host installed fonts appear in this list). You can download
,
edit, or delete any font in this list by selecting the entry and clicking on the appropriate
button. The download, edit, and delete buttons are disabled for printer disk fonts unless
you have the appropriate access rights.
Additional information about a particular font appears in a status line below the list box
when that font is selected.
The fonts listed in this window appear in the list of available fonts in your application.
Font Status Line - This line displays additional information about the font currently
selected in the Installed Fonts list. This information consists of the font name, the ID
assigned by the Fonts and Forms Installer, orientation, the installed location (either host
or printer disk), and the file name of the installed font (host installed fonts include a
path). The font name and ID can be modified by editing the font.
Download - Copies the selected font to printer memory (RAM) and makes it
permanent. Once downloaded, the selected font is denoted with the word memory, and
the Memory resident checkbox in the Edit Installed Font window is enabled (checked).
NOTE:
Fonts that you download from your system appear as memory-resident on
your system only.
1-4 Fonts and Forms Installer
Page 11

All fonts have an identification number (ID) associated with them that is automatically
generated by the Fonts and Forms Installer at the time of installation. In assigning IDs,
the system will not introduce conflicts by assigning an ID that is already used by a hostinstalled font on your system or a printer disk-installed font.
However, it is possible to install a font on your system which has the same ID as a font
installed on another user’s system. The Fonts and Forms Installer does not know which
IDs are used by host-installed fonts on other systems and therefore cannot prevent
duplicates at installation time. This allows for the possibility of ID conflicts when
multiple users download host-installed fonts to RAM. If you download a host font that
has the same ID as a host font previously downloaded by another user, your font will
still be downloaded but it will overwrite the other user’s font.
To avoid such conflicts, it is advised that the system administrator allocate a unique
range of ID values for each user. Then, before downloading a host font or macro, edit
it and change the Font ID to one of the IDs allocated to you.
Note that fonts residing in printer memory are deleted when the printer’s power is
cycled. If you suspect that a font you downloaded is no longer in printer memory, you
should edit it and uncheck the Memory resident checkbox. Failure to do so will result
in a different printer font being selected when the font is used in your document.
NOTE:
The Download button will be disabled for printer disk fonts.
Edit - Enters the Edit Installed Font dialog.
NOTE:
The Edit button will be disabled for printer disk fonts unless you have the
appropriate access rights
.
Delete - Removes the highlighted, installed item. The printer driver, Fonts and Forms
Installer, and your applications will no longer be aware of deleted items. In addition to
deleting the reference, delete provides the option to delete the actual font (and PFM file
file from its installed location. Answering YES to the prompt will delete the reference
and the file, NO will delete only the reference, and CANCEL will not delete anything.
NOTE:
The Delete button will be disabled for printer disk fonts unless you have
the appropriate access rights
.
Update - Causes your local system to be updated with information from the Printer
Information File
. An update is performed automatically each time you enter the Fonts
and Forms Installer, and when a Printer Information File is selected via the Configure
button. However, while in the Fonts and Forms Installer, you will not be aware of any
fonts or macros installed on the printer disk by another user unless you perform an
update by pressing the Update button. The Installed Fonts (or Installed Macros) list box
will reflect any changes resulting from the update.
)
The Update button is only enabled if a Printer Information File has been selected via
the Configure button in either the PCL Fonts dialog or the PCL Macros dialog.
Fonts and Forms Installer 1-5
Page 12
Update is only necessary in a network environment.
NOTE:
In addition to explicitly selecting the Update button, automatic (and
sometimes transparent) updates occur under the following conditions:
• When a Printer Information File is selected.
• Each time the Fonts and Forms Installer is entered when a Printer
Information File is selected.
• When you attempt to download, edit, or delete a printer disk font and
the local copy of the Printer Information File is out of date.
Install fonts - Enters the Install PCL Fonts dialog.
Configure - Enters the Configure dialog. See Configure Dialog on page 1-18.
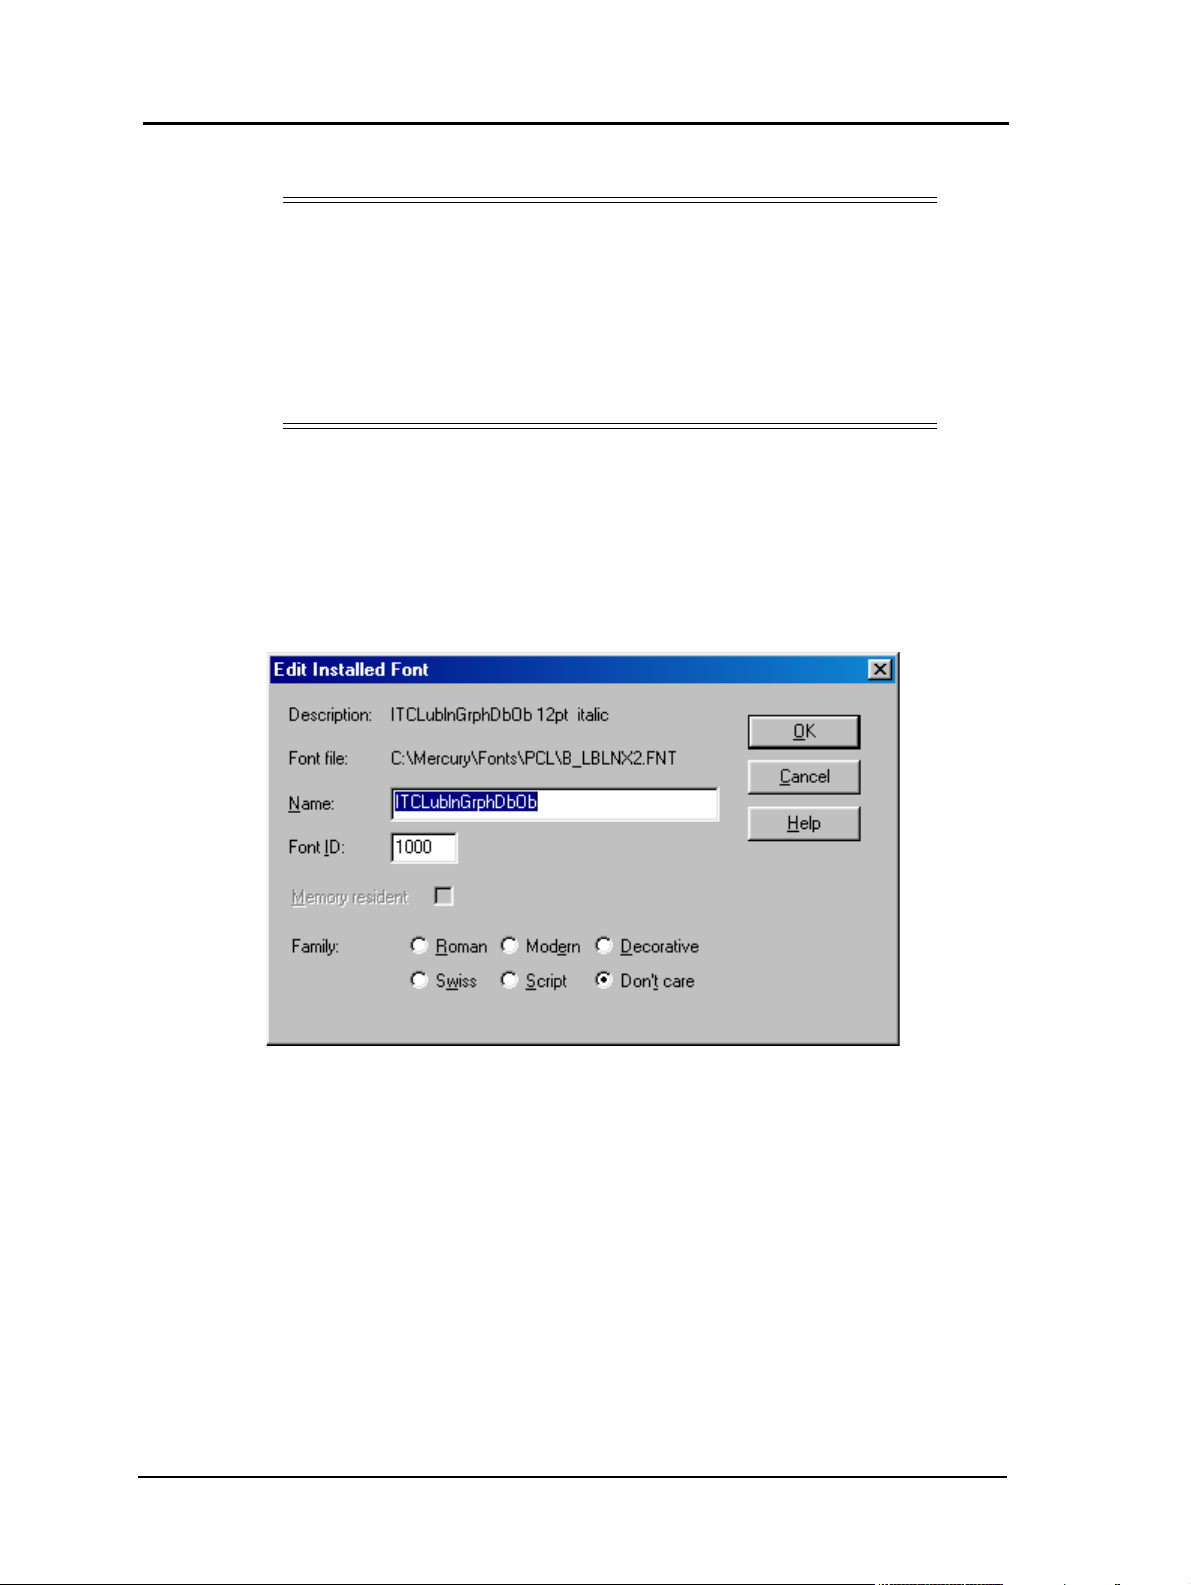
Edit Installed Font Dialog
The Edit Installed Font window allows modification of some basic attributes of
installed fonts.
Description - Identifies the font as described in the Installed Fonts list box of the PCL
Fonts dialog. The description is made up of the fonts face name and attributes such as
point size, style, and weight.
Font File - Identifies the file name of the installed font as it appears on the hard disk
(host or printer). The file name of a host installed font will include the path. Printer diskinstalled fonts are identified by name only.
Name - The face name of the font
a face name then this name is used by default at installation time. If the font file did not
contain a face name, then the name is the one chosen at installation. This name appears
in the Font Description field of this dialog, the Installed Fonts list box and status line of
the PCL Fonts dialog, and in the fonts list box of your application. Editing this field
effectively edits the face name field of the fonts PFM file
1-6 Fonts and Forms Installer
(maximum of 64 characters)-If the font file contained
.
Page 13

Font ID - This field contains the ID automatically generated and assigned to the font
by the Fonts and Forms Installer during installation. Editing of this field should only be
necessary to avoid or eliminate ID conflicts among fonts downloaded to printer RAM.
If you select an ID that is already in use, a message will inform you that the ID is in use
and cannot be used, and the ID will revert to the previous value.
NOTE:
(Range 0 - 32767)
Automatically generated font IDs are in the range of 1000-1999 for fonts
installed to the host and 3000-3999 for fonts installed to the printer disk.
When a font is installed the Fonts and Forms Installer determines which IDs are used
by looking in the HOSTINFO.INI file (located in the Mercury dBase directory) for all
IDs assigned to host installed fonts on your system and the Printer Information File (if
one is selected) for all IDs assigned to printer disk installed fonts. It then selects the
lowest numerical value in the range that is not used and assigns this as the default ID.
If a font is memory resident (as the result of a download performed on your system) and
its ID changes, whether explicitly or as the result of an Update, the memory resident
reference in the HOSTINFO.INI file will be removed and the font will no longer appear
as memory resident.
NOTE:
In addition to explicitly selecting the Update button, automatic (and
sometimes transparent) updates occur under the following conditions:
• When a Printer Information File is selected.
• Each time the Fonts and Forms Installer is entered when a Printer
Information File is selected.
• When you attempt to download, edit, or delete a printer disk font and
the local copy of the Printer Information File is out of date.
Memory resident - If checked, this indicates that the font was previously downloaded
to printer RAM. However, it does not guarantee that the font is in printer RAM, as the
printer’s power may have been cycled, nor may it be used to make a font memory
resident. It is only enabled if the box is checked. Unchecking this checkbox will remove
the information from the Windows HOSTINFO.INI file indicating that this font is
memory resident and the checkbox will become disabled.
This checkbox is intended to allow the user to remove the memory resident status of a
font if they know or suspect that the font is no longer present in printer RAM.
Family - Allows selection of the family name of the font being edited. This selection
may influence the accuracy of the Windows screen font substitution mechanism.
Editing this field effectively edits the family field of the fonts PFM file
.
Windows groups typefaces into five “families,” based on the general appearance of the
type. These families are called Modern, Swiss, Roman, Script and Decorative. The
most common typefaces are categorized as Modern, Swiss, or Roman, depending on
two characteristics.
Fonts and Forms Installer 1-7
Page 14
The first characteristic involves “stroke width” -- the width of the lines that make up the
characters -- which can be constant or variable. Typefaces in the Modern family have
constant stroke widths. Typefaces in the Swiss and Roman families have variable stroke
widths. (Most typefaces with constant stroke widths are also of “fixed pitch,” which
means that all the characters in the font are the same width. Typefaces with variable
stroke widths are generally of “variable pitch,” which means that the characters have
variable widths. However, it is the stroke width rather than the use of fixed or variable
pitch that determines the family of a particular typeface.)
The second characteristic involves “serifs,” which are small lines that finish off the
character strokes. The Swiss family comprises “sans serif” typefaces (typefaces with no
serifs); the Roman family comprises serif typefaces.
The Script family comprises typefaces that resemble cursive handwriting. The
Decorative family includes typefaces of elaborate design (such as Old English). At one
time, symbol fonts were considered to be in the Decorative family, but they are now
generally identified as symbol fonts by a character-set attribute of the font -- the
character set is Symbol rather than ANSI or OEM.
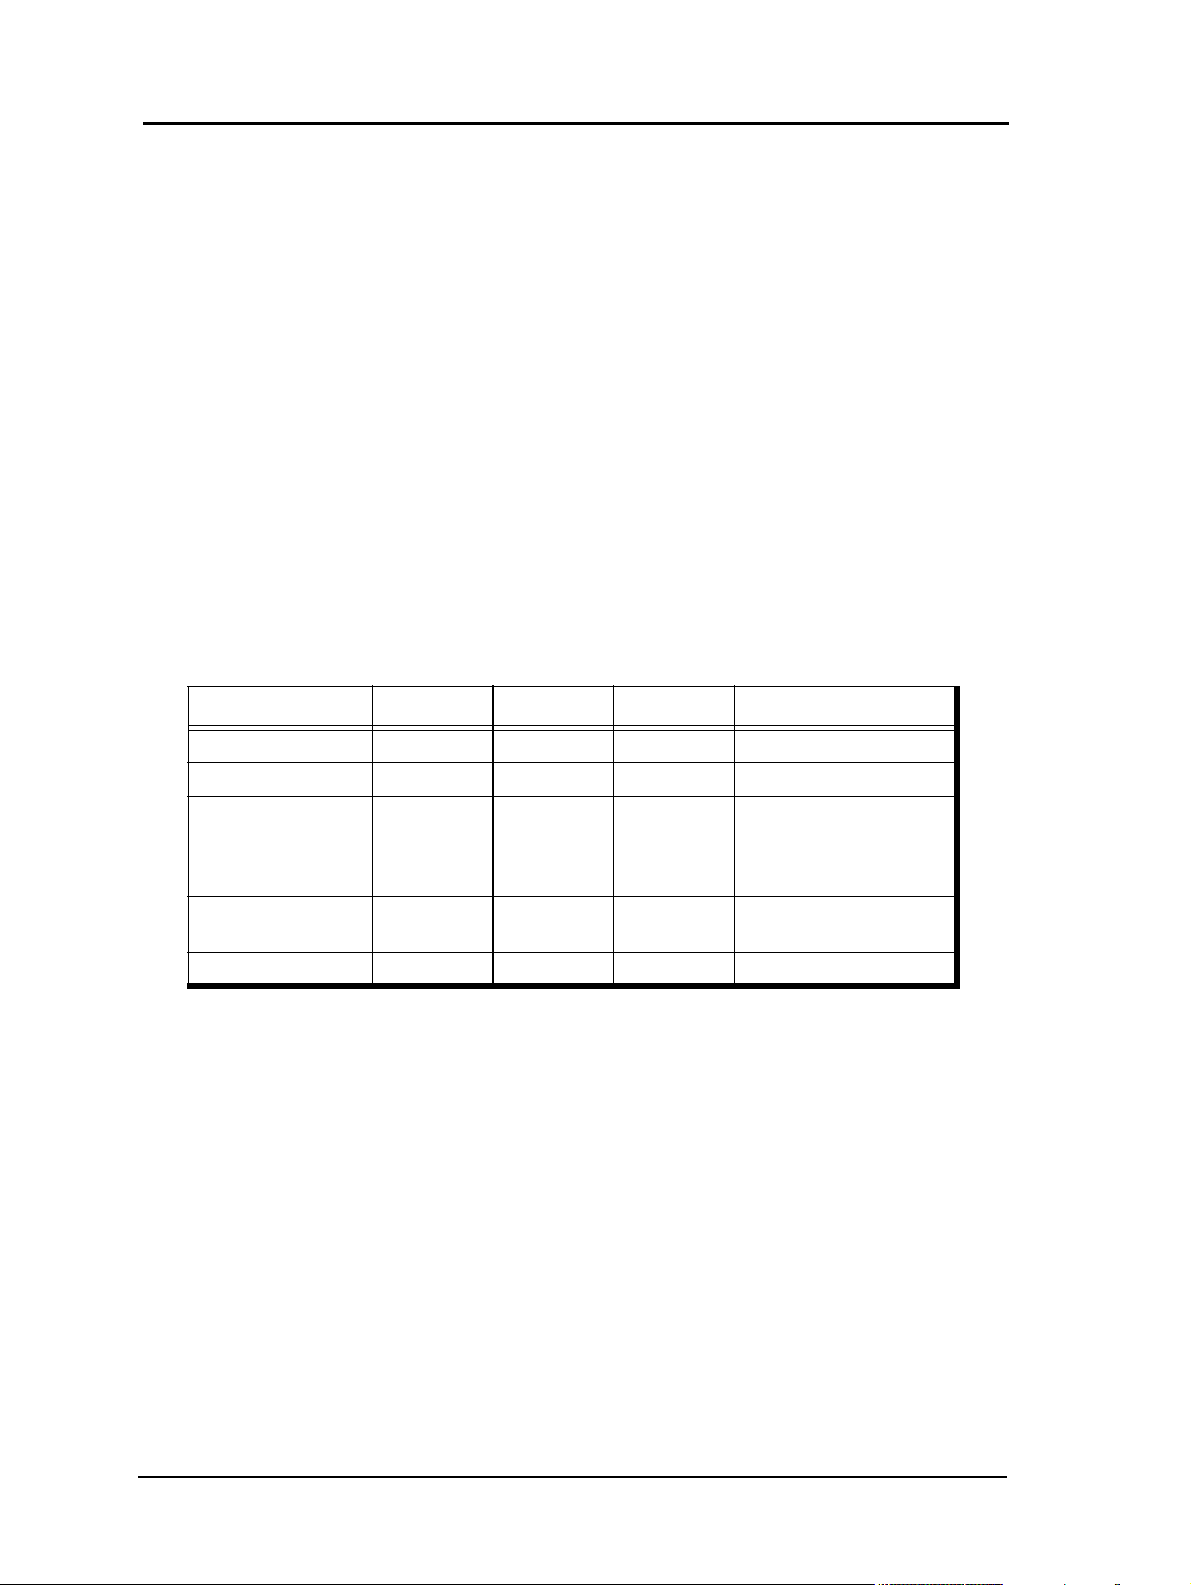
The following table summarizes the grouping of typefaces into families and shows the
identifiers (defined in WINDOWS.H) that programs can use to specify the font family.
Font Family Stroke Usual Pitch Serifs Typical Typefaces
FF_MODERN Fixed Fixed -- Courier, Elite, Pica
FF_SWISS Variable Variable No Helvetica, Avant Garde
Times Roman, Palatino,
FF_ROMAN Variable Variable Yes
FF_SCRIPT -- -- --
FF_DECORATIVE------Old English
New Century Schoolbook
Cursive, Zapf Chancery,
Old English
Cursive, Zapf Chancery,
Old English
WINDOWS.H also includes a sixth font-family identifier, FF_DONTCARE, which a
program can use when it wants to select a font but doesn’t care which family it comes
from.
1-8 Fonts and Forms Installer
Page 15
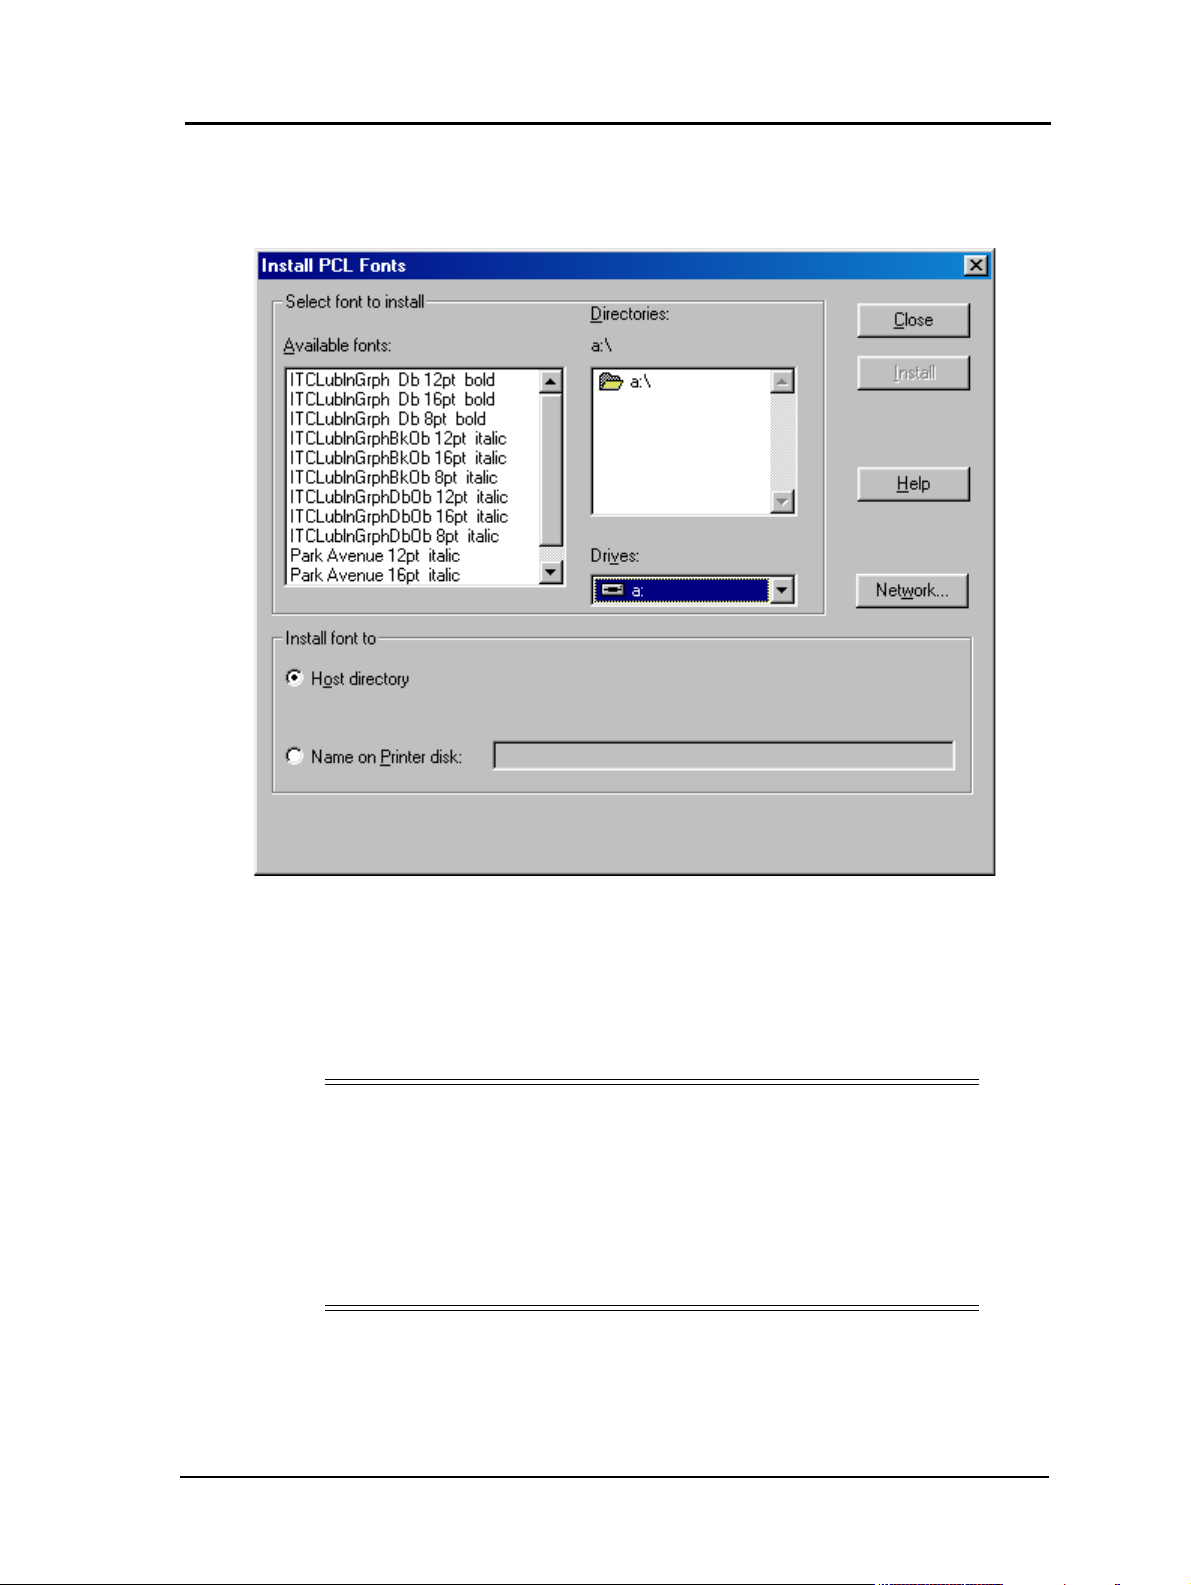
PCL Fonts Install Dialog
The Install PCL Fonts dialog allows for the selection and installation of fonts.
Select font to install - The Available Fonts list contains the names of all valid fonts
residing in the currently specified directory. If a valid file font does not contain a face
name for the font, the file name of the font is used and will appear in the Available Fonts
list enclosed in parentheses. The user will be prompted to enter a face name if the user
attempts to install a font whose name is enclosed in parentheses. If installing a font
requires entering a face name, the face name entered will appear in the Installed Fonts
list when the installation is complete.
NOTE:
In a given directory, the Fonts and Forms Installer will first look for a file
named GLUE.TXT, which is included with scalable soft font products. This
file, if present, is used to enumerate all scalable fonts available for
installation. Font files in this directory that are not referenced in
GLUE.TXT are not recognized if GLUE.TXT is present. If the directory
does not contain GLUE.TXT, the Fonts and Forms Installer looks at all
files in the directory, displaying only PCL bitmap fonts.
Fonts and Forms Installer 1-9
Page 16

Install font to - Install Font To indicates the destination for the font installation. There
are two possible destinations:
Host directory - This radio button is the default setting and indicates that the font
selected in the Available Fonts list is to be installed on the host system.
Name on Printer disk - This radio button indicates that the font selected in the
Available Fonts list is to be installed on the printer’s hard disk with the name specified
in this field. By default, the field contains the font’s name as it appears in the Available
Fonts list plus the font’s file name. The Printer disk option is disabled unless you have
the appropriate access rights and a Printer Information File is currently selected
(maximum 99 characters).
Install - Performs the actual installation of the selected font. If the font selected for
installation does not have a valid face name (e.g., it is enclosed in parentheses), the user
will be prompted to enter a face name.
If installing to the host, the font file is copied to the location specified in the Host
directory field. The user will be prompted if the host directory field is blank or contains
a directory that does not exist. The Installed Fonts list in the PCL Fonts window will
now show that this font is installed on the host.
If installing to printer disk, the font file is copied to the printer’s hard disk and given the
name specified in the Name on Printer disk field. The Installed Fonts list in the PCL
Fonts window will now show that the font is installed on the printer’s hard disk.
NOTE:
This button is enabled only if a font is selected.
Only one font may be installed at a time.
1-10 Fonts and Forms Installer
Page 17
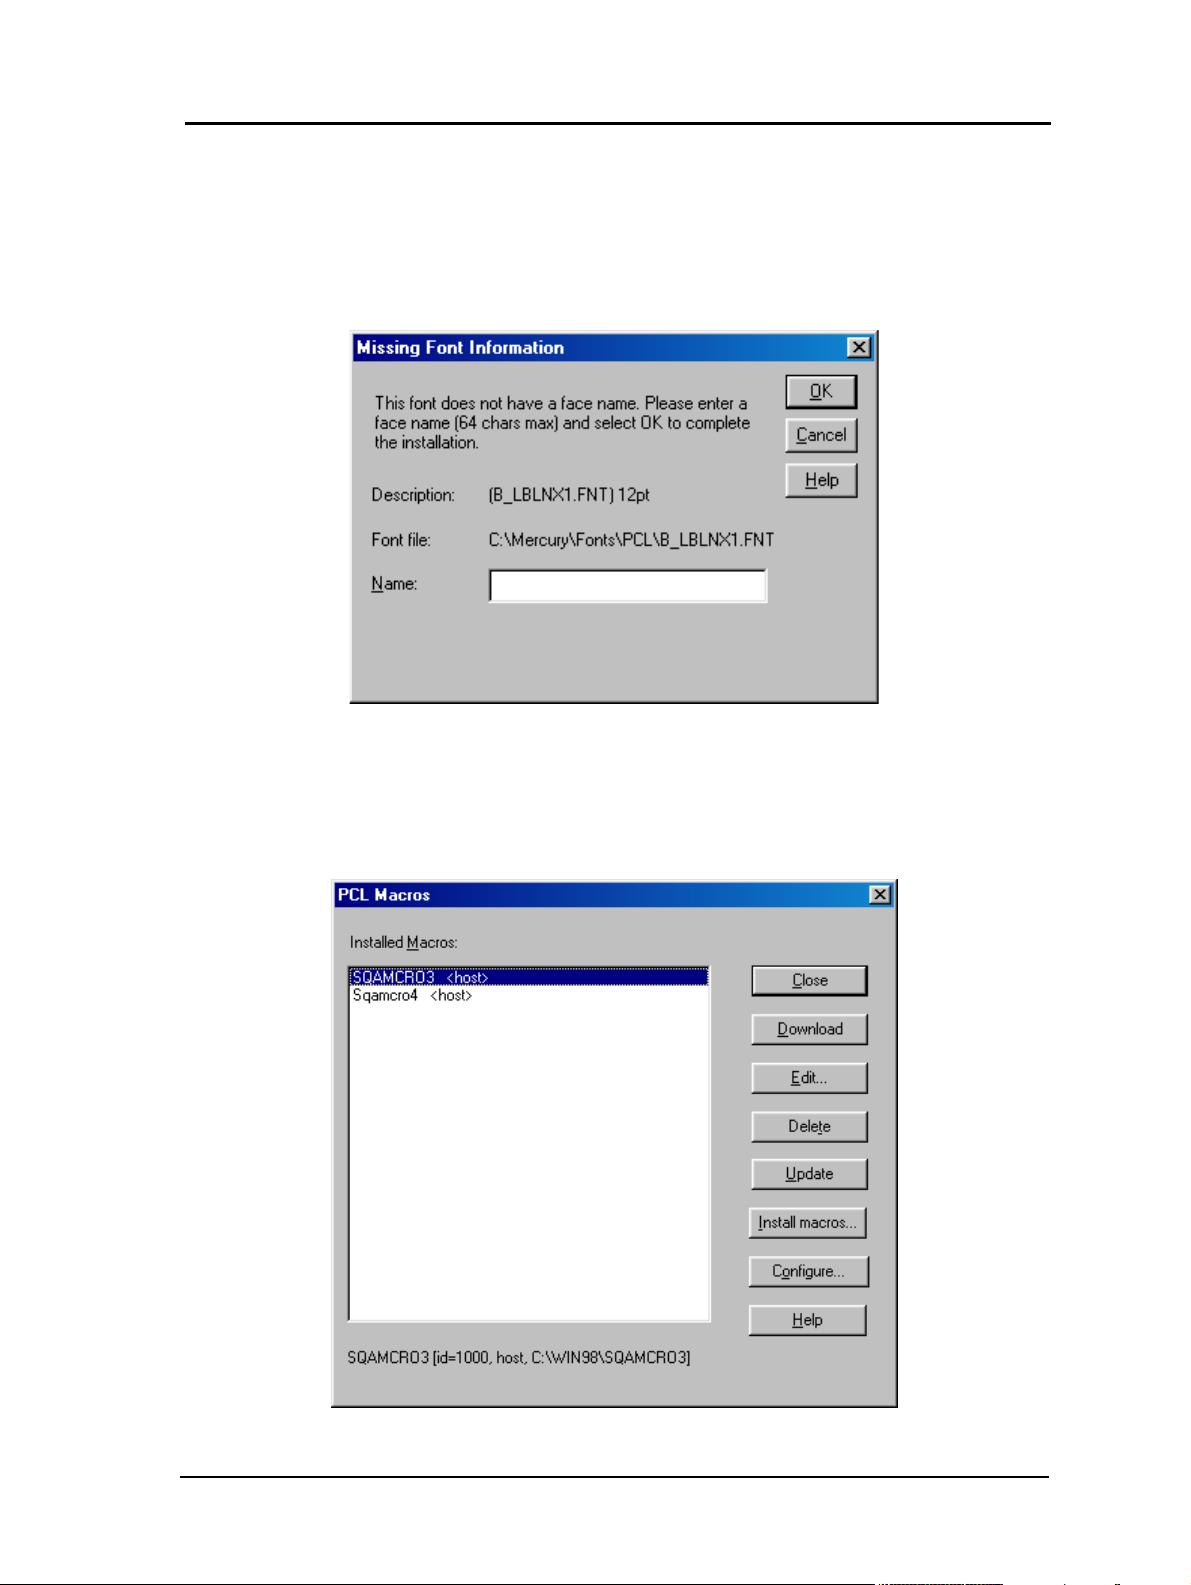
Missing Font Information Dialog
This dialog is presented when attempting to install a font which has no face name. To
complete the installation, a face name must be entered in the Name field of this dialog.
The face name entered in this field, which may be anything, is stored in the PFM file
created for this font during installation.
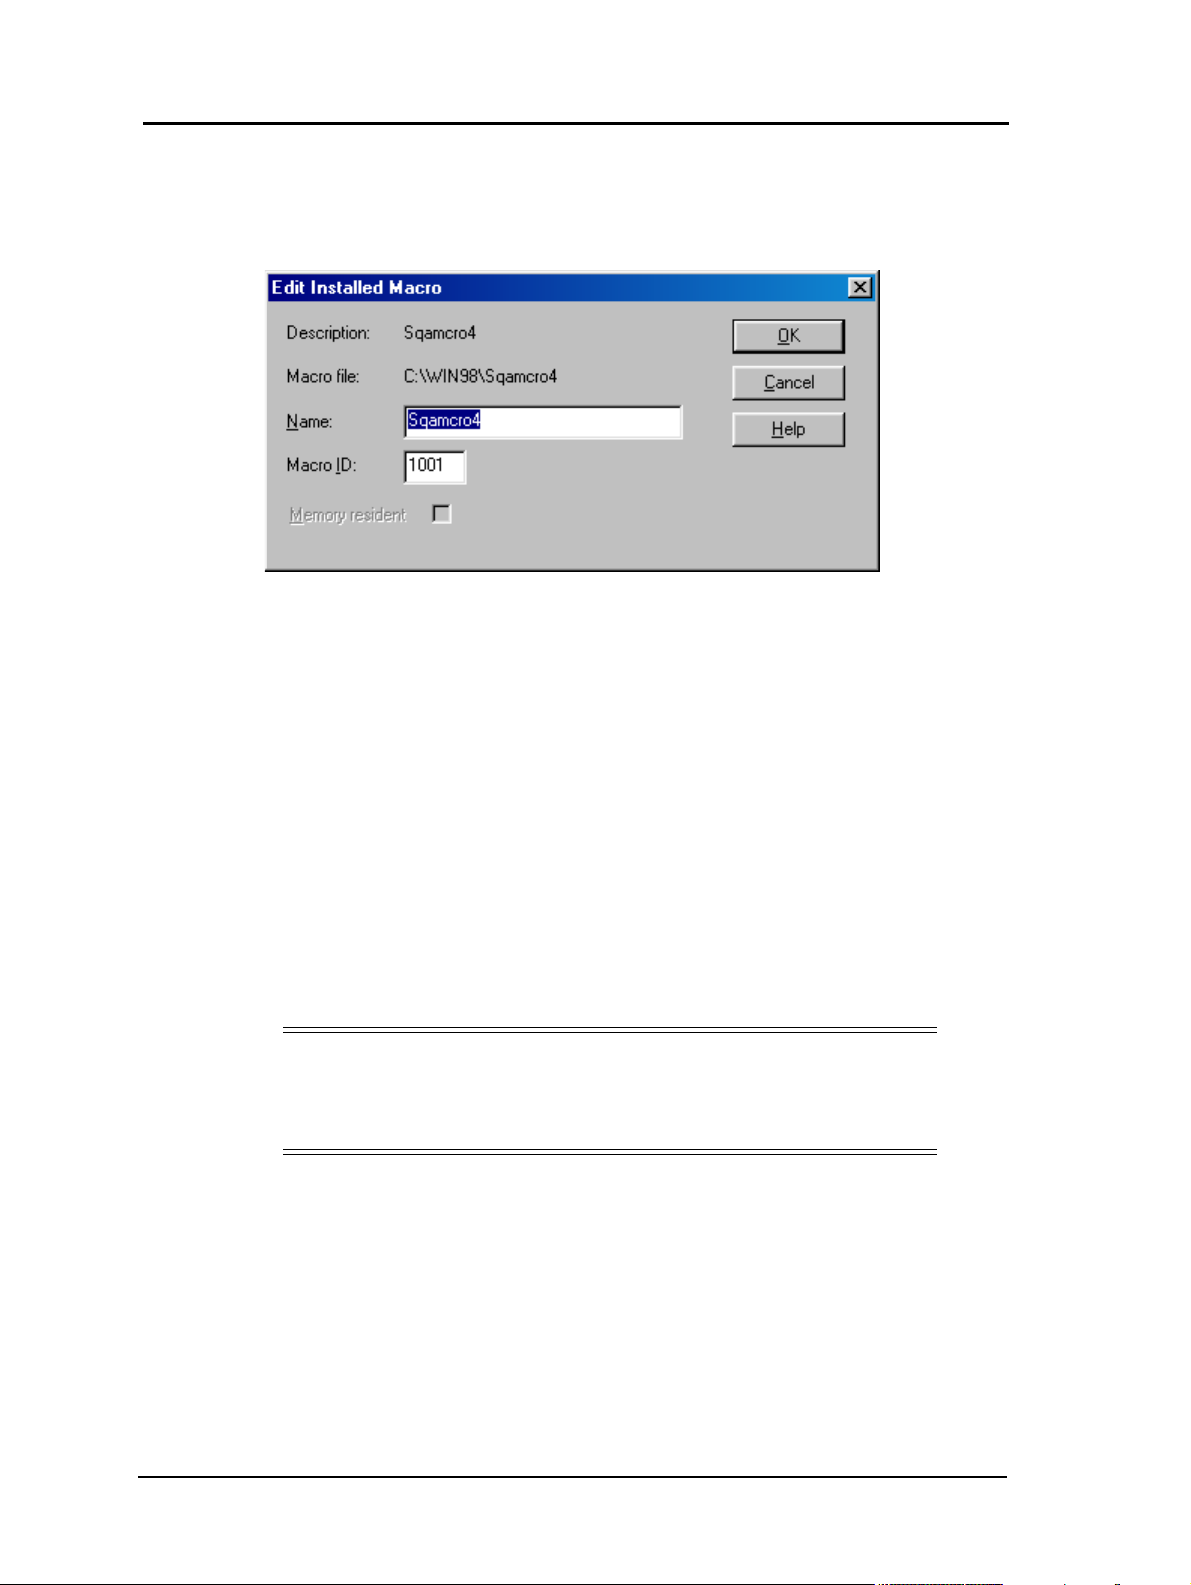
PCL Macros Dialog
The PCL Macros dialog includes basic tools for the installation and management of
printer macros. In addition to displaying installed macros, it provides functions for
downloading
, editing, deleting, updating, and installing macros.
Fonts and Forms Installer 1-11
Page 18

The Installed Macros box lists the names and locations of all macros installed using the
Fonts and Forms Installer. You may download, edit, or delete any macro in this list by
selecting the entry and clicking on the appropriate button. The download, edit, and
delete buttons will be disabled for printer disk macros unless you have the appropriate
access rights.
Additional information about a particular macro will appear in a status line below the
list box when that macro is selected.
The macros listed in this window will appear in the list of available Forms in the printer
driver’s Forms and Watermarks folder.
Macro Status Line - This line displays additional information about the macro
currently selected in the Installed Macros list. This information consists of the macro’s
name, the ID assigned by the Fonts and Forms Installer, the installed location (either
host or printer disk), and the file name of the installed macro (host-installed macros will
include a path). The macros name and ID may be modified by editing the macro.
Download - Copies the selected macro to print memory (RAM) and makes it
permanent. Only host-installed macros may be downloaded to printer memory. Once
downloaded, the selected macro will be denoted with the word ‘memory’ and the
Memory resident checkbox in the Edit Installed Macro window will become enabled
and checked.
NOTE:
Macros that you download from your system appear as memory resident
only on your system.
All macros have an identification number (ID) associated with them that is
automatically generated by the Fonts and Forms Installer at the time of installation. In
assigning IDs, the system will not introduce conflicts by assigning an ID that is already
used by a host- installed macro on your system or a printer disk installed macro.
However, it is possible to install a macro on your system which has the same ID as a
macro installed on another user’s system. The Fonts and Forms Installer does not know
which IDs are used by host-installed macros on other systems and therefore cannot
prevent duplicates at installation time. This allows for the possibility of ID conflicts
when multiple users download host-installed macros to RAM.
If you download a host macro that has the same ID as a host macro previously
downloaded by another user, your macro will still be downloaded but it will overwrite
the other user’s macro. To avoid such conflicts, it is advised that your system
administrator allocate a unique range of ID values for each user. Then, before
downloading a host font or macro, edit it and change the Font ID to one of the IDs
allocated to you.
Note that macros residing in printer memory are deleted when the printer’s power is
cycled. If you suspect a macro you downloaded is no longer in printer memory, you
should edit it and uncheck the Memory resident checkbox. The overlay will not occur
if Memory resident is checked and the macro is not in RAM.
NOTE:
The Download button will be disabled for printer disk macros.
1-12 Fonts and Forms Installer
Page 19

Edit - Enters the Edit Installed Macro dialog.
NOTE:
The Edit button will be disabled for printer disk macros unless you have
the appropriate access rights.
Delete - Removes the installed item from the Installed list. The printer driver, Fonts and
Forms Installer, and your applications will no longer be aware of deleted items. In
addition to deleting the reference, Delete provides the option to delete the actual macro
file from its installed location. Answering YES to the prompt will delete the reference
and the file; NO will delete only the reference; and CANCEL will not delete anything.
NOTE:
The Delete button will be disabled for printer disk macros unless you have
the appropriate access rights.
Update - Causes your local system to be updated with information from the Printer
Information File. An update is performed automatically each time you enter the Fonts
and Forms Installer, and when a Printer Information File is selected via the Configure
button. However, while in the Fonts and Forms Installer, you will not be aware of any
fonts or macros installed on the printer disk by another user unless you perform an
update by pressing the Update button. The Installed Fonts (or Installed Macros) list box
will reflect any changes resulting from the update.
The Update button is only enabled if a Printer Information File has been selected via
the Configure button in either the PCL Fonts dialog or the PCL Macros dialog.
Update is only necessary in a network environment.
NOTE:
In addition to explicitly selecting the Update button, automatic (and
sometimes transparent) updates occur under the following conditions:
• When a Printer Information File is selected.
• Each time the Fonts and Forms Installer is entered when a Printer
Information File is selected.
• When you attempt to download, edit, or delete a printer disk font and
the local copy of the Printer Information File is out of date.
Install macros - Enters the Install PCL Macros dialog.
Configure - Enters the Configure dialog. See Configure Dialog on page 1-18.
Fonts and Forms Installer 1-13
Page 20
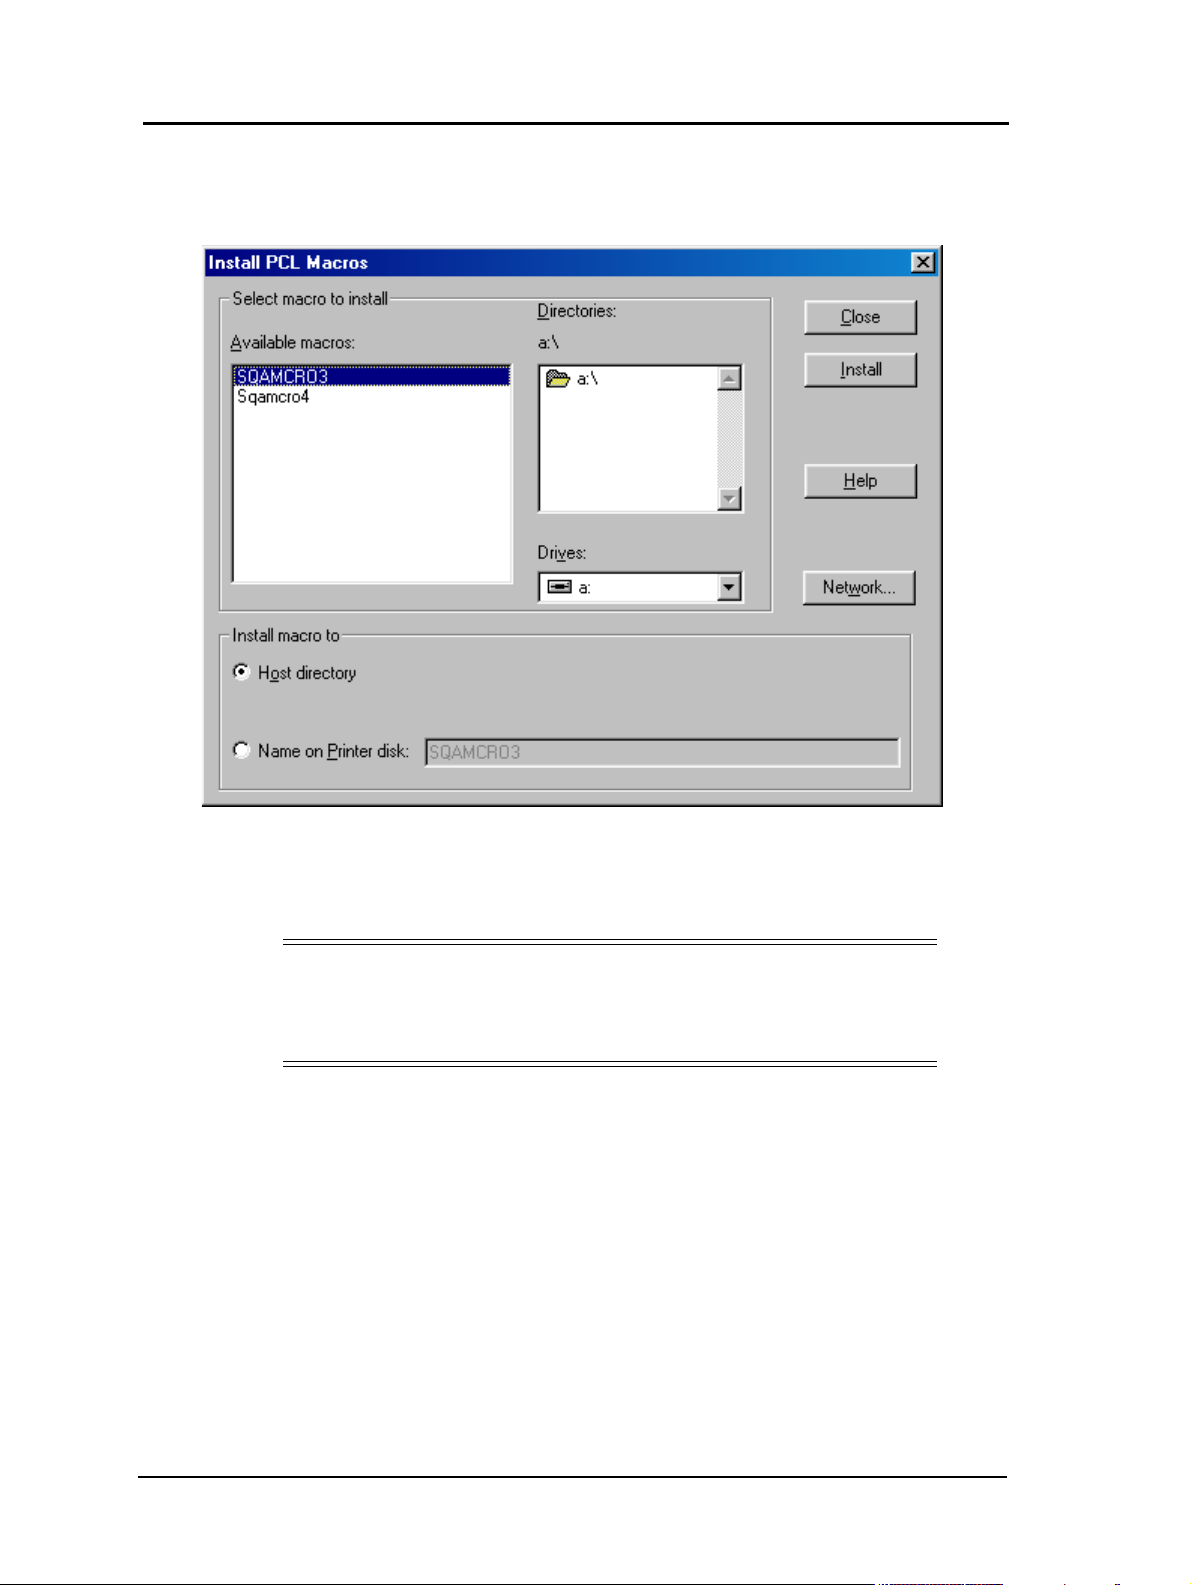
Edit Installed Macro Dialog
The Edit Installed Macro window allows modification of some basic attributes of
installed macros.
Description - Identifies the macro as it is described in the Installed Macro list box of
the PCL Macros dialog. The description is made up of the macro’s name as chosen
during installation.
Macro file - The file name of the macro as it appears on the disk where it was installed.
Name - The name of the macro as chosen during installation. Unless the user selects
another name, the file name of the macro is used by default at installation time. This
name appears in the Macro Description field of this dialog, the Installed Macros list box
and status line of the PCL Macros dialog, and in the Overlay Macros list in the driver’s
Options dialog. (Maximum length for a Macro Name is 64 characters)
Macro ID - This field contains the ID automatically generated and assigned to the
macro by the Fonts and Forms Installer during installation. Editing of this field should
only be necessary to avoid or eliminate ID conflicts among macros downloaded to
printer RAM. If you select an ID that is already in use, a message will inform you that
the ID is in use and may not be used, and the ID will revert to the previous value (range
0 - 32767).
NOTE:
Automatically generated macro IDs are in the range of 1000-1999 for
macros installed to the host and 3000-3999 for macros installed to the
printer disk.
When a macro is installed the Fonts and Forms Installer determines which IDs are used
by looking in the Windows HOSTINFO.INI file (located in the Mercury dBase
directory) for all IDs assigned to host-installed macros on your system and the Printer
Information File (if one is selected) for all IDs assigned to printer disk installed macros.
It then selects the lowest numerical value in the range that is not used and assigns this
as the default ID.
1-14 Fonts and Forms Installer
Page 21

If a macro is memory resident (as the result of a download performed on your system)
and its ID changes, whether explicitly or as the result of an Update, the memory resident
reference in the HOSTINFO.INI file will be removed and the macro will no longer
appear as memory resident.
NOTE:
In addition to explicitly selecting the Update button, automatic (and
sometimes transparent) updates occur under the following conditions:
• When a Printer Information File is selected.
• Each time the Fonts and Forms Installer is entered when a Printer
Information File is selected.
• When you attempt to download, edit, or delete a printer disk font and
the local copy of the Printer Information File is out of date.
Memory resident - If checked, this indicates that the macro was previously
downloaded to printer RAM. However, it does not guarantee that the macro is in printer
RAM, as the printer’s power may have been cycled, nor may it be used to make a macro
memory resident. It is only enabled if the box is checked. Unchecking this checkbox
will remove the information from the HOSTINFO.INI file that was designating the
macro as memory resident, and the checkbox will become disabled.
This checkbox is intended to allow the user to remove the memory resident status of a
macro if the user knows or suspects that the macro is no longer present in printer RAM.
Fonts and Forms Installer 1-15
Page 22
Install PCL Macros Dialog
The Install PCL Macros dialog allows for the selection and installation of macros.
Select macro to install - The Available Macros list contains the file names of the all
files residing in the currently specified directory. By default the macro’s name is its file
name. The user will be prompted to accept or change the macro name when installing
a macro.
NOTE:
It is the user’s responsibility to make sure the file selected for installation
contains a valid PCL macro definition. The Fonts and Forms Installer will
accept any file and assume it contains a macro definition.
Install macro to - Install Macro To indicates the destination for the macro installation
(Maximum 99 characters). There are two possible destinations:
Host directory - This radio button is the default setting and indicates that the macro
selected in the Available Macros list is to be installed on the host system.
Name on Printer disk - This radio button indicates that the macro selected in the
Available Macros list is to be installed on the printer’s hard disk with the name specified
in this field. By default this field contains the macro’s name as it appears in the
Available Macros list. The Printer disk option is disabled unless you have the
appropriate access rights and a Printer Information File is currently selected.
1-16 Fonts and Forms Installer
Page 23
Install - Performs the actual installation of the selected macro. The user will be
prompted to accept or change the macro name. If installing to the host, the macro file
is copied to the location specified in the Host directory field. The user will be prompted
if the host directory field is blank or contains a directory that does not exist.
The Installed Macros list in the PCL Macros window now shows that this macro is
installed on the host. If installing to printer disk, the macro file is copied to the printer’s
hard disk and given the name specified in the Name on Printer disk field. The Installed
Macros list in the PCL Macros window will now show that the macro is installed on the
printer’s hard disk.
NOTE:
This button is enabled only if a file is selected.
Only one macro may be installed at a time.
Network - Opens the standard Connect Network Drive dialog if the system is
connected to a network.
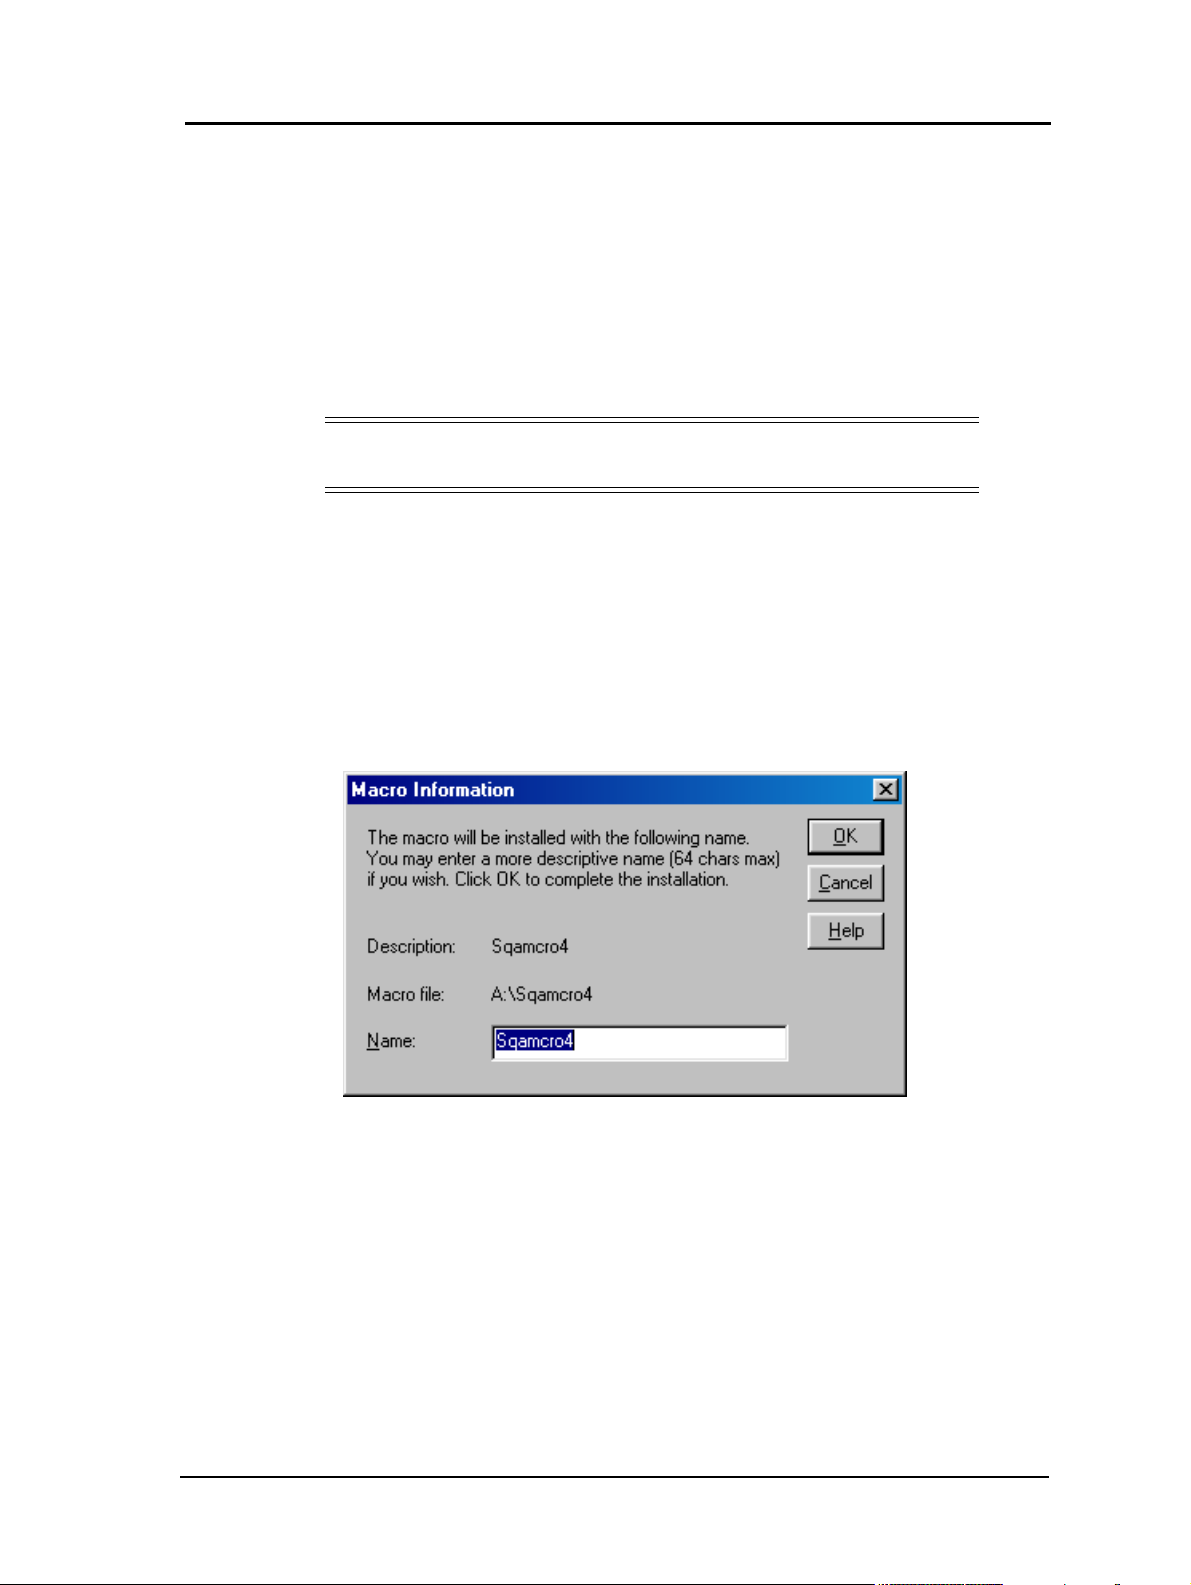
Macro Information Dialog
This dialog is presented when installing a macro to allow modification of the default
name given to the macro. The user may change the name in the Name field or choose
to accept the default name presented. Selecting OK will complete the installation.
Fonts and Forms Installer 1-17
Page 24
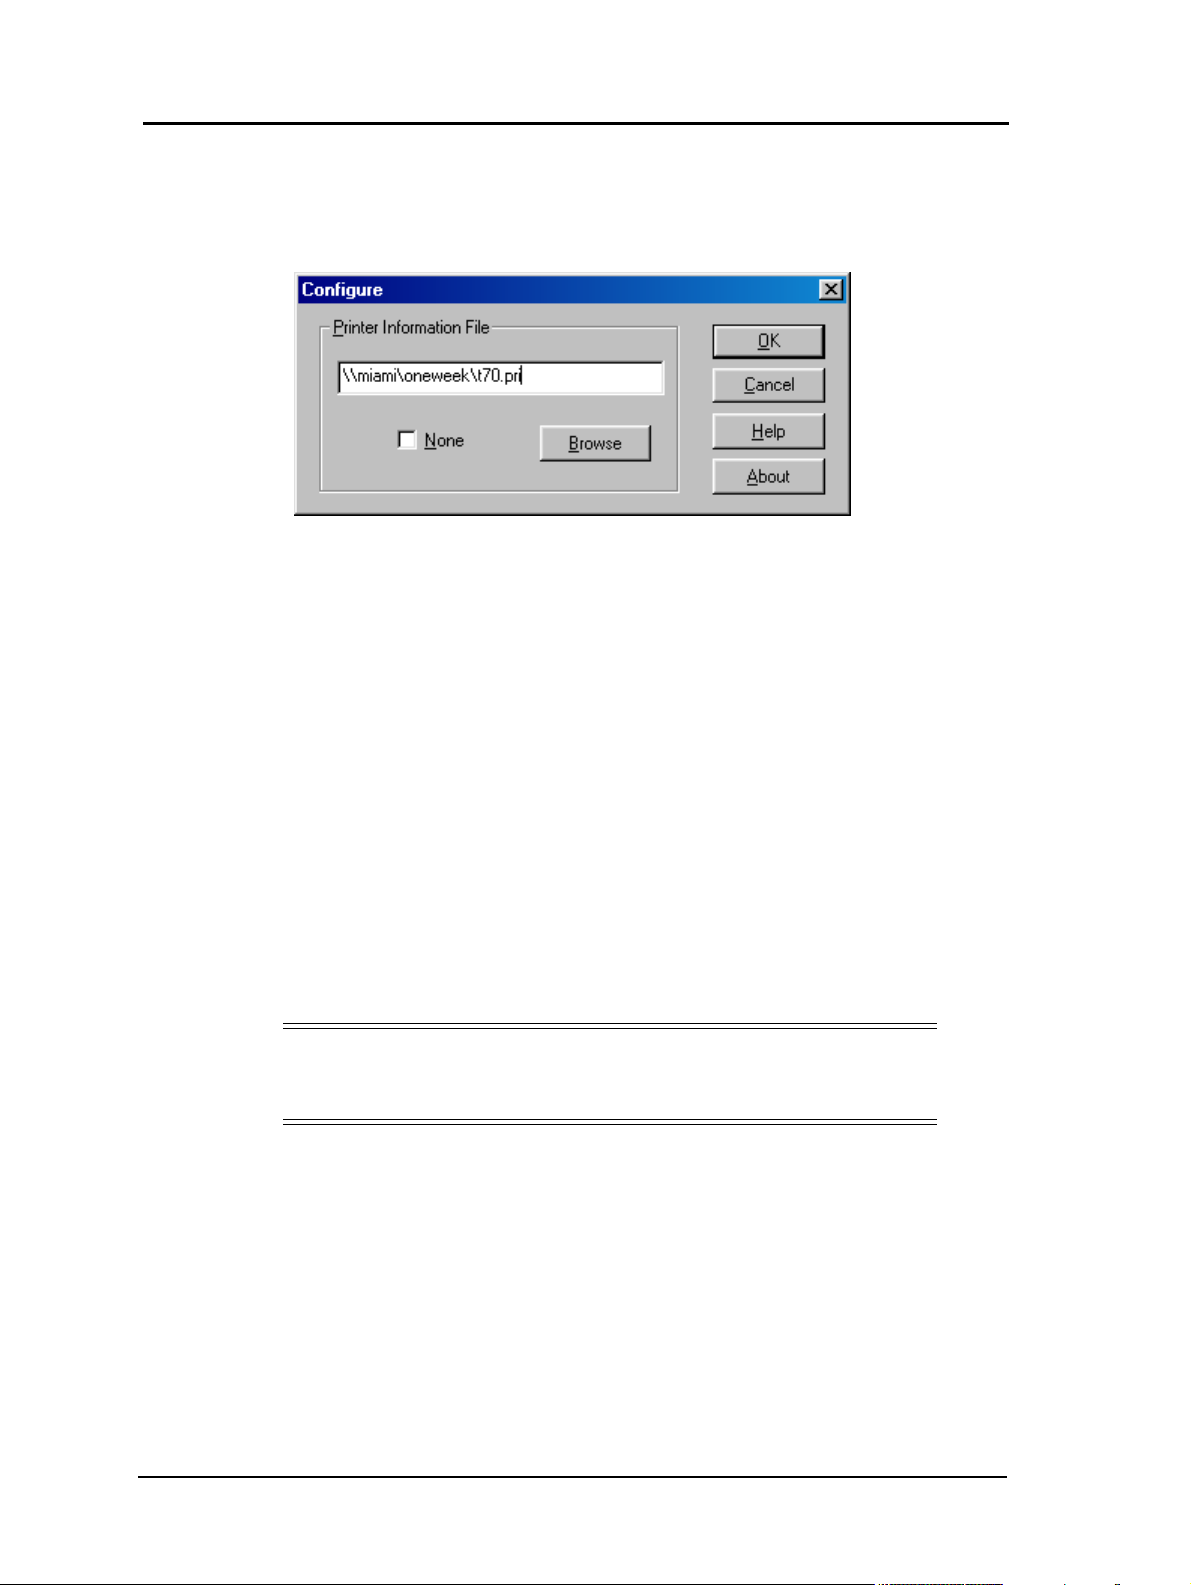
Configure Dialog
The Configure dialog allows selection of a Printer Information File that describes
which fonts and/or macros are installed on the printer.
Printer Information File - The Printer Information File contains information about
fonts and macros installed on the printer’s hard disk. This file must be created by your
system administrator and is intended to reside on a network drive that is accessible to
all users.
You may select a Printer Information File via the Configure button in either the PCL
Fonts or PCL Macros dialog. Each time anyone installs a font or macro on the printer’s
hard disk, information about that font or macro is recorded in the currently selected
Printer Information File.
When a user selects a Printer Information File or an update occurs, this file is copied to
the user’s Windows directory (and given the extension .LOC). This local copy of the
Printer Information File is maintained to improve performance.
Upon selection of a Printer Information File, the Installed Fonts list (or Installed Macros
list) will automatically be updated to reflect any fonts (or macros) installed on the
printer’s hard disk.
Contact your system administrator for the name and location of this file.
This field and the Browse button are only enabled if the None checkbox is unchecked.
NOTE:
Universal Naming Convention (UNC) names should be used, not specific
drive letters as these may change. UNC example: \\fileserver\public\myfile.
None - If checked, this indicates that no Printer Information File is specified. With no
Printer Information File selected, you may not install fonts or macros on the printer’s
hard disk, and you will not see any fonts or macros that are installed on the printer’s
hard disk.
Checking this box clears the Printer Information File field above and disables the
Browse button.
Browse - Opens the standard Browse dialog.
1-18 Fonts and Forms Installer
Page 25

HP PCL5e Language Printer Commands
Additional PCL5e printer codes and commands needed to use the unique features of the
printer are included in this section.
NOTE:
HP 4000 Series printers use the HP Printer Command Language, Level
5e. This language, usually referred to as PCL5e, includes both the PCL
and HP-GL/2 command structures.
For a detailed description of HP PCL 5, see HP PCL5 Comparison Guide Edition 1, E1097.
About PCL5e
PCL5e is Hewlett Packard’s Printer Command Language. PCL5e adds scalable fonts
and GL/2 vector graphics to the basic text and raster graphics capabilities of earlier
levels of HP’s printer emulations.
PCL5e printer language commands can be divided into three different groups: printer
control codes, PCL commands, and HP-GL/2 commands.
Chapter 2
Within the PCL5e context, there are two types of commands: control codes and escape
code sequences. Escape codes are described in detail in the following pages.
Unprintable control codes cause the printer to do some function such as eject a sheet of
paper. These codes and their functions are listed below.
Code ASCII Description
Backspace BS Move one column left or take no action if already at left margin.
Carriage Return CR
Escape ESC Begin a special control sequence.
Form Feed FF
Line Feed LF
Horizontal Tab HT Move to the next horizontal tab stop.
Shift In SI
Shift Out SO
Move to the left margin on the current print line. May be modified
by an escape sequence code.
Move to the same column in first line at the top of the next page.
May be modified by an escape sequence.
Move to the same column in the next line. May be modified by an
escape sequence.
Select the current primary font for the printable characters that
follow. Use this font until SO is received.
Select the current secondary font for the printable characters that
follow. Use this font until SI is received.
HP PCL5e Language Printer Commands 2-1
Page 26

PC-DOS Application Escape Character Commands
The following lists the escape character commands for some of the more familiar MSDOS applications. Escape characters can be entered from the application.
DOS Application Keys To Enter What You See
Lotus 1-2-3 and Symphony Type \027 027
Microsoft Word for DOS
WordPerfect for DOS Type 027 <27>
MS-DOS Editor Hold down CTRL P then ESC ¨
MS-DOS Edlin Hold down CRTL V then [ ^[
dBase ??CHR(27)+‘‘command’’ //CHR(27)+‘‘ ’’
Hold down ALT key and type 027
on the numeric keypad
Using PCL5e Printer Escape Sequences
A printer command escape sequence always begins with the escape character (ESC).
The escape sequence is a command that tells the printer to perform a certain function.
It consists of an ESC code (27 decimal or 1B hexadecimal) followed by one or more
printable characters (48 through 126 decimal, 30 through 7E hexadecimal).
Most escape sequence printer commands consist of the ESC code followed by a
character (within the range of 33 through 47 decimal, 21 through 2F hexadecimal), a
group character (within the range of 96 through 126 decimal, 60 through 7E
hexadecimal), a value field, and a terminating character.
The value field specifies a number whose interpretation depends on the command. A
value field is indicated by [#] in the escape sequences. In general, numbers can start
with a plus (+) or minus (-) sign indicating a positive or negative value.
¨
NOTE:
In this manual, a value field is indicated by [#] in the escape sequence.
When sending data for a value field, do not include the brackets ([ ]).
The + or - sign is followed by one or more ASCII numerals followed by a decimal point
(ASCII period) and more numerals. The sign and decimal point can be omitted if not
needed.
Value fields without a sign are treated as positive numbers. Value fields without decimal
points are treated as integers. If an integer value is required, fractions are truncated.
Spaces within the value field are ignored.
The terminating characters indicate that the escape sequence command is complete.
The emulation uses characters within the range of 64 through 94 decimal (40 through
5E hexadecimal) as terminators. When escape sequences are combined, group
characters are used instead of terminating characters.
Some escape sequences must be followed by binary data. Usually the number of bytes
of binary data is specified within the command.
2-2 HP PCL5e Language Printer Commands
Page 27

Combining Escape Sequence Commands
The amount of data sent to the printer can be reduced by combining related escape
sequence commands. To combine the escape sequence commands, omit the ESC
character, group character, and character from all but the first command. Change the
terminating character to lower case for all but the last command.
For example, ESC * c 12.34 H, ESC * c 56.78 V, ESC * c 75 G, and ESC * c 2 P can
be combined into ESC * c 12.34 h 56.78 v 75 g 2 P.
NOTE:
In this manual, escape code sequences are printed with spaces between the
individual characters for clarity. Do not include these spaces when using
the commands.
Escape Sequences Syntax
The escape sequence syntax includes the lower case letters “l” and “o” that are easily
confused with the numbers one (1) and zero (0). For clarity, the lower case “l” is
italicized (l ) in the escape sequence descriptions and listings.
If escape sequence does not work correctly, make sure that you did not use a “0" (zero)
or “1" (one) where a letter “o” or “l” is needed.
Note that the spaces shown in the escape sequences should not be included when a
command is sent to the printer. The brackets ([ and ]) used to show value fields or data
are also not part of the escape sequences.
When you see [#] in an escape code sequence, you must supply a parameter value.
Replace the [#] with a decimal or hexadecimal value. When using a quoted string in
BASIC, replace the [#] with an ASCII decimal value or character. In both cases, do not
include the brackets.
HP PCL5e Language Printer Commands 2-3
Page 28

HP PCL5e Escape Code Sequences
Job Controls
ESC % -12345X Universal exit/start of PJL.
ESC E Reset printer to user defaults. All temporary fonts and macros are deleted. Any
remaining data is printed using the user default values.
ESC & l [#]X Select [#] of copies (1 to 32,767).
ESC & l [#]U Set left (long edge) offset registration in decipoints (1/720") to adjust the
logical page position on the width of the physical page. Both positive and
negative values are accepted.
ESC &
l [#] Z Set top (short edge) offset registration in decipoints (1/720") to adjust the
logical page position on the length of the page. Both positive and negative
values are accepted.
ESC & l [#] S Select simplex or duplex printing mode.
# Printing Mode
0 Simplex.
1 Duplex, Long-Edge Binding.
2 Duplex, Short-Edge Binding.
ESC & a [#] G Select page side [#] for printing. If duplex printing is not supported, a page
eject is performed.
# Page Side
0 Next side is selected.
1 Front side is selected.
2 Back side is selected.
2-4 HP PCL5e Language Printer Commands
Page 29

ESC | x [#] J This command can modify several different job control settings.
n
PCL image offset*
n
Page mode jog*
n
Input tray selection mode*
n
Output tray mask
* These settings are persistent, meaning they stay in effect after a power cycle.
To change all of these settings back to Standard, execute a “Restore to
Factory Defaults” via the OCP or Web. To change a specific setting back to
Standard, reenter the command with the Standard value field.
# PCL Image Offset
0 Standard (default).
1 MicroPress.
Use with early versions of MicroPress systems only.
# Page Mode Jog
20 Standard (default).
21 Enable page mode jog.
When Page Mode Jog is enabled, Job Offset (Jog) enabled, multiple copies selected,
and collation is disabled, a jog operation occurs between the printing of pages. For
example, if a job prints 10 pages (simplex), 3 copies, with collation off and Page Mode
Jog disabled, the output is offset at the end of the job. That is, if two such jobs are
printed, the second job is offset from the first. If Page Mode Jog is enabled for this same
job, sheet 11 is offset from sheet 10, sheet 21 is offset from sheet 20, and the first sheet
of the next job is offset from sheet 30 (the last sheet of this job).
HP PCL5e Language Printer Commands 2-5
Page 30

# Input Tray Selection Mode
100 Standard (default).
101 Option 1.
102 Option 2.
103 Option 3.
104 Option 4.
105 Option 5.
106 Custom Mapping 6
107 Custom Mapping 7
200 Standard (default).
201 Option 1
Setting the tray selection mode with a 10X code makes
the mode persistent. The selected mode will be active
immediately and it will be reestablished whenever PJL
environment values are set to their default values. This
happens when:
- PJL mode is entered with a Universal Exit Language
(UEL) command.
- a PJL End of Job (EOJ) command is processed.
- a PJL initialize command is processed.
- the printer is reset to the Factory default from the OCP or
SNMP.
202 Option 2
203 Option 3
204 Option 4
205 Option 5
206 Custom Mapping 6
207 Custom Mapping 7
Setting the tray selection mode with a 20X code makes
the selected mode active immediately, but it is not
persistent. The tray selection mode will revert to the last
persistent selection whenever PJL environment values are
set to their default values. See the comments above.
NOTE: Refer to “Paper Source” on page 2-12 for input tray option definitions.
# Output Tray Mask
15 Disable auto cascading for Stacker 5
16 Disable auto cascading for Stacker 6
17 Disable auto cascading for Stacker 7
18 Disable auto cascading for Stacker 8
25 Enable auto cascading for Stacker 5 (default)
26 Enable auto cascading for Stacker 6 (default)
27 Enable auto cascading for Stacker 7 (default)
28 Enable auto cascading for Stacker 8 (default)
Refer to “Output Bin” on page 2-10 for output tray selections. These settings
stay in effect until they are changed or the printer is reset.
2-6 HP PCL5e Language Printer Commands
Page 31

Alphanumeric ID
ESC & n # W <operation> <string>
n
Maximum length of <string> data is 99 bytes.
n
Range of # value is 1 to 100 inclusive (length of <string> data + one operation
byte).
The following are supported values for the <operation> byte.
Value Description
(0 Dec, 0x00 Hex, \000 Oct)
^@
Sets the current Font ID to <string>.
(1 Dec, 0x01 Hex, \001 Oct)
^A
Associates the current Font ID to the font referred to by <string>.
(2 Dec, 0x02 Hex, \002 Oct)
^B
Selects the font referred to by <string> as primary.
(3 Dec, 0x03 Hex, \003 Oct)
^C
Selects the font referred to by <string> as secondary.
(4 Dec, 0x04 Hex, \004 Oct)
^D
Sets the current Macro ID to <string>.
(5 Dec, 0x05 Hex, \005 Oct)
^E
Associates the current Macro ID to the macro referred to by <string>.
(20 Dec, 0x14 Hex, \024 Oct)
^T
Deletes the font association named by the current Font ID.
(21 Dec, 0x15 Hex, \025 Oct)
^U
Deletes the macro association named by the current Macro ID.
(1100 Dec, 0x64 Hex, \144 Oct)
d
Selects the media type.
Valid media type names are:
Plain, Prepunched, Transparency, Transparency-pp, Preprinted,
Letterhead, Label, Bond, Recycled, Color, Special,
and Other.
For example, the media called Letterhead, can be selected by the PCL5e Alphanumeric
ID command in the following form:
<esc>&n11WdLetterhead
HP PCL5e Language Printer Commands 2-7
Page 32

Page Controls
Paper Size
ESC & l [#] A Set physical page size to [#]. A tray with the selected paper size must be
installed and selected as a paper source.
# Paper Size
1 Executive (7.25’’ x 10.5’’)
2 Letter (8.5" x 11")
3 Legal (8.5" x 14")
6 Ledger (11" x 17")
7 Statement (8.5” x 5.5”)
26 A4 (297mm x 210mm)
27 A3 (297mm x 420mm)
40 Folio (216mm x 330mm)
45 JIS B5 (182mm x 257mm)
46 JIS B4 (257mm x 364mm)
Universal or Custom. Media size must be set to
101
Custom and physical media dimensions must be
entered through the operator control panel or SNMP.
102 Letter SEF (8.5” x 11”)
115 A5 SEF (149mm x 210mm)
126 A4 SEF (210mm x 297mm)
202 LetterTab Stock (9” x 11”)
226 A4 Tab Stock (297mm x 225mm)
2006 SuperB (12” x 18”)
Page Length
ESC & l [#] P Set logical page length to [#] lines. This is an alternate, but not recommended,
method for selecting a page length. The page length selected is the smallest
logical page length that is greater than the specified number of lines multiplied
by the current VMI.
2-8 HP PCL5e Language Printer Commands
Page 33

Orientation
ESC & l [#] O Select print orientation (#).
# Print Orientation
0 Portrait.
1 Landscape.
2 Reverse portrait.
3 Reverse landscape.
ESC & a [#] P Select print direction [#]. Rotate the logical page coordinates counterclockwise
in 90 degree increments from the current logical page orientation.
#Rotation
0 Do not rotate.
90 Rotate 90 degrees.
180 Rotate 180 degrees.
270 Rotate 270 degrees.
HP PCL5e Language Printer Commands 2-9
Page 34

Output Bin
ESC & l [#] G Select Output Bin [#]. For Auto cascade, when the Stacker 5, 6, 7 and 8 of
Container Stacker is full, the output bin can be switched to another output bin
and the Stacker 5, 6, 7 and 8 can be individually enabled or disabled auto
cascading. (Refer to “Output Tray Mask” on page 2-6.) This command is
ignored for any selection that is not installed or supported.
# No Finisher
Engine Output Tray
1
Face Down
2 - Elevator Tray Face down Elevator Tray Face down Elevator tray Face down
3 - Upper Tray Face down Upper Tray Face down Upper Tray Face down
4 - - Booklet Holder Face down
5- -
6- -
7- -
8- -
9- -
10 - -
Engine Output Tray
11
Face Up
12 - Elevator Tray Face up Elevator Tray Face up Elevator Tray Face up
13 - Upper Tray Face up Upper Tray Face up Upper Tray Face up
14 - - Booklet Holder Face up
Advanced Finisher
(70 ppm only)
-
-
Standard Finisher
(108H)
(92 ppm only)
Booklet Finisher
(108HBM)
(92 ppm only)
15 - -
16 - -
17 - -
18 - -
19 - -
* Autocascade can be enabled/disabled for each stacker individually. Refer to “Output Tray Mask” on page 2-
5.
Table continues on the following page.
2-10 HP PCL5e Language Printer Commands
Page 35

# Publishing Finisher Container Stacker
0-
2- -
3- -
4 Booklet Stacker Face down -
5 - Stacker 5 Face down
6 - Stacker 6 Face down
7 - Stacker 7 Face down
8 - Stacker 8 Face down
9 - Sample Tray Face down
10 -
11 - -
12 - -
13 - -
14 Booklet Stacker Face up -
15 - Stacker 5 Face up
16 - Stacker 6 Face up
17 - Stacker 7 Face up
Auto cascade*
Face down
Auto cascade*
Face up
18 - Stacker 8 Face up
19 - Sample Tray Face up
* Autocascade can be enabled/disabled for each stacker
individually. Refer to “Output Tray Mask” on page 2-5.
HP PCL5e Language Printer Commands 2-11
Page 36

Paper Source
ESC & l [#] H Select Paper (Media) Source Input Tray [#]. This command is ignored for any
selection that is not installed or supported.
.
Input Tray Selection Mode*
Standard
#
Mode
Option 1 Option 2 Option 3 Option 4 Option 5
(default)
0 1235 1235 3215 2 1 0 0 0
1131112 1 1
2242224 4 4
3343334 4 4
4424331 5 5
5515553 2 2
6 1235 5 3215 2 1 4 4 4
7 1235 1235 3215 2 1 1235 1235 1235
8 1235 1235 3215 2 1 1235 3 3
9 1235 1235 3215 2 1 1235 0 0
10 6 6 3215 2 1 1235 0 0
11 7 7 3215 2 1 1235 0 0
12 1235 1235 3215 2 1 1235 0 0
------- - -
19 1235 1235 3215 2 1 1235 0 0
20 8 8 3215 2 1 4 4 4
21 1235 1235 3215 2 1 5 5 5
22 1235 1235 3215 2 1 1235 0 0
------- - -
69 1235 1235 3215 2 1 1235 0 0
Custom
Mapping
6
Custom
Mapping
7
NOTES:
Refer to Valid Tray Group Codes on page 2-13.
Refer to the escape sequences on page 2-5 to modify the input tray selection mode.
All other values default to 0.
Custom Mapping 6 & 7 are displayed on the status page in the printer general information
section. The mappings are reported as a comma separated list of tray group codes.
2-12 HP PCL5e Language Printer Commands
Page 37

Input Tray Mapping and Grouping
Input Tray Mapping and Grouping provides a method for the PCL Paper
Source control sequence to select any paper tray or any valid group of paper
trays. It allows the printer administrator to define and manage two sets of
mappings, and provides the administrator the ability to select and set one of the
mappings from the paper source control sequence to paper trays or groups of
trays as the default mapping. It allows the printer user to select different
mappings for the duration of the user’s print job.
Tray Group Code
Decimal digits 1-8 are used to represent the input trays of the printer as shown
in the table below. Groups of trays are selected using the code numbers. The
number of trays in a group is limited to four and the priority order is from left
to right. For example, a tray group consisting of the HCF and Tray 3 with the
HCF having the highest priority is represented by the number 53. Any
combination of trays is valid with the following exceptions:
n
The MBT (4) cannot be used in any group.
n
Inserter trays (6, 7 and 8) cannot be grouped with printer trays (1, 2, 3, or
5).
Code Trays Listed in Priority Order
0 Special code indicating Eject Page. The existing tray group selection is retained
1 Tray 1 only (lower tray)
2 Tray 2 only (middle tray)
3 Tray 3 only (upper tray)
4 MBT only
5 HCF only
6 PF Tray 1 only
7 PF Tray 2 only
8 HBM Tray only
Valid Tray Group Codes
NOTE:
If the group being specified is in numeric ascending order, the input trays
will be used in the order specified and each tray will be used until the tray
is empty. At that time the next tray in sequence that contains the same
paper definition will be selected. At any time where a higher priority tray
is filled with the same paper, that tray will be selected after the current
tray becomes empty.
If the group being specified is in a non-ascending order, then where a tray
of higher order priority becomes empty the next lower priority tray will be
selected. In this case if a higher priority tray is filled and the tray goes
“Ready” before the current tray becomes empty, the printer will
automatically switch back to the higher priority tray.
HP PCL5e Language Printer Commands 2-13
Page 38

Character Text Path Direction
ESC & c [#] T Vertically rotate text for use in vertical writing applications.
# Print Direction
0 Horizontal.
1Vertical.
Margin Controls
ESC & a [#] L Set left margin at the left edge of column [#].
ESC & a [#] M Set right margin at the right edge of column [#].
ESC 9 Clear left and right margins.
ESC & l [#] E Set top margin to [#] lines. Top margin is the number of lines between the top
of the logical page and the text area.
ESC & l [#] F Set text length to [#] lines.
Perforation Skip
ESC & l [#] L Perforation skip is enabled or disabled. Printing skips from the end of the text
area to the top of the text area on the next page.
# Perforation Skip Mode
0 Disable perforation skip.
1 Enable perforation skip.
Horizontal Column Spacing
ESC & k [#] H Set the Horizontal Motion Index (HMI) to [#]/120th inch. The value of [#] is
valid to four decimal places.
Vertical Line Spacing
ESC & l [#] C Set Vertical Motion Index (VMI) to [#]/48th inch. The value of [#] is valid to
four decimal places.
ESC & l [#] D Set line spacing to [#] lines-per-inch. The values for [#] can be 1, 2, 3, 4, 6, 8,
12, 16, 24 or 48. This is an alternate method for setting VMI.
2-14 HP PCL5e Language Printer Commands
Page 39

Cursor Controls
Cursor control commands are used for relative or absolute cursor positioning. To make
a relative cursor move, insert a plus (+) or minus (-) sign before the value of [#] in the
escape sequence. The cursor is moved relative to the current cursor position.
To make an absolute cursor move, do not insert a plus (+) or minus (-) sign in front [#].
An absolute horizontal position is referenced from the left edge of the logical page. An
absolute vertical position is referenced from the top margin.
Vertical and Horizontal Movement
ESC & a [#] C Move the cursor to column [#]. Column width is determined by the current
HMI value.
ESC & a [#] H Move the cursor horizontally [#] decipoints (a decipoint = 1/720th inch). The
value of [#] is valid to two decimal places.
ESC & a [#] R Move the cursor [#] lines within the same column. The actual distance is
determined by the current VMI value.
ESC & a [#] V Move the cursor vertically [#] decipoints (a decipoint = 1/720th inch). The
value of [#] is valid to four decimal places.
ESC * p [# ] X Move the cursor horizontally [#] dots (a dot = 1/300th inch).
ESC * p [#]Y Move the cursor vertically [#] dots (a dot = 1/300th inch).
ESC = Stay in the same character position and move the cursor down a half-line feed.
The actual distance depends on the current VMI value.
Push/Pop Position
ESC & f [#] S ESC & f 0 S pushes a cursor position on the stack. ESC & f 1 S pops the last
saved cursor position from the stack. Up to 20 cursor positions can be saved.
HP PCL5e Language Printer Commands 2-15
Page 40

End-of-Line Termination
ESC & k [#] G Define line termination code mode as shown in the table below.
Mode Code Functions
0 CR=CR, LF=LF, FF=FF
1 CR=CR+LF,LF=LF, FF=FF
2 CR=CR, LF=CR+LF,FF=CR+FF
3 CR=CR+LF, LF=CR+LF, FF=CR+FF
CR = Carriage Return
LF = Line Feed
FF = Form Feed
Font Selection
Fonts can be selected by their attributes. The printer then chooses the resident or
downloaded font that most closely matches the desired attributes according to
established search priority.
When changing from one font to another, the attributes that are the same as the current
font do not have to be specified again. However, it is recommended that all attributes
be specified to make sure that the correct font is selected. Font attributes are ranked
according to the following priorities:
Attribute Description
Font ID Number assigned to the font.
Symbol set Roman-8, Math-8, etc.
Spacing type Fixed or proportional.
Pitch CPI (fixed spacing only).
Height Point size.
Style Upright or italic.
Stroke weight Light through bold.
Typeface Courier, Lineprinter, etc.
Source Soft then resident.
Orientation Portrait or landscape.
NOTE:
The printer can print resident and downloaded fonts in portrait,
landscape, reverse portrait or reverse landscape orientation. Scalable
fonts from any source can be oriented to any angle.
2-16 HP PCL5e Language Printer Commands
Page 41

Symbol Set Selection
The following lists the symbol set table. The selected symbol set must be supported by
a resident or downloaded font.
ESC ( [##] Select the primary font symbol set according to the value of [##] from column
one in the table below.
ESC ) [##] Select the secondary font symbol set according to the value of [##]. Use the
primary font symbol set list for selections (see the HP PCL5 Comparison
Guide Edition 1, E1097).
ID # Symbol Set
0D ISO 60 Norwegian v1
1E ISO 4 United Kingdom
9E Windows Latin 2
1F ISO 69 French
1G ISO 21 German
0I ISO 15 Italian
6J Microsoft Publishing
7J Desktop
10J PostScript Text
13J Ventura International
14J Ventura US
5M PostScript Math
6M Ventura Math
8M Math-8
0N ECMA-94 Latin 1
2N ECMA-94 Latin 2
5N ECMA-94 Latin 5
0S ISO 11 Sweden: names
2S ISO 17 Spanish
5T Windows Latin 5
9T PC-8 Turkish
0U USASCII
1U US Legal
8U Roman-8
9U Windows
10U PC-8 US
11U PC-8 Danish/Norwegian
12U PC-850
15U PiFont
17U PC-852
19U Windows Latin 1
HP PCL5e Language Printer Commands 2-17
Page 42

Font Spacing and Pitch
ESC ( s [#] P Select proportional or fixed spacing.
# Spacing
0 Fixed spacing
1 Proportional spacing
ESC ( s [#] H Select character pitch (Characters Per Inch) for a monospaced font.
Font Character Size and Style
ESC ( s [#] V Set primary point size to [#]/72nd inch.
ESC ( s [#] S Select character style [#]:
# Character Style
0 Upright font
1 Italic font
4 Condensed
5 Condensed Italic
8 Compressed
24 Expanded, extra condensed
32 Outline
64 Inline
128 Shadowed
160 Outline shadowed
As per the HP PCL5 Comparison Guide Edition 1, E1097.
NOTE:
The selected character style must be supported by a resident or
downloaded font.
2-18 HP PCL5e Language Printer Commands
Page 43

Font Character Stroke Weight
ESC ( s [#] B Select stroke weight [#]:
# Stroke Weight
-7 Ultra thin
-6 Extra thin
-5 Thin
-4 Extra light
-3 Light
-2 Demi light
-1 Semi light
0 Medium
1Semi bold
2 Demi bold
3Bold
4Extra bold
5Black
6 Extra black
7 Ultra black
As per the HP PCL5 Comparison Guide Edition 1, E1097.
NOTE:
The selected stroke weight must be supported by a resident or
downloaded font.
Secondary Font Character Size and Style
To select the font character size and style for a secondary font, replace the open
parenthesis “(” in a primary font sequence with a close parenthesis “)”.
HP PCL5e Language Printer Commands 2-19
Page 44

Typeface Selection
ESC ( s [#] T Select primary font typeface [#]. The table below lists the code numbers of
internal typefaces that are available.
# Typeface
0 Line Printer-Bitmap
4099 Courier
4101 CG Times
4102 Letter Gothic
4113 CGn Omega
4116 Coronet
4140 Clarendon
4148 Univers
4168 Antique Olive
4197 Garamond Antiqua
4297 Marigold
4362 Albertus
4822 Wingdings
16602 Arial
16686 Symbol
16901 Times New Roman
ESC ) s[#]T Select secondary font typeface [#]. Use the primary font typeface values to
select [#}.
Primary/Secondary Font Selection
ESC ( 3 @ Select default primary font.
ESC ) 3 @ Select default secondary font.
ESC & k [#] S Select print pitch mode by the alternate method.
#Pitch
0 10.0 characters per inch.
2 16.67 characters per inch.
4 12.0 characters per inch.
2-20 HP PCL5e Language Printer Commands
Page 45

Auto Underline
ESC & d [#] D Enable auto underline mode [#].
# Underline Mode
0 Enable fixed underline.
3 Enable floating underline.
ESC & d @ Disable auto underline mode.
Transparent Print
ESC &p[#]X[data] Transparent print [#] bytes of character data. This command allows access to
all characters in a font including those defined as unprintable.
Text Parsing
ESC &t[#] P This command informs the PCL parser whether character codes should be
interpreted as 1-byte or 2-byte character codes as described below.
# Parsing Method
0, 1 All character codes are processed as 1-byte characters.
Character codes in the range 0x21-0xFF are processed as the first byte of a 2-byte
21
character. The following byte is processed as the second byte of the 2-byte
character. All character codes outside this range are processed as 1-byte values.
Character codes in the range 0x81-0x9F and 0xE0-0xFC are processed as the first
byte of a 2-byte character. The following byte is processed as the second byte of
31
the 2-byte character. All character codes outside this range are processed as
1-byte values.
Character codes in the range 0x80-0xFF are processed as the first byte of a 2-byte
38
character. The following byte is processed as the second byte of the 2-byte
character. All character codes outside this range are processed as 1-byte values.
HP PCL5e Language Printer Commands 2-21
Page 46

Font Management
ESC * c [#] D Assign font ID number [#] (0 to 32,767) to a font to be downloaded. The font
with this ID number will be used for the next font management command.
ESC ( [#] X Assign downloaded font with identification [#] as primary font (0-32,767).
ESC ) [#] X Assign downloaded font with identification [#] as secondary font (0-32,767).
ESC * c [#] F Select a font or character management operation [#] from the following list:
# Operation
0 Delete all soft fonts.
1 Delete all temporary soft fonts.
2 Delete soft font specified by the last ID#.
Delete character code specified by the last ID# and
3
character code.
4 Make the soft font specified by the last ID# temporary.
5 Make the soft font specified by the last ID# permanent.
6 Copy or assign the current font as temporary.
Soft Font Creation
ESC ) s[#]W [data] Create font header for a soft font. There are [#] bytes of data in the header. The
data follows the command.
ESC *c [#] E Assign decimal value to a character to be downloaded (0 to 32,767).
ESC ( s[#]W [data] Download [#] bytes of binary character data.
2-22 HP PCL5e Language Printer Commands
Page 47

PCL Vector Graphics Switching/Set-up
ESC * c [#] X Set horizontal size of picture frame to [#] decipoints (1/720th inch).
ESC * c [#] Y Set vertical size of picture frame to [#] decipoints (1/720th inch).
ESC * c 0 T Set picture frame anchor point to the PCL cursor position.
ESC * c [#] K Set HP-GL/2 horizontal plot size to [#] inches.
ESC * c [#] L Set HP-GL/2 vertical plot size to [#] inches.
ESC % [#] B Enter HP-GL/2 mode and position pen according to the value of [#]. If [#]
equals:
# Pen Position
0 Place pen to previous HP-GL/2 pen position.
1 Place pen to current PCL cursor position.
ESC % [#] A Enter PCL mode and position cursor according to the value of [#]. If [#] equals:
#Cursor Position
0 Position cursor to previous PCL cursor position.
1 Position cursor to current HP-GL/2 pen position.
Raster Graphics
ESC *t [#] R Select graphics resolution [#]:
75 dots-per-inch
100 dots-per-inch
150 dots-per-inch
300 dots-per-inch
600 dots-per-inch
ESC * r [#] F Set graphics presentation position. ESC * r 0 F prints image in the current print
direction. ESC * r 3 F prints along the width of the physical page.
ESC * r [#] T Set raster height to [#] raster rows.
ESC * r [#] S Set raster width to [#] pixels.
ESC *r [#]A Start graphics mode. If [#] equals:
#
0 Start at the left graphics margin.
1 Start at the current cursor position.
Starting Point
ESC * b [#] Y Move [#] raster lines vertically from the current line of the picture area.
HP PCL5e Language Printer Commands 2-23
Page 48

ESC * b [#] M Set compression mode (method) for the transfer of binary raster data. The value
of [#] is one of the following:
# Compression Mode
0 Unencoded.
1 Run length encoded.
2 TIFF (Tag Image File Format V4.0) encoded.
3 Delta row encoded.
5 Adaptive compression.
6 CCITT Group 3 one-dimensional (modified Huffman).
7 CCITT Group 3 two-dimensional (modified READ).
8 CCITT Group 4 two-dimensional (modified modified READ).
97 TIFF CCITT Group 3 and 4.
98 CCITT Group 3 one- and two-dimensional.
99 TIFF CCITT Group 4.
ESC *b [#]W [data] Transfer the [#] bytes of graphics data that follow this command.
NOTE:
The printer recognizes and acts upon both “end of graphics” commands.
ESC *r B End graphics mode (B version).
ESC *r C End graphics mode (C version-Unique to HP IIISi). Resets left margin and
compression mode to zero (0).
Print Model
Imaging
ESC * v [#] N Set source transparency mode to transparent ([#] = 0) or opaque ([#] = 1).
ESC * v [#] O Set pattern transparency mode to transparent ([#] = 0) or opaque ([#] = 1).
ESC * v [#] T Select current pattern [#].
#Pattern
0 Solid black.
1 Solid white.
2 HP shading pattern.
3 HP cross hatch pattern.
2-24 HP PCL5e Language Printer Commands
Page 49

Logical Operation
ESC * l [#] O Specifies the logical operation to be performed in RGB color space on the
destination, source and texture to produce new destination data.
# Logical Operation
0 - 255 Boolean function to be performed.
252 TSo (default).
Pixel Placement
ESC l [#] R This command determines how pixels are rendered in images.
#Grid
0 Grid intersection. Default.
1 Grid centered.
Two models are used for rendering pixels when an image is placed on paper:
n
Grid Intersection Model
n
Grid Centered Model
This command can be invoked multiple times during a page. It has no effect except to
switch the model being used for imaging.
Rectangle Dimensions
ESC *c [#] A Horizontal rule/pattern size in dots (300 dots = 1 inch).
ESC *c [#] H Horizontal rule/pattern size in decipoints (a decipoint = 1/720th inch).
ESC *c [#] B Vertical rule/pattern size in dots (300 dots = 1 inch).
ESC *c [#]V Vertical rule/pattern size in decipoints (a decipoint = 1/720th inch).
HP PCL5e Language Printer Commands 2-25
Page 50

Rectangle Area Fill
ESC *c [#]G Define pattern ID or area fill ID. Use 1 to 6 for [#] to select predefined cross-
hatched pattern or 1 to 100 to select grey scale.
ESC *c [#] P Print rule/pattern [#]:
# Rule/Pattern
0 Black (solid).
1 White (erase).
2 Gray scale shading.
3 HP cross-hatch.
4 User-defined pattern.
5 Current pattern.
Macro Controls
ESC & f [#] Y Assign Macro ID [#] from 0 to 32,767 to be used in a macro control operation.
ESC & f [#] X Select Macro Control Operation [#]:
# Macro Operation
0 Start macro definition for last specified ID.
1 Stop macro definition for last specified ID.
2 Execute macro for last specified ID.
3 Call macro for last specified ID.
4 Enable auto macro overlay.
5 Disable auto macro overlay.
6 Delete all macros.
7 Delete all temporary macros.
8 Delete macro for last specified ID.
9 Make the macro with last specified ID temporary.
10 Make the macro with the last specified ID permanent.
Miscellaneous Controls
ESC Y Display function ON.
ESC Z Display function OFF.
ESC & s [#] C Enable/disable end-of-line wrap.
# End-of-line Wrap Mode
0 Enables end-of-line wrap.
1 Disables end-of-line wrap.
2-26 HP PCL5e Language Printer Commands
Page 51

HP 4000 Series Emulation PCL5e Command Summary
Command Summary
Function Variable Command Hexidecimal Decimal
JOB CONTROL
Left offset registration decipoints (1/720") ESC & l [#] U 1B 26 6C [#] 55 27 38 108 [#] 85
Top offset registration decipoints (1/720") ESC & l [#] Z 1B 26 6C [#] 5A 27 38 108 [#] 90
Job separation jog collator ESC & l 1 T 1B 26 6C 31 54 27 38 108 49 84
Image offset Standard
Modified
Page mode jog Standard
Modified
Input tray selection Standard mode
PAGE CONTROL
Page size Executive (7.25" x 10.5")
Paper length Number of lines ESC & l [#] P 1B 26 6C [#] 50 27 38 108 [#] 80
Page orientation Portrait
Page side selection Next side
Paper (media) source*
(without High Capacity
Feeder)
Paper (media) source*
(with High Capacity
Feeder; selected tray
must be installed)
* Standard mode input tray selection is shown here. Refer to “Paper Source” on page 2-12 for information on additional
mode selections.
Modified mode
Letter (8.5" x 11")
Legal (8.5" x 14")
Ledger (11" x 17")
Statement (8.5’ x 5.5’)
A4 (210mm x 297mm)
A3 (297mm x 420mm)
Folio (216 x 330)
JIS B5 (182mm x 257mm)
JIS B4 (257mm x 364mm)
Universal or Custom
Letter SEF (8.5" x 11")
A5 SEF (149mm x 210mm)
A4 SEF (210mm x 297mm)
Letter Tab Stock (9” x 11”)
A4 Tab Stock
SuperB (12” x 18”)
Landscape
Reverse portrait
Reverse landscape
Front side
Back side
Auto Select and Auto Cascade
Tray 1 (Lower)
Tray 2 (Middle)
Tray 3 (Upper)
Multi Bypass Tray
Auto Select and Auto Cascade
Tray 1 (Lower)
Tray 2 (Middle)
Tray 3 (Upper)
Multi Bypass Tray
High Capacity Feeder
ESC | x 0 J
ESC | x 1 J
ESC | x 20 J
ESC | x 21 J
ESC | x 100 J
ESC | x 101 J
ESC & l 1 A
ESC & l 2 A
ESC & l 3 A
ESC & l 6 A
ESC & l 7 A
ESC & l 26 A
ESC & l 27 A
ESC & l 40 A
ESC & l 45 A
ESC & l 46 A
ESC & l 101 A
ESC & l 102 A
ESC & l 115 A
ESC & l 126 A
ESC & l 202 A
ESC & l 226 A
ESC & l 2006 A
ESC & l 0 O
ESC & l 1 O
ESC & l 2 O
ESC & l 3 O
ESC & a 0 G
ESC & a 1 G
ESC & a 2 G
ESC & l 0 H
ESC & l 1 H
ESC & l 2 H
ESC & l 3 H
ESC & l 4 H
ESC & l 0 H
ESC & l 1 H
ESC & l 2 H
ESC & l 3 H
ESC & l 4 H
ESC & l 5 H
1B 7C 78 0 4C
1B 7C 78 1 4C
1B 7C 78 20 4C
1B 7C 78 21 4C
1B 7C 78 100 4C
1B 7C 78 101 4C
1B 26 6C 31 41
1B 26 6C 32 41
1B 26 6C 33 41
1B 26 6C 36 41
1B 26 6C 37 41
1B 26 6C 32 36 41
1B 26 6C 32 37 41
1B 26 6C 34 30 41
1B 26 6C 34 35 41
1B 26 6C 34 36 41
1B 26 6C 31 30 31 41
1B 26 6C 31 30 32 41
1B 26 6C 31 32 35 41
1B 26 6C 31 32 36 41
1B 26 6C 32 30 32 41
1B 26 6C 32 32 36 41
1B 26 6C 32 30 30 36 41
1B 26 6C 30 4F
1B 26 6C 31 4F
1B 26 6C 32 4F
1B 26 6C 33 4F
1B 26 61 30 47
1B 26 61 31 47
1B 26 61 32 47
1B 26 6C 30 48
1B 26 6C 31 48
1B 26 6C 32 48
1B 26 6C 33 48
1B 26 6C 34 48
1B 26 6C 30 48
1B 26 6C 31 48
1B 26 6C 32 48
1B 26 6C 33 48
1B 26 6C 34 48
1B 26 6C 35 48
27 124 120 0 74
27 124 120 1 74
27 124 120 20 74
27 124 120 21 74
27 124 120 100 74
27 124 120 101 74
27 38 108 49 65
27 38 108 50 65
27 38 108 51 65
27 38 108 54 65
27 38 108 55 65
27 38 108 50 54 65
27 38 108 50 55 65
1B 26 6C 52 48 41
27 38 108 52 53 65
27 38 108 52 54 65
27 38 108 49 49 49 65
27 38 108 49 48 50 65
27 38 108 49 50 53 65
27 38 108 49 50 54 65
27 38 108 50 48 50 65
27 38 108 50 50 54 65
27 38 108 50 48 48 54 65
27 38 108 48 79
27 38 108 49 79
27 38 108 50 79
27 38 108 51 79
27 38 97 48 71
27 38 97 49 71
27 38 97 50 71
27 38 108 48 72
27 38 108 49 72
27 38 108 50 72
27 38 108 51 72
27 38 108 52 72
27 38 108 48 72
27 38 108 49 72
27 38 108 50 72
27 38 108 51 72
27 38 108 52 72
27 38 108 53 72
HP PCL5e Language Printer Commands 2-27
Page 52

Command Summary (Continued)
Function Variable Command Hexidecimal Decimal
Media type Plain ESC &n6WdPlain 1B 26 6E 36 57 64 50
6C 61 69 6E
Bond ESC &n5WdBond 1B 26 6E 35 57 64 42
6F 6E 64
Recycled ESC &n9WdRecycled 1B 26 6E 39 57 64 52
65 79 63 6C 65 64
Color ESC &n6WdColor 1B 26 6E 36 57 64 43
6F 6C 6F 72
Prepunched
ESC &n11WdPrepunched
1B 26 6E 31 31 57 64
50 72 65 70 75 6E 63
68 65 64
Letterhead
ESC &n11WdLetterhead
1B 26 6E 31 31 57 64
4C 65 7474 65 72 68
65 61 64
Preprinted
ESC &n11WdPreprinted
1B 26 6E 31 31 57 64
50 72 65 70 72 69 6E
74 65 64
Special ESC &n8WdSpecial 1B 26 6E 38 57 64 53
70 65 63 96 61 72
Other ESC &n6WdOther 1B 26 6E 36 57 64 4F
74 68 65 72
Transparency
ESC &n13WdTransparency
1B 26 6E 31 33 57
6454 72 61 6E 73 70
61 72 65 6E 63 79
Transparency-pp
ESC &n1 6WdTransparency-p p
1B 26 6E 31 36 57 64 54
72 61 6E 73 70 61 72 65
6E 63 79 2D 70 70
Label ESC &n6WdLabel 1B 26 6E 36 57 64 4C
61 62 65 6C
Paper (media) destination
(with Advanced
Finisher)
Paper (media) destination
engine output tray
(without Finisher)
Elevator Tray Face down
Upper Tray Face down
Elevator Tray Face up
Upper Tray Face up
Engine Output Tray Face
down
Engine Output Tray Face up
ESC & l 2 G
ESC & l 3 G
ESC &
l 12 G
ESC &
l 13 G
ESC &
l 1 G
l 11 G
ESC &
1B 26 6C 32 47
1B 26 6C 33 47
1B 26 6C 31 32 47
1B 26 6C 31 33 47
1B 26 6C 31 47
1B 26 6C 31 31 47
Extensions or Variations to the HP Emulation
Print direction (rotation) 0 degrees
90 degrees
180 degrees
270 degrees
Perforation skip Disable
Enable
ESC & a 0 P
ESC & a 90 P
ESC & a 180 P
ESC & a 270 P
ESC & l 0 L
ESC & l 1 L
1B 26 61 30 50
1B 26 61 39 30 50
1B 26 61 31 38 30 50
1B 26 61 32 37 30 50
1B 26 6C 30 4C
1B 26 6C 31 4C
Left margin Left column [#] ESC & a [#] L 1B 26 61 [#] 4C 27 38 97 [#] 76
Right margin Right column [#] ESC & a [#] M 1B 26 61 [#] 4D 27 38 97 [#] 77
Clear side margins ESC 9 1B 39 27 57
Top margin Number of lines ESC & l [#] E 1B 26 6C [#] 45 27 38 108 [#] 69
Text length Number of lines ESC & l [#] F 1B 26 6C [#] 46 27 38 108 [#] 70
27 38 110 54 87 100
80 108 97 105 110
27 38 110 53 87 100
66 111 11 0 100
27 38 110 57 87 100 82
101 99 121 99 108 101 100
27 38 110 54 87 100
67 111 108 111 114
27 38 110 54 87 100
80 114 101 112 118
110 99 104 101 100
27 38 110 49 49 87 100
76 101 116 116 101 114
104 101 100
27 38 110 49 49 87 100
80 114 101 112 114 105
110 101 100
27 38 110 49 49 87 100
83 112 101 99 105 108
27 38 110 54 87 100 79
116 104 101 114
27 38 110 49 51 87 100
84 114 97 110 115 112
97 110 99 121
27 38 110 49 54 87 100
84 114 97 110 115 112 97
110 99 121 45 112 112
27 38 110 54 87 100
76 97 98 101 108
27 38 108 50 71
27 38 108 51 71
27 38 108 49 50 71
27 38 108 49 51 71
27 38 108 49 71
27 38 108 49 49 71
27 38 97 48 80
27 38 97 57 48 80
27 38 97 49 56 48 80
27 38 97 50 55 48 80
27 38 108 48 76
27 38 108 49 76
2-28 HP PCL5e Language Printer Commands
Page 53

Command Summary (Continued)
Function Variable Command Hexidecimal Decimal
CURSOR CONTROL
HMI # of 1/120" increments ESC & k [#] H 1B 26 6B [#] 48 27 38 107 [#] 72
VMI # of 1/48" increments ESC & l [#] C 1B 26 6C [#] 43 27 38 108 [#] 67
Set lines per inch 1 line per inch
2 lines per inch
3 lines per inch
4 lines per inch
6 lines per inch
8 lines per inch
12 lines per inch
16 lines per inch
24 lines per inch
48 lines per inch
Horizontal movement Column
Dots
Decipoints
Carriage return CR 0D 13
Horizontal tab HT 09 09
Space SP 20 32
Back space BS 08 08
Vertical movement Lines
Dots
Decipoints
Half line feed
Line feed LF 0A 10
Form feed FF 0C 12
Print line termination CR=CR, LF=LF, FF=FF ESC & k 0 G 1B 26 6B 30 47 27 38 107 48 71
CR=CR+LF, LF=LF, FF=FF ESC & k 1 G 1B 26 6B 30 47 27 38 107 49 71
CR=CR, LF=CR+LF,
FF=CR+FF
CR=CR+LF, LF=CR+LF,
FF=CR+FF
Stack push/pop position Push (up to 20 positions) ESC & f 0 S 1B 26 66 30 53 27 38 102 48 83
Pop ESC & f 1 S 1B 26 66 31 53 27 38 102 49 83
ESC & l 1 D
ESC & l 2 D
ESC & l 3 D
ESC & l 4 D
ESC & l 6 D
ESC & l 8 D
ESC & l 12 D
ESC & l 16 D
ESC & l 24 D
ESC & l 48 D
ESC & a [#] C
ESC * p [#] X
ESC & a [#] H
ESC & a [#] R
ESC * p [#] Y
ESC & a [#] V
ESC =
ESC & k 2 G 1B 26 6B 30 47 27 38 107 50 71
ESC & k 3 G 1B 26 6B 30 47 27 38 107 51 71
1B 26 6C 31 44
1B 26 6C 32 44
1B 26 6C 33 44
1B 26 6C 34 44
1B 26 6C 36 44
1B 26 6C 38 44
1B 26 6C 31 32 44
1B 26 6C 31 36 44
1B 26 6C 32 34 44
1B 26 6C 34 38 44
1B 26 61 [#] 43
1B 2A 70 [#] 58
1B 26 61 [#] 48
1B 26 61 [#] 52
1B 2A 70 [#] 59
1B 26 61 [#] 56
1B 3D
27 38 108 49 68
27 38 108 50 68
27 38 108 51 68
27 38 108 52 68
27 38 108 54 68
27 38 108 56 68
27 38 108 49 50 68
27 38 108 49 54 68
27 38 108 50 52 68
27 38 108 52 56 68
27 38 97 [#] 67
27 42 112 [#] 88
27 38 97 [#] 72
27 38 97 [#] 82
27 42 112 [#] 89
27 38 97 [#] 86
27 61
HP PCL5e Language Printer Commands 2-29
Page 54

Command Summary (Continued)
Function Variable Command Hexidecimal Decimal
FONT SELECTION
Primary font symbol set ISO 60 Norwegian Ver. 1
ISO 4 United Kingdom
Windows Latin 2
ISO 69 French
ISO 21 German
ISO 15 Italian
Microsoft Publishing
Desktop
PS Text
Ventura International
Ventura US
PS Math
Ventura Math
Math-8
ECMA-94 (Latin 1)
ECMA-94 (Latin 2)
ECMA-94 (Latin 5)
ISO 11 Sweden names
ISO 17 Spanish
Windows Latin 5
PC-8 TK
ISO 6 ASCII
US Legal
Roman-8
Windows
PC-8
PC-8 (D/N)
PC-850
Pi Font
PC-852
Windows Latin 2
Secondary font symbol
set
Primary font character
spacing
Secondary font
character spacing
Primary font pitch # = font pitch. ESC ( s [#] H 1B 28 73 [#] 48 27 40 115 [#] 72
Secondary font pitch # = font pitch. ESC ) s [#] H 1B 28 73 [#] 48 27 40 115 [#] 72
Primary font point size ESC ( s [#] V 1B 28 73 [#] 56 27 40 115 [#] 86
Secondary font point
size
Primary font style Upright
Secondary font style See primary font for [#]. ESC ) s [#] S 1B 28 73 [#] 53 27 40 115 [#] 83
See primary font for [##]. ESC ) [##] 1B 29 [##] 27 41 [##]
Proportional
Fixed
Proportional
Fixed
Italic
Condensed
Condensed Italic
Compressed
Expanded, extra condensed
Outline
Inline
Shadowed
Outline Shadowed
ESC ( 0D
ESC ( 1E
ESC ( 9E
ESC ( 1F
ESC ( 1G
ESC ( 0I
ESC ( 6J
ESC ( 7J
ESC ( 10J
ESC ( 13J
ESC ( 14J
ESC ( 5M
ESC ( 6M
ESC ( 8M
ESC ( 0N
ESC ( 2N
ESC ( 5N
ESC ( 0S
ESC ( 2S
ESC ( 5T
ESC ( 9T
ESC ( 0U
ESC ( 1U
ESC ( 8U
ESC ( 9U
ESC ( 10U
ESC ( 11U
ESC ( 12U
ESC ( 15U
ESC ( 17U
ESC ( 19U
ESC ( s 1 P
ESC ( s 0 P
ESC ) s 1 P
ESC ) s 0 P
ESC ( s [#] V 1B 28 73 [#] 56 27 40 115 [#] 86
ESC ( s 0 S
ESC ( s 1 S
ESC ( s 4 S
ESC ( s 5 S
ESC ( s 8 S
ESC ( s 24 S
ESC ( s 32 S
ESC ( s 64 S
ESC ( s 128 S
ESC ( s 160 S
1B 28 30 44
1B 28 31 45
1B 28 39 45
1B 28 31 46
1B 28 31 47
1B 28 30 49
1B 28 36 4A
1B 28 37 4A
1B 28 31 30 4A
1B 28 31 33 4A
1B 28 31 34 4A
1B 28 35 4D
1B 28 36 4D
1B 28 38 4D
1B 28 38 4E
1B 28 32 4E
1B 28 35 4E
1B 28 30 53
1B 28 32 53
1B 28 35 54
1B 28 39 54
1B 28 30 55
1B 28 31 55
1B 28 38 55
1B 28 39 55
1B 28 31 30 55
1B 28 31 31 55
1B 28 31 32 55
1B 28 31 35 55
1B 28 31 37 55
1B 28 31 39 55
1B 28 73 31 50
1B 28 73 30 50
1B 28 73 31 50
1B 28 73 30 50
1B 28 73 30 53
1B 28 73 31 53
1B 28 73 34 53
1B 28 73 35 53
1B 28 73 38 53
1B 28 73 32 34 53
1B 28 73 33 32 53
1B 28 73 36 34 53
1B 28 73 31 32 38 53
1B 28 73 31 36 30 53
27 40 48 68
27 40 49 69
27 40 57 69
27 40 49 70
27 40 49 71
27 40 48 73
27 40 54 74
27 40 55 74
27 40 49 48 74
27 40 49 51 74
27 40 49 52 74
27 40 53 77
27 40 54 77
27 40 56 77
27 40 48 78
27 40 50 78
27 40 53 78
27 40 48 83
27 40 50 83
27 40 53 84
27 40 57 84
27 40 48 85
27 40 49 85
27 40 56 85
27 40 57 85
27 40 49 48 85
27 40 49 49 85
27 40 49 50 85
27 40 49 53 85
27 40 49 55 85
27 40 49 57 85
27 40 115 49 80
27 40 115 48 80
27 40 115 49 80
27 40 115 48 80
27 40 115 48 83
27 40 115 49 83
27 40 115 52 83
27 40 115 53 83
27 40 115 56 83
27 40 115 50 54 83
27 40 115 51 50 83
27 40 115 54 52 83
27 40 115 49 50 56 83
27 40 115 49 54 48 83
2-30 HP PCL5e Language Printer Commands
Page 55

Command Summary (Continued)
Function Variable Command Hexidecimal Decimal
Primary font weight Ultra thin
Extra thin
Thin
Extra light
Light
Demi light
Semi light
Medium
Semi bold
Demi bold
Bold
Extra bold
Black
Extra black
Ultra black
ESC ( s - 7 B
ESC ( s - 6 B
ESC ( s - 5 B
ESC ( s - 4 B
ESC ( s - 3 B
ESC ( s - 2 B
ESC ( s - 1 B
ESC ( s 0 B
ESC ( s + 1 B
ESC ( s + 2 B
ESC ( s + 3 B
ESC ( s + 4 B
ESC ( s + 5 B
ESC ( s + 6 B
ESC ( s + 7 B
1B 28 73 2D 37 42
1B 28 73 2D 36 42
1B 28 73 2D 35 42
1B 28 73 2D 34 42
1B 28 73 2D 33 42
1B 28 73 2D 32 42
1B 28 73 2D 31 42
1B 28 73 30 42
1B 28 73 2B 31 42
1B 28 73 2B 32 42
1B 28 73 2B 33 42
1B 28 73 2B 34 42
1B 28 73 2B 35 42
1B 28 73 2B 36 42
1B 28 73 2B 37 42
Secondary font weight See primary font for [#]. ESC ) s [#] B 1B 29 73 [#] 42 27 41 115 [#] 66
Primary font typeface
values [#] for all
installed fonts are listed
on the Font List printout
Line Printer
Courier
CG Times
Letter Gothic
CGn Omega
Coronet
Clarendon
Univers
Antique Olive
Garamond Antiqua
Marigold
Albertus
Arial
Symbol
Times New Roman
Wingdings
ESC ( s 0 T
ESC ( s 4099 T
ESC ( s 4101 T
ESC ( s 4102 T
ESC ( s 4113 T
ESC ( s 4116 T
ESC ( s 4140 T
ESC ( s 4148 T
ESC ( s 4168 T
ESC ( s 4197 T
ESC ( s 4297 T
ESC ( s 4363 T
ESC ( s 16602 T
ESC ( s 16686 T
ESC ( s 16901 T
ESC ( s 4822 T
1B 28 73 30 54
1B 28 73 34 30 39 39 54
1B 28 73 34 31 31 31 54
1B 28 73 34 31 30 32 54
1B 28 73 34 31 31 33 54
1B 28 73 34 31 31 36 54
1B 28 73 34 31 34 30 54
1B 28 73 34 31 34 38 54
1B 28 73 34 31 36 38 54
1B 28 73 34 31 39 37 54
1B 28 73 34 32 39 37 54
1B 28 73 34 33 36 33 54
1
B 28 73 31 36 36 30 32 54
1B 28 73 31 36 36 38 36 54
1B 28 73 31 36 39 30 31 54
1B 28 73 34 38 32 32 54
Secondary font typeface See primary font typeface list. ESC ) s [#] T 1B 29 73 [#] 54 27 41 115 [#] 84
Select font by ID # Primary font
Secondary font
ESC ( [#] X
ESC ) [#] X
1B 28 [#] 58
1B 29 [#] 58
Primary font selected SI 0F 15
Secondary font selected SO 0E 14
Font default Primary font
Secondary font
Primary & secondary
font pitch (alternate
method)
10.00 pitch
16.67 pitch
12.00 pitch
ESC ( 3 @
ESC ) 3 @
ESC & k 0 S
ESC & k 2 S
ESC & k 4 S
1B 28 33 40
1B 29 33 40
1B 26 6B 30 53
1B 26 6B 32 53
1B 26 6B 34 53
FONT MANAGEMENT
Assign Font ID # = font ID number (0- 32767) ESC * c [#] D 1B 2A 63 [#] 44 27 42 99 [#] 68
Character and font
control
Delete all fonts
Delete all temporary fonts
Delete font with last ID #
Delete character with last ID #
Make font temporary
Make font permanent
Copy/assign font as temporary
ESC * c 0 F
ESC * c 1 F
ESC * c 2 F
ESC * c 3 F
ESC * c 4 F
ESC * c 5 F
ESC * c 6 F
1B 2A 63 30 46
1B 2A 63 31 46
1B 2A 63 32 46
1B 2A 63 33 46
1B 2A 63 34 46
1B 2A 63 35 46
1B 2A 63 36 46
27 40 115 45 55 66
27 40 115 45 54 66
27 40 115 45 53 66
27 40 115 45 52 66
27 40 115 45 51 66
27 40 115 45 50 66
27 40 115 45 49 66
27 40 115 48 66
27 40 115 43 49 66
27 40 115 43 50 66
27 40 115 43 51 66
27 40 115 43 52 66
27 40 115 43 53 66
27 40 115 43 54 66
27 40 115 43 55 66
27 40 115 48 84
27 40 115 52 48 57 57 84
27 40 115 52 49 48 49 84
27 40 115 52 49 48 50 84
27 40 115 52 49 49 51 84
27 40 115 52 49 49 54 84
27 40 115 52 49 52 48 84
27 40 115 52 49 52 56 84
27 40 115 52 49 54 56 84
27 40 115 52 49 57 55 84
27 40 115 52 50 57 55 84
27 40 115 52 51 54 51 84
27 40 115 49 54 54 48 50 84
27 40 115 49 54 54 56 54 84
27 40 115 49 54 57 48 49 84
27 40 115 52 56 50 50 84
27 40 [#] 88
27 41 [#] 88
27 40 51 64
27 41 51 64
27 38 107 48 83
27 38 107 50 83
27 38 107 52 83
27 42 99 48 70
27 42 99 49 70
27 42 99 50 70
27 42 99 51 70
27 42 99 52 70
27 42 99 53 70
27 42 99 54 70
HP PCL5e Language Printer Commands 2-31
Page 56

Command Summary (Continued)
Function Variable Command Hexidecimal Decimal
Soft Font Creation
Download font
descriptor
Download character
descriptor
Character code #= Decimal ASCII number ESC * c [#] E 1B 2A 63 [#] 45 27 42 99 [#] 69
GRAPHICS CONTROL
PCL Vector Graphics Setup
Picture frame horizontal
size
Picture frame vertical
size
Set picture frame
anchor point
HP-GL/2 horizontal plot
size
HP-GL/2 vertical plot
size
Enter HP-GL/2 mode Pen to previous HP-GL/2
Enter PCL mode Cursor to previous PCL cursor
Raster Graphics
Resolution 75 dots per inch
Graphics presentation Logical page orientation
Raster height # = raster rows ESC * r [#] T 1B 2A 72 [#] 54 27 42 114 [#] 84
Raster width # = pixels ESC * r [#] S 1B 2A 72 [#] 53 27 42 114 48 83
Start raster graphics Left graphics margin
Y offset # = number of raster lines ESC * b [#] Y 1B 2A 62 [#] 59 27 42 98 [#] 89
Compression mode Unencoded
Xsfer raster graphics # of bytes ESC * b [#] W[data] 1B 2A 62 [#] 57[data] 27 42 98 [#] 87[data]
End raster graphics Version B
#=no. of bytes in descriptor ESC ) s [#] W[data] 1B 29 73 [#] 57 [data] 27 41 115 [#] 87 {data]
#=no. of bytes in descriptor ESC ( s [#] W[data] 1B 28 73 [#] 57 [data] 27 40 115 [#] 87 {data]
# of decipoints ESC * c [#] X 1B 2A 63 [#] 58 27 42 99 [#] 88
# of decipoints ESC * c [#] Y 1B 2A 63 [#] 59 27 42 99 [#] 89
PCL cursor position ESC * c [#] T 1B 2A 63 [#] 54 27 42 99 [#] 84
# = inches horizontally ESC * c [#] K 1B 2A 63 [#] 4B 27 42 99 [#] 75
# = inches vertically ESC * c [#] L 1B 2A 63 [#] 4C 27 42 99 [#] 76
ESC % 0 B 1B 25 30 42 27 37 48 66
position
Pen to current PCL cursor ESC % 1 B 1B 25 31 42 27 37 49 66
ESC % 0 A 1B 25 30 41 27 37 48 65
position
Cursor to current HP-GL/ 2
pen position
100 dots per inch
150 dots per inch
300 dots per inch
600 dots per inch
Width of physical page
Current cursor position
Run-length encoded
TIFF encoded
Delta row encoded
Adaptive
Version C
ESC % 1 B 1B 25 31 41 27 37 49 65
ESC * t 75 R
ESC * t 100 R
ESC * t 150 R
ESC * t 300 R
ESC * t 600 R
ESC * r 0 F
ESC * r 3 F
ESC * r 0 A
ESC * r 1 A
ESC * b 0 M
ESC * b 1 M
ESC * b 2 M
ESC * b 3 M
ESC * b 4 M
ESC * r B
ESC * r C
1B 2A 74 37 35 52
1B 2A 74 31 30 30 52
1B 2A 74 31 35 30 52
1B 2A 74 33 30 30 52
1B 2A 74 36 30 30 52
1B 2A 72 30 46
1B 2A 72 33 46
1B 2A 72 30 41
1B 2A 72 31 41
1B 2A 62 30 4D
1B 2A 62 31 4D
1B 2A 62 32 4D
1B 2A 62 33 4D
1B 2A 62 34 4D
1B 2A 72 42
1B 2A 72 43
27 42 116 55 53 82
27 42 116 49 48 48 82
27 42 116 49 53 48 82
27 42 116 51 48 48 82
27 42 116 54 48 48 82
27 42 114 48 70
27 42 114 51 70
27 42 114 48 65
27 42 114 48 65
27 42 98 48 77
27 42 98 49 77
27 42 98 50 77
27 42 98 51 77
27 42 98 52 77
27 42 114 66
27 42 114 67
2-32 HP PCL5e Language Printer Commands
Page 57

Command Summary (Continued)
Function Variable Command Hexidecimal Decimal
Print Model Imaging
Source transparency
mode
Pattern transparency
mode
Area fill ID (Pattern ID) # = shade/pattern number ESC * c [#] G 1B 2A 63 [#] 45 27 42 99 [#] 71
Select current pattern Solid black
Rectangle Dimensions
Area fill ID (Pattern ID) # = shade/pattern number ESC * c [#] G 1B 2A 63 [#] 47 27 42 99 [#] 71
Rectangle width Number of dots
Rectangle height Number of dots
Fill rectangle area Solid area fill
Rectangle Area Fill
Gray scale pattern 2% shading
Defined pattern Horizontal lines
MACRO CONTROL
Macro ID #=ID number (0-32767) ESC & f [#] Y 1B 26 66 [#] 59 27 38 102 [#] 89
Macro control definition Start macro definition
MISCELLANEOUS CONTROLS
Display function Enable
End-of-line wrap Enable
Transparent
Opaque
Transparent
Opaque
Solid white
Shading pattern
1-100 for shading
1-6 for cross hatch
Number of decipoints
Number of decipoints
Solid white area fill
Shading fill
Cross hatch pattern fill
Current pattern
Vertical lines
Diagonal lines
Diagonal lines
Square grid
Diagonal grid
Stop macro definition
Execute macro
Call macro
Enable auto macro overlay
Disable auto macro overlay
Delete all macros
Delete all temporary macros
Delete last specified macro
Make last macro temporary
Make last macro permanent
Disable
Disable
ESC * v 0 N
ESC * v 1 N
ESC * v 0 O
ESC * v 1 O
ESC * v 0 T
ESC * v 1 T
ESC * v 2 T
ESC * c [#] A
ESC * c [#] H
ESC * c [#] B
ESC * c [#] V
ESC * c 0 P
ESC * c 1 P
ESC * c 2 P
ESC * c 3 P
ESC * c 2 G
ESC * c 5 P
ESC * c 1 G
ESC * c 2 G
ESC * c 3 G
ESC * c 4 G
ESC * c 5 G
ESC * c 6 G
ESC & f 0 X
ESC & f 1 X
ESC & f 2 X
ESC & f 3 X
ESC & f 4 X
ESC & f 5 X
ESC & f 6 X
ESC & f 7 X
ESC & f 8 X
ESC & f 9 X
ESC & f 10 X
ESC Y
ESC Z
ESC & s 0 C
ESC & s 1 C
1B 2A 76 30 4E
1B 2A 76 31 4E
1B 2A 76 30 4F
1B 2A 76 31 4F
1B 2A 76 30 54
1B 2A 76 31 54
1B 2A 76 32 54
1B 2A 63 [#] 41
1B 2A 63 [#] 48
1B 2A 63 [#] 42
1B 2A 63 [#] 56
1B 2A 63 30 50
1B 2A 63 31 50
1B 2A 63 32 50
1B 2A 63 33 50
1B 2A 63 [#] 47
1B 2A 63 35 50
1B 2A 63 31 47
1B 2A 63 32 47
1B 2A 63 33 47
1B 2A 63 34 47
1B 2A 63 35 47
1B 2A 63 36 47
1B 26 66 30 58
1B 26 66 31 58
1B 26 66 32 58
1B 26 66 33 58
1B 26 66 34 58
1B 26 66 35 58
1B 26 66 36 58
1B 26 66 37 58
1B 26 66 38 58
1B 26 66 39 58
1B 26 66 30 31 58
1B 59
1B 5A
1B 26 73 30 43
1B 26 73 31 43
27 42 118 48 78
27 42 118 49 78
27 42 118 48 79
27 42 118 49 79
27 42 118 48 84
27 42 118 49 84
27 42 118 50 84
27 42 99 [#] 65
27 42 99 [#] 72
27 42 99 [#] 66
27 42 99 [#] 86
27 42 99 48 80
27 42 99 49 80
27 42 99 50 80
27 42 99 51 80
27 42 99 [#] 71
27 42 99 53 80
27 42 99 49 71
27 42 99 50 71
27 42 99 51 71
27 42 99 52 71
27 42 99 53 71
27 42 99 54 71
27 38 102 48 88
27 38 102 49 88
27 38 102 50 88
27 38 102 51 88
27 38 102 52 88
27 38 102 53 88
27 38 102 54 88
27 38 102 55 88
27 38 102 56 88
27 38 102 57 88
27 38 102 48 49 88
27 89
27 90
27 38 115 48 67
27 38 115 49 67
HP PCL5e Language Printer Commands 2-33
Page 58

HP 4000 Series Emulation PJL Environment Variables Summary
The following table lists the PJL environment variables supported by the printer.
NOTE:
Factory defaults for the variable values are listed first where applicable.
Environment Variables Summary
Variable Values Supported?
AUTOCONT OFF No
BINDING LONGEDGE (SHORTEDGE) Yes
CLEARABLEWARNINGS
CLIP ON (OFF) Yes
CMAPTBL 0 - 69 Yes
COPIES 1 to (65535) Yes
CPLOCK OFF No
DENSITY 3 (1 to 5) No
DOCPASSWORD Yes (See Note)
DUPLEX OFF (ON) Yes
ECONOMODE OFF (ON) No
FINISH NONE (STAPLE0, STAPLE1, STAPLE2, STAPLE3) Yes
FITTOMEDIA OFF (ON, FORCE) Yes (See Note)
FOLD NONE (FOLDH) Yes
FONTNUMBER 0 (to N; maximum value depends on currently set font
source)
FONTSOURCE 1 (2 - 6) Internal font
FORMLINES 6 (5 TO 128) (Default = 6 LPI=VMI Index of 1200) Yes
IMAGEADAPT OFF No
INTRAY1 UNLOCKED (LOCKED) No
INTRAY2 UNLOCKED (LOCKED) No
INTRAY3 UNLOCKED (LOCKED) No
INTRAY1SIZE LETTER (LETTERSEF, LETTERTAB, LEDGER, LEGAL,
A3, A4, A4SEF, A4TAB, FOLIO, A5SEF, STATEMENT,
EXECUTIVE, SUPERB, CUSTOM)
INTRAY2SIZE LETTER (LETTERSEF, LETTERTAB, LEDGER, LEGAL,
A3, A4, A4SEF, A4TAB, FOLIO, A5SEF, STATEMENT,
EXECUTIVE, SUPERB, CUSTOM)
INTRAY3SIZE LETTER (LETTERSEF, LETTERTAB, LEDGER, LEGAL,
A3, A4, A4SEF, A4TAB, FOLIO, A5SEF, STATEMENT,
EXECUTIVE, SUPERB, CUSTOM)
No
Yes
cartridge =
default or
downloaded font
All trays
supported and
page sizes as
dictated by the
engine.
NOTE: S/W v3.0 and above.
2-34 HP PCL5e Language Printer Commands
Page 59

Environment Variables Summary (Continued)
Variable Values Supported?
JAMRECOVERY ON (OFF) Yes
JOBOFFSET ON (OFF) Yes
LANG No
LOWTONER CONTINUE (STOP) No
MANUALFEED OFF (ON) Yes
MEDIASOURCE AUTO (TRAY1, TRAY2, TRAY3, TRAY4, MPTRAY,
TRAY5, INSERT1, INSERT2)
MEDIATYPE PLAIN (BOND, RECYCLED, COLOR, PREPUNCHED,
LETTERHEAD, PREPRINTED, SPECIAL, OTHER,
TRANSPARENCY, LABEL,
TRANSPARENCYPREPUNCHED)
ORIENTATION PORTRAIT (LANDSCAPE) Yes
OUTBIN LOWER (AUTO, UPPER, OPTIONALOUTPUTBIN1,
OPTIONALOUTPUTBIN4,
OPTIONALOUTPUTBIN5,
OPTIONALOUTPUTBIN6,
OPTIONALOUTPUTBIN7,
OPTIONALOUTPUTBIN8
OPTIONALOUTPUTBIN0, AUTOFACEUP,
LOWERFACEUP, UPPERFACEUP,
OPTIONALOUTPUTBIN1FACEUP,
OPTIONALOUTPUTBIN4FACEUP,
OPTIONALOUTPUTBIN5FACEUP,
OPTIONALOUTPUTBIN6FACEUP,
OPTIONALOUTPUTBIN7FACEUP,
OPTIONALOUTPUTBIN8FACEUP,
OPTIONALOUTPUTBIN0FACEUP)
PAGEPROTECT No
PAPER LETTER (LETTERSEF, LETTERTAB, LEDGER, LEGAL,
A3, A4, A4SEF, A4TAB, FOLIO, A5SEF, STATEMENT,
EXECUTIVE, SUPERB, CUSTOM)
PASSWORD* 0 (0 - 65535) Yes
PDFORIENTATION PORTRAIT (LANDSCAPE, RPORTRAIT, RLANDSCAPE) Yes (See Note)
PERSONALITY PCL No
PITCH 10 (0.44 to 99.99) Yes
PRTPSERRS No
PTSIZE 12 (4.00 to 999.75) Yes
QTY 1 - 65535 Yes
RESOLUTION 600 Yes
RET ON (OFF) No
Ye s
Ye s
Ye s
All engine page
sizes.
NOTE: S/W v3.0 and above.
HP PCL5e Language Printer Commands 2-35
Page 60

Environment Variables Summary (Continued)
Variable Values Supported?
SYMSET PC8 (DESKTOP, ISO4, ISO6, ISO11, ISO15, ISO17,
ISO21, ISO60, ISO69, ISOL1, ISOL2, ISOL5, LEGAL,
MATH8, MSPUBL, ROMAN 8, PC850, PC852, PC8DN,
PC8TK, PIFONT, PSMATH, PSTEXT, VNINTL, VNMATH,
VNUS, WIN30, WINL1, WINL2, WINL5)
TIMEOUT 300 Yes
TRIM OFF (ON) Yes
* INQUIRE PASSWORD is not supported.
Yes
2-36 HP PCL5e Language Printer Commands
Page 61

HP 4000 Series Emulation PJL Differences
To ensure that PJL commands are properly recognized and processed, insert the
following command immediately before the first of a series of PJL commands:
<esc>%-12345X@PJL<CR><LF>
For example:
<esc>%-12345X@PJL
@PJL JOB NAME = “JOB1"
@PJL SET PAPER = LETTER
@PJL SET OUTBIN = UPPER
@PJL ENTER LANGUAGE = PCL
PCL Data<esc>E<esc>%-12345X@PJL
@PJL EOJ
<esc>%-12345X@PJL
@PJL JOB NAME = “JOB2"
@PJL SET PAPER = LEGAL
@PJL SET OUTBIN = LOWER
@PJL ENTER LANGUAGE = PostScript
%!PostScript Data^D<esc>%-12345X@PJL
@PJL EOJ
<esc>%-12345X
(If last entry, no <CR> <LF> following.)
JOB Command and Parameters
The JOB command informs the printer of the insert page information. The JOB
command parameter INSERT provides an insert status that directs the sheet to be blank.
The command parameter INSERTMEDIA can designate the insert media size, source,
and/or type for the following INSERT option, that would otherwise depend on the PDL
without this option.
The INSERTMEDIA and INSERT parameters can be set multiple times in the JOB
commands, but the total number of parameters in each PJL JOB command must be less
than seven (7). Refer to page 2-45 for the command syntax.
Parameter Variables/Functional Range
media size (LETTER, LETTERSEF, LETTERTAB, LEDGER, LEGAL, A3,
A4, A4SEF, A4TAB, FOLIO, A5SEF, SUPERB, CUSTOM*)
INSERTMEDIA=”media size,
media source, media type”
INSERT=”sheet #1, sheet #2,,,”
* When CUSTOM is used, two numbers must indicate the paper dimensions, expressed in units of 1/72
inch. For example: @PJL JOB NAME-”sample” INSERTMEDIA=”CUSTOM,612,792,INSERT1”
INSERT=”1”
media source (TRAY1, TRAY2, TRAY3, MPTRAY, TRAY5, INSERT1,
INSERT2)
media type (PLAIN, RECYCLED, COLOR, PREPUNCHED,
LETTERHEAD, PREPRINTED, SPECIAL, OTHER, TRANSPARENCY,
LABEL, TRANSPARENCYPREPUNCHED)
Maximum 32 numeric characters, comma (,), and space ( ) enclosed in
double quotation marks. Maximum 4 digit page number parts divided by
comma.
HP PCL5e Language Printer Commands 2-37
Page 62

PJL Environment Variable Differences
The following describes the PJL environmental variable differences.
COPIES Environment Variable
The COPIES environment variable sets the number of uncollated copies for each page
of a job. The range of valid values is 1 to 65535 inclusive.
CLIP Environment Variable
Value Edge to Edge Printing
ON Disable.
OFF Enable.
CMAPTBL Environment Variable
PJL environment vairables CMAPTBL 6 and CMAPTBL 7 hold the custom tray
mapping definition.
A custom tray mapping definition consists of a comma separated list of Tray Group
Codes. A Tray Group Code may optionally be proceeded by a repeat count and a colon
to define a sequence of identical mapping entries. The first value in the list corresponds
to the Paper Source control sequence with a parameter of 0. The next item in the list
corresponds to the Paper Source control sequence with a parameter of 1 and so on up
to 69. If an item in the list is empty or contains an invalid Tray Group Code it will be
replaced with a Tray Group Code of 0. The list may have a maximum of 70 entries and
a length of no longer than 72 characters. Excess entries will be discarded and undefined
entries will have a Tray Group Code of 0.
For example, if you want to change Custom Mapping 6 to be the same as its factory
default except you want the paper source control sequence <ESC>&l58H to select
either of the Publishing Finisher Trays, you would send the following PJL command
(refer to the table on page 2-12):
@PJL DEFAULT CMAPTBL6=
“,1,4,4,5,2,4,1235,3,11:0,4,5,36:0,67”
2-38 HP PCL5e Language Printer Commands
Page 63

DOCPASSWORD Environment Variable
NOTE:
Available in S/W v3.0 and above.
The DOCPASSWORD command is a PDF-specific PJL Variable. There are two
passwords available for PDF files:
User password - controls opening and/or printing of the file.
Owner password - controls printing/editing/annotating of the file.
When an encrypted PDF is presented to the printer, the “DOCPASSWORD” is
processed. The Owner password is checked first. If there is a match, then the document
will be printed. If the Owner password is not matched, the User password is checked.
If there is a match, the printing permissions are checked. The following table shows the
password combination printing results:
USER
PASSWORD
1 Y N --- User Yes
2 Y Y HR User Ye s
3 N Y HR Owner Ye s
4 N N --- Owner Yes
5 N N --- User Yes
6 Y Y HR User Ye s
7 Y Y None User No
8 Y Y None Owner Yes
9 Y N --- --- No
10 N Y HR --- Yes
11 N Y None --- No
12 N Y None Owner Ye s
---
No printing permissions set
HR
High Resolution printing allowed
None
No printing allowed
OWNER
PASSWORD
PRINT
PERMISSION
DOCPASSWORD PRINT?
HP PCL5e Language Printer Commands 2-39
Page 64

FINISH Environment Variable
Value
Staple Mode Staple Position Publishing Finisher
NONE Disabled None None
STAPLE0 Enabled Front -
STAPLE1 Enabled Rear -
STAPLE2 Enabled Center -
STAPLE3 - - Saddle Stitch
Note: All other corner and edge staple positions provided by the Controller are for
Mercury driver use only.
FITTOMEDIA Environment Variable
NOTE:
Available in S/W v3.0 and above.
FITTOMEDIA is a PDF-specific PJL variable. Use the following syntax to make sure
the command is recognized by the PJL:
Finisher Option
@PJL SET LPARM:PDF FITTOMEDIA=OFF
@PJL SET LPARM:PDF FITTOMEDIA=ON
@PJL SET LPARM:PDF FITTOMEDIA=FORCE
VALUE PDF/TIFF Printing
OFF Select the next larger paper size; do not scale the page to fit.
ON Select the nearest available paper size; scale the page to fit.
FORCE Follow PJL PAPER command; scale page to fit the selected media.
FOLD Environment Variable
Val ue
NONE No fold.
FOLDH Half fold.
All other values default to NONE.
Publishing Finisher or
Booklet Finisher
2-40 HP PCL5e Language Printer Commands
Page 65

JOBOFFSET Environment Variable
Val ue Jogging Offset Mode
OFF Disabled.
ON Enabled.
All other values default to OFF.
MEDIASOURCE Environment Variable
Input Tray
Val ue
Without HCF With HCF
AUTO Auto Cascade Auto Cascade Auto Cascade Auto Cascade Auto Cascade
TRAY1 Tray 1 Tray 1 Tray 1 Tray 1 Tray 1
TRAY2 Tray 2 Tray 2 Tray 2 Tray 2 Tray 2
TRAY3 Tray 3 Tray 3 Tray 3 Tray 3 Tray 3
TRAY5 Tray 1 HCF HCF HCF HCF
MPTRAY
INSERT1 - - - - Insert Tray 1
INSERT2 - - - - Insert Tray 2
INSERT3 - - - Inserter
Multi Bypass
Tray
Multi Bypass
Tray
Standard
Finisher
(92 ppm only)
Multi Bypass
Tray
Booklet
Finisher
(92 ppm only)
Multi Bypass
Tray
Publishing
Finisher
Multi Bypass
Tray
HP PCL5e Language Printer Commands 2-41
Page 66

OUTBIN Environment Variable
Advanced
Value No Finisher
AUTO Not designated Not designated Not designated Not designated
LOWER
UPPER
OPTIONALOUTPUTBIN1
OPTIONALOUTPUTBIN4
LOWERFACEUP
UPPERFACEUP
OPTIONALOUTPUTBIN1FACEUP
OPTIONALOUTPUTBIN4FACEUP
Value Publishing Finisher Container Stacker
Engine Output
Tray Face down
Engine Output
Tray Face up
Finisher
(70 ppm only)
Elevator
TrayFace down
Upper Tray
Face down
Elevator Tray
Face up
Upper Tray
Face up
Standard
Finisher
(92 ppm only)
Elevator Tray
Face down
Upper Tray
Face down
Elevator Tray
Face up
Stacker 3
Face up
Booklet Finisher
(92 ppm only)
Elevator Tray Face
down
Upper Tray Face
down
Booklet Holder
Face down
Elevator Tray
Face up
Upper Tray
Face up
Booklet Holder
Face up
AUTO Not designated Auto cascade Face down
OPTIONALOUTPUTBIN4 Booklet Stacker Face down
OPTIONALOUTPUTBIN5 Stacker 5 Face down
OPTIONALOUTPUTBIN6 Stacker 6 Face down
OPTIONALOUTPUTBIN7 Stacker 7 Face down
OPTIONALOUTPUTBIN8 Stacker 8 Face down
OPTIONALOUTPUTBIN0 Sample Tray Face down
AUTOFACEUP Auto cascade Face up
OPTIONALOUTPUTBIN4FACEUP Booklet Stacker Face up
OPTIONALOUTPUTBIN5FACEUP Stacker 5 Face up
OPTIONALOUTPUTBIN6FACEUP Stacker 6 Face up
OPTIONALOUTPUTBIN7FACEUP Stacker 7 Face up
OPTIONALOUTPUTBIN8FACEUP Stacker 8 Face up
OPTIONALOUTPUTBIN0FACEUP Sample Tray Face up
NOTE: All other values default to Auto.
2-42 HP PCL5e Language Printer Commands
Page 67

PAPER Environment Variable
Value Physical Media Size
LETTER Letter (8.5" x 11")
LEGAL Legal (8.5" x 14")
A4 A4 (210mm x 297mm)
LEDGER Ledger (11" x 17")
A3 A3 (297mm x 420mm)
EXECUTIVE Executive (7.25’’ x 10.5’’)
A5 A5 (149mm x 210mm)
STATEMENT Statement (8.5" x 5.5")
FOLIO Folio (8.5" x 13")
SUPERB SuperB (12” x 18”)
Universal or Custom. Media Size must be set to
CUSTOM
LETTER SEF Letter SEF (8.5” 11”)
A5SEF A5SEF (149mm x 210mm)
A4SEF A4SEF (210mm x 297mm)
Custom and physical media dimensions must be
entered through the operator panel or SNMP.
LETTERTAB Letter Tab Stock (9” x 11”)
A4TAB A4 Tab Stock (225mm x 297mm)
PDFORIENTATION Environment Variable
NOTE:
Available in S/W v3.0 and above.
This environment variable is used in PDF printing. It accepts the same values as PJL
ORIENTATION (PORTRAIT, LANDSCAPE, RPORTRAIT, RLANDSCAPE).
Setting PDFORIENTATION to either PORTRAIT or LANDSCAPE has the same
effect on the printed output. Similarly RPORTRAIT and RLANDSCAPE are treated
the same and are printed 180 degrees from PORTRAIT and LANDSCAPE. This feature
can be used to control which edge of the printed sheets is stapled.
Use the following Syntax:
@PJL SET LPARM:PDF PDFORIENTATION=PORTRAIT
@PJL SET LPARM:PDF PDFORIENTATION=LANDSCAPE
@PJL SET LPARM:PDF PDFORIENTATION=RPORTRAIT
@PJL SET LPARM:PDF PDFORIENTATION=RLANDSCAPE
QTY Environment Variable
The QTY environment variable sets the number of collated copies of a job. The range
of valid values is 1 to 65535 inclusive.
HP PCL5e Language Printer Commands 2-43
Page 68

TRIM Environment Variable
OFF No trim
ON Trim
Publishing Finisher only. All other values
default to OFF.
File System Command
Value Description
Appends data to an existing file on the printer’s hard disk; if the file
does not exist, it is created with the data provided.
FSAPPEND
FSDOWNLOAD
Syntax:
@PJL FSAPPEND FORMAT:BINARY SIZE =
integer NAME = “filename” <CR><LF>
<binary data><esc>%-12345X
Downloads data to a file on the printer’s hard disk; if a file with the
same name exists, it is overwritten with the data provided.
Syntax:
@PJL FSDOWNLOAD FORMAT:BINARY SIZE =
integer NAME = “filename” <CR><LF>
<binary data><esc>%-12345X
Val ue Publishing Finisher
Deletes a file from the printer’s hard disk.
FSDELETE
FSDIRLIST Displalys a directory listing.
FSMKDIR Creates a directory.
FSQUERY Determines if a file exists.
FSUPLOAD Uploads data from a file on the printer’s hard disk.
Syntax:
@PJL FSDELETE NAME = “filename” <CR><LF>
Maximum length of string value to the NAME option is 40 characters.
Valid values to the
NAME option are strings containing ASCII printable characters (0x20
0x7E hex, inclusive).
Trailing white spaces in string value to the
FORMAT modifier is ignored and not required; all file transfers are executed in binary
NAME option are discarded.
mode.
The integer value specifies the number of data bytes in <binary data>.
The range is 0 to (2
31
-1)
2-44 HP PCL5e Language Printer Commands
Page 69

HP 4000 Series Emulation PJL Command Summary
The following table lists the PJL commands supported by the printer.
Command PJL Command Support ?
COMMENT
DEFAULT
DINQUIRE
ECHO
ENTER
EOJ
INFO*
@PJL COMMENT <words> [<CR>] <LF>
@PJL DEFAULT [LPARM : personality] variable =
value [<CR>] <LF>
@PJL DINQUIRE [LPARM : personality] variable
[<CR>] <LF>
Response
@PJL DINQUIRE [LPARM : personality] variable
[<CR>] <LF> value <FF>
@PJL ECHO [<words>] [<CR>] <LF>
Response
@PJL ECHO [<words>] [<CR>] <LF> <FF>
@PJL ENTER LANGUAGE = personality] [<CR>] <LF>
@PJL EOJ [NAME = “job name”] [<CR>] <LF>
@PJL INFO category [<CR>] <LF>
Response
@PJL INFO category [1 or more lines of
printable characters or <WS> followed by
[<CR>] <LF>] <FF>
INITIALIZE
INQUIRE*
JOB
PJL
RESET
SET
UEL
USTATUS
@PJL INITIALIZE [<CR>] <LF>
@PJL INQUIRE [LPARM : personality] variable
[<CR>] <LF>
Response
@PJL INQUIRE [LPARM : personality] variable
[<CR>] <LF> value <FF>
@PJL JOB [NAME = “job name”] [START = first page]
[END = last page] [INSERTMEDIA = “[media size,
media source, media type]”] [INSERT = ”sheet #n,
sheet #m,,,”][PASSWORD = number] [<CR>] <LF>
@PJL [<CR>] <LF>
@PJL RESET [<CR>] <LF>
@PJL SET [LPARM : personality] variable = value
[<CR>] <LF>
<ESC>%-12345x
@PJL USTATUS variable = value [<CR>] <LF>
Unsolicited Status Message returned when printer events occur.
@PJL USTATUS variable [<CR>] <LF> [1 or more
lines of printable characters or <WS>
followed by [<CR>] <LF>] <FF>
USTATUSOFF
@PJL USTATUSOFF [<CR>] <LF>
* INQUIRE PASSWORD is not supported.
Yes
Yes
Yes
Yes
Yes
Yes
Yes
Yes
Yes
Yes
Yes
Yes
Yes
Yes
Yes
Yes
HP PCL5e Language Printer Commands 2-45
Page 70

HP-GL/2 Differences
The following HP-GL/2 commands are not supported.
Command Description
MC [mode [, opcode] ] ; Merge control.
PP [mode] ; Pixel placement.
Disk Storage and Management of PCL Fonts and Macros
Disk storage and management of PCL resources such as fonts and macros require the
use of the new PJL file system commands defined in the LaserJet 5si PJL
implementation. These commands and their features related to supporting PCL fonts
and macros downloaded to the printer’s hard disk are briefly described below. Consult
the Printer Job Language Technical Reference Manual for more information.
The PJL File System Interface
n
The maximum number of characters in a file name is 40 characters; the minimum
number of characters is 1.
n
Only those printable ASCII characters in the range 0x20 and 0x7E (inclusive)
may be used in a file name.
The following subsections briefly describe each file system command.
FSAPPEND
This command appends incoming data to an existing named file. If the named file does
not exist on the printer’s hard disk, a file is created with the name provided and the
given data is stored in it.
FSDELETE
This command is used to delete a named file from the printer’s hard disk.
FSDOWNLOAD
This command creates a file in the printer’s hard disk with the name provided and stores
in it the given data. If a file with the name provided already exists on the printer’s hard
disk, this file is overwritten by the new one.
FSINIT
This command is used to initialize the printer’s hard disk. All user accessible files will
be erased.
Naming Disk Fonts and Forms
The PCL interpreter expects disk fonts and forms to be named in a certain fashion. That
is, each disk font should have “/fonts/” as the first part of its filename and each disk
form should have “/pcl/macros/” as the first part of its filename. Refer to the next
section “Example: Using the File System Commands” for examples.
2-46 HP PCL5e Language Printer Commands
Page 71

Format of Disk Fonts and Forms
Disk fonts created using the Mercury Font and Forms Installer are the correct format
for storing on the printer’s hard disk drive. See Chapter 1 for information on the Font
and Forms Installer.
Disk forms must be stored in PCL macro format without the ESC&f0X (Start Macro
Definition) and ESC&f1X (Stop Macro Definition) commands.
Consult the PCL 5 Printer Language Technical Reference Manual for more information
on the structure PCL soft fonts and macros.
Example: Using the File System Commands
Storing a Font on the Printer’s Hard Disk
The following PJL job stores a font in a file called “/fonts/myDiskFont” on the printer’s
hard disk:
ESC%-12345X@PJL
@PJL FSDOWNLOAD FORMAT:BINARY NAME =
“0:/fonts/myDiskFont” SIZE = 51200
<<< 50K of soft font data >>>ESC%-12345X
Storing a Form on the Printer’s Hard Disk
The following PJL job stores a simple form in a file called “/macros/myDiskForm” on
the printer’s hard disk:
ESC%-12345X@PJL
@PJL FSDOWNLOAD FORMAT:BINARY NAME =
“0:/pcl/macros/myDiskForm” SIZE = 33
ESC*p900x1500YThis is my Disk Form.ESC%-12345X
Removing Files from the Printer’s Hard Disk
Files can be removed from the printer’s hard disk by sending the PJL FSDELETE
command:
ESC%-12345X@PJL
@PJL FSDELETE NAME = “0:/fonts/myDiskFont”
@PJL FSDELETE NAME = “0:/pcl/macros/myDiskForm”
ESC%-12345X
Using PCL Fonts and Macros Stored on Disk
The primary interface to using PCL fonts and macros downloaded to the printer’s hard
disk is the new Alphanumeric ID command defined in the LaserJet 5si PCL5e
implementation. This command and its features related to supporting PCL fonts and
macros downloaded to the printer’s hard disk are described below. Consult the PCL 5
Comparison Guide for more information.
HP PCL5e Language Printer Commands 2-47
Page 72

The Alphanumeric ID Command
In general, the Alphanumeric ID command is used to manage, select and/or use PCL
fonts, macros and various media types by referring to these objects with a specified
string ID.
Command Syntax
ESC&n#W[operation byte][string data]
The maximum number of characters in a string data parameter is 99. This maximum
length plus 1 for the operation byte sets the maximum value (100) for the # parameter
which specifies the number of data bytes following the command.
The Alphanumeric ID command supports a number of different operations that
determine how to handle the string ID supplied to the command.
Set Current Font ID
The current font ID can be set to the given string data by specifying an operation byte
value of ^@ (control-@ or 0x00 hex). This is analogous to the Font ID [ESC * c # D]
command. Whereas the Font ID command sets the current font ID to a specified
numeric value, the Alphanumeric ID ^@ operation sets the current font ID to a specified
string value.
Associate Current Font ID
The current font ID can be associated to the font identified by the given string data by
specifying an operation byte value of ^A (control-A or 0x01 hex). The font ID currently
in effect could be a numeric value (as specified by the Font ID command) or a string value
(as specified by the Alphanumeric ID ^@ operation). An association is made between the
current font ID to the given string ID ( the string data parameter) such that selection
operations on the current font ID refer to the font identified by the string ID and
management operations refer to the original font identified by the current font ID.
Select Primary Font
The font associated to the given string ID (the string data parameter) can be selected as
the primary font by specifying an operation byte value of ^B (control-B or 0x02 hex).
This is analogous to the Primary Font Selection by ID [ESC ( # X] command. Whereas
the Primary Font Selection by ID command selects a primary font by specifying its
numeric ID, the Alphanumeric ID ^B operation selects a primary font by specifying its
string ID.
Select Secondary Font
The font associated to the given string ID (the string data parameter) can be selected as
the secondary font by specifying an operation byte value of ^C (control-C or 0x03 hex).
This is analogous to the Secondary Font Selection by ID [ESC ) # X] command.
Whereas the Secondary Font Selection by ID command selects a secondary font by
specifying its numeric ID, the Alphanumeric ID ^C operation selects a secondary font
by specifying its string ID.
2-48 HP PCL5e Language Printer Commands
Page 73

Set Current Macro ID
The current macro ID can be set to the given string data by specifying an operation byte
value of ^D (control-D or 0x04 hex). This is analogous to the Macro ID [ESC & f # Y]
command. Whereas the Macro ID command sets the current macro ID to a specified
numeric value, the Alphanumeric ID ^D operation sets the current macro ID to a
specified string value.
Associate Current Macro ID
The current macro ID can be associated to the macro identified by the given string data
by specifying an operation byte value of ^E (control-E or 0x05 hex). The macro ID
currently in effect could be a numeric value (as specified by the Macro ID command)
or a string value (as specified by the Alphanumeric ID ^D operation). An association
is made between the current macro ID to the given string ID (the string data parameter)
such that usage operations on the current macro ID refer to the macro identified by the
string ID and management operations refer to the original macro identified by the
current font ID.
Delete Font Association
The font association identified by the current font ID can be deleted by specifying an
operation byte value of ^T (control-T or 0x14 hex). Again, the font ID currently in
effect could be a numeric value (as specified by the Font ID command) or a string value
(as specified by the Alphanumeric ID ^@ operation). This command merely removes
the information associating the current font ID to a particular font. The font itself,
either in RAM or on disk, is not removed.
Delete Macro Association
The macro association identified by the current macro ID can be deleted by specifying
an operation byte value of ^U (control-U or 0x15 hex). Again, the macro ID currently
in effect could be a numeric value (as specified by the Macro ID command) or a string
value (as specified by the Alphanumeric ID ^D operation). This command merely
removes the information associating the current macro ID to a particular macro. The
macro itself, either in RAM or on disk, is not removed.
Example: Using a Disk Font or Macro
The role of the Alphanumeric ID command in the disk based PCL fonts and macros
feature centers on its ability to identify PCL resources by means of alphanumeric string
IDs. Although this is just another way of referring to some fonts and macros
downloaded to RAM, it provides a means by which fonts and macros downloaded to
the printer’s hard disk can be selected and/or used in subsequent PCL operations. This
is done with the Alphanumeric ID command by using the font or macro association
operation on the current font or macro ID to a disk font or macro resource and
specifying the disk resource’s file name as the command’s string ID parameter.
Selecting Disk Fonts
For example, when a user wants to use a font which has already been downloaded to
the printer’s hard disk (assume it is saved in a file named “/fonts/myDiskFont”), the
user must first associate that font with a new font ID.
HP PCL5e Language Printer Commands 2-49
Page 74

Set the current font ID to a new font ID called “myNewFontID”.
ESC&n12W^@myNewFontID
Associate the disk font contained in the file “/fonts/myDiskFont” to the current font ID
(in this case, it is “myNewFontID”)
ESC&n11W^AmyDiskFont
Select the disk font as the primary font by setting its associated name as the primary
font ID.
ESC&n12W^BmyNewFontID
All printable characters following this command should print in the disk font selected.
Selecting Disk Macros
Suppose then that a user wants to use a form which has already been downloaded to the
printer’s hard disk (assume it is saved in a file named “/macros/myDiskForm”). As in
using disk fonts, the user must first associate this disk form with a new macro ID.
Set the current macro ID to a new macro ID called “myNewMacroID”.
ESC&n13W^DmyNewMacroID
Associate the disk form contained in the file “/macros/myDiskForm” to the current
macro ID (in this case, it is “myNewMacroID”)
ESC&n11W^EmyDiskForm
At this point, whenever the current macro ID “myNewMacroID” is referenced, the disk
form contained in the file “/macros/myDiskForm” is invoked.
ESC&f2X(execute macro)
ESC&f3X(call macro) or
ESC&f4X(enable macro for automatic overlay)
or
Removing Font and Macro Associations
Disk font and macro associations can be explicitly removed by sending the
Alphanumeric ID ^T and ^U (Delete Font Association and Delete Macro Association)
operations.
ESC&n12W^@myNewFontID
ESC&n1W^T
ESC&n13W^DmyNewMacroID
ESC&n1W^U
Disk font and macro associations are automatically removed upon receipt of the Printer
Reset command (
ESCE).
2-50 HP PCL5e Language Printer Commands
Page 75

Overview
The Startup File increases the overall capability of the printer by allowing you to place
any required PCL soft fonts and/or macros in a single file to be processed each time the
printer starts the PCL Page Description Language. The file is stored on the printer’s
hard disk drive with a filename of /pcl/startup.
When the printer controller encounters a PCL data stream for the first time, it processes
the Startup File as if it were coming from a normal printer input port. The PCL Page
Description Language processes the PCL data stream contained in the Startup File in
the normal manner.
The data stream contains soft fonts and/or macros to be processed. During the
processing of the data stream, the soft fonts and/or macros are stored in the printer’s
RAM. These soft fonts and macros are then available to all PCL data streams sent to the
printer.
By using the Startup File, the host is no longer required to transmit any special data
streams to the printer in order to make soft fonts or macros available.
Chapter 3
Using the Startup File
PCL requires all soft fonts (*.sfp or *.sfs) to be used by a print data stream to reside in
RAM. From a user perspective, the application being run on the host assumes the
required internal and soft fonts are in RAM.
Soft fonts have an associated Font ID as well as the normal font attributes. Once
installed in RAM, you can select a soft font for use by ID or by attribute. For example,
to select a soft font by ID, use:
<esc>(nX
where n is the assigned soft font ID .
The following example selects the Postnet Bar Code soft font by attribute:
<esc>(15Y<esc>(s1p12.00v0s0b0T
Refer to “Startup File Examples” on page 3-3 for a sample of how the Postnet Bar Code
font can be stored in the Startup File, as well as the sample test job to be sent after a
power cycle.
Using the Startup File 3-1
Page 76

Procedure to Install and Test a Soft Font
1. Order the font(s) in HP Soft Font format from a font vendor. (File type .sfp or .sfs.)
2. Build a job stream to load the soft font(s) in memory as permanent fonts. (Refer to
Example 1.)
Send the job stream to load the font in memory.
3. Build a job stream to test the font after being loaded into memory. (Refer to
Example 2.)
Send the test file.
4. Once the soft fonts are proved to print correctly, build the Startup File. (Refer to
Example 3.)
5. Send the Startup File to the printer.
6. Power cycle the printer.
7. To print a list of all printer fonts, make the following selections from the OCP:
Reports / Fonts
Page 7 of the Font List Report contains the soft fonts loaded via the Startup File.
8. Send the test file (from Step 3) to the printer and verify the output.
Procedure to Install and Test a Macro
1. Build a job stream to load the macro(s) in memory as permanent. (Refer to
Example 4.)
Send the job stream to load the macro in memory.
2. Build a job stream to test the macro after being loaded into memory. (Refer to
Example 5.)
Send the test file.
3. Once the macros are proved to process correctly, build the Startup File. (Refer to
Example 6.)
4. Send the Startup File (from Step 3) to the printer.
5. Power cycle the printer.
6. Send the test file (from Step 2) to the printer and verify the output.
3-2 Using the Startup File
Page 77

Startup File Examples
NOTE:
In the following examples, <esc> represents 0x1B.
Example 1: Loading a Single Font into RAM
The following command loads a single font into RAM.
<esc>E<esc>*cfontIDD<esc>)s100W
Where:
<esc>*cfontIDD assigns a unique font ID to the soft font.
<esc>)s100W is the beginning of the actual HP standard soft font.
<esc>*c5F informs PCL to make the soft font permanent in RAM
until a reset or power cycle.
To load multiple fonts into RAM, concatenate the individual files created (per the
example above) into a single file.
...more font data...<esc>*c5F<esc>E
Example 2: Testing the Postnet Font
The following job tests the Postnet font after it has been loaded into memory.
<esc>%-12345X@PJL
<esc>(15Y<esc>(s1p12.00v0s0b0T 01234567890
<esc>E<esc>%-12345X
Where:
<esc>(15Y<esc>(s1p12.00v0s0b0T
is the soft font call out by attribute.
Example 3: The Startup File
A sample Startup File that loads a single font into RAM is shown below.
<esc>%-12345X@PJL
@PJL FSDOWNLOAD FORMAT:BINARY NAME ="0:/pcl/startup" SIZE=ssss
...file...<esc>%-12345X
Where:
ssss is the DOS file size of the file created in Example 1.
file is the file created in Example 1.
Changing the Startup File
To change the Startup File, first delete the file, then send the newly created file.
Using the Startup File 3-3
Page 78

Deleting the Startup File
<esc>%-12345X@PJL
@PJL FSDELETE NAME = “0:/pcl/startup”
@PJL FSDELETE NAME = “0:/pcl/macros/StartUpFile”
<esc>E<esc>%-12345X
NOTE:
Do not modify this set of commands; use exactly as shown.
Example 4: Loading a Single Macro into RAM
<esc>E<esc>&fmacroIDY<esc>&f0X<esc>&l1E...more data...
<esc>*c0P<esc>&f1x10X<esc>E
Where:
<esc>&fmacroIDY assigns a unique macro ID to the macro.
<esc>&f0X is the start macro PCL command.
<esc>&f1x10X is the end macro definition command, followed by the
command to make the macro permanent in RAM until a
reset or power cycle.
To load multiple macros into RAM, concatenate the individual files created (per the
example above) into a single file.
Example 5: Testing the Graybar Macro
<esc>E<esc>&l1O<esc>&f21y4XPage 1 graybar macro test.
<FF>Page 2 graybar macro test.<FF>Page 1 graybar macro
test. <FF><esc>E
Where:
<esc>&f21y4X is the macro call out by ID # 21, followed by the command
to use the macro as an overlay.
Example 6: The Startup File
A sample Startup File that loads a single macro into RAM is shown below.
<esc>%-12345X@PJL
@PJL FSDOWNLOAD FORMAT:BINARY NAME ="0:/pcl/startup" SIZE=ssss
...file...<esc>%-12345X
Where:
ssss is the DOS file size of the file created in Example 4.
file is the file created in Example 5.
Example 3 explains how to change or delete a Startup File.
3-4 Using the Startup File
Page 79

Index
A
access rights 1-3
Alphanumeric ID 2-7
auto underline 2-21
C
character text path direction 2-14
commands, PCL5e 2-27
Configure dialog 1-18
control codes 2-1
cursor controls 2-15
D
delete fonts 1-1
delete macros 1-1
DOS escape commands 2-2
download fonts 1-1
download macros 1-1
duplex printing mode 2-4
E
edit fonts 1-1
Edit Installed Font dialog 1-6
Edit Installed Macro dialog 1-14
edit macros 1-1
end-of-line termination 2-16
environment variables 2-34
differences 2-38
escape sequences 2-2
combining 2-3
syntax 2-3
font name 1-6
font pitch 2-18
font selection 2-16
font size 2-18
font spacing 2-18
font style 2-18
font weight 2-19
fonts
host based 1-1
in printer memory 1-1, 3-1
in the startup file 3-1
on printer’s hard disk 1-1, 3-1
PCL bitmap fonts 1-2
PCL scalable fonts 1-2
Fonts and Forms Installer 1-1
Forms and Watermarks folder 1-1
G
GLUE.TXT file 1-2
H
horizontal column spacing 2-14
horizontal movement 2-15
host based fonts 1-1
I
image offset 2-4, 2-5
input tray selection 2-5
Install PCL Fonts dialog 1-9
Install PCL Macros dialog 1-16
J
F
family 1-7
files
created during installation 1-2
GLUE.TXT 1-2
Printer Font Metric (PFM) 1-2
fixed spacing 2-18
font attributes 2-16
font description 1-6
font family 1-8
font file 1-6
font ID 1-5, 1-7, 2-22
font identification (ID) 1-5, 1-7, 2-22
font management 2-22
JOB command and parameters 2-37
job controls 2-4
jog 2-5
L
landscape orientation 2-9
M
macro controls 2-26
macro description 1-14
macro file 1-14
macro formats, supported 1-2
macro ID 1-14
Macro Information dialog 1-17
Index-1
Page 80

macro name 1-14
margin controls 2-14
memory resident fonts 1-1, 1-7
memory resident macros 1-15
miscellaneous controls 2-26
Missing Font Information dialog 1-11
O
offset registration 2-4
output bin selection 2-10
output tray mask 2-5
overlay macro 1-3
P
page controls 2-8
page length selection 2-8
page mode jog 2-5
page orientation selection 2-9
paper size selection 2-8
paper source selection 2-5, 2-12
PCL bitmap fonts 1-2
PCL Fonts dialog 1-3
PCL image offset 2-5
PCL Macros dialog 1-11
PCL scalable fonts 1-2
PCL5e commands 2-27
perforation skip selection 2-14
PFM file 1-2
PJL commands 2-37
PJL environment variables 2-34
differences 2-38
point size 2-18
portrait orientation 2-9
primary font symbol set 2-17
primary/secondary font selection 2-20
print graphics 2-24
printer commands 2-2
Printer Font Metric (PFM) file 1-2
Printer Information file 1-18
printer resident fonts 1-1
proportional spacing 2-18
push/pop position 2-15
size, font 2-18
soft font creation 2-22
via the startup file 3-1
startup file 3-1
style, font 2-18
symbol set selection 2-17
syntax of escape sequences 2-3
T
Tagged Font Metric (TFM) file 1-2
text parsing 2-21
TFM file 1-2
transparent print 2-21
Tray
Grouping 2-13
Mapping 2-13
Selection 2-6
typeface selection 2-20
U
underline mode 2-21
Universal Naming Convention (UNC) 1-3
V
vector graphics 2-23
vertical line spacing 2-14
vertical movement 2-15
W
weight, font 2-19
R
raster graphics 2-23
S
secondary font 2-19
secondary font size and style 2-19
secondary font symbol set 2-17
simplex printing mode 2-4
Index-2
 Loading...