

Page 1
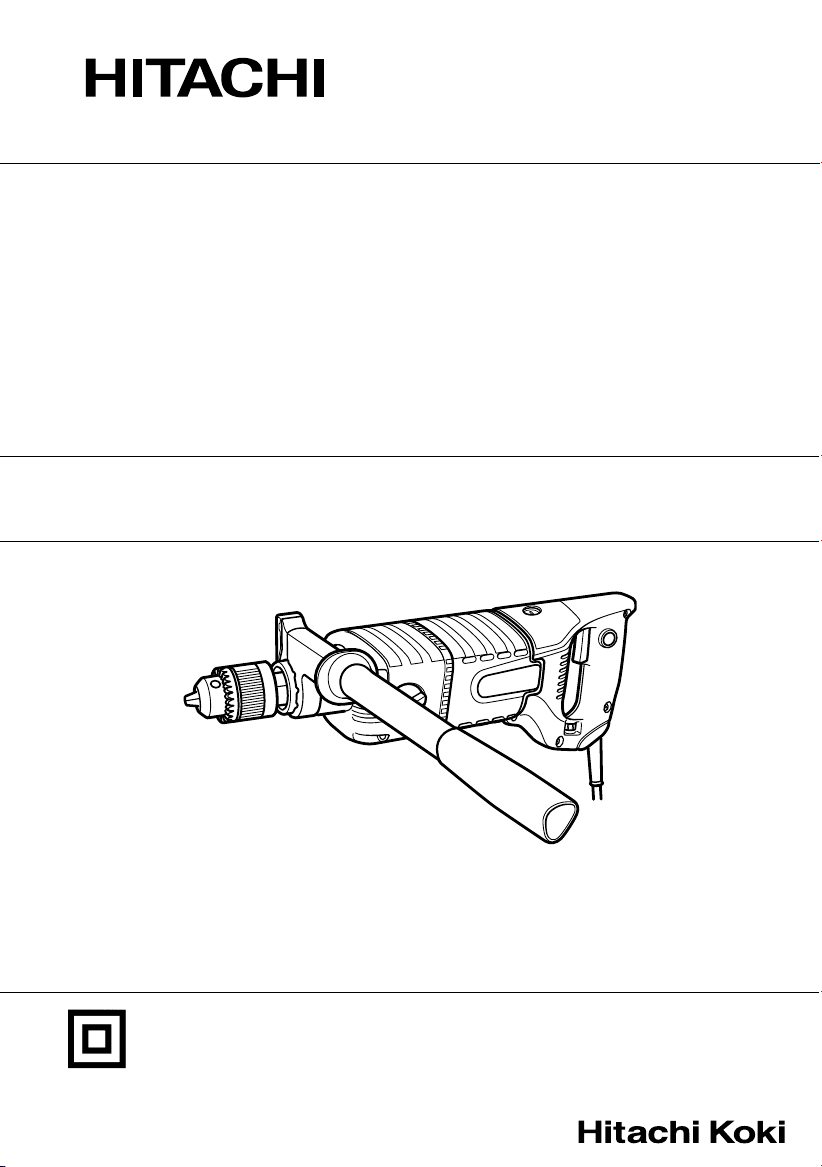
Diamond Core Drill
Diamant-kern bohr maschine
Perceuse pour trepan diamant
Trapano con corona a punte diamantate
Diamant doos boor
Taladro para corona diamante
DC 120VA
Read through carefully and understand these instructions before use.
Diese Anleitung vor Benutzung des Werkzeugs sorgfältig durchlesen und verstehen.
Lire soigneusement et bien assimiler ces instructions avant usage.
Prima dell’uso leggere attentamente e comprendere queste instruzioni.
Deze gebruiksaanwijzing s.v.p. voor gebruik zorgvuldig doorlezen.
Leer cuidadosamente y comprender estas instrucciones antes del uso.
Handling instructions
Bedienungsanleitung
Mode d’emploi
Instruzioni per l’uso
Gebruiksaanwijzing
Instrucciones de manejo
Page 2
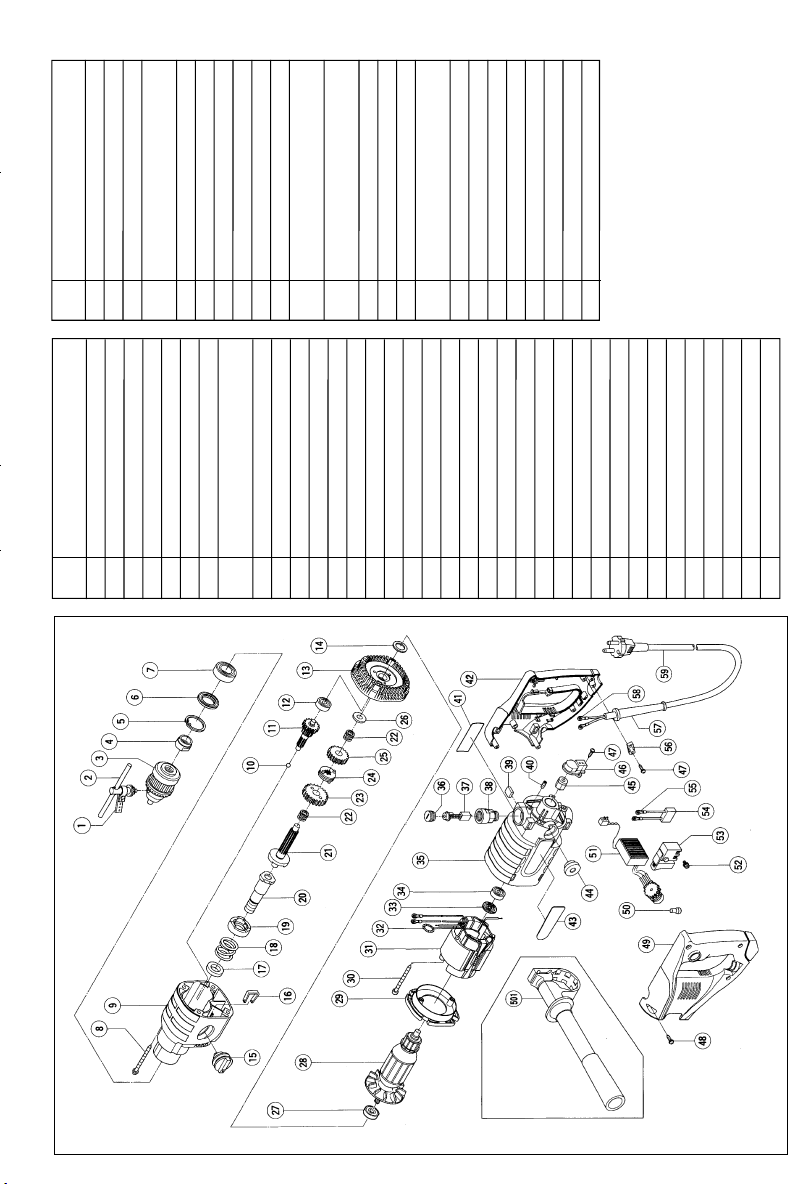
Part Name
M5×8
D4×16
D4×20
M3.5×6
37 Carbon Brush
38 Brush Holder
No.
Item
Part Name
1 Vinyl Band
2 Chuck Wrench 10G
No.
Item
Hex. Socket Set Screw
39 Rubber Piece (B)
40
41 Name Plate
42 Handle (A)
43 HITACHI Label
44 Rubber Piece (A)
45 Magnet
46 Magnet Pick Up Case
Tapping Screw
(W/Sp. Washer) D5×55
3 Drill Chuck 13WLR
4 Nut
5 Retaining Ring For D35 Hole
6 Dust Seal
7 Ball Bearing (6003VVCMPS2L)
8
9 Gear Cover
10 Steel Ball D3.97
Tapping Screw (W/Flange)
Tapping Screw (W/Flange)
47
48
11 Second Pinion
12 Ball Bearing (608VVC2PS2L)
13 Inner Cover Ass’y
14 Washer
Machine Screw (W/Washer)
49 Handle(B)
50 Connector (50091)
51 Controller
52
53 Switch
15 Shift Lever
16 Shift Spring
17 Sleeve
18 Spring
19 Clutch
54 Noise Suppressor
55 Terminal
56 Cord Clip
57 Cord Armor
58 Terminal
20 Spindle (B)
21 Spindle (A)
22 Spring (A)
23 Low Speed Gear
24 Cluch Disk
25 High Spped Gear
59 Cord
501 Side Handle
Parts are subject to possible
modification without notice due to
improvements.
26 Washer (A)
27 Ball Bearing (609VVC2PS2L)
28 Armature
29 Fan Guide
30 Tapping Screw D5×60
31 Stator Ass’y
32 Brush Terminal
33 Dust Seal (A)
34 Ball Bearing (608VVC2PS2L)
35 Housing Ass’y
36 Brush Cap
Exploted assembly drawing should be used only for authorized serivce center.
Page 3
12
4
3
1
2
5
3
6
43
7
6 mm
17 mm
English
Side handle
1
Removing (Loosen)
2
Fixing (Tighten)
3
Gear shift dial
4
Dial
5
Wear limit
6
7
No. of carbon brush
Italiano
Impugnatura laterale
1
Fissaggio (stringere)
2
Rimozione (allentare)
3
Regolazione di velocità
4
Selettore
5
Limite d’usura
6
7
N. della spazzola di carbone
1 2 35
Seitengriff
Befestigen (Festziehen)
Abnehmen(Lösen)
Gangschaltscheibe
Skala
Verschleißgrenze
Nr. der Kohlebürste
Zijhendel
Vastzetten (Aandraaien)
Verwijderen (Losdraaien)
Toerentalkiezer
Schijf
Slijtagelimiet
Nr. van koolborstel
Deutsch
Poignée latérale
Mise en place (Serrer)
Dépose (Desserrer)
Bouton de changement de vitesse
Cadran
Limite d’usure
No. de balai en carbone
Nederlands
Mango lateral
Fijación (apretado)
Extracción (Aflojado)
Dial de cambio
Dial
Límite de desgasta
No. de la escobilla de carbón
Français
Español
Page 4

English
GENERAL SAFETY RULES
WARNING!
Read all instructions
Failure to follow all instructions listed below may result
in electric shock, fire and/or serious injury.
The term “power tool” in all of the warnings listed below
refers to your mains operated (corded) power tool or
battery operated (cordless) power tool.
SAVE THESE INSTRUCTIONS
1) Work area
a) Keep work area clean and well lit.
Cluttered and dark areas invite accidents.
b) Do not operate power tools in explosive
atmospheres, such as in the presence of flammable
liquids, gases or dust.
Power tools create sparks which may ignite the
dust of fumes.
c) Keep children and bystanders away while operating
a power tool.
Distractions can cause you to lose control.
2) Electrical safety
a) Power tool plugs must match the outlet.
Never modify the plug in any way.
Do not use any adapter plugs with earthed
(grounded) power tools.
Unmodified plugs and matching outlets will reduce
risk of electric shock.
b) Avoid body contact with earthed or grounded
surfaces such as pipes, radiators, ranges and
refrigerators.
There is an increased risk of electric shock if your
body is earthed or grounded.
c) Do not expose power tools to rain or wet conditions.
Water entering a power tool will increase the risk
of electric shock.
d) Do not abuse the cord. Never use the cord for
carrying, pulling or unplugging the power tool.
Keep cord away from heat, oil, sharp edges or
moving parts.
Damaged or entangled cords increase the risk
of electric shock.
e) When operating a power tool outdoors, use an
extension cord suitable for outdoor use.
Use of a cord suitable for outdoor use reduces
the risk of electric shock
3) Personal safety
a) Stay alert, watch what you are doing and use
common sense when operating a power tool.
Do not use a power tool while you are tired or
under the influence of drugs, alcohol or medication.
A moment of inattention while operating power
tools may result in serious personal injury.
b) Use safety equipment. Always wear eye protection.
Safety equipment such as dust mask, non-skid safety
shoes, hard hat, or hearing protection used for
appropriate conditions will reduce personal injuries.
c) Avoid accidental starting. Ensure the switch is in
the off position before plugging in.
Carrying power tools with your finger on the
switch or plugging in power tools that have the
switch on invites accidents.
d) Remove any adjusting key or wrench before
turning the power tool on.
A wrench or a key left attached to a rotating part
of the power tool may result in personal injury.
e) Do not overreach. Keep proper footing and balance
at all times.
This enables better control of the power tool in
unexpected situations.
f) Dress properly. Do not wear loose clothing or
jewellery. Keep your hair, clothing and gloves
away from moving parts.
Loose clothes, jewellery or long hair can be caught
in moving parts.
g) If devices are provided for the connection of dust
extraction and collection facilities, ensure these
are connected and properly used.
Use of these devices can reduce dust related
hazards.
4) Power tool use and care
a) Do not force the power tool. Use the correct
power tool for your application.
The correct power tool will do the job better and
safer at the rate for which it was designed.
b) Do not use the power tool if the switch does not
turn it on and off.
Any power tool that cannot be controlled with the
switch is dangerous and must be repaired.
c) Disconnect the plug from the power source before
making any adjustments, changing accessories, or
storing power tools.
Such preventive safety measures reduce the risk
of starting the power tool accidentally.
d) Store idle power tools out of the reach of children
and do not allow persons unfamiliar with the
power tool or these instructions to operate the
power tool.
Power tools are dangerous in the hands of
untrained users.
e) Maintain power tools. Check for misalignment or
binding of moving parts, breakage of parts and
any other condition that may affect the power
tools operation.
If damaged, have the power tool repaired before
use.
Many accidents are caused by poorly maintained
power tools.
f) Keep cutting tools sharp and clean.
Properly maintained cutting tools with sharp cutting
edges are less likely to bind and are easier to
control.
g) Use the power tool, accessories and tool bits etc.,
in accordance with these instructions and in the
manner intended for the particular type of power
tool, taking into account the working conditions
and the work to be performed.
Use of the power tool for operations different from
intended could result in a hazardous situation.
5) Service
a) Have your power tool serviced by a qualified
repair person using only identical replacement
parts.
This will ensure that the safety of the power tool
is maintained.
PRECAUTION
Keep children and infirm persons away.
When not in use, tools should be stored out of reach
of children and infirm persons.
Page 5
English
PRECAUTIONS ON USING DIAMOND CORE
DRILL
1. Wear ear protectors with impact drills.
Exposure to noise can cause hearing loss.
2. Use auxiliary handles supplied with the tool.
Loss of control can cause personal injury.
3. Before drilling into a wall, floor or ceiling, thoroughly
confirm that no items such as electric cables or
4. Always hold the body handle and side handle of the
power tool firmly. Otherwise the counterforce
produced may result in inaccurate and even
dangerous operation.
5. This diamond core drill is designed exclusively for
use in dry operation.
Never use it for any drilling operation using water!
conduits are buried inside.
SPECIFICATIONS
Voltage (by areas)*
Power Input*
1
1
Gear shift dial–(Dial)
No-load speed
Capacity
Brick, Block*
2
400 – 1000 min
Steel
Wood
Weight (without cord)
1
*
Be sure to check the nameplate on product as it is subject to change by areas.
2
When using dry type diamond core bit (Excluding hard brick)
*
(230V, 240V) (110V)
1400 W 1250 W
1–(A–E) 2–(A–E) 1–(A–E) 2–(A–E)
–1
800 – 2000 min–1400 – 1000 min–1800 – 2000 min
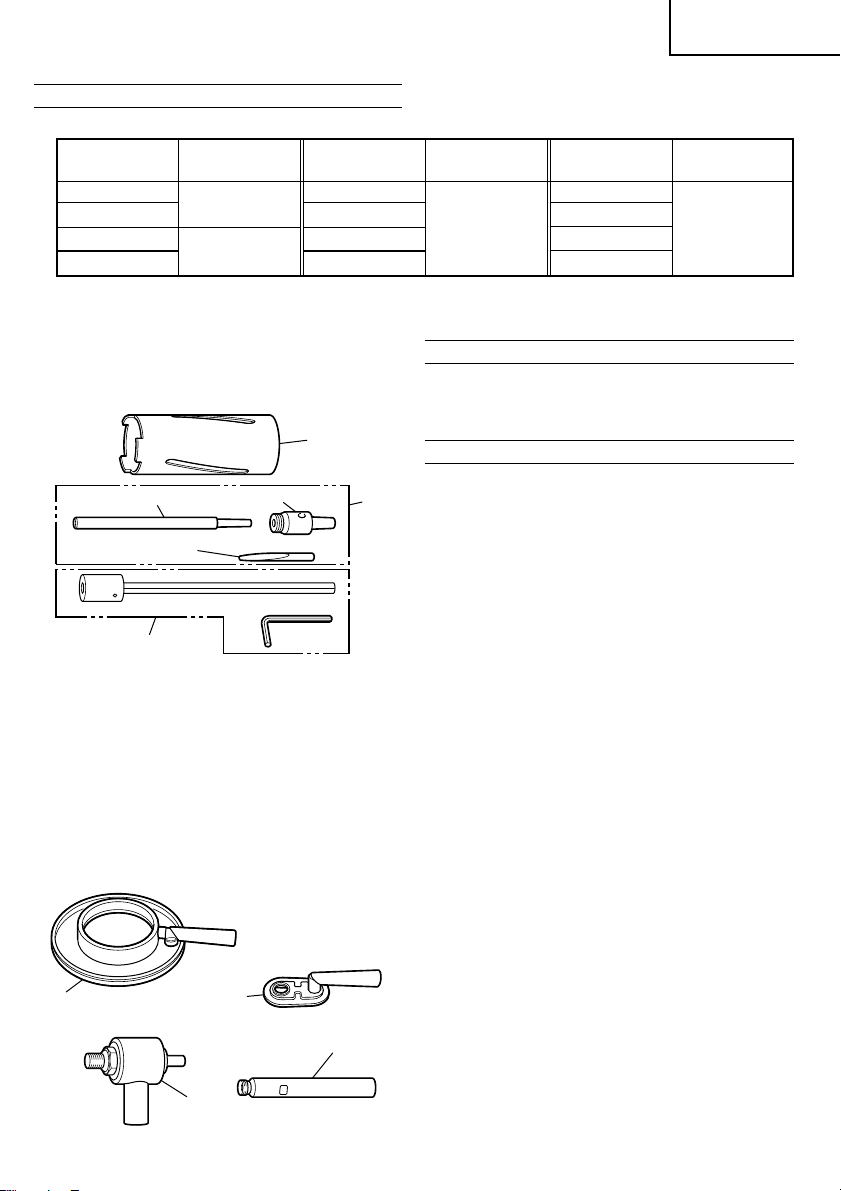
STANDARD ACCESSORIES
(1) Chuck wrench ............................................................. 1
(2) Side handle ................................................................. 1
Standard accessories are subject to change without
notice.
–1
152 mm
13 mm
30 mm
4.0 kg
OPTIONAL ACCESSORIES (sold separately)
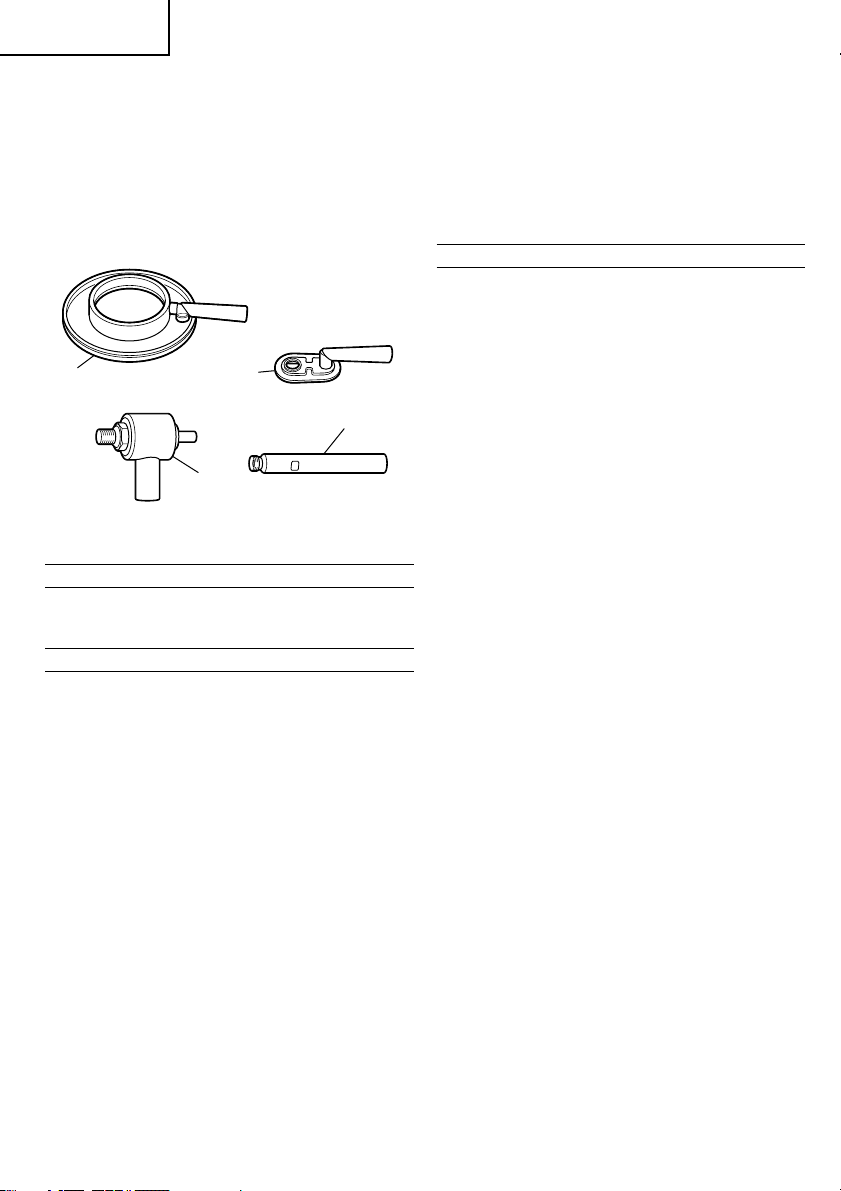
(1) Diamond Core Bits (Fig. 4-1)
Bit Dia. (mm) Length (mm) Bit Dia. (mm) Length (mm) Bit Dia. (mm) Length (mm)
22
28 65 117
38
48 91 152
(2) Adapter Packs and Extension Rods
䡬 Adapter Pack (Fig. 4-2)
300
150
Adapter for Dia. 38 – 152 mm core Bits (Fig. 4-3)
Pilot Spigot (Fig. 4-4)
Ejector Drift (Fig. 4-5)
䡬 Extention Rod (Length 250 mm) (Fig. 4-6)
52
78 127
150
107
4
5
6
Fig. 4
1
3
150
2
3
Page 6
English
(3) Dust Extraction Range
䡬 Dust Sucker-Large (Fig. 5-1)
䡬 Dust Sucker-Small (Fig. 5-2)
䡬 Dust Swivel (Fig. 5-3)
䡬 Extention Rod for Dust Swivel (Length 230mm)
(Fig. 5-4)
CAUTION:
When using the dust swivel, connect the vacuum
cleaner hose before turning on the main unit
switch.
Used to such chips by connecting a vacuum cleaner.
1
Optional accessories are subject to change without notice.
2
4
3
Fig. 5
APPLICATIONS
䡬 Drilling various blocks and bricks products
䡬 Boring holes in metals, wood and plastics.
PRIOR TO OPERATION
1. Power source
Ensure that the power source to be utilized conforms
to the power requirements specified on the product
nameplate.
2. Power switch
Ensure that the power switch is in the OFF position. If
the plug is connected to a receptacle while the power
switch is in the ON position, the power tool will start
operating immediately, which could cause a serious
accident.
3. Extension cord
When the work area is removed from the power
source, use an extension cord of sufficient thickness
and rated capacity. The extension cord should be
kept as short as practicable.
CAUTION:
Damaged cord must be replaced or repaired.
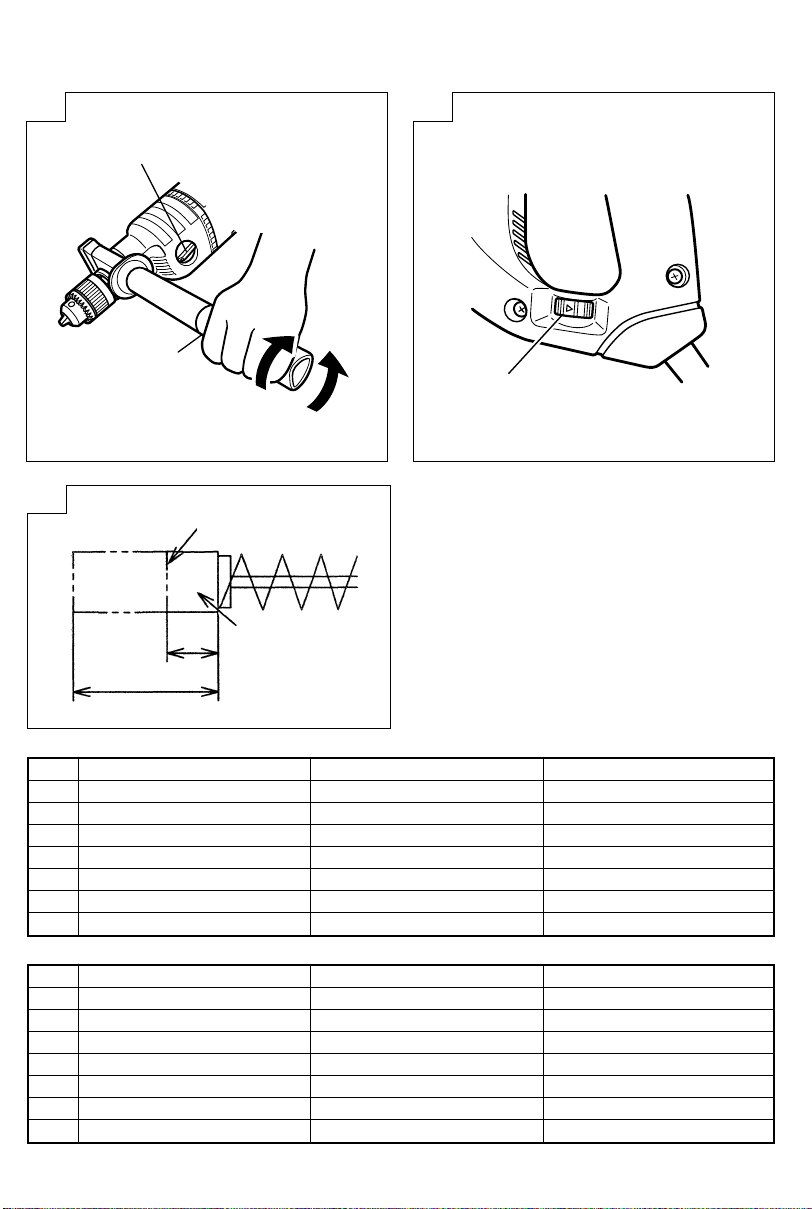
4. Mounting the side handle
Mount the side handle in the main body, as shown in
Fig. 1.
Rotate the handle in clockwise direction to tighten
the side handle and rotate it in counterclockwise
direction to loosen it.
When mounting the side handle, loosen the handle
and mount the side handle to the gear cover. Then
press it to the proper position in the side handle
mounting section of the gear cover and tighten it.
Before operation, securely tighten the side handle.
(The side handle can be secured in any position over
360°.)
5. Clamping
Insert the diamond core bit or drill bit as far as it will
go into the open chuck. Clamp tightly in normal
manner by inserting the toothed end in the chuck
wrench into the three key holes.
PRACTICAL HANDLING PROCEDURES
1. Switch operation
Switching-on: Push the trigger.
Switching-off: Release the trigger.
CAUTION
Securely hold the handle of the main body and the
side handle when switching on as there is danger
that your hands may be turned by force of reaction.
2. Relationship between material to be drilled and
optimum number of rotation
The relationship between the material to be drilled
and the optimum number of rotation may slightly
differ depending upon the working condition, power
supply situation, etc. Use the tool referring to
TABLE 1 as a rough guide.
For drill positioning, you will find it easier to work if
you turn the dial once and set it to the low speed.
CAUTION:
䡬 If you exceed the standard values (optimum numbers
of rotation) given in the table or engage in continued
work for an extended period of time or perform a
drilling job on soft materials, the motor may be
subjected to an unreasonable load and may result in
burnout. Especially, avoid such an abnormal way of
use as a case where a drill stops during the drilling
work. Adjust the number of rotation so that a smooth
drilling job can be done at all times.
䡬 Make absolutely certain that you never use any tool
with more than the maximum capacity as otherwise
the service life of the main unit may be extremely
shortened.
3. When drilling completely through the material:
When the drill bit bores completely through the
material, careless handling often results in broken
drill bit or damage to the drill body itself due to the
sudden movement of the drill.
Always be alert and ready to release pushing force
when drilling through the material.
4. Diamond Core drilling
(1) Place the diamond core bit in the drilling location.
(2) When drilling, always hold the tool squarely against
the material.
(3) Do not force the core bit, but allow the core bit to do
the work. This will prolong the life of the core bit and
reduce breakage.
(4) Ensure that masonry dust/swarf produced during
drilling is regularly removed. Allowing dust/swarf to
accumulate will result in overheating and excessive
clutch/torque limiter wear and loss of segments from
the core bit.
(5) When entering or leaving a hole, ensure that the core
bit is rotating.
4
Page 7
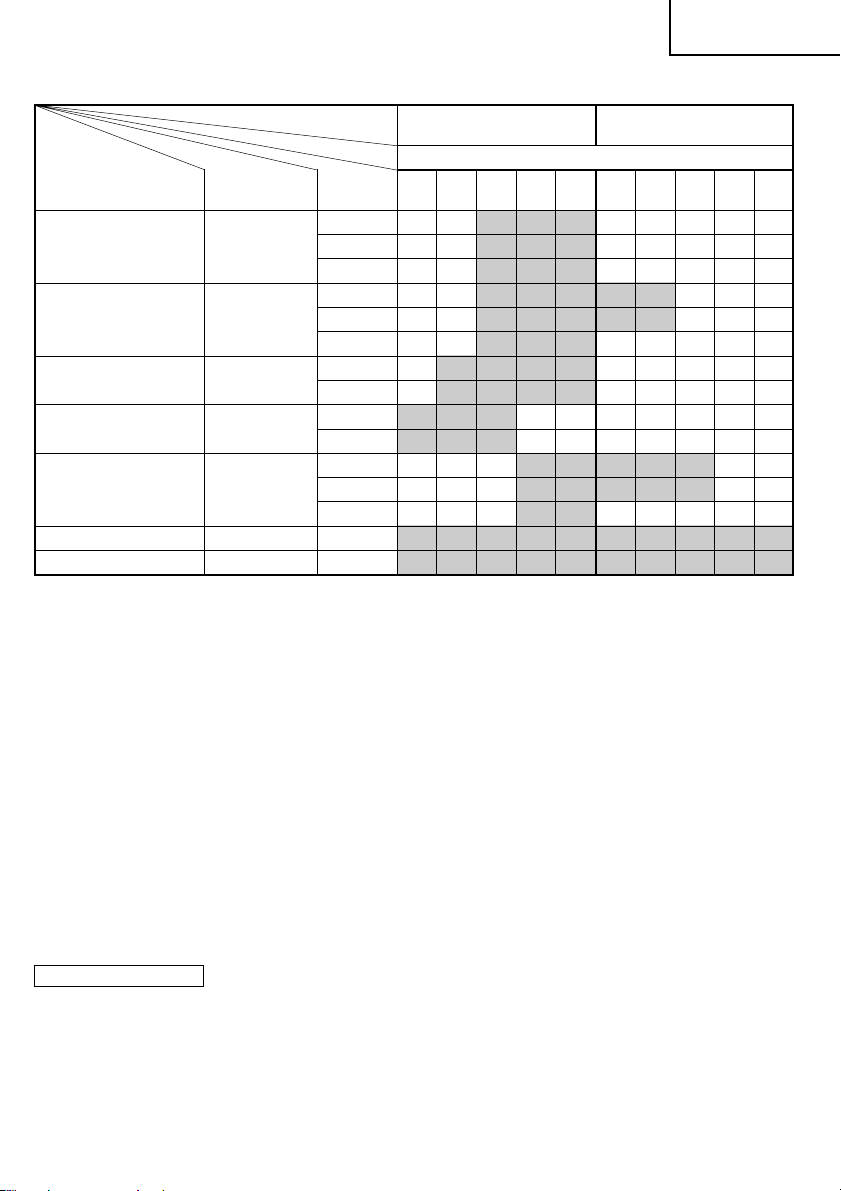
TABLE 1
Shift lever indication 1 2
Materials to be drilled Types of drills
Brick, Block Diamond φ27
ALC t3.0 Hole saw φ27
Steel Hole saw φ15
SPCC t3.0
Stainless steel Hole saw φ15
t1.6
Wood Hole saw φ27
t50
Steel SPCC t3.0 Drill φ13
Wood t50 Drill φ30
core bit
Drill
diameters
English
[Low speed gear] [High speed gear]
Dial
ABCDEABCDE
φ65
φ152
φ65
φ120
φ55
φ55
φ65
φ120
(6) If the core bit starts to vibrate and when the core bit
begins to break through the material, reduce pressure
immediately.
(7) After use, store the core bit carefully in its box and
remember that it is a diamond core bit.
cDrilling method by using Pilot Spigotv
For easy positioning, carry out the following steps
when using a diamond core bit.
(1) Make a pilot hole at the center position of the material
to be drilled with a 13 mm stone drill bit.
(2) Attach a pilot spigot to a diamond core bit.
(3) Align the pilot spigot to the pilot hole and begin the
drilling operation to make a guide groove.
(4) When making the guide groove, temporarily stop the
drilling operation and remove the pilot spigot.
(5) Align the diamond core bit with the guide groove and
start the drilling operation again.
CAUTION
䡬 When drilling with a diamond core bit, there will be a
high force of reaction load to your hands. Make sure
to hold the handle of the main body and the side
handle.
Safety-Release Clutch
This tool is equipped with a positive type Safety-
Release Clutch. The clutch will slip when a certain
torque level is required, causing the motor to
disengage from the output shaft. When this happens,
the chuck will stop turning.
CAUTION
䡬 Immediately pull away the main body when the
Safety-Release Clutch starts its operation.
䡬 Do not continue to operate the tool for more than two
seconds while the clutch is slipping.
䡬 Do not let the Safety-Release Clutch activate too
frequently.
5. Drilling with a conventional drill bit
(1) Drilling in wood
Use a woodworking drill bit. However, use an
metalworking drill bit when drilling a hole which is
less than 6.5 mm in diameter. The usable drill bit
diameter is maximum 30 mm.
(2) Drilling in mild steel or plastics
Use a conventional metalworking drill bit. The usable
drill bit diameter is minimum 1.2 mm and maximum
13 mm.
CAUTIONS
䡬 Pressure:
Drilling will NOT be accelerated by placing heavy
pressure on the drill. Such action will only result in a
damaged drill bit, decreased drilling efficiency, and/
or shortened service life of the drill.
䡬 Using a large diameter drill bit:
The larger the drill bit diameter, the larger the reactive
force on your arm. Be careful not to lose control of
the drill because of this reactive force. To maintain
firm control, establish a good foot-hold, hold the drill
tightly with both hands, and ensure that the drill is
vertical to the material being drilled.
䡬 When drilling completely through the material:
When the drill bit bores completely through the
material, careless handling often results in broken
drill bit or damage to the drill body itself due to the
sudden movement of the drill.
Always be alert and ready to release pushing force
when drilling through the material.
5
Page 8

English
MAINTENANCE AND INSPECTION
1. Inspecting the diamond core bit
Continued use of a dull or damaged diamond core bit
results in reduced drilling efficiency and may cause
overloading of the motor. Replace the diamond core
bit with a new one as soon as excessive abrasion is
noted.
2. Inspecting the mounting screws:
Regularly inspect all mounting screws and ensure
that they are properly tightened. Should any of the
screws be loose, retighten them immediately. Failure
to do so could result in serious hazard.
3. Maintenance of the motor
The motor unit winding is the very “heart” of the
power tool. Exercise due care to ensure the winding
does not become damaged and/or wet with oil or
water.
4. Inspecting the carbon brushes (Fig. 3)
The motor employs carbon brushes which are
consumable parts. Since an excessively worn carbon
brush can result in motor trouble, replace the carbon
brushes with new ones which have the same carbon
brush No. shown in the figure when they become
worn to or near the “wear limit”. In addition, always
keep carbon brushes clean and ensure that they slide
freely within the brush holders.
5. Replacing carbon brushes
Disassemble the brush caps with a slotted-head
screwdriver the carbon brushes can the be easily
removed.
NOTE
Due to HITACHI’s continuing program of research and
development, the specifications herein are subject to
change without prior notice.
Information concerning airborne noise and vibration
The measured values were determined according to
EN60745 and declared in accordance with ISO 4871.
Measured A-weighted sound pressure level: 84 dB (A)
Uncertainty KpA: 3 dB (A).
Wear ear protection.
The typical weighted root mean square acceleration
value: 6.0 m/s2.
IMPORTANT
Correct connection of the plug
The wires of the main lead are coloured in accordance
with the following code:
Blue: -Neutral
Brown: -Live
As the colours of the wires in the main lead of this tool
may not correspond with the coloured markings
identifying the terminals in your plug proceed as follows:
The wire coloured blue must be connected to the terminal
marked with the letter N or coloured black. The wire
coloured brown must be connected to the terminal
marked with the letter L or coloured red. Neither core
must be connected to the earth terminal.
NOTE
This requirement is provided according to BRITISH
STANDARD 2769: 1984.
Therefore, the letter code and colour code may not
be applicable to other markets except The United
Kingdom.
6
Page 9

Deutsch
ALLGEMEINE SICHERHEITSMASSNAHMEN
WARNUNG!
Lesen Sie sämtliche Hinweise durch
Wenn nicht sämtliche nachstehenden Anweisungen
befolgt werden, kann es zu Stromschlag, Brand und/oder
ernsthaften Verletzungen kommen.
Der Begriff „Elektrowerkzeug“ bezieht sich in den
folgenden Warnhinweisen auf Elektrowerkzeuge mit Netz(schnurgebunden) oder Akkubetrieb (schnurlos).
BEWAHREN SIE DIESE ANWEISUNGEN AUF
1) Arbeitsbereich
a) Sorgen Sie für einen sauberen und gut
ausgeleuchteten Arbeitsbereich.
Zugestellte und dunkle Bereiche ziehen Unfälle
förmlich an.
b) Verwenden Sie Elektrowerkzeuge niemals an
Orten, an denen Explosionsgefahr besteht – zum
Beispiel in der Nähe von leicht entflammbaren
Flüssigkeiten, Gasen oder Stäuben.
Bei der Arbeit mit Elektrowerkzeugen kann es
zu Funkenbildung kommen, wodurch sich Stäube
oder Dämpfe entzünden können.
c) Sorgen Sie bei der Arbeit mit Elektrowerkzeugen
dafür, dass sich keine Zuschauer (insbesondere
Kinder) in der Nähe befinden.
Wenn Sie abgelenkt werden, können Sie die
Kontrolle über das Werkzeug verlieren.
2) Elektrische Sicherheit
a) Elektrowerkzeuge müssen mit passender
Stromversorgung betrieben werden.
Nehmen Sie niemals irgendwelche Änderungen
am Anschlussstecker vor.
Verwenden Sie bei Elektrowerkzeugen mit
Schutzkontakt (geerdet) niemals Adapterstecker.
Stecker im Originalzustand und passende
Steckdosen reduzieren das Stromschlagrisiko.
b) Vermeiden Sie Körperkontakt mit geerdeten
Gegenständen wie Rohrleitungen, Heizungen,
Herden oder Kühlschränken.
Bei Körperkontakt mit geerdeten Gegenständen
besteht ein erhöhtes Stromschlagrisiko.
c) Setzen Sie Elektrowerkzeuge niemals Regen oder
sonstiger Feuchtigkeit aus.
Wenn Flüssigkeiten in ein Elektrowerkzeug
eindringen, erhöht sich das Stromschlagrisiko.
d) Verwenden Sie die Anschlussschnur nicht
missbräuchlich. Tragen Sie das Elektrowerkzeug
niemals an der Anschlussschnur, ziehen Sie es
nicht damit heran und ziehen Sie den Stecker
nicht an der Anschlussschnur aus der Steckdose.
Halten Sie die Anschlussschnur von Hitzequellen,
Öl, scharfen Kanten und beweglichen Teilen fern.
Beschädigte oder verdrehte Anschlussschnüre
erhöhen das Stromschlagrisiko.
e) Wenn Sie ein Elektrowerkzeug im Freien
benutzen, verwenden Sie ein für den
Außeneinsatz geeignetes Verlängerungskabel.
Ein für den Außeneinsatz geeignetes Kabel
vermindert das Stromschlagrisiko.
3) Persönliche Sicherheit
a) Bleiben Sie wachsam, achten Sie auf das, was
Sie tun, und setzen Sie Ihren Verstand ein,
wenn Sie mit Elektrowerkzeugen arbeiten.
Benutzen Sie keine Elektrowerkzeuge, wenn Sie
müde sind oder unter Einfluss von Drogen,
Alkohol oder Medikamenten stehen.
Bei der Arbeit mit Elektrowerkzeugen können
bereits kurze Phasen der Unaufmerksamkeit zu
schweren Verletzungen führen.
b) Benutzen Sie Schutzausrüstung. Tragen Sie
immer einen Augenschutz.
Schutzausrüstung wie Staubmaske, rutschsichere
Sicherheitsschuhe, Schutzhelm und Gehörschutz
senken das Verletzungsrisiko bei angemessenem
Einsatz.
c) Vermeiden Sie unbeabsichtigten Anlauf. Achten
Sie darauf, dass sich der Schalter in der Aus(Off-) Position befindet, ehe Sie den Stecker
einstecken.
Das Herumtragen von Elektrowerkzeugen mit
dem Finger am Schalter und das Einstecken des
Steckers bei betätigtem Schalter zieht Unfälle
regelrecht an.
d) Entfernen Sie sämtliche Einstellwerkzeuge
(Einstellschlüssel), ehe Sie das Elektrowerkzeug
einschalten.
Ein an einem beweglichen Teil des
Elektrowerkzeugs angebrachter Schlüssel kann
zu Verletzungen führen.
e) Sorgen Sie für einen festen Stand. Achten Sie
jederzeit darauf, sicher zu stehen und das
Gleichgewicht zu bewahren.
Dadurch haben Sie das Elektrowerkzeug in
unerwarteten Situationen besser im Griff.
f) Kleiden Sie sich richtig. Tragen Sie keine lose
Kleidung oder Schmuck. Halten Sie Haar,
Kleidung und Handschuhe von beweglichen
Teilen fern.
Lose Kleidung, Schmuck oder langes Haar kann
von beweglichen Teilen erfasst werden.
g) Wenn Anschlüsse für Staubabsaug- und -
sammelvorrichtungen vorhanden sind, sorgen
Sie dafür, dass diese richtig angeschlossen und
eingesetzt werden.
Die Verwendung solcher Vorrichtungen kann
Staub-bezogene Gefahren mindern.
4) Einsatz und Pflege von Elektrowerkzeugen
a) Überanspruchen Sie Elektrowerkzeuge nicht.
Benutzen Sie das richtige Elektrowerkzeug für
Ihren Einsatzzweck.
Das richtige Elektrowerkzeug erledigt seine Arbeit
bei bestimmungsgemäßem Einsatz besser und
sicherer.
b) Benutzen Sie das Elektrowerkzeug nicht, wenn
es sich nicht am Schalter ein- und ausschalten
lässt.
Jedes Elektrowerkzeug, das nicht mit dem
Schalter betätigt werden kann, stellt eine Gefahr
dar und muss repariert werden.
c) Ziehen Sie den Netzstecker, ehe Sie
Einstellarbeiten vornehmen, Zubehörteile
tauschen oder das Elektrowerkzeug verstauen.
Solche präventiven Sicherheitsmaßnahmen
verhindern den unbeabsichtigten Anlauf des
Elektrowerkzeugs und die damit verbundenen
Gefahren.
7
Page 10

Deutsch
d) Lagern Sie nicht benutzte Elektrowerkzeuge
außerhalb der Reichweite von Kindern, lassen
Sie nicht zu, dass Personen das Elektrowerkzeug
bedienen, die nicht mit dem Werkzeug selbst
und/oder diesen Anweisungen vertraut sind.
Elektrowerkzeuge in ungeschulten Händen sind
gefährlich.
e) Halten Sie Elektrowerkzeuge in Stand. Prüfen
Sie auf Fehlausrichtungen, sicheren Halt und
Leichtgängigkeit beweglicher Teile,
Beschädigungen von Teilen und auf jegliche
andere Zustände, die sich auf den Betrieb des
Elektrowerkzeugs auswirken können.
Bei Beschädigungen lassen Sie das
Elektrowerkzeug reparieren, ehe Sie es benutzen.
Viele Unfälle mit Elektrowerkzeugen sind auf
schlechte Wartung zurückzuführen.
f) Halten Sie Schneidwerkzeuge scharf und sauber.
Richtig gewartete Schneidwerkzeuge mit scharfen
Schneidkanten bleiben weniger häufig hängen
und sind einfacher zu beherrschen.
g) Benutzen Sie Elektrowerkzeuge, Zubehör,
Werkzeugspitzen und Ähnliches in
Übereinstimmung mit diesen Anweisungen und
auf die für das jeweilige Elektrowerkzeug
bestimmungsgemäße Weise – beachten Sie
dabei die jeweiligen Arbeitsbedingungen und
die Art und Weise der auszuführenden Arbeiten.
Der bestimmungswidrige Einsatz von
Elektrowerkzeugen kann zu gefährlichen
Situationen führen.
5) Service
a) Lassen Sie Elektrowerkzeuge durch qualifizierte
Fachkräfte und unter Einsatz passender,
zugelassener Originalteile warten.
Dies sorgt dafür, dass die Sicherheit des
Elektrowerkzeugs nicht beeinträchtigt wird.
VORSICHT
Von Kindern und gebrechlichen Personen fernhalten.
Werkzeuge sollten bei Nichtgebrauch außerhalb der
Reichweite von Kindern und gebrechlichen Personen
aufbewahrt werden.
VORSICHTSMASSNAHMEN BEI DER
BENUTZUNG DER DIAMANT-KERN
BOHRMASCHINE
1. Tragen Sie bei der Arbeit mit Schlagbohrmaschinen
einen Gehörschutz.
Starke und/oder dauerhafte Lärmbelastung kann zu
Gehörverlust führen.
2. Benutzen Sie die mit dem Werkzeug gelieferten
Zusatzgriffe.
Wenn Sie die Kontrolle über das Werkzeug verlieren,
kann es zu Verletzungen kommen.
3. Bevor man in eine Wand, den Boden oder in die
Decke bohrt, muß man sich gründlich davon
überzeugen, daß keine elektrischen Kabel oder
kabelrohre darunterliegen.
4. Immer der Körper-Handgriff und den Seiten-Handgriff
des Elektrowerkzeugs festhalten, weil sonst die
entstehende Gegenkraft zu einem ungenauen und
sogar gefährlichen Arbeiten führen kann.
5. Dieser Diamant-Kern Bohr Maschine ist nur für
Verwendung in trockenem Betrieb entworfen.
Verwenden Sie ihn niemals für Bohrbetrieb unter
Verwendung von Wasser!
TECHNISCHE DATEN
Spannung (jenach Gebiet)*
Leistungsaufnahme*
1
1
Gangschaltscheibe–(Skala)
Leerlaufdrehzahl
Kapazität:
Ziegel, Blöcke*
400 – 1000 min
2
Stahl
Holz
Gewicht (ohne Kabel)
1
*
Vergessen Sie nicht, die Produktangeben auf dem Typenschild zu überprüfen, da sich diese je nach Verkaufsgebiet
ändern.
2
Bei Verwendung bei Bohrkrone mit trockenem Diamanten (ausschließlich Hartziegel)
*
(230V, 240V)
1400 W 1250 W
1–(A–E) 2–(A–E) 1–(A–E) 2–(A–E)
–1
800 – 2000 min–1400 – 1000 min–1800 – 2000 min
152 mm
13 mm
30 mm
4,0 kg
(110V)
STANDARDZUBEHÖR
(1) Bohrfutterschlüssel .................................................... 1
(2) Seitengriff ................................................................... 1
Das Standardzubehör kann ohne vorherige Bekanntmachung jederzeit geändert werden.
8
–1
Page 11
SONDERZUBEHÖR (separat zu beziehen)
(1) Diamantenkernkrone (Abb. 4-1)
Bohrspitzendurch-
masser (mm) (mm) masser (mm) (mm) masser (mm) (mm)
22
28 65 117
38
48 91 152
(2) Adapterpacks und Verlängerungsstäbe
䡬 Adapterpack (Abb. 4-2)
Adapter für 38~152 mm Diamantbohrkrone (Abb.
4-3)
Führungshülse (Abb. 4-4)
Ejektorversatz (Abb. 4-5)
䡬 Verlängerungsstab (Länge 250 mm) (Abb. 4-6)
Länge
300
150
Bohrspitzendurch-
52
78 127
Länge
150
Das Sonderzubehör hann ohne vorherige
Bekanntmachung jederzeit geändert werden.
ANWENDUNGSGEBIETE
䡬 Bohren von verschiedenen Block- und
Ziegelproducten.
1
䡬 Bohren von Löchern in Metall, Holz und Plastik.
Bohrspitzendurch-
107
VOR INBETRIEBNAHME
4
5
6
Abb. 4
(3) Staubabsaugbereich
䡬 Staubschlucker-Groß (Abb. 5-1)
䡬 Staubschlucker-Klein (Abb. 5-2)
䡬 Staubschwenkhülse (Abb. 5-3)
䡬 Verlängerungsstange für Staubschwenkhülse
(Länge 230 mm) (Abb. 5-4)
ACHTUNG:
Bei Verwendung der Staubschwenkhülse den
Staubabsaugschlauch vor dem Einschalten des
Betriebsschalters anschließen.
Zum Absaugen von Spänen durch Anschluß eines
Staubsaugers.
1
3
2
2
4
1. Netzspannung
Prüfen Sie, daß die zu verwendende Netzspannung
der Angabe auf dem Typenschild entspricht.
2. Netzschalter
Prüfen Sie, daß der Netzschalter auf “AUS” steht.
Wenn der Stecker an das Netz angeschlossen wird,
während der Schalter auf “EIN” steht, beginnt das
Werkzeug sofort zu laufen, was gefährlich ist.
3. Verlängerungskabel
Wenn der Arbeitsbereich nicht in der Nähe des
Netzanschlusses liegt, ist ein Verlängerungskabel
ausreichenden Querschnitts und ausreichender
Nennleistung zu verwenden. Das Verlängerungskabel
sollte so kurz wie möglich gehalten werden.
ACHTUNG:
Ein beschädigtes Kabel muß ersetzt oder repariert
werden.
4. Anbringen des Seitengriffs
Den Seitengriff am Hauptkörper anbringen, wie in
der Abb. 1 gezeigt.
Den Handgriff im Uhrzeigersinn drehen, um den
Seitengriff zu befestigen, und gegen den
Uhrzeigersinn, um ihn zu lösen.
Beim Anbringen des Seitengriffs den Handgriff lösen
und den Seitengriff an der Rückabdeckung anbringen.
Dann in der richtigen Position in die
Seitengriffhalterung an der Rückabdeckung
eindrücken und befestigen.
Vor dem Betrieb den Seitengriff sicher festziehen.
(Der Seitengriff kann in jeder Position über 360°
befestigt werden.)
5. Festspannen
Die Bohrkrone oder Bohrspitze so weit wie möglich
in das offene Futter einsetzen. Auf normale Weise
durch Einsetzen des gezähnten Endes des
Futterschlüssels in die drei Schlüssellöcher festziehen.
Deutsch
Länge
150
3
Abb. 5
9
Page 12
Deutsch
Tabelle 1
Schalthebelanzeige 1 2
Zu bohrendes Material Bohrertypen
Ziegel, Blöcke Diamantkern- φ27
ALC t3.0 Lochsäge φ27
Stahl Lochsäge φ15
SPCC t3.0
Rostfreier Stahl Lochsäge φ15
t1.6
Holz Lochsäge φ27
t50
Stahl SPCC t3.0 Bohrer φ13
Holz t50 Bohrer φ30
Bohrer
Bohrerdurchmesser
[Langsamgang] [Schnellgang]
Skala
ABCDEABCDE
φ65
φ152
φ65
φ120
φ55
φ55
φ65
φ120
PRAKTISCHE ARBEITSWEISE
1. Schalterbetätigung
Einschalten: Den Auslöser drücken.
Ausschalten: Den Auslöser loslassen.
ACHTUNG
Den Handgriff am Hauptkörper und den Seitengriff
beim Einschalten der Maschine festhalten, da sonst
die Gefahr besteht, daß die Hände durch die
Rückstoßkraft gedreht werden können.
2. Zusammenhang zwischen dem zu bohrenden
Material und der optimalen Drehzahl
Der Zusammenhang zwischen dem zu bohrenden
Material und der optimalen Drehzahl kann sich
entsprechend den Arbeitsbedingungen, der
Stromversorgung usw. etwas unterscheiden.
Verwenden Sie das Werkzeug unter Bezug auf
Tabelle 1 als groben Anhalt.
Für die Bohrerpositionierung werden Sie es einfacher
finden, wenn Sie die Skala einmal drehen und eine
niedrige Drehzahl einstellen.
ACHTUNG:
䡬 Wenn Sie die in der Tabelle gegebenen Standardwerte
(optimale Drehzahl) überschreiten oder lange Zeit
fortgesetzt arbeiten oder weiches Material bohren,
so kann der Motor übermäßig belastet werden und
durchbrennen. Vermeiden Sie eine solche unnormale
Verwendung besonders, wenn ein Bohrer während
des Bohrens anhält. Stellen Sie die Drehzahl so ein,
daß immer glattes Bohren durchgeführt werden kann.
䡬 Stellen Sie immer sicher, daß Sie nie ein Werkzeug
mit einer größeren Kapazität als der maximalen
Kapazität verwenden, da sonst die Lebensdauer des
Gerätes selbst extrem verkürzt werden kann.
10
3. Beim Durchbohren durch das Material:
Wenn der Bohrer ganz durch das Material bohrt,
führt eine unachtsame Handhabung oft zu einem
abgebrochenen Bohrer oder einer Beschädigung des
Bohrgehäuses selbst aufgrund der plötzlichen
Bewegung der Bohrmaschine. Man muß immer
darauf gefaßt und bereit sein, den Druck beim
Durchbohren des Materials zu verringern.
4. Bohren mit Diamantkern
(1) Die Bohrkrone an der Bohrstelle ansetzen.
(2) Beim Bohren immer das Werkzeug im rechten Winkel
am Material ansetzen.
(3) Nicht die Bohrkrone gewaltsam andrücken, sondern
die Bohrarbeit dem Diamantkern überlassen. Dadurch
wird die Lebensdauer des Bohrers verlängert, und
Ausfälle werden verringert.
(4) Sicherstellen, daß Mauerstaub und Späne, die beim
Bohren entstehen, regelmäßig entfernt werden. Wenn
sich Mauerstaub und Späne ansammeln, kann
Überhitzung und zu großer Verschleiß von Kupplung/
Drehmomentbegrenzer erzeugt werden, und Teile der
Bohrspitze können sich lösen.
(5) Beim Einsetzen in ein Loch und Herausziehen aus
einem Loch immer sicherstellen, daß sich die
Bohrkrone dreht.
(6) Wenn die Bohrkrone zu vibrieren beginnt und die
Bohrkrone durch das Material zu brechen beginnt,
sofort den Druck verringern.
(7) Nach der Verwendung die Bohrkrone sorgfältig in
ihrem Kasten ablegen, und daran denken, daß es
sich um eine Diamantenkrone handelt.
Page 13

Deutsch
cBohrmethode mit Führungshülsev
Für leichte Positionierung beim Bohren mit Bohrkrone
folgendermaßen vorgehen.
(1) Eine Vorbohrung in der Mitte der Bohrstelle im
Material mit einer 13-mm-Steinspindel machen.
(2) Eine Führungshülse an der Diamantbohrkrone
anbringen.
(3) Die Führungshülse mit der Vorbohrung angleichen
und zu bohren beginnen, um eine Führungsrille zu
machen.
(4) Beim Herstellen der Führungsrille provisorisch den
Bohrbetrieb stoppen, und die Führungshülse
entnehmen.
(5) Die Bohrkrone mit der Führungsrille ausrichten, und
den Bohrbetrieb erneut beginnen.
ACHTUNG
䡬 Beim Bohren mit Diamantbohrkrone wird eine hohe
Rückschalagwirkung gegen die Hände erzeugt. Immer
den Hauptgriff und den Seitengriff sicher festhalten.
Sicherheitskupplung
Dieses Werkzeug ist mit einer Sicherheitskupplung
ausgestattet. Die Kupplung rutscht, wenn ein
bestimmter Drehmomentpegel erforderlich ist, und
bewirkt, daß der Motor von der Werkzeugwelle
getrennt wird. Wenn das geschieht, hört das Futter
auf sich zu drehen.
ACHTUNG
䡬 Sofort das Gerät von der Bohrstelle abziehen, wenn
die Sicherheitskupplung in Funktion tritt.
䡬 Nicht bei rutschender Kupplung das Werkzeug noch
länger als zwei Sekunden betreiben.
䡬 Nicht die Sicherheitskupplung zu oft in Funktion treten
lassen.
5. Bohren mit herkömmlicher Bohrspitze
(1) Bohren in Holz
Verwenden Sie eine Holzspiralbohrer. Verwenden Sie
aber eine Metallbohrer, wenn ein Loch von weniger
als 6,5 mm Durchmesser gebohrt wird. Der
verwendbare Bohrendurchmesser ist maximal 30
mm.
(2) Bohren in Weichstahl oder Plastik
Verwenden Sie eine herkömmliche Metallbohrer. Der
verwendbare Bohrendurchmesser ist minimal 1,2 mm
und maximal 13 mm.
ACHTUNG
䡬 Druck:
Das Bohren wird durch Ausübung eines starken
Drucks auf den Bohrer nicht beschleunigt. Zusätzlicher
Druck führt nur zu einem beschädigten Bohrer,
verminderter Bohrleistung und/oder verkürzter
Lebensdauer der Bohrmaschine.
䡬 Verwendung eines Bohrers mit großem durchmesser:
Je größer der Bohrerdurchmesser um so stäker ist
die auf den Arm rückwirkende Kraft. Man muß darauf
achten, daß man aufgrund dieser rückwirkenden Kraft
nicht die Kontrolle über die Bohrmaschine verliert.
Für eine gute Kontrolle ist ein sicherer Stand
erforderlich. Man muß die Bohrmaschine mit beiden
Händen festhalten und dafür sorgen. daß die
Bohrmaschine senkrecht zum Material steht, in das
gebohrt wird.
䡬 Beim Durchbohren durch das Material:
Wenn der Bohrer ganz durch das Material bohrt,
führt eine unachtsame Handhabung oft zu einem
abgebrochenen Bohrer oder einer Beschädigung des
Bohrgehäuses selbst aufgrund der plötzlichen
Bewegung der Bohrmaschine. Man muß immer
darauf gefaßt und bereit sein, den Druck beim
Durchbohren des Materials zu verringern.
WARTUNG UND INSPEKTION
1. Prüfen der Diamantbohrkrone
Bei längerer verwendung einer stumpfen oder
beschädigten Diamantbohrkrone wird die
Bohrleistung beeinträchtigt, und es besteht die Gefahr
der Motorüberlastung. Die Diamantbohrkrone durch
eine neue ersetzen, sobald zu starker Abrieb erkennbar
wird.
2. Inspektion der Befestigungsschrauben
Alle Befestigungsschrauben müssen regelmäßig
inspiziert und geprüft werden, ob sie gut angezogen
sind. Wenn sich eine der Schrauben lockert, muß sie
sofort wieder angezogen werden. Geschieht dies
nicht, kann das zu erheblichen Gefahren führen.
3. Wartung des Motors:
Die Motorwicklung ist das “Herz” des
Elektrowerkzeugs. Daher ist besonders sorgfältig
darauf zu achten, daß die Wicklung nicht beschädigt
wird und nicht mit Öl oder Wasser in Berührung
kommt.
4. Inspektion der Kohlebürsten (Abb. 3)
Im Motor sind Kohlebürsten verwendet, die
Verbrauchsteile sind. Übermäßig abgenutzte
Kohlebürsten führen zu Motorproblemen. Deshalb
wird eine Kohlebürste durch eine neue ersetzt, die
dieselbe Nummer trägt wie auf der Abbildung gezeigt,
wenn sie teilweise oder ganz verbraucht ist. Darüber
hinaus müssen die Kohlebürsten immer sauber
gehalten werden und müssen sich immer in der
Halterung frei bewegen können.
5. Austausch einer Kohlenbürste
Der Bürstendeckel wird mit einem Steckschlüssel
abmontiert. Dann kann die Kohlenbürste leicht
entfernt werden.
ANMERKUNG
Aufgrund des ständigen Forschungs-und Entwicklungsprogramms von HITACHI sind Änderungen der hierin
gemachten technischen Angaben nicht ausgeschlossen.
Information über Betriebslärm und Vibration
Die gemessenen Werte wurden entsprechend EN60745
bestimmt und in Übereinstimmung mit ISO 4871
ausgewiesen.
Gemessener A-gewichteter Schalldruck: 84 dB (A)
Messunsicherheit KpA: 3 dB (A)
Bei der Arbeit immer einen Ohrenschutz tragen.
Der typische gewogene quadratische Mittelwert für die
Beschleunigung ist 6,0 m/s2.
11
Page 14

Français
CONSIGNES DE SÉCURITÉ GÉNÉRALES
AVERTISSEMENT!
Lire toutes les instructions
Tout manquement à observer ces instructions peut
engendrer des chocs électriques, des incendies et/ou
des blessures graves.
Le terme "outil électrique" qui figure dans l'ensemble
des avertissements ci-dessous se réfère aux outils
électriques (câblé) ou aux outils à piles (sans fil).
CONSERVER CES INSTRUCTIONS
1) Aire de travail
a) Maintenir l'aire de travail propre et bien éclairée.
Les endroits encombrés et sombres sont propices
aux accidents.
b) Ne pas utiliser d'outils électriques en présence
de liquides, gaz ou poussière inflammables, au
risque de provoquer une explosion.
Les outils électriques créent des étincelles
susceptibles d'enflammer la poussière.
c) Ne pas laisser les enfants et les visiteurs
s'approcher de vous lorsque vous utiliser un
outil électrique.
Les distractions peuvent faire perdre le contrôle.
2) Sécurité électrique
a) Les prises de l'outil électrique doivent
correspondre à la prise secteur.
Ne jamais modifier la prise.
Ne pas utiliser d'adaptateurs avec les outils
électriques mis à la masse.
Les prises non modifiées et les prises secteurs
correspondantes réduisent les risques de choc
électrique.
b) Eviter tout contact avec les surfaces mises à la
masse telles que les tuyaux, radiateurs, bandes
et réfrigérateurs.
Le risque de choc électrique est accru en cas de
mise à la masse du corps.
c) Ne pas exposer les outils électriques à la pluie
ou à des conditions humides.
Si l'eau pénètre dans l'outil, cela augmente les
risques de choc électrique.
d) Ne pas utiliser le cordon à tort. Ne jamais utiliser
le cordon pour transporter ou débrancher l'outil
électrique.
Maintenir le cordon loin de la chaleur, de l'huile,
des bords pointus ou des pièces mobiles.
Les cordons endommagés ou usés augmentent
les risques de choc électrique.
e) En cas d'utilisation d'un outil électrique à
l'extérieur, utiliser un cordon de rallonge adapté
à un usage extérieur.
L'utilisation d'un cordon adapté à l'usage extérieur
réduit les risques de choc électrique.
3) Sécurité personnelle
a) Restez alerte, regarder ce que vous faites et
usez de votre bon sens en utilisant un outil
électrique.
Ne pas utiliser d'outil électrique si vous êtes
sous l'influence de drogues, d'alcool ou de
médicaments.
Pendant l'utilisation d'outils électrique, un instant
d'inattention peut entraîner des blessures graves.
12
b) Utiliser des équipements de sécurité. Toujours
porter des verres de protection.
L'utilisation d'équipements de sécurité tels que
les masques anti-poussière, les chaussures de
sécurité anti-dérapantes, les casques ou les
protections auditives dans des conditions
appropriées réduisent les risques de blessures.
c) Eviter les démarrages accidentels. Veiller à ce
que l'interrupteur soit en position d'arrêt avant
de brancher l'outil.
Transporter les outils électriques avec le doigt sur
l'interrupteur ou brancher les outils électriques
avec l'interrupteur en position de marche peut
entraîner des accidents.
d) Retirer toute clé de sécurité ou clé avant de
mettre l'outil électrique en marche.
Laisser une clé ou une clé de sécurité sur une
partie mobile de l'outil électrique peut engendrer
des blessures.
e) Ne pas trop se pencher. Toujours garder une
bonne assise et un bon équilibre pendant le
travail.
Cela permet un meilleur contrôle de l'outil
électrique dans des situations imprévisibles.
f) Porter des vêtements adéquats. Ne pas porter
de vêtements amples ni de bijoux. Maintenir les
cheveux, les vêtements et les gants loin des
pièces mobiles.
Les vêtements amples ou les cheveux longs
peuvent se prendre dans les pièces mobiles.
g) En cas de dispositifs destinés au raccordement
d'installations d'extraction et de recueil de la
poussière, veiller à ce qu'ils soient correctement
raccordés et utilisés.
L'utilisation de ces dispositifs peut réduire les
dangers associés à la poussière.
4) Utilisation et entretien d'un outil électrique
a) Ne pas forcer sur l'outil électrique. Utiliser l'outil
électrique adapté à vos travaux.
Le bon outil électrique fera le travail mieux et en
toute sécurité au régime pour lequel il a été conçu.
b) Ne pas utiliser l'outil électrique si l'interrupteur
ne le met pas en position de marche et d'arrêt.
Tout outil ne pouvant être contrôlé par
l'interrupteur est dangereux et doit être réparé.
c) Débrancher la prise avant de procéder à des
réglages, au remplacement des accessoires ou
au stockage des outils électriques.
Ces mesures préventives de sécurité réduisent les
risques de démarrage accidentel de l'outil électrique.
d) Stockez les outils électriques inutilisés hors de
la portée des enfants et ne pas laisser des
personnes non familiarisées avec l'outil ou ces
instructions utiliser l'outil électrique.
Les outils électriques sont dangereux entre les
mains d'utilisateurs non habilités.
e) Entretenir les outils électriques. Vérifier l'absence
de mauvais alignement ou d'arrêt,
d'endommagement de pièces ou toute autre
condition susceptible d'affecter l'opération de
l'outil.
Si l'outil est endommagé, le faire réparer avant
utilisation.
De nombreux accidents sont dus à des outils mal
entretenus.
Page 15

Français
f) Maintenir les outils coupants aiguisés et propres.
Des outils coupants bien entretenus avec des
bords aiguisés sont moins susceptibles de se
coincer et plus simples à contrôler.
g) Utiliser l'outil électrique, les accessoires et les
mèches de l'outil, etc. conformément à ces
instructions et de la manière destinée pour le
type précis d'outil électrique, en tenant compte
des conditions d'utilisation et du travail à réaliser.
L'utilisation de l'outil électrique pour des
opérations différentes de celles pour lesquelles il
a été conçu est dangereuse.
5) Service
a) Faire entretenir l'outil électrique par un technicien
habilité à l'aide de pièces de rechange identiques
exclusivement.
Cela garantira le maintien de la sécurité de l'outil
électrique.
PRECAUTIONS
Maintenir les enfants et les personnes infirmes
éloignés.
PRECAUTIONS POUR L’UTILISATION DE LA
PERCEUSE POUR TREPAN DIAMANT
1. Portez des bouchons avec les perceuses à percussion.
L’exposition au bruit peut engendrer une perte de
l’audition.
2. Utilisez les poignées auxiliaires fournies avec l’outil.
Toute perte de contrôle peut entraîner des blessures.
3. Avant de percer dans un mur, un plancher ou un
plafond, s’assurer bien qu’ils ne renferment ni câbles
ni lignes électriques.
4. Maintenir toujour fermement la poignée principale et
la poignée latérale de la machine. Dans le cas
contraire, la force du recul peut amoindrir la précision
de travail et présenter aussi quelque danger.
5. Ce preceuse pour tré pan diamanté est conçu
exclusivement pour fonctionner à sec.
Ne jamais l’utiliser pour des travaux de perçage faisant
intervenir de l’eau.
Lorsque les outils ne sont pas utilisés, ils doivent
être rangés hors de portée des enfants et des
personnes infirmes.
SPECIFICATIONS
Tension (par zone)*
Puissance*
1
1
Bouton de changement de vitesse–(Cadran)
Vitesse sans charge
Capacité:
Brique, Parpaing*
400 – 1000 min
2
Acier
Bois
Poids (sans fil)
1
*
Assurez-vous de vérifier la plaque signalétique se trouvant sur le produit, car elle peut changer suivant les régions.
*2Lors de l’utilisation d’une couronne de type sec (sauf brique dure)
(230V, 240V) (110V)
1400 W 1250 W
1–(A–E) 2–(A–E) 1–(A–E) 2–(A–E)
–1
800 – 2000 min–1400 – 1000 min–1800 – 2000 min
152 mm
13 mm
30 mm
4,0 kg
–1
ACCESSOIRES STANDARD
(1) Clef pour mandrin ...................................................... 1
(2) Poignée latérale .......................................................... 1
Les accessoires standard sont sujets à changement sans
préavis.
ACCESSOIRES SUR OPTION
(vendus séparément)
(1) Couronnes (Fig. 4-1)
Dia. du foret (mm)
22
28 65 117
38
48 91 152
Longueur (mm)
300
150
Dia. du foret (mm)
52
78 127
Longueur (mm)
150
Dia. du foret (mm)
107
Length (mm)
150
13
Page 16

Français
(2) Adaptateurs et tiges d’allongement
䡬 Adaptateur (Fig. 4-2)
Adaptateur pour couronnes de dia. 38 ~152 mm
(Fig. 4-3)
Tourillon pilote (Fig. 4-4)
Chasse-outils (Fig. 4-5)
䡬 Tige d’allongement (longueur 250 mm) (Fig. 4-6)
1
4
5
6
(3) Groupe dépoussiéreur
䡬 Aspirateur de poussière-Grand (Fig. 5-1)
䡬 Aspirateur de poussière-Petit (Fig. 5-2)
䡬 Aspirateur orientable (Fig. 5-3)
䡬 Tige d’allongement pour l’aspirateur orientable
(longueur 230 mm) (Fig. 5-4)
ATTENTION:
Quand l’aspirateur orientable est utilisé, raccorder le
tuyau d’aspirateur avant de mettre la machine en
service.
Sert à aspirer les copeaux en raccordant un aspirateur.
Fig. 4
3
2
AVANT LA MISE EN MARCHE
1. Source de puissance
S’assurer que la source de puissance àutiliser
correspond àla puissance indiquée sur la plaque
signalétique du produit.
2. Interrupteur de puissance
S’assurer que l’interrupteur de puissance est en
position ARRET. Si la fiche est branchée alors que
l’interrupteur est sur MARCHE, l’outil démarre
immédiatement et peut provoquer un grave accident.
3. Fil de rallonge
Lorsque la zone de travail est éloignée de la source
de puissance, utiliser un fil de rallonge d’une épaisseur
suffisante et d’une capaciténominale suffisante. Le fil
de rallonge doit être aussi court que possible.
PRECAUTION
Remplacer ou réparer tout cordon endommagé.
4. Montagede la poignée latérale
Monter la poignée latérale dans le corps principal
comme indiqué sur la Fig. 1.
Tourner la poignée dans le sens des aiguilles d’une
montre pour serrer la poignée, et tourner dans le
sens contraire pour la desserrer.
Au moment du montage de la poignée latérale,
desserrer la poignée et monter la poignée latérale
sur le couvre-engrenage. L’enfoncer jusqu’à la
position correcte dans la section de montage de
poignée latérale du couvre-engrenage, puis la serrer.
Avant utilisation, serrer fermement la poignée latérale.
(Elle peut être fixée dans n’importe quelle position
au-delà de 360°.)
5. Serrage des pièces
Insérer la couronne ou la mèche à fond dans
l’ouverture du mandrin. Serrer fermement de la
manière ordinaire en insérant les machoires du
mandrin dans les trois orifices de clé.
1
Les accessoires à option sont sujets à changement sans
préavis.
2
4
3
Fig. 5
APPLICATIONS
䡬 Perçage de divers produits en briques et en parpaing.
䡬 Forage de trous dans du métal, du bois et du plastique.
14
FONCTIONNEMENT
1. Mise en marche
Mise en marche: Appuyer sur la gâchette.
Arrêt: Relâcher la gâchette.
ATTENTION
Tenez fermement la poignée du corps principal et la
poignée latérale au moment de la mise en marche,
car la force de réaction risque de vous tordre les
mains.
2. Rapport entre le matériau à percer et le nombre
optimal de rotations
Le rapport entre le matériau à percer et le nombre
optimal de rotations peut varier légèrement en
fonction des conditions de travail, de l’état de
l’alimentation, etc. Utiliser le TABLEAU 1 à titre
indicatif.
Pour le positionnement du perçage, l’on s’apercevra
qu’il est plus facile de travailler si l’on tourne la
bague une fois puis qu’on la règle sur la vitesse
faible.
Page 17

TABLE 1
Indication du sélecteurde
Matériaux à percer Type de foret
Brique, bloc Foret trépan φ27
ALC t3.0 Scie circulaire φ27
Acier Scie circulaire φ15
SPCC t3.0
Acier inoxydable Scie circulaire φ15
t1.6
Bois Scie circulaire φ27
t50
Acier SPCC t3.0 Foret φ13
Bois t50 Foret φ30
ATTENTION :
䡬 Si l’on dépasse les valeurs standard (nombre optimal
de rotations) données dans le tableau, qu’on effectue
un travail continu pendant longtemps ou qu’on
effectue des travaux de perçage dans des matériaux
mous, le moteur peut être soumis à charge excessive
et il risque de brûler. En particulier, éviter les
conditions de travail anormales, par exemple celles
entraînant un arrêt du foret pendant le perçage. Régler
le nombre de rotations de façon à obtenir
constamment un travail en douceur.
䡬 Bien veiller à ne jamais utiliser un objet d’une capacité
maximale supérieure car cela pourrait réduire
considérablement la durée de service de l’appareil
principal.
3. Le matériau est entièrement percé:
Lorsque le foret perce complétement le matériau, un
maniement négligent conduit souvent à la rupture
du foret ou à la détérioration du corps même de la
perceuse par suite du mouvement brusque de la
perceuse. Soyez toujours sur vos gardes et soyez
prêts à relâcher la force de pression lorsque le
matériau est percé en entier.
4. Perçage au diamant
(1) Poser la couronne dans la position de perçage.
(2) Pendant le perçage, toujours tenir l’outil
perpendiculaire par rapport au matériau.
(3) Ne pas forcer sur la couronne, mais la laisser faire le
travail. La durée de vie de la couronne est ainsi
prolongée et les risques de casse sont réduits.
(4) Prendre soin d’enlever régulièrement la poussière de
maçonnerie ou les copeaux produits pendant le
perçage. Une accumulation de poussière ou de
diamanté
changement
Diamètre
de foret
φ65
φ152
φ65
φ120
φ55
φ55
φ65
φ120
Français
12
[Vitesse lente] [Vitesse rapide]
Cadran
ABCDEABCDE
copeaux peut entraîner une surchauffe, une usure
excessive de l’embrayage et du limiteur de couple et
une perte de segments sur la couronne.
(5) Au moment de l’entrée ou du retrait d’un trou,
s’assurer que la couronne est en rotation.
(6) Si la couronne se met à vibrer et quand elle commence
à traverser le matériau, réduire immédiatement la
pression.
(7) Après utilisation, ranger soigneusement la couronne
dans son coffret, et ne pas oublier qu’il s’agit d’une
couronne à diamants.
cMéthode de perçage avec le tourillon pilotev
Pour assurer un positionnement facile, effectuer les
étapes suivantes lors de l’utilisation d’une couronne.
(1) Effectuer un trou pilote dans le matériau sur la position
de perçage avec une broche en pierre de 13 mm.
(2) Fixer un tourillon pilote sur une couronne.
(3) Aligner le tourillon pilote sur le trou pilote et
commencer à percer la rainure de guidage.
(4) Quand la rainure de guidage est terminée, arrêter
temporairement le perçage et retirer le tourillon pilote.
(5) Aligner la couronne sur la rainure de guidage et
reprendre l’opération de perçage.
ATTENTION
䡬 Pendant le perçage avec une couronne, les mains
subissent une force de réaction très puissante. Il faut
tenir la machine fermement par la poignée du corps
principal et la poignée latérale.
Embrayage de sécurité
Cet outil est équipé d’un embrayage de sécurité de
type positif. Quand un couple d’un certain niveau est
requis, l’embrayage patine et le moteur se
désaccouple de l’arbre moteur. Quand cela se produit,
le mandrin cesse de tourner.
15
Page 18

Français
ATTENTION
䡬 Retirer immédiatement le corps principal quand
l’embrayage de sécurité se déclenche.
䡬 Ne pas continuer d’utiliser l’outil pendant plus de
deux secondes après le dé clenchement de
l’embrayage.
䡬 Eviter que l’embrayage de sécurité ne se déclenche
trop souvent.
5. Perçage avec une couronne ordinaire
(1) Perçage du bois
Utiliser un foret de perçage pour bois. Toutefois,
pour percer des trous de 6,5 mm ou plus petits,
utiliser un foret de perçage pour métal.
(2) Perçage d’acier doux ou de plastique
Utiliser un foret de perçage pour métal. Les
dimensions vont d’un minimum de 1,2 mm à la
capacité maximale de 13 mm.
ATTENTION
䡬 Pression:
Le perçage n’est pas accéléré si on applique une
pression forte à la perceuse. Ceci ne peut qu’abîmer
le foret de perçage, diminuer l’efficacité de perçage,
et/ou réduire la durée de vie de la perceuse.
䡬 Utilisation d’un foret de large diamètre:
Plus le diamètre du foret est grand, plus la force de
réaction sur votre bras est grande. Attention de ne
pas perdre le contrôle de la perceuse à cause de cette
force de réaction. Pour avoir la perceuse bien en
main, se tenir bien d’aplomb, tenir la perceuse
fermement à deux mains, et s’assurer que la perceuse
est perpendiculaire au matériau en cours de perçage.
䡬 Le matériau est entièrement percé:
Lorsque le foret perce complétement le matériau, un
maniement négligent conduit souvent à la rupture
du foret ou à la détérioration du corps même de la
perceuse par suite du mouvement brusque de la
perceuse. Soyez toujours sur vos gardes et soyez
prêts à relâcher la force de pression lorsque le
matériau est percé en entier.
5. Remplacement d’un balai carbone
Démonter le capuchon du balai avec un tournevis à
petite tête. Le balai en carbone peut se retirer
faiclement.
NOTE
Par suite du programme permanent de recherche et de
développement HITACHI, ces spécifications peuvent faire
l’objet de modifications sans avis préalable.
Au sujet du bruit et des vibrations
Les valeurs mesurées ont été déterminées en fonction de
la norme EN60745 et déclarées conforme à ISO 4871.
Niveau de pression acoustique pondérée A: 84 dB (A)
Incertitude KpA: 3 dB (A)
Porter un casque de protection.
Valeur d’accélération moyenne quadratique pondérée
type: 6,0 m/s2.
ENTRETIEN ET CONTROLE
1. Inspection de la couronne
L’utilisation continue d’une couronne épointée ou
endommagée réduit l’efficacité du perçage et risque
de provoquer une surcharge du moteur. Remplacer
la couronne par une neuve dès qu’une abrasion
excessive apparaît.
2. Contrôle des vis de montage:
Vérifier régulièrement les vis de montage et s’assurer
qu’elles sont correctement serrées. Resserrer
immédiatement toute vis desserrée. Sinon, il y a
danger sérieux.
3. Entretien du moteur:
Le bobinage de l’ensemble moteur est le “coeur”
même de l’outil électro-portatif. Veiller soigneusement
à ce que ce bobinage ne soit pas endommagé et/ou
mouillé par de l’huile ou de l’eau.
4. Contrôle des balais en carbone: (Fig. 14)
Le moteur utilise des balais en carbone qui sont des
pièces qui s’usent. Comme un balai en carbone trop
usé peut détériorer le moteur, remplacer les balais
en carbone par des neufs ayant le même No. que
celui montré à la figure quand ils sont usés ou à la
limite d’usure. En outre, toujours tenir les balais
propres et veiller à ce qu’ils coulissent librement
dans les supports.
16
Page 19

Italiano
NORME DI SICUREZZA GENERALI
AVVERTENZA!
Leggere tutte le istruzioni
La mancata osservanza di tutte le istruzioni di seguito
riportata potrebbe essere causa di scosse elettriche,
incendi e/o gravi lesioni.
Il termine “elettroutensili” riportato in tutte le avvertenze di
seguito elencate si riferisce agli elettroutensili azionati con
alimentazione di rete (via cavi) o a batterie (senza cavi).
CONSERVARE QUESTE ISTRUZIONI
1) Area operativa
a) Mantenere l'area operativa pulita e ordinata.
Aree operative sporche e disordinate possono
favorire gli infortuni.
b) Non utilizzare gli elettroutensili in atmosfere
esplosive, ad es. in presenza di liquidi , gas o
polveri infiammabili.
Gli elettroutensili generano delle scintille che
potrebbero accendere la polvere dei fumi.
c) Tenere lontani bambini e astanti durante l'utilizzo
degli elettroutensili.
Qualsiasi distrazione può essere causa di perdita
di controllo.
2) Sicurezza elettrica
a) Le spine degli elettroutensili devono essere idonee
alle prese disponibili.
Non modificare mai le prese.
Con gli elettroutensili a massa (messi a terra),
non utilizzare alcun adattatore.
L'utilizzo di spine intatte e corrispondenti alle
prese disponibili ridurrà il rischio di scosse
elettriche.
b) Evitare qualsiasi contatto con le superfici a massa
o a terra, quali tubi, radiatori, fornelli e frigoriferi.
In caso di messa a terra o massa del corpo,
sussiste un maggior rischio di scosse elettriche.
c) Non esporre gli elettroutensili alla pioggia o
all'umidità.
La penetrazione di acqua negli elettroutensili
aumenterà il rischio di scosse elettriche.
d) Non tirare il cavo. Non utilizzarlo per il trasporto,
o per tirare o scollegare l'elettroutensile.
Tenere il cavo lontano da fonti di calore, oli, bordi
appuntiti o parti in movimento.
Cavi danneggiati o attorcigliati possono
aumentare il rischio di scosse elettriche.
e) Durante l'uso degli elettroutensili all'esterno,
utilizzare una prolunga idonea per usi esterni.
L'utilizzo di cavi per esterno riduce il rischio di
scosse elettriche.
3) Sicurezza personale
a) Durante l'uso degli elettroutensili, state all'erta,
verificate ciò che state eseguendo e adottate
sempre il buon senso.
Non utilizzate gli elettroutensili qualora siate
stanchi, sotto l'influenza di farmaci, alcol o cure
mediche.
Anche un attimo di disattenzione durante l'uso
degli elettroutensili potrebbe essere causa di gravi
lesioni personali.
b) Indossate l'attrezzatura di sicurezza. Indossate
sempre le protezioni oculari.
L'attrezzatura di sicurezza, quali maschera
facciale, calzature antiscivolo, caschi o protezioni
oculari ridurrà il rischio di lesioni personali.
c) Ponete attenzione alle accensioni involontarie.
Prima dell'attivazione dell'alimentazione,
verificate che l'interruttore sia posizionato su OFF.
Il trasporto degli elettroutensili tenendo le dita
sull'interruttore o con alimentazione elettrica attivata
dall'interruttore su ON, implica il rischio di incidenti.
d) Prima di attivare l'elettroutensile, rimuovete
qualsiasi chiave di regolazione.
Lasciando la chiave in un componente in rotazione
dell'elettroutensile, sussiste il rischio di lesioni
personali.
e) Mantenersi in equilibrio. Mantenersi sempre su
due piedi, in equilibrio stabile.
Ciò consente di controllare al meglio
l'elettroutensile in caso di situazioni impreviste.
f) Vestirsi in modo adeguato. Non indossare abiti
larghi o gioielli. Tenere i capelli, gli abiti e i guanti
lontano dalle parti in movimento.
Abiti allentati, gioielli e capelli lunghi potrebbero
impigliarsi nelle parti in movimento.
g) In caso di dispositivi provvisti di collegamento ad
apparecchiature di rimozione e raccolta polveri,
verificare che queste siano collegate e utilizzate
in modo adeguato.
L'utilizzo di questi dispositivi può ridurre i rischi
connessi alle polveri.
4) Utilizzo e manutenzione degli elettroutensili
a) Non utilizzare elettroutensili non idonei. Utilizzare
l'elettroutensile idoneo alla propria applicazione.
Utilizzando l'elettroutensile corretto, si garantirà
un'esecuzione migliore e più sicura del lavoro,
alla velocità di progetto.
b) Non utilizzare l'elettroutensile qualora non sia
possibile accenderlo/spegnerlo tramite
l'interruttore.
É pericoloso utilizzare elettroutensili che non
possano essere azionati dall'interruttore.
Provvedere alla relativa riparazione.
c) Prima di effettuare qualsiasi regolazione, sostituire
gli accessori o depositare gli elettroutensili,
scollegare la spina dalla presa elettrica.
Queste misure di sicurezza preventive riducono il
rischio di avvio involontario dell'elettroutensile.
d) Depositare gli elettroutensili non utilizzati lontano
dalla portata dei bambini ed evitare che persone
non esperte di elettroutensili o non a conoscenza
di quanto riportato sulle presenti istruzioni
azionino l'elettroutensile.
É pericoloso consentire che utenti non esperti
utilizzino gli elettroutensili.
e) Manutenzione degli elettroutensili. Verificare che
non vi siano componenti in movimento disallineati
o bloccati, componenti rotti o altre condizioni
che potrebbero influenzare negativamente il
funzionamento dell'elettroutensile.
In caso di guasti, provvedere alla riparazione
dell'elettroutensile prima di riutilizzarlo.
Molti incidenti sono causati da una scarsa
manutenzione.
17
Page 20

Italiano
f) Mantenere gli strumenti di taglio affilati e puliti.
Gli strumenti di taglio in condizioni di
manutenzione adeguata, con bordi affilati, sono
meno soggetti al bloccaggio e sono più
facilmente controllabili.
g) Utilizzare l'elettroutensile, gli accessori, le
barrette, ecc. in conformità a quanto riportato
nelle presenti istruzioni e secondo l'uso preposto,
tenendo in debita considerazione le condizioni
operative e il tipo di lavoro da eseguire.
L'utilizzo di elettroutensili per operazioni diverse
da quanto previsto, può essere causa di situazioni
pericolose.
5) Assistenza
a) Affidate le riparazioni dell'elettroutensile a
persone qualificate che utilizzino solamente parti
di ricambio identiche.
Ciò garantirà il mantenimento della sicurezza
dell'elettroutensile.
PRECAUZIONI
Tenere lontano dalla portata di bambini e invalidi.
Quando non utilizzati, gli strumenti dovranno essere
deposti lontano dalla portata di bambini e invalidi.
PRECAUZIONI PER L’USO DEL TRAPANO CON
CORONA A PUNTE DIAMANTATE
1. Indossare protezioni per le orecchie con le sonde a
percussione.
L’esposizione al rumore può causare la perdita
dell’udito.
2. Utilizzare le leve ausiliarie fornite con l’utensile.
La perdita di controllo può causare lesioni alla
persona.
3. Prima di perforare un muro, un pavimento od un
soffitto, accertarsi con sicurezza che nessun cavo
elettrico e nessuna condotta si trovino all’interno
dello stesso.
4. Impugnare sempre saldamente il corpo e
l’impugnatura dell’utensile, per evitare che la forza di
controreazione produca un lavoro impreciso e persino
pericoloso.
5. Questo trapano con corona a punte diamantate deve
essere usato esclusivamente in
funzionamento a secco.
Non usarlo mai per qualsiasi operazione di
trapanatura che utilizza acqua!
CARATTERISTICHE
Voltaggio (per zona)*
Potenza assorbita*
1
1
Regolazione di velocità–(Selettore)
Velocità senza carico
Capacità:
Mattone, blocco*
400 – 1000 min
2
Acciaio
Legno
Peso (escluso il cavo)
1
*
Accertatevi di aver controllato bene la piastrina perché essa varia da zona a zona.
*2Quando si usa una corona di tipo a secco (tranne per mattoni duri)
(230V, 240V)
1400 W 1250 W
1–(A–E) 2–(A–E) 1–(A–E) 2–(A–E)
–1
800 – 2000 min–1 400 – 1000 min–1 800 – 2000 min
152 mm
13 mm
30 mm
4,0 kg
(110V)
–1
ACCESSORI STANDARD
(1)Chiave per mandrino ................................................... 1
(2)Impugnatura laterale ................................................... 1
Gli accessori standard possono essere soggetti a
cambiamento senza preavviso.
ACCESSORI FACOLTATIVI (venduti a parte)
(1) Corone a punte diamantate (Fig. 4-1)
Diam. punta (mm)
22
28 65 117
38
48 91 152
18
Lunghezza (mm)
300
150
Diam. punta (mm)
52
78 127
Lunghezza (mm)
150
Diam. punta (mm)
107
Lunghezza (mm)
150
Page 21

Italiano
(2) Kit adattatore e estensori
䡬 Kit adattatore (Fig. 4-2)
Adattatore per corone da 38-152 mm dia. (Fig. 4-
3)
Tappo pilota (Fig. 4-4)
Spostamento eiettore (Fig. 4-5)
䡬 Estensore (lunghezza 250 mm) (Fig. 4-6)
1
4
5
6
Fig. 4
(3) Gamma di estrazione polvere
䡬 Succhiapolvere-grande (Fig. 5-1)
䡬 Succhiapolvere-piccolo (Fig. 5-2)
䡬 Dirottatore polvere (Fig. 5-3)
䡬 Estensore per il dirottatore polvere (lunghezza
230 mm) (Fig. 5-4)
ATTENZIONE:
Quando si usa il dirottatore polvere, collegare il
tubo dell’aspirapolvere prima di attivare
l’interruttore dell’attrezzo.
Usato per risucchiare le schegge tramite collegamento
ad un aspirapolvere.
3
2
PRIMA DELL’USO
1. Alimentazione
Assicurarsi che la rete di alimentazione che si vuole
usare sia compatibile con le caratteristiche relative
all’alimentazione di corrente specificate nella piastrina
dell’apparecchio.
2. Interruttore di corrente
Mettere l’interruttore in posizione SPENTO. Se la
spina è infilata in una presa mentre l’interruttore è
acceso, l’utensile elettrico si mette immediatamente
in moto, facilitando il verificarsi di incidenti gravi.
3. Prolunga del cavo
Quando l’ambiente di lavoro è lontano da una presa
di corrente, usare una prolunga del cavo di sufficiente
spessore e di prestazione adeguata. La prolunga deve
essere più corta possibile.
CAUTELA
Il cavo danneggiato deve essere riparato o sostituito.
4. Montaggio dell’impugnatura laterale
Montare l’impugnatura laterale sul corpo principale,
come mostrato nella Fig. 1.
Ruotare l’impugnatura in senso orario per stringere
l’impugnatura laterale e ruotaria in senso antiorario
per allentaria.
Quando si monta l’impugnatura laterale, allentare
l’impugnatura e montare l’impugnatura laterale sul
coperchio ingranaggi. Quindi premerla nella posizione
corretta nella sezione di montaggio impugnatura
laterale del coperchio ingranaggi e stringerla.
Prima dell’uso stringere saldamente l’impugnatura
laterale. (L’impugnatura laterale può essere assicurata
in qualsiasi posizione nel giro di 360°.)
5. Fissaggio
Inserire la corona o la punta del trapano il più dentro
possibile nel mandrino aperto. Fissare saldamente
nel modo normale inserendo la parte dentata della
chiave mandrino nei tre fori.
1
Gli accessori disponibili a richiesta possono essere
soggetti a cambiamento senza preavviso.
2
4
3
Fig. 5
IMPIEGHI
䡬 Trapanatura di vari oggetti in blocchi o mattoni.
䡬 Trapanatura di fori in metalli, legno e plastiche.
PROCEDIMENTI DI IMPIEGO PRATICO
1. Attivazione
Attivazione: Premere il grilletto.
Disattivazione: Rilasciare il grilletto.
ATTENZIONE
Tenere saldamente l’impugnatura del corpo principale
e l’impugnatura laterale quando si attiva l’utensile
perché c’è il rischio che la forza di reazione lo strappi
dalle mani.
2. Rapporto tra materiale da trapanare e numero di
rotazioni ottimale
Il rapporto tra il materiale da trapanare e il numero di
rotazioni ottimale può differire leggermente a seconda
delle condizioni di lavoro, della situazione di
alimentazione, ecc. Usare l’utensile facendo riferimento
alla TABELLA 1 come guida approssimativa.
Per il posizionamento del trapano, è più facile lavorare
se si gira una volta la ghiera e si imposta una velocità
bassa.
19
Page 22

Italiano
TABELLA 1
Indicazione sulla leva del
Materiali da trapanare Tipi di trapani
Mattone, blocchetto Punta a nucleo φ27
ALC t3.0 Sega da fori φ27
Acciaio Sega da fori φ15
SPCC t3.0
Acciaio inossidabile Sega da fori φ15
t1.6
Legno Sega da fori φ27
t50
Acciaio SPCC t3.0 Trapano φ13
Legno t50 Trapano φ30
di diamante
cambio
Diametro
dei trapani
[Marcia a bassa velocità] [Marcia ad alta velocità]
12
Selettore
ABCDEABCDE
φ65
φ152
φ65
φ120
φ55
φ55
φ65
φ120
CAUTELA:
䡬 Se si eccedono i valori standard (numeri di rotazioni
ottimali) forniti nella tabella o si lavora
ininterrottamente per lunghi periodi o si esegue la
trapanatura su materiali morbidi, il motore può essere
sottoposto a carichi eccessivi e rimanere bruciato. In
particolare, evitare usi anomali tali che il trapano si
fermi durante il lavoro. Regolare il numero di rotazioni
in modo da potere trapanare sempre in modo
uniforme.
䡬 Accertarsi sempre con cura di non usare mai alcun
utensile con una capacità superiore a quella massima
perché altrimenti la vita utile dell’unità sarà
grandemente ridotta.
3. Quando si perfora il materiale da parte a parte:
Quando la punta perfora tutto il materiale, un
maneggio non attento ha spesso come risultato una
punta spezzata o danni al corpo stesso del trapano,
dovuti all’improvviso movimento del trapano. Restare
sempre in guardia e pronti a rilasciare la pressione
quando si perfora il materiale da parte a parte.
4. Trapanatura con corona a punte diamantate
(1) Collocare la corona sulla posizione di trapanatura.
(2) Durante la trapanatura, tenere sempre l’utensile diritto
contro il materiale.
(3) Non forzare la corona: lasciare invece che lavori
liberamente. Questo prolunga la durata della corona
e riduce le rotture.
(4) Ricordarsi di rimuovere regolarmente la polvere/
residui prodotti durante la trapanatura. L’accumularsi
di tale polvere/residui causa surriscaldamenti e
eccessiva usura del limitatore di frizione/torsione,
nonché nella perdita di pezzi della corona.
20
(5) Quando si inserisce o si estrae la punta da un foro,
assicurarsi che la corona stia ruotando.
(6) Se la corona inizia a vibrare e quando la corona inizia
a trapassare il materiale, ridurre immediatamente la
pressione.
(7) Dopo l’uso riporre attentamente la corona nella sua
scatola e ricordare che si tratta di una corona a punte
diamantate.
cMetodo di trapanatura con il tappo pilotav
Per facilitare il posizionamento, procedere come
segue quando si usa una corona a punte diamantate.
(1) Creare un foro pilota nella posizione centrale del
materiale da trapanare con un perno per pietra da 13
mm.
(2) Applicare un tappo pilota alla corona.
(3) Allineare il tappo pilota con il foro pilota e iniziare la
trapanatura per creare una scanalatura di guida.
(4) Una volta creata la scanalatura di guida, interrompere
temporaneamente la trapanatura e staccare il tappo
pilota.
(5) Allineare la corona con la scanalatura di guida e
iniziare di nuovo la trapanatura.
PRECAUZIONE
䡬 Quando si esegue la trapanatura con una corona a
punte diamantate, c’è una potente forza di reazione
contro le mani. Tenere saldamente l’impugnatura del
corpo principale e l’impugnatura laterale.
Frizione di arresto di sicurezza
Questo utensile è dotato di una frizione di arresto di
sicurezza di tipo positivo. La frizione scorre quando
viene richiesto un certo livello di torsione, causando
il disimpegno del motore dall’albero di uscita. Il
mandrino cessa quindi di girare.
Page 23

Italiano
PRECAUZIONE
䡬 Tirare immediatamente indietro il corpo principale
quando la frizione di arresto di sicurezza si attiva.
䡬 Non continuare ad usare l’utensile per più di due
secondi mentre la frizione sta scorrendo.
䡬 Evitare attivazioni troppo frequenti della frizione di
arresto di sicurezza.
5. Trapanatura con una punta convenzionale
(1) Trapanatura di legno
Usare una punta da legno. Tuttavia, quando si fanno
fori da 6,5 mm o inferiori, usare una punta da metallo.
Il diametro perno massimo utilizzabile è 30 mm.
(2) Trapanatura di acciaio dolce o plastica
Usare una punta da metallo. La misura va da un
minimo di 1,2 mm fino alla massima di 13 mm.
PRECAUZIONE:
䡬 Pressione:
Il lavoro di foratura NON sarà accelerato se si esercita
una forte pressione sul trapano. Una tale azione avrà
conseguenze solo in un danneggiamento della punta,
in una minore efficacia di perforazione e/o in una
diminuzione della vita del trapano.
䡬 Quando si usa una punta a grande diametro:
Più è grande il diametro della punta, più grande sarà
la forza di reazione sul vostro braccio. Fare attenzione
a non perdere il controllo del trapano a causa di
questa forza di reazione. Per mantenere un solido
controllo, prendere un assetto stabile sui piedi, tenere
stretto it trapano con ambedue le mani e tenere il
trapano ortogonale rispetto al materiale da perforare.
䡬 Quando si perfora il materiale da parte a parte:
Quando la punta perfora tutto il materiale, un
maneggio non attento ha spesso come risultato una
punta spezzata o danni al corpo stesso del trapano,
dovuti all’improvviso movimento del trapano. Restare
sempre in guardia e pronti a rilasciare la pressione
quando si perfora il materiale da parte a parte.
5. Sostituzione di una spazzola di carbone
Togliere la capsula della spazzola con un cacciavite a
taglio. La spazzola può cosi’ essere agevolmente
rimossa.
NOTA
A causa del continuo programma di ricerca e sviluppo
della HITACHI, le caratteristiche qui riportate sono
soggette a cambiamenti senza preventiva comunicazione.
Informazioni riguardanti i rumori trasmessi dall’aria e
le vibrazioni
I valori misurati sono stati determinati in conformitá a
EN60745 e descritti in conformità alla normativa ISO 4871.
Livello misurato di pressione sonora pesato A: 84 dB (A)
KpA incertezza: 3 dB (A)
Indossare protezioni per le orecchie.
Il valore efficace pesato tipico dell’accelerazione è di
6,0 m/s2.
MANUTENZIONE E CONTROLLI
1. Ispezione della corona a punte diamantate
L’uso continuato di corone smussate o danneggiate
causa una ridotta efficienza di trapanatura e può
causare sovraccarichi del motore. Sostituire la corona
con un’altra nuova non appena si nota un’abrasione
eccessiva.
2. Controllo delle viti di tenuta:
Controllare regolarmente tutte le viti di tenuta e
assicurarsi che siano esclusìvamente serrate. Nel caso
che una di queste viti dovesse allentarsi riserrarla
immediatamente. Se si non ottiene di farlo, si può
causare un grave incidente.
3. Manutenzione del motore:
L’avvolgimento del motore il vero e proprio “cuore”
degli attezzi elettrici. Fare attenzione a non
danneggiare l’avvolgimento e/o non bagnarlo con
olio o acqua.
4. Controllo delle spazzole di carbone (Fig. 3)
Il motore impiega spazzole di carbone che sono
materiali di consumo. Poiché una spazzola di carbone
troppo usurata può creare fastidi al motore, sostituire
le spazzole con altre nuove dello stesso numero
indicato nella figura quando sono logore fino al limite
del regolamento e quasi.
Tenere inoltre sempre pulite le spazzole di carbone e
fare in modo che esse scorrano liberamente
nell’interno del portaspazzola.
21
Page 24

Nederlands
ALGEMENE VEILIGHEIDSVOORSCHRIFTEN
WAARSCHUWING!
Lees alle instructies aandachtig door
Nalating om de hieronderstaande voorschriften op te
volgen kan in elektrische schok, brand en/of ernstig letsel
resulteren.
De term “elektrisch gereedschap” heeft zowel betrekking
op elektrisch gereedschap dat via de netvoeding van
stroom wordt voorzien als gereedschap dat via een accu
(snoerloos) van stroom wordt voorzien.
BEWAAR DEZE INSTRUCTIES
1) Werkplek
a) Zorg voor een schone en goed verlichte
werkplek.
Een rommelige en donkere werkplek verhoogt
de kans op ongelukken.
b) Gebruik het elektrisch gereedschap niet in een
omgeving met ontplofbare vloeistoffen, gassen
of stof.
Elektrisch gereedschap kan vonken afgeven. Deze
vonkjes kunnen stofdeeltjes of gassen doen
ontbranden.
c) Houd kinderen en andere toeschouwers tijdens
het gebruik van elektrische gereedschap uit de
buurt.
Afleidingen kunnen gevaarlijk zijn.
2) Elektrische veiligheid
a) De stekker op het elektrische gereedschap moet
geschikt zijn voor aansluiting op de
wandcontactdoos.
De stekker mag op geen enkele manier
gemodificeerd worden. Gebruik geen
verloopstekker met geaard elektrisch
gereedschap.
Deugdelijke stekkers en geschikte
wandcontactdozen verminderen het risico op een
elektrische schok.
b) Vermijd lichamelijk contact met geaarde
oppervlakken zoals leidingen, radiatoren,
fornuizen en koelkasten.
Wanneer uw lichaam in contact staat met geaarde
oppervlakken loopt u een groter risico op een
elektrische schok.
c) Stel het elektrisch gereedschap niet bloot aan
regen of vochtige omstandigheden.
Het risico op een elektrische schok wordt vergroot
wanneer er water in het elektrisch gereedschap
terechtkomt.
d) Behandel het snoer voorzichtig. Draag het
gereedschap nooit door dit bij het snoer vast
te houden. Trek niet aan het snoer wanneer u
de stekker uit het stopcontact wilt halen.
Houd het snoer uit de buurt van warmtebronnen,
olie, scherpe randen of bewegende onderdelen.
Een beschadigd of verward snoer verhoogt het
risico op een elektrische schok.
e) Gebruik buitenshuis een verlengsnoer dat
specifiek geschikt is voor het gebruik buiten.
Het gebruik van een snoer dat specifiek geschikt
is voor gebruik buitenshuis vermindert het risico
op een elektrische schok.
3) Persoonlijke veiligheid
a) Blijf waakzaam, let voortdurend op uw werk en
gebruik uw gezond verstand wanneer u
elektrisch gereedschap gebruikt.
Gebruik geen elektrisch gereedschap wanneer
u moe bent of onder invloed van drugs, alcohol
of medicijnen.
Eén moment van onoplettendheid kan in ernstig
lichamelijk letsel resulteren.
b) Gebruik persoonlijke beschermingsmiddelen.
Draag altijd oogbescherming.
Persoonlijke beschermingsmiddelen, zoals
stofmaskers, niet-glijdende veiligheidsschoenen,
helm of oorbescherming vermindert het risico
op lichamelijk letsel.
c) Voorkom dat het gereedschap per ongeluk op
kan starten. Controleer of de schakelaar op de
uit stand staat voordat u de stekker in het
stopcontact steekt.
Zorg ervoor dat u tijdens het verplaatsen van het
elektrisch gereedschap uw vingers uit de buurt
van de schakelaar houdt en steek de stekker van
het gereedschap niet in het stopcontact terwijl de
schakelaar op aan staat om ongelukken te
vermijden.
d) Verwijder sleutels en moersleutels uit het
gereedschap voordat u het elektrisch
gereedschap aanzet.
Een (moer-)sleutel die op een bewegend
onderdeel van het elektrisch gereedschap
bevestigd is kan in lichamelijk letsel resulteren.
e) Reik niet te ver. Zorg ervoor dat u te allen tijde
stevig staat en uw evenwicht behoudt.
Op deze manier heeft u tijdens een onverwachte
situatie meer controle over het elektrisch
gereedschap.
f) Draag geen loszittende kleding of sieraden. Houd
uw haar, kleding en handschoenen uit de buurt
van bewegende onderdelen.
Loszittende kleding, sieraden en lang haar kunnen
in de bewegende onderdelen verstrikt raken.
g) Indien het elektrisch gereedschap van een
aansluiting voor stofafzuiging is voorzien dan
dient u ervoor te zorgen dat de stofafzuiging
aangesloten en op de juiste manier gebruikt
wordt.
Het gebruik van stofafzuiging vermindert
eventuele stofgerelateerde risico’s.
4) Bediening en onderhoud van elektrisch gereedschap
a) Het elektrisch gereedschap mag niet geforceerd
worden. Gebruik het juiste gereedschap voor
het karwei.
U kunt de klus beter en veiliger uitvoeren
wanneer u het juiste elektrische gereedschap
gebruikt.
b) Gebruik het elektrisch gereedschap niet als de
schakelaar niet goed werkt.
Elektrisch gereedschap dat niet via de schakelaar
bediend kan worden is gevaarlijk en moet
onmiddellijk gerepareerd worden.
c) Haal de stekker uit het stopcontact voordat u
afstellingen verricht, accessoires verwisselt of
voordat u het elektrisch gereedschap opbergt.
22
Page 25

Nederlands
Dergelijke preventieve veiligheidsmaatregelen
verminderen het risico dat het elektrisch
gereedschap per ongeluk opstart.
d) Berg elektrisch gereedschap buiten het bereik
van kinderen op en sta niet toe dat personen
die niet bekend zijn met het juiste gebruik van
het gereedschap of deze voorschriften dit
elektrisch gereedschap gebruiken.
Eletrisch gereedschap is gevaarlijk in onbevoegde
handen.
e) Het elektrisch gereedschap moet regelmatig
onderhouden worden. Controleer het
gereedschap op een foutieve uitlijning,
vastgelopen of defecte bewegende onderdelen
en andere problemen die van invloed zijn op de
juiste werking van het gereedschap.
Indien het gereedschap defect of beschadigd is
moet het gerepareerd worden voordat u het
gereedschap opnieuw gebruikt.
Slecht onderhouden elektrisch gereedschap is
verantwoordelijk voor een groot aantal doe-hetzelf ongelukken.
f) Houd snijwerktuigen scherp en schoon.
Goed onderhouden snijwerktuigen met scherpe
snijranden lopen minder snel vast en zijn
gemakkelijker in het gebruik.
g) Elektrisch gereedschap, toebehoren, bits enz.
moeten in overeenstemming met deze
instructies en het bestemde doel worden
gebruikt waarbij de werkomstandigheden en
het werk in overweging moeten worden
genomen.
Gebruik van elektrisch gereedschap voor andere
doeleinden dan het bestemde doel kan tot
gevaarlijke situaties leiden.
5) Onderhoudsbeurt
a) Het gereedschap mag uitsluitend door bevoegd
onderhoudspersoneel worden onderhouden die
authentieke onderdelen gebruikt.
Hierdoor kunt u erop aan dat de veiligheid van
het elektrisch gereedschap behouden blijft.
VOORZORGMAATREGELEN
Houd kinderen en kwetsbare personen op een
afstand.
Het gereedschap moet na gebruik buiten het bereik
van kinderen en andere kwetsbare personen worden
opgeborgen.
VOORZORGSMAATREGELEN BETREFFENDE
HET GEBRUIK VAN DE DIAMANT
BOORMACHINE
1. Draag gehoorbescherming tijdens het gebruik van
klopboormachines.
Blootstelling aan lawaai kan tot gehoorverlies leiden.
2. Gebruik de extra handgrepen die met het gereedschap
zijn meegeleverd.
Verlies van controle over het gereedschap kan in
lichamelijk letsel resulteren.
3. Voordat men in een wand, vloer of plafond boort,
moet men zich er eerst terdege van overtuigen, dat
er geen electrische kabels of buizen onder liggen.
4. Houd de handgrepen van het electrisch gereedschap
altijd stevig vast. Zoniet dan zal de tegendruk onzuiver
werk of gevaarlijke situaties in de hand werken.
5. Deze diamant doos boor is uitsluitend bedoeld voor
droog gebruik.
Gebruik deze nooit voor boren met gebruik van water!
TECHNISCHE GEGEVENS
Voltage (verschillend van gebied tot gebied)*
Opgenomen vermogen*
1
1
Toerentalkiezer–(Schijf)
Onbelaste snelheid
Capaciteit:
Baksteen, bouwblokken*
400 – 1000 min
2
Staal
Hout
Gewicht (zonder kabel)
1
*
Controleer het naamplaatje op het apparaat afhankelijk van het gebied waar het verkocht wordt gewijzigd kan
worden.
2
Bij gebruik van diamantkern-boortjes voor droog boren (niet voor harde baksteen)
*
(230V, 240V)
(110V)
1400 W 1250 W
1–(A–E) 2–(A–E) 1–(A–E) 2–(A–E)
–1
800 – 2000 min–1 400 – 1000 min–1 800 – 2000 min
152 mm
13 mm
30 mm
4,0 kg
STANDAARD TOEBEHOREN
(1)Boorhoudersleute ....................................................... 1
(2)Zijhendel ...................................................................... 1
De standaard toebehoren kunnen zonder aankondiging
op ieder moment worden veranderd.
–1
23
Page 26

Nederlands
EXTRA TOEBEHOREN (los verkrijgbaar)
(1) Diamantkern-boortjes (Afb. 4-1)
Doorsnede Lengte Doorsnede Lengte Doorsnede Lengte
boorkop (mm) (mm) boorkop (mm) (mm) boorkop (mm) (mm)
22
28 65 117
38
48 91 152
(2) Adaptersets en verlengstangen
䡬 Adapterset (Afb. 4-2)
Adapter voor boortjes met een diameter van 38
tot 152 mm (Afb. 4-3)
Boorgeleider (Afb. 4-4)
Uitdrijver (Afb. 4-5)
䡬 Verlengstang (lengte 250 mm) (Afb. 4-6)
4
6
(3) Stofverwerking
䡬 Stofzuiger-adapter-klein (Afb. 5-1)
䡬 Stofzuiger-adapter-groot (Afb. 5-2)
䡬 Stofwartel (Afb. 5-3)
䡬 Verlengstuk voor stofwartel (Lengte 230 mm) (Afb.
5-4)
LET OP:
Voor het gebruik van de stofwartel dient u eerst
de stofzuigerslang vast te maken, alvorens u het
hoofdapparaat inschakelt.
Voor het opzuigen van stof en gruis, door aansluiten op
een stofzuiger.
1
300
150
3
5
Afb. 4
2
3
52
78 127
150
De extra toebehoren kunnen zonder aankondiging op
ieder moment worden veranderd.
TOEP ASSINGSGEBIEDEN
䡬 Boren in verschillende soorten bouwblokken en
bakstenen.
1
䡬 Boren in metalen, hout en plastic.
VOOR BEGIN VAN WERK
2
4
1. Netspanning
Controleren of de netspanning overeenkomt met de
opgave op het naamplaatje.
2. Netschakelaar
Controleren of de netschakelaar op “UIT” staat.
Wanneer de stekker op het net aangesloten is, terwijl
de schakelaar op “AAN” staat, begint het gereedschap
onmiddellijk te draaien, hetwelk ernstig gevaar
betekent.
3. Verlengsnoer
Wanneer het werkterrein niet in de buurt van een
stopcontact ligt, dan moet men gebruik maken van
een verlengsnoer, dat voldoende dwarsprofiel en
voldoende nominaal vermogen heeft. Het
verlengsnoer moet zo kort mogelijk gehouden
worden.
VOORZICHTIG
Een beschadigd snoer moet vervangen of gerepareerd
worden.
4. Aanbrengen van de zijgreep.
Breng de zijgreep op het apparaat aan, zoals getoond
in Afb. 1.
Draai de zijgreep rechtsom om deze vast te zetten en
linksom om deze los te draaien.
Bij het aanbrengen van de zijgreep dient u de hendel
los te draaien. Monteer de zijgreep aan de behuizing
van het apparaat. Duw de zijgreep vervolgens naar
de gewenste positie op het daarvoor geschikte
oppervlak en zet deze vast.
Alvorens de boor te gebruiken, dient u de zijgreep
stevig vast te zetten.
(De zijgreep kan over 360° gedraaid worden en in
iedere gewenste positie gebruikt worden.)
5. Vastzetten van boortjes
Plaats de diamantkern-boortjes of andere boortjes
zover mogelijk in de boorkop. Zet de boren vervolgens
goed vast door het getande uiteinde van de
boorkopsleutel in één van de drie openingen in de
boorkop te plaatsen en aan te draaien.
107
150
24
Afb. 5
Page 27

Nederlands
PRAKTISCHE WERKWIJZE
1. Bediening van de schakelaar
Inschakelen: Duw de trekschakelaar in
Uitschakelen: Laat de trekschakelaar los
LET OP
Zorg dat u de boor goed vasthoudt aan de hoofdgreep
en de zijgreep als u de trekschakelaar induwt om het
apparaat in te schakelen, zodat u niet door de
terugslag uit uw evenwicht word gebracht.
2. Verhouding tussen het te boren materiaal en het
optimale toerental
De verhouding tussen het te boren materiaal en het
optimale toerental kan in geringe mate afhangen van
de werkomstandigheden, de stroomvoorziening enz.
Gebruik het gereedschap en raadpleeg TABEL 1 als
een grove indicatie.
Het plaatsen van de boor zal gemakkelijker gaan als u
de instelling verdraait en op de lage snelheid instelt.
VOORZICHTIG:
䡬 Als de standaardwaarden (optimale toerentallen) zoals
aangegeven in de tabel worden overschreden, of
wanneer u lange tijd doorgaat met het werk, of
wanneer u zachte materialen boort, is het mogelijk
dat de motor overbelast raakt en doorbrandt. U dient
in het bijzonder abnormale werkzaamheden die de
boor doen stoppen tijdens het boren te vermijden.
Regel het toerental zo dat u altijd soepel door kunt
blijven boren.
䡬 U mag in geen geval gereedschap overbelasten, daar
dit de levensduur van het hoofdtoestel aanzienlijk zal
bekorten.
TABEL 1
Aanduiding wisselhendel 1 2
Te boren materialen Soorten boren
Baksteen, Blok Diamantkern- φ27
ALC t3.0 Gatenzaag φ27
Staal Gatenzaag φ15
SPCC t3.0
Roestvrij-staal Gatenzaag φ15
t1.6
Hout Gatenzaag φ27
t50
Staal SPCC t3.0 Boor φ13
Hout t50 Boor φ30
boor
Doorsnede
boren
φ65
φ152
φ65
φ120
φ55
φ55
φ65
φ120
3. Bij het boren door het materiaal:
Wanneer de boor volledig door het materiaal
heenboort, leidt een achteloze hantering dikwijls tot
een afgebroken boor of tot een beschadiging van de
boormachine zelf vanwege de plotselinge beweging
van de boormachine. Men moet er steeds op
voorbereid zijn de druk bij het doorboren van het
materiaal te verminderen.
4. Boren met diamantkern-boortjes
(1) Plaats het diamantkern-boortje op de gewenste plaats
tegen het materiaal.
(2) Houd het boortje altijd loodrecht op het werkstuk.
(3) Oefen tijdens het boren nooit teveel kracht uit maar
laat het boortje het werk doen. Dit om de levensduur
van het boortje te verlengen en breken ervan te
voorkomen.
(4) Zorg dat beton- en baksteengruis dat tijdens het boren
onstaat, regelmatig uit het geboorde gat wordt
verwijderd. Ophoping van dit materiaal zal leiden tot
een te zware belasting, slijtage van de koppeling en
beschadiging van het boortje.
(5) Zorg dat het boortje altijd draait als u dit in een
boorgat steekt of hieruit trekt.
(6) Als het boortje begint te trillen, of als u door het
materiaal heen begint te komen, verminder dan
onmiddellijk de druk op de boor.
(7) Berg het boortje na gebruik altijd zorgvuldig in het
doosje op. Vergeet niet dat het een diamantkern-
boortje is.
[Lage versnelling] [Hoge versnelling]
Schijf
ABCDEABCDE
25
Page 28

Nederlands
cBoren met de boorgeleiderv
Volg, bij boren met een diamantkern-boortje en de
boorgeleider, de onderstaande stappen uit.
(1) Maak in het materiaal waarin u wilt boren, op de
gewenste plaats een hulpgat met een 13 mm
steendrevel.
(2) Bevestig een boorgeleider aan een diamantkern-
boortje.
(3) Plaats de boorgeleider tegen het hulpgat en begin te
boren om een aanzetgat te maken.
(4) Nadat u even heeft doorgeboord in het aanzetgat,
dient u te stoppen met boren en de boorgeleider te
verwijderen.
(5) Plaats het diamantkern-boortje in het aanzetgat en
ga verder met het boren.
LET OP
䡬 Bij boren met een diamantkern-boortje kan er een
grote kracht op uw handen worden uitgeoefend. Houd
de boor goed vast, met beide handen.
Veiligheids-ontkoppelingsmechanisme
Uit veiligheidsoverwegingen is dit gereedschap
uitgerust met een ontkoppelingsmechanisme. Als een
bepaald koppel wordt overschreden, zal deze
koppeling doorslippen waardoor de draaiende
beweging van de elektromotor niet meer naar de
aandrijfas wordt doorgevoerd. Als dit zich voordoet,
zal de boorkop tot stilstand komen.
LET OP
䡬 Als de koppeling begint door te slippen, trek de boor
dan onmiddelijk uit het boorgat.
䡬 Wacht, nadat het ontkoppelingsmechanisme in
werking is getreden, minimaal twee sekonden voordat
u de boor weer inschakelt.
䡬 Zorg ervoor dat dit ontkoppelingsmechanisme niet al
te vaak wordt geaktiveerd.
5. Boren met een konventioneel boortje
(1) Boren in hout
Gebruik maken van een houtboor. Voor gaten van
6,5 mm of kleiner maakt men gebruik van een
metaalboor. De maximale diameter voor boren in
hout is 30 mm.
(2) Boren in zacht staal of plastic
Gebruik maken van een metaalboor. De minimum
diameter is 1,2 mm en de maximale diameter is 13
mm.
LET OP
䡬 Druk:
Het boren wordt niet bespoedigd door het uitoefenen
van een sterke druk op de boor. Extra druk leidt tot
een beschadigde boor, een verminderde boorprestatie
en/of kortere levensduur van de boormachine.
䡬 Het gebruik van een boor met grote diameter:
Hoe groter de boordiameter, des te sterker is de op
de arm terugwerkende kracht. Men moet er op letten,
dat men door deze terugwerkende kracht niet de
macht over de boormachine verliest. Voor een goede
kontrole is een zekere stand vereist, men moet de
boormachine met beide handen vasthouden en er
voor zorgen, dat de boormachine loodrecht op het
materiaal staat, waarin men boort.
䡬 Bij het boren door het materiaal:
Wanneer de boor volledig door het materiaal
heenboort, leidt een achteloze hantering dikwijls tot
een afgebroken boor of tot een beschadiging van de
boormachine zelf vanwege de plotselinge beweging
26
van de boormachine. Men moet er steeds op
voorbereid zijn de druk bij het ddorboren van het
materiaal te varminderen.
ONDERHOUD EN INSPECTIE
1. Inspektie van een diamant-kern boortje
Boren met een diamantkern-boortje dat bot of
beschadigd is, zal leiden tot sterk verminderde
boorkracht en mogelijke overbelasting van de motor.
Als het diamantkern-boortje te ver versleten is, dient
u dit te vervangen.
2. Inspectie van de bevestigingsschroef:
Alle bevestigingsschroeven worden regelmatig
geïnspecteerd en gecontroleerd of zij juist
aangedraaid zijn. Wanneer één van de schroeven
losraakt, dan moet deze onmiddellijk opnieuw
aangedraaid worden. Gebeurt dat niet, dan kan dat
tot aanzienlijke gevaren leiden.
3. Onderhoud van de motor
De motorwikkeling is het “hart” van het elektrische
gereedschap. Er moet daarom bijzonder zorgvuldig
op gelet worden, dat de wikkeling niet beschadigd
en/of met olie of water bevochtigd wordt.
4. Inspectie van de koolborstels (Afb. 3)
Bij de motor zijn koolborstels gebruikt, die onderhevig
zijn aan slijtage. Buitengewoon versleten koolborstels
leiden tot problemen bij de motor. Dientengevolge
dienen de koolborstels vervangen te worden met
borstels die hetzelfde nummer hebben als de
afbeelding aantoont, wanneer de koolborstel
versleten, of bijna versleten is. Bovendien moeten de
koolborstels altijd schoon zijn en zich in vrij de
borstelhouders bewegen kunnen.
5. Het wisselen van de koolborstel
Men demonteert de borsteldeksel met een steeksleutel
Men kan de koolborstel dan gemakkelijk verwijderen.
AANTEKENING
Op grond van het voortdurende research- en
ontwikkelingsprogramma van HITACHI zijn
veranderingen van de hierin genoemde technische
opgaven voorbehouden.
Informatie betreffende luchtgeluid en trillingen
De gemeten waarden zijn verkregen overeenkomstig
EN60745 en voldoen aan de eisen van ISO 4871.
Gemeten A-gewogen geluidsdrukniveau: 84 dB (A)
Onzekerheid KpA: 3 dB (A)
Draag gehoorbescherming.
Typische gewogen effektieve versnellingswaarde:
6,0 m/s2.
Page 29

Español
NORMAS GENERALES DE SEGURIDAD
¡ADVERTENCIA!
Lea todas las instrucciones
Si no se siguen las instrucciones de abajo podría producirse
una descarga eléctrica, un incendio y/o daños graves.
El término “herramienta eléctrica” en todas las
advertencias indicadas a continuación hace referencia a
la herramienta eléctrica que funciona con la red de
suministro (con cable) o a la herramienta eléctrica que
funciona con pilas (sin cable).
CONSERVE ESTAS INSTRUCCIONES
1) Área de trabajo
a) Mantenga la zona de trabajo limpia y bien
iluminada.
Las zonas desordenadas y oscuras pueden
provocar accidentes.
b) No utilice las herramientas eléctricas en entornos
explosivos como, por ejemplo, en presencia de
líquidos inflamables, gases o polvo.
Las herramientas eléctricas crean chispas que
pueden hacer que el polvo desprenda humo.
c) Mantenga a los niños y transeúntes alejados
cuando utilice una herramienta eléctrica.
Las distracciones pueden hacer que pierda el
control.
2) Seguridad eléctrica
a) Los enchufes de las herramientas eléctricas
tienen que ser adecuados a la toma de corriente.
No modifique el enchufe.
No utilice enchufes adaptadores con
herramientas eléctricas conectadas a tierra.
Si no se modifican los enchufes y se utilizan
tomas de corriente adecuadas se reducirá el
riesgo de descarga eléctrica.
b) Evite el contacto corporal con superficies
conectadas a tierra como tuberías, radiadores y
frigoríficos.
Hay mayor riesgo de descarga eléctrica si su
cuerpo está en contacto con el suelo.
c) No exponga las herramientas eléctricas a la
lluvia o a la humedad.
La entrada de agua en una herramienta eléctrica
aumentará el riesgo de descarga eléctrica.
d) No utilice el cable incorrectamente. No utilice
el cable para transportar, tirar de la herramienta
eléctrica o desenchufarla.
Mantenga el cable alejado del calor, del aceite,
de bordes afilados o piezas móviles.
Los cables dañados o enredados aumentan el
riesgo de descarga eléctrica.
e) Cuando utilice una herramienta eléctrica al aire
libre, utilice un cable prolongador adecuado para
utilizarse al aire libre.
La utilización de un cable adecuado para usarse
al aire libre reduce el riesgo de descarga eléctrica.
3) Seguridad personal
a) Esté atento, preste atención a lo que hace y
utilice el sentido común cuando utilice una
herramienta eléctrica.
No utilice una herramienta eléctrica cuando esté
cansado o esté bajo la influencia de drogas,
alcohol o medicación.
La distracción momentánea cuando utiliza
herramientas eléctricas puede dar lugar a
importantes daños personales.
b) Utilice equipo de seguridad. Utilice siempre una
protección ocular.
El equipo de seguridad como máscara para el
polvo, zapatos de seguridad antideslizantes, casco
o protección para oídos utilizado para condiciones
adecuadas reducirá los daños personales.
c) Evite un inicio accidental. Asegúrese de que el
interruptor está en “off” antes de enchufarlo.
El transporte de herramientas eléctricas con el
dedo en el interruptor o el enchufe de
herramientas eléctricas con el interruptor
encendido puede provocar accidentes.
d) Retire las llaves de ajuste antes de encender la
herramienta eléctrica.
Si se deja una llave en una pieza giratoria de
la herramienta eléctrica podrían producirse daños
personales.
e) No se extralimite. Mantenga un equilibrio
adecuado en todo momento.
Esto permite un mayor control de la herramienta
eléctrica en situaciones inesperadas.
f) Vístase adecuadamente. No lleve prendas sueltas
o joyas. Mantenga el pelo, la ropa y los guantes
alejados de las piezas móviles.
La ropa suelta, las joyas y el pelo largo pueden
pillarse en las piezas móviles.
g) Si se proporcionan dispositivos para la conexión
de extracción de polvo e instalaciones de
recogida, asegúrese de que están conectados y
se utilizan adecuadamente.
La utilización de estos dispositivos puede reducir
los riesgos relacionados con el polvo.
4) Utilización y mantenimiento de las herramientas
eléctricas
a) No fuerce la herramienta eléctrica. Utilice la
herramienta eléctrica correcta para su aplicación.
La herramienta eléctrica correcta trabajará mejor
y de forma más segura si se utiliza a la velocidad
para la que fue diseñada.
b) No utilice la herramienta eléctrica si el interruptor
no la enciende y apaga.
Las herramientas eléctricas que no pueden
controlarse con el interruptor son peligrosas y
deben repararse.
c) Desconecte el enchufe de la fuente eléctrica
antes de hacer ajustes, cambiar accesorios o
almacenar herramientas eléctricas.
Estas medidas de seguridad preventivas reducen
el riesgo de que la herramienta eléctrica se
ponga en marcha accidentalmente.
d) Guarde las herramientas eléctricas que no se
utilicen para que no las cojan los niños y no
permita que utilicen las herramientas eléctricas
personas no familiarizadas con las mismas o
con estas instrucciones.
Las herramientas eléctricas son peligrosas si
son utilizadas por usuarios sin formación.
e) Mantenimiento de las herramientas eléctricas.
Compruebe si las piezas móviles están mal
alineadas o unidas, si hay alguna pieza rota u
otra condición que pudiera afectar al
funcionamiento de las herramientas eléctricas.
27
Page 30

Español
Si la herramienta eléctrica está dañada, llévela
a reparar antes de utilizarla.
Se producen muchos accidentes por no realizar
un mantenimiento correcto de las herramientas
eléctricas.
f) Mantenga las herramientas de corte afiladas y
limpias.
Las herramientas de corte correctamente
mantenidas con los bordes de corte afilados son
más fáciles de controlar.
g) Utilice la herramienta eléctrica, los accesorios
y las brocas de la herramienta, etc., de acuerdo
con estas instrucciones y de la manera adecuada
para el tipo de herramienta eléctrica, teniendo
en cuenta las condiciones laborales y el trabajo
que se va a realizar.
La utilización de la herramienta eléctrica para
operaciones diferentes a pretendidas podría dar
lugar a una situación peligrosa.
5) Revisión
a) Lleve su herramienta a que la revise un experto
cualificado que utilice sólo piezas de repuesto
idénticas.
Esto garantizará el mantenimiento de la seguridad
de la herramienta eléctrica.
PRECAUCIÓN
Mantenga a los niños y a las personas enfermas
alejadas.
Cuando no se utilicen, las herramientas deben
almacenarse fuera del alcance de los niños y de
las personas enfermas.
ESPECIFICACIONES
PRECAUCIONES AL UTILIZAR EL TALADRO
PARA CORONA DIAMANTE
1. Utilice protección de oídos con taladros de impacto.
La exposición al ruido puede causar daños auditivos.
2. Utilice los mangos auxiliares proporcionados con
la herramienta.
La pérdida de control puede causar dañ os
personales.
3. Antes de taladrar en una pared, suelo o techo,
comprobar cuidadosamente que no haya objetos
empotrados tales como cables o conducciones
eléctricas.
4. Sujetar siempre el asidero del cuerpo y el asidero
lateral de la herramienta. De lo contrario, la
contrafuerza producida podría causar un
funcionamento impreciso e incluso peligroso.
5. El taladro para corona diamante está diseñado
exclusivamente para la operación en condiciones
secas.
¡No lo utilice para el taladrado con el uso de agua!
Voltaje (por áreas)*
Acometida*
1
1
Dial de cambio–(Dial)
Velocidad sin carga
Capacidad:
Ladrillo, Bloque*
400 – 1000 min
2
Acero
Madera
Peso (sin cable)
1
*
Verificar indefectiblemente los datos de la placa de características de la máquina, pues varían de acuerdo con el
país de destino.
2
Cuando utilice una barrena tubular (Excluyendo ladrillo duro)
*
(230V, 240V)
(110V)
1400 W 1250 W
1–(A–E) 2–(A–E) 1–(A–E) 2–(A–E)
–1
800 – 2000 min–1 400 – 1000 min–1 800 – 2000 min
152 mm
13 mm
30 mm
4,0 kg
ACCESORIOS ESTANDAR
(1)Volvedor de mandril .................................................... 1
(2)Mango lateral ............................................................... 1
Los accesorios estándar están sujetos a cambio sin previo
aviso.
28
–1
Page 31

ACCESORIOS OPCIONALES
(de venta por separado)
(1) Barrenas tubulares (Fig.4-1)
Diá. de la broca Longitud Diá. de la broca Longitud Diá. de la broca Longitud
(mm) (mm) (mm) (mm) (mm) (mm)
22
28 65 117
38
48 91 152
300
150
52
78 127
150
107
Español
150
(2) Adaptadores y barras de prolongación
䡬 Adaptador (Fig. 4-2)
Adaptador paraa barrenas tubulares de 38~152
mm de diá. (Fig. 4-3)
Macho piloto (Fig. 4-4)
Impulso del extractor (Fig. 4-5)
䡬 Barra de prolongación (Longitud de 250 mm) (Fig.
4-6)
1
4
5
6
Fig. 4
(3) Margen de extracción de polvo
䡬 Succionador de polvo-grande (Fig. 5-1)
䡬 Succionador de polvo-pequeño (Fig. 5-2)
䡬 Palanca giratoria para polvo (Fig. 5-3)
䡬 Varilla prolongadora de la palanca para polvo
(longitud: 230 mm) (Fig. 5-4)
PRECAUCIÓN:
Cuando utilice la palanca para polvo, conecte la
manguera de la aspiradora antes de accionar el
interruptor de la unidad principal.
Se utiliza para succionar virutas conectando un aspirador.
1
3
Fig. 5
3
2
2
4
Los accesorios opcionales están sujetos a cambio sin
previo aviso.
APLICACIONES
䡬 Taladrado de diversos productos de bloques y
ladrillos
䡬 Taladrado de orificios en metales, madera, y
productos de plástico
ANTES DE LA PUESTA EN MARCHA
1. Alimentación
Asegúrese de que la fuente de alimentación que ha
de ser utilizada cumpla con los requerimientos de
alimentación especificados en la placa de
características del producto.
2. Interruptor de alimentación
Asegúrese de que el interruptor de alimentación esté
en la posición OFF. Si conectase la clavija a un
tomacorriente con el interruptor de alimentación en
la posición ON, la herramienta eléctrica empezaría a
funcionar imprevistamente, y podría producirse un
accidente grave.
3. Cable prolongador
Cuando el área de trabajo esté alejada de la fuente de
alimentación, utilice un cable prolongador de
suficiente grosor y capacidad nominal. El cable
prolongador deberá ser lo más corto posible.
PRECAUCIÓN
Si el cable está dañado, reemplácelo o repárelo.
4. Montaje del mango lateral
Monte el mango lateral en el cuerpo principal como
se muestra en la Fig. 1.
Gire el mango hacia la derecha para apretar el mango
lateral y gírelo hacia la izquierda para aflojarlo.
Cuando monte el mango lateral, afloje el mango y
monte el mango lateral en la cubierta de engranajes.
Después presiónelo hasta la posición apropiada en la
sección de montaje del mango de la cubierta de
engranajes y apriételo.
Antes de la operación, apriete con seguridad el mango
lateral.
(El mango lateral podrá asegurarse en cualquier
posición dentro de 360°.)
5. Fijación
Inserte la barrena tubular o la barrena de taladrado a
fondo en el portabrocas abierto. Fijela de la forma
normal insertando el extrremo dentado de la llave
del portabrocas en los tres orificios de llave.
29
Page 32

Español
PROCEDIMIENTOS PRACTICOS DE MANEJO
1. Operación de conmutación
Puesta en funcionamiento: Presione el disparador.
Parada: Suelte el disparador.
PRECAUCIÓN
Sujete con seguridad el mango del cuerpo principal y
el mango lateral cuando ponga en funcionamiento la
máquina, ya que de lo contrario existiría el peligro de
que sus manos girasen por la fuerza de reacción.
2. Relación entre el material que se va a taladrar y el
número óptimo de rotaciones
La relación entre el material que se va a taladrar y el
nú mero ó ptimo de rotaciones podría diferir
ligeramente según las condiciones de trabajo, de la
posición de la fuente de alimentación, etc. Utilice la
herramienta refiriéndose a la TABLA 1 como guía
aproximada.
Para el control posicional del taladro, le resultará
más fácil trabajar si gira el dial una vez y lo ajusta a
baja velocidad.
PRECAUCIÓN:
䡬 El motor podría quedar sometido a una carga excesiva
y quemarse si se exceden los valores estándar
(número óptimo de rotaciones) indicados en la tabla,
si trabaja continuamente durante un tiempo
prolongado o si realiza el taladrado de materiales
blandos. Especialmente evite la utilización en
condiciones anormales, como cuando el taladro se
detiene durante la operación. Ajuste el número de
rotaciones de manera que la operación de taladrado
se realice siempre con suavidad.
TABLA 1
Indicación de la palanca de
Materiales a taladrar
Ladrillo, bloque Barrena de φ27
ALC t3.0 Sierra de φ27
Acero Sierra de φ15
SPCC t3.0 perforación
Acero inoxidable Sierra de φ15
t1.6 perforación
Madera Sierra de φ27
t50 perforación
Acero SPCC t3.0 Taladro φ13
Madera t50 Taladro φ30
Tipos de
taladros
núcleo de
diamante
perforación
cambio
Diámetros
de taladrado
φ65
φ152
φ65
φ120
φ55
φ55
φ65
φ120
䡬 Cerciórese de no utilizar jamás ninguna herramienta
que exceda la capacidad máxima pues de lo contrario,
la vida de servicio de la unidad principal disminuirá
considerablemente.
3. Perforando el material completamente a través del
material:
Si la broca de taladro perfora completamente a través
del material, un manejo sin cuidado resulta a menudo
una broca de taladro rota o daño del mismo cuerpo
de taladro, a causa del movimiento repentino del
taladro. Siempre estar atento y preparado para relajar
la fuerza de apretar al taladrar a través del material.
4. Taladrado con barrena tubular
(1) Coloque la barrena tubular en el lugar de taladrado.
(2) Cuando taladre, sujete siempre con seguridad la
máquina perpendicular al material.
(3) No fuerce la broca, deje que realice el trabajo. Esto
prolongará su duración útil, y reducirá el riesgo de
que se rompa.
(4) Cerciórese de eliminar regularmente el polvo/las
virutas que se producen durante el taladarado. Si
dejase que se acumulasen el polvo/las virutas, la
máquina podría recalentarse y producirse el desgaste
excesivo del embrague/limitador de par y la pérdida
de los segmentos de la barrena.
(5) Cuando introduzca la barrena en un orifico, o cuando
la saque, cerciórese de que esté girando.
(6) Si la barrena comienza a vibrar, y cuando comience a
atravesar el material, reduzca inmediatamente la
presión.
(7) Después de haber utilizado la barrena, guárdela
cuidadosamente en su caja y recuerde que es una
barrena de diamante.
[Engranaje de baja velocidad] [Engranaje de alta velocidad]
ABCDEABCDE
12
Dial
30
Page 33

Español
cMétodo de taladrado utilizando un macho pilotov
Para facilitar la ubicación realice los pasos siguientes
cuando utilice una barrena tubular.
(1) Realice un orificio piloto en la posición central del
material a ser taladrado con una barrena para piedra
de 13 mm.
(2) Fije el macho piloto a la barrena tubular.
(3) Alinee el macho piloto con el orificio piloto y comience
la operación de taladrado para realizar una ranura
guía.
(4) Cuando realice la ranura guía, pare temporalmente
la operación de taladrado y extraiga el macho piloto.
(5) Alinee la barrena tubular con la ranura guía y vuelva
a iniciar la operación de taladrado.
PRECAUCIÓN
䡬 Cuando taladre con una barrena tubular, recibirá una
gran fuerza de reacción en sus manos. Cerciórese de
sujetar el cuerpo principal y el mango lateral.
Embraque de seguridad
Esta máquina dispone de un embrague de seguridad
muy positivo. El embrague se deslizará cuando se
adquiera cierto nivel de par, haciendo que el motor
se desconecte del eje de salida. Cuando suceda esto,
el portabrocas dejará de girar.
PRECAUCIONES
䡬 Cuando el embrague comience a funcionar, tire
inmediatamente del cuerpo principal.
䡬 No continúe utilizando la máquina durante más de
dos seguncos mientras el embrague esté deslizándo-
se.
䡬 No deje que el embrague de seguridad se active con
demasiada frecuencia.
5. Taladrado con una barrena convencional
(1) Taladrado de madera
Usar una broca de taladro para trabajos en madera.
En cualquier caso, perforando orificios de 6,5 mm, o
menos, usar una broca de taladro para trabajo en
metal. El diámetro máximo de la barrena es de
30 mm.
(2) Taladrado de acero suave o de material de plástico
Usar una broca de taladro para trabajo en metal. El
diámetro mínimo de la barrena es de 1,2 mm y de 13
mm como máximo.
PRECAUCION
䡬 Presión:
Cuando se empieza a taladrar NO se acelera aplican-
do una presión pesada en el taladrador. Una tal acción
tendria sólo como resultado una broca de taladro
dañada, y disminuiria la eficiencia de taladro y/o
acortaria la vida de servicio del taladrador.
䡬 Uso de un diámetro grande de la broca de taladro:
Cuanto más grande sea el diámetro de la broca de
taladro, y tanto más grande sea la fuerza reactiva en
su brazo. Tener cuidado de no perder el control sobre
el taladrador a causa de esta fuerza reactiva. Para
mantener un firme control establecer una buena
posición de los pies, sujetar el taladrador firmemente
con ambas manos y asegurarse de que el taladrador
está en vertical al material que se taladre.
䡬 Perforando el material completamente a través del
material:
Si la broca de taladro perfora completamente a través
del material, un manejo sin cuidado resulta a menudo
una broca de taladro rota o daño del mismo cuerpo
de taladro, a causa del movimiento repentino del
taladro. Siempre estar atento y preparado para relajar
la fuerza de apretar al taladrar a través del material.
MANTENIMENTO E INSPECCION
1. Inspección de la barrena tubular
La utilización continua de una barrena desgastada o
dañada podría resultar en la reducción de la eficacia
de taladrado y sobrecargar el motor. Cuando note
abrasión, reemplace lo antes posible la barrena
tubular por otra nueva.
2. Inspección de los tornillos de montaje.
Inspeccione con regularidad todos los tornillos de
montaje y asegúrese de que estén correctamente
apretados. Si hay algún tornillo flojo, reapriételo
inmediatamente. La negligencia en la observación
de esta advertencia podría ser sumamente peligroso.
3. Mantenimiento del motor
El devanado del motor es el “corazón” mismo de la
herramienta eléctrica. Preste suma atención para
asegurarse de que el devanado no se dañe y/o se
humedezca con aceite o agua.
4. Inspección de las escobillas de carbón (Fig. 14)
El motor emplea escobillas de carbón, que son piezas
fungibles. Como una escobilla de carbón excesivamente desgastada podría producir averías en el
motor, reemplace las escobillas por otras que tengan
el mismo número que el indicado en la figura, cuando
se hayan desgastado o estén cerca del “límite de
uso”. Asimismo, mantenga las escobillas de carbón
limpias y asegúrese de que se deslicen libremente en
los portaescobillas.
5. Reemplazar la escobilla
Quitar la cápsula de la escobilla con un destornillador
con cabeza pequeña. La escobilla de contacto se deja
entonces quitar fácilmente.
OBSERVACIÓN
Debido al programa continuo de investigación y
desarrollo de HITACHI éstas especificaciones están
sujetas a cambio sin previo aviso.
Información sobre el ruido propagado por el aire y
vibración
Los valores medidos se determinaron de acuerdo con
EN60745 declararon de conformidad con ISO 4871.
Nivel de presión auditiva ponderada A: 84 dB (A)
Duda KpA: 3 dB (A)
Utilice protectores para los oídos.
Valor medio cuadrático ponderado típico de aceleración:
6,0 m/s2.
31
Page 34

32
Page 35

English
Italiano
GUARANTEE CERTIFICATE
1 Model No.
2 Serial No.
3 Date of Purchase
4 Customer Name and Address
5 Dealer Name and Address
(Please stamp dealer name and address)
Deutsch
GARANTIESCHEIN
1 Modell-Nr.
2 Serien-Nr.
3 Kaufdaturn
4 Name und Anschrift des Kunden
5 Name und Anschrift des Händlers
(Bitte mit Namen und Anschrift des
Handlers abstempeln)
Français
CERTIFICAT DE GARANTIE
1 No. de modèle
2 No. de série
3 Date d'achat
4 Nom et adresse du client
5 Nom et adresse du revendeur
(Cachet portant le nom et l'adresse du
revendeur)
CERTIFICATO DI GARANZIA
1 Modello
2 N° di serie
3 Data di acquisto
4 Nome e indirizzo dell'acquirente
5 Nome e indirizzo del rivenditore
(Si prega di apporre il timbro con questi
dati)
Nederlands
GARANTIEBEWIJS
1 Modelnummer
2 Serienummer
3 Datum van aankoop
4 Naam en adres van de gebruiker
5 Naam en adres van de handelaar
(Stempel a.u.b. naam en adres vande de
handelaar)
Español
CERTIFICADO DE GARANTIA
1 Número de modelo
2 Número de serie
3 Fecha de adquisición
4 Nombre y dirección del cliente
5 Nombre y dirección del distribudor
(Se ruega poner el sellú del distribudor
con su nombre y dirección)
✄
33
Page 36

1
2
3
4
5
✄
34
Page 37

English
Only for EU countries
Do not dispose of electric tools together with
household waste material!
In observance of European Directive 2002/96/EC
on waste electrical and electronic equipment and
its implementation in accordance with national
law, electric tools that have reached the end of
their life must be collected separately and returned
to an environmentally compatible recycling
facility.
Deutsch
Nur für EU-Länder
Werfen Sie Elektrowerkzeuge nicht in den
Hausmüll!
Gemäss Europäischer Richtlinie 2002/96/EG über
Elektro- und Elektronik- Altgeräte und Umsetzung
in nationales Recht müssen verbrauchte
Elektrowerkzeuge getrennt gesammelt und einer
umweltgerechten Wiederververtung zugeführt
werden.
Italiano
Solo per Paesi UE
Non gettare le apparecchiature elettriche tra i rifiuti
domestici.
Secondo la Direttiva Europea 2002/96/CE sui rifiuti
di apparecchiature elettriche ed elettroniche e la
sua attuazione in conformità alle norme nazionali,
le apparecchiature elettriche esauste devono
essere raccolte separatamente, al fine di essere
reimpiegate in modo eco-compatibile.
Nederlands
Alleen voor EU-landen
Geef elektrisch gereedschap niet met het huisvuil
mee!
Volgens de Europese richtlijn 2002/96/EG inzake
oude elektrische en elektronische apparaten en de
toepassing daarvan binnen de nationale
wetgeving, dient gebruikt elektrisch gereedschap
gescheiden te worden ingezameld en te worden
afgevoerd naar een recycle bedrijf dat voldoet aan
de geldende milieu-eisen.
Français
Pour les pays européens uniquement
Ne pas jeter les appareils électriques dans les
ordures ménagères!
Conformément à la directive européenne 2002/96/
EG relative aux déchets d’équipements électriques
ou électroniques (DEEE), et à sa transposition dans
la législation nationale, les appareils électriques
doivent être collectés à part et être soumis à un
recyclage respectueux de l’environnement.
Español
Sólo para países de la Unión Europea
¡No deseche los aparatos eléctricos junto con los
residuos domésticos!
De conformidad con la Directiva Europea 2002/96/
CE sobre residuos de aparatos eléctricos y
electrónicos y su aplicación de acuerdo con la
legislación nacional, las herramientas eléctricas
cuya vida útil haya llegado a su fin se deberán
recoger por separado y trasladar a una planta de
reciclaje que cumpla con las exigencias
ecológicas.
Page 38

Hitachi Koki Co., Ltd.
English
EC DECLARATION OF CONFORMITY
We declare under our sole responsibility that this
product is in conformity with standards or standardized
documents EN60745, EN55014 and EN61000-3 in
accordance with Council Directives 73/23/EEC,
89/336/EEC and 98/37/EC.
This declaration is applicable to the product affixed CE
marking.
Deutsch
ERKLÄRUNG ZUR KONFORMITÄT MIT CE-REGELN
Wir erklären mit alleiniger Verantwortung, daß dieses
Produkt den Standards oder standardisierten
Dokumenten EN60745, EN55014 und EN61000-3 in
Übereinstimmung mit den Direktiven des Europarats
73/23/EWG, 89/336/EWG und 98/37/CE entspricht.
Diese Erklärung gilt für Produkte, die die CE-Markierung
tragen.
Français
DECLARATION DE CONFORMITE CE
Nous déclarons sous notre seule et entière respon-sabilité
que ce produit est conforme aux normes ou documents
normalisés EN60745, EN55014 et EN61000-3 en accord
avec les Directives 73/23/CEE, 89/336/CEE et 98/37/CE du
Conseil.
Cette déclaration s’applique aux produits désignés CE.
Representative office in Europe
Hitachi Power Tools Europe GmbH
Siemensring 34, 47877 Willich 1, F. R. Germany
Italiano
DICHIARAZIONE DI CONFORMITÀ CE
Si dichiara sotto nostra responsabilità che questo
prodotto è conforme agli standard o ai documenti
standardizzati EN60745, EN55014 e EN61000-3
conforme alle direttive 73/23/CEE, 89/336/CEE e
98/37/CE del concilio.
Questa dichiarazione è applicabile ai prodotti cui sono
applicati i marchi CE.
Nederlands
EC VERKLARING VAN CONFORMITEIT
Wij verklaren onder eigen verantwoordelijkheid dat dit
produkt conform de richtlijnen of gestandardiseerde
documenten EN60745, EN55014 en EN61000-3 voldoet
aan de eisen van EEG Bepalingen 73/23/EEG,
89/336/EEG en 98/37/EC.
Deze verklaring is van toepassing op produkten
voorzien van de CE-markeringen.
Español
DECLARACIÓN DE CONFORMIDAD DE LA CE
Declaramos bajo nuestra única responsabilidad que
este producto está de acuerdo con las normas o con
los documentos de normalización EN60745, EN55014
y EN61000-3, según indican las Directrices del Consejo
73/23/CEE, 89/336/CEE y 98/37/CE.
Esta declaración se aplica a los productos con marcas
de la CE.
29. 12. 2005
Head office in Japan
Hitachi Koki Co., Ltd.
Shinagawa Intercity Tower A, 15-1, Konan 2-chome,
Minato-ku, Tokyo, Japan
K. Kato
Board Director
512
Code No. C99101773 N
Printed in Japan
 Loading...