

Page 1
SERVICE MANUAL
CV-SG90
VC No.0236E
SPECIFICATIONS AND PARTS ARE SUBJECT TO CHANGE FOR IMPROVEMENT
CONTENTS
1.Attachments ・・・・・・・・・・・・・・・・・・・・・・・・・・・・・ 2
2.Replacement instructions
・・・・・・・・・・・・・・・・・・ 2
3.How to empty the dust case
・・・・・・・・・・・・・・・ 4
4.Maintenance
・・・・・・・・・・・・・・・・・・・・・・・・・・・・ 5
5.Final test
・・・・・・・・・・・・・・・・・・・・・・・・・・・・・・・・ 8
6.General instructions for
operation and maintenance
・・・・・・・・・・・・・・・・8
7.Parts list
・・・・・・・・・・・・・・・・・・・・・・・・・・・・・・・・ 9
8.Construction diagram and
connection diagram
・・・・・・・・・・・・・・・・・・・・・・11
SPECIFICATIONS
Rated voltage :AC240V, 50-60Hz
Rated input :900W, MAX 1000W
Motor :Commutator motor
Fan :Turbo type 1 stage
Speed :39,000rpm
Insulation class of materials :Class E
Weight(Without attachment) :3.6kg
Dimensions :330mm(L)x255mm(W)x214mm(H)
VACUUM CLEANER
SEPTEMBER 2004 Hitachi Home &Life Solutions,lnc.
Page 2
-2-
1. Attachments
2. Replacement instructions
2.1 How to replace the power control board assembly, motor assembly and lead wire
assembly (include triac PWB assembly).
(1)Open the dust case cover while pressing the button of dust case, and lift out the dust case from
cleaner body.
(2)Take off three tapping screws 4x20(7)(8)and two tapping screws 4x12(9), then the upper case
assembly can be removed.
(3)Take out the power control board assembly(13), motor assembly(18) and lead wire assembly(16)
from the lower case .
(4)Release the triac PWB assembly by taking off the lower case.
2.2 How to replace the power cord
(1)Open the dust case cover while pressing the button of dust case,and lift out the dust case from
cleaner body.
(2)Take off three tapping screws 4x20(7)(8) and two tapping screws 4x12(9), then the upper case
assembly can be removed.
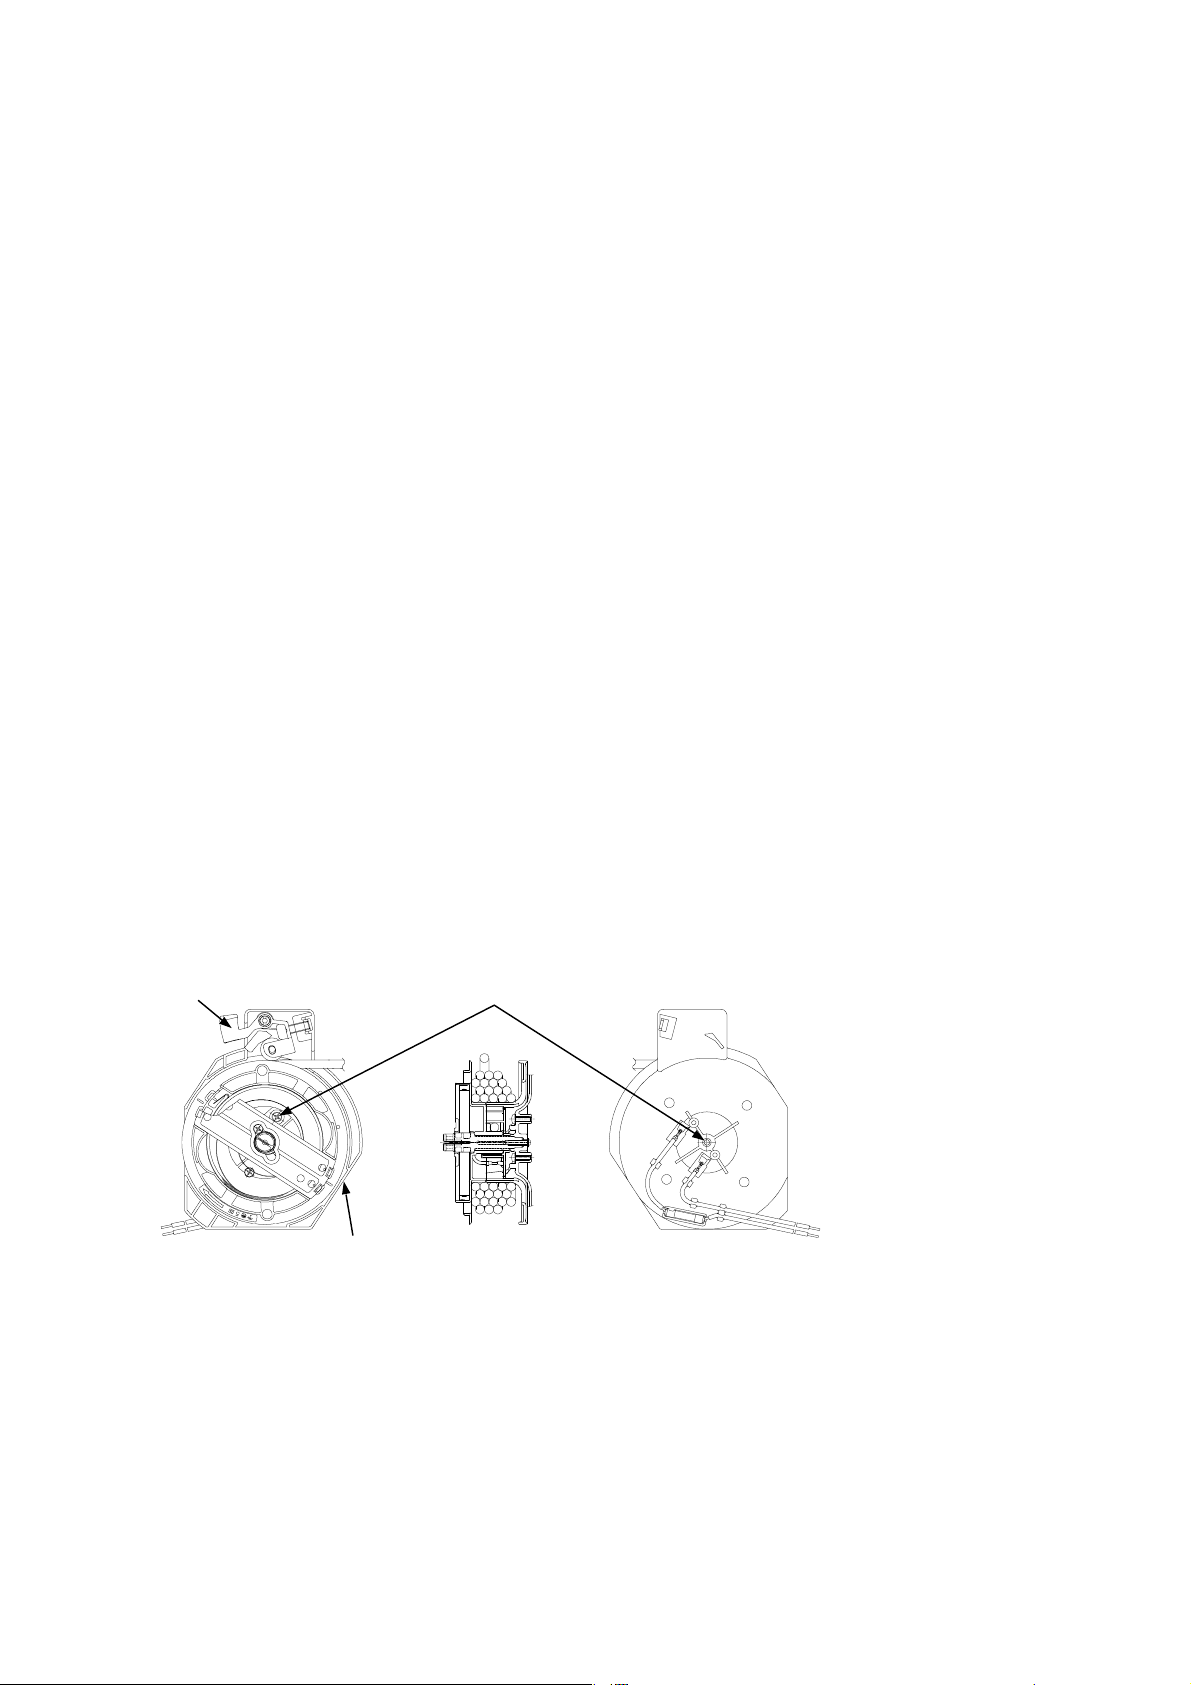
(3)Take out the cord reel assembly from the lower case .
(4)After rotate the cord reel assembly anticlockwise several times by pushing the C pedal to release prewind
of cord reel, take of four tapping screws 4x16 can be taken out.
Hose ass'y (With control panel handset and joint pipe)
・・・・1
Ion Air Turbine Brush
・・・・・・・・・・・・・・・・・・・・・・・・・・・・・・・・・1
Telescopic Extension Pipe
・・・・・・・・・・・・・・・・・・・・・・・・・・・・・1
Crevice nozzle
・・・・・・・・・・・・・・・・・・・・・・・・・・・・・・・・・・・・・・1
Carrying Handle
・・・・・・・・・・・・・・・・・・・・・・・・・・・・・・・・・・・・・・1
C pedal
Cord reel assembly
four tapping screws 4x16
(5)After assembly, wind a spring 5 times before set.
Page 3
-3-
2.3 How to replace the dust indicator assembly
(1)Take off the inner case(15) can be removed.
(2)Take out the dust indicator assembly.
2.4 How to disassemble the ion air turbine brush
(1)How to replace roller ass'y(F)
Insert a blade of cutter between the roller shaft cover and lower case of ion air turbine brush
(2positions, both edges off the ion air turbine brush), cut the projection of roller ass'y cover(F). And
detach the roller shaft cover(F) from the ion air turbine brush with a screwdriver. (When you
maintenance the roller ass'y, please settle the ion air turbine brush firmly, and be careful the blade
of cutter not to be broken.)
Detach the roller shaft and roller ass'y(F) from the ion air turbine brush.
Insert a roller shaft into new roller ass'y(F) and install it into lower case of ion air turbine brush.
Please assemble the roller shaft while facing flat face toward inside.
Push the roller shaft inside and put the roller shaft cover on it. Assure that the roller ass'y dosen't
take off from the ion air turbine brush while pulling it with your fingers.
(2)How to replace roller ass'y(R)
Undo the screw and the roller shaft cover, and take off the wasted roller ass'y(R).
Replace to new roller ass'y(R), return the roller shaft cover to original position and screw it.
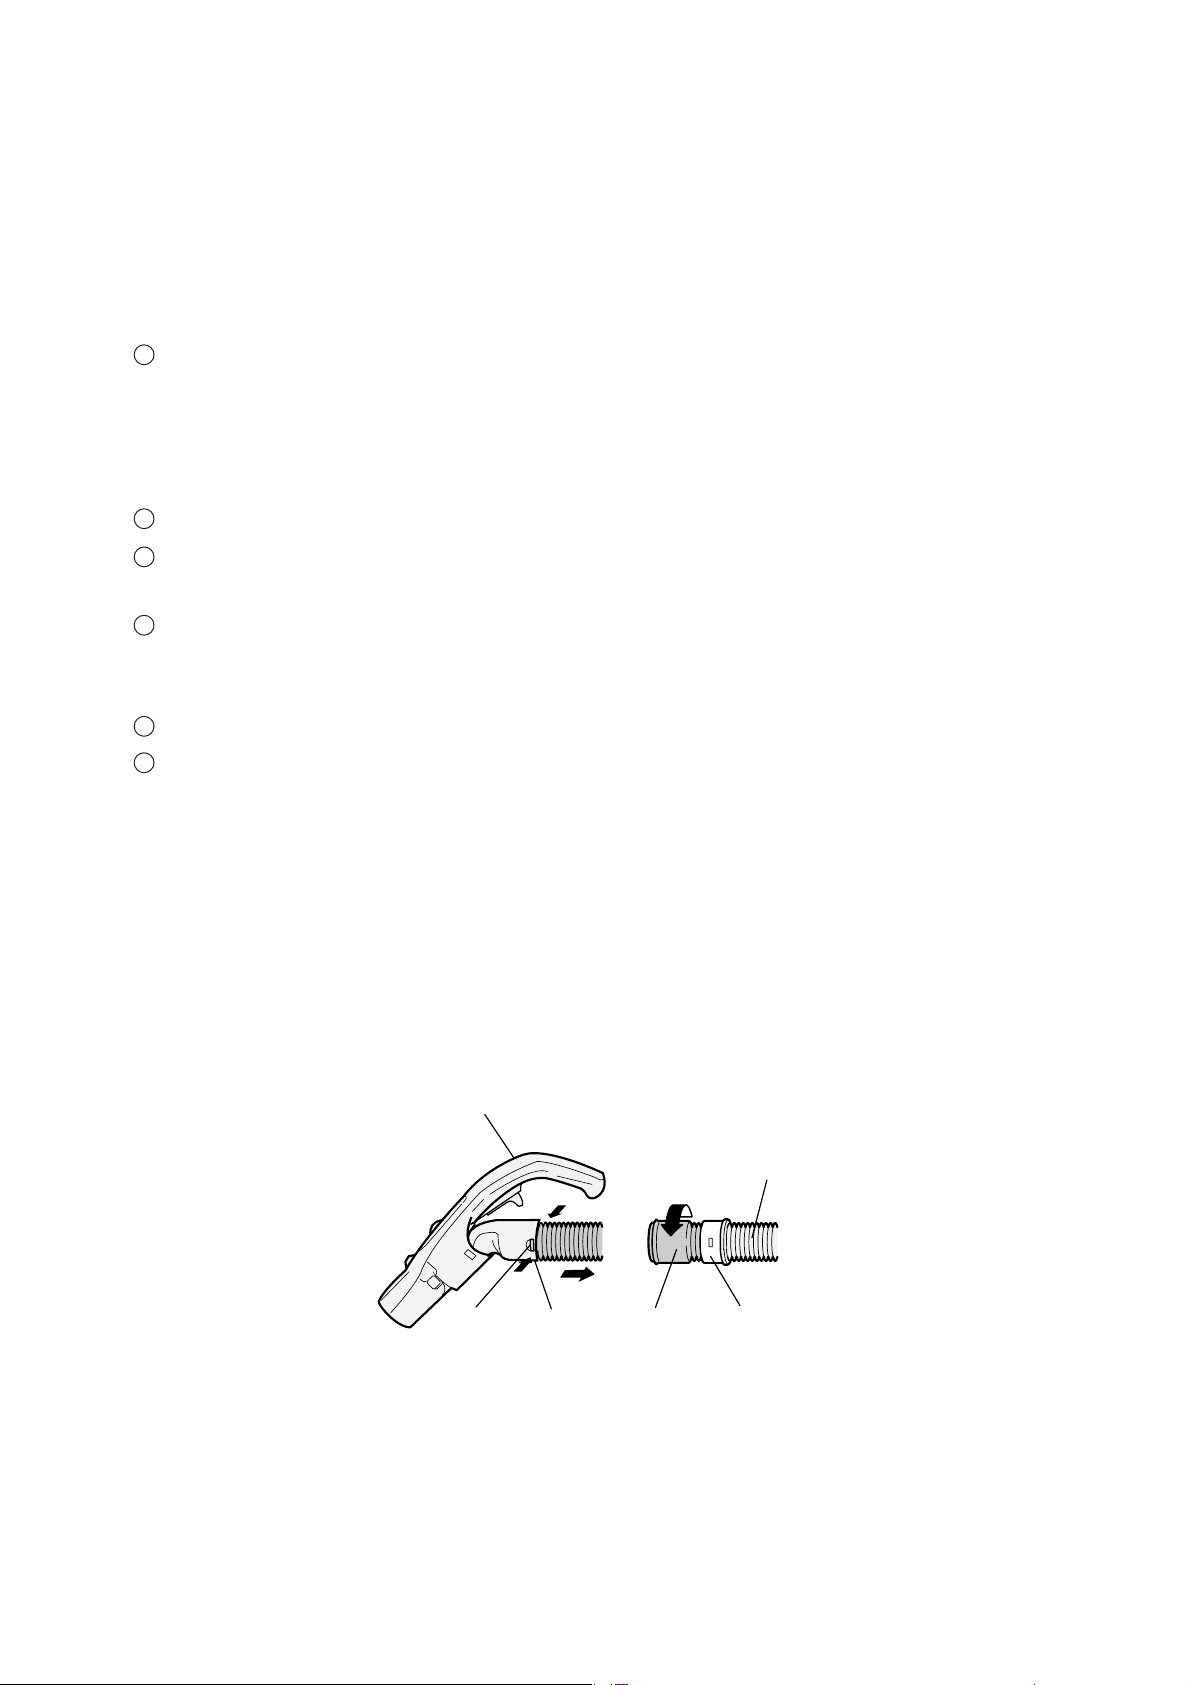
2.5 How to replace the hose
(1)You can separate the control panel handset from the hose.
(2)Pull the hose pressing two claws clicked into the holes on both sides of the control panel handset.
(3)Remove the seal ring and the stopper ring from the hose end by turning the seal ring (left-handed
screw).
(4)As to removing the joint pipe assembly(40) from the other side's hose end, do it as same as the
control panel handset removal.
2
1
4
3
2
1
Seal ring Stopper ring
Control panel handset
Knob
Hose
Claws
Page 4
-4-
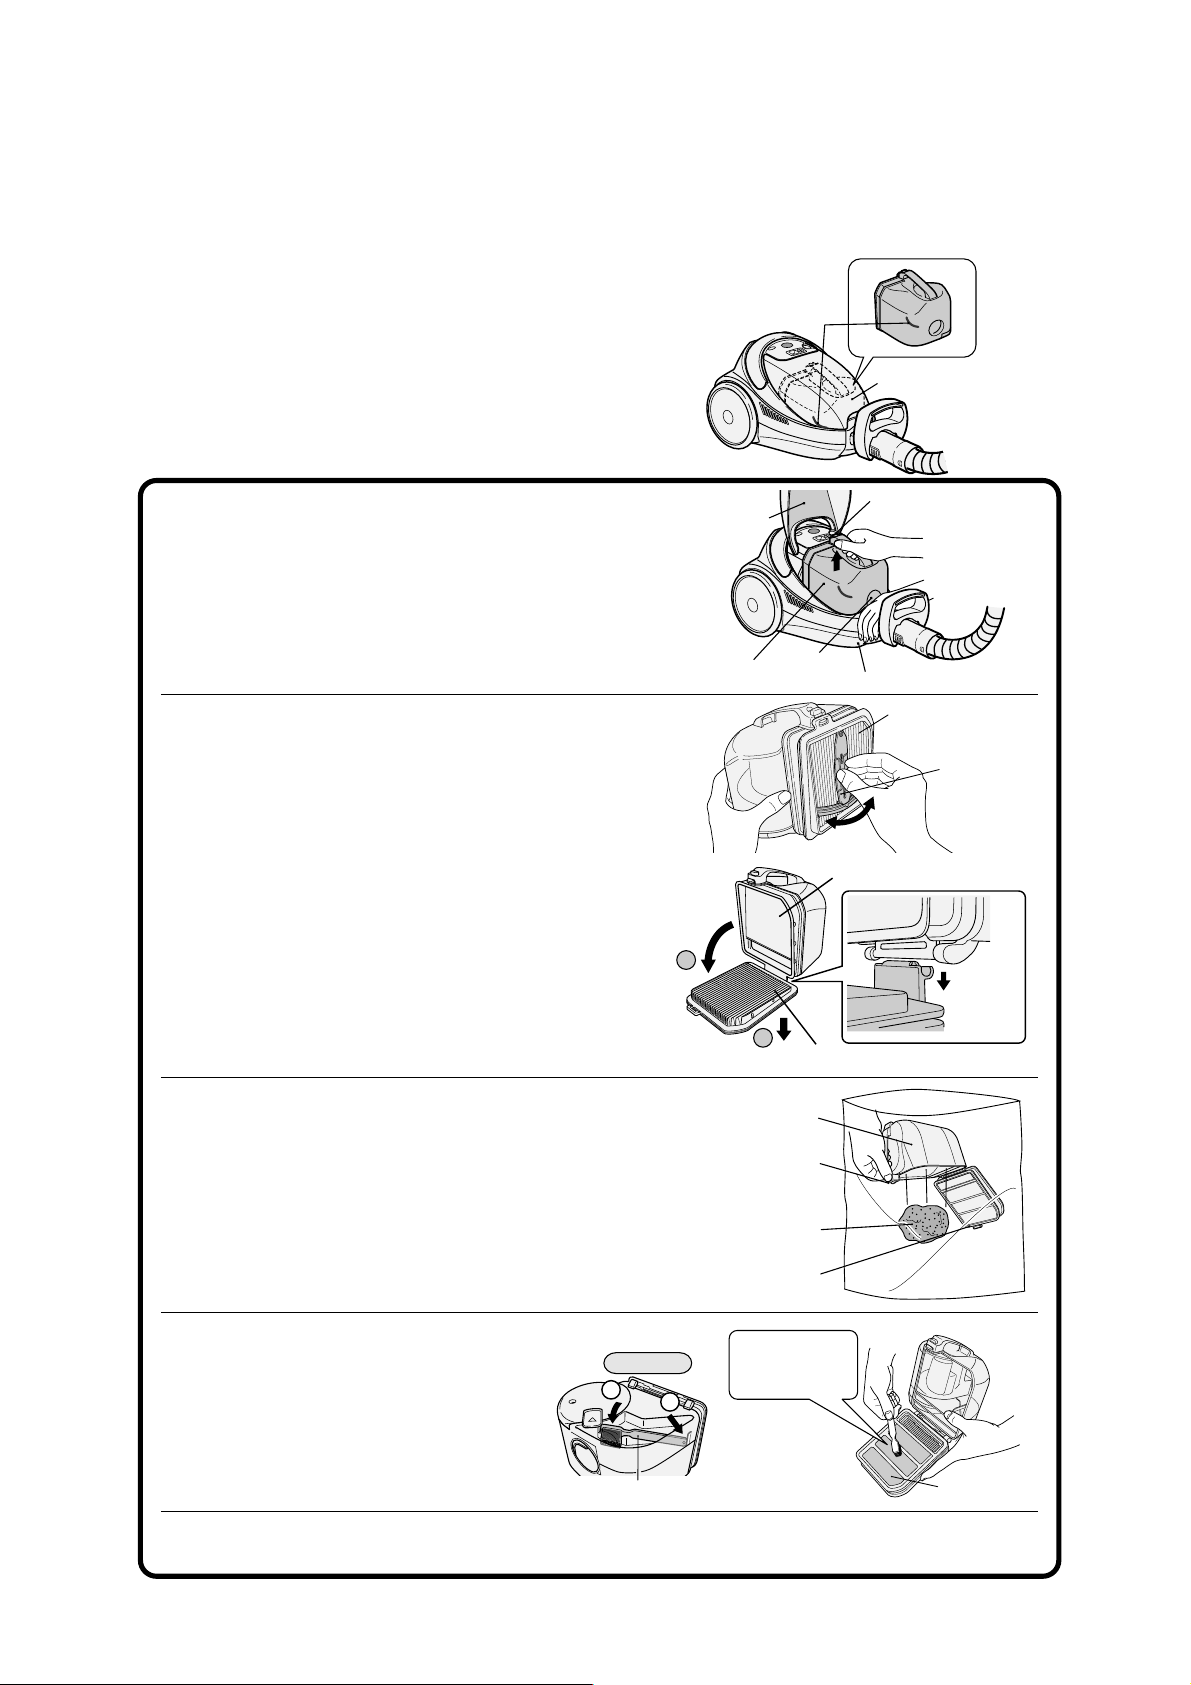
3.How to empty the dust case
1) Empty the dust case before the dust reaches the
max line. If you continue using the cleaner with a full
dust case, the suction power will be decreased.
2) Empty the dust case periodically.
Note :
¡Before you empty the dust case, be sure to turn off the power and
unplug the cleaner from the mains socket.
Dust case
Max line
Dust case
Dust
Open button for lid
of dust collection
case
The lid of
dust case
1
Open the dust case cover while pressing
the front side of cleaner body, and lift out the
dust case from cleaner right above.
Mesh filter
Remove tiny
dust from the
mesh filter.
Maintenance brush
2
1
Pleated black filter
90°
Mesh filter
2
1
max.
max.
How to dispose of the dust
Notes :
¡When you lift out the dust case from cleaner body, be
careful not to press the open button of the dust case.
¡Do not turn the dust case downward, otherwise it may
cause dust scattered.
¡Move the dust removal lever on right and left by ten
times.
Request :
¡If the suction power would be weak, please move the
dust removal lever several times more.
At the maintenance of pleated black filter,
1) Open the pleated black filter to the angle of 90 degree.
2) Remove the filter downward with keeping opened.
When you reinstall it, put the filter by contrary way of
removal.
Transparent
case cover
Open button for lid of
dust collection case
Front side of cleaner body
2
Maintenance of pleated black filter
¡Turn the dust case downward and push the open button on
the lid of the dust case to release dust into a vinyl bag.
¡To remove stubborn dust adhesion inside the dust case,
pat the side of dust case.
Caution :
¡When dust is put to the pleated black filter, remove it away
from the filter with attached maintenance brush.
3
Put the dust case into a big vinyl bag,
and press the open button in the bag.
Request :
¡When you reattach the maintenance brush
to original position, set it firmly according
to the procedure 1)
-
2).
Notes :
¡If the ion air turbine brush sucks some sharp items such as pieces of broken glass, pins, take care not to
touch them.
4
Remove the dust around mesh filter
with attached maintenance brush.
Pleated black filter
Dust removal
lever
Remove
filter
Back side
Dust case
Dust case
inlet
Page 5

-5-
How to empty dust case
Dust case
m
a
x
.
Set the dust case
not to make any gap
between the lid of
the dust case and
cleaner body.
Body
7
Carrying
handle
Transparent
case cover
5
Close the lid of dust case until the button clicks.
Caution :
¡Be sure to set the dust case and each filter, and operate the
cleaner. Otherwise motor noise level will be increased. And also
some dust enter the motor, it may cause motor failure.
Note :
¡Please be careful not to be put your fingers between the top
cover and dust case.
¡In case that the base of cyclone chamber is not set correctly,
the top cover may not be closed. Close it until the button
clicks.
The lid of
dust case
6
Install the dust case to original position firmly.
7
Close the top cover until the button clicks while
pressing down the carrying handle.
Warning :
Before maintaining, the mains plug should be removed from the mains socket.
Filter maintenance sign
¡When suction power is weak, the operation noise level is higher and the filter maintenance sign
operates, the dust case should be emptied and the filters cleaned.
When the orange indicator appears in the window continuously, the cleaner requires emptying.
Check the dust indicator by lifting suction tool from the floor and removing the crevice nozzle when it is used.
Note :
¡
If the cleaner is used in such a condition that the orange indicator appears in the window, air to the motor will be
reduced and the motor will eventually burn out.
Click
Page 6

-6-
Maintenance
The base of
cyclone
chamber
Press the
button
2
1
The base of
cyclone
chamber
2
1
Inside mesh filter Urethane filter
Pleated black filter
Warning :
Before maintaining, the mains plug should be removed from the mains socket.
5
2
Remove the dust putting on each filter.
3
Reinstall the lid of dust case and base of
cyclone chamber into dust case.
4
Detach the washable HEPA clean filter while
pulling the knob of the filter, and remove dust
with attached maintenance brush.
5
Reinstall the washable HEPA clean filter
into dust case.
1) Press the button and remove the base
of cyclone chamber.
2) Remove tiny dust around inside mesh
filter with attached maintenance brush.
Inside mesh
filter
Remove tiny
dust from the
mesh filter.
Open the lid of dust case,
and remove dust with
attached maintenance
brush.
Wash and rub the urethane filter well
with water until the water is clear,
and lay it out flat to dry naturally.
¡You can clean the filter by
taking it out.
¡It can take a long time for the
urethane filter to dry up, so
please use a replacement one
alternately.
Set the base of cyclone chamber until it clicks while
aligning the ▼ mark of the base of cyclone chamber to
the ▼ mark of the dust case.
Caution :
¡In case that the base of cyclone chamber is not set into the
dust case correctly, the attached maintenance brush may be
taken off.
Caution :
¡Be sure to set the washable HEPA clean filter and operate the
cleaner because the filter is useful for protection of motor.
¡Do not scrub it strongly, otherwise it may cause filter damage.
6
6
Reinstall the dust case into cleaner body.
Request :
¡Maintenance for washable HEPA clean filter is required once a month to keep suction power. The
maintenance timing depends on types of dust and number of cleaning times.
Caution :
¡Be sure to set the dust case and each filter, and operate the cleaner. Otherwise motor noise level will be
increased. And also some dust enter the motor, it may cause motor failure.
Back side
Maintenance
brush
Washable
HEPA clean filter
Knob
Washable HEPA
clean filter
Urethane filter
When suction power is weak, the operation noise level is
higher and the filter maintenance sign operates.
1
Remove the dust case and empty the dust.
5
Request :
¡Clean filters according to ‘How to empty the dust case’.
Pleated black filter
The base of
cyclone chamber
合わせ位置
抗菌サイクロン室キャップ
Click
mark
Page 7

-7-
Maintenance
Inside mesh filter
Mesh filter
Urethane filter
When you feel ‘weak suction power even though after maintenance’
and ‘dirtiness of filters’, wash each filter with water.
Remove the mesh filter, urethane filter and the base of cyclone chamber from the dust
case, and wash them with water while rubbing softly. After drying the filter completely, fit
them in their correct positions and use the cleaner.
Dust case
Pleated black filter
12
12
¡You can clean the filter
by taking it out.
Washable HEPA
clean filter
¡Wash and rub the urethane filter well
with water until the water is clear, and
lay it out flat to dry naturally.
¡It can take a long time for the
urethane filter to dry up, so please
use a replacement one alternately.
Dust case
Mesh filter
Pleated
black filter
¡As for the dust stopped
at the bottom of pleated
black filter and washable
HEPA clean filter, open
the pleat and wash away
the dust with water.
Notes :
¡After washing the filters with water, please dr y up them naturally and install them in their correct
positions. Do not use wet filters, as this may damage your cleaner and render it unsafe.
¡Be sure to set the dust case and each filter, and operate the cleaner. Otherwise motor noise level
will be increased. And also some dust enter the motor, it may cause motor failure.
¡Do not wash the filters with hard hairbrush, do not wash the mesh filter vigorously, it may damage
the filter.
¡Do not wash the filters with detergent, bleach, benzene, thinner and alcohol, do not wash them in a
washing machine. And also do not dry the filters with hair dryer, otherwise we can not guarantee the
cleaner performance and quality.
Urethane
filter
Notes :
¡When suction power is weak, even though all the filters have been cleaned in the dust case and dust
has been removed from the HEPA clean filter, the filters will need to be replaced. When you need to
replace the filters, these should be purchase from a Hitachi dealer.
Maintenance for cleaner body
Unplug the cleaner from the mains and wipe the body
with a soft cloth slightly moistened with water.
Note :
¡Do not wash the cleaner with benzene, thinner and
detergent, it may cause colour change and transformation.
Remove tiny
dust from the
mesh filter.
Inside mesh
filter
The base of
cyclone chamber
Washable HEPA
clean filter
Page 8

-8-
5. Final test
(1)After reassembly,run the cleaner for at least 15 minutes without joining the hose its main body and be
certain that there is no abnomal vibration.
(2)Measure the insulation resistance between the power supply plug and the metal surface by 500V DC
insulation resistance tester and be certain that the insulation resistance is not less than 10M ohm.
6.
General instructions for operation and maintenance
(1)Always disconnect cord from electrical outlet before servicing the cleaner.
(2)Do not pick up matches, fireplace ashes or smoking material with the vacuum cleaner as a possible
fire hazard may result.
(3)Avoid picking up sharp objects. They may damage the vacuum cleaner.
(4)Do not use the cleaner to pick up wet dirt, and avoid using it in a wet and moist place as moisture
may damage the motor and other mechanical parts.
(5)Do not block the air flow. Any blockages or obstructions to the nozzle, hose, etc. or the exhaust air
outlet can cause loss of power and motor overheating.
(6)Do not run the cleaner over cord. It may damage insulation.
(7)Avoid cleaning the swich and receptacle parts with wet cloth and splashing water on it as moisture
may cause a short circuit.
(8)Your vacuum cleaner is not a toy. Do not allow children to play with it. Do not leave the vacuum
cleaner connected to an electrical outlet unattended.
¡Warning: Electric shock could occur if used outdoors or on wet surfaces.
Page 9

-9-
7. Parts list
Page 10

-10-
Page 11

-11-
8. CONSTRUCYION DIAGRAM AND CONNECTION DIAGRAM
8
7
13
15
21
7
36
39
43
41
44
38
40
41
39
35
42
32
33
34
37
40
19
22
9
6
14
20
11
1
16
10
47
17
18
27
24
26
2
25
23
Cordreel
28
31
30
29
Noisesuppressor
13
M
46
12
4
5
24
3
4320
Connectiondiagram
Page 12

CV-SG90 NO.0236E Hitachi Home &Life Solutions,lnc.
 Loading...