

Page 1

CS30EH (S)/CS35EH (S)
G
B
S
E
D
K
N
O
Owner's manual
F
I
R
U
Ägarhandbok
Betjeningsvejledning
Bruksanvisning
Omistajan opas
Руководство пользователя
970-82102-200 2007.07
Page 2
CS30EH (S)/CS35EH (S)
Read the manual carefully before
operating this machine.
G
B
Owner's manual
GB-1
Page 3
WARNING
The engine exhaust from this product
contains chemicals known to the State of
California to cause cancer, birth defects
and other reproductive harm.
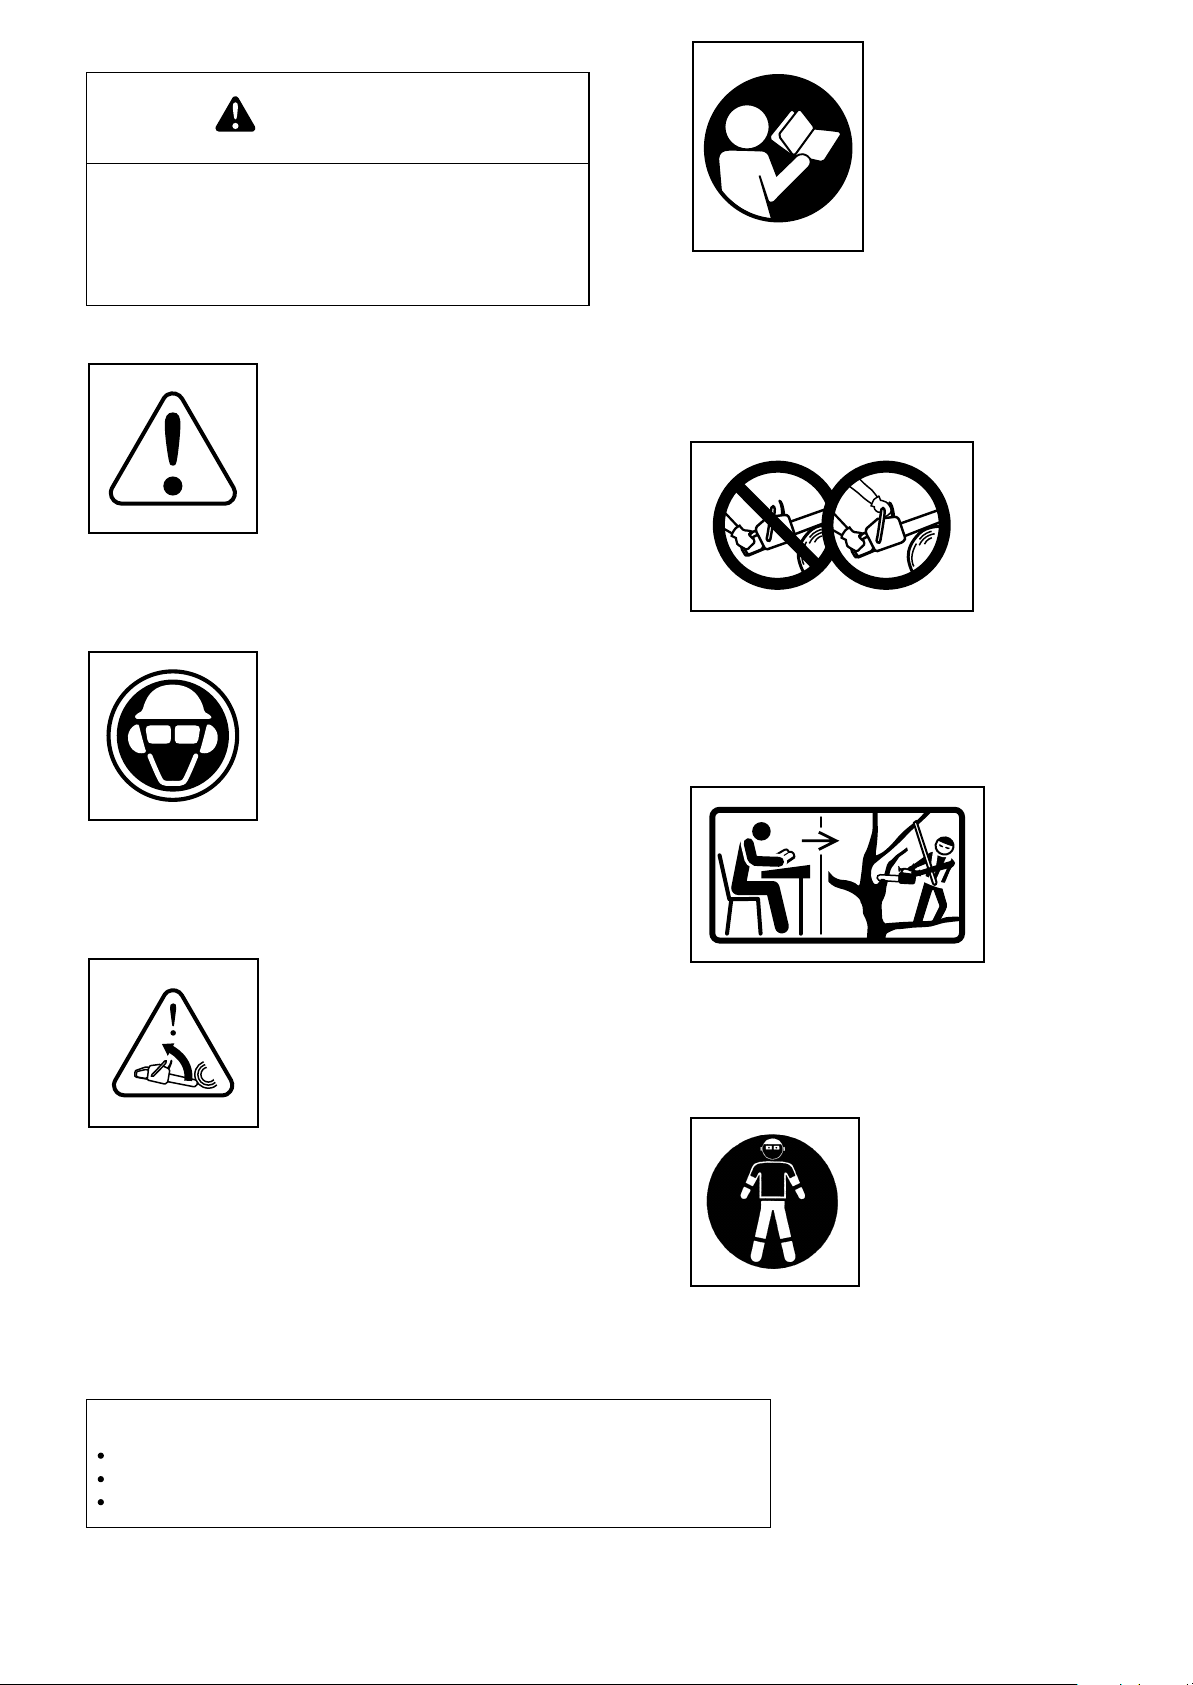
Read, understand and follow all warnings and
instructions in this manual and on the unit.
It is important that you read, fully understand
and observe the following safety precautions
and warnings. Careless or improper use of the
unit may cause serious or fatal injury.
One-handed usage not permitted. While cutting,
hold saw firmly with both hands with thumb
firmly locked around front handle.
Always wear eye, head and ear protectors when
using this unit.
Warning, kickback danger. Be careful sudden
and accidental upward and/or backward motion of the guide bar.
Before using your machine
Read the manual carefully.
Check that the cutting equipment is correctly assembled and adjusted.
Start the unit and check the carburetor adjustment. See "Maintenance".
The saw is specially designed for tree service
and therefore shall be used by trained operators only, in off-ground work in trees.
It is important that you wear the protective clothing
for feet, legs, hands and fore-arms.
GB-2
Page 4
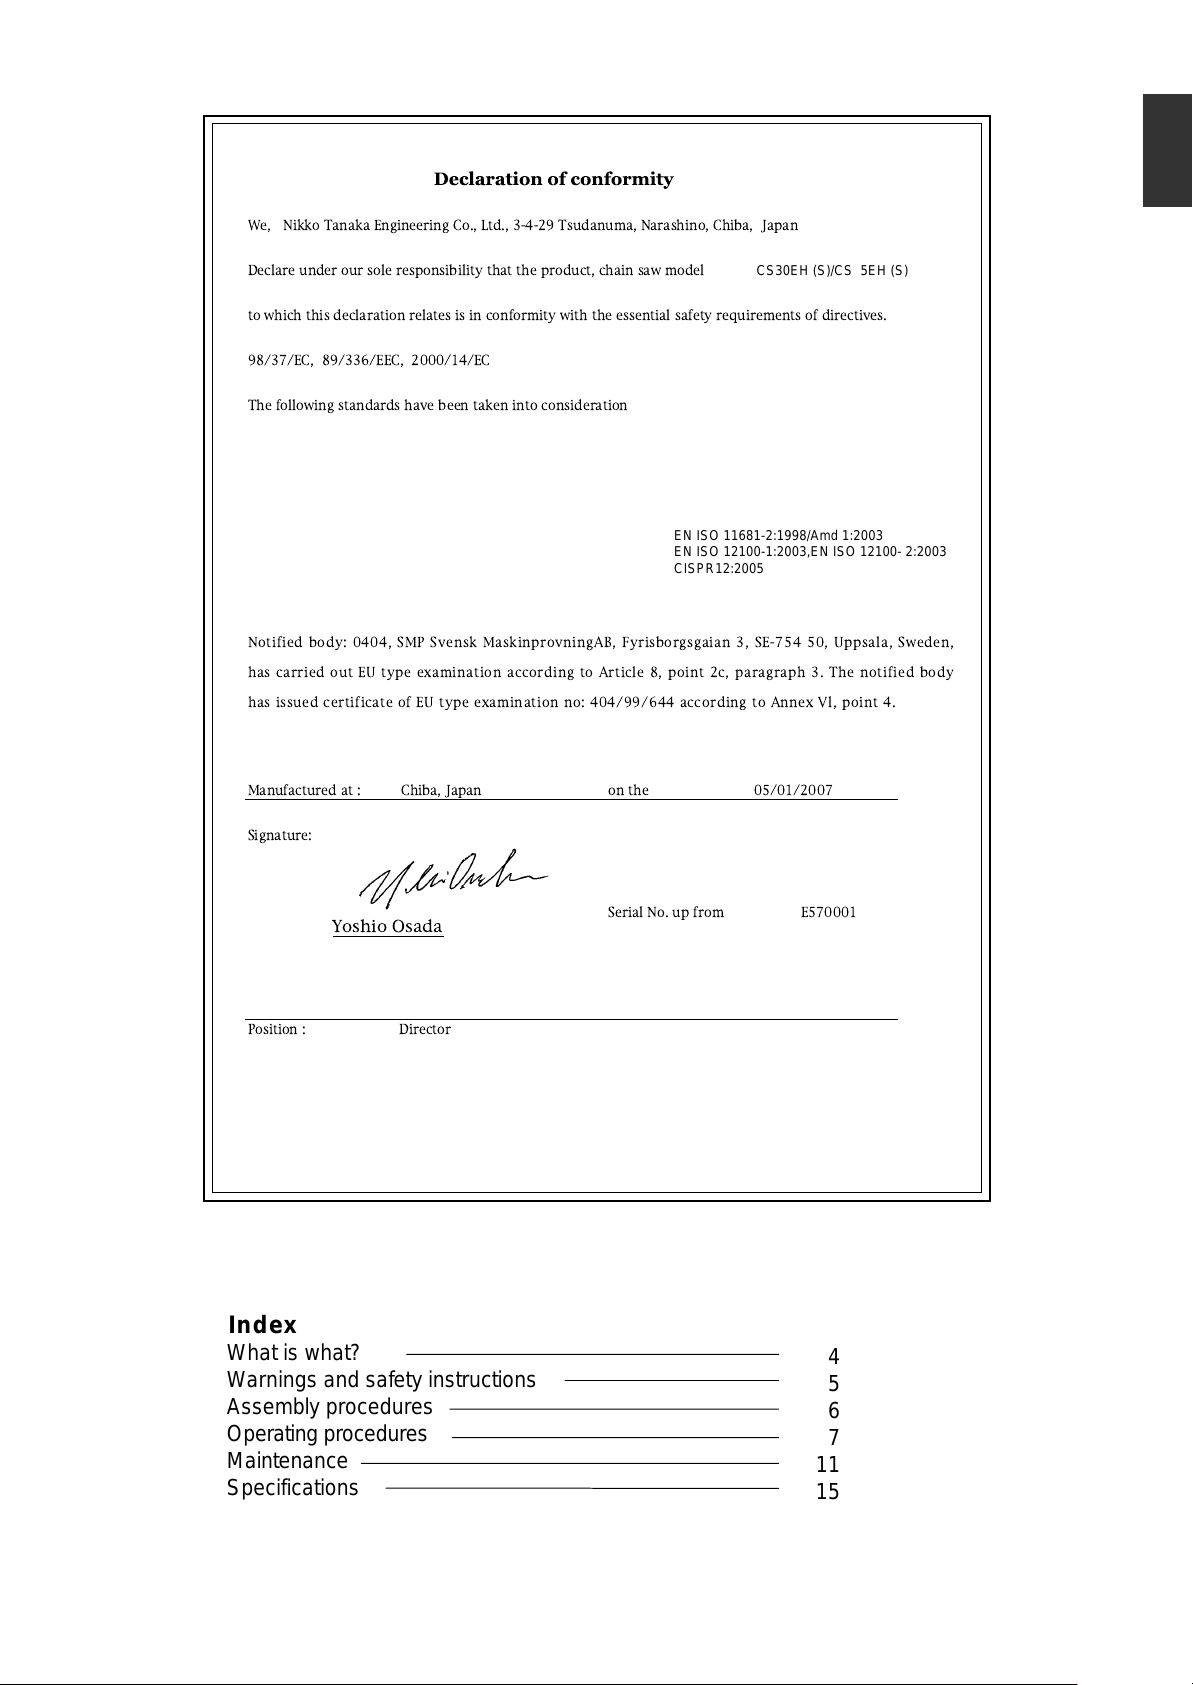
We, Nikko Tanaka Engineering Co., Ltd., 3-4-29 Tsudanuma, Narashino, Chiba, Japan
G
B
Declare under our sole responsibility that the product, chain saw model
to which this declaration relates is in conformity with the essential safety requirements of directives.
98/37/EC, 89/336/EEC, 2000/14/EC
The following standards have been taken into consideration
EN ISO 11681-2:1998/Amd 1:2003
EN ISO 12100-1:2003,EN ISO 12100- 2:2003
CISPR12:2005
Notified body: 0404, SMP Svensk MaskinprovningAB, Fyrisborgsgaian 3, SE-754 50, Uppsala, Sweden,
has carried out EU type examination according to Article 8, point 2c, paragraph 3. The notified body
has issued certificate of EU type examination no: 404/99/644 according to Annex Vl, point 4.
Manufactured at : Chiba, Japan
Signature:
on the 05/01/2007
CS30EH (S)/CS35EH (S)
Yoshio Osada
Position : Director
Index
What is what?
Warnings and safety instructions
Assembly procedures
Operating procedures
Maintenance
Specifications
Serial No. up from E570001
4
5
6
7
11
15
GB-3
Page 5
y
e
y
c
y
r
r
o
d
c
r
a
r
e
s
o
n
n
t
b
b
o
t
e
R
s
a
a
m
h
o
m
r
o
r
e
r
o
s
v
e
e
m
a
t
A
h
a
v
t
w
t
a
n
e
t
A
o
t
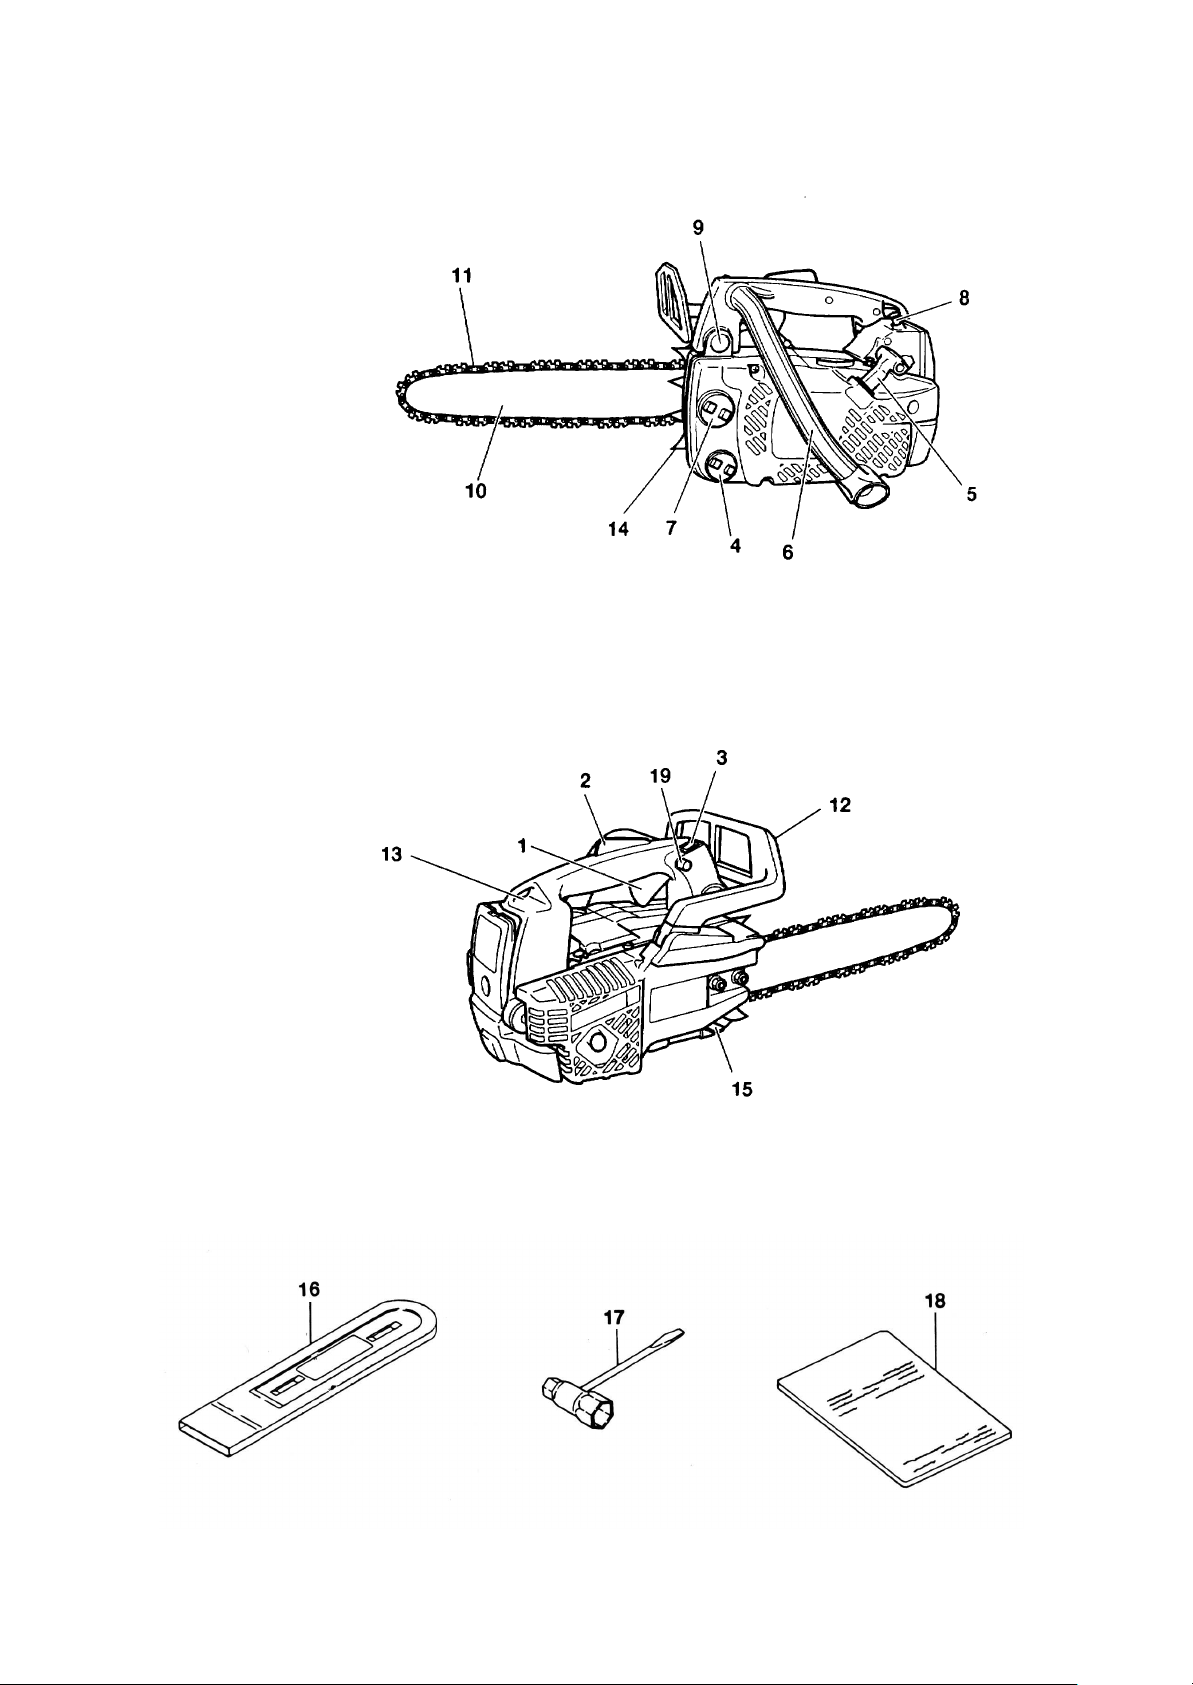
1. What is what?
Since this manual covers several models, there may be some difference between pictures and your unit. Use the instructions that apply to your unit.
10. Guide bar
11. Saw chain
12. Chain brake(Front hand guard)
13. Attachment point
14. Spiked bumper (optional)
15. Chain catcher
16. Guide bar cover
17. Combi box spanner
18. Owner's manual
19. Throttle lock
1. Throttle trigger
2. Throttle trigger lockout (Safety trigger)
3. Ignition switch
4. Oil tank cap
5. Recoil starter
6. Front handle
7. Fuel tank cap
8. Choke control knob
9. Priming pump
GB-4
Page 6

2. Warnings and safety instructions.
Operator safety
WARNING!
This chain saw is designed especially for
tree care and surgery. Only persons trained
in tree care and surgery may use this saw.
Observe all literature, procedures and
recommendations from the relevant
professional organization. Failure to do so
constitutes a high accident risk. We
recommend always using a rising platform
for sawing in trees. Rappelling techniques
are extremely dangerous and require special
training. The operator must be trained in and
familiar with the use of safety equipment and
working and climbing techniques. Always
use the restraining equipment for both the
operator and the saw.
Always wear a safety face shield or goggles.
Gloves should be used when sharpening
chain.
Always wear safety protective equipment such
as jacket, trousers, gloves, helmet, boots with
steel toe-caps and non-slip soles whenever
you use a chain saw. For working in trees the
safety boots must be suitable for climbing
techniques. Do not wear loose clothing,
jewelry, short pants, sandals or go barefoot.
Secure hair so it is above shoulder length.
Do not operate this tool when you are tired, ill
or under the influence of alcohol, drugs or
medication.
Never let a child or inexperienced person
operate the machine.
Wear hearing protection.
Never start or run the engine inside a closed
room or building. Breathing exhaust fumes can
kill.
For respiratory protection, wear a protection
mask while emitting the chain oil mist and dust
from sawdust.
Keep handles free of oil and fuel.
Keep hands away from cutting equipment.
Do not grab or hold the unit by the cutting
equipment.
When the unit is turned off, make sure the
cutting attachment has stopped before the unit
is set down.
When operation is prolonged, take a break
from time to time so that you may avoid
possible whitefinger disease which is caused
by vibration.
The operator must obey the local regulations
of cutting area.
WARNING!
Long or continuous exposure to high noise
levels may cause permanent hearing
impairment. Always wear approved hearing
protection when operating a unit/machine.
Unit / machine safety
Inspect the entire unit/machine before each
use. Replace damaged parts. Check for fuel
leaks and make sure all fasteners are in place
and securely tightened.
Replace parts that are cracked, chipped or
damaged in any way before using the
unit/machine.
Make sure the safety guard is properly
attached.
Keep others away when making carburetor
adjustments.
Use only accessories as recommended for this
unit/machine by the manufacturer.
Never let the chain strike any obstacle.
If the chain makes contact, the machine should
be stopped and checked carefully.
Make sure the automatic oiler is working.Keep
the oil tank filled with clean oil. Never let chain
run dry on the bar.
All chainsaw service, other than the items listed
in the operator's/owner's manual, should be
performed by competent chain-saw service
personnel. (For example, if improper tools are
used to remove the flywheel or if an improper
tool is used to hold the flywheel in order to
remove the clutch, structural damage to the
flywheel could occur and could subsequently
cause the flywheel to burst.)
WARNING!
Never modify the unit/machine in any way.
Do not use your unit/machine for any job
except that for which it is intended.
WARNING!
Never use chain saw without any safety
equipment or that has faulty safety
equipment. It could result in serious
personal injury.
WARNING!
Using guide bar/chain other than recommended by the manufacturer which are not
approved, could result in a high risk of
personal accidents or injury.
Fuel safety
Mix and pour fuel outdoors and where there are
no sparks or flames.
Use a container approved for fuel.
Do not smoke or allow smoking near fuel or the
unit/machine or while using the unit/machine.
Wipe up all fuel spills before starting engine.
Move at least 3 m away from fueling site before
starting engine.
Stop engine before removing fuel cap.
Empty the fuel tank before storing the
unit/machine. It is recommended that the fuel
be emptied after each use. If fuel is left in the
tank, store so fuel will not leak.
Store unit/machine and fuel in area where fuel
vapors cannot reach sparks or open flames
from water heaters, electric motors or switches,
furnaces. etc.
WARNING!
Antivibration systems do not guarantee that
you will not sustain whitefinger dis-ease or
carpal tunnel syndrome. Therefore, continual
and regular users should monitor closely the
condition of their hands and fingers. If any of
the above symptoms appear, seek medical
advice immediately.
Cutting safety
Do not cut any material other than wood or
wooden objects.
For respiratory protection, wear an aerosol
protection mask when cutting the wood after
insecticide has been applied.
Keep others including children, animals,
bystanders and helpers outside the hazard
zone, Stop the engine immediately if you are
approached.
Hold the unit/machine firmly with the right
hand on the rear handle and the left hand on
the front handle.
Keep firm footing and balance. Do not overreach.
Keep all parts of your body away from the
muffler and cutting attachment when the
engine is running.
Keep Bar/Chain below waist level.
Before felling a tree, the operator must be
accustomed to the sawing techniques of the
chain saw.
Be sure to pre-plan a safe exit from a failing
tree.
While cutting, hold saw firmly with both hands
with thumb firmly locked around front handle,
and stand with feet well balanced and your
body balanced.
Stand to the side of the saw when cutting never directly behind it.
Always keep the spiked bumper face to a tree,
because the chain may suddenly be drawn into
a tree.
When completing a cut, be ready to hold up the
units as it breaks into clear, so it will not follow
through and cut your legs, feet or body, or
contact an obstruction.
Be alert against kickback (when saw kicks up
and back at operator). Never cut with the nose
of the bar.
Maintenance safety
Maintain the unit/machine according to recommended procedures.
Disconnect the spark plug before performing
maintenance except for carburetor adjustments .
Keep others away when making carburetor
adjustments.
Use only genuine HITACHI replacement parts
as recommended by the manufacturer.
WARNING!
Improper maintenance could result in
serious engine damage or in serious
personal injury.
Transport and storage
Carry the unit/machine by hand with the
engine stopped and the muffler away from
your body.
Allow the engine to cool, empty the fuel tank,
and secure the unit/machine before storing or
transporting in a vehicle.
Empty the fuel tank before storing the
unit/machine, It is recommended that the fuel
be emptied after each use. If fuel is left in the
tank, store so fuel will not leak.
Store unit/machine out of the reach of
children.
Clean and maintenance the unit carefully and
store it in a dry place
Make sure engine switch is off when transporting or storing.
When transporting in a vehicle, cover chain
with chain cover.
If situations occur which are not covered in this
manual, take care and use common sense.
Contact HITACHI dealer if you need assistance.
Pay special attention to statements preceded by
the following words:
WARNING!
Indicates a strong possibility of severe
personal injury or loss of life, if instructions
are not followed.
CAUTION!
Indicates a possibility of personal injury or
equipment damage, if instructions are not
followed.
NOTE!
Helpful information for correct function and
use.
GB-5
G
B
Page 7
h
n
g
A
a
w
w
s
h
a
m
F
A
p
y
i
g
e
f
n
o
D
d
r
y
s
t
m
h
Fig.1-1 Fig.1-2Fig.1-1B
Fig.1-3 Fig.1-4
3. Assembly procedures
Never try to start engine without side case
securely fastened.
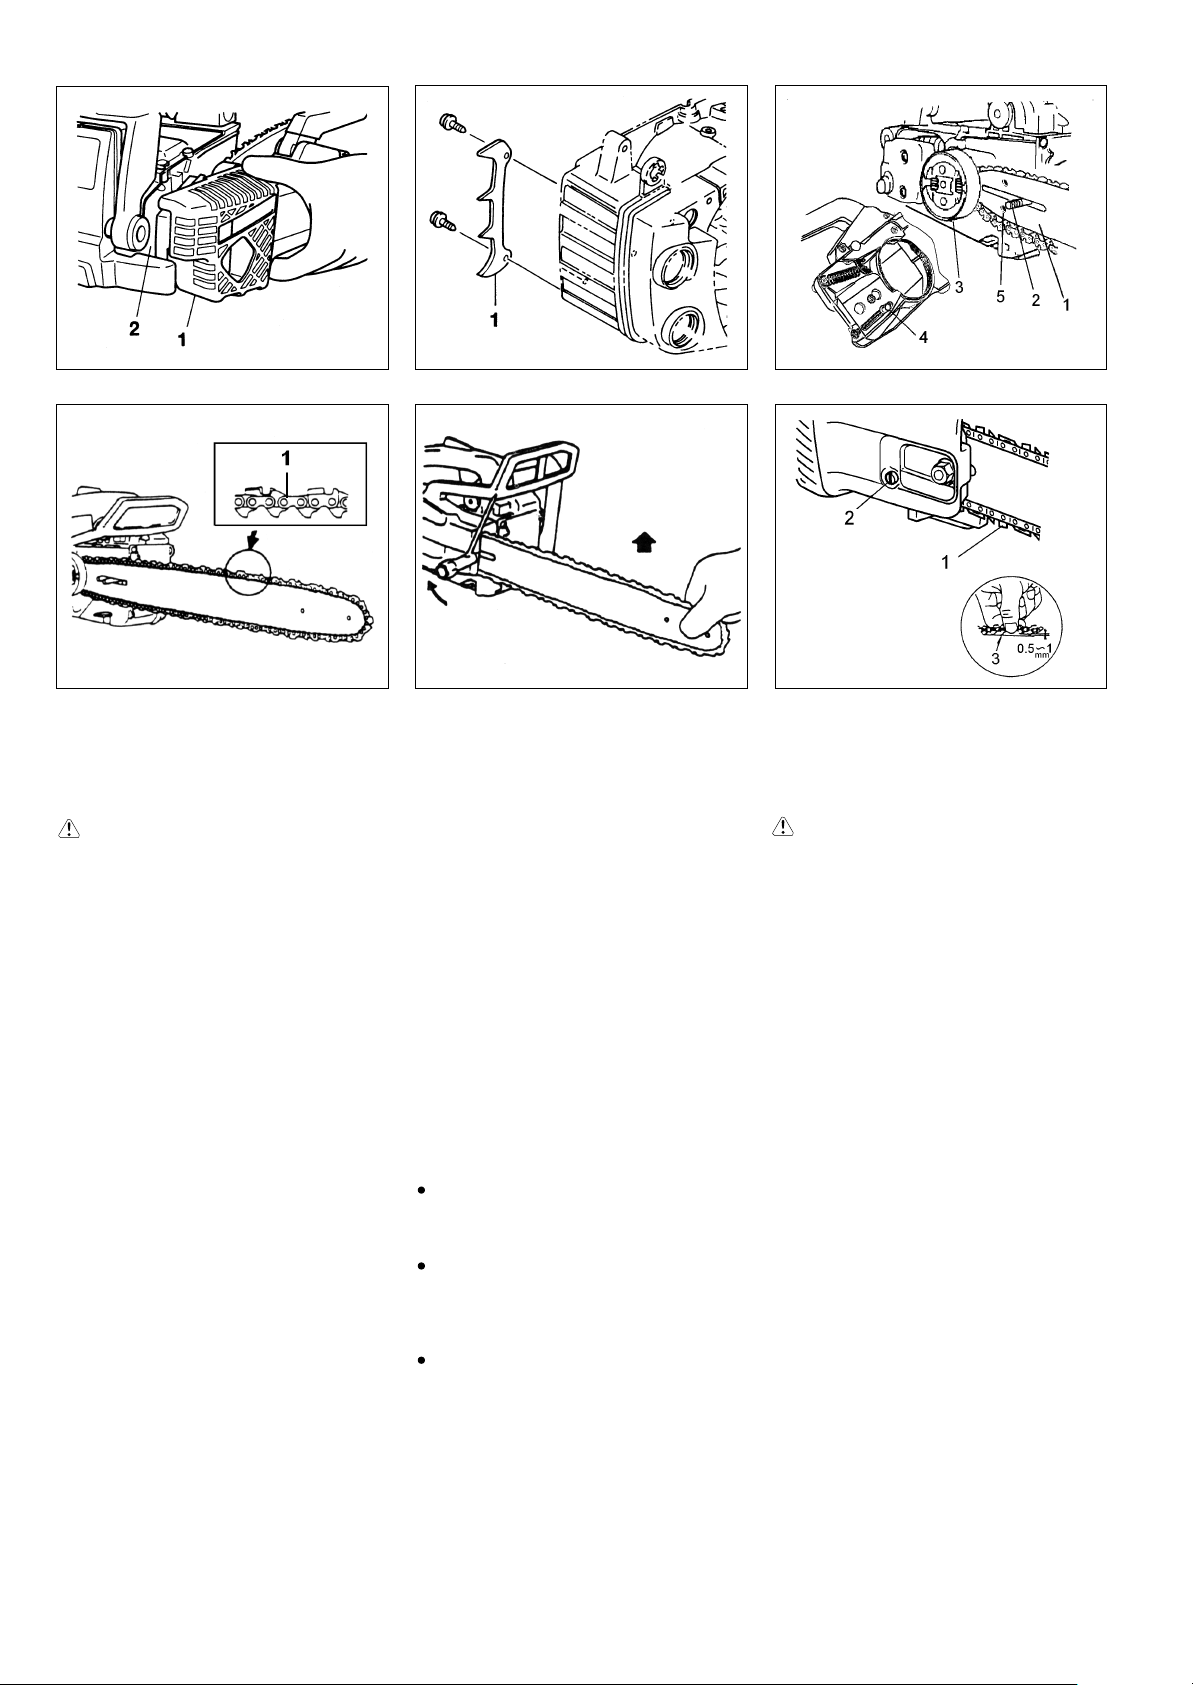
1. Remove chain bar clamp nuts (3).
2. Remove the side case (1) as pinching the
rear part of the side case (1) .(Fig. 1-1)
* Install the spiked bumper (1) (If so equipped)
to the unit with the two screws. (Fig.1-1B)
3. Install, the chain bar (1) onto the bolts (2),
then push it toward the sprocket (3) as far as
it will go. Make sure that the boss of chain
tension adjust bolt (4) fits into the hole of the
bar (5). (Fig.1-2)
NOTE!
Slightly move the bar back and forth and make
sure the chain tension boss (4) fits into the hole
(5) in the bar properly.
4. Confirm the direction of saw chain (1) is
correct as in the figure, and align the chain on
the sprocket. (Fig. 1-3)
5. Guide the chain drive links into the bar
groove all around the bar.
6. Install the side case (1) onto the guide bar
clamp bolts after inserting it on the align ment/locking tab on the engine case (2).
(Fig. 1-1)
Then fix the clamp nuts temporarily.
WARNING!
7. Raise the bar end, and tighten the chain (1)
by turning the tension adjustment bolt (2)
clockwise. To check proper tension, lightly
lift up the center of chain and there should
be about 0.5-1.0mm clearance between bar
and edge of drive link (3). (Fig.1-4, 5)
CAUTION!
PROPER TENSION IS EXTREMELY IM PORTANT!
8. Raise the bar end and securely tighten the
chain bar clamp nuts with the box wrench.
(Fig. 1-4)
9. A new chain will stretch so adjust the chain
after a few cuts and watch chain tension
carefully for the first half hour of cutting.
NOTE!
Check the chain tension frequently for
optimum performance and durability.
CAUTION!
When the chain is excessively tightened, the
bar and chain will be damaged rapidly.
Conversely, when the chain is excessively
loosened, it may get out of the groove in the
bar.
Always wear gloves when touching the chain.
Fig.1-5
WARNING!
During operation, hold chain saw firmly
with both hands. A single hand operation
may cause serious injury.
GB-6
Page 8

Fig. 2-1 Fig. 2-1CFig. 2-1B
Fig. 2-2 Fig. 2-3 Fig. 2-4
G
B
4. Operating procedures
Fuel (Fig. 2-1)
WARNING!
The chain saw is equipped with a twostroke engine. Always run the engine on
fuel, which is mixed with oil.
Provide good ventilation, when fueling or
handling fuel.
Fuel
Always use branded 89 octane unleaded
gasoline.
Use genuine two-cycle oil or use a mix
between 25:1 to 50:1, please consult the oil
bottle for the ratio or HITACHI dealer.
Only for the state of California at 50:1.
If genuine oil is not available, use an antioxidant added quality oil expressly labeled for
air-cooled 2-cycle engine use(JASO FC
GRADE OIL or ISO EGC GRADE). Do not use
BIA or TCW (2-stroke water-cooling type)
mixed oil.
Never use multi-grade oil (10 W/30) or waste
oil.
Always mix fuel and oil in a separate clean
container.
Always start by filling half the amount of fuel,
which is to be used. Then add the whole
amount of oil. Mix (shake) the fuel mixture. Add
the remaining amount of fuel.
Mix (shake) the fuel-mix thoroughly before filling
the fuel tank.
Fueling
Before fueling, clean the tank cap area carefully, to ensure that no dirt falls into the tank.
Make sure that the fuel is well mixed by shaking
the container, before fueling.
Chain oil (Fig. 2-1B)
Fill up with chain oil (2). Always use good
quality chain oil. When the engine is running,
the chain oil is automatically discharged.
NOTE!
When pouring fuel (1) or chain oil (2) into the
tank, place the unit with cap side up.
(Fig. 2-1B)
ADJUSTMENT OF CHAIN OIL SUPPLY
The chain oil quantity discharged through the
lubrication system is factory adjusted to the
maximum. Adjust the quantity in accordance
with the operating condition.
Turn the adjusting screw (1) counterclockwise
to decrease the quantity and turn it clockwise to
increase the quantity. (Fig.2-1C)
Do not try to turn the screw beyond level marks.
Starting (Fig. 2-2, 3)
WARNING!
When the engine starts with the throttle
lock engaged, the engine speed is high
enough to make the chain rotate.
CAUTION!
Before starting, make sure chain brake is
disengaged (if so equipped) and that the
bar/chain does not touch anything.
1. Set ignition switch (1) to ON position.
* Push priming bulb (5) several times so
that fuel flows through bulb into carburetor.
(If so equipped)(Fig. 2-3)
2. With the safety trigger (2) pressed pull
throttle trigger (4) and push throttle lock (3),
then slowly release the throttle trigger first,
then the safety trigger.
This will lock the throttle in starting position.
(Fig.2-2)
3. Pull choke knob to choked position (4).
(Fig.2-3)
4. Pull recoil starter briskly, taking care to keep
the handle in your grasp and not allowing it
to snap back. (Fig.2-4)
5. When you hear the engine want to start,
return choke lever to RUN position (open).
Then pull recoil starter briskly again.
NOTE!
If engine does not start, repeat procedures
from 2 to 5.
6. After starting engine, pull throttle trigger to
release throttle lock. Then allow the engine
about 2-3 minutes to warm up before
subjecting it to any load.
WARNING! (Fig.2-1B)
Always shut off the engine before refuel ing.
Slowly open the fuel tank (1), when filling
up with fuel, so that possible over pressure disappears.
Tighten the fuel cap carefully, after fuel ing.
Always move the unit at least 3 m (10 ft.)
from the fueling area before starting.
GB-7
Page 9
A
a
a
e
v
c
t
r
g
a
a
-
c
t
d
t
A
d
e
f
c
s
Fig.2-4B
Fig.2-6Fig.2-5
Fig.2-7
NOTE!
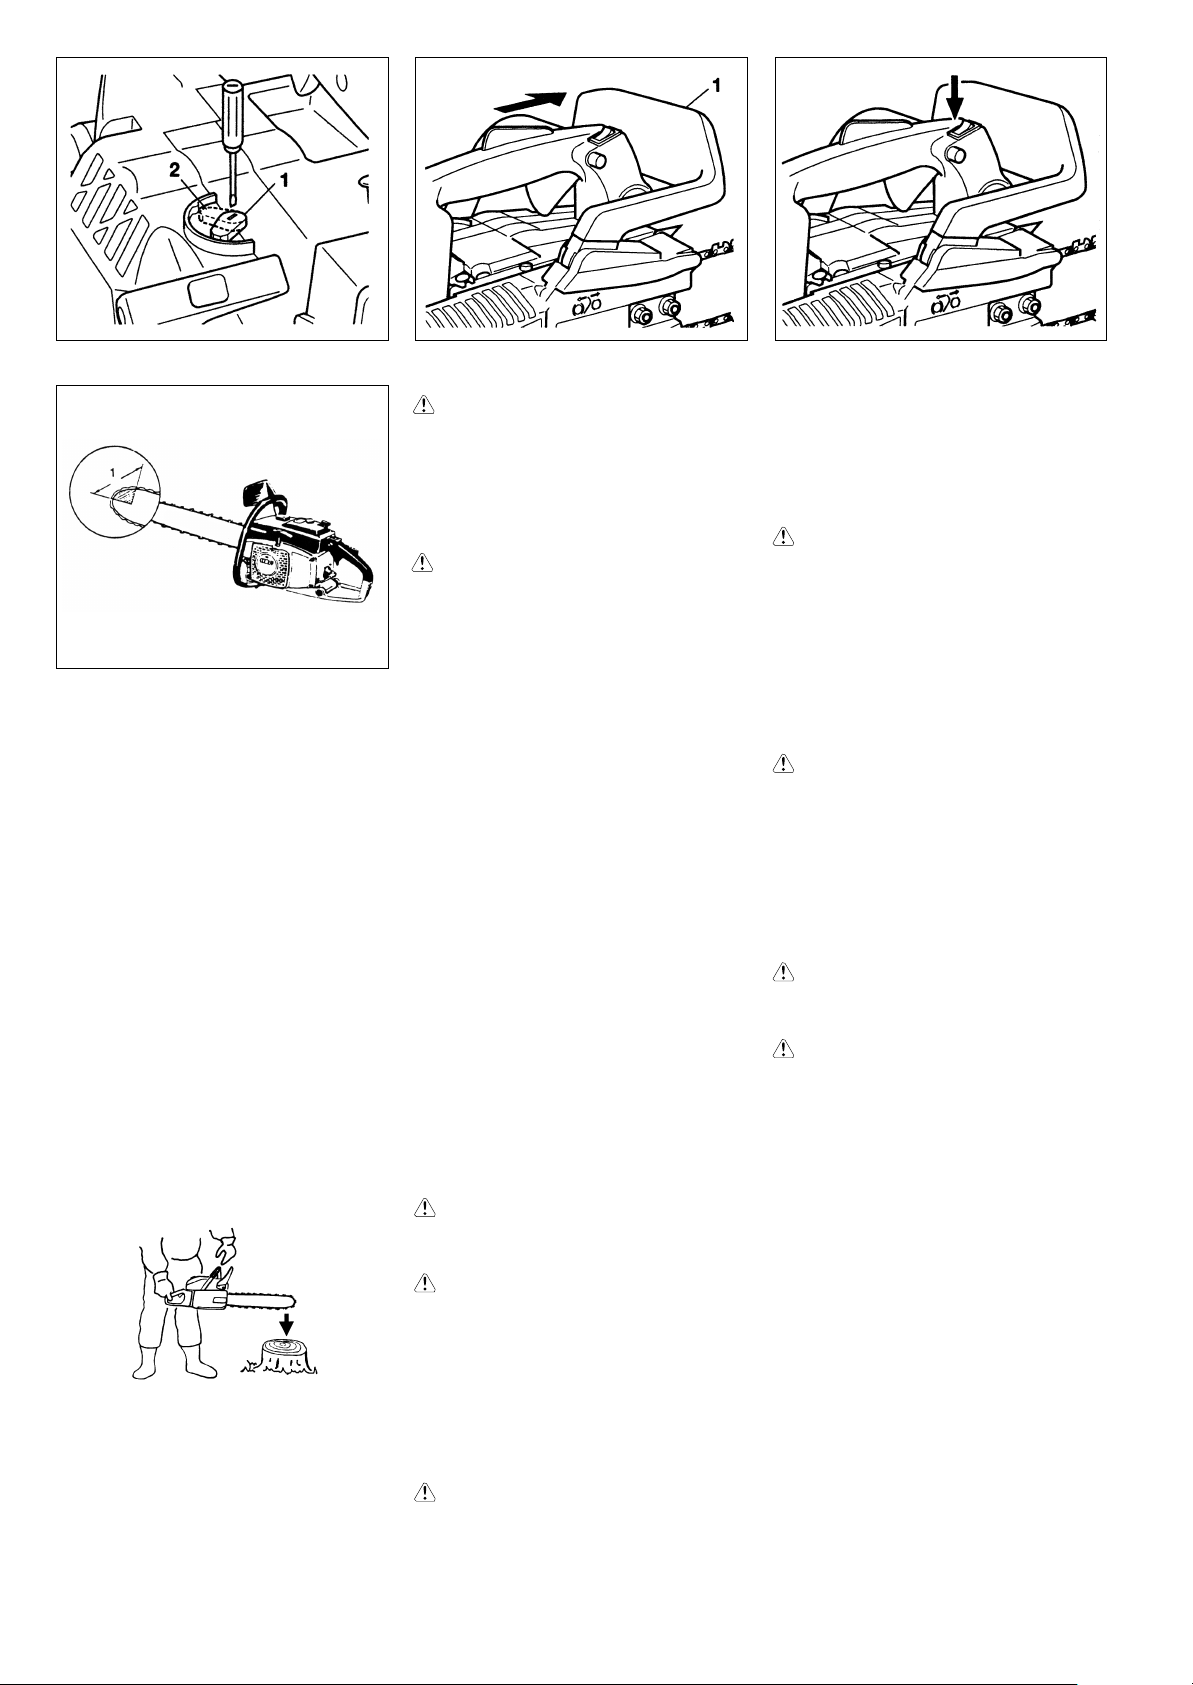
Icing protection system (Fig.2-4B)
When you use the unit in winter time or cold
weather, move the lever forward (2) to protect
carburetor from icing, otherwise just leave it in
its regular position (1).
Chain brake operation (Fig. 2-5)
Chain brake (1) (If so equipped) is designed to
activate in an emergency such as kick-back
action. Please check to verify that it works
properly before use.
Application of brake is made by moving the
front guard towards the bar. During the chain
brake operation, even if the throttle lever is
pulled, the engine speed does not increase
and the chain does not turn. To release the
brake, pull up the chain brake lever.
How to confirm:
1) Turn off the engine.
2) Holding the chain saw horizontally, release
your hand from the front handle, hit the tip of
the guide bar to a stump or a piece of wood,
and confirm brake operation. Operating level
varies by bar size.
WARNING!
Do not carry the machine with the engine
running.
Stopping (Fig. 2-6)
Decrease engine speed, and push ignition
switch to stop position.
WARNING!
KICKBACK DANGER (Fig. 2-7)
One of the most severe dangers when
working with a chain saw is the possibility of
kickback. Kickback may occur when the
upper tip of the guide bar touches an object,
or when the wood closes in and pinches the
saw chain in the cut. Tip contact in some
cases may cause a lightning fast reverse
reaction, kicking the guide bar up and back
toward you. Pinching the saw chain along the
top of the guide bar may also push the guide
bar rapidly back towards you. Either of these
reactions may cause you to lose control of the
saw which could result in serious personal
injury.
Even though your saw has safety built into its
design, you should not rely on these safety
features exclusively.
Know where your bar tip is at all times. Kickback
does occur if you allow the kickback zone (1) of
the bar to touch an object. Do not use that area.
Kickback from pinching is
caused by a cut closing and pinching the
upper side of the guide bar. Study your cut
and make sure it will open as you cut through.
Maintain control when the engine is running
by always keeping a firm grip on the saw with
your right hand on the rear handle, your left
hand on the front handle and your thumbs
and fingers encircling the handles. Always
hold the saw with both hands during operation
and cut at high engine speed.
WARNING!
Do not overreach or cut above shoulder
height.
WARNING!
Use extra caution when felling, and do not
use the saw in a nose-high position or
above shoulder height.
BASIC TECHNIQUES FOR MAKING FELLING, LIMBING AND BUCKING CUTS
The intention of the following information is
to provide you with the general introduction
to wood cutting techniques.
WARNING!
This information does not cover all
specific situations, which may depend on
differ-ences in terrain, vegetation, kind of
wood, form and size of trees, etc. Consult
your servicing dealer, forestry agent or
local forestry schools for advice on
specific woodcutting problems in your
area,
This will make your work more efficient
and safer.
WARNING!
Avoid cutting in adverse weather conditions, such as dense fog, heavy rain,
bitter cold, high winds, etc.
Adverse weather is often tiring to work in
and creates potentially dangerous conditions such as slippery ground.
High winds may force the tree to fall in an
unexpected direction causing property
damage or personal injury.
CAUTION!
Never use a chainsaw to pry or for any
purpose for which it is not intended.
WARNING!
Avoid stumbling on obstacles such as
stumps, roots, rocks, branches and fallen
trees. Watch out for holes and ditches. Be
extremely cautious when working on
slopes or uneven ground. Shut off the
saw when moving from one work place to
another.
Always cut at wide open throttle. A slow
moving chain can easily catch and force the
saw to jerk.
In case the brake is not effective, ask our dealer
for inspection and repairs.
If the engine keeps rotating at high speed with
the brake engaged, the clutch will overheat
causing trouble.
When the brake engages during operation,
immediately release the throttle lever to stop the
engine.
GB-8
CHAIN CATCHER
The chain catcher is located on the power head
just below the chain to further prevent the
possibility of a broken chain striking the
chainsaw user.
WARNING!
Do not stand in-line with chain when
cutting.
Page 10
G
B
WARNING!
Never use the saw with only one hand.
You cannot control the saw properly and
you may lose control and injure yourself
severely.
Keep the saw body close to your body to
improve control and reduce strain.
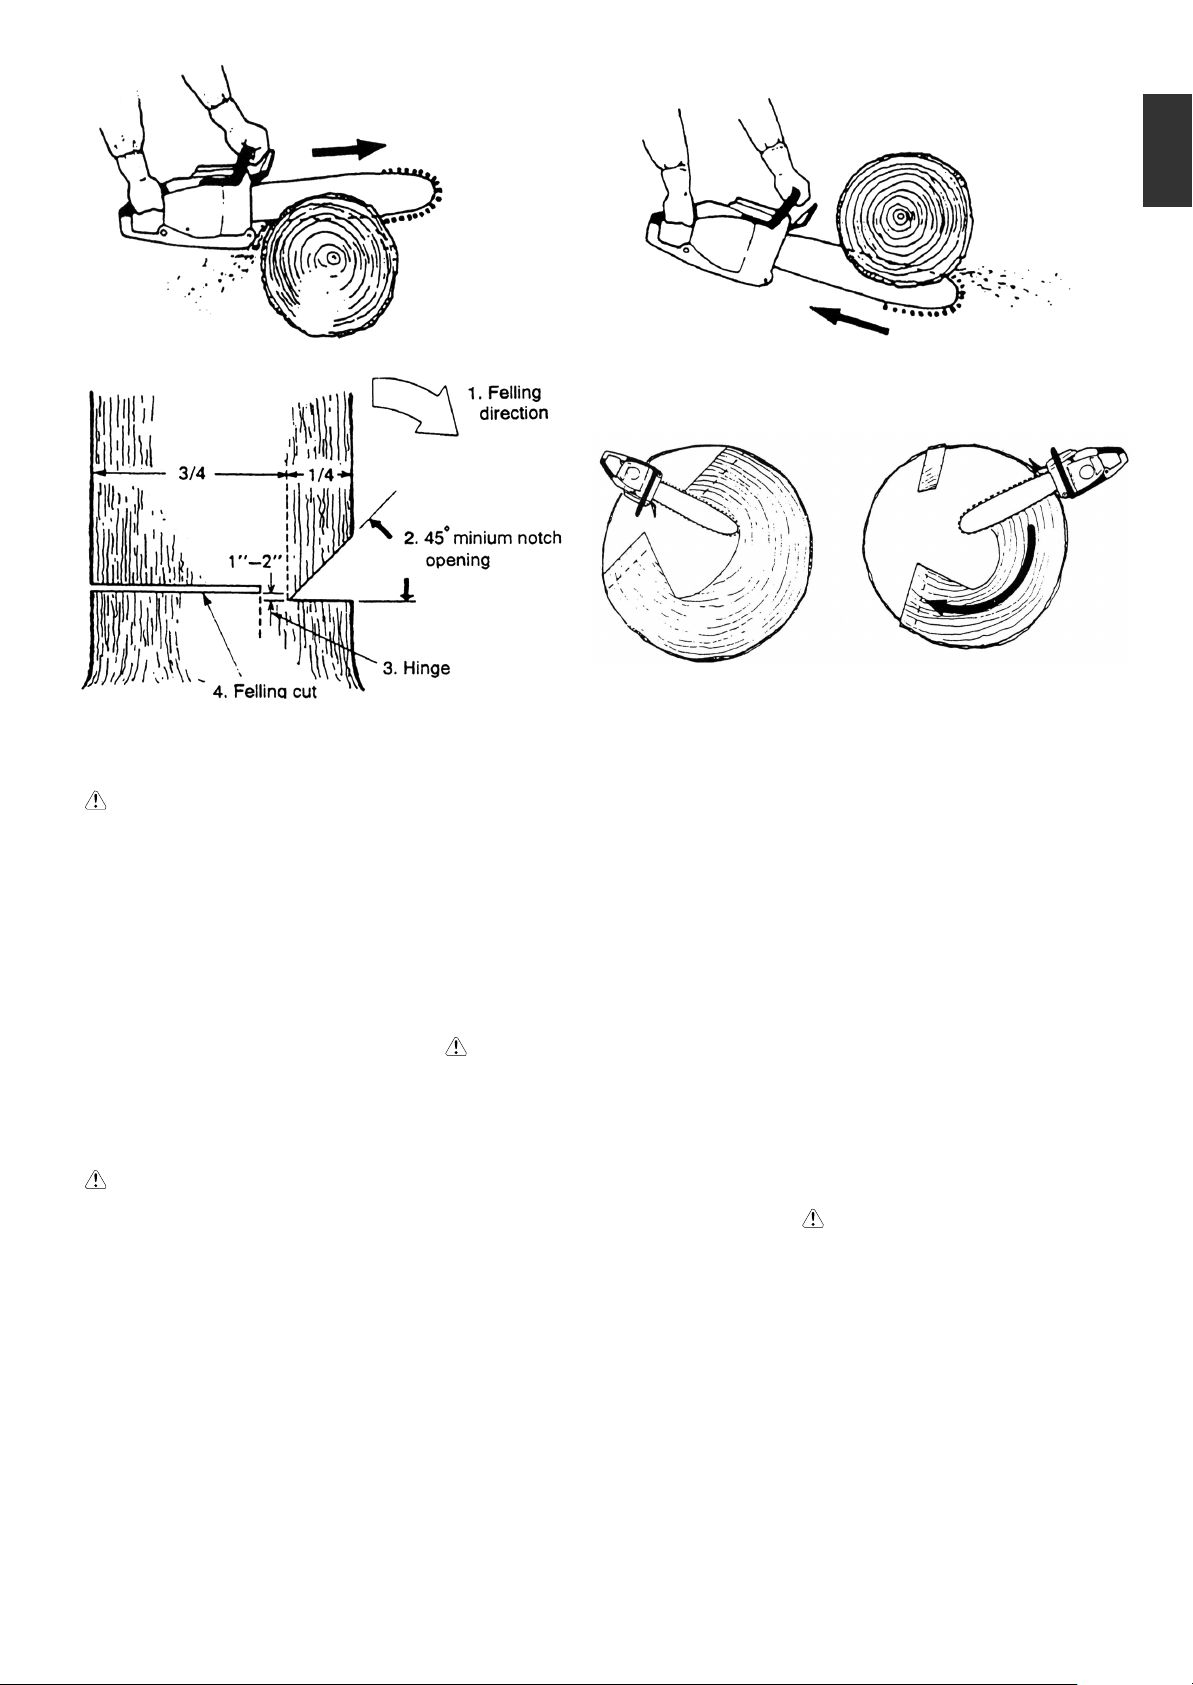
When cutting with the bottom part of the
chain the reactive force will pull the saw
away from you towards the wood you are
cutting.
The saw will control the feeding speed
and sawdust will be directed towards you.
(Fig. 2-7B)
When cutting with the upper part of the
chain the reactive force will push the saw
towards you and away from the wood you
are cutting. (Fig. 2-7C)
WARNING!
There is a risk of kickback if the saw is
pushed far enough so that you begin to cut
with the nose of the bar.
The safest cutting method is to cut with the
bottom part of the chain. Sawing with the
upper part makes it much more difficult to
control the saw and increases the risk of
kickback.
NOTE!
Always keep the spiked bumper face to a tree,
because the chain may suddenly be drawn into
a tree.
Fig. 2-7B
Fig. 2-7E
Fig. 2-7D
FELLING
Felling is more than cutting down a tree. You
must also bring it down as near to an intended
place as possible without damaging the tree or
anything else.
Before felling a tree, carefully consider all
conditions which may effect the intended
direction, such as:
Angle of the tree. Shape of the crown. Snow
load on the crown. Wind conditions. Obstacles
within tree range (e.g., other trees, power lines,
roads, buildings, etc.).
WARNING!
Always observe the general conditions of
the tree. Look for decay and rot in the trunk
which will make it more likely to snap and
start to fall before you expect it.
Look for dry branches, which may break and
hit you when you are working.
Always keep animals and people at least
twice the tree length away while felling.
Clear away shrubs and branches from
around the tree.
Prepare a path of retreat away from the
felling direction.
BASIC RULES FOR FELLING TREES
Normally the felling consists of two main
cutting operations, notching and making the
felling cut.
Start making the upper notch cut on the side of
the tree facing the feeling direction. Look
through the kerf as you saw the lower cut so
you do not saw too deep into the trunk.
The notch should be deep enough to create a
hinge of sufficient width and strength. The
notch opening should be wide enough to direct
the fall of the tree as long as possible.
Saw the felling cut from the other side of the
tree between one and two inches (3-5 cm)
above the edge of the notch. (Fig. 2-7D)
Fig. 2-7C
Fig. 2-7F
Never saw completely through the trunk. Always
leave a hinge.
The hinge guides the tree. If the trunk is
completely cut through, you lose control over
the felling direction.
Insert a wedge or a felling lever in the cut well
before the tree becomes unstable and starts to
move. This will prevent the guide bar from
binding in the felling cut if you have misjudged
the falling direction. Make sure no people have
come into the range of the falling tree before
you push it over.
FELLING CUT, TRUNK DIAMETER MORE
THAN TWICE GUIDE BAR LENGTH
Cut a large, wide notch. Then cut a recess into
the center of the notch. Always leave a hinge
on both sides of the center cut. (Fig. 2-7E)
Complete the felling cut by sawing around the
trunk as in the Fig. 2-7F.
WARNINGI
These methods are extremely dangerous
because they involve the use of the nose of
guide bar and can result in kickback. Only
properly trained professionals should attempt
these techniques.
GB-9
Page 11
E
F
A
R
R
D
e
R
c
o
a
t
t
e
h
s
e
a
e
y
e
t
R
h
m
a
Fig.2-7G
Fig.2-7H
Fig.2-7J
Fig.2-7K
Fig.2-7L
THICK LOG, LARGER THAN GUIDE BAR
LENGTH
Begin by cutting on the opposite side of the
log. Pull the saw towards you followed by
previous procedure. (Fig. 2-7J)
Fig.2-7M Fig.2-7N
LIMBING
Limbing is removing the branches from a feller
tree.
WARNING!
A majority of kickback accidents occur during
limbing.
Do not use the nose of the guide bar. Be
extremely cautious and avoid contacting the
log, other limbs or objects with the nose of the
guide bar. Be extremely cautious of limbs
under tension. They can spring back towards
you and cause loss of control resulting in
injury. (Fig. 2-7G)
Stand on the left side of the trunk. Maintain a
secure footing and rest the saw on the trunk.
Hold the saw close to you so that you are in
full control of it. Keep well away from the chain.
Move only when the trunk is between you and
the chain. Watch out for spring back of limbs
under tension.
LIMBING THICK BRANCHES
When limbing thick branches, the guide bar
may get pinched easily. Branches under
tension often snap up, so cut troublesome
branches in small steps. Apply the same
principles as for cross cutting.
Think ahead and be aware of the possible
consequences of all your actions.
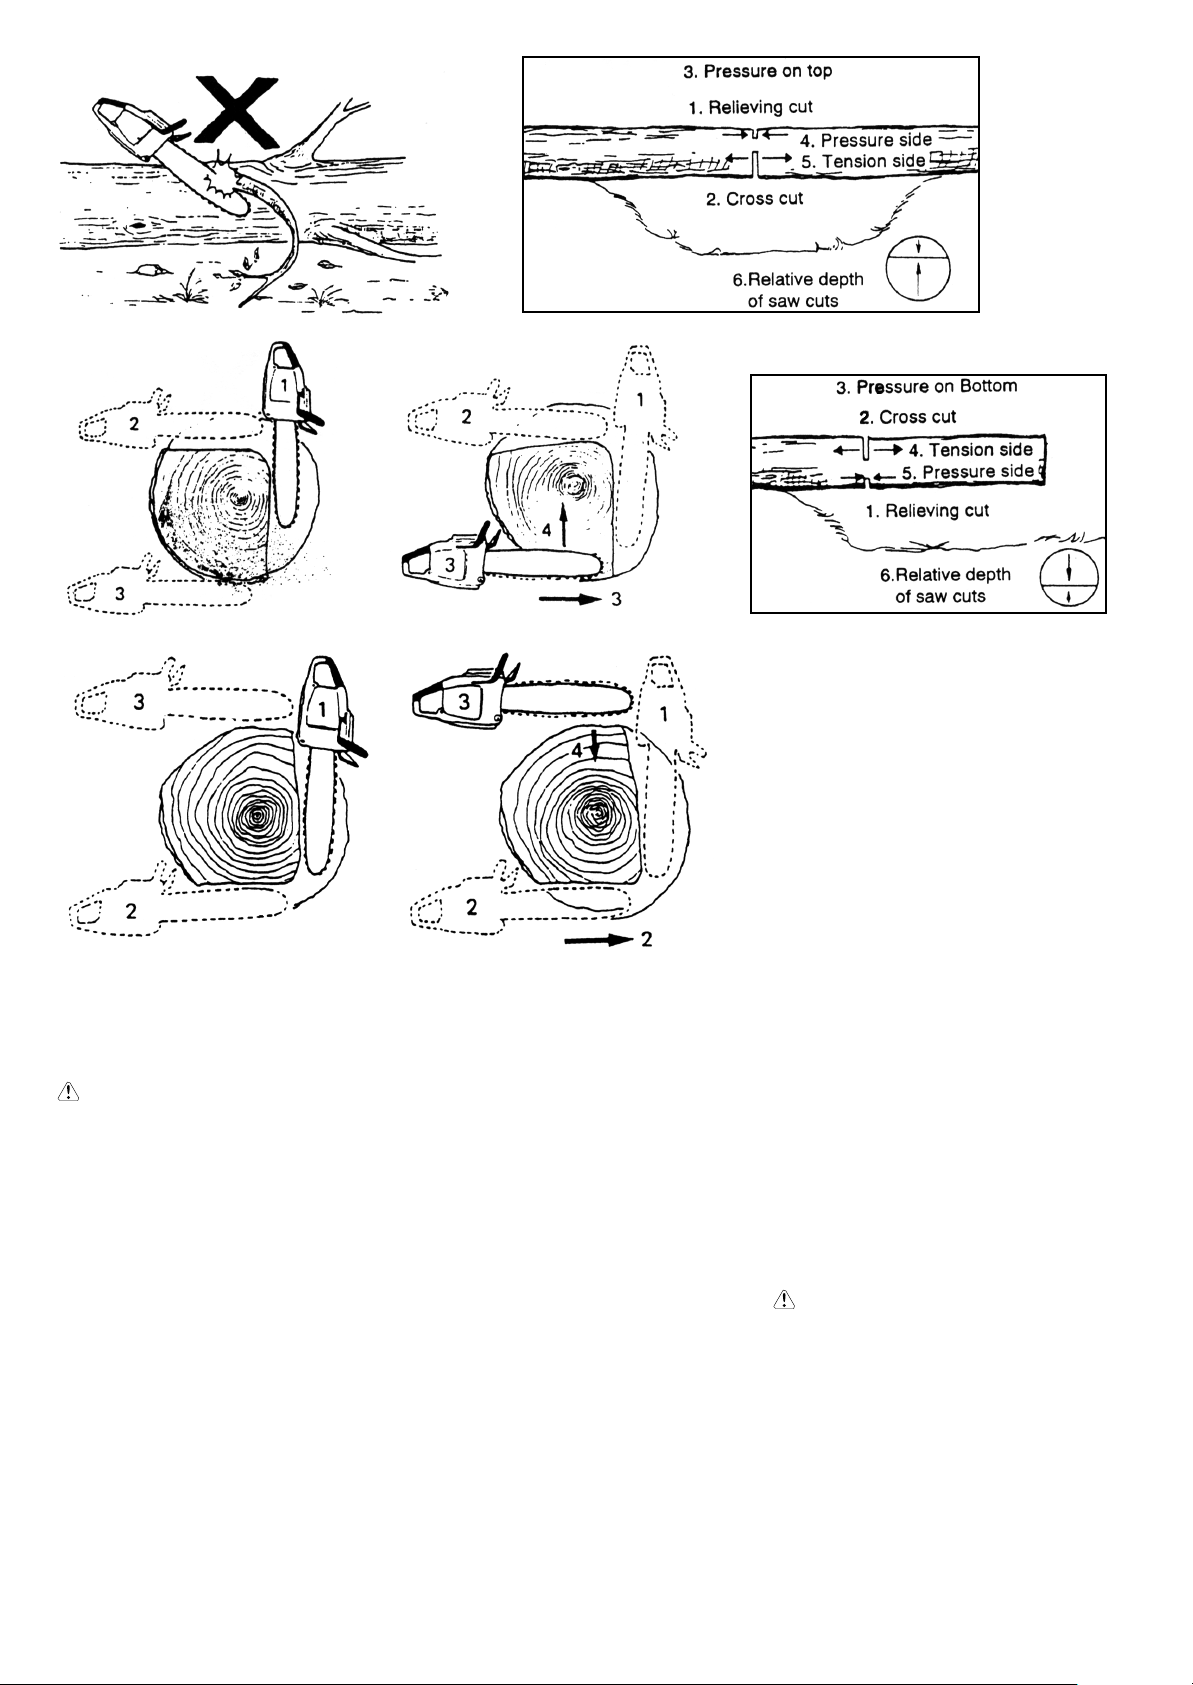
CROSS CUTTING/BUCKING
Before starting to cut through the log, try
to imagine what is going to happen. Look
out for stresses in the log and cut through
it in such a manner that the guide bar will
not get pinched.
CROSS CUTTING LOGS, PRESSURE ON
TOP
Take a firm stance. Begin with an upper
cut. Do not cut too deeply, about 1/3 of
the log diameter is enough.
Finish with a bottom cut. The saw cuts
should meet. (Fig. 2-7H)
If the log is lying on the ground make a boring
cut to avoid cutting into the ground. Finish with
a bottom cut. (Fig. 2-7K)
WARNING! KICKBACK DANGER!!
Do not attempt a boring cut if you are not
properly trained. A boring cut involves the use
of the nose of the guide bar and can result in
kickback.
CROSS CUTTING LOGS, PRESSURE ON
BOTTOM
Take a firm stance. Begin with a bottom cut.
The depth of the cut should be about 1/3 of
the log diameter.
Finish with an upper cut. The saw cuts should
meet. (Fig. 2-7L)
THICK LOG, LARGER THAN GUIDE BAR
LENGTH
Begin by cutting on the opposite side of the
log. Pull the saw towards you, followed by
previous procedure.
Make a boring cut if the log is close to the
ground.
Finish with a top cut. (Fig. 2-7M)
WARNING! KICKBACK DANGER!!
Do not attempt a boring cut if you are not
properly trained. A boring cut involves the
use of the nose of the guide bar and can
result in kickback. (Fig. 2-7N)
IF THE SAW GETS STUCK
Stop the engine.
Raise the log or change its position, using a
thick branch or pole as a lever.
Do not try to pull the saw free. If you do, you
can deform the handle or be injured by the
saw chain if the saw is suddenly released.
GB-10
Page 12

Fig. 3-1 Fig. 3-3Fig. 3-2
G
B
5. Maintenance
MAINTENANCE, REPLACEMENT, OR REPAIR OF THE EMISSION CONTROL DEVICES AND SYSTEM MAY BE
PERFORMED BY ANY NON-ROAD ENGINE
REPAIR ESTABLISHMENT OR
INDIVIDUAL.
Carburetor adjustment (Fig. 3-1)
WARNING!
Never start the engine without the complete
clutch cover. Otherwise the clutch can
come loose and cause personal injuries.
In the carburetor, fuel is mixed with air. When
the engine is test run at the factory, the
carburetor is adjusted. A further adjustment
may be required, according to climate and
altitude. The carburetor has one adjustment
possibility:
T = Idle speed adjustment screw.
Idle speed adjustment (T)
Check that the air filter is clean. When the idle
speed is correct, the cutting attachment will not
rotate. If adjustment is required, close (clockwise) the T-screw, with the engine running,
until the cutting attachment starts to rotate.
Open (counter-clockwise) the screw until the
cutting attachment stops. You have reached
the correct idle speed when the engine runs
smoothly in all positions well below the rpm
when the cutting attachment starts to rotate.
If the cutting attachment still rotates after idle
speed adjustment, contact HITACHI dealer.
WARNING!
When the engine is idling the cutting
attachment must under no circumstances
rotate.
NOTE!
Some models sold areas with strict exhaust
emission regulation do not have high and low
speed carburetor adjustments. Such
adjustments may allow the engine to be
operated outside of their emission compliance
limits. For these models, the only carburetor
adjustment is idle speed.
For models that equipped with low and high
speed adjustments; carburetors are pre set at
the factory Minor adjustments may optimize
performance based on climate, altitude, etc.
Never turn the adjustment screws in increments
greater than 90 degrees, as engine damage
can result from incorrect adjustment If you are
not familiar with type of adjustment-assistance
HITACHI dealer.
Air filter (Fig. 3-2)
The air filter (1) must be cleaned from dust and
dirt in order to avoid:
Carburetor malfunctions.
Starting problems.
Engine power reduction.
Unnecessary wear on the engine parts.
Abnormal fuel consumption.
Clean the air filter daily or more often if working
in exceptionally dusty areas.
Cleaning the air filter
Remove the air filter cover (2) and the filter (1).
Rinse them in warm soap suds. Check that the
filter is dry before reassembly. An air filter that
has been used for some time cannot be
cleaned completely. Therefore, it must regularly
be replaced with a new one. A damaged filter
must always be replaced.
Spark plug (Fig. 3-3)
The spark plug condition is influenced by:
An incorrect carburetor setting.
Wrong fuel mixture (too much oil in the
gasoline)
A dirty air filter.
Hard running conditions (such as cold
weather).
These factors cause deposits on the spark
plug electrodes, which may result in malfunction and starting difficulties. If the engine is
low on power. difficult to start or runs poorly at
idling speed, always check the spark plug first.
If the spark plug is dirty, clean it and check the
electrode gap. Readjust if necessary. The
correct gap is 0.6 mm (.024″). The spark plug
should be replaced after about 100 operation
hours or earlier if the electrodes are badly
eroded.
NOTE!
In some areas, local law requires using a
resistor spark plug to suppress ignition signals.
If this machine was originally equipped with
resistor spark plug, use same type of spark
plug for replacement.
GB-11
Page 13

A
s
A
a
a
e
e
a
e
e
r
g
n
-
Fig.3-4 Fig.3-6
Fig.3-5
Fig.3-7
Fig.3-10
Oiler port (Fig. 3-4)
Clean the chain oiler port (1) whenever
possible.
Guide bar (Fig. 3-5)
Before using the machine, clean the groove
and oiler port (1) in the bar with the special
gauge offered as an optional accessory.
Side case (Fig. 3-6)
Always keep the side case and drive area
clean of saw dust and debris.
Periodically apply oil or grease to this area to
protect from corrosion as some trees contain
high levels of acid.
Fuel filter (Fig. 3-7)
Remove the fuel filter from the fuel tank and
thoroughly wash it in solvent. After that, push
the filter into the tank completely.
NOTE!
If the filter is hard due to dust and dirt, replace
it.
Fig.3-8
Chain oil filter (Fig. 3-8)
Remove the oil filter and thoroughly wash it in
solvent
Cleaning the cylinder fins (Fig, 3-9)
When wood chips are caught between cylinder
fins (1), the engine may overheat, resulting in
lower output. To avoid this, alwa ys keep
cylinder fins and fan case clean.
Every 100 operating hours, or once a year
(more often if conditions require), clean fins
and external surfaces of engine of dust, dirt
and oil deposits which can contribute to improper cooling.
Fig.3-9
Cleaning the muffler (Fig. 3-10)
Remove the muffler (1) and spark arrestor (if so
equipped), and clean out any excess carbon
from the exhaust port or muffler inlet every 100
hours of operation.
For long-term storage
Drain all fuel from the fuel tank. Start and let
engine run until it stops. Repair any damage
which has resulted from use. Clean the unit with
a clean rag, or the use of high pressure air
hose. Put a few drops of two-cycle engine oil
into the cylinder through the spark plug hole,
and spin the engine over several times to
distribute oil. Cover the unit and store it in a dry
area.
GB-12
Page 14

Fig. 4-1
G
B
Fig. 4-2
Fig. 4-4
Fig. 4-3
CHAIN SHARPENING Parts of a cutter.
(Fig. 4-1, 2)
WARNING!
Gloves should be used when sharpening
chain.
WARNING!
Be sure to round off the front edge to reduce
the chance of kickback or tie-strap
breakage.
1. Top plate
2. Working corner
3. Side plate
4. Gullet
5. Heel
6. Chassis
7. Rivet hole
8. Toe
9. Depth gauge
10. Correct angle on top plate (degree of angle
depends on chain type)
11. Slightly protruding "hook" or point (curve on
non-chisel chain)
12. Top of depth gauge at correct height below
top plate
13, Front of depth gauge rounded off
Fig. 4-5
LOWERING DEPTH GAUGES WITH A FILE
1) If you sharpen your cutters with a file holder,
check and lower the depth.
2) Check depth gauges every third sharpening.
3) Place depth gauge tool on cutter. If depth
gauge projects, file it level with the top of the
tool. Always file from the inside of the chain
toward an outside cutter. (Fig. 4-3)
4) Round off front corner to maintain original
shape of depth gauge after using depth
gauge tool. Always follow the recommended
depth gauge setting found in the
maintenance or operator manual for your
saw. (Fig. 4-4)
GENERAL INSTRUCTIONS FOR FILING
CUTTERS
File (1) cutter on one side of the chain from the
inside out.
File on forward stroke only. (Fig. 4-5)
5) Keep all cutters the same length. (Fig. 4-6)
Fig. 4-6
GB-13
Page 15

e
z
g
T
h
g
u
e
w
w
Fig.4-7
Fig.4-7B
6) File enough to remove any damage to
cutting edges (side plate (1) and top plate
(2)) of cutter. (Fig. 4-7)
SHARPENING ANGLES FOR SHARPENING
SAW CHAIN (Fig. 4-7B)
Maintenance schedule
Below you will find some general maintenance
instructions. For further information please
contact HITACHI dealer.
Daily maintenance
Clean the exterior of the unit.
Clean the chain oil filter port.
Clean the groove and oil filter port in the
guide bar.
Clean the side case of saw dust.
Check that the saw chain is sharp.
Check that the bar nuts are sufficiently
tightened.
Make sure that the chain transport guard is
undamaged and that it can be securely
fitted.
Check that nuts and screws are sufficiently
tightened.
Weekly maintenance
Check the starter, especially cord and return
spring.
Clean the exterior of the spark plug.
Remove the spark plug and check the
electrode gap. Adjust it to 0.6 mm (.024 ") or
change the spark plug.
Clean the cooling fins on the cylinder and
check that the air intake at the starter is not
clogged.
Clean the air filter.
Monthly maintenance
Rinse the fuel tank with gasoline, and clean
fuel filter.
Clean chain oil filter.
Clean the exterior of the carburetor and the
space around it.
Clean the fan and the space around it.
Clean the muffler of carbon.
GB-14
Page 16

6. Specifications
MODEL CS30EH (S)/CS35EH (S)
Engine Size (ml)
Spark Plug
Fuel Tank Capacity (mI)
Chain Oil Tank Capacity (mI)
............................................... 34
....................................................... Campion CJ-8Y or RCJ-8Y
NGK BPM-6A or BPMR-6A
or equivalent
................................... 300
............................ 190
2
Vibration level (m/s
Front handle ..................................................... 7.4
Rear handle ...................................................... 9.0
Max. engine speed (min
Idle engine speed (min
......................... 11,500
............................ 2,800
) by ISO22867
-1
)
-1
)
G
B
Dry Weight (kg)
(Without guide bar and chain)
Guide bar length (mm)
Chain pitch (mm)
Chain gauge (mm)
Sound pressure level (dB(A)) by ISO22868
Sound power level (dB(A)) by ISO22868 ......... Lw measured
106.7
................................................ 3.6
CS30EH (S)........ 300 (12")
CS35EH (S)........ 350 (14")
.............................................. 9.52 (3/8")
............................................ 1.27 (0.05")
..... LpA
97.0
Type of guide bar
Type of chain
Max. chain speed (m/sec)
Sprocket (number of teeth)
NOTE : Equivalent noise level/vibration levels are calculated as the
time-weighted energy total for noise/vibration levels under
various working conditions with the following time distribution:
1/3 idle, 1/3 full, 1/3 racing speed.
* All data subject to change without notice.
.........................................
.............................................. 91 VG
(Oregon)
............................. 21.9
.......................... 6
Sound power level (dB(A)) by 2000/14/EC ..... LwA
107
GB-15
Page 17

GB-16
Page 18

CS30EH (S)/CS35EH (S)
Перед эксплуатацией этой
машины внимательно
прочтите руководство.
R
U
Руководство пользователя
RU-1
Page 19

ПРEДОСТEРEЖEНИE
Выхлоп двигателя данного изделия
содержит химикаты, известные в Штате
Kалифорния, как вызывающие рак,
врождённые дефекты и другой
репродуктивный вред.
Следует прочитать, понять и выполнять
все предостережения и инструкции,
указанные в этом руководстве и на
аппарате.
Важно, чтобы Вы прочли, полностью поняли и
соблюдали приведённые ниже меры
предосторожности по безопасности и
предупреждения. Халатное или ненадлежащее
применение аппарата может вызвать серьёзные
или смертельные телесные повреждения.
Применение при удерживании одной рукой
запрещается. При выполнении резки твёрдо
держите пилу двумя руками, при этом большой
палец прочно фиксируется вокруг передней
рукоятки.
При эксплуатации данного аппарата всегда
носить средства защиты зрения, слуха, а
также головной убор.
Осторожно, опасность отдачи. Соблюдать
осторожность при внезапном и случайном
движении направляющей шины вверх или
назад.
Перед применением нового аппарата
Внимательно прочесть руководство пользователя.
Проверить правильность сборки и регулировки режущего
оборудования.
Запустить аппарат и проверить регулировку карбюратора. Смотри
"Техобслуживание".
Пила разработана специально для обработки
деревьев и поэтому должна использоваться только
опытными операторами, для незаземлённой
работы на деревьях.
Важно носить спецодежду для защиты ног и рук.
RU-2
Page 20

Заявление о соответствии
Мы, Nikko Tanaka Engineering Co., Ltd., 3-4-29 Tsudanuma, Narashino, Chiba, Japan
Заявляем с исключительной ответственностью, что изделие, модель цепной пилы
к которому относится настоящее заявление, выполняет основные требования по
технике безопасности Директив.
98/37/EC, 89/336/EEC, 2000/14/EC
Приняты во внимание следующие стандарты
Зарегистрированный орган: Компания 0404, SMP Svensk MaskinprovningAB, Fyrisborgsgaian 3, SE-754 50,
Uppsala, Sweden, выполнила испытание по типу ЕС, согласно Статье 8, пункт 2c, параграф 3.
Зарегистрированный орган выдал сертификат испытания по типу ЕС, №: 404/99/644, в соответствии с
Приложением Vl, пункт 4.
Изготовлено на :
Подпись:
Chiba, Japan
EN ISO 11681-2:1998/Amd 1:2003
EN ISO 12100-1:2003,EN ISO 12100- 2:2003
CISPR12:2005
CS30EH (S)/CS35EH (S)
05/01/2007
Yoshio Osada
Должность: Директор
Содержание
Что это такое?
Предостережения и инструкции по
технике безопасности
Сборочные операции
Рабочие операции
Техобслуживание
Спецификации
Серийный № от
E570001
11
15
R
U
4
5
6
7
RU-3
Page 21

ч
а
у
ю
б
л
и
л
ь
р
к
ы
т
л
с
р
и
с
т
р
п
й
о
т
г
ж
м
ь
и
п
ь
е
л
ь
й
т
л
ь
ь
з
.
Н
х
о
д
н
о
т
з
п
н
ь
о
С
н
а
о
р
у
о
д
а
В
а
1. Что это такое?
Поскольку в этом руководстве описывается несколько моделей, возможны различия между рисунками и Вашим аппаратом. Пользуйтесь
инструкциями, прилагаемыми к Вашему аппарату.
1. Дроссельное пусковое устройство
2. Блокировка дроссельного пускового устройства (предохранительное пусковое устройство)
3. Выключатель зажигания
4. Крышка масляного бака
5. Возвратный стартер
6. Передняя рукоятка
7. Крышка топливного бака
8. Ручка управления воздушной заслонкой
9. Заливной насос
10. Направляющая шина
11. Пильная цепь
12. Цепной тормоз (передний щиток для защиты руки)
13. Узел крепления
14. Шипованный буфер (по заказу)
15. Цепной ограничитель
16. Кожух направляющей шины
17. Кольцевой гаечный ключ Combi
18. Руководство пользователя
19. Дроссельный затвор
RU-4
Page 22

2. Предостережения и инструкции по технике безопасности
Безопасность оператора
ПРEДОСТEРEЖEНИE!
Данная цепная пила сконструирована
специально для ухода за деревьями и обрезки.
Применять эту пилу должны только лица,
имеющие опыт ухода за деревьями и их
обрезки. Соблюдать информацию из
специальной литературы, процедуры и
рекомендации соответствующей
профессиональной организации.
Невыполнение этого условия влечёт за собой
высокий риск несчастного случая. Мы
рекомендуем всегда пользоваться подъёмной
платформой для обрезки деревьев. Методика
подъёма и спуска на верёвке чрезвычайно
опасна и требует специальной подготовки.
Оператор должен иметь навык обращения с
оборудованием, обеспечивающим
безопасность, владеть техникой работы и
подъёма. Всегда использовать удерживающее
оборудование, как для оператора, так и для
пилы.
Всегда носить защитный щиток для лица или
очки.
При заточке следует использовать перчатки.
Всегда носить защитную экипировку, такую
каккрутка, брюки, перчатки, каска, обувь со
стальными носками и нескользящей подошвой,
приэксплуатации цепной пилы. Для работы на
деревьях следуетприменять защитную обувь,
походящую для техникиподъёма. Не надевать
широкую одежду, украшения,шорты, сандалии и
не ходить босиком. Подбирать волосы так, чтобы
их длина была выше плеч.
Не управляйте этим аппаратом/ машиной, если
Вы устали, больны или находитесь под влиянием
алкоголя, наркотиков или медикаментов.
Не позволять детям или некомпетентным лицам
управлять машиной.
Носить средства защиты слуха.
Не запускать и не эксплуатировать двигатель в
закрытом помещении или здании. Вдыхание
выхлопных газов может быть смертельным.
Для защиты органов дыхания носите респиратор
при выделении от цепи масляного тумана и пыли
из древесных опилок.
Держите рукоятки в чистом состоянии, без масла
или топливной смеси.
Не прикасайтесь к режущему оборудованию.
Не захватывать и не держать устройство за
режущее оборудование.
Eсли устройство отключено, убедитесь, что
режущий аппарат остановился, прежде чем
положить устройство.
Eсли эксплуатация длительная, периодически
устраивайте перерывы, чтобы избежать
возможного синдрома белых пальцев, который
вызывает вибрация.
Оператор должен соблюдать местные правила
области, где выполняется обрезка.
ПРEДОСТEРEЖEНИE!
Длительное или непрерывное воздействие
высокого уровня шума может вызвать
перманентное снижение слуха. При
эксплуатации аппарата/машины всегда носить
средства защиты слуха.
Безопасность аппарата/машины
Перед каждым применением проверяйте весь
аппарат/машину. Заменяйте повреждённые
детали. Проверяйте отсутствие утечки топлива и
прочность посадки всех креплений.
Перед применением устройства/машины
замените треснувшие, сколотые или иным
образом повреждённые детали.
Убедитесь, что защитное приспособление
установлено надлежащим образом.
При выполнении регулировки карбюратора не
допускать в рабочую зону посторонних.
Применяйте вспомогательное оборудование,
рекомендованное для этого аппарата/машины
изготовителем.
Не позволять цепи наталкиваться на препятствия.
Если цепь столкнулась с чем-то, следует
отключить машину и тщательно её проверить.
Следить за работоспособностью автоматической
маслёнки. Заполнять масляный бак чистым
маслом. Не допускать, чтобы цепь двигалась на
шине в сухом состоянии.
Все работы по техническому обслуживанию
цепной пилы, не описанные в руководстве
оператора/пользователя, должны производиться
компетентными специалистами по сервисному
обслуживанию цепных пил. (Например, если для
демонтажа маховика применяются неподходящие
инструменты, либо если подобные инструменты
используются для удержания маховика, чтобы
демонтировать муфту, на маховике могут
возникнуть структурные повреждения, что затем
приведёт к разрыву маховика.)
ПРEДОСТEРEЖEНИE!
Не производить на аппарате/машине никаких
изменений. Не применяйте режущий
аппарат/машину для других работ, кроме тех,
для которых он предназначен.
ПРEДОСТEРEЖEНИE!
Не пользоваться пилой без защитного
оборудования или с дефектным защитным
оборудованием. Результатом может быть
серьёзная травма.
ПРEДОСТEРEЖEНИE!
При применении направляющей шины/цепи,
отличающейся от рекомендованной
изготовителем и не санкционированной, может
возникнуть высокий риск травмы или ущерба.
Безопасность при обращении с топливом
ВНИМAНИE!
Опорожнить топливный бак перед отправкой
аппарата/машины на хранение. В частности, это
следует делать при хранении более трёх месяцев,
иначе топливо может вызвать коррозию и
повредить карбюратор. Рекомендуется сливать
топливо после каждого применения. Eсли топливо
остаётся в баке, необходимо проследить, чтобы
бак не протекал.
Топливо смешивать и наливать на открытом
воздухе и там, где нет опасности возникновения
искр или огня.
Применять контейнер, пригодный для топлива.
Не курить и не позволять другим курить
поблизости от топлива или аппарата/машины,
либо во время применения аппарата/машины.
Удалить пролитое топливо, прежде чем запускать
двигатель.
Следует отойти от места заправки минимум на 3
м, прежде чем запускать двигатель.
Отключить двигатель, прежде чем удалить
крышку топливного бака.
Хранить аппарат/машину и топливо в месте, где
топливные пары не могут достигнуть искр или
огня из водонагревателей, электрических
двигателей или выключателей, печей и т.п.
ПРEДОСТEРEЖEНИE!
Aнтивибрационные системы не гарантируют,
что Вы не будете подвержены синдрому белых
пальцев или кистевому туннельному синдрому.
Поэтому постоянные и регулярные
пользователи должны внимательно наблюдать
за состоянием своих рук и пальцев. Eсли
появится один из упомянутых выше
симптомов, следует немедленно обратиться к
врачу.
Безопасность при резке
Не отрезать другой материал, кроме дерева и
деревянных объектов.
Для защиты дыхания носите защитную маску от
аэрозольных частиц, если обрезка дерева
производится после применения инсектицида.
Не пускать детей, животных, наблюдающих лиц и
помощников в опасную зону, немедленно
отключайте двигатель, если к Вам кто-то
приближается.
Крепко держите аппарат/машину правой рукой за
заднюю рукоятку и левой рукой за переднюю
рукоятку.
Сохраняйте устойчивое положение и равновесие.
Не тянитесь.
При работающем двигателе держите все части
тела на расстоянии от глушителя и режущего
аппарата.
Держать шину/цепь ниже уровня пояса.
Перед срубанием дерева оператор должен быть
обучен технике распиливания посредством
цепной пилы.
Следует заранее продумать безопасный выход из
зоны срубаемого дерева.
При резке следует крепко держать пилу обеими
руками, при этом большой палец прочно
фиксируется вокруг передней рукоятки, также
необходимо твёрдо стоять на ногах и сохранять
равновесие.
При выполнении резки следует стоять сбоку от
пилы, не стоять непосредственно позади неё.
Всегда держать лицевую поверхность
шипованного буфера направленной к дереву,
поскольку цепь может быть внезапно втянута в
дерево.
При завершении резки следует быть наготове,
чтобы удерживать аппарат, когда он выходит в
свободное пространство, чтобы он не двигался
дальше и не отрезал Ваши ноги, тело или не
наткнулся на препятствие.
Будьте бдительны на случай возникновения
отдачи (когда пила поднимается и отдаёт назад
на оператора). Не резать носовой частью шины.
Безопасность при техобслуживании
Выполняйте техобслуживание аппарата/машины
в соответствии с рекомендованными
процедурами.
Отсоедините свечу зажигания, прежде чем
производить техобслуживание, за исключением
работ по регулировке карбюратора.
При выполнении регулировки карбюратора не
допускать в рабочую зону посторонних.
Для замены используйте только оригинальные
запчасти HITACHI, рекомендованные
изготовителем.
ПРEДОСТEРEЖEНИE!
Ненадлежащее техобслуживание может
повлечь за собой серьёзное повреждение
двигателя или травмы.
Транспортировка и хранение
Переносить аппарат/машину вручную при
отключенном двигателе и при отведённом в
сторону от тела глушителе.
Охладить двигатель, опорожнить топливный бак
и заблокировать аппарат/машину, прежде чем
отправлять на хранение или перевозить на
транспорте.
Опорожнить топливный бак перед отправкой
аппарата/машины на хранение. Рекомендуется
сливать топливо после каждого применения.
Eсли топливо остаётся в баке, необходимо
проследить, чтобы бак не протекал.
Хранить агрегат/машину в недоступном для
детей месте.
Aппарат тщательно очистить и хранить в сухом
месте.
При транспортировке или хранении убедитесь,
что включатель двигателя отключён.
При перевозке на транспорте закройте лезвие
кожухом.
При перевозке на транспорте закройте цепь
кожухом.
При возникновении ситуаций, не описанных в
данном руководстве, надлежит соблюдать
осторожность и действовать в соответствии со
здравым смыслом. Обратитесь к дилеру фирмы
HITACHI, если Вам нужна консультация.
Обратите особое внимание на указания,
сопровождающиеся следующими словами:
ПРEДОСТEРEЖEНИE!
Указывает на высокую вероятность
причинения телесного вреда или на
смертельную опасность, если инструкции не
соблюдаются.
ОСТОРОЖНО!
Указывает на вероятность причинения телесного
вреда или повреждения оборудования, если
инструкции не соблюдаются.
ВНИМAНИE!
Полезная информация для правильного
функционирования и применения.
R
U
RU-5
Page 23

я
т
т
е
в
Р
е
л
в
E
а
д
в
л
о
о
к
у
о
н
т
к
D
ж
с
W
д
л
а
и
в
в
л
п
в
Рис.1-1 Рис.1-2Рис.1-1B
Рис.1-3 Рис.1-4 Рис.1-5
3. Сборочные операции
Не пытайтесь запускать двигатель без
надлежащего крепления бокового
корпуса.
1. Демонтировать зажимные гайки цепной
шины (3).
2.Удалить боковой корпус (1) при
сдавливании задней части бокового
корпуса (1). (Рис. 1-1)
* Установить шипованный буфер (1) (если
имеется) на аппарате посредством двух
винтов. (Рис. 1-1 В)
3. Смонтировать цепную шину (1) на болтах
(2), затем протолкнуть её в направлении
звёздочки (3), насколько это возможно.
Проследить, чтобы выступ
регулировочногоболта для натяжения
цепи (4)зафиксировался в отверстии
шины (5). (Рис. 1-2)
ВНИМAНИE!
Слегка подвигать шину назад и вперёд и
убедиться, что выступ для натяжения цепи
(4) надлежащим образом зафиксирован в
отверстии (5) на шине.
4. Проверить, чтобы направление пильной
цепи (1) было правильным, как показано
на рисунке и выравнить цепь на
звёздочке. (Рис. 1-3)
5. Направить звенья цепного привода в
желобок шины со всех сторон шины.
ПРEДОСТEРEЖEНИE!
6. Смонтировать боковой корпус (1) на
зажимных болтах направляющей шины,
после того, как он вставлен в
центрирующую/блокирующую петлю на
корпусе двигателя (2) (Рис. 1-1).
Затем временно зафиксировать
зажимные гайки.
7.
Поднять конец шины и натянуть цепь (1)
посредством вращения болта регулировки
натяжения (2) по часовой стрелке. Чтобы
проверить натяжение нужно слегка
поднять центр цепи, при этом должен
присутствовать зазор около 0.5-1.0 мм
между шиной и кромкой приводного звена
(3). (Рис.1-4, 5)
ОСТОРОЖНО!
ПРАВИЛЬНОЕ НАТЯЖЕНИЕ
ИСКЛЮЧИТЕЛЬНО ВАЖНО!
8. Поднять конец шины и осторожно
затянуть зажимные гайки цепной шины с
помощью накидного гаечного ключа.
(Рис. 1-4)
9. Новая цепь вытягивается, поэтому
следует подрегулировать цепь через
несколько операций по распиловке и
затем контролировать натяжение цепи в
течение первого получаса эксплуатации.
ПРИМЕЧАНИЕ!
Проверяйте чаще натяжение цепи для
оптимальной эксплуатации и срока
службы.
ОСТОРОЖНО!
Если цепь чрезмерно натянута, шина и
цепь могут быстро повредиться.
Наоборот, если цепь слишком свободна,
она может выскочить из желобка в шине.
При работе с цепью всегда надевать
перчатки.
ПРEДОСТEРEЖEНИE!
При эксплуатации твёрдо держите
цепную пилу двумя руками. Работа
одной рукой может иметь последствием
серьёзную травму.
RU-6
Page 24

Рис. 2-1 Рис. 2-1CРис. 2-1B
Рис. 2-2 Рис. 2-3 Рис. 2-4
4. Рабочие операции
Топливо (Рис. 2-1)
ПРEДОСТEРEЖEНИE!
Цепная пила оснащена двухтактным
двигателем. Всегда эксплуатировать
двигатель на топливе, смешанном с маслом.
При заливке топлива или обращении с ним
следует обеспечить хорошую вентиляцию.
Топливо
Всегда использовать марочный 89
октавный неэтилированный бензин.
Использовать оригинальное двухтактное
масло или смесь в пределах от 25:1 до
50:1, соотношение см. на бутылке масла
или обратиться к дилеру фирмы HITACHI.
только для штата Kалифорния при 50:1.
Если оригинальное масло отсутствует,
следует применять масло с
антиоксидантной присадкой,
предназначенное для применения в
двухтактном двигателе, работающем на
газолине, с воздушным охлаждением
(марка JASO FCGRADE OIL или ISO EGC
GRADE). Не применять смешанное масло
BIA или TCW (двухтактный тип с водяным
охлаждением).
Не использовать многостепенное масло
(10 W/30) или отработанное масло.
Всегда смешивать топливо и масло в
отдельном чистом контейнере.
Всегда следует начинать с наполнения
половины количества используемого
топлива. Затем добавить всё количество
масла. Смешать (встряхнуть) топливную
смесь. Добавить оставшееся количество
топлива.
Тщательно смешать (встряхнуть) топливную
смесь перед заполнением топливного бака.
Заправка топливом
ПРEДОСТEРEЖEНИE! (Рис.2-1B)
Перед заправкой топливом всегда
отключать двигатель.
При наполнении топливом открывать
топливный бак медленно, чтобы
сбросить возможное избыточное
давление.
После заправки осторожно затянуть
крышку топливного бака.
Всегда удалять аппарат минимум на 3
м (10 футов) от зоны топливной
заправки, прежде чем запускать его.
Перед заправкой топливом тщательно
очистить участок вокруг крышки бака,
чтобы в бак не попала грязь. Перед
заправкой топливом хорошо смешать
топливо путём встряхивания контейнера.
Масло для цепи (Рис. 2-1B)
Залить масло для цепи (2). Все
использовать качественное масло для цепи.
Когда двигатель работает, масло для цепи
автоматически выпускается.
ПРИМЕЧАНИЕ!
При заливке топлива (1) или масла для цепи
(2) в бак установите аппарат крышкой
вверх. (Рис. 2-1B)
РЕГУЛИРОВКА ПОДАЧИ МАСЛА ДЛЯ
ЦЕПИ
Количество масла для цепи, выпускаемого
через систему смазки, настроено на заводеизготовителе на максимальную величину.
Регулируйте количество в соответствии с
рабочими условиями.
Поворачивать регулировочный винт (1)
против часовой стрелки для уменьшения
количества и поворачивать его по часовой
стрелке для увеличения количества. (Рис.
2-1 С)
Не пытайтесь поворачивать винт дальше
отметок уровня.
Пуск (Рис. 2-2, 3)
ПРЕДОСТЕРЕЖЕНИЕ!
Если двигатель запускается при
действующем дроссельном затворе,
скорость двигателя достаточно высокая,
чтобы вращать цепь.
ОСТОРОЖНО!
Перед запуском убедитесь, что цепной
тормоз выключен (если имеется) и что
шина/цепь не задевают посторонние
объекты.
1. Установить выключатель зажигания (1) в
положение ON (ВКЛ).
* Несколько раз нажать на заливочный
баллон (5), чтобы топливо потекло через
баллон в карбюратор. (Если имеется)
(Рис. 2-3)
2.Eсли нажато предохранительное
пусковое устройство (2), потянуть
дроссельное пусковое устройство (4) и
нажать блокировочную кнопку (3), затем
сначала медленно отпустить
дроссельное пусковое устройство, затем
предохранительное пусковое устройство.
При этом дроссель заблокируется в
пусковом положении. (Рис. 2-2)
3.Полностью вытянуть ручку заслонки в
закрытое положение (4). (Рис. 2-3)
4.Быстро потянуть возвратный стартер,
крепко удерживая рычаг в руке и не
позволяя ему защёлкиваться назад.
(Рис.2-4)
5.Eсли Вы услышите, что двигатель
начинает заводиться, верните рычаг
заслонки в положение RUN (РAБОТA)
(открыто). Затем снова быстро потяните
возвратный стартер.
ВНИМAНИE!
Eсли двигатель не заводится, повторить
операцию 2 – 5 раза.
6. После пуска двигателя, дать ему
разогреться в течение 2-3 минут, прежде
чем прилагать к нему нагрузку.
R
U
RU-7
Page 25

с
.
о
з
и
ч
ж
и
б
л
В
и
в
а
т
ь
л
н
е
е
Е
а
а
у
п
Рис.2-4B Рис.2-6
Рис.2-5
Рис.2-7
ПРИМEЧAНИE!
Система противообледенения (Рис.2-4B)
Eсли Вы используете устройство зимой или
в холодную погоду, переместите уровень
вперёд (2) для защиты карбюратора от
обледенения, в противном случае просто
оставьте уровень в его обычном положении
(1).
Действие цепного тормоза (Рис. 2-5)
Цепной тормоз (1) (если имеется)
предназначен для действия в аварийной
ситуации, такой, как отдача. Перед
применением проверить его
работоспособность.
Применение тормоза осуществляется путём
движения переднего защитного щитка в
сторону шины. Во время действия цепного
тормоза, даже если вытянут дроссельный
рычаг, скорость двигателя не возрастает и
цепь не вращается. Для деблокировки
тормоза следует вытянуть вверх рычаг
цепного тормоза.
Как подтвердить:
1) Отключить двигатель.
2) Удерживая цепную пилу горизонтально,
отпустить руку с передней рукоятки,
ударить концом направляющей шины о
пень или кусок дерева и подтвердить
действие тормоза. Рабочий уровень
меняется в зависимости от размера
шины.
В случае, если тормоз не эффективный,
обратитесь к дилеру для инспекции и
ремонта.
Если двигатель продолжает вращаться с
высокой скоростью при действующем
тормозе, муфта перегревается и вызывает
неполадку.
RU-8
Если тормоз срабатывает во время
эксплуатации, немедленно деблокируйте
дроссельный рычаг, чтобы остановить
двигатель.
ПРЕДОСТЕРЕЖЕНИЕ!
Не переносить машину с работающим
двигателем.
Остановка (Рис. 2-6)
Снизить скорость двигателя и переместить
выключатель зажигания в положение
остановки.
ПРЕДОСТЕРЕЖЕНИЕ!
ОПАСНОСТЬ ОТДАЧИ (Рис. 2-7)
Самой большой опасностью при работе с
цепной пилой является возможность
отдачи. Отдача может возникнуть, когда
верхний конец направляющей шины
натыкается на объект или когда дерево
закрывает и защемляет пильную цепи при
резке.
Контакт конца шины в некоторых случаях
может вызвать молниеносную обратную
реакцию, выбрасывая направляющую шину
вверх и назад на оператора. Защемление
пильной цепи может также резко отбросить
направляющую шину назад, на оператора.
При любой из этих реакций Вы можете
потерять контроль над пилой, что повлечёт
за собой серьёзную травму.
Даже если Ваша пила имеет безопасную
конструкцию, Вам не следует полагаться
только на эти меры обеспечения
безопасности.
Всегда следите за положением конца шины.
Отдача возникнет, если Вы позволите зоне
отдачи (1) шины задеть объект.
Не пользуйтесь этим участком. Отдача
вследствие защемления происходит при
перекрытии и защемлении верхней части
направляющей шины. Следите за процессом
и убедитесь, что распил сохраняется
открытым, когда Вы прорубаете насквозь.
Сохраняйте контроль, когда двигатель
работает, при этом всегда крепко держите
пилу правой рукой за заднюю рукоятку,
левой рукой за переднюю рукоятку, а Ваши
пальцы должны охватывать рукоятки.
Всегда держите пилу во время эксплуатации
двумя руками и выполняйте распил при
высокой скорости двигателя.
ПРЕДОСТЕРЕЖЕНИЕ!
Не тянитесь и не пилите выше уровня
плеч.
ПРЕДОСТЕРЕЖЕНИЕ!
Будьте чрезвычайно осторожны во
время срубания, не пилите при высоком
положении носовой части или над
уровнем плеч.
ЦЕПНОЙ ОГРАНИЧИТЕЛЬ
Цепной ограничитель находится на
шпиндельной головке, точно под цепью, и
препятствует удару цепью оператора
цепной пилы в случае её обрыва.
ПРЕДОСТЕРЕЖЕНИЕ!
Не стойте в одной линии с цепью во
время распиливания.
ОСНОВНЫЕ МЕТОДЫ ВЫПОЛНЕНИЯ
РУБКИ, ОБРЕЗКИ СУЧЬЕВ И
РАСКРЯЖЁВКИ
Следующая информация является общим
введением в методику распиливания
древесины.
ПРЕДОСТЕРЕЖЕНИЕ!
Данная информация не содержит
описание всех специфических ситуаций,
которые могут зависеть от различий
топографии, растительности, типа
древесины, формы и размера деревьев
и т.п. Обратитесь к Вашему сервисному
дилеру, лесничему или в местные
учебные заведения по лесоводству для
консультаций об особенностях валки
леса в Вашем регионе, это поможет
сделать Вашу работу более
эффективной и безопасной.
ПРЕДОСТЕРЕЖЕНИЕ!
Избегать валки леса при
неблагоприятных погодных условиях,
таких, как густой туман, интенсивный
дождь, сильный холод и ветер и т.п.
Неблагоприятная погода быстро
утомляет и создаёт потенциально
опасные условия, такие, как скользкий
грунт.
Сильный ветер может свалить дерево в
неожиданном направлении, что влечёт
за собой ущерб имущества и здоровья.
ОСТОРОЖНО!
Не применять цепную пилу в качестве
рычага или в целях, для которых она не
предназначена.
ПРЕДОСТЕРЕЖЕНИЕ!
Избегать столкновения с
препятствиями, такими, как пни, корни,
камни, ветки и срубленные деревья.
Обращать внимание на ямы и канавы.
Проявляйте повышенную бдительность
при работе на откосах или неровном
грунте. Отключайте пилу при
перемещении с одного рабочего места на
другое.
Всегда производите распиливание при
широко открытом дросселе. Медленно
движущаяся цепь может легко
зацепиться и вынуждает пилу работать
рывками.
Page 26

Рис
. 2-7B
1. Направление
валки
Рис
. 2-7C
2. Раскрытие надреза
минимум 45
3. Петля
4. Разрез валки
ПРЕДОСТЕРЕЖЕНИЕ!
Не эксплуатировать пилу только одной
рукой. Вы не сможете надлежащим
образом контролировать пилу и можете
серьёзно себя поранить.
Держите корпус пилы близко к Вашему
телу, чтобы повысить контроль и снизить
напряжение.
Если Вы пилите нижней частью цепи,
реактивная сила будет тянуть пилу от
Вас, в сторону распиливаемого дерева.
Пила будет управлять скоростью подачи,
а опилки будут лететь на Вас. (Рис. 2-7B)
Если Вы пилите верхней частью цепи,
реактивная сила будет толкать пилу на
Вас и в сторону от распиливаемого
дерева. (Рис. 2-7 С)
ПРЕДОСТЕРЕЖЕНИЕ!
При этом существует риск отдачи, если
пила отошла так далеко, что Вы начинаете
пилить носовой частью шины.
Наиболее безопасный метод распиливания
– нижней частью цепи. Распиливание
верхней частью значительно сложнее в
смысле сохранения контроля над пилой,
также увеличивается риск отдачи.
ПРИМЕЧАНИЕ!
Всегда держать лицевую поверхность
шипованного буфера направленной к
дереву, поскольку цепь может быть
внезапно втянута в дерево.
o
Рис
. 2-7E
Рис
. 2-7D
РУБКА
Рубка – это больше, чем отпиливание
дерева. Вам нужно свалить его как можно
ближе к предполагаемому месту, по
возможности, не повредив дерево или чтонибудь ещё.
Перед рубкой дерева тщательно изучите
все условия, которые могут повлиять на
предполагаемое направление, такие как:
Угол дерева. Форма кроны. Груз снега на
кроне. Условия ветра. Препятствия в зоне
расположения дерева (напр., другие
деревья, линии электропередач, дороги,
здания и т.п.).
ПРЕДОСТЕРЕЖЕНИЕ!
Всегда изучайте общее состояние дерева.
Обращайте внимание на гниль и труху в
стволе, что может вызвать разлом
дерева и оно начнёт падать раньше, чем
Вы ожидаете.
Проверьте наличие сухих веток, которые
могут сломаться и ударить Вас во время
работы.
Во время рубки дерева не допускайте
животных и людей в зону размером, как
минимум, в два раза больше, чем длина
дерева. Удалите кустарники и ветки
вокруг дерева.
Подготовьте путь отступления в
противоположную сторону направления
валки.
ОСНОВНЫЕ ПРАВИЛА РУБКИ ДЕРЕВЬЕВ
Обычно рубка состоит из двух главных
операций распиливания, надрезаи
выполнения разреза валки.
Начните с выполнения верхнего надреза
на боковой стороне дерева по
направлению в сторону валки. Смотрите
через зарубку, когда пилите нижний
разрез, чтобы Вы не слишком глубоко
распилили ствол.
Рис
. 2-7F
Надрез должен быть достаточно
глубоким, чтобы получилась петля
достаточной ширины и прочности.
Раскрытие надреза должно быть
достаточно широким, чтобы направлять
падение дерева как можно дольше.
Выполните разрез валки с другой
стороны дерева, на один – два дюйма (3-5
см) выше кромки надреза. (Рис. 2-7 D)
Не распиливайте ствол полностью. Всегда
оставляйте петлю.
Петля направляет дерево. Если ствол
разрезан полностью, Вы теряете контроль
над направлением валки.
Вставить в разрез клин или валочный рычаг,
прежде чем дерево станет неустойчивым и
начнёт двигаться. Это предотвратит
защемление направляющей шины в разрезе
валки, если Вы неправильно оценили
направление валки. Прежде чем толкнуть
дерево, убедитесь, что в зоне валки дерева
не находятся люди.
РАЗРЕЗ ВАЛКИ, ДИАМЕТР СТВОЛА В ДВА
РАЗА БОЛЬШЕ, ЧЕМ ДЛИНА
НАПРАВЛЯЮЩЕЙ ШИНЫ
Выполнить длинный, широкий надрез.
Затем вырезать углубление в центре
надреза. Всегда оставлять петлю с двух
сторон центрального разреза. (Рис. 2-7 Е)
Выполнить разрез валки путём
распиливания вокруг ствола, как показано
на Рис. 2-7F.
ПРЕДОСТЕРЕЖЕНИЕ!
Эти методы чрезвычайно опасны,
поскольку они включают применение
носовой части направляющей шины, что
может привести к отдаче. Этими
методиками должны пользоваться
только обученные профессионалы.
R
U
RU-9
Page 27

х
С
Ч
Н
И
р
Д
р
с
р
и
а
а
р
о
з
р
и
ь
а
в
р
)
и
г
п
й
й
е
ь
Ч
о
.
л
о
в
ь
с
Т
Т
3. Давление на верхнюю часть
1. Затыловочный разрез
4. Сторона нажима
5. Сторона натяжения
2. Поперечный распил
6. Относительная
глубина распилов
Рис
Рис
.2-7G
.2-7H
3. Давление на нижнюю часть
2. Поперечный распил
4. Сторона натяжения
5. Сторона нажима
1. Затыловочный разрез
РАСКРЯЖЁВКА
Раскряжёвка – это удаление веток со
срубленного дерева.
ПРЕДОСТЕРЕЖЕНИЕ!
Большинство случаев отдачи происходит во
время раскряжёвки.
Не используйте носовую часть
направляющей шины. Будьте очень
внимательны и избегайте контакта носовой
части направляющей шины с бревном,
другими ветками или объектами. Будьте
бдительны и обращайте внимание на
натянутые ветки. Они могут распрямиться
на Вас, в результате чего Вы можете
потерять контроль и получить травму.
(Рис. 2-7 G)
Стойте с левой стороны от ствола.
Сохраняйте устойчивое положение и
опирайте пилу на ствол. Держите пилу
ближе к себе, чтобы иметь полный контроль
над ней. Старайтесь держаться подальше от
цепи. Двигайтесь только, когда ствол
Рис
Рис
.2-7J
.2-7M
находится между Вами и цепью. Следите за
распрямлением натянутых веток.
РАСКРЯЖЁВКА ТОЛСТЫХ ВЕТОК
При раскряжёвке толстых ветвей
направляющая шина может легко
защемиться. Натянутые ветки часто
трескаются, поэтому отпиливайте
проблемные ветки короткими операциями.
RU-10
Рис
.2-7K
Рис
.2-7N
Применяйте такие же принципы и для
поперечного распила.
Продумывайте действия заранее и
просчитайте возможные последствия всех
Ваших действий.
ПОПЕРЕЧНЫЙ РАСПИЛ/РАСКРЯЖЁВКА
Прежде, чем распиливать бревно,
попытайтесь представить возможное
развитие ситуации. Обратите внимание на
наличие напряжения бревна и распиливайте
его таким образом, чтобы направляющая
шина не защемилась.
БРЁВНА ПОПЕРЕЧНОГО РАСПИЛА,
ДАВЛЕНИЕ НА ВЕРХНЮЮ ЧАСТЬ
Примите устойчивое положение. Начните с
верхнего разреза. Не разрезайте слишком
глубоко, достаточно прибл. на 1/3 диаметра
бревна.
Завершайте нижним разрезом. Распилы
должны пересечься. (Рис. 2-7 Н)
ТОЛСТОЕ БРЕВНО, БОЛЬШЕ ДЛИНЫ
НАПРАВЛЯЮЩЕЙ ШИНЫ
Начинайте разрезать на противоположной
стороне бревна. Тяните пилу на себя, как
описано в предыдущей процедуре.
(Рис. 2-7J)
6. Относительная
глубина распилов
Рис
.2-7L
Если бревно лежит на земле, выполняйте
расточный разрез, чтобы избежать
врезания в землю. Завершайте нижним
разрезом. (Рис. 2-7K)
ПРЕДОСТЕРЕЖЕНИЕ! ОПАСНОСТЬ
ОТДАЧИ!!
Не применяйте расточный разрез, если Вы
не имеете соответствующего опыта.
Расточный разрез предполагает
применение носовой части направляющей
шины и может привести к возникновению
отдачи.
БРЁВНА ПОПЕРЕЧНОГО РАСПИЛА,
ДАВЛЕНИЕ НА НИЖНЮЮ ЧАСТЬ
Примите устойчивое положение. Начинайте
с нижнего разреза. Глубина разреза должна
составлять около 1/3 диаметра бревна.
Завершайте верхним разрезом. Распилы
должны пересечься. (Рис. 2-7 L)
ТОЛСТОЕ БРЕВНО, БОЛЬШЕ ДЛИНЫ
НАПРАВЛЯЮЩЕЙ ШИНЫ
Начинайте разрезать на противоположной
стороне бревна. Тяните пилу на себя, как
описано в предыдущей процедуре.
Если бревно находится близко к земле,
выполняйте расточной разрез.
Завершайте верхним разрезом. (Рис. 2-7 М)
ПРЕДОСТЕРЕЖЕНИЕ! ОПАСНОСТЬ
ОТДАЧИ!! Не применяйте расточный
разрез, если Вы не имеете
соответствующего опыта. Расточный
разрез предполагает применение
носовой части направляющей шины и
может привести к возникновению
отдачи. (Рис. 2-7N)
ЕСЛИ ПИЛА ЗАСТРЯЛА
Отключить двигатель.
Поднять бревно или изменить его
положение, воспользовавшись толстой
веткой или шестом в качестве рычага.
Не пытайтесь вытянуть пилу. При этом Вы
можете деформировать рукоятку или
травмироваться от пильной цепи, если пила
внезапно освободится.
Page 28

Рис. 3-1 Рис. 3-3Рис. 3-2
5. Техобслуживание
ТEХОБСЛУЖИВAНИE. ЗAМEНA ИЛИ РEМОНТ
УСТРОЙСТВ И СИСТEМ ДЛЯ СНИЖEНИЯ
ТОKСИЧНОСТИ ВЫХЛОПОВ МОЖEТ
ВЫПОЛНЯТЬСЯ В РEМОНТНОЙ МAСТEРСKОЙ
ДЛЯ ДВИГAТEЛEЙ ИЛИ ИНДВИДУAЛЬНО.
Регулировка карбюратора (Рис. 3-1)
ПРEДОСТEРEЖEНИE!
Режущий аппарат может вращаться во время
регулировки карбюратора.
ПРEДОСТEРEЖEНИE!
Не запускать двигатель без полностью
установленного корпуса муфты и
смонтированной трубы. Иначе муфта может
отсоединиться и причинить телесный вред.
В карбюраторе топливо смешивается с воздухом.
Kарбюратор отрегулирован во время пробного
пуска на заводе. Дополнительную регулировку
можно производиться в соответствии с климатом
и высотой над уровнем моря. Kарбюратор имеет
одну возможность регулировки:
T = Регулировочный винт холостого хода.
Регулировка холостого хода (Т)
Проверить чистоту воздушного фильтра. Eсли
скорость холостого хода верная, режущий аппарат
не вращается. Eсли требуется регулировка,
закручивать (по часовой стрелке) T-винт при
работающем двигателе, чтобы режущий аппарат
начал вращаться. Откручивать (против часовой
стрелки) винт, чтобы режущий аппарат
остановился. Вы добились правильной скорости
холостого хода, если двигатель плавно работает
во всех положениях ниже числа оборотов, когда
режущий аппарат начинает вращаться. Если
режущий аппарат продолжает вращаться после
выполнения настройки скорости, следует
обратиться к дилеру фирмы HITACHI.
ПРИМEЧAНИE!
Винты H и L может регулировать только
уполномоченный сервисный дилер компании
HITACHI.
Стандартные отверстия (обратные ходы) винтов
L/H из слегка посаженных положений как
показано ниже.
Внимание !
Некоторые модели, проданные в областях с
высокими требованиями в отношении
регламентирования газообразных выбросов, не
имеют карбюраторных настроек высокой и низкой
скорости.Подобные настройки позволяют
двигателю работать за рамками контрольных
пределов газообразных выбросов. Для этих
моделей единственной карбюраторной настройкой
является скорость холостого хода.
Для моделей, оснащённых настройками низкой и
высокой скорости; карбюраторы предварительно
настроены на заводе-изготовителе.
Незначительные настройки могут оптимизировать
работу, основываясь на климате, высоте над
уровнем моря и т.п. Не вращать настроечные
винты в сторону увеличения больше, чем на 90
градусов, поскольку из-за неверной настройки
может повредиться двигатель. Если Вы не
знакомы с этим типом настройки – обратитесь за
консультацией к дилеру компании HITACHI.
Воздушный фильтр (Рис. 3-2)
Воздушный фильтр (1) должен быть очищен от
пыли и грязи, чтобы избежать:
Неполадок карбюратора.
Проблем при пуске.
Снижения мощности двигателя.
Излишнего износа деталей двигателя.
Ненормального расхода топлива.
Eжедневно очищайте воздушный фильтр, либо
чаще, если работа выполняется в пыльной
области.
Чистка воздушного фильтра
Демонтировать крышку воздушного фильтра (2) и
фильтр (1). Промыть их в тёплом мыльном
растворе. Перед повторной сборкой проверить,
чтобы фильтр был сухим. Воздушный фильтр,
применявшийся некоторое время, невозможно
очистить полностью. Поэтому его следует
регулярно заменять на новый. Всегда необходимо
заменять повреждённый фильтр.
Свеча зажигания (Рис. 3-3)
На состояние свечи зажигания влияет:
Неверная регулировка карбюратора.
Неверно составленная топливная смесь
(слишком много масла в газолине)
Грязный воздушный фильтр.
Неблагоприятные условия работы (такие,
как холодная погода).
Эти факторы вызывают отложения на электродах
свечи зажигания, что приводит к неполадкам и
затруднениям при пуске. Eсли мощность двигателя
снижается, он трудно запускается или плохо
работает на холостом ходу, нужно всегда сначала
проверить свечу зажигания. Eсли свеча зажигания
грязная, необходимо её очистить и проверить
межэлектродный зазор. При необходимости
выполнить повторную регулировку. Правильный
зазор составляет 0.6 мм (.024"). Свечу зажигания
надлежит заменять через 100 рабочих часов или
раньше, если электроды сильно эродированы.
ВНИМAНИE!
В некоторых областях местный закон требует
применять резисторную свечу зажигания для
подавления сигналов зажигания. Eсли эта машина
изначально оснащена резисторной свечой
зажигания, для замены следует использовать
такой же тип свечи зажигания.
R
U
Скорость холостого хода (мин-1)
ВИНТ L
ВИНТ H
ПРEДОСТEРEЖEНИE!
Eсли двигатель работает на холостом ходу,
режущий аппарат ни в коем случае не должен
вращаться.
2900 ~ 3300
1
1+
4
3
1+
4
RU-11
Page 29

а
т
н
т
р
р
б
к
а
т
а
к
ы
б
о
а
п
е
р
с
р
Ч
у
Рис
Рис
.3-4
.3-7
Рис
Рис
.3-5
.3-8
Рис
Рис
.3-6
.3-9
Рис
Отверстие для маслёнки (Рис. 3-4)
Очищайте отверстие для маслёнки цепи (1) ,
если это возможно.
Направляющая шина (Рис. 3-5)
Перед началом применения машины
очистить желобок и отверстие для
маслёнки (1) в шине с помощью
специального калибра, предлагаемого по
заказу как комплектующее изделие.
Боковой корпус (Рис. 3-6)
Всегда очищайте от пыли и обрезков
боковой корпус и область привода.
Периодически наносите масло или смазку
на этот участок с целью защиты от
коррозии, поскольку некоторые деревья
имеют высокий уровень кислоты.
Топливный фильтр (Рис. 3-7)
Демонтировать топливный фильтр из
топливного бака и тщательно промыть его в
растворителе. После этого полностью
вставить фильтр в бак.
ВНИМAНИE!
Eсли фильтр твёрдый по причине пыли и
грязи, заменить его.
.3-10
Фильтр масла для цепи (Рис. 3-8)
Демонтировать масляный фильтр и
тщательно промыть его в растворителе
Чистка охлаждающих рёбер цилиндра
(Рис. 3-9)
Если между охлаждающими рёбрами
цилиндра (1) застревает древесная стружка,
двигатель может перегреваться, что
выражается в снижении мощности. Чтобы
избежать этого, всегда очищайте
охлаждающие рёбра цилиндра и корпус
вентилятора.
Каждые 100 рабочих часов или раз в год
(чаще, если требуют условия) очищать рёбра
и наружные поверхности двигателя от пыли,
грязи и масляных отложений, которые
затрудняют охлаждение.
Чистка глушителя (Рис. 3-10)
Через каждые 100 часов эксплуатации
демонтировать глушитель (1) и искровой
разрядник (если имеется) и вычищать
излишний нагар из выхлопного отверстия
или входа глушителя.
Для долгосрочного хранения
Слить всё топливо из топливного бака.
Запустить двигатель и дать ему поработать
до остановки. Отремонтировать
повреждения, возникшие при применении.
Очистить агрегат чистой тканью или
воспользоваться воздушным шлангом
высокого давления. Накапать несколько
капель двухтактного двигательного масла в
цилиндр, через отверстие в свече
зажигания, и прокрутить двигатель
несколько раз, чтобы распределить масло.
Закрыть агрегат и хранить его в сухом
месте.
RU-12
Page 30

Рис
Рис
. 4-1
. 4-5
Рис
. 4-3
Рис
Рис
. 4-2
. 4-4
Рис
. 4-6
R
U
ЗАТОЧКА ЦЕПИ Детали режущего
инструмента. (Рис. 4-1, 2)
ПРЕДОСТЕРЕЖЕНИЕ!
При заточке цепи следует использовать
перчатки.
ПРЕДОСТЕРЕЖЕНИЕ!
Проследите за тем, чтобы закруглить
переднюю кромку в целях снижения
вероятности отдачи или поломки скобы
траверсы.
1. Верхняя пластина
2. Рабочий угол
3. Боковая пластина
4. Впадина
5. Пята
6. Шасси
7. Заклёпочное отверстие
8. Мысок
9. Глубиномер
10. Скорректировать угол на верхней
пластине (степень угла зависит от типа
цепи)
11. Слегка выступающий "крючок" или точка
(изгиб на неостроконечной цепи)
12. Верх глубиномера на соответствующей
высоте, ниже верхней пластины
13. Передняя часть закруглённого
глубиномера
СНИЖЕНИЕ ГЛУБИНОМЕРОВ
ПОСРЕДСТВОМ НАПИЛЬНИКА
1) Если Вы затачиваете режущий
инструмент держателем напильника,
следует проверить и снизить глубину.
2) Проверяйте глубиномеры каждую третью
заточку.
3) Поместить инструмент глубиномера на
режущий инструмент. Если глубиномер
выступает, обработать напильником его
уровень посредством верхней части
инструмента. Всегда затачивать
напильником по направлению изнутри
цепи в сторону наружного режущего
инструмента. (Рис. 4-3)
4) Закруглить передний угол для придания
оригинальной формы глубиномера после
использования инструмента глубиномера.
Всегда выполнять рекомендованную
настройку глубиномера, как указано в
руководстве по техобслуживанию или
руководстве пользователя пилы.
(Рис. 4-4)
ОБЩИЕ ИНСТРУКЦИИ ДЛЯ ЗАТОЧКИ
РЕЖУЩЕГО ИНСТРУМЕНТА
Обрабатывать напильником (1) режущий
инструмент на одной стороне цепи, по
направлению изнутри наружу.
Обрабатывать напильником только
движением вперёд. (Рис. 4-5)
5) Поддерживать одинаковую длину всех
режущих инструментов. (Рис. 4-6)
RU-13
Page 31

е
в
ж
т
б
с
р
п
ц
д
8
м
8
е
1.Номер детали
2.Шаг
3.Настройка
глубиномера
6) Обрабатывать напильником в
достаточной степени, чтобы удалить
повреждение режущих кромок (боковая
пластина (1) и верхняя пластина (2))
режущего инструмента. (Рис. 4-7)
ЗАТОЧКА УГЛОВ ДЛЯ ЗАТОЧКИ
ПИЛЬНОЙ ЦЕПИ (Рис. 4-7B)
Рис.4-7
График техобслуживания
Ниже приведены некоторые общие
инструкции по техобслуживанию. Для
дальнейшей информации обратитесь к
дилеру фирмы HITACHI.
Eжедневное техобслуживание
Чистка наружной поверхности аппарата
живой изгороди.
Очистить отверстие масляного фильтра
цепи.
Очистить желобок и отверстие масляного
фильтра в направляющей шине.
Очистить боковой корпус от древесных
опилок.
Проверить, острая ли пильная цепь.
Проверить прочности затягивания гаек
шины.
Проверка целостности защитного
устройства для транспортировки цепи и
прочности его крепления.
Проверка прочности посадки гаек и
винтов.
4.Угол заточки
боковой п
ластины
5.Угол верхней
пластины
6.Угол
направляющей
заточки
Рис.4-7B
RU-14
Eженедельное техобслуживание
Проверка стартера, особенно, шнура и
возвратной пружины.
Чистка наружной поверхности свечи
зажигания.
Удалить свечу зажигания и проверить
расстояние между электродами.
Отрегулировать его на 0.6 мм (0,024”) или
заменить свечу зажигания.
Чистка охлаждающих рёбер цилиндра и
проверка чистоты воздухозаборника на
стартере.
Чистка воздушного фильтра.
Eжемесячное техобслуживание
Промыть топливный бак газолином и
очистить топливный фильтр.
Очистить фильтр масла для цепи.
Чистка наружной поверхности
карбюратора и пространства вокруг него.
Чистка вентилятора и пространства
вокруг него.
Очистить глушитель от нагара.
Page 32

6. Спецификации
MODEL CS30EH (S)/CS35EH (S)
Объём двигателя (мл)
Свеча зажигания
Ёмкость топливного бака (л)
Ёмкость бака масла для цепи (мл)
Сухая масса (кг)
(Без направляющей шины и цепи)
.................................... 34
............................................ Campion CJ-8Y или RCJ-8Y
NGK BPM-6A или BPMR-6A
или эквивалент
......................... 300
................ 190
.............................................. 3.6
-1
)
2
) по ISO22867
-1
)
Уровень вибрации (м/с
Передняя рукоятка ................................ 7.4
Задняя рукоятка ..................................... 9.0
Макс. скорость двигателя (мин
Ґ№ Холостой ход скорость
двигателя (мин
Тип направляющей шины
......... 11,500
........................ 2,800
..........................
Длина направляющей шины (мм)
Шаг цепи (мм)
Шаблон цепи (мм)
Уровень давления звука (дб(A)) по
ISO22868
Уровень мощности звука (дб(A)) по .............. Lw measured
ISO22868 106.7
................................................. 9.52 (3/8")
............................................ 1.27 (0.05")
............... LpA
97.0
CS30EH (S)
CS35EH (S)
... 300 (12")
... 350 (14")
Тип цепи
Макс. скорость цепи (м/сек)
Звёздочка (количество зубьев)
ВНИМАНИЕ: Эквивалентные уровни шума/вибрации вычисляются
в качестве взвешенной по времени энергии, общей
для уровней шума/вибрации при различных рабочих
условиях, при следующем распределении по
времени: 1/3 холостой ход, 1/3 полная, 1/3 разгонная
скорость.
*Все данные подлежат изменению без уведомления.
....................................................... 91 VG
(Oregon)
..................... 21.9
............... 6
R
U
ЕO Уровень мощности звука (дб(A)) по ........ LwA
2000/14/EC 107
RU-15
Page 33

RU-16
Page 34

PRINTED IN JAPAN
 Loading...