

Page 1
Projector
Contents of package
CP-S335/X340/X345
User's Manual – Quick Guide
Thank you for purchasing this projector.
WARNING ►Before using, read the "User's Manual - Safety Guide" and
these manuals to ensure correct usage through understanding. After reading,
store them in a safe place for future reference.
NOTE • The information in this manual is subject to chance without notice.
• The manufacture assumes no responsibility for any errors that may appear in this
manual.
• The reproduction, transmission or use of this document or contents is not
permitted without express written authority.
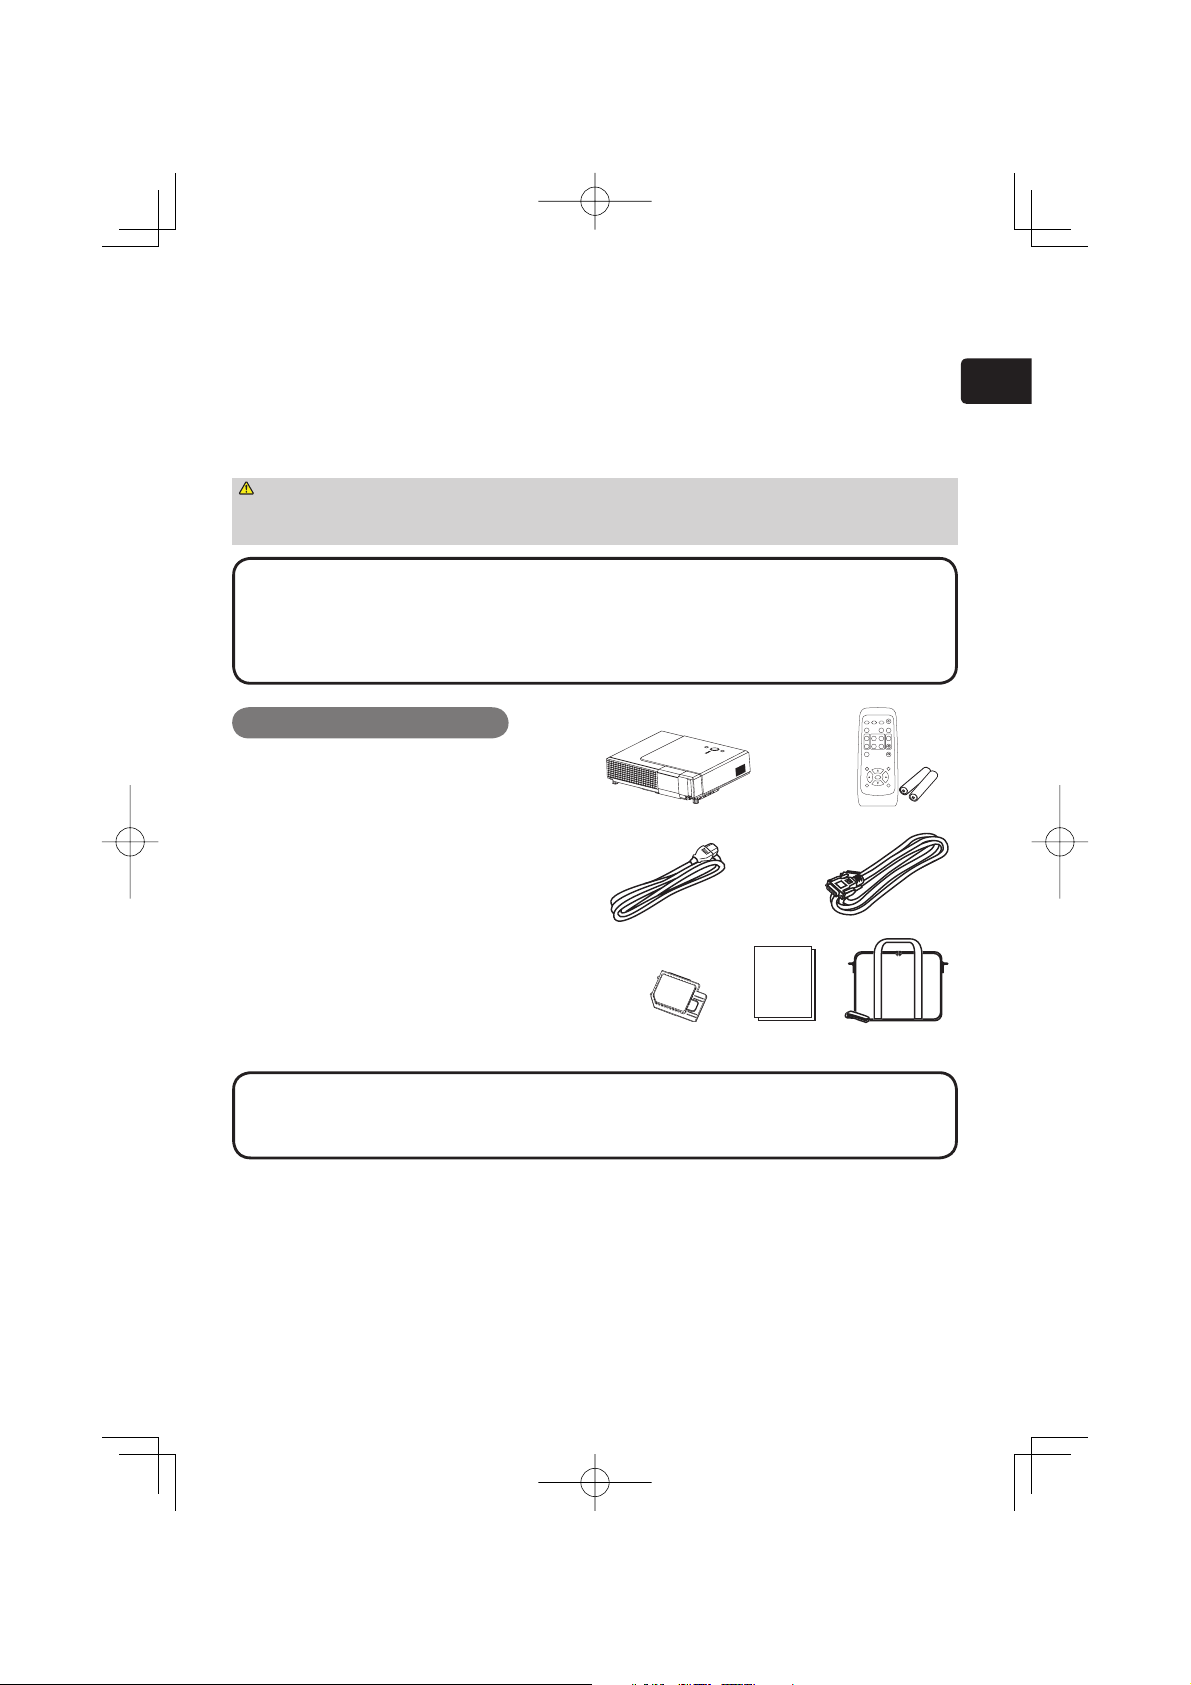
Contents of package
(1) Projector
(2) Remote control
with two
(3) Power cord
(4) RGB cable
(5) Filter cover for bottom-up use
(6) User’s manuals
(7) Soft case
AA batteries
STANDBY/ON
SEARCH
VIDEO
RGB
BLANK
ASPECT AUTO
PAGE UP
VOLUME
HOME
MAGNIFY
ON
PAGE DOWN
MUTE
END
OFF
FREEZE
KEYSTONE
MENU
POSITION
ENTER
RESET
ESC
(1) (2)
(3)
(4)
ENGLISH
(5)
(6)
(7)
NOTE • Keep the original packing materials for future reshipment. For
moving the projector, be sure to use the original packing material. Use special
caution for the lens part.
1
Page 2
Arrangement
Arrangement
Arrangement
WARNING ►Install the projector in a suitable environment according to
instrictions of the "User's Manual - Safety Guide".
CAUTION ►This projector has some intake vents also on the bottom. Avoid
blocking vents. Put nothing that is sucked or sticks to the bottom of projector.
(b)
(c) up
(a)
4:3
16:9
(a)
(c) down
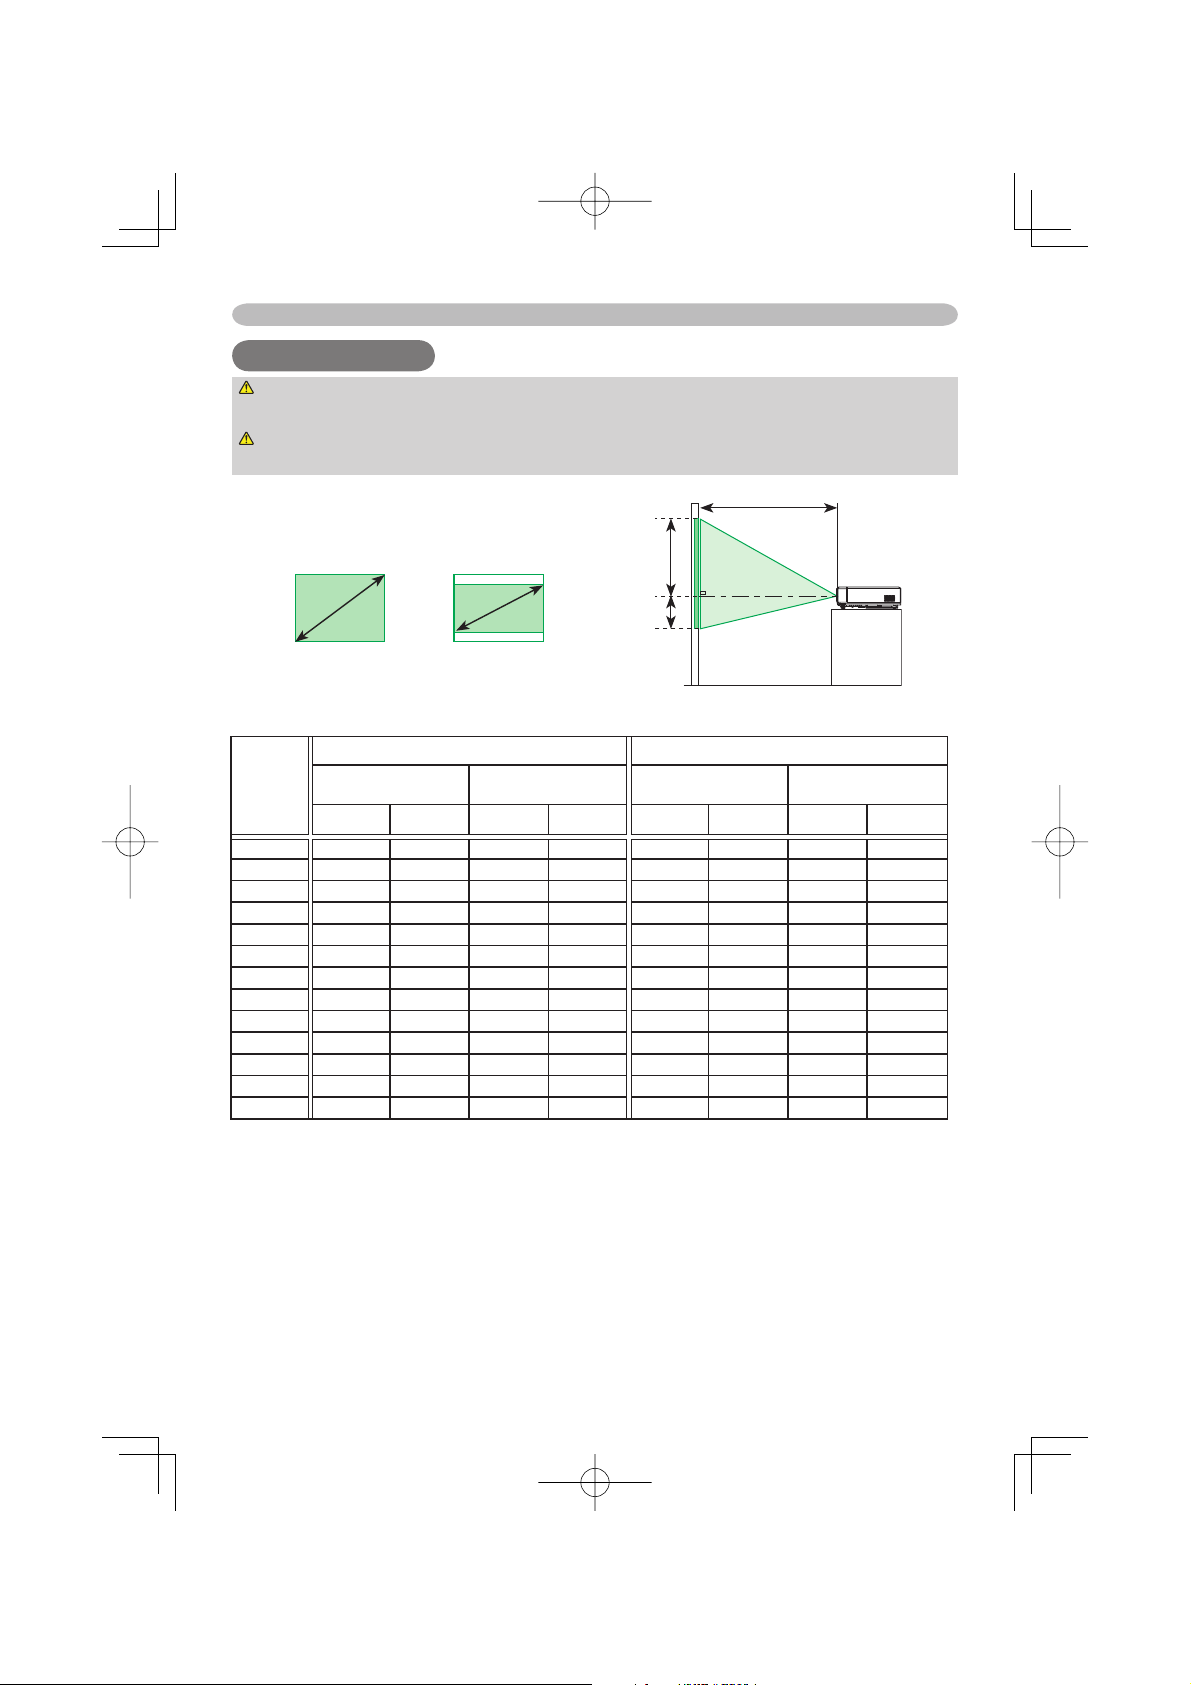
(calculated for a full size screen, ±10%)
(a) Screen
size
(b) Projection distance
[inch (m)]
min. max. down up min. max. down up
30 (0.8) 0.9 (35) 1.1 (42)
40 (1.0) 1.2 (47) 1.4 (56) 6 (2) 55 (22) 1.3 (52) 1.6 (62) -2 (-1) 51 (20)
50 (1.3) 1.5 (59) 1.8 (71) 8 (3) 69 (27) 1.6 (65) 2.0 (77) -2 (-1) 64 (25)
60 (1.5) 1.8 (72) 2.2 (85) 9 (4) 82 (32) 2.0 (78) 2.4 (93) -2 (-1) 77 (30)
70 (1.8) 2.1 (84) 2.5 (100) 11 (4) 96 (38) 2.3 (91) 2.8 (109) -3 (-1) 90 (35)
80 (2.0) 2.4 (96) 2.9 (114) 12 (5) 110 (43) 2.7 (105) 3.2 (125) -3 (-1) 103 (41)
90 (2.3) 2.7 (108) 3.3 (129) 14 (5) 123 (49) 3.0 (118) 3.6 (140) -4 (-1) 116 (46)
100 (2.5) 3.1 (120) 3.6 (143) 15 (6) 137 (54) 3.3 (131) 4.0 (156) -4 (-2) 129 (51)
120 (3.0) 3.7 (144) 4.4 (172) 18 (7) 165 (65) 4.0 (158) 4.8 (188) -5 (-2) 154 (61)
150 (3.8) 4.6 (181) 5.5 (216) 23 (9) 206 (81) 5.0 (197) 6.0 (235) -6 (-2) 193 (76)
200 (5.1) 6.1 (242) 7.3 (288) 30 (12) 274 (108) 6.7 (264) 8.0 (314) -8 (-3) 257 (101)
250 (6.4) 7.6 (303) 9.2 (361) 38 (15) 343 (135) 8.4 (330) 10.0 (393) -10 (-4) 322 (127)
300 (7.6) 9.2 (363) 11.0 (433) 46 (18) 411 (162) 10.1 (396) 12.0 (472) -12 (-5) 386 (152)
At 4 : 3 screen At 16 : 9 screen
[m (inch)]
(c) Screen height
[cm (inch)]
5 (2) 41 (16)
(b) Projection distance
[m (inch)]
1.0 (38) 1.2 (46)
(c) Screen height
[cm (inch)]
-1 (0) 39 (15)
2
Page 3
Adjusting the projector's elevator / About the fi lter cover for bottom - up use
About the fi lter cover for bottom - up use
Adjusting the projector's elevator
Adjusting the projector's elevator
WARNING ►Do not adjust the projector’s elevator during use or
immediately after use. Handling while the projector is in a high temperature
could cause a burn and/or malfunction to the projector.
CAUTION ►
the projector might crash down, overturn, smash your fi ngers and possibly result
in malfunction. To prevent damaging the projector and injuring yourself, always
hold the projector whenever using the elevator buttons to adjust the elevator feet.
►Except for inclining by the elevator feet adjustment, place the projector
horizontally.
After making sure that the projector is cool adequately,
1.
press and hold in the elevator buttons while holding the
projector. The elevator buttons and the elevator feet are on
the both sides.
Raise or lower the projector to the desired height and the
2.
release the elevator buttons.
When you release the elevator buttons, the elevator feet
will lock into position.
As necessary, you can also fi nely adjust the height of the projector by twisting
3.
the elevator feet by hand.
If you press the elevator button without holding the projector,
About the fi lter cover for bottom - up use
Elevator
feet
ENGLISH
Elevator
button
WARNING ►For the projector installed bottom-up, use the accessory fi lter
cover for bottom-up use. And in the case of a ceiling installation or the like,
contact your dealer before installation.
►Do not replace the fi lter cover during use or immediately after use. While the
projector connects with a power supply, or the projector is in a high temperature
state, handling could cause an electric shock, a fi re, a burn and/or malfunction
to the projector.Before handling, make sure the power switch is off and the
power cord is not plugged in, then wait at least 45 minutes.
After making sure that the projector is cool adequately,
1.
slowly turn the projector so that the lens-side is facing
up. Please be careful for a projector not to fall. While the
projector is placed lens-side up, hold the projector.
Putting a fi nger on the fi lter cover’s knob, slide the fi lter
2.
cover in the direction of the arrow to remove it.
Replace the fi lter cover for bottom-up use and snap it
3.
back into place.
Slowly turn the projector so that the top is facing up.
4.
3
Page 4

Connecting your devices
Connecting your devices
Connecting your devices
Examples of connection with a computer
RGB out
RS-232C
Audio out
USB(A)
RGB cable
Stereo mini
audio cable
Y
CB/P
B
VIDEO
CR/P
R
S-VIDEO
COMPONENT VIDEO
AUDIO IN1
AUDIO IN2
AUDIO OUT
USB
RGB IN1
CONTROL
* AUDIO IN1
is linked to
RGB IN1.
RGB IN2 RGB OUT
RS-232C
cable
USB cable
RGB out Audio out
COMPONENT VIDEO
Stereo mini
audio cable
RGB cable
Connecting to a monitor (output)
RGB in
COMPONENT VIDEO
RGB cable
Connecting to a speaker with amplifi er (output)
Audio in
COMPONENT VIDEO
Stereo mini
audio cable
AUDIO IN1
Y
AUDIO OUT
RGB IN1
CONTROL
RGB IN1
CONTROL
RGB IN1
CONTROL
RGB IN2 RGB OUT
RGB IN2 RGB OUT
RGB IN2 RGB OUT
CB/P
B
AUDIO IN2
VIDEO
CR/P
R
S-VIDEO
USB
AUDIO IN1
Y
AUDIO OUT
CB/P
B
AUDIO IN2
VIDEO
CR/P
R
S-VIDEO
USB
AUDIO IN1
Y
AUDIO OUT
CB/P
B
AUDIO IN2
VIDEO
CR/P
R
S-VIDEO
USB
4
Page 5

Examples of connection with a VCR/DVD player
Audio out
Audio out
Video out
COMPONENT VIDEO
Video cable
Stereo mini audio cable
S-Video out
COMPONENT VIDEO
S-Video cable
Stereo mini audio cable
Connecting your devices
AUDIO IN1
Y
AUDIO OUT
AUDIO OUT
USB
RGB IN1
USB
CONTROL
RGB IN1
CONTROL
CB/P
B
AUDIO IN2
VIDEO
CR/P
R
S-VIDEO
AUDIO IN1
Y
CB/P
B
AUDIO IN2
VIDEO
CR/P
R
S-VIDEO
RGB IN2 RGB OUT
ENGLISH
RGB IN2 RGB OUT
Audio out
Audio out
Component video out
Y
C
B/PB
CR/P
R
Component video cable
Component video out
Y
C
B/PB
CR/P
R
Component video cable
AUDIO IN1
Y
AUDIO OUT
RGB IN1
USB
CONTROL
COMPONENT VIDEO
CB/P
B
AUDIO IN2
VIDEO
CR/P
R
S-VIDEO
Stereo mini audio cable
AUDIO IN1
Y
AUDIO OUT
RGB IN1
USB
CONTROL
COMPONENT VIDEO
CB/P
B
AUDIO IN2
VIDEO
CR/P
R
S-VIDEO
Stereo mini audio cable
RGB IN2 RGB OUT
RGB IN2 RGB OUT
5
Page 6

Connecting the power supply / Putting batteries into the remote control
Connecting the power supply
Putting batteries into the remote control
Connecting the power supply
WARNING ►Please use extra caution when connecting the power cord as
incorrect or faulty connections may result in fi re and/or electrical shock.
• Only use the power cord that came with the projector. If it is damaged, contact
your dealer to newly get correct one.
• Only plug the power cord into an outlet rated for use with the power cord's
specifi ed voltage range.
• Never modify the power cord. Never attempt to defeat the ground connection of
the three-pronged plug.
Connect the connector of the power cord to
1.
the AC inlet of the projector.
Firmly plug the power cord's plug into the
2.
outlet.
Putting batteries into the remote control
WARNING ►Always handle the batteries with care and use them only as
directed. Improper use may result in battery explosion, cracking or leakage,
which could result in fi re, injury and/or pollution of the surrounding environment.
• Be sure to use only the batteries specifi ed. Do not use batteries of different
types at the same time. Do not mix a new battery with used one.
• Make sure the plus and minus terminals are correctly aligned when loading a
battery.
• Keep a battery away from children and pets.
• Do not recharge, short circuit, solder or disassemble a battery.
• Do not allow a battery in a fi re or water. Keep batteries in a dark, cool and dry play.
• If you observe a leakage of a battery, wipe out the fl ower and then replace a
battery. If the fl ower adheres your body or clothes, rinse well with water immediately.
AC inlet
Connector
of the power cord
Remove the battery cover.
1.
Slide back and remove the battery cover in the direction of
the arrow.
I
nsert the batteries.
2.
Align and insert the two AA batteries according to their plus
and minus terminals as indicated in the remote control.
Close the battery cover.
3.
Replace the battery cover in the direction of the arrow and
snap it back into place.
6
Page 7

Operating
Operating
Operating
WARNING ►When the power is on, a strong light is emitted. Do not look
into the lens or vents of the projector.
Turning on the power
Set the power switch to the ON position.
1.
Press the STANDBY/ON (projector or
2.
remote control) button.
POWER
(Solid orange)
POWER POWER
(Blinking green) (Solid green)
Displaying
To select an input signal, use the button of INPUT (projector), or the buttons
1.
of RGB, VIDEO or SEARCH (remote control).
To change the aspect ratio, use the button
2.
ASPECT (remote control).
To adjust the zoom and focus, use the
3.
zoom knob and the focus ring.
LAMP
indicator
TEMP
indicator
POWER
indicator
STANDBY/ON INPUT
STANDBY/ON
LAMP
TEMP
POWER
MENU
Power switch
MENU
button
Cursor
buttons
INPUT
button
button
ASPECT button
ESC (Escape) button
Zoom knob
Focus ring
VIDEO button
HOME button
MAGNIFY
ON button
OFF button
END button
FREEZE button
POSITION button
Cursor buttons
RGB
button
VIDEO
RGB
ASPECT AUTO
HOME
MAGNIFY
ON
END
OFF
FREEZE
POSITION
ESC
ENTER
button
ENTER
SEARCH
PAGE UP
PAGE DOWN
STANDBY/ON
BLANK
VOLUME
MUTE
KEYSTONE
MENU
RESET
SEARCH button
STANDBY/ON
button
AUTO button
BLANK button
VOLUME button
PAGE UP button
MUTE button
KEYSTONE
button
PAGE DOWN
button
MENU button
RESET button
Turning off the power
Press the STANDBY/ON (projector or remote control) button.
1.
The message "Power off?" will appear on the screen for approximately 5 seconds.
Press the STANDBY/ON (projector or remote control) button again while the
2.
message is visible.
The projector lamp will go off, and the POWER
indicator will begin blinking orange. Then the
POWER indicator will stop blinking and light to
solid orange when the lamp cooling is complete.
Make sure that the power indicator lights to solid
3.
orange, set the power switch to the OFF position.
The POWER indicator will go off.
POWER
(Blinking orange)
POWER
(Solid orange)
ENGLISH
7
Page 8

Lamp
Lamp
Lamp
WARNING
HIGH VOLTAGE
HIGH TEMPERATURE
HIGH PRESSURE
►The projector uses a high-pressure mercury glass lamp. The lamp can break
with a loud bang, or burn out, if jolted or scratched, handled while hot, or worn
over time. Note that each lamp has a different lifetime, and some may burst or
burn out soon after you start using them. In addition, when the bulb bursts, it is
possible for shards of glass to fl y into the lamp housing, and for gas containing
mercury to escape from the projector’s vent holes.
►About disposal of a lamp • This product contains a mercury lamp; do not
put in trash. Dispose of in accord with environmental laws.
For lamp recycling, go to www.lamprecycle.org. (in the US)
For product disposal, contact your local government agency or www.eiae.org (in
the US) or www.epsc.ca (in Canada).
For more information, call your dealer.
• If the lamp should break (it will make a loud bang when it does),
unplug the power cord from the outlet, and make sure to request a
replacement lamp from your local dealer. Note that shards of glass
could damage the projector’s internals, or cause injury during handling,
so please do not try to clean the projector or replace the lamp yourself.
Disconnect
the plug
from the
• If the lamp should break (it will make a loud bang when it does),
ventilate the room well, and make sure not to breathe the gas that
comes out of the projector vents, or get it in your eyes or mouth.
power
• Before replacing the lamp, turn the projector off and unplug the power
outlet
cord, then wait at least 45 minutes for the lamp to cool sufficiently.
Handling the lamp while hot can cause burns, as well as damaging the
lamp.
• Never unscrew except the appointed (marked by an arrow) screws.
• Do not open the lamp cover while the projector is suspended from
above. This is dangerous, since if the lamp’s bulb has broken, the
shards will fall out when the cover is opened. In addition, working in
high places is dangerous, so ask your local dealer to have the lamp
replaced even if the bulb is not broken.
• Do not use the projector with the lamp cover removed. At the lamp
replacing, make sure that the screws are screwed in firmly. Loose
screws could result in damage or injury.
• Use only the lamp of the specifi ed type.
• If the lamp breaks soon after the first time it is used, it is possible
that there are electrical problems elsewhere besides the lamp. If this
happens, contact your local dealer or a service representative.
•
Handle with care: jolting or scratching could cause the lamp bulb to burst during use.
• If the indicators or a message prompts you to replace the lamp
(see the "User's Manual - Operating Guide"), replace the lamp as
soon as possible. Using the lamp for long periods of time, or past the
replacement date, could cause it to burst. Do not use old (used) lamps;
this is a cause of breakage.
8
Page 9

Lamp (continued)
When the indicators or a message prompts you to replace the lamp, replace the
lamp as soon as possible.
Turn the projector off, and unplug the power cord. Allow the lamp to cool for
1.
at least 45 minutes.
To prepare a new lamp, contact your dealer and tell the lamp type number
2.
= DT00671. If the projector is mounted on the ceiling, or if the lamp has
broken, also ask the dealer to replace the lamp.
In the case of replacement by yourself,
After making sure that the projector has
3.
cooled adequately, slowly turn over the
projector, so that the bottom is facing up.
Please unhook the claws of the lamp cover
4.
using a minus screwdriver or similar, and
remove the lamp cover.
Loosen the 2 screws (marked by arrow) of
5.
the lamp, and slowly pick up the lamp by the
handles.
Insert the new lamp, and retighten fi rmly two
6.
screws that are loosened in the previous
process to lock it in place.
Interlocking the 2 tabs of the lamp cover to
7.
the projector, position the lamp cover on the
projector. Then push the center point of two
claws to fi x the lamp cover.
Slowly turn the projector so that the top is
8.
facing up.
Turn the projector on, and reset the lamp time
9.
using the LAMP TIME function of OPTION
menu.
Lamp cover
Claws
Screws marked
by arrow
Ta bs
Center point
of claws
Claws
ENGLISH
NOTE • When the lamp has been replaced after the message of "THE
POWER WILL TURN OFF AFTER 0hr." is displayed, complete the following
operation within 10 minutes of switching power on.
• Incorrectly resetting of the lamp timer (resetting without replacement, or
neglect of resetting after replacement) will result in incorrect message functions.
9
Page 10

Air fi lter
Air fi lter
Air fi lter
WARNING ►Before caring, make sure the power switch is off and the power
cable is not plugged in, then allow the projector to cool suffi ciently. The care in a
high temperature state of the projector could cause a burn and/or malfunction to
the projector.
►Use only the air fi lter of the specifi ed type. Do not use the projector with the air
fi lter and fi lter cover removed.
►Avoid wetting the projector or inserting liquids in the projector. It could result in
a fi re, an electric shock, and and/or malfunction to the projector.
CAUTION ►Please replace the air fi lter when it is damaged or too soiled,
and also when you replace the lamp.
When the indicators or a message prompts you to clean the air fi lter, clean the air fi lter as
soon as possible. If the air fi lter becomes clogged by dust or the like, internal temperatures
rise and the power may be automatically turned off for malfunction prevention.
Turn the projector off, and unplug the power cord.
1.
Allow the projector to cool for at least 45 minutes. And
prepare a vacuum cleaner.
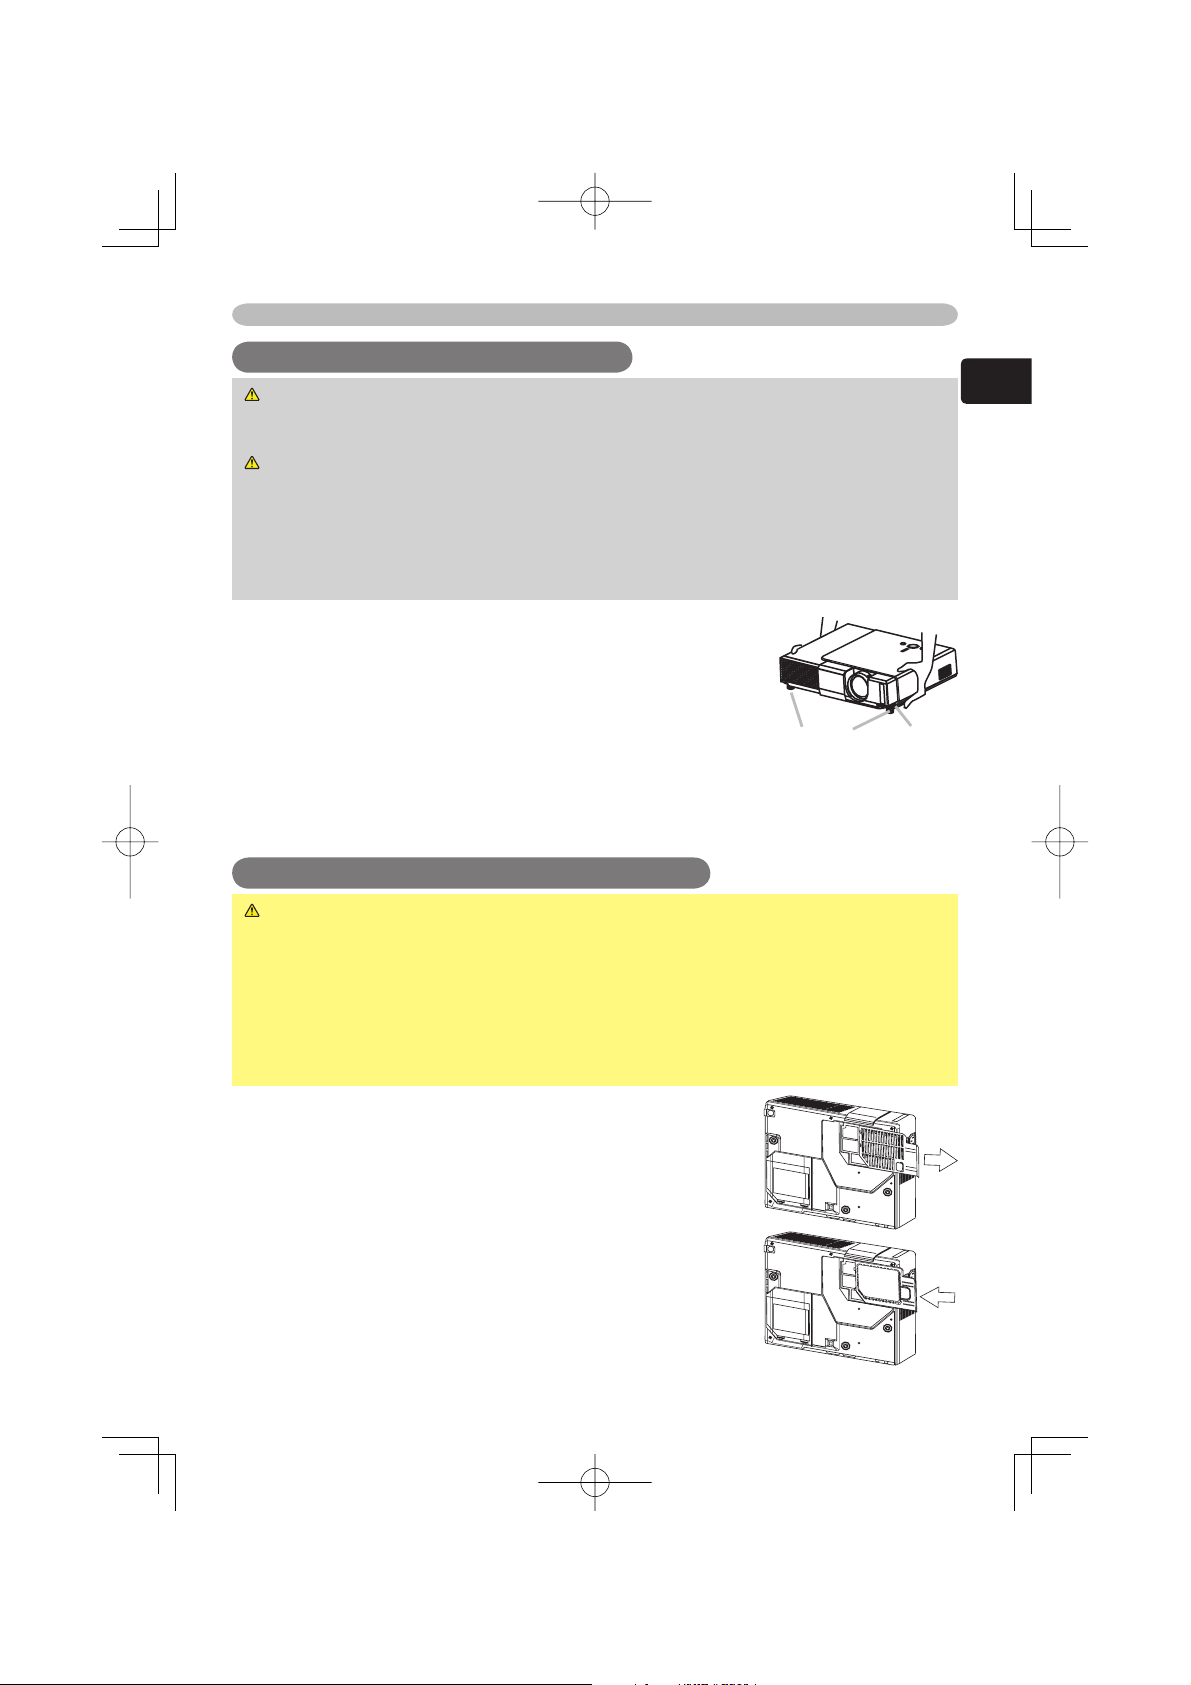
After making sure that the projector is cool adequately,
2.
slowly turn the projector so that the lens-side is facing
up. Please be careful for a projector not to fall. While the
projector is placed lens-side up, hold the projector.
Putting a fi nger on the fi lter cover’s knob, slide the
3.
fi lter cover in the direction of the arrow to remove it.
Holding the air fi lter’s knob, pull the air fi lter off.
4.
Apply a vacuum cleaner to the vent of the projector for the
5.
air fi lter. And then slowly turn the projector bottom up.
Apply a vacuum cleaner to the air fi lter and fi lter cover.
6.
Please replace the air fi lter when it is damaged or too soiled.
To prepare a new air fi lter, contact your dealer and tell the air
fi lter type number = NJ09702.
An air fi lter of specifi ed type will come even with the replacement lamp for this projector.
Position the cleaned air fi lter or a new air fi lter into place, and push the points
7.
of "PUSH" word with claws to fi x the air fi lter.
Replace the fi lter cover and snap it back into place.
8.
Filter cover’s knob
Filter cover
Air fi lter’s knob
Air fi lter
Slowly turn the projector so that the top is facing up.
9.
Turn the projector on, and reset the fi lter time using the FILTER TIME
10.
function of OPTION menu.
NOTE • Incorrectly resetting of the fi lter timer (resetting without replacement,
or neglect of resetting after replacement) will result in incorrect message
functions.
10
 Loading...