

Page 1
I
HITACHI
HAIR
CLIPPER
EræË.aË
cL-8320B'
INSTRUCTIONS
iËHË+
Before use, read
this manual
thoroughly
and
familiarize
yourself
with
the
procedures
herein.
.fË
Æ
Êi,
iÊ
{t
2w
lÃÉtà.+
flff
,
#tå
*
i8
E
^
tE#rF*IEt
w
"
'
€t\
-'a
*.ffi
HITACHI
Page 2

FEATURES
HÉ
.
Easy-to-use swingable
head
The head is swingable
up to 30 degrees
for ease of side trimming.
ã+lÈ.ffik]t**tf"
frlÈ.P^ÈÌ,
ì+*Èß{'n,f+308,
Fl*ãfla'
Ê
fi .
¡
Since two
Ni-cd-batteries are
built in, the device can
be used for about
50 minutes
with a
full charge.
É
+
â #
Ë
Ér ffi
7 ffi
fr
fF
tE
É
;ú, Ffr
,\
E
È
È.î.Ë frT'Ë
)r,
T' ÊU,lÈ. H
L.j50
tl
+4
"
o
Cutting length can
be adjusted
to 3mm, 6mm, 9mm,
12mm by
using the cropped
hair attachments.
Æ
ptl{+El
rxËË-3Ê
r(.
6
Ê
)K.
eËrK. I
2Ë
*
*ïfriJäÈ È.
"
¡
Cordless I
hour charging/AC type.
Fl
L\x,&,1È.ffift184t F-.1
ñ
Ê' ä
ìñBÆ tt"
o
Single-point
lubrication
of blades
NHÈiÉ,
_,IEIJFI"
NAMES OF
PARTS
#Èßtlaq¡
Switch display
window
iË+ã4.EzrË
Charge indicator
lamp
ñÊæzrtT
Head
*Èß
Cropped
hair attachment
FlTT+
Cleaning brush
;Ë+tÆü
Switch
frx
Body
È{4
AC
adaptor
ÉììHi+t*åÊ
Cord
+^&
Lu
o
Page 3
Before using,
first charge
the
unit
or connect to AC
outlet.
Ë)t,lËÆ
Fl,
+ñ ÈETflÆ
äìñÊtH.
Procedure
for charging fte.fria
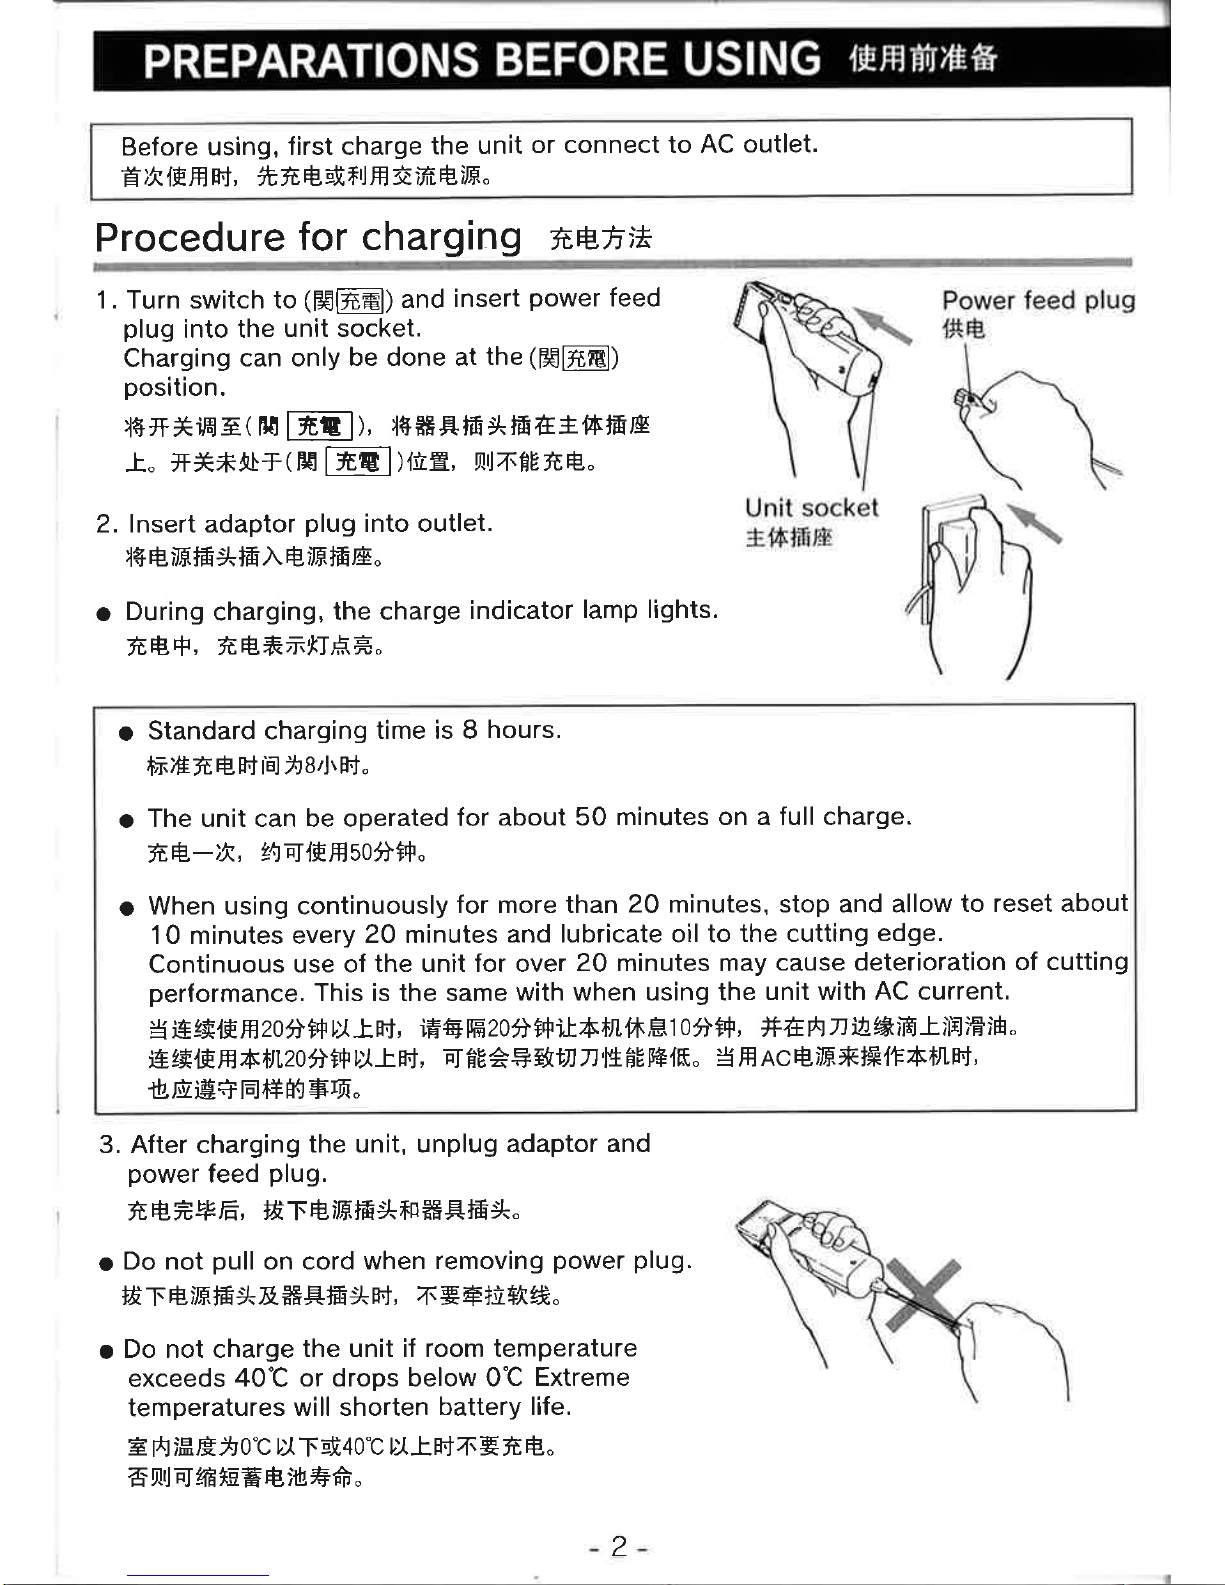
1. Turn switch to
(E€lãæl)
and
insert
power
feed
plug
into the
unit socket.
Charging
can only
be done at
the
(E€lRml)
position.
t++*Ëã(
E!
lñt l),
N+åËRtÉrr.tÉ4Êtr,ÊÆ
r" +J€*ar(F€
lñE
I
){üË,
nüziÉEñË.
2. lnsert adaptor
plug
into outlet.
l+ÊìTFm*ffi^ÉrFmÆ.
o
During
charging,
the charge
indicator
lamp lights.
ñÈ+,
ñÉtr¡tT,F.Ê.
o
Standard charging
time is 8
hours.
f,¡ÆñÊr,Ì14åB4tB-'J.
o
The unit can be operated
for about
50
minutes on a full charge.
ñÉ-n,
¿tÃr.lËHsoât+"
o
When using continuously
for more than
20 minutes, stop and allow
to reset about
10 minutes every
20 minutes
and lubricate oil to
the cutting
edge.
Continuous
use of
the unit for over
20 minutes may
cause deterioration
of cutting
performance.
This is the same
with when using the
unit with AC current,
4
Æ2*tÈ. H2oài+')r
l'
r,J, iˀ
ffi
20â
f
+
it 6
fn
fh
-Ë.
1
0
ât+, xÆ.fi
n
þ&'É
t
iÈl
iË tÉ
"
¡E È
lÈ.
H
*/il120
â
t+
U
L Ff
,
Fl
ÊV à
++{rn
n'Ë
H^
g
P+ lft . *
H
n c
Ë
¡T.f,
* t*
{t
4
tlt
r'f
,
ürüië+rEt+Ét+fi"
3. After charging
the unit, unplug adaptor
and
power
feed
plug.
fr.Ðft+Ê,
#TÉtFm*fHåËEffi*"
o
Do not
pull
on cord when
removing
power plug.
# T É,EtÉ+e.å*Rffi
*
r,f
, Tgäl,n#**
¡
Do not charge
the unit if room temperature
exceeds
40C or drops below 0C
Extreme
temperatures
will shorten
battery life.
Ë
ÉJ
ììfl Êåoc U
TEl4Oc
tXt F,tTE
ñ
Ë"
6rulEIffiiEËf8tüËô"
2
Page 4
PREPARATIONS
BEFORE
USING
IÊÆÊi;Êã
Direct
AC
power
source
rilHätñr'Ì
As in the case of charging, insert
power
feed
plug
into unit
socket and adaptor
plug
into outlet.
Wait 2 minutes and turn
on
switch.
o
lf the switch is set at
(f€lñ€l)
after use, charging can
be
accomplished.
IÈ.ffiñ,
{l+rÉi,aã(F5lte
ll,
æFIñÉ"
Before us¡ng
È.Hzffi
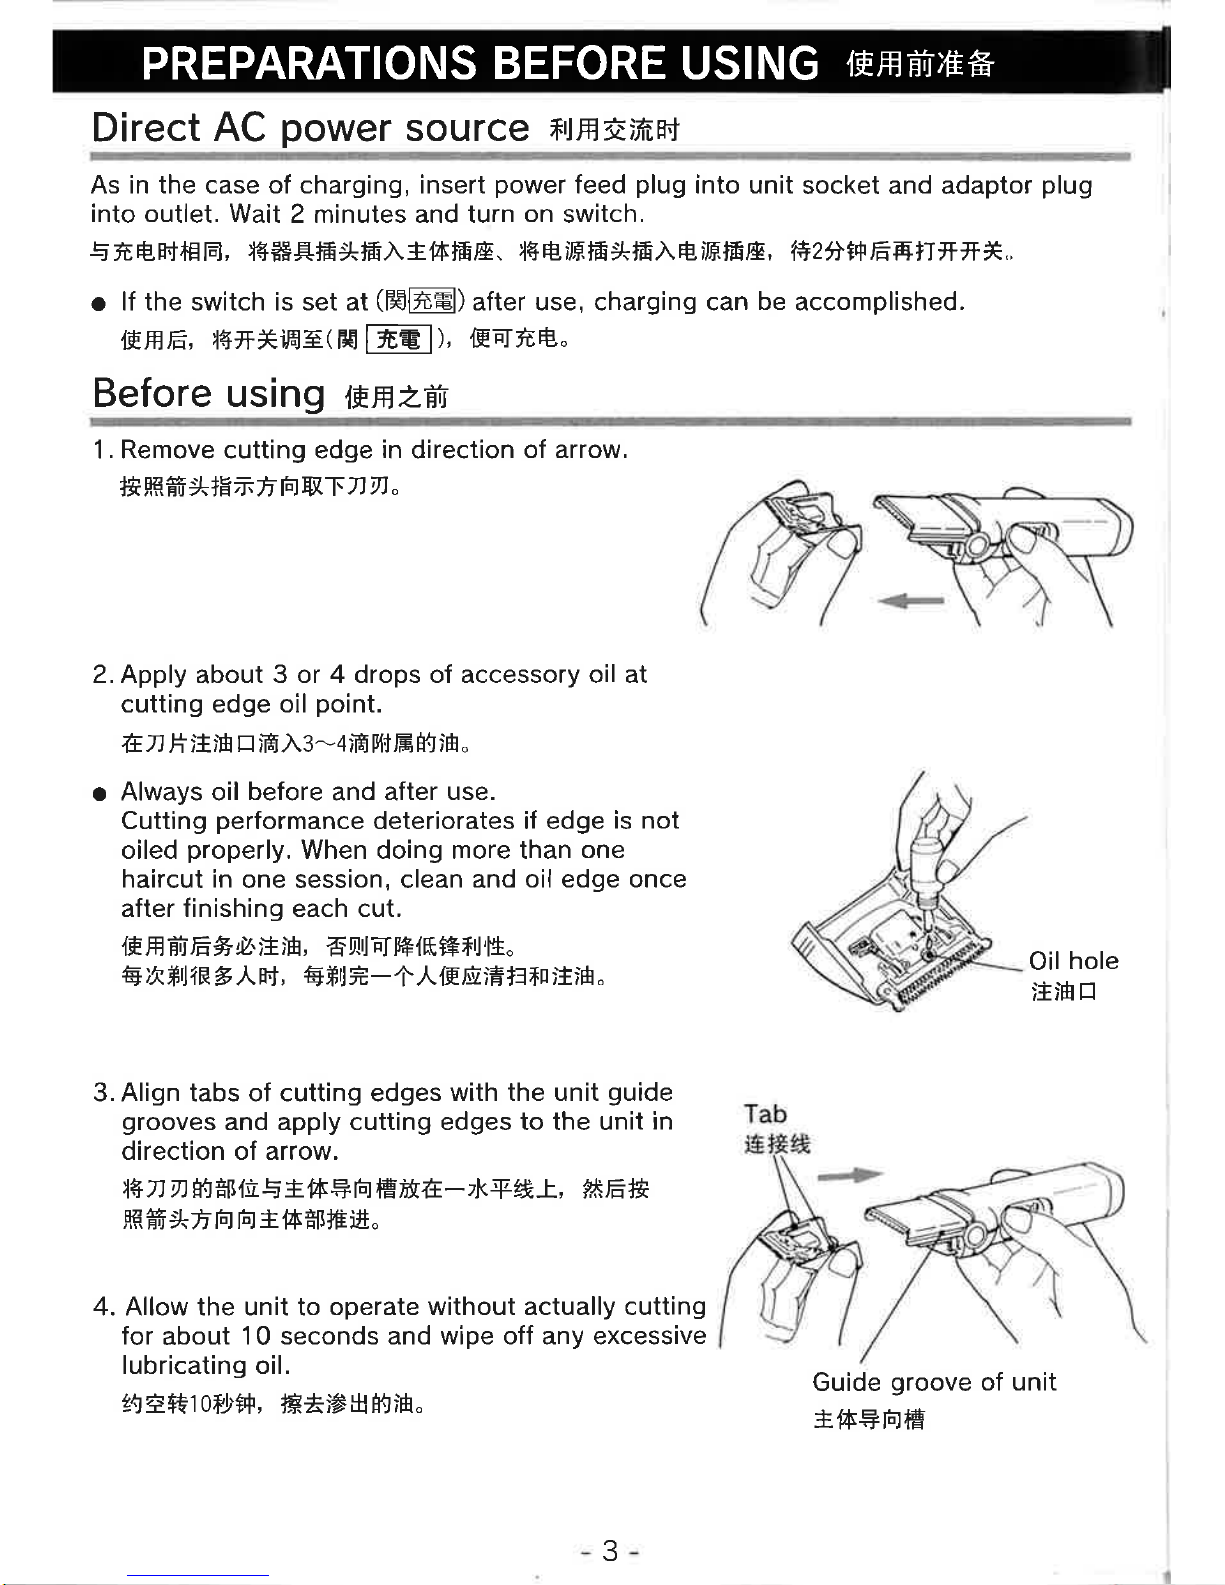
1. Remove cutting edge
in
direction
of arrow,
+*flRffi*+Ez.Ê r"-JryTzz.
2. Apply
about
3 or 4 drops of accessory oil at
cutting edge oil
point.
Ë
]l,H
ÈìE
tr
i-Ë^3-4iÊ
Plf
Æ
kJ iÊ
"
o
Always oil
before
and after
use.
Cutting
performance
deteriorates if edge
is not
oiled
properly,
When doing more than
one
haircut in
one session, clean and
oil edge once
after finishing each cut.
'lË,8
Êttr#¿.Èì8,
?5t!ilEIF+{ft #Íl'l+.
EìRfrilîRã LÈt,
€fl
Ê-t^æ&iË+trr ir;É.
3. Align tabs of cutting edges
with the unit
guide
grooves
and apply cutting edges to the unit
in
direction of arrow.
\+
v n
*tr-É/ßÈ-5
È
{f +
E
Ëü E
-
tK*Z*,
L,
f^ tr &
,SR
ffi
*Ì I".J ËJ
È
ft
Èß'Ê JT.
4. Allow the unit to
operate without actually cutting
for
about
10 seconds and wipe off any excessive
lubricating oil.
LA4++1
]f]'i;+,
Htìä $
Ê! iÈ"
Oil
hole
ÈiìË
tr
Guide
groove
of unit
È{fi+HË
3
Page 5

Head
tilting
*Èr+äd
Head
can be tilted
30 degrees as shown
in
the figure.
fi B Ff
,rr,
EII++ÉlJl'nf$30Ë"
Over
30 degrees
30Ërltl.
I
I
XI
Cutti
n
g
and th
i n n i n
g
operati
on
æ Ë.aÍîúÊtlt*tE
Cutting
o
Slide switch
in direction of
arrow; switch
display
window reads as
"ÐÉ"
and the blade starts
operating.
æË.*íÊilÊ
fR
ffi ffi
FEFf
zr
fr
l"J+11¿+ft84#T,
ErF
Ë
1"8
ü
I4,
t**t
?tfl,
Mffin#M.+dt"
Fine
Cutting
Slide switch
in direction of arrow; switch display
window
reads as
"ee=lërê"
the thinning
plate
protrudes
and the
blade starts operating,
lf the switch is
pushed
one step further
in
arrow
direction,
the window reads as
"AEíT>Ê"
and
the thinning
plate protrudes
even
farther.
ftммЛдКtr'I'fЛ
ERPËffi
FEFf
,r\
rt
H+ftHætE.L,
Ez.
Ë
F
üIE
|
5
*lëffi
t +tr+,
lë Ê.tF.IFfr
,æ8
fr dr
"
fi
Elt-b_ffi
|
ù,*lëffit +t+EHr[,
vä&g.,tr
ÊitFH.
-4
Page 6
PREPARATIONS
BEFORE USINGlÊÆÊi)Êã
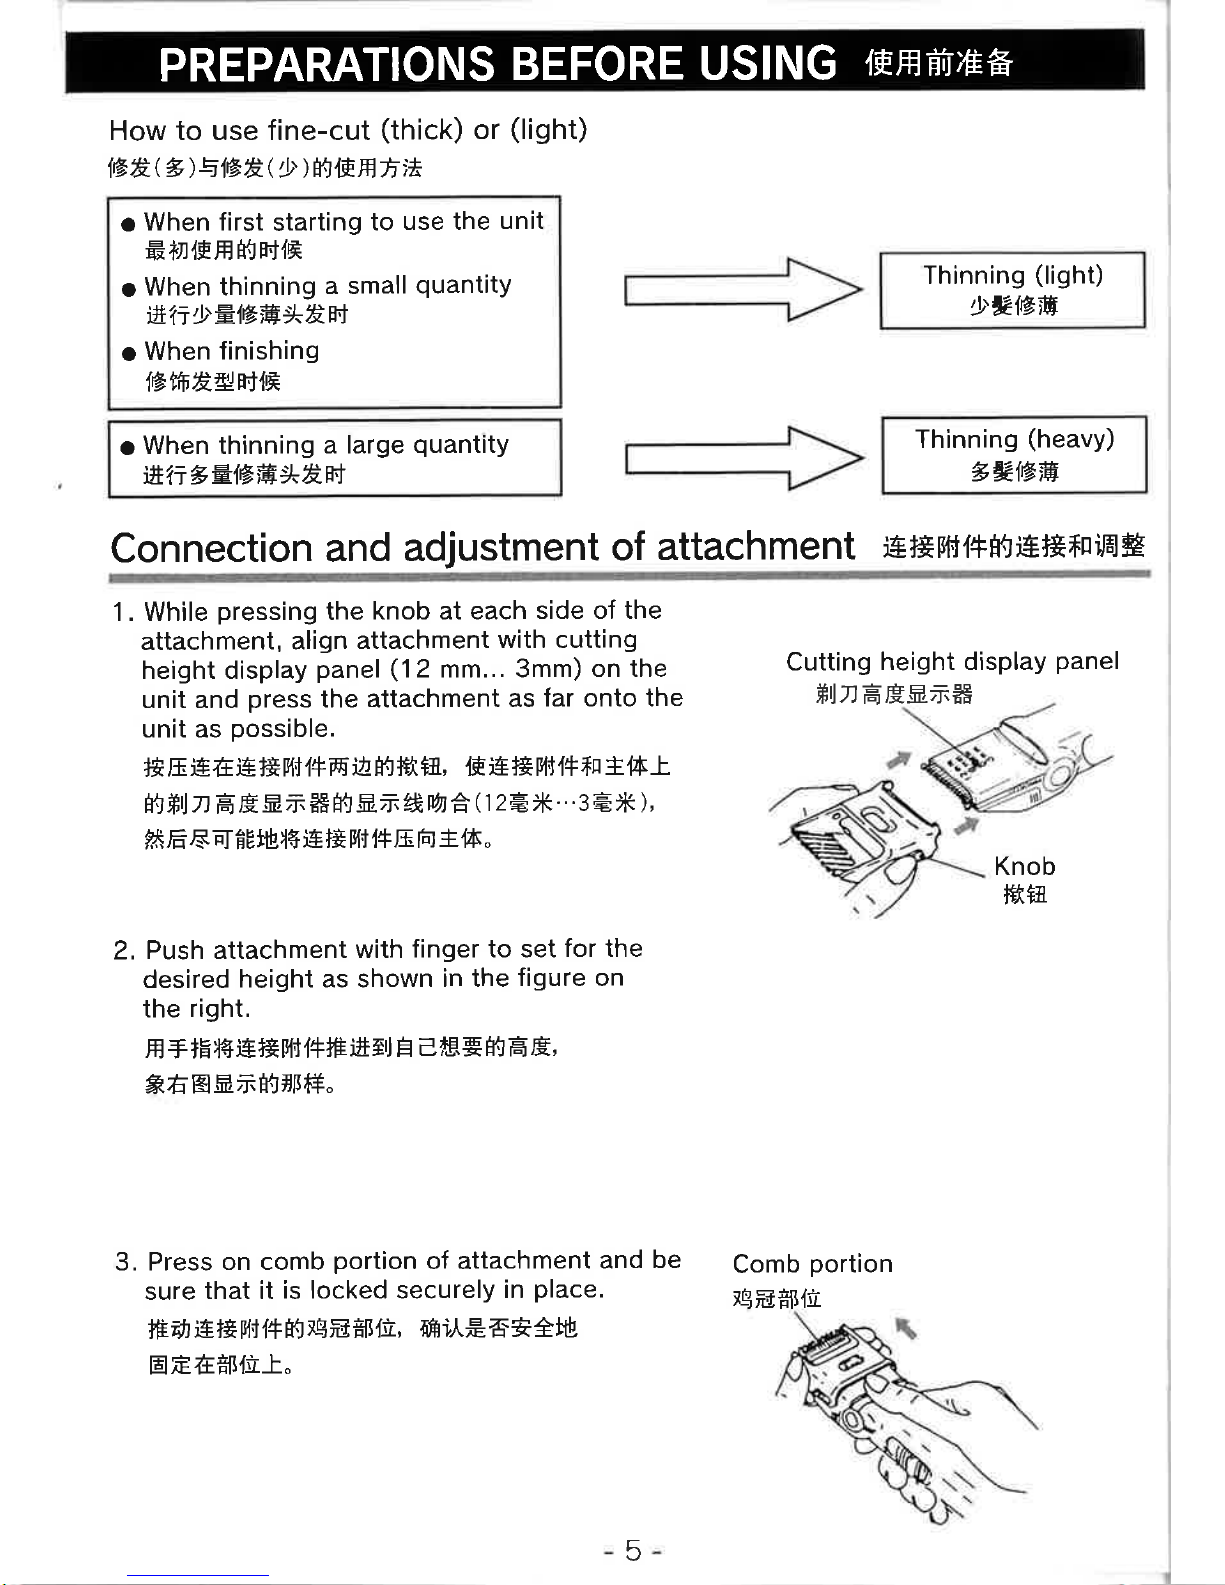
How to use fine-cut
(thick)
or
(light)
lrt Ë-
G
)
5
1ø È.( r' )
È!
{ÈÆ f
tt
o
When first
starting
to
use the
unit
Ë,i,n'lÉÆklr.J'lË
o
When thinning
a small
quantitY
fr.?iù'Êlëffi*Ë.Èt
o
When
finishing
lëtfrä,4ÈttÊ
o
When thinning
a large
quantity
fr?r*Élë#*äË+
Thinning
(light)
,t*løffi
Thinning
(heavy)
t*{ëffi
Con
necti on and
adj ustm
ent of
attach
ment
j€
r* Frll+Éi
j+Ïtfn
il*l
#
1. While
pressing
the
knob at each
side of the
attachment,
align
attachment
with cutting
height display
panel
(12
mm,.. 3mm)
on the
unit and
press
the attachment
as
far onto the
unit as
possible.
tt,E
i€ É i+
r* fif
.l+
ffi
i¿
Hl ft +fl ,
.lË
i5 +*
plt
l+ f
H
È
{f
t
Ê!
#lJ7l Ë
Ë
E
z' åE
É!.Ezr
4
ú)t
ã
0
2-È
*
"'
3
Ë
rK
),
l,*
tr,S
EI
E'gfüll
ie
ft fif {+
E
ÉJ
È'ffi
.
2,
Push attachment
with
finger to set
for the
desired
height as shown
in the
figure on
the
right.
Æ +rFì+ieÍ*p{f
l+#iä4il
Ë
E,#.e É!
ÊË,
*äKEzrÈT#Ff+"
Cutting
height display
panel
#ü)1,ËËEztåE
Knob
ffi+fl
3. Press
on comb
portion
of attachment
and
be
sure
that it
is locked securely
in
place.
iEü
iEt*
[jil+Él
igEÊßÊ,
fifr
iIË
ã-tâ!Ú
trËêÈß,fù-t.
Comb
portion
;-qEÊß,1ü
q
Page 7

PREPARATIONS
BEFORE
CUTTING
#il*Éi)Ëã
1. Place a
vinyl sheet or a sheet
of newspaper
on
the
floor.
æiüifilffit4++6ErfErft.
o
Use
a
chair as
high as
possible
for ease of
haircut work.
t6fÊFTìÉ, A+ljl*"
2. Apply
powder
to the
neck,
place
tissue
paper,
and wrap around
with a towel.
ËB+Í-Effi}'+l'fr),
Ëttft,
E#.L'€tþ.
3. Put on a cape from
the front and
fasten
it with
a string.
frtTÊË, H&,TÃEÈ-"
'*
lf a suitable cape
is not available,
substitute
a
nylon wrapping cloth
or the like.
r+ÊÊ r't,
¡t
lÈ. H trcfr,friJ€
È..
Names
of
hair
parts
)\*&frT,
Bangs
ÊiÊtriÊä
\z-
Crown
*mÈß
Around
ears
4i¿
Sideburn
Éñ
Neck
ÊË.w
))
{,
o
Page 8

SHORT
HAIR
trJä,Ð
I
th¡nn¡ng
(entre
head)
fÊù)Ëä('}|+*äêEtÊ,rÉ)
O
Comb
hair
to desired
stYle.
Æ +ñ
ìå
Ê
ê.
ÉÉ.
#r äðJttln
þ.*
trñrs.
@
Lightly
move
unit
from top
to
bottom
as
if
combing
the
hair.
E+ãiüH
tñ
É
.E' lËJ T ll
9L ä F,'#
lf
"
Front
Side
ËÍ*{l
1>
ruEi
Back
+
trÈ[
By
keeping
one
hand
underneath
the
hair while
cutting
with the
unit,
there
is
little
chance
of cut
hair
getting
in the
face.
tøú
N
t++ffiæ+
äT E,
FI
U
â
ã|J
ffi ä
iÊ
Uffi
,ËæEi-1"
Do not
thin
hair
near top
of head
since
short
hair will
standard
up,
iÉ
zi Eæ
*
rñ
Éß {n fif
iE
fÉù
ìË tt ä.
"
E
h
â
+
Eü
iË
4 tr
H! * ä
E Ë
"
2Cutt¡ng
top
head
*rñÈ[fr':trUä
Pull up
hair
between
fingers
directly
perpendicular to
top of
head
and slowly
run
the
unit
above
fingers
to
cut'
H ++âtH * älrF
rl Ë
ÉÉ+8,
nËä
++â?&'lE!ütril
ä
"
o
To ensure
cutting
at the
same
length,
take
up
hair already
cut together
with
hair
to
be cut
and
cut
latter to
the same
length
as
the
former.
+ # ;tä
É! {<
Ë
F.f
,
lltrü
!+É!
* ÞtfriÈ'
T+Ë
{<
Ë
itli#ff ü.
7-
How to
hold
Switch
position
frnei|
itl+4{üËi
Thinning
(light)
,!æ{ë
or
9J¿
\
Tilt
head
portion
tfr*+**ß
Thinning
(heavy)
eæÞ#
d
Straighten
head
lFË*Êt]
Switch
position
itf++'liË
Page 9

al
tlCutting around
ears
løHþÈ.v^
Put
the blade
edge lightly
against the
skin
and move
it in
a
circle
in the
arrow direction.
##.1+nh'ñËfr{Éflt,
-,å-Æ.Érffi+t-ÊrE#"
4S¡¿" cutting
(evening
up the
sides)
Put
the blade
edge
at
right
angles
to the skin
to
trim the hair.
l+nEÈ_ñtEfriJ"
Neck
þ.F^
F
Ðshaving downy
hair
fr\ì+4,
Put the
blades directly
on
the skin
and shave
the
downy hair
working
from the
lower to
the
upper
part
of the neck.
lín
hÈtt*ttñAÉffi,,r
TI"Jt+ã+ãfÊ#ü.
tk
Do
not
press
the blades
too hard.
T'FHhlàl-¡"
fr\Ë.þr(1Èfr.P¡ß)
How
to hold
Switch
position
fr7t+ìt
it*fl,fiË
Tilt head
portion
Ínf+rtÈß
How to hold
Switch
position
Ðn+ìt.
Ë+++tùË
Tilt head
portion
{'mf++*tI
How
to hold
Switch
position
*r+ìt
iË+++,frË
Thinning
(light)
,)'æ{¡ë#
Tilt head
portion
I'nfjt*Êß
Sideb
Éñ
6r¡n¡.f,¡ng
the
whole
head
Comb
entire head.
Even
out any
ÈF,{ëffiÊU
I
How
to
Ët Tl ê.ì+
u
þ,
/h
Tilt
head
1fi1+)tÈtr
hold
Switch
position
iftf++.fnË
Page 10

i
HAIRCUT
Frj*¡-;t
BOB STYLE
ØJÈ#
î
tn¡nn¡ng
(entre
head)
ttí#Ê.Q4*äêEi{fù,Ë)
O
Comb
hair to desired style.
@
Lightly
move unit
from top to bottom as
if
combing
the
hair.
+ã+ã!üÆ ffi
É
-t
Êt
T
ll
*ä
+,ñ#ür.
o
By
keep one hand
underneath
the hair while
cutting
with
the unit, there
is little
chance
of cut
hair
getting
in the face.
1ëæ
Èt
ffi +'Ìfr.E*ä
TEi,
Fr
Uâ4il ffi ä
iÊUtrËÉÉir.
o
Do not thin
hair near
top of head since
short
hair will
iËtF e
4
*
rñ
Ê{l'fn ${f
iE
fft
,Ë * ä
"
E
å
âê
Eü
?Ë 4
E É!
*
ä
E H
"
o
lf
person
has a lot of hair,
take up a
portion
of hair
in
thin
hair beneath
hand.
E *ä n JFn ä
Êt,
tr\4
*Ë-F-
*+EËE
ft tr løfr
ñ Urltl
*Ê.
"
stand
up.
2S¡¿" cutting
(evening
up the
sides)
Put the
blade edge
at right angles
to the skin
to
trim the
hair.
i,ínEÈñ#.fr\"
Sideburns
æñ
fr\ËVrrUøäV8)
How to
hold Switch
position
æn+iE
ËF+'fnË
Tilt head
portion
lfiâ+**ß
How
to hold Switch
position
il71êìt
iËEgÊË
Thinning
(light)
,J'æløffi
or
Et
Tilt head
portion
lrãf++Êfr
Thinning
(heavy)
**{ë#
9
Page 11

3Snav¡ng
downy
hair
frlìTa
Put the blades directly
on the
skin and shave
the downy hair
working
from the
lower to the
upper
part
of the neck.
\4n h
Ht*+tfrÈ
Éffi ,,!l.T
Ì"-J
L+õ4ãffi
tr|J
"
I
Do
not
press
the
blades too
hard
I
nEm
h&tr"
I
ir\
How to
hold Switch
position
frn+ìt
it#+{üË
Tilt head
portion
I'nf+*Ëß
LONG HAIR
Kä,H
1
trr¡nn¡ng
(entre
head) ff,i,Ëä(l+tkäâEiffiË)
O
Comb
hair to desired style,
ffi Fnffi
â
¿E
E *tr
äUt
rlñ
ä t+ ôî
Is
"
Ø
Lightly move unit
from top to
bottom as
if
combing the
hair,
+ã+ñiúÆ ffi
É
L
Ér Tl+*äffi
#tr.
Front
ÊiÈß
Do not
thin
hair near top of
head since short
hair will stand up.
ìË
õ Eæ
r'.r4Êlr,fü
Flf
iE
fÉ'l
¡Ë * ä. E
å
â â
ril
ifi fr
Ê ki
*
Ê:EË
"
lf
person
has a
lot of hair, take up a
portion
of hair
in hand and
thin hair beneath
hand.
+
*äx,FXË
Et,
ft\4
*Ë.-X-*rËfrE#\Flä
gÉrukr*ä.
Side
ütE
Back
trÊtl
iì
/i
l]
t
K.\
How to
hold Switch
position
æ71+ìÈ
it+++{üË
Thinning
(light)
ù'ælø#
Tilt head
portion
mf+JtÈr
-
10
-
Page 12

¡tl
ZSide
cutting
(evening
up
Side
and back
lëúË-tr+5äÉfiiftllÊ
3Shau¡ng
downy hair
Apply the
cutting edge to skin at right angle,
ffin#æH+É.EËffir"
o
Comb hair
first, and
be
sure to
maintain
evenness
and
balance in hair
length while cutting.
ffi*T*Ë.Ê&ÆfrÈrtþ9#*xäw"
the sides)
WAøG+äñæ*)
How to hold Switch
position
ü71*ìt
iä+++lüË
Tilt head
portion
{'mâ+*Èß
How to hold Switch
position
*ne-È
iäE+ÊË
w-\
=_\_
Tilt
head
portion
tüî,+*Èß
'(
'{
_-(
Put the blades directly on the skin and shave
the
downy
hair
working from the lower to the
upper
part
of the neck.
ft7r här*#ñ*Éffi
,
rIT
Ë
.t.+ã+ñ#ff|J.
*
Do not
press
the blades
too hard.
44Hh&8"
ffüi++
CREW CUT +:K#
1
Close cropp¡ng
+*u
Clipping
the entire
part
tr|JË1*ä
O
Mount the cropped hair
attachment of
proper
size of for the desired cutting
length.
+*iÉ+Ê!Ftil+.
Ø
While
putting
the comb of the cropped hair
attachment in
contact with the head skin,
slowly crop the hair from
the hairline
toward the crown against
the
growing
direction
of the hair.
ll
plJ
f++ñÍÊllK
nå*
É,,r E
i¿#
Êr JlrñÈi],
ü
*
Ë æ,lEtÊ#ü
"
How to hold Switch
position
fru+ìt
it#H{nË
Straighten head
tñ#l*Ètr
-
11-
Page 13

o
The knack
for
quick
and clean cropping
is
to crop the once
cropped
part
over again.
ÉF'frilÃlfrill+Tì+"
@
Finish by cropping
the entire
part
in
crossed
manner as shown
to make sure
that
no
part
is
left uncropped.
ËËtÊtrü,
4güË"
@
Clip the
lower
part
of the
back.
løÉffiäPtr'"
o
Mount
the cropped hair
attachment one
size smaller
than the
cropped hair
attachment
used
for close
cropping.
+ër.Fr.fft-fÊÉtFlil+"
9mm
for side trimming
against 12mm
for close cropping.
6mm against
9mm, 3mm against
6mm,
1
24)1.Èt,
lø
Êäfr äPltÈ.ffie
Ë
)K
"
eÊ )K r'J,
lë ÊçfrËPtr'lÈ.Æ
6
ã
tK"
6€ rK
r,J,
lë Êfrà ÈF,nlæ.H3EX
"
o
Clip
the lower
part
of the back
by
gradually
moving the clippers
away
from the
head skin.
Ië ÊfräF¡st,
þfr!þtå
É.i+dr
+./ú.
2
cutting
around eaß
IøHùâr,-
O
Remove the cropped
hair attachment.
ryTfiil+"
@
Put the blade edge
lightly against the
skin
-12-
How to hold Switch
position
ü,+ìt
ËF4ËË
Tilt head
portion
lfifi++Èß
How
to hold Switch
position
ün+it iËF+{nË
Tilt head
portion
l'ñf++Êß
Page 14

3S¡0"
cutting
(evening
up
the
sides)
frlialtr.fttäF;¡)
Put
the
blade
edge
at right
angles
to the
skin
to trim
the hair.
14n:s-Èñffi,frt.
Sideburns
æñ
4srraving downy
hair
#lj;r=
Put
the blades
directly
on
the
skin
and shave
the downy
hair working
from
the
lower
to
the
upper
part
of the
neck.
N471
h
H+&r*fr4Éffi
,
r
T Fr-t
+ã+ãffi
tr|J.
How
to hold
Switch
position
ûn+it
ìtF4lnË
Tilt
head
portion
lfrf+;tËß
Tilt head
portion
I'nf++Êfi
Switch
position
iËEfllüË
LAYERING
AND
SHAPING
ffi;Ê*
1 tfr¡nn¡ng
(entree
head)
tñffiÈ.(\+*ÈemrfiË)
O
Comb
hair
to desired
style.
Ø
Lightly
move
unit from
top
to bottom
as
if
combing
the
hair.
+ã+ñ'úÆ
tî
É
-L
HT
¿4 * Èt¡ñ#.tt
"
o
By
keeping
one hand
underneath
the hair
while
cutting
with
the unit,
there
is little
chance
of cut
hair
getting
in
the
face
¡rÐ
Ft
¿4 +¡¡y.E;tä
TE,
Er
U
â
îlJ
ffi ä
iÊ
U ffi ,ËË
E-t.
o
Do not
thin
hair near
top
of head
since
short hair
will
stand
up.
iË^æä*n*ß{üFttiEtff
#*ä" E å
ââËü
?Ë
4trÊi*ägË.
o
lf
person
has
a lot
of hair,
take
up
a
portion
of
hair in
hand
and
thin
hair
beneath
hand.
E
*äX,FXÐ
ET,
ft\+ *Ê._fr
_R+EËÈ
*EløÐÈt[i.t]þi*Ë."
Back
tr*fi
How
to hold
Switch
position
frn+ìt
Ë+++ÊË
Thinning
(light)
,!'Xlø#
or
eJ(
Tilt head
portion
l'ñf+;k*fr
Thinning
(heavy)
t*të#
Page 15

¡¡l
Z
Cutting of crown
*rñflÉl#lä
Pull up hair
between fingers
directly
perpendicular
to top of head
and slowly run
the unit
above fingers
to cut.
ffi
++âtF
*Ë.ln*ËÉËe
ËÉ,
rtiä
++E
É:erÉFlj
ä.
¡
To
ensure cutting
at the same length,
take
up hair
already cut together with
hair to be
cut and cut
latter to the same length
as
How to hold
Switch
position
æn+ì*
iËF+ÊË
Straighten head
lÊHrk*11
the former.
¡ll
5 Layering
and shaping
##¡¡
O
Lift
up hair from the bottom with
a comb.
{f
{,fi
f
,t
T
r"'J
-b
ll*ätËtg"
(Ð
Hold comb firmly in
place
and cut hair in
direction
of arrow.
EËûf
l,ñ+, Ë,sRffi *Ë-
ÉJ#ût,t
l,î+âg
+ æ H
Éi
*Ê."
o
Do
not try
to cut a lot of hair
at once.
Cut
a little at
a time.
o
Always
comb hair after
cutting and trim
portion
while checking that
cutting
has
been done
properly.
#frlÊ,
ù.tFÐffi+ffi#.,
-ì¿rñi
##|JHrâ-i¿'Ê#|J
How
to hold
Switch
position
ilne*
Ë84ËË
Straighten head
.fHË*Èß
Shaped
portion
t4È#üÈßâ
4Cutting
around
ears IøHùÈpl
Put
the blade edge
lightly
against the skin
and
move it in
a circle in the arrow
direction.
+1#'1+n
ÈffiF-fiAÊffi ,
-Æ-.È
h ffi JtË'rËr E+Ë"
o
Hold
the ear by hand
to facilitate
the
job.
How
to hold
*n+it
\à
h
/1
Tilt head
portion
tfi#l*Èß
Switch
position
iä#+{nË
Æ+t*lf4*nt
Ð+tÈfrit"
14
Page 16

HAIRCUT
frl*T;t
5S¡0"
cutting
(evening
up
the
sides)
fri)äF¡r,(øäF+)
Put the blade edge at
right angles
to the
skin
to trim
the hair.
\+N:-.ÈffiIEfrI]"
Sideburns
+æñ
€iShuu¡ng
downy
hair
#lir+
Put the
blades directly
on the
skin and
shave
the
downy hair
working
from the
lower to the
upper
part
of the neck.
l+n È Ht*ttfr4Êffi
,,rIT
rE
-t+ã+ã+ËtrÜ.
*
Do not
press
the
Z¡9'H)1#tr"
blades
too
hard.
Neck
HF¡t¡
Switch
position
Ë'+ryfiË
/cut \
\ëË)
Tilt head
portion
l'ñf++Ëtt
Switch
position
iËr+g{üË
d
ion
Tfin¡rf'¡ng
the whole
head èurløffiÊu
Comb
entire
head. Even
out any rough
parts
by using the
unit set
for thinning.
ttñ*Í
*Ë.
"
iEÊ'tF+'f
Ê!
r'IE,
lrtúçl-**hrL"
How
to hold Switch
position
*u+it
iËEg{üË
\
Thinning
(light)
Tilt head
portion
{'nfjt*Êtt
-
15
Page 17

SPECIAL PRECAUTIONS
++;il'iË+]F
Always
use
an AC 22OV outlet for
power
and the
special
purpose
adaptor.
ì+ttlil
+Ë{* Êr
È
ñ F Fff
,q
+ë
Ë
Í+
l8
Ff
Æ
Ê!
zzovÈ;ñrFlÉÈì€#ËÊ*"
The
cutting
edge has
been finished
to
high
precision.
Do
not
allow
contact
with hard
surfaces,
lf
the edge becomes
damaged
or
deformed,
it can
cause injuries
to
the
skin,
n
hffi&,
7i*üñ4ffi
+r.
ã¡ilFIiËr5I z
H
*.frr.
ÂfrtñXtñl,rÉffi.
Never
use the
unit in bathroom
or
other area
of high
moisture
concentration.
Electric
shock
or malfunctioning
may
occur.
+fr
44
H?RËiË,
ü7¡TEæÊF]
+'ËE tES
FT
tür.{ÉÆ
"
?5nilEläÊfi4 Êfi
ËÞrüH"
Always
store
the
unit in
a location
out
of the
reach
of
children.
+.tr
ñffi.Æ.fi
)L
t/r(
õ
Eü
Ê$üÊ'.
o
Do not
press
cutting edge
against
skin
too hard
since
this could result
in skin
injury.
,È4g-Bfi&EÉffi,
ãnüqffiffiÉffi.
Do
not
charge continuously
for
more
than
24 hours;
do not
store the
unit in
an area
exposed
to direct
sunlight;
do
not charge
or store
the unit
near
heating
equipment
or in area
of high
moisture
concentration.
Malfunctioning
may result.
õ9'ìÆ&f.Ê,24drFûDtL
üTEêËå+IH
ÌtË,
ãlllErËFttrË.
The
clippers are
specifically designed
for human
hair cutting. Do not
use
your
clippers
on cats, dogs,
or other
pets.
ãp'nå Ää#ilikËÆ åË, TeÆ
TfiJ.
IË+fr,Wr"
-
16
-
Page 18

SERVICING
PROCEDURES
)Ë'ËÈ;*
o
Always clean out
hair and lubricating
oil unit after use.
1ËÆÉ#¿.iË+1äEfEÈì'É"
1. Always turn switch to
(F€Eæl)
before
servicing
the unit.
tË+r
r't,
*,I\4fr X1ÃE(
E€
I
ñ€]
).
2. Use accessory cleaning
brush to clean
out hair from the unit
and around
cutting edge.
Æ Ftttre
ÉiìÊB&ilìË fi
Ë
ft fE
z,HFl
E
"
3. Remove the blade
from the unit and
clean out
hair from the
inside.
,r
Atr+iEHz
rl, ;ËFAEEÉ!*ä.
4. Lubricate the
blade with a few
drops of oil.
æn,Hr+tÉ"
¡
Store the unit
in a dry
place.
ËË7FilE;,8É!!üt"
SPEC|FICAT|ONS
t^ttg
Power supply
ÊiE
AC 22OV 50Hz
Ni-Cd-battery
(DC
äiñ.2201f.
501ñü,
fFfñÉ;U(Ëìh]
.2'lt,
1.2V, 600mAhx2)
600mAhX2Ë)
Charging
time
ffi)ÊñÈrft4
8
hours
(Standard)
B4rfr,J
Weioht Ë'Ei
Body
È.ffr:
:
145g
145fr,
AC
adaptor:
32Og
ÊìTHiSt*åç
:
320fr,
Accessories
Htl+ AC
adaptor,
Cropped
hair attachment
Cleaning brush,
Lubricating oil
ÊììHi€ftåË.
PlÍl+.
tËfiÆÛ'
iÉ
Cord
length
+RUÈ.,KÈ.
2m
DK
-17-
Page 19

I
When
any trouble occurs during
use,
disconnection the use, and make
sure of the following
points
before asking a repair.
.tÉH
+äÉEHrn*.Èt
:
'lÉÆ
+ ü
I4,FH
È+,
æt+,1ëry2ÊÍ,
iËt*Tæ
jtlr+ôÊ.
Symptom
ft,lt
Points to be checked
ЛдКЯЛ
Remedy
4[IeÈ ì*
oSharpness is not
good.
f+Ít,l+rfiÊ
o
Rotation is weak.
*ÈiltÊÊ
A
great
deal of hair cuttings are
accumulated inside
the
blade.
]?
É
É
ûril
ËãrËt'q^7
*.Ê.ä.8
"
Periodically clean up and oil.
Ës;ËfifiritÊ"
o
Changing
is not
avallable.
AÉE'EÈ..
The switch is set to ON.
*xEã$ToN{nË.
Turn the switch
(F€IEB)
and
begin
charging.
{++*tð5(E€ lñÈl)8, Fi
ñÉ.
oThe
clipper is out
of
charge. lt dose not
work even through the
cord
is
connected.
ft.É-HÈÊ,
i++*+î.
&.þ.Tdl"
The cord is connected with the
switch
set to ON.
ETFl+#*irflãoNr'Jt€T*
kit¡
&"
Turn
the switch
(F€Eel)
and use
after waiting for a while.
lt+*irrjã( E€
[nÐ
tr, rE+
hàtlF,IÈ.H"
o
Charging is not available.
T'âEî,8"
o
Does
not work.
Z¡ûr"
The
cord
is interrupted.
ls not the
service life of nickel cadmium
battery, blade
or motor over?
+t
4È,8Ãffi
*,
"
fFta-
Éiü.
r,É.
güEãE'HIE"
Ask
a shop
where
you
have
bought, to repair.
4tÍ.2ÃtíÊlërq"
-
18 -
Page 20

I
I
Hiiachi, Ltd.
Shin-Otemachi
Bldg. 2-1 Otemachí 2-Chome, Chiyoda-ttu,
Tokyo, 1 00-0004 Japan
Kyushu
Hitachi
Maxell,
Ltd.
4680
lkata,
Fukuchi-Machi, Tägawa-Gun,
Fu
kuoka,
822-1 296 Japan
 Loading...