

Page 1
QUICK GUIDE
49HK6T74U
655/0372
Please read this quick guide fully before installing or operating because it contains important setup information and keep for
future reference.
For any help concerning set up and use of your TV please call theCustomer Helpline:
0345 604 0105
Lines open: 9am - 8pm Monday to Saturday and 10am - 4pm Sunday
IMPORTANT - If placing TV into cabinet or alcove, ensure there is at least a 100mm (10cm) gap to the sides,
rear and top of the TV. This is to allow for adequate ventilation during operation. Please read the
main Users Guide for more safety information before installation.
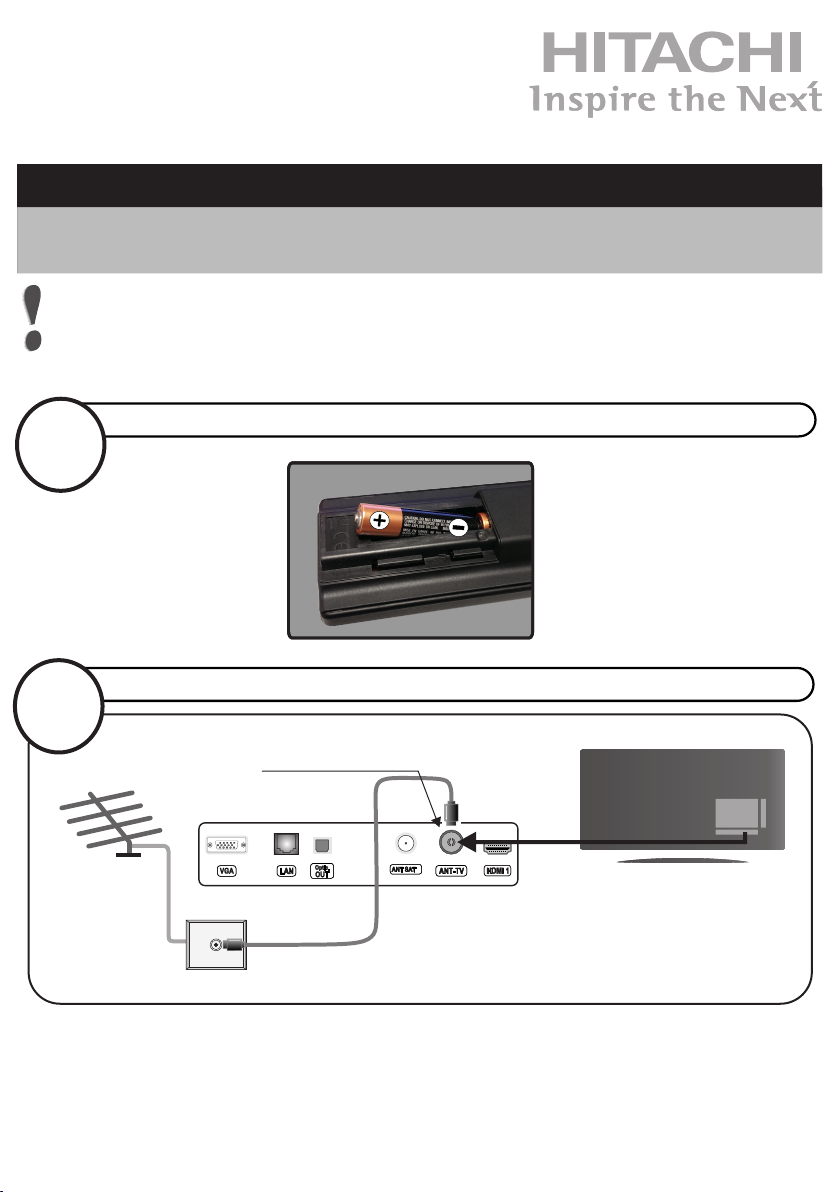
insert the batteries into your handset
1
either connect the aerial straight to your TV...
2a
Aerial (RF)
Lead
wall socket
Aerial (RF) Socket
13V/18V DC
13V/18V DC
max. 300 mA
max. 300 mA
1
1
Page 2
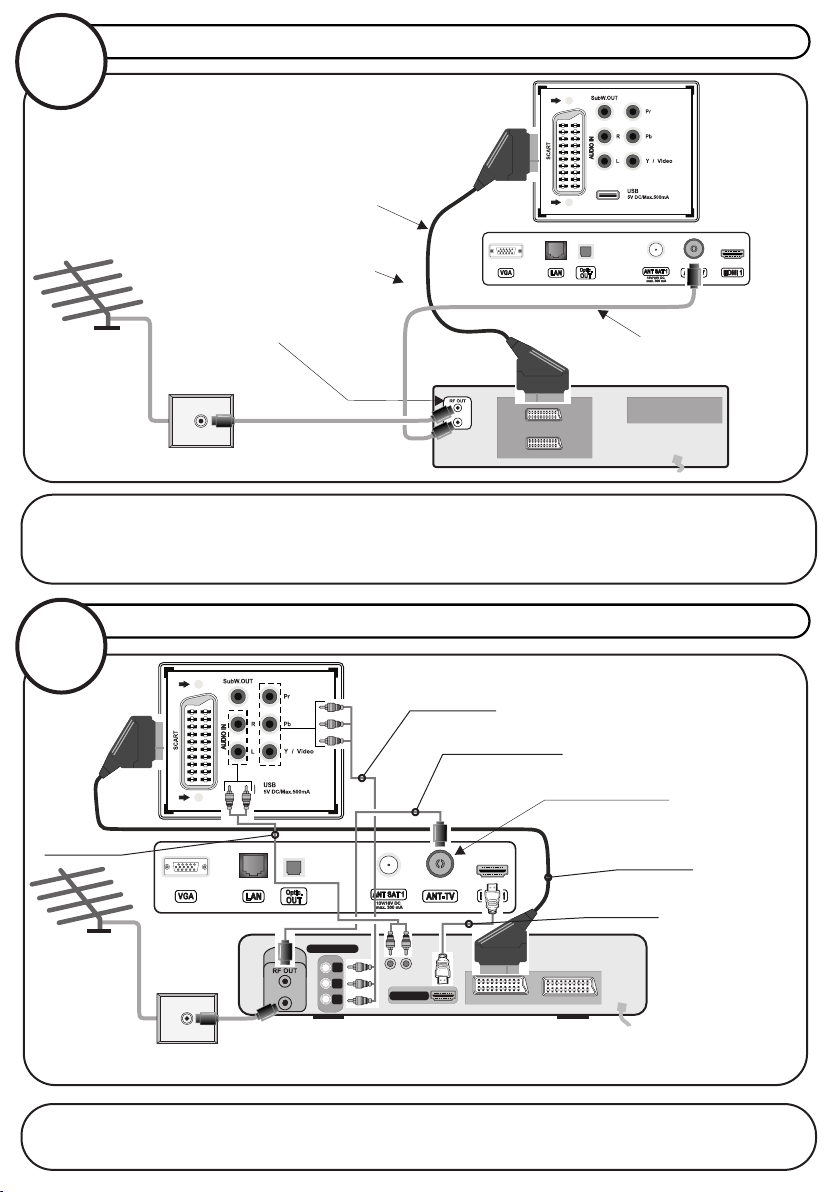
2b
...or connect the aerial through a VCR...
Optional Scart Lead
(RF) connector
lead VCR to TV
Aerial (RF) Socket VCR
Aerial (RF) Socket
wall
Aerial (RF)
Lead
• It is recommended that a scart lead should be fitted between your TV and VCR to enhance your picture and
sound quality. Scart leads are essential if you have a stereo TV and VCR and wish to obtain stereo sound from your
equipment. These leads can be purchased from your Hitachi dealer or any good High Street electrical retailer.
socket
ANT.IN
AV-1
AV-2
VCR
...or through a HDMI and YPbPr products (DVD-RW)
2c
YPbPr cable
(RF) connector
lead Device to TV
Aerial (RF) Socket
AUDIO cable
Scart Lead
HDMI cable
COMPONENT
ANTENNA
ANT.IN
Aerial (RF)
wall
socket
Lead
Note : These three methods of connection perform the same function but in different levels of quality. It is not
necessary to connect by all three methods.
• High Definition
Your LCD Television is capable of displaying High Definition pictures from devices such as a High Definition Satellite Receiver or DVD
Device.These devices must be connected via the HDMI socket or Component Socket.
Y
PB
PR
AUDIO OUT
HDMI OUT
DVD RECORDER
Page 3

2d
...or through a VCR and satellite decoder.
TFT-LCD TV
Scart Lead
to AV on TV
RF Lead
from
VCR to TV
RF Lead
from VCR to
Satellite
Aerial
ANT.IN
RF Lead to
Aerial
ANT.IN
TV VCR
AV-1
AV-2
Satellite LNB lead
VCR
Page 4

3
connect the TV plug to the mains socket
UK plug
insert plug...
...and switch on
Press the OPERATE/STANDBY button on the remote control or
4
NB: When the set is first switched on, the set will be in standby. Press the Standby button, Programme
+ / - button or a numeric button on the remote control.
press the Standby button or Programme +/- button on the TV.
The TV will then switch on.
The joystick allows you to control the
Volume / Programme / Source and
Standby-On functions of the TV.
P+
V+
V-
P-
basic functions of remote control
OPERATE/STANDBY
Note: The position of the joystick
may differ depending on the model.
To select a programme
number.
Volume Up
Volume Down
To enter the main menu
Programme Up
Programme Down
For navigation of the menus
RC 4848F
Page 5

First Time Installation
5
When turned on for the first time, the language selection screen is displayed. Select the desired
language and press OK.
On the next screen, set your preferences as follows:
Country UK
Teletext Language West
Scan encrypted Channels On
Select Favourite Network Type Digital Aerial
Select Broadcast Type:
Digital Aerial On
Digital Cable Off
Analogue Off
Press OK to continue.
Select Home Mode for home use. You can activate Store Mode option at this point if necessary,
however, this option is only intended for store use.
Press OK button on the remote control to continue and the Network Settings menu will be
displayed.
Select Network Type: Wired or Wireless You will then be prompted by the menu to make the
correct settings. When you have connected to your network, press OK.
If you are not sure how to proceed, press Skip button to perform the channel scan. You can
connect to the internet by following the instructions in item 6 at any time.
After the channel scan has completed, the Choose Region menu may appear. Select the
appropriate settings for your location using the directional buttons then press OK.
After the initial settings are completed TV will start to search for available broadcasts of the
selected broadcast types. The Edit Channel List menu will be displayed when the search is
completed. You can edit the channel list according to your preferences or press the Menu button
to quit and watch TV.
While the search continues a message may appear, asking whether you want to sort channels
according to the LCN(*). Select Yes and press OK to confirm.
(*) LCN is the Logical Channel Number system that organizes available broadcasts in accordance with a
recognizable channel number sequence (if available).
Note: Do not turn off the TV while initializing first time installation. Note that, some options may not be
available depending on the country selection.
important note
Once the TV has found all your local stations, they are then automatically assigned a
programme number and name, if available from the broadcast.
Page 6

Connect your TV to the internet
50370200
6
Connectivity feature allows you to connect your TV to the home network wired or wirelessly. You
can use this networking system to connect to the Portal or to access photo, video and audio files
that are stored on a Media server connected to the network and play/display them on the TV.
Add your TV to your home network by connecting it to the modem/router via an LAN cable (not
supplied) as illustrated.
Press the Menu button to open the main TV menu. Select Settings by using the directional
buttons and press OK to enter. Highlight Network/Internet Settings and press OK. While
Network Type is highlighted, press Left or Right buttons to select connection type. Wired
connection will be established automatically. If wireless connection is selected TV will search for
the available wireless networks and list them when finished. Select one and press the OK button
to connect. If the wireless network is password protected you should enter the correct code to
access the network. Once you have established a wireless connection, this will be saved and you
shouldn’t enter the password to connect to the same wireless network again. You can delete the
saved wifi profile any time. If a First Time Installation is performed, this profile will be deleted as
well.
Press the Internet button - on the remote to access internet portal, while your TV is
connected. You can access a wide range of applications and services, using the internet portal
feature of your TV.
Note: The appearance of the Internet button on your remote may differ according to the remote type
supplied with your TV. Please check the remote overview page in the instruction manual. Portal page content
is subject to change at any given time without prior notice.
Nero MediaHome software download link: http://www.nero.com/mediahome-tv.
Refer to the instruction manual for more details.
Wireless Connection
Broadband
ISP
connection
TV with internal wifi
Wired Connection
Broadband
ISP
connection
LAN (ethernet) cable
LAN input on the rear side
of the TV
 Loading...