

Hisense WFXE6012, WFXE6012S, WFHXE1260S, WFXE7012, WFXE7012S User's Operation Manual
...
USER’S OPERATION MANUAL
Before operating this unit, please read this manual thoroughly,
and retain for future reference
WFXE6012/WFXE6012S
WFHXE1260/WFHXE1260S
WFXE7012/WFXE7012S
WFHXE1270/WFHXE1270S


TABLE OF CONTENTS
1. CAUTION.........................................................................................................2
3 DESCRIPTION OF THE WASHING MACHINE .............................................4
4 INSTALLATIOIN..............................................................................................6
5 BEFORE THE FIRST WASH CYCLE...........................................................13
6 PREPARATION OF THE WASHING.............................................................13
7 PROGRAMMES INSTRUCTIONS................................................................18
8 PROGRAMME SETTINGS AND OPTIONS.................................................19
2 PRECAUTIONS AND GENERAL RECOMMENDATIONS.............................3
2.1 Packaging....................................................................................................3
2.2 Disposing package and scrapping used washing machines.......................3
2.3 Location and surroundings..........................................................................3
2.4 Safety...........................................................................................................3
3.1 Overview......................................................................................................4
3.2 Parts supplied..............................................................................................5
3.3 Control panel...............................................................................................5
4.1 Choosing an appropriate installation location..............................................6
4.2 Removing the packaging and inspection.....................................................6
4.3 Removing the transportation bolt.................................................................7
4.4 Adjusting the feet.........................................................................................8
4.5 Connecting the water supply.......................................................................9
4.6 Connecting drain hose to the drain.............................................................11
4.7 Electrical connection..................................................................................12
6.1 Sort the laundry..........................................................................................13
6.2 Preparing laundry for washing...................................................................14
6.3 Detergents and additives...........................................................................15
7.1 Programme table.......................................................................................18
7.2 Programmes..............................................................................................19
8.1 Add detergents, close the door and select the programme.......................19
8.2 Select any desired option..........................................................................19
8.3 Delay.........................................................................................................21
8.4 Programme Start.......................................................................................21

9 CLEANING AND MAINTENANCE.............................................................23
10 TROUBLESHOOTING GUIDE..................................................................25
11 OPERATING DATA...................................................................................30
8.5 Reload in process....................................................................................21
8.6 Change programme or optional function during operation......................21
8.7 Programme end......................................................................................22
8.8 Opening/closing door..............................................................................22
8.9 Child lock................................................................................................22
9.1 Removing the filter..................................................................................23
9.2 Draining residual water...........................................................................24
9.3 Care and maintenance...........................................................................24

1. CAUTION
2
The manufacturer reserves the right for any modifications
on the product which might be deemed necessary or
useful without informing about it in this IFU.
Thank you for choosing a Hisense washing machine.
Before operating your new washing machine, please read
this instruction carefully, and keep it for future reference.
Please make sure the socket is grounded securely, the
water source connection is reliable. The manufacturer
declines all liability and warranty for damage to property
or injury to persons or animals due to non-compliance
with the directions given in this instruction.
If the supply cord is damaged, it must be replaced by the
manufacturer, its service agent or similarly qualified
persons in order to avoid a hazard.
The new hose-sets supplied with the appliance are to be
used and that old hose-sets should not be reused.
This appliance can be used by children aged from 8 years
and above and persons with reduced physical. Sensory
or mental capabilities or lack of experience and knowledge
if they have been given supervision or instruction
concerning use of the appliance in a safe way and
understand the hazards involved.
Children shall not play with the appliance. Cleaning and
user maintenance shall not be made by children without
supervision.
Children of less than 3 years should be kept away unless
continuously supervised.
The maximum permissible inlet water pressure, 1 MPa,
for appliances intended to be connected to the water
mains.The minimum permissible inlet water pressure, 0.1
MPa, if this is necessary for the correct operation of the
appliance.
For washing machines with ventilation openings in the
base,that a carpet must not obstruct the openings.

3
2.1 Packaging
The packaging material is entirely recyclable, and marked with the recycling symbol .
Adhere to current local regulations when disposing of packaging material.
2.2 Disposing package and scrapping used washing machines
The washing machine is built from reusable materials. It must be disposed of in
compliance with current local waste disposal regulations.
Before scrapping, remove all detergent residues, break the door hook, and cut off
the power cable so that the washing machine is made unusable.
This appliance is marked according to the European directive on Waste Electrical and
Electronic Equipment (WEEE). By ensuring that this product is disposed of correctly,
you will help prevent potential negative consequences for the environment and human
The symbol on the product, or on the documents accompanying the product
indicates that this appliance may not be treated as housedhold waste. instead it
shall be handed over to the applicable collection point for the recycling of electrical
and electronic equipment. Disposal must be carried out in accordance with local
environmental regulations for waste disposal. For more detailed information about
treatment, recovery and recycling of this product, please contact your local city
office, your household waste disposal service or the shop where you purchased
the product.
health, which could otherwise be caused by inappropriate waste handling of this product.
2.3 Location and surroundings
The washing machine must only be installed in enclosed spaces. installation in the
bathroom or other places where air is humid is not recommended.
Do not store flammable fluids near the appliance.
2.4 Safety
Do not leave the appliance plugged in when not in use. Never plug or unplug the
power from the mains supply, if your hands are wet.
Turn off the tap.
Before any cleaning and maintenance, switch off the machine or disconnect if from
the mains.
2 PRECAUTIONS AND GENERAL RECOMMENDATIONS
4
Control panel layout and
appearance will depend on the model.
Clean the outside of the washing machine with a damp cloth. Do not use abrasive
detergents.
Never open the door forcibly or use it as a step.
This appliance is not intended for use by persons (including children) with reduced
physical, sensory or mental capabilities, or lack of experience and knowledge, unless
they have been given supervision or instruction concerning use of the appliance by a
person responsible for their safety.
Childen should be supervised to ensure that they do not play with the appliance.
Children must not be allowed to play with the appliance or to climb into the drum.
If necessary, the power cable may be replaced with an identical one obtained from our
After-Sales Service. The power cable must only be replaced by a qualified technician.
If the product you bought has no special procedure for washing waterproof clothes such
as down coat, raincoat, bicycle cover, ski pants or waterproof cover, please do not wash
these articles or spin-dry them.
3.1 Overview
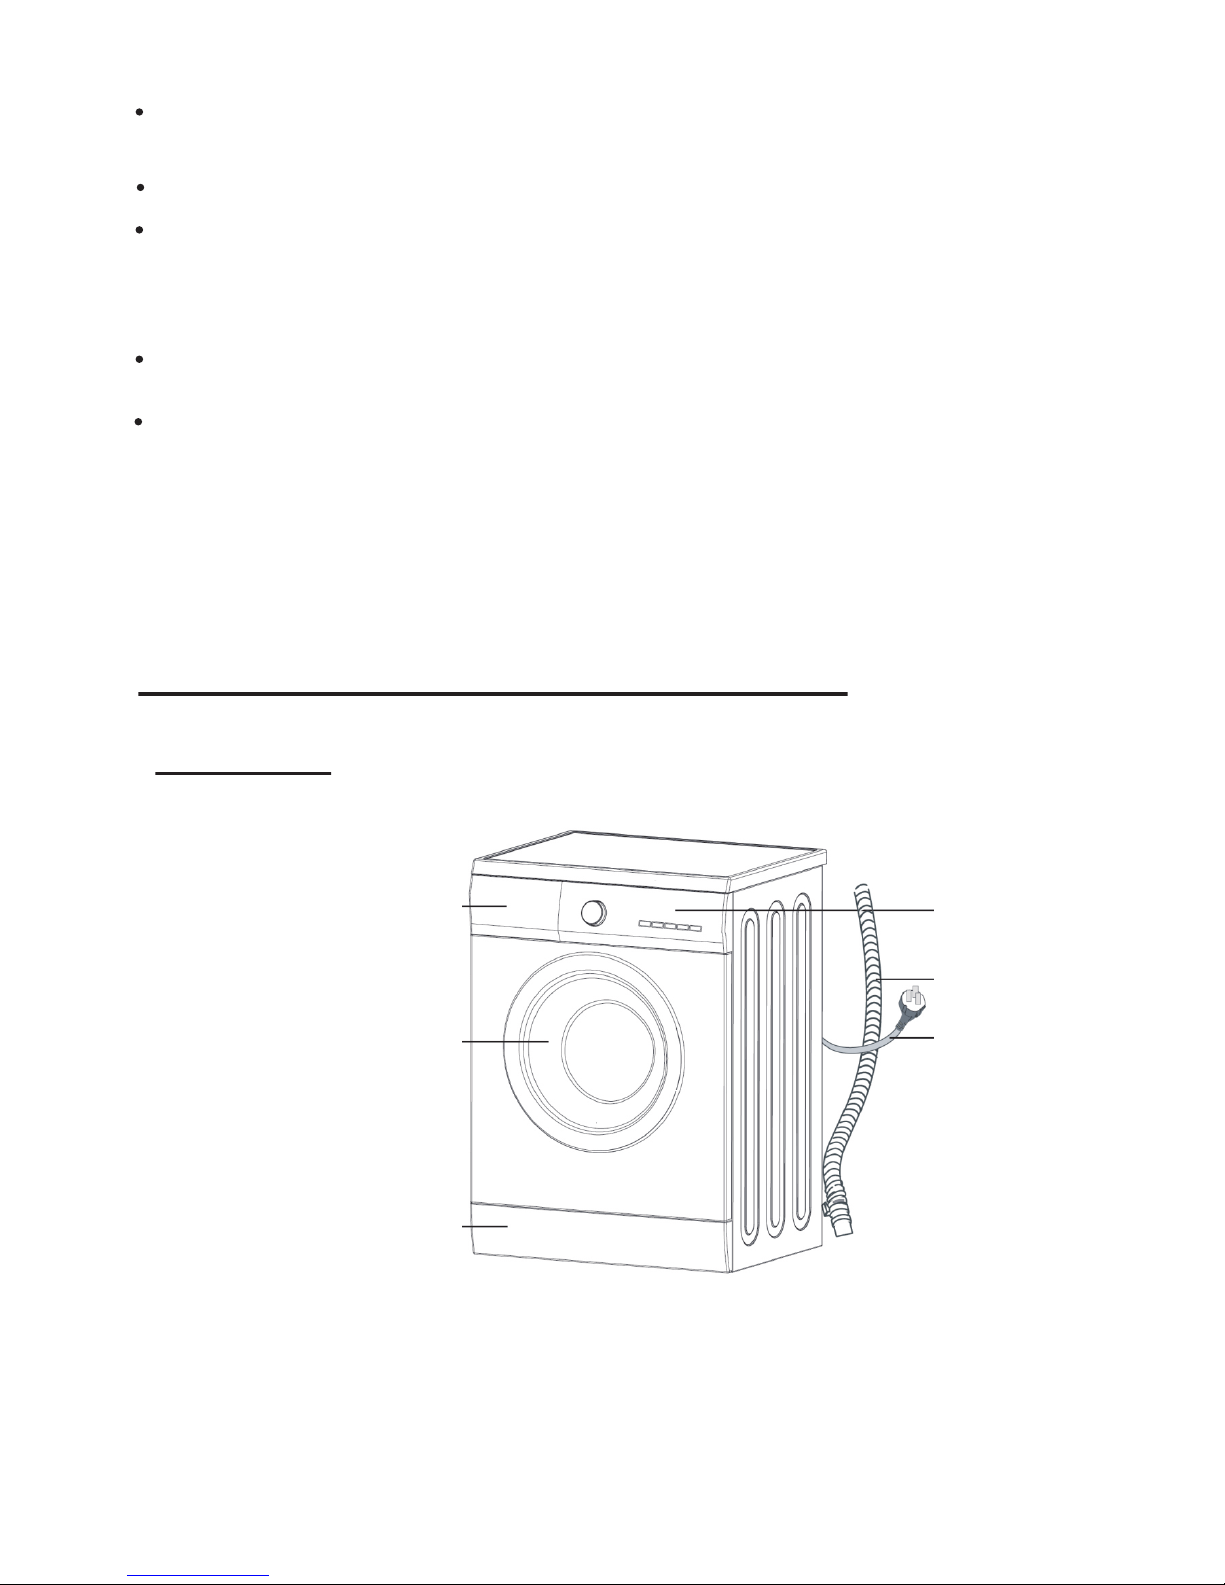
3 DESCRIPTION OF THE WASHING MACHINE
Control Panel
Plinth covering pump access
Door
Power Plug
Detergent Dispenser
Drain Hose
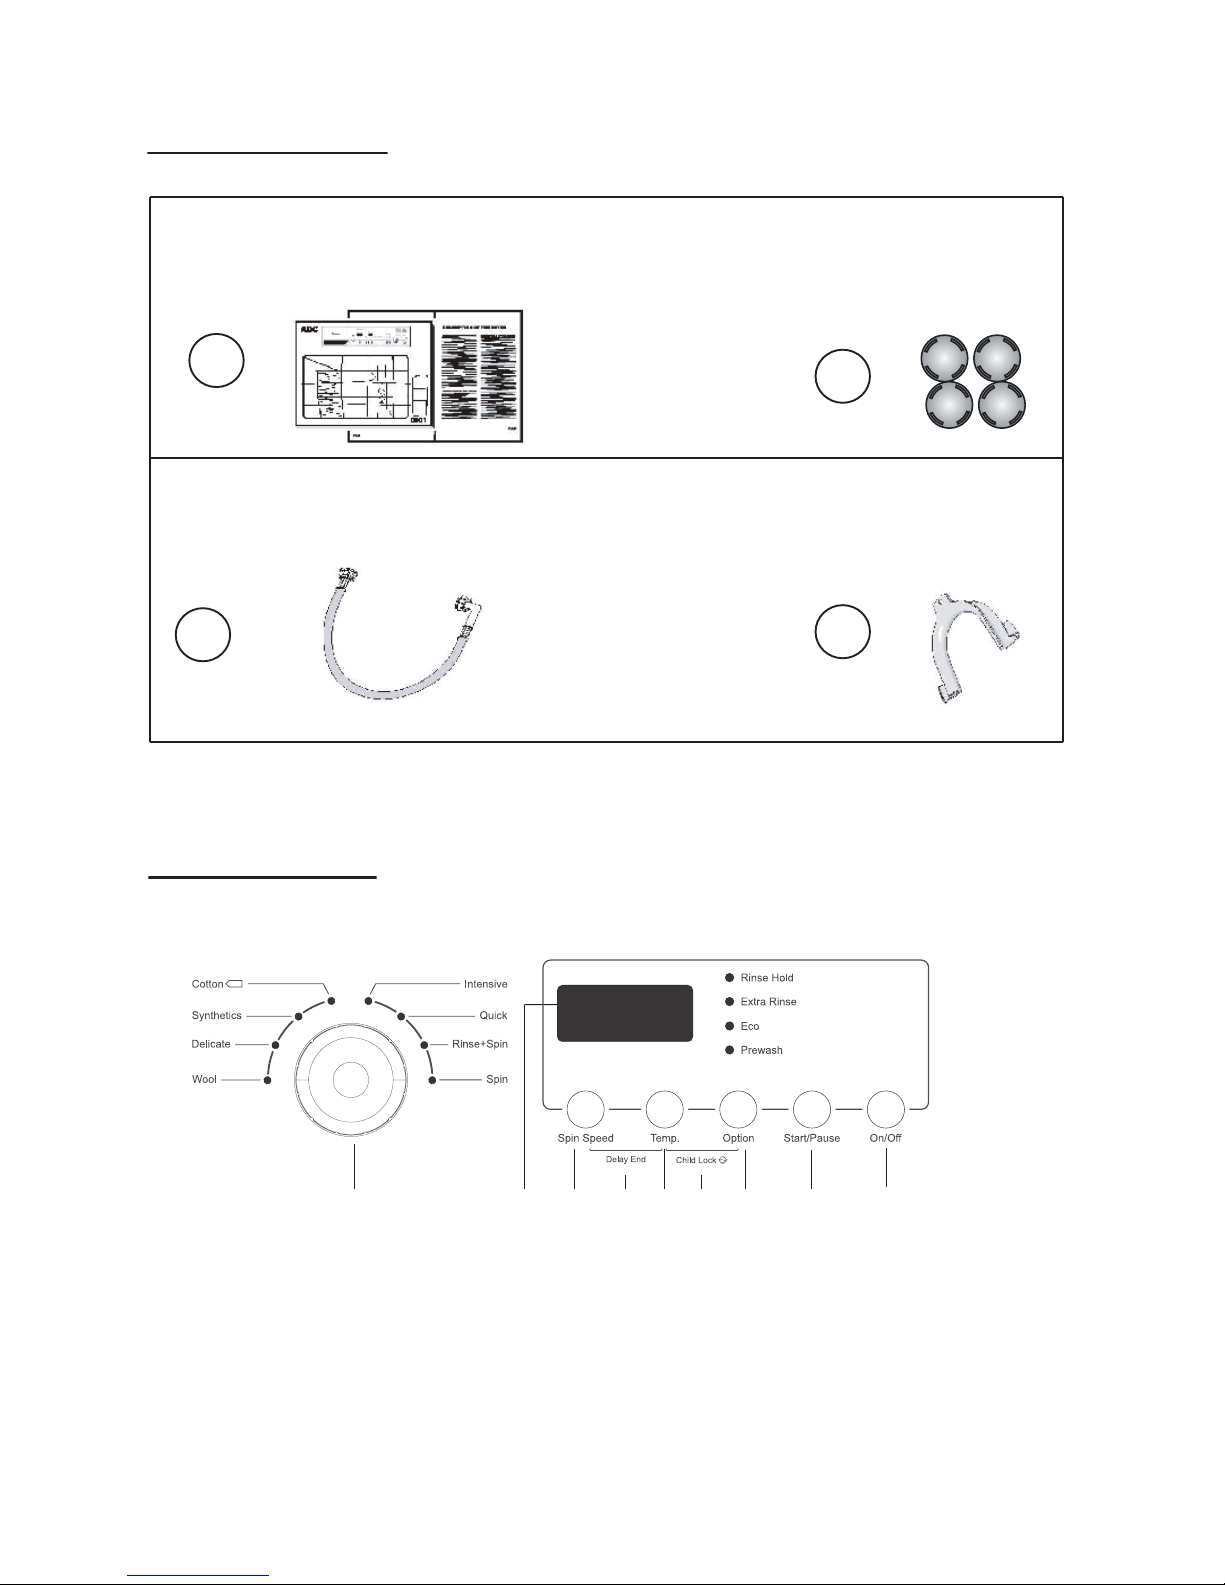
H I ABCGD FE
A: “On/Off” button B: “Start/Pause” button C: “Option” button
D: “Temp.” button E: “Spin Speed” button F: “Delay End” button
G: Child lock H: Programme selector I: Time and temperature display
D
C
B
A
5
3.2 Parts supplied
User’s operation Manual
4 Plastic Caps
Hot inlet hose (if available, depending on models)
“U” - bendCold inlet hose
warranty card (depends on model)
3.3 Control panel

After unpacking, ensure that the washing machine is undamaged. If in doubt, do
4.2 Removing the packaging and inspection
not use the washing machine. Contact After-Sales Service or your local retailer
Check that the accessories and supplied parts are all present.
Keep the packaging materials (plastic bags, polystyrene parts, etc.) out of reach of
children, as they are potentially dangerous.
Move the appliance without lifting it by the worktop.
Minimum housing dimensions:
Width: 600 mm
Height: 850 mm
Depth: refer to the
Specification
6
4 INSTALLATIOIN
4.1 Choosing an appropriate installation location
Do not place the product on a floor without sufficient capacity to carry the load.
Do not install the product in places where there is the risk of freezing.
1. Preparation of the location and electrical, tap water and waste water
installations at the place of installation is under customer's responsibility. Make
sure that the installation and electrical connections of the product are performed
by competent persons.
2. Make sure that the water inlet and drain hoses as well as the power cable are
not folded, pinched or crushed while pushing the product into its place after
installation or cleaning procedures.
3.
The appliance must be installed on a solid and level floor surface (if
necessary use a spirit level). If the appliance is to be installed on a wooden
floor, distribute the weight by placing it on a 60 x 60 cm sheet of plywood at
least 3 cm in thickness and secure it to the floor. If the floor is uneven, adjust
the 4 leveling feet as required; do not insert pieces of wood etc. under the feet.
4. Never place the product on a carpet-covered floor.
5. Do not lean the product on furniture, keep a distance between them.
6. Do not place the product on any platform.
7. Manufacturer shall not be held liable for damages that may arise from
procedures carried out by unauthorised persons.
Note:
There is risk of getting injured, two or more people are needed for
removing the packaging.

The washing machine is fitted with transportation bolts to avoid any possible
damage to the interior during transport.
Transport bolts which are not removed can cause damage to the
Screw off all transportation bolts for approx. 30mm with wrench following the
direction of arrow shown (not fully screw it off).
Push two transportation bolts on horizontal direction inward and loose
transportation bolt.
Pull out transportation bolts together with rubber part and plastic part.
30
7
appliance.
4.3 Removing the transportation bolt
Step 1:
Step 2:
Step 3:
To ensure safety and reduce noise, you should install the transportation bolt
cover supplied with the unit (see the annex accompanying the unit). Lean and
place the transportation bolt into hole and press it following the shown direction
until it clicks.
8
Important: Keep the transportation bolt and the wrench for future transporting of the
appliance and in this case refit the transportation bolts in reverse order.
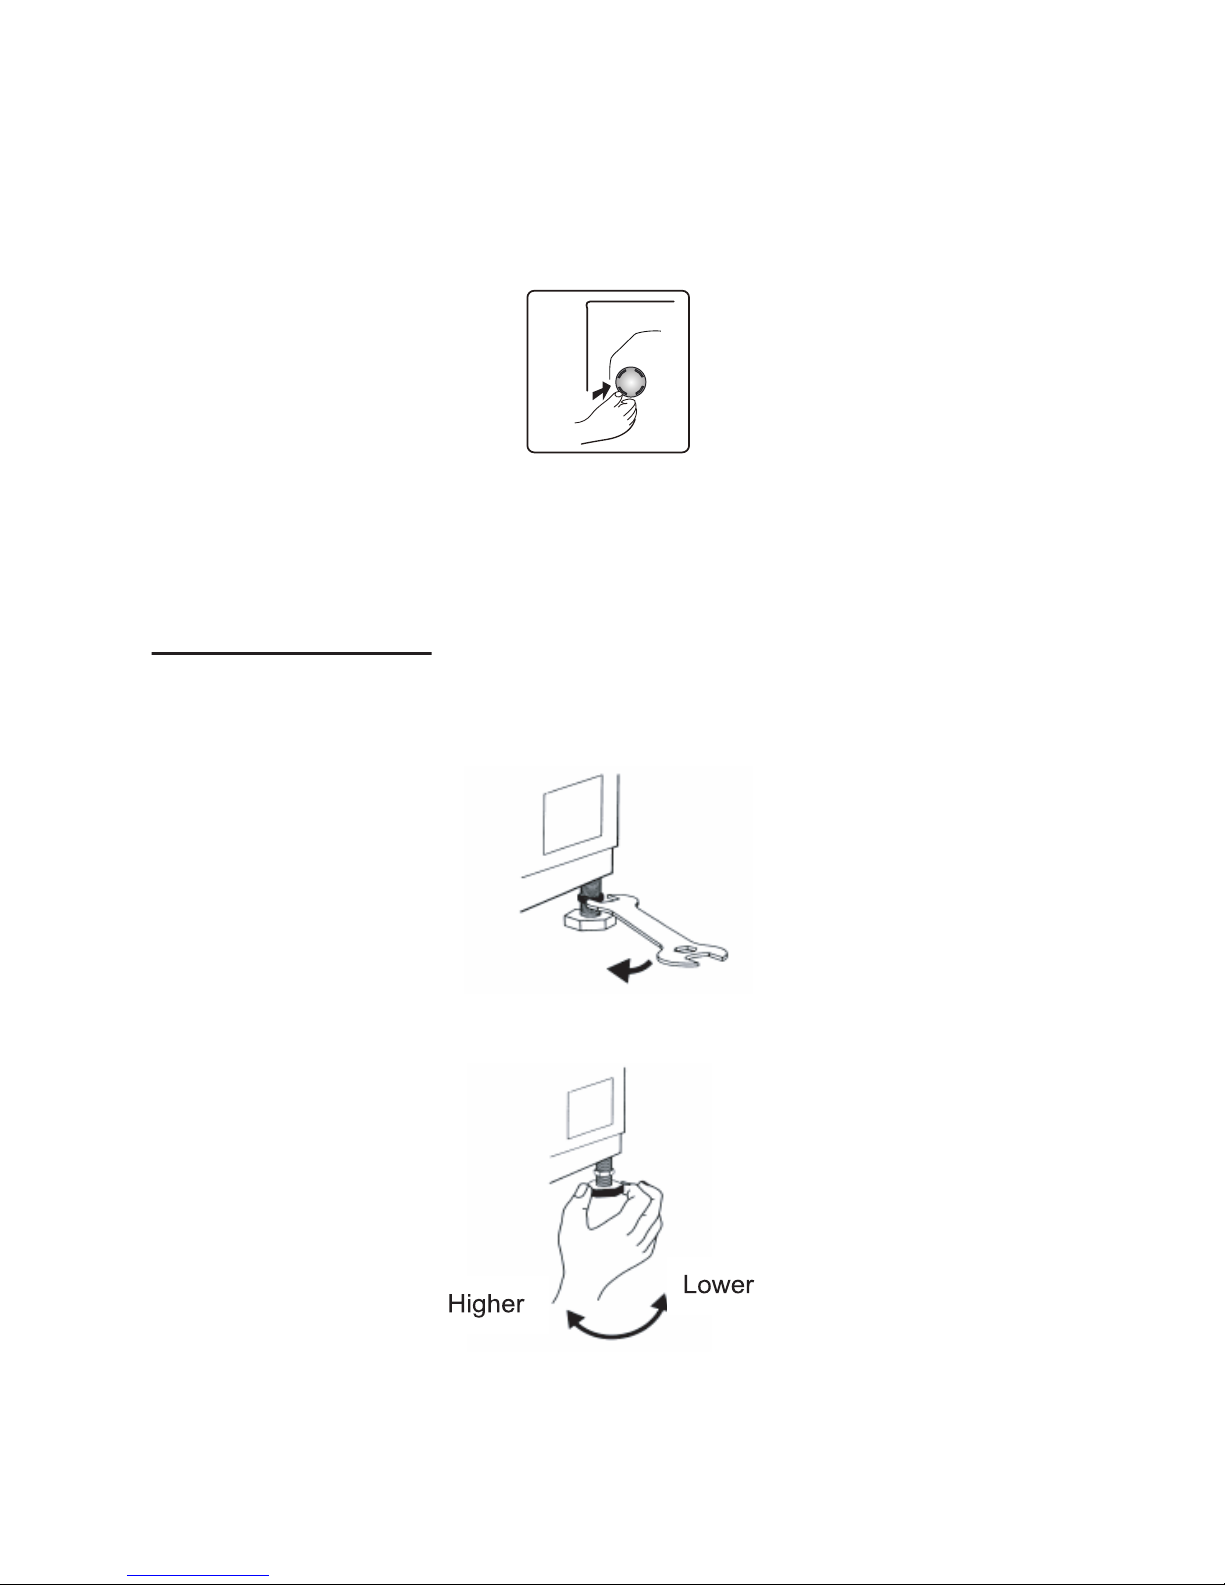
Slacken the locknut clockwise (see arrow) using the wrench.
Lift the machine slightly and adjust the height of the foot by revolving it.
Step 4:
4.4 Adjusting the feet
Step 1:
Step 2:
 Loading...