

Page 1

Page 2
12
17
20
22
24
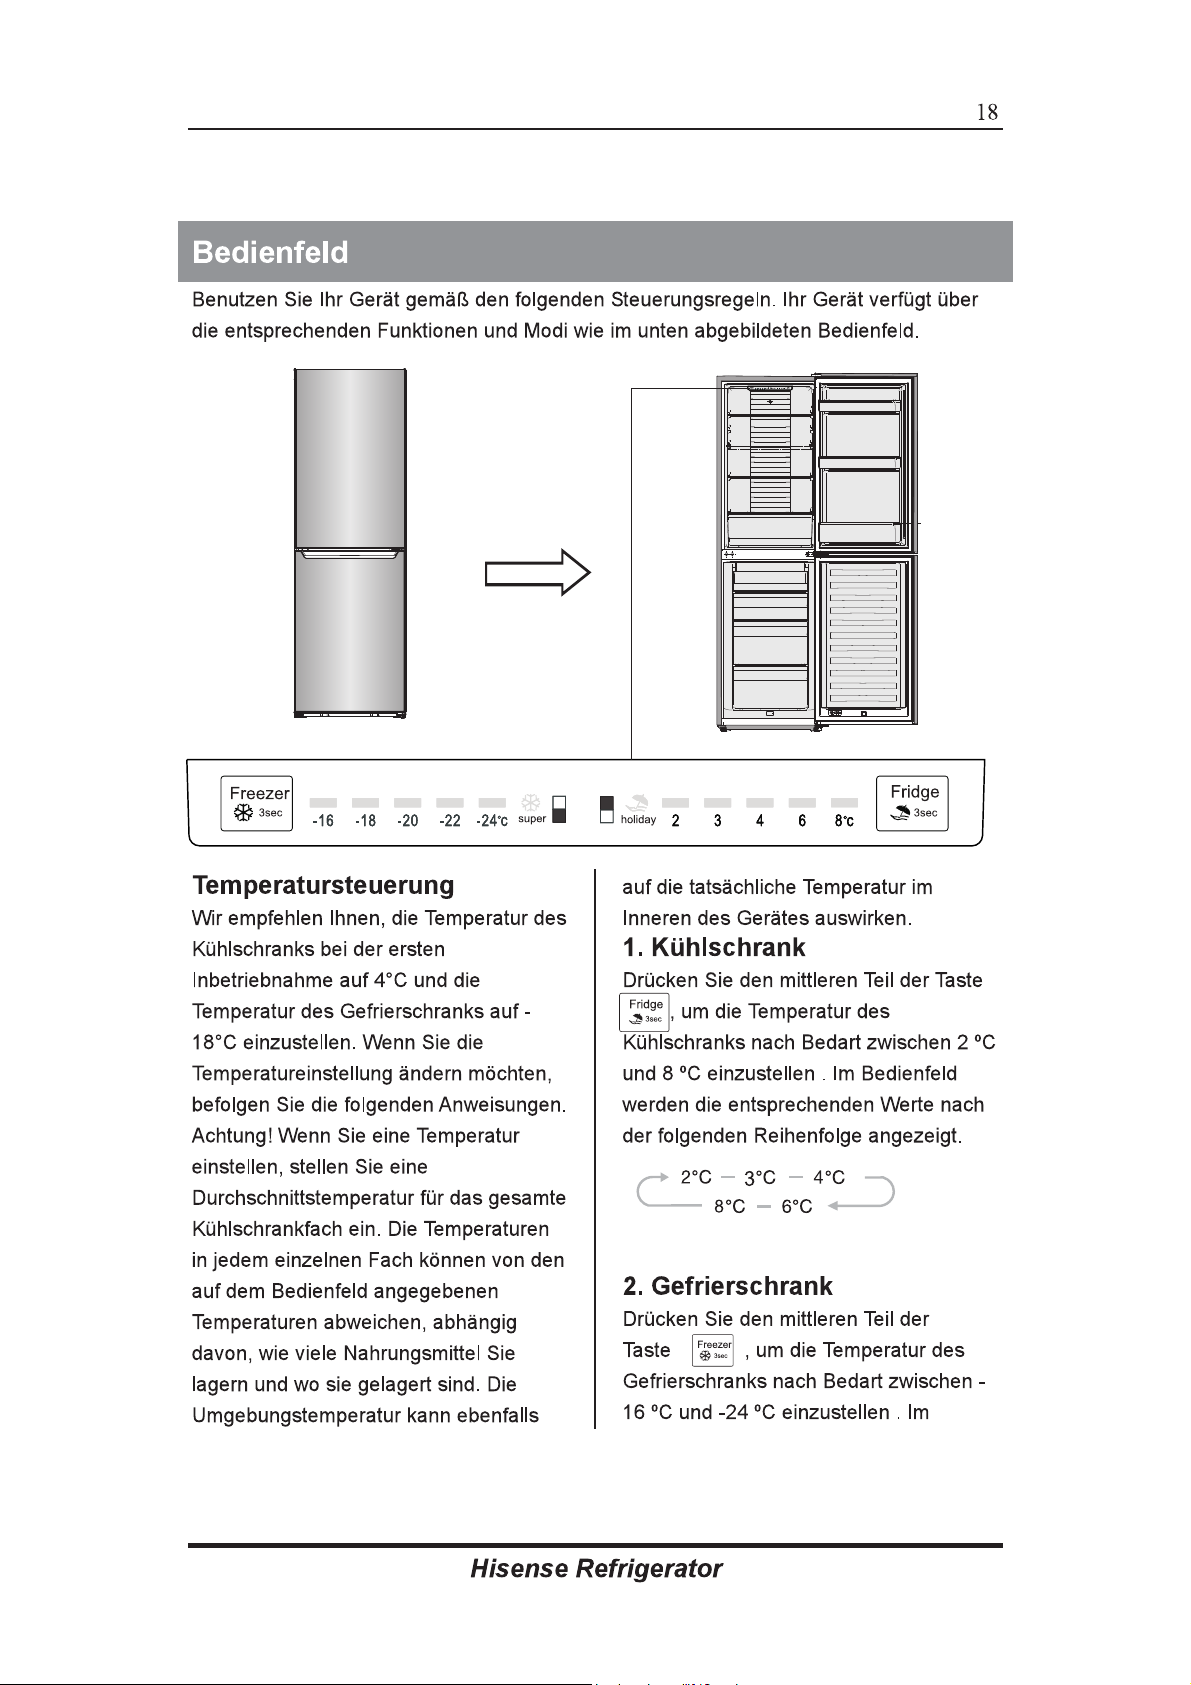
18
20
Dieses Gerät entspricht den folgenden EU-Richtlinien: 2014/35/EU
und 2014/30/EU und 2009/125/EC und und .
(EC) No 643/2009
2011/65/EU
26
Page 3
Page 4
Page 5
Page 6
Page 7
Page 8
Page 9
Page 10
Page 11
Page 12
Page 13
Linker Türstopper
Linke Scharnierabdeckung
Vorsicht! Quetschen Sie bitte die
Türablage von zwei Seiten zur
Mitte und Innenseite der
Türablage, und dann bewegen Sie
sie beim Herausnehmen nach
oben.
2. Nehmen Sie die rechte obere
Scharnierabdeckung ① auf der
Oberseite des Schrankes aus.
Entfernen Sie die 3 Schrauben ②,
die zur Befestigung des rechten
oberen Scharnierteils verwendet
sind (siehe das Bild unten) und
nehmen Sie die oberen
Scharnierteile ③ ab.
①
Scharnierabdeckung
②
Schneidschraube
③
Oberes Scharnier
⑤
Dichtung
④
Scharnierachse
③
Obere Scharnierteile
Page 14
3. Lösen Sie die Scharnieachse ④
mit Schraubenschlüssel und
ändern Sie sie zur umgekehrten
Lochseite, und dann ziehen Sie sie
fest. Nehmen Sie die Dichtung ⑤
ab und ändern Sie sie zur
umgekehrten Lochseite.
Hinweis: Bitte halten Sie bei
Schritt 3 die obere Tür fest, um
Türfallenlassen zu verhindern.
4. Entfernen Sie die
Schraubenabdeckung von der
linken vorderen Ecke des
Schrankes mit
Schlitzschraubendreher und
installieren Sie sie auf der rechten
vorderen Ecke.
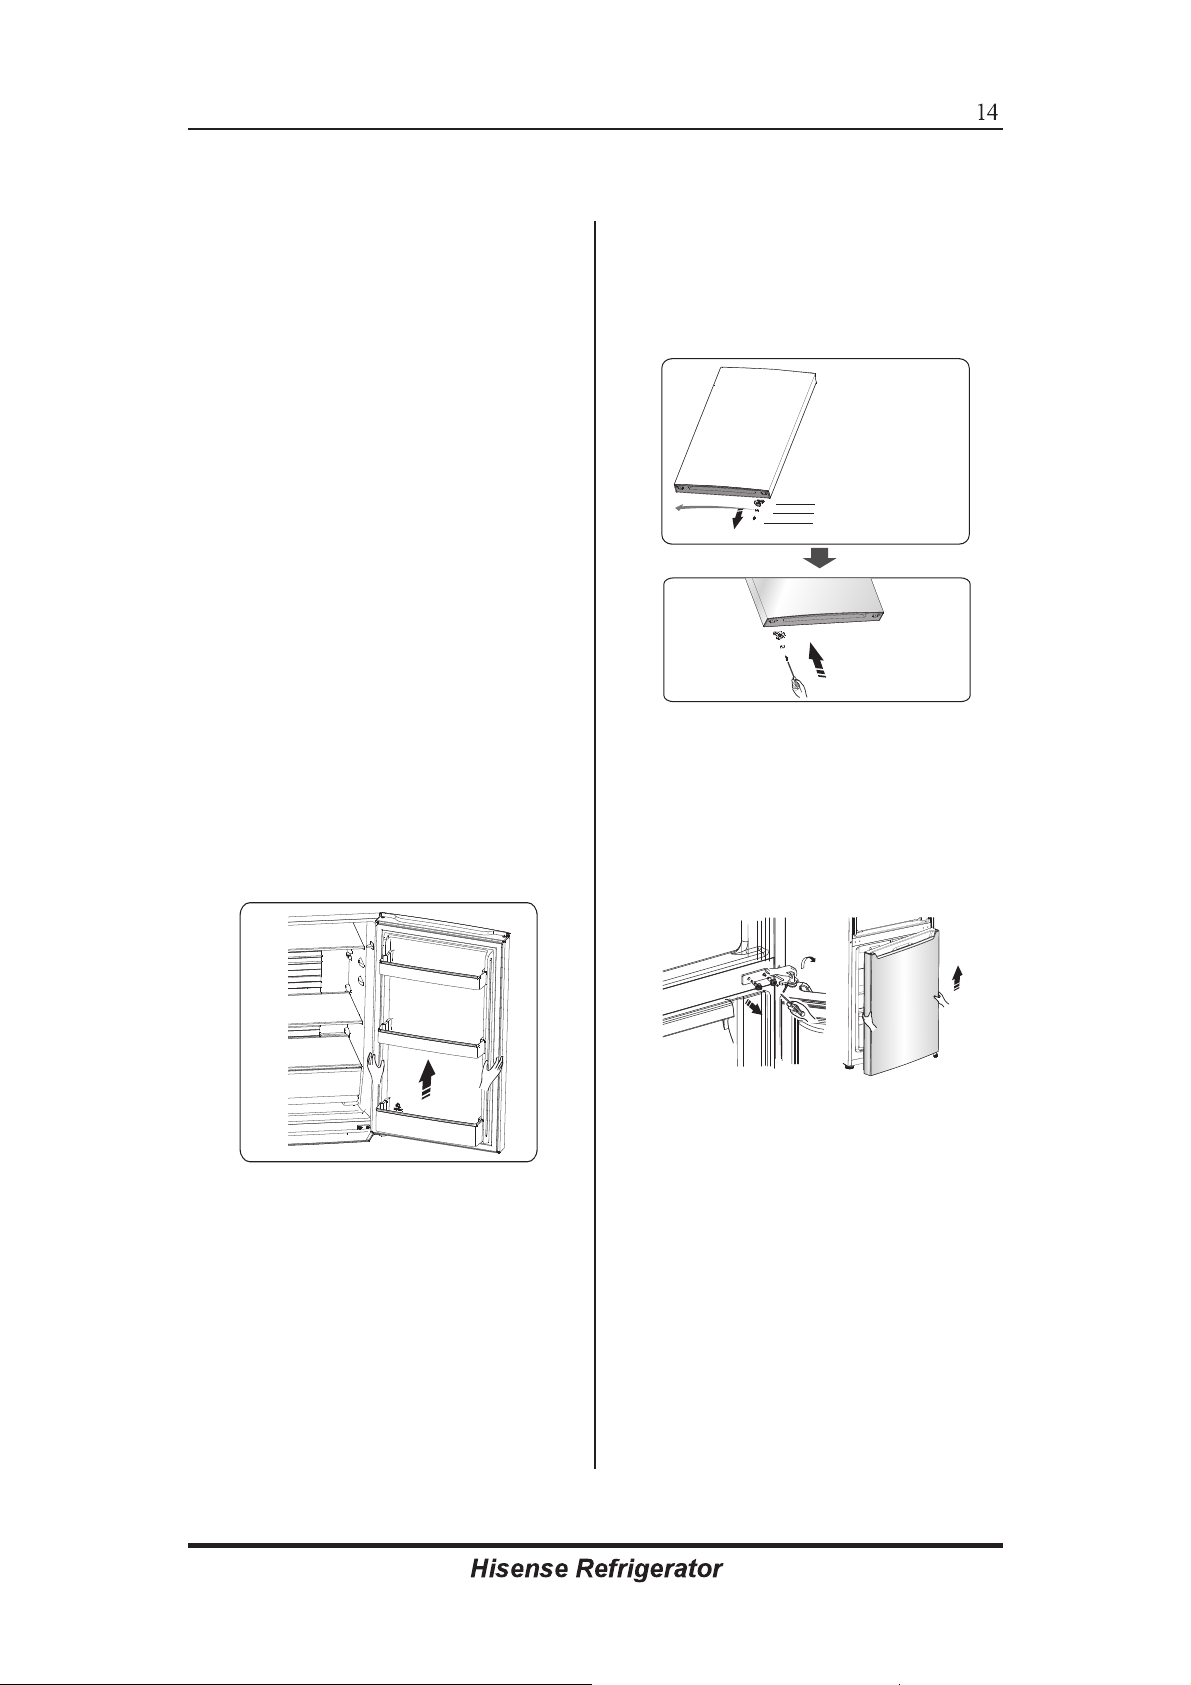
5. Entfernen Sie die obere Tür vom
mittleren Scharnier durch
vorsichtiges Heben der Tür gerade
nach oben.
der linken Seite mit Schraube
③. Halten Sie das Teil ① mit
dem Gerät für zukünftige
Referenzzwecke.
①
Türstopper
②
Anschlagblock
③
Schneidschraube
①
②
③
7.Lösen Sie die Schrauben, die für
das Befestigen des mittleren
Scharniers verwendet werden,
und entfernen Sie das mittlere
Scharnier, und dann entfernen Sie
die untere Tür.
6. Legen Sie die obere Tür auf
eine glatte Oberfläche mit seiner
Verkleidung nach oben. Lösen Sie
die Schrauben ③, und nehmen Sie
Teil ② und Teil ① ab, installieren
Sie den gelieferten linken ErsatzTürstopper
und das Teil ②
④ (im Plastikbeutel)
(Anschlagblock) an
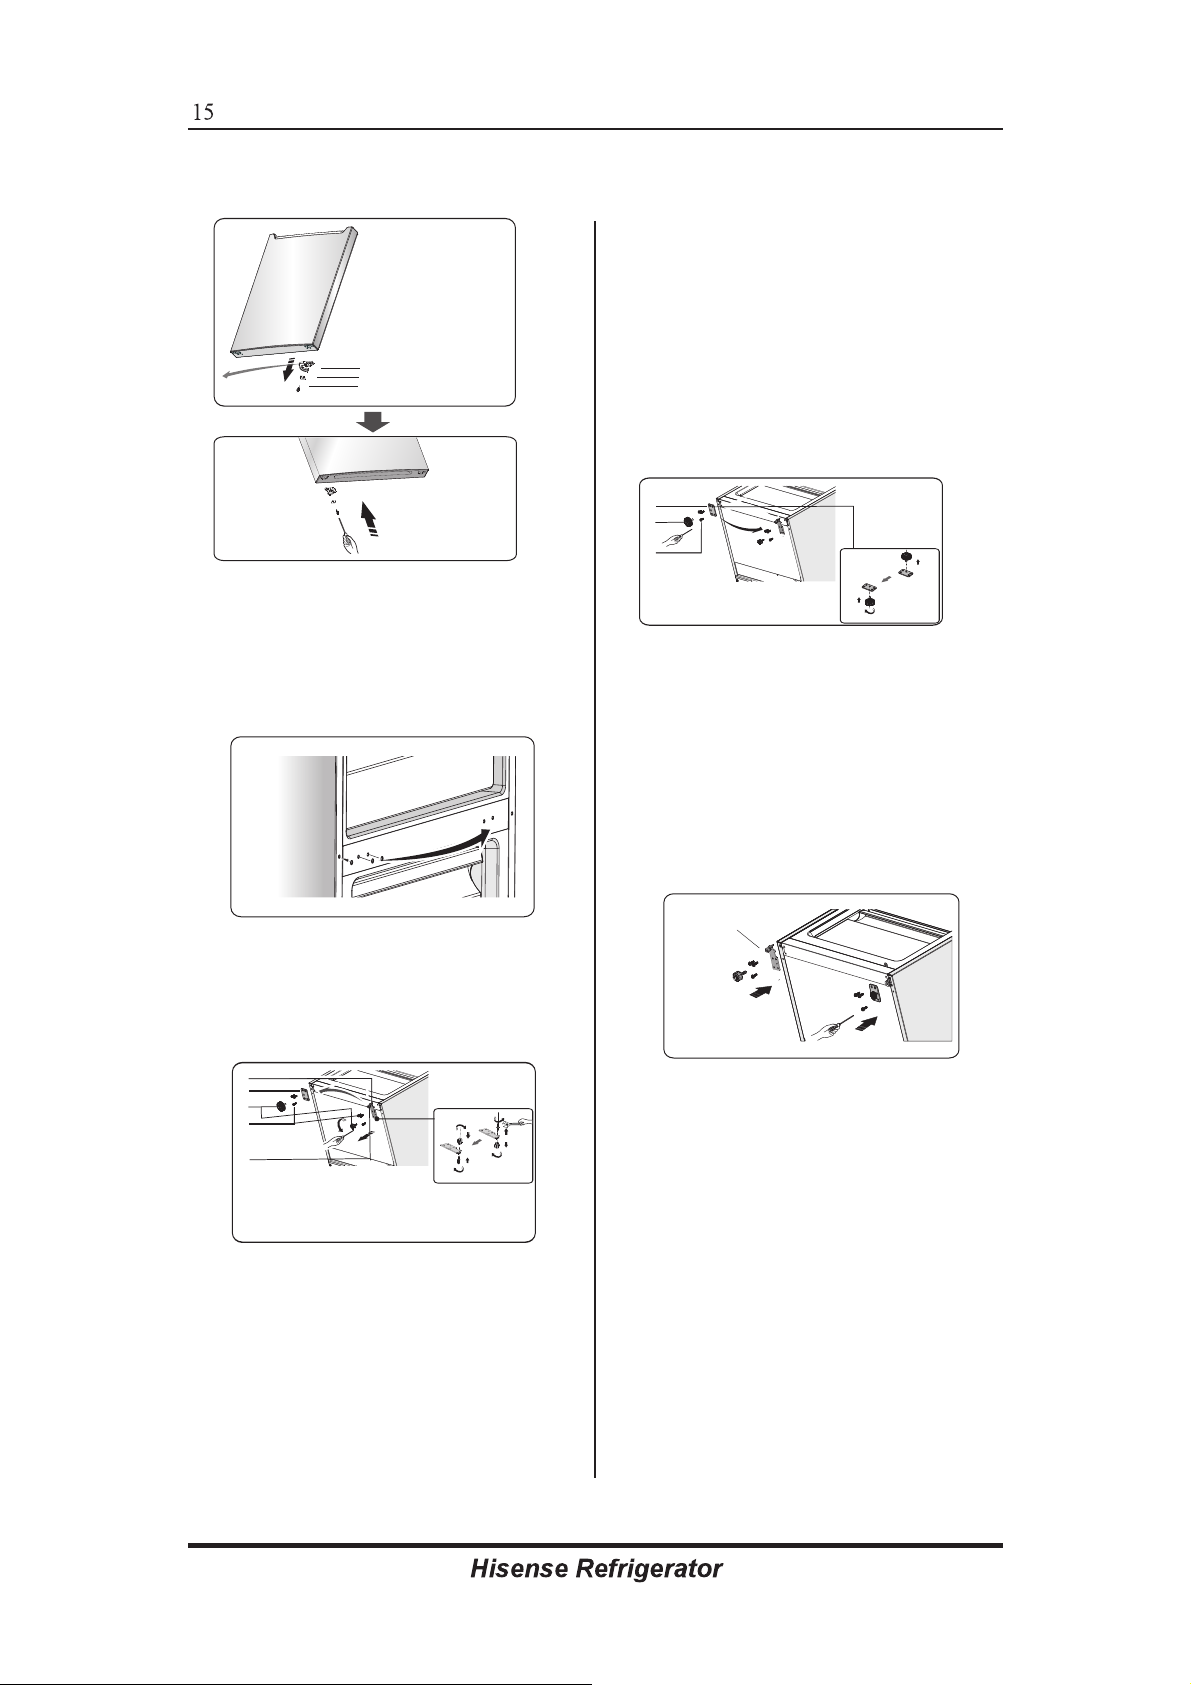
8. Legen Sie die untere Tür auf
einer glatten Oberfläche mit seiner
Verkleidung nach oben. Lösen Sie
die Schrauben③
, nehmen Sie
Teil② und Teil① ab. Installieren
Sie den gelieferten linken ErsatzTürstopper④ (im Plastikbeutel) und
das Teil ② (Anschlagblock) an der
linken Seite mit Schraube ③.
Halten Sie das Teil ①
mit dem
Gerät für zukünftige
Referenzzwecke.
Page 15
①
Türstopper
②
Anschlagblock
③
Schneidschraube
①
②
③
9. Änderm Sie die
Schraubenlochabdeckungen und
Schraube auf der mittleren
Deckplatte von links nach rechts
(wie in der Abbildung unten gezeigt).
⑤ auf dem unteren
Scharnierbolzen .
12.
Entfernen Sie das Teil ③
aus
dem Teil②ab, lösen Sie dann die
Schrauben④
das Teil ③ auf der umgekehrten
, und schrauben Sie
Lochstelle an .
②
③
④
②
Vordere Fuß- Festplatte
③
Einstellbarer Fußteil
④
Schneidschraube
13. Ersetzen Sie die im Schritt 11
und 12 wieder montierten
Einzelteile, ändern Sie das Teil ①
nach links und Teil ② nach rechts
und dann fixieren Sie sie mit
Schrauben ④. Schließlich
installieren Sie das Teil ③
.
10. Kippen Sie den Kühlschrank
nach hinten, entfernen Sie das
Teil ③ Teil und dann entfernen
Sie die Schrauben ④
①
②
③
④
⑤
①
Unteres Scharnierteil (rechts)
②
Vordere Fuß- Festplatte
③
Einstellbarer Fußteil
④
Schneidschraube
⑤
Einstellbarer Fußteil
.
11. Nehmen Sie das Teil ⑤ aus
dem unteren Scharnierbolzen ab,
lösen Sie den unteren
Scharnierbolzen aus, und ändern
Sie ihn zur umgekehrten Lochseite ,
und dann ziehen Sie ihn fest, dann
installieren Sie das Teil
Unteres
Scharnierteil (links)
14. Stellen Sie den Kühlschrank
aufrecht und stecken Sie die
untere Tür auf den unteren
Scharnierbolzen und halten Sie sie
in Position. Drehen Sie das mittlere
Scharnier um 180° und ändern Sie
die Scheibe auf der Achse auf die
untere Seite, passen Sie das
mittlere Scharnier an die
entsprechende Position an und
dann installieren Sie es und achten
Sie auf sichere Befestigung der
unteren Tür.
Page 16
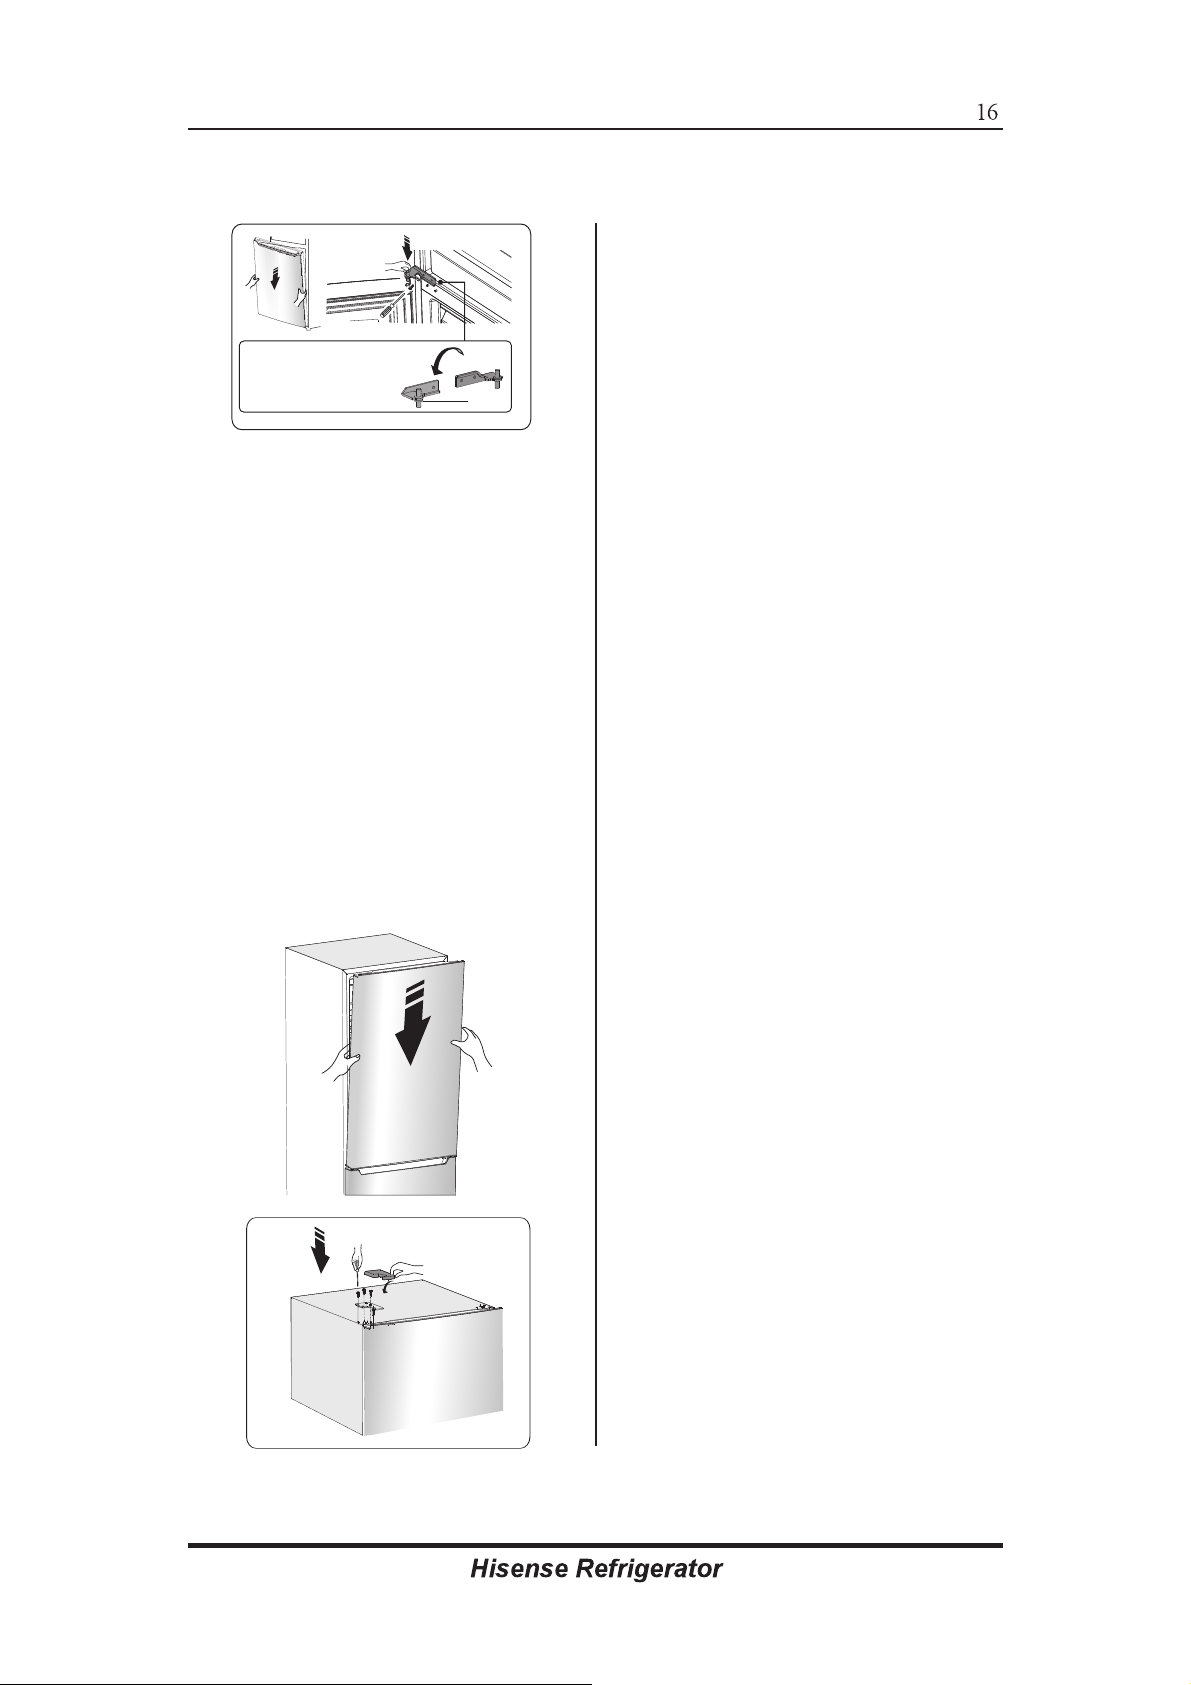
Hinweis: Die Scheibe
kann auf der unteren Tür
kleben.
Scheibe
15. Stecken Sie die obere Tür auf
den mittleren Scharnierbolzen und
halten Sie sie in Position Bewegen
Sie die obere Tür auf eine
geeignete Position, passen Sie
oberes Scharnier und obere Tür
an, dann befestigen Sie den
Scharnierbolzen in das
Scharnierloch an der Oberseite
oder an der Tür, um die Tür zu
befestigen. Anschließend
befestigen Sie das obere
Scharnierteil mit Schrauben.
(Bitte halten Sie die obere Tür von
Hand bei der Installation)
16.
Montieren Sie die gelieferte linke
Scharnierabdeckung (im
Plastikbeutel), um auf das
Scharnier zu passen. Installieren
Sie die Türregale und den
Wassertank in die ursprüngliche
Position. Halten Sie die rechte
Scharnierabdeckung mit dem Gerät
für zukünftige Referenzzwecke.
Page 17
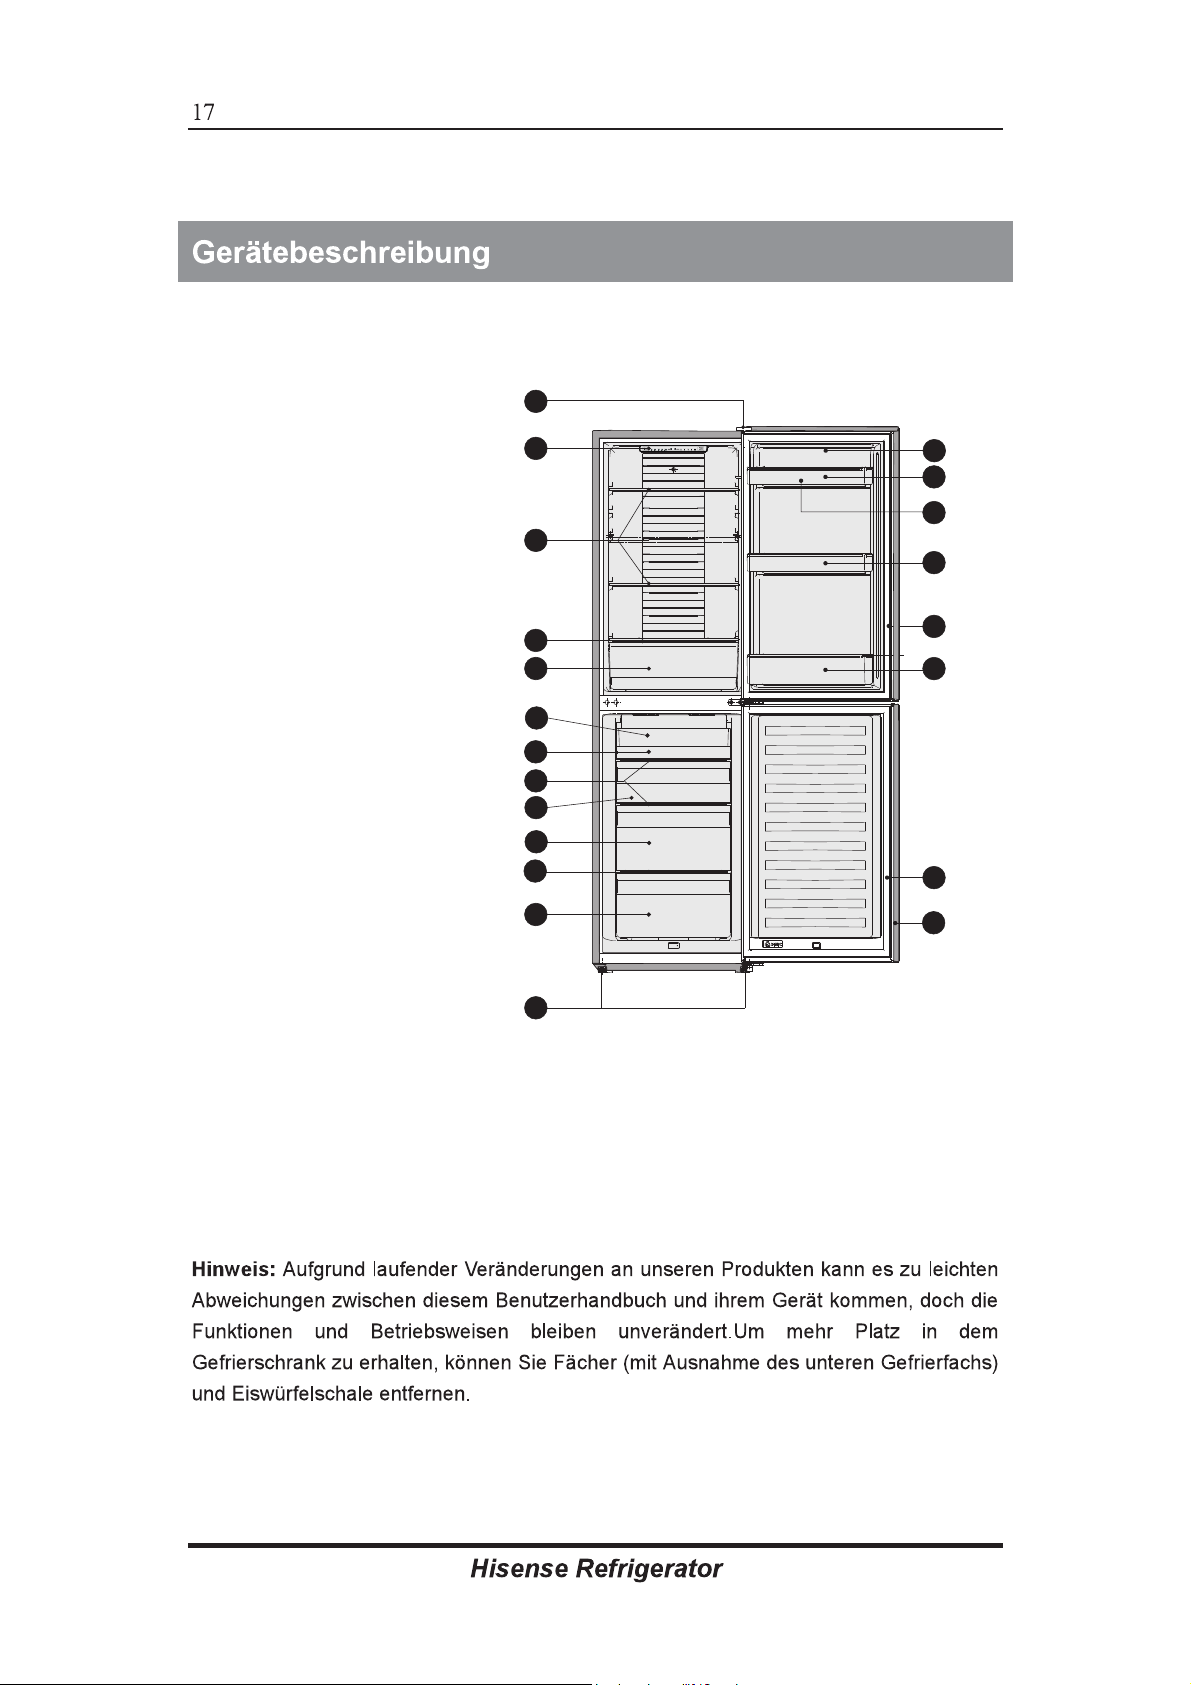
1. Obere Scharnierabdeckung
2.Teil des Bedienfelds
3.Glasregal
4. Gemüsefachabdeckung
5.Obst- und Gemüsefach
6. Eiswürfelschale
7. Gefriertablett
8. Oberes Glasregal
9. Oberes Gefrierfach
10. Mittleres Gefrierfach
11. Unteres Gefrierfach-Glasregal
12. Unteres Gefrierfach
13.Einstellbare Fußteile
14. Kühlschranktür
15. Oberes Fach
16.Eierfach(innen)
17.Mittleres Fach
18.Kühlschrank-Türdichtung
19.Unteres Fach
20. Gefrierschrank-Türdichtung
21. Gefrierschranktür
Geräteansicht 1
1
2
3
4
5
6
7
8
9
10
11
12
13
9
14
15
16
17
13
18
14
19
17
20
21
19
10
11
20
Page 18
Page 19
Page 20

Page 21
Page 22

Page 23
Page 24
Page 25
Page 26
Page 27

Page 28
2
Safety and warning information_ _ _ _ _ 2
Installing your new appliance_ _ _ _ _ _
Description of the appliance _ _ _ _ _ _
Control panel _ _ _ _ _ _ _ _ _ _ _ _ _ _
Using your appliance _ _ _ _ _ _ _ _ _ _
This appliance is in accordance with the following EU guidelines:
2014/35/EU and 2014/30/EU and 2009/125/EC and
2011/65/EU.
and
8
13
14
16
For your safety and
correct usage, before
installing and first using
the appliance, read this
user manual carefully,
including its hints and
warnings.
To avoid unnecessary
mistakes and accidents, it
is important to make sure
that all people using the
appliance are thoroughly
familiar with its operation
and safety features.
Save these instructions
and be sure that they
remain with the appliance
if it is moved or sold, so
that anyone, using it
throughout its life, will be
properly informed on
usage and safety notices.
For the safety of life and
property, keep the
precautions of these user's
instructions as the
manufacturer is not
Helpful and hints and tips _ _ _ _ _ _ _
Cleaning and care _ _ _ _ _ _ _ _ _ _ _
Troubleshooting_ _ _ _ _ _ _ _ _ _ _ _ _
Disposal of the appliance_ _ _ _ _ _ _ _
(EC) No 643/2009
16
18
20
22
responsible for damages
caused by omission.
Safety for children and others
who are vulnerable people
This appliance can be
used by children aged
from 8 years and above
and persons with reduced
physical, sensory or
mental capabilities or lack
of experience and
knowledge if they have
been given supervision or
instruction concerning
use of the appliance in a
safe way and understand
the hazards involved.
Children shall not play
with the appliance.
Cleaning and user
maintenance shall not be
made by children without
supervision.
Keep all packaging away
from children as there is
risk of suffocation.
Page 29
3
If you are discarding the
appliance, pull the plug
out of the socket, cut the
connection cable (as
close to the appliance as
you can) and remove the
door to prevent children
playing from suffering an
electric shock or from
closing themselves inside
it.
If this appliance, featuring
a magnetic door seals, is
to replace an older
appliance having a spring
lock (latch) on the door or
lid, be sure to make the
spring lock unusable
before you discard the old
appliance. This will
prevent it from becoming
a death trap for a child.
General safety
WARNING - This
appliance is intended
to be used in household
and similar applications
such as
-staff kitchen areas in
shops, offices and other
working environments;
-farm houses and by
clients in hotels, motels
and other residential type
environments;
-bed and breakfast type
environments;
-catering and similar nonretail applications
WARNING - Do not store
explosive substances
such as aerosol cans with
a flammable propellant in
this appliance.
WARNING - If the supply
cord is damaged, it must
be replaced by the
manufacturer, its service
agent or similarly qualified
persons in order to avoid
a hazard.
WARNING - Keep
ventilation openings, in
the appliance enclosure
or in the built-in structure,
clear of obstruction.
WARNING - Do not use
mechanical devices or
other means to accelerate
the defrosting process,
other than those
recommended by the
manufacturer.
WARNING - Do not
damage the refrigerant
circuit.
WARNING - Do not use
electrical appliances
inside the food storage
compartments of the
appliance, unless they are
of the type recommended
by the manufacturer.
WARNING - The
refrigerant and insulation
Page 30
4
blowing gas are
flammable.
When disposing of the
appliance, do so only at
an authorized waste
disposal centre. Do not
expose to flame.
Refrigerant
The refrigerant isobutene
(R600a) is contained
within the refrigerant
circuit of the appliance, a
natural gas with a high
level of environmental
compatibility, which is
nevertheless flammable.
During transportation and
installation of the
appliance, ensure that
none of the components
of the refrigerant circuit
becomes damaged.
The refrigerant (R600a) is
flammable.
Caution:risk of fire
If the refrigerant circuit
should be damaged:
-Avoid opening flames
and sources of ignition.
-Thoroughly ventilate the
room in which the
appliance is situated.
It is dangerous to alter
the specifications or
modify this product in any
way.
Any damage to the cord
may cause a shortcircuit,
fire, and/or electric shock.
Electrical safety
1.The power cord must
not be lengthened.
2. Make sure that the
power plug is not crushed
or damaged. A crushed or
damaged power plug may
overheat and cause a
fire.
3. Make sure that you can
access the main plug of
the appliance.
4. Do not pull the main
cable.
5. If the power plug
socket is loose, do not
insert the power plug.
There is a risk of electric
shock or fire.
6.You must not operate
the appliance without the
interior lighting lamp
cover.
7.The fridge is only
applied with power supply
of single phase
alternating current of
220~240V/50Hz. If
fluctuation of voltage in
the district of user is so
large that the voltage
exceeds the above
scope, for safety sake, be
Page 31

5
sure to apply A.C.
Automatic voltage
regulator of more than
350W to the fridge. The
fridge must employ a
special power socket
instead of common one
with other electric
appliances. Its plug must
match the socket with
ground wire.
Daily use
Do not store flammable
gass or liquids in the
appliance,There is a risk of
an explosion.
Do not operate any
electrical appliances in the
appliance(e.g.electric ice
cream makers,mixers
etc.).
When unplugging always
pull the plug from the
mains socket,do not pull
on the cable.
Do not place hot items
near the plastic
components of this
appliance.
Do not place food products
directly against the air
outlet on the rear wall.
Store pre-packed frozen
food in accordance with the
frozen food manufacture’s
instructions.
The appliances
manufactures storage
recommendations
should be strictly adhered
to.Refer to relevant
instructions for storage.
Do not place carbonated
or fizzy drinks in the
freeze compartment as it
creates pressure on the
container, which may
cause it to explode,
resulting in damage to the
appliance.
Frozen food can cause
frost burns if consumed
straight from the freezer
compartment.
Do not place the
appliance in direct
sunlight.
Keep burning candles,
lamps and other items
with naked flames away
from the appliance so that
do not set the appliance
on fire.
The appliance is intended
for keeping food stuff
and/or beverages in
normal household as
explained in this
instruction booklet The
appliance is heavy.Care
should be taken when
moving it.
Do not remove or touch
items from the freezer
compartment if your
Page 32

6
hands are damp/wet,as
this could cause skin
abrasions or frost/freezer
burns.
Never use the base,
drawers, doors etc. to
stand on or as supports.
Frozen food must not be
refrozen once it has been
thawed out.
Do not consume ice
popsicles or ice cubes
straight from the freezer
as this can cause freezer
burn to the mouth and
lips.
To avoid items falling and
causing injury or damage
to the appliance, do not
overload the door racks
or put too much food in
the crisper drawers.
caution!
Care and cleaning
Before maintenance,
switch off the appliance
and disconnect the mains
plug from the mains
socket.
Do not clean the
appliance with metal
objects, steam cleaner,
ethereal oils, organic
solvents or abrasive
cleansers.
Do not use sharp objects
to remove frost from the
appliance. Use a plastic
scraper.
Installation Important!
For electrical connection
carefully, follow the
instructions given in this
manual.
Unpack the appliance and
check if there are
damages on it. Do not
connect the appliance if it
is damaged. Report
possible damages
immediately to the place
you bought it. In this case
retain packing.
It is advisable to wait at
least four hours before
connecting the appliance
to allow the oil to flow
back in the compressor.
Adequate air circulation
should be around the
appliance, lacking this
leads to overheating. To
achieve sufficient
ventilation, follow the
instructions relevant to
installation.
Wherever possible the
back of the product
should not be close to a
wall to avoid touching or
catching warm parts
(compressor, condenser)
to prevent the risk of a
fire, follow the instructions
Page 33

7
relevant to installation.
The appliance must not
be locate close to
radiators or cookers.
Make sure that the mains
plug is accessible after
the installation of the
appliance.
Service
Any electrical work
required to do the
servicing of the appliance
should be carried out by
qualified electrician or
competent person.
This product must be
serviced by an authorized
Service Center, and only
genuine spare parts must
be used.
1)If the appliance is Frost
Free.
2)If the appliance
contains freezer
compartment.
Page 34

8
Installing your new appliance
Before using the appliance
for the first time, you should
review the following tips.
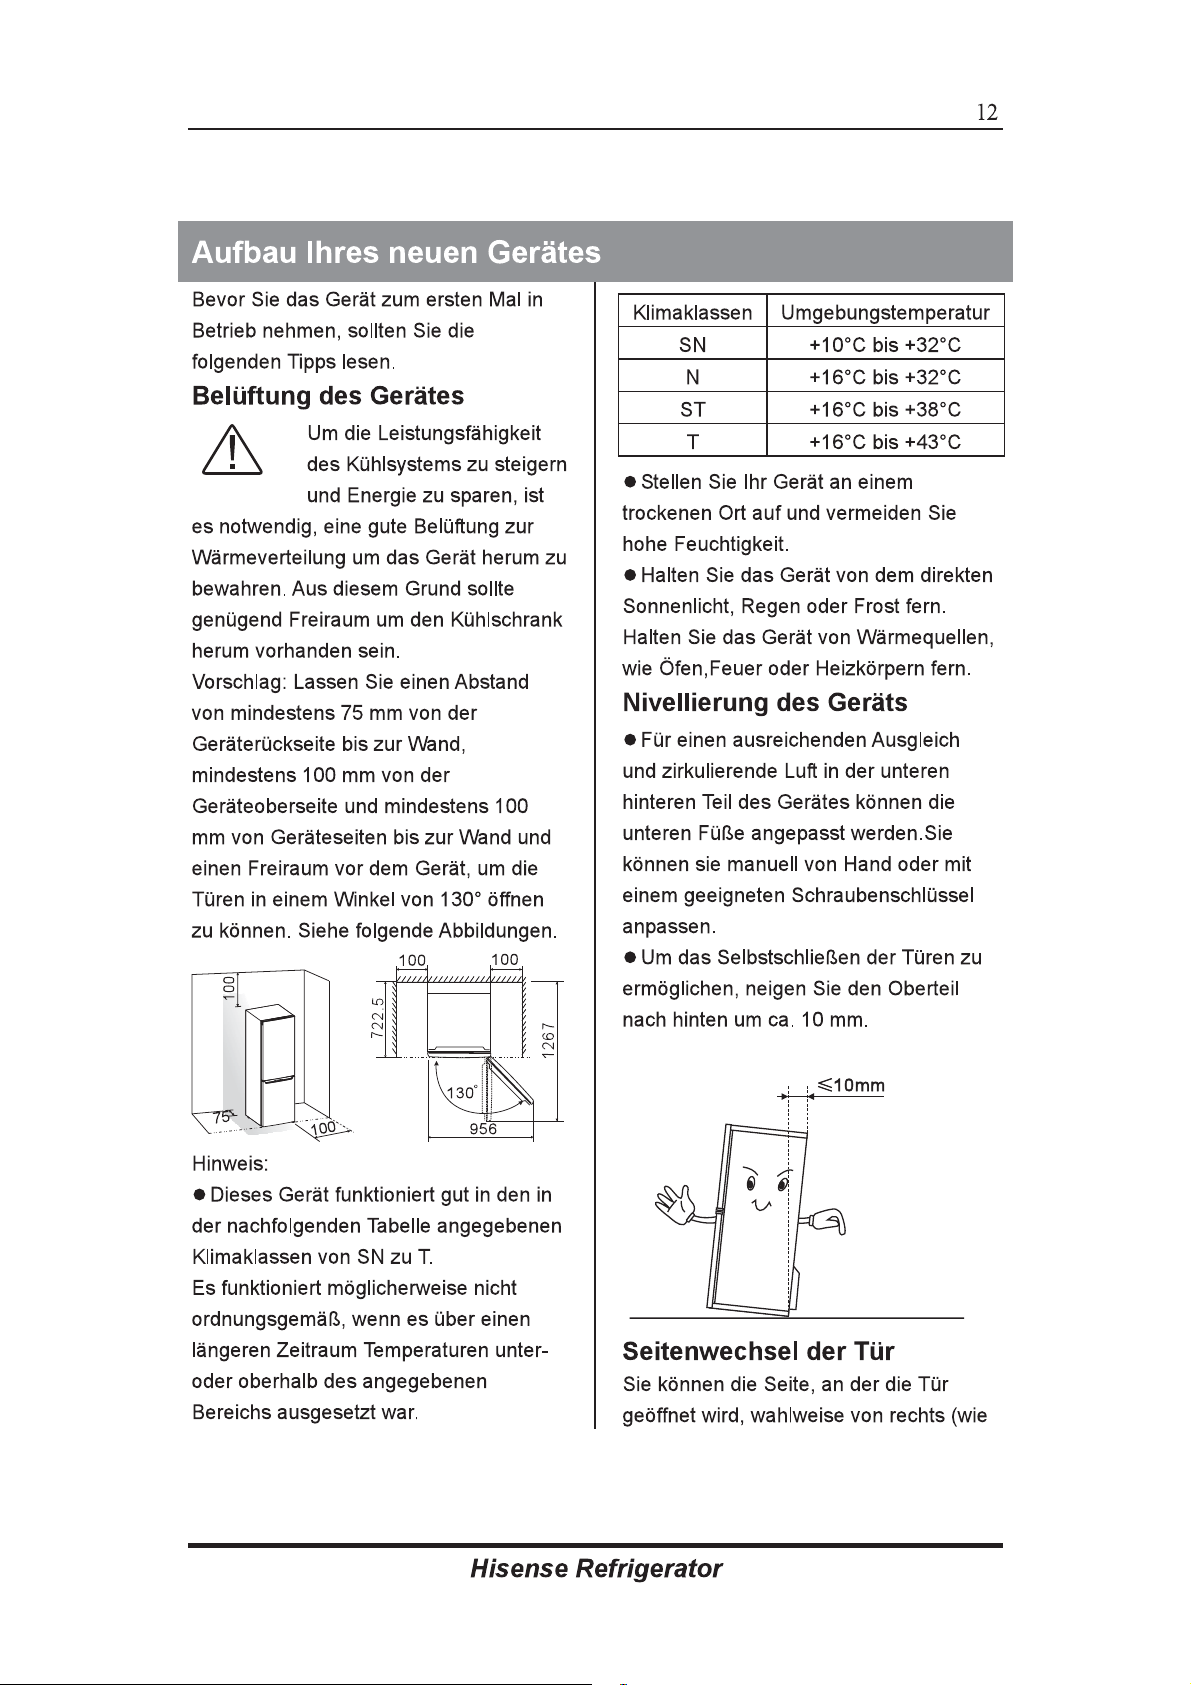
Ventilation of appliance
In order to improve
efficiency of the cooling
system and save energy, it
is necessary to maintain
Note:
●
This appliance performs
well within the climate class
from SN to T showed in the
table below.
It may not work properly if
left at a temperature above
or below the indicated
range for a long period.
good ventilation around the
appliance. For this reason,
sufficient clear space
should be available around
the refrigerator.
Climate class
SN
N
ST
T
Ambient temperature
It is advisable for there to
be at least 75mm of space
from the back to the wall, at
least 100mm from its top,at
last 100mm from its side to
the wall and a clear space
in front to allow the doors to
open 130°. Please see the
following diagrams.
130
100
。
956
100
100
.5
2
2
7
100
75
●
Stand your appliance in a
dry place to avoid moisture
damage.
●
Keep the appliance out of
direct sunlight, rain or frost.
Stand the appliance away
from heat sources such as
stoves, fires or heaters.
●
Leveling of appliance
67
2
1
For sufficient leveling and
air circulating in the lower
rear section of the
appliance, the bottom feet
may need to be adjusted.
You can adjust them
manually using a suitable
spanner.
+10°C to +32°C
+16°C to +32°C
+16°C to +38°C
+16°C to +43°C
Page 35

9
●
To allow the doors to selfclose, tilt the top backwards
by about 10mm.
≤10mm
Reversing the door
The side at which the door
opens can be changed,
from the right side (as
supplied) to the left side, if
required.
Warning! When reversing
the door, the appliance
must not be connected to
the mains. Ensure that the
plug is removed from the
mains socket.
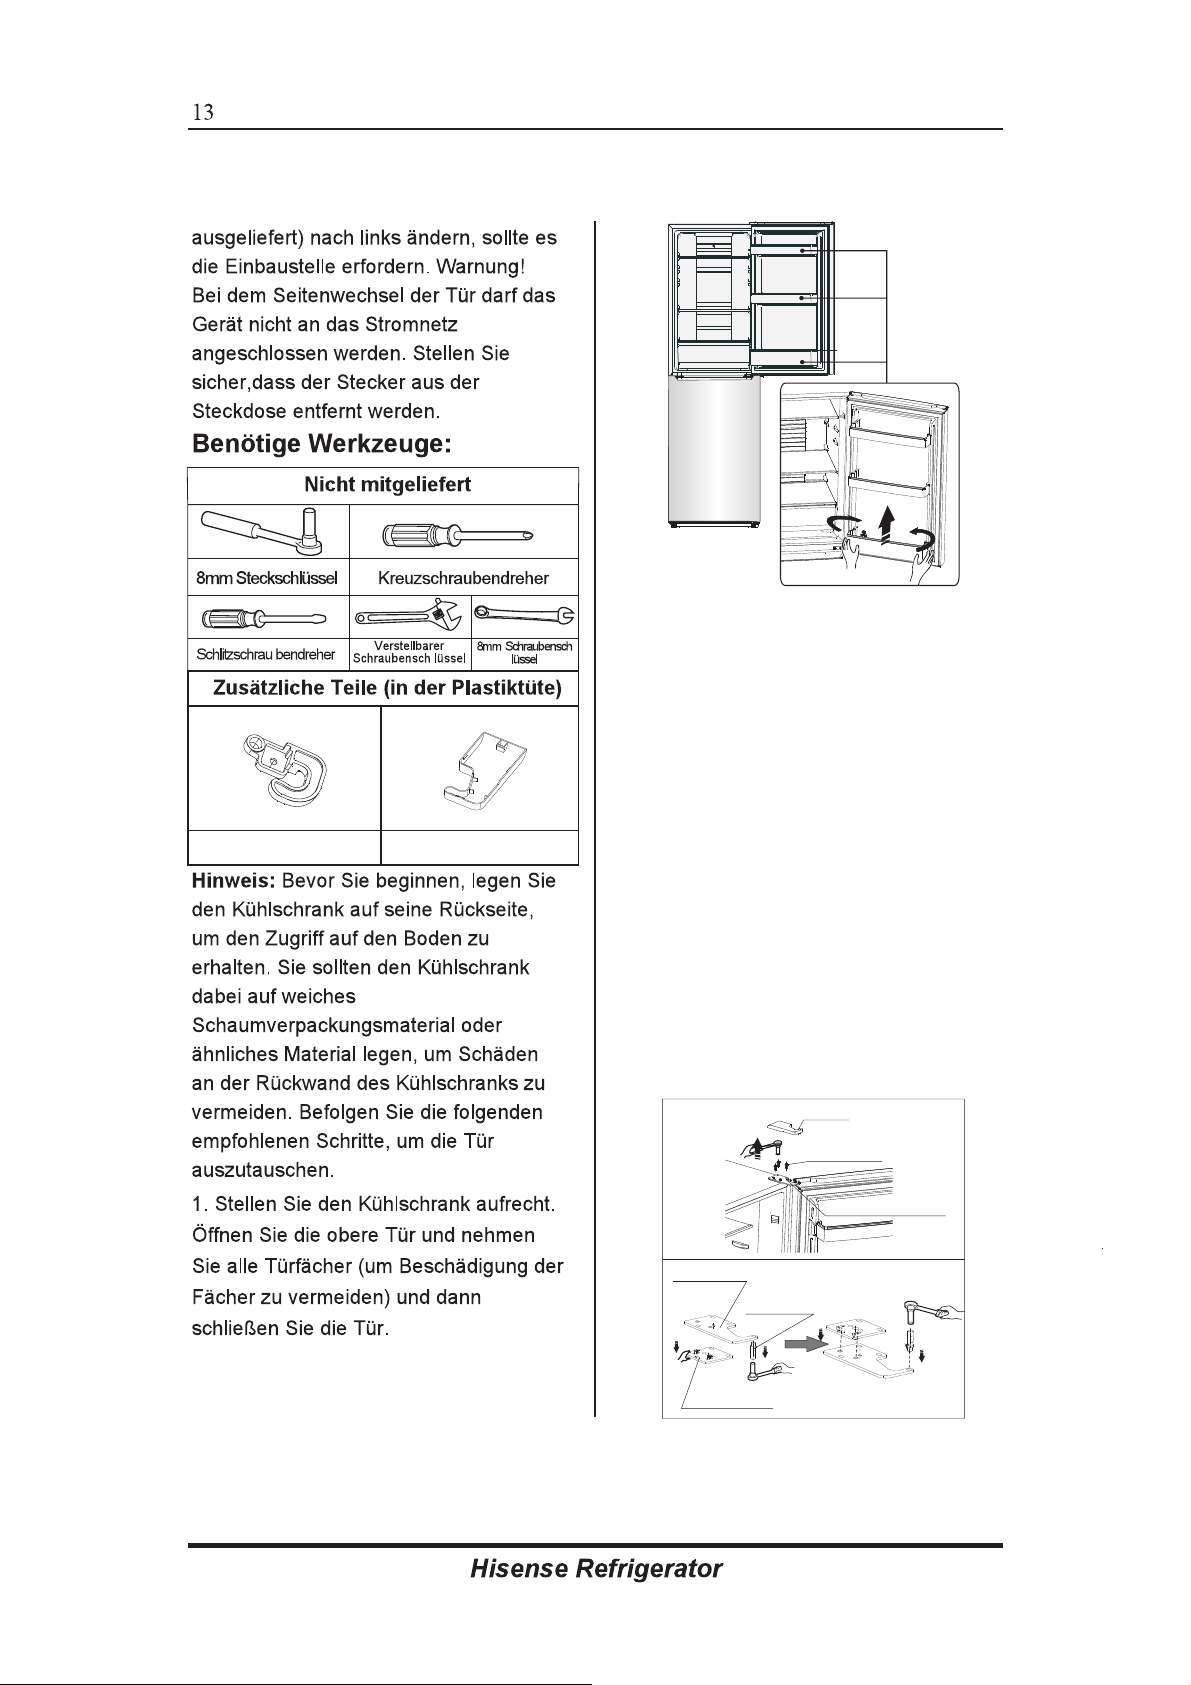
Note: If required you may
lay the refrigerator on its
back in order to gain
access to the base, you
should rest it on soft
foam packaging or similar
material to avoid damaging
the backboard of the
refrigerator. To reverse the
door, the following steps
are generally
recommended.
1. Stand the refrigerator
upright. Open the upper
door to take out all door
racks(to avoid damage)
and then close the door.
Tools you will need
8mm socket wrench
Thin-blade screwdriver
left d oo r stopp er
Cross-shaped screwdriver
Monkey wrench
Left H in ge Cove r
8mm wrench
Caution! Please slightly
squeeze the door rack from
two sides toward
inside of
door rack,and then
centre and
move it upward when taking
out.
Page 36

10
2. Remove right upper
hinge cover ①
on top of the
cabinet.remove the 3
screws② which are used
for fixing the right upper
hinge part (see the picture
below)
and take down the
upper hinge parts③
①hin ge cove r
②sel f-ta pp ing s crew
③upp er hing e parts
③upp er hing e
④hin ge axle
⑤ gas ket
3. Loosen the hinge axle
④
with monkey wrench and
change it to the reverse
hole site , and then tighten
into position. Take down the
gasket and change it to
⑤
the reverse hole site .
5. Remove the upper door
from the middle hinge by
carefully lifting the door
straight up.
6. Place the upper door on a
smooth surface with its panel
upwards. Loose screw ③
a a
nd take down part ② nd
part ①, Install replacement
door stopper-left ④
provided (in the plastic bag)
and part ②(stop block) to
the left side with screw③.
Keep part ① with the
appliance for future
reference.
Caution! Please hold the
upper door in place during
step 3 to prevent the door
dropping.
4. Remove screw cover
from the left-front corner of
cabinet with thin-blade
screwdriver and install it to
the right-front corner.
① Door stopper
Stop block
②
③ Self-tapping screw
①
②
③
Page 37

11
7. Loosen screws used to
fix the middle hinge and
remove middle hinge. Then
remove the lower door.
8. Place the lower door on a
smooth surface with its
panel upwards. Loose
screw ③ nd take down
part ② nd part ①, Install
a
a
replacement door stopperleft ④ provided (in the
plastic bag) and part ②
(stop block) to the left side
with screw ③. Keep part
with
① the appliance for
future reference.
① Door stopper
② Stop block
③ Self-tapping screw
①
②
③
9. Change screw hole
covers and screw on middle
cover plate from left to right
(as shown in figure below).
10. Tip the refrigerator back
wards, remove part and
then remove screws .
①
②
③
④
⑤
① Low er hing e part (r ight)
② Fro nt foot f ixed bo ard
③ Adj ustab le bott om feet p art
④ Sel f-tap ping sc rews
⑤ Adjustable bottom feet part
11. Remove part from
③
④
⑤
the lower hinge pin, loose
out the lower hinge pin,
change it to the reverse hole
site, and then tighten into
position, then install part
⑤
on the lower hinge pin.
12. Remove part ③ from
the part②, then remove
screws④,screw part ③ to
the reverse hole site.
②
③
④
② Fro nt foot f ixed bo ard
③ Adj ustab le bott om feet p art
④ Sel f-tap ping sc rews
Page 38

12
13. Replace the items
remount in step 11 and step
12, change part ① to left
and part ② to right and
then fix them with screws ④.
Finally install part ③.
Lower hinge part (left)
14. Stand the refrigerator
upright and carefully slot the
lower door onto the bottom
hinge pin and hold in
position. Turn the middle
hinge by 180°, change the
washer on the axis to the
lower side, adjust the
middle hinge to the
appropriate position and
then install it ensuring the
lower door in secured in
place.
door, then fit the hinge pin
into the hinge hole at the top
or the door to secure the
door in place. Then fix the
upper hinge part with
screws.
(Please carefully hold upper
door by hand when
installing)
Note: washer may
stick to lower door.
was her
15. Carefully slot the upper
door onto the middle hinge
pin and hold in position.
Move the upper door to an
appropriate position, adjust
upper hinge and upper
16. Assemble the hinge
cover-left provided (in the
plastic bag) to match the
hinge, install the door racks
to original position.Keep the
hinge cover-right with the
appliance for future
reference.
Page 39

13
Description of the appliance
1. Upper hinge cover
2. Control panel part
Glass shelf
3.
Crisper drawer cover
4.
Fruit and vegetables crisper
5.
6. Ice tray
Freezer tray
7.
. Upper glass shelf
8
9. Upper freezer drawer
10. Middle freezer drawer
11. Lower freezer glass shelf
12.
Lower freezer drawer
Adjustable bottom feet
13.
14. Fridge door
Upper rack
15.
Egg tray (inside)
16.
Middle rack
17.
Fridge door seal
18.
Lower rack
19.
Freezer door
20.
Freezer door
21.
Note: Due to constant development of our products, your
seal
View 1 of the appliance
1
2
3
4
5
6
7
8
9
10
11
12
13
9
10
11
12
refrigerator may be slightly different with this instruction
manual, but its functions and usage remain the same. To get
more space in freezer, you can remove drawers (except the
bottom freezer drawer), ice tray.
14
15
16
17
13
18
14
19
15
17
18
20
21
19
20
Page 40

Control panel
Use your appliance according to the following guidelines, your
appliance has functions as the control panel shown in the
pictures below.
14
Controlling the temperature
We recommend that when
you start your refrigerator
for the first time, the
temperature for the
refrigerator is set to 4°C and
the freezer to -18°C. If you
want to change the
temperature, follow the
instructions below.
Caution! When you set a
temperature, you set an
average temperature for the
whole refrigerator cabinet.
Temperatures inside each
compartment may vary from
the temperature displayed
on the panel,
depending on how much
food you store and where
you place them. Ambient
temperature may also affect
the actual temperature
inside the appliance.
1. Fridge
Press the middle part of
button to set fridge
temperature between 2℃
and 8℃ as needed, and
control panel will display
corresponding figures
according to the following
sequence.
3
8
Page 41

15
2. Freezer
Press the middle part of
button to set fridge
temperature between -16℃
and -24℃ as needed, and
control panel will display
corresponding figures
according to the following
sequence.
-16
-18
-24
-20
-22
3. Super Freeze
Super Freeze will
quickly lower the
temperature within
the freezer so food will
freeze faster. This can lock
in nutrients of food and
keep food fresh for longer.
Press the middle part of
button for 3 seconds to
●
activate the super freeze
function. The light will
be on.
●
Super freezer will
automatically switch off
after 26 hours.
●
When super freeze function
is on, you can switch off
super freeze function by
pressing the middle part of
button and the freezer
temperature setting will
revert back to the previous
setting.
4. Holiday
If you are going to
be away for a long
period of time, you
can activate this function by
pressing the middle part of
button for 3 seconds
until the light comes on.
●
When the holiday function is
activated, the temperature
of the refrigerator
will be
automatically switched to
15℃ to minimize the
energy consumption.
Important! Do not store any
food in the fridge during this
time.
●
When holiday function is on,
you can switch it off by
pressing the middle part of
button. The fridge
temperature setting will
revert back to the previous
setting.
Page 42

16
Using your appliance
Your appliance has the accessories as the "Description of
the appliance”showed in general, with this part instruction
you can have the right way to use them.
Door rack
●
It is suitable for the storage
of eggs, canned liquid,
bottled drinks and packed
food, etc. Do not place too
many heavy in the
stuff
Shelf in Refrigerator
chamber
●
There are shelves in
refrigerator chamber, and
they can be taken out
clean
racks.
Helpful hints and tips
●
Energy saving tips
We recommend that you
follow the tips below to save
energy.
●
Try to avoid keeping the
door open for long periods.
●
Ensure the appliance is
away from any sources of
heat (Direct sunlight,
electric oven or cooker
etc).
●
Don't set the temperature
colder than necessary.
Don't store warm food or
evaporating liquid in the
appliance.
●
Place the appliance in a
well ventilated, humidity
free, room. Please refer to
Installing your new
appliance chapter.
●
The description of appliance
diagram shows a
combination of shelves and
drawers designed to be the
most energy efficient
configuration.
to
.
Page 43

17
Hints for fresh food
refrigeration
●
Do not place hot food
directly into the refrigerator
or freezer, the internal
temperature will increase
resulting in the compressor
having to work harder.
●
Cover or wrap food,
particularly if it has a strong
flavor.
●
Place food so that
carefully
air can circulate freely
around it.
Hints for refrigeration
●
Meat (All Types) Wrap in
polythene food: wrap and
place on the glass shelf
above the vegetable
drawer. Always follow food
storage times and use by
dates suggested by
manufacturers.
●
Cooked food, cold dishes,
etc.:
They should be covered
and may be placed on any
shelf.
●
Fruit and vegetables:
They should be stored in
the special drawer provided.
●
Butter and cheese:
Should be wrapped in
airtight
foil or plastic film
wrap.
●
Milk bottles:
Should have a lid and be
stored in the door racks.
Hints for freezing
●
When first starting-up or
after a period out of use, let
the appliance run at least 2
hours on the higher settings
before putting food in the
compartment.
●
Prepare food in small
portions to enable it to be
rapidly and completely
frozen and to make it
possible to subsequently
thaw only the quantity
required.
●
Wrap up the food In aluminum
foil or polyethylene food wraps
which are airtight.
●
Do not allow fresh,
unfrozen food to touch the
food which is already frozen
to avoid temperature rise of
the latter.
●
Iced products, if consumed
immediately after removal
from the freezer compartment,
will probably cause frost burns
to the skin.
Page 44

●
It is recommended to label
and date each frozen
package in order to keep
track of the storage time.
Hints for the storage of
frozen food
●
Ensure that frozen food has
been stored correctly by the
food retailer.
●
Once defrosted, food will
deteriorate rapidly and
should not be re-frozen. Do
not exceed the storage
period indicated by the food
manufacturer.
Cleaning and care
18
Switching off your
appliance
If the appliance needs to be
switched off for an extended
period, the following steps
should be taken prevent
mould on the appliance.
1. Remove all food.
2. Remove the power plug
from the mains socket.
3. Clean and dry the interior
thoroughly.
4. Ensure that all the doors
are wedged open slightly to
allow air to circulate.
For hygienic reasons the
appliance (including exterior
and interior accessories)
should be cleaned regularly
(at least every two months).
Caution! The appliance
must not be connected to
the mains during cleaning
as there is a danger of
electrical shock!
Exterior cleaning
-Wipe the control panel with
a clean, soft cloth.
-Spray water onto the
cleaning cloth instead of
spraying directly on the
surface of the appliance.
This helps ensure an even
distribution of moisture to
the surface.
-Clean the doors, handles
and cabinet surfaces with a
mild detergent and then
wiped dry with a soft cloth.
Caution!
-Don't use sharp objects as
they are likely to scratch
the surface.
-Don't use Thinner, Car
detergent, Clorox, ethereal
oil, abrasive cleansers or
organic solvent such as
Benzene for cleaning. They
may damage the surface of
the appliance and may
cause fire.
Page 45

19
Interior cleaning
You should clean the
appliance interior regularly.
Wipe the inside of the fridge
freezer with a weak solution
of bicarbonate of soda, and
then rinse with warm water
using a wrung-out sponge
or cloth. Wipe completely
dry before replacing the
shelves and baskets.
Thoroughly dry all surfaces
and removable parts.
Although this appliance
automatically defrosts, a
layer of frost may occur on
the freezer compartment's
interior frequently or kept
open too long. If the frost is
too thick, choose a time
when the supply of food
stocks are low and proceed
as follows:
1.Remove existing food and
accessories baskets,
unplug the appliance from
the mains power and leave
the doors open. Ventilate
the room thoroughly to
accelerate the thawing
process.
2. When defrosting is
completed, clean your
freezer as described above.
Caution! Don't use sharp
objects to remove frost from
the freezer compartment.
Only after the interior is
completely dry should the
appliance be switched back
on and plugged back into
the mains socket.
Door seals cleaning
Take care to keep door
seals clean. Sticky food and
drinks can cause seals to
stick to the cabinet and tear
when you open the door.
Wash seal with a mild
detergent and warm water.
Rinse and dry it thoroughly
after cleaning.
Caution! Only after the
door seals are completely
dry should the appliance be
powered on.
Page 46

20
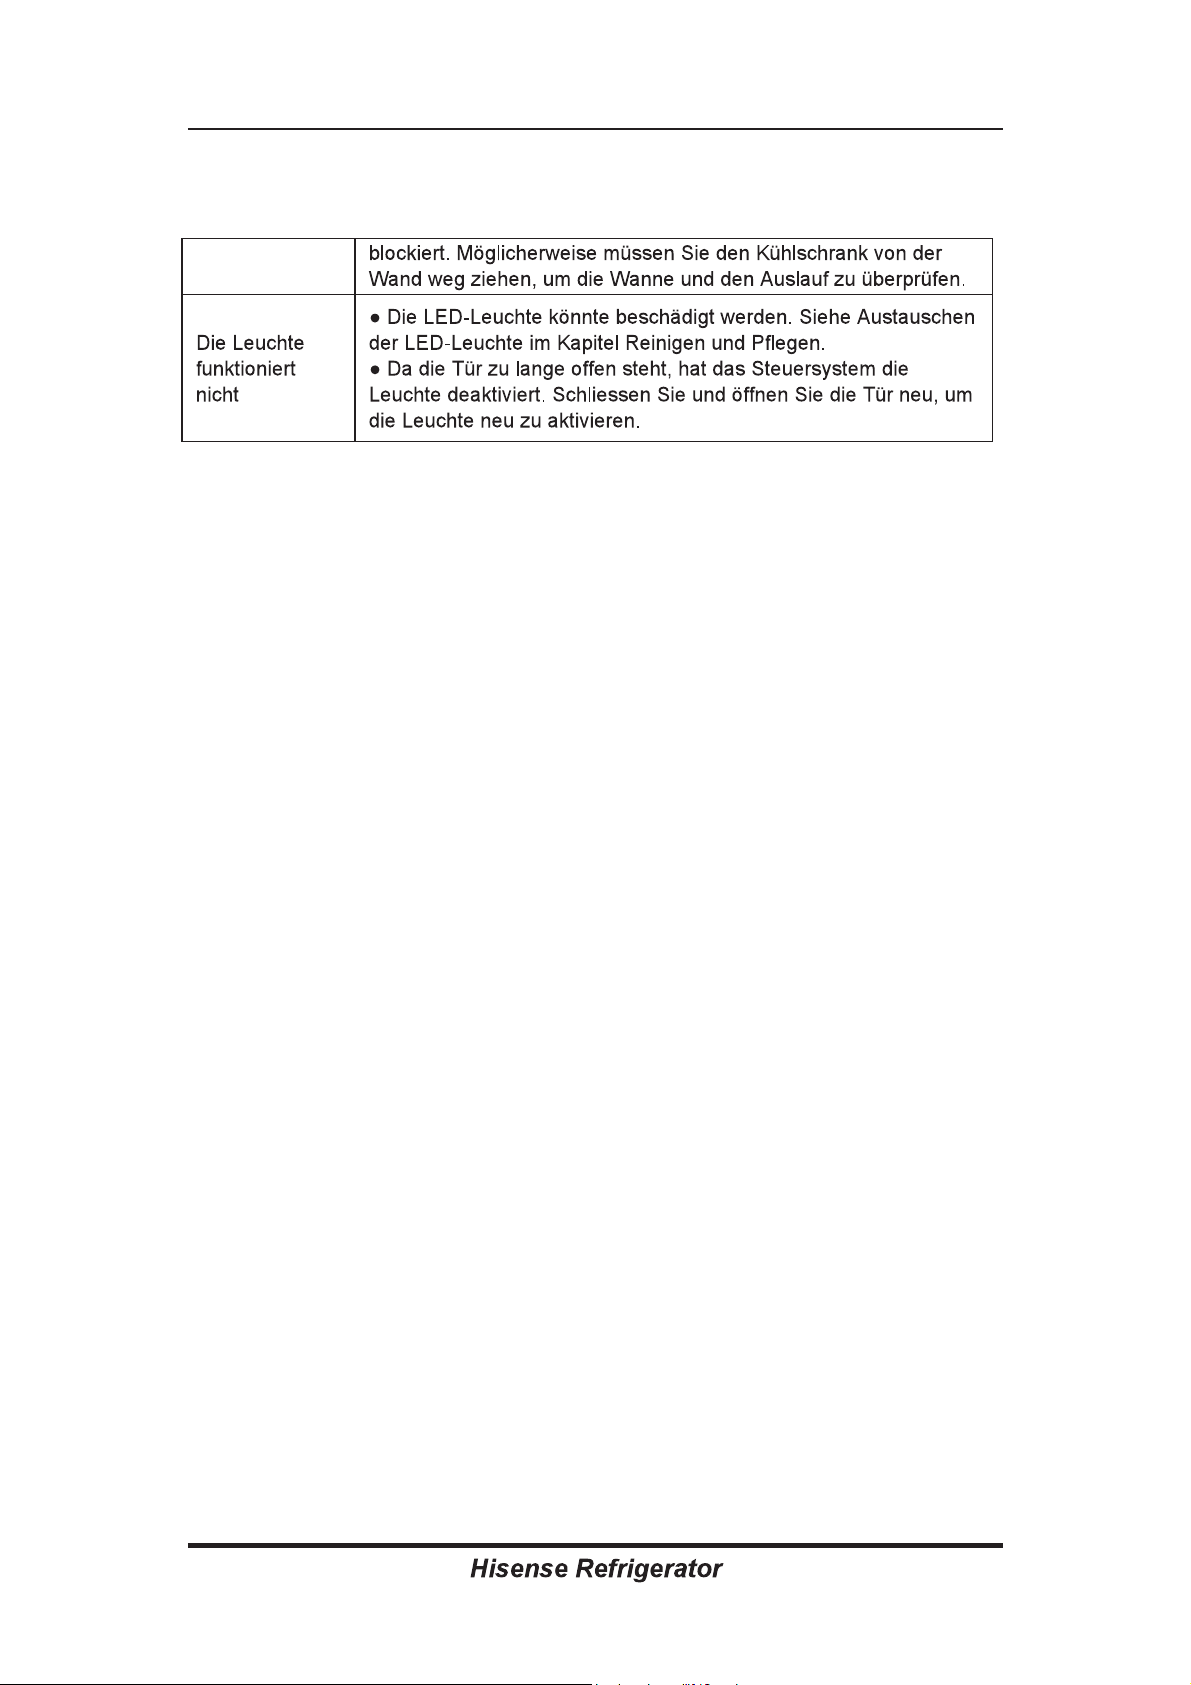
Replacing the LED light:
Warning:
The LED light
should be replaced by a
competent person.
If the
LED light is damaged,
contact the customer
helpline for assistance. To
replace the
LED light, the
below steps can be
1. Unplug your appliance.
2. Remove light cover by
pushing up and out.
3. Hold the LED cover with
one hand and pull it with the
other hand while pressing
the connector latch.
4. Replace LED light and
snap it correctly in place.
followed:
Troubleshooting
If you experience a problem with your appliance or are
concerned that the appliance is not functioning correctly, you
can carry out some easy checks before calling for service,
please see below.
Warning! Don't try to repair the appliance yourself. If the
problem persists after you have made the checks mentioned
below, contact a qualified electrician, authorized service
engineer or the shop where you purchased the product.
Problem
Appliance is
not working
correctly
Possible cause & Solution
Check whether the power cord is plugged
into the power outlet properly.
Check whether the “Power” funtion is on
by pressing the “power” button for 1
second.
Check the fuse or circuit of your power
supply, replace if necessary.
The ambient temperature is too low. Try
setting the chamber temperature to a
colder level to solve this problem.
Page 47

21
Appliance is
not working
correctly
Odours from the
compartments
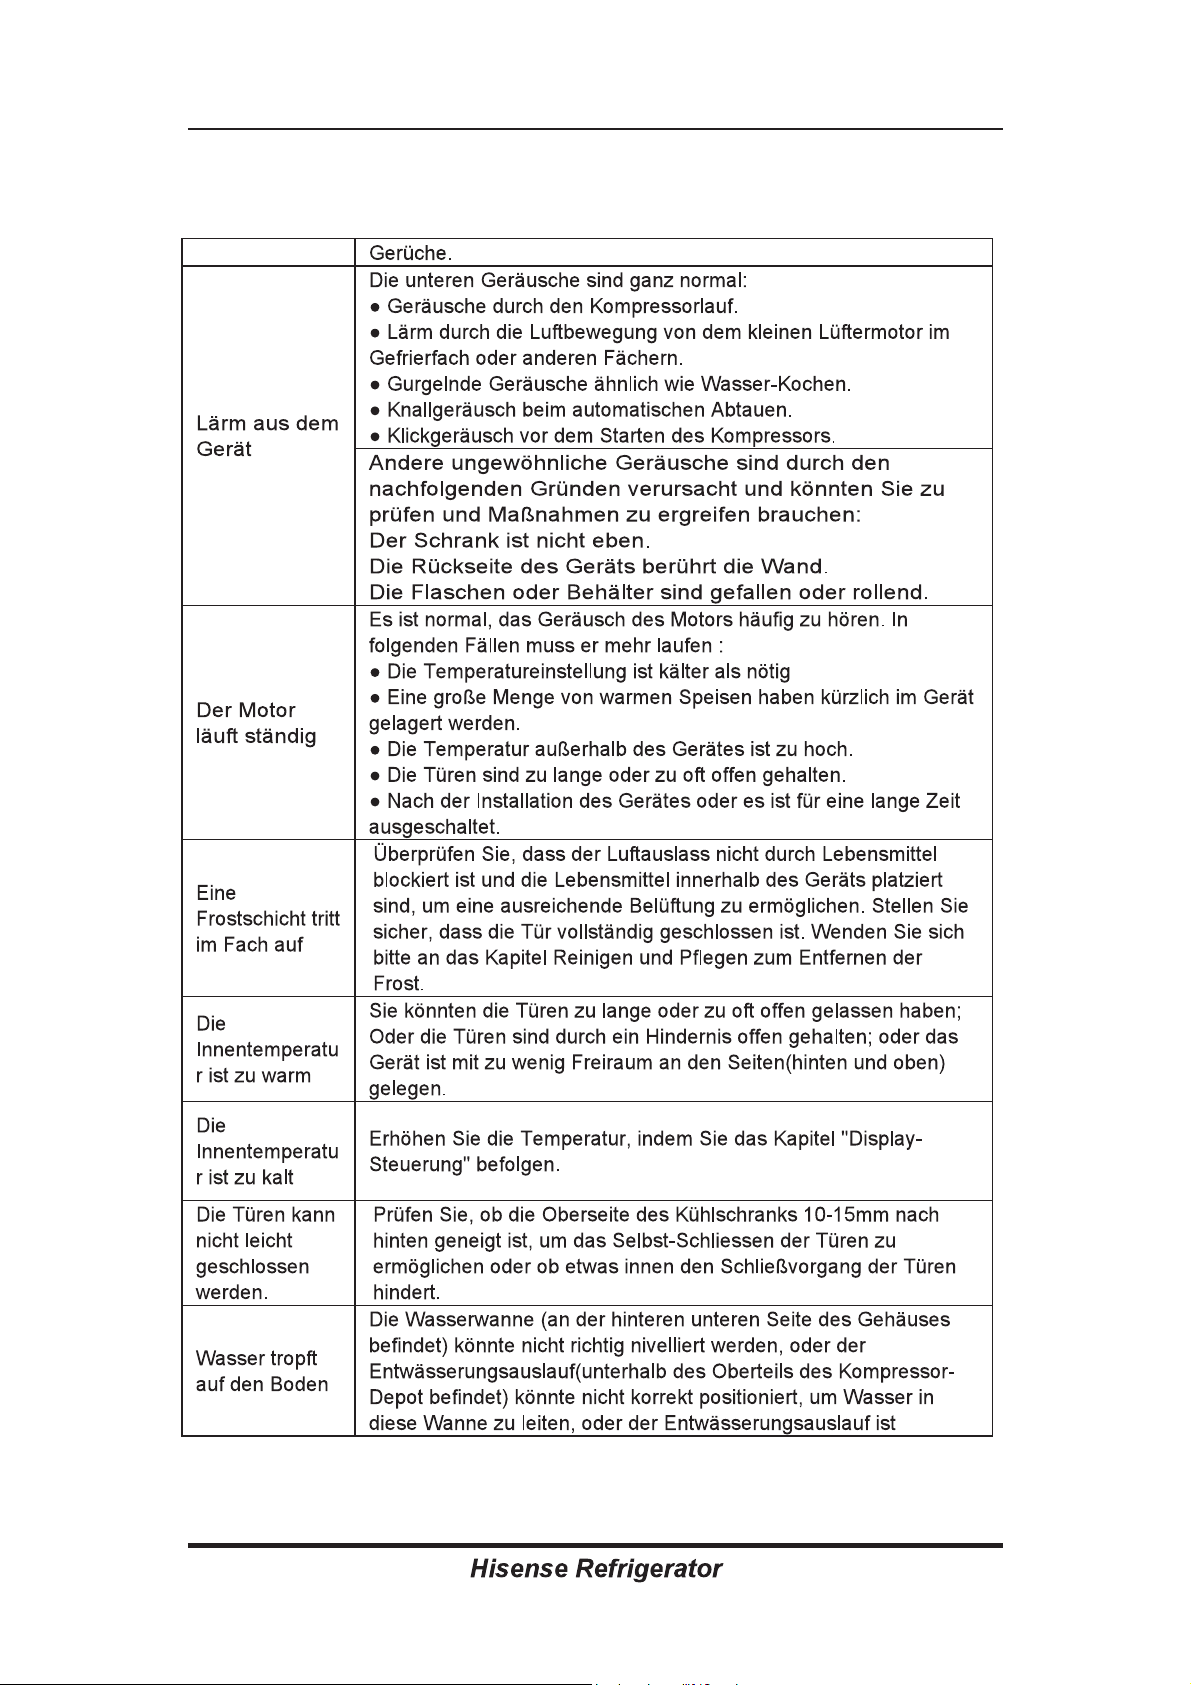
Noise from the
appliance
It is normal that the refrigerator is not
operating during the automatic defrost
cycle, or for a short time after the
appliance is switched on to protect the
compressor.
The interior may need to be cleaned.
Some food, containers or wrapping cause
odours.
The sounds below are quite normal:
Compressor running noises.
Air movement noise from the small fan
motor in the fridge compartment or other
compartments.
Gurgling sound similar to water boiling.
Pop p in g noi se d uri ng a uto mat ic
defrosting.
Clicking noise before the compressor
starts.
The motor runs
continuously
Other unusual noises are due to the
reasons below and may need you to
check and take action:
●
The cabinet is not level.
●
The back of appliance touches the wall.
●
Bottles or containers fallen or rolling.
It is normal to frequently hear the sound
of the motor, it will need to run more
when in following circumstances:
●
Temperature setting is set colder than
necessary
●
Large quantity of warm food has
recently been stored within the appliance.
●
The temperature outside the appliance
is too high.
●
Doors are kept open too long or too
often.
Page 48

The motor runs
continuously
A layer of frost
occurs in the
compartment
Tem p er a t ur e
inside is too
warm
●
After your installing the appliance or it
has been switched off for a long time.
Check that the air outlets are not blocked
by food and ensure food is placed within
the ap pl ian ce to a ll ow su f fic ie nt
ventilation. Ensure that door is fully
closed. To remove the frost, please refer
to cleaning and care chapter.
You may have left the doors open too
long or too frequently; or the doors are
kept open by some obstacle; or the
appliance is located with insufficient
clearance at the sides, back and top.
22
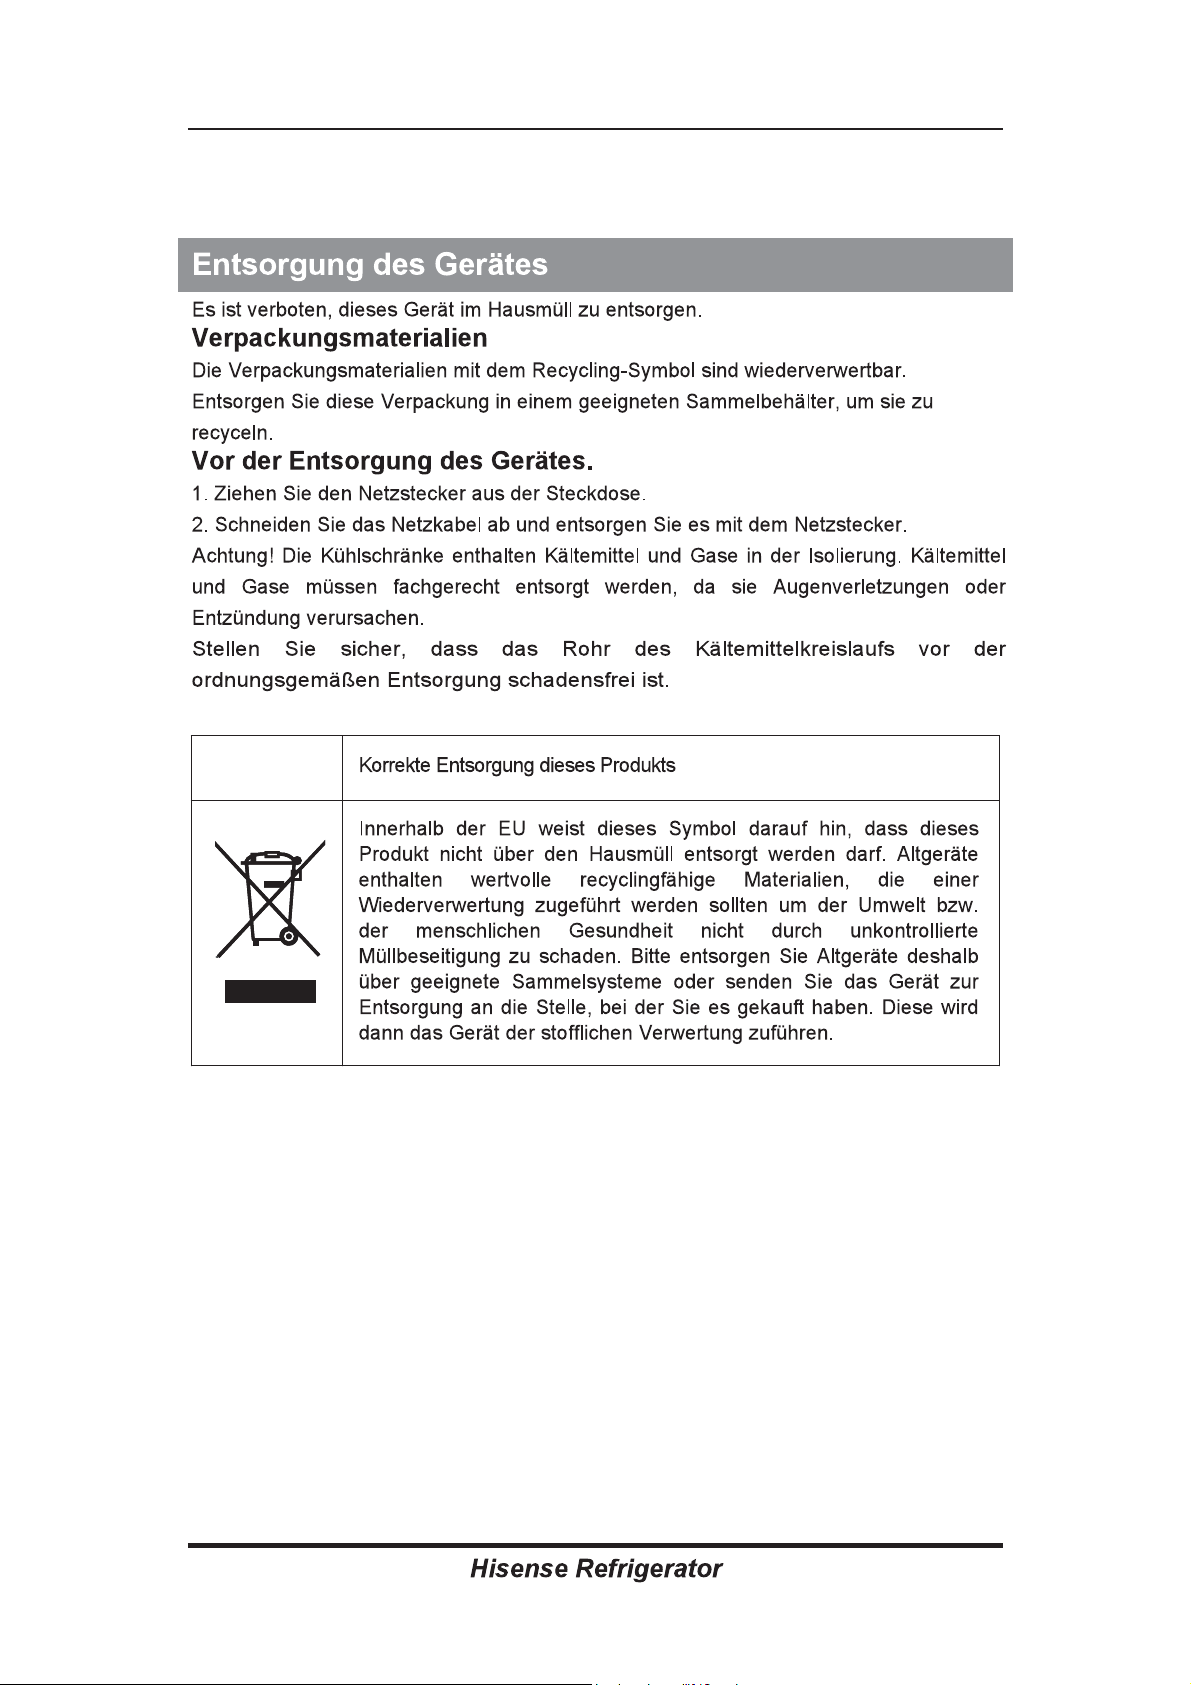
It is prohibited to dispose of this appliance as household
waste.
Packaging materials
Packaging mate r ials with th e recycle symbo l are
recyclable. Dispose of the packaging into a suitable
waste collection container to recycle it.
Before disposal of the appliance
1. Pull out the mains plug from the mains socket.
2. Cut off the power cord and discard with the mains
plug.
Warning! Refrigerators contain refrigerant and gases in
the insulation. Refrigerant and gases must be disposed
of professionally as they may cause eye injuries or
ignition. Ensure that tubing of the refrigerant circuit is
not damage prior to proper disposal.
Page 49

23
Correct Disposal of this product
This marking indica tes that this product
should not be disposed with other household
wa s t e s th r ou gh ou t the EU . To pre ve nt
possible harm to the environment or human
health from uncontrolled waste disposal,
re c y c l e it r e s p on s i b l y to p r o m ot e t h e
sustainable reuse of material resources. To
return your used device, please use the
return and collection systems or contact the
retailer where the product was purchased.
They can take this product for environmental
safe recycling.
Page 50

Español
Page 51

20
11
16
17
19
Este electrodoméstico cumple con las siguientes pautas de la UE:
2014/35/EU, 2014/30/EU, 2009/125/EC, y .
(EC) No 643/2009
2011/65/EU
21
23
26
Page 52

Page 53

Page 54

Page 55

Page 56

Page 57

Page 58

Page 59

Page 60

Page 61

Tope izquierdo de la puerta
Cobertor de bisagra izquierda
¡Precaución! Presione suavemente el
estante de la puerta desde ambos lados
hacia el centro y el interior del estante y
luego mueva hacia arriba para quitarlo.
2. Quite el cobertor de la bisagra
derecha ①
Quite los 3 tornillos ②
en la superficie del gabinete.
que se utilizan
para ajustar la bisagra superior derecha
(vea la imagen de arriba) y retire las
piezas ③ de la bisagra superior.
①
Cubierta de la bisagra
②
Tornillo autorroscante
Piezas de la bisagra superior
③
③
Bisagra superior
④
Eje de la bisagra
⑤
Junta
3. Afloje el eje de la bisagra ④ con una
llave Stilson y cámbielo al orificio
contrario. Luego, ajústelo en la posición.
Quite la junta ⑤ y cámbiela al orificio
contrario.
¡Precaución! Sostenga la puerta
superior en su lugar durante el paso 3
para evitar que la puerta se caiga.
Page 62

4. Quite el cobertor del tornillo del rincón
delantero izquierdo del gabinete con un
destornillador de punta plana e instálelo
en el rincón delantero derecho.
5. Quite la puerta superior desde la
bisagra del medio levantando la puerta
hacia arriba con cuidado.
6. Coloque la puerta superior en una
superficie suave con los paneles hacia
arriba. Afloje el tornillo ③ y quite la parte
② y la parte ①. Instale el tope izquierdo
de la puerta ④ (proporcionado en la
bolsa de plástico) y la parte ②
(tope) en
el lado izquierdo con un tornillo ③. Deje
la parte ① con el electrodoméstico para
una futura referencia.
8. Coloque la puerta inferior en una
superficie suave con los paneles hacia
arriba. Afloje el tornillo ③
y quite la parte
② y la parte ①. Instale el tope izquierdo
de la puerta ④
bolsa de plástico) y la parte ②
(proporcionado en la
(tope) en
el lado izquierdo con un tornillo ③. Deje
la parte ① con el electrodoméstico para
una futura referencia.
①
Tope de la puerta
②
Bloque de tope
③
Tornillo autorroscante
①
②
③
①
Tope de la puerta
②
Bloque de tope
③
Tornillo autorroscante
①
②
③
7. Afloje los tornillos utilizados para fijar
la bisagra del medio y quite la bisagra.
Luego, quite la puerta inferior.
9. Cambie el cobertor del orificio del
tornillo y atorníllelo en la placa de la
cubierta media desde la izquierda a la
derecha (como se muestra en la
siguiente imagen).
10. Incline el refrigerador hacia atrás,
quite la parte ③ y luego los tornillos ④.
Page 63

①
②
③
④
⑤
①
Parte bisagra inferior (derecha)
②
Pie delantero del tablero fijo
③
Parte de las patas del fondo ajustables
④
Tornillos autorroscantes
⑤
Parte de las patas del fondo ajustables
Nota: la arandela podría
adherirse a la puerta.
Arandela
11. Quite la parte ⑤ de la clavija de la
bisagra inferior. Afloje la clavija de la
bisagra inferior, cámbiela al orificio
contrario y luego ajústela en la posición.
Luego, instale la parte ⑤ en la clavija
de la bisagra inferior.
12. Quite la parte ③ de la parte ②.
Luego, quite los tornillos ④
③ al orificio inverso.
parte
②
③
④
②
Pie delantero del tablero fijo
Parte de las patas del fondo ajustables
③
④
Tornillos autorroscantes
, atornille la
13. Reemplace los artículos montados
en los pasos 11 y 12. Cambie la parte ①
hacia la izquierda y la parte ②
hacia la
derecha y luego ajuste con los tornillos
④. Por último, instale la parte ③.
Parte de la bisagra
inferior (izquierda)
15. Inserte cuidadosamente la puerta
superior en la clavija de la bisagra del
medio y sosténgala en la posición.
Mueva la puerta superior a una posición
adecuada, ajuste la bisagra superior y la
puerta. Luego, ajuste la clavija de la
bisagra en el orificio de la bisagra en la
parte superior o en la puerta para
asegurarla en el lugar. Luego, fije la
bisagra superior con tornillos.
(Sostenga cuidadosamente la puerta
con la mano mientras se instala)
14. Coloque el refrigerador en posición
vertical e inserte cuidadosamente la
puerta inferior en la clavija de la bisagra
inferior y sosténgala en la posición. Gire la
bisagra del medio a 180º. Cambie la
arandela en el eje del lado superior, ajuste
la bisagra del medio a una posición
adecuada y luego instálela asegurando
que la puerta inferior esté en su lugar.
16. Monte el cobertor de la bisagra
izquierda (proporcionado en la bolsa de
plástico) para que coincida con la
bisagra. Instale los estantes de la puerta
y el tanque de agua en su posición
original. Deje el cobertor derecho de la
bisagra con el electrodoméstico para una
futura referencia.
Page 64

15
1. Cobertor de la bisagra superior
2. Parte del panel de control
3. Estante de vidrio
4. Cubierta del cajón Crisper
5. Cajón para frutas y verduras
6. Bandeja de hielo
7. Bandeja del congelador
8. Estante de vidrio superior
9. Cajón superior del congelador
10. Cajón medio del congelador
11. Estante de vidrio inferior del
congelador
12. Cajón inferior del congelador
13. Patas inferiores ajustables
14. Puerta de la heladera
15. Estante superior
16. Bandeja para huevos (por
dentro)
17. Estante medio
18. Sello de la puerta de la
heladera
19. Estante inferior
20. Sello de la puerta del
congelador
21. Puerta del congelador
Vista 1 del electrodoméstico
1
2
3
4
5
6
7
8
9
10
11
12
13
9
10
11
14
15
16
17
13
18
14
19
17
20
21
19
20
Page 65

16
Page 66

17
Page 67

18
Page 68

192021
Page 69

Page 70

Page 71

222324
Page 72

Page 73

Page 74

25
Page 75

Page 76

20
11
16
17
19
Cet appareil est conforme aux Directives Européennes: 2014/35/EU, 2014/30/
EU, 2009/125/EC, et .
(EC) No 643/2009
2011/65/EU
21
22
25
Page 77

Page 78

Page 79

Page 80

Page 81

Page 82

Page 83

Page 84

Page 85

Page 86

Attention! Ramenez délicatement
l’étagère de porte des deux côtés en
direction du centre et l‘intérieur de
l’étagère de porte, puis extrayez-la, en
la dirigeant vers le haut.
2. Retirez la charnière du côté droit
supérieur ①. Retirez les 3 vis②
utilisées pour fixer la charnière
supérieure droite (voir illustration cidessous) et retirez les éléments③
①
Charnière
②
Vis auto-taraudeuse
Butée porte gauche
Charnière porte gauche
Éléments de la charnière
③
supérieure
③
Charnière supérieure
④
Gond de la charnière
⑤
Joints
3. Desserrez le gond de la charnière
④au moyen d’une clé, et inversez le
sens d’installation, puis serrez le tout
afin de fixer l’ensemble. Retirez le joint
⑤ et changez le sens d’installation.
Attention ! Maintenez la porte
supérieure en position pendant l’étape 3
afin d’éviter que la porte ne chute.
Page 87

4. Retirez la protection de vis du coin
gauche central au moyen d’un
tournevis à tête plate, et installez-la
au niveau du coin droit supérieur.
5. Retirez la porte supérieure de la
charnière centrale, en soulevant
légèrement la porte vers le haut.
8. Placez la porte inférieure sur une
surface lisse et régulière, le panneau de
la porte vous faisant face. Desserrez la
et les éléments ② et l’élément ①,
vis ③
Installez la butée de porte de
remplacement de la porte gauche
④fournie (dans le sachet de pièces de
rechange) et l’élément ②( bloc de
butée) du côté gauche au moyen d’une
③. Conservez l’élément ① pour
vis
votre référence future.
6. Placez la porte supérieure sur une
surface stable et régulière, le panneau
de la porte vous faisant face. Desserrez
la vis ③ et retirez l’élément ② et
l’élément ①, Installez la butée de porte
de remplacement de la porte gauche ④
fournie (dans le sachet de pièces de
rechange) et l’élément ② (bloc de
butée) du côté gauche au moyen d’une
vis③. Conservez l’élément ① pour
votre référence future.
①
Butée de porte
②
Bloc de butée
③
Vis auto-taraudeuse
①
②
③
①
Butée de porte
②
Bloc de butée
③
Vis auto-taraudeuse
①
②
③
9. Remplacez les protections des trous
de vis ainsi que les vis du cache
central, de gauche à droite (comme
indiqué sur l’illustration suivante).
7. Desserrez les vis utilisées pour fixer
la charnière centrale, et retirez
cette dernière. Retirez ensuite la
porte inférieure.
10. Faites basculer le réfrigérateur
délicatement vers l’arrière, retirez
l’élément ③
puis retirez les vis ④.
Page 88

①
②
③
④
⑤
Élément charnière inférieure (droite)
①
Panneau fixe avant bas
②
Élément pied ajustable inférieur bas
③
Vis auto-taraudeuse
④
Élément pied ajustable inférieur bas
⑤
11. Retirez l’élément ⑤ de la goupille de
la charnière inférieure, desserrez la
goupille, puis inversez-la de côté. Serrezla ensuite afin de la fixer dans cette
position, puis installez l’élément ⑤ sur la
goupille de la charnière inférieure.
12. Retirez l’élément ③ de la pièce ②,
puis retirez les vis④, vissez la pièce ③
sur le trou de vis du côté opposé.
②
③
④
②
Panneau fixe avant bas
Élément pied ajustable inférieur bas
③
④
Vis auto-taraudeuse
13. Remplacez les éléments réassemblés
lors des étapes 11 et 12, remplacez la
pièce ① en la faisant passer de gauche
② à droite, puis vissez-les ④
. Enfin,
installez la pièce ③.
Élément de la charnière
inférieure (gauche)
Remarque : il se peut que le
joint adhère à la porte
inférieure.
Joint
15. Faites délicatement la porte supérieure
contre la goupille de la charnière de
porte et maintenez le tout en position.
Déplacez la porte supérieure dans la
position adaptée, ajustez la goupille de la
charnière ainsi que la porte supérieure,
puis fixez la goupille de la charnière pardessus le trou de vis, en haut de la porte,
afin de sécuriser la porte dans cette
position. Fixez ensuite la partie
supérieure au moyen de vis.
(Soyez vigilant lorsque vous maintenez
la porte supérieure avec la main,
pendant l’installation)
14. Placez le réfrigérateur en position
verticale et faites délicatement glisser la
goupille de la charnière basse de la porte
inférieure, et maintenez le tout en
position. Faites pivoter la charnière
centrale de 180°, remplacez la rondelle
présente sur l’axe du côté inférieur,
ajustez la charnière central dans la bonne
position et installez le tout, en vous
assurant que la porte inférieure est bien
sécurisée.
16. Assemblez le protège-goupille gauche
fourni (dans le sachet plastique de pièces
de rechange) en veillant à bien l’aligner à
la charnière , remettez la porte, les racks
de porte et le compartiment à eau dans
leur position d’origine. Conservez le
protège-goupille droite pour votre
référence.
Page 89

1. Cache de protection de la
charnière supérieure
2. Panneau de commandes
3. Étagère en verre
4. Cache du bac à légumes
5. Bac à fruits et légumes
6. Bac à glaçons
7. Étagère du congélateur
8. Étagère en verre supérieure
9. Bac de congélation supérieur
10. Bac de congélation central
11. Étagère en verre inférieure
12. Bac de congélation inférieur
13. Pied ajustable
14. Porte du réfrigérateur
15. Rack supérieure
16. Plateau à œufs (intérieur)
17. Rack central
18. Joint de porte du
réfrigérateur
19. Rack inférieur
20. Joint de porte du congélateur
21. Porte du congélateur
Vue 1 de l’appareil
1
2
3
4
5
6
7
8
9
10
11
12
13
9
10
11
14
15
16
17
13
18
14
19
17
20
21
19
20
Page 90

Page 91

Page 92

Page 93

Page 94

Page 95

Page 96

Page 97

Page 98

Page 99

Page 100

20
11
16
17
19
Quest’apparecchio è conforme alle seguenti direttive UE: 2014/35/EU,
2014/30/EU, 2009/125/CE, e .
(EC) No 643/2009
2011/65/EU
21
22
25
 Loading...