

Hisense LTDN42K660HK3D, LTDN50K660HK3D, LTDN46K660HK3D User Manual

条形码定位框,长 35mm,高度请根
据长度等比例缩放。该定位框不做印
刷处理。物料号:1125043
K660HK3D series
USER MANUAL
RSAG2.025.3714SS
www.hisense.com
www.hismarttv.com
00852-27811789
Before using the TV, Please read this manual
thoroughly, retain it for future reference.
ENGLISH
I
Preface
Dear Hisense Customer,
We appreciate for your buying Hisense products, and believe that this wholly new product can bring you
infinite pleasure. Before using the TV, Please read this manual thoroughly, retain it for future reference.
Our company does not assume any liability for any accident arising from violation of the matters of
attention and instruction on use in this manual.
This product involves high voltage. The user may not open the cabinet without authorization. Any
person other than the repairer may not repair and replace parts without authorization to avoid shock
and fire accidents.
Please clean and maintain the entire TV set with clean and soft cotton cloths, and repeated forcible
cleanings are prohibited.
The screen may not be scribed, tapped, impacted with hard objects or rubbed with any grinding
materials.
During placement and use, the product should be kept from water droplet and splash. In case of
adverse weather e.g. thunderstorm, the power plug and cable TV (or outdoor antenna) plug shall be
rapidly pulled off to avoid damage due to lightning strike.
The TV set is a Type II equipment, and used without requiring grounding.
WARNING
CAUTION
Attention:
Still images can result in permanent damage to TV screen.
1. The time for displaying static images on the LCD TV screen may not exceed 2 hours, otherwise it will result
in residual image on the screen. To avoid this, you need to lower the screen brightness and contrast when
displaying the still images.
2. When viewing 4:3 format program over long time, different traces will be left on the left and right sides of
the screen and the edge of margin. So the user is advised not to use such pattern over long time.
3. Long-time display of electronic games and computer static images may result in local residual image, and
the screen may get burnt and result in residual image on the screen. To avoid this, you need to lower the
screen brightness and contrast during use.
For any image residual shadow, local residual image and trace problems with the TV screen due to the
said reasons, the display screen is not within the range of warranty.
Tips for energy saving:
1. Please choose AC power off (turn off the TV through the power switch) when not viewing TV program to
minimize energy consumption.
2. Under condition that the view quality is not impacted, reduce the brightness of display screen to minimize
the energy consumption of TV during use.
Check the Symbol
Triangle enclosing a lightning arrow is a warning symbol,
reminding you of the high voltage danger in the product.
√
The correct way.
Triangle enclosing an exclamation mark is a warning
symbol, reminding you of the important notes related to
the product.
×
The wrong way.
General notes.
->
Next step.
II
3D Display
Apply latest 3D process technology and new 3D display technology,giving you ultra-comfortable 3D visual enjoyment.
Cloud Share
Apply cloud technology, own cloud background resource, share platform and rich application, provide each Hisense TV user with
great Internet video resource, and make it easy to share and broadcast user side.
Dual Operating System
3D Play
The device has 3D play function, it can provide with virtual and perfect 3D scenes, reproducing shocking presence experiences.
2D/3D Compatible Display
Use menu to turn on or turn off 3D function, switch between 2D and 3D freely.
3D UI Interface
Use 3D UI technology to show stereoscopic dynamic menus, provide with you more magnificent and personal operating
experience.
High Quality LED Backlight 3D Liquid Screen
New generation backlight source with the 4 cutting edges of magnificence,energy saving, environment protection and slimness.
Built-in WiFi wireless network function
Capable to connect to wireless router directly for surfing on Internet.
Small to Big/Big to Small
Capable to interconnect between TV and mobile, Hisense I’TV, meet family entertainment sharing needs.
Family share
Easy to share picture, music and video display with extern mobile terminal device installed with Hisense multi-screen interact
software.
Hisense Community
Hisense “envelope” special forum consists of how to use the device, experiences exchange, resource sharing, happiness
interchange and enjoy deposit.
Great Application
The device carries Hisense App store and gfan market, provide magnitude Apps for users to download.
SRS TruSurround XT sound effect
Make TV audio more real and more shocking.
Multi-Mode Widescreen Display
Provide with multiple aspect ratio choice: full screen, normal, zoom in one, zoom in two, intelligence panorama, point to point.
Power Saving Mode
The device will enter sleep or standby mode after there is no input signal 15 minutes later, thus extending the device lifetime
and saving power.
Multimedia Port
There are several ports for antenna, VGA, HDMI, Video, Component, USB, head-sets, network interface and SD card.
is trademarks registered by SRS Labs,Inc..SRS Labs,Inc.have approved the product to apply
TruSurround XT technology.
Characteristics
Special Statement: (This statement is applicable throughout this user manual)
The pictures and instructions in the user manual are only for reference, and may be different from appearance of
actual products. Please make the object as the standard.
User manual is only part of the application guidance instructions, and other applications can refer to the prompt
in the application instructions.
Any change to quality upgrade, product design and specification will not be subject to any prior notice.
III
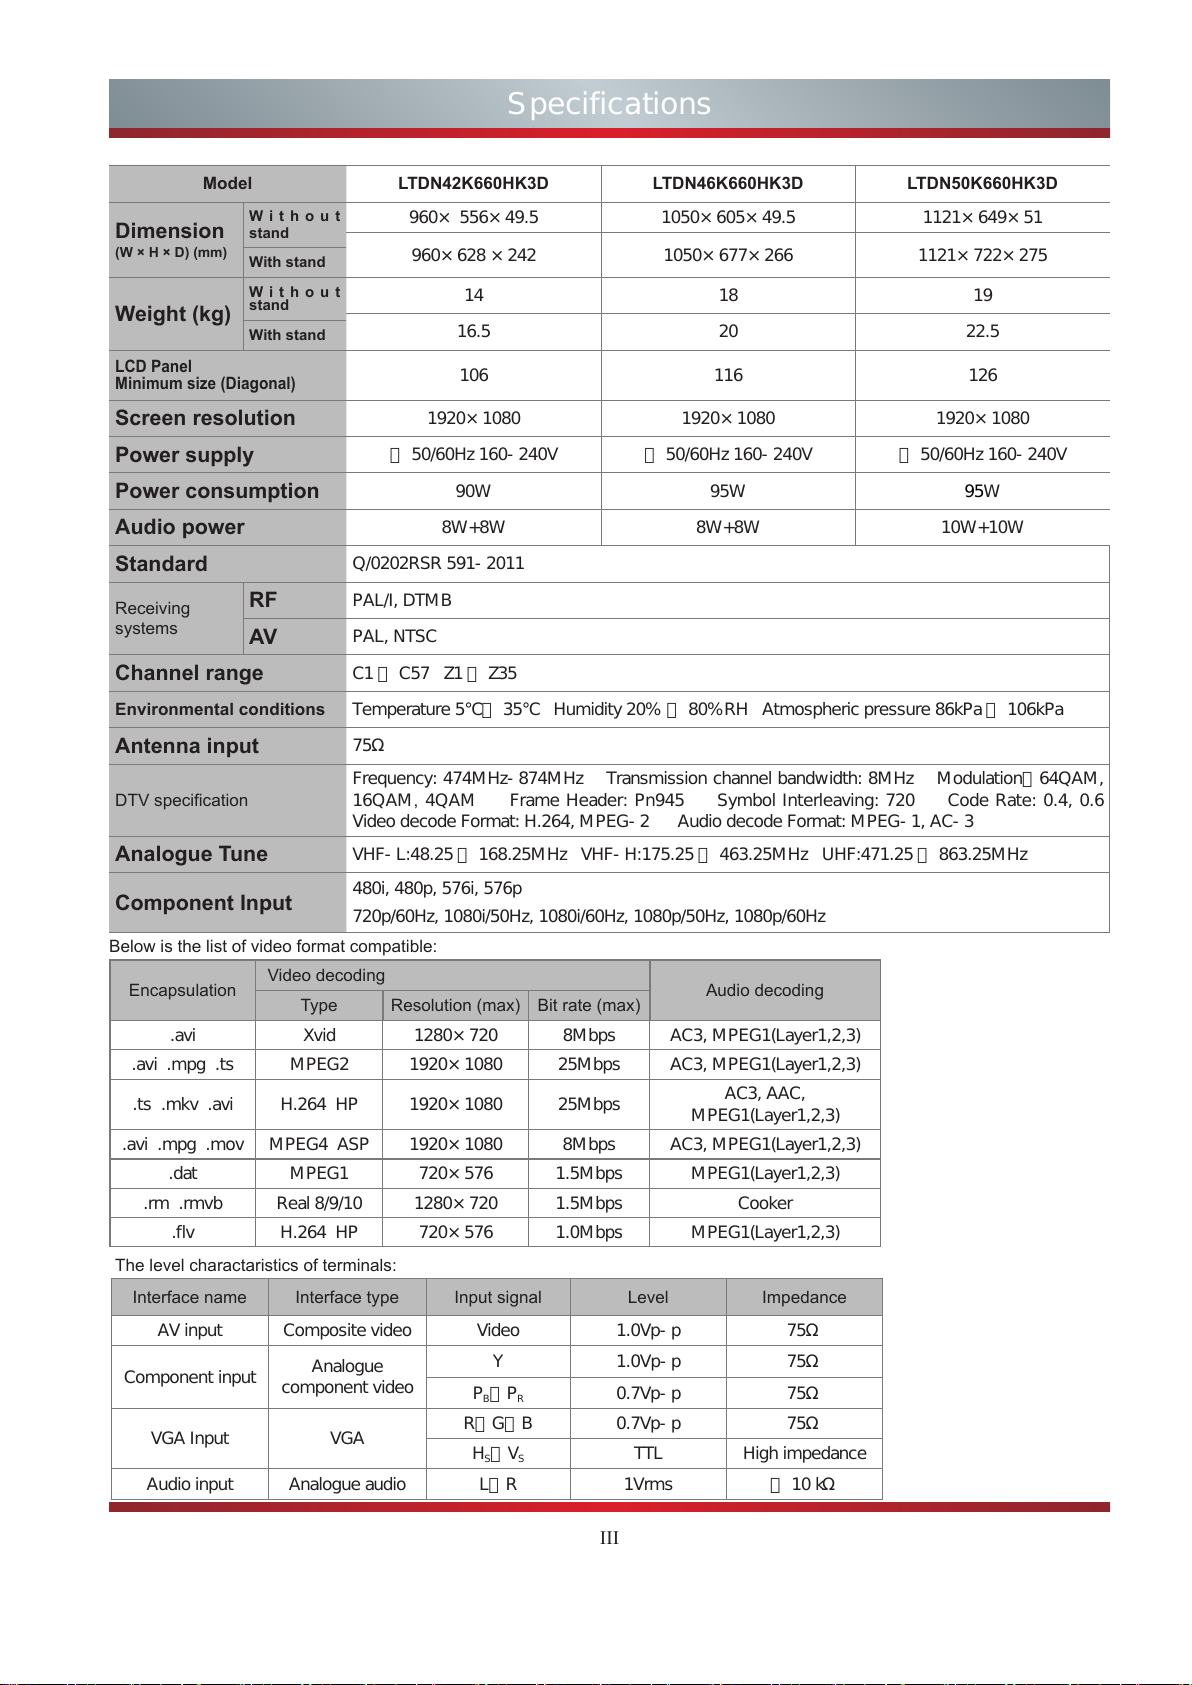
Below is the list of video format compatible:
Encapsulation
Video decoding
Audio decoding
Type Resolution (max) Bit rate (max)
.avi Xvid 1280×720 8Mbps AC3, MPEG1(Layer1,2,3)
.avi .mpg .ts MPEG2 1920×1080 25Mbps AC3, MPEG1(Layer1,2,3)
.ts .mkv .avi H.264 HP 1920×1080 25Mbps
AC3, AAC,
MPEG1(Layer1,2,3)
.avi .mpg .mov MPEG4 ASP 1920×1080 8Mbps AC3, MPEG1(Layer1,2,3)
.dat MPEG1 720×576 1.5Mbps MPEG1(Layer1,2,3)
.rm .rmvb Real 8/9/10 1280×720 1.5Mbps Cooker
.flv H.264 HP 720×576 1.0Mbps MPEG1(Layer1,2,3)
Specifications
Model LTDN42K660HK3D LTDN46K660HK3D LTDN50K660HK3D
Dimension
(W × H × D) (mm)
Without
stand
960× 556×49.5 1050×605×49.5 1121×649×51
960×628 ×242 1050×677×266 1121×722×275
With stand
Weight (kg)
Without
stand
14 18 19
16.5 20 22.5
With stand
LCD Panel
Minimum size (Diagonal)
106 116 126
Screen resolution
1920×1080 1920×1080 1920×1080
Power supply
~ 50/60Hz 160-240V ~ 50/60Hz 160-240V ~ 50/60Hz 160-240V
Power consumption
90W 95W 95W
Audio power
8W+8W 8W+8W 10W+10W
Standard
Q/0202RSR 591-2011
Receiving
systems
RF
PAL/I, DTMB
AV
PAL, NTSC
Channel range
C1 ~ C57 Z1 ~ Z35
Environmental conditions
Temperature 5℃~ 35℃ Humidity 20% ~ 80%RH Atmospheric pressure 86kPa ~ 106kPa
Antenna input
75Ω
DTV specication
Frequency: 474MHz-874MHz Transmission channel bandwidth: 8MHz Modulation:64QAM,
16QAM, 4QAM Frame Header: Pn945 Symbol Interleaving: 720 Code Rate: 0.4, 0.6
Video decode Format: H.264, MPEG-2 Audio decode Format: MPEG-1, AC-3
Analogue Tune
VHF-L:48.25 ~ 168.25MHz VHF-H:175.25 ~ 463.25MHz UHF:471.25 ~ 863.25MHz
Component Input
480i, 480p, 576i, 576p
720p/60Hz, 1080i/50Hz, 1080i/60Hz, 1080p/50Hz, 1080p/60Hz
The level charactaristics of terminals:
Interface name Interface type Input signal Level Impedance
AV input Composite video Video 1.0Vp-p 75Ω
Component input
Analogue
component video
Y 1.0Vp-p 75Ω
P
B、PR
0.7Vp-p 75Ω
VGA Input VGA
R、G、B 0.7Vp-p 75Ω
H
S、VS
TTL High impedance
Audio input Analogue audio L、R 1Vrms > 10 kΩ

IV
When it is rainy, please pull out the power plug, CATV plug or
outside antenna plug to avoid any possible damage to the TV
set. Do not touch the inducting wire of the antenna.
If you do not use the product for a long time, please pull out
the power plug.
If you find abnormal sound or smell, or there is sound but no
image, please turn off the TV and pull out the plug immediately
and contact the professional technicians.
Please do not press the power line and signal line with other
things.
Please do not make the power outlet overloaded, or it will
result in the danger of fire.
Keep the power line away from high temperature and heating
things.
There are some changes for the outdoor antenna if it stays
outside for a long time, which may affect the picture quality of
the TV, so please check the antenna or replace it regularly.
Do not clean this unit with volatile oils or dilution, which may
cause cabinet deterioration or damage its coating surface.
If the cabinet becomes dirty, please clean it with a soft cloth
which has neutral detergent wet with water.
In the case where such substances that are painted with paint
or organic solvent and grease, etc. on the surface of the TV
cabinet, the chemical reaction may be occurred in between the
rubber cushion on the base and such substances hereinbefore,
which may cause a slight corrosion on the surface of the TV
cabinet. Therefore, users are recommended to firstly put a
layer of protective material (such as pressboard or glass sheet,
etc.) on the TV cabinet and then place the TV set.
Please do not try to decompose any part of the product, which
may cause damage to the product as well as harm to the
human. And it will also make you face the product warranty
failure.
Please do not remove the back cover. The adjust and check
inside the unit should only be carried out by the professional
technicians.
Please do not cover or block the heat-radiating holes in order
not to hamper the unit to give off heat.
Please do not stick the sharp objects, metal, or liquid into or
use them to touch the signal interface or heat-radiating holes
in case of short circuit or damage to the product.
Watch TV at a proper distance, and the best distance is 3
to 4 times the length of the vertical distance of LCD.
Keep the lighting indoors bright enough to read newspaper.
The volume should be properly set in order not to disturb
your neighbors, esp. when it is during the night.
It is recommended that 2 or more people should load, unload
and carry the unit; try to avoid any crash when carrying the
unit, and protect the LCD screen in particular.
If you touch the LCD screen when turning on or off the TV,
you can feel the slight electric shock, which is the so-called
electrostatic and does no harm to your health.
As the difference between the power cord/ground cord and
wired cable, It may cause the heat in the connection ports and
may lead to serious accidents.
The professional technicians will detect the situation when
installing the TV set to decide whether to install the isolator, if
installed, please never remove it.
√
Even and steady occasions.
× Places under direct sunshine or close to heating devices.
× Places with poor ventilation.
× Places close to furnace or places to which water, oil or smoke
is easy to enter.
× Places where ventilating openings are closed.
× Unsteady places.
× Places suffering from easy vibration.
× Places of lot of dust or moist places.
× Places of high temperatures.
LCD display panel is the advanced S&T product, composed of
several millions of Movie transistors inside. There can be dark
or bright spots appearing on the panel. please note that this
is a normal phenomenon, which does not affect the overall
performance.
The incorrect maintenance will lead to damage to the LCD screen,
which will affect the image effect, so you must pay attention to the
following items:
Don't clean the screen with the organic solvents, such as
alcohol, gasoline, etc. or chemical reagents ,such as acid,
alkali, etc.
Do not clean the screen with any kind of detergent.
After the TV is turned off, you, when necessary, can clean the
screen with a clean and soft cotton cloth to properly safeguard
it, but repeatedly cleaning with force is prohibited.
Please do not directly touch the screen with your fingers,
which may damage the screen surface. What's more, the oil
and fat on the screen is difficult to remove.
Please do not put pressure on the LCD, for the LCD screen is
delicate and vulnerable.
The hard object is not allowed to touch the LCD screen, for it
is easily scratched.
Alerts: Before using the product, please read the following clauses carefully.
Product
Watching TV
Others
Antenna isolator
Power and signal
Maintenance
LCD display instruction and maintenance
Method of placement
How to install:
Plug1 Plug2
1. Connect the plug1 to cable signal.
2. Connect the plug2 to the antenna port in the rear of the
TV. If the cable signal is connected with STB, please
connect plug2 to the antenna input port in the rear of the
STB.
NOTE
The isolator is not a accessary with the TV set. If there is
heating for your signal cable, please contact with us and
we will provide the service for detecting and installing.
Important Safety Instructions
1
| Contents USER MANUAL
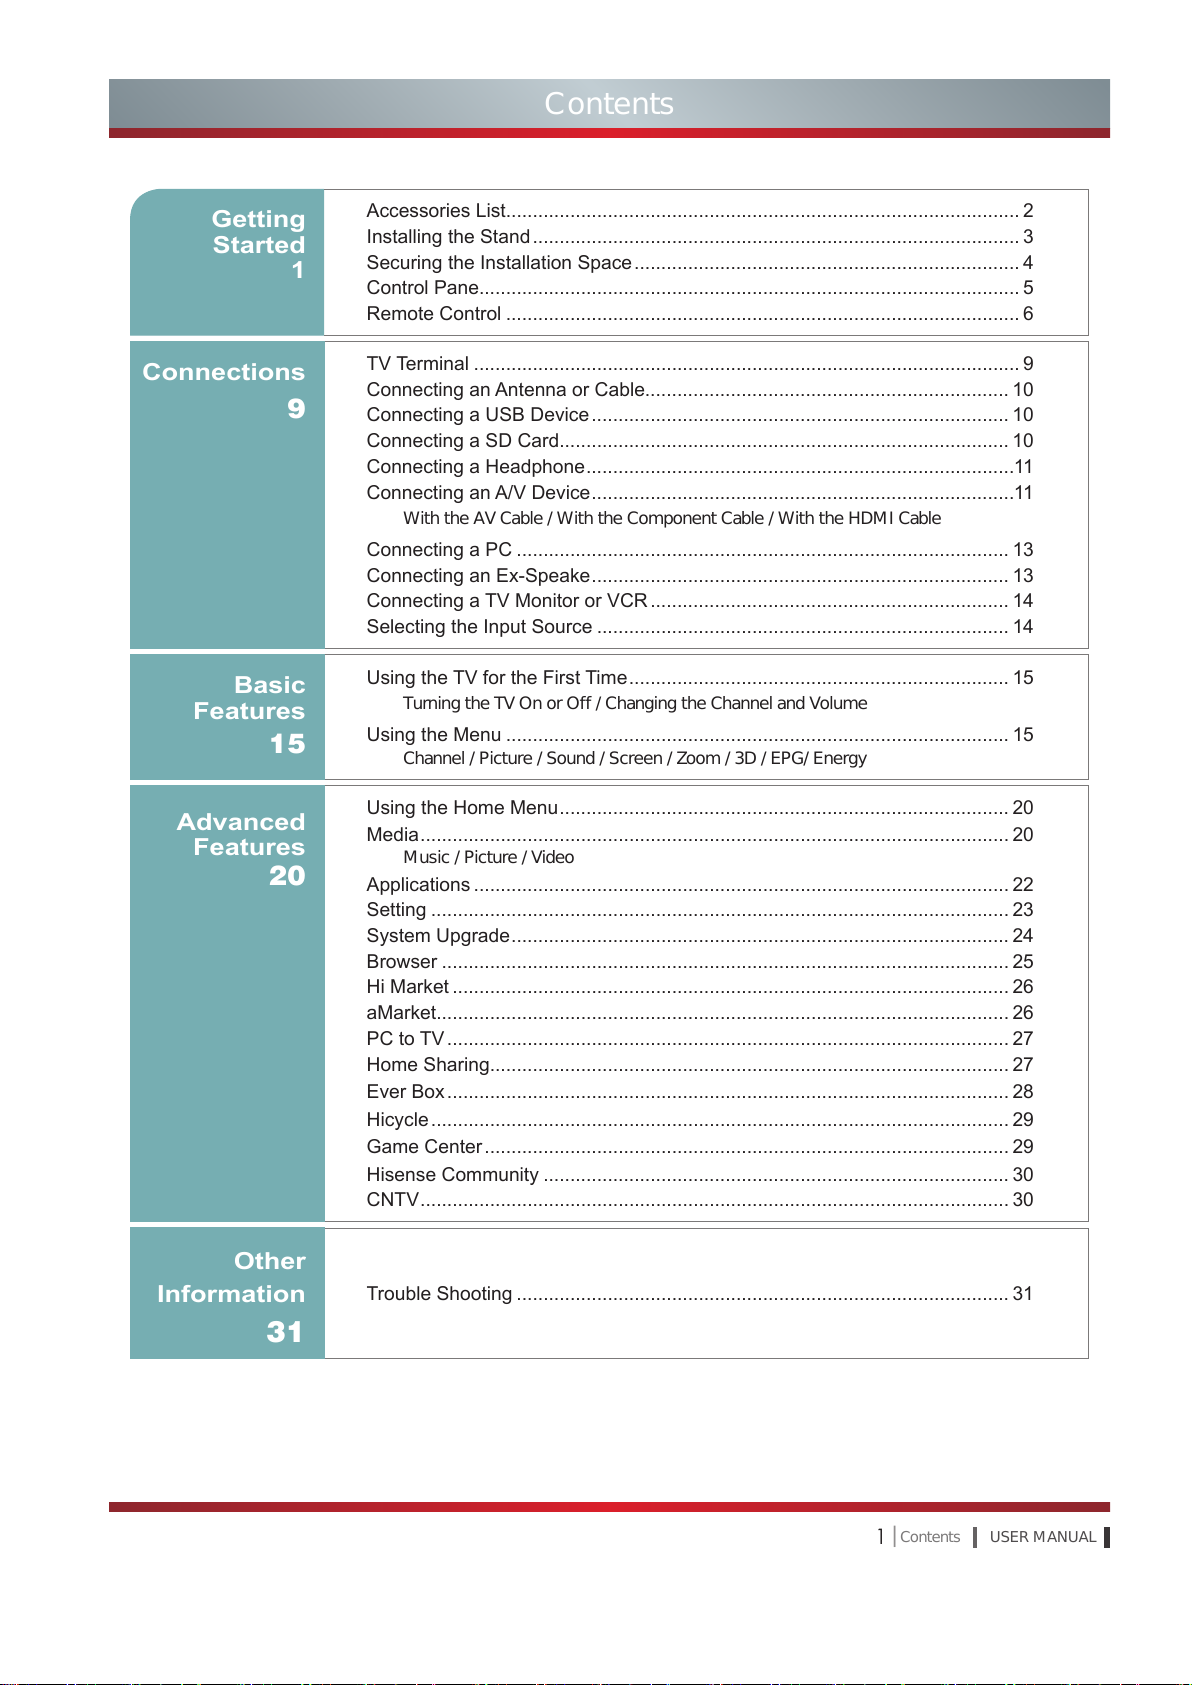
Contents
Getting
Started
1
Accessories List................................................................................................ 2
Installing the Stand ........................................................................................... 3
Securing the Installation Space ........................................................................ 4
Control Pane..................................................................................................... 5
Remote Control ................................................................................................ 6
Connections
9
TV Terminal ...................................................................................................... 9
Connecting an Antenna or Cable.................................................................... 10
Connecting a USB Device .............................................................................. 10
Connecting a SD Card.................................................................................... 10
Connecting a Headphone ................................................................................11
Connecting an A/V Device ...............................................................................11
With the AV Cable / With the Component Cable / With the HDMI Cable
Connecting a PC ............................................................................................ 13
Connecting an Ex-Speake .............................................................................. 13
Connecting a TV Monitor or VCR ................................................................... 14
Selecting the Input Source ............................................................................. 14
Basic
Features
15
Using the TV for the First Time ....................................................................... 15
Turning the TV On or Off / Changing the Channel and Volume
Using the Menu .............................................................................................. 15
Channel / Picture / Sound / Screen / Zoom / 3D / EPG/ Energy
Advanced
Features
20
Using the Home Menu .................................................................................... 20
Media .............................................................................................................. 20
Music / Picture / Video
Applications .................................................................................................... 22
Setting ............................................................................................................ 23
System Upgrade ............................................................................................. 24
Browser .......................................................................................................... 25
Hi Market ........................................................................................................ 26
aMarket........................................................................................................... 26
PC to TV ......................................................................................................... 27
Home Sharing................................................................................................. 27
Ever Box ......................................................................................................... 28
Hicycle ............................................................................................................ 29
Game Center .................................................................................................. 29
Hisense Community ....................................................................................... 30
CNTV .............................................................................................................. 30
Other
Information
31
Trouble Shooting ............................................................................................ 31
USER MANUAL Getting Started |
2
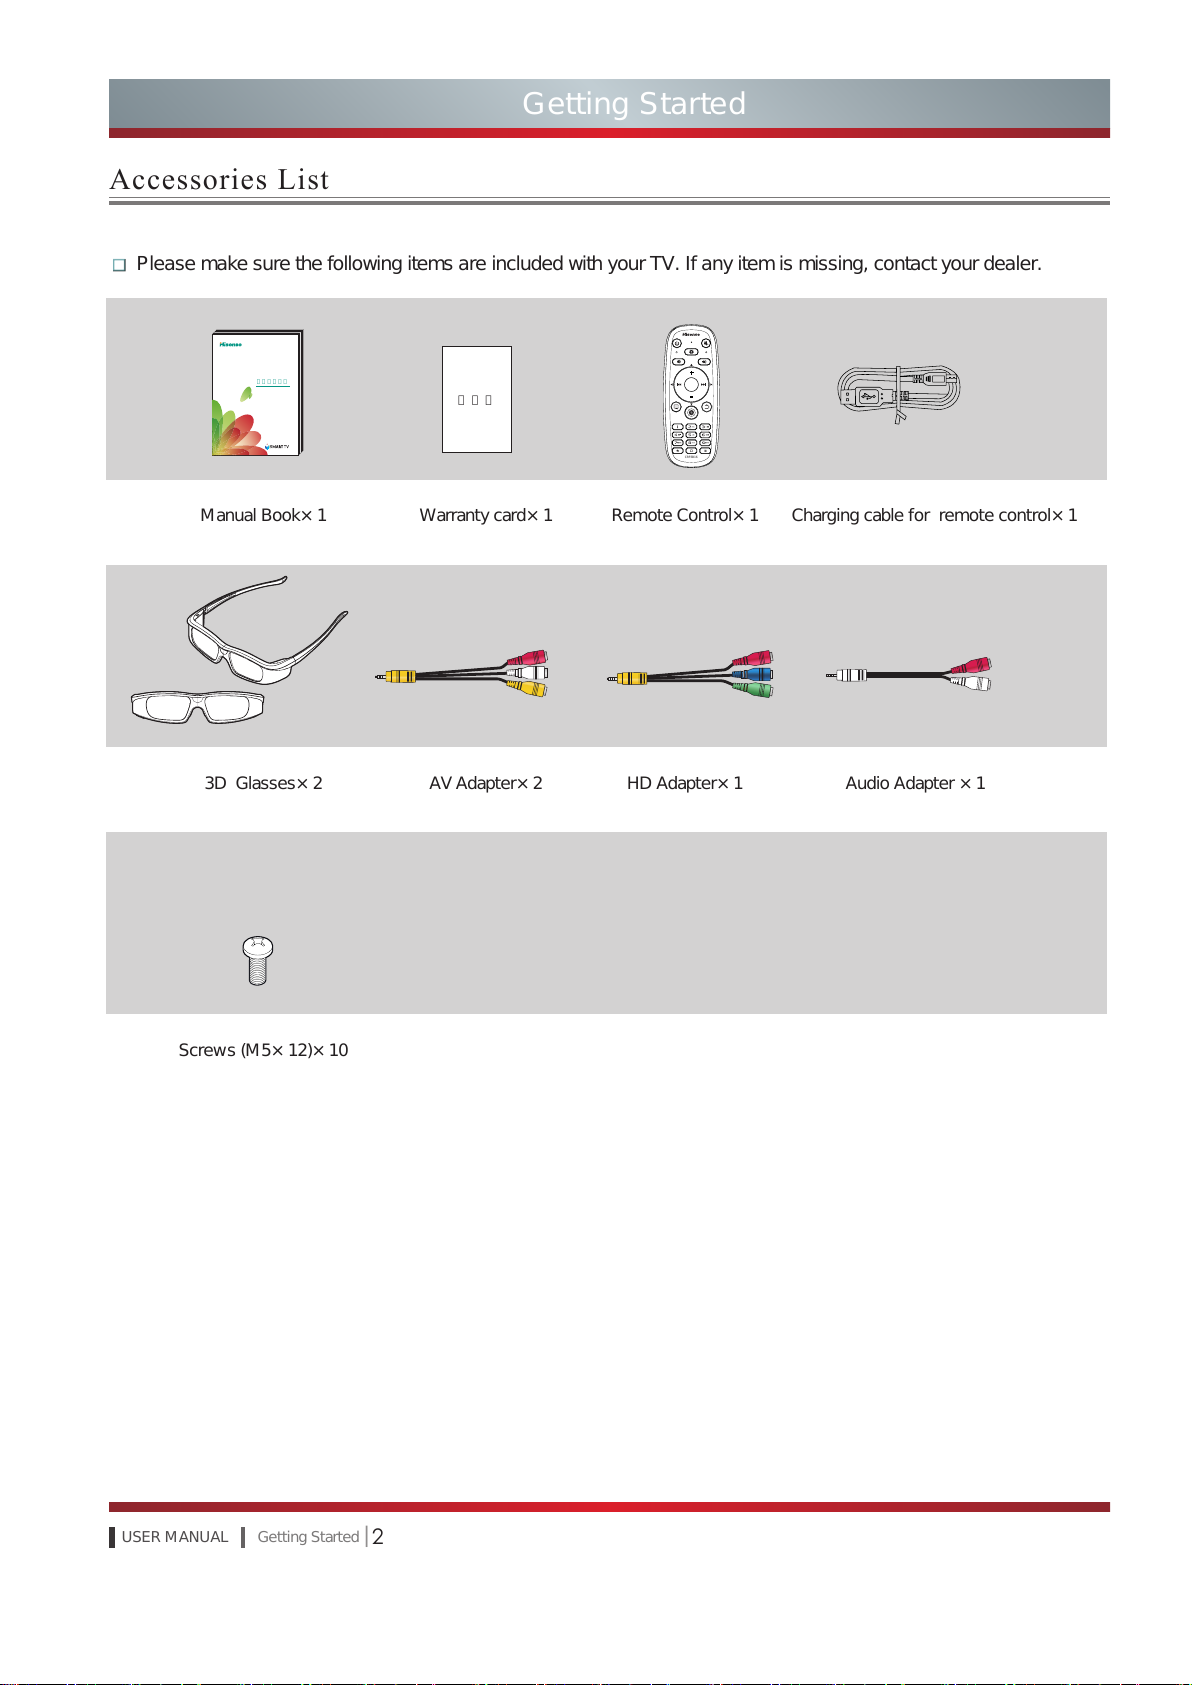
Please make sure the following items are included with your TV. If any item is missing, contact your dealer.
Getting Started
Accessories List
Manual Book×1 Warranty card×1 Remote Control×1 Charging cable for remote control×1
3D Glasses×2 AV Adapter×2 HD Adapter×1 Audio Adapter ×1
Screws (M5×12)×10
产品使用指南
保 修 卡
CRF6B16
3
| Getting Started USER MANUAL
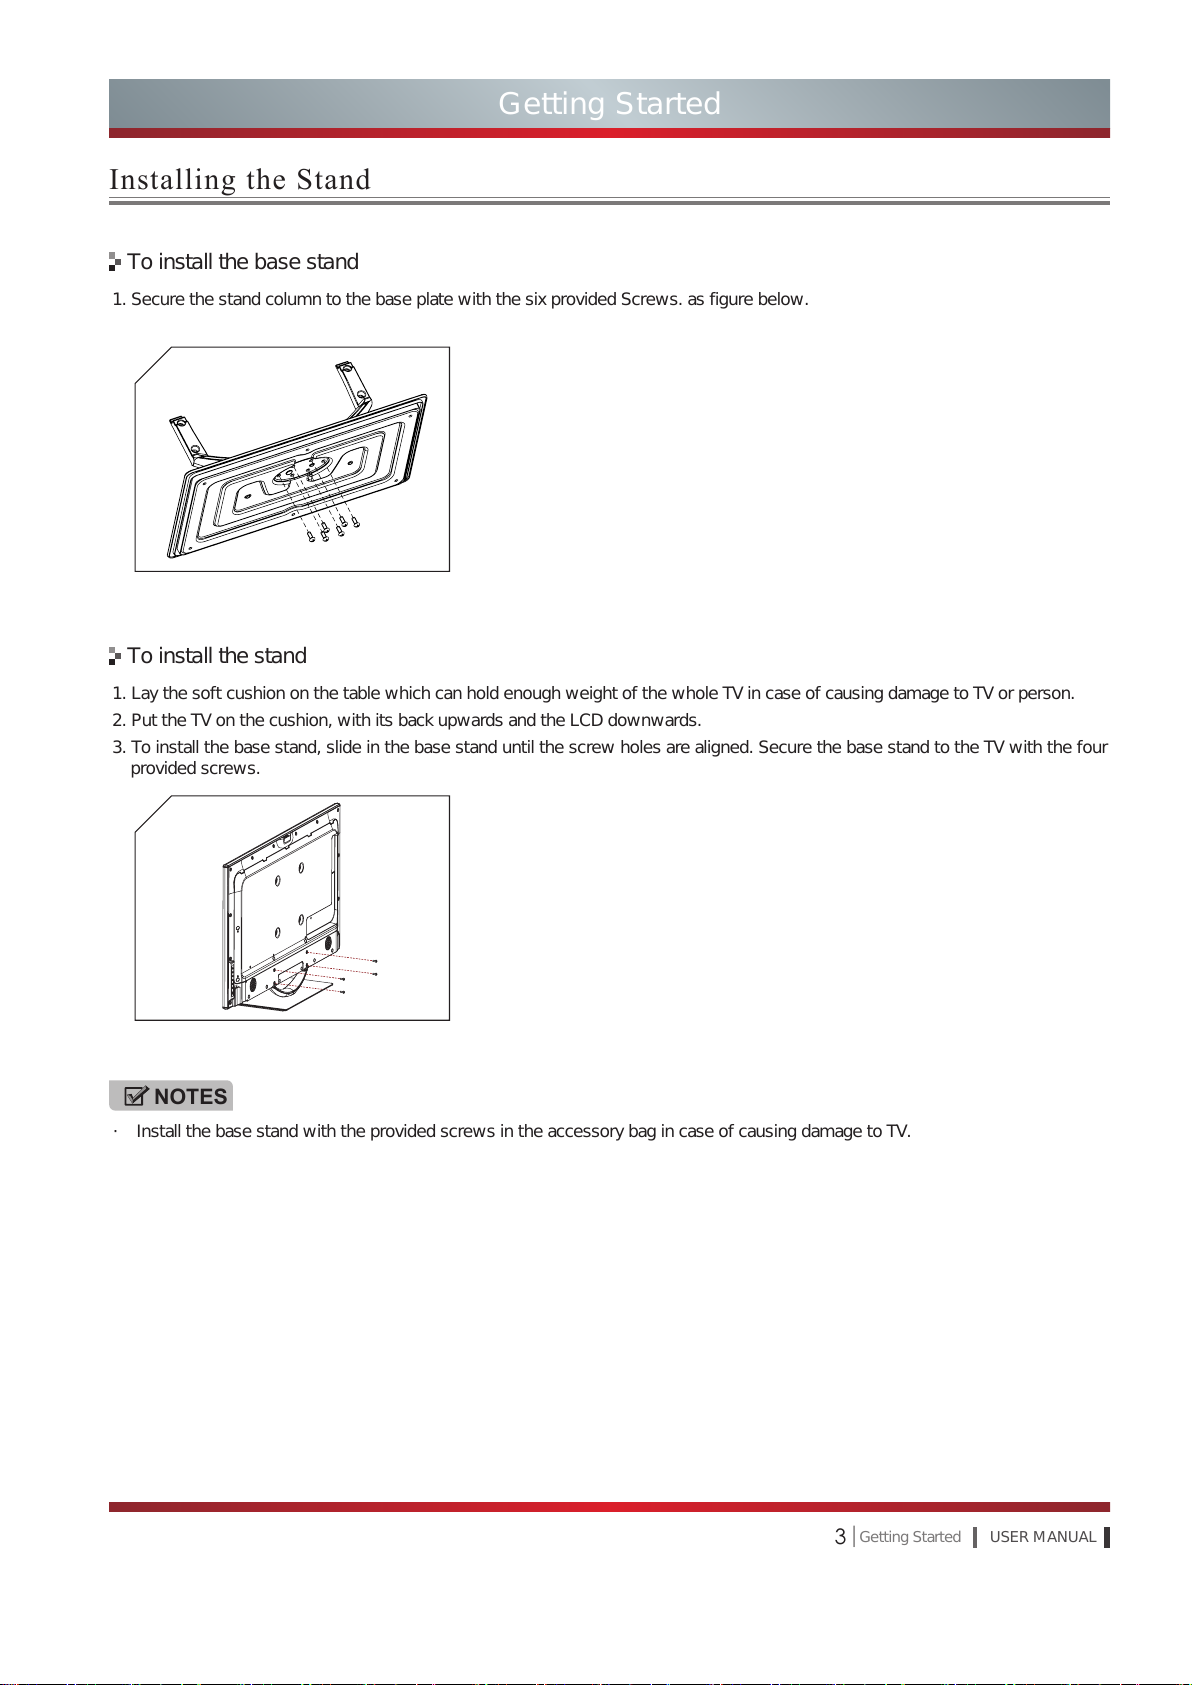
1. Secure the stand column to the base plate with the six provided Screws. as figure below.
1. Lay the soft cushion on the table which can hold enough weight of the whole TV in case of causing damage to TV or person.
2. Put the TV on the cushion, with its back upwards and the LCD downwards.
3. To install the base stand, slide in the base stand until the screw holes are aligned. Secure the base stand to the TV with the four
provided screws.
To install the base stand
To install the stand
Getting Started
Installing the Stand
NOTES
· Install the base stand with the provided screws in the accessory bag in case of causing damage to TV.
USER MANUAL Getting Started |
4
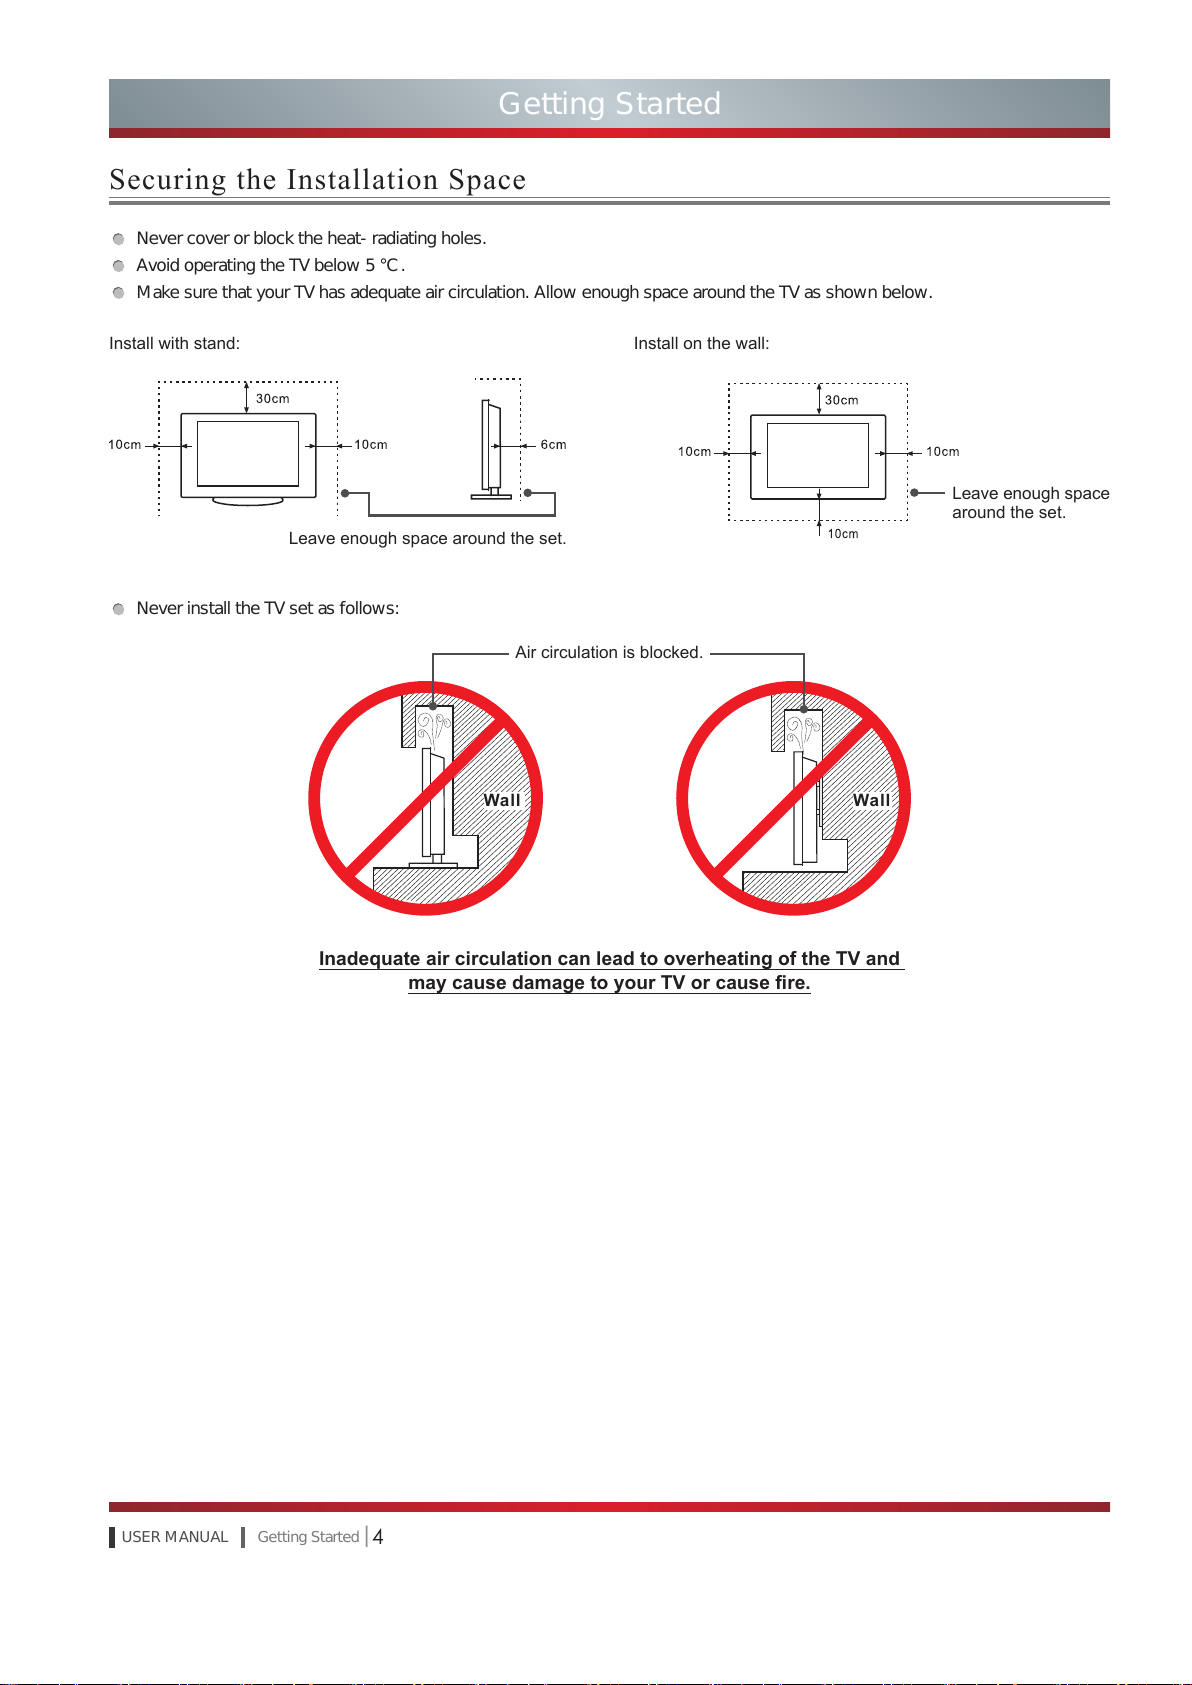
Never cover or block the heat-radiating holes.
Avoid operating the TV below 5 ℃ .
Make sure that your TV has adequate air circulation. Allow enough space around the TV as shown below.
Never install the TV set as follows:
Inadequate air circulation can lead to overheating of the TV and
may cause damage to your TV or cause re.
Leave enough space around the set.
Install with stand: Install on the wall:
Leave enough space
around the set.
Wall Wall
Air circulation is blocked.
Getting Started
Securing the Installation Space
5
| Getting Started USER MANUAL
Getting Started
Control Panel
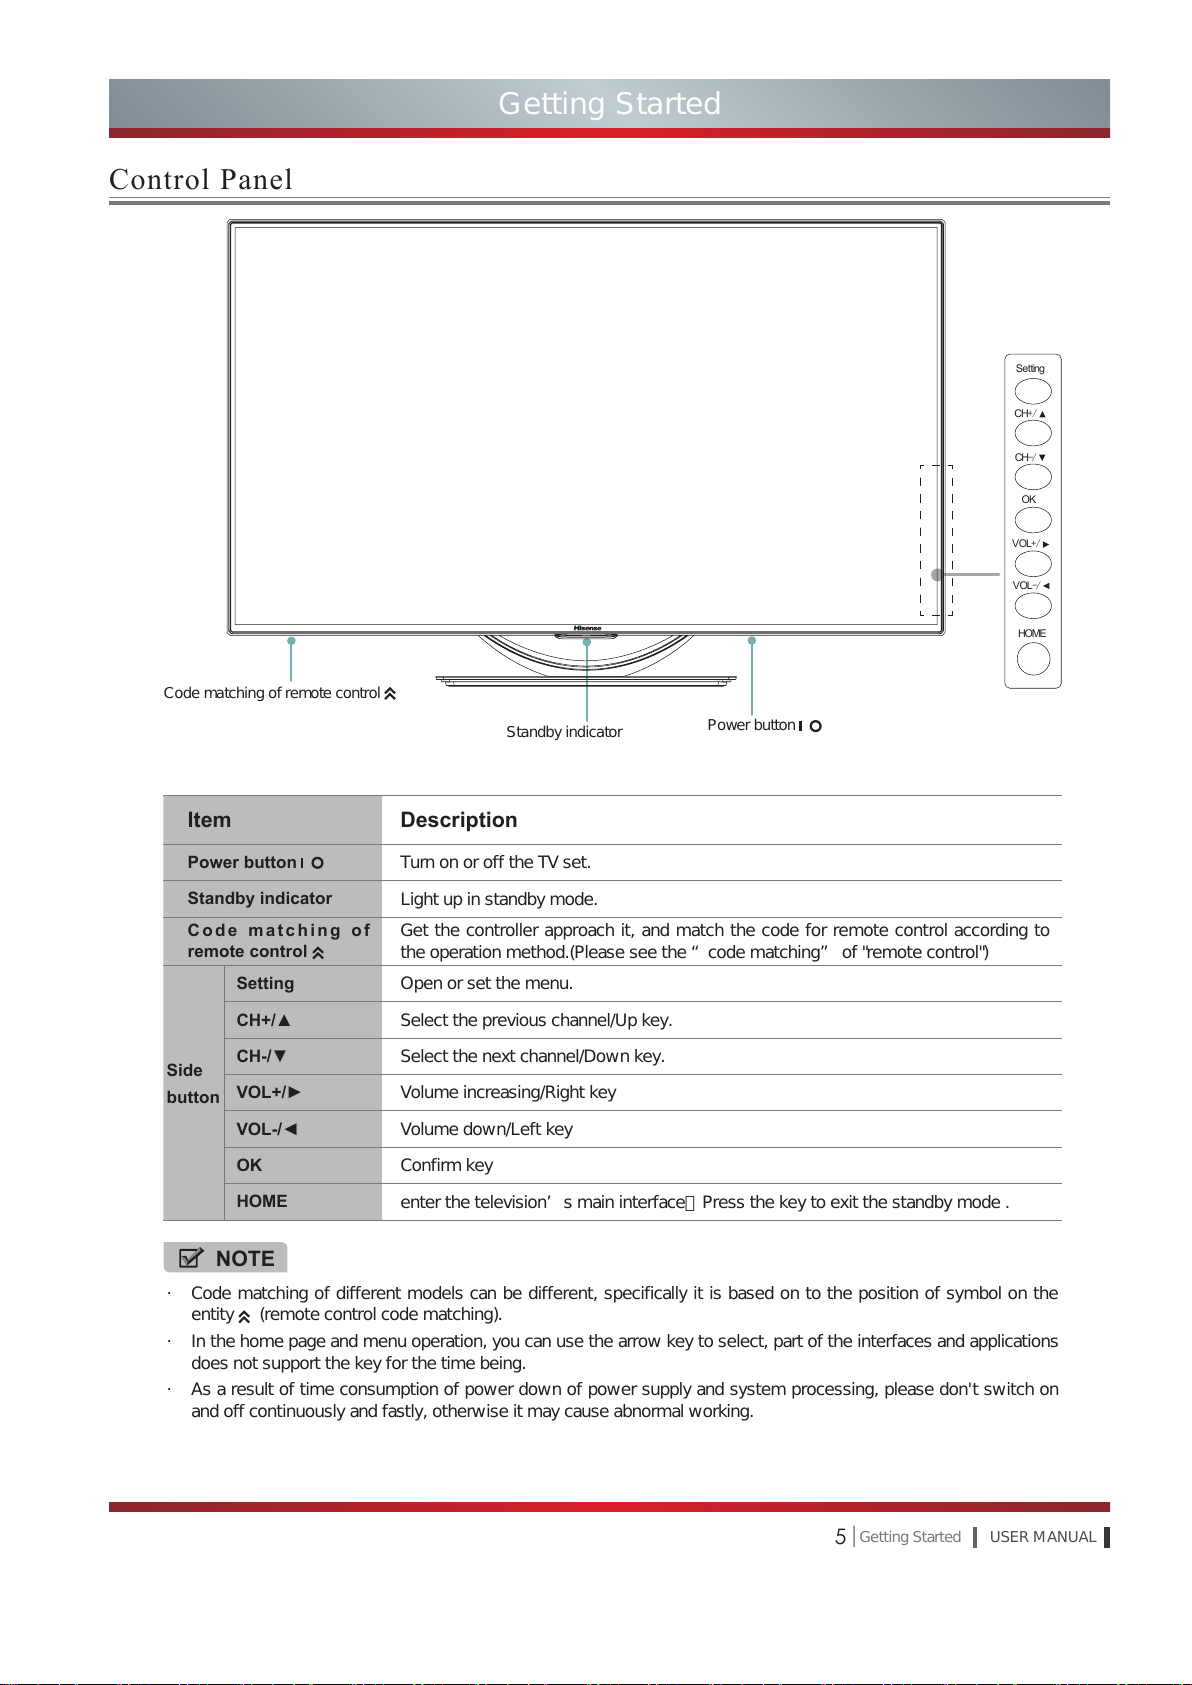
Item Description
Power button
Turn on or off the TV set.
Standby indicator
Light up in standby mode.
Code matching of
remote control
Get the controller approach it, and match the code for remote control according to
the operation method.(Please see the “code matching” of "remote control")
Setting
Open or set the menu.
CH+/▲
Select the previous channel/Up key.
CH-/▼
Select the next channel/Down key.
VOL+/►
Volume increasing/Right key
VOL-/◄
Volume down/Left key
OK
Confirm key
HOME
enter the television’s main interface;Press the key to exit the standby mode .
Standby indicator
Code matching of remote control
NOTE
· Code matching of different models can be different, specifically it is based on to the position of symbol on the
entity (remote control code matching).
· In the home page and menu operation, you can use the arrow key to select, part of the interfaces and applications
does not support the key for the time being.
· As a result of time consumption of power down of power supply and system processing, please don't switch on
and off continuously and fastly, otherwise it may cause abnormal working.
Set ting
CH
+/
CH
-
/
OK
HOME
VOL
+/
VOL
-
/
Power button
Side
button
USER MANUAL Getting Started |
6
Getting Started
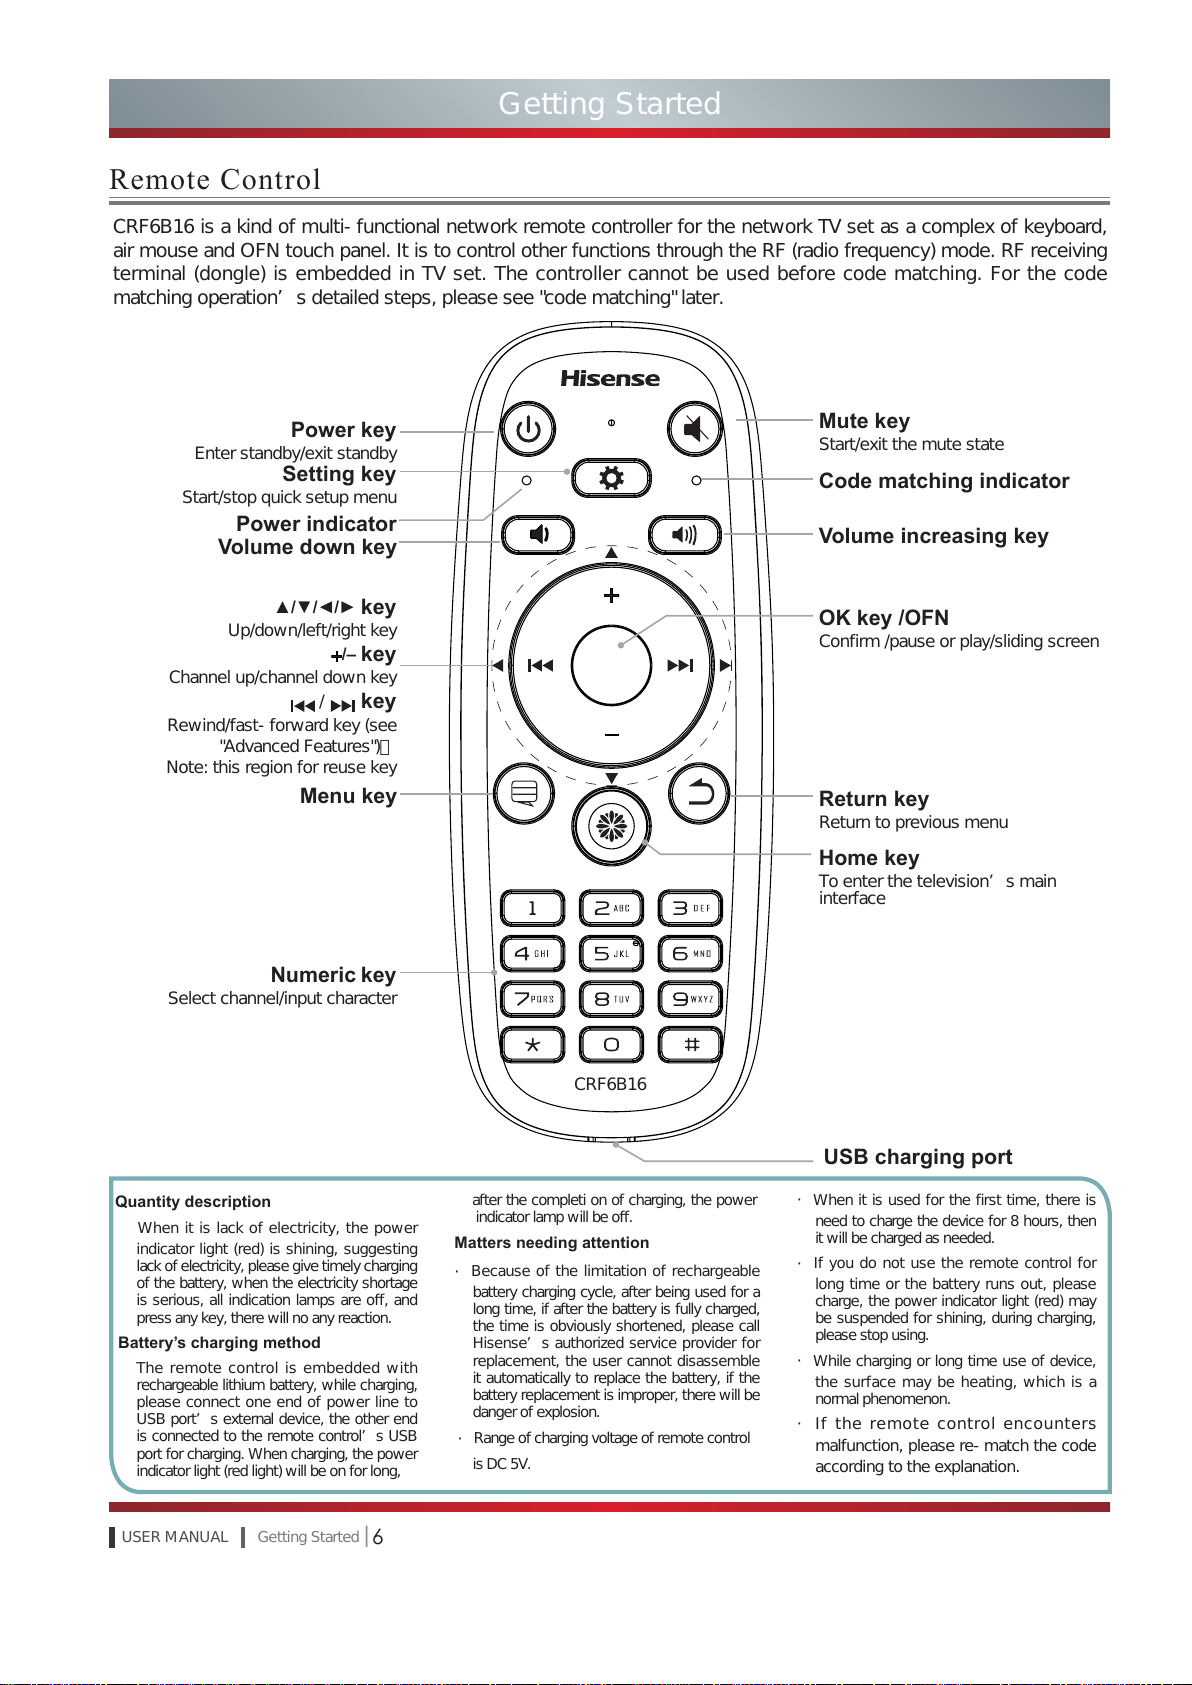
Remote Control
Power key
Enter standby/exit standby
Setting key
Start/stop quick setup menu
Power indicator
Menu key
Return key
Return to previous menu
Home key
To enter the television’s main
interface
USB charging port
OK key /OFN
Confirm /pause or play/sliding screen
Mute key
Start/exit the mute state
Volume increasing key
Code matching indicator
Numeric
key
Select channel/input character
▲/▼/◄/►
key
Up/down/left/right key
/–
key
Channel up/channel down key
/
key
Rewind/fast-forward key (see
"Advanced Features"))
Note: this region for reuse key
CRF6B16 is a kind of multi-functional network remote controller for the network TV set as a complex of keyboard,
air mouse and OFN touch panel. It is to control other functions through the RF (radio frequency) mode. RF receiving
terminal (dongle) is embedded in TV set. The controller cannot be used before code matching. For the code
matching operation’s detailed steps, please see "code matching" later.
Quantity description
When it is lack of electricity, the power
indicator light (red) is shining, suggesting
lack of electricity, please give timely charging
of the battery, when the electricity shortage
is serious, all indication lamps are off, and
press any key, there will no any reaction.
Battery’s charging method
The remote control is embedded with
rechargeable lithium battery, while charging,
please connect one end of power line to
USB port’s external device, the other end
is connected to the remote control’s USB
port for charging. When charging, the power
indicator light (red light) will be on for long,
after the completi on of charging, the power
indicator lamp will be off.
Matters needing attention
·
Because of the limitation of rechargeable
battery charging cycle, after being used for a
long time, if after the battery is fully charged,
the time is obviously shortened, please call
Hisense’s authorized service provider for
replacement, the user cannot disassemble
it automatically to replace the battery, if the
battery replacement is improper, there will be
danger of explosion.
·
Range of charging voltage of remote control
is DC 5V.
·
When it is used for the first time, there is
need to charge the device for 8 hours, then
it will be charged as needed.
·
If you do not use the remote control for
long time or the battery runs out, please
charge, the power indicator light (red) may
be suspended for shining, during charging,
please stop using.
·
While charging or long time use of device,
the surface may be heating, which is a
normal phenomenon.
·If the remote control encounters
malfunction, please re-match the code
according to the explanation.
Volume down key
CRF6B16
 Loading...