

Page 1
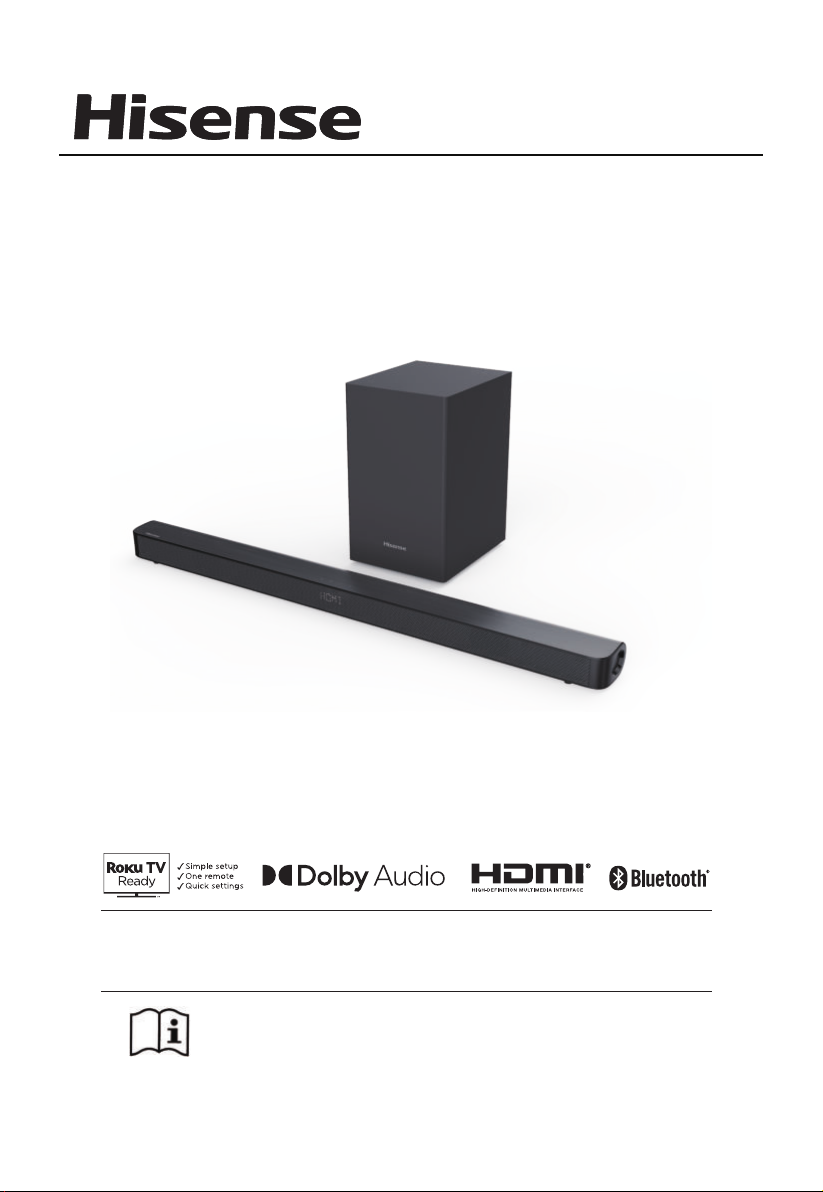
2.1 CH SoundBar with Wireless Subwoofer
Model: HS212F
USER MANUAL
Before using the sound bar, please read this manual
thoroughly and retain it for future reference.
Roku TV Ready and the Roku TV Ready logo are trademarks of Roku, Inc.
Page 2
Contents
Important Safety Instructions 3
Safety ...........................................................................................................................................................................................3
Warning.......................................................................................................................................................................................4
FCC/IC Information 5
What’s in the Box 6
Identifying the Parts 7
Main Unit ...................................................................................................................................................................................7
Wireless Subwoofer................................................................................................................................................................7
Remote Control........................................................................................................................................................................8
Instructions 8
Prepare the Remote Control................................................................................................................................................8
Replace the Remote Control Battery................................................................................................................................8
Placement and Mounting.....................................................................................................................................................9
Wall Mounting (if using option-B).....................................................................................................................................9
Connections 10
Connect to OPTICAL Socket .............................................................................................................................................10
Connect to AUX Socket ..................................................................................................................................................... 10
Connect to HDMI (ARC) Socket .......................................................................................................................................10
Connect to COAXIAL Socket ............................................................................................................................................ 11
Connect Power...................................................................................................................................................................... 11
Pair up with the subwoofer...............................................................................................................................................11
Basic Operation 12
Standby/On
Auto Wake
How to Enable Auto Wake
Automatic Power Off Function
Select Modes.......................................................................................................................................................................... 12
Adjust the Bass/Treble Level............................................................................................................................................. 12
Turn the Surround Sound ON/OFF.................................................................................................................................12
Adjust the Volume................................................................................................................................................................12
Adjust the Brightness.......................................................................................................................................................... 12
............................................................................................................................................................................
..............................................................................................................................................................................
................................................................................................................................................
.......................................................................................................................................
............................................................................................................................................. 12
12
12
12
12
OPTICAL / COAXIAL / HDMI ARC / AUX Operation 13
Bluetooth Operation 13
Pair Bluetooth-enabled Devices...................................................................................................................................... 13
Listen to Music from Bluetooth Device ........................................................................................................................13
USB Operation 14
Troubleshooting 14
15
2
Page 3
Important Safety Instructions
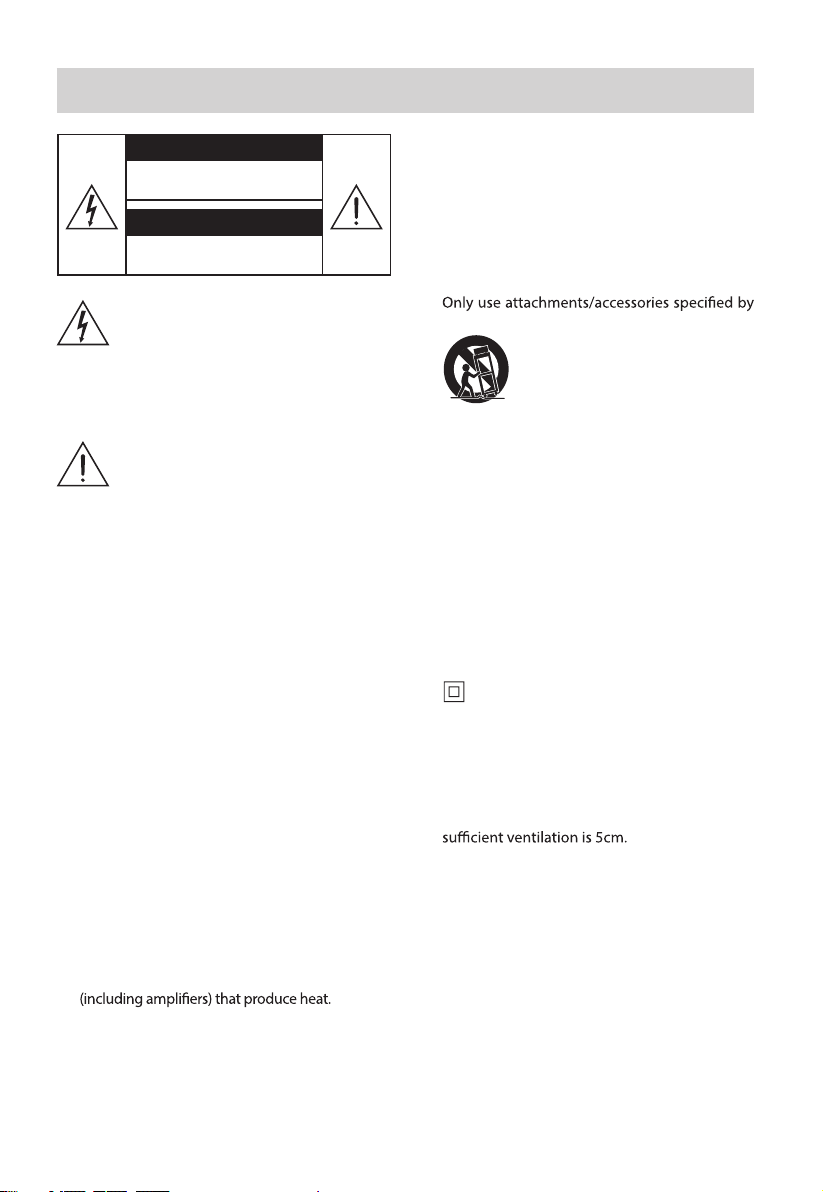
CAUTION
RISK OF ELECTRIC SHOCK
DO NOT OPEN
AVIS
RISQUE DE CHOC
ÉLECTRIQUE NE PAS PUVRIR
Th e lightning flash with arrowhe ad
symbol, within an equilateral triangle, is
intended to alert the user to the presence
of uninsulated “dangerous voltage” within
the product’s enclosure that may be of
sufficient magnitude as to constitute a
risk of electric shock to persons.
The exclamation point within an
equilateral triangle is intended to alert the
user to the presence of important operating
and maintenance (servicing) instructions in
the literature accompanying the appliance.
Safety
1 Read these instructions – All the safety and
operating instructions should be read before
this unit is operated.
2 Keep these instruc tions – The safet y and
operating instructions should be retained for
future reference.
3 Heed all warnings – All warnin gs on the
appliance and in the operating instructions
should be adhered to.
4 Follow all instruc tions – All operating and
usage instructions should be followed.
5 Do not use this unit near water – The
appliance should not be used near water or
moisture – for example, in a wet basement or
near a swimming pool or similar location.
6 Clean only with a dry cloth.
7 Do not block any ventilation openings.
Install in accordance with the manufacturer’s
instructions.
8 Do not install near any heat sources such as
radiators, heaters, stoves, or other apparatus
9 The unit is supplied with a standard mains lead
and moulded plug which for safety reason must
not be modified. If the provided plug does not fit
into your wall socket, consult an electrician for
replacement of the obsolete mains socket.
10 Protect the power cord from being walked on
or pinched particularly at plugs, convenience
receptacles, and the point where they exit
from the apparatus.
11
the manufacturer.
12
used, use caution when moving the car t/
unit combination to avoid injury from
tip-over.
13 Unplug the unit during lightning storms
or when unused for long periods of time.
14 R efer all ser vicing to qualified personnel.
Servicing is required when the unit has
been damaged in any way, such as power
supply cord or plug is damaged, liquid has
been spilled or objects have fallen into the
unit, the unit has been exposed to rain
or moisture, does not operate normally, or has
been dropped.
15
insulated electrical appliance. It has been
designed in such a way that it does not require
a safety connection to electrical earth.
16 Do not place liquid filled objects such as vases
on the unit.
17 Minimum distance around the unit for
18 The ventilation should not be impeded by
covering the ventilation openings with items,
such as newspapers, table-cloths, curtains, etc.
19 No naked flame sources, such as light ed
candles, should be placed on the unit.
20 Batteries should be recycled or disposed of as
per state and local guidelines.
21 The unit can be used in moderate or tropical
climates.
Use only with the cart, stand, tripod,
bracket or table specified by the
manufactu rer, or sold with the
unit. When a cart or rack is
This equipment is a Class II or double
3
Page 4
Caution:
not expose this unit to rain or moisture.
The unit must not be exposed to
dripping or splashing and objects filled with
liquids, such as vases, must not be placed on
unit.
- The mains plug/appliance coupler is used as
the disconnect device, the disconnect device
must remain readily operable.
- Danger of explosion if battery is incorrectly
replaced. R eplace only with the same or
equivalent type.
Warning
• The battery (batteries or battery pack) shall not
be exposed to excessive heat such fires, or other
direct heat sources.
• Bef ore o perating this unit, c heck the
voltage of this unit to see if it is identical to
the voltage of your local power supply.
• Do not place this unit close to strong magnetic
• Do not place this unit on the amplifier or
receiver.
• If any solid ob ject or liquid falls into the
system, unplug the system and have it checked
further.
• Do not attempt to clean the unit with chemical
Battery usage CAUTION
To prevent battery leakage which may result in
bodily injury, property damage, or damage to the
apparatus:
- Install all batteries correctly, + and - as marked
on the apparatus.
- Do not mix old and new batteries.
- Do not mix alkaline, standard (Carbon-Zinc) or
rechargeable (Ni-Cd, Ni- MH, etc.) batteries.
- Remove batteries when the unit is not used for
a long time.
Correct Disposal of this product. This
marking indicates that this product
should not be disposed with other
household wastes throughout the EU.
To prevent possible harm to the environment or
human health from uncontrolled waste disposal,
recycle it responsibly to promote the sustainable
reuse of material resources. To return your used
device, please use th e return and collection
systems or contact the retailer where the product
was purchased. They can take this product for
environmental safe recycling.
Hereby, Hisense International
Co., Ltd declares that the 2.1 channel
soundbar with wireless subwoofer is
in compliance with the essential requirements and
other relevant provisions of Directive 2014/53/EU
clean, dry or slightly damp cloth.
• When removing the power plug from the wall
outlet, always pull directly on the plug, never
yank on the cord.
• Changes or modifications to this unit not
expressly approved by the party responsible
for compliance will void the user’s authority to
operate the equipment.
• The rating label is pasted on the bottom or
back of the equipment.
WARNING: This product contains
chemicals known to the State of California
to cause cancer and birth defects or other
reproductive harm. For more information:
www.watts.com/prop65
The Bluetooth word mark and logos are registered
trademarks owned by Bluetooth SIG,. Inc.
HDMI is a trademark or registered trademark of
HDMI Licensing, LLC in the United States and/or
other countries.
Ma nufactur ed un de r lic ense f rom Dolb y
La borato ries. Dolby, Dolb y Audio, and the
do uble-D symbol are trademarks of Dolby
Laboratories Licensing Corporation.
4
Page 5
FCC INFORMATION (for US customers)
Warning:
expressly approved by the party responsible for
compliance could void the user’s authority to
operate the equipment.”
NOTE:
• This equipment has been tested and found
to comply with the limits for a Class B digital
device, pursuant to Part 15 of the FCC Rules.
These limits are designed to provide reasonable
protection against harmful interference in
a residential installation. This equipment
generates, uses and can radiate radio
frequency energy and, if not installed and
used in accordance with the instructions,
may cause harmful interference to radio
communications.
• However, there is no guarantee that interference
will not occur in a particular installation. If this
equipment does cause harmful interference
to radio or television reception, which can be
on, the user is encouraged to try to correct the
interference by one or more of the following
measures:
- Reorient or relocate the receiving antenna.
- Increase the separation between the
equipment and receiver.
- Connect the equipment into an outlet on a
is connected.
- Consult the dealer or an experienced radio /
TV technician for help.
• This device complies with Part 15 of the FCC
Rules. Operation is subject to the following
two conditions:
(1) this device may not cause harmful
interference, and
(2) this device must accept any interference
received, including interference that may cause
undesired operation.
• Shielded cables must be used with this unit to
ensure compliance with the Class B FCC limits.
INFORMATION FCC (pour les clients américains)
EN
Avertissement :
Les ch
non expressément approuvées par la partie
responsable de la conformité pourraient annuler
l’autorisation de l’utilisateur à utiliser l’équipement.
REMARQUE :
• Ce dispositif a été testé et déclaré conforme aux
limites d’un dispositif numérique de classe B,
conformément à la partie 15 des règles de la FCC.
Ces limites sont conçues pour fournir une
protection raisonnable contre les interférences
nuisibles dans une installation résidentielle.
Cet appareil génère, utilise et peut émettre de
l’énergie radiofréquence et, s’il n’est pas installé et
utilisé conformément aux instructions, il peut
causer des interférences nuisibles aux
communications radio.
• Cependant, il n’est pas garanti que des
interférences ne se produiront pas dans une
installation particulière. Si cet appareil provoque
des interférences nuisibles à la réception radio
ou de télévision, ce qui peut être déterminé en
mettant l’appareil hors tension, l’utilisateur est
encouragé à essayer de corriger l’interférence par
une ou plusieurs des mesures suivantes :
- Réorienter ou déplacer l’antenne de réception.
- Augmenter la distance entre l’appareil et le
récepteur.
- Brancher l’appareil à une prise sur un circuit
branché.
- Consulter le revendeur ou un technicien radio/TV
expérimenté.
• Cet appareil est conforme à la partie 15 des règles
de la FCC. Son fonctionnement est soumis aux
deux conditions suivantes :
(1) ce dispositif ne peut pas causer d’interférences
nuisibles et
(2) cet appareil doit accepte r toute inter férence
reçue, y compris les interférences qui peuvent
causer un mauvais fonctionnement.
• Des câbles blindés doivent être utilisés avec cet
apparei l pour assurer la conformité avec les
limites de la classe B de la FCC.fonctionnement
de I'appareil.
FR
IC Notice:
This device complies with Canada Industry licenceexempt RSS standard(s). Operation is subject to the
following two conditions: (1) this device may not
cause interference. and (2) this device must accept
any interference. Including interference that may
cause undesired operation of the device.
CAN ICES-3 (B) / NMB-3 (B)
Avis d’Industrie Canada
Le présent appareil est conforme aux CNR d'industrie
Canada applicables aux appareils radio exem pts
de licence L'exploitation est autorisée aux deux
conditions suivantes: (1) I'appareil ne doit pas produire
de brouillage, et (2) I'utillsateur de I'appareil doit
accepterbrouillage radioélectrique subi meme si
le brouillage est susceptible d'encompromettre le
fonctionnement. mauvais fonctionnement de I'appareil.
5
Page 6
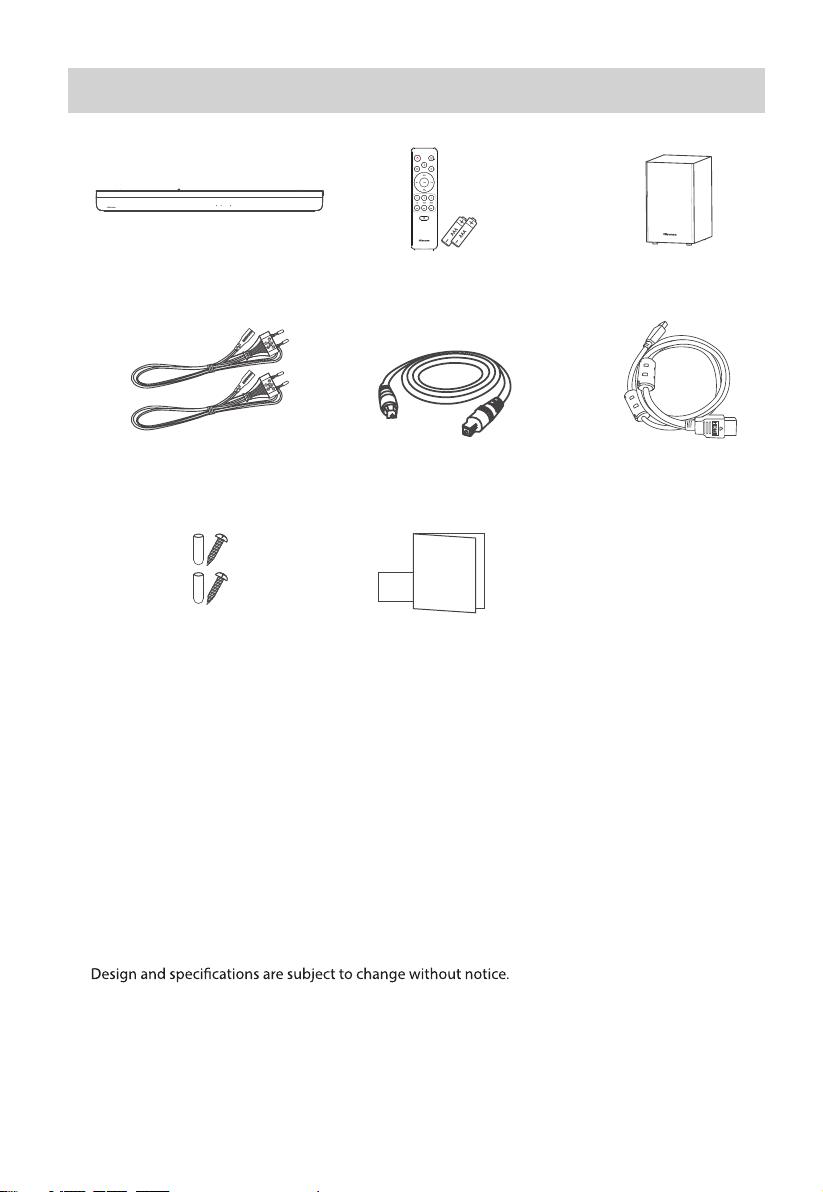
What’s in the Box
Main Unit Remote Control /
AC Power Cord
x 2
AAA Batteries x 2
Optical Cable HDMI Cable
User Manual/Quick Start GuideWall Mounting Kit
Wireless Subwoofer
•
6
Page 7
Identifying the Parts
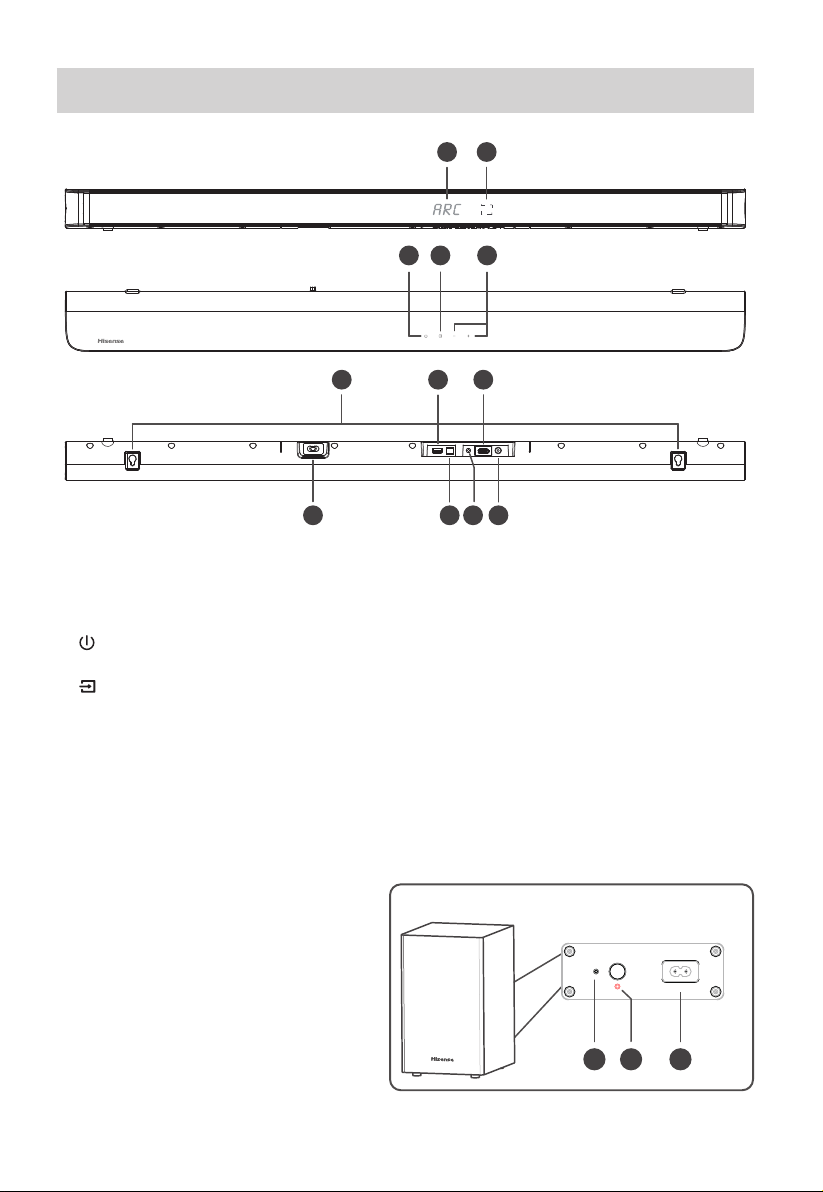
Main Unit
1 Display Window
Show the current status.
2 Remote Control Sensor
Receive signal from the remote control.
(ON/OFF) Button
3
Switch the unit between ON and STANDBY mode.
4
(SOURCE) Button
Select the play mode.
5 +/- (Vol+/Vol-) Buttons
Increase/decrease the volume level.
6 Wall Mount
Install the wall mounting screws into the
wall mount of the unit.
1 2
3
6
54
11
8
12
10
97
7 AC IN Socket
Connect to the power supply.
8 USB Socket
Insert the USB device to play music.
9 OPTICAL Socket
Connect to an optical audio output on the TV.
10 AUX Socket
Connect to an external audio device.
11 HDMI ARC Socket
Connect to a TV via HDMI cable.
12 COAXIAL Socket
Connect to a coaxial audio output on the TV.
Wireless Subwoofer
1 PAIR Indicator
Light up solidly when the pairing succeed.
2 Reset Button
Reset the unit and broadcast the bluetooth
version.
3 AC IN Socket
Connect to power supply.
AC IN
1 2 3
7
Page 8
Remote Control
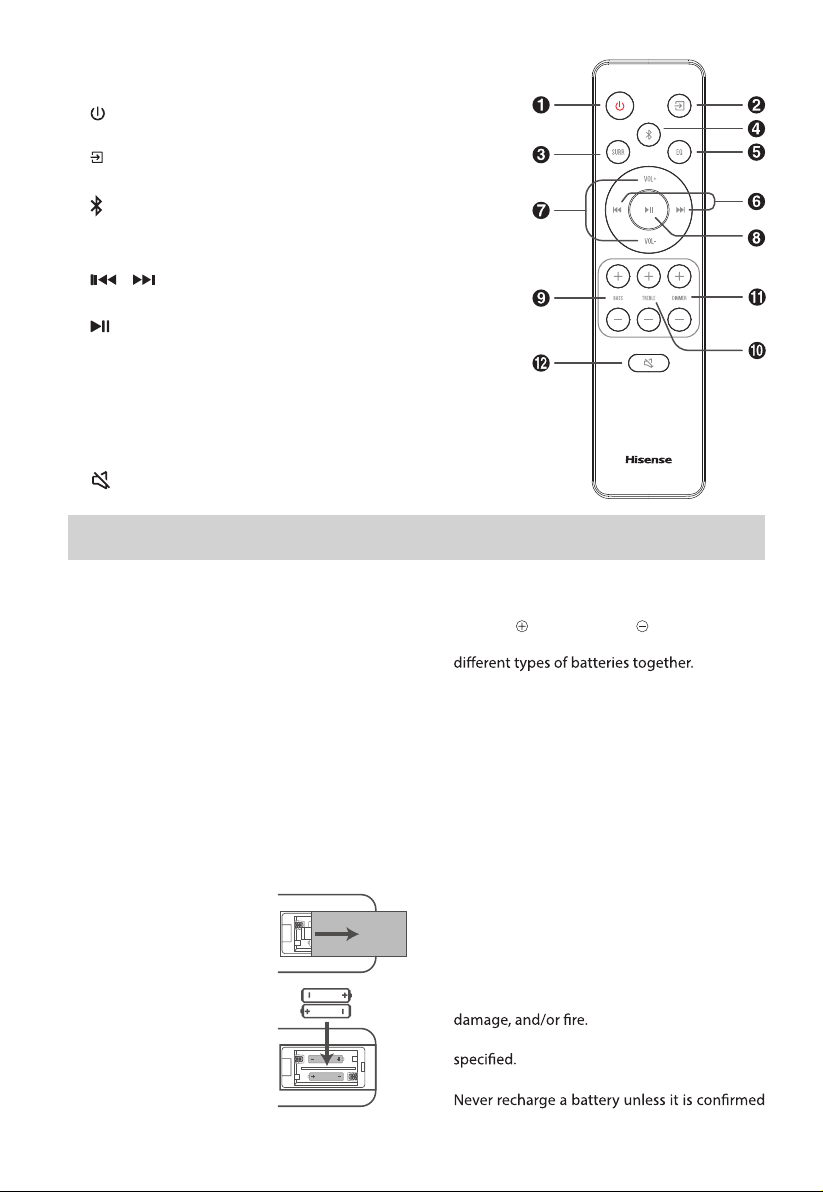
1 Switch the unit between ON and
2 (SOURCE) Select the play mode.
3 SURR Adjust the surround ON/OFF.
4
(BT) Select the Bluetooth mode.
5 EQ Select MUSIC/MOVIE/NEWS/SPORT/NIGHT
6
/ Skip to previous/next track in BT/USB mode.
7 VOL+/VOL- Increase/decrease the volume level.
8
9 BASS+/- Increase/decrease the bass level.
10 TREBLE+/- Increase/decrease the treble level.
11 DIMMER+/- Adjust display brightness.
12 (MUTE) Mute or resume the volume.
STANDBY mode.
sound effect.
Play/pause/resume playback in BT/USB mode.
Press and hold to activate the pairing
function in Bluetooth mode or disconnect the
existing paired Bluetooth device.
Instructions
Prepare the Remote Control
The provided Remote Control allows the unit to
be operated from a distance.
•
Even if the Remote Control is operated within
the effec tive range 19.7 feet (6m), remote
control operation may be disrupted if there
are any obstacles between the unit and the
remote control.
•
If the Remote Control is operated near other
products which generate infrared rays, or if
other remote control devices using infra-red
rays are used near the unit, it may operate
incorrectly. Conversely, the other products may
operate incorrectly.
Replace the Remote Control Battery
1 Press and slide the back
cover to open the battery
compartment of the
remote control.
2 Insert two AAA size
batteries (included). Make
sure the (+) and (–) ends of
the batteries match the (+)
and (–) ends indicated in
the battery compartment.
3 Close the battery
compartment cover.
Precautions Concerning Batteries
• Be sure to insert the batteries with correct
positive “ ” and negative “ ” polarities.
• Use batteries of the same type. Never use
• Either rechargeabl e or non-rechargeable
batteries can be used. Refer to the precautions
on their labels.
• Be aware of your fingernails when removing
the battery cover and the battery.
• Do not drop the remote control.
• Do not allow anything to impact the remote
control.
• Do not spill water or any liquid on the remote
control.
• Do not p lace the remote control on a wet
object.
• Do not place the remote control under direct
sunlight or near sources of excessive heat.
• Remove the battery from the remote control
when not in use for a long period of time,
as corrosion or battery leakage may occur
and result in physical injury, and/or property
• Do not use any batteries other than those
• Do not mix new batteries with old ones.
•
to be a rechargeable type.
8
Page 9
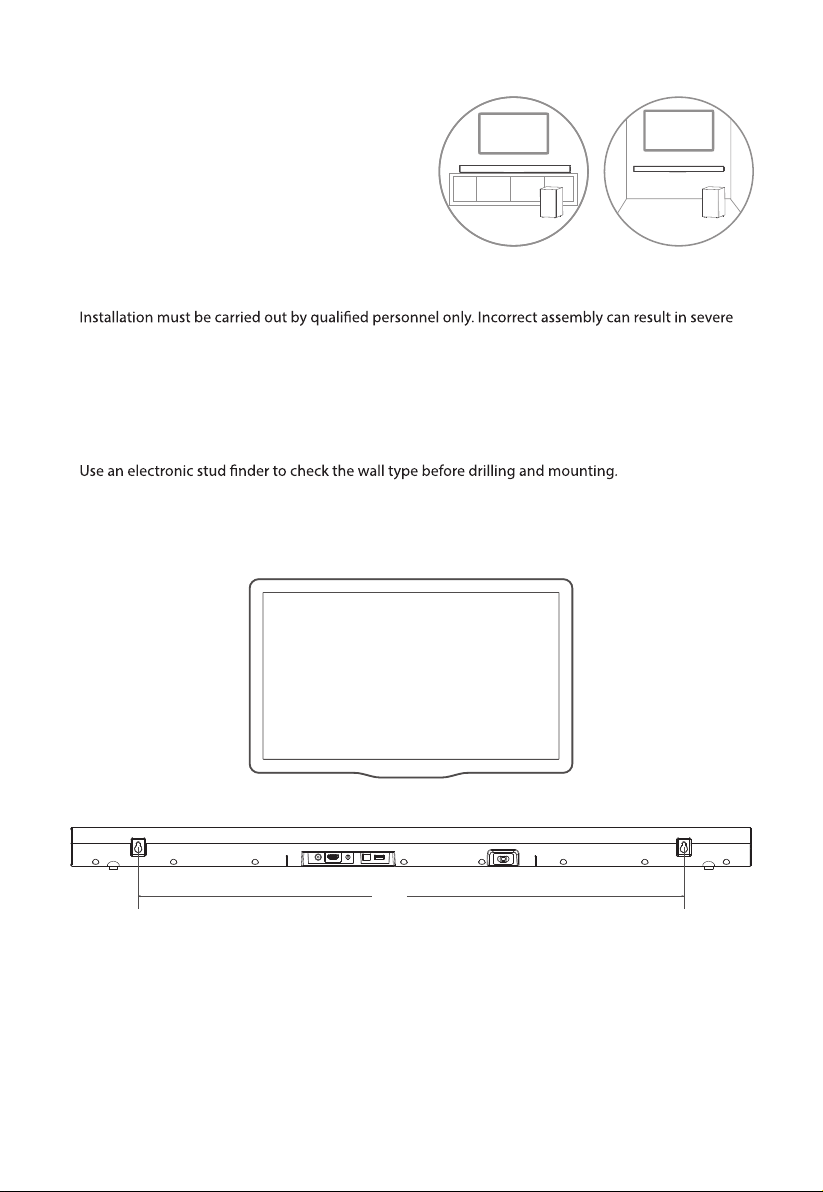
Placement and Mounting
Placement
A If your TV is placed on a table, you can place the
unit on the table directly in front of the TV stand,
centered with the TV screen.
B If your TV is attached to a wall, you can mount
the unit on the wall directly below the TV screen.
A B
Wall Mounting (if using option-B)
Note:
personal injury and property damage (if you intend to install this product yourself, you must check
for installations such as electrical wiring and plumbing that may be buried inside the wall). It is the
installer’s responsibility to verify that the wall will safely support the total load of the unit and wall
brackets.
- Additional tools (not included) are required for the installation.
- Do not overtighten screws.
- Keep this instruction manual for future reference.
-
770mm
9
Page 10
Connections
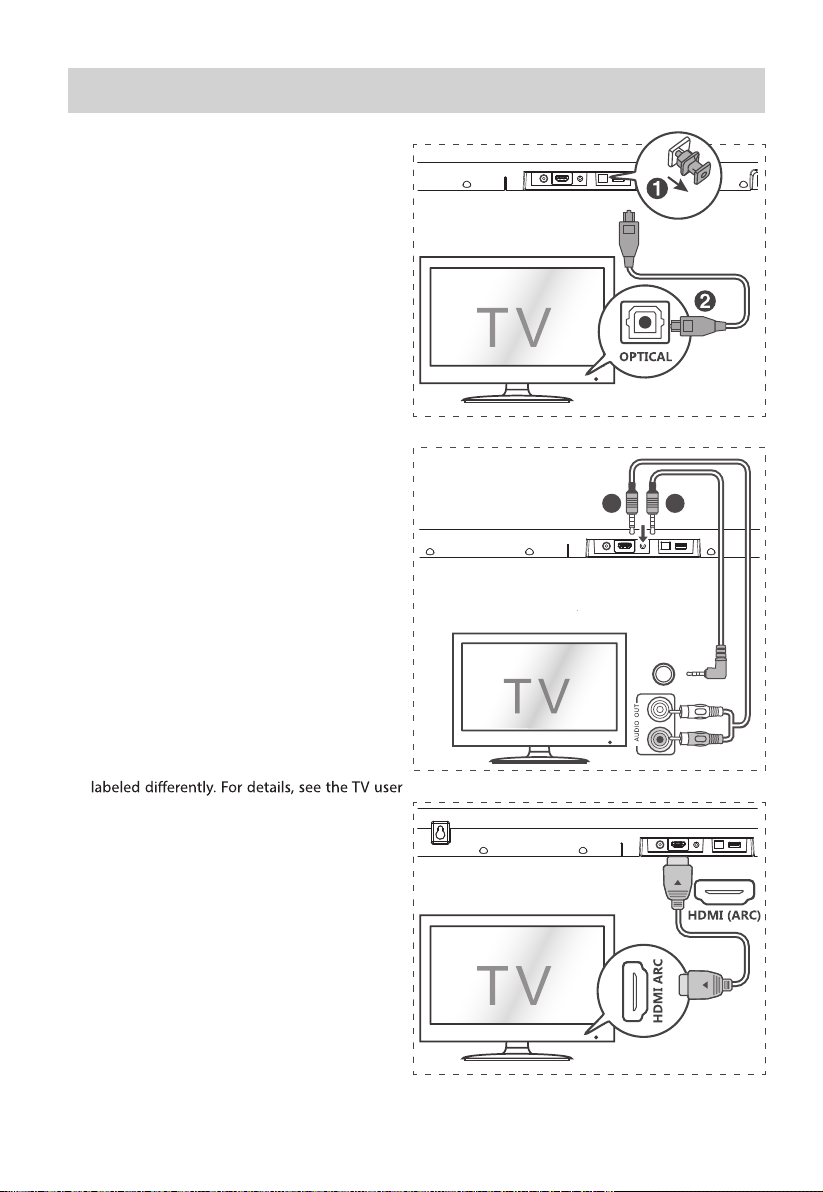
Connect to OPTICAL Socket
- Remove the protective cap of the OPTICAL
sock et, then connec t an OPTICAL cable
to the TV’s OPTICAL OUT socket and the
OPTICAL socket on the unit.
Connect to AUX Socket
A Us e a RCA to 3.5mm audio cable (not
included) to connect the TV’s audio output
sockets to the AUX socket on the unit.
B Use a 3.5mm to 3.5mm audio cable (not
included) to connect the TV’s or external
audio device AUX socket to the AUX socket
on the unit.
Connect to HDMI (ARC) Socket
Your Soundbar supports HDMI with Audio Return
Channel (ARC). If your TV is HDMI ARC compliant,
you can hear the TV audio through your Soundbar
by using a single HDMI cable.
1 Using a High Speed HDMI cable, connect the
HDMI OUT (ARC)-TO TV connector on your
Soundbar to the HDMI ARC connector on
the TV.
- The HDMI ARC connector on the TV might be
BA
AUX
manual.
2 On your TV, turn on HDMI-CEC operations. For
details, see the TV user manual.
Tips:
- Your TV must support the HDMI-CEC and ARC
function. HDMI-CEC and ARC must be set to
On.
- The setting method of HDMI-CEC and ARC may
differ depending on the TV. For details about
ARC function, please refer to your TV owner’s
manual.
- Only HDMI 1.4 compatible cables can support
the ARC function.
10
Page 11
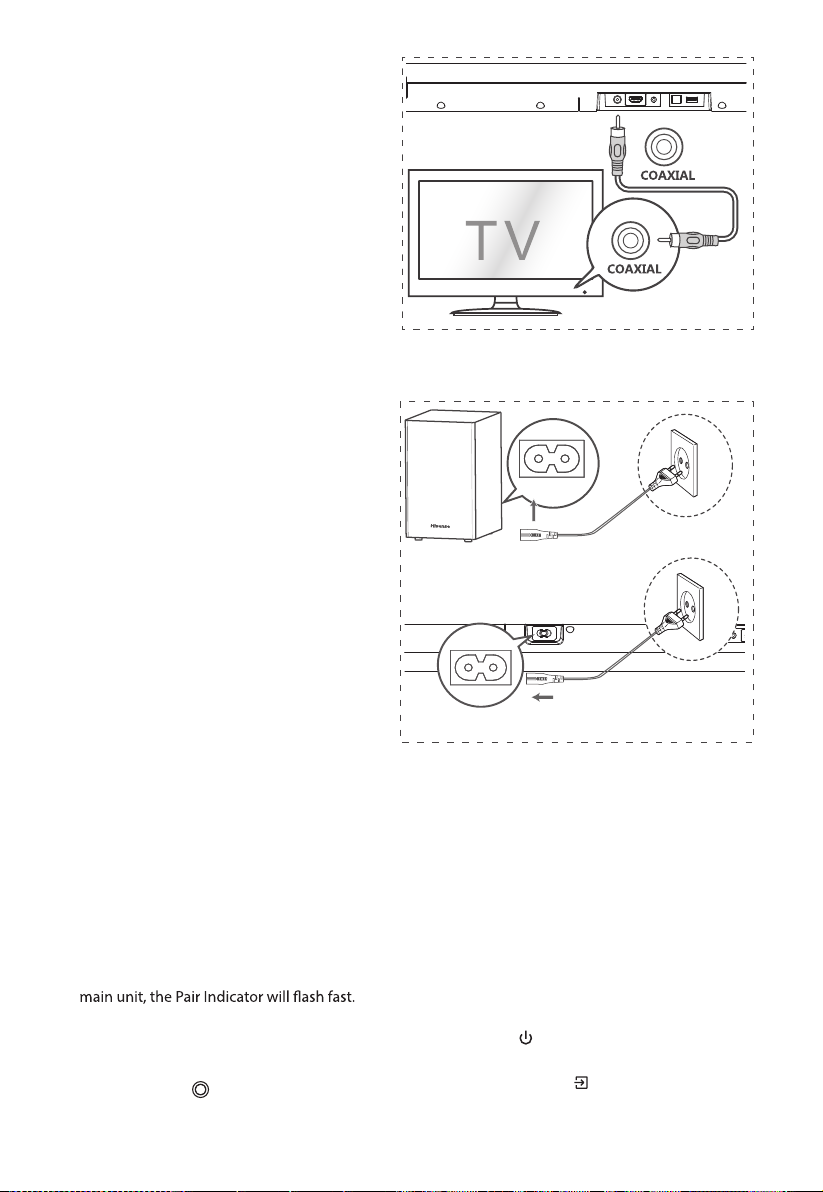
Connect to COAXIAL Socket
• You can use the COAXIAL cable (not
included) to connect the TV's COAXIAL OUT
socket and COAXIAL socket on the unit.
Tip: The unit may not be able to decode all digital
audio formats from the input source. In this case,
the unit will mute. This is NOT a defect. Ensure
that the audio setting of the input source (e.g. TV,
game console, DVD player, etc.) is set to PCM or
Dolby Digital (Refer to the user manual of the
input source device for its audio setting details)
with HDMI / OPTICAl / COAXIAL input.
Connect Power
Risk of product damage!
- Ensure that the po wer supply voltage
corresponds to the voltage printed on the
back or the underside of the unit.
- Before connect ing the AC power cord,
ensure you have completed all other
connections.
Subwoofer
• Connect the mains cable to the AC IN Socket
of the subwoofer and then into a mains
socket.
Soundbar
• Connect the mains cable to the AC IN Socket
of main unit and then into a mains socket.
Pair up with the subwoofer
Automatic pairing
Plug the soundbar and the subwoofer into the
mains sockets and then press on the unit or
remote control to switch the unit to ON mode.
The subwoofer and soundbar will automatically
pair.
• When the subwoofer is pairing with the
• When the subwoofer is paired with the main
unit, the Pair Indicator will light up.
NOTE:
- Do not press the button on the subwoofer
except for manual pairing.
- I f th e automatic pair ing fails, pair the
subwoofer with the main unit manually.
Manual pairing
If no audio from the wireless subwoofer can be
heard, manually pair up the subwoofer.
1 Unplug both units from the mains sockets
again, then plug them in again after 3 minutes.
- Then press on the unit or remote control to
switch the unit ON.
Press and hold the button on the
soundbar or on the remote control for 3 seconds.
11
Page 12
- The Pair indicator on the subwoofer will rapidly
blink.
2 The Pair indicator on the subwo ofer will
become solid when successful.
3 If the Pair indicator still keeps blinking, repeat
step 1-2.
NOTE:
• The subwoofer should be within 6 m of the
soun dbar in an open area (the closer the
better).
• Remove any objects between the subwoofer
and the soundbar.
• If the wireless connection fails again, check
if there is a conflict or strong interference
(e. g. interference from an electronic device)
around the location. Remove these conflicts
or strong interferences and repeat the above
procedures.
• If the main unit is not connected with the
subwoofer and it is in ON mode, the unit’s
Basic Operation
Standby/On
sequentially. While in STANDBY mode, the LED
is in solid red.
The unit automatically turns to STANDBY mode
after about 15 minutes if the TV or the external
•
mains plug from the mains socket.
• Please turn the unit off completely to save
energy when not in use.
Select Modes
Press the
the unit or on the remote control to select the
OPTICAL, COAXIAL, HDMI ARC, BT(Bluetooth),
USB, AUX mode.
The selected mode will show on the display.
(SOURCE) butt on repeatedly on
Adjust the Bass/Treble Level
• Press TREBLE +/- button to increase or
decrease the treble. (treble+5 / treble–5)
• Press BASS+/- button to increase or decrease
the bass. (bass+5 / bass–5)
• After about 3 seconds, the unit will exit from
bass/treble setting. The display will show the
current selected mode. You may now press the
VOL+ / - buttons to adjust volume.
socket, the main unit will be in STANDBY mode.
• Press the
remote control to switch the unit ON.
• Press the
back to STANDBY mode.
• Disconnect the mains plug from the mains
socket if you want to switch the unit OFF
completely.
button on the unit or on the
button again to switch the unit
Auto Wake
• If a TV or an external device is connected (AUX
/ OPTICAL / COAXIAL / HDMI ARC), the unit
will switch on automatically when the TV or
the external device is switched on.
How to Enable Auto Wake
•
Short press the (SOURCE) button and
+ (VOL +) button on the unit to enable or
disable Auto Wake function.
•
Auto Wake On: white and green LED blink twice
sequentially. While in STANDBY mode, the
RED LED is breathing.
•
Turn the Surround Sound ON/OFF
• Press the SURR button on the remote control
to turn on the surround sound. Press this
Adjust the Volume
- Press the + / - buttons on the unit or VOL+/VOL-
on the remote control to adjust the volume.
(MUTE) button on the remote control. Press
the (MUTE) button again or press the VOL+ /
VOL- buttons to resume normal listening.
Adjust the Brightness
- Press the DIMMER +/- buttons on the remote
control to select brightness level.
• While playing, press the EQ button on the
re mote contr ol to selec t desire d preset
equalizers: MUSIC, MOVIE, NEWS, SPORT,
NIGHT.
12
Page 13
OPTICAL/COAXIAL/HDMI
ARC/AUX Operation
1 Ensure that the unit is connected to the TV or
audio device.
2 Press the
on the remote control to select the OPTICAL,
COAXIAL, HDMI ARC, BT, USB, AUX mode.
3 Operate your audio device directly for playback
features.
4 Press the VOL +/– button to adjust the volume
to your desired level.
Tip:
• The unit may not be able to decode all digital
audio formats from the input source. In this
case, the unit will mute. This is NOT a defect.
Ensure that the audio setting of the input
source (e.g. TV, game console, DVD player,
etc.) is set to PCM or Dolby Digital (Refer to
the user manual of the input source device
for its audio setting details) with HDMI ARC /
OPTICAl / COAXIAL input.
button repeatedly on the unit or
Bluetooth Operation
Pair Bluetooth-enabled Devices
player, you need to pair your device to this player.
Note:
- The operational range between this player
and a Bluetooth device is approximately 26
feet (8m) (without any object between the
Bluetooth device and the unit).
- Before you connect a Bluetooth device to this
unit, ensure you know the device’s capabilities.
- Compatibility with all Bluetooth devices is not
guaranteed.
- Any obstacle between this unit and a Bluetooth
device can reduce the operational range.
- If the signal strength is weak, your Bluetooth
receiver may disconnect, but it will re-enter
pairing mode automatically.
1 D ur ing ON mode, press the
repeatedly on the unit or the
the remote control to select Bluetooth mode.
“NO BT” will show on the display if the unit is
not paired to any Bluetooth device.
button
(BT) button on
2 Activate your Bluetooth device and select the
search mode. “Hisense HS212F ” will appear on
your Bluetooth device list.
button on the remote control to be
searchable. The display will show “PAIR” and
you will hear "Pairing" from the unit.
3 Select “Hisense HS212F ” in the pairing list. After
successful pairing, you will hear "Paired" from
the unit, and the display panel shows “BT”.
4 Play music from the connected Bluetooth device.
To disconnect the Bluetooth function, you can :
- Switch to another function on the unit.
- Disable the function from your Bluetooth device.
The Bluetooth device will be disconnected from the
unit after the “Disconnected” voice prompt.
- Press and hold the
remote control.
Tips:
• Enter "0000" for the password if necessary.
• If no other Bluetooth device pairs with this
player within two minutes, the player will
recover its previous connection.
• The player will also be disconnected when your
device is moved beyond the operational range.
• If you want to reconnect your device to this
player, place it within the operational range.
• If the device is moved beyond the operational
range, when it is brought back, please check if
the device is still connected to the player.
• If the connection is lost, follow the instructions
above to pair your device to the player again.
press and hold the
button on the
Listen to Music from Bluetooth Device
- If the connected Bluetooth device supports
Advanced Audio Distribution Profile (A2DP),
you can listen to the music stored on the
device through the player.
- If the device also supports Audio Video Remote
Cont rol Profile (AVRCP), you can use the
player's remote control to play music stored on
the device.
1 Pair your device with the player.
2 Play music via your device (if it supports A2DP).
3 Use supplied remote control to control play (if
it supports AVRCP).
- To pause/resume play, press the
button on the remote control.
- To skip to a track, press the
buttons on the remote control.
13
/
Page 14
USB Operation
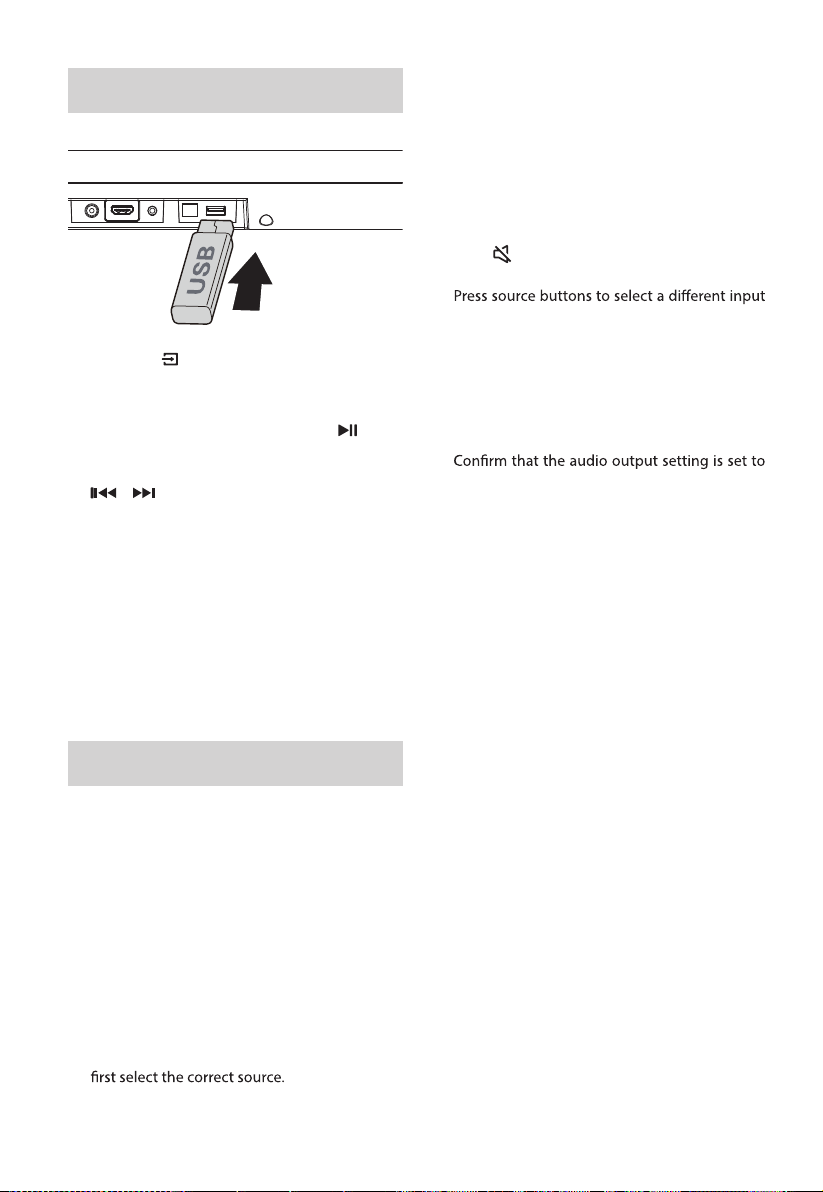
1 Insert the USB device.
2 Press the button repeatedly on the unit
or on the remote control to select USB mode.
3 During playback:
- To pause or resume play, press the
button on the remote control.
- To skip to the previous/nex t file, press the
Tips:
• The unit can support USB devices with up to
32 GB of memory.
• This unit can play MP3/WAV/WMA.
• The unit support FAT32.
• Embedded USB full speed host for USB
applications should not exceed 6.5Mbps.
• For the le in FLAC format,the max blocksize
8107/8109 can support 4608 as the maximum.
buttons on the remote control.
/
Troubleshooting
To keep the warranty valid, never try to repair the
system yourself. If you encounter problems when
using this unit, check the following points before
requesting service.
No power
• Ensure that the AC cord of the unit is
properly connected .
• Ensure that there is power at the AC outlet.
• Press STANDBY button to turn the unit on.
Remote control does not work
• Before you press any playback control button,
• Insert the batt ery with its polarities (+/-)
aligned as indicated.
• Replace the battery.
• Aim the remote control directly at the sensor
on the front of the unit.
No sound
- Increase the volume. Press VOL + on the
remote control or on the soundbar.
- Press (MUTE) on the remote control to ensure
the soundbar is not muted.
source.
- When using either of the Digital inputs, if there
is no audio:
- Try setting the TV output to PCM or
- Connect directly to your Blu-ray/other source,
some TVs do not pass through digital audio.
- Your TV may be set to variable audio output.
FIXED or STANDARD, not VARIABLE. Consult
your TV ’s user manual for more detailed
information.
- If using Bluetooth, ensure that the volume on
your source device is turned up and that the
device is not muted.
I can’t find the Bluetooth name of
this unit on my Bluetooth device for
Bluetooth pairing
• Ensure the Bluetooth function is activated on
your Bluetooth device.
• Ensure you have paired the unit with your
Bluetooth device.
This is a 15 mins power off function,
one of the ERPII standard requirement
for saving power
• When the unit's external input signal level is too
low, the unit will be turned off automatically in
15 minutes. Please increase the volume level of
your external device.
The subwoofer is idle or the indicator
of subwoofer do not light up.
• Please unplug power cord from the mains
sockect, and plug it in again after 4 minutes to
resent the subwoofer.
• Reduce the distance between the remote
control and the unit.
14
Page 15
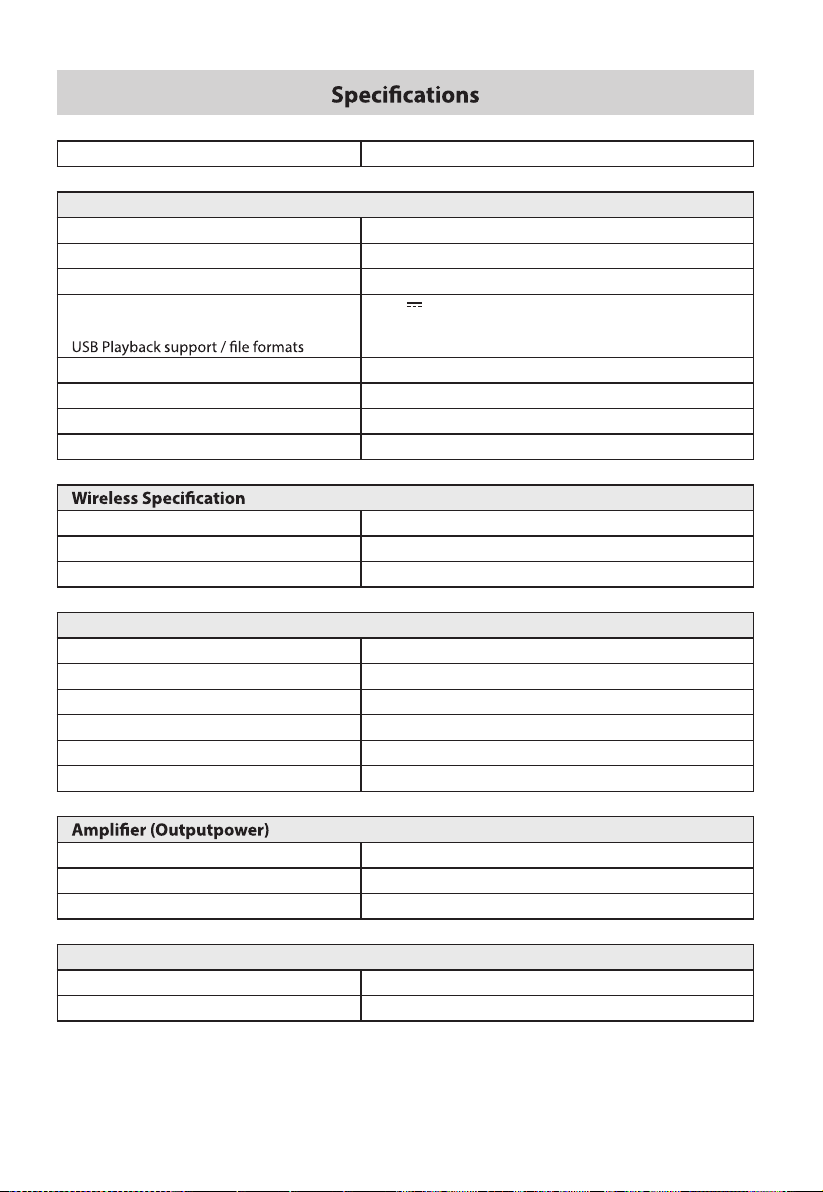
Model Name HS212F
Soundbar
Power Supply AC100-240V~50/60Hz
Power Consumption 15W
Standby Power ≤ 0.5 W
USB port for playback
USB Compatibility
Dimension (WxDxH) 38 x 2.17 x 3.35 inches (960 x 55 x 85.08mm )
Net weight 3.79 lbs (1.72kg)
Audio input sensitivity 500mV
Frequency Response 120Hz - 20KHz
Bluetooth Version V 5.0
Bluetooth Maximum power transmitted 10dBm
Frequency bands 2402-2480MHz
5V
0.5A
Hi-Speed USB (2.0) / FAT32
32G (max) , MP3/WAV/WMA
Subwoofer
Power Supply AC100-240V~50/60Hz
Power Consumption 15 W
Standby Power ≤ 0.5 W
Dimension (WxHxD) 8.27 x 13.3 x 9.76inches (210 x 338 x248mm)
Net weight 10.47 lbs (4.75kg)
Frequency Response 40Hz -120Hz
Sound bar 60W, 30W x 2, Test Mode@THD=10%
Subwoofer 60W, Test Mode@THD=10%
Total 120W
Remote Control
Distance/Angle 6m / 30°
Battery type AAA (1.5V X 2)
15
Page 16

HS212F
 Loading...