

Page 1
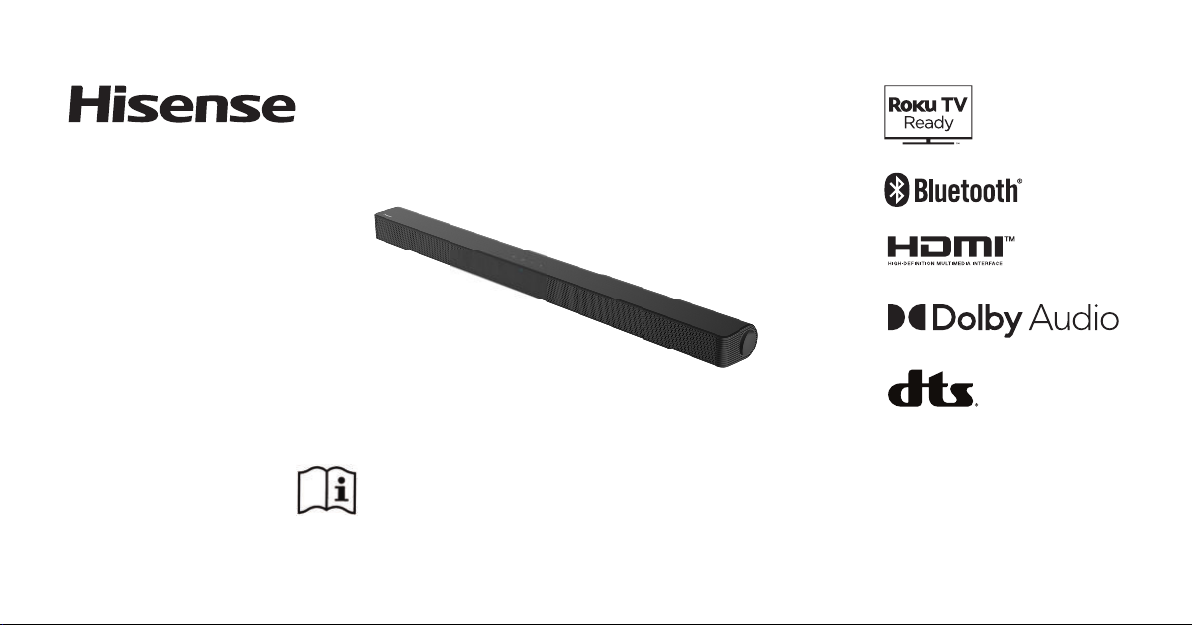
2.0 Channel Soundbar Home Theater System
Model: HS205G
User Manual
Before using the soundbar, please read this manual
thoroughly and retain it for future reference.
RSAG3.834.1002SS
English
Page 2

Contents
Important Safety Instructions 2
Safety ...........................................................................................................................................................................................2
Warning .......................................................................................................................................................................................3
Package Contents 6
Product Diagram 7
Main Unit ...................................................................................................................................................................................7
Remote Control ........................................................................................................................................................................8
Preparations 9
Prepare the Remote Control ................................................................................................................................................9
Replace the Remote Control Battery ................................................................................................................................9
Placement and Mounting .................................................................................................................................................. 10
Wall Mounting (if using option-B) .................................................................................................................................. 10
Connections 11
Connect to HDMI (ARC) Socket ....................................................................................................................................... 11
Connect to OPTICAL Socket ............................................................................................................................................. 11
Connect Power ............................................................................................................................................12
Basic Operation
Standby/ON
Select Modes ................................................................................................................................................13
Adjust the Volume ......................................................................................................................................13
Select a Preset Sound Eect ...................................................................................................................13
OPTICAL / HDMI ARC Operation
12
........................................................................................................................................................................
15
Bluetooth Operation 15
Pair Bluetooth-enabled Devices ...........................................................................................................15
Listen to Music from Bluetooth Device ..............................................................................................16
USB Operation 17
Troubleshooting 18
Specications 19
1
12
Page 3
Important Safety Instruction
CAUTION
RISK OF ELECTRIC SHOCK
DO NOT OPEN
AVIS
RISQUE DE CHOC
ÉLECTRIQUE NE PAS OUVRIR
The lightning flash with arrowhead symbol, within an equilateral
triangle, is intended to alert the user to the presence of uninsulated
“dangerous voltage” within the product’s enclosure that may be
of sufficient magnitude as to constitute a risk of electric shock to
persons.
The exclamation point within an equilateral triangle is intended
to alert the user to the presence of important operating and
maintenance (servicing) instructions in the literature accompanying
the appliance.
Safety
1 Read these instructions – All the safety and operating instructions should
be read before this product is operated.
2 Keep these instructions – The safety and operating instructions should
be retained for future reference.
3 Heed all warnings – All warnings on the appliance and in the operating
instructions should be adhered to.
4 Follow all instructions – All operating and usage instructions should be
followed.
5 Do not use this apparatus near water – The appliance should not be
used near water or moisture – for example, in a wet basement or near a
swimming pool and the like.
6 Clean only with a dry cloth.
7 Do not block any ventilation openings. Install in accordance with the
manufacturer’s instructions.
8 Do not install near any heat sources such as radiators, heaters, stoves, or other
apparatus (including ampliers) that produce heat.
9 Do not defeat the safety purpose of the polarized or grounding plug. A
polarized plug has two blades with one wider than the other. A grounding
plug has two blades and a third grounding prong. The wide blade or the
third prong is provided for your safety. If the provided plug does not t
into your outlet, consult an electrician for replacement of the obsolete
outlet.
10 Protect the power cord from being walked on or pinched particularly at
plugs, convenience receptacles, and the point where they exit from the
apparatus.
2
Page 4

11 Only use attachments/accessories specied by the manufacturer.
12
13 Unplug the apparatus during lightning storms or when unused for long
periods of time.
14 Refer all servicing to qualied personnel. Servicing is required when the
apparatus has been damaged in any way, such as power supply cord or
plug is damaged, liquid has been spilled or objects have fallen into the
apparatus, the unit has been exposed to rain or moisture, does not operate
normally, or has been dropped.
15
It has been designed in such a way that it does not require a safety
connection to electrical earth.
16 The apparatus shall not be exposed to dripping or splashing. No objects
lled with liquids, such as vases, shall be placed on the apparatus.
17 Minimum distance around the apparatus for sucient ventilation is 5cm.
18 The ventilation should not be impeded by covering the ventilation
openings with items, such as newspapers,table-cloths, curtains, etc.
19 No naked ame sources, such as lighted candles, should be placed on the
apparatus.
Use only with the cart, stand, tripod, bracket or table specied
by the manufacturer, or sold with the apparatus. When a cart or
rack is used, use caution when moving the cart/apparatus
combination to avoid injury from tip-over.
This equipment is a Class II or double insulated electrical appliance.
20 Batteries should be recycled or disposed of as per state and local guidelines.
21 The use of apparatus in moderate or tropical climates.
Caution:
- Use of controls or adjustments or performance of procedures other than
those described herein, may result in hazardous radiation exposure or
other unsafe operation.
- To reduce the risk of fire or electric shock, do not expose this apparatus
to rain or moisture. The apparatus must not be exposed to dripping or
splashing and objects lled with liquids, such as vases, must not be placed
on apparatus.
- The mains plug/appliance coupler is used as the disconnect device, the
disconnect device must remain readily operable.
- Danger of explosion if battery is incorrectly replaced. Replace only with the
same or equivalent type.
Warning
• The battery (batteries or battery pack) shall not be exposed to excessive
heat such as sunshine, re or the like.
• Before operating this system, check the voltage of this system to see if it is
identical to the voltage of your local power supply.
• Do not place this unit close to strong magnetic elds.
• Do not place this unit on the amplier or receiver.
• If any solid object or liquid falls into the system, unplug the system and
have it checked by qualied personnel before operating it any further.
3
Page 5
• Do not attempt to clean the unit with chemical solvents as this may
damage the nish. Use a clean, dry or slightly damp cloth.
• When removing the power plug from the wall outlet, always pull directly
on the plug, never yank on the cord.
• Changes or modications to this unit not expressly approved by the party
responsible for compliance will void the user’s authority to operate the
equipment.
• The rating label is pasted on the bottom or back of the equipment.
WARNING: This product can expose you to chemicals including
lead, which is known to the State of California to cause cancer. For
more information go to www.P65Warnings.ca.gov.
Correct Disposal of this product. This marking indicates that this
product should not be disposed with other household wastes
throughout the EU. To prevent possible harm to the environment
or human health from uncontrolled waste disposal, recycle it
responsibly to promote the sustainable reuse of material resources. To return
your used device, please use the return and collection systems or contact the
retailer where the product was purchased. They can take this product for
environmental safe recycling.
Battery usage CAUTION
To prevent battery leakage which may result in bodily injury, property
damage, or damage to the apparatus:
- Install all batteries correctly, + and - as marked on the apparatus.
- Do not mix old and new batteries.
- Do not mix alkaline, standard (Carbon-Zinc) or rechargeable (Ni-Cd, NiMH, etc.) batteries.
- Remove batteries when the unit is not used for a long time.
The Bluetooth word mark and logos are registered trademarks owned by
Bluetooth SIG,. Inc.
The terms HDMI and HDMI High-Definition Multimedia Interface, and the
HDMI Logo are trademarks or registered trademarks of HDMI Licensing
Administrator, Inc.
4
Page 6

Roku TV Ready and the Roku TV Ready logo are trademarks of Roku, Inc.
Manufactured under license from Dolby Laboratories. Dolby, Dolby Audio,
and the double - D symbol are trademarks of Dolby Laboratories Licensing
Corporation.
For DTS patents, see http://patents.dts.com. Manufactured under license from
DTS, Inc. (for companies headquartered in the U.S./Japan/Taiwan) or under
license from DTS Licensing Limited (for all other companies). DTS, Digital
Surround, Virtua:X, and the DTS logo are registered trademarks or trademarks
of DTS, Inc. in the United States and other countries. © 2021 DTS, Inc. ALL
RIGHTS RESERVED.
EN
FCC INFORMATION (for US customers)
Warning:
Changes or modications to this unit not expressly approved by the party
responsible for compliance could void the user’s authority to operate the
equipment.”
NOTE:
• This equipment has been tested and found to comply with the limits for a
Class B digital device, pursuant to Part 15 of the FCC Rules. These limits are
designed to provide reasonable protection against harmful interference in
a residential installation. This equipment generates, uses and can radiate
radio frequency energy and, if not installed and used in accordance with
the instructions, may cause harmful interference to radio communications.
• However, there is no guarantee that interference will not occur in a
particular installation. If this equipment does cause harmful interference
to radio or television reception, which can be determined by turning
the equipment off and on, the user is encouraged to try to correct the
interference by one or more of the following measures:
- Reorient or relocate the receiving antenna.
- Increase the separation between the equipment and receiver.
5
Page 7

- Connect the equipment into an outlet on a circuit dierent from that to
which the receiver is connected.
- Consult the dealer or an experienced radio / TV technician for help.
• This device complies with Part 15 of the FCC Rules. Operation is subject to
the following two conditions:
(1) this device may not cause harmful interference, and
(2) this device must accept any interference received, including interference
that may cause undesired operation.
• This equipment should be installed and operated with minimum distance
20cm between the radiator&your body.
IC Notice:
This device contains licence-exempt transmitter(s)/receiver(s) that comply
with Innovation, Science and Economic Development Canada’s licenceexempt RSS(s). Operation is subject to the followingtwo conditions:
(1) This device may not cause interference.
(2) This device must accept any interference, including interference that may
cause undesired operation of the device.
CAN ICES-3 (B) / NMB-3 (B)
Package Contents
• Main Unit
• Remote Control / AAA Batteries(x2)
• AC Power Cord
• Power Adapter
• Wall Plug(x2) / screw(x2)
• Optical Cable
• HDMI Cable
• User Manual
*
Design and specications are subject to change without notice.
6
Page 8
Product Diagram
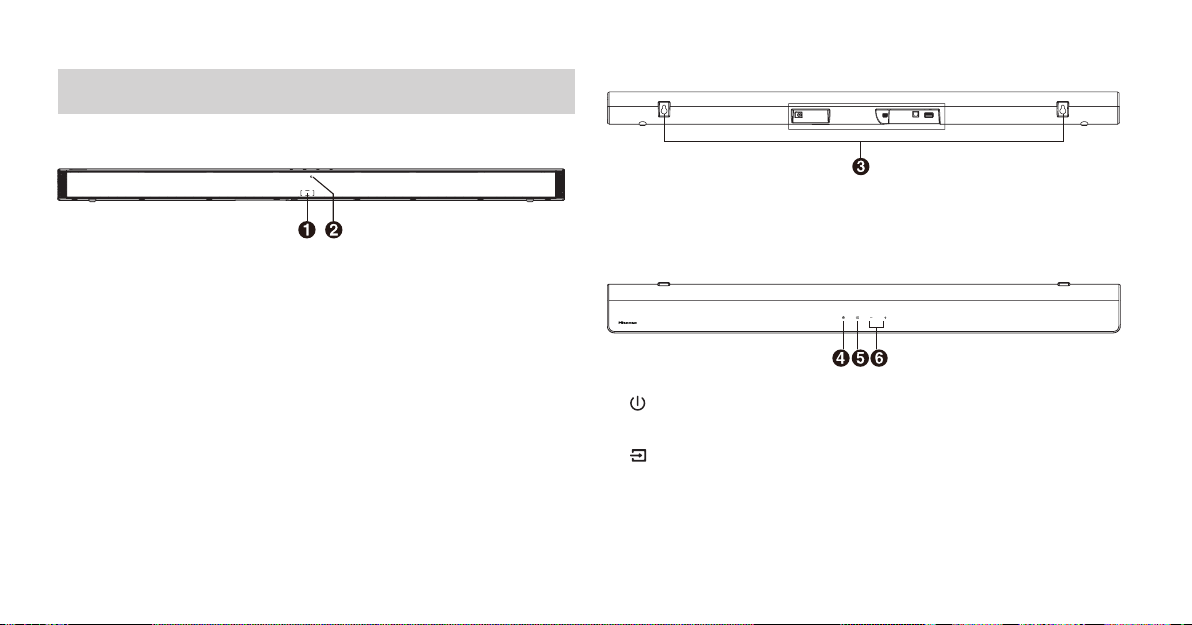
Main Unit
1 Remote Control Sensor
Receive signal from the remote control.
2 LED Indicators
• Red : In STANDBY mode.
• Orange : In Optical mode.
• Blue : In Bluetooth mode.
• White : In HDMI ARC mode.
• Green: In USB mode.
* You can quickly check the above LED Indicators mode on the back label of the remote
control.
3 Screws
Install the wall mounting screws into the wall mount of the unit
(ON/OFF) Button
4
Switch the unit between ON and Standby mode.
(SOURCE) Button
5
Select the play function.
6 +/- (Vol+/Vol-) Buttons
Increase/decrease the volume level.
7
.
Page 9
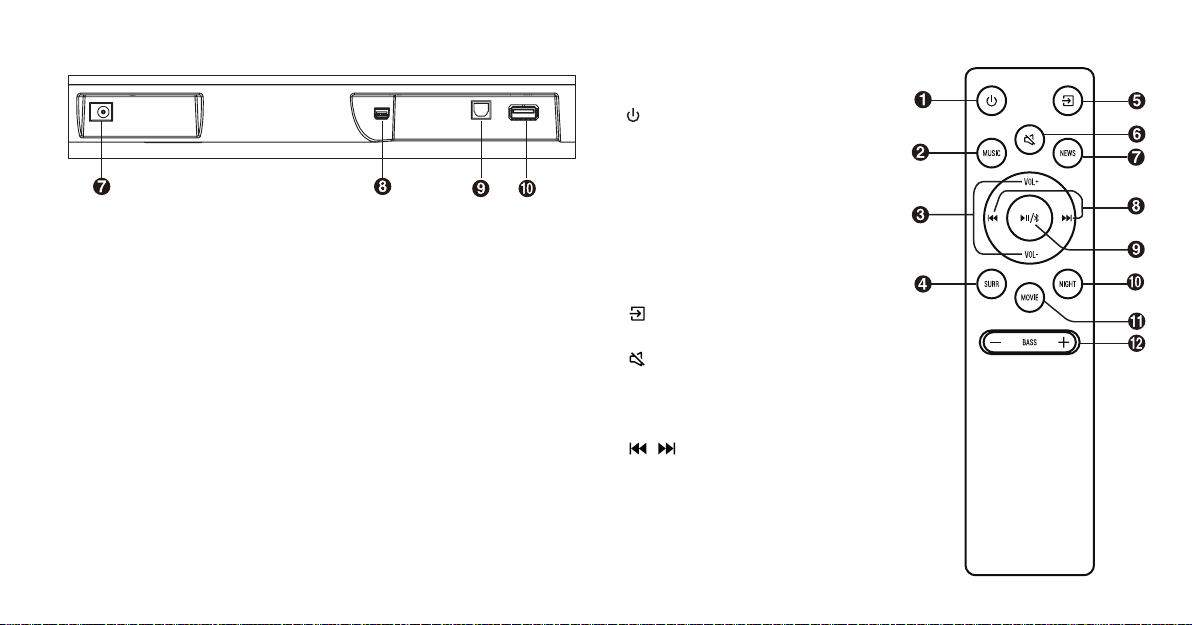
7 DC Socket
Connect to the power adapter.
8 HDMI ARC Socket
Connect to a TV via HDMI cable.
9 OPTICAL Socket
Connect to an optical audio output on the TV.
10 USB Socket
Insert the USB device to play music.
Remote Control
1
Switch the unit between ON and STANDBY
mode.
2 MUSIC
Switch to MUSIC EQ eect.
3 VOL+/VOL-
Increase/decrease the volume level.
4 SURR
Adjust the surround ON/OFF.
5
(Source)
Select the play mode.
6 (MUTE)
Mute or resume the sound.
7 NEWS
Switch to NEWS EQ eect.
/
8
Skip to previous/next track in BT/USB mode.
8
Page 10

9 /
Play/pause/resume playback in BT/USB mode. Press and hold to activate
the pairing function in Bluetooth mode or disconnect the existing paired
Bluetooth device.
10 NIGHT
Switch to NIGHT EQ eect.
11 MOVIE
Switch to MOVIE EQ eect.
12 BASS+/-
Increase/decrease the bass level.
Preparations
Prepare the Remote Control
The provided Remote Control allows the unit to be operated from a distance.
•
Even if the Remote Control is operated within the effective range 19.7
feet (6m), remote control operation may be impossible if there are any
obstacles between the unit and the remote control.
•
If the Remote Control is operated near other products which generate
infrared rays, or if other remote control devices using infra-red rays are used
near the unit, it may operate incorrectly. Conversely, the other products
may operate incorrectly.
Replace the Remote Control Battery
1 Press and slide the back cover to open the battery
compartment of the remote control.
2 Insert two AAA size batteries (included). Make sure the
(+) and (–) ends of the batteries match the (+) and (–)
ends indicated in the battery compartment.
3 Close the battery compartment cover.
Precautions Concerning Batteries
• Be sure to insert the batteries with correct positive “ (+)
polarities.
• Use batteries of the same type. Never use different types of batteries
together.
• Either rechargeable or non-rechargeable batteries can be used. Refer to the
precautions on their labels.
• Be aware of your fingernails when removing the battery cover and the
battery.
• Do not drop the remote control.
• Do not allow anything to impact the remote control.
• Do not spill water or any liquid on the remote control.
• Do not place the remote control on a wet object.
• Do not place the remote control under direct sunlight or near sources of
excessive heat.
• Remove the battery from the remote control when not in use for a long
period of time, as corrosion or battery leakage may occur and result in
physical injury, and/or property damage, and/or re.
9
” and negative “(–)”
Page 11
AB
• Do not use any batteries other than those specied.
• Do not mix new batteries with old ones.
• Never recharge a battery unless it is conrmed to be a rechargeable type.
Placement and Mounting
Placement
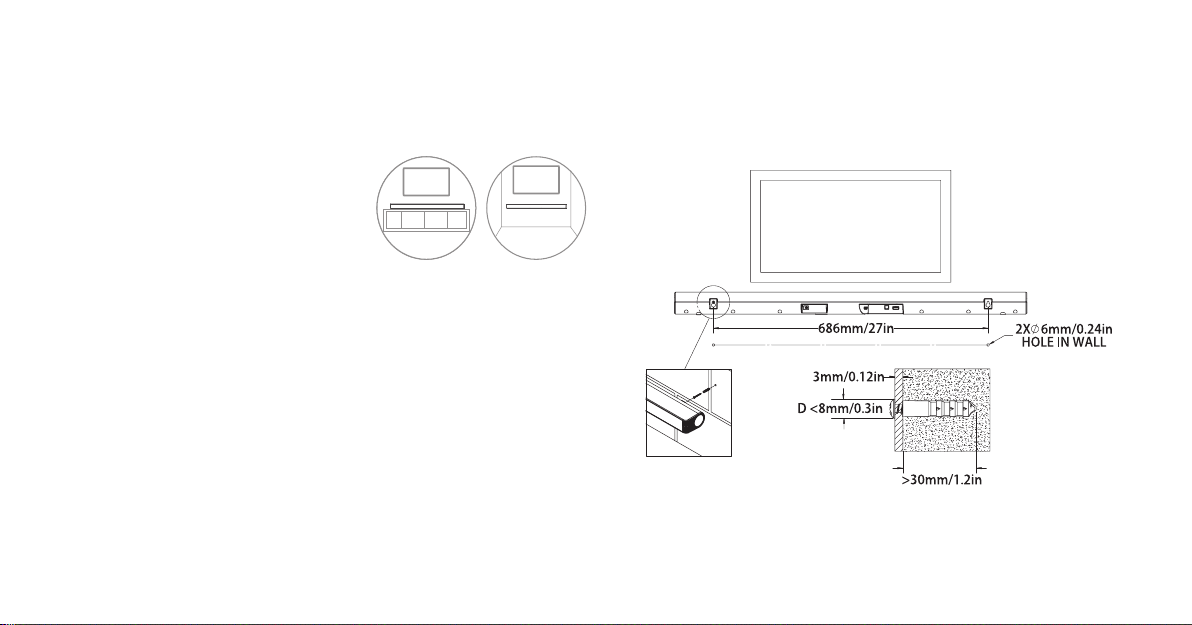
A If your TV is placed on a table, you can
place the unit on the table directly in
front of the TV stand, centered with the
TV screen.
B If your TV is attached to a wall, you can mount the unit on the wall directly
below the TV screen.
Wall Mounting (if using option-B)
Note:
- Installation must be carried out by qualied personnel only. Incorrect
assembly can result in severe personal injury and property damage (if you
intend to install this product yourself, you must check for installations such
as electrical wiring and plumbing that may be buried inside the wall). It is
the installer’s responsibility to verify that the wall will safely support the
total load of the unit and wall brackets.
- Additional tools (not included) are required for the installation.
- Do not overtighten screws.
- Keep this instruction manual for future reference.
- Use an electronic stud nder to check the wall type before drilling and
mounting.
10
Page 12
Connections
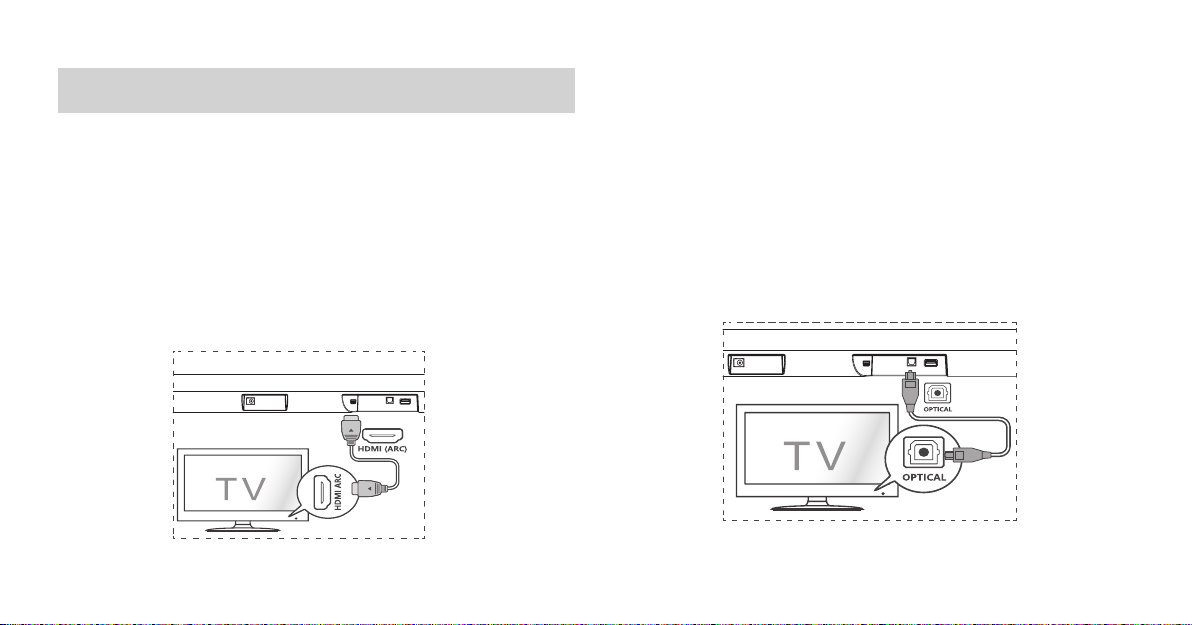
Connect to HDMI (ARC) Socket
Your Soundbar supports HDMI with Audio Return Channel (ARC). If your TV is
HDMI ARC compliant, you can hear the TV audio through your Soundbar by
using a single HDMI cable.
1 Using a High Speed HDMI cable, connect the HDMI ARC connector on your
Soundbar to the HDMI ARC Connector on the TV.
- The HDMI ARC connector on the TV might be labeled differently. For
details, see the TV user manual.
2 On your TV, turn on HDMI-CEC operations. For details, see the TV user
manual.
Tips:
- Your TV must support the HDMI-CEC and ARC function. HDMI-CEC and
ARC must be set to On.
- The setting method of HDMI-CEC and ARC may dier depending on the
TV. For details about ARC function, please refer to your TV owner’s manual.
- Only HDMI 1.4 compatible cables can support the ARC function.
Connect to OPTICAL Socket
- Remove the protective cap of the OPTICAL cable, then connect an
OPTICAL cable to the TV’s OPTICAL OUT socket and the OPTICAL socket
on the unit.
11
Page 13
Tip:
• While in OPTICAL or HDMI ARC mode, if there’s no sound output from the
unit, you may need to activate PCM Signal output on your source device (eg.
TV, DVD or Blu-ray player).
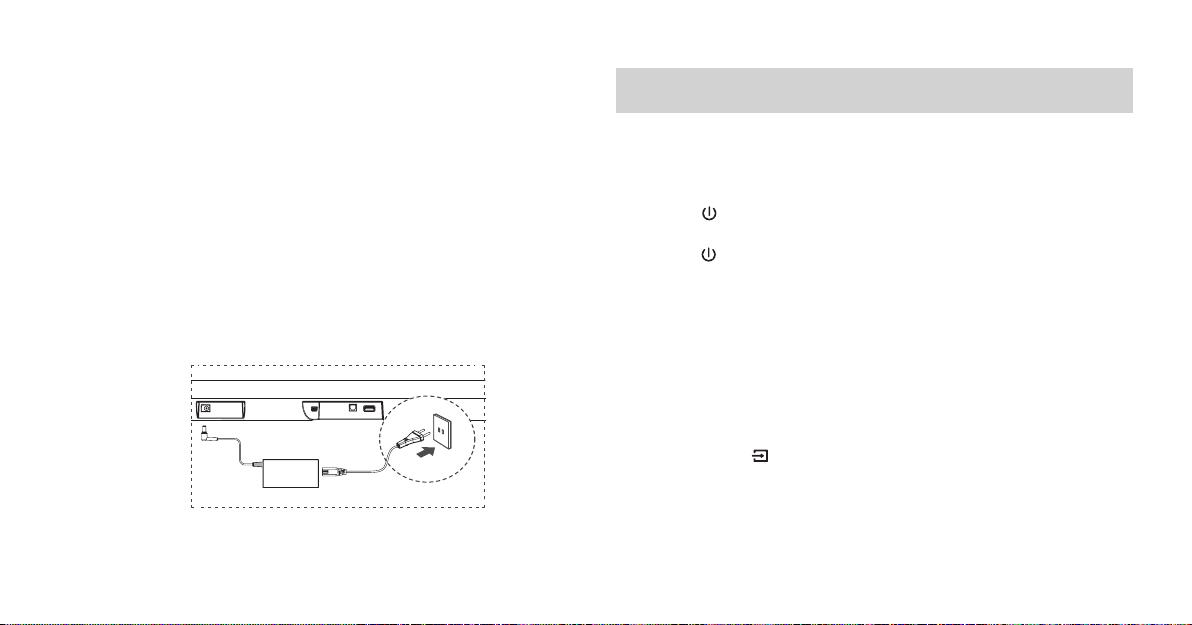
Connect Power
Risk of product damage!
- Ensure that the power supply voltage corresponds to the voltage printed
on the back or the underside of the unit and the power adapter.
- Before connecting the AC power cord, ensure you have completed all
other connections.
- Connect the DC cable of the power adapter to the DC Socket of main unit.
- Connect the mains cable to the AC~ Socket of power adapter and then
into a mains socket.
* Power cord quantity and plug type vary by regions.
Basic Operation
Standby/ON
When you rst connect the main unit to the mains socket, the main unit will
be in Standby mode.
• Press the
ON.
• Press the
• Disconnect the mains plug from the mains socket if you want to switch the
unit OFF completely.
Auto Wake
• If a T V or an external device is connected (OPTICAL / HDMI ARC), the unit
will switch on automatically when the TV or the external device is switched
on and output audio signals .
How to Enable Auto Wake
• Short press the
enable or disable Auto Wake function.
• Auto Wake On: white and green LED blink twice sequentially. While in
STANDBY mode, the RED LED is breathing.
• Auto Wake Off: white and red LED blink twice sequentially. While in
STANDBY mode, the LED is in solid red.
12
button on the unit or on the remote control to switch the unit
button again to switch the unit back to STANDBY mode.
(SOURCE) button and VOL + button on the unit to
Page 14

Automatic Power O Function
The unit automatically turns to STANDBY mode after about 15 minutes if the
TV or the external unit is disconnected, switched o.
• To switch the unit o completely, remove the mains plug from the mains
socket.
• Please turn the unit o completely to save energy when not in use.
• In optical mode, press
mode, the Yellow LED Flash 3 times quickly.
• In optical mode, press
mode, the Yellow LED Flash 3 times slowly.
in sequence to turn on Auto Standy
in sequence to turn o Auto Standy
Select Modes
Press the
mode.
The indicator light on the front of the main unit will show which mode is
currently in use.
(SOURCE) button repeatedly on the unit to select the desired
Adjust the Volume
Press the VOL+ / VOL- buttons on the unit or on the remote control to adjust
the volume.
If you wish to turn the sound o, press the
Press the
button again or press the VOL+ / VOL- buttons to resume normal
button on the remote control.
listening.
Note: While adjusting the volume, the status LED indicator will flash once.
When the volume has hit maximum/minimum value level, the status LED
indicator will ash quickly.
Select a Preset Sound Eect
While playing, press the EQ button on the remote control to select desired
preset equalizers: MUSIC, MOVIE, NEWS , NIGHT.
13
Page 15
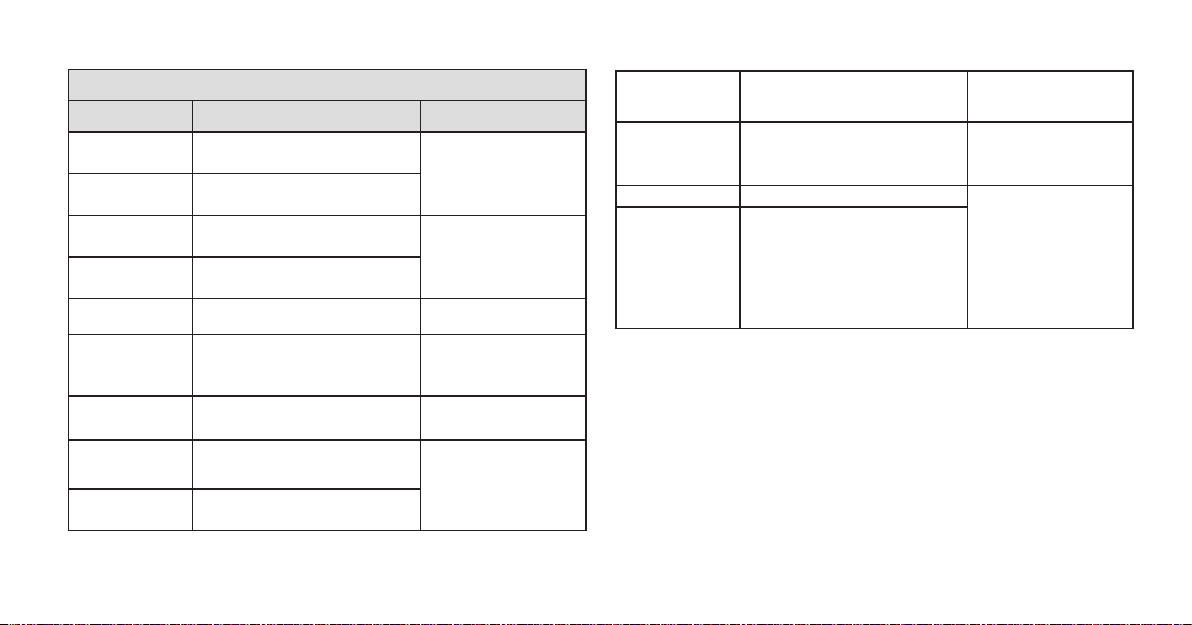
Indicator light function
Features Display Operation
Automatic
Standby On
Automatic
Standby O
Auto Wake Mode
On
Auto Wake Mode
O
Volume limit The light ashes 3 times Adjust volume
Bluetooth pairing Red-Blue-Red-Blue.......
Failed to play Red-Green-Red-Green.......
Surround On The light ashes 5 times, quickly
Surround O The light ashes 5 times, slowly
Yellow-Yellow-Yellow, quickly
Yellow-Yellow-Yellow, slowly
White-White-Green-Green
White-White-Red-Red
Optical mode, "Prev"-
"Prev"-"Next"-"Next"
Soundbar: "Source" +
"Vol+"
In Bluetooth Mode,
Press and hold the Play
button
Press "SURR"
DTS Digital
Surround
Dolby Digital Green-Green-Green, quickly Dolby signal received
Bass Boost On The light ashes 3 times, quickly
Bass Boost O The light ashes 3 times, slowly
Cyan-Cyan-Cyan, quickly DTS signal received
Optical mode,
"Prev"+"Play"+"Next"
14
Page 16

OPTICAL / HDMI ARC Operation
Bluetooth Operation
1 Ensure that the unit is connected to the TV or audio device.
2 Press the
OPTICAL, HDMI ARC mode.
3 Operate your audio device directly for playback features.
4 Press the VOL +/– button to adjust the volume to your desired level.
Tips:
• The unit may not be able to decode all digital audio formats from the input
source. In this case, the unit will mute. This is NOT a defect. Ensure that
the audio setting of the input source (e.g. TV, game console, DVD player,
etc.) is set to PCM, Dolby Digital, Dolby Digital Plus or DTS, refer to the
table“Supported Input Audio Formats”(Refer to the user manual of the
input source device for its audio setting details) with HDMI ARC / OPTICAl
input.
• While in OPTICAL or HDMI ARC mode , you may need to set the sound
output device of your TV to OPTICAL or HDMI ARC, for the detailed
operation please refer to the manual of your TV.
button repeatedly on the unit or on the remote control to select the
Pair Bluetooth-enabled Devices
The first time you connect your bluetooth device to this player, you need to pair
your device to this player.
Note:
- The operational range between this player and a Bluetooth device is
approximately 26 feet (8m) (without any object between the Bluetooth
device and the unit).
- Before you connect a Bluetooth device to this unit, ensure you know the
device’s capabilities.
- Compatibility with all Bluetooth devices is not guaranteed.
- Any obstacle between this unit and a Bluetooth device can reduce the
operational range.
- If the signal strength is weak, your Bluetooth receiver may disconnect, but
it will re-enter pairing mode automatically.
1 During ON mode, press the
Bluetooth mode. The Blue indicator will light ash.
2 Activate your Bluetooth device and select the search mode. “Hisense
HS205G” will appear on your Bluetooth device list.
15
button repeatedly on the unit to select
Page 17

• If you cannot nd the unit, press and hold the / button on the remote
control to be searchable. The system has entered pairing mode.
You will hear audio prompt from the unit and the Bluetooth indicator will
ash quickly.
3 Select “Hisense HS205G” in the pairing list. After audio prompt, the
system is successfully connected and the Bluetooth indicator will light up
solidly.
4 Play music from the connected Bluetooth device.
To disconnect the Bluetooth function, you can :
- Switch to another function on the unit.
- Disable the function from your Bluetooth device. The Bluetooth device will be
disconnected from the soundbar after audio prompt.
- Press and hold the
Tips:
• Enter "0000" for the password if necessary.
• If no other Bluetooth device pairs with this player within two minutes, the
player will recover its previous connection.
• The player will also be disconnected when your device is moved beyond the
operational range.
• If you want to reconnect your device to this player, place it within the
operational range.
• If the device is moved beyond the operational range, when it is brought
/ button on the remote control.
back, please check if the device is still connected to the player.
• If the connection is lost, follow the instructions above to pair your device
to the player again.
Listen to Music from Bluetooth Device
- If the connected Bluetooth device supports Advanced Audio Distribution
Prole (A2DP), you can listen to the music stored on the device through
the player.
- If the device also supports Audio Video Remote Control Prole (AVRCP),
you can use the player's remote control to play music stored on the device.
1 Pair your device with the player.
2 Play music via your device (if it supports A2DP).
3 Use supplied remote control to control play (if it supports AVRCP).
- To pause/resume play, press the
- To skip to a track, press the
16
/ button on the remote control.
/ buttons on the remote control.
Page 18
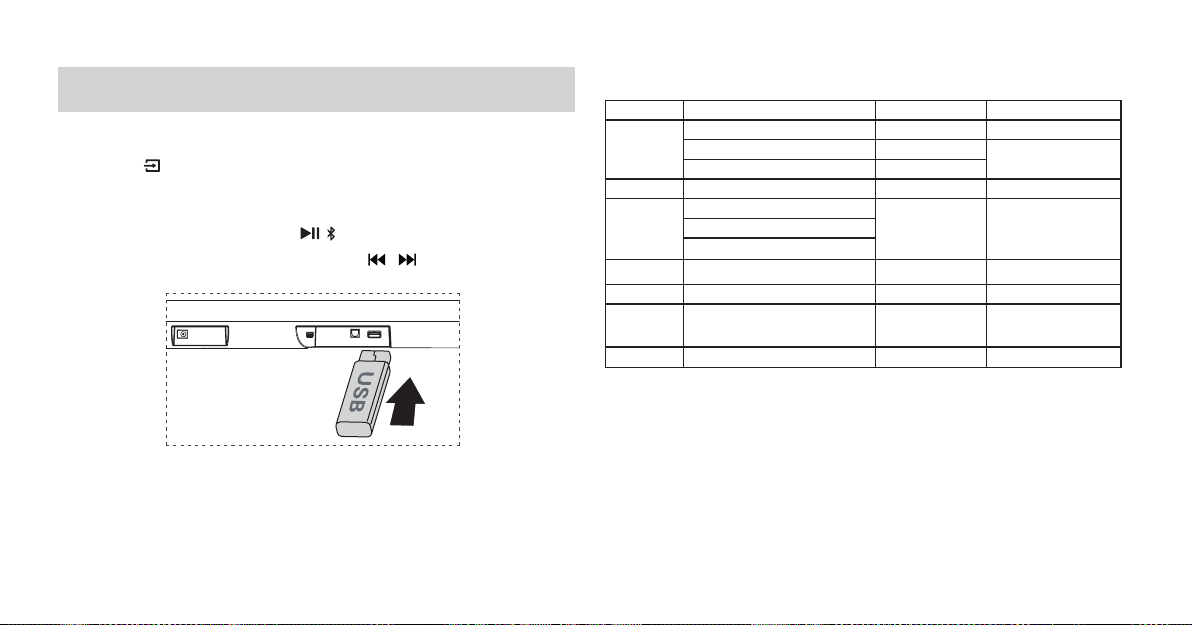
USB Operation
1 Insert the USB device.
2 Press the
remote control to select USB mode.
3 During playback:
- To pause or resume play, press the
- To skip to the previous/next le, press the
control.
Tips:
• The unit can support USB devices with up to 32 GB of memory.
• This unit can play MP3/WMA/AAC/OGG/FLAC/WAV/AIFF.
button repeatedly on the unit or press the USB button on the
/ button on the remote control.
/ buttons on the remote
File Format Type Compatibility list
Extension Codec Sampling Rate Bit Rate
*.mp3
*.wma WMA7/8/9/STD 8kHz~48kHz ≤320kbps
*.aac
*.ogg Vorbis codec 8kHz~48kHz ≤ 500kbps
*.ac - 8kHz~192kHz ≤9Mbps
*.wav
*.AIFF PCM、ALAW、MULAW 8kHz~192kHz ≤9Mbps
MPEG-1 Layer1/2/3 32kHz~48kHz 32kbps~320kbps
MPEG-2 Layer1/2/3 16kHz~24kHz
MPEG-2.5 Layer3 8kHz~12kHz
AAC
AAC-LC
HE-AAC
PCM、LPCM、IMA_ADPCM
MPEG、ALAW、MULAW
、
8kHz~96kHz ≤1728kbps
8kHz~192kHz ≤9Mbps
8kbps~160kbps
• Only USB Format Type FAT 32 is supported for USB storage device
connection.
• for *.ogg audio les, below are unspported formats:
1). block size 0 < 64 block size 0 > 2048; 2). block size 1 < 64 , block size 1
> 4096; 3). codebook counter > 64; 4). codebook entry > 640; 5). floor
counter > 4; 6). oor type 0; 7). residua counter > 4; 8). dimension != 2; 9).
mapping counter > 2; 10). mode couter > 2.
17
Page 19

Troubleshooting
To keep the warranty valid, never try to repair the system yourself. If you
encounter problems when using this unit, check the following points before
requesting service.
No power
• Ensure that the AC cord of the apparatus is properly connected .
• Ensure that there is power at the AC outlet.
• Press standby button to turn the unit on.
• Ensure that the DC cable of the power Adapter is properly connected.
Remote control does not work
• Before you press any playback control button, first select the correct
source.
• Reduce the distance between the remote control and the unit.
• Insert the battery with its polarities (+/-) aligned as indicated.
• Replace the battery.
• Aim the remote control directly at the sensor on the front of the unit.
No sound
• Increase the volume. Press Volume Up on the remote control or on the
soundbar.
• Press MUTE on the remote control to ensure the soundbar is not muted.
• Press source buttons to select a dierent input source.
• When using either of the Digital inputs, if there is no audio:
- Try setting the TV output to PCM or
- Connect directly to your Blu-ray/other source, some TVs do not pass
through digital audio.
• Your TV may be set to variable audio output. Confirm that the audio
output setting is set to FIXED or STANDARD, not VARIABLE. Consult your
TV’s user manual for more detailed information.
• If using Bluetooth, ensure that the volume on your source device is turned
up and that the device is not muted.
I can’t nd the Bluetooth name of this unit on my Bluetooth
device for Bluetooth pairing
• Ensure the Bluetooth function is activated on your Bluetooth device.
• Ensure you have paired the unit with your Bluetooth device.
This is a 15 mins power o function, one of the ERPII standard
requirement for saving power
• When the unit's external input signal level is too low, the unit will be
turned o automatically in 15 minutes. Please increase the volume level of
your external device.
18
Page 20
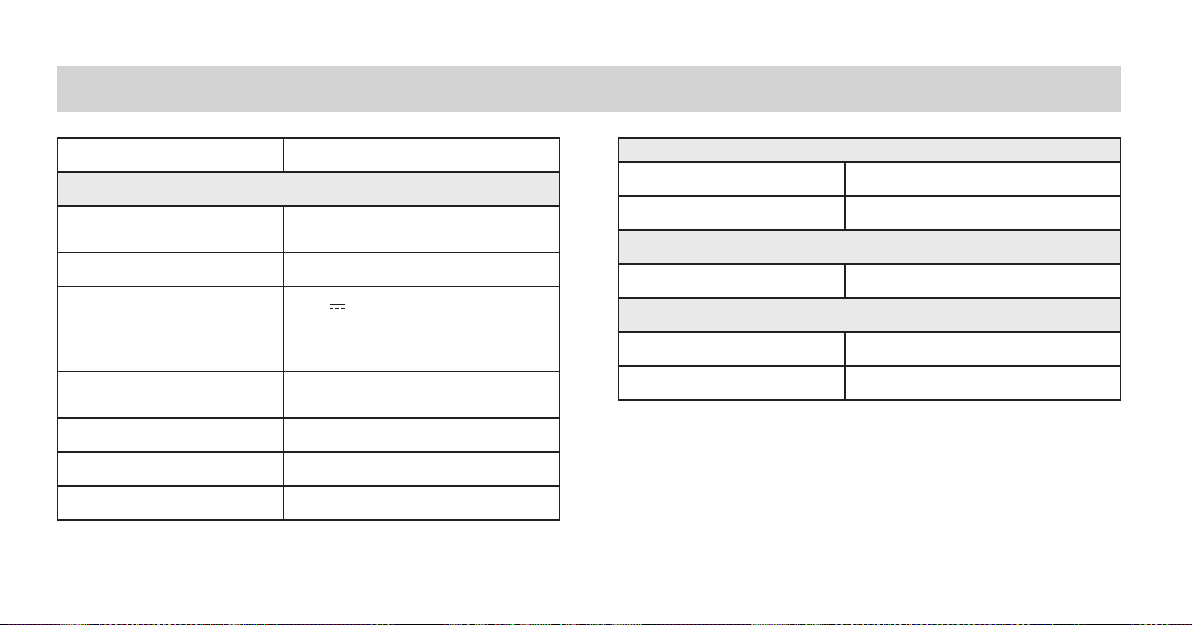
Specications
Model Name HS205G
General
Power Supply
Standby Power ≤ 0.5 W
USB port for playback
USB Compatibility
USB Playback support / le
formats
Dimension (WxHxD)
Net weight 3.5 lbs / (1.6 kg)
Impedance 8Ω x 2
Frequency Response 40Hz - 20kHz
AC100-240V ~ 50/60Hz
DC 24V/2A
5V
500mA
Hi-Speed USB (2.0) / FAT32
32G (max) , MP3
34.6 x 2.2 x 3.5inches
(880 x 56 x 88 mm)
Wireless Specication
Bluetooth Version V 5.0
Frequency bands 2402 MHz ~ 2480 MHz
Max Audio Power
Total 120W
Remote Control
Distance/Angle 6m / 30°
Battery type AAA (1.5V X 2)
19
Page 21

Supported Input Audio Formats
Audio formats supported by the Soundbar are as follows:
Format
LPCM 2ch
LPCM 5.1ch
LPCM 7.1ch
Dolby Digital Plus
Dolby Digital
DTS
: Supported format.
× : Unsupported format.
Function
Optical HDMI ARC
×
×
×
20
Page 22

HS205G
 Loading...