

Hisense 75U8G, 55A7G, 55U7G, 55U8G, 65U8G User Manual for 55A7G
...
Hisense User Manual
VIDAA U5

Contents
Live TV....................................................................................... 5
Channel Scan.............................................................................................5
Channel List............................................................................................... 7
Channel Edit...............................................................................................9
Favourite...................................................................................................10
Guide (EPG).............................................................................................11
PVR.......................................................................................................... 13
Recording List.......................................................................................... 14
Timeshift................................................................................................... 16
Connection...............................................................................18
Wired Internet Connection....................................................................... 18
Wireless Internet Connection...................................................................19
Connecting Bluetooth Devices.................................................................20
Connecting Headphones..........................................................................22
Connecting USB Devices.........................................................................22
Connecting an Antenna........................................................................... 23
Connecting Audio Visual (AV) Devices................................................... 23
Connecting Speakers or Other Audio Receivers..................................... 25
Connecting a Digital Audio System to Use ARC/eARC...........................25
Using HDMI & CEC................................................................................. 26
Connecting a PC or a Game Console.....................................................28
Multi-screen............................................................................. 29
Screen Sharing........................................................................................ 29
Content Sharing....................................................................................... 29
Smart Functions......................................................................31
Getting Familiar with the Home Screen...................................................31
Using a VIDAA Account...........................................................................34
Using Voice Service.................................................................................34
Media........................................................................................................40
App........................................................................................................... 43

Installing Mobile App to Control your TV.................................................44
Picture and Sound.................................................................. 45
Adjusting the Picture Quality................................................................... 45
Game Mode Settings............................................................................... 50
Adjusting the Sound Quality.................................................................... 51
Speakers Settings.................................................................................... 54
Using Headphones...................................................................................55
Accessibility and System.......................................................56
Accessibility.............................................................................................. 56
Setting Time............................................................................................. 56
Using Timer.............................................................................................. 57
Using Parental Control.............................................................................58
Setting Language and Location...............................................................58
Using Power Indicator..............................................................................59
Enhanced Viewing................................................................................... 59
Setting Usage Mode................................................................................ 60
Using Remote Control Service................................................................ 60
Upgrade....................................................................................................61
Reset to Factory Default..........................................................................62
Troubleshooting...................................................................... 63
Picture Issues...........................................................................................63
Sound Issues........................................................................................... 64
Network Issues.........................................................................................64
External Device Connection Issues......................................................... 65
Apps......................................................................................................... 66
Media Files............................................................................................... 66
Voice Service Issues............................................................................... 66
TV Status Diagnosis................................................................................ 67
Recording/Timeshift Issues......................................................................67
Other Issues............................................................................................. 68
Using the E-Manual................................................................ 69
Launching the E-Manual.......................................................................... 69
Using the buttons in the E-Manual.......................................................... 69

Guidelines.................................................................................................69

Live TV
Channel Scan
You can scan for channels automatically or manually.
Note:
• Satellite/antenna/cable function may not be applicable in some models/
countries/regions.
Auto Scan
Automatically scan for channels to view programmes from TV source.
> TV
Alternatively, in Live TV, / > Settings > Channel > Auto Scan.
If no TV channels were saved before, you will be prompted to do a channel
search.
Satellite
• Single satellite: You can use single satellite if you only have one satellite
equipped.
• DiSEqC: You can choose DiSEqC if you have DiSEqC equipment. Up to
four satellites in DiSEqC 1.0 mode can be installed.
If you are using a motorized antenna, you can use DiSEqC 1.2 mode.
• Unicable: If your house is equipped with Unicable satellite distribution,
you should use this option.
Please make sure that you know the Unicable band and frequency that
can be used. The information should be available on the equipment or the
landlord can provide it.
Antenna
• Channel: Select from All Channels or Free Channels. This option may
not be available depending on countries/regions/operators.
• Scan Mode: Select from digital channels only (DTV), digital and analogue
channels (DTV+ATV) or analogue channels only (ATV).
If you receive DVB-T or DVB-T2 signal, you can use DTV.
• LCN: Switch on/off LCN (Logical Channel Number).
Please note that some operators are restricted to manually change the
channel order. If you switch off LCN, then the channel list can be edited
after channel scan.
This function may not be applicable in some models/countries/regions.
5

Cable
• Channel: Select from All Channels or Free Channels. This option may
not be available depending on countries/regions/operators.
• Scan Mode: Select from digital channels only (DTV), digital and analogue
channels (DTV+ATV) or analogue channels only (ATV).
• LCN: Switch on/off LCN (Logical Channel Number).
Please note that some operators are restricted to manually change the
channel order. If you switch off LCN, then the channel list can be edited
after channel scan.
This function may not be applicable in some models/countries/regions.
Manual Scan
Manually scan for channels to view programmes from your TV sources
through DTV or ATV.
In Live TV, / > Settings > Channel > Advanced Settings > Manual
Scan
DTV Manual Scan
Manually scan for DTV channels to view programmes from a TV source.
When the DTV Manual Scan screen appears, press / button to select
Antenna, Cable or Satellite, and select Start to commence the search
of that channel. When the signal has been tuned, signal strength will be
displayed on the screen.
ATV Manual Scan
Manually scan for ATV channels to view programmes from a TV source.
• Frequency: Input the channel frequency you want.
• Picture System: Select the Colour System.
• Sound System: Select the Sound System.
Live TV tutorial
After channel scanning is done for the first time, the screen will display Live
TV operating tutorial, including:
/ : Load the info bar
/ : Load the channel list
/ : Open the electronic programme guide (only available in some
models/countries/regions)
/ : Load onscreen menu
: Call up search function
6

: Jump to the previous channel
Note:
• The remote control buttons may vary depending on models/countries/
regions.
Related Topic
• Connecting an Antenna
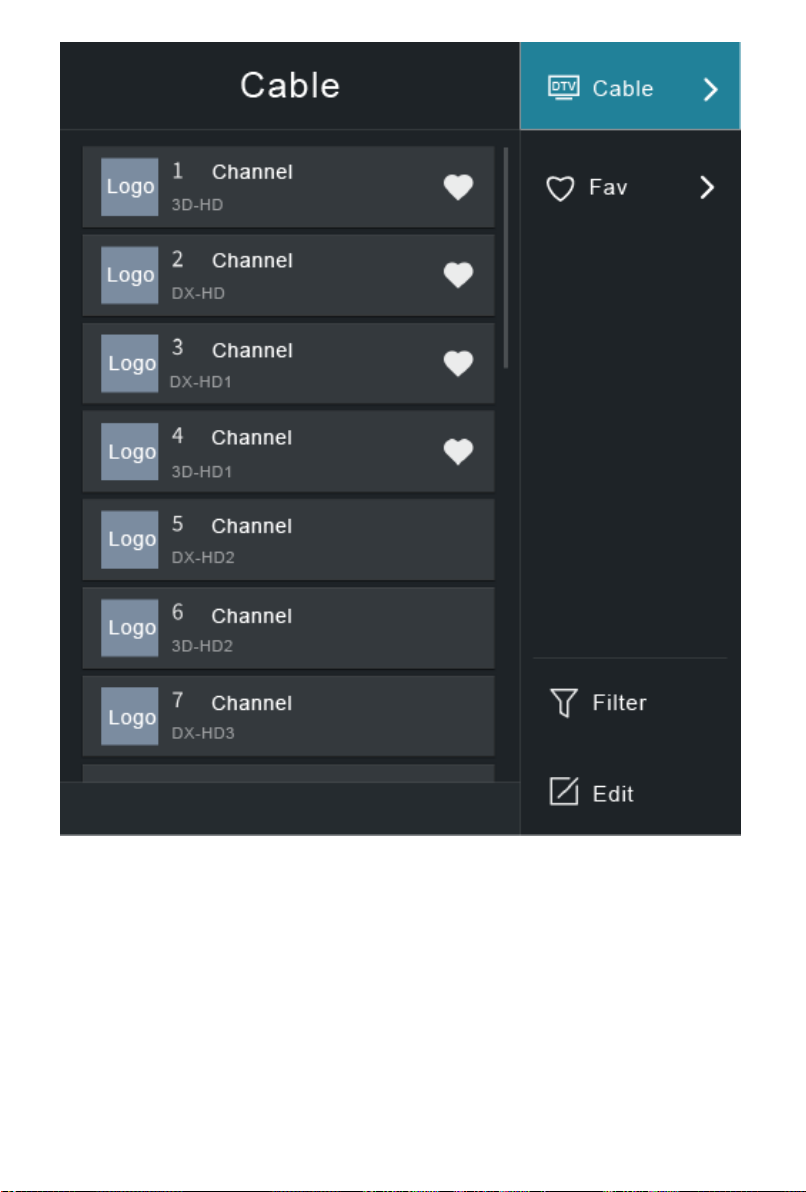
Channel List
Displaying the channel list
In Live TV, press / button to display the Channel List menu.
Alternatively, in Live TV, / > Channel List.
Entering the sub-menu of channel list
In Live TV, / >
Introducing the sub-menu
In Live TV, / >
7
TV List
Display Live TV channel categories, such as Cable and Antenna.
Fav
Display favourite lists 1 to 4.
Filter
Select channels by Content, HD, Child Lock, Scrambled and Sort.
Some options in Filter may not be available in some models/countries/
regions.
Edit
8
Edit the channel list.
Note:
• The sub-menu options may vary depending on models/countries/regions.
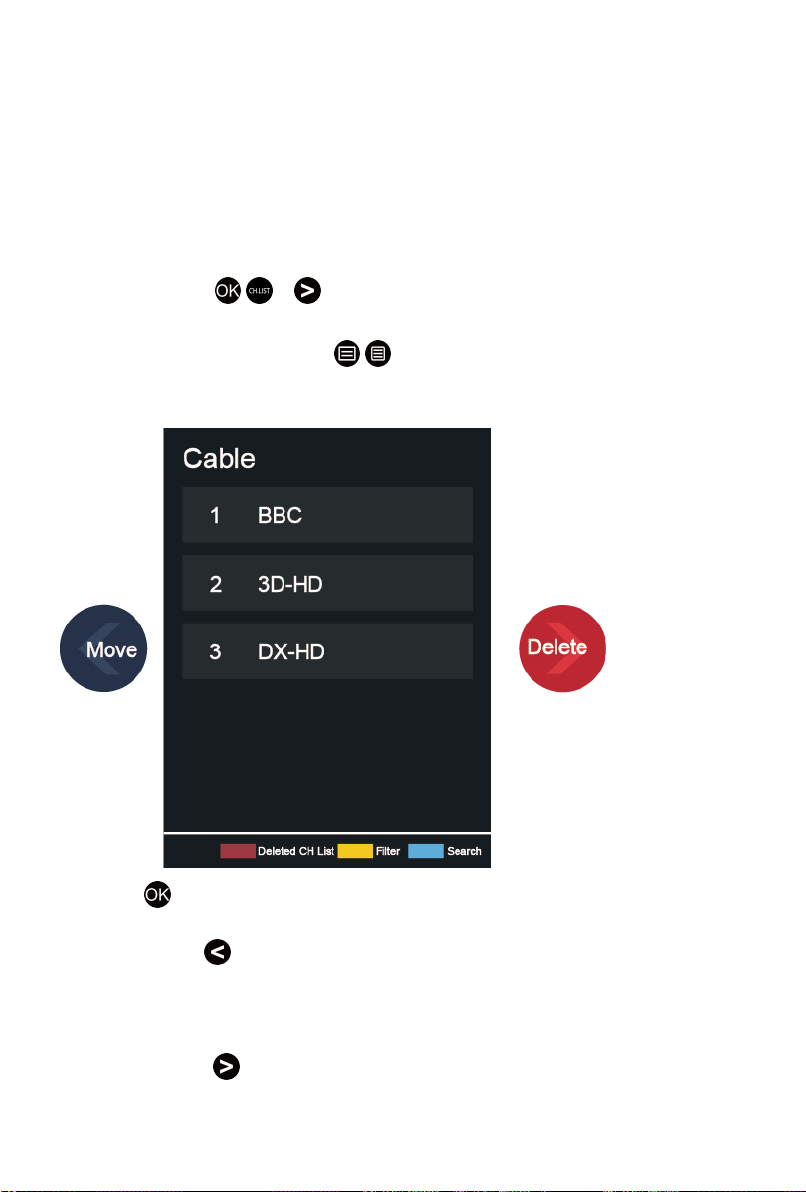
Channel Edit
Manually edit the channel list to your preference.
Editing Live TV channels
In Live TV, press / > to select a Live TV channel category such as
Antenna or Cable, then use D-pad to select Edit.
Alternatively, in Live TV, press / button, select Settings > Channel >
Channel Edit, and select a Live TV channel category such as Antenna or
Cable.
•
Press button on the selected channel, then a checkbox will appear.
You can select multiple channels at the same time to move or delete.
•
Move: Press button to move the selected channel.
Moving the channels could be restricted by the operator. If you want to
be able to move channels, it is not recommended to choose an operator
during channel scan, and LCN should be set to Off.
•
Delete: Press button to delete the selected channel.
9

•
Restore: Press [RED] button, or press button to call out the
colour menu and select RED to enter the list of deleted channels. Press
button to restore the deleted channel.
•
Filter: Press [YELLOW] button or press button to call out the
colour menu and select YELLOW, the filter screen will pop up. Press
button to select options, and the channel list can be updated.
•
Search: Press [BLUE] button or press button to call out the
colour menu and select BLUE, to search the channel.
Exporting to USB
Allow you to export the current channel list to a USB storage device.
In Live TV, / > Settings > Channel > Channel Edit > Export to USB
Importing from USB
Allow you to import a previously exported channel list via a USB storage
device.
In Live TV, / > Settings > Channel > Channel Edit > Import from
USB
Related Topic
• Connecting USB Devices
Favourite
Adding a channel to a favourite list
1.
In Live TV, press / button to call out the channel list.
2.
Press / button and select the channel(s) you want to add to the
favourite list.
3. Select Add to Favourite, and choose from FAV1-FAV4.
4. Then, a heart-shape icon will appear next to the added channel.
Viewing your favourite list
In Live TV, press / > > Fav to call out the favourite list.
Editing the favourite list
In Live TV, press / > > Fav > to select FAV1-FAV4, then use D-
pad to select Edit.
Alternatively, go to / > Settings > Channel > Channel Edit, and select
FAV1 - FAV4.
10

You can add, move or remove favourite channels.
•
Select Add channels to add the selected channel to the favourite list.
•
Select a channel in a favourite list, and press button to move it.
•
Select a channel in a favourite list, and press button to remove it.
Note:
• These steps should be operated under the TV input.
• Before you edit the favourite lists, Channel Scan must be completed first.
• You can add channels from various reception types to the favourite list.
Guide (EPG)
The Guide (EPG) provides a convenient way to check TV programs for
the upcoming 7 days. The information displayed by the Guide (EPG) is
made available by the commercial television networks for digital channels
only. The Guide (EPG) also provides a simple way to record your favourite
programmes and a reminder function which can switch channel automatically
at scheduled time, so that you will not miss programmes of interest. The
availability and amount of programme information will vary depending on the
particular broadcaster.
Note:
• The Guide (EPG) function is only available for digital channels. Analogue
channels are not supported.
11

In Live TV, press / button, or press / > Guide (EPG) to display
channel information on programme guide list.
• Watch
In Guide (EPG), when a current programme is selected, press >
Watch to switch to the channel you want to see.
• PVR/Reminder
In Guide (EPG), press / button to select the channels. Press /
button to select programme based on the time schedule.
Press button to select PVR or Reminder.
For more information, please refer to Live TV > PVR in this manual.
Note:
• Reminder in the Guide (EPG) is only available for programmes that
haven't been aired yet.
• A storage device (space should be no less than 2G, and transfer
rate should be no less than 4MB/s) must be attached to the TV for
recording purposes. It is strongly recommended to use USB mobile
hard disk drive instead of USB flash drive as the storage device. For
more information, please refer to Connecting USB Devices in this
manual.
• The TV will record the programme even in standby mode.
• The PVR function may not be applicable in some models/countries/
regions.
• Schedule
In Guide (EPG), press [RED] button or press button to call out
the colour menu and select RED, to view a list of scheduled reminders
and recordings.
• Programme Colour
In Guide (EPG), press [GREEN] button or press button to call
out the colour menu and select GREEN, to choose colours to indicate
different genres in the Guide (EPG) for quick and easy viewing.
Note:
• This function may not be applicable in some models/countries/regions.
• 24h−
In Guide (EPG), press [YELLOW] button or press button to call
out the colour menu and select YELLOW, to select programmes of the
previous day.
12
• 24h+
In Guide (EPG), press [BLUE] button or press button to call
out the colour menu and select BLUE, to select programmes of the next
day.
PVR
The PVR function allows you to easily record digital television content for
later viewing. The function is only available for digital channels. To use
PVR, you must connect a storage device for recording. The format of the
storage disk should be NTFS, FAT32. The PVR will not function if a data
storage device has not been connected. For more information, please refer to
Connecting USB Devices in this manual.
Schedule Recording
In Live TV, press / > PVR.
Alternatively, press / to load the info bar, and select a programme and
choose PVR.
If your remote has button, press it and use D-pad to select to set up
PVR.
You can select recording mode from time, manual stop and program.
When you select time, you can set the appointment time and period.
In Guide (EPG), press the [RED] button or press button to call
out the colour menu and select RED, to view the scheduled recording. In
schedule recording list, you can readjust the reservation information that has
been set.
13

Standby Recording
If you press the power button during recording and select Standby
Recording, your TV will go into standby mode but the recording process
is still going on. If you press power button again to wake up the TV, the
recording process will not be affected. After recording, the recorded file will
be automatically saved to the disk.
Note:
• The storage space of your device should be no less than 2G (for 15
minutes high definition video). It is strongly recommended to use USB
mobile hard disk drive instead of USB flash drive as the storage device.
• If the transfer rate of your hard disk is too slow, a pop-up notice will
appear. In this case, you can use another disk with higher speed.
• The PVR function doesn't support analogue channels.
• Some broadcasters may restrict to record the programme.
• During the recording progress, channels locked with Channel Lock
(password needed) are disabled to watch.
• Some channel-related configuration may conflict with background
recording. In this case, a reminding window will pop up.
• The PVR function may not be applicable in some models/countries/
regions.
Recording List
Accessing the recording list
View the list of recorded programmes and scheduled list.
To enter the recording list:
In Live TV, / > Recording List
Managing the recording list
In Live TV, / > Recording List > Recorded
You can watch, sort or delete recorded programmes.
Watch recorded programme
Select a recorded programme in the recording list, and press button to
watch it.
Sort recorded programme
Select All, and you can choose from the list to sort the recorded programme.
Note:
• This function may not be applicable in some models/countries/regions.
14
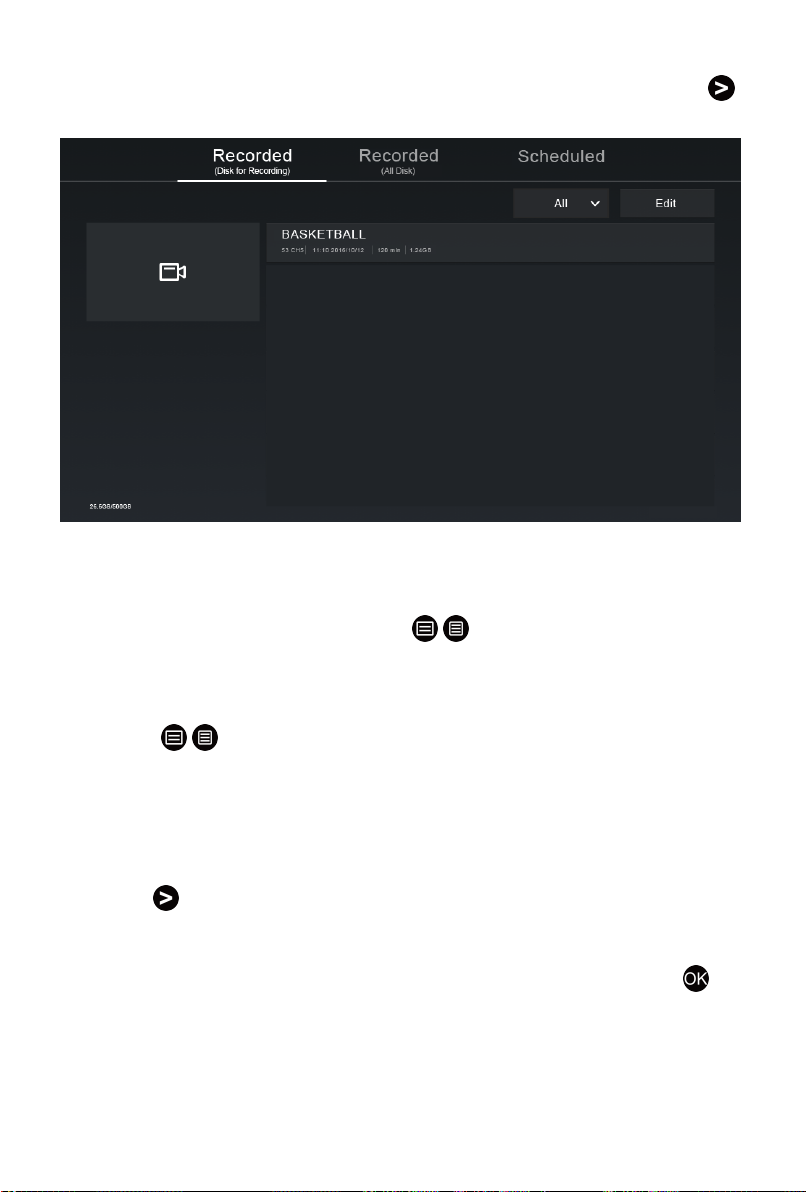
Delete recorded programme
Select Edit, select a recorded programme in the recording list, and press
button to delete it.
If you connect more than one storage devices to the TV, Recorded (Disk for
Recording) and Recorded (All Disk) are available on-screen to select.
In Recorded (Disk for Recording), you can watch recorded programme
of the storage device that is selected at / > Settings > System >
Advanced Settings > PVR & Time Shift > PVR Setup/Time Shift Setup.
Managing the schedule list
In Live TV, / > Recording List > Scheduled
You can change scheduled recording information and reminder information,
or cancel scheduled recordings or reminders.
Delete scheduled recording or reminder
Select Edit, select a scheduled recording or reminder in the schedule list,
and press button to delete it.
Edit scheduled recording or reminder
Select scheduled recording or reminder in the schedule list, and press
button to adjust it.
15
Note:
• The Recording List function may not be applicable in some models/
countries/regions.
Related Topic
• Connecting USB Devices
• Recording/Timeshift Issues
Timeshift
This option allows you to pause and rewind Live TV. This function operates
by recording temporarily to a storage device. Please ensure your storage
device is connected and there is enough free disk space. Otherwise, the
timeshift function will not commence.
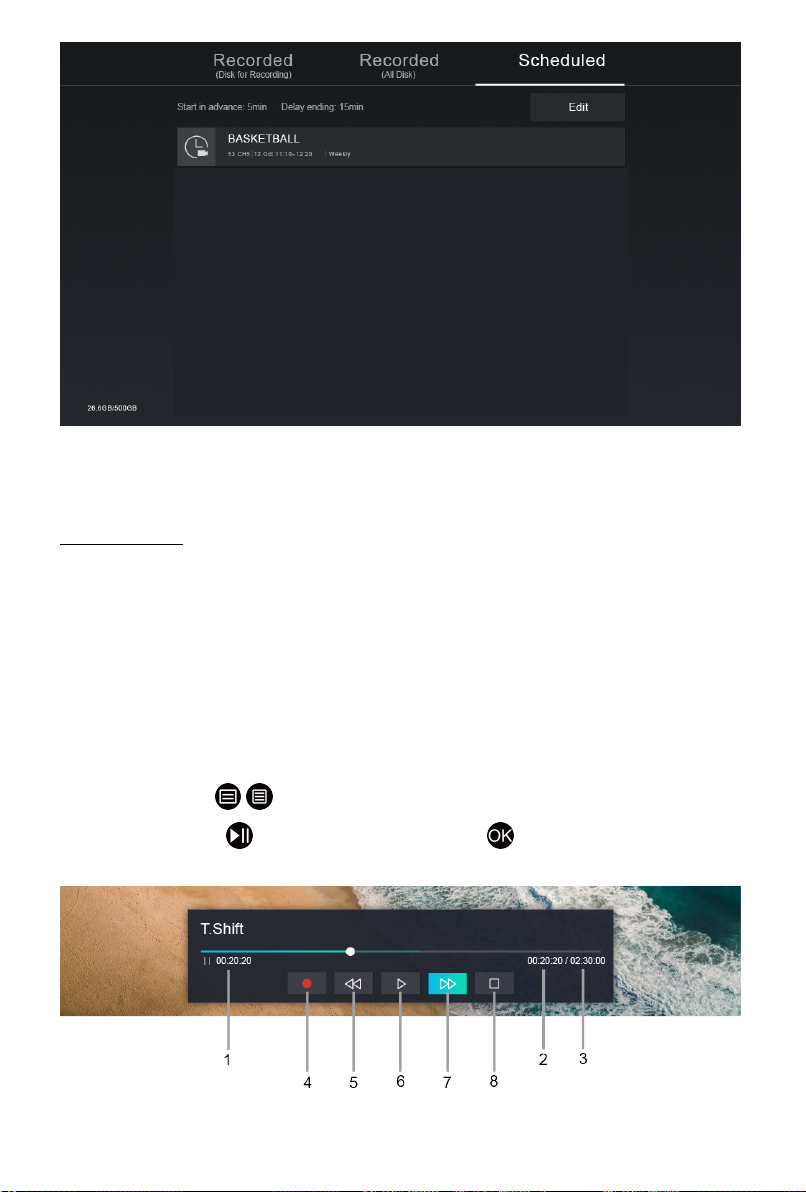
In Live TV, press / > Timeshift, and then the playback bar will appear.
If your remote has button, press it and press button to launch
Timeshift.
1 Unwatched time for buffered content
16

2 Current time
3 Total time
4
5
Record: to convert timeshift to live recording of current broadcast channel.
Select and the programme content you've watched in Timeshift before will
also be saved in the storage device.
Fast backward: you can choose 2×, 4×, 8× or 16×.
6
7
8
Pause/ Play
Fast forward: you can choose 2×, 4×, 8× or 16×.
Stop Timeshift: to exit the function and watch the current broadcast.
Note:
• The Timeshift function doesn't support analogue channels.
• The storage space of the device should be no less than 2G. It is strongly
recommended to use USB mobile hard disk drive instead of USB flash
drive as the storage device.
• The Timeshift function may not be applicable in some models/countries/
regions.
Related Topic
• Connecting USB Devices
• Recording/Timeshift Issues
17
Connection
Wired Internet Connection
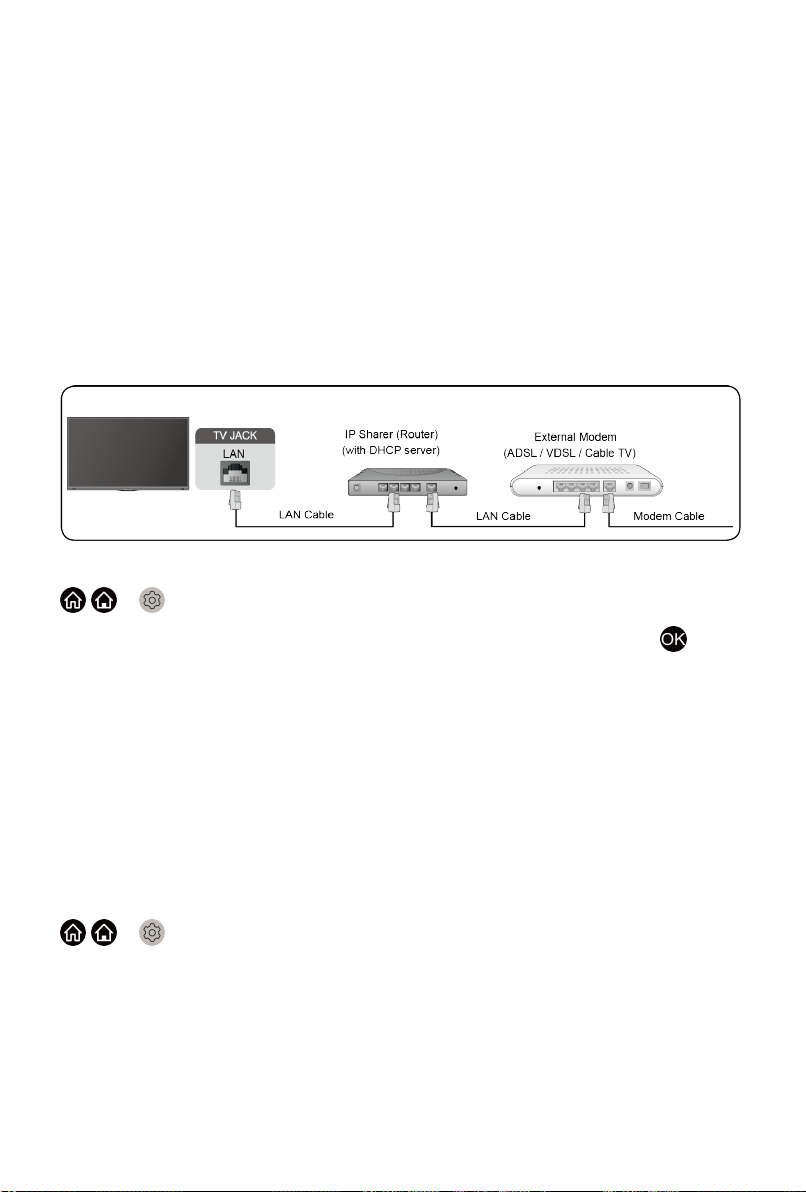
Connecting to a wired (Ethernet) network
To get access to the Internet in a wired way, it is recommended to use
a modem or router that supports Dynamic Host Configuration Protocol
(DHCP). Modems and routers that support DHCP automatically provide the
IP address, subnet mask, gateway, and DNS, so you don't have to enter
them manually. Most home networks already have DHCP.
See the illustration below.
After connecting to a wired (Ethernet) network:
/ > Settings > Network > Network Configuration
Set the TV network by selecting Network Configuration and press
button to enter the submenu.
• Connection Type
Choose a wired (Ethernet) network connection to access the Internet.
• Ethernet
Display network status.
• IP Settings
Configure the IP setting for your network connection.
Wake on LAN
/ > Settings > Network > Wake on LAN
Using an Ethernet connection and switching on Wake on LAN, this feature
can make you turn on the TV from the standby mode, and push content to be
broadcast on the TV with an app supporting the screencast feature in your
mobile device.
Note:
• To use this function, make sure your TV and mobile device are connected
to the same network environment.
18
• Enabling this function may result in higher energy consumption.
Related Topic
• Network Issues
Wireless Internet Connection
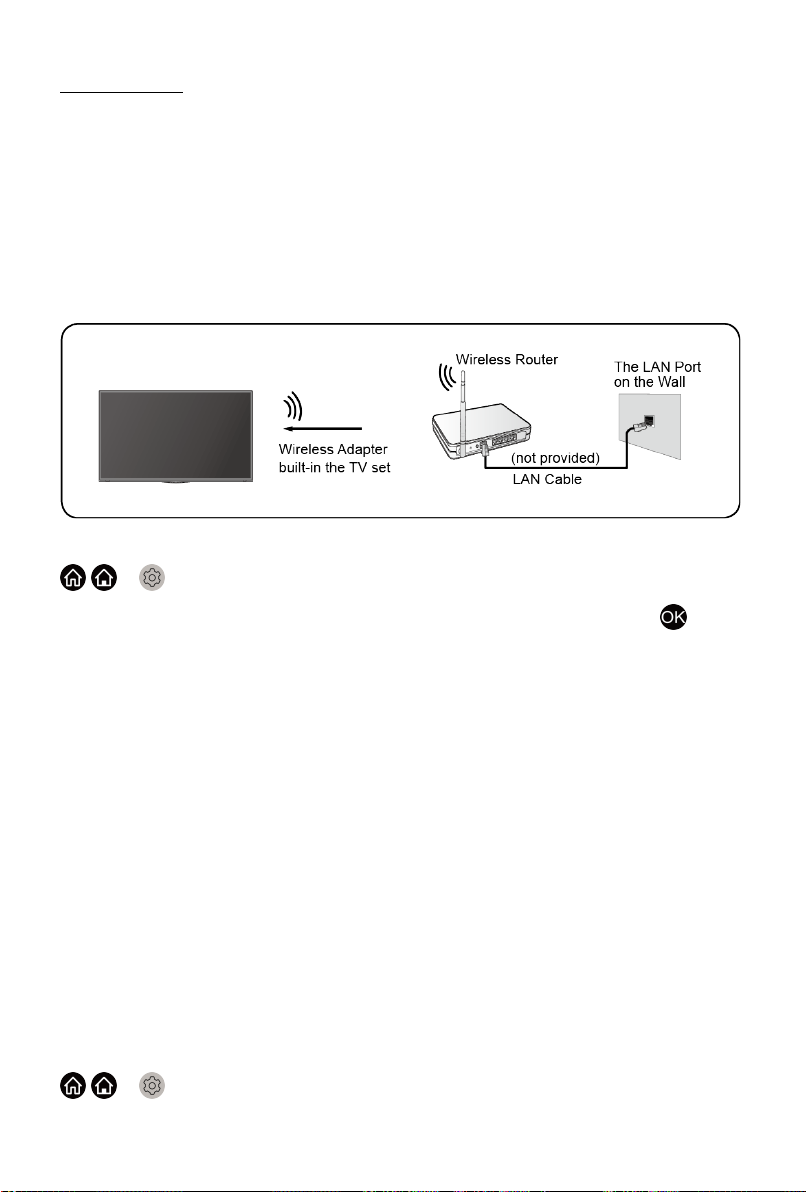
Connecting to a wireless network
To connect to an available wireless network, make sure that you turn on your
WiFi and have the wireless router's SSID and password before attempting to
connect.
To get access to the Internet in a wireless way:
/ > Settings > Network > Network Configuration
Set the TV network by selecting Network Configuration and press
button to enter the submenu.
• Connection Type
Choose a wireless network connection to access the Internet.
• Advanced Settings
Configure the advanced wireless network settings for the TV.
• Add
You can add wireless network.
• Refresh
Refresh wireless network.
Note:
• If no wireless router is found, select Add and enter the network name in
the SSID.
• If no wireless router is found, select Refresh.
Wake on wireless network
/ > Settings > Network > Wake on Wireless Network
19

Using a wireless network connection and switching on Wake on Wireless
Network, this feature can make you turn on the TV from the standby mode,
and push content to be broadcast on the TV with an app supporting the
screencast feature in your mobile device.
For more information about screencast feature, please refer to Multi-screen >
Screen Sharing or Content Sharing in this manual.
Note:
• To use this function, make sure your TV and mobile device are connected
to the same network environment.
• Enabling this function may result in higher energy consumption.
Related Topic
• Network Issues
Connecting Bluetooth Devices
You can connect to devices using Bluetooth technology.
/ > Settings > Network > Bluetooth
Note:
• Bluetooth function may not be applicable in some models/countries/
regions.
Connecting a Bluetooth remote
Pair the Bluetooth remote with the TV.
1. Pair the Bluetooth remote to the TV after you power the TV on, and set
/ > Settings > Network > Bluetooth to On.
2. Keep the remote control within 3 metres from the TV. Press any button
(except power and mic button) to pair with the TV.
Note:
•
In special cases, press and hold / button to pair.
• This function may not be applicable in some models/countries/regions.
• If an unknown error occurred with the remote, it could have been caused
by interference. Try to remove what's causing the interference and pair it
again.
• If an unknown error occurred with the remote while the battery power is
normal, you can take out the batteries, press any key for 1~2 seconds,
and insert them back. Then the remote will work normally.
• The remote cannot be paired to the TV while the TV is in standby mode.
20

Connecting a Bluetooth device
To pair a Bluetooth device, such as Bluetooth headphones, speakers,
keyboards, mouse or even mobile devices:
1.
Set / > Settings > Network > Bluetooth to On.
2. Before pairing your Bluetooth devices, make sure they're in pairing mode
and put devices within pairing range. To put your Bluetooth devices in
pairing mode, refer to the manual of devices.
3.
Find the Bluetooth device name in / > Settings > Network >
Bluetooth > Equipment Management and select it. The device will be
automatically connected to the TV.
Note:
• Only one Bluetooth speaker or Bluetooth headphone can be connected to
the TV. If a new Bluetooth speaker or headphone connects to the TV, the
old one will be disconnected automatically.
• Compatibility issues may occur depending on the Bluetooth device.
• The TV and Bluetooth devices may disconnect depending on the distance
between them.
• For more information about Bluetooth headphone settings, please refer to
Picture and Sound > Using Headphones in this manual.
Listening to the audio through Bluetooth devices
Pair the Bluetooth audio devices using the TV's Bluetooth function. Refer to
the user manual for your audio devices, such as Bluetooth speaker or sound
bar, for detailed connection and usage.
After the Bluetooth connection is completed, go to / > Settings >
Sound > Speakers > Audio Output, and then select BT Sound Bar option
to listen to the audio through bluetooth devices.
Note:
• Compatibility issues may occur depending on the Bluetooth device.
• The TV and Bluetooth device may disconnect depending on the distance
between them.
TV Bluetooth speaker
/ > Settings > Network > Bluetooth > TV Bluetooth Speaker
TV Output: Mobile devices are connected to TV with Bluetooth. Sound
outputs via TV speaker.
When your mobile device is connected to the TV via Bluetooth, you can play
your mobile phone's music through TV built-in speakers. This function makes
the TV perform as a speaker.
21

Go to your mobile Settings to enable Bluetooth, and choose the TV to
connect.
To use this function, make sure to select TV Speaker at / > Settings
> Sound > Speakers > Audio Output.
Related Topic
• Speakers Settings
Connecting Headphones
You can connect a pair of headphones (not provided) to the HEADPHONE
port on your TV. While the headphone is connected, the sound from the builtin speakers will be disabled.
Note:
• Headphone port may not be available in some models.
• Headphones with microphones are not supported.
•
If Headphone with Speakers is selected manually in / >
Settings > Sound > Headphone > Headphone Mode, the headphone
and the TV will have sound output at the same time.
• For more information about headphone settings, please refer to Picture
and Sound > Using Headphones in this manual.
Connecting USB Devices
Connect the USB devices, such as hard drives and USB sticks for browsing
photos, or listening to music.
22
 Loading...