

Page 1

Bar code
Page 2

50M5010UW
55M5010UW
65M5010UW
QUICK SETUP GUIDE
Before using the TV, please read this guide thoroughly
and retain it for future reference. For more detailed
instructions, please see the User Manual.
ES-A164610-1
English
Page 3

Declaration
Declaration
Any content and service accessed through this device, while only intended for
individual non-commercial use, shall be the property of the applicable third party and
subject to protection by regulations and laws on copyright, patent, trademark and
other intellectual property rights. No part of such content and service may be modified,
duplicated, published, uploaded, distributed, translated, marketed, or used to make and
distribute products derived from it without the prior permission of the content owner or
service provider.
You acknowledge and agree explicitly that you will solely bear the risk associated with
the use of this device, and further you will solely bear any risk related to satisfactory
quality, performance and accuracy for any content and service accessed through
this device. To the maximum extent permitted by applicable law, this device and any
third party’s content and service is provided as it is without any guarantee, express or
implied.
Manufacturer hereby declare explicitly that Manufacturer shall not be held liable for any
guarantee and conditions, express or implied, related to this device and any content
and service, including but not limited to warranty on marketability, satisfactory quality,
fitness for a particular purpose, accuracy, quiet use and non-violation of any third
party’s rights; to the maximum extent permitted by applicable law, Manufacturer gives
no guarantee on the accuracy, validity, timeliness, legitimacy and completeness of any
content or service provided through this device, or the fitness of such device, content
or service for your particular requirement, or the protection from interruption and error
during operation of such device, content or service; to the maximum extent permitted
by applicable law, in any case, including fault or neglect, Manufacturer shall not be held
liable for legal actions or indemnity obligation arising from any consequence as a result
of or related to any information loaded in this device or use of such device, content or
service by you or any third party.
Any content and service provided as it is together with this device shall be the property
of the applicable third party, therefore Manufacturer gives no declaration or warranty
on modification, suspension, cancellation, termination or abortion thereof, and shall not
be held liable for legal actions or indemnity obligation arising thereof.
Manufacturer reserves the rights to restrict the use or access of certain content or
service. As the content and service are transmitted through third party’s network and
transmission facilities, Manufacturer undertakes no customer service thereof or the
obligation for such customer service.
A
Page 4
Important Safety Precautions
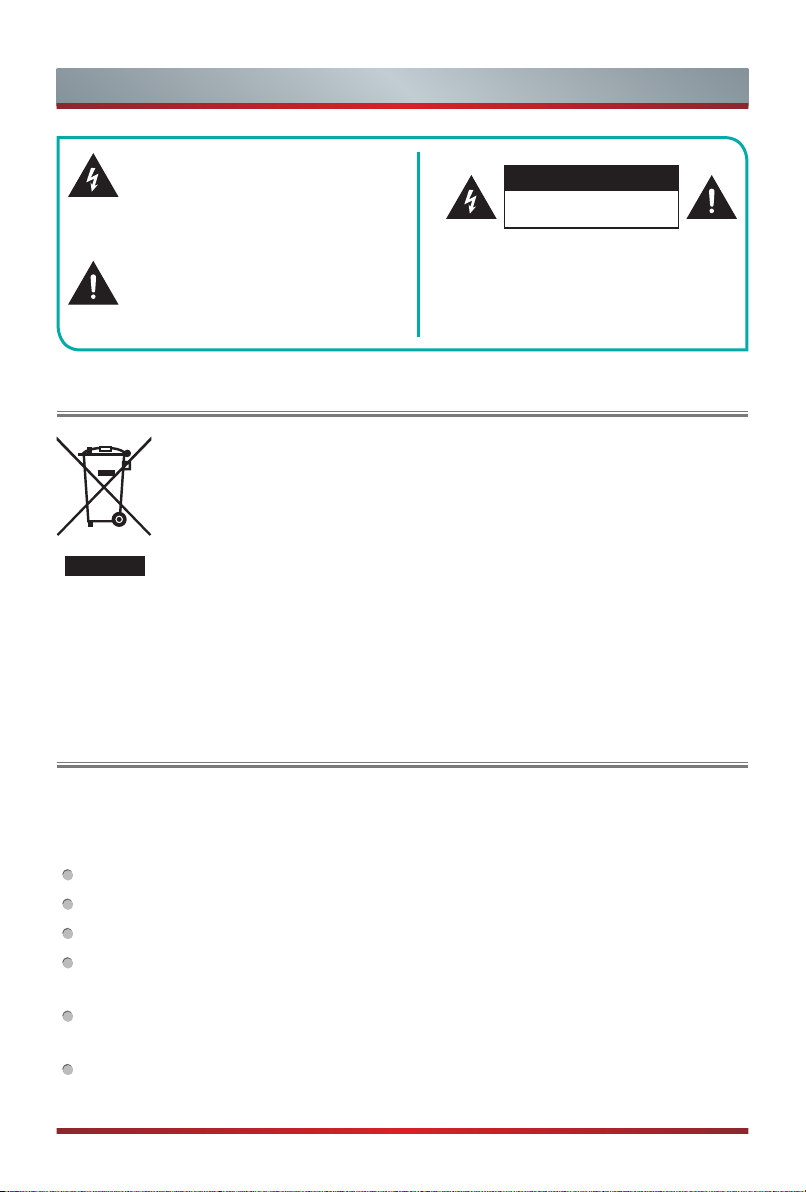
This symbol alerts user about the
presence of a dangerous voltage not
isolated inside the product which can
be sufficiently powerful to constitute a
risk of electrocution.
This symbol alerts user about the
presence of important operating
instructions and maintenance in the
document enclosed in the package.
In no case the user is allowed to operate
Disposal of Used Electrical & Electronic Equipment
Packaging and electrical goods should be recycled appropriately, and
not treated as household waste. Please dispose of this equipment at
your applicable collection point for the recycling of electrical & electronic
equipment waste. By ensuring the correct disposal of this product,
you will help prevent potentially hazardous to the environment and to
human health, which could otherwise be caused by unsuitable waste
handling of this product. The recycling of materials will help conserve
natural resources. Please do not therefore dispose of your old electrical
and electronic equipment with your household waste. For more detailed
information about recycling of this product, please contact your local city
office, your household waste disposal service or the shop where you
purchased the product.
ATTENTION
RISK OF SHOCK
ELECTRIC
Do not open the back cover.
inside the TV set. Only a qualified
technician is entitled to operate.
Warning
If a television is not positioned in a sufficiently stable location, it can be potentially
hazardous due to falling. Many injuries, particularly to children, can be avoided by
taking simple precautions such as:
Using cabinets or stands recommended by the manufacturer of the television.
Only using furniture that can safely support the television.
Ensuring the television is not overhanging the edge of the supporting furniture.
Not placing the television on tall furniture (for example, cupboards or bookcases)
without anchoring both the furniture and the television to a suitable support.
Not standing the televisions on cloth or other materials placed between the
television and supporting furniture.
Educating children about the dangers of climbing on furniture to reach the television
or its controls.
B
Page 5

Important Safety Precautions
Safeguards
Please read the following safeguards for your TV and retain for future reference.
Always follow all warnings and instructions marked on the television.
1. A note about safety and operating instructions
Read and follow all safety and operating instructions, and retain them safely for future
reference.
2. Heed Warnings
Adhere to all warnings on the appliance and in the operating instructions.
3. Cleaning
Unplug the TV from the wall outlet before cleaning. Do not use liquid, abrasive, or
aerosol cleaners. Cleaners can permanently damage the cabinet and screen. Use a
lightly dampened cloth for cleaning.
4. Wall Bracket
After market brackets may be available to purchase locally. Please refer to the
specification page for dimensions.
5. Water and Moisture
Avoid dripping or splashing of liquids onto the product. Objects filled with liquids, such
as vases, should not be placed on the product.
6. Setting
Do not place this TV on an unstable cart, stand or table. Placing the TV on an unstable
base can cause the TV to fall, resulting in serious personal injuries as well as damage
to the TV. Use only a cart, stand, bracket or table recommended by the manufacturer
or salesperson.
7. Ventilation
Slots and openings in the cabinet are provided for ventilation, to ensure reliable
operation of the TV and to protect it from overheating. Do not cover the ventilation
openings in the cabinet and never place the set in a confined space such as built-in
cabinet unless proper ventilation is provided. Leave a minimum 10cm gap all around
the unit, the rear of the TV should be 6cm away from the wall.
C
Page 6

Important Safety Precautions
8. Power Source
This TV should be operated only from the type of power source indicated on the
marking label. If you are not sure of the type of power supplied to your home, consult
your appliance dealer or local power company.
9. Power-Cord Protection
Power- supply cords should be routed so that they are not likely to be walked on or
pinched by items placed upon or against them, paying particular attention to cords at
plug, wall outlets, and the point where they exit from the TV. MAIN plug is used as the
disconnect device, the disconnect device shall remain readily operable.
10. Lightning
For added protection for this TV during a lightning storm, or when it is left unattended
and unused for long periods of time, unplug it from the wall outlet and disconnect the
antenna or cable system. This will prevent damage to the TV due to lightning or powerline surge.
11. Power Lines
An outside antenna system should not be located in the vicinity of overhead power
lines or other electric light or power circuits, or where it can fall into such power lines or
circuits. Where installing an outside antenna system, extreme care should be taken to
keep from touching such power lines or circuits as contact with them might be fatal.
12. Overloading
Do not overload wall outlets and extension cords as this can result in a risk of fire or
electric shock.
13. Object and Liquid Entry
Never push objects of any kind into this TV through openings as they may touch
dangerous voltage points or short-out parts that could result in fire or electric shock.
Never spill liquid of any kind on or into the TV.
14. Outdoor Antenna Grounding
If an outside antenna or cable system is connected to the TV, be sure the antenna or
cable system is grounded so as to provide some protection against voltage surges and
built-up static charges.
15. Servicing
Do not attempt to service this TV yourself as opening or removing covers may expose
you to dangerous voltage or other hazards. Refer all servicing to qualified service
personnel.
D
Page 7
Important Safety Precautions
16. Damage Requiring Service
Unplug the TV from the wall outlet and refer servicing to qualified service personnel
under the following conditions:
(a) When the power - supply cord or plug is damaged.
(b) If liquid has been spilled, or objects have fallen into the TV.
(c) If the TV has been exposed to rain or water.
(d) If the TV does not operate normally by following the operating instructions. Adjust
only those controls that are covered by the operating instructions as an improper
adjustment of other controls may result in damage and will often require extensive
work by a qualified technician to restore the TV to its normal operation.
(e) If the TV has been dropped or the cabinet has been damaged.
(f) When the TV exhibits a distinct change in performance - this indicates a need for
service.
17. Replacement Parts
When replacement parts are required, be sure the service technician has used
replacement parts specified by the manufacturer or have the same characteristics as
the original part. Unauthorized substitutions may result in fire, electric shock or other
hazards.
18. Safety Check
Upon completion of any service or repair to the TV, ask the service technician to
perform safety checks to determine that the TV is in safe operating condition.
19. Heat
The product should be situated away from heat sources such as radiators, heat
registers, stoves, or other products (including amplifiers) that produce heat.
Incorrect replacement of the battery may lead to the risk, including the
replacement of another similar or the same type. Do not expose batteries
to heat such as sun or fire or something like that.
The device should not be exposed to dripping and spraying and it cannot
be placed under objects filled with liquids.
Main plug is used as the disconnect device, the disconnect device shall
remain ready for operating.
E
Page 8
Contents
Contents
Accessories List..............................................................................................................1
Installing the Stand .........................................................................................................2
TV Front..........................................................................................................................4
TV Rear ..........................................................................................................................5
Making Connections .......................................................................................................6
Remote Control ............................................................................................................ 11
Turning the TV on for the First Time ............................................................................. 13
Specifications ...............................................................................................................14
Accessories List
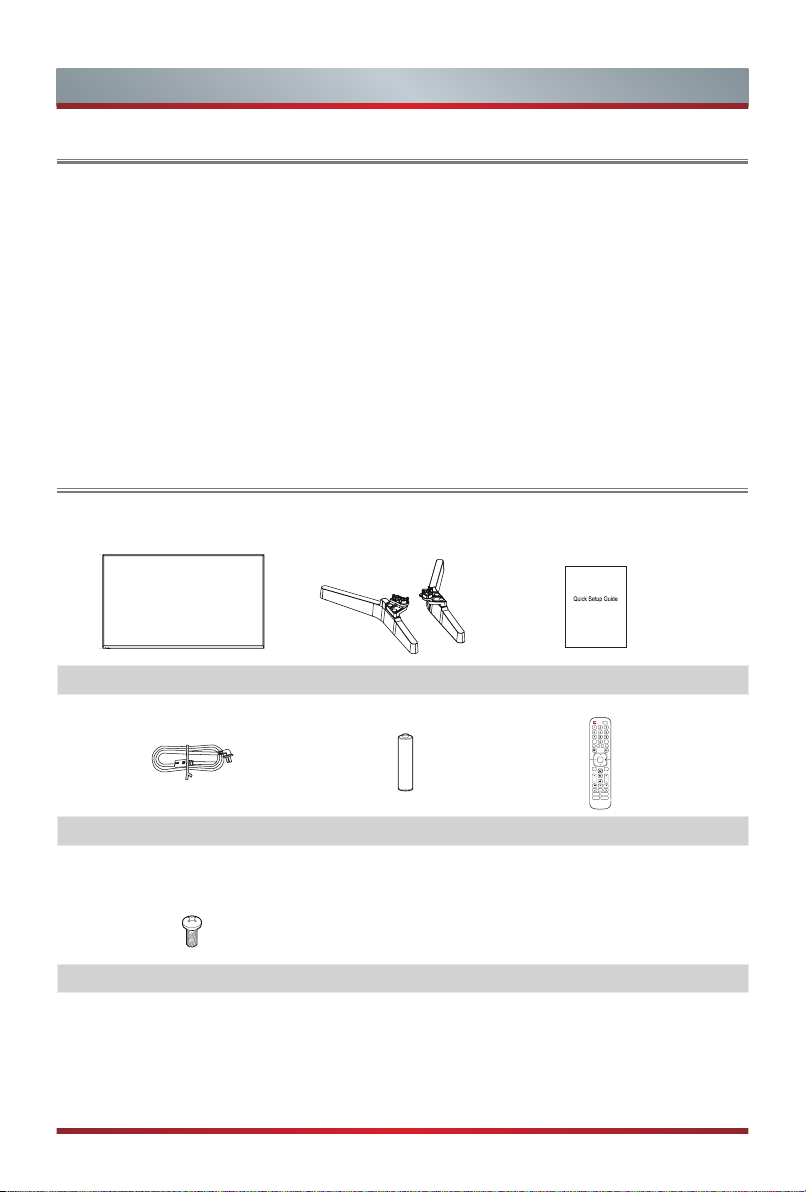
The following accessories are included with TV:
Power cord AAA Battery × 2 Remote Control
(Actual product may vary
TV Base Stand Quick Setup Guide
in appearance.)
Screw × 4
1
INPUT
SubtitleT.shift
OK
BACK EXIT
VOLC
CH
Info
EPGCH.List
APP
APP
Page 9
Installing the Stand
Installing the Stand
CAUTION
Be sure to disconnect the A/C power cord before removing a base stand or
installing Wall-Mount brackets.
The screen display is very fragile, and must be protected at all times when installing
the base stand. Be sure that no hard or sharp object, or anything that could scratch
or damage the screen display, comes into contact with it. DO NOT exert pressure
on the front of the TV at any time because the screen could crack.
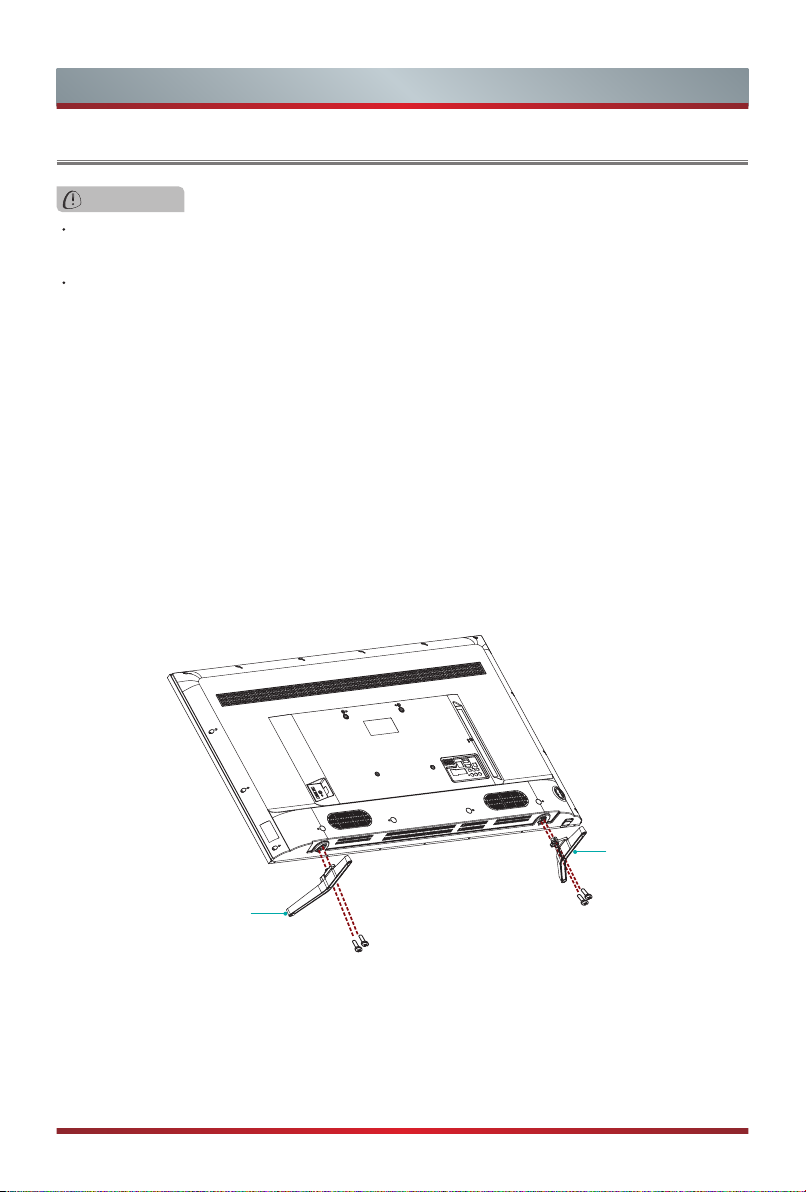
Follow the illustrations and textual instructions below to complete the installation steps:
For 50"/55"
1. Carefully place your TV face-down on a soft, flat surface to prevent damage to the
TV or scratching to the screen.
2. Remove the 2 stands from the accessory bag and then insert the stands into the
bottom slots of the TV.
3. Secure the Base Stand to the TV with the 4 screws in accessory tightly.
Base Stand
Base Stand
Screws: ST4×16(50")
M4×12(55")
Screws: ST4×16(50")
M4×12(55")
2
Page 10
Installing the Stand
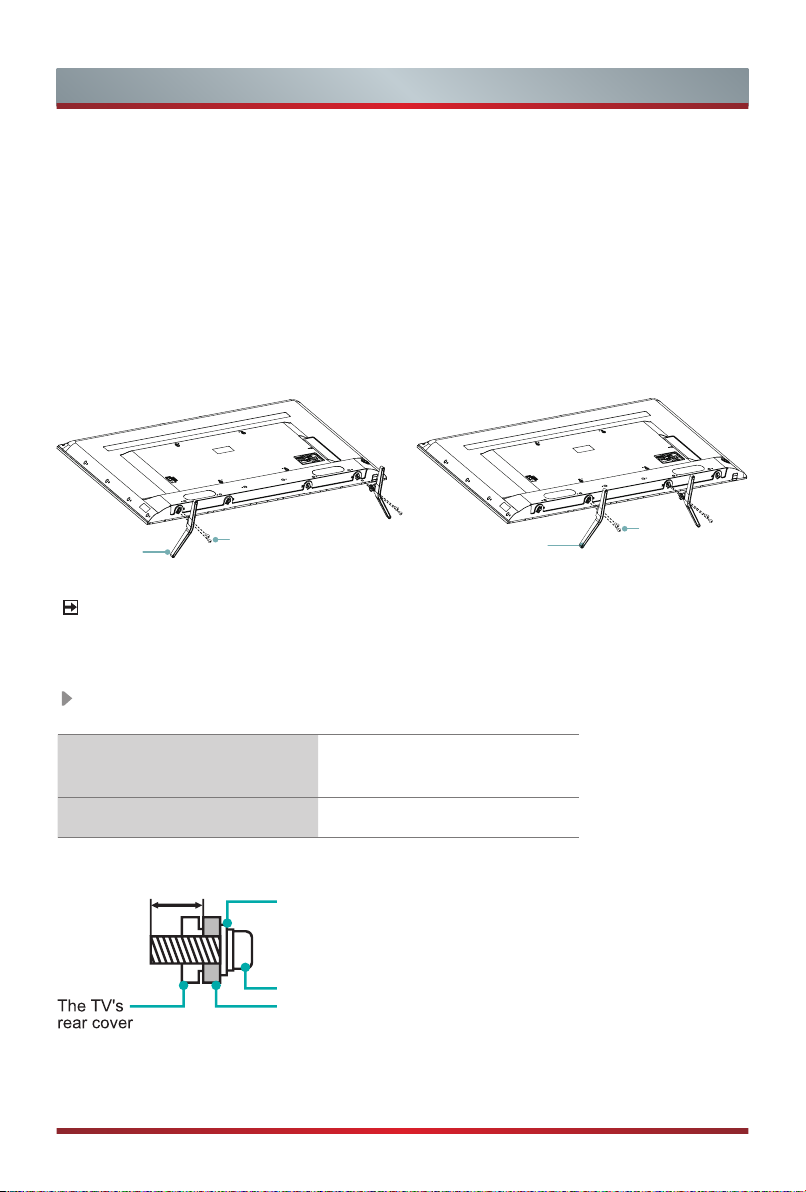
For 65"
1. Carefully place your TV facedown on a soft, flat surface to prevent damage to the
TV or scratching to the screen.
2.
Remove the 2 stands from the accessory bag and then insert the stands into the
bottom slots of the TV.
Attention: According to the desktop size, you can select one of the base stand
installation, as shown in the figure.
3. Secure the Base Stand to the TV with the 4 screws in accessary tightly.
Screws:
M4×12
Base Stand
Screws: M4×12
Base Stand
NOTE
Product images are only for reference, actual product may vary in appearance.
WALL-MOUNT BRACKET SPECIFICATIONS
Wall-Mount hole pattern (mm)
200 × 200 (50"/55")
400 × 400 (65")
Wall-Mount screw size M6
9.5~11.5mm
Wall-Mount Bracket (not provided)
Screw (not provided)
Spacer (not provided)
3
Page 11
TV Front
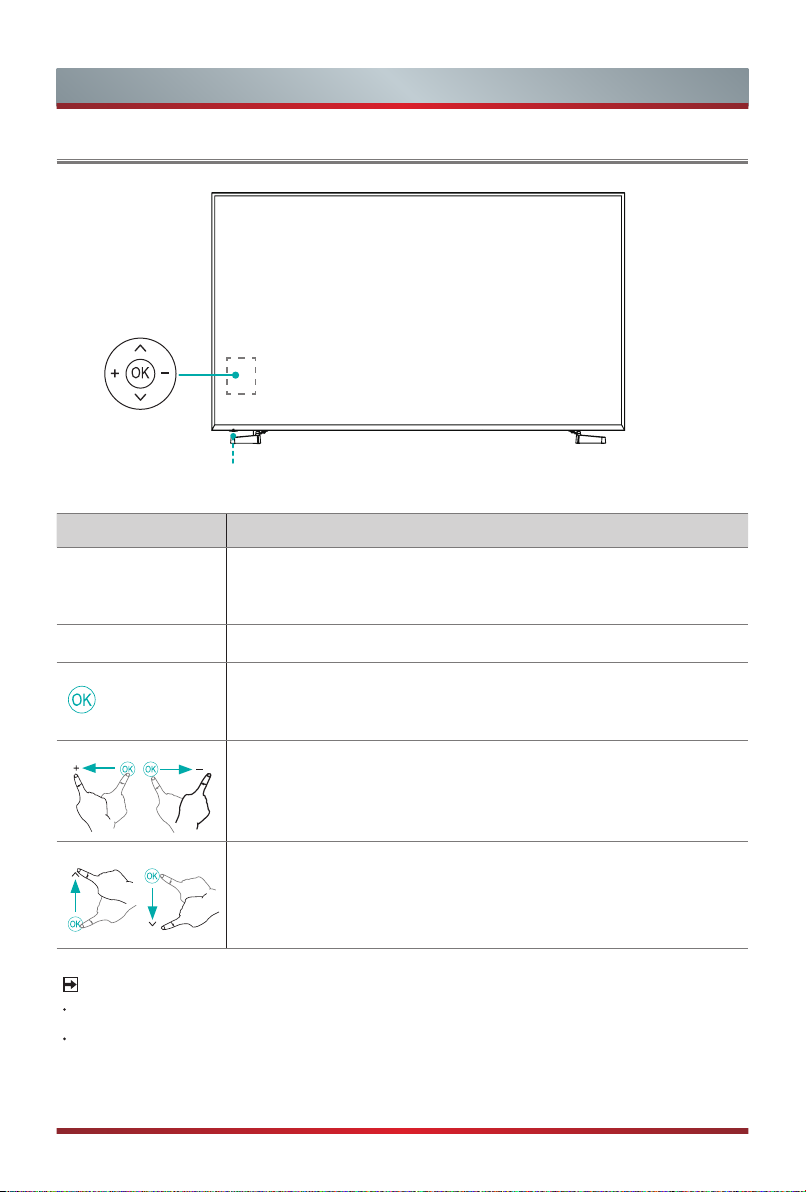
TV Front
TV Bottom Panel
TV Back View
Remote sensor
Power indicator
Item Description
Receives remote signals from the remote control.
Remote sensor
Power indicator The light is off when turned on. Lights up in standby mode.
Do not put anything near the sensor, as its function may be
affected.
Select among the different input signal sources or put the TV
in standby mode, or you can turn on the TV when the TV in
standby mode.
Toggle the OK button left and right to adjust the volume.
Toggle the OK button up and down to select the channel.
NOTES
The Picture is Only for Reference.
Powering on the TV requires several seconds to load program. Do not rapidly turn
the TV off as it may cause the TV to work abnormally.
4
Page 12
TV Rear
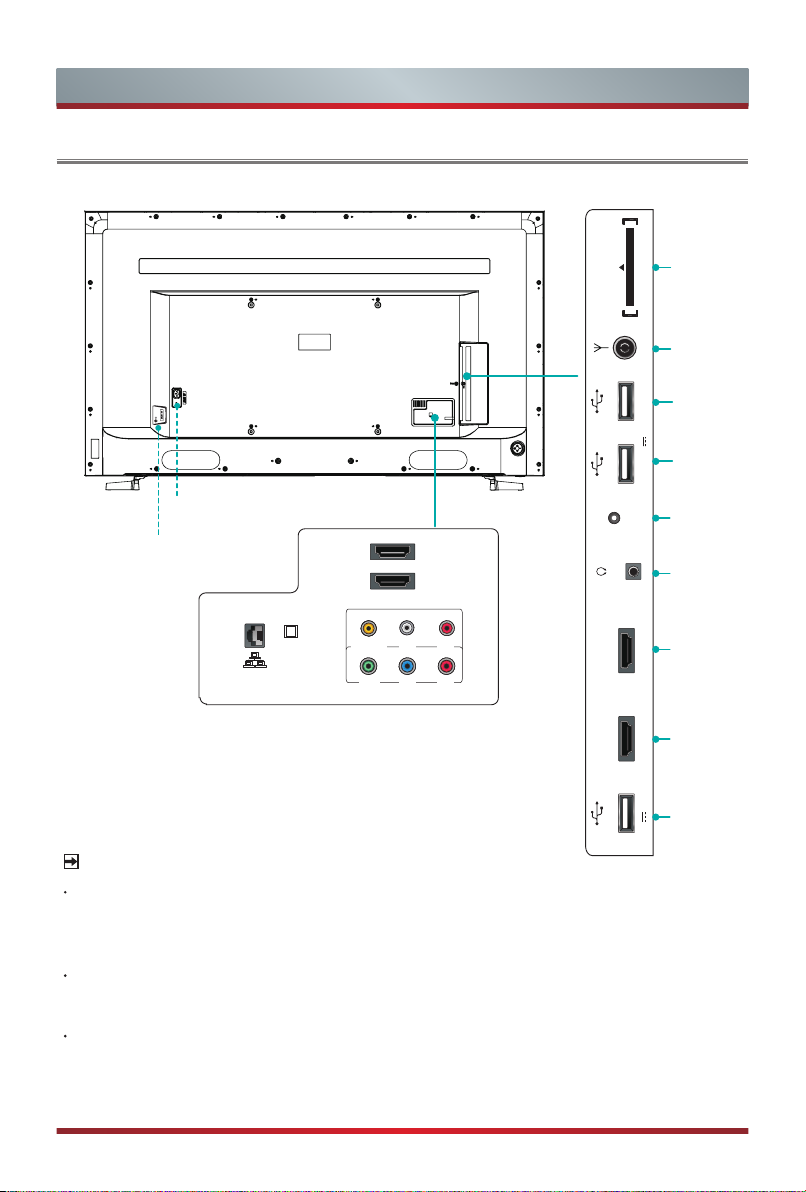
TV Rear
COMMON INTERFACE
CARD FACE FRONT
ANT
COMMON
INTERFACE
ANT
0.5A(MAX)
DC 5V
SERVICE
HEADPHONE
MHL(DC 5V 900mA)
ARC
DC 5V 1A(MAX)
USB
USB
SERVICE
HEADPHONE
HDMI
HDMI
USB
Power Input(65"
Power Input(50"/55"
LAN
)
)
DIGITAL
AUDIO OUT
AV IN
VIDEO
Y
COMPONENT IN
USB 1
USB 2
(4K@30Hz)
HDMI 3
(4K@30Hz)
HDMI 4
L
R
P
P
B
R
HDMI 1(4K@60Hz)
HDMI 2(4K@60Hz)
USB 3
NOTES
Check the jacks for position and type before making any connections. Loose
connections can result in image or color problems. Make sure that all connections
are tight and secure.
The TV may not be compatible with all external devices. To check compatibility,
please refer to the user manual of external device.
Do not connect external equipment while TV's power cord is plugged in. It may
cause electric shock.
5
Page 13
Making Connections
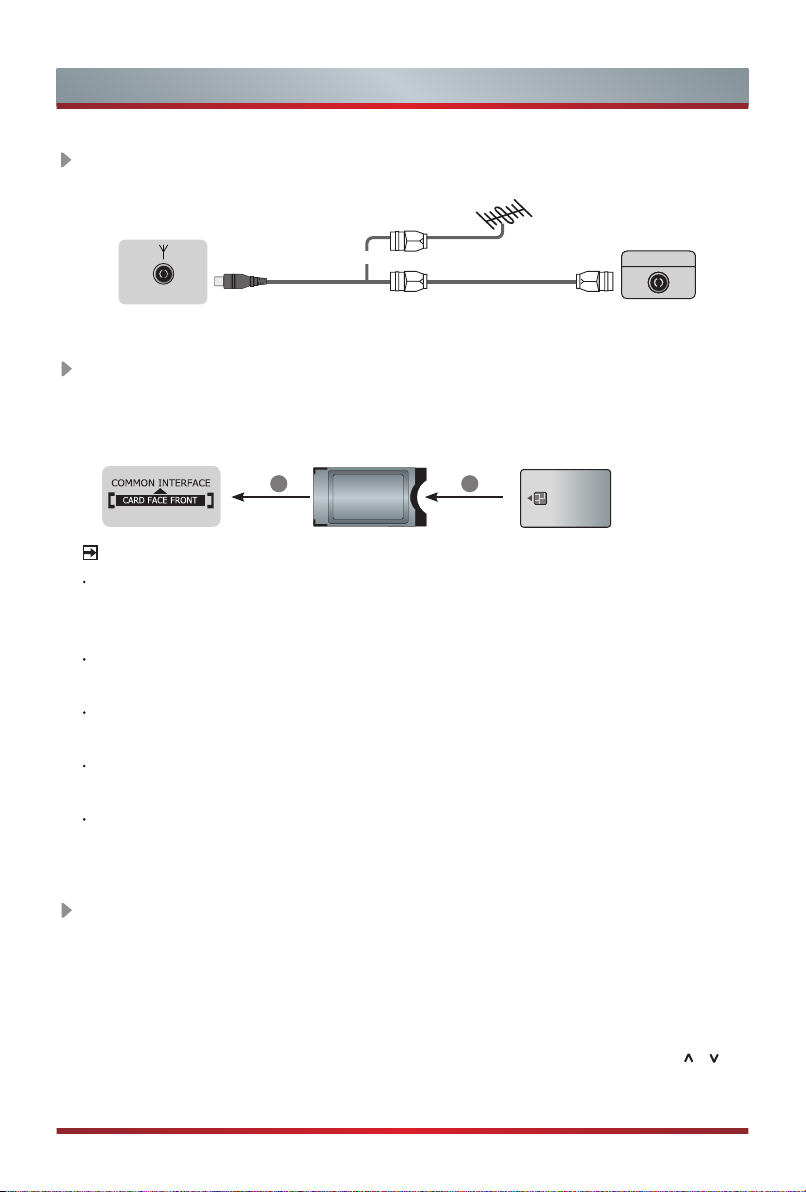
ANT
Connect an outdoor VHF/UHF antenna or cable.
TV JACK
or
ANT
(not included)
Outdoor
Antenna
Antenna Cable (75Ω)
Cable
ANT OUT
VHF/UHF Antenna
COMMON INTERFACE
Insert the CI+ module for watching scrambled services like pay-tv channels or
some HD channels.
TV JACK
CAM CARD
1 2
SMART CARD
NOTES
Before you insert/remove the CI+ module, ensure that the TV is switched off.
Then insert the CI card into the CI+ module in accordance with the Service
Provider’s instructions.
Do not repeatedly insert or remove the Common Access Module as this may
damage the interface and cause a malfunction.
You must obtain a CI+ module and card from the service provider of the
channels you want to watch.
Insert the CI+ module with the SmartCard in the direction marked on the module
and SmartCard.
CI+ is not supported in some countries and regions; check with your authorized
dealer.
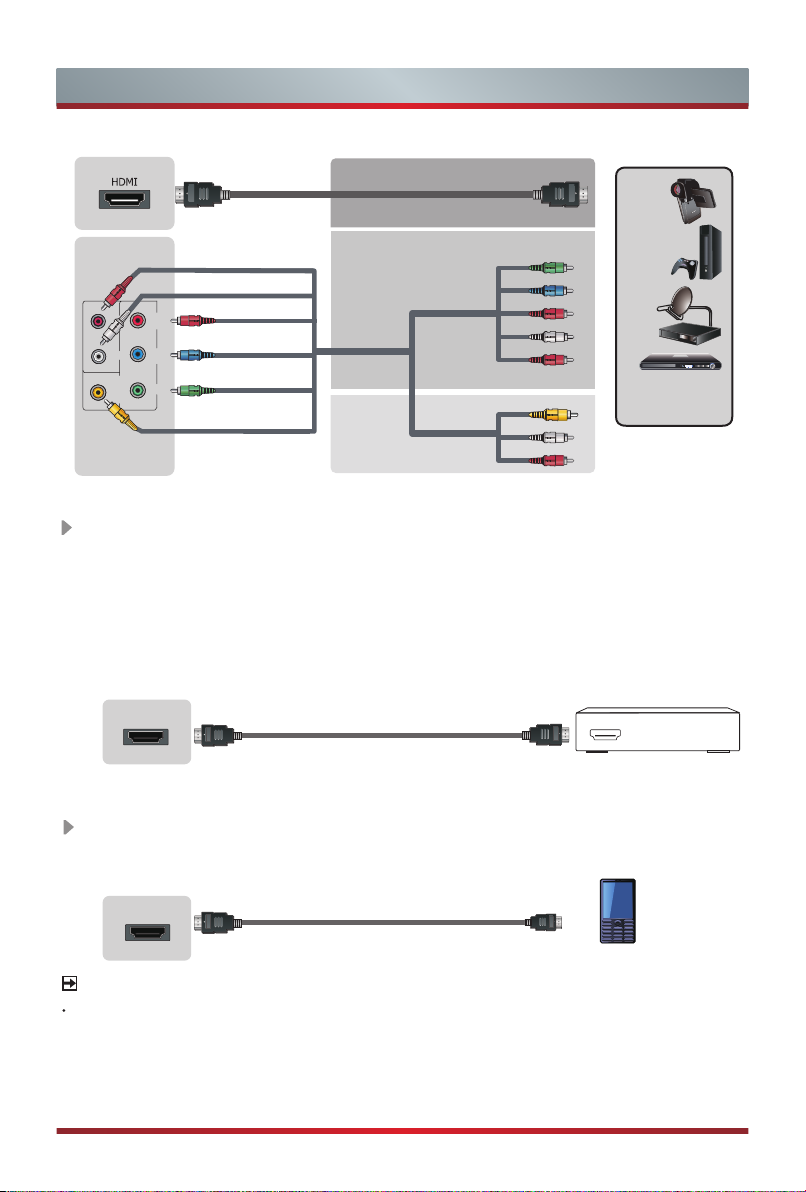
HDMI/COMP/AV
Connect a HDMI / Comp / AV cable from an external AV equipment. No sound
connection is needed for HDMI to HDMI connection. If the signal resolution does not
match the specification table, you need to change the setting of device according to
the table. Please consult your device user manual for instruction.
· To select the HDMI / Component / AV
Press the [INPUT] button, when the list of input Source appears, press the [
/ >] buttons to select the source [HDMI] / [COMPONENT] / [AV], then press the [OK]
button to connect.
6
/ / <
Page 14
Making Connections
TV JACK
Video Effect:
BEST(HDMI)
L R
VIDEO
BETTER
(COMP)
R
P
B
P
COMPONENT IN
Y
GOOD
(AV)
Component
AV
Y
P
Pr
L
R
Video
L
R
b
Video Camera/
Set-top Box/
Satellite Receiver
ARC Connect an HDMI cable from an external digital audio system.
ARC enables the TV to directly output the digital sound through an HDMI cable.
Please note that it works only when the TV is connected to the audio receiver that
supports the ARC (Audio Return Channel) function.
When this port is used as the ARC function, it can't be used as signal input at the
same time.
TV JACK
HDMI 2(4K@60Hz)
ARC
HDMI cable (not included)
Audio Amplier/Speaker
HDMI
MHL Connect an MHL cable from your MHL-enabled device, such as a cell
phone.
TV JACK
HDMI 1(4K@60Hz)
MHL(DC 5V 900mA)
MHL cable (not included)
MHL-enabled Device
NOTE
MHL is only available through HDMI 1(MHL) and only when the TV is connected to
compatible MHL devices. Please note that not all MHL devices are supported.
7
Page 15
Making Connections
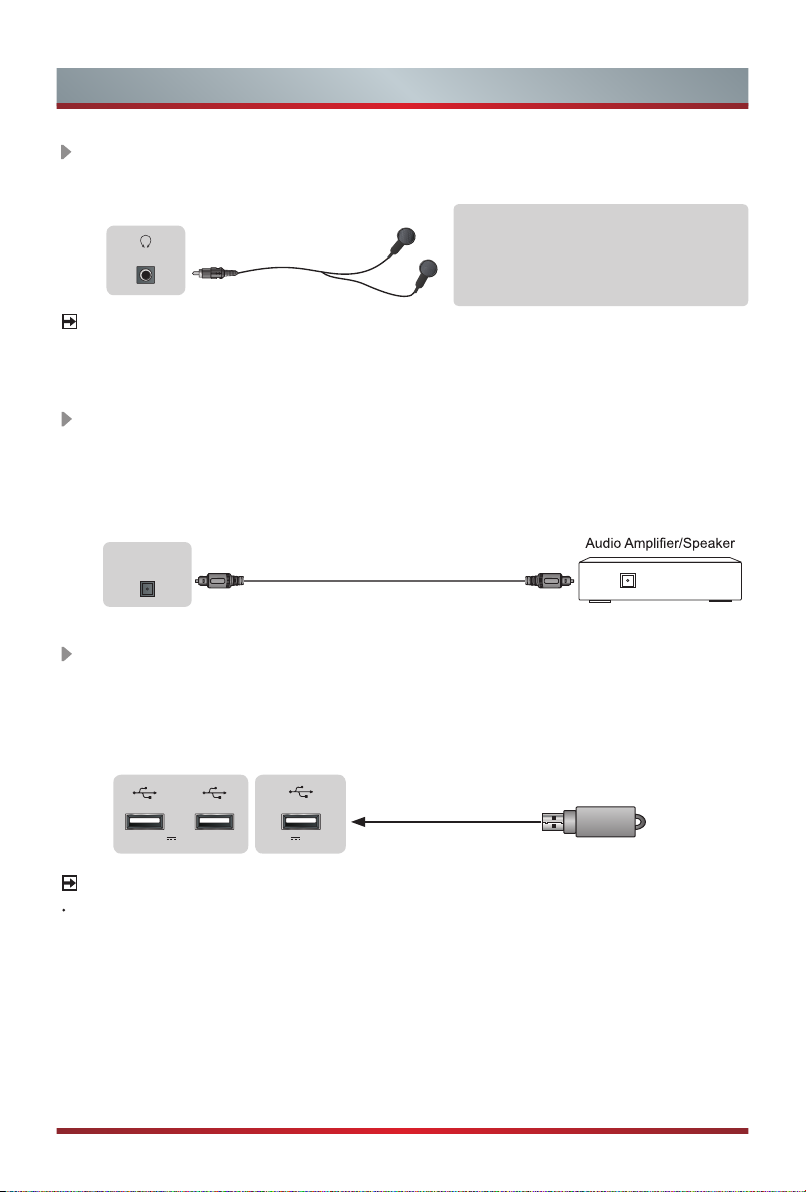
HEADPHONE
Connect Headphone for audio out of the TV.
The built-in speakers will be disabled once the headphone is connected.
TV JACK
HEADPHONE
Headphone (not included)
ATTENTION
Excessive sound pressure from
earphones and headphones can
cause hearing loss.
NOTE
Please make sure that the headphone you plug in is without microphone function, or it
may not be supported.
DIGITAL AUDIO OUT Connect to an external digital audio system.
Before connecting a digital audio system to the DIGITAL AUDIO OUT jack, you
should decrease the volume of both the TV and the system to avoid that the
volume suddenly becomes bigger.
TV JACK
DIGITAL
AUDIO OUT
DIGITAL AUDIO cable (not included)
USB
Connect the USB1.1, USB2.0 and USB3.0 devices such as hard drives, USB sticks
and digital cameras for browsing photos, listening music and watching recorded
movies.
TV JACK
USB 3
DC 5V 1A(MAX)
NOTES
USB 2
DC 5V 0.5A(MAX)
USB 1
When connecting a hard disk or a USB hub, always connect the mains adapter of
the connected device to the power supply. If a USB 1.1 or USB2.0 device requires
more than 500mA or 5V, the USB device may not be supported. Max supported
current for USB 3.0 device is 1A. Exceeding the max supported current may result
in damage or data loss.
8
Page 16
Making Connections
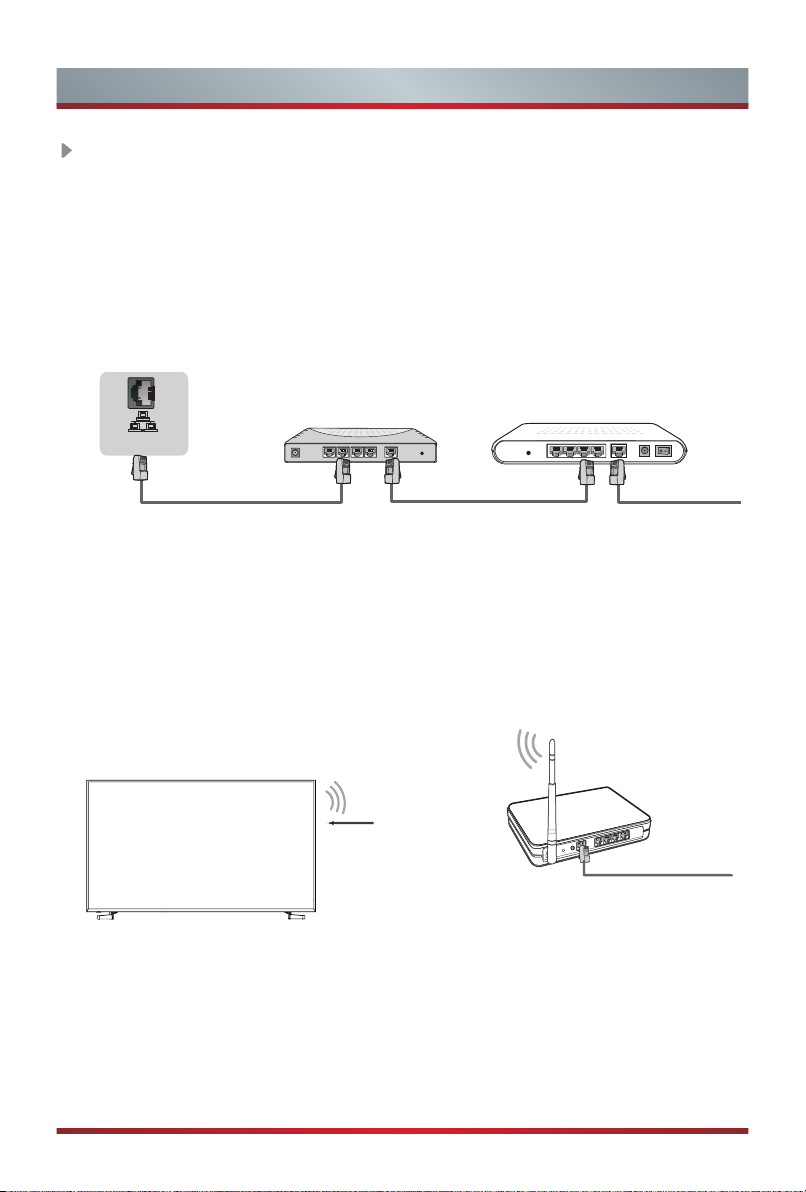
LAN (Wired setup)
Connect your TV to your network by connecting the LAN port on the back of your
TV to an external modem or router using a LAN (Ethernet/Cat 5) cable. See the
illustration below.
· We recommend using a modem or router that s upports Dynamic Host
Configuration Protocol (DHCP). Modems and routers that support DHCP
automatically provide the IP address, subnet mask, gateway, and DNS, so you
don’t have to enter them manually. Most home networks already have DHCP.
TV JACK
IP Sharer (Router)
(with DHCP server)
LAN
Wireless setup
Connect your TV to your wireless network, you need a wireless router or modem.
See the illustration below.
· The TV’s built-in Wireless LAN Adapter supports the IEEE 802.11 ac/b/g/n
communication protocols. We recommend using IEEE 802.11ac router. Low
transfer rates for b/g/n may have the influence on the quality of streamed videos
and other media.
External Modem
(ADSL / VDSL / Cable TV)
Modem CableLAN CableLAN Cable
Wireless LAN Adapter
built-in TV set
9
Wireless router with DHCP
LAN Cable
Page 17
Making Connections
NOTES
You must use the built-in Wireless LAN Adapter to use a wireless network because
the set doesn’t support external USB network adapter.
If the wireless router supports DHCP, your TV can connect more easily to the
wireless network.
If you apply a security system other than the systems listed below, it will not work with
the TV.
Security system : WPA, WEP, WPA2.
In order to guarantee smooth network, the distance between router and TV should
be less than 10 meters.
What is FreeviewPlus?
FreeviewPlus is a new television service delivered via broadband providing a state of
the art Electronic Program Guide (EPG) and seamless access to catch-up TV across
the free-to-air networks with the simple press of a button.
How does it work?
First ensure the TV is connected to internet and an antenna system. Then when you’re
button on your remote to launch FreeviewPlus. More information about FreeviewPlus
can be found on http://www.freeview.com.au/
NOTE
FreeviewPlus service only available in Australia territories.
10
Page 18
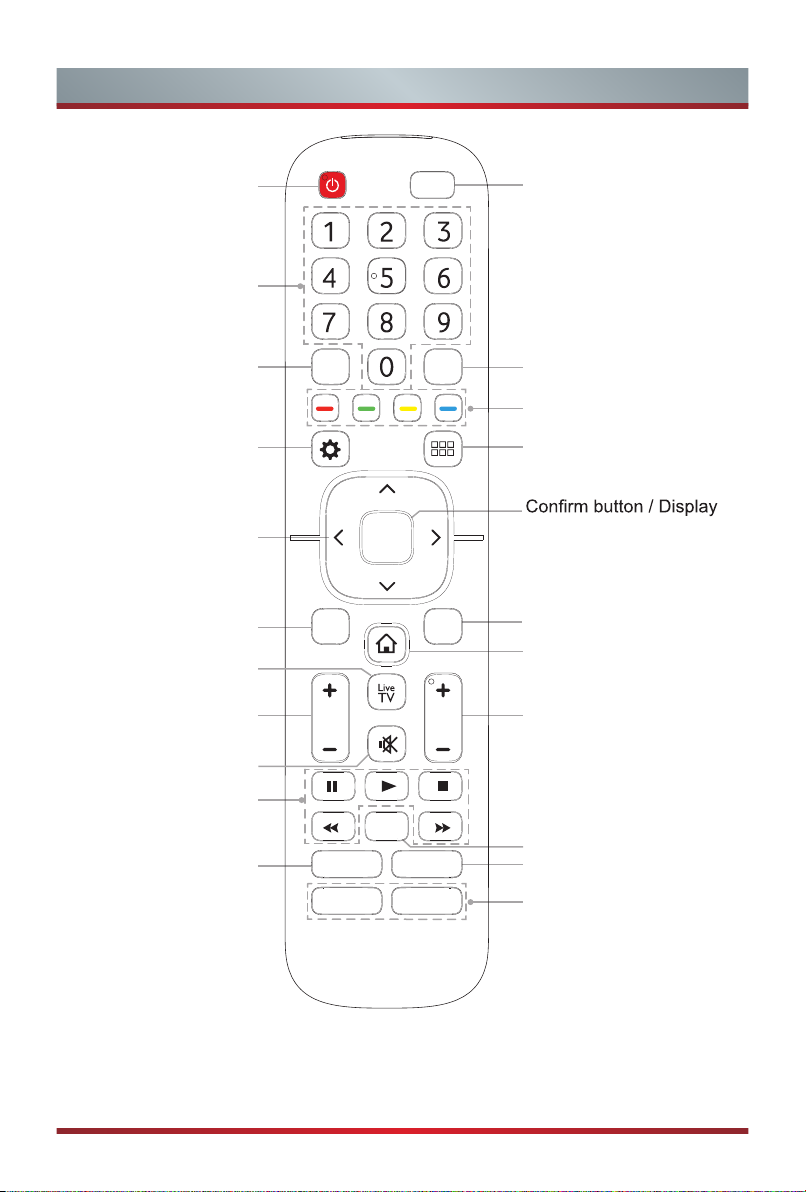
Remote Control
Power Standby button:
Power on/ Standby
Select a channel or input
numbers
Start Timeshift
Quick Setup
Navigation buttons
(Up/Down/Left/Right)
Returns to the
previous menu
Enter the Live TV screen
Volume (up/down)
Mute and restore sound
Media content control
function buttons
Display the channel
list on the screen
INPUT
T.shift
Subtitle
OK
BACK EXIT
VOL
Info
APP
CH
EPGCH.List
APP
Source selecting button
Display subtitles in the
Live TV
Special function buttons
Fast access to
all applications
the on-screen keyboard
Exit the menu or exit
the application
Display the Home screen
Channel (up/down)
Display the current
program information
Display the Electronic
Program Guide (DTV mode)
Quick access buttons to
apps
11
Page 19
Remote Control
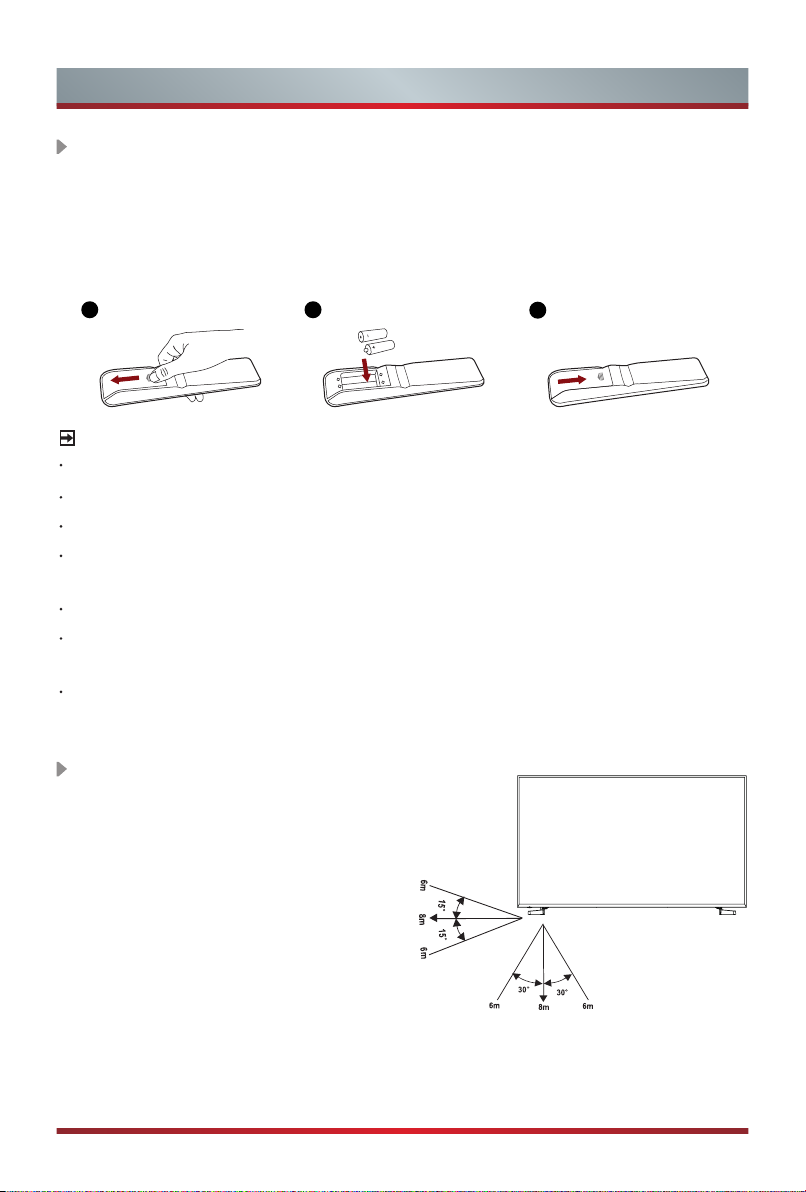
Installing Batteries in the Remote Control
1. Slide the back cover to open the battery compartment of the remote control.
2. Insert two AAA size batteries. Make sure to match the ( + ) and ( - ) ends of the
batteries with the ( + ) and ( - ) ends indicated in the battery compartment.
3. Close the battery compartment cover.
1
Gently push and slide
2
Insert the batteries
3
Gently push and slide
NOTES
Product image is only for reference, actual product may vary in appearance.
Dispose of your batteries in a designated disposal area. Do not throw the batteries into fire.
Do not mix battery types or combine used batteries with new ones.
Remove depleted batteries immediately to prevent battery acid from leaking into
the battery compartment.
If you do not intend to use the remote control for a long time, remove the batteries.
Batteries should not be exposed to excessive heat, such as sunshine, heat
registers, or fire.
Battery chemicals can cause a rash. If the batteries leak, clean the battery
compartment with a cloth. If chemicals touch your skin, wash immediately.
Remote Control Operation Range
1. The remote control can work at a distance
of up to 8 meters in front of the TV set.
2. The remote control angle: taking the
remote sensor as an apex, 6 meters
away, its controlled horizontal angle is
within ±30°, while the vertical angle is
within ±15°.
3. The operating distance may vary
depending on the brightness of the room.
Disposal of this unit
Product should not be damaged, dismantled or thrown in municipal waste.
It should be packed and handed over to authorised re-cycler.
12
Page 20
Turning the TV on for the First Time
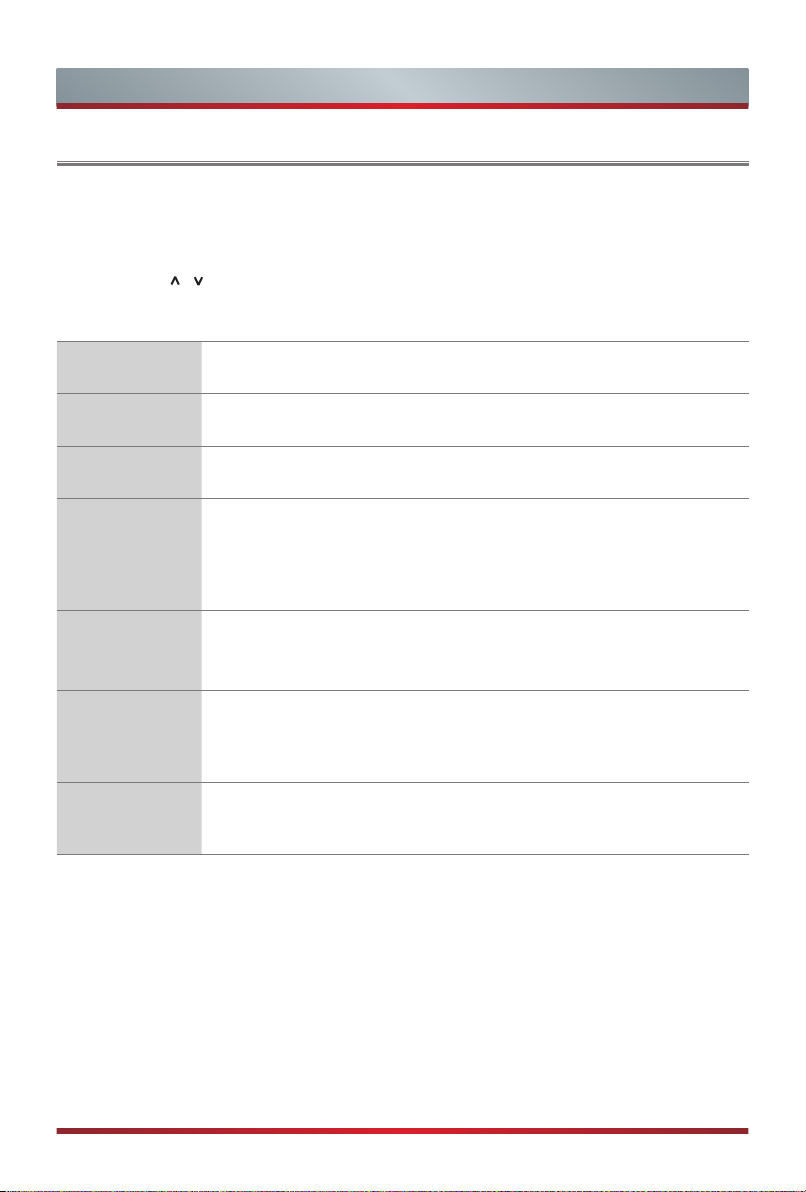
Turning the TV on for the First Time
1. Connect the mains cable to the mains socket after you have completed all the
connections.
2. The first time you turn the TV on, it will go straight into the Installation Guide.
3.
Press the [
button to confirm.
Language Select your desired language to be displayed on the menu.
Location Select the Country where you will operate the TV.
Time Zone Select the local time zone according to your region.
TV Usage
/ / < / >] to navigate the menu and change the settings. Press the [OK]
Select Home Mode or Store Mode.
Home Mode uses less energy.
Store Mode should only be selected by Retailers who plan to
demonstrate the TV.
End User
License
Agreement
Network
Connection
Success
Accept EULA.
Help promote the TV user experience.
If your TV does not detect an Ethernet connection, then it will
select Wireless automatically, select your network from the list
that displays and move to the next screen.
Congratulations, you have finished the Wizard setup!
Press "Finish" to use your TV.
13
Page 21
Specifications
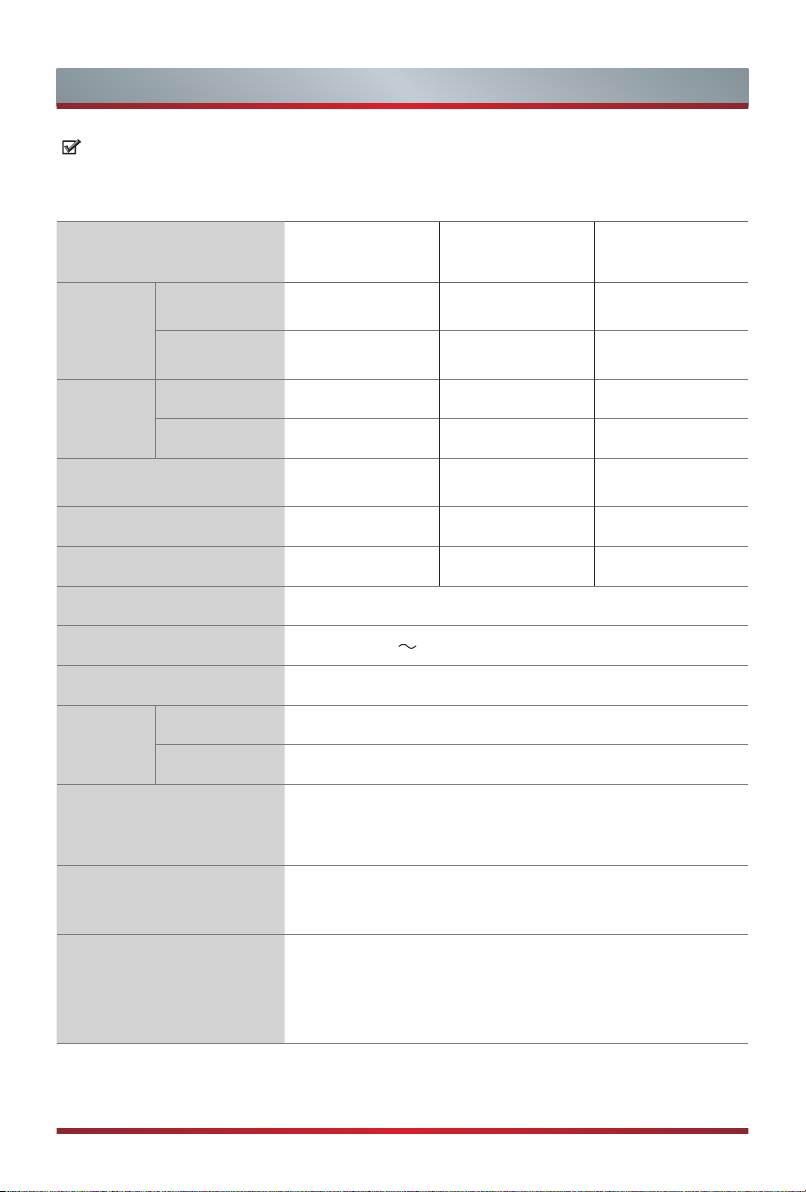
Features, appearance and specifications are subject to change without notice.
If you encountered difficulty when setting up your TV, we suggest you refer to the
troubleshooting tips in the User Manual.
Item
Without Stand
Dimension
(mm)
Weight
(kg)
Active Screen Size
(Diagonal)
Screen resolution
Audio power
Power consumption
Power supply
Standby Power
Receiving
systems
Environmental conditions
Component Input
HDMI Input
(W × H × D)
With Stand
(W × H × D)
Without Stand
With Stand
Analog
Digital
50" 55" 65"
1118 × 655 × 82 1233 × 715 × 83 1452 × 837 × 85
1118 × 694 × 249 1233 × 760 × 249 1452 × 875 × 310
14.3 16.7 25
14.6 17.0 25.3
50 inches 55 inches 65 inches
3840 × 2160 3840 × 2160 3840 × 2160
10W + 10W 10W + 10W 15W + 15W
Please refer to the rating label.
100V - 240V 50Hz/60Hz
0.5W
PAL-D/K, B/G, I SECAM-D/K, B/G, L/L’
DVB-T/T2, DVB-C
Temperature: 5°C - 45°C
Humidity: 20% - 80% RH
Atmospheric pressure: 86 kPa - 106 kPa
480 I / 60 Hz, 480 P / 60 Hz, 576 I /50 Hz, 576 P /50 Hz,
720 P / 50 Hz, 720 P / 60 Hz, 1080 I / 50 Hz,
1080 I / 60 Hz, 1080 P / 50 Hz, 1080 P / 60 Hz
60 Hz (640×480, 800×600, 1024×768)
60 Hz (480 I, 480 P, 720 P, 1080 I, 1080 P)
50 Hz (576 I, 576 P, 720 P, 1080 I, 1080 P)
24 Hz 30 Hz (3840×2160 HDMI 3,4)
24 Hz 30 Hz 50 Hz 60 Hz (3840×2160 HDMI 1,2)
Made in China
14
 Loading...