

Hip Street S-301S User Manual
User Manual
Features
1.Resolution: 2048X1536, 3.1 Mega Pixels
2.Image sensor: 1/2” CMOS sensor
3.Interface: USB
4.Lens: Aperture, 1:2.8
Focus Length: f=9.0mm
5.Capture range: 0.5m~ infinity
6.Memory: SD/MMC Card up to 512MB
7.Self timer: 10 seconds
8.Video rate: 10 fps @ QVGA resolution
9.Storage capacity*: 16MB SDRAM Built-in Memory
10-30 Pictures 3.1M Pixels
20-50 Pictures 2.0M Pixels
30-70 Pictures 1.3M Pixels
10.Power: 2xAAA alkaline batteries
11.Driver: Supports mass storage function
*
The quantity of pictures varies, depending on the contents of the picture.
System Requirement
1.
Compatible with Microsoft® 98SE/ME/2000 or XP
Mac V9.1/10.1/10.2
2. Pentium II 333MHz or equivalent processor
3.
64MB RAM (128MB recommended)
4. USB PORT
5. 200MB free hard disk space
6.
Color monitor with high color (16-bits) graphic capability
7. CD-ROM Driver
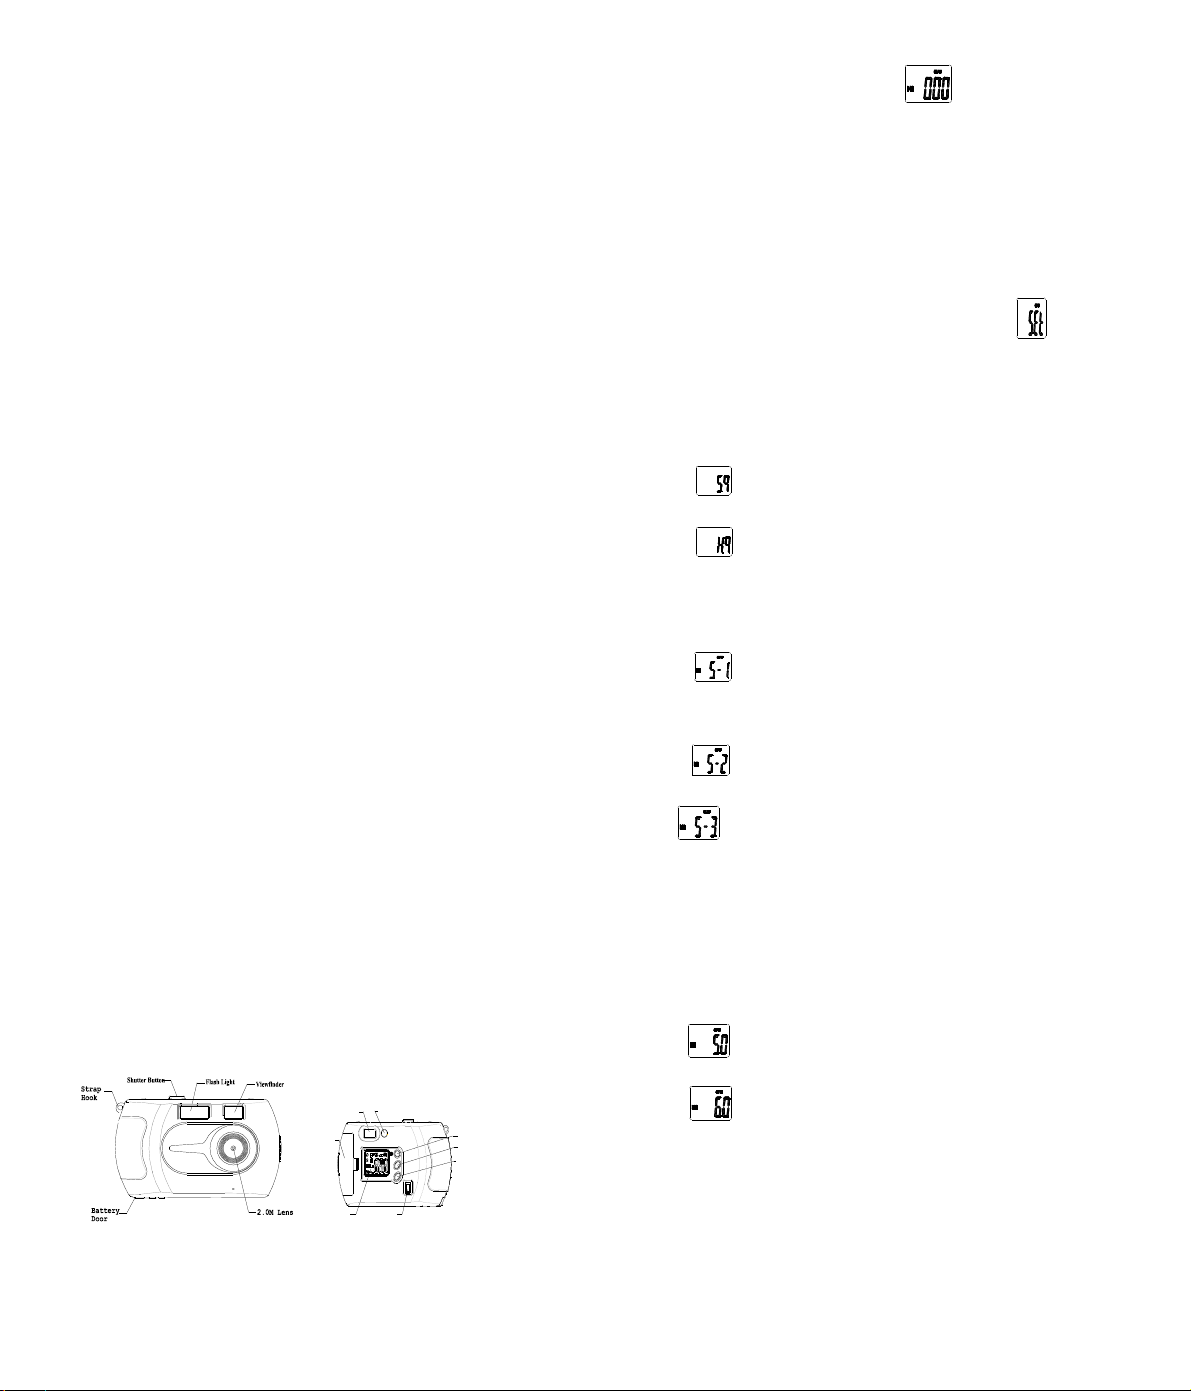
Functional parts
Power/Flash LED
LCD Screen
USB Interface
M
SD Card Door
Viewfinder
O
K
Mode Button
Okay Button
Power Button
Take pictures
1. Press POWER button to turn the camera on.
2.
You are now in the still picture mode to take still picture.
3.
View desired object using the viewfinder. Holding the camera steady, press the
Shutter button to take a picture. The picture will be taken with a distinct
beeping sound.
Setting the Camera
1. Press MODE button repeatedly until you see this screen .
2. Press
“
OK” to confirm. In (this) Setting mode, you can set the image
resolution, image quality (compression rate), and anti-conflicting frequency.
2.1 Press Mode to alternate the picture quality (Compression rate) setting.
Low quality image (High compression rate).
High quality image (low compression rate).
Press OK or SHUTTER to confirm.
2.2 Press Mode button to alternate the resolution setting.
1.3M pixels image resolution (SXGA 1280x1024 pixels).
2.0M pixels image resolution (UXGA 1600x1200 pixels).
3.1M pixels image resolution (QXGA 2048x1536 pixels).
Press OK or SHUTTER to confirm.
2.3 According to the electricity frequency of your country (50Hz or 60Hz), Press
MODE button to select a correct one. If you make a wrong selection, the
picture under indoor light will have strap lines. The default one is suitable to
your country already.
Sets anti-conflicting frequency to 50Hz.
Sets anti-conflicting frequency to 60Hz.
Press OK or SHUTTER to confirm.
3. After exiting from the frequency setting, you will return to the SETTING mode
menu screen, please press MODE button to quit setting mode or press OK or
SHUTTER to select another setting.
Format SD/MMC Card (Delete All pictures)

1. Press MODE button repeatedly until you see this screen
.
2. Press MODE to quit without formatting.
3. If you decide(elect) to format the card or delete all pictures, press the OK or
SHUTTER button once, the LED will start blinking, then press OK or
SHUTTER again to confirm formatting (delete all pictures).
NOTE: You will lose all data in memory (External and built-in memory)
after the format operation.
Use SD/MMC Card
When you use the SD/MMC card, the LED will add an icon . The
function is same as without card. With a SD/MMC card inserted, all pictures will
be automatically saved in the card rather than the built-in memory of the camera.
Enable/Disable the flash
1.
When taking still pictures and in self-timer mode, you can press the power
button lightly to toggle the enable/disabling the flash.
2.
If the flash is enabled, the indication LED will blink while charging and keep
steady after fully charged
.
3. The flash will be disabled automatically after taking a picture.
Using the Self Timer function
Press MODE button repeatedly until you see this screen , then press
the shutter or OK button.
Taking Movie Clips.
1. Press MODE button repeatedly until you see this screen
2. Then press OK or SHUTTER button to start and press Shutter button again to
end.
Deleting one picture (the last picture only)
1.
Press MODE button repeatedly until you see this screen .
2.
Press OK or SHUTTER button to delete the last picture.
Installing the software (drivers)
IMPORTANT! (For Windows® ME, 2000, XP)
Plug-into the camera directly to your computer to transfer and edit the pictures or
video files. There is no need to install the drivers. However, if you want to use the
Ulead software to transfer the pictures, video files, or you want to use PC-Cam
function, please install the camera driver before connecting the camera to
computer.
For Windows® 98SE Mass Storage function needs to install the camera
Driver.
1.
Close all other software applications opened before installation.
2.
Insert the CD supplied into the computer CD-ROM Drive.
3.
The CD User Interface will be launched automatically.
4. Click each button on software interface in turn and follow the instruction on
screen.
NOTE: If the setup screen doesn’t appear after loading the CD, then you can
manually start it by double-c licking the “M y Compute r” Icon
onyour desktop, then double click the icon for the CD-ROM drive.
When installing the camera driver, this screen appears on any frame.
Please click “Yes” or “Continue”.
Transfer pictures, video files to your computer
1. Connect the camera to a computer via the USB cable.
2.
USB connection icon in camera LED will appear to confirm the connection
.
3.
Open the Windows® Explorer and then you can see a “Removable Disk” drive.
4.
Double click “Removable Disk” -> double click “DCIM”-> double click
“100IMAGE”.
5.
All the pictures and video files are in the “100IMAGE” folder. Highlight
 Loading...