


Instruction Manual
HS-T29
MP4 Player
Thank you for your purchase of this Hip Street MP4 player and we hope you enjoy using it.
Please visit our website at www.hipstreetonline.com
Please ensure that you fully read and understand the information with this instruction manual
prior to using your product. It is advised that you keep this instruction manual in a safe place
for future reference. We sincerely hope that this high quality product offers you endless hours
of entertainment.
Important safety precautions
‚ Always follow these basic safety precautions when using your player. This will reduce
the risk of product damage and personal injury.
‚ Do not disassemble, repair or modify the player by yourself. Refer servicing to
qualified personnel.
‚ Do not dispose of the player in fire to avoid explosion.
‚ Keep the player away from direct sunlight or heat source.
‚ Do not expose the unit to rain or moisture to avoid any malfunction.
‚ Do not use the player in a rather dry environment to avoid static.
‚ Never apply heavy impact on the player like dropping it or placing it on a magnet.
‚ Clean only with a dry cloth. Make sure the player is turned off before cleaning. Do not
use liquid cleanser.
‚ Be sure to back up your files. We will not be liable for the loss of data due to improper
operation, repair or other causes.
Precautions in using the earphones
‚ Do not use the player with earphones while driving an automobile or riding a bicycle.
‚ To avoid an accident, do not turn up the volume of the earphones too high while
walking.
‚ It’s not recommended that you use the earphones at a high volume for an extended
time as this may cause hearing damage.
.
Features
‚ 2GB memory capacity
‚ Sleek MP4 / MP3 / WMA /WAV Player
‚ Video / Music / Photos
‚ Built-in Re-Chargeable battery
‚ 1.5” LCD Display
‚ FM Radio
‚ Built-in Speaker
‚ Works as a memory storage device (USB flash drive)
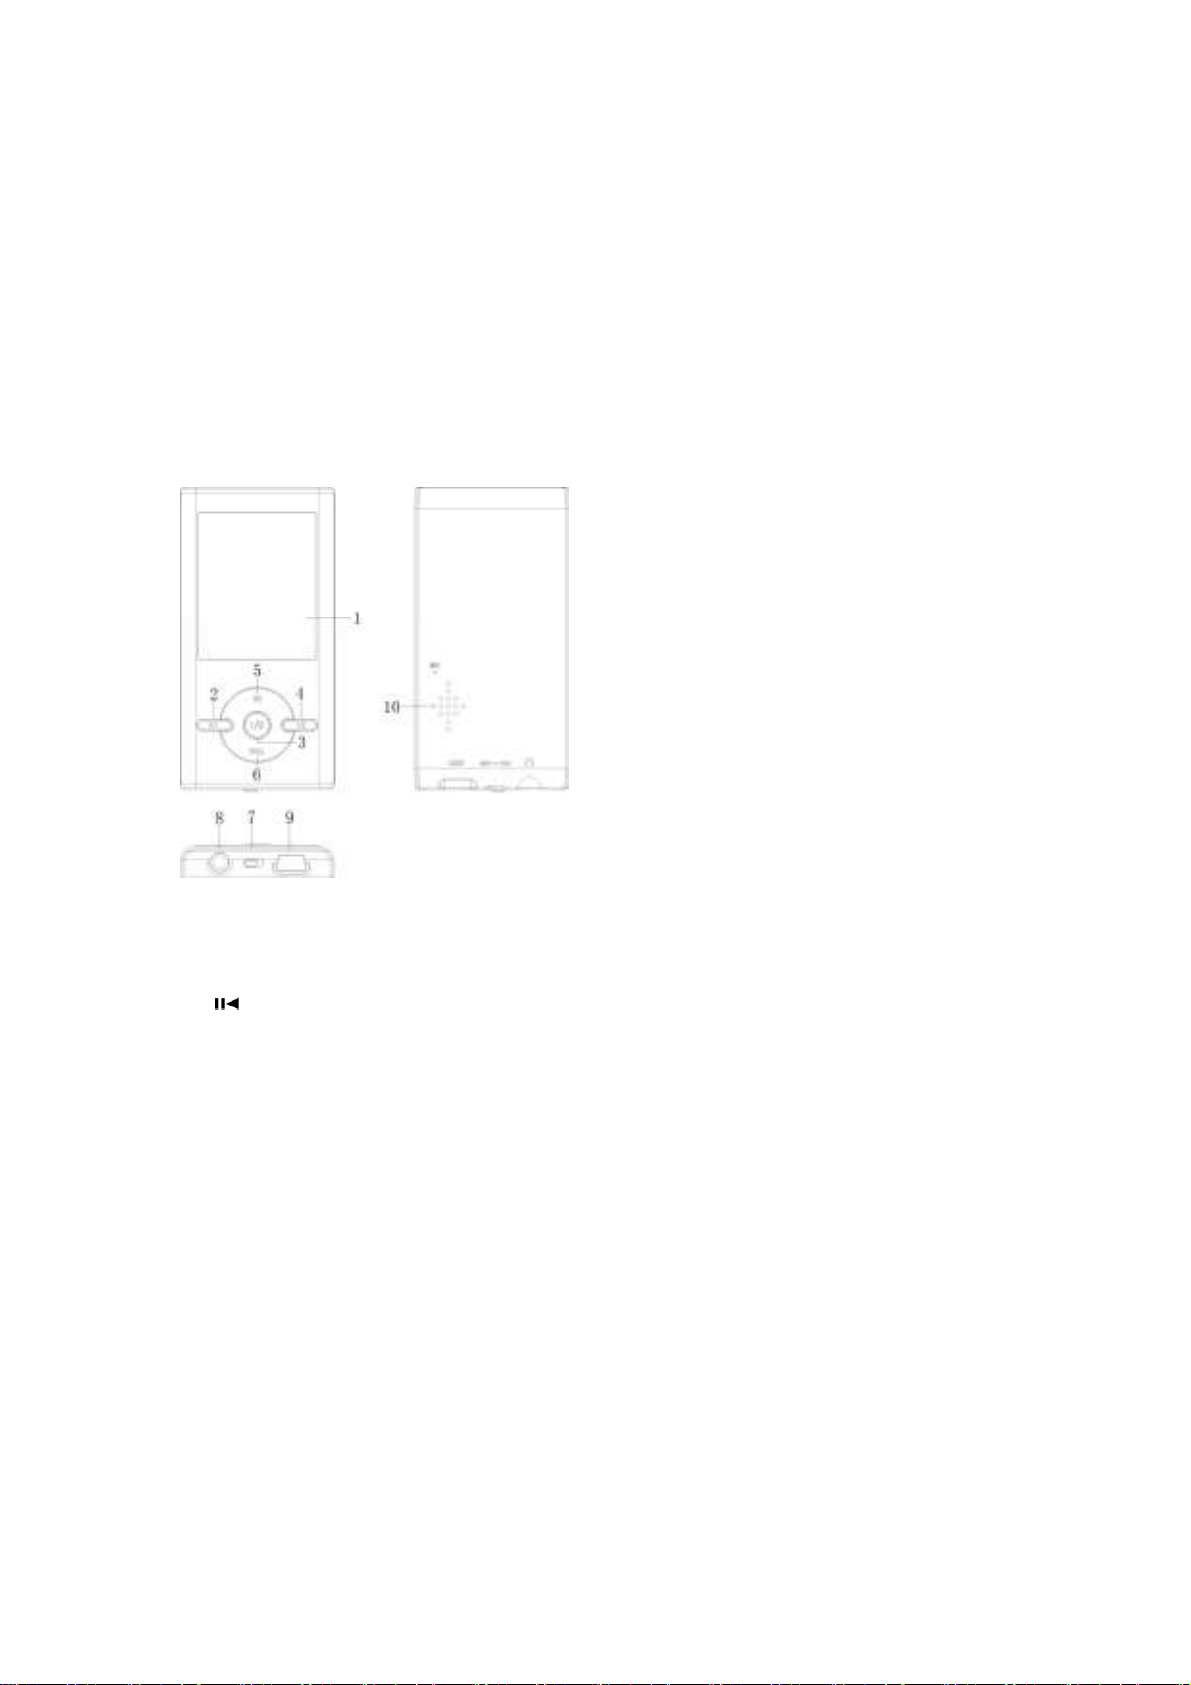
Diagram
1) Screen
2) ; Previous/Backward key
PLAY Key
3)
4) < Next/Forward key
5) MENU◇MENU key
6) VOL Volume key
7) OFF/ON Switch
8) Earphone Jack
9) USB Interface
10) Built-in speaker
Connecting with the Computer
System requirements
Your computer system must meet the following specifications:
‚ Pentium III or above
‚ Microsoft Windows 2000/ME/XP/Vista
‚ 120MB of available hard disk space
‚ USB port supported

Connecting the player to computer
Before connecting the player, make sure your computer is powered on.
1. Insert the USB cable provided into the player and computer.
2. For Windows, the computer system detects “New hardware” and starts to install the driver
automatically. Wait for the system to finish the installation. When it has finished, a new
“Removable Disk” will be created in “My Computer”.
Loading files to the player
To download the MP3, Video or Photo files from your computer, perform the following steps.
NOTE: Video files must be converted using supplied convertor software before they can be
downloaded onto the player.
1. Open Windows Explorer or My computer. “Removable Disk” will be displayed.
2. Select the files on your computer and simply move it into the “Removable Disk” in the
usual way (drag-and-drop or copy-and-paste). After copying is completed, the data will
be available on the MP4 player.
Note:
‚ Do not disconnect the player during loading. It may cause malfunction of the player
and the files may not copy correctly.
Disconnecting the player
After completing the file transfer, safely disconnect the MP3 player.
1. Double click the green arrow “Safety Remove Hardware” in the taskbar on the bottom
right of the window.
2. Select “USB Device” and click “Stop”.
3. When the “Stop a Hardware device” appears, click “OK” to disconnect the USB mass
storage device. Then you can unplug the player safely.
Mass Storage
The MP4 player can be used to store any type of file as a USB flash drive. It can, for example,
be used to simply transfer files from one computer to another or as a back-up device.
Charging the battery
The battery of the player is charged automatically when the player is connected to the
computer. Ensure the computer is turned on. The battery of the player is 80% charged in about
one hour and fully charged in about two hours. If you charge the player while loading files to
the player, it may take longer time to charge. While charging, the indicator flashes slowly.
When the player is fully charged, the icon on the screen will be green in colour.
Button Definitions:
On-power on, Off-power off
モ=- Press and hold to turn power ON / OFF, Press once to pause.
M – Press once to select, Press and hold to get back to the main menu (Does not work when
music is playing)

- Press once for previous track/previous song/volume down. Press and hold to Reverse.
- Press once for next track/next song/volume up. Press and hold to fast forward.
VOL - Volume select.
‚ How to use keys
There are two ways:
Press Once: Press and release at once
Press and Hold: Press and hold for about 2 seconds, then release.
Main Functions:
Using the Menu
Press and hold/Press once “M” to enter into/exit all the main menus and submenus;
‚ Power On/Off
Slide ON/OFF button to ON; press and hold “モ=” to turn on the player.
‚ Play/Pause
In music mode, press “モ=” once to play/pause your music.
‚ Adjusting Volume
When in play mode, press “VOL”; The ‘VOL’ indicator starts flashing; press 9<” to increase or
press 9;” to decrease the volume.
‚ DO NOT slide the Power button to Off position when a file is being played. This may result in
your losing data.
‚ Music Mode: Music play interface:
‚ Please follow the steps below to play your music:
Turn the player ON. Press and hold “モ=” to turn the player ON. Press 9M: to enter into music
play interface, then press “モ=” to start playing your music.
Selecting a song: Press 9<: once to go to the next song, Press 9;: once to go to the
previous song.
Adjusting the Volume: Press 9VOL: once; Press 9<: to increase; Press 9;: to decrease.
‚ Repeat Mode
Press the MENU key to enter the Sub-MENU while music is playing, select Repeat, then press
” to enter and select the Repeat mode desired. Press 9MENU: to exit after your selection.
“
‚ Equalizer (“EQ”) Mode
Press the MENU key to enter the Sub-MENU while music is playing, Select EQUALIZER and
then select the EQ mode desired. Press 9M: to exit after your selection.
‚ Deleting files
When in the music menu, while paying a song, press During the music stopping status, press “
”
to pause playing and then press the 9M: key to enter into the sub-menu. You now have a menu
to delete a file or delete all or to exit back to the previous menu. Press9M: key to enter in, press
:or 9 :to select target file, press 9M: key to exit and play, Select delete file, press 9M:
9
key to enter in, press 9YES: to confirm.

‚ Lyrics Display: Displaying the name of the song and lyrics
This machine can support “*.LRC” format files that display lyrics.
In order to display the lyrics of a song, the filename of the lyric file should be the same as the
name of the song.
For example:
If the name of the song is: Let it be.mp3
Then the lyrics filename should be: Let it be.lrc
Basically the file name needs to be the same and the file extensions would be different. If the
player detects that there is an .lrc file in the same folder as the .mp3 file that is playing, it will
automatically display the lyrics.
‚ Video M ode
1 From the main menu, select AMV mode, then press the 9M: key to enter.
2 Press the 9
3 Press the
: or 9 : key to select a video file, then press the key to play the file.
key to stop playing and back to the Video Mode interface.
‚ Record Mode
1. Start at the main menu of record mode
2. Press “M” once to enter the recording sub-menu. Press “M” once more to select Rec Type
3. Select from Fine REC, long REC, Fine VOR, Long VOR. Once selected, you will be returned
to the record mode.
3. Press “モ=” once to start or pause recording. Press and hold “モ=” to stop and the recording
will be saved as a voice file.
4. Press “M” once to save the recorded file and exit recording menu. If you would like to play this
recorded file, you will need to proceed to the Voice menu and play this file.
‚ Playing your Recording
1. Start at the main menu of Voice mode.
2. Press “M” once to enter the Voice sub-menu.
3. Press “モ=” once to start playing your recording. Press and hold “M” to stop and exit.
‚ FM Tuner [Please ensure you are close to a window to receive clear FM signals]
1. Start at the main menu of FM Radio. Press “M” to enter.
2. The player will start playing music from the last station played.
3. Auto search: Press and hold 9
: key. The player will search and save channels from 87.0
108.0.
4. Manual search: When FM is playing, press the 9
: or 9 : key once move forward or
backward to scan.
5. Save station: Press the MENU key once you have found a station you want to save, select
Save and then press “M” to save the station.
6. Playing saved stations: To select the saved station (if there are more than one saved FM
station), press the
key to move from one to the next saved station.
7. FM Recording: While the station desired is being played, press the 9M: key once enter the
FM sub-menu. Press the 9
: key to select 9Record: then press 9M: key enter in, press
“モ=” to start recording. Press “モ=” key to pause or stop recording and press and hold the 9M
9 key to save and exit.
‚ E-BOOK (Reading T ext files)
1. From the main menu, select the “E-book” and press 9M: to enter.

2. Press to select a text file from the folder and press 9 : to read.
3. To select options Press 9
sub-menu. Press 9
one of 2 options. 9Manual play: or 9Auto play:. If you choose ‘Auto Play’ it will as you to
specific a time delay. Please choose accordingly and then Press 9M: key to confirm.
4. When in the E-Book submenu, you also have options to delete files that are not needed. If you
decide to delete a file, you will be asked to confirm deletion. Please select as desired.
‚ Viewing Photos
1. From the main menu, select the “Photo” and press 9M: to enter.
2. Press
3. To select display options Press 9
the 9M: key to enter a sub-menu. Press 9
and then select from one of 2 options. 9Manual play: or 9Auto play:. If you choose ‘Auto Play’
it will as you to specific a time delay. Please choose accordingly and then Press 9M: key to
confirm.
4. When in the Photo submenu, you also have options to delete files that are not needed. If you
decide to delete a file, you will be asked to confirm deletion. Please select as desired
‚ Setup: System Settings.
ʼ Date & Time: Press ‘VOL’ key to move from Year, Month, Day, Hour, Minute & Second. Press
9
: or 9 : to adjust the values.
ʼ LCD set: Press “M” to enter the submenu and then press “
want to make adjustments to the ‘Brightness’ or the “Black Screen time”. Press “M” to select
which one you want to make changes to and you may then make your selections accordingly.
Press ‘M’ once done to save your selections.
ʼ Language: This unit supports 16 languages. Press “
then press 9M: to confirm
ʼ Power saving: There are two power saving settings. “Off time” and “Sleep time”.
Off Time is used to turn the screen off if there are no buttons being pressed.
Sleep Time is simply based on a time that you choose for the screen to go off.
ʼ Replay mode: The replay function may be set to either Manual replay or Auto replay.
‚ Delete Music / E-Book / Pictures / Video files
When you are within the respective menu’s, you may press the “M” key when the file has
stopped being played. You will see a submenu and you can delete files in this submenu. Once
you choose to Delete a file, you will be asked to confirm your choice.
‚ Formatting your player .
When you connect to a computer, you can format your player. You will be able to view your
player as a ‘Removable Hard Drive’. Highlight the Drive and then right click your mouse button to
get an option to Format your player.
to select an image file from the folder and press 9 : to display.
: key to select “Play set” (short for Play Settings) and then select from
: to go back to the file list. Now press the 9M: key to enter a
: to stop displaying and go back to the file list. Now press
: key to select “Play set” (short for Play Settings)
” or “ ” to select whether you
” or “ ” to select desired language,
Warning! Please ensure you back up important files before you format your player as
formatting your player will delete all files on the player.
 Loading...