


HS-7DTB3-4G B
User Manual
1
February 2012
Please read this user’s manual carefully before use.
CONGRATULATIONS!
Thank you for your purchase of this Hip Street product and we hope you enjoy
using it. Please visit our website at www.hipstreetonline.com.
Please ensure that you fully read and understand the information within this
instruction manual prior to using your product. It is advised that you keep this
2

instruction manual in a safe place for future reference. We sincerely hope that
this high quality product offers you endless hours of entertainment.
Important safety precautions
Always follow these basic safety precautions when using the unit.
This will reduce the risk of product damage and personal injury.
Do not disassemble, repair or modify the unit by yourself. Refer
servicing to qualified personnel.
Do not dispose of the unit in extreme heat to avoid explosion.
Keep the unit away from direct sunlight or heat source.
Do not expose the unit to rain or moisture to avoid any malfunction.
Do not use the unit in a rather dry environment to avoid static.
Never apply heavy impact on the unit like dropping it or placing it on
a magnet.
Clean only with a dry cloth. Make sure the unit is turned off before
cleaning. Do not use liquid cleanser.
FCC WARNING:
This device complies with the limits for a Class B digital device, pursuant to
Part 15 of the FCC Rules and the Canadian ICES-003. Operation is subject to the
following conditions:
- This device may not cause harmful interference, and
3

- This device must accept any interference received, including
interference that may cause undesired operation.
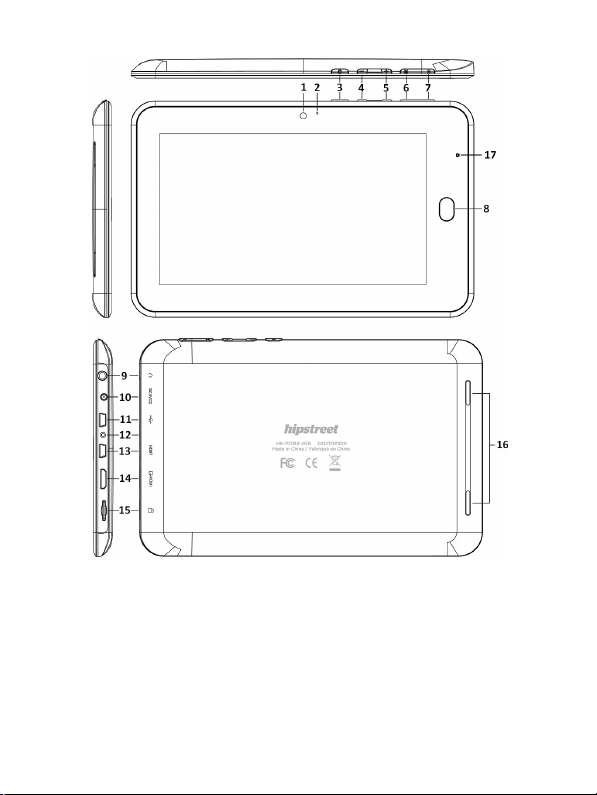
1. Description of Appearance
Product Structural Diagram
:
(1) Camera
(2) Microphone
(3) Power Button
(4) Volume Down Button
(5) Volume Up Button
(6) Menu Button
(7) Home Button
(8) Back Button
(9) 3.5mm Headphone Jack
(10) 5V DC Charging Port
(11) HOST USB Port
(12) Housing Screw
(13) OTG USB Port
(14) Mini-HDMI Port
(15)
Micro-SD Card Slot
(16) Speakers
(17) LED Indicator
4
2.1 Battery charging
The tablet is equipped with a built-in battery. Notifications will appear when the
battery is low for when to charge it.
Power Adapter
Connect one end of the power adapter to an outlet and the other end to the 5V DC
Charging Port of the tablet.
5

Charging Methods
1. Once the power adapter is connected, the charging LED indicator of the battery
will turn red to show that charging is in process. When the battery is full, the
charging indicator will go out.
2. During the charging process, the tablet may be used normally.
2.2 Use of Memory Card
Insert memory card:
Insert the memory card with correct orientation into the card slot. (Press it into the
card slot until a click is heard). A prompt will appear on the top left corner of the
screen: Preparing Memory Device.
Browse the files in the memory card:
Run the My Pad application. Displayed are all the files under the LOCAL directory.
Select SD1 at the top to browse the content in the memory card.
Remove memory card:
Close all the files opened from the card and return to the home screen. Click Menu,
select Settings → Storage → external sdcard → unmount external sdcard. The
system will prompt Memory device safe to remove": Gently press the card and it
will pop-out. The system will prompt: Removed Memory Device at the top left
corner of the screen.
Note:
1. The card should be inserted in the correct orientation; otherwise it could be
damaged.
6

2. Please do not pull the memory out card before being prompted.
2.3 Storage Space
The device has three storage spaces: Internal storage, USB flash disk that can be
attached at the HOST Port and Micro-SD memory cards. Internal storage of the
device is not displayed; the displayed folder name of memory card is: SD1; the
displayed folder name of external USB flash disk is UDisk1. System storage area
can only be used for storing system files. The total internal storage space of the
device is 4 GB. The storage space of USB flash disk and memory card is
determined by their specific capacities.
Please refer to 9.7 storage card and device storage for related specific information
on storage.
2.4 ON/OFF/Hibernate
1. Startup: Press and hold the power button for 2 seconds to start the unit up. The
lock screen will be entered after start up. Slide unlock icon upward to enter the
main interface; (slide it downward to turn off sound and repeat to turn on sound)
2. Shutdown: Press and hold the power button for 4 seconds and the system will
popup a shutdown confirmation window. Touch power off to shut the unit down.
3. Hibernation: Press the power button and the system will enter a hibernation
state. The screen will turn off while in hibernation. Press the power button again to
wake the system up when in the hibernation state. If the battery is low when in the
hibernation state, the device will shut-down after automatically staring up to save
7
power.
2.5 Screen Orientation
The system interface can automatically rotate according to the held direction of the
device. The system interface will be display a vertical screen when held vertically,
and a horizontal screen when held horizontally. The rotation time of the screen is
within 2 seconds.
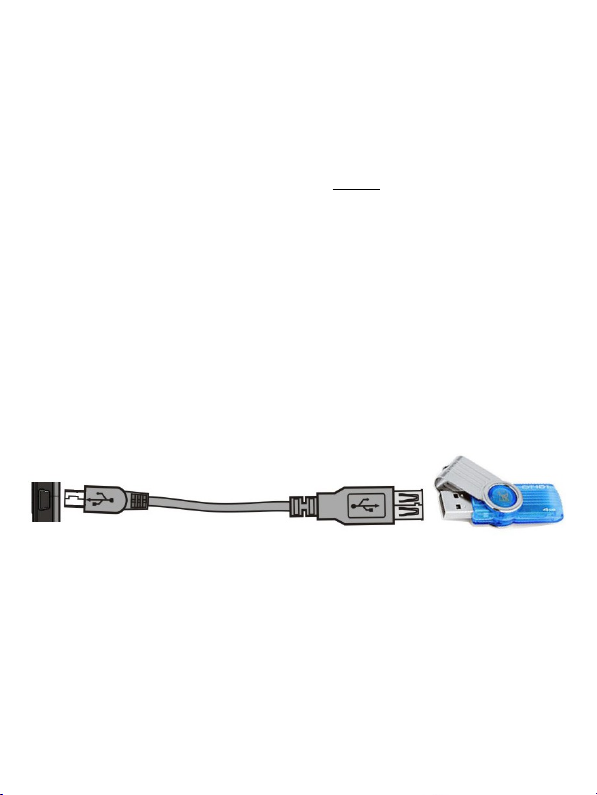
2.6 External USB flash disk
Insert a USB flash disk into the USB HOST port, through a transfer cable (not
included), like the following figure illustrates. The USB flash disk can be used after
it is connected to the device. Files can be copied between the device and USB flash
disk. Always unmount the device before removing it from the tablet.
2.7 Network Connection
Wireless network:
1. Select the Settings icon under the shortcut bar of the desktop
2. Select Wireless & Network in the Settings menu
3. Check off the WI-FI box to turn on WI-FI
4. Select WI-FI Settings to set up the WI-FI network
8

5. All connections the device finds will be listed. Touch the connection to connect
to it.
6. If the connection was successfully connected previously, the information will be
stored. Select Connect in the pop-up window to start the connection, while
selecting forget to delete connection information.
7. If the connection is not encrypted, select connect in the pop-up window to start
the connection.
8. If the connection is encrypted, input the password in the pop-up window and
click connect to start the connection.
9. After successfully connecting to the network, the WI-FI icon will appear in the
status bar at the top of the desktop, indicating the strength of the connection.
3. Input Operations
3.1 Keyboard
When using procedures or files that need a user input, the keyboard will
automatically appear on the screen.
Note: The tablet supports external USB keyboards, but when using an external USB
keyboard, some keys may not function.
3.2 Touch screen
The touch screen can track the movement of fingers, which can carry out the
following operations:
Click: Select an icon or option needed by tapping it with your finger.
9

Long Press: Touch and hold an icon/area to allow for extra options to appear.
Drag: Touch and hold an icon to drag onto the desktop, to move them to different
pages or to add application icons to quick bar.
Note: Please do not place objects on the surface of the touch screen that may
scratch or damage it. A tablet stylus can replace the use of fingers.
3.3 Mouse
The device supports an external USB mouse. Insert the USB mouse into the HOST
port through the same transfer cable to carry out functions of clicking, selecting,
dragging, sliding, and popup menus through the right click.
4. Desktop
4.1 Status bar
The status bar is on the top of the screen. It has one soft button on the left and five
on the right. They are: Home, Screenshot, Volume Down, Volume Up, Menu, and
Back. The status bar also shows signal strength of WI-FI, the battery status, current
time and other system information.
4.2 Main interface
The tablets’ main interface page includes two modes: desktop screen and
application screen. The two modes can be switched by the central shortcut button.
The interface of the desktop is shown in the following figure:
10

Click the button on the quick bar to enter the application screen. The
application screen is showed as the following figure:
Tap the button to return to the home screen (Desktop).
4.3 Shortcut
In the desktop home screen, press the Menu button or tap on the status bar.
11
A menu will pop up on the bottom of the screen. Menu items includes: Add,
manage apps, wallpaper, search, notifications, settings, and animation mode.
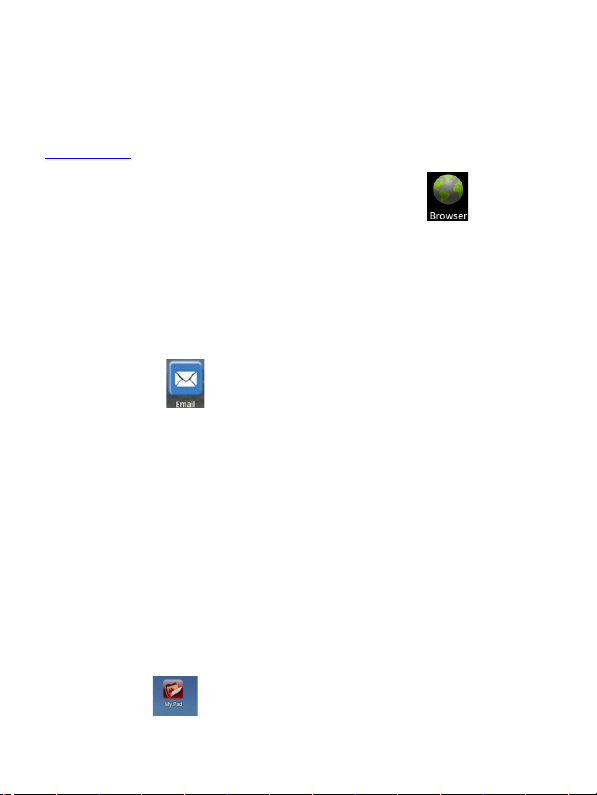
5. Web Surfing
Users can access the Internet by clicking on the browser icon on the desktop
to open web browser.
6. Applications
6.1 Email
Click the email icon to enter Email. The following operation can be carried
out:
1. Setup email account
2. Set up new email
3. Receive and send emails
4. Download or open attachments
6.2 File browsing
Click My Pad icon to enter file browsing interface.
12

Click to enter browsing interface to carry out: copy, cut, paste, new, rename, delete
and other operations on LOCAL, SD1 and USB flash disk.
File installation:
To install software in the file browser, you only need to click the installation file
with extension name .apk. The installation prompts will popup. Select install to
install the software to the device.
6.3 Music
Click the icon to enter music mode.
Click on a song to play it.
13

1. Click the icon to enter shuffle mode.
2. Click the icon to switch between all repeat mode and single play
6.4 Video Player:
Click the icon to enter the video interface. Click on a video to play it.
The interface is showed as following:
14

2. Click the icon
to change view
modes. The interface
is showed as
following:
6.5 Calendar
Click the calendar icon to check date and time, add memorandum etc. The
calendar can be used only after being set. The specific operation is as follows:
1. Firstly, connect the device to the wireless network, and then open the calendar. A
dialog box will come up asking to Add an Exchange account. Input the email
address and password, and then click Next.
15

2. This screen will automatically exit and return to the main screen after setup. Now
you may set the date, add memorandums, etc. Remove the email address by
restoring to the factory settings.
3. Click the menu button to show the following shortcut menu: 1 day, 7 weeks, 31
month, Agenda, Today, and more. The interface is shown as following:
16

6.6 Calculator
Click the icon to carry out calculations. It’s showed as the following figure:
6.7 Recorder
Click the icon to enter audio interface:
17

1. Click the icon button to start recording.
2. Click the icon button to stop recording. A prompt will ask if you would
like to keep or discard the recording.
3. Click the icon to listen to the recording.
6.8 Clock
Click the icon to enter the desktop clock interface, which has an alarm clock,
slideshow mode, music mode, and other functions. It appears as the following
figure:
18

7. Camera
Click the icon to enter the camera mode.
Its operation is described as follows:
1. Click the icon on the bottom right corner to take photos. Photos can be stored in
DCIM/CAMERA under the root directory of memory card.
2. Move the slider on the right upward to switch to video mode.
3. Click the icon on the top right corner to view the last photo taken. By pressing
the menu button you can use the functions: Slideshow, Details, Delete, Share, and
Rotate. Also, you may set this photo as a contact’s icon or as your wallpaper. Click
the back button to return to camera.
7.1 APK manager
Pre-installed software cannot be displayed in the APK manager. The APK manager
can display installed or uninstalled APKs on the memory card. Install/Uninstall,
select, scan path, exit and other functions can be operated. The interface appears as
the following:
19

8. Tips and skills
To return to the home screen – click
To adjust the volume – click /
8.1 Convenient settings
8.1.1 Wireless Internet Settings:
Click the wireless Internet Settings icon to enter the wireless internet
connection interface. The interface is showed as following:
20
After clicking on the name and inputting the password, click “connect” to connect
to the wireless network
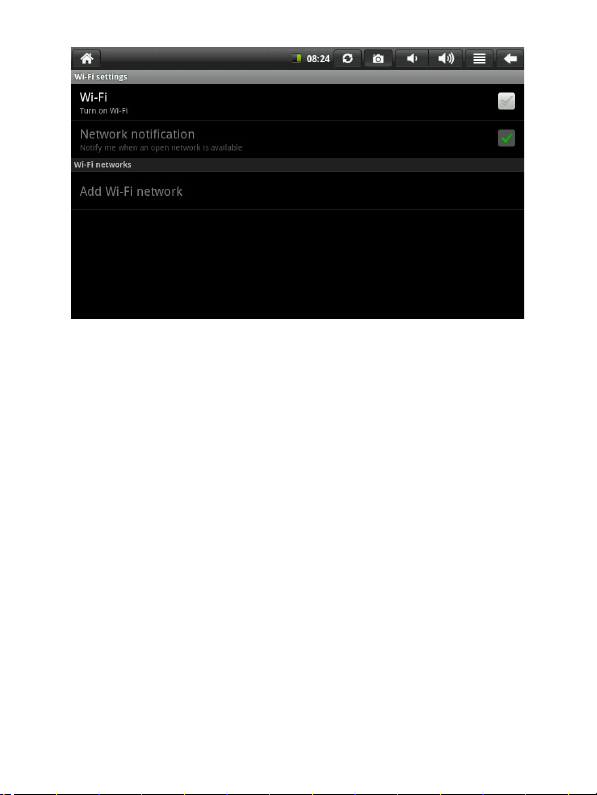
8.2 Use battery prompts
The wide screen of the device will use a lot of power. If you want to extend the
battery time, you can reduce the use of the following functions:
1. Watching movies, listening to music or taking photos
2. Display brightness: To reduce, press menu button - settings - display - brightness
(turn down brightness)
3. Network search: Press the menu button – settings – wireless & network - WIFI
settings – uncheck network notification
21

9. Settings
Click on the settings icon to carry out personalized settings.
9.1 Wireless and Network
1. To open WIFI settings, press the menu button - settings - wireless & network –
select the WIFI checkbox.
2. To set and manage wireless access points, press the menu button - settings -
wireless & network – WIFI settings
Please refer to 8.1.1 Wireless Internet connection in convenient settings for specific
information
9.2 Sound
Set the Ringtone and Notifications.
Silent mode
22

To set all sounds to mute except the media and alarm clock, press the menu button -
settings – sound – check silent mode.
Volume
To set volume of media, alarm, and notifications: press the menu button - settings -
sound - volume.
Notification ringtone
To set ringtone, press the menu button - settings - sound - notification ringtone
Audible selection
To make sounds with screen selections, press the menu button - settings - sound –
Check Audible selection
Screen lock sounds
To make sounds when screen is locked/unlocked, press the menu button - settings -
sound – Check Screen lock sounds
9.3 Display
Brightness
Press the menu button – settings - display (display settings) – brightness
Automatic screen rotation
Press the menu button – settings - display (display settings) – check auto-screen
rotation to automatically change display orientation. If the check box is checked,
the interface of the device will automatically follow the users orientation of the
device.
Animation
23

To display all or part of the animations on windows, press the menu button -
settings - display (display settings) – animation.
Screen timeout
To adjust the delay before automatically locking of the screen, press the menu
button - settings - display (display settings) - screen timeout.
9.4 Location & Security
Use wireless networks
To use the wireless network, press the menu button - settings - location & security –
check Use wireless networks
Passwords
To show passwords as you type, press the menu button - settings - location &
security - check visible passwords.
9.5. Applications
24

Unknown source
To allow the installation of applications from non-electronic markets.
Manage applications
To manage and remove installed applications, press the menu button - settings -
applications - manage applications.
Running services
To view and control the services currently running, press the menu button - settings
- applications – running services.
Storage use
To view storage used by applications, press the menu button - settings -
applications – Storage use.
Battery use
To view what has been using the battery, press the menu button - settings -
applications – Battery use.
Development
To set the development options of applications, press the menu button – settings -
applications - development.
9.6 Privacy
Factory data reset
To erase all data on the device and restore settings to factory default, press the
menu button – settings – privacy – Factory data reset
Format local storage
25

To format (clear) local storage, press the menu button - settings - privacy - format
local
9.7 Storage
Check the available storage space
Storage devices (SD card and USB flash disk)
To check and operate the storage devices, press the menu button - settings –
external sdcard and internal device storage. Select the corresponding storage
device under the storage device directory. The total space and available space can
be checked after entering the storage device interface. The unmount operation also
can be carried out. The interface showed as the following figure:
26

9.8 Language & keyboard
Set language (language and area), text input and automatic correction options.
27

Select language
To select language and area, press menu - settings - language & keyboard – select
language
User dictionary
To add words to the user dictionary and delete words from the user dictionary, press
menu - settings - language & keyboard – user dictionary.
Android keyboard
To carry out Android keyboard settings, press menu - settings - language &
keyboard - Android keyboard
9.9 Date & Time
To set date, time, time zone, 24-hour format and date format, press menu - settings -
date & time.
28

9.10 About device
System updates, Status, Battery use, Legal information, model number, android
version, and software versions.
10. The use of HDMI
Videos on the tablet can also be viewed on equipment through HDMI (such TV sets
with HDMI port). The maximum output resolution from the tablet is 1080p. This
method is explained below:
1. Turn on the tablet.
2. Connect an HDMI cable (not included) with an HDMI display device. Turn on
the display device and a message will pop up on status bar. Note: The tablet screen
will remain on except during video playback.
3. Play video files on the tablet or have the HDMI display device as a second screen
to browse the internet, play games, view images, etc.
29
11. Lock Screen
To unlock the screen/device:
Press the power button to turn the screen on, then you will see the lock screen.
Slide unlock icon upward to unlock and enter the interface.
12. Troubleshooting
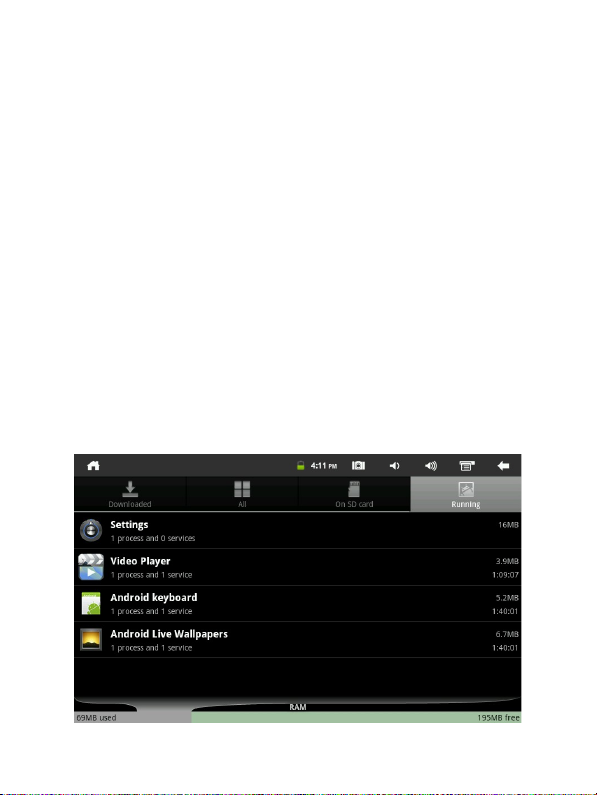
12.1 Close Applications
All applications running will occupy memory on the device. Too many applications
open will influence the running speed of the device. Therefore, unused applications
should be closed in time to reduce memory usage and keep the normal operating
speed of the device.
To close applications, in the home screen press menu – settings - applications -
running services. The interface is showed as the following picture:
30

Tap the application that is to be closed. The interface is showed as follow:
Tap Stop - OK to close the application.
12.2 Forced shutdown
Press and hold the power key of the device until the screen shuts off.
12.3 Restore defaults
To restore the device to original factory settings and clear all information, press the
menu button - settings - privacy – factory data reset – reset device.
WARNING: After selecting to reset the device, all Google accounts, data,
application settings, and downloaded applications will be deleted. Use this function
with caution.
31

13. Specifications
Multimedia
Features
Video
AVI (DIVX/XVID/MPEG4), 3GP, MOV, MPEG, MKV,
FLV, RMVB, RM, MP4, VOB WMV, ASF
Audio
MP3, WMA, APE, FLAC, AAC, OGG
Image
JPG, BMP, GIF, PNG
USB port:
USB host x1, for connection with USB Mouse, keyboard, U-
disk, portable hard disk, 3G dongle etc. USB OTG x1
Earphones:
3.5mm stereo earphone jack
32

14. Frequently Asked Questions
14.1 I cannot connect to the Internet using Manual Setup.
Answer: Ensure you have used Menu Save when exiting the advanced
settings page.
14.2 I can see my access point name, but I cannot connect to the Internet.
Answer: If your access point (AP) supports multiple access points at a time,
you may have to connect the device using WPA encryption and not WEP.
Please refer to your AP device manual for setup details.
14.3 My Micro-SD card is not being detected and/or shows damaged SD card.
Answer: Please re-insert the Micro-SD card and try again. If this does not
work, please restart the device again with Micro-SD card inserted. Please
ensure that you have removed the Micro-SD card using the correct procedure
as described in Using Micro-SD card.
14.4 My system freezes when installing / removing applications.
Answer: This may be caused by a memory handling error. Use Force Close
icon in application manager before removing the software. If the system
continues to freeze, please restart your device for a complete clearing of all
running processes.
14.5 My device freezes while powering-on.
33

Answer: This may be caused by a failure in reading the Micro-SD card. Please
turn off the device and power-on again. Also, please ensure that the card is
fully inserted. Alternatively, please try to start the device with the Micro-SD
card removed.
14.6 Can I manually change the screen orientation?
Answer: Yes. Please check in “Display” in “Settings”, Touch “Auto-rotate
screen” to toggle.
14.7 The device showed an error message and the application closed:
“android.process.acore” fault.
Answer: This happens when the system has too many applications running at
once.
14.8 What is the life of the battery?
Answer: On average use, a complete charge will give up to 6-15 hours battery
life with Wi-Fi turned on and connected.
14.9 Can I amend the Operating System or code on the device myself?
Answer: No. Any misuse of the tablet in this way will void the warranty.
14.10 I have my Micro-SD card inserted, but I am unable to use applications that
require a Micro-SD card.
34

Answer: The device checks the first Micro-SD card as the default slot. Please
insert the Micro-SD card to the first slot when using the voice recording, and
applications such as SlideMe.
14.11 The touch-screen is not very responsive
Answer: As the touch-screen is capacitive, please use your finger-tips for best
results. Do not use a objects and remove any gloves before use.
Recycling
This crossed bin symbol on the device indicates that the product,
at the end of its life, must be disposed of separately from
domestic waste, either by taking it to a separate waste disposal
site for electronic devices or by returning it to your dealer when
you buy another similar device. The user is responsible for taking the device to a
special waste disposal site at the end of its life. If the device is collected
correctly as separate waste, it can be recycled, treated and disposed of
ecologically. This avoids a negative impact on both the environment and health,
and contributes towards the recycling of the product’s materials. For further
information regarding the waste disposal service available, contact your local
waste disposal agency or the place of purchase.
35

Contact Us
Need assistance? Please call us!
If you encounter any difficulties with this product, please visit our website at
www.hipstreetonline.com and review our support section or call us. Our
representatives are ready to help you with any questions about your product. We can
guide you through connections, first-time use, or any of the features. Just give us a call
or send us an email.
Customer & Technical Support: 1-888-456-2426
Monday through Friday: 8:30am – 5:00pm EST
Email: support@hipstreetonline.com
We want you to start enjoying your product right away!
Battery statement
Product and Battery Disposal
This product contains a built-in lithium battery and should not be disposed of in normal
household waste. The battery in this device is not intended to be removed by the
individual or end user. For disposal and recycling, please contact your local waste
management authorities.
The recycling and processing of electronic waste will make a significant contribution
towards helping protect the environment.
Warning: To reduce the risk of fire and burns; do not disassemble, crush,
36

puncture, short external contacts, or dispose of in fire or water.
37
 Loading...