

Hillrom Welch Allyn RetinaVue 700 Directions For Use Manual
Directions for use
Software version 1.00.XX

© 2019 Welch Allyn. All rights are reserved. To support the intended use of the product described in this
publication, the purchaser of the product is permitted to copy this publication, for internal distribution only,
from the media provided by Welch Allyn. No other use, reproduction, or distribution of this publication, or any
part of it, is permitted without written permission from Welch Allyn. Welch Allyn assumes no responsibility
for any injury to anyone, or for any illegal or improper use of the product, that may result from failure to use
this product in accordance with the instructions, cautions, warnings, or statement of intended use published
in this manual.
Software in this product is Copyright 2019 Welch Allyn or its vendors. All rights are reserved. The software is
protected by United States of America copyright laws and international treaty provisions applicable
worldwide. Under such laws, the licensee is entitled to use the copy of the software incorporated with this
instrument as intended in the operation of the product in which it is embedded. The software may not be
copied, decompiled, reverse-engineered, disassembled, or otherwise reduced to human-perceivable form.
This is not a sale of the software or any copy of the software; all right, title, and ownership of the software
remain with Welch Allyn or its vendors.
This product may contain software known as “free” or “open source” software (FOSS). Welch Allyn uses
and supports the use of FOSS. We believe that FOSS makes our products more robust and secure, and
gives us and our customers greater flexibility. To learn more about FOSS that may be used in this product,
please visit our FOSS website at
source code is available on our FOSS website.
For information about any Welch Allyn product, contact Welch Allyn Technical Support: http://
www.welchallyn.com/support.
DIR 80022736 Ver. C
Revision date: 2019-06
Distributed by Welch Allyn, Inc.
4341 State Street Road
Skaneateles Falls, NY 13153 USA
Medimaging Integrated Solution Inc. (MiiS)
1F, No. 7, R&D Rd II, Hsinchu Science Park,
Hsinchu, TAIWAN 30076, R.O.C.
Made in Taiwan
http://www.welchallyn.com/opensource. Where required, a copy of FOSS
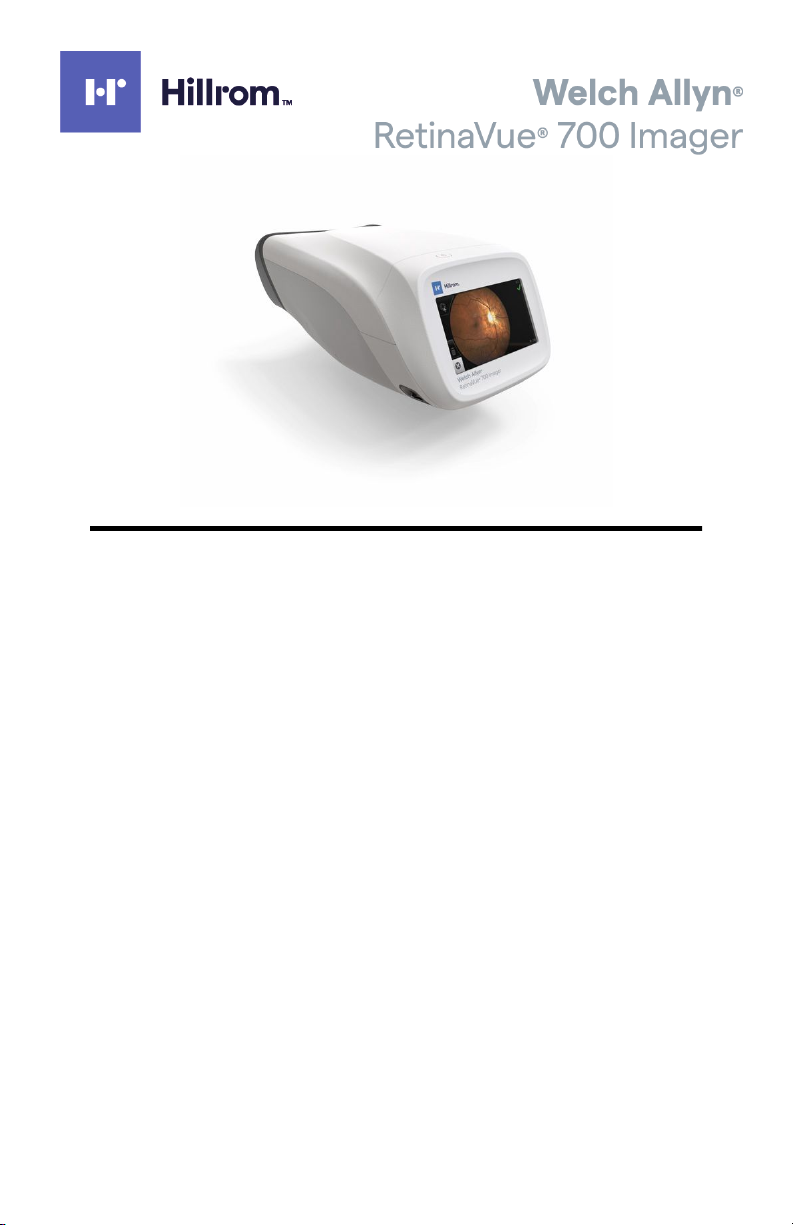
This manual applies to the 901124 Ophthalmic Camera

Contents
Symbols ..................................................................... 1
Introduction ............................................................... 5
Intended use ............................................................................ 5
About warnings and cautions ................................................... 5
General warnings, cautions, and notes .................................... 6
Controls and connectors ........................................................ 12
First time set up of the RetinaVue 700 Imager ..... 15
Unpack the system ................................................................ 15
Startup ................................................................................... 20
First time selection of practice mode .................................... 22
iii
Camera registration ................................................ 25
USB camera registration ........................................................ 25
Wi-Fi camera registration ....................................................... 27
Using the RetinaVue 700 Imager ........................... 33
Auto Exam mode ................................................................... 33
About image quality scores .................................................... 35
About the face cup ................................................................. 35
About Exam protocols ............................................................ 37
Tutorial ................................................................................... 39
Before starting an eye exam ................................................. 40
Perform a Retina eye exam ................................................... 43
Create a patient on the camera .............................................. 49
Search for a patient in the Scheduled patients list ................. 50
Search for a patient in the Saved exams list .......................... 52
Delete an image during an eye exam ................................... 55
Delete a patient ...................................................................... 57
Delete a patient and exam ..................................................... 58
Capture additional images using the same protocol .............. 60
Review of saved exams ......................................................... 61

iv Contents
Review of submitted exams .................................................. 62
Update the RetinaVue 700 Imager software (firmware) ........ 63
Controls ................................................................... 67
RetinaVue 700 Imager main Patient screen ........................... 67
Practice mode ........................................................................ 71
Select or change a clinic on the RetinaVue 700 Imager
(wireless only) ........................................................................ 77
Select or change a Multi-State clinic on the RetinaVue 700
Imager (wireless only) ............................................................ 79
View or change the RetinaVue 700 Imager settings .............. 81
Advanced features .................................................. 91
Manual Exam mode ............................................................... 91
Use the Anterior Imaging Spacer for a patient Anterior image
exam ...................................................................................... 97
Perform a Anterior image eye exam ...................................... 99
Wireless certificate support overview for the IT
department .......................................................................... 104
Troubleshooting ................................................... 107
Wireless radio messages ..................................................... 112
Maintenance .......................................................... 119
Cleaning and Disinfection .................................................... 119
Specifications ........................................................ 125
Device radio .......................................................... 129
General compliance and standards .................... 131
General radio compliance ..................................................... 132
RetinaVue 700 Imager Accessories .................... 139
Warranty ................................................................ 143
Symbols
Documentation symbols
For information on the origin of these symbols, visit http://
www.welchallyn.com/symbolsglossary for the Welch Allyn symbols
glossary.
WARNING The warning statements in this manual identify conditions or
practices that could lead to illness, injury, or death. Warning symbols will
appear with a grey background in a black and white document.
Caution The caution statements in this manual identify conditions or practices
that could result in damage to the equipment or other property, or loss of data.
1
Consult directions for use.
Power symbols
Power button
Direct current (DC)
Rated power input, DC
Rated power output, DC
Fuse

2 Symbols
Rechargeable battery
Connectivity symbols
USB
Wireless
Wireless radio symbols
Non-ionizing electromagnetic radiation
Wireless signal strength
• Best (4 bars)
• Good (3 bars)
• Fair (2 bars)
• Weak (1 bar)
• No signal (no bars)
FCC ID
The identification number assigned by the Federal Communication Commission
Shipping, storing, and environment symbols
Temperature limit
Keep Dry
Separate collection of Electrical and Electronic Equipment. Do not dispose as
unsorted municipal waste.
Fragile

Directions for use Symbols 3
Humidity limitation
Atmospheric pressure limitation
This way up
Stacking limit by number
Recyclable
Miscellaneous symbols
Product Identifier
Reorder Number
Global Trade Item Number
For indoor use only
Type BF applied part
Class II equipment
Prescription only or "For Use by or on the order of a licensed medical
professional"
Clock; time switch; timer
Serial Number
Manufacturer
Call for maintenance
4 Symbols
Process indicator for activities like connecting to network or connecting to
computer
Battery charge level indicators
Device is running on battery and charge is between 75 and 100 percent.
Device is running on battery and charge is below 75 percent.
Device is running on battery and charge is below 50 percent.
Device is running on battery and charge is below 25 percent.
Device is running on battery and charge is near 0 percent.
Device is connected to a power supply.

Introduction
Intended use
The Welch Allyn RetinaVue 700 Imager (RV700) is a high-resolution
ophthalmic camera used to acquire, save and transmit digital images of the
human eye. Anterior and posterior ocular structures such as the surface of
the eye, cornea, and fundus including retina, macula and optic disc can be
imaged. It is a prescription use only medical device.
5
About warnings and cautions
Warning and caution statements can appear on the RetinaVue 700 Imager
device, the packaging, the shipping container, or in this Directions for use.
The RetinaVue 700 Imager is safe for patients and clinicians when used in
accordance with the instructions and the warning and caution statements
presented in this Directions for use.
Before using the device, you must familiarize yourself with all warnings and
cautions, with the steps to power up the device, and with the sections of
this Directions for use that pertain to your use of the device. Specific
warnings and cautions are also found throughout this manual.
Failure to understand and observe any warning statement in this manual could
•
lead to patient injury or illness.
• Failure to understand and observe any caution statement in this manual could
lead to damage to the equipment or other property, or loss of patient data.
6 Introduction
General warnings, cautions, and notes
WARNING When manually entering patient information,
do not use the same patient identifier for multiple
patients. This may result in inaccurate data association.
WARNING Operating the device in the presence of a
flammable anesthetic mixture with air, oxygen, or
nitrous oxide; in oxygen-enriched environments; or in
any other potentially explosive environment may cause a
fire and explosion hazard.
WARNING Do not use batteries from other sources.
This may result in excessive temperatures, fire, or
explosion.
WARNING To prevent fire or electrical shock, do not
expose the device to rain or moisture.
WARNING Use only Welch Allyn approved accessories,
and use them according to the manufacturer’s directions
for use. Using unapproved accessories with the camera
can affect patient and operator safety and can
compromise product performance and accuracy, and
void the product warranty.
WARNING Exposure to the RetinaVue 700 Imager
flash, in rare cases, may contribute to migraines or
temporary visual disturbances, particularly in patients
with a history of light sensitivity or migraines. Multiple
flashes per eye in a single exam may increase the
likelihood of occurrence.
CAUTION Avoid subjecting the device to vibration or
shock.
CAUTION Avoid using the device in a dusty
environment.
CAUTION Keep the power cord away from any heat
source.
CAUTION Do not sterilize the device.
Directions for use Introduction 7
CAUTION All servicing of this equipment is to be
performed by Welch Allyn, Inc. or by a center approved
by Welch Allyn, Inc.
CAUTION This device needs to be installed and put into
service according to the EMC information provided
herein.
CAUTION Portable and mobile RF communications
equipment can affect the RetinaVue 700 Imager
performance.
CAUTION Input overload can occur in proximity to
defibrillator or electrocautery devices.
CAUTION This device is not protected against the
ingress of water and should not be used in the presence
of liquids which may enter the device.
CAUTION Data deleted on the device cannot be
recovered.
CAUTION Do not modify this equipment without
authorization of the manufacturer.
CAUTION Do not use the device in direct sunlight.
Strong ambient light may affect results.
CAUTION Within the patient environment, only connect
the equipment (the RetinaVue 700 Imager) to computers
or laptops that have passed the safety standard for
information technology equipment IEC 60601-1, EN
60601-1, ANSI/AAMI ES 60601-1 to ensure the safety of
the USB electrical connection. Outside the patient
environment, only connect the equipment (the
RetinaVue 700 Imager) to computers or laptops that
have passed the safety standard for information
technology equipment IEC 60950-1, EN 60950-1, UL
60950-1 to ensure the safety of the USB electrical
connection.
CAUTION Do not turn off the device while saving data
from a patient test. Turning off the device while saving
patient data may cause data loss.
8 Introduction
CAUTION Do not use the device adjacent to or stacked
with other equipment. If the device is used adjacent or
stacked with other equipment, the device should be
observed to verify normal operation in the configuration
in which it will be used.
CAUTION Do not submerge the device in liquid or allow
liquid to enter the interior of the device.
CAUTION Do not use automatic cleansing machines or
sterilization.
CAUTION Consult the cleaning and disinfection agent
manufacturer instructions for their proper use and
germicidal efficacy, prior to their use.
CAUTION Consult your facility's procedures and the
cleaning and disinfection agent manufacturer
instructions for recommended Personal Protective
Equipment and other safety precautions such as
ventilation, etc..
Note The RetinaVue 700 Imager can be used on patients with
eye implants and intraocular lenses. While the RetinaVue
700 Imager can be used on patients with cataracts and
other eye opacities, images will likely be blurry or
unreadable because of the refractive nature of the
opacities.
Residual risk of magnets
WARNING Patient injury risk - magnetic fields. Exercise
caution when using the RetinaVue 700 Imager in close
proximity to implanted devices such as, but not limited
to, cranial implants, adjustable CSF shunts, and
pacemakers.
Design and protective measures have been implemented to limit magnetic
interference to be lower than the limit set by the Active Implantable Medical
Devices standards. Nevertheless, in the event the device is placed in close
proximity to these life supportive devices, patient harm associated with
magnetic field hazards cannot be completely excluded.
Directions for use Introduction 9
Warnings related to RetinaVue 700 Imager applied parts components
Warnings related to the face cup
WARNING Clean and disinfect the face cup after each
patient to avoid the risk of cross-contamination.
WARNING Patient injury risk. The face cup of the
RetinaVue 700 Imager uses magnets to attach to the
device. If your patient has any type of cranial implant, it
is advisable to reduce direct contact of the face cup's
magnets with the patient's skin surface containing the
implant.
Warnings and cautions related to accessories
Cautions related to the pedestal
CAUTION To avoid camera damage, remove camera
from pedestal prior to transport.
CAUTION To avoid camera damage, position the
pedestal on a stable surface to reduce the likelihood of
shock, bump, or vibration hazards.
Warnings and cautions related to the Anterior Imaging Spacer
WARNING Patient injury risk. The Anterior Imaging
Spacer of the RetinaVue 700 Imager uses magnets to
attach to the device and to the face cup. If your patient
has any type of cranial implant, it is advisable to reduce
direct contact of the Anterior Imaging Spacer or the face
cup's magnets with the patient's skin surface containing
the implant.
CAUTION Failure to remove the Anterior Imaging
Spacer before a Retina exam may result in unacceptable
image quality or failure to capture an image.
10 Introduction
CAUTION Failure to install the Anterior Imaging Spacer
before an Anterior image exam may result in
unacceptable image quality or failure to capture an
image.
Warnings, cautions, and notes related to the battery charger
WARNING The battery charger (non-medical electrical
equipment) shall be situated outside the patient
environment (reference IEC 60601-1-1).
WARNING Electric shock hazard. Do not open the
battery charger or attempt repairs. The battery charger
has no user-serviceable internal parts. Inspection and
servicing of internal parts shall only be performed by
qualified service personnel.
WARNING Electric shock hazard. Before cleaning the
battery charger, disconnect the AC power cord from the
mains outlet and the power source.
WARNING Do not use batteries from other sources.
This may result in excessive temperatures, fire, or
explosion.
CAUTION Do not modify this equipment without
authorization of the manufacturer.
CAUTION Use appropriate power plug for your country.
Note The removal of the plug from the socket provides the
means of isolation from the mains power supply. The
user is reminded to keep this means of disconnection
easily accessible in case of emergency.

Directions for use Introduction 11
Caution related to the EMR test server
CAUTION Incorrectly setting up the RetinaVue 700
Imager to connect to a Wi-Fi test server may result in
loss of exam data. The test server is NOT intended to be
used for patient exams and is only intended for use by a
software integrator on an EMR integration team. A
patient's exam data cannot be recovered once sent to
the Wi-Fi test server.
12 Introduction
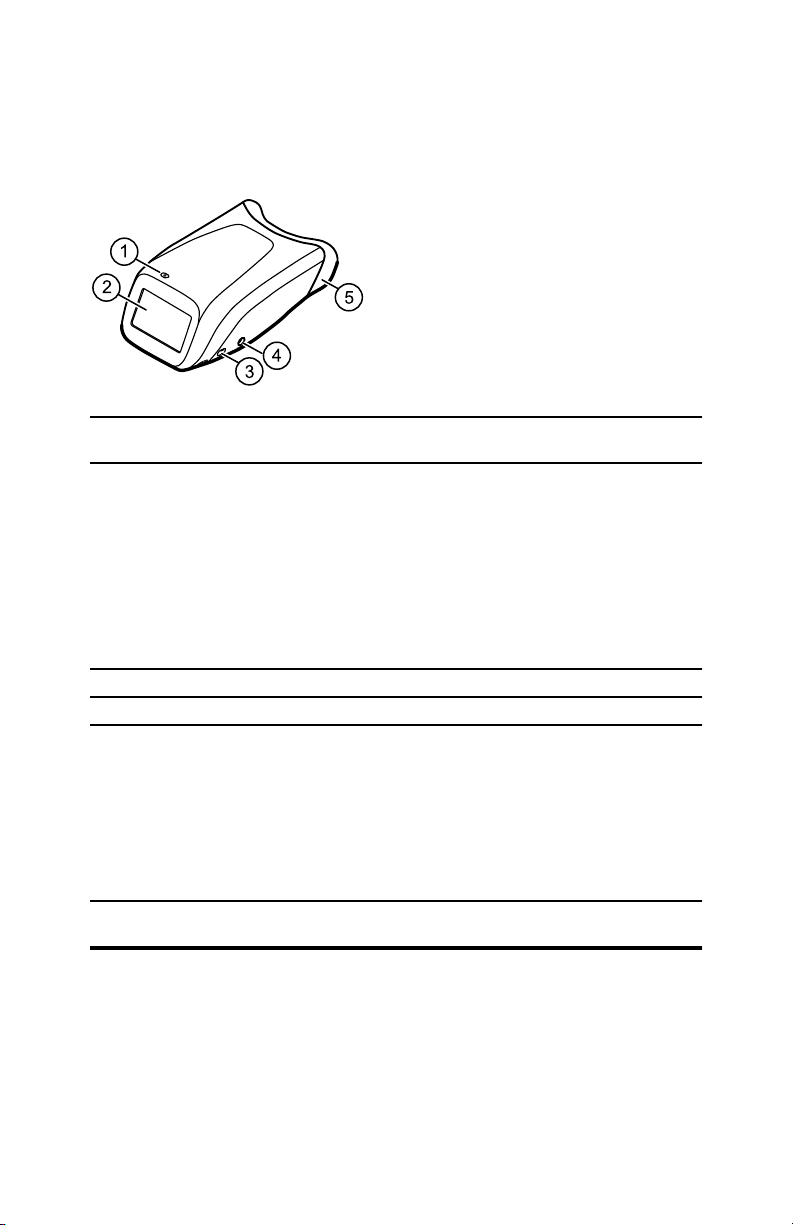
Controls and connectors
No. Feature Description
1 Power button
• Push button to turn the device on and off.
• Push button to bring the device out of Sleep
mode.
• Push button to launch a dialogue box with
three options:
○ Power down
○ Sleep
○ Cancel
2 LCD touchscreen 4.3 inch diagonal color LCD touchscreen.
3 USB port Data transfer port
4 Charging port and power indicator Connect AC power supply
• When the LED light is green, it indicates that
the device is fully powered.
• When the LED light is orange, it indicates that
the device is in the process of charging.
• When the device is not charging the LED is
off.
5 Face cup Helps align the patient's eyes to the camera and blocks
ambient light during testing

Directions for use Introduction 13
Bottom
No. Feature Description
5 Face cup Helps align the patient's eyes to the camera and blocks
6 Pedestal mounting Pedestal mounting well (¼-20 thread) and locator ridge
7 Battery cover Covers the battery compartment
ambient light during testing
The two service ports under the battery
Note
cover are for factory use only and are not for
customer use.
8 Wrist or neck strap bracket Wrist or neck strap mounting bracket

14 Introduction

First time set up of the RetinaVue 700 Imager
Refer to the following topics when setting up the RetinaVue 700 Imager for
the first time.
View images saved to the RetinaVue 700 Imager on the LCD touchscreen.
The images saved on the RetinaVue 700 Imager are encrypted. To view the
images on the computer, install the RetinaVue Network software
application. For information on the RetinaVue Network software visit
www.RetinaVue.com.
15
Unpack the system
The RetinaVue 700 Imager device is packaged with the following items.
Confirm that all items are included.
Number
1 RetinaVue 700 Imager device
Item Description
Digital hand-held eye-fundus camera used to
record digital photographs of the fundus of the

16 First time set up of the RetinaVue 700 Imager
Number Item Description
human eye and anterior and posterior ocular
structures such as the cornea, lens and fundus
including retina, macula and optic disc.
2 USB cable
3
4 Lithium-ion battery Battery
5
6
7
8 Lens cloth RetinaVue 700 Imager lens cloth
Wall adapter plug and AC power
cord
Anterior Imaging Spacer Attaches to the device (only for Anterior imaging
Wrist strap Attaches to the device and slips over the wrist
RetinaVue 700 Imager Directions for
use
Connects the device to a computer or laptop to
transfer data.
Connects the device to the wall adapter plug for
AC charging. Match to region-specific AC wall
outlet.
exams)
to hold the device.
This document. The Directions for use (DFU) is
also available on the Welch Allyn web site.
If any item is missing, contact Welch Allyn Technical Support:
www.welchallyn.com/service. We recommend that you save the shipping
box and packing materials in case you need to store or ship the system.
Install the wrist strap
Note The strap can be mounted on the right or left side of the
RetinaVue 700 Imager. Follow the manufacturer's
instructions on wrist strap packaging.
1. Turn the RetinaVue 700 Imager over to access the wrist strap mounting
bracket and set the RetinaVue 700 Imager on a flat, clean surface.
2. Detach the Uni-Loop system connector from the neoprene strap at the quick
disconnect. Slide the ¼-inch webbing through the wrist strap mounting
bracket and create an opening large enough to loop the Uni-Loop system
connector through. Pull the Uni-Loop system connector tight to form a secure
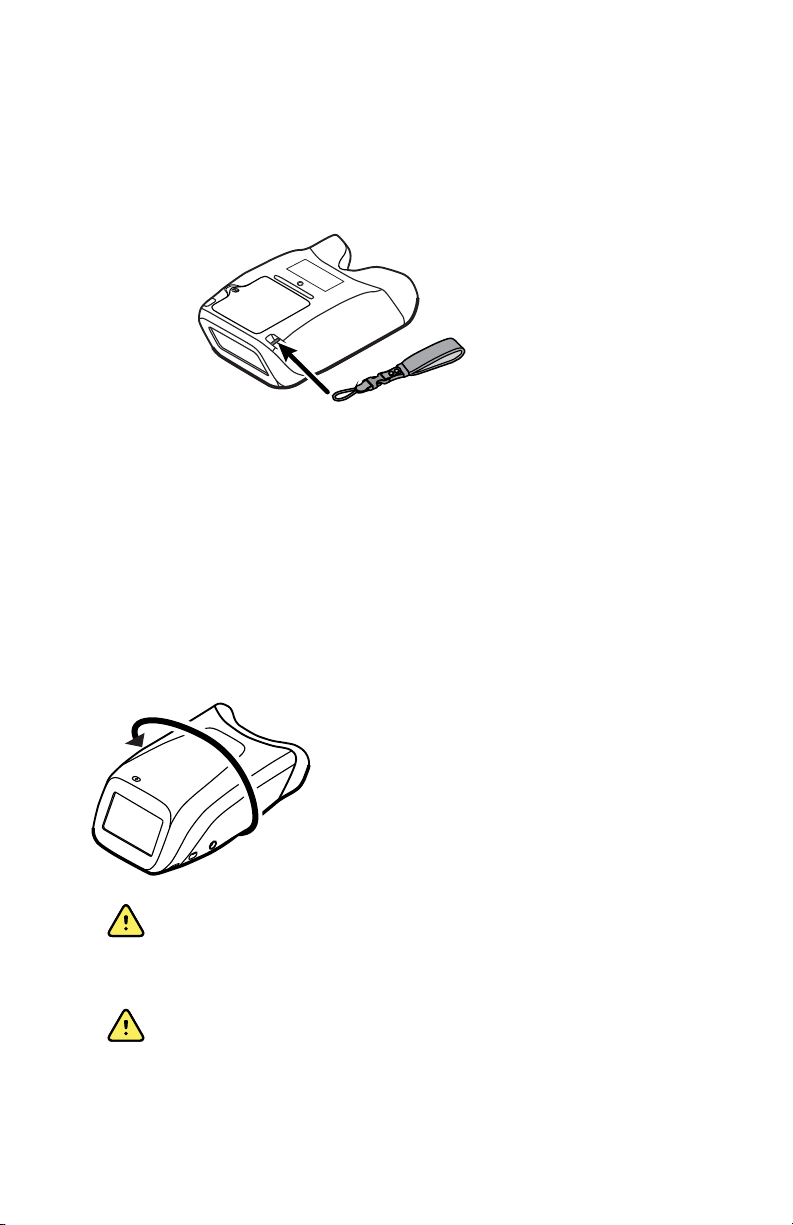
Directions for use First time set up of the RetinaVue 700 Imager 17
hold onto the RetinaVue 700 Imager. Pull the neoprene strap all the way
through to secure the strap to the mounting bracket. Click the Uni-Loop
system connector to the neoprene strap to finish assembly. Slip the strap over
your wrist and tighten the security slide to keep the strap firmly in place.
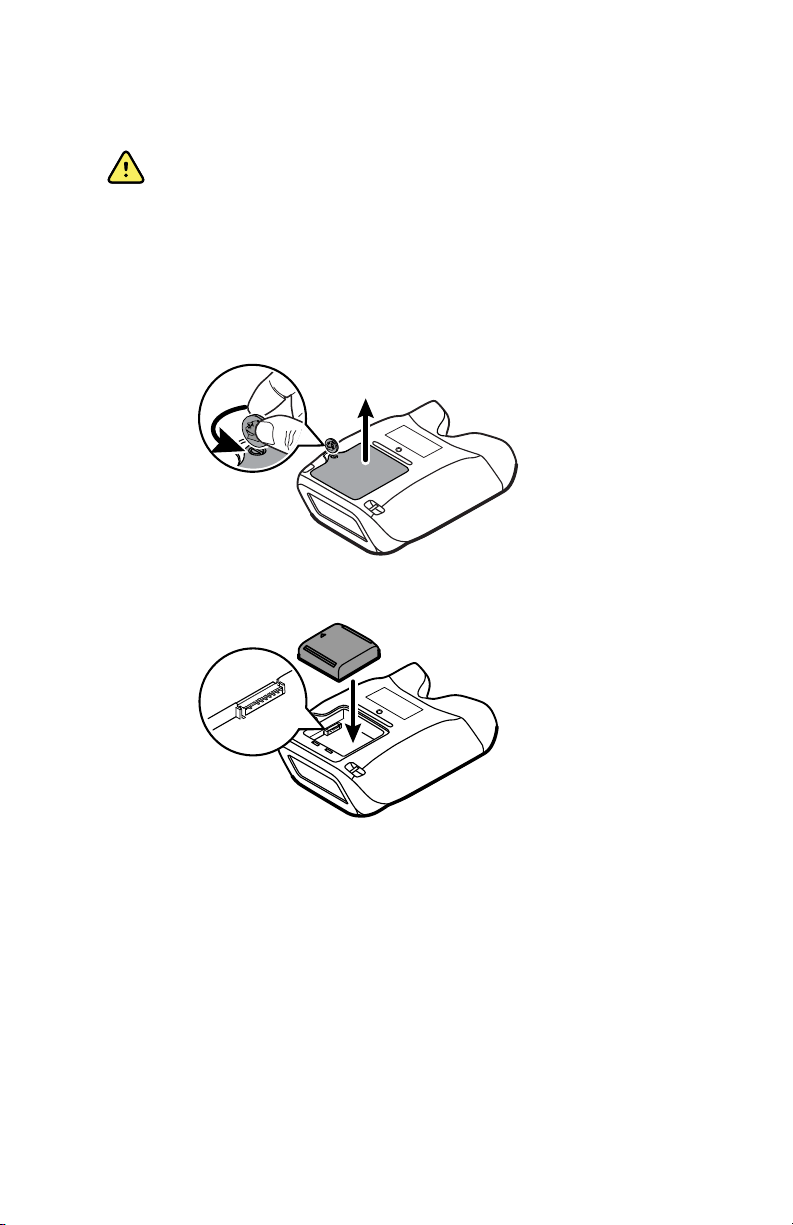
Battery installation and replacement
Use the device on battery power once the battery is installed and charged.
Note To charge the battery, plug the AC power cable into the
device and the AC power supply.
Install the battery/replace the battery
Turn the RetinaVue 700 Imager over to access the battery cover and set the
RetinaVue 700 Imager on a flat, clean surface.
WARNING
an explosion or contamination hazard. Never dispose of
batteries in refuse containers. Always recycle batteries
according to local regulations.
WARNING Risk of fire, explosion, and burns. Do not
short-circuit, crush, incinerate, or disassemble the
battery.
Improper disposal of batteries may create
18 First time set up of the RetinaVue 700 Imager
WARNING Use only Welch Allyn approved accessories,
and use them according to the manufacturer’s directions
for use. Using unapproved accessories with the camera
can affect patient and operator safety and can
compromise product performance and accuracy,and void
the product warranty.
1. Use a coin to loosen the screw at the edge of the battery cover.
2. Slide open the battery cover by tilting the cover upward.
3. For first-time setup of the RetinaVue 700 Imager, insert the battery into the
battery compartment.
For battery replacement, remove the existing battery and then insert the new
replacement battery into the battery compartment.
4.
Insert the two battery cover tabs into the slots, then push in the tab to close
the battery cover.
5. Tighten the screw at the edge of the battery cover.
Directions for use First time set up of the RetinaVue 700 Imager 19
Note Do not over-tighten the screw.
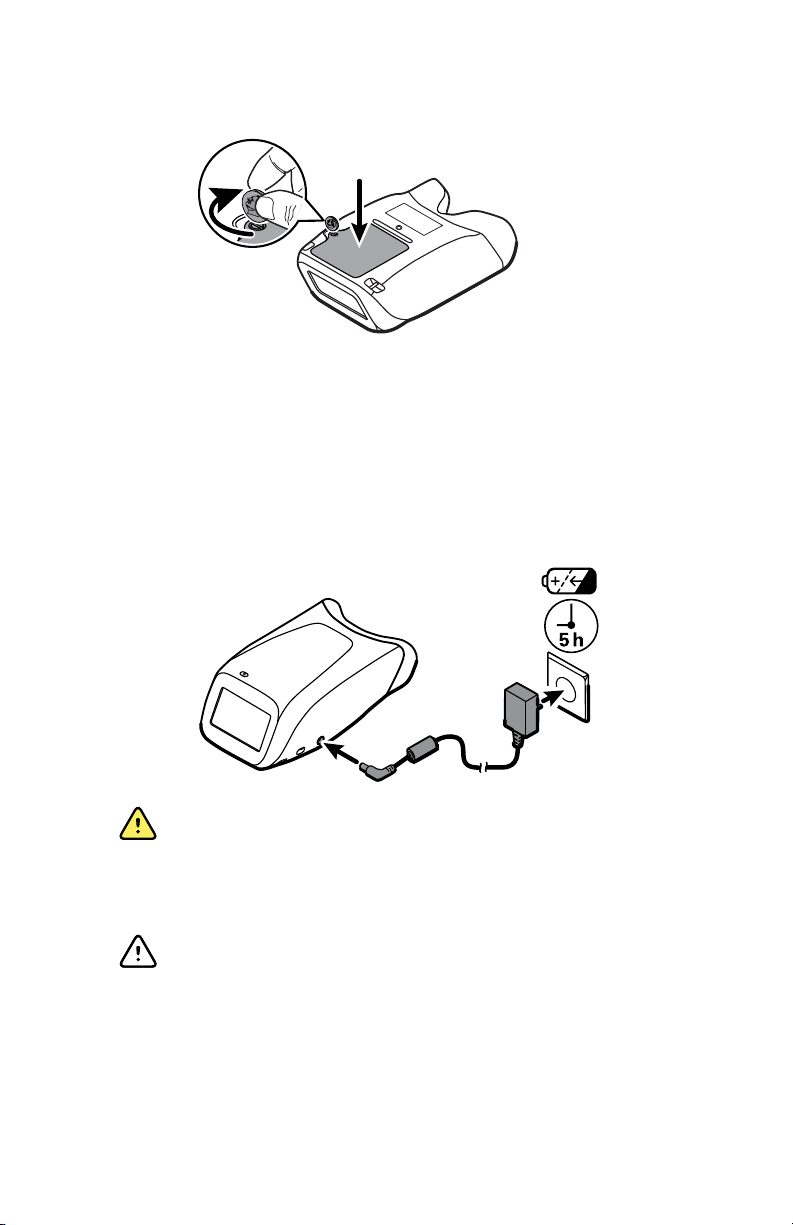
Connect the power supply to the RetinaVue 700 Imager
1. Locate the power connector charging port on the RetinaVue 700 Imager and
plug the power supply connector plug into the RetinaVue 700 Imager.
WARNING Use only Welch Allyn approved accessories, and
use them according to the manufacturer’s directions for use.
Using unapproved accessories with the camera can affect
patient and operator safety and can compromise product
performance and accuracy, and void the product warranty.
CAUTION The power supply connector easily inserts into the
RetinaVue 700 Imager. Using force to connect the power
supply connector plug can damage the device and will void the
warranty.
2. Plug the power cord into an available wall outlet to charge the device. When
the power indicator LED light is orange, it indicates that the device is in the
process of charging.
20 First time set up of the RetinaVue 700 Imager
Note For first time use, the device needs to be charged for 5 hours
before use.
Note The removal of the plug from the socket provides the means
of isolation from the mains power supply. The user is
reminded to keep this means of disconnection easily
accessible in case of emergency.
Startup
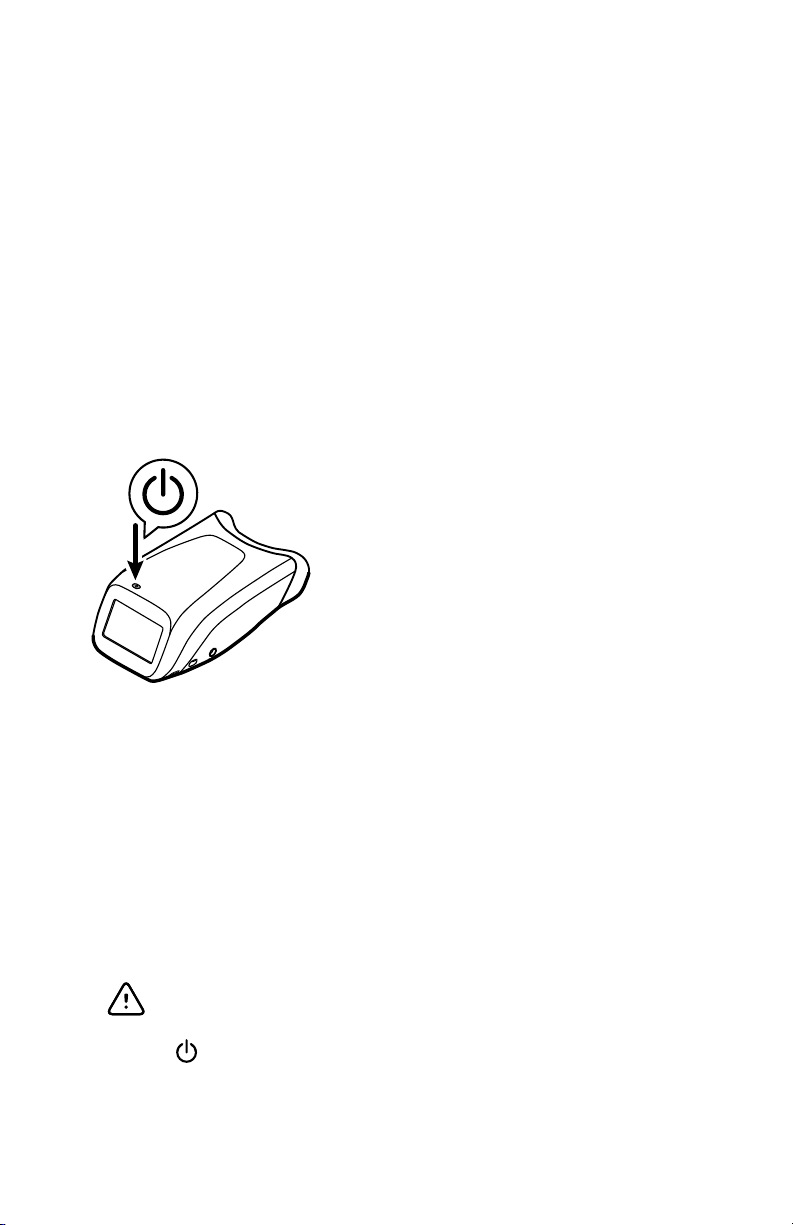
Power
The Power button, located on the upper-left corner of the RetinaVue 700
Imager, performs multiple functions:
powers up the RetinaVue 700 Imager
•
• wakes the RetinaVue 700 Imager from Sleep mode
• opens a dialogue screen with controls to power down, enter Sleep mode, or
to cancel and return to the prior screen, depending on the option you choose
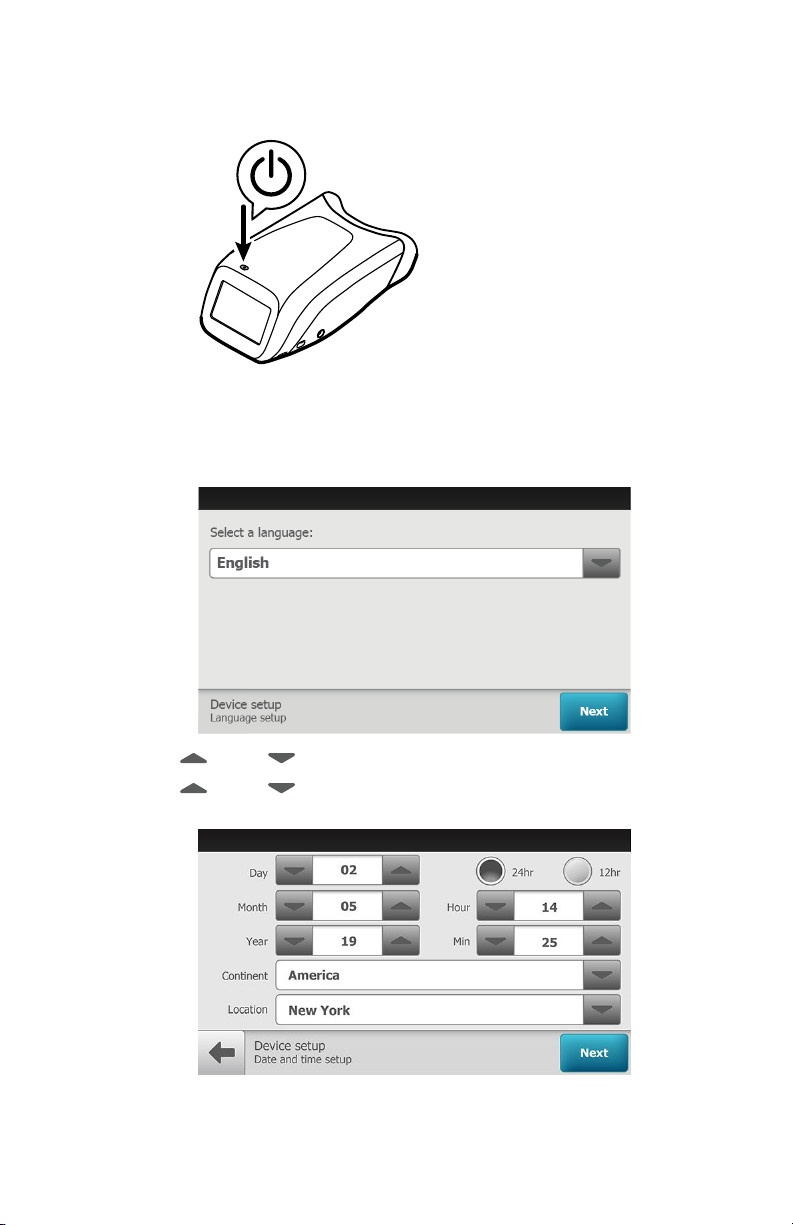
Power up the RetinaVue 700 Imager
The RetinaVue 700 Imager runs a brief diagnostic self-test each time it
powers up.
CAUTION
an adequately charged and properly functioning battery.
1. Press to power up the RetinaVue 700 Imager.
Always use the RetinaVue 700 Imager with
Directions for use First time set up of the RetinaVue 700 Imager 21
As the device is powering up, the RetinaVue 700 Imager displays the
startup screen.
2.
If this is the first time set up, select your preferred language from the dropdown list and then touch Next.
3. Touch (up) or (down) to enter, or adjust, the Day, Month, and Year.
4. Touch (up) or (down) to enter, or adjust, the Hour, Minute (Min),
Continent, and Location. Touch Next.
Note Use the radio buttons to select the 24-hour or 12-hour format.
22 First time set up of the RetinaVue 700 Imager
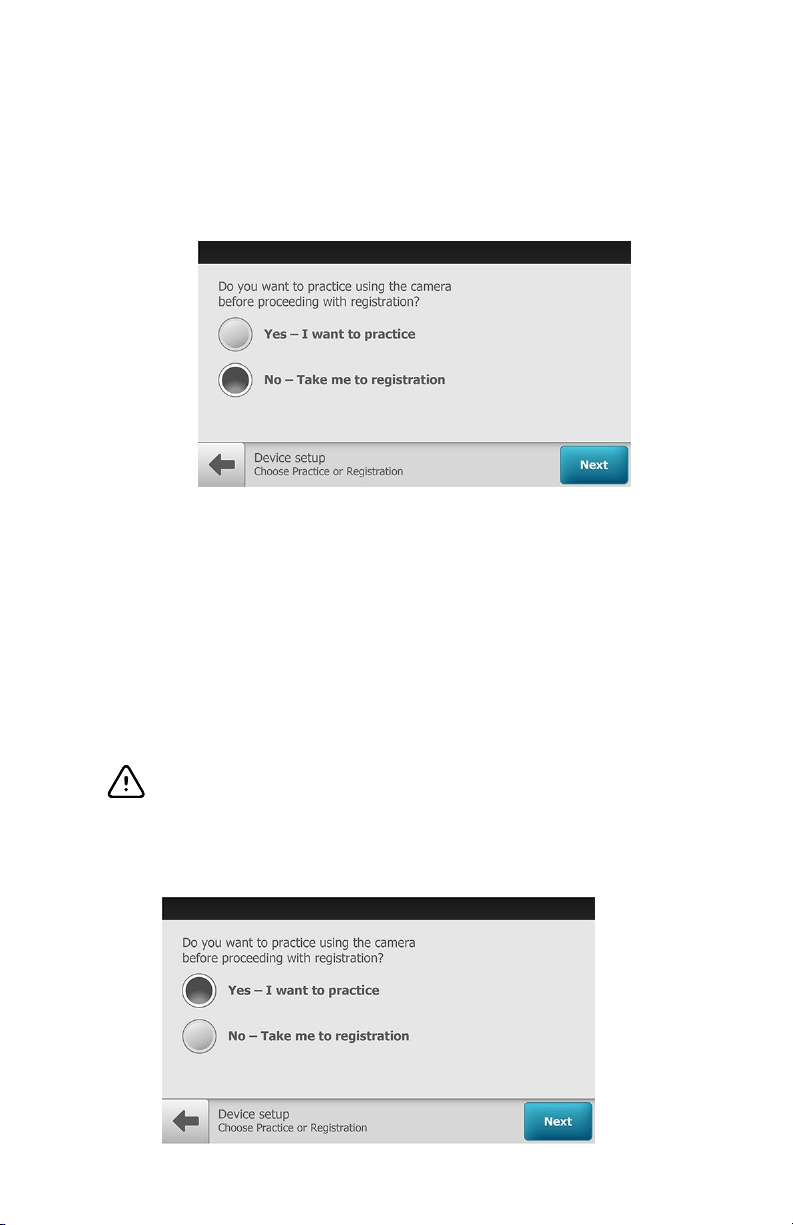
5. If you want to use the camera in practice mode before registering the camera,
touch Yes - I want to practice.
a. If you want to proceed to registering the camera, touch No - take
me to registration and then touch Next.
First time selection of practice mode
Practice mode allows RetinaVue 700 Imager users to become familiar with
the camera features and does not require camera registration. Screens in
the Practice mode prominently display the text "Practice mode" and a blue
banner also appears at the top of the screen. Most users prefer to run
through Practice mode after registering the camera and just before
performing their first exam. For further instruction about using Practice
mode and returning to Practice mode after device registration, see the topic
Practice mode.
CAUTION
data collected in Practice mode will be deleted when
Practice mode is exited and cannot be recovered.
If you want to use the camera in practice mode before registering the camera,
touch Yes - I want to practice and touch Next.
No data is preserved in Practice mode. Any
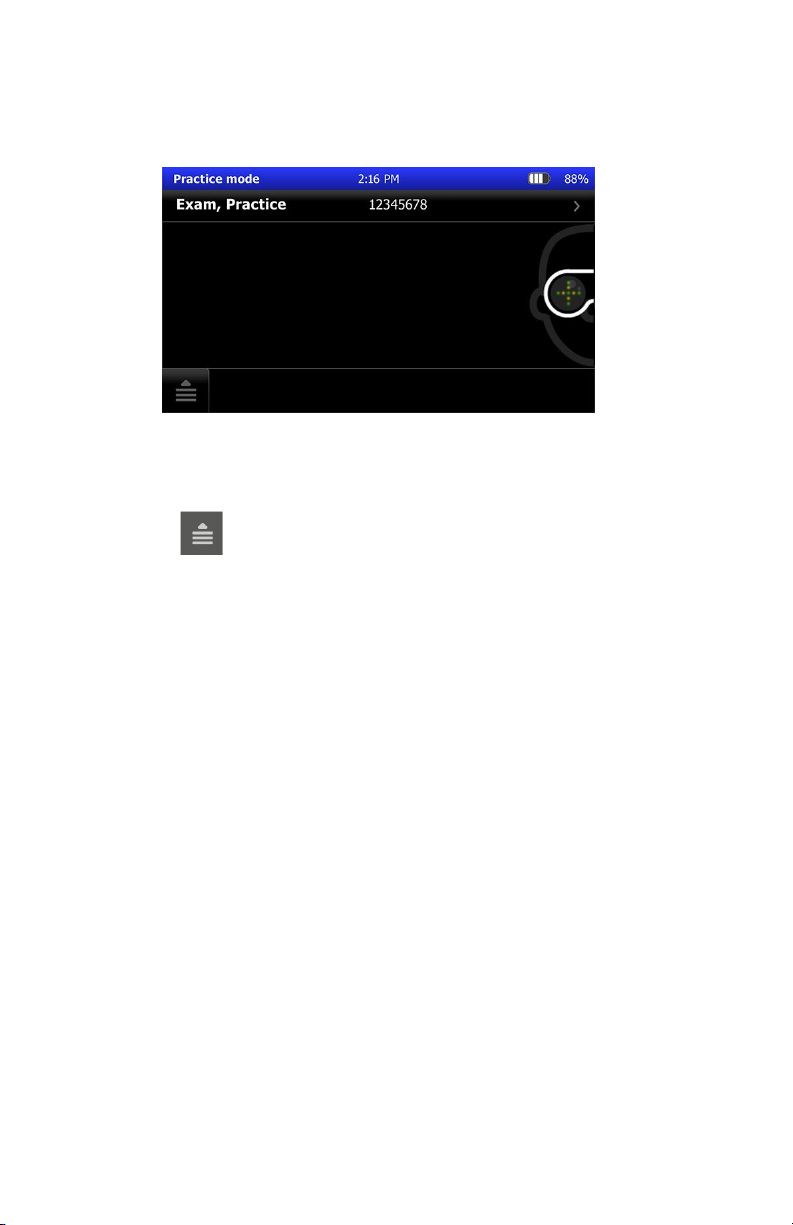
Directions for use First time set up of the RetinaVue 700 Imager 23
The Practice mode screen appears.
For instructions about using Practice mode see the topic Practice
mode.
Exiting Practice mode
1.
Touch and then touch Exit.
2. Touch OK at the prompt: "Exit practice mode and return to camera
registration?" to leave Practice mode and to complete the camera registration.

24 First time set up of the RetinaVue 700 Imager

Camera registration
The RetinaVue 700 Imager needs to be registered and your clinic needs to
have an account set up with RetinaVue Network to send exams for
overread. There are two types of camera registration. Depending on your
needs, select the USB registration or the Wi-Fi registration:
•
Select the USB registration to use the RetinaVue 700 Imager with a USB
cable and a computer connected to the Internet. The RetinaVue Network
software application must be installed onto the computer to register the
camera and to send exams to the RetinaVue Network.
• Select Wi-Fi registration and follow the instructions in the Wi-Fi camera
registration topic to set up your RetinaVue 700 Imager to be used with your
Wi-Fi network and the RetinaVue Network.
25
USB camera registration
1. Touch RetinaVue Network - USB to select the USB workflow and touch
Next.
2. Touch OK at the Setup complete screen and follow the touchscreen
instructions to connect the camera to a computer.

26 Camera registration
Note For the USB workflow, the RetinaVue 700 Imager must be
connected to a computer running the RetinaVue Network
software application (requires additional software) to transfer
exams.
Note If needed, the USB camera registration settings can be reset
after the initial set up. Touch > Settings > Advanced
settings > Reset factory defaults. Touch Restore Settings
at the prompt: "Do you want to restore to factory defaults?
This will reset all device settings. Any saved exams on this
camera will be deleted." Touch OK at the prompt: "Reset all
settings to defaults? Any saved exams on this camera will be
deleted."
 Loading...