

Page 1

First Choice For Security Professionals
Quick Start Guide
Hybrid DVR
DS-9000HFI-ST Series Hybrid DVR
DS-9600NI-ST Series
NOTE: For more detailed information, refer to the User’s Manual on the
CD-ROM. You must use your PC or MAC to access the files.
NVR
NVR
www.hikvision.com
Page 2

First Choice For Security Professionals
Quick
Start
NOTE: For more detailed information, refer to the User’s Manual on the
NOTE: Connect VGA monitor and mouse before starting.
1. Overview
2. Connection
3. Start Up/Shutdown
4. Formatting a Disk
5. Setting Date & Time
6. Recording
7. Playback
8. Backup
9. Network Connection
10. Configure IP Cameras
(Only for DS-9000HFI-ST Series Hybrid DVR
and DS-9600NI-ST Series NVR)
CD-ROM. You must use your PC or MAC to access the files.
Page 3
HYBRID
DVR/NVR/ANALOG
1.
Overview
BEFORE STARTING: Connect VGA monitor and mouse (mouse supplied).
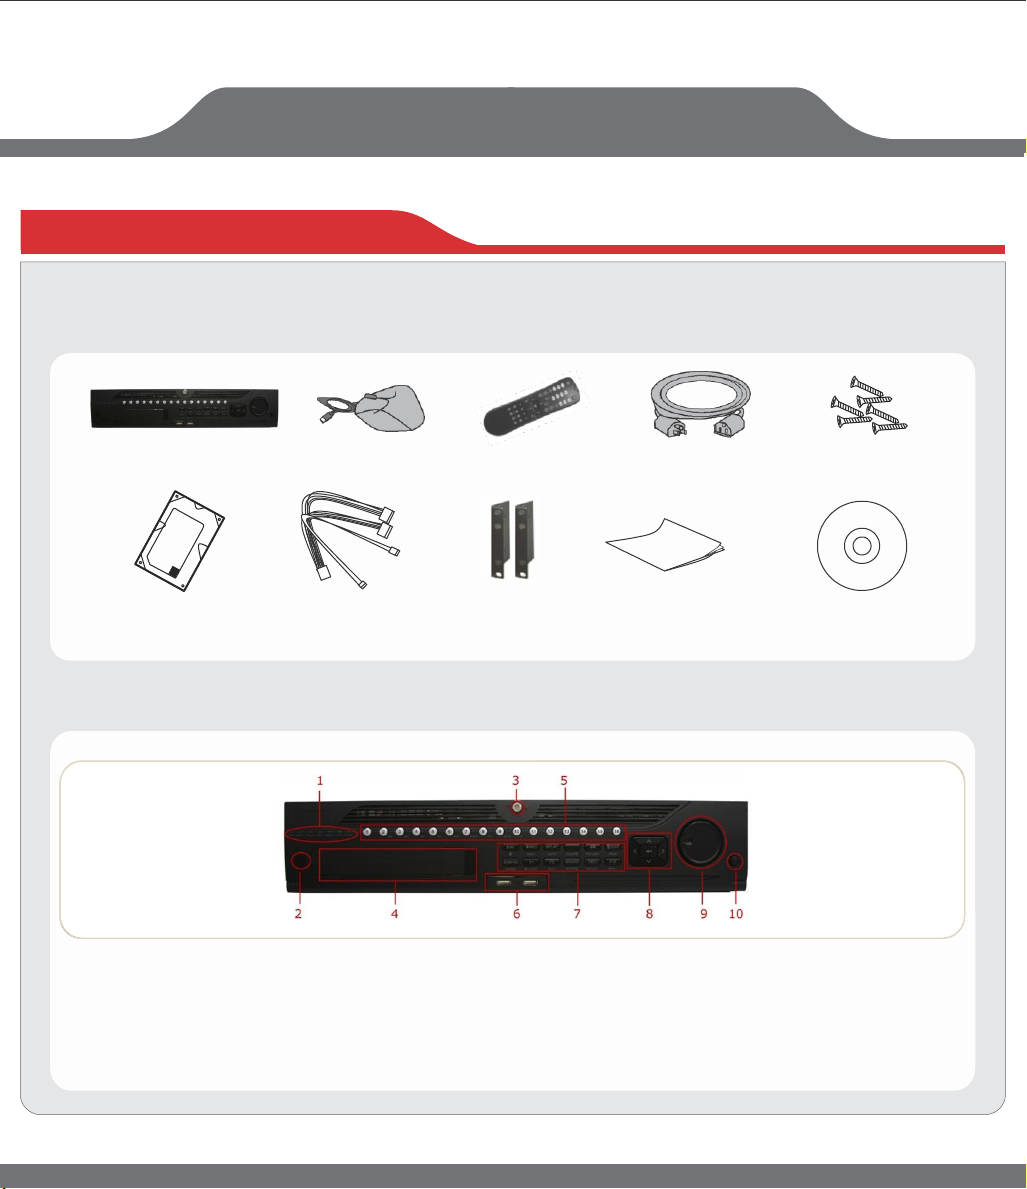
Check that your package includes the following:
Hybrid/Analog DVR Mouse IR Remote Power Cord Screws
Hard Drive (PreInstalled) HDD Cables Rack Mount Ears Quick Start Guide Manual/Software CD
Front Panel Description:
1 4 5 7
3 2 6 8
1.
Status Indicators
2. IR Receiver
3. Front Panel Lock
4. DVD-R/W
Alphanumeric Buttons
5.
6. USB Ports
7. Control Buttons
8. Direction/Enter Button
9. Jog Shuttle Control
Power Button
10.
Page 4

First Choice For Security Professionals
2.
Connection
Internet
PC
Router
VGA
Monitor
Main
Monitor Aux/Spot Monitor
Ethernet
PC
USB
Mouse
Keyboard
Alarm
Output
Alarm
Input
Audio Input USB
Analog
Dome
NOTE:
DS-9000HFI-ST Series Hybrid
DS-9600NI-ST Series
NVR
DVR
support
support
only IP
both
Analog
cameras.
Analog Camera
and IP
cameras.
IP Dome IP
Camera
3. Startup and
Shutdown
To startup your DVR:
1. Plug power cord into DVR and electrical outlet. It is HIGHLY recommended to use a surge
protector.
2. Connect a VGA or HDMI monitor and mouse into the DVR. NOTE: Monitor and mouse
need to be plugged in before starting.
3. Switch the POWER button on the back rear panel. The Power indicator LED will turn blue.
The unit will begin to start.
NOTE: Each HDD will start separately to conserve power
NOTE:
Default password is 12345
www.hikvision.com
Speaker
IR
Remote
Device
Page 5

First Choice For Security Professionals
3. Startup and Shutdown (cont.)
To shut down your DVR:
OPTION 1: Standard Shutdown
1. Enter the Shutdown menu by going to Main
Menu > Maintenance.
2. Click Shutdown button to access the Shutdown
menu.
3. Select the Shutdown button.
4.
Click the Yes button.
OPTION 2: Manual Shutdown
1. Press and hold the POWER button for 3 seconds.
2. Enter the administrator's username and password
in the dialog box for authentication.
3. Click the Yes button.
NOTE: Do not press the POWER button again
when the system is shutting down.
4. Formatting a
Disk
A newly installed hard disk drive (HDD) must be formatted first before it can be used with your DVR.
NOTE: Formatting the disk will erase all data on it.
To format a new disk:
1. Enter the Disk Management menu by going to Main Menu > System Configuration
> HDD.
2. Place a check next to the disk to format. A disk that has not been formatted will show
Uninitialized as its status.
If the disk is newly installed, the status of the drive will show up as
Uninitialized.
Page 6

HYBRID
4. Formatting a Disk (cont.)
3. Click the Init button.
4. A confirmation message will appear on the screen.
Click the OK button to continue formatting process.
5. The status column will show the Initialization progress.
After the disk has been formatted, the status of the
disk will change to Normal.
6. Click the button to exit out of Disk Management.
DVR/NVR
5. Setting Date &
To setup date and time:
1. Enter the Time/Date menu by going to Main Menu
> System Configuration > General > Time/Date.
2. Select the correct time zone. Enter the correct date and time.
3. Click the Apply button to save the settings.
Time
Page 7

First Choice For Security Professionals
6.
Recording
To setup recording schedule:
You can set the recording through two ways:
OPTION1:
Right click to access the menu. Select Start Recording from
the list, select either Continuous Record or Event Record.
This will apply a 24/7 recording for all active channels.
OPTION2:
1. Enter the Schedule Configuration menu by going
to Main Menu > Recording Configuration
> Schedule.
2. Select a camera to configure from the camera
drop down menu.
3. Check the Enable Schedule checkbox to enable the recording schedule. If the checkbox is
unchecked, the recording schedule will be disabled.
4. Click blue Continuous or yellow Event icon below time table to select recording type. The
time table will switch to editable mode, drag mouse over time table to configure recording
schedule. Different recording types will be marked with corresponding color.
Note: Step 4 scheduling adjustments made to the hour, if recording schedule requires
adjustments to the minutes, move to Step 7.
5. Select Recording Type for each day of the week. Recording type includes Continuous for
continuous recording or Event for recording when an event is triggered (i.e. from detected
motion) for the selected time period.
6. Select the start and stop time for each day of the week. The start and stop time are listed
using a 24 hr cycle (i.e. 18:00 is equivalent to 6:00pm)
7. Select the Apply button to save the schedule settings and click to return to the
previous menu. Clicking without clicking Apply will go out of the menu without saving
settings.
NOTE: Event recordings are recordings that are triggered from motion detection
and/or from an external alarm.
www.hikvision.com
Page 8
First Choice For Security Professionals
7.
Playback
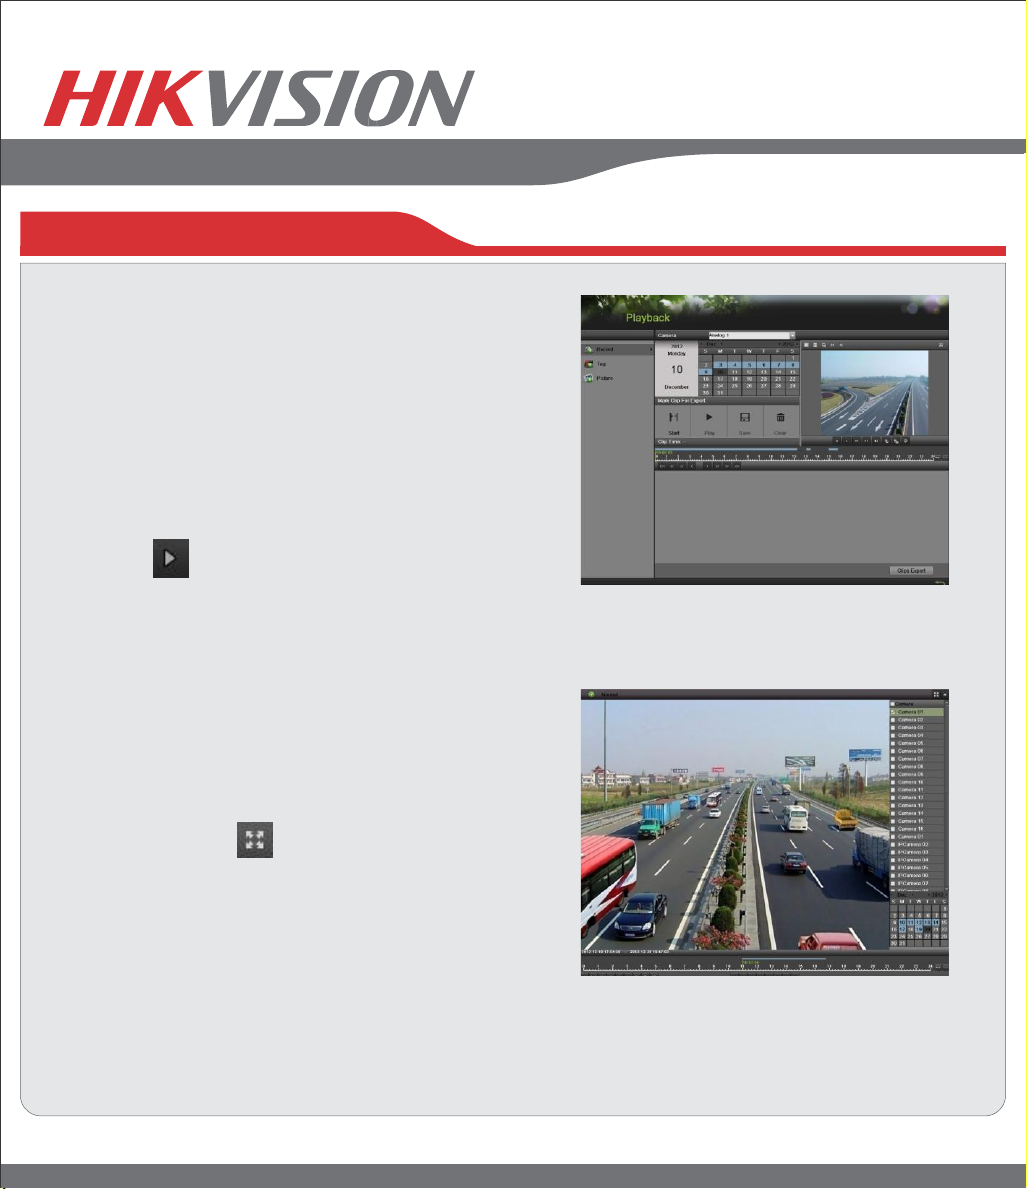
Playback from Search:
1. Enter the Playback menu by going to
Main Menu > Playback.
2. Select the camera and date you want to
search.
3. The search results will be shown on the timeline
with blue bars designating recorded files.
4. Click a time on the timeline, and then click Play
Forward button below the video preview
window.
Playback Multiple Channels
1. Follow the steps mentioned above to playback the video.
2. Click Full-screen button to enter full-screen mode,
and select additional channels by clicking the checkbox
next to the camera to playback multiple channels.
3. Stop playback on any of channel by un-checking the
corresponding checkbox.
NOTE: Up to 16 channels can be played back at the
same time
Page 9

8.
Backup
HYBRID
Backup recorded files (Export):
1. Enter the File Management menu by going to
Main Menu > File Management
2. Place a check next to the cameras you want to
search files for backup. Select the recording type,
date and time range you want to backup. Click
on Search.
3. A search results window will display your results. You
may click the Play button to verify that these files
are indeed the ones you would like to backup. The total
size of backup files will be displayed in lower left hand
corner.
4. Click the Export button.
5. Select device to backup to from drop-down list (USB
Flash Drive, USB HDD, DVD Writer). If backup device
is not recognized:
• Click the Refresh button.
• Reconnect the device.
• Check for compatibility from vendor.
6. The total available free space will be shown. If the
free space is not sufficient, delete files from the
storage device or insert a device with more available
free space.
7. Click the Export button to begin backup process.
After the backup has completed, click the OK button.
DVR/NVR
Page 10

First Choice For Security Professionals
9. Network
Network Connection
Using Web Browsers
Connection
All Hikvision products use the default IP address of 192.0.0.64
1. Connect a CAT5 or CAT6 cable from the DVR to a PC or Laptop computer.
Note your laptop or PC computers existing address, such as:
IP: 192.0.0.62
Subnet: 255.255.255.0
2. Open web browser.
3. In the address bar, type 192.0.0.64
If prompted, allow the installation of the Hikvision application.
It may be necessary to add this IP address as a Trusted Site with Low Security.
4. Login to the DVR:
Username: admin
Password: 12345
5. Go to the Configuration tab, then Remote Configuration, then [Network Settings]
6. Click on Network Settings.
7. Enter the IP address you wish the DVR to have, then SAVE.
8. Reset your laptop or PC to its original IP address, subnet and gateway.
9. Type the new address in web browser.
Using Hikvision iVMS-4200 client software
If possible, check http://www.hikvision.com for the latest version of the iVMS-4200 client software.
If internet access is not available, install the software from the CD.
Then follow the instructions included with the software.
Page 11

HYBRID
DVR/NVR/ANALOG
10. Adding IP
Adding IP Cameras
Cameras
Directly on the Hybrid DVR and NVR’s Menu:
1. Enter the Add/Remove Cameras menu by going to Main Menu > Cameras Setup > Cameras.
2. Select the IP Camera tab.
3. Click the Search button to automatically detect connected IP cameras on the network.
4. If the detected IP cameras and DVR are not on the same subnet, you can modify the camera’s IP,
subnet and port settings by clicking on the next to camera’s IP address.
5. Input the camera’s password in the password field. Click the Add button to add the IP camera to
the Added Cameras list. Please note the camera’s status will show as disconnected initially.
Click the refresh button to obtain a connected status. You can also click the play icon to
verify a successful connection to the camera.
6. Once an IP camera has been added to the Added Cameras list, you may remove the camera by clicking
the Trashcan icon or view the camera by clicking the Play icon.
7. Go to Main Menu > Recording Configuration > Recording Quality to setup IP camera recording
resolution, frame rate, etc.
Using Internet Explorer
1. Connect to the DVR by typing the IP address in the address bar
2. Login to the DVR as above.
3. Click on Configuration > Camera Management > IP Camera
4. Enter the camera IP Address and other appropriate information on the right side of the screen.
5. Repeat to add more cameras.
Page 12

First Choice For Security Professionals
908 Canada Court
City of Industry, CA 91748
U.S.A.
www.hikvision.com
 Loading...