

Page 1

DS-9500NI-S Series NVR
USER’S MANUAL
Version 1.2.0
Page 2

Hikvision® Network Digital Video Recorder User’s Manual
This manual, as well as the software described in it, is furnished under license and may be used or copied only in
accordance with the terms of such license. The content of this manual is furnished for informational use only, is subject
to change without notice, and should not be construed as a commitment by Hikvision Digital Technology Co., Ltd.
(Hikvision). Hikvision assumes no responsibility or liability for any errors or inaccuracies that may appear in the book.
Except as permitted by such license, no part of this publication may be reproduced, stored in a retrieval system, or
transmitted, in any form or by any means, electronic, mechanical, recording, or otherwise, without the prior written
permission of Hikvision.
HIKVISION MAKES NO WARRANTIES, EXPRESS OR IMPLIED, INCLUDING WITHOUT LIMITATION THE
IMPLIED WARRANTIES OF MERCHANTABILITY AND FITNESS FOR A PARTICULAR PURPOSE,
REGARDING THE HIKVISION SOFTWARE. HIKVISION DOES NOT WARRANT, GUARANTEE, OR MAKE
ANY REPRESENTATIONS REGARDING THE USE OR THE RESULTS OF THE USE OF THE HIKVISION
SOFTWARE IN TERMS OF ITS CORRECTNESS, ACCURACY, RELIABILITY, CURRENTNESS, OR
OTHERWISE. THE ENTIRE RISK AS TO THE RESULTS AND PERFORMANCE OF THE HIKVISION
SOFTWARE IS ASSU MED BY YOU. THE EXCLUSION OF IMPLIED WARRANTIES I S NOT PERMITTED BY
SOME STATES. THE ABOVE EXCLUSION MAY NOT APPLY TO YOU.
IN NO EVENT WILL HIKVISION, ITS DIRECTORS, OFFICERS, EMPLOYEES, OR AGENTS BE LIABLE TO
YOU FOR ANY CONSEQUENTIAL, INCIDENTAL, OR INDIRECT DAMAGES (INCLUDING DAMAGES FOR
LOSS OF BUSINESS PROFITS, BUSINESS INTERRUPTI ON, LOSS OF BUSINESS INFORMATION, AND THE
LIKE) ARISING OUT OF THE USE OR INABILITY TO USE THE HIKVISION SOFTWARE EVEN IF
HIKVISION HAS BEEN ADVISED OF THE POSSIBILITY OF SUCH DAMAGES. BECAUSE SOME STATES DO
NOT ALLOW THE EXCLUSION OR LIMITATION OF LIA BILITY FOR CONSEQUENTIAL OR INCIDENTAL
DAMAGES, THE ABOVE LIMITATIONS MA Y NOT APPLY TO YOU.
1
Page 3

Preventive and Cautionary Tips
Before connecting and operating your NVR, please be advised of the following tips:
• Ensure unit is installed in a well-ventilated, dust-free environment.
• Unit is designed for indoor use only.
• Keep all liquids away from the NVR.
• Ensure environmental conditions meet factory specifications.
• Ensure unit is properly secured to a rack or shelf. Major shocks or jolts to the unit as a result of dropping it may cause
damage to the sensitive electronics within the unit.
• Use the NVR in conjunction with an UPS if possible.
• Power down the unit before connecting and disconnecting accessories and peripherals.
• A factory recommended HDD should be used for this device.
• Improper use or replacement of the battery may result in hazard of explosion. Replace with the same or equivalent
type only. Dispose of used batteries according to the instructions provided by the battery manufacturer.
2
Page 4

TABLE OF CONTENTS
C H A P T E R 1 ..................................................................................................................................... 5
Introduction ........................................................................................................................................... 5
1.1 Front Panel Introduction............................................................................................................ 6
1.2 Starting and Shutting Down Your NVR .................................................................................... 8
C H A P T E R 2 ................................................................................................................................... 10
Network Parameters Configuration .................................................................................................. 10
2.1 Hyper Terminal Setup ............................................................................................................. 11
2.2 Network Configuration by Hyper Terminal ............................................................................ 13
C H A P T E R 3 ................................................................................................................................... 15
ActiveX Control Installation .............................................................................................................. 15
C H A P T E R 4 ................................................................................................................................... 17
User Login and Exit ............................................................................................................................ 17
C H A P T E R 5 ................................................................................................................................... 19
Preview ................................................................................................................................................. 19
5.1 Preview ................................................................................................................................... 20
5.1.1 Win dows Division ........................................................................................................ 20
5.1.2 Preview ......................................................................................................................... 21
5.1.3 Preview Control ........................................................................................................... 21
5.1.4 Stop Preview ................................................................................................................ 22
5.2 Recording and Capturing Image ............................................................................................. 22
5.2.1 Recording ..................................................................................................................... 22
5.2.2 Capturing Image ........................................................................................................... 23
5.3 Video Parameters Setting ........................................................................................................ 23
C H A P T E R 6 ................................................................................................................................... 24
PTZ Control......................................................................................................................................... 24
C H A P T E R 7 ................................................................................................................................... 26
Playback ............................................................................................................................................... 26
7.1 Playback Query ....................................................................................................................... 27
7.2 Play Recording File ................................................................................................................. 28
7.3 Capturing Image and Download ............................................................................................. 29
7.4 Remote Backup ....................................................................................................................... 30
C H A P T E R 8 ................................................................................................................................... 31
Log Search ........................................................................................................................................... 31
C H A P T E R 9 ................................................................................................................................... 33
Configuration ...................................................................................................................................... 33
9.1 Local Configuration ................................................................................................................ 34
9.2 IP Camera Configuration ........................................................................................................ 34
9.2.1 Quick Add of IP camera ............................................................................................... 35
9.2.2 Single Add of IP camera ............................................................................................... 36
9.3 Recording Settings .................................................................................................................. 38
9.3.1 V ideo Parameters ......................................................................................................... 39
9.3.2 Schedule Recording ..................................................................................................... 39
9.3.3 Motion Detection Recording ........................................................................................ 41
9.3.4 Alarm Recording .......................................................................................................... 43
9.3.5 Other Recording Modes ............................................................................................... 45
9.4 Alarm Settings ......................................................................................................................... 45
9.4.1 Motion Detection Alarm .............................................................................................. 45
9.4.2 Signal Level Alarm ...................................................................................................... 46
9.4.3 Video Loss .................................................................................................................... 47
9.4.4 V ideo Tampering .......................................................................................................... 48
3
Page 5

9.4.5 Exceptions .................................................................................................................... 49
9.5 Network Configuration ........................................................................................................... 50
9.5.1 Basic Configuration ..................................................................................................... 50
9.5.2 PPPoE Settings ............................................................................................................. 51
9.5.3 DDNS Settings ............................................................................................................. 51
9.5.4 NTP Settings ................................................................................................................ 51
9.5.5 Net Disk Settings ......................................................................................................... 52
9.5.6 E-Mail Settings ............................................................................................................ 52
9.6 Channel Configuration ............................................................................................................ 53
9.6.1 Channel Display Settings ............................................................................................. 53
9.6.2 Video Mask .................................................................................................................. 53
9.7 Account Management ............................................................................................................. 54
9.8 Remote Upgrade ..................................................................................................................... 55
9.9 HDD Settings .......................................................................................................................... 56
C H A P T E R 10 ................................................................................................................................. 58
Appendix .............................................................................................................................................. 58
Glossary ....................................................................................................................................... 59
FAQ .............................................................................................................................................. 60
List of Compatible IP Cameras .................................................................................................. 61
List of Hikvision IP Cameras Supported by DS-9500NI-S NVR ......................................... 61
List of Third-party IP Cameras Supported by DS-9500NI-S NVR ....................................... 62
4
Page 6

C H A P T E R 1
Introduction
5
Page 7
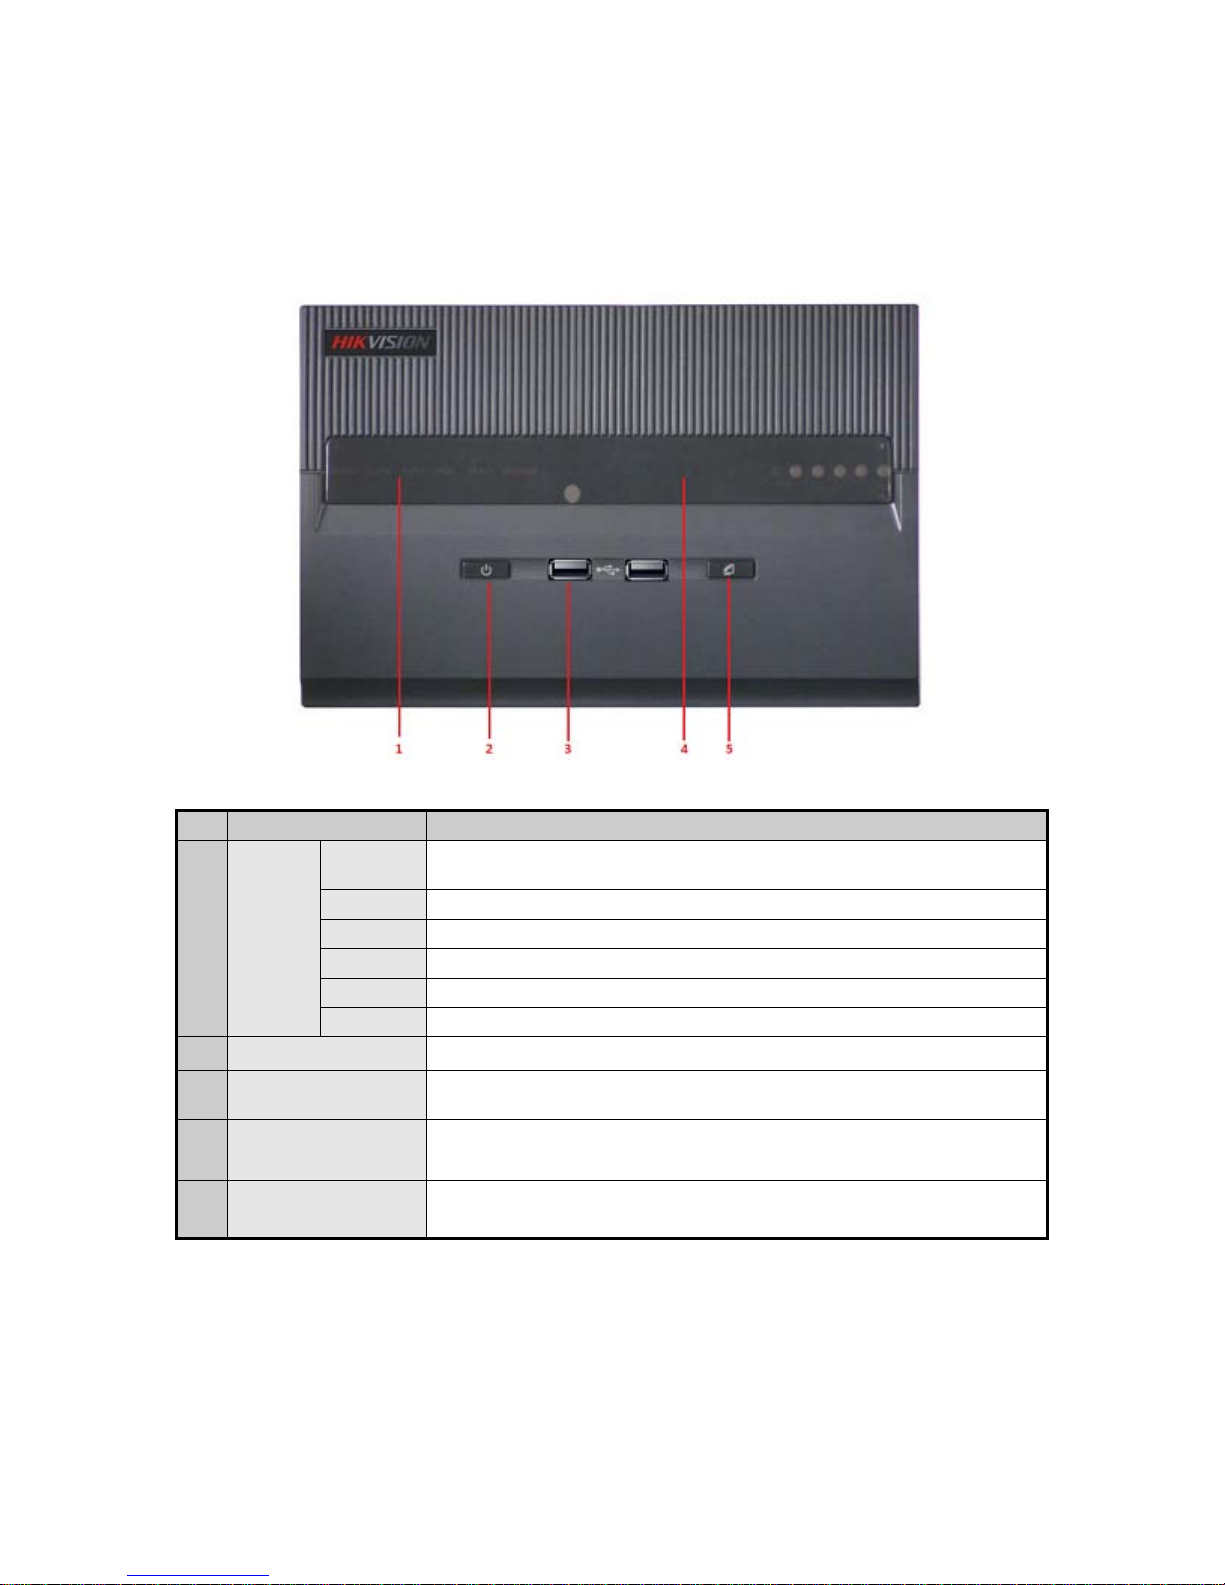
1.1 Front Panel Int roduction
indicates power supply and system running.
purple indicates
DS-9504NI-S Front Panel:
No.
1
2
3
4
5
Name
Status
LED
Indicators
Power Button
USB Ports Universal Serial Bus (USB) ports for additional devices such as USB mouse and
Channel Status
Backup Button
Power
Alarm Alarm indicator turns red when a sensor alarm is detected.
TX/RX TX/RX indictor blinks blue when network connection is functioning properly.
HDD HDD indicator blinks red when data is being read from or written to HDD.
Ready Ready indicator turns blue when NVR is functioning properly.
Backup Backup indicator blinks blue when data is being backup.
Indicators
Turning red indicates power supply but without system running, turning blue
Powers NVR on/off.
USB Hard Disk Drive (HDD).
Blue indicates recording, red indicates network connection,
recording & network connection.
Backup video files.
Description
6
Page 8
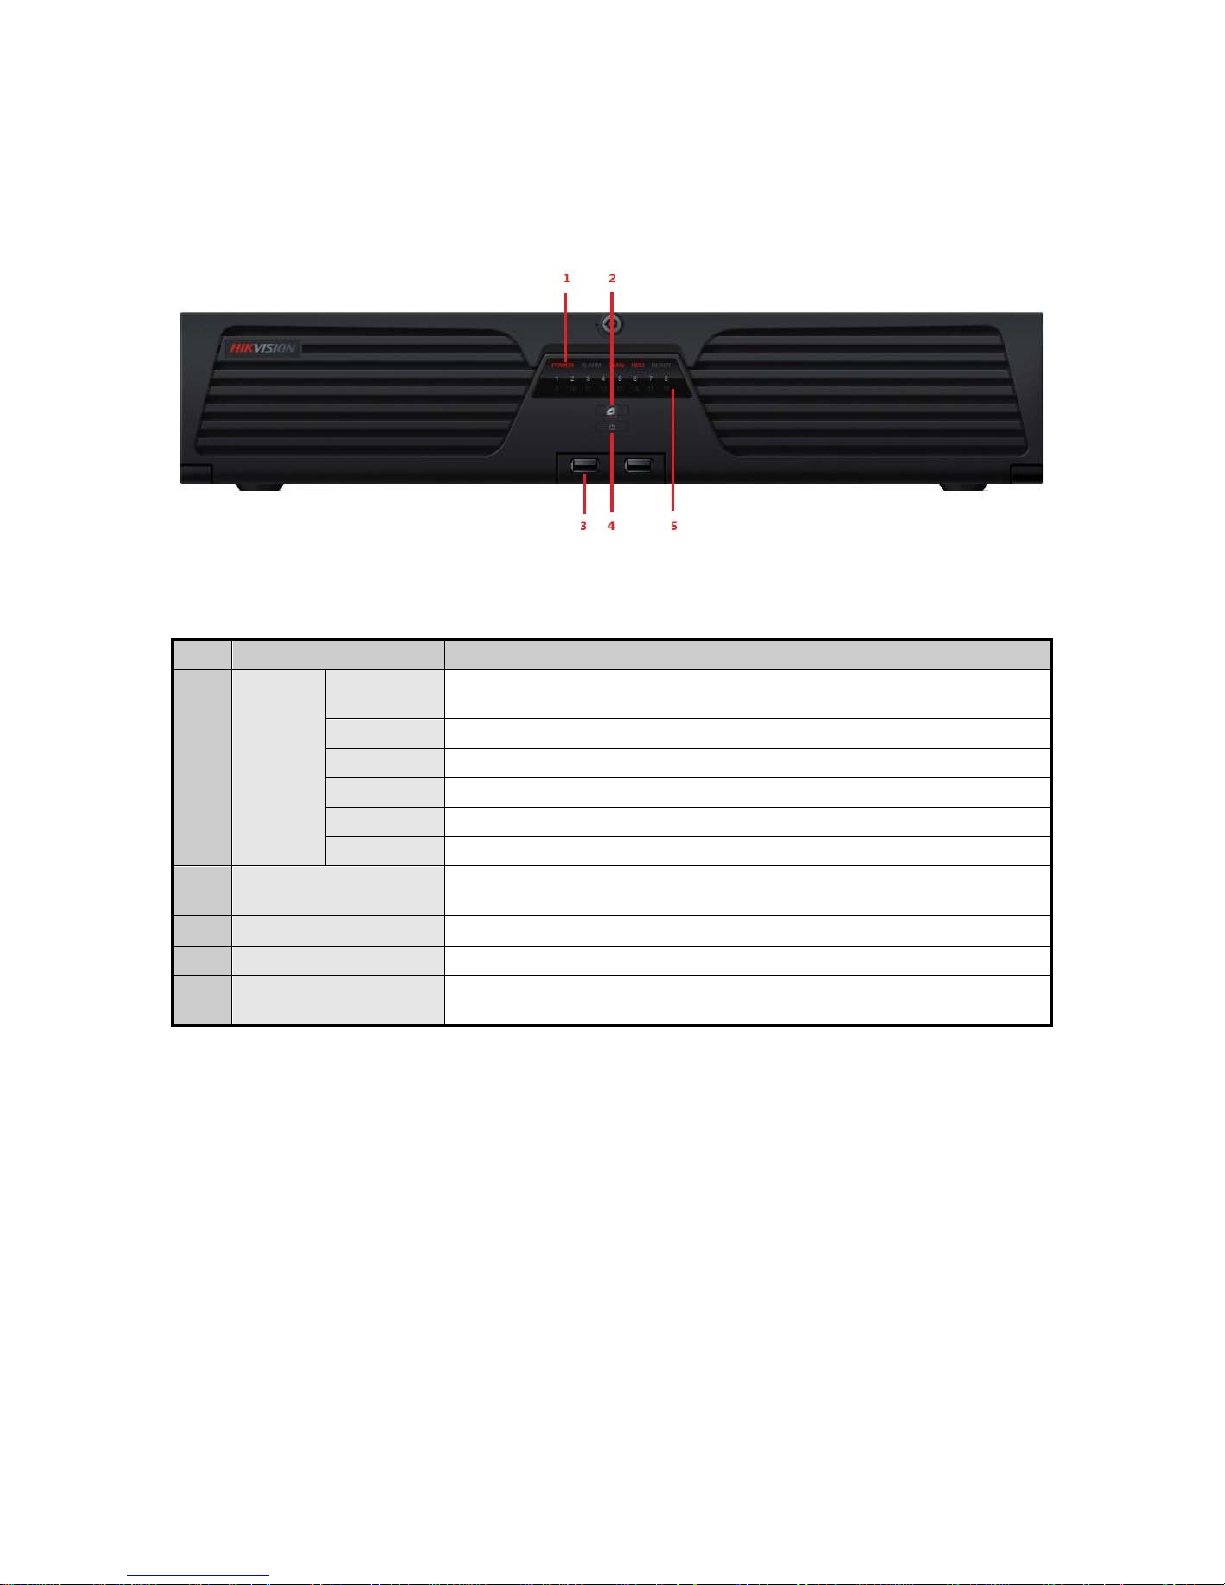
DS-9508NI-S Front Panel:
No.
Status
LED
1
Indicators
2
3
4
Channel Status Indicators Blue indicates recording, red indicates network connection, purple indicates
5
Name
USB Ports Universal Serial Bus (USB) ports for additional devices such as USB mouse and
Power Button
Backup Button
Power
Alarm Alarm indicator turns red when a sensor alarm is detected.
TX/RX TX/RX indictor blinks blue when network connection is functioning properly.
HDD HDD indicator blinks red when data is being read from or written to HDD.
Ready Ready indicator turns blue when NVR is functioning properly.
Backup Backup indicator blinks blue when data is being backup.
Turning red indicates power supply but without system running, turning blue
indicates power supply and system running.
USB Hard Disk Drive (HDD).
Powers NVR on/off.
Backup video files.
recording & network connection.
Description
7
Page 9

DS-9516NI-S Front Panel:
USB Hard Disk Drive (HDD).
d indicates network connection, purple indicates
No.
1
Name
Status
LED
Indicators
Power
Alarm Alarm indicator turns red when a sensor alarm is detected.
TX/RX TX/RX indictor blinks blue when network connection is functioning properly.
HDD HDD indicator blinks red when data is being read from or written to HDD.
Description
Turning red indicates power supply but without system running, turning blue
indicates power supply and system running.
Ready Ready indicator turns blue when NVR is functioning properly.
Backup Backup indicator blinks blue when data is being backup.
2
3
4
5
Backup Button
USB Ports Universal Serial Bus (USB) ports for additional devices such as USB mouse and
Power Button
Channel Status
Indicators
Backup video files.
Powers NVR on/off.
Blue indicates recording, re
recording & network connection.
1.2 Starting and Shutting Down Your NVR
Power On
If the power LED indicator on the front panel is off, please plug the power supply into an electrical outlet, the LED
should turn red, indicating the unit is receiving power.
When the LED is red, please press the Power button on the front panel. The Power indicator will turn blue. The unit
will begin to start.
Note: DS-9500NI-S series NVR do not have local output, when Ready indicator turns blue, that means the unit is
power on and ready to be configured.
8
Page 10

Power Off
Standard Shutdown
Press and hold the POWER button for 3 seconds; the device will enter power off process, when power indicator turns
red, turn off the power switch on the back panel.
Other Methods of Shutdown
Shutdown with Power Switch
Please try to avoid shutting down the unit by turn off the power switch on the back panel (especially during recording).
Shutdown by Unplug Power Supply
Please try to avoid shutting down the unit by unplug power supply (especially during recording).
Note: It is highly recommended that an Uninterruptible Power Supply (UPS) be used in conjunction with the unit.
9
Page 11

C H A P T E R 2
Network Parameters Configuration
10
Page 12
DS-9500NI-S Series NVR are mainly for IPC, DVS network video storage and playback. Network configurations are
needed before operating, including: IP address, subnet mask, gateway and port.
Note: The factory default username is admin, password is 12345.
The factory default IP address of DS-9500NI-S series is 192.168.0.1.
2.1 Hyper Terminal Setup
The common method is to connect NVR and PC with serial line, run Hyper Terminal and modify parameters with serial
command. Please connect the RS-232 port of NVR with the COM port of PC directly, power on the NVR and PC and
follow the steps:
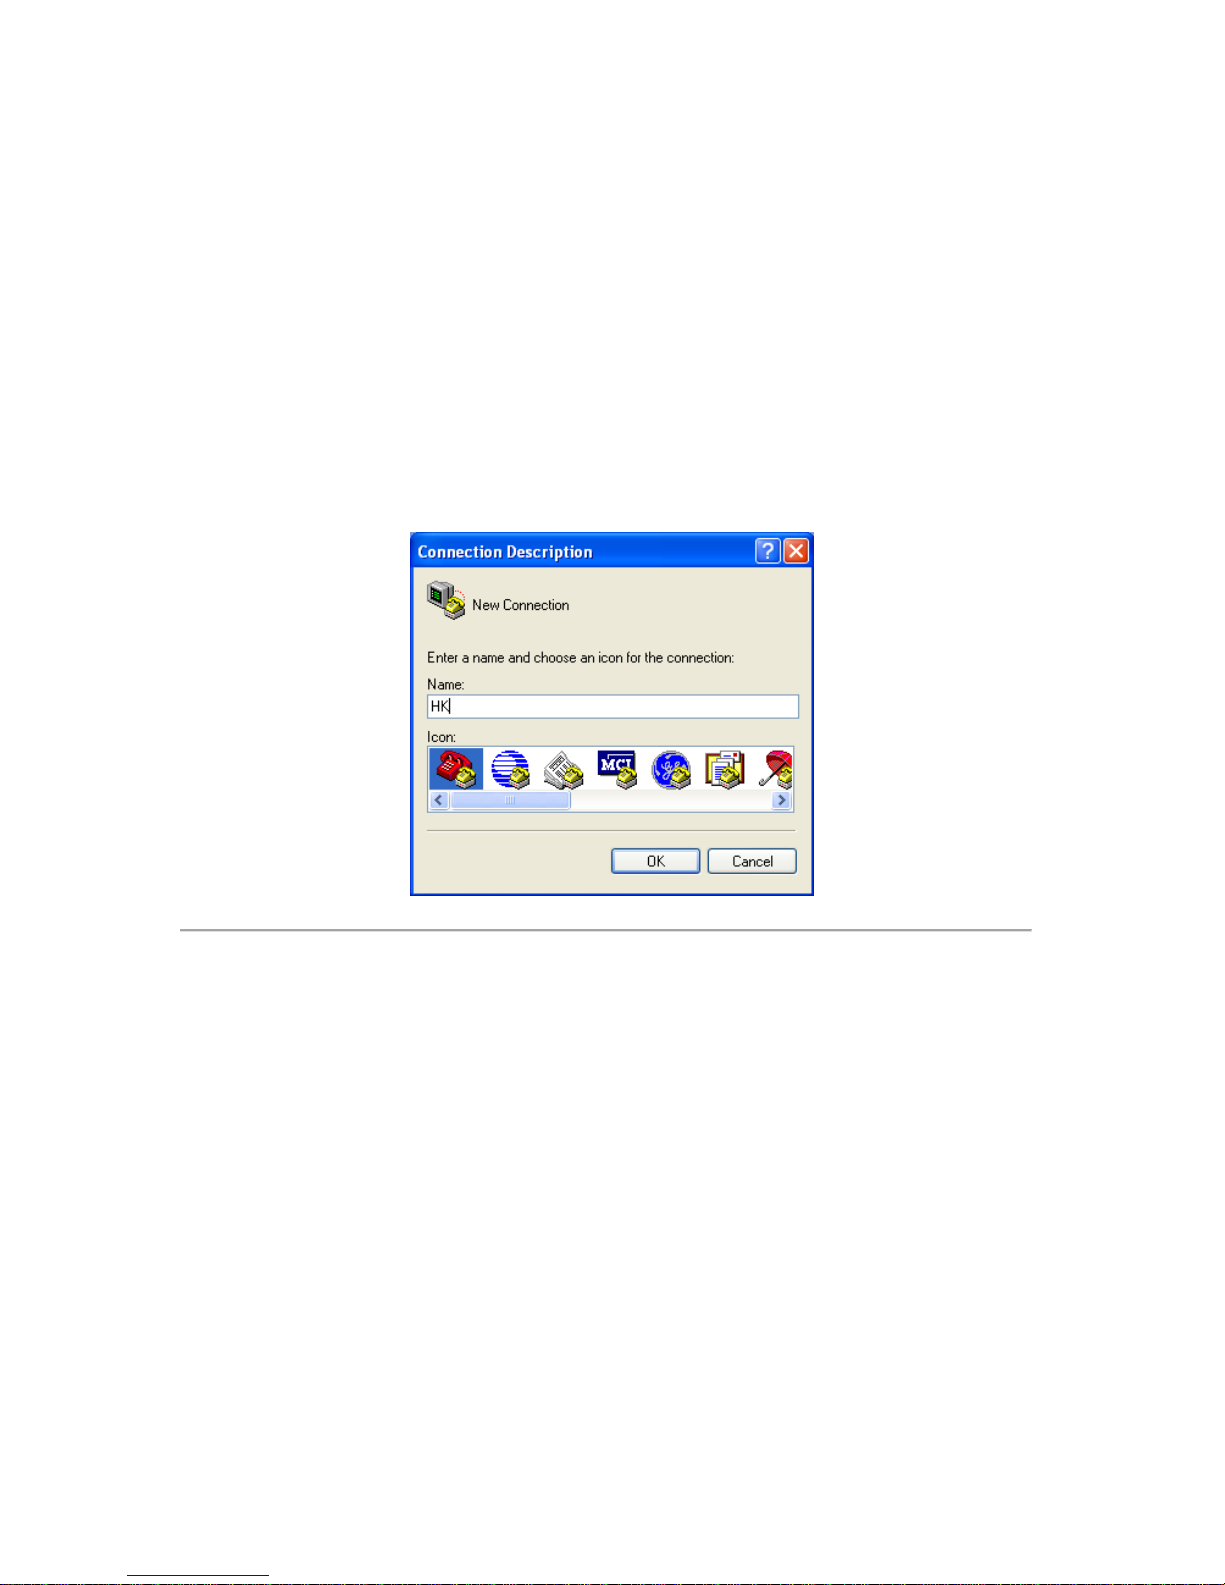
Step 1: Enter Hyper Terminal.
Click “Start”-> “Programs” -> “Accessories” -> “Communications” -> “Hyper Terminal” in Windows system, and the
dialogue box below will appears as Figure 2.1.1.
Figure 2.1.1
Step 2: Name the connection and define the icon.
Input a name (e.g. HK), select an icon, and press “OK” to enter “Connect T o” dialogue box.
Step 3: Select the communication port.
Select “COM1” in “Connect To” inter face (Please select the COM port according to the reality, in case PC has more
than 1 COM.) Press “OK” to enter “Properties” dialogue box.
11
Page 13
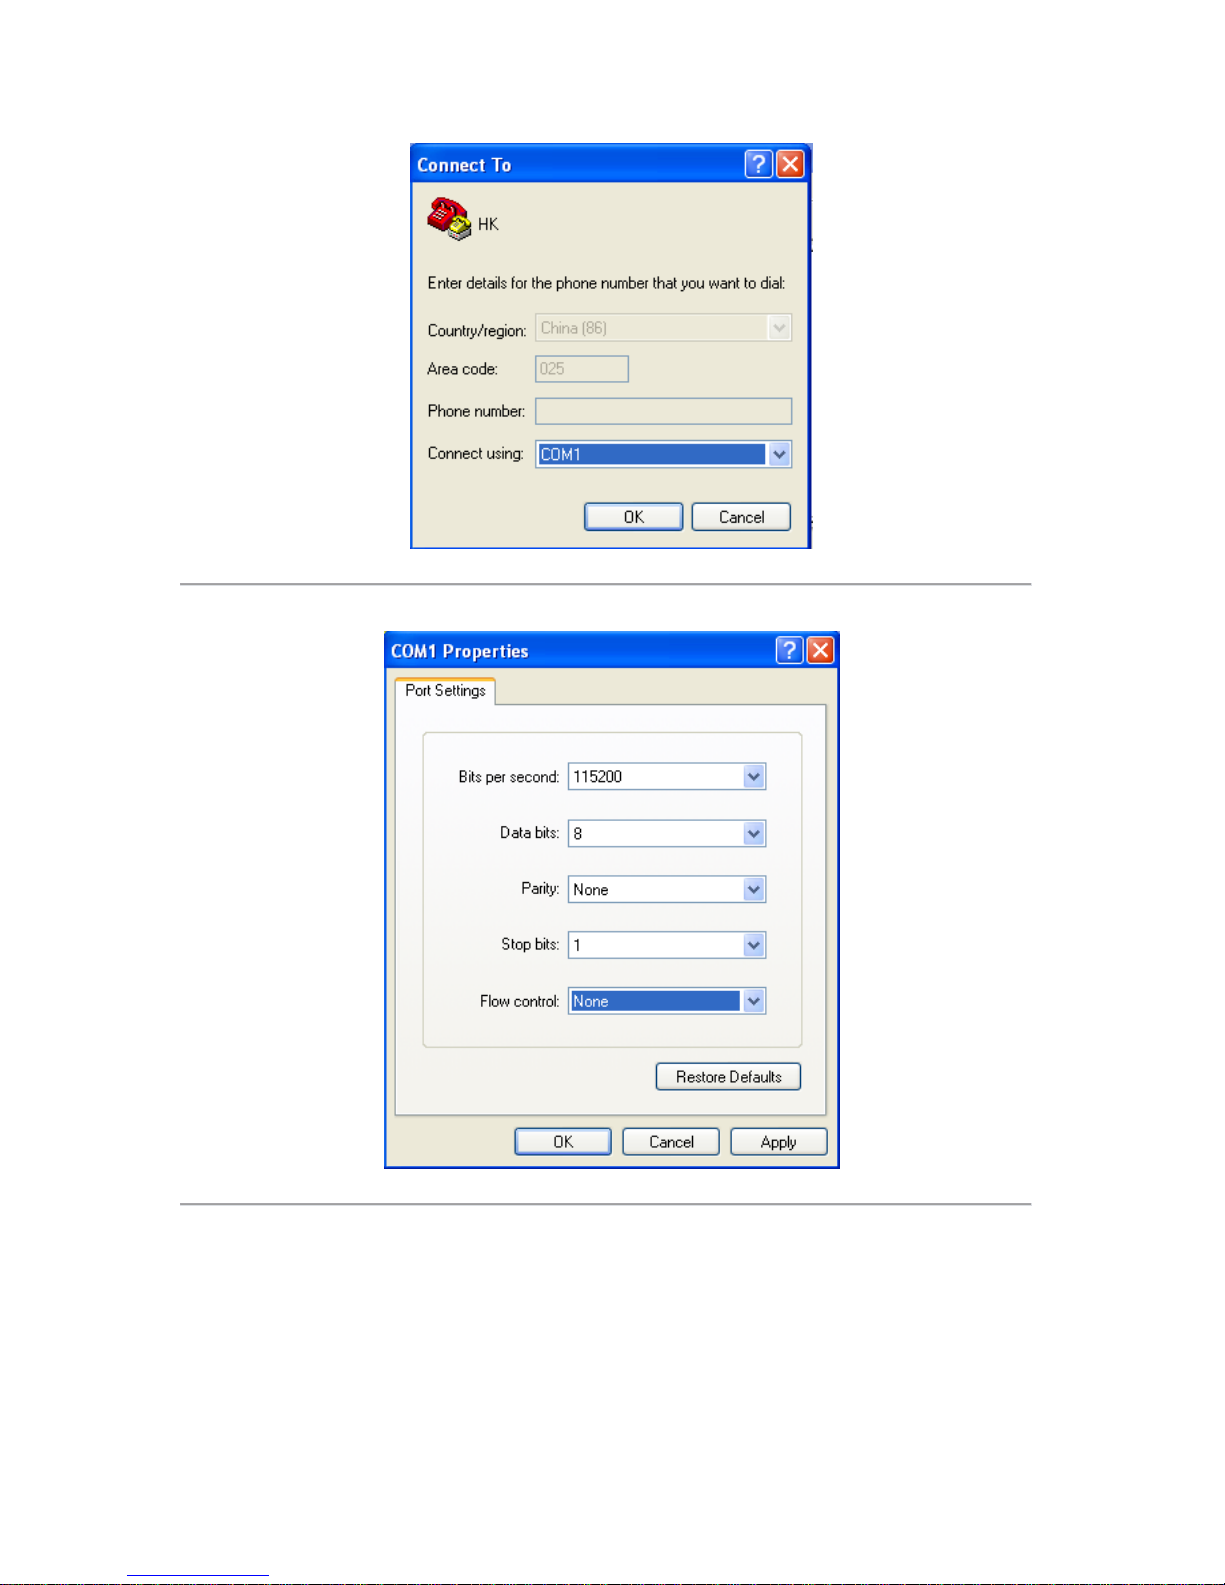
Figure 2.1.2
Step 4: Serial port setup.
Set port parameters in “COM1 Properties” dialogue box as follow: (Fig 2.1.3)
Figure 2.1.3
The parameters should be:
Bits per second: 115200
Data bits: 8
Parity: None
Stop bits: 1
Flow control: None
Press “Apply” and “OK” after the setup. Press “Enter” under Hyper Terminal interface. When “[root@dvrdvs/]#”
appears, the connection is established.
12
Page 14
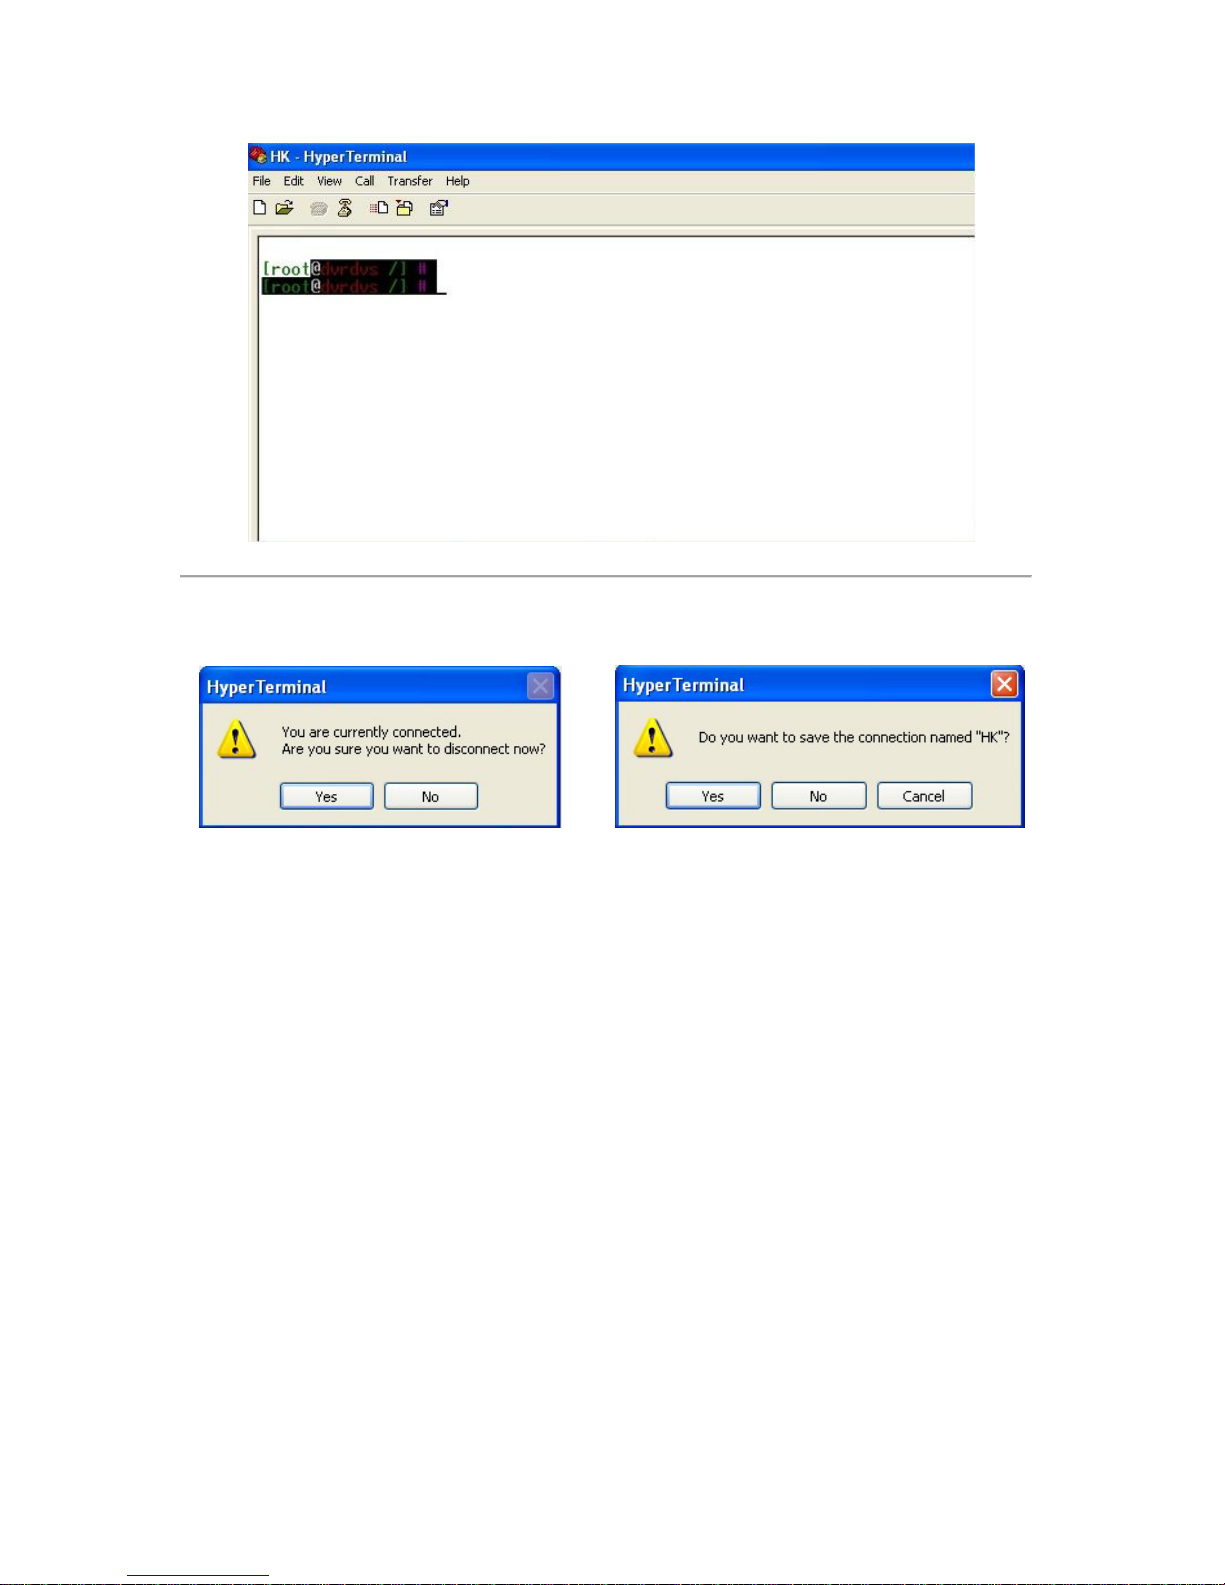
Figure 2.1.4
Step5: Disconnect and save connection.
According to the tips, disconnect and save “HK” for the next time. After saving, there will be a new “Hyper Terminal”
item established in the program group “Start”-> “Accessories”->“Communications”->“Hyper Terminal”. “Connection”
names of all Hyper Te rminal are included. You can see an icon named as “HK” here.
2.2 Network Configuration by Hyper Terminal
Enter Hyper Terminal
Click “Start”->“Programs”->“Accessories”->“Communications”->“Hyper Terminal”->“HK”, then the Hyper Terminal
interface will appear as figure below. Type “Enter”, and the prompt “[root@dvrdvs/]#” will appear which means
connection between RS232 interface of PC and RS232 interface of NVR is established successfully by Hyper Terminal.
The following operation commands are to accomplish the parameters setup in the prompt.
13
Page 15
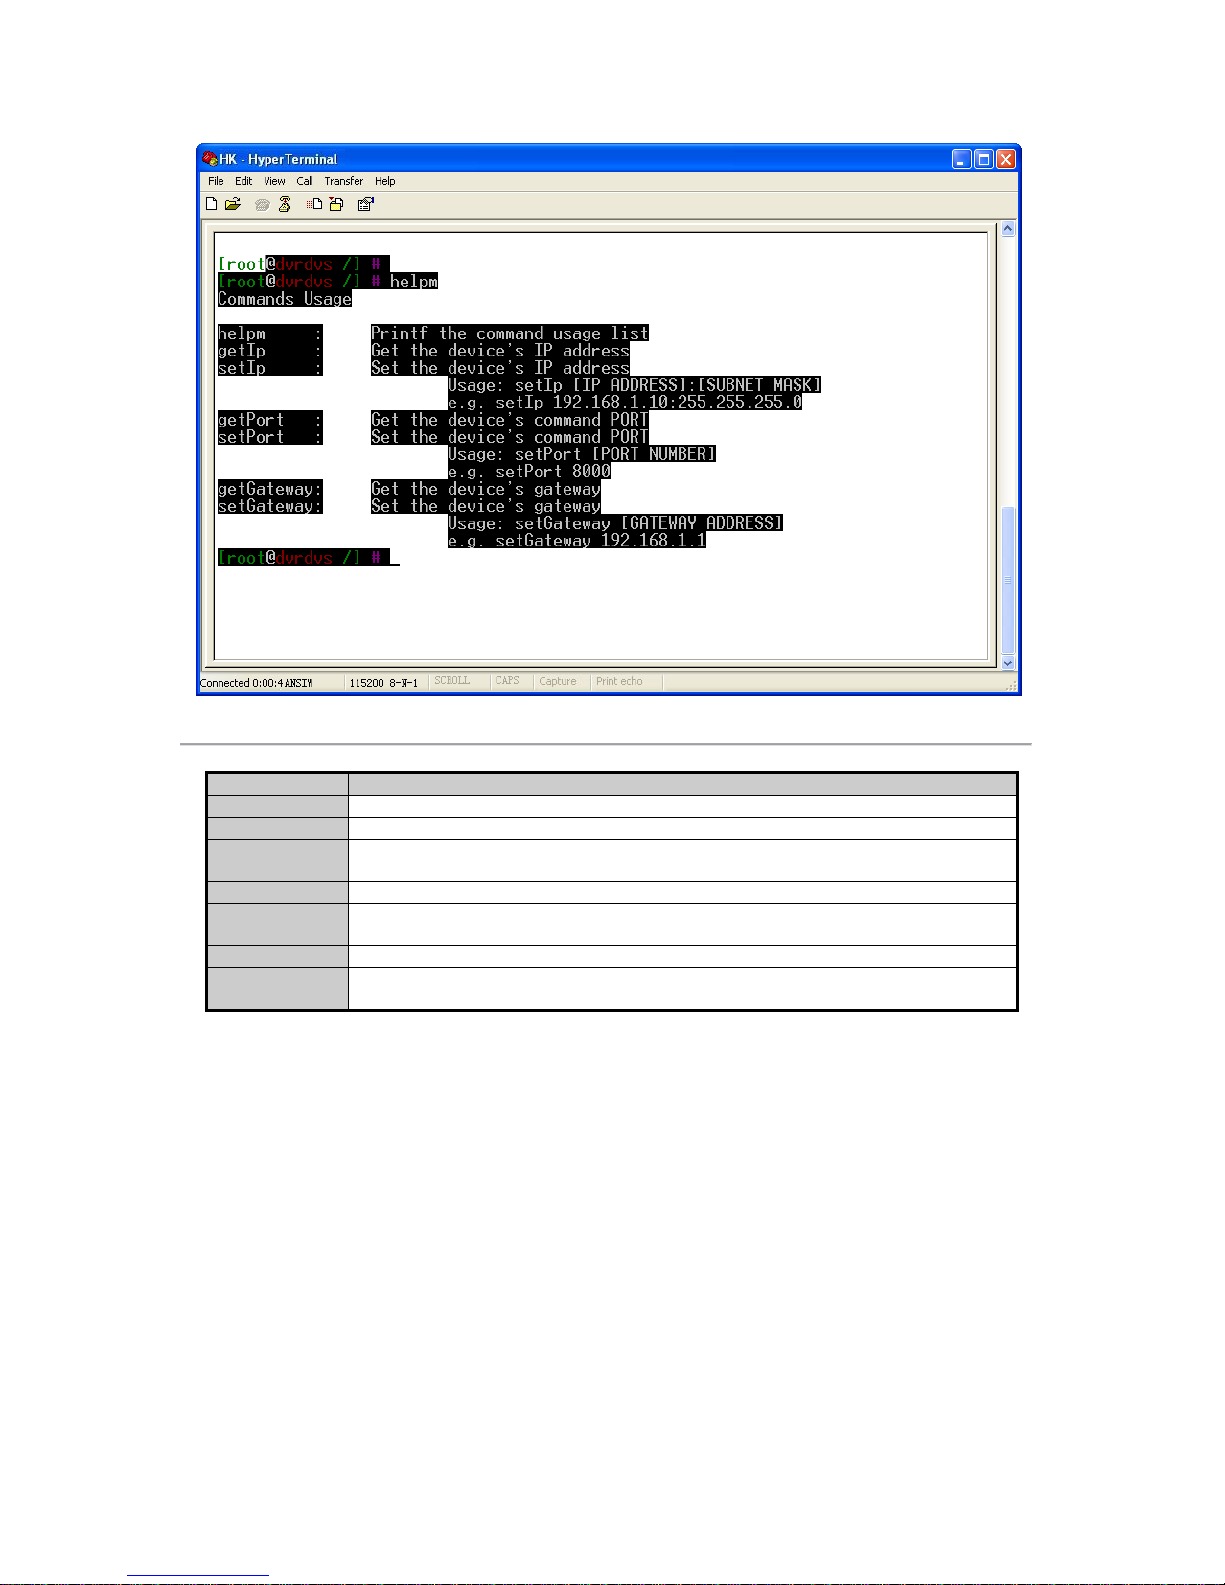
Figure 2.2.1
Commands
Utilities
helpm
Console help command is used to print common commands, show as Figure 2.2.1.
getIp
Show the current IP address of NVR. Command format: getIp “Enter”.
Setup NVR IP address. Command format: setIp IP: mask
e.g. setIp 192..168.1.11:255.255.255.0
Setup NVR port. Command format: setPort Port
e.g. setPort 9000
Setup NVR gateway. Command format: setGateway Gateway
e.g. setGateway 192.168.1.1
setIp
getPort Show the current port of NVR. Command format: getPort “Enter”.
setPort
getGateway Show current NVR gateway address. Command format: getGateway “Enter”.
setGateway
14
Page 16

C H A P T E R 3
ActiveX Control Installation
15
Page 17

DS-9500NI-S series NVR can be accessed and configured by web server. Open IE browser, input the IP address of
DS-9500NI-S and then click Enter. The system will remind you to install the ActiveX control. After the installation,
you can configure and manage the NVR remotely.
The ActiveX control has English and Chinese to selections. It can be used under 1024*768, 1152*864, 1280*1024
display resolutions.
Note: Please use IE 6.0 or IE 7.0 as browser, and upgrade OS to the latest version.
16
Page 18

C H A P T E R 4
User Login and Exit
17
Page 19
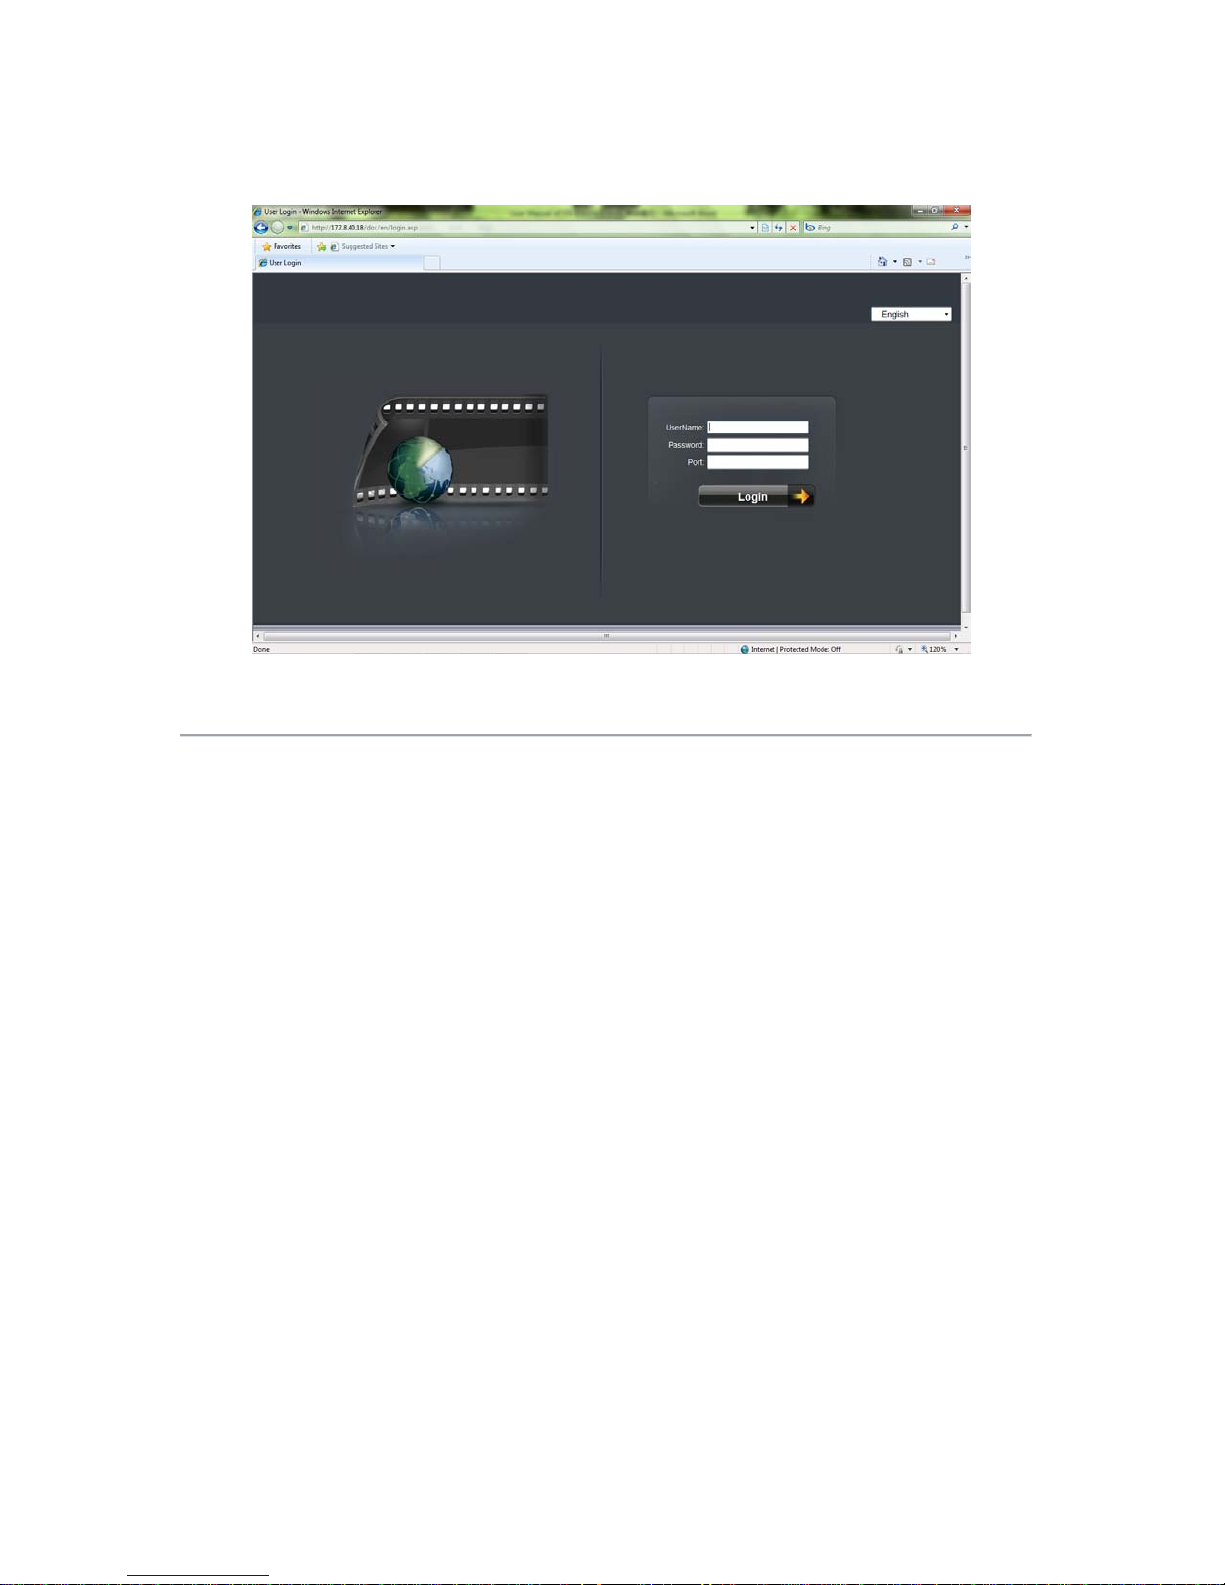
Open IE browser, input the IP address of NVR, the web server will select the language automatically according to the
system language and maximize the IE browser.
Figure 4.1
On the top right corner, language is selectable between Chinese and English.
Input the correct user name, password and port, click “Login” to enter preview interface, or it will pop up an error box.
The default user name is admin, password is 12345, and port is 8000.
After login, click “Exit” to log off and return to the login interface.
18
Page 20

C H A P T E R 5
Preview
19
Page 21

After login, the preview interface will display:
1
2
3
4
5
Area
Description
Area
Description
Channel list
Live view
PTZ
Video adjustment
Play control
Button
Description
Button
Description
1 window division
4 windows division
9 windows division
16 windows division
Start all recording
Stop all recording
Previous page
Next page
Open/ Close audio
Figure 5.1
Interface description:
Play control buttons description:
Stop all preview
Capture image
5.1 Preview
5.1.1 Windows Division
When live preview, the windows division can be selected by click the button on play control area. It can support 1, 4, 9
and 16 windows division. The change between different windows division modes will not stop the current preview; the
window still can be operated.
20
Page 22

5.1.2 Preview
Preview by channel:
become .
Preview by page:
Double click to maximize:
After choosing window division mode, select one
window, and click
current channel. If preview successful, the icon will
Click the device node on the list, then multiple
channels will start to display synchronously
according to the selected window divisions. Click
to switch to the next page, click
5.1.3 Preview Control
page.
Or just click
Click the selected window can maximize the window
to full screen, double click again to resume.
Full screen display:
Click
full screen, click
to change the multi-channel preview to
on channel list to preview the
to the previous
and to start preview by page.
to resume.
When previewing, select the channel, and click
to open audio, the status will be
open audio scroll bar and adjust the audio. After the
adjustment, the bar will disappear automatically.
When audio is open, click
status will resume to .
to close audio and the
Note: When preview with web server, only one channel audio can be previewed at one time.
. Then click to
21
Page 23

5.1.4 Stop Preview
Click “Config”, enter local configuration menu
Click on the playlist, it will become . This
can stop the channel preview.
Click
to stop all channels preview.
5.2 Recording and Capturin g I mage
The previewing channel is required when recording and capturing image.
Note: When stop previewing, will also stop the recording of this channel.
5.2.1 Recording
where can change the directory of saving recording
file and the size of file packing.
Click button on playlist to start recording of this
channel, if the icon is not
failed”.
Click
file folder will pop up automatically.
When multiple channels are under previewing, user may
click
stop all channel recording.
Stop previewing will also stop recording of this
channel.
icon again to stop recording, and the saving
to start all channel recording, or click to
, it will note “Recording
22
Page 24

Note: If saving file disk space is less than 500M, the web server will stop recording automatically.
Click “Config” to enter local configuration menu, where can
Select the previewing channel, and adjust the brightness,
5.2.2 Capturing Image
modify the saving capturing image directory.
Select a previewing window, click to capture image. If
capture image successfully, the saving folder will pop up
automatically.
Note: When disk space is less than 500M, capture image will be failed.
5.3 Video Parameters Setting
contrast, saturation and Hue for it.
Click
Click
to increase and click to decrease. Click or
can also adjust the value.
icon to resume the default values.
23
Page 25

C H A P T E R 6
PTZ Control
24
Page 26

If the front-end connects with PTZ, PTZ control is available when preview.
With the direction buttons, it can achieve 8 directions control.
Also zoom, focus, iris, light and wiper are adjustable.
Click
to enable auto scan, click again to stop it.
If preset point is set, the point can be called by selecting in the
draw down list and clicking
.
25
Page 27

C H A P T E R 7
Playback
26
Page 28

Click “Playback” to enter playback me nu.
1
2
3
4
6
5
7
Area
Description
Area
Description
Channel list
Playback video
Playback control
Playback status
Calendar
Download/ Backup
Timeline
Button
Description
Button
Description
Stop
Speed up
Snapshot
Open/Close audio
Step 1:
Figure 7.1
Playback interface description:
Playback control buttons description:
Play
Slow down
Play by single frame
Video clip
7.1 Playback Query
Select a channel on the channel list. (Channel 1 is the default.)
27
Page 29

Step 2:
Select a date in calendar.
When playback, the playback status will indicate
Step 3:
Click “Search” to search the matched recorded files. If there are search results, then they will be shown in the time line
area.
Drag the timeline to select the specific time. Different file types will be indicated with different colors.
7.2 Play Recording File
After searching file, click
to play.
the channel number, time and status.
28
Page 30

Recording file location:
Click , input the time in the pop-up box and click “Go”.
Click “Config” to enter local configuration menu, where
This will start the file playback from the specified time.
Drag timeline, and set “” to the specified time to play back
the video.
7.3 Capturing Image and Dow nload
can change saving directory of captured image and
recorded file.
When playback, click
automatically.
When playback, click to pop up saving file window. After
the selection, the status will become
saving.
to capture image. If capturing image successfully, the saving image folder will pop up
, click again to stop
29
Page 31

After searching file, click to pop up a new
page where list all the files for the specific day.
Select one file and click
again to stop download.
During download, the window will display the file number
and download progress.
to start download, click
7.4 Remote Backup
DS-9500NI-S series NVR support local one key backup function, and it can also support backup to USB storage
devices remotely.
After searching files, click to pop up a new page
where list all the files for the specific day.
Select the backup device, enable backup player or not, select
the files and click to start backup, click again to
stop backup.
During backup, the window will display the file number and
backup progress.
Note: If USB device cannot be detected, please try to connect again. If it still cannot be detected, this may be because
of the compatible problem between NVR and backup device.
30
Page 32

C H A P T E R 8
Log Search
31
Page 33

Click “Log” to enter log query menu:
Figure 8.1
Select the log type and date, and click to list all
matched logs.
Enable “Start” as to search the log file in a certain period
of a day.
Click can export the logs as Excel or TXT file.
Note: Up to 2000 logs can be listed; if the items are more than 2000, please choose a certain period and search again.
32
Page 34

C H A P T E R 9
Configuration
33
Page 35

Click “Config” button in the menu bar and enter parameters setup menu, which displays local configuration by default.
Parameters
Descriptions
Protocol Type
Select network transmission protocol: TCP or UDP.
The Size of File Packaging
Set the size of recordings
live images.
Network Transmission
Feature
Path for saving recording
Path for saving preview
Select a folder to save the pictures captured while
Path for saving playback
captured images
Select a folder to save the pictures captured while
playback
files
9.1 Loca l Configuration
Figure 9.1
Local Parameters Information:
Main Stream for recording. Substream for viewing
Set real-time and fluency of network feature
Select a folder to save the recordings
Select a folder to save downloaded recordings
Local
Configurations
Stream T ype
files
captured images
Path for saving download
9.2 IP Camera Configuration
Click “Remote Config” and enter IP camera configuration menu.
preview
34
Page 36

Figure 9.2
Model Name
IP camera connections
DS-9504NI-S
Up to 4-ch D1 or 2-ch 720P or 1-ch UXGA IP cameras
DS-9508NI-S
Up to 8-ch D1 or 4-ch 720P or 2-ch UXGA IP cameras
DS-9516NI-S
Up to 16-ch D1 or 8-ch 720P or 4-ch UXGA IP cameras
Note: For DS-2CD852MF series IP camera at UXGA resolution, up to 1 channel can be connected to DS-9504NI-S
model, 2 channels to DS-9508NI-S model and 4 channels to DS-9516NI-S model.
9.2.1 Quick Add of IP camera
DS-9500NI-S series NVR provides a function of remote auto searching IP camera. When there are supported IP
cameras in the same network segment of a LAN with NVR, you may add it in one button with default user name,
password and port number.
Note: Be fore a pply ing Quick Add function, please make sure that IP camera is compatible with NVR and default user
name, password, port number are not changed.
Click , the on-line IP cameras will be listed as figure below shown:
35
Page 37

Figure 9.3
Tick a box in front of the listed camera and click OK to finish.
9.2.2 Single Add of IP camera
This function enables you to add a single IP camera quickly. When there are supported IP cameras in the same network
segment of a LAN with NVR, you may add it in one button with default user name, password and port number.
Note: Before applying Single Add function, please make sure that IP camera is compatible with NVR and default
user name, password, port number are not changed.
First, select a Channel No. then click and the on-line IP cameras will be listed as figure below shown:
36
Page 38

Figure 9.4
Select one camera in the list and click
to finish.
Then you can change IP address, sub mask or user name, password in the menu on the right, and click “Modify” to
confirm.
Manually Add IP camera
First select a Channel No. to enable IP camera Config menu shown on the right.
Input the IP address, port, user name and password, click “Modify” to finish adding an IP
camera that will be listed in the IP Camera Information area.
Clicking Reset button will restore the configurations of IPC back to the previous ones.
Clicking
button will delete the selected IP camera.
37
Page 39

9.3 Recording Settings
Click “Remote Config” and select to enter remote settings menu where you can configure
recording, alarm, network settings and etc.
Figure 9.5
38
Page 40

9.3.1 Video Parameters
Items
Descriptions
Encoding
Parameters
Stream Type
Video and Video & Audio
Resolution
Recording Resolution
Bit rate Type
Variable and Constant
Frame Type
BBP,BP and Single P
Figure 9.6
Settings for recording:
Main Stream (Normal/Event) and Sub stream.
9.3.2 Schedule Recording
Step1: Enable Schedule Recording.
Note: When NVR is succeed to connect to IP camera, it will start schedule recording which means recording
for 7/24.
39
Page 41

Figure 9.7
Step 2: Set recording time and type.
Click Settings button besides to “Record Time” to enter setup
page.
Select one day in a week, and select All Day recording if
necessary. You may also set period recording by disable All
Day Recording; there are 8 time periods in one day. Then you
can select schedule recording from the drop-down menu
beside the periods. Then you may also select copy the settings
to whole week or to one day.
Note: Please make sure that each time period is not
overlapped.
40
Page 42

In the “Advanced Record Settings”, you may configure
parameters of Pre Record time, Post Record time, Recordings
Duration, Redundant Recording and whether to record audio.
9.3.3 Motion Detection Recording
Go to Motion Detection page:
Figure 9.8
Note: If you are using IP camera that is not from Hikvision, please setup this function by using its own software.
Step1: Select Channel No. for motion detection recording.
Step2: Enable motion detection by tick the box.
Step3: Then you can click settings buttons to set area, arm schedule and linkage.
41
Page 43

Step4: Tick b o x of Start Draw and draw an area on the image
by lift-pressing and holding the mouse. Double-click can
Step7: Go back to Schedule Record page and click settings
Step6: Arm Schedule Setup
select full screen.
Step5: Select a sensitivity level for motion detection. Level 1
is the lowest, 6 is the highest.
You may select one day in a week, or select several time
periods in one day. Then you may also select copy the settings
to whole week or to one day.
Note: There are 8 time periods in one day.
button besides Record Time to enter Recording Schedule
menu.
Step8: Select one day in a week, and select All Day recording
if necessary. You may also set period recording by disable All
Day Recording; there are 8 time periods in one day. Then you
can select Motion Detection from the drop-down menu beside
the periods. Then you may also select copy the settings to
whole week or to one day.
Note:
(1) Please make sure that each time period is not overlapped.
(2)The valid time of motion detection recording is the
intersection of arm schedule and recoding schedule.
42
Page 44

9.3.4 Alarm Recording
Step2:
Step3: Enable “Alarm Handle” to activate “Arm Schedule” &
Select
Step1: Select alarm input.
Note: It refers to the alarm input of IP channel.
Select the type of alarm input, “NO” or “NC”.
Note: “NO” is the def ault status. The settings wil l become
effective after rebooting.
If you are using IP camera that is not from Hikvision, please
setup this function by using its own software.
“Linkage Method”.
43
Page 45

Step5: Set recording channel triggered by alarm.
Step6: Enter schedule recording interface. Click
Step4:
Set the fortify time for alarm input.
Click “Settings” in “Fortify Time” menu. Select “Weekday”
as some day of the week or the whole week for recording
time. The “All Day Record” or 8 “Segment s” can be selected
as well.
Note: The time of each segment can not be overlapped.
Click “Settings” in “Linkage” menu and select “Trigger
Recording” tab.
Enable the recording channels you want.
to enable Recording.
44
Page 46

Step7: Select one day in a week, and select All Day recording
if necessary. You may also set period recording by disable All
Day Recording; there are 8 time periods in one day. Then you
can select Alarm Recording from the drop-down menu beside
the periods. Then you may also select copy the settings to
whole week or to one day.
Note:
(1) Please make sure that each time period is not overlapped.
(2)The valid time of alarm recording is the intersection of arm
schedule and recoding schedule.
9.3.5 Other Recording Modes
Other Recording Modes are including “Motion detection & Alarm”, “Motion detection | Alarm”.
“&” means recording is triggered when two situations happened together.
“|” means recording is triggered when one of the situations happened.
The configurations are the same with “Motion detection recording” or “Alarm recording”.
9.4 Alarm Settings
You can configure motion detection alarm, signal level alarm, video loss alarm and other alarm and linkage through
web client.
9.4.1 Motion Detection Alarm
Step1: The same with the Step 1 of Section 9.3.3 Motion Detection Recording.
Step2: The same with the Step 2 of Section 9.3.3 Motion Detection Recording.
Step3: The same with the Step 3 of Section 9.3.3 Motion Detection Recording.
Step4: The same with the Step 4 of Section 9.3.3 Motion Detection Recording.
45
Page 47

Linkage
Description
When the alarm signal is detected, the image of corresponding channel will pop out as
single screen.
Audio W arning
Alarm triggers buzzer
Upload to Center
Upload the alarm signal to the center, such as client software
When the alarm signal is detected, the client software will send the email to the
designated mailbox.
of IP channel can be selected as well.
Step5: Set the alarm linkage for motion detection and select
alarm output channel.
Step5: Set the alarm linkage for signal level and select alarm
Alarm Linkages Description:
Warning on Monitor
E-mail Linkage
Trigger Alarm Output
Trigger alarm output of the device; if the device is 9000 series, triggering alarm output
9.4.2 Signal Level Alarm
Step1: The same with the Step1 of Section 9.3.4 Alarm Recording.
Step2: The s ame with the Step2 of Section 9.3.4 Alarm Recording.
Step3: The same with the Step3 of Section 9.3.4 Alarm Recording.
Step4: The s ame with the Step4 of Section 9.3.4 Alarm Recording.
output channel.
46
Page 48

Step6: Set PTZ linkage for signal level alarm.
Step1: Select the channel number for video loss.
Step2:
Step3: Set the fortify time for video loss.
Note: Alarm input can link PTZ of several channels, but
one channel can only link one option of preset, sequence and
pattern.
9.4.3 Video Loss
Note: This function is only available on IP cameras from Hikvision.
Select
Enable “Video Loss” to activate settings of “Fortify
Time” and “Linkage”
Click “Settings” in “Fortify Time” menu.
Select “Weekday” as some day of the week or the whole week
for the fortify time.
The “All Day Record” or 8 “Segments” can be selected as
well.
Note: The time of each segment can not be overlapped.
47
Page 49

Step4: Set linkage for video loss.
Click “Settings” in the “Linkage” menu.
Step1: Select the channel number for video tampering.
Step2: Enable “Video Tampering Alarm” to activate settings
9.4.4 Video Tampering
Note: This function is only available on IP cameras from Hikvision.
Select
of “Area Settings”, “Arm Schedule” and “Linkage”.
48
Page 50

Step4: Set the fortify time for video tampering.
Step5: Set linkage for video tampering.
Step3: Set the video tampering area and sensitivity.
The sensitivity can be divided into three levels: Low,
Medium, and High.
Enable “Start Draw”, and select the detection area by usi ng
mouse.
Click “Settings” in “Arm Schedule” menu.
Select “Weekday” as some day of the week or the whole week
for the arm schedule.
The “All Day Record” or 8 “Periods” can be selected as well.
Note: The time of each segment can not be overlapped.
Click “Settings” in the “Linkage” menu.
9.4.5 Exceptions
Exception parameters are for the alarm handle of abnormal event, which is including “HDD Full”, “HDD Fault” (HDD
errors or HDD not initialization), “Network Broken”, “IP Address Conflict”, “Illegal Access” (user name or password
wrong), “Video Output Standard Mismatch” and “Video Signal Exception” (video signal unstable).
49
Page 51

Parameters
Description
DNS1 DNS2
Preferred and spare DNS server
Alarm host
Alarm signal can be uploaded to the IP address automatically
IP sever
IP address of IP server
Select the exception type and handle method.
to enter configuration
Select “Advance” to enter advanced configuration. You can
Select
interface.
9.5 Network Configuration
9.5.1 Basic Configuration
Select
Configure the network according to the actual situation. If
there is DHCP server in the network, enable “Obtain Auto”
and reboot the device to get the IP address under this network
segment automatically.
configure preferred DNS server1 and spare DNS server2, IP
address of alarm host and IP server.
50
Page 52

9.5.2 PPPoE Settings
If the “Dyndns” is selected as protocol:
If the “Peanut Hull” is selected as protocol:
Select
Enable PPPoE by ticking , input the user name and
password, then save the changes and reboot the device to
make the parameters become effective.
If succeed to dial, the current IP address will be displayed in
the blank “DDNS IP”.
9.5.3 DDNS Settings
Adopting DDNS function can solve the problems caused by dynamic IP.
Click
Enable DDNS.
If the “IP Server IP” is selected as protocol, then input the
address where the IP server is running.
Server Name: Input the IP address of the server, such as
members.dyndns.org;
Domain: the domain name that user applied for the device,
such as test.dynlia.com;
User name, password and verify: the account information that
user registered on the Dyndns website.
Input the user name and password applied on the Peanut Hull
website to visit the device by the applied domain name.
9.5.4 NTP Settings
Adopting NTP function can enable client software to synchronize the time and data of the device regularly.
51
Page 53

Select
Tick
to enable NTP function.
Note: Time Synchronization Interval: 0~10080 min (default
60min).
If the device connected to the public network, the IP address
of NTP server provided by carrier can be input in the blank
“Server Address”;
If the device connected to private network, the IP address of
NTP server built by NTP software can be input the blank
“Server Address”.
9.5.5 Net Disk Settings
By Net Disk Settings, recorded data can be saved to the network storage disk provided by NAS or IP SAN server.
Select
Input the IP address of NAS or IP SAN server in the blank
“Server IP address”; input the saving path allocated by NAS
or IP SAN server in the blank “File Path”.
Note:
1. Make sure that the device supports NFS function and
NAS or IP SAN server allocated the storage space
correctly.
2. Up to 1 IP SAN server is allowable to be used.
9.5.6 E-Mail Settings
Through E-mail configuration, the e-mail can be sent to the designated mailbox when there is an alarm.
Select
If server authentication is needed, enable it (i.e.
user name and password.
Input the sender and recipient information, if it needs t o send
picture, you can enable “Attachment” (i.e.
Note: Currently the function of captured picture attachment
is invalid for DS-9500 NI-S.
) and input
).
52
Page 54

9.6 Channel Configurat i on
Step1: Select channel number, and enable video mask
9.6.1 Channel Display Settings
Note: This function is only available on IP cameras from Hikvision.
Select
You can configure channel name, OSD and related
parameters here.
9.6.2 Video Mask
Note: This function is only available on IP cameras from Hikvision.
(i.e. ).
Select
53
Page 55

Step2: Set the mask area.
Click “Settings” to enter area set menu.
Enable “Start Draw” (i.e.
and dragging the mouse.
), select the mask area by clicking
Note: Max. 4 areas can be configured in one image.
9.7 Account Managemen t
The default user name and password of device administrator are “admin” and “12345”. Administrator can remote add,
delete users or distribute authority for users. The new added users are divided into two levels: user and operator. (For
“Remote Configuration” privilege, operator has “Voice Talk” right, user does not; for “Channel Configuration”
privilege, operator has all the rights, user has local playback, remote playback rights.)
Select
54
Page 56

Click “Add” to add user.
Note: If you set the IP address or physical address, and then
Remote Upgrade:
only the PC with the same IP address or physical address can
visit the device through network.
Note:
Local PTZ Control: Locally control PTZ cameras.
Local Manual Record: Locally start and stop manual recording on any of the channels.
Local Playback: Locally play recorded files that are on the NVR.
Local Parameters Settings: Configure the settings, restore to default settings, import/export configuration file.
Local Log Query: Search and view logs of NVR.
Local Advanced Operation: HDD management (including the initialization and changing the properties of a
disk). Ability to update system firmware as well as to stop the relay output.
Local Camera Management: Enable and disable analog channels. Ability to add and delete IP cameras.
Local Backup: Locally backup recorded files from any of the channels.
Local Shutdown/Reboot: Shutdown or reboot the NVR.
Remote PTZ Control: Remotely control PTZ camera s.
Remote Manual Record: Remotely start and stop manual recording on any of the channels.
Remote Playback: Remotely play and download recorded files that are on the NVR.
Remote Configuration: Remotely configure parameters, restore parameters to factory defaults and import
settings to as well as export settings from NVR.
Remote Log Search: Remotely view logs that are saved on the NVR.
Remote Advanced Operation: Remotely manage hard disk drives (initializing and setting properties for HDDs).
Ability to remote update system firmware and stop of the relay output.
Voice Talking: Ability to use two-way radio between the remote client and the NVR.
Remote preview: Select and view live video over the network.
Remote Alarm Control: Remote alert or control the relay output of the NVR. Alarm and exception settings must
be configured properly to upload to host.
Remote Video Output Control: Send remote button control signal.
Remote Serial Port Control: Configure settings for RS232 and RS485 ports.
Remote Camera Management: Remotely enable and disable analog channels. Add and delete IP cameras.
Remote Shutdown/Reboot: Remotely shutdown or reboot the NVR.
9.8 Remote Upgrade
Click
Click “Browse” to search the local upgrade file, click
“Upgrade” to start upgrade remotely.
55
Page 57

9.9 HDD Settings
HDD Formatting:
HDD Property Settings:
Click
Note: Please backup the data before formatting hard disk.
Disk Group Management:
Select one disk and select one HDD Group you want it to be
shown as figure right.
Note: NVR supports up to 16 HDD Groups.
Select one disk, and configure its property by selecting
Read-Write, Read-Only or redundant from drop-down menu,
shown as figure right.
Note:
Read-Write: Writing in or Read from this disk is allowed
when selecting this option.
Write-Only: Unable to write in this disk to protect existed
recordings from being overwritten when selecting this option.
Redundant: Redundant recording in this disk is allowed
when selecting this option.
56
Page 58

HDD Group record channel:
Click “HDD Group attribute” button to enter setup page.
First select a HDD group and then tick channels you want to
record in this HDD group, and then click OK to finish
Note: Recording the images of one channel in one HDD
group is recommended.
57
Page 59

C H A P T E R 10
Appendix
58
Page 60

Glossary
DHCP
Dynamic Host Configuration Protocol (DHCP) is a network application protocol used by devices (DHCP clients) to
obtain configuration information for operation in an Internet Protocol network.
NTP
Acronym for Network Time Protocol. A protocol designed to synchronize the clocks of computers over a network.
PPPoE
PPPoE, Point-to-Point Protocol over Ethernet, is a network protocol for encapsulating Point-to-Point Protocol (PPP)
frames inside Ethernet frames. It is used mainly with ADSL services where individual users connect to the ADSL
transceiver (modem) over Ethernet and in plain Metro Ethernet networks.
DDNS
Dynamic DNS is a method, protocol, or network service that provides the capability for a networked device, such as a
router or computer system using the Internet Protocol Suite, to notify a domain name server to change, in real time
(ad-hoc) the active DNS configuration of its configured hostnames, addresses or other information stored in DNS.
MTU
Maximum Transmission Unit. Unit is represented by bytes. MTU of most network devices is 1500. If it’s bigger than
gateway MTU, the data packets will be split into smaller ones for transmission. In this case, there will be pieces of data
packet causing packet loss ratio to raise and slow down network speed. When MTU is preset smaller than the gateway
MTU, the packet loss ratio will decrease.
NVR
Acronym for Network Video Recorder. An NVR can be a PC-based or embedded system used for centralized
management and storage for IP cameras, IP Domes and other DVRs.
59
Page 61

FAQ
• Why does my NVR make a beeping sound after booting?
There are a few reasons for the warning beep your NVR makes after booting.
1. There is no HDD present in the NVR.
2. The HDD has not been initialized.
3. The HDD is defective.
If you wish to use your NVR without any HDDs, you may disable this warning beep in the Exception Settings menu
(See Exceptions).
• Why is there no video recorded after setting the motion detection?
If there are no recorded video after setting the motion detection, please check:
1. Check that the recording schedule is setup correctly by following the steps listed in Schedule Recording.
2. Check that the motion detection area is configured correctly (See Motion Detection).
3. Make sure that channels are being triggered for motion detection (See Motion Detection).
• Why doesn’t the NVR detect my USB export device for exporting recorded files?
There’s a chance that the NVR and your USB device is not compatible. Please refer to our company’s website to view a
list of compatible devices.
60
Page 62

List of Compatible IP Cameras
Standard MPEG4+
V2.0 build
List of Hikvision IP Cameras Supported by DS-9500NI-S NVR
IPC
Platfo
rm
6446
Platfo
rm
IPC
Type
SD IP
Camera
HD IP
Camera
Model
DS-2CD802P
DS-2CD802N
DS-2CD812P
DS-2CD812N
DS-2CD892P
DS-2CD892N
DS-2CD832
DS-2CD852
MF-E
DS-2CD862
MF-E
Sub
Stream
Support
Support
Support
IPC
Resolution
4CIF/DCI
F/2CIF/
CIF/QCIF
UXGA/90
0P/720p/V
GA
4CIF/DCI
F/2CIF/CI
F/QCIF
XVGA/72
0P/VGA
Main Stream
Resolution
Supported by
9500NVR
4CIF/DCIF/2CIF
/CIF/QCIF
UXGA(1600*12
00)@12.5fps/720
P/VGA/4CIF/DC
IF/2CIF
/CIF/QCIF
720P/VGA CIF CIF
IPC Sub
Stream
Resolution
CIF/QCIF CIF/QCIF
CIF/QCIF CIF/QCIF
Sub
Stream
Resolution
Supported
by
9500NVR
Audio
Compr
ession
G722
G711
G722
G711
G722
G711
Encoding
Format/Transmission/
Packaging Format
HIK H.264+HIK
RTSP+PS
Standard H.264+
Standard RTSP+RTP
Standard MPEG4+
Standard RTSP+RTP
HIK H.264+HIK
RTSP+PS
Standard H.264+
Standard RTSP+RTP
Standard RTSP+RTP
HIK H.264+HIK
RTSP+PS
Standard H.264+
Standard RTSP+RTP
Standard MPEG4+
Standard RTSP+RTP
Latest
Version
V2.0 build
090811
V2.0 build
090522
V2.0 build
090715
V2.0 build
090316
V2.0 build
090608
090629
V2.0 build
090316
V2.0 build
090608
V2.0 build
090629
SD IP
365
Platfo
rm
6467
Platfo
rm
Camera
HD IP
Camera
HD IP
Camera
DS-2CD7133
F-E
DS-2CD7153
-E
DS-2CD876
MF-E
DS-2CD886B
F-E
Support VGA VGA QVGA/CIF
1600x900/
1280x960
/UXGA/72
Support
Support UXGA
Support
0P/800x60
/VGA/4CI
F/CIF/
5M(2560*
1920)/
2048x1536
/1080P/
0
720P
1600x900/1280x
960
/UXGA/720P/80
0x600
/VGA/4CIF/CIF/
UXGA(1600*12
00)@25fps
5M(2560*1920)/
2048x1536/1080
P/720P
QVGA/CIF
400×300/VGA
VGA VGA G711
QVGA/CI
F
QVGA/
CIF
400×300/
VGA
G711
G711
G711
Standard H.264+
Standard RTSP+RTP
Standard H.264+
Standard RTSP+RTP
Standard H.264+
Standard RTSP+RTP
Standard H.264+
Standard RTSP+RTP
V2.0 build
100423
V2.0 build
100423
V2.0 build
100529
V2.0 build
100529
61
Page 63

List of Third-party IP Cameras Supported by DS-9500NI-S NVR
IPC
Manufa
cturer
Mode
l
Firmware
Version
Video
Compressi
on
Audio
Compression
Supported Resolution
Supported
BitRate
Motion Detection
Alarm In/Out
Panasonic
Sony
Axis
Q1755 5.02
WV-
1.00Ex(x
NP240
stands for
Series
numeric)
SNC-D
F40/DF
1.03
70
207W/
207MW 4.4
MPEG4(supp
ort: private
protocol
UDP),
JEPG(not
support)
MPEG4(supp
ort: private
protocol
UDP),
JEPG(not
support)
MPEG4(supp
ort)
MJEPG(not
support)
H.264(suppor
t)
MJEPG(not
support)
G726A-Law(sup
port)
G711U-Law(sup
port)
G726(not
support)
G711U-Law(sup
port)
G726(support)
AAC(not
support)
G711U-Law(sup
port)
G726(support)A
AC(not support)
640*480/320*240
(not support frame rate settings)
640*480/480*360/384*288/
320*240/256*192/160*120
(frame rate: 25, 20, 15, 10, 8, 6,
5, 4, 3, 2, 1)
640*480/1280x1024/1280x720/1
280x960
/1280x480/480x360
/480x270/352x288
/320x240
/320x180/240x180/240x135/
176x144/160x120/160x90
(frame rate: 25, 20, 15, 10, 8, 6,
5, 4, 3, 2, 1)
1920x1080/1280x720/800x450/4
80x270/320x180
(frame rate: 25, 20, 15, 10, 8, 6,
5, 4, 3, 2, 1)
CBR: (support: 64,
128, 256, 512, 1024,
1536, 2048, 3072,
4096kbps)
VBR: (support:
2048, 1536, 1024,
768, 512, 384, 256,
128, 64 kbps)
CBR: (support:
2048, 1536, 1024,
768, 512, 384, 256,
128, 64 kbps)
VBR: (support: 64,
128, 256, 512, 1024,
1536, 2048, 3072,
self-defined 32-8192
kbps)
CBR: (support: 64,
128, 256, 512, 1024,
1536, 2048, 3072,
self-defined 32-8192
kbps)
VBR: (support: 64,
128, 256, 512, 1024,
1536, 2048, 3072,
self-defined 32-8192
kbps)
CBR: (support: 64,
128, 256, 512, 1024,
1536, 2048, 3072,
self-defined 32-8192
kbps)
Allow NVR to receive
motion detection alarm
information, but not to
set motion detection
zone
Allow NVR to receive
motion detection alarm
information, but not to
set motion detection
zone
Allow NVR to receive
motion detection alarm
information, but not to
set motion detection
zone
Support(4 motion
detection zones)
AlarmIn(1 alarm
input),
AlarmOut(no t
support)
AlarmIn(1 alarm
input) ,
AlarmOut
(2 alarm outputs)
AlarmIn (1 alarm
input),
AlarmOut
(1 alarm output)
AlarmOut
(2 alarm outputs)
Sanyo
Bosch
MAIN
VCC-H
Ver:1.04-90
D4000
SUB
Ver:1.00-03
CAM MAIN
Ver 1.00-08
CAM SUB
VCC-H
Ver 1.00-00
D2500
NET MAIN
ver 1.00-04
NET SUB
Ver 1.00-01
MAIN
Ver:1.01-01(1
VCC-H
00312-03)
D2300
SUB
Ver:1.00-02(1
00224-00)
H264(suppos
e: RTSP)
MJPEG(not
support)
H264(not
support:
RTSP)
MJPEG(not
support)
H264(suppos
e: RTSP)
MJPEG(not
support)
Not support
G711A-Law(Unt
ested)
Not support
1280*720/960*540/640*360/320
*180
(not support frame rate settings)
1280*720/640*360/320*180
(not support frame rate settings)
1920*1080/1280*720/640*360/3
20*180
(not support frame rate settings)
62
Not support
Not support
Not support
Allow NVR to receive
motion detection alarm
information, but not to
set motion detection
zone
Support (4 motion
detection zones)
Allow NVR to receive
motion detection alarm
information, but not to
set motion detection
zone
AlarmIn (2 alarm
inputs),
AlarmOut(1
alarm output)
AlarmIn (2 alarm
inputs),
AlarmOut(2
alarm outputs)
AlarmIn (2 alarm
inputs),
AlarmOut(2
alarm outputs)
Page 64

H.264 BP+
VBR: (support: 64,
VBR: (support: 64,
3M, 4M, 5M kbps)
VBR: (support: 56,
2048*1536/1920*1080/1600*12
alarm outputs)
Zavio
f3105 MG.0.5.1.01
Provideo
SD-605 V 1.1020
SD-615 V 1.1020
NBC25
18500400
5P
NWC0
18500400
495
SD-615
V 1.1020
M
(support:
RTSP: single
stream)
H.264MP(not
support)
MJPEG(not
support)
H.264(suppor
t: RTSP: dual
stream),
H.263(not
support),
MJPEG(not
support)
MPEG4(supp
ort: RTSP)
MJEPG (not
support),
H.264(not
support)
MPEG4(supp
ort: RTSP)
MJEPG(not
support),
H.264(not
support)
MPEG4(supp
ort: RTSP)
MJEPG(not
support),
H.264(not
support)
MPEG4(supp
ort: RTSP)
MJEPG(not
support),
H.264(not
support)
G711(support)
No audio
G711U-Law(sup
port)G711A-Law
(support)
AMRAudio(unte
sted)
G711
(support)
G711
(support)
G711
(support)
640*480/320*240/
704*576/704*288/352*288/176*
144
(not support frame rate settings)
(Note: the resolution actually
supported is 640*480/320*240)
640*480/320*240/
704*576/704*288/352*288/176*
144
(not support frame rate settings)
(Note: the resolution actually
supported is
704*576/704*288/352*288/176*
144)
320*240/640*480/1280*720/128
0*1024
(frame rate: 1, 2, 3, 4, 5, 7, 10,
15, 20, 30)
D1/CIF/QCIF/640*480/1280*10
24
(frame rate: 5, 10, 15, 25)
(Note: the resolution actually
supported is D1/CIF/QCIF)
D1/CIF/QCIF/
640*480/1280*1024
(frame rate: 5, 10, 15, 25)
(Note: the resolution actually
supported is D1/CIF/QCIF)
D1/CIF/QCIF/
640*480/1280*1024
(frame rate: 5, 10, 15, 25)
(Note: the resolution actually
supported is
640*480/1280*1024)
VBR: (not support)
CBR: (support:
2048, 1536, 1024,
512, 384, 256, 128,
64, self-defined
32-8192 kbps)
VBR: (not support)
CBR: (support:
2048, 1536, 1024,
512, 384, 256, 128,
64, self-defined
32-8192 kbps)
128, 256, 384, 512,
768, 1M, 1.5M, 2M,
3M, 4M, 5M, 6M
kbps)
CBR: (support: 64,
128, 256, 384, 512,
768, 1M, 1.5M, 2M,
3M, 4M, 5M, 6M
kbps)
VBR: (support: 64,
128, 256, 384, 512,
768, 1M, 1.5M, 2M,
3M, 4M, 5M kbps)
CBR: (support: 64,
128, 256, 384, 512,
768, 1M, 1.5M, 2M,
3M, 4M, 5M kbps)
VBR: (support: 64,
128, 256, 384, 512,
768, 1M, 1.5M, 2M,
3M, 4M, 5M kbps)
CBR: (support: 64,
128, 256, 384, 512,
768, 1M, 1.5M, 2M,
3M, 4M, 5M kbps)
128, 256, 384, 512,
768, 1M, 1.5M, 2M,
3M, 4M, 5M kbps)
CBR: (support: 64,
128, 256, 384, 512,
768, 1M, 1.5M, 2M,
Not support Not support
Not support Not support
Allow NVR to receive
motion detection alarm
information, but not to
set motion detection
zone
Allow NVR to receive
motion detection alarm
information, but not to
set motion detection
zone
Allow NVR to receive
motion detection alarm
information, but not to
set motion detection
zone
Allow NVR to receive
motion detection alarm
information, but not to
set motion detection
zone
Not support
Alarm IN(1
alarm input)
Alarm Out(not
support)
Alarm IN(2
alarm inputs)
Alarm Out(not
support)
AlarmIN(2 alarm
inputs)
AlarmOut1
alarm output)
Arecont
Acti
Pelco
ARE-A
V5105
DN
ACM
V3.11.13
7411
Sarix
1.3.7.9080-A
IXS0C
1.3199
Sarix
1.3.7.9080-A
IX30C
1.3199
H264(not
support)
MPEG4(supp
ort: RTSP)
MJEPG(not
support)
MPEG4(supp
ort: RTSP);
H.264(suppor
t: not
adopted);
MJPG(not
support)
H.264(suppor
t: RTSP);
MJPG(not
support)
Not support
PCM(support)
Support
Not support
2592*1944/1296*972
(frame rate: 1, 2, 3, 4, 5, 6, 7, 8,
9)
160*112/320*240/640*480/1280
*720/1280*1024
(support: 1, 2, 3, 4, 5, 6, 7, 10,
15, 30)
00/1280*1024/1280*960/1280*7
20/800*600/640*480/320*240/
(frame rate: 1, 2, 3, 4, 5, 6, 8, 10,
12, 15, 20, 25)
(Note: the resolution actually
supported is 640*480/320*240)
2048*1536/1920*1080/1600*12
00/1280*1024/
1280*960/1280*720/800*600/64
0*480/320*240/
(frame rate: 1, 2, 3, 4, 5, 6, 8, 10,
12, 15, 20, 25)
VBR: (support:
4096, 3072, 2048,
1536, 1024, 768,
512, 384, 256, 128,
64 kbps)
128, 256, 384, 512,
750, 1024, 1.2M,
1.5M, 2M, 2.5M,
3Mkbps)
CBR: (support: 56,
128, 256, 384,
512, 750, 1024,
1.2M, 1.5M, 2M,
2.5M, 3Mkbps)
Not support
Not support
Not support Not support
Allow NVR to receive
motion detection alarm
information, but not to
set motion detection
zone
Allow NVR to receive
motion detection alarm
information, but not to
set motion detection
zone
Allow NVR to receive
motion detection alarm
information, but not to
set motion detection
zone
63
AlarmIN(1 alarm
input)
AlarmOut(not
support)
AlarmIn(support:
undetermined
alarm inputs),
AlarmOut(suppo
rt: undetermined
alarm outputs)
AlarmIn
(support:
undetermined
alarm inputs),
AlarmOut(suppo
rt, undetermined
Page 65

AlarmIn
alarm outputs)
kbps)
VBR: (support: 256,
Vivotec
IP7161 0102h
Spectra
01.00.0022
Mini IP
MPEG4(supp
ort: private
protocol
UDP);
MJPG(not
support)
MPEG4(supp
ort: RTSP)
MJPEG(not
support)
G711(support)
AAC
(not support)
AMR
(not support)
4CIF/CIF
(not support frame rate settings)
1600*1200/1280*960/800*600/
640*480/320*240/176*114
(frame rate: 1, 2, 3, 4, 5, 6, 8, 10,
12, 15, 20, 25)
Not support
CBR: (support: 40,
50, 128, 256, 512,
768, 1024, 1536,
2048, 3072, 4096,
self-defined 32-8192
Allow NVR to receive
motion detection alarm
information, but not to
set motion detection
zone
Not support Not support
(support:
undetermined
alarm inputs),
AlarmOut(suppo
rt: undetermined
Infinova
D1/2CIF/CIF/QCIF/640*480/12
80*720/1280*960
(frame rate: 1, 2, 4, 6, 8,10, 12,
15, 20, 30N/25P)
(Note: the resolution actually
supported is
640*480/1280*720/1280*960)
D1/2CIF/CIF/QCIF/640*480/12
80*720/1280*960
(frame rate: 1, 2, 4, 6, 8, 10, 12,
15, 20, 30N/25P)
(Note: the resolution actually
supported is D1/2CIF/CIF/QCIF)
CBR: (support: 256,
512, 1M, 2M, 3M, 4M,
5M, 6M, 7M, 8M
kbps)
512, 1M, 2M, 3M,
4M, 5M, 6M, 7M,
8M kbps)
CBR: (support: 256,
512, 1M, 2M, 3M,
4M, 5M, 6M, 7M,
8M kbps)
Allow NVR to receive
motion detection alarm
information, but not to
set motion detection
zone
Allow NVR to receive
motion detection alarm
information, but not to
set motion detection
zone
V6201MSerie
s
Normal
IP
Camera
Series
1.02.110.2009
0903
1.03.71.20091
229
MPEG4
(support:
RTSP)
MJEPG
(not support)
MPEG4
(support:
RTSP)
MJEPG(not
support)
PAL format
G711U-Law
(support)
G711U-Law
(support)
Alarm IN(2
alarm inputs),
Alarm Out(not
support)
Alarm IN(2
alarm inputs),
AlarmOut(not
support)
64
 Loading...