

Page 1

1
Rocket 750
40-Channel SATA 6Gb/s PCI-Express 2.0 x8 HBA
User’s Guide
Revision: 1.1
Nov. 27, 2015
HighPoint Technologies, Inc.
Page 2

2
Copyright
Copyright © 2015 HighPoint Technologies, Inc. This document contains materials protected
by International Copyright Laws. All rights reserved. No part of this manual may be reproduced,
transmitted or transcribed in any form and for any purpose without the express written permission
of HighPoint Technologies, Inc.
Trade marks
Companies and products mentioned in this manual are for identification purpose only. Product names or
brand names appearing in this manual may or may not be registered trademarks or copyrights of their
respective owners. Backup your important data before using HighPoint's products and use at your own
risk. In no event shall HighPoint be liable for any loss of profits, or for direct, indirect, special, incidental or
consequential damages arising from any defect or error in HighPoint's products or manuals. Information
in this manual is subject to change without notice and does not represent a commitment on the part of
HighPoint.
Notice
Reasonable effort has been made to ensure that the information in this manual is accurate. HighPoint
assumes no liability for technical inaccuracies, typographical, or other errors contained herein.
Page 3

3
Table of Contents
1 Features and Specifications ................................................................................................................... 4
2 Physical Specifications ........................................................................................................................... 5
3 Kit Contents .......................................................................................................................................... 6
4 Hardware Description and Installation .................................................................................................. 7
4.1 Rocket 750 Host Adapter board layout ........................................................................................... 7
4.2 Connector and Jumper Description ................................................................................................ 8
4.3 Installing the Rocket 750 Host Adapter .......................................................................................... 9
5 Rocket 750 BIOS Utility ....................................................................................................................... 10
6 Rocket 750 Driver Installation ............................................................................................................. 11
6.1 Driver installation - Microsoft Windows ....................................................................................... 11
6.2 Driver installation -Linux and FreeBSD ......................................................................................... 17
7 HighPoint Web Non-RAID Management Software .............................................................................. 18
7.1 Installing the Web Non-RAID Management Software - Microsoft Windows ................................. 18
7.2 Installing the Web Non-RAID Management Software - Linux ........................................................ 25
7.3 Using the Web Non-RAID Management Software ........................................................................ 26
7.3.1 Web Non-RAID Management Software - Global View ......................................................... 26
7.3.2 Web Non-RAID Management Software - Physical ............................................................... 26
7.3.3 Web Non-RAID Management Software - Setting ................................................................. 28
7.3.4 Web Non-RAID Management Software - Event ................................................................... 29
7.3.5 Web Non-RAID Management Software - SHI (Storage Health Inspector) ............................ 30
8 BIOS Update ........................................................................................................................................ 32
9 Thank You ........................................................................................................................................... 33
10 Customer Support ............................................................................................................................. 34
Page 4

4
HighPoint Rocket 750 HBA
Industry 1st Lowest-Cost 40-Port SATA HBA
The HighPoint Rocket 750 is the industry’s first 40-Port 6Gb/s SATA HBA. Powered by a PCIe 2.0 host
interface and HighPoint’s Intelligent Storage Health Management Suite, and was designed for use with
any standard PC hardware and software platform. The 10 industry-standard Mini-SAS ports are fully
compatible with any generation of SATA hard disk, and directly support up to 320TB of storage capacity.
The HighPoint Non-RAID Management Software provides a user friendly interface to monitor and
maintain your storage solutions.
1 Features and Specifications
Data Transfer Rate Up to 6Gb/s (per SFF-8087)
Device Connector Type SFF-8087 ( Internal Mini-SAS)
Number of Connectors 10
Host Bus Interface PCI Express 2.0 x8 speed
Onboard Indicators /Monitor Alarm Buzzer , Fail and Active LEDs
Device Supported Up to 40 SATA devices
Physical Form Factor Full Height
Supported Device Feature
Staggered Drive Spin Up
Hot-Plug and Hot-Swap Support
Larger than 2 TB drive Support
Management Suites Intelligent Storage Health Manager
Operating System Support
Windows: 8 / 2012 / 7 / 2008R2
Linux: OpenSource Driver /Ubuntu /SLES /RHEL /Open SuSE /
Fedora, FreeBSD
Supported Storage Expansion
Options
None
Monitoring and Management
Support
SGPIO, Active/ Fail LED, I2C
Page 5

5
2 Physical Specifications
Dimensions:
198 mm x 110 mm x 19 mm (7.80” L x 4.39” H x 0.06” W)
EMI:
FCC Part 15 Class B and CE
Thermal and Atmospheric Characteristics:
Work Temperature Range: +5°C ~ + 55°C
Relative Humidity Range: 5% ~ 60% non-condensing
Storage Temperature: -20°C ~ +80°C
MTBF: 920,585 Hours
Electrical Characteristics:
PCI-E 3.3V 12V
Power 4W max 1W max
Page 6

6
3 Kit Contents
• One Rocket 750 Host Adapter
• So
ftware
CD
• Quick Installation Guide
Page 7

4 H
4.1
R
P
ardware
D
ocket 750
Po
r
ort10
escripti
o
Host Adap
t
Port8
t9
n and Ins
t
er board l
a
B
Port7
7
t
allation
yout
EEP1
J1
P
o
Port6
Roc
k
A1-A10 A
c
rt5
et 750
tive LED
F1-F10 Fai
l
Port1
Port3
Port2
Port4
ure LED
Page 8

4.2
C
A1-
F1-
F
onnector
a
A10
10
nd Jumpe
r
Disk Ac
t
A1
A2
A3
A4
A5
A6
A7
A8
A9
A10
Disk Fai
F1
F2
F3
F4
F5
F6
F7
F8
F9
F10
Descripti
o
ivity LED con
n
P1
Drive1
Drive5
Drive9
Drive13
Drive17
Drive21
Drive25
Drive29
Drive33
Drive37
lure LED conn
P1
Drive1
Drive5
Drive9
Drive13
Drive17
Drive21
Drive25
Drive29
Drive33
Drive37
8
n
ector pins.
P2
Drive2
Drive6
Drive10
Drive14
Drive18
Drive22
Drive26
Drive30
Drive34
Drive38
ector pins.
P2
Drive2
Drive6
Drive10
Drive14
Drive18
Drive22
Drive26
Drive30
Drive34
Drive38
P3
Drive3
Drive7
Drive11
Drive15
Drive19
Drive23
Drive27
Drive31
Drive35
Drive39
P3
Drive3
Drive7
Drive1
1
Drive1
5
Drive1
9
Drive2
3
Drive2
7
Drive3
1
Drive3
5
Drive3
9
P4
Drive4
Drive8
Drive12
Drive16
Drive20
Drive24
Drive28
Drive32
Drive36
Drive40
P4
Drive
4
Drive
8
Drive
1
Drive
1
Drive
2
Drive
2
Drive
2
Drive
3
Drive
3
Drive
4
2
6
0
4
8
2
6
0
Page 9

9
J1
I2C interface can be used for enclosure monitoring.
BEEP1
Audible alarm
–
will sound if a disk fails or stops responding.
PORT1 to PORT10
These represent the Rocket 750’s 10 Internal Mini-SAS ports. Each port can
directly support up to 4 hard disks.
Active/FAIL LED PIN connector:
Active/Failed LED Pin Connectors
Two pins are provided for each of the Rocket 750’s 40 device channels: one for disk activity, and one for
disk failure. For more information about LED functionality and connection requirements, please refer to:
http://www.highpoint-tech.com/PDF/LED_connection.pdf
4.3 Installing the Rocket 750 Host Adapter
Note: Make sure the system is powered-off before installing the Rocket host adapter.
1. Open the system chassis and locate an unused PCIe 2.0/1.0 (x8, x16) slot (or 3.0, x16).
2. Remove the PCI-E slot cover.
3. Gently insert the Rocket 750 HBA into the PCI-E slot, and secure the bracket to the system chassis.
4. After installing the adapter, attach the hard disks or backplane enclosure to the host adapter using the
appropriate cables.
Note: Many server-level chassis include hard-drive hot-swap bays. For these system chassis, cables
are attached to the chassis backplane, rather than directly to each individual hard drive. Consult the
chassis manual for proper installation procedures.
5. Close and secure the system chassis.
Page 10

10
5 Rocket 750 BIOS Utility
After installing the Rocket 750, power on the system. The Rocket 750 BIOS should post during the system’s
boot procedure. The BIOS does not include a management interface. The Rocket 750 and hosted devices
can be managed at the operating system level, using the Intelligent Storage Health Manager interface.
Page 11

6 R
o
6.1
D
Inst
a
1. I
n
2.
W
3.
Dth
cket 75
0
river inst
a
lling the driv
e
stall the Roc
k
indows will
d
evice Manag
e
e “RAID Con
t
Driver In
llation - M
i
r for an exis
t
et 750 host a
etect the Ro
c
r will display
roller” entry.
stallation
crosoft Wi
n
ing Windows
dapter into t
h
ket 750 HBA
a
the Rocket 7
5
11
dows 8 /
2
operating sy
s
e PC, then b
o
nd automati
c
0 HBA under
012 / 7 / 2
0
tem
ot up the Wi
n
ally search f
o
“Other” devi
c
08R2
dows operati
r the driver.
es, with a yel
ng system.
low “!” mark
b
efore
Page 12
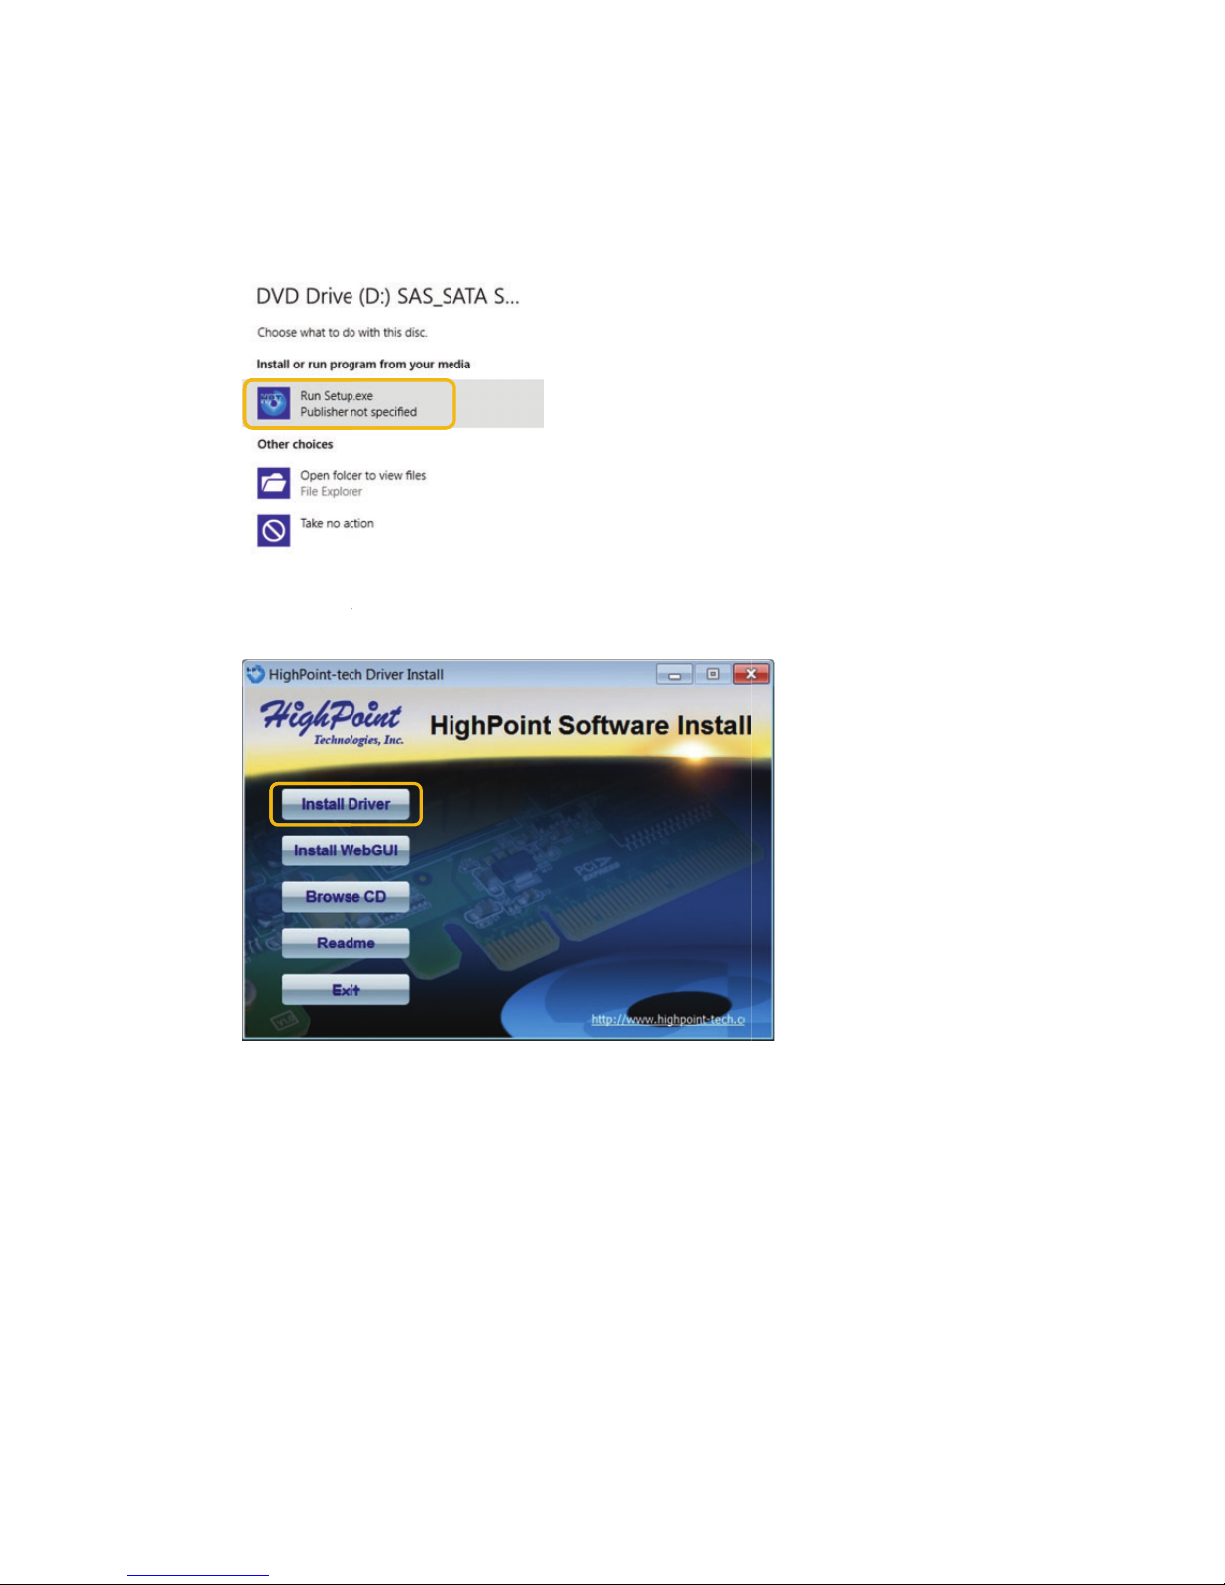
4. I
nth
5. T
i
n
sert the High
e Setup.exe i
he HighPoint
S
terface will i
n
Point softwar
con.
oftware Inst
a
stall the Roc
k
e CD into the
ll window sh
o
et 750 driver,
12
CD/DVD driv
e
uld be displ
a
automaticall
y
. The progra
m
yed. Click the
.
should start
“Install Drive
automaticall
y
r” button. Th
e
. Click
Page 13

6. Y
o
7.
R
8. S
u can via th
e
ight-click the
elect “Brows
e
Device Man
a
“RAID Contro
my compute
ger entry to i
n
ller” entry an
d
r for driver so
13
nstall the driv
select “Upd
a
ftware” in th
e
er for Rocket
7
te Driver Sof
t
popup wind
o
50 HBA too.
ware”.
w.
Page 14

14
Page 15

9.
B\D
S
x
3x6
10. F
o
W
rowse to the
f
river\R750\
W
elect the driv
e
2 (32-bit)
4 (64-bit).
llow the Inst
izard and re
b
ollowing Sof
t
indows
r option that
allShield Wiz
a
oot once the
ware CD fold
e
matches you
r
rd’s prompts
driver has be
e
15
r:
operating sy
to install the
R
en successfull
stem:
ocket 750 dr
i
y installed.
iver. Click “Close” to exit the
Page 16

11.
Oto
nce complet
e
reboot the
s
, the interfac
e
ystem.
will notify y
o
16
u that the driver has been
successfully i
nstalled. Click “OK”
Page 17

12.
A
u
6.2
D
Plea
s
mor
e
Linu
x
\Dri
v
Befo
Visit
http:
fter rebootin
g
nder “Storag
e
river inst
a
e refer to th
e
information
.
driver packa
er\R750\Lin
u
re Installing –
the HighPoin
t
//www.high
p
the system,
t
Controllers”.
llation - Li
n
Driver Install
ges are inclu
d
x
make sure y
o
website for
t
oint-tech.co
m
he Rocket 75
ux and Fre
ation Guide
o
ed with the S
u have the la
t
he latest driv
e
17
0 HBA will be
eBSD
r README fil
e
oftware CD:
est driver up
d
r updates an
recognized b
y
included wit
ates:
d documenta
t
Device Man
a
h the driver p
ion:
ger, and liste
ackages for t
h
d
e
Page 18

7 H
The
H
soft
w
7.1
I
Inst
a
1. I
nth
2.
T
c
ighPoint
N
ighPoint No
n
are can be i
n
nstalling /
ll the Non-R
A
sert the High
e Setup.exe
i
he HighPoin
t
lick Rocket S
e
on-RAID
-RAID Mana
g
stalled from
t
Uninstall t
h
ID Managem
Point softwa
r
con.
Software In
s
ries (Non-R
A
Manage
m
ement softw
a
he HighPoint
e Non-RAI
ent Software
e CD into the
tall window
s
ID) icon in th
e
18
ent Soft
w
re provides
c
software CD.
D Manage
m
CD/DVD driv
e
hould be dis
window.
are
onfiguration
a
ent Softw
a
. The progra
m
played. Click
t
nd manage
m
re - Micro
s
should star
t
the “Install
W
ent features.
oft Windo
w
automaticall
y
ebGUI” butt
o
The
s
. Click
n. And
Page 19

3.
F
4. P
Rto
ollow the In
s
lease use the
estrict to loc
a
the local ne
t
tallShield Wi
z
default setti
n
lhost access
–
work.
ard’s prompt
s
gs.
This setting
19
to install th
e
will restrict t
h
HighPoint N
o
e HighPoint
N
n-RAID Man
a
on-RAID Ma
n
gement inte
r
agement int
e
face.
rface
Page 20

5.
C
6. I
m
lick the “Finis
portant: Th
e
h” button to
c
default user
omplete the
name is “RAI
D
20
installation p
r
” and passw
o
ocedure.
rd is “hpt”.
Page 21

7. T
M
o start the Hi
g
anagement”
hPoint Non-
R
icon that wa
s
AID Manage
m
placed on th
e
21
ent Interfac
e
desktop du
r
, double-clic
k
ing the install
the “HighPo
ation proced
u
int Non-RAID
re.
Page 22

8.
O
h
N
uIfsy
“nInsu
r, start the u
t
ttp://localho
s
ote: If you a
r
pdate “local
h
you are una
b
stem (check
et start hpt
s
addition, m
a
re the firew
a
ility manuall
y
t:7402
e accessing t
h
ost” to the s
e
le to connec
t
using Windo
w
vr” comman
d
ke sure you
a
ll (if configu
r
by opening y
e Non-RAID
M
rver’s addre
s
to the local
s
s Task Man
a
from a Win
d
re able to a
c
ed) is not blo
22
our web bro
w
anagemen
t
s.
ystem, pleas
e
ger). If it is n
o
ows comma
n
cess the rem
o
cking TCP Po
r
ser. Enter th
e
interface usi
n
make sure
h
ot running, y
o
d prompt wi
n
te system vi
a
t 7402.
following U
R
g a remote
s
ptsvr.exe is
r
u can start i
t
dow.
a TCP/IP co
n
L address:
ystem, pleas
e
unning on th
a
manually us
i
nection, and
t
ng the
make
Page 23

Unin
1. T
“
A
stall the We
b
here are two
Uninstall” ico
n
ll apps.
RAID Mana
g
choices to un
i
in the scree
n
ement Softw
a
nstall the Hig
bottom aft
e
23
re
hPoint Non-R
A
r click the “Hi
ID Manage
m
ghPoint Web
ent software
Non-RAID M
a
. One is click
t
nagement” i
c
he
on by
Page 24

2. T
3.
D
4. F
he other choi
c
ouble click th
ollow the Ins
t
e is click the
e icon in the
f
allShield Wiz
a
“Uninstall a
p
ollowing fold
e
rd’s prompts
24
rogram” in th
r.
to uninstall t
h
e Control Pa
n
e HighPoint
N
el.
on-RAID Ma
n
agement interface.
Page 25

7.2
I
Inst
a
Plea
s
fold
e
Soft
w
\Ma
n
Befo
r
Visit
http:
Unin
Ope
n
# rp
m
nstalling /
ll the Web N
o
e refer to th
r for the inst
a
are location
agement_So
f
e Installing –
the HighPoin
t
//www.highp
stall the We
b
a terminal,
a
-e hptsvr-ht
t
Uninstallin
g
n-RAID Man
a
e Web Non-
R
llation proce
d
(HighPoint So
f
tware\Non-
R
make sure yo
website for t
oint-tech.co
m
Non-RAID M
nd use the fo
t
ps
g
the Web
N
gement Soft
w
AID Manage
m
ure.
f
tware CD):
AID_series\Li
u have the la
t
he latest driv
e
anagement S
o
llowing com
m
25
on-RAID
M
w
are
ent Installa
t
nux
est driver up
d
r updates an
d
ftware
and:
anageme
n
ion Guide or
ates:
documenta
t
t Softwar
e
README file
ion:
- Linux
under the following
Page 26

7.3
U
High
mon
i
The
s
and
t
7.3.
1
Cont
Host
Phys
Tota
7.3.
2
Cont
Mod
BIO
S
Ven
d
PCI
B
PCI
D
PCI
F
Upd
a
sing the
W
Point’s web-b
tor and confi
g
oftware pac
k
he device dri
v
Web Non-
R
roller(1):
Adapter Mo
d
ical Drive:
l Capacity:
Web Non-
R
roller Inform
a
el Name:
Version:
or:
us Number:
evice Numb
e
unc Number:
te BIOS from
eb Non-R
A
ased Non-RAI
ure hard dis
k
age must be
i
er must be l
o
AID Manag
Drop
-
el: Nam
e
Total
Total
AID Manag
tion
Rock
e
Rock
e
Vend
o
PCI sl
o
r: PCI d
e
PCI fu
the web GUI.
ID Manag
e
D Managem
e
s attached t
o
nstalled on a
aded to run
t
ement Soft
w
down menu t
of the Rocke
physical driv
e
capacity of al
l
ement Soft
w
t model num
b
t BIOS versio
n
r Name
t informatio
n
vice number
nction numb
e
Browse for B
26
ment Soft
w
nt Software (
a
HighPoint R
o
system with
s
he service.
are - Globa
hat displays t
h
t series contr
o
s detected b
y
detected HD
are - Physi
c
er
r
IOS image an
d
are
lso known si
m
cket host ada
upported Hig
l View
e controller
t
ller
the Rocket c
o
D’s
al
click the Su
b
ply as the “
W
pters.
hPoint Rocke
t
hat is curren
t
ntroller
mit button.
eb GUI”), is
controllers i
n
ly being man
a
used to
stalled,
ged.
Page 27

7.3.
2
Phys
.1 Physical
-
ical Devices I
n
Controller
1
formation:
Devices
These are t
h
device mod
e
27
e devices att
a
l, serial num
b
ched to the
c
er and capa
c
ontroller. Inf
o
ity.
rmation includes the
Page 28

7.3.
2
The i
7.3.
3
This
t
7.3.
3
Ena
b
Set
S
Disk
.2 Physical
-
tem will resc
a
Web Non-
R
ab displays v
a
.1 Setting -
le audible al
a
pindown Idl
e
(Minutes):
Rescan
n the control
AID Manag
rious control
System
rm: Whe
n
Hard
set p
e
ler to detect
d
ement Soft
w
ler related se
t
a disk goes
o
drives can b
e
riod of time.
28
evices.
are - Settin
g
tings and op
t
ff-line the be
e
instructed t
o
You are free
t
ions:
per on the H
spin down
w
o specify the
BA will sound
hen there is
interval – fro
m
.
no disk activi
10 to 240
m
ty for a
inutes.
Page 29

Rest
r
acce
s
Port
Pass
w
7.3.
3
The
R
7.3.
4
The
E
Even
Clea
r
Nex
t
Dow
ict to localh
o
s:
Number 740
2
ord Setting:
.2 Setting -
ocket 750 H
B
Web Non-
R
vent tab will
t View logs al
l
:
:
nload:
st This
o
remo
t
: The li
num
b
are fr
The d
Note
:
reins
t
Whe
n
eight
.
Email
A can be con
f
AID Manag
open the Eve
n
RAID related
Click “Clea
r
The Event
V
The Event
V
ption is used
t
e access.
stening port
n
er. Other po
r
ee.
efault passw
o
If the curren
t
all the Web
R
changing th
e
igured to sen
ement Soft
w
t View interf
a
activity inclu
d
” to remove
a
iew log can
s
iew log can
b
29
to restrict w
e
umber used
t
t numbers ca
rd “hpt” can
password is
AID Manage
password,
t
d Event Log e
are - Event
ce.
ing administ
r
ll current en
t
pan several
p
e saved as a
t
b GUI acces
s
o log into th
e
n be used in
p
be changed.
lost or forgo
t
ment softwa
r
he maximum
ntries to one
o
ative actions
,
ries from the
ages. Click “
N
t
ext file for r
e
to the local
s
web GUI. 74
0
lace of the d
e
ten, you can
u
e to restore
t
number of c
h
r more E-Ma
warnings an
d
Event View l
o
ext” to view
p
ference.
ystem and n
o
2 is the defa
fault as long
ninstall and
he default se
t
aracters allo
w
il addresses.
hardware fa
i
g.
ast entries.
t allow
ult port
as they
tings.
ed is
lures.
Page 30

7.3.
5
Stor
a
HDD
SM
A
Web Non-
R
ge Health In
s
Temperatur
e
RT:
AID Manag
pector:
Threshold:
ement Soft
w
SHI will insp
recorded in
SHI can hel
p
data loss. If
the onboar
d
Setup the H
HDD goes b
e
SMART attri
30
are - SHI (S
t
ect each HD
D
the Event log
to identify p
r
additional pr
o
SATA port a
n
DD temperat
u
yond the thr
butes for eac
h
orage Heal
t
periodically.
.
oblems with
of of errors i
s
d a 3rd party
re threshold
eshold an ale
r
HDD will be
h Inspector
)
If any abnor
m
HDD’s and pr
e
needed, the
SMART soft
w
to prevent H
D
t will be trig
g
displayed.
al status is fo
vent further
HDD’s can b
e
are utility ca
n
D overheati
n
ered.
und, it will b
e
damage or
placed onto
be run.
g. When the
Page 31

Task
List: The Task ta
b
31
allows you to schedule m
a
intenance system status.
Page 32

8 B
I
The
B
utilit
y
1.
V
2. E
3.
B4.A
5. T
l
o6.A
OS Upda
t
IOS update
u
cannot be r
u
isit the www.
xtract the do
w
oot the syste
m
t the comma
n
he following
c
ad.exe
fter the BIOS
e
tility must be
n from a DO
S
highpoint-tec
nload to a b
o
using the b
o
d prompt, a
c
ommand lin
e
has been suc
c
run while th
e
-prompt win
d
h.com websit
otable DOS
U
otable USB
d
cess the BIOS
is used to la
u
essfully upd
a
32
system is op
e
ow.
e to downloa
d
SB drive.
rive.
update’s dir
e
nch the flash
ted, the follo
w
rating in a p
u
the latest fi
r
ctory:
utility:
ing informa
t
re DOS envir
o
mware.
ion will be di
s
nment. The
u
played:
pdate
Page 33

33
9 Thank You
Thank you for purchasing the Rocket 750 SATA 6Gb/s Host adapter. We appreciate your support, and
welcome any questions, comments or product suggestions you may have.
Page 34

34
10 Customer Support
If you encounter any problem while utilizing Rocket & RocketRAID series host adapters, or have any
questions about this or any other HighPoint Technologies, Inc. product, feel free to contact our Customer
Support Department.
HighPoint Technologies, Inc. websites:
http://www.highpoint-tech.com/
We
b Support:
http://www.highpoint-tech.com/websupport/
http://www.hptmac.com
 Loading...