

Page 1
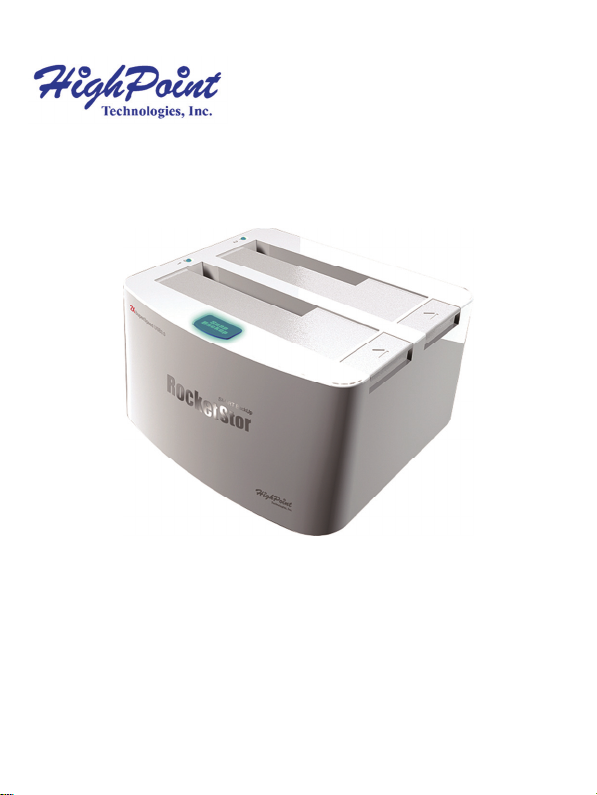
RocketStor SMART BackUp
User’s Guide
v1.0
1
Page 2

Copyright © HighPoint Technologies Inc., 1995-2011. All rights reserved.
Windows is a registered trademark of Microsoft Corporation.
All other trademarks and copyrights referred to are the property of their
respective owners.
Distribution of substantively modified versions of this document is prohibited
without the explicit permission of the copyright holder.
Distribution of this work or derivative work in any standard (paper) book
form for commercial purposes are prohibited unless prior permission is
obtained from the copyright holder.
DOCUMENTATION IS PROVIDED "AS IS" AND ALL EXPRESS OR IMPLIED
CONDITIONS, REPRESENTATIONS AND WARRANTIES, INCLUDING ANY
IMPLIED WARRANTY OF MERCHANTABILITY, FITNESS FOR A PARTICULAR
PURPOSE OR NON-INFRINGEMENT, ARE DISCLAIMED, EXCEPT TO THE
EXTENT THAT SUCH DISCLAIMERS ARE HELD TO BE LEGALLY INVALID.
2
Page 3

Table of Contents
1 – Introduction to RocketStor SMART BackUp
1.1 Kit Contents………………………………………………………………………………………………..………………………………..………………………….…………………..4
1.2RocketStor SMART BackUp Hardware…………………………………………………………………………………………………………………………………………….4
2 – Setting Up RocketStor SMART BackUp.
2.1 Connecting USB cables…………………………………………………………………………………………………………………………………………………………………4
2.2 Connecting Power Adapter…………………………………………………………………………………………………………………………………………………………..5
2.3 Connecting 3.5” HDD and or 2.5” HDD / SSD…………………………………………………………………………………………………………………………………5
3 – RocketStor SMART BackUp Suite
3.1 Introduction to RocketStor SMART BackUp Suite…………………………………………………………………………………………………………………………..6
3.2 Installation of RocketStor SMART BackUp Suite……………………………………………………………………………………………………………………………6
4 – Getting Started SMART BackUp Suite
4.1 Summary screen of your storage……………………………………………………………………………………………………………………………………………………9
4.2 Using the Management Console…………………………………………………………..……………………………………………………………………………………..10
4.3 Creating a Backing Up File(s) and Folders……………………………………………………………………………………………………………………………………11
4.4 Backup Job Name and Description………………………………………………….…………………………………………………………………………………………14
5 – Adaptive Backups
5.1 Intelligent Backup Jobs…………………………………………………………………… …………………………………………………………….…………………………… 16
5.2 Setting up Adaptive Backups………………………………………………………………………………………………………………......………… ……………………… 17
6 – Snap Backups
6.1 What is Snap Backup? ……………………………………………………………………………………………………………..…………………….……………………………20
6.2 Automatic backup with Snap Backups……………………………………………………………………………………………………..………………………………… 21
7 – Maintenance Features
7.1 Retrieve ……………………………………………………………………………………………………………………………………………………………………23
7.2 Retrieving a File ………………………………………………………………………………………………………………………………………………………….24
7.3 Delete …………………………………………………………………………...……………………..……………………………………………………………………25
7.4 Log……………………………………………………………………………………………………………………………………………………………………………27
8 – Status
8.1 Status ……………………………………………………………………………………………………………..………………………………………………………………………… 28
3
Page 4
1. Introduction to RocketStor SMART BackUp
RocketStor’s unique high performance and large storage capacity are suitable for
multimedia editing systems, servers, databases, DVR data storage, 2D/3D
animation, graphics and art drawing and data backup of systems, support
Windows and Mac operating systems for desk top on the type of PC / Mac /laptop
can be easy to use.
1.1 Kit Contents
The RocketStor SMART BackUp includes the following items:
• RocketStor SMART BackUp device
• Dual USB 3.0 cable
• Manual and CD
• Power adapter (Including the AC Power cord: CCC, EUR and US).
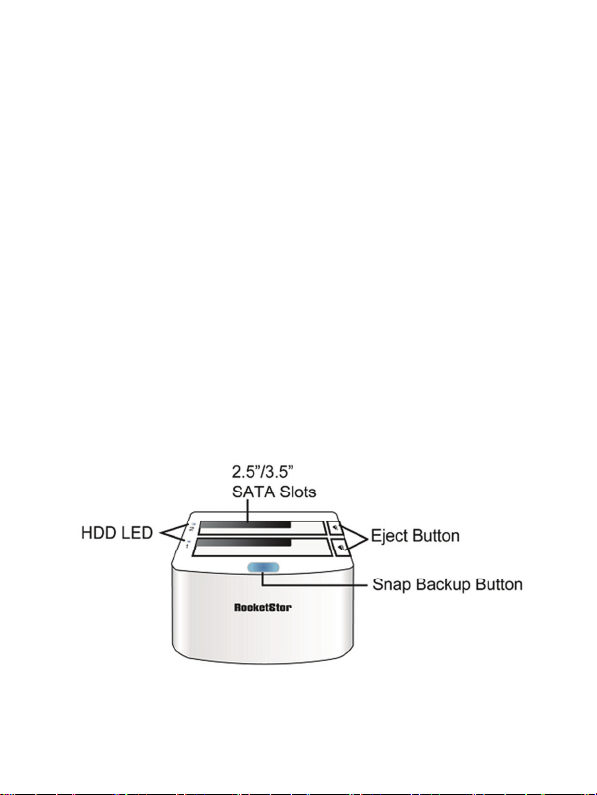
1.2 RocketStor SMART BackUp Hardware
4
Page 5
2. Setting Up RocketStor SMART BackUp
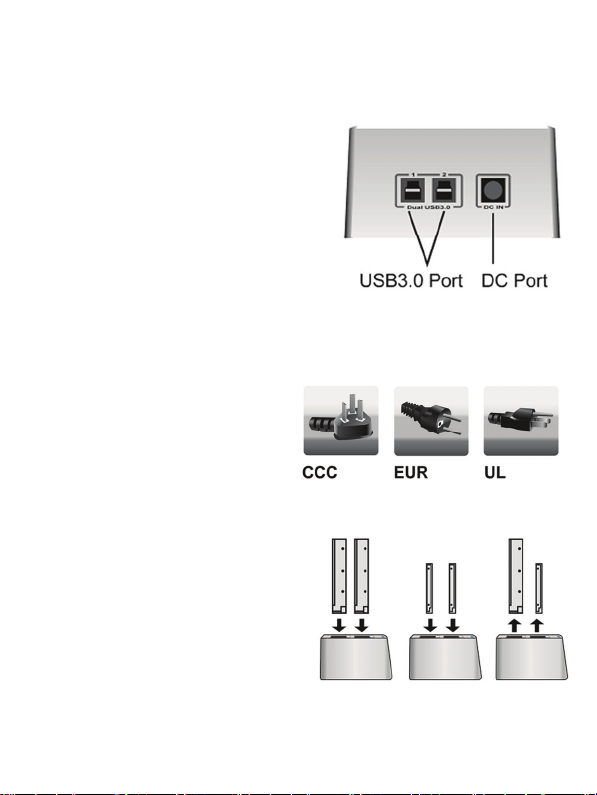
2.1 Connecting USB cables
Connect the Type B USB Connectors
to the back of the RocketStor USB
device.
2.2 Power Adapter Installation
Installing the DC Power Plug:
Connect the power adapter to the DC Port
found on the back of the RocketStor SMART BackUp device.
Installing the AC Power cord:
Connecting the AC Power cord to the Power Adapter and connecting the AC Power
Plug to the Power Jack.
UL is for the United States
CCC is for Asia
EUR is for Europe
2.3SATA Drives Installation and Ejecting
Installation
two 3.5’’HDD or two 2.5’’HDD/SDD
- Simultaneously install
Ejecting
- Hold the base of the
RocketStor device and press the Eject
Button. Gently remove the drive by
pulling straight upwards.
5
Page 6
3. RocketStor SMART BackUp Suite
3.1 Introduction to RocketStor SMART BackUp Suite
backup drives, folders and individual files with the RocketStor BackUp Software
Suite. The intuitive, web-based interface provides a selection of backup schemes
with intelligent data Management and Maintenance services.
3.2 Installation of RocketStor SMART BackUp Suite
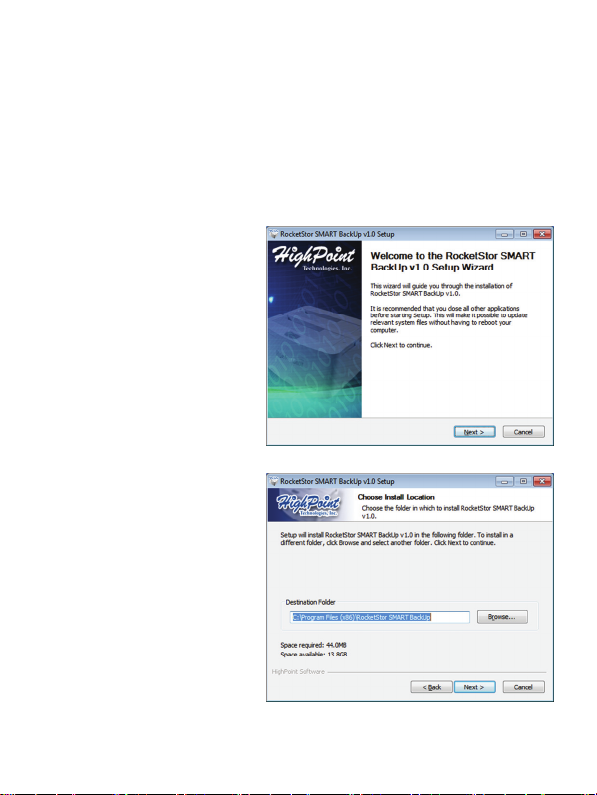
Step 1. Run the Setup
program; then click Next to
continue.
Step 2. Accept the
installation agreement and
specify the Destination
Folder
- Quickly and easily
6
Page 7
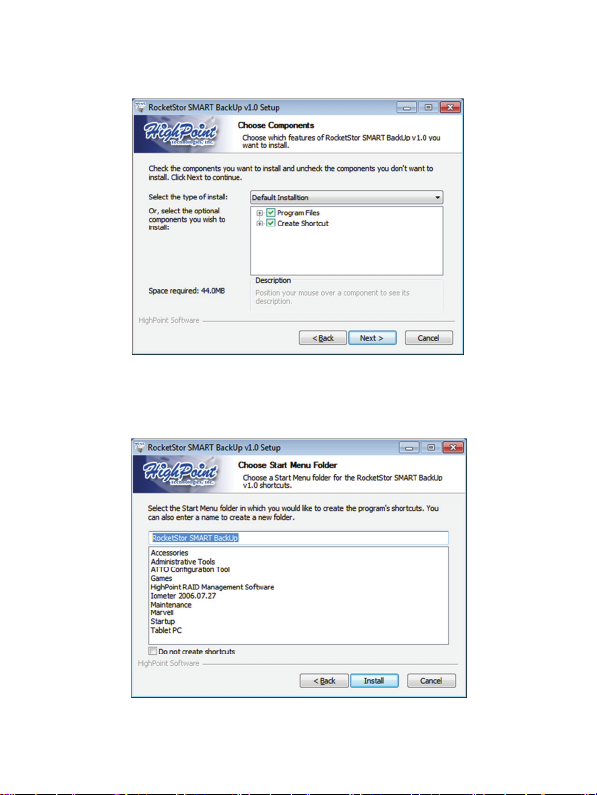
Step 3. Choose the components you wish to install:
Step 4. Select "Start Menu" folder, follow the installation prompt, and
select “Next”
7
Page 8
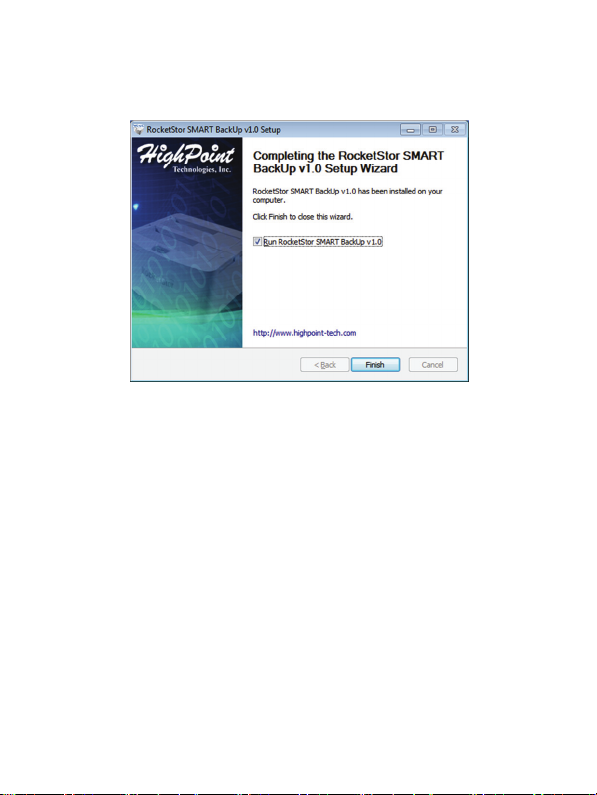
Step 5.Allow the Setup Wizard to install the BackUp Suite and click
"Finish" when prompted:
If you had unchecked the “Run RocketStor SMART BackUp” option before
completing the installation procedure, double-click the Desktop shortcut to start
the backup software. RocketStor SMART BackUp software utilizes a web-based
interface.
Note:
1. The RocketStor SMART BackUp software requires a web browser with XML
support such as Internet Explorer, Firefox or Chrome.
2. Please allow the Windows to change the following Firewall settings if needed.
8
Page 9
4. Getting Started
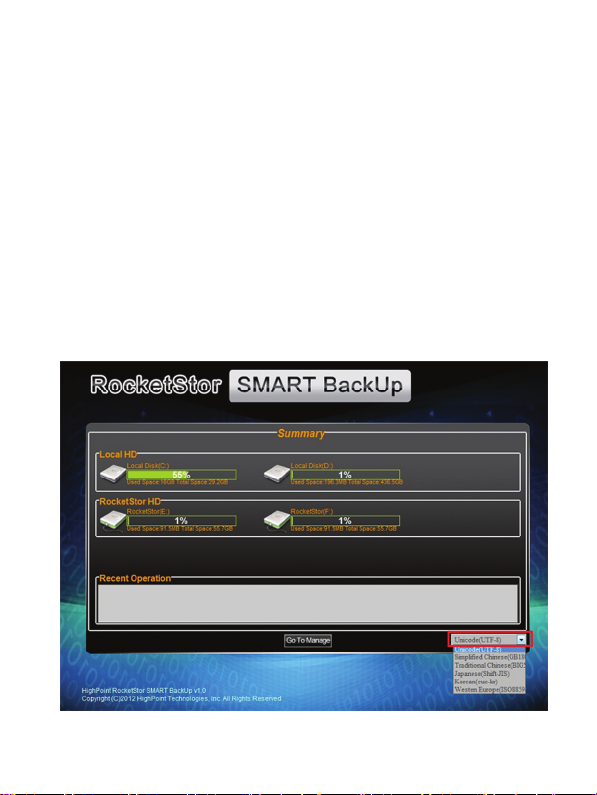
4.1 Summary screen of your storage. This screen provides a
summary of your Local hard drive (source) and any hard drive
attached to the RocketStor backup device.
Recent Operation will display information about any recent
backup activities.
Language Unicode drop down menu is for changing the
RocketStor SMART BackUp management software’s language
code for capable with various kinds system language.
Click on the Go to Manage button to proceed.
9
Page 10

4.2 Using the Management Console has the source Volume and a
Target HD.
Select A Volume has the drive letter with the file(s) and folders
data that you want to backup.
Select A Target HD has the drive letter that saves all of the
Backup Jobs.
Selecting A Volume – The drive letter from the drop down menu
is the volume you select that has the file(s) and folders data that
you want to backup.
10
Page 11

Selecting A Target HDD – The SMART Backup Suite will use the
drive letter you select from this drop down for Backup Jobs.
4.3 Creating a Backing Up File(s) and Folders
After selecting the source drive (drive C is shown in the below
example) you can select the file(s) and folders you wish to backup
to the Target RocketStor drive (drive D in the below example).
Note: Selecting a folder in the root directory will automatically
select all sub-folders. To backup individual files, you will need to
expand the folder tab and choose the specific file you want to
backup.
11
Page 12

Click on Create New. A popup window will appear with
information about the Backup Task,
Full Backup: Backup all the files selected in the volume.
Note: You will need to start a Full backup for the first time backup
operation. Select the folders of backup source on the left window
and destination drive on the right widow.
Select the backup modes: Zero Compression or Full Compression
12
Page 13

Zero Compression: Faster backup, minimum file compression
ratio
Full Compression: Maximum file compression ratio, slow
Name the backup job and click the “Start Backup” button.
Optionally, you can check the “Set As Snap Backup” option if you
want to set the backup task as the Snap Backup task (see section
6 for more information about the Snap Backup function).
.
13
Page 14

4.4 Backup Job Name and Description
Backup Job Name – A Backup Job Name is required for all Backup
Jobs. This Backup Job Name is a unique identifier for each backup
job, and helps you easily identify and organize backup jobs for
retrieval or deletion (see section 7 – Maintenance Features, for
more information)..
Warning - If you do not input a Backup Name, you will be
prompted to do so. (See the image below)
14
Page 15

Backup Job Name Warning - You are required to enter a Backup
Job Name when you back up your data. This Backup Job Name is
your unique identifier for your backup job. This unique name
identifier give true meaning to your back up jobs and allows you
to easily trace backup jobs when you need to restore.
Backup Job Description – A Backup Job Description is optional. It
can be left blank. The default Backup Job Description will be the
current Date and Time. (See the image below))
15
Page 16

5. Adaptive Backups
5.1 Intelligent Backup Jobs - Adaptive Backup gives you the
flexibility to backup any files and folders that were changed from
previous backup jobs. Select the Adaptive button to initiate the
Adaptive Backup mode.
16
Page 17

5.2 Setting up Adaptive Backups – The Adaptive backup requires
that you specify the compression mode for the backup job.
Select the backup modes: Zero Compression or Full Compression
Zero Compression: Faster backup, minimum file compression
ratio
Full Compression: Maximum file compression ratio, slow
17
Page 18

Backup Job Name: Next, select the previous Backup Job that to
you want to add to the Adaptive Backup Job.
18
Page 19

Backup Job Description – This field is optional, with the default
setting being the current time stamp. The Backup Job Description
allows you to provide a meaningful description to trace the
changes in your adaptive backups. The description allows you to
organize your backup tasks, in case you need to Retrieve files and
folders from specific backup jobs at a later date (see section
7.1 – Retrieve, for more information).
19
Page 20

6. Snap Backups
6.1 What is Snap Backup? Instant, hassle-free backup; press the
Snap Backup button to immediately backup your drive.
Snap Backup works in conjunction with the Snap Backup button
found on the front of the RocketStor backup device.
20
Page 21

When you press the Snap Backup button on the RocketStor, your
preconfigured backup job will immediately start backing up your
data.
6.2 Automatic backup with Snap Backups – Click on the Snap
Backup button, then select the Target HDD.
Snap BackUp Setting Information – Choose the Snap Backup
setting for you backup job. This action will be performed
automatically every time you press the Snap Backup button.
21
Page 22

Volume selects the target Volume
Name of the Backup Job
Select the Backup Modes
Zero Compression: Faster backup, minimum file compression
ratio
Full Compression: Maximum file compression ratio, slow
Snap Backup Type
Full Backup to backup all files and folder(s)
22
Page 23

Adaptive to backup modified files and folder(s) that were
changed from the previous backup
7. Maintenance Features
7.1 Retrieve – When you’ve accidentally deleted a file or changed
a document but need the original, the Retrieve function will allow
you retrieve that file or document at a specific time that you
backed up that file. Expand the Maintenance tab by selecting it.
There will be three functions from the list. Retrieve, Delete, Log.
23
Page 24

7.2 Retrieving a File - Click on the Retrieve button to begin
retrieving the file(s) or folder at a specific time. You will need to
select the Source volume to retrieve the file. You can search for
the specific file and folder from the target volume that has the
Backup Job.
Note: Retrieving will override every file in the Source volume.
When using this feature, and there are files in the source volume
that you do not want to override, you should only retrieve a
specific file(s) from the folder.
24
Page 25

7.3 Delete– All backup jobs are archived into drives attached
RocketStor SMART Backup device. When it is time to delete older
backup jobs, use the Delete button to delete backup jobs at a
specific time.
Select the Delete button found in the Maintenance tab.
Next choose the Target HDD that has the Backup Job(s) that you
want to delete.
Warning – Deleting a Backup Job will permanently remove the
backup job. You will not be able to retrieve data from a deleted
job.
25
Page 26

Select the Backup Job then click the Delete button.
Note: You still have the opportunity to Cancel the Delete task by
clicking on the Cancel button.
26
Page 27

7.4 Log – The RocketStor Log will record and log all information
related to any backup jobs or maintenance performed on the
Target volumes attached to the RocketStor SMART Backup device.
Once a task is completed, it will be recorded in the RocketStor Log
with the Current Timestamp and status. When Backup Jobs are
completed, information about the total number of files backed up,
and the total capacity used by the backup job will be recorded to
this log.
Warning – When you clear the RocketStor log, all information will
be deleted.
27
Page 28

8. Status
8.1 Status – When you need to check the Status of the Backup or
Maintenance task, select the Status button from the dropdown
menu of the Maintenance button.
28
Page 29

When you have the option to cancel a Backup Job that has not
finished when you are in Status.
Note: When there are no activities occurring the Status tab will
tell you that there are no activities occurring.
29
 Loading...