

Page 1
RocketRAID 3622/3620
SATA 6Gb/s PCI-Express 2.0 x 8 RAID HBA
Quick Installation Guide
V1.00
May. 2, 2013
1
Page 2

Table of Contents
Hardware Installation ............................................................ 3
Kit Contents ........................................................................... 3
Board Layout ......................................................................... 3
Installing the RocketRAID 3622/3620.................................... 5
Using the RocketRAID 3622/3620 ......................................... 5
Driver and Software Installation (Windows) ..................... 5
Driver and Software Installation Linux, FreeBSD and
Mac OS X............................................................................ 6
Using HighPoint RAID Management software ...................... 6
Customer Support ................................................................. 7
FCC Part 15 Class B Radio Frequency Interference
statement .............................................................................. 8
2
Page 3
Hardware Installation
RocketRAID 362x series RAID-on-Chip HBA's are optimized for I/O
intensive storage configurations. The dedicated processor and 512MB
of onboard DDR3 cache memory offloads RAID processing from the
host system, ensuring stable and high-performance data transfer.
Kit Contents
RocketRAID 3622/3620 Card
Two Mini-SAS cables : SFF-8087 to 4*SATA
(Only for RocketRAID 3620)
Low Profile Bracket
Quick Installation Guide
Software CD
Board Layout
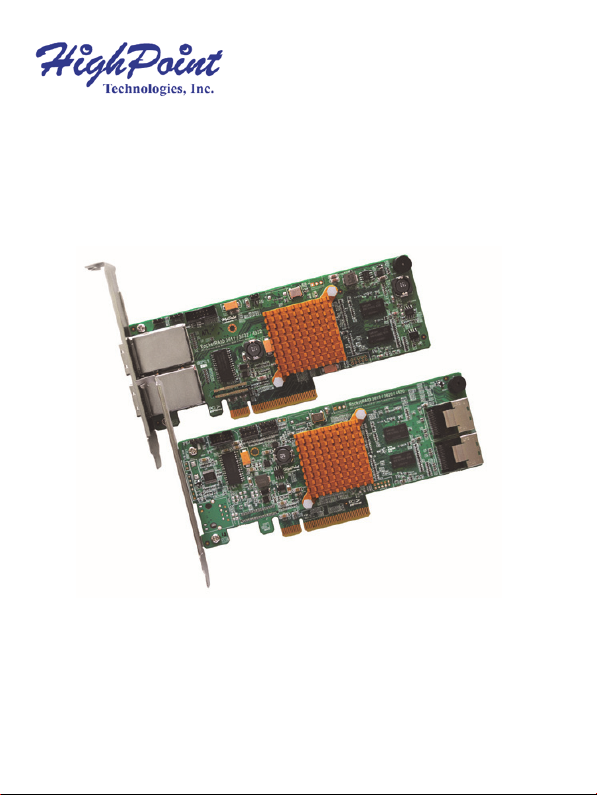
RocketRAID 3622
3
Page 4

RocketRAID 3620
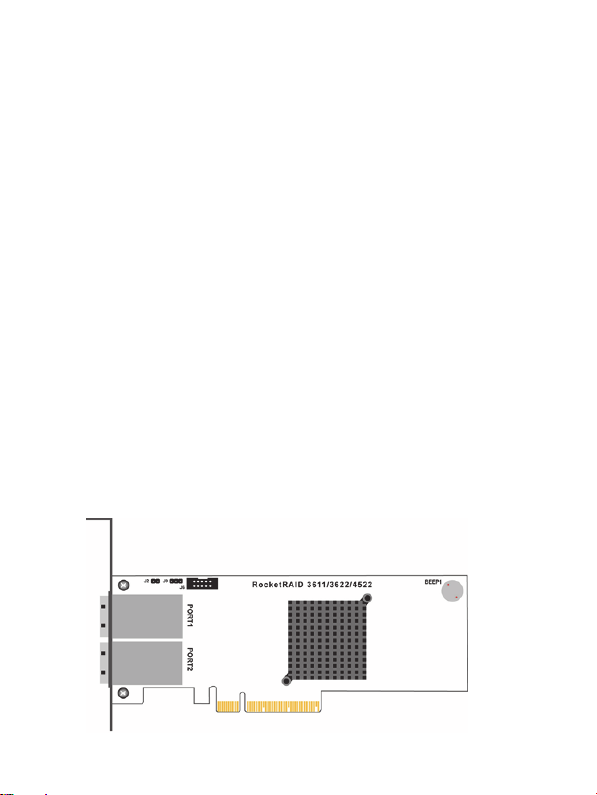
Connector and Jumper description
Connector / Jumper
description
J9 I2C connector
J6 BBU connector
A1, A2 Active LED PIN N/A
F1, F2 Fail LED PIN N/A
PORT1, PORT2
BBU connector:
This connector is for the optional battery backup unit (HPTBBU-05).
Active/FAIL LED PIN connector:
Each SATA channel has a dedicated LED pin connector for both
Active and FAIL status, which can be connected to the
corresponding LED connectors on the chassis backplane. For
detailed instructions and information about LED connections,
please refer to:
http://www.highpoint-tech.com/PDF/LED_connection.pdf
RocketRAID 3620 RocketRAID 3622
Mini-SAS Port
(SFF-8087)
Mini-SAS Port
(SFF-8088)
4
Page 5

Installing the RocketRAID 3622/3620
Note: Make sure the system is powered-off before installing the host
adapter.
1. Open the system chassis and locate an unused PCI-E 2.0 x8/x16
slot or PCI-E 3.0 x8/x16 slot.
2. Remove the PCI-E slot cover.
3. Gently insert the RocketRAID 3622/3620 into the PCI-E slot, and
secure the bracket to the system chassis.
4. After installing the adapter, attach the hard disks or backplane
enclosure to the host adapter using the mini-SAS cables.
5. Close and secure the system chassis.
Using the RocketRAID 3622/3620
Driver and Software Installation (Windows)
1. After installing the RocketRAID 3600 series host adapter, boot to
the Windows operating system.
2. Windows should automatically detect the card, and display the
“Found New Hardware Wizard”.
3. Insert the HighPoint software CD into the system’s optical drive.
4. Windows will display the CD auto-run window. Run the CD by
clicking “Run Setup.exe”.
5. The HighPoint software install program interface will be displayed.
Click the “Install Driver” button to install the Device Driver for
RocketRAID 3600 Series HBA.
5
Page 6

6. A system reboot is required to complete the driver installation.
7. After Windows reboots, check Device Manager>Storage
Controllers to verify that the RocketRAID 362x Series HBA driver
has been installed properly.
Driver and Software Installation Linux, FreeBSD and Mac OS X
Please refer to the Driver Installation Guide and README file under
the driver package for the installation steps. Software location
(RocketRAID Software CD):
/Driver/RR45xx_36xx/
Please check the RocketRAID 362x Series webpage for the latest
software updates.
Using HighPoint RAID Management software
The HighPoint RAID Management software provides RAID
configuration and management features. The software can be
installed from the HighPoint software CD. Browse to the location of
the HighPoint RAID Management software.
Windows
Software location (RocketRAID Software CD):
/Management_Software/ RocketRAID_45xx36xx27xx26xx6xx/
Windows
6
Page 7

1. Double click the “HighPoint RAID Management.exe” setup
program to install the management software.
2. After the setup is completed, double click the
program shortcut on the Windows desktop to run
HighPoint RAID Management software:
Linux & FreeBSD
Software location (RocketRAID Software CD):
/Management_Software/ RocketRAID_45xx36xx27xx26xx6xx/
Linux (or FreeBSD)
Please refer to the README file for installation steps.
OS X (Only for RocketRAID 3622)
Software location (RocketRAID Software CD):
/Driver/RR45xx_36xx/Mac
Please refer to the Installation Guide under the folder for
installation steps.
For online assistance, please refer to “How to use the Web RAID
Management Utility”: http://www.highpoint-tech.com/help/
Customer Support
If you encounter any problems while utilizing RocketRAID series host
adapters, or have any questions about this or any other HighPoint
Technologies, Inc. product, feel free to contact our Customer Support
Department.
HighPoint Technologies, Inc. websites:
http://www.highpoint-tech.com/
Web Support: http://www.highpoint-tech.com/websupport/
7
Page 8

FCC Part 15 Class B Radio Frequency Interference Statement
This equipment has been tested and found to comply with the limits for a Class
B digital device, pursuant to part 15 of the FCC Rules. These limits are designed
to provide reasonable protection against harmful interference in a residential
installation. This equipment generates uses and can radiate radio frequency
energy and, if not installed and used in accordance with the instructions, may
cause harmful interference to radio communications. However, there is no
guarantee that interference will not occur in a particular installation. If this
equipment does cause harmful interference to radio or television reception,
which can be determined by turning the equipment off and on, the user is
encouraged to try to correct the interference by one or more of the following
measures:
Reorient or relocate the receiving antenna.
Increase the separation between the equipment and receiver.
Connect the equipment into an outlet on a circuit different from that to
which the receiver is connected.
Consult the dealer or an experienced radio/TV technician for help.
Modifications not expressly approved by the manufacturer could void the
user’s authority to operate the equipment under FCC rules.
This device complies with part 15 of the FCC Rules. Operation is subject to the
following two conditions: (1) this device may not cause harmful interference,
and (2) this device must accept any interference received, including
interference that may cause undesired operation.
European Union Compliance Statement
This Information Technologies Equipment has been tested and found to comply
with the following European directives:
European Standard EN55022 (1998) Class B
European Standard EN55024 (1998)
© Copyright 2013 HighPoint Technologies, Inc. All right reserved.
8
 Loading...