

Page 1
RocketRAID 2782 6Gb/s
SAS/SATA
Host Adapter User Guide
Revision: 1.1
Date: May 2011
HighPoint Technologies, Inc.
Page 2

2
Copyright
Copyright © 2010 HighPoint Technologies, Inc. This document contains
materials protected by International Cop yright Laws. All rights res erved. No
part of this manual may be reproduce d, tr ans mitted or transcribed in any form
and for any purpose without the express written permission of HighPoint
Technologies, Inc.
Trademarks
Companies and products mentioned in this manual are for identification
purpose only. Product names or bran d nam es appear ing in this manual ma y
or may not be registere d tradem ark s or cop yrights of their respec tive o wners .
Backup your important data before using HighPoint's products and use at
your own risk . In no event shall HighPoint b e liable for any loss of prof its, or
for direct, indirect, special, incidental or consequential dam ages arising fr om
any defect or error in H ighPoint's products or manuals. Information in this
manual is subject to change without notice and does not represent a
commitment on the part of HighPoint.
Notice
Reasonable effort has been made to ensure that the in formation in this
manual is accurate. High Point assumes no liability for tech nic al
inaccuracies, typographical, or other errors contained herein.
Page 3

Table of Contents
3
Contents
HIGHPOINT TECHNOLOGIES, INC. .............................................................. 6
HIGHPOINT ROCKETRAID 2782 – PCI-EXPRESS 2.0×16 ........................... 7
1 - Features and Specifications ....................................................................... 8
2 - Kit Contents ................................................................................................ 9
HARDWARE – DESCRIPTION AND INSTALLATION ................................... 10
ROCKETRAID27 8 2 BIO S UTILITY ............................................................... 13
1 - BIOS Settings Overview ........................................................................... 13
Using the BIOS Utility………………………………………………………..13
BIOS Commands……………………………………………………………….14
2 - Creating RAID Arrays ............................................................................... 14
3 – Deleting A rray s ......................................................................................... 18
4 - Add/Remove Spare Disks ......................................................................... 19
5 - Settings ..................................................................................................... 19
HIGHPOINT SOFTWARE CD ....................................................................... 21
Creating a driver diskette ............................................................................... 21
Device Driver Installation – Windows Operating Systems ............................. 22
RocketRAID 2782 Windows 7/Vista/Windows 2008 Driver Installation ......... 22
HighPoint RAID Management Utilities (HRM) – Web GUI / CLI .................... 27
Windows Operating S ystem s – Installing the Web GUI from the Software CD.
....................................................................................................................... 27
Page 4

Table of Contents
4
Red Hat Enterprise/C entOS, Fedora Core, Open SuS E, SL ES – Installing the
Web-based Management utility ..................................................................... 27
Debian/Ubuntu Linux Distributions – Installing the Web-based Management
Utility .............................................................................................................. 29
Linux Distributions – Command Line Interface ( CLI)………………………… 30
1 - Installing the Web GUI (v1.5.5) - Windows Operating Systems ( Vista,
2008, Windows 7) .......................................................................................... 30
2 - Starting the Web GUI ................................................................................ 34
3 - Web GUI – Icon Definitions ...................................................................... 35
4 - Web GUI - Configuring an Array ............................................................... 36
Initializing a new hard dr ive ……………………………………………………36
Create an Array……………………………………………………………….37
5 - Web GUI - Configuring Spare Disks ......................................................... 40
To assign a Spare disk:………………………………………………………...40
6 - Web GUI - Recovering an Array ............................................................... 41
To Rebuild an array:………………………………………………………….42
7 - Web GUI - Maintaining RAID Arrays ........................................................ 43
Scheduling Tasks:………………………………………………………………44
Removing Tasks……………………………………………………………...44
SHI – Storage Health Ins p e ct or……………………………………………….44
8 - Web GUI - Safeguarding your Array ......................................................... 45
Automatic RAID Rebu il ding……………………………………………………46
9 - Web GUI - Event Notification .................................................................... 48
Configuring SMTP (E-mail) Notification……………………………………49
10 - Web GUI - Advanced RAID Functions (Windows VSS, OCE/ORLM) .... 50
VSS – Variable Sector Size……………………………………………………50
Online Capacity Expansion and RAID Level Migration (OCE/ORLM)….55
CUSTOMER SUPPORT ................................................................................ 58
Page 5

Table of Contents
5
Troubleshooting Checklist .............................................................................. 58
THANK YOU .................................................................................................. 59
Contact Us ..................................................................................................... 59
FCC Part 15 Class B Radio Frequency Interference statement .................... 60
Page 6

6
HighPoint Technologies, Inc.
HighPoint Technologies, long recognized as a leader in mass storage
technologies specializes in the design and manufacturer of HBA (Host Bus
Adapters) and HighPoint RAID IP (Intellectual Property). HighPoint provides
a broad range of scalable hardware HBA’s that meet the storage
requirements from Enterprise to SMB (Small Medium Sized Business) to PC
enthusiast.
Page 7

HighPoint RocketRAID 2700 Series
7
HighPoint RocketRAID 2782 – PCI-Express
2.0×16
The RocketRAID 2782 host adapter is a high-performance SAS RAID
solution, delivering reliability to demanding data-intensive applications such
as tiered storage environments (disk-to-disk or disk-to-disk-to-tape backup),
security and surveillance, video editing, and digital content creation.
Support for both 6Gb/s SAS and SATA drives on the same controller
maintains configuration optimization for performance based on the
characteristics of SAS and SATA dri ves av ailab le tod a y.
HighPoint RAID Management HighPoint RAID Management software offers a
user friendly interface to create, manage and maintain your storage solutions.
Email notification and remote are some of the advance features that the
RAID Management software has to offer.
COMPREHENSIVE OS SUPPORT
HighPoint offers the broadest range of support for all major operating
systems to ensure OS and hardware server compatibility. Drivers are
available for all major operating systems, including Windows, Linux and
FreeBSD.
Page 8

HighPoint RocketRAID 2700 Series
8
1 - Features and Specifications
Host Adapter Archi tecture
• PCI-Express x16 (Gen2)
• Support up 32 SAS/SATA drives
• Hot Swap and hot plug
• RoHS complaint
Advanced RAID Features
• Supports RAID 0, 1, 5, 10 , 50 and JBOD
• NCQ (Native Command Queuing)
• Auto detect of unplug/plug SAS/SA TA hard drive for RAID auto rebuild
• Staggered drive spin up
• Support bad sector repair feature
• Support Disk Scrubbing
• BIOS Booting (INT13) to RAID array for better redundancy
• 64bit LBA for RAID arrays greater than 2TB single partition
Array Monitors, Alerts and Indicators
• Hard Drive LED Indicators (Activity and Failed)
• SMTP email notification for events and error reporting
• Alarm/Buzzer alerts for drive/array failure
• SAF-TE (I2C) and SGPIO enclosure management
• SHI – Storage Health Inspector (S.M.A.R.T. and disk maintenance)
RAID Management
• Online Capacity Expansion (OCE) and Online RAID Level Migration
(ORLM) for Windows/Linux/FreeBSD
• Quick and Background initialization for instant RAID access
• Online array roaming
Page 9

HighPoint RocketRAID 2700 Series
9
HighPoint RAID Management (HRM)
• Hot key (ctrl-h) boot-up RAID manager via BIOS
• Web browser-base RAID management software (Web GUI)
• Command Line Interface (CLI)
Operating System Support
• Windows XP, 2003, Windows Vista, Windows 2008, Windows 7 (32 and
64-bit versions)
• Linux (Fedora Core, Red Hat Enterprise / CentOS, SuSE,SLES, Debian
Ubuntu)
• FreeBSD
Physical Specifications
• Size: 203mm X 111mm
• EMI: FCC Part 15 Class B and CE
Thermal and Atmospheric Characteristics:
• Work Tem per at ure Range: +5℃~+ 55℃
• Relative H umidity Range: 5% ~ 60% non condensing
• Storage Temperature: -20℃~ +80℃
• MTBF: 920,585 Hours
Electrical Characteristics:
PCI-E 3.3V 12V
Power 10W max 35W max
2 - Kit Contents
• RocketRAID Host Adapter
• Quick Install Guide
• HighPoint RAID Management and software CD
Page 10

Hardware – Description and Installation
10
Hardware – Description and Installation
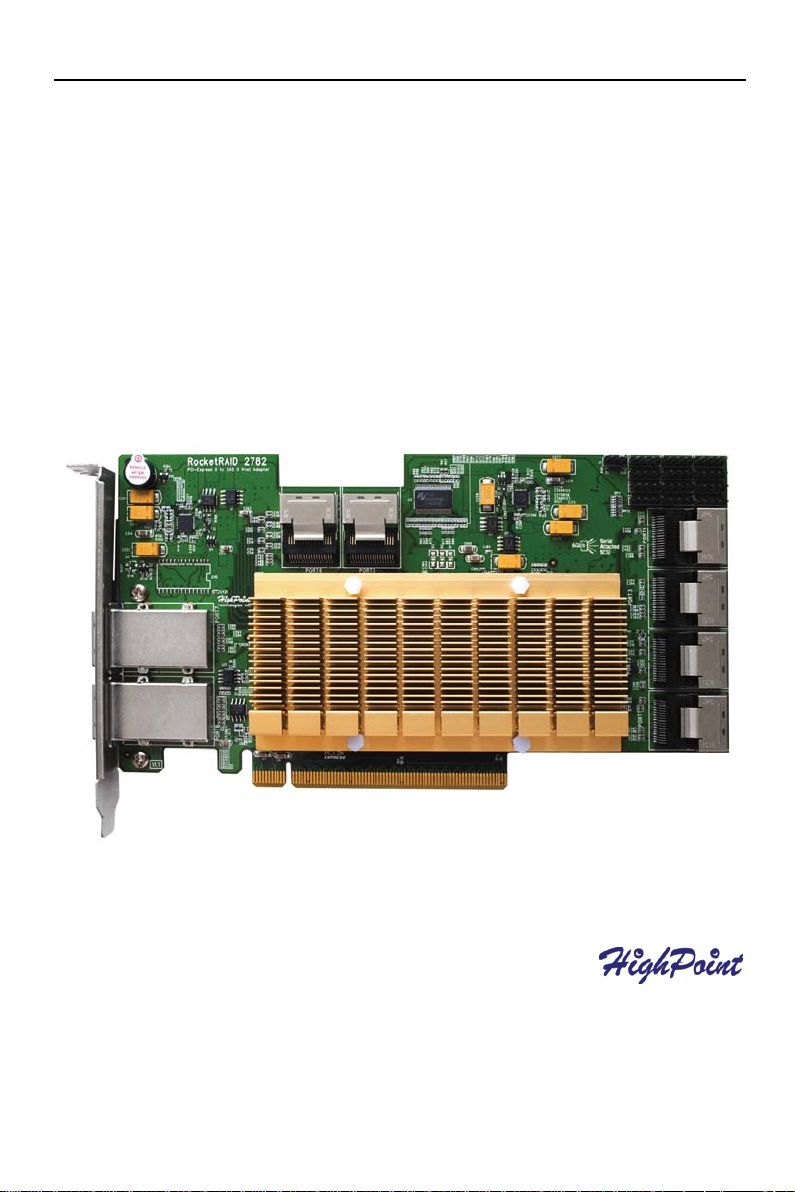
1-RocketRAID 2782 Host Adapter l ayout
Port1-Port6
These represent the RocketRAID 2782’s 6 Internal Mini-SAS por ts.
Port7-Port8
These represent the RocketRAID 2782’s 2 External Mini-SAS ports
Each port can direct connect up to 4 SATA/SAS hard disks.
LED Connections
LED connectors (Drive-activity/Drive-failure): The RocketRAID 2782 host
adapter has 12 LED connectors that are used to indicate the activity and
failure status of hard drives attached to the card’s 6 SATA/SAS channels.
A1-A6, F1-F6
A1-A6 provides LEDs s up p or t for Drive Acti v it y, while F 1-F6 supports Drive
Failure.
Page 11

Hardware – Description and Installation
11
Pin Number
Pin
Number
PIN
description
Pin1
SCL
Pin2
GND
Pin3
SDA
A1 Drive1 Drive2 Drive3 Drive4
A2 Drive5 Drive6 Drive7 Drive8
A3 Drive9 Drive10 Drive11 Drive12
A4 Drive13 Drive14 Drive15 Drive16
A5 Drive17 Drive18 Drive19 Drive20
A6 Drive21 Drive22 Drive23 Drive24
F1 Drive1 Drive2 Drive3 Drive4
F2 Drive5 Drive6 Drive7 Drive8
F3 Drive9 Drive10 Drive11 Drive12
F4 Drive13 Drive14 Drive15 Drive16
F5 Drive17 Drive18 Drive19 Drive20
F6 Drive21 Drive22 Drive23 Drive24
Pin 1 Pin 2 Pin3 Pin4
BEEP1-Speaker
Alarm (speaker): the speaker emits and audible alarm in the case of
Drive/array failure.
J1
This jumper supports the SAF-TE interface (I2C).
2 - Installing the RocketRAID 2782 Host Adapter
Note: Make sure the system is powered-off before installing the RocketRAID
2782 host adapter.
1. Open the system chassis and locate an unused PCI-Express x16.
2. Remove the PCI slot/bracket cover.
3. Gently insert the RocketRAID2782 card into the PCI-Express slot, and
secure the bracket to the system chassis (illustration shows RocketRAID
2782).
Page 12

Hardware – Description and Installation
12
4. After installing the adapter, attach hard drives to the host adapter using the
data cable. Each Mini-SAS cable can direct connect up to 4 hard drives.
Consult the chassis manual for proper installation procedures.
Note: Many server-level chassis include hard-drive hot-swap bays. For
these system chassis, cables are attached to the chassis backplane, rather
than directly to each individual hard drive. Consult the chassis manual for
proper installation procedures.
5. Close and secure the system chassis.
3 - Verifying Installat ion
Once the host adapter and hard drives have been installed into the chassis,
boot-up the system to verify that the hardware is properly recognized.
1. Power on the system. If the system detects the presence of the adapter,
the RocketRAID BIOS Utility will be displayed during boot up.
2. Press Ctrl+H to access the RocketRAID adapter’s BIOS Utility.
The BIOS Utility will display information about hard drives attached to the
adapter.
Make sure all attached drives are detected by this utility. If any of the hard
drives are not detected, power down the system and check the power and
cable connections.
Page 13

RocketRAID BIOS Utility
13
RocketRAID 2782 BIOS Utilit y
The RocketRAID 2782 card will display its BIOS screen during the system's
boot process.
Press Ctrl+ H when prompted, to access the BIOS settings Menu.
1 - BIOS Settings Overview
The RocketRAID 2782 BIOS utility is an interface that provides management
commands and controller related settings.
Using the BIOS Utility
The following keys utilized by the RocketRAID 2782 BIOS utility:
Alt – press Alt to highlight the tool bar.
Arrow keys – use these to move between different menu items, and to
browse through the device list (the menu will display 32 disks/ports at once).
Enter – Open the selected toolbar command/execute the selected command.
Esc – move back to the previous menu, cancel the selec ted oper a tio n, or ex i t
the BIOS Utility.
Page 14

14
BIOS Commands
RocketRAID BIOS Utility
Create - this command is used to open the RAID Creation menu.
Delete - this command will delete the selected RAID array.
Add/Remove Spare - this command is used t o assign hard disks to func tion
as spare disks. The c ontrol l er is c apabl e of usi ng s par e disks to automatically
rebuild broken or faulted RAID arrays.
Settings - this command opens the settings menu (selecting the boot
disk/array, staggered drive spinup)
View – this command is used to s elect between t wo views: Devices (H ARD
DISKS), and Arrays (configured RAID arrays).
Initialize - this command is used to prepare disks for use with RAID arrays.
Disks must be initialized before they can be used to create arrays.
2 - Creating RAID A rray s
Initializing Disks:
Before creating a RAID arra y, th e disks must be initialized. Disk initialization
writes necessary RAI D conf iguration inf ormation to th e hard d isks . Select the
Initialize command from the toolbar, and press ENTER.
Page 15

RocketRAID BIOS Utility
15
Highlight the target disks using the arrow ke ys, then select using Enter. You
can use the arrow k eys to select from the next set of disks (the sc reen will
display 16 ports at a time). A n umeral wil l be displa yed before eac h selected
disk. Once all target disks have been selec ted, press ESC. The uti lity will
display a warning, and ask you to press Y (yes) to initialize, or N (no) to
cancel. Once initialized, these disks can be used to create RAID arrays.
Warning: Initialization will destroy all pre- existing data on the
selected hard disks. Only initialize disks that do not contain
critical data
Creating Arrays:
Select Create from the toolbar and press Enter.
Page 16

RocketRAID BIOS Utility
16
1. Use the arrow key s to select the RAID level and press ENTER.
2. Use the arrow key s to highlight the Ar r ay Name option and press Enter.
The array name dialogue box will appear. Use the keyboard to input a
new Array Name, and press the Enter key.
Note: the Array Name command is optional – it is not necessary to name the
array. The array can be named at a later time, and the name of the array can
be changed at any time.
3. On the Create menu, use the arrow keys to highlight the Select Devices
item and press Enter. A device list will appear, and display all available
hard disk drives.
4. Highlight the target disks that you want to use, and press Enter to select
them. You can use the arrow keys to select from the next set of disks
Page 17

RocketRAID BIOS Utility
17
(the screen will display 1 ports at a time. A numeral wi ll be displa yed
before each selected disk. This number designates disk order. After all
of the disks have been selected and press the ESC key to return to the
Create Menu.
5. Next, Use the ↓ arrow key to highlight the Capacity (GB) option and
press Enter. The total available capacity will be displayed. Press ENTER
if you wish to use all available space. If you wish to reserve disk space
for additional arrays/single disks, use the keyboard to input the amount of
space (in GB) you wish to set aside for this particular array, and press
Enter.
Note: Multiple arrays can be created using the same set of hard disk drives.
The Capacity option allows you to set aside disk space that be used to create
another array, set as a spare disk, or partitioned to act as a single disk (by
the operating system).
6. For redundant RAID arrays (RAID 1, 5, 10), select the Cache Policy:
Write Back – utilizes disk cache (higher performing)
Write Through – writes directly to the disks (may reduce the risk of data loss
during a critical failure, but at the cost of lower performance).
7. Sector Size – Also known as “Variable Sector Size”. Use this option if
you are using an older 32-bit Windows operating system. This allows
older operating systems to support volumes over 2TB in size. Do not
use if the operating system already supports large volumes (such as
GPT).
8. To complete the creation procedure, use the arrow key to highlight the
Start Creation item and press Enter. Press the Y (yes) key to create
Page 18

RocketRAID BIOS Utility
18
the array, or N (no) key to cancel the creation process.
3 – Deleting Arrays
Highlight the Delete command from the toolbar, and press Enter.
The BIOS utility will disp lay a list of available RAID arrays. Select th e array
you wish to delete, and press Enter.
The utility will displa y a warning mess age. Press Y (yes) to delete the arra y,
or select N (no) to cancel.
Warning: all data stored on the ar ra y will be lost – do not delete if the
array contains critical data.
Page 19

RocketRAID BIOS Utility
19
4 - Add/Remove Spare Disks
This Add/Remove Spare command is used to assign a hard disk to act as a
Spare Disk. Spare Disks are used to automatically rebuild Redundant RAID
arrays (RAID 1, 5, 10, 50) in the case of disk failure. As with creating RAID
arrays, disks must be initialized before they can be used as spares. To set a
hard disk to act as a Spare Disk, use the arrow keys to select the target disk
from the list of initialized disks, and press Enter. To remove the Spare Disk
setting from a hard disk, highlight the spare disk, and press Enter.
Generally, single disks are designated to act as spares (disks that are not
configured into RAID arrays).
However, in some instances, disks that are members of RAID arrays may
also be designated to ac t as a spare. If the disks in question are part of a
RAID array that did not utilize the full available capacity at the time of creation,
these disks may be used as spares. For example: a RAID 0 array was
created between t wo 200GB hard disks, but only 200 GB of space (out of a
grand total of 400GB), was as signed to that array. In this example, 2 00GB of
disk space remains unallocated. This unallocated space would allow these
disks to be set as spares for a separate redundant array that falls into the
same capacity range (200GB).
5 - Settings
To access the Settings menu, highlight the Settings command from the
toolbar, and press Enter.
Page 20

RocketRAID BIOS Utility
20
Select Boot Device – select which disk or array will act as the boot disk, if
the motherboard BIOS instructs the card to act as the boot device.
Staggered Drive Spinup – This option is disabled by default. Enabling this
setting will instruct the card to power up the hard disks, sequentially (one disk
approximately every 2 seconds). Not all disk support this setting – consult
the disk documentation for more information.
Warning: Western Digital hard disks do not support this setting. Enabling
this setting is not recommended. If enabled, these disks may not be detected
by non-RAID controllers.
Page 21

HighPoint Software CD
21
HighPoint Software CD
Each retail box includes a copy of the HighPoint Products Software CD.
This CD can be used t o generate driver diskettes, and i nstall the HighPoint
RAID Management Utility Suite for a variety of operating systems.
Creating a driver diskette
Windows XP, 2003,2000,Vista,Win2008,Win7 and several distributions of
Linux and FreeBSD require driver diskettes when installing the operating
system directly to a disk or array hosted by the Rocket RAID host adapter.
To create a driver floppy diskette:
1. Insert the CD into the system’s CD/DVD drive. The program should start
automatically.
2. Insert a blank floppy diskette into the system’s floppy drive.
3. Click on “Create Driver Diskette”.
4. Click on the “Please Select a Product” drop-down button, and select the
appropriate host adapter model from the list.
5. Click on the “Please Select the Diskette you want to create” drop-down
button, and select the desired operating system from the list.
6. Click on the “OK” button to create the driver diskette.
Page 22

HighPoint Software CD
22
Device Driver Installation – Windows Operating Systems
We recommend visiting the RocketRAID product pages for the latest
Windows Device Driver updates:
http://highpoint-tech.com
Drivers are posted in . zip archive format. Most Windows opera ting systems
will recognize this arc hive format, natively. Double click the driver download
to view and extract their contents. Drivers can be extracted and/or copi ed to
various media.
RocketRAID 2782 Windows 7/Vista/Windows 2008 Driver Installation
Installing the driver for an existing Windows 7, Vista and 2008
system
Install the RocketRAID 2872 host adapter into the PC, then boot up Windows
Windows should au tomatically detect the c ard, and display the “F ound New
Vista.
1. When Windows asks: “Windows needs your permission to continue”,
select “continue”.
2. Hardware” wizard pop-up window. Select “Locate and install driver
software”.
3. When asked to search online select “Don’t Search Online”.
 Loading...