

HighPoint 2644X4 User Manual

RocketRAID 2644X4
SAS Host Adapter
User’s Guide
Revision: 1.0
Date: March 2008
HighPoint T echnologies, Inc.

Copyright
Copyright © 2008 HighPoint Technologies, Inc. This document contains materials
protected by International Copyright Laws. All rights reserved. No part of this
manual may be reproduced, transmitted or transcribed in any form and for any
purpose without the express written permission of HighPoint Technologies, Inc.
T rademarks
Companies and products mentioned in this manual are for identification purpose only.
Product names or brand names appearing in this manual may or may not be registered
trademarks or copyrights of their respective owners. Backup your important data
before using HighPoint’s products and use at your own risk. In no event shall
HighPoint be liable for any loss of profits, or for direct, indirect, special, incidental or
consequential damages arising from any defect or error in HighPoint’s products or
manuals. Information in this manual is subject to change without notice and does not
represent a commitment on the part of HighPoint.
Notice
Reasonable effort has been made to ensure that the information in this manual is
accurate. HighPoint assumes no liability for technical inaccuracies, typographical, or
other errors contained herein.

Table of Contents
Table of Contents
Chapter 1
Introduction
1 - About this Guide...................................................................................................1-1
2 - Introducing the RocketRAID 2644X4 Host Adapters ...........................................1-1
3 - Product Features ...................................................................................................1- 1
4 - Understanding RAID Concepts and T erminology ................................................1-2
Chapter 2
Hardware Description/Installation
1 - RocketRAID 2644X4 Host Adapter layout............................................................2-1
2 - Installing the RocketRAID Host Adapter .............................................................2-3
3 - Verifying Installation .............................................................................................2-4
Chapter 3
BIOS Utility
1 - BIOS Command Overview .....................................................................................3-1
2 - Creating RAID Arrays...........................................................................................3-2
3 - Adding/Remove Spare Disks ................................................................................3-4
4 - Updati ng th e BIO S ................................................................................................3-4
5 - BIOS – Additional Settings ...................................................................................3-7
Chapter 4
Driver and Software Installation Microsoft Windows
1 - Driver and Software CD ........................................................................................4-1
2 - Windows Driver Installation .................................................................................4-3
I

Table of Contents
3 - W indows Vista Driver Installation..................................................................................4-4
Chapter 5
W eb-RAID Management Interface
1 - W eb RAID Management Interface........................................................................5-1
2 - Preparing Hard d isks.............................................................................................5-2
3 - Array Management ...............................................................................................5-2
4 - Device Management .............................................................................................5-7
5 - Configuring Spare Disks ..................................................................................... 5-10
6 - Managing Events and T asks...............................................................................5-11
7 - Setting ................................................................................................................ 5-13
Chapter 6
Linux Driver Support
1 - Fedora Core Linux installation Overview ..............................................................6-1
2 - Red Hat Enterprise/CentOS Linux Overview ....................................................... 6-10
3 - SuSE Linux Overview ..........................................................................................6-17
Chapter 7
FreeBSD Driver Support
1 - Overview ...............................................................................................................7-1
2 - Installing FreeBSD on RocketRAID 2644 Controller .............................................7-1
3 - Installing the RocketRAID 2644X4 Driver on an Existing System.........................7-5
4 - Updating the Driver ..............................................................................................7-8
5 - Installing RAID Management Software ................................................................7-8
6 - Uninstalling the Driver ..........................................................................................7-9
Chapter 8
Mac OSX Driver and RAID Management Software
1 - Installing the driver and RAID utility....................................................................8-1
II

Table of Contents
Appendix
Customer Support
Customer Support .................................................................................................... A-1
III

Contents of this Chapter:
About this guide
Introducing the RocketRAID 2644X4 SAS Host Adapter
Product Features
Understanding RAID Concepts and Terminology
Chapter 1
Introduction

Introduction
About this Guide
The RocketRAID 2644X4 SAS Host Adapter’s User’s Guide provides information
about the functions and capabilities of this host adapter product, and instructions for
installing, configuring and maintaining RAID arrays hosted by this adapter cards.
Introducing the RocketRAID 2644X4 Host Adapters
The RocketRAID 2644X4 is high-performance SAS RAID solution, delivering reliability to demanding data-intensive applications such as tiered storage environments
(disk-to-disk or disk-to-disk-to-tape backup), security and surveillance, video editing,
and digital content creation.
Support for both SAS and SATA 3Gb/s drives on the same controller maintains
configuration optimization for performance based on the characteristics of SAS and
SATA drives available today.
Host Adapter Architecture
PCI-Express x4 (adjustable to x1 speed with jumper)
1 External mini-SAS(SFF-8088) Driver Connector
Up to 4 SAS/SATA Hard Drives
128 max hard drives via SAS expanders
NCQ (Native Command Queuing)
Low Profile
Advance RAID Features
Support RAID 0,1,5,10 and JBOD
Multiple RAID support
Multiple logical drive support
BIOS booting support
Online Array roaming
Automatic drive (insert / remove) detection
Automatic RAID rebuild
64bit LBA support greater than 2TB per volume
S.M.A.R.T (Early Warning System)
T erabyteGuard. for data protection and reliability
1-1

Introduction
Bad sector repair and remapping to reduce dropped drives
Array Monitors, Alerts and Indicators
Email Notification
Alarm/Buzzer alerts for drive/array failure
RAID Management
Online Capacity Expansion (OCE) and Online RAID Level Migration
(ORLM)
Quick and Background initialization for instant RAID configuration
Write Back and Write Through support
API library for customization
CLI (Command Line Interface)
Web GUI RAID management (local and remote monitoring)
SHI (Drive analysis driven from S.M.A.R.T)
Operating System Support
Windows 2000, XP, 2003, 2008 and Vista (32 and 64 bit)
Linux (Fedora Core, Red Hat Enterprise Linux / CentOS, SuSE)
Mac OS X 10.4.x and above
FreeBSD
Linux Open Source
PHYSICAL SPECIFICATIONS
Size : 79.3mm X 62mm X 1.6mm
EMI : FCC Part 15 Class B and CE
Thermal
Work Temperature Range : +5 ℃ ~+ 55 ℃
Relative Humidity Range : 5% ~ 60% non condensing
Storage
MTBF: 920,585 Hours
Elec
PCI-e : 3.3V
Pow
and Atmospheric Characteristics:
Temperature : -20℃ ~ +80 ℃
trical Characteristics:
er: 5W
1-2

Introduction
Understanding RAID Concepts and Terminology
The following concepts and terminology is commonly used when describing the
functions of the RocketRAID Host Adapter cards.
Disk Status
New The disk contains no data and has not been initialized.
Initialized The disk has been initialized and can be used for array creation.
Configured The disk has been assigned to one or more arrays, or configured as a
spare disk.
Legacy The disk was used on other controllers before use with the
RocketRAID 2644X4.
Array initialization
A redundant array (RAID5, RAID1, RAID10) needs to be initialized to ensure full
performance and reliability. Non-redundant arrays (RAID0, JBOD) do not need to be
initialized.
When you create a redundant array using the host adapter’s BIOS Configuration
Utility, it will create the array in un-initialized state. The initialization process can be
completed after installing the driver and management software.
When creating an array using the HighPoint RAID Management Console software,
you can specify an initialization option (Skip initialization, foreground and
background).
Foreground initialization
Foreground initialization will zero-out all data on the array. The array is not accessible
by the operating system until initialization is complete.
Background initialization
Background initialization allows the array to be used immediately. For RAID1 and
RAID10 arrays, initialization will results in data being duplicated identically to the
mirror pair. For RAID5 arrays, initialization will result in parity being generated from
all array members.
1-3

Introduction
Note: An un-initialized RAID1 or RAID10 array can still provide redundancy in
case of a disk failure. A RAID5 array, however, is not fault-tolerant until initializa-
tion is finished.
Online Capacity Expansion (OCE)
This feature allows disks to be added to existing RAID arrays, in order to increase the
array’s capacity, without fear of data loss. Any number of disks can be added to an
array, at any time. Data can be accessed and utilized even while being redistributed.
Online RAID Level Migration
This term describes the ability to change one type of array (RAID level), into a
different type of array (changing a RAID 1 array into a RAID 10 array for example).
Data is still accessible during the migration process, and a base level of security is
still active.
OCE, ORLM and the RocketRAID 2644X4
This host adapter support both Online Capacity Expansion (OCE), and Online RAID
Level Migration (ORLM). Both features are supported by a single function - an array
can be transformed from one RAID level to another RAID level while simultaneously
being resized, even under I/O load.
Spare disk
A spare disk is a single disk that can be used to automatically rebuild a redundant
array in case of drive failure. Spare disks may also be members of a RAID array. Any
available space on these disks may be used to rebuild other broken arrays.
Legacy disk
Disks attached to the host adapter that contain valid partition tables will be identified
as “legacy” disks. A legacy disk attached to the host adapter can be accessed by the
operating system, but cannot be used to create RAID arrays. A legacy disk must be
initialized before assigning it to an array.
1-4

Hardware Description/Installation
Contents of this Chapter:
RocketRAID 2644X4 Hardware
1 - RocketRAID 2644X4 Host Adapter Layout
2 - Installing the RocketRAID Host Adapter
3 - Verifying Installation
Chapter 2
RocketRAID 2644X4 Hardware Description/Installation
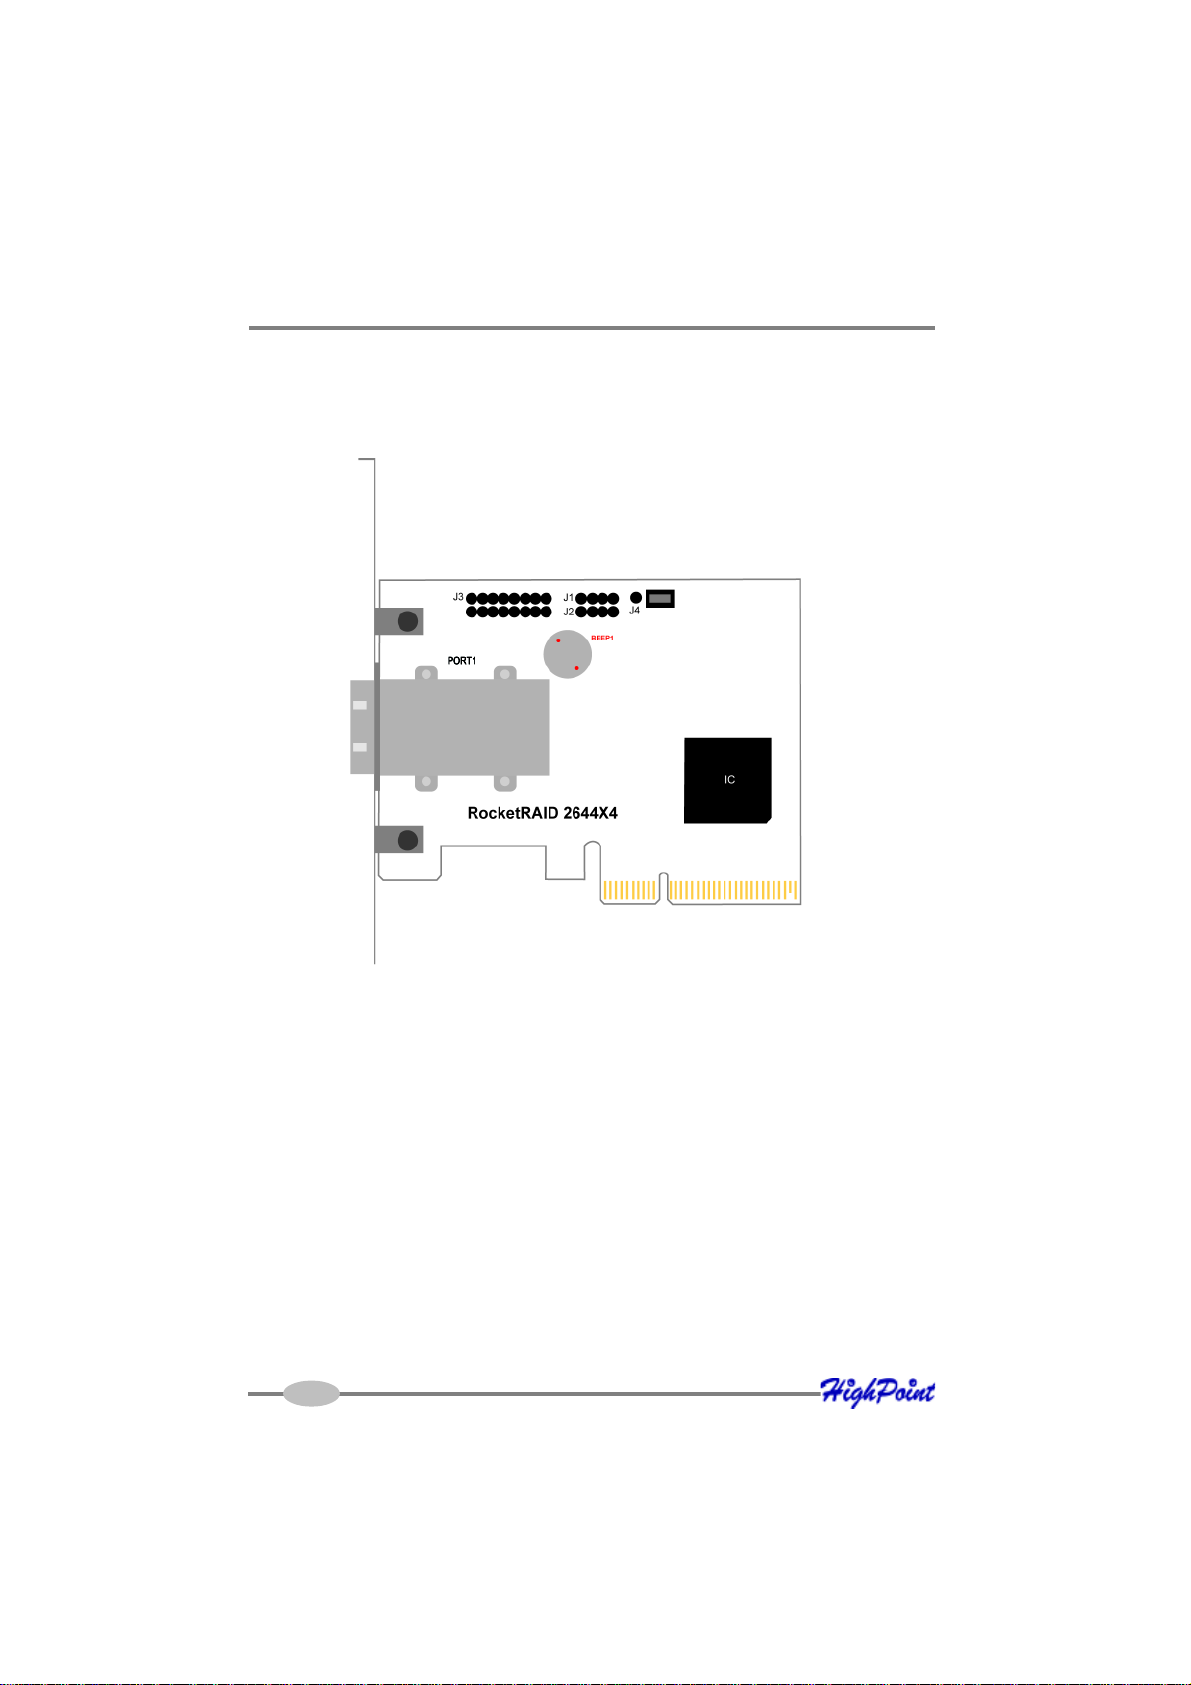
1 – RocketRAID 2644X4 Host Adapter layout
RocketRAID 2644X4
Port1
This represent the host adapter’s one external Mini-SAS port. It can support up to 4
SAS/SATA Hard Drives.
J3 is reserved
2-1
RocketRAID 2644X4 Hardware Description/Installation
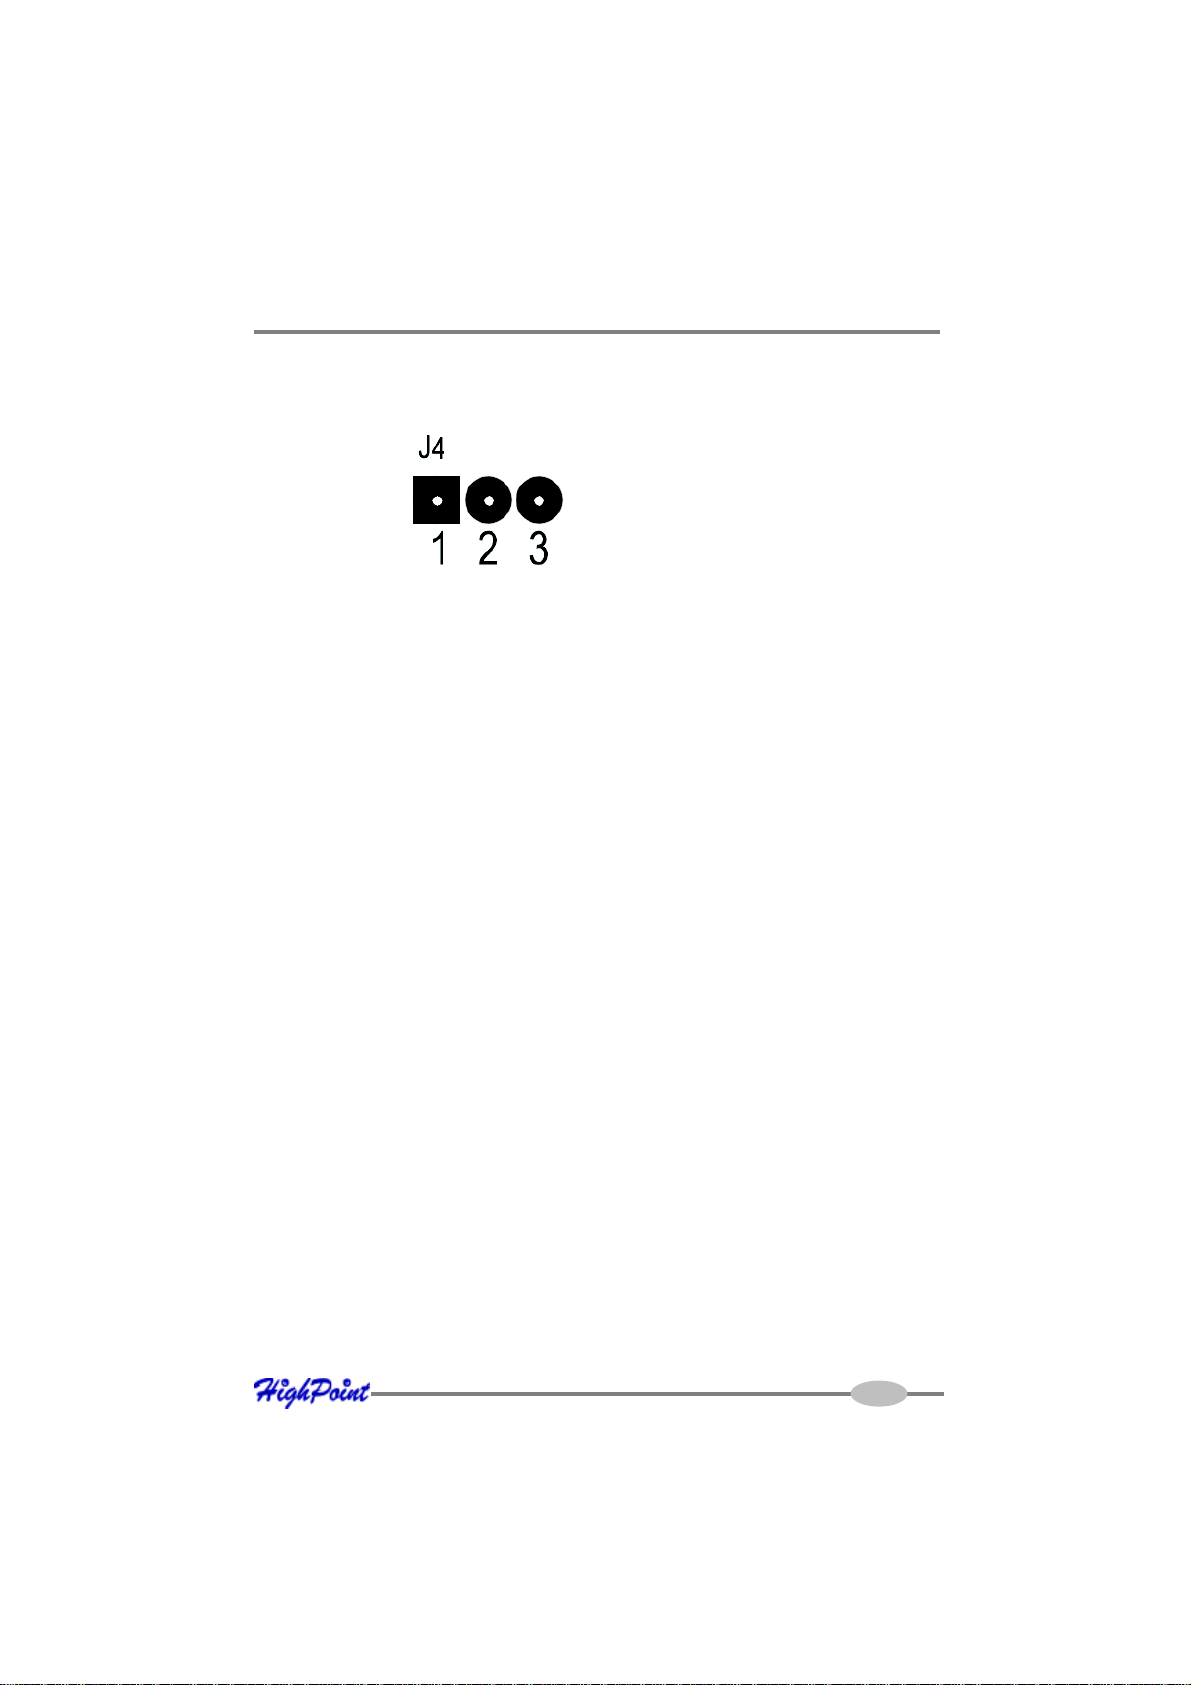
J4
These jumper can be used to select PCI-E work model. As following:
Connect Pin 1 and Pin 2 support PCI-E X1, and connect Pin 2 and Pin 3 support PCI-E
X4.
2 - Installing the RocketRAID Host Adapter
Note: Make sure the system is powered-off before installing the RocketRAID host
adapter.
The RocketRAID 2644X4 include both standard and low-profile brackets. It may be
necessary to attach the low-profile bracket in place of the standard bracket, depending upon the chassis design. The RocketRAID 2644X4 is a full-height card, and is not
designed for use with low-profile chassis.
1. Open the system chassis and locate an unused PCI-Express x4.
2. Remove the PCI slot/bracket cover.
3. Gently insert the RocketRAID card into the PCI-Express slot, and secure the
bracket to the system chassis (illustration below shows RR2644X4).
2-2

RocketRAID 2644X4 Hardware Description/Installation
4. After installing the adapter, attach hard disks to the host adapter using the data
cable. The RocketRAID 26444X4 model utilizes standard Internal SATA to SAS
cables – four are included in each retail box. This card can support up to four
SAS/SATA hard disk drives.
The RocketRAID 2644X4 includes 4 internal SATA to SAS cables. It can
support up to four SAS/SATA hard disk drives.
2-3

RocketRAID 2644X4 Hardware Description/Installation
Note: Many server-level chassis include hard-disk hot-swap bays. For these
system chassis, cables are attached to the chassis backplane, rather than
directly to each individual hard disk. Consult the chassis’s manual for proper
installation procedures.
5. Close and secure the system chassis.
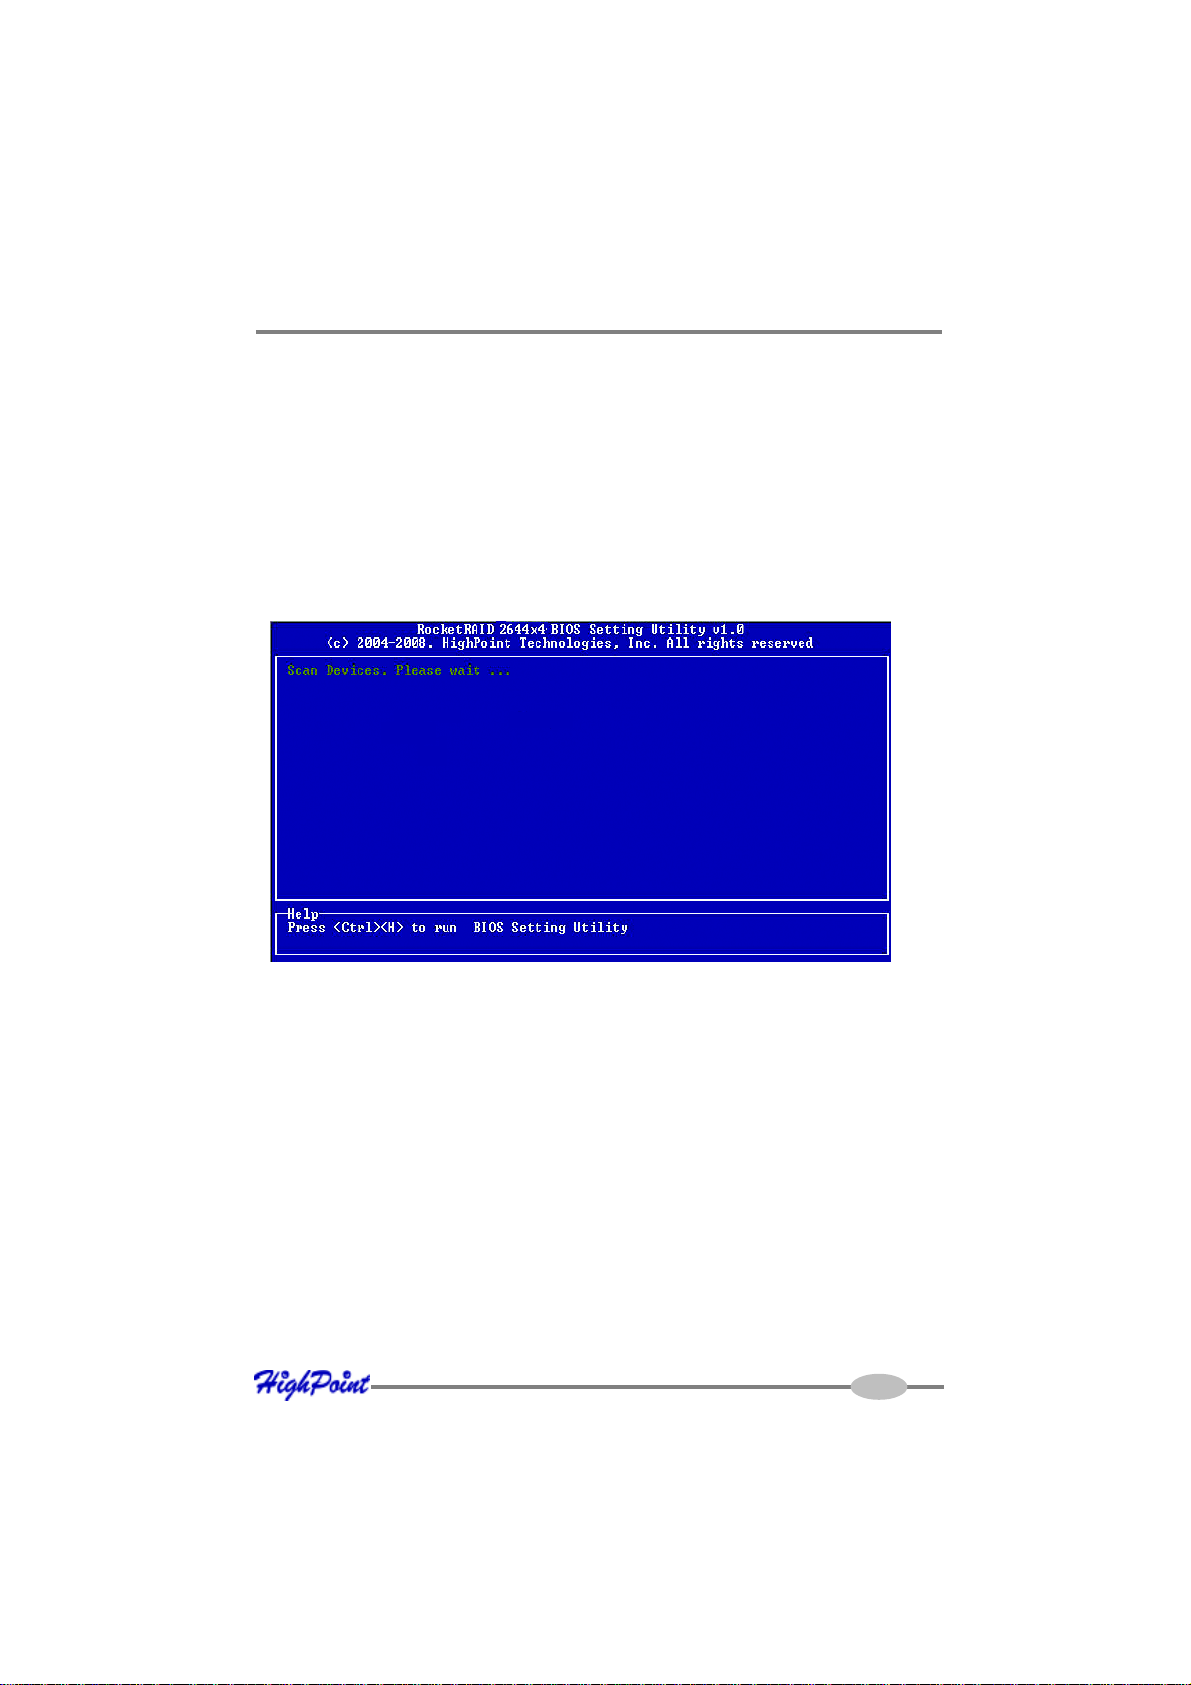
3 - Verifying Installation
Once the host adapter and hard disks have been installed into the chassis, boot-up
the system to verify that the hardware is properly recognized.
1. Power on the system. If the system detects the presence of the adapter, the
RocketRAID BIOS Utility will be displayed during boot up.
2. Press Ctrl+H to access the RocketRAID adapter’s BIOS Utility.
The BIOS Utility will display information about hard disks attached to the adapter.
Make sure all attached disks are detected by this utility. If any of the hard disks are
not detected, power down the system and check the power and cable connections.
2-4

Contents of this Chapter:
RocketRAID 2644X4 BIOS Utility
1 - BIOS Command Overview
2 - Creating RAID Arrays
3 - Adding/Remove Spare Disks
4 - Updating the BIOS
5 - BIOS – Additional Settings
Chapter 3
BIOS Utility
RocketRAID 2644X4 BIOS Utility
RocketRAID BIOS Utility
Access the RocketRAID host adapter’s BIOS utility using the “Ctrl + H”.
This command should be displayed automatically when the host adapter’s BIOS
screen appears during the system’s boot up procedure.
1 - BIOS Command Overview
The BIOS Utility provides a wide selection of RAID related commands. These
commands are displayed towards the top of the utility’s interface.
Use the ← →arrow keys to scroll through the various commands, and the ↑ ↓
arrows to browse through the corresponding command menus. Use the ENTER key
to execute the selected command.
The ESC button can be used to cancel the selected command, or return to the previ-
ous command menu.
Create - this command is used to create RAID arrays. Section 2 discusses this
command in detail.
Delete - this command will delete the selected RAID array.
Warning: This command may result in permanent data loss - it should only be used
if data stored on the target array is no longer relevant, or has been backed up to an
alternate storage device.
3-1

RocketRAID 2644X4 BIOS Utility
Add/Remove Spare - this command is used to assign hard disks to function as
spare disks. The controller is capable of using spare disks to automatically rebuild
broken or faulted RAID arrays.
Section 3 discusses this command in detail.
Settings
Set Boot Mark - this function is used to designate a particular disk or RAID array
to function as the host adapter’s boot device.
Note: This setting is only relevant if the motherboard’s BIOS has set the host
adapter to function as the system’s primary boot device.
Staggered drive spin up – This function is used to enable (or disable) staggered
drive spin up support This setting, by default, is disabled. Enabling staggered drive
spin up will power up the hard disks one at a time, approximately every two seconds.
View – this command is used to select between two views. Press the ENTER key to
change the view.
Devices – displays information about hard disks attached to the host adapter. Use
the ↑ ↓ arrow keys to highlight the target hard disk, and press ENTER to view the
information.
RAID Arrays – displays information about RAID arrays attached to the host adapter.
Use the ↑ ↓ arrow keys to highlight the target array, and press ENTER to view the
information.
Initialize - this function is used to prepare disks for use with RAID arrays.
Note: Arrays cannot be created between disks that have not been initialized.
The following section discusses this command in detail.
2 - Creating RAID Arrays
Initializing Disks:
Before creating a RAID array, the disks must be initialized.
3-2

RocketRAID 2644X4 BIOS Utility
Initialization writes necessary RAID configuration information to the hard disk.
Use the ← →arrow keys to select the Initialize command, and press ENTER.
Warning: Initialization will destroy all pre- existing data on the selected hard
disks.
Use the ↑ ↓ arrow keys to highlight the target hard disk(s) and press ENTER. Next,
press the Y (yes) key to initialize the selected disk(s), or N (no) key to cancel the
initialization process.
Once initialized, these disks can be utilized to create RAID arrays.
To create an array:
1. Use the ← → arrow keys to highlight the Create command, and press ENTER to
open the Create Menu.
2. Use the ↑ ↓ arrow keys to select the appropriate RAID level, then press ENTER.
3. Next, use the ↓ arrow key to highlight the Array Name option and press ENTER.
The array name dialogue box will appear. Use the keyboard to input a new Array
Name, and press the Enter key.
Note: the Array Name command is optional – it is not necessary to name the
array. The array can be named at a later time, and the name of the array can be
changed at any time.
4. On the Create menu, use the ↓ arrow key to highlight the Select Devices item and
press ENTER. A device list will appear, and display all available hard disk drives.
5 . Highlight the target disks that you want to use, and press ENTER to select them.
After all of the disks have been selected, press the ESC key to return to the
Create Menu.
6. Next, Use the ↓ arrow key to highlight the Capacity (GB) option and press
ENTER. The total available capacity will be displayed. Press ENTER if you wish
to use all available space.
7. If you wish to reserve disk space for additional arrays/single disks, use the
keyboard to input the amount of space (in GB) you wish to set aside for this
particular array, and press ENTER.
3-3

RocketRAID 2644X4 BIOS Utility
Note: Multiple arrays can be created using the same set of hard disk drives.
The Capacity option allows you to set aside disk space that be used to create
another array, set as a spare disk, or partitioned to act as a single disk (by the
operating system).
8 . T o complete the creation procedure, use the ↓ arrow key to highlight the Start
Creation item and press ENTER. Press the Y (yes) key to create the array, or N
(no) key to cancel the creation process.
3 - Adding/Remove Spare Disks
This command is used to assign a hard disk to act as a Spare Disk.
Spare Disks are used to automatically rebuild Redundant RAID arrays (RAID 1, 5, 10)
in the case of disk failure. To set a hard disk to act as a Spare Disk, use the ↑ ↓ arrow
keys to select a disk, and press ENTER.
T o remove the Spare Disk setting from a hard disk, highlight the spare disk, and press
ENTER.
Generally, single disks are designated to act as spares (disks that are not configured
into RAID arrays).
However, in some instances, disks that are members of RAID arrays may also be
designated to act as a spare. If the disks in question are part of a RAID array that did
not utilize the full available capacity at the time of creation, these disks may be used
as spares.
For example: a RAID 0 array was created between two 200GB hard disks, but only
200GB of space (out of a grand total of 400GB), was assigned to that array. In this
example, 200GB of disk space remains unallocated. This unallocated space would
allow these disks to be set as spares for a separate redundant array that falls into the
same capacity range (200GB).
4 - Updating the BIOS
BIOS updates are released periodically, and posted on our website for download.
There are several ways to flash the host adapter’s BIOS.
3-4
RocketRAID 2644X4 BIOS Utility
For Windows based operating systems:
1 . Download the desired BIOS update from the Support section provided for the
host adapter. Extract the download to the directory of your choice.
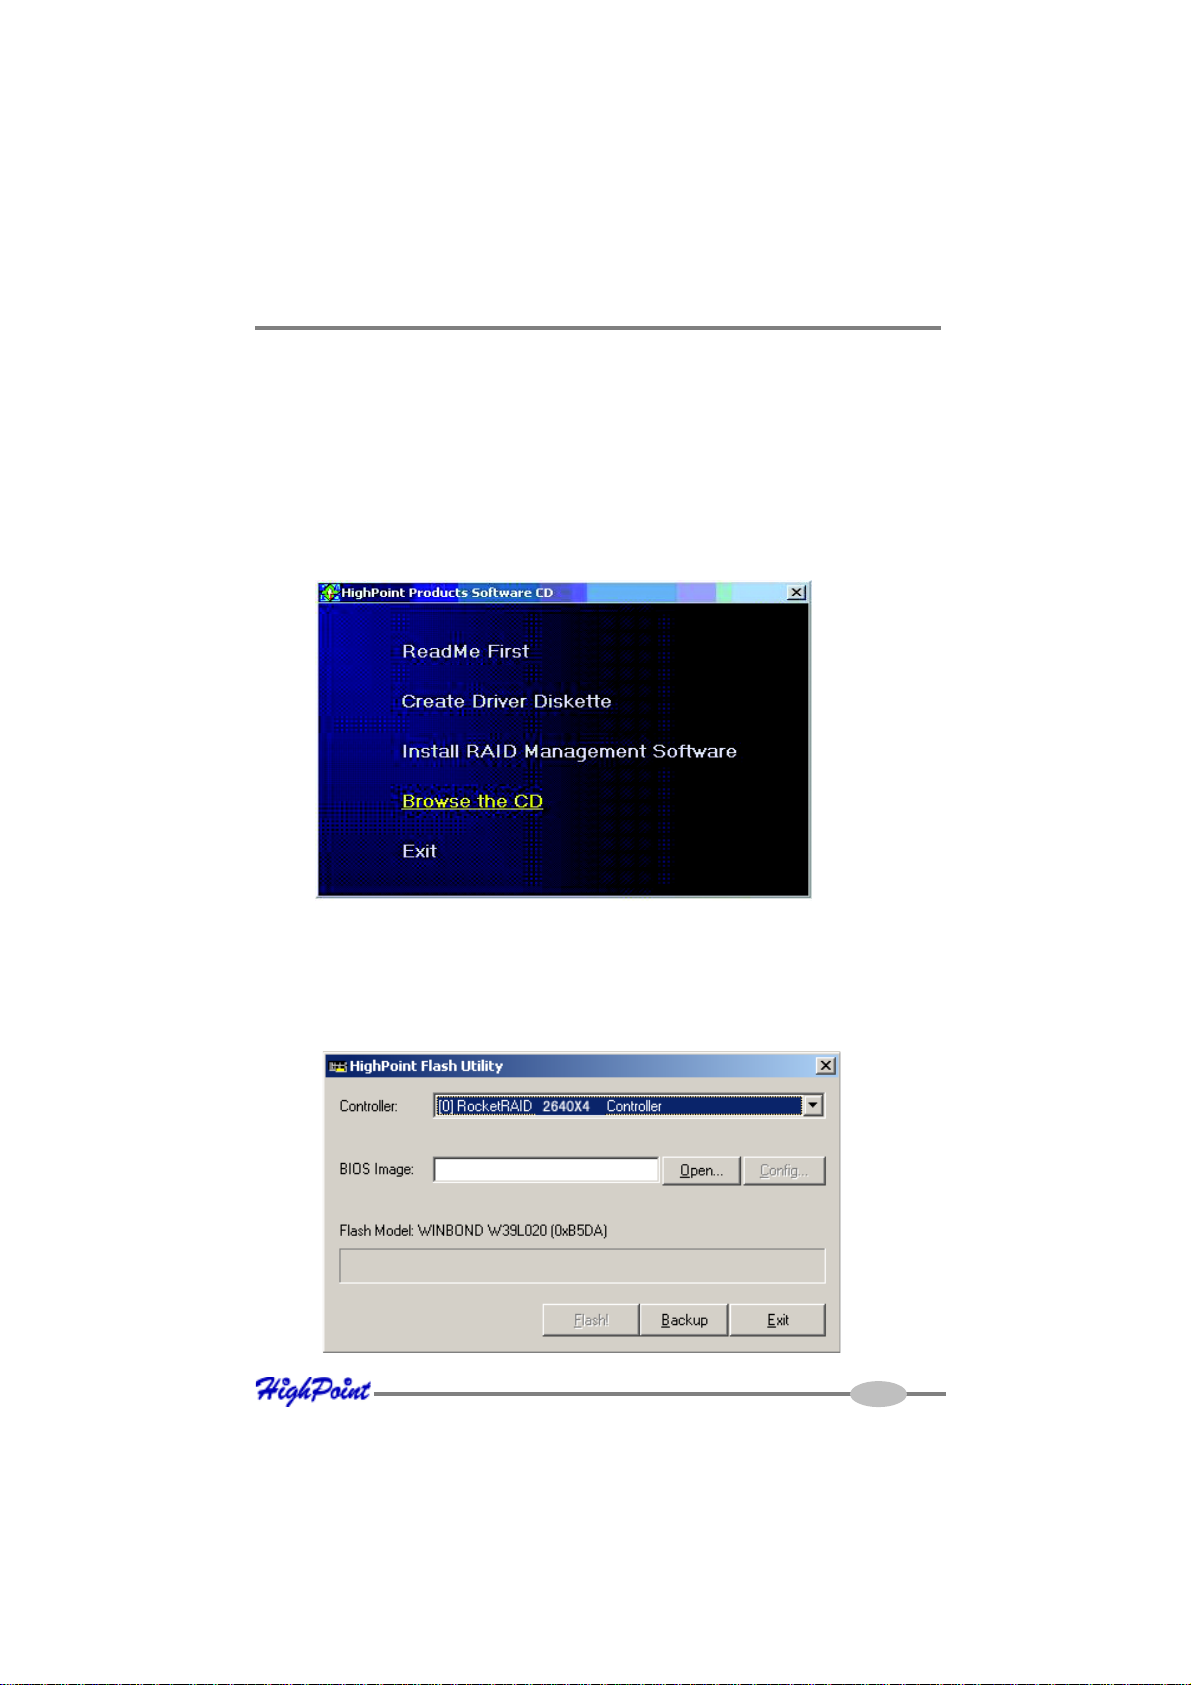
2. Insert the Driver and Software CD included with the retail box into the system’s
CD-ROM or DVD drive.
3. The CD should autorun, and display the following screen:
4. Select the “Browse the CD” option, and access the directory provided for the
RR2644X4 host adapter.
5. Open the “BIOS” directory, and double click the “hptflash.exe” icon. This will
start the BIOS flash utility (RR2644X4 example below):
3-5

RocketRAID 2644X4 BIOS Utility
5. Open the “BIOS” directory, and double click the “hptflash.exe” icon. This will
start the BIOS flash utility (RR2644X4 example below):
6. Select the appropriate model from the drop down menu labeled “Controller”, and
press the “Open” button – this will allow you to browse to the extracted BIOS
download (step 1).
7. Highlight the image file, and click the “Flash!” button. The utility will update the
card, then verify the update.
8. Once complete, click on the “Exit” button to close the utility. Shutdown and
reboot the system.
Note: the “Backup” button will save a copy of the card’s current BIOS to the
directory of your choice.
For other operating systems:
In order to update the BIOS, the system must be booted into DOS mode, using a
DOS-boot diskette or CD image.
1. Copy the load.exe and the bios image file to the bootable floppy diskette (you
may need to use a different floppy depending upon how much space is available
on the boot diskette - this can vary).
3-6

RocketRAID 2644X4 BIOS Utility
2. If you are booting from a CD image, you will need to add these files to the CD.
Insert the boot image media into the appropriate drive, and boot the system.
3. Once the A:\> prompt has appeared, insert the media that contains the required
BIOS files, and type the following command:
load xxx.xxx
Then, press enter.
Note: xxx.xxx = the name of the BIOS image file (type it exactly as it appears).
4. The utility will scan for the controller, and ask if you want to backup the BIOS
(save a copy of the current BIOS to a floppy diskette). This is optional - you can
answer No, and continue.
Note: This option will not function if the system was booted from CD.
5. The utility will then ask if you want to flash the controller (upgrade the BIOS).
Select Y for yes.
6. The utility will display a progress bar during the flash procedure, then will attempt
verify the update.
7. Once complete, the system can be rebooted.
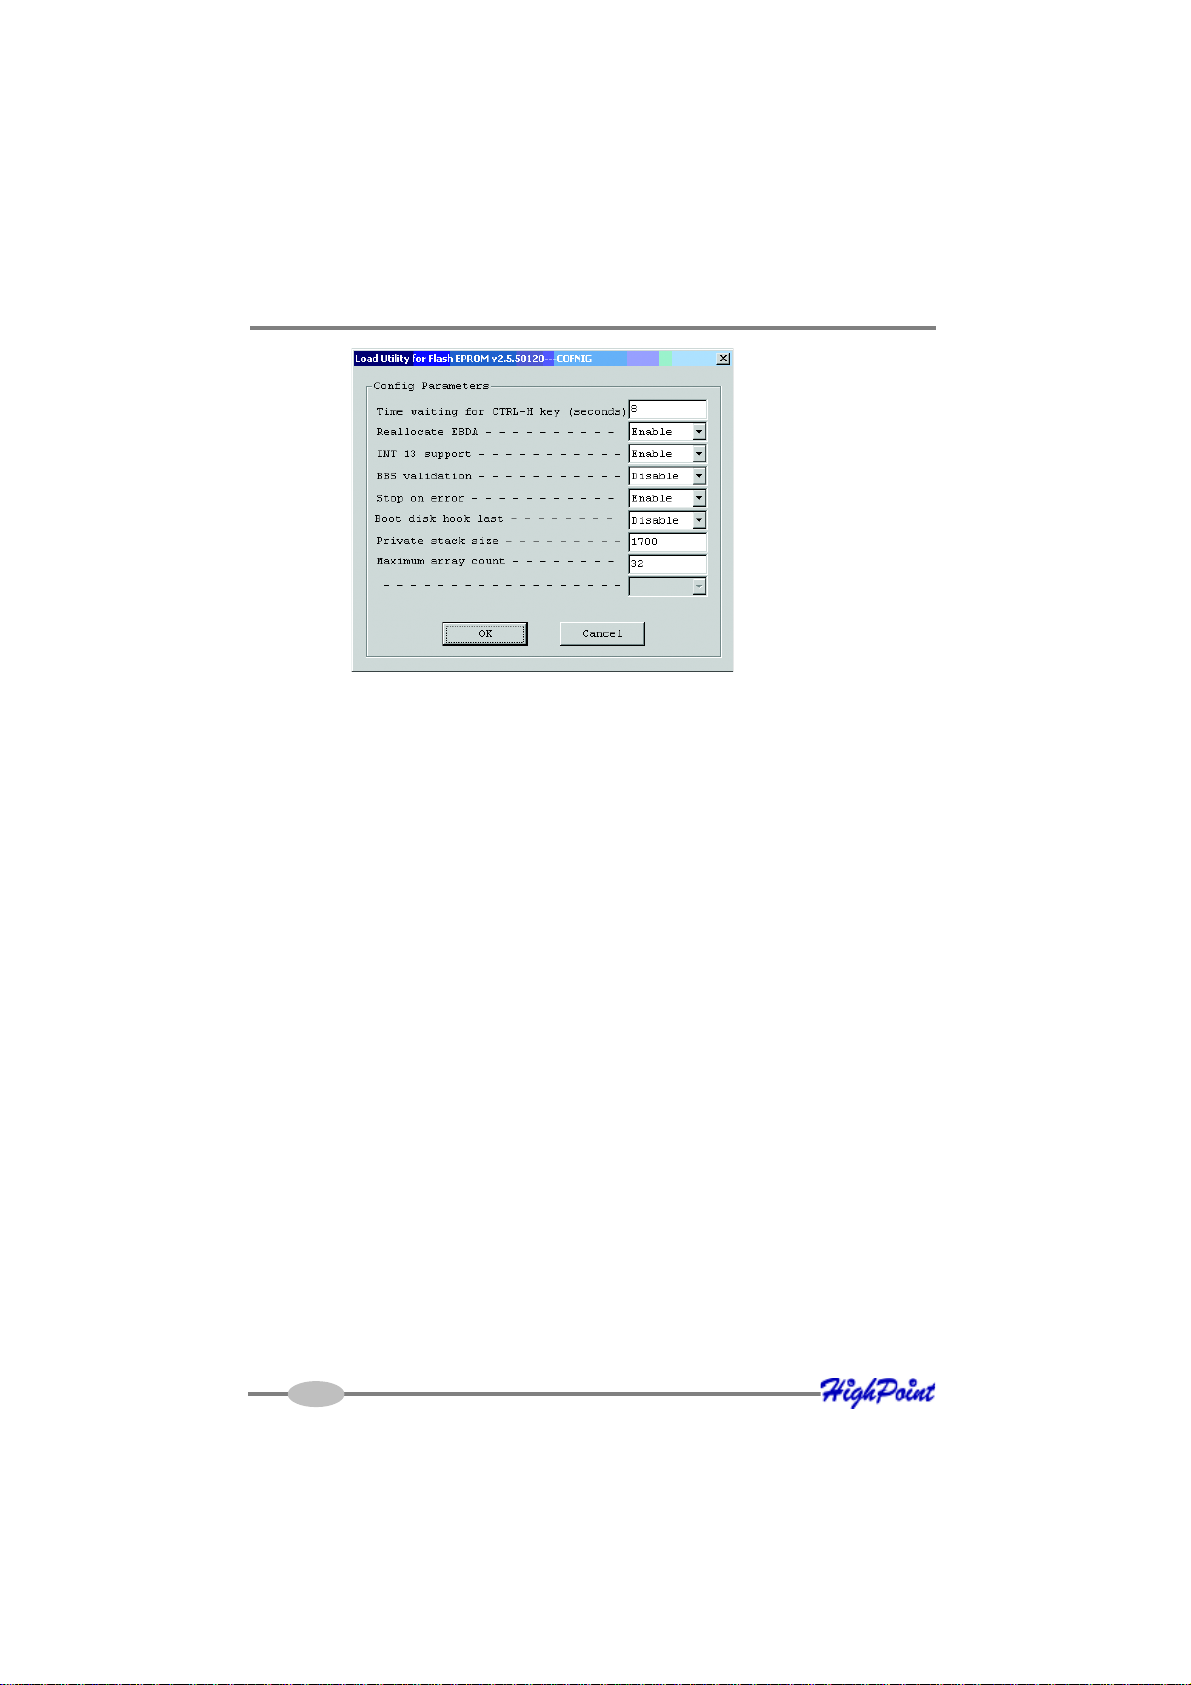
5 - BIOS – Additional Settings
The RocketRAID host adapter’s BIOS utility has several other configurable settings
that can be accessed when flashing the BIOS.
Using the hptflash.exe utility (from within a Windows operating system):
Click on the “Configure” button from the main interface window.
The following window will appear:
3-7
RocketRAID 2644X4 BIOS Utility
Use the drop down menus to enable or disable controller functions.
Using the DOS mode utility (load.exe):
Load xxx.xxx –c
Note: “xxx.xxx” refers to the BIOS image file.
A BIOS menu similar to the BIOS setup utility will be displayed.
This sub-menu allows the administrator to enable/disable various controller
functions.
Several of the more common functions are described below:
Stop on Error – disabling this option will prompt the card to automatically
skip error messages during bootup (broken array warnings), if the administrator does not input the “Ctrl + H” command to access the BIOS menu.
EBDA Reallocation – this function refers to “Extended BIOS Data Area”.
Disabling this feature may remedy boot problems associated with
motherboards that halt after the RR2644X4 BIOS screen is displayed.
INT13 – The card’s boot function. Disabling this feature removes the card’s
ability to boot the system. This may be useful for systems that utilize
multiple bootable controllers – some motherboards may not be able to load
the BIOS of each device during boot up, which may impair the system’s
ability to boot from a specific device.
3-8

Chapter 4
Driver and Software Installation Microsoft
Windows
Contents of this Chapter:
Driver and Software CD
Windows Driver Installation

RocketRAID 2644X4 W eb-RAID Management Interface
Driver and Software CD
The retail box includes a Driver and Software CD.
This CD can be used to generate driver diskettes, and install the RAID Management
software for a variety of operating systems.
T o create a driver diskette:
1. Insert the CD into the system’s CD/DVD drive. The program should start
automatically.
2 . Insert a blank floppy diskette into the system’s floppy drive.
3. Click on “Create Driver Diskette”.
4 . Click on the “Please Select a Product” drop-down button, and select the appro-
priate host adapter model from the list.
4-1
 Loading...