

Page 1

HighPoint RocketHybrid 1220/1222
SATA 6Gb/s, PCI-Express 2.0 x1
Host Adapters User’s Guide
Revision: 1.0
Date: January 2011
HighPoint Technologies, Inc.
0
Page 2

Copyright
Copyright © 2011 HighPoint Technol ogies, Inc. This document contains materials prote ct ed by
International Copyright Laws. All rights reserved. No part of this manual may be reproduced, transmitted
or transcribed in any form and for any purpose without the express written permission of HighPoint
Technologies, Inc.
Trademarks
Companies and products mentioned in this manual are for identification purpose only. Product names or
brand names appearing in this manual may or may not be registered trademarks or copyrights of their
respective owners. Backup your important data before using HighPoint's p roducts and use at your own risk.
In no event shall HighPoint be liable for any loss of profits, or for direct, indirect, special, incidental or
consequential damages arising from any defect or error in HighPoint's products or manuals. Information in
this manual is subject to change without notice and does not represent a commitment on the part of
HighPoint.
Notice
Reasonable effort has been made to ensure that the information in this manual is accurate. HighPoint
assumes no liability for technical inaccuracies, typographical, or other errors contained herein.
1
Page 3

HighPoint Technologies, Inc.
HighPoint Technologies, long recognized as a leader in mass storage technologies, specializes in the design
and manufacturer of HBA (Host Bus Adapters) and HighPoint RAID IP (Intellectual Prop erty). HighPoin t
provides a broad range of scalable hardware HBA’s that meet the storage requirements for all customer
types, ranging from Enterprise corporations, SMB (Small Medium Sized Business), to the home PC
enthusiast.
2
Page 4

Table of Contents
HIGHPOINT TECHNOLOGIES, INC......................................................................................................2
1 – ROCKETHYBRID 1220/1222...............................................................................................................5
1.1 - The RocketHybrid 1220/1222 – Smart Hybrid Drives...................................................................... 5
1.2 - Card Features and Specifications.......................................................................................................5
1.3- Kit Contents........................................................................................................................................ 6
2 – INSTALLING THE HOST ADAPTER................................................................................................ 7
2.1 – RocketHybrid 1220........................................................................................................................... 7
2.2 - RocketHybrid 1222 ........................................................................................................................... 8
2.3 - LED Connections (Figure displays the RocketHybrid 1220)............................................................ 8
2.4 - Installing the RocketHybrid 1220/1222 Host Adapter ...................................................................... 9
2.5 - Verifying Installation....................................................................................................................... 10
2.6 - Windows 7, 2008 and Vista – Native Driver support...................................................................... 10
3 - LAUNCHING THE BIOS.................................................................................................................... 11
4 - NAVIGATING THE BIOS...................................................................................................................12
4.1 Topology............................................................................................................................................ 13
4.2 Information........................................................................................................................................13
4.3 Help ...................................................................................................................................................13
4.4 Keyboard Controls.............................................................................................................................14
5 - CREATING HYBRID DRIVES .......................................................................................................... 15
6 - ERASING HYBRID CONFIG URATION DATA .............................................................................. 21
7 - DELETING A HYBRID DRIVE......................................................................................................... 22
8 - INSTALLING MSU IN WINDOWS...................................................................................................23
9 – MSU OVERVIEW...............................................................................................................................27
9.1- Opening MSU...................................................................................................................................27
9.2 - Tray Application for Windows........................................................................................................ 28
9.2.1 - Accelerate Status......................................................................................................................28
9.2.2 - Open MSU...............................................................................................................................29
3
Page 5

9.2.3 - Enable/Disable Alarm.............................................................................................................. 29
9.2.4 - Enable/Disable Pop-up Event Messages.................................................................................. 29
9.2.5 - View Version Information ....................................................................................................... 29
9.2.6 - Exit MSU................................................................................................................................. 29
9.3 Login.................................................................................................................................................. 30
9.3.1 - Security Warning ..................................................................................................................... 30
9.3.2 - Login Page...............................................................................................................................30
9.4 - User Interface.................................................................................................................................. 31
9.4.1 - Marvell Storage Management.................................................................................................. 31
9.4.2 – Properties................................................................................................................................. 32
9.4.3 - Event Logs............................................................................................................................... 33
10 - MSU: CREATING HYBRID DRIVES.............................................................................................34
11 – MSU: M AN AGI N G HYBRID DRIVES...........................................................................................36
11.1 –Selecting and Adding folders for Optimization:............................................................................ 36
11.2 - Changing the method of Optimization...........................................................................................36
12 – MSU: MONITORING HYBRID DRIVES ...................................................................................... 38
12.1 - Receiving Email Event Notifications ............................................................................................ 38
12.2 - Viewing Events using Windows Event Viewer.............................................................................38
12.3 - Enabling the Alarm for Critical Events.........................................................................................39
13 - DELETING HYBRID DRIVES.........................................................................................................40
THANK YOU.............................................................................................................................................41
4
Page 6

1 – RocketHybrid 1220/1222
1.1 - The RocketHybrid 1220/1222 – Smart Hybrid Drives
The RocketHybrid 1220/1222 series host adapters are breakthrough SATA 6Gb/s controllers; their
innovative Smart Hybrid Technology enables you to take full advantage of low cost, large capacity SATA
hard drives and combine them with the high performance benefits provided by SSD devices. In addition,
an intelligent algorithm automatically migrates regularly accessed “hot” data to the SSD region, while
safely storing all of your files on a larger capacity SATA hard disk drive.
The RocketHybrid 1220/1222’s easy to use BIOS interface allows you to quickly configure Hybrid Virtual
disks between SSD’s and SATA hard drives – Safe mode for data security, and Capacity for highperformance storage.
1.2 - Card Features and Specifications
Host Side Interface
Disk Interface
Number of Channels
Virtual Disk Support
Operating Systems Support
Virtual Disk Management
Some Highlighted Features
Physical Specifications
• Size: (110mm x 62mm) 4.33〞L x 2.44〞W
• WEMI: FCC Part 15 Class B and CE
Thermal and Atmospheric Characteristics:
• Working Temperature Range: +5℃~ + 55℃
• Relative Humidity Range: 5% ~ 60% non-condensing
• Storage Temperature: -20℃ ~ +80℃
• MTBF: 920,585 Hours
PCI-Express x1 (Gen2)
SATA 6Gb/s
2 SATA 6Gb/s ports (RocketHybrid 1220)/2 eSATA 6Gb/s
ports(RocketHybrid 1222)
Capacity Mode(for best performance)
Safe Mode(for performance and fault tolerance)
Windows 7, Windows 2008, Windows Vista (32 and 64-bit)
BIOS Utility
MSU Manangement Software
BIOS booting support
Web-based Management interface (MSU)
Driverless installation (AHCI device)
5
Page 7

Electrical Characteristics:
PCI-Express 3.3V 12V
Power 1W max 3W max
1.3- Kit Contents
• RocketHybrid 1220/1222 Host Ada pt e r
• 2 SATA cables (RocketHybrid 1220)
• Low-profile bracket
• Software CD
• Quick installation Guide
6
Page 8
2 – Installing the Host Adapter
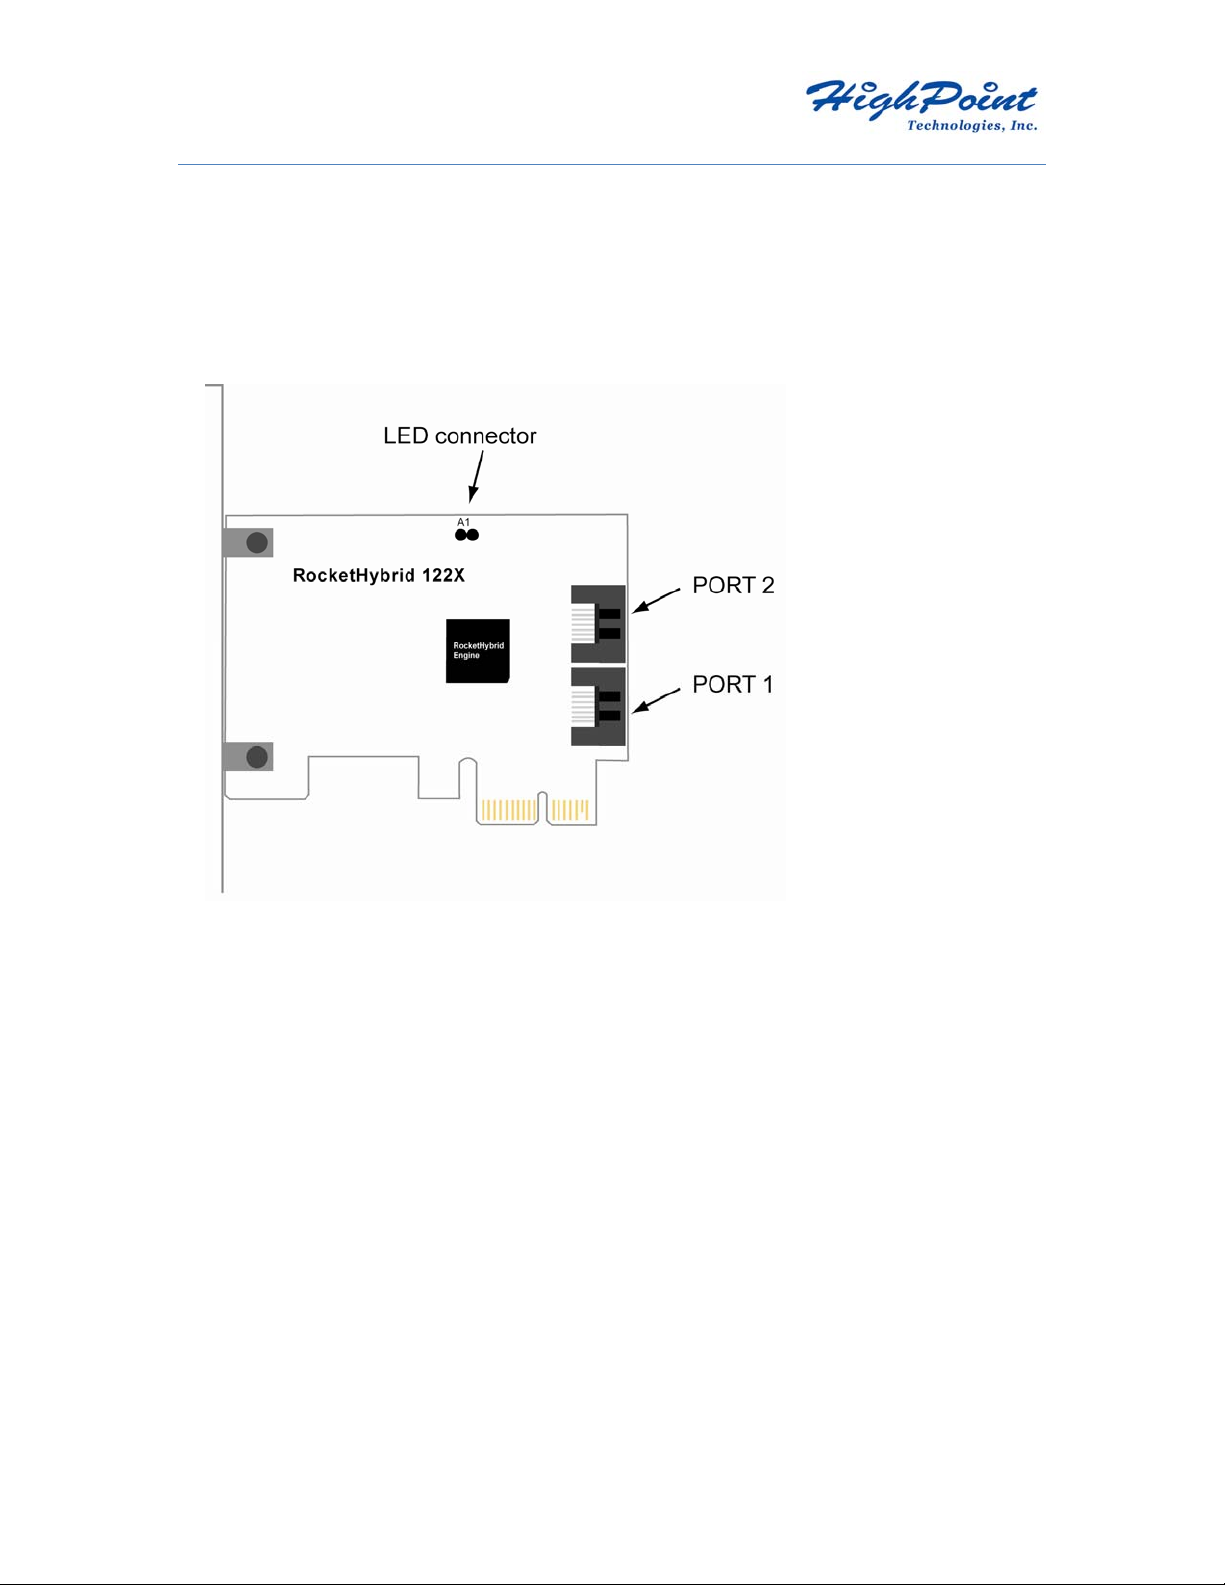
2.1 – RocketHybrid 1220
Port1, Port2,
These represent the RocketHybrid 1220’s 2 internal SATA ports.
These Ports can support up to 2 SATA hard disks.
7
Page 9
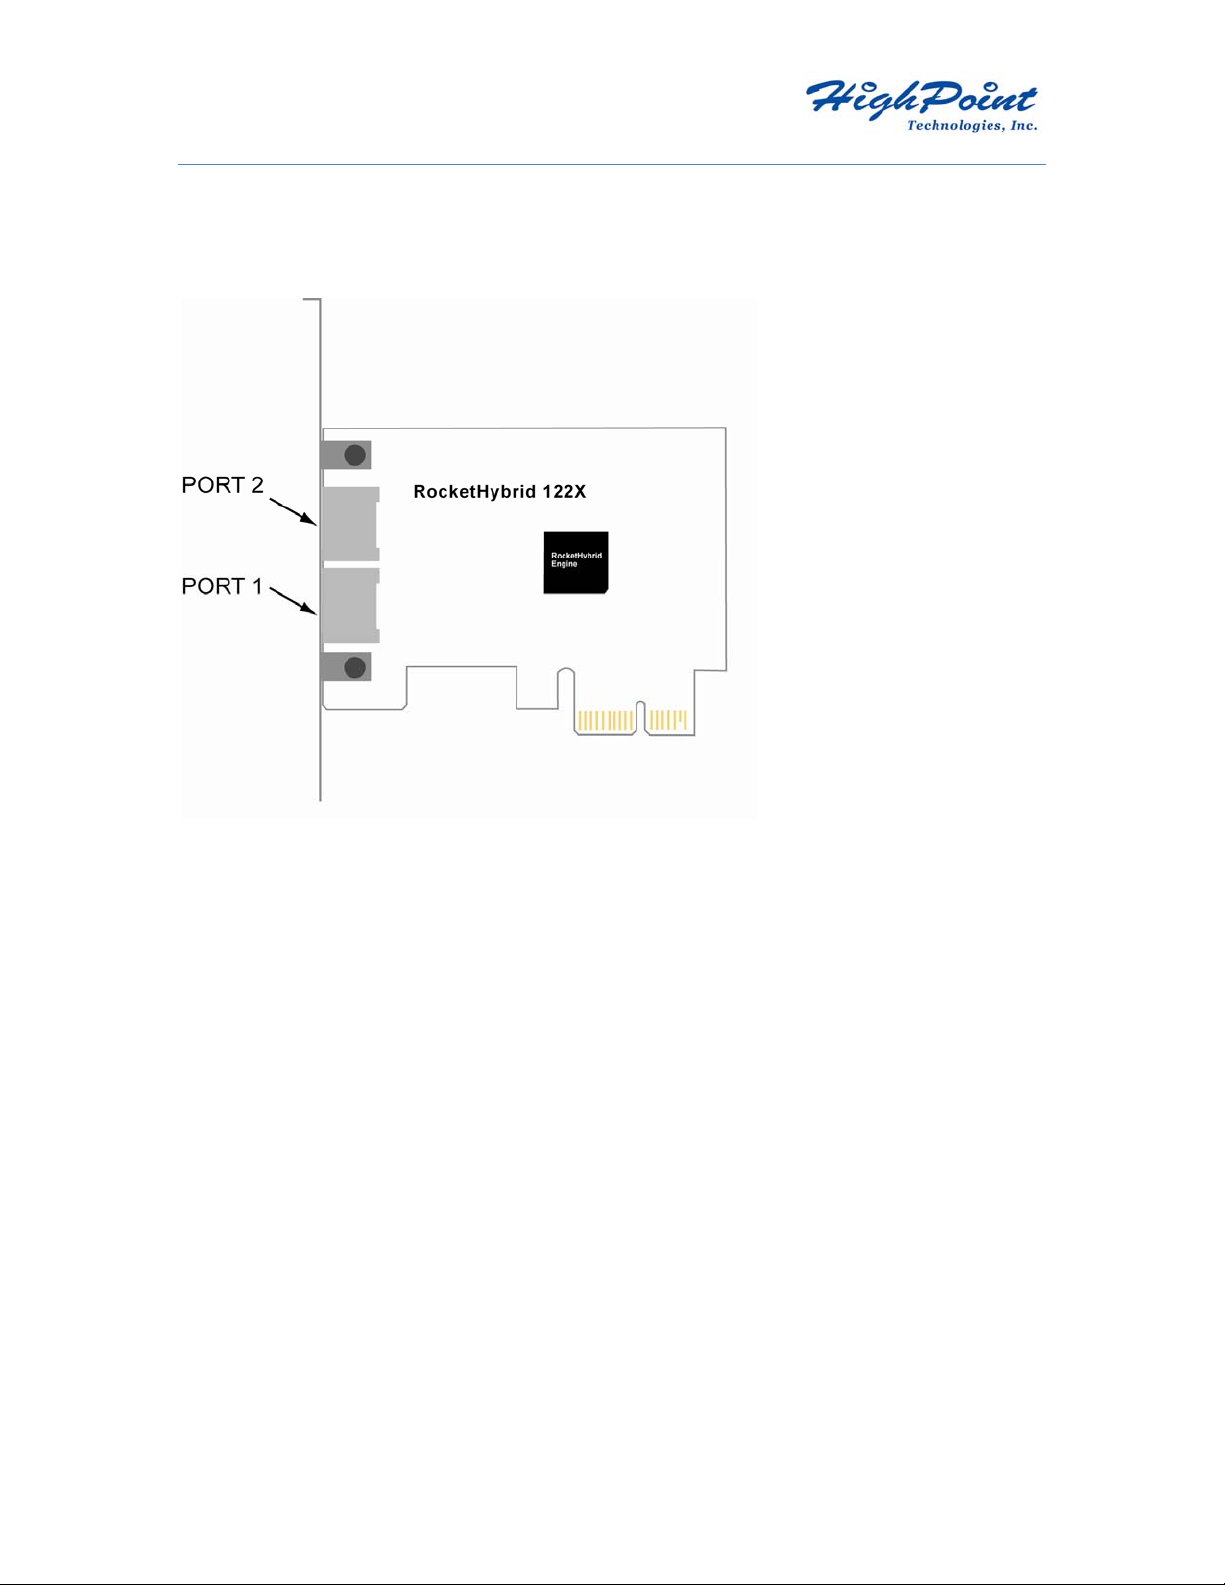
2.2 - RocketHybrid 1222
Port1, Port2,
These represent the RocketHybrid 1222’s 2 e-SATA ports.
These Ports can support up to 2 e-SATA hard disks.
2.3 - LED Connections (Figure displays the RocketHybrid 1220)
LED connectors (Drive-activity): The RocketHybrid1220 host adapter has 1 LED connector that is used to
indicate the activity status of hard drives attached to the card’s 2 SATA channels.
8
Page 10
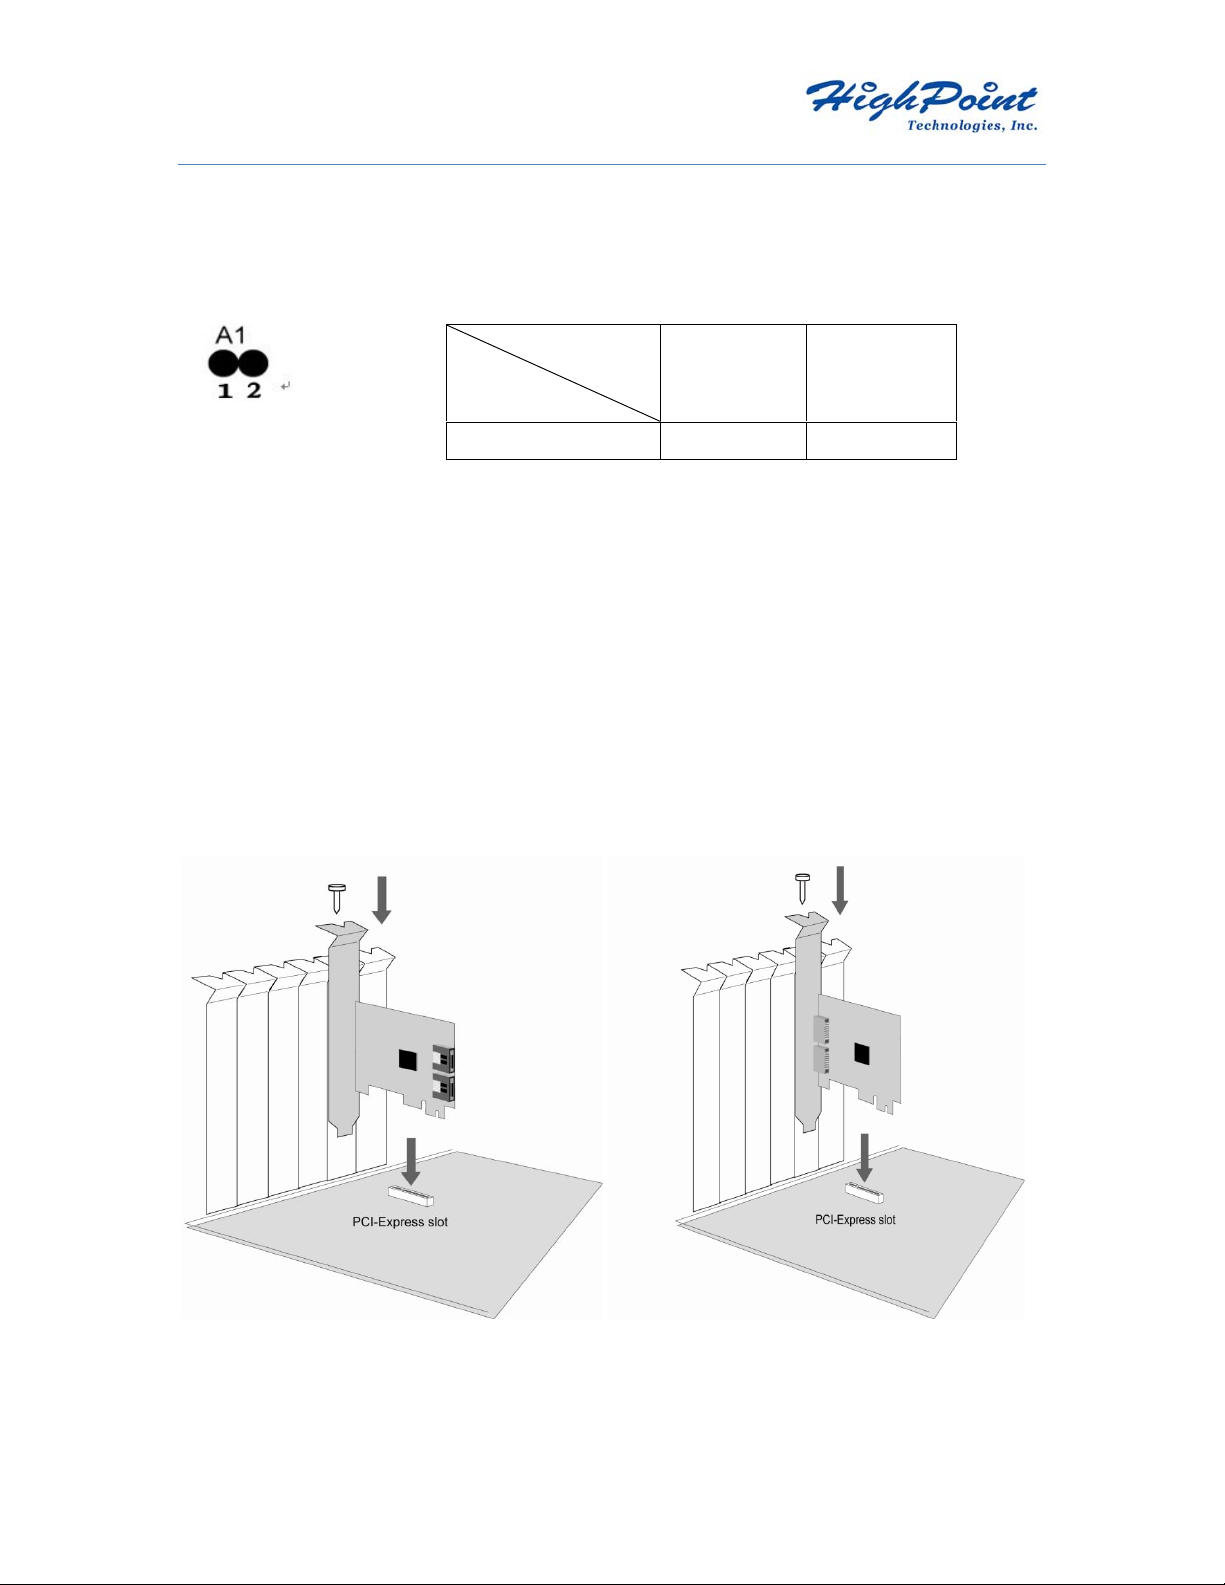
A1
Jumper A1 provides LED support for Drive Activity
Pin Number
Connections
Pin 1 Pin2
A1 Channel/Disk 1 Channel/Disk 2
2.4 - Installing the RocketHybrid 1220/1222 Host Adapter
Note: Make sure the system is powered-off before installing the RocketHybrid 1220/1222 host adapter.
The RocketHybrid 1220/1222 includes both standard and low-profile brackets. It may be necessary to
attach the low-profile bracket in place of the standard bracket, depending upon the chassis design.
1. Open the system chassis and locate an unused PCI -Express x1 (Gen2).
2. Remove the PCI slot/bracket cover.
3. Gently insert the RocketHybrid 1220/1222 card into the PCI-Express slot, and secure the bracket to
the system chassis.
9
Page 11

4. After installing the adapter, attach hard drives to the host adapter using the data cable. The
RocketHybrid 1220/1222 models utilize 2 SATA/eSATA cables, which are included in each retail box.
Each SATA cable can support a single SSD or HDD. Consult the chassis manual for proper
installation procedures.
Note: Many server-level chassis include hard-drive hot-swap bays. For these system chassis, cables
are attached to the chassis backplane, rather than directly to each individual hard drive. Consult the
chassis manual for proper installation procedures.
5. Close and secure the system chassis.
2.5 - Verifying Installation
Once the host adapter and hard drives have been installed into the chassis, boot-up the system to verify that
the hardware is properly recognized.
1. Power on the system. If the system detects the presence of the adapter, the RocketHybrid 1220/1222
BIOS Utility will be displayed during boot up.
2. Press Ctrl+M to access the RocketHybrid 1220/1222 adapter’s BIOS Utility.
The BIOS Utility will display information about hard drives attached to the adapter.
Make sure all attached drives are detected by this utility. If any of the hard drives are not detected, power
down the system and check the power and cable connections.
2.6 - Windows 7, 2008 and Vista – Native Driver support
The RocketHybrid 1220/1222 is natively support by the Windows 7, 2008 and Vista operating systems. It
will be recognized automatically, as an AHCI device. Driver installation is not required.
10
Page 12

3 - Launching the BIOS
Table 1-1 lists the keyboard controls for launching the BIOS during the controller’s Power-On Self Test
(POST).
Table 1-1 Launching the BIOS
Key Function
Launch the BIOS Utility
Press the key combination during the controller’s POST.
Note: You may have to wait a few seconds for the controller BIOS to appear.
Figure 1-1 shows the messages displayed during the POST of the RocketHybrid 1220/1222.
Figure 1-1 BIOS Post Message
-E X1 3.0G
BIOCI
11
Page 13
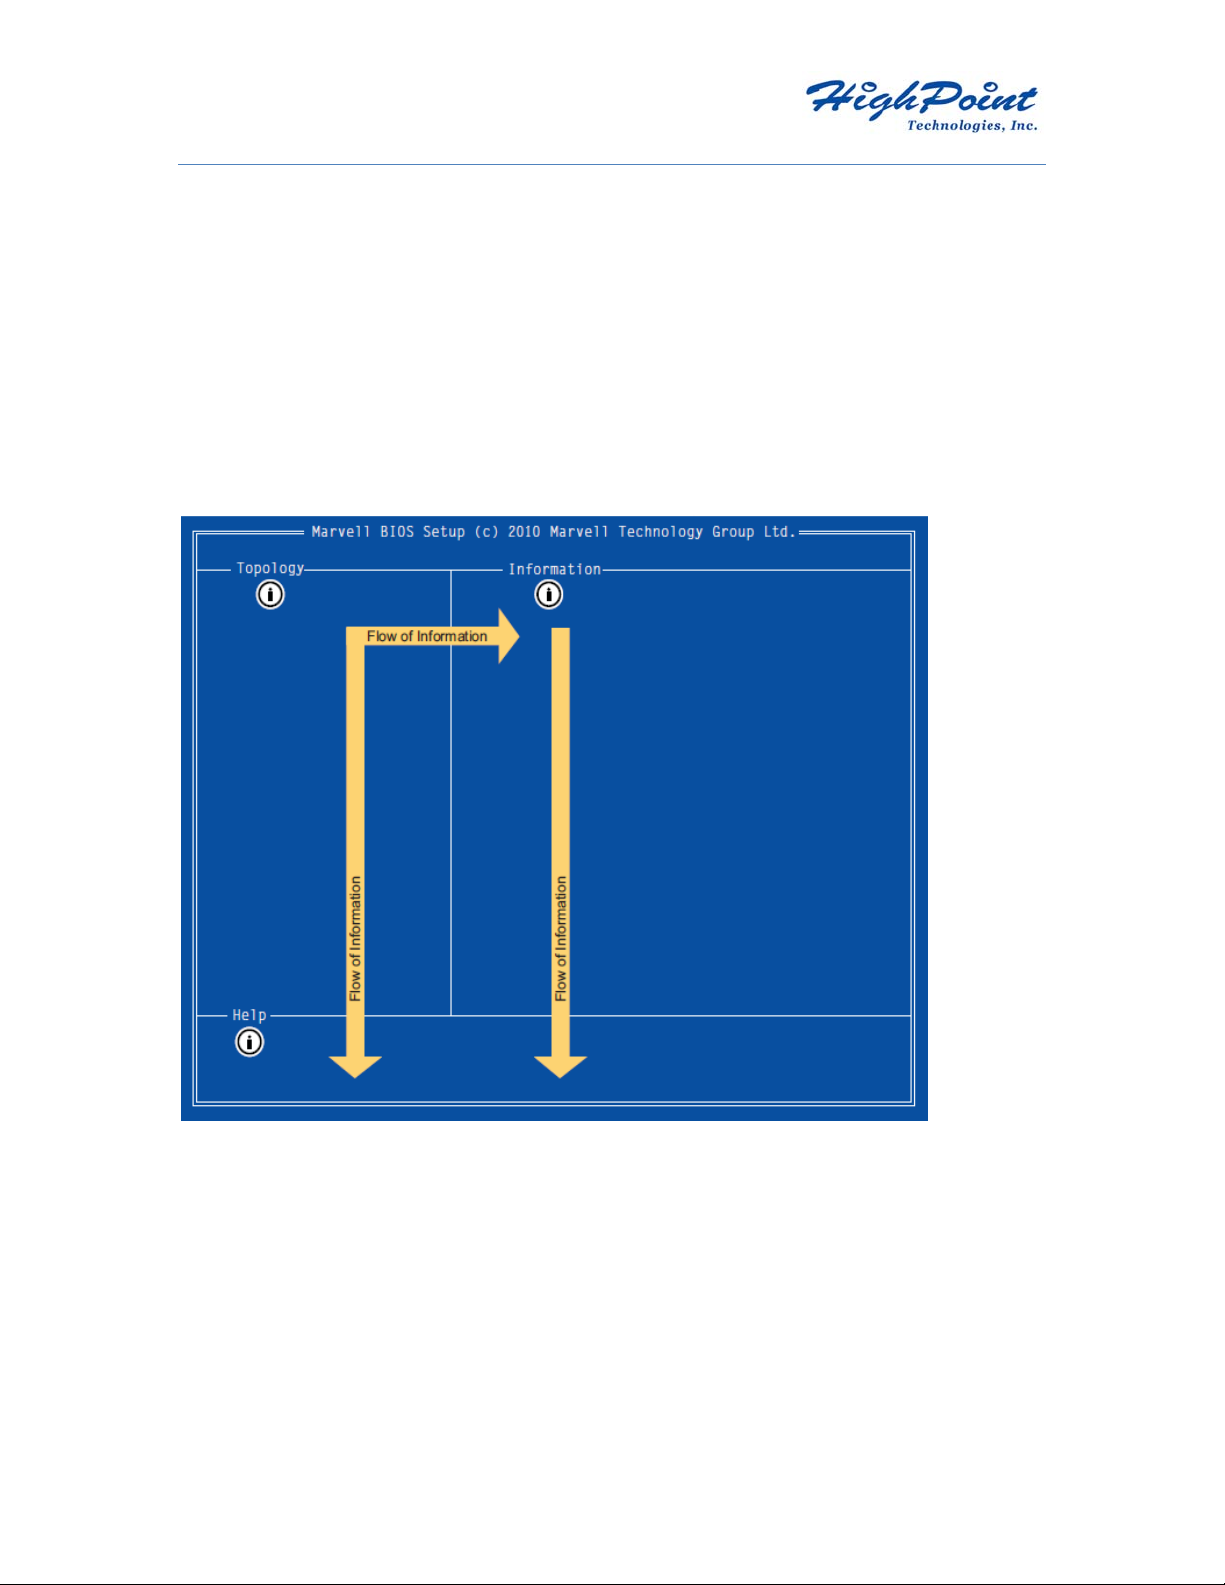
4 - Navigating the BIOS
As shown in Figure 1-2, the BIOS user interface (UI) is divided into three main panes:
• Topology
• Information
• Help
Figure 1-2 BIOS User Interface
Note: This symbol is a visual element used in this document to emphasize specific areas of
the BIOS UI as relevant to the topic under discussion. It is not part of the Marvell BIOS UI.
The arrow lines in Figure 1-2 show the flow of information in the user interface. Selections
made in a pane determine the contents shown in other panes in the following ways:
• Content in the Information pane is populated based on selections in the Topology pane.
• Content in the Help pane is populated based on selections in both the Topology and Information
panes.
12
Page 14

4.1 Topology
As shown in Figure 1-3, the Topology pane uses a tree view to list and show the relationships between the
various physical/virtual devices attached to the system. The devices on this list include the HBA, physical
disks, and virtual disks.
Figure 1-3 BIOS UI Example Selection
4.2 Information
The Information pane is populated based on the selection in the Topology pane. Figure 1-3
shows information relevant to the selection HBA 0: Marvell 0.
4.3 Help
The Help pane is populated based on selections in both the Topology and Information panes. The Help
pane in Figure 1-3 shows a brief description and lists keyboard controls for performing actions relevant to
the selection.
13
Page 15

4.4 Keyboard Controls
Table 1-2 lists the controls for navigating and using the BIOS Interface.
Table 1-2 Navigation Keys
14
Page 16

5 - Creating Hybrid Drives
Creating a Hybrid Drive
The BIOS Utility allows you to create Hybrid Drives using the Configuration Wizard.
To create Hybrid Drive:
1. In the Topology pane, scroll to HBA 0: Marvell 0 and press Enter to select. A menu pops up, as
shown in Figure 1- 4.
Select Configuration Wizard and press Enter to begin creating the virtual disk.
Figure 1- 4 Configuration Wizard
15
Page 17

Free Physical Disks
2. Use the arrow keys to scroll through the list of free physical disks, as shown in Figure 1- 5. Press
Space to select/unselect a disk.
Note: When a disk is selected, an asterisk (*) appears to the left of the disk label, as shown in Figure
1-5.
Figure 1- 5 Select Free Disks
Note: Hybrid mode requires 1 SSD and 1 SATA har d di sk .
16
Page 18

3. After selecting the required disks, press Enter to continue.
4. The Create Virtual Disk configuration options appear in the Information pane, as shown in Figure
1- 6. Available keystrokes are listed in the Help pane when a setting is highlighted.
Figure 1- 6 Create Virtual Disk
Note: Max Size (MB), Stripe Size, and Name options are unavailable in the current version of MBU.
09 M
17
Page 19

5. Highlight Hybrid and press Enter.
A menu will be displayed (as shown in Figure 1- 7) listing available Hybrid modes. Select your
preferred mode and press Enter.
Figure 1- 7 Hybrid Mode
Note: The default Hybrid mode is Safe mode.
• Safe mode creates a virtual disk that is optimized for fault tolerance. It is safe to use with hard
drives that contain existing data.
• Capacity mode creates a virtual disk that is optimized for read and write performance.
18
Page 20

6. Highlight Keep original data and press Enter to select.
A menu will be displayed, as shown in Figure 1- 8. Select Yes or No and press Enter.
Figure 1- 8 Keep Original Data
Note: This option is disabled when selecting Capacity mode, as it is inherently data-destructive.
7. After configuring the virtual disk, highlight Next.
Press Enter to create the virtual disk.
19
Help
Page 21

8. Press Y to confirm the creation of the virtual disk, as shown in Figure 1- 9.
The virtual disk is now listed in the Topology pane.
Figure 1-9 Create Virtual Disk
20
Page 22

6 - Erasing Hybrid Configuration Data
This topic describes the procedure to erase Hybrid configuration data (if any) on a foreign
physical disk.
Note: The RocketHybrid 1220/1222 stores Hybrid configuration data on all physical d isks that are part of a
virtual disk. This configuration data must be erased from each physical disk before they can be used to
create another virtual disk.
To erase Hybrid configuration data
WARNING If the physical disk was originall y part of an ot h e r vi rt ual disk, using Erase RAID
Configuration Data may damage that virtual disk.
1. In the Topology pane, select Physical Disk (Test > HDD 0: WDC WD1002FAEX in Figure 1- 1 0
and press Enter. A menu pops-up, as shown Figure 1-10.
2. Select Erase RAID Config Data to erase the RAID configuration data, as shown in
Figure 1-10.
3. Select Yes to confirm the operation.
Figure 1- 10 Erase Configuration Data
Test 2FAEX
Free Physical Disks
21
Page 23

7 - Deleting a Hybrid Drive
This topic describes the procedure to delete a Hybrid Drive using the BIOS interface.
To delete a Hybrid Drive:
WARNING Using Delete permanently erases all data on the Hybrid Drive.
1. In the Topology pane, select Virtual Disk (Test in Figure 1-17) and press Enter. A menu pops-up,
as shown Figure 1-17.
2. Select Delete to delete the virtual disk, as shown in Figure 1-17.
3. Press Y to select Yes when prompted Do you want to delete this virtual disk?.
4. Press Y to select Yes when prompted Do you want to delete MBR from this virtual disk?
Figure 1-17 Delete Virtual Disk
22
Page 24

8 - Installing MSU in Windows
This section describes the procedure for installing MSU in Windows.
To install MSU for Windows 7, 2008 and Vista
1. Verify that the RocketHybrid 1220/1222 is detected by the system. Access Device Manager and make
sure the AHCI driver is present, under , as described in section
2. Run MSUSetup.exe. The MSU Setup Wizard appears, as shown in Figure 1-2.
Figure 1-2 MSU Setup Wizard
3. Select Next, as shown in Figure 1-2.The License Agreement window appears, as shown in
Figure 1-3.
Figure 1-3 License Agreement
23
Page 25

4. Read the License Agreement.
Select I accept the terms of the License Agreement, as shown in Figure 1-3.
5. Select Next, as shown in Figure 1-3, to continue with the installation.
The Choose Components window appears, as shown in Figure 1-4.
Figure 1-4 Choose Components
Note: Installation of the Command Line Interface utility and Flash Command Line Interface utility is optional and disabled by default.
Check these components if you wish to install them.
6. Select Next, as shown in Figure 1-4.
The Choose Install Location window appears, as shown in Figure 1-5, with the default location displayed
in the Destination Folder field.
7. Select Browse, as shown in Figure 1-5, to specify an alternate folder if required.
Figure 1-5 Choose Install Location
24
Page 26

8. Select Install, as shown in Figure 1-5, to begin installation.
The installation wizard displays progress, as shown in Figure 1-6.
Figure 1-6 Installation Progress
9. After installing the Apache2 HTTP Server (which is a built-in component of the installation package),
the installation triggers a Windows Security Alert on some versions of Windows, as shown in Figure 1-7.
Select Unblock or Allow Access to continue.
Figure 1-7 Windows Security Alert
Note: Figure 1-7 shows the Security Alert that appears in Windows 7. The alert is similar for other
Windows operating systems.
25
Page 27

10. When the installation is complete, the wizard confirms the completion, as shown in
Figure 1-8.
Click Finish, as shown in Figure 1-8. MSU is now installed.
Figure 1-8 Completing the Setup Wizard
26
Page 28

9 – MSU Overview
MSU is a browser-based management utility for the RocketHybrid 1220/1222 host adapters.
It can create and manage Hybrid Drives, using storage and enclosure devices connected to the host adapter.
This section provides an overview of MSU’s user interface.
9.1 - Opening MSU
This section discusses the following:
• Opening MSU in Windows
• Tray Application for Windows
9.1.1 - Opening MSU in Windows
This section describes the procedure to open MSU in Win d ows .
To open MSU in Windows
1. Verify that Active Scripting or JavaScript is enabled in the default browser, as described in
9.1, Enabling Scripting.
2. Open MSU.
The MSU can be opened using any of the following methods:
Double-click the desktop shortcut for MSU, as shown in Figure 2-8.
•
Figure 2-8 MSU Desktop Shortcut
OR
• Right-click the desktop shortcut for MSU, and select Open.
OR
• Double-click the MSU Tray Application icon.
OR
• Right-click the MSU Tray Application icon, and select Open MSU.
3. Upon opening, the Login page appears, as described in 2.5, Login.
To control a local 88SE91xx controller
4. By default, MSU uses the following URL to select the default local 88SE91xx controller (if
any) installed on the local system.
https://localhost:8443/MSU/JumpPage.php?Target=LoginPage
Note: If MSU does not open the login page, replace localhost in the URL with the IP address
of the local controller (127.0.0.1).
To control a remote RAID controller
5. Type the following URL the browser address bar.
27
Page 29

https://ip_adress:8443/MSU/JumpPage.php?Target=LoginPage
Note: Replace ip address with the IP address of the remote RAID controller. Alternatively, you
can use the System Name instead of the IP address in most internal network environments.
9.2 - Tray Application for Windows
When MSU opens in Windows, the Tray Application appears in the System Tray, as shown
in Figure 2-9.
Figure 2-9 Tray Application
The Tray Application provides right-click menu options for controlling the MSU, as shown in
Figure 2-10. The menu has options for performing the following tasks:
• Accelerate Status
• Open MSU
• Enable/Disable Alarm
• Enable/Disable Pop-up Event Messages
• View Version Information
Exit MSU
•
Figure 2-10 Tray Application: Right-click Menu
9.2.1 - Accelerate Status
Select Accelerate Status to see a pop-up window that displays the status of a scheduled acceleration task,
as shown in Figure 2-11.
Figure 2-11 Tray Application: Accelerate Status
28
Page 30

9.2.2 - Open MSU
Select Open MSU to open MSU in the system’s default browser.
Note: You can also open MSU by double-clicking the Tray Application icon.
9.2.3 - Enable/Disable Alarm
The audible alarm is disabled by default. To enable the audible alarm for critical and warning events,
select Enable Alarm. The alarm is played through speakers connected to the Line Out jack on the
computer’s sound card. On controller HBAs and evaluation boards with on-board buzzer, the hardware
buzzer is also sounded.
Note: The audible alarm uses the file c:/program files/marvell/raid/tray/alarm.wav.
9.2.4 - Enable/Disable Pop-up Event Messages
Event messages are pop-up messages that appear above the System Tray, as shown in
Figure 2-12. Event messages are enabled by default.
Select Enable Event Messages and Disable Event Messages to toggle between enable/disable states.
Figure 2-12 Tray Application: Pop-up Event Message
9.2.5 - View Version Information
Select About Storage Tray to view version information for the MSU Tray Application.
9.2.6 - Exit MSU
Select Exit to exit MSU (and the Tray Application).
29
Page 31

9.3 Login
This section discusses the following:
• Security Warning
• Login Page
9.3.1 - Security Warning
Note: This section only applies to Internet Explorer.
When opening MSU in some versions of Windows, Internet Explorer may detect a problem with the
security certificate for the MSU web page, as shown in Figure 2-13. Select Continue to this website
(not recommended), as shown in Figure 2-13, to continue opening MSU.
Figure 2-13 Internet Explorer: Website Security Certificate Warning
9.3.2 - Login Page
Opening the MSU will take you to a login page, as seen in Figure 2-14. Use your Windows username and
password to log into the MSU. If you have a username but no password, leave the password field blank.
Note: If you are on a network, preface your username wit h t he netw ork do main name and a backslash.
Figure 2-14 MSU Login
30
Page 32

9.4 - User Interface
The MSU user interface, as shown in Figure 2-15, contains the following three panes:
• Marvell Storage Management
• Properties
• Event Logs
Figure 2-15 MSU User Interface
9.4.1 - Marvell Storage Management
As shown in Figure 2-16, the Marvell Storage Management pane uses a tree view to list and show the
relationships between the various physical/virtual devices attached to the system.
Depending on the usage of the controller, this list includes the following devices and services:
• Adapter
• Physical Disk
• Enclosures
• Hybrid Drives
• Email Notify Setting
31
Page 33

Figure 2-16 Marvell Storage Management Pane
9.4.2 – Properties
As shown in Figure 2-17, the Properties pane lists the properties of the device selected in the System pane.
The Properties pane contains tabs at the top. Depending on the device selected in the System pane, one of
more of the following tabs appear:
• Property
Select Property to view/modify the properties of the device selected in the System pane.
• Operation
Roll-over the Operation tab to view a menu of operations that can be performed on the device
selected in the System pane.
• Programs
This tab allows you to configure the virtual disk.
• Schedule
This tab allows you to schedule regular maintenance tasks.
Figure 2-17 Properties Pane
32
Page 34

9.4.3 - Event Logs
As shown in Figure 2-18, the Events Logs pane lists adapter events. The events are categorized into
informational, warning, and error events.
Figure 2-18 Event Logs Pane
2.7 Logout
Select Logout, as shown in Figure 2-19, to logout of MSU.
Figure 2-19 MSU Logout
Note: To exit MSU, right-click the Tray Application, and select Exit MS
33
Page 35

10 - MSU: Creating Hybrid Drives
This section describes the procedure to quickly create a Hybrid Drive that is optimized for either
read/write performance or fault tolerance (reliability).
Note: A Hybrid Drive must contain one HDD and one SSD.
To quickly create Hybrid Drive optimized for performance/reliability
1. Click the Adapter from the left-hand portion of the interface.
2. Mouse-over the Operation tab and select Create HyperDuo, as shown in Figure 4-1.
The Create HyperDuo screen appears, as shown in Figure 4-2.
Figure 4-1 Create Hybrid Drive (HyperDuo)
Figure 4-2 Create Hybrid Drive (HyperDuo) Screen
34
Page 36

3. As shown in Figure 4-2, select one of the following options:
• Safe mode creates a Hybrid Drive that is optimized for fault tolerance. It is safe to use with hard
drives that contain existing data.
• Capacity mode creates a Hybrid Drive that is optimized for read and write performance.
Note: Capacity mode is a data-destructive process. Please back up all data before using capacity
mode.
4. MSU displays the Property tab for the Hybrid Drive (listed as HyperDuo virtual disk) and begins
initialization, as shown in Figure 4-3. This can take up to 30 minutes to complete.
Figure 4-3 Initialization
35
Page 37

11 – MSU: Managing Hybrid Drives
This section describes procedures for customizing your Hybrid Drive. The interface will label your hybrid
drive as a HyperDuo virtual disk.
11.1 –Selecting and Adding folders for Optimization:
1. Select HyperDuo Service.
2. Select Advanced.
The Customize Wizard window will appear, as shown in Figure 4-4.
3. Check folders to add them, as shown in Figure 4-4.
4. Review the folders. Select the red X beside a folder or file to remove it.
5. Select Submit to save settings.
Figure 4-4 Customize Wizard
11.2 - Changing the method of Optimization
1. Select HyperDuo Service.
2. Check folders or programs, as shown in Figure 4-5.
• Check Auto to have the MSU manage the optimization of a folder or program automatically.
• Check Cache to manually select a folder or program for optimization.
• Check neither to specify that a folder or program should never be optimized.
4. Select Submit to commit changes, as shown in Figure 4-5.
36
Page 38

Figure 4-5 Check Methods of Optimization
4. Select OK in the pop-up that follows. MSU begins optimization, as shown in Figure 4-6.
Figure 4-6 Optimization in Progress
37
Page 39

12 – MSU: Monitoring Hybrid Drives
This section describes monitoring options for Hybrid disks, including Event Notification and alarms.
12.1 - Receiving Email Event Notifications
This section describes the procedure to configure MSU to send event notifications to a user’s email account.
Note: This requires a working SMTP email server.
To configure email event notifications
1. Select Email Notify Setting, as shown in Figure 4-7.
2. Configure the email server settings and select Test setting, as shown in Figure 4-7.
MSU sends a test email to the configured email address. If the test email is received, the settings are
working correctly.
4. Select Submit to save settings. MSU confirms changes with the message Setting updated
successfully!
Figure 4-7 Email Notify Setting
12.2 - Viewing Events using Windows Event Viewer
Note: Because adapter events are triggered by the Windows driver, MSU events can also be viewed in the
Windows Event Viewer.
To view events in the Windows Event Viewer
1. From the Start menu, right-click My Computer (in XP or 2003) or Computer (in Vista, 2008,or 7) and
select Manage.
The Computer Management utility appears, as shown in Figure 4-8.
38
Page 40

3. Browse to System Tools >Event Viewer > Windows Logs > System (in Vista, 2008, or 7) to view all
system events including those of MSU, as shown in Figure 4-8.
Figure 4-8 Event Viewer (Windows 7)
12.3 - Enabling the Alarm for Critical Events
MSU can play an audible alarm when critical events (warning and error) occur. When a hardware buzzer is
present, the buzzer is also sounded. The audible alarm is disabled by default. the alarm can be enabled or
disabled using the Tray Application, as shown in Figure 4-9.
Figure 4-9 Enabling Alarm using Tray Application
39
Page 41

13 - Deleting Hybrid Drives
This section describes the procedure for deleting a Hybri d Drive.
Note: After deleting a Hybrid Drive, the physical disks constituting the Hybrid Drive become available for
use in other Hybrid Drives.
To delete a Hybrid Drive
1. Select HyperDuo from the Virtual Disks menu under Adapter.
The Property tab for the HyperDuo virtual disk appears.
2. Mouse-over the Operation tab and select Delete, as shown in Figure 4-10.
Figure 4-10 Delete
3. MSU requests confirmation of deleti on wi t h a pop-up message: Are you sure you want to delete this
HyperDuo?
Select OK to confirm deletion.
4. MSU displays a pop-up message asking Do you want to delete the partition information if this has
one?
Select OK to delete partition information or Cancel to keep it.
40
Page 42

Thank You
Thank you for purchasing the RocketHybrid 122 0/1 22 2 SA TA 6G b/ s H ost ada pte r. We a ppreci at e your
support, and welcome any questions, comments or product suggestions you may have.
Technical Support
For Technical and Customer Support related inquiries, please visit
tech.com/websupport/
Contact Us
• HighPoint Corporate Headquarters USA
Address 1161 Cadillac Ct.
Milpitas, CA, 95035
Website:
Phone: 1-408-942-5800 (9 am ~ 6 pm PST, M-F)
Fax: 1-408-942-5801
E-mail: sales@highpoint-tech.com
Global Support: http://www.highpoint-tech.com/websupport/
• HighPoint Taiwan
5F., No.3, Swei Lane , Jhongjheng Rd.
Sindian City, Taipei County 231, Taiwan (R.O.C.)
Website:
Phone: + 886-2-2218-3435 (9 am ~ 6 pm)
Fax: + 886-2-2218-3436
E-mail: sales@highpoint-tech.com
Global Support:
• HighPoint China
4th Floor Kehaifulin Building, N0. 12
Zhong Guan Cun South Rd.
Haidian District Beijing, China 100081
Website:
Phone: + 86-10-6213-0920 (9 am ~ 6 pm)
Fax: + 86-10-6897-5074
E-mail:
Global Support: http://www.highpoint-tech.com/websupport/
http://www.highpoint-tech.com
http://www.highpoint-tech.com/Taiwan/indextw.htm
http://www.highpoint-tech.com/websupport/
http://www.highpoint-tech.cn/
sales@highpoint-tech.com.cn
http://www.highpoint-
41
Page 43

FCC Part 15 Class B Radio Frequency Interference statement
This equipment has been tested and found to comply with the limits for a Class B digital device, pursuant to part 15
of the FCC Rules. These limits are designed to provide reasonable protection against harmful interference in a
residential installation. This equipment generates, uses and can radiate radio frequency energy and, if not installed
and used in accordance with the instructions, may cause harmful interference to radio communications. However,
there is no guarantee that interference will not occur in a particular installation. If this equipment does cause
harmful interference to radio or television reception, which can be determined by turning the equipment off and on,
the user is encouraged to try to correct the interference by one or more of the following measures:
z Reorient or relocate the receiving antenna.
z Increase the separation between the equipment and receiver.
z Connect the equipment into an outlet on a circuit different from that to which the receiver is connected.
z Consult the dealer or an experienced radio/TV technician for help.
Modifications not expressly approved by the manufacturer could void the user’s authority to operate the
equipment under FCC rules.
This device complies with part 15 of the FCC Rules. Operation is subject to the following two conditions: (1) this
device may not cause harmful interference, and (2) this device must accept any interference received, including
interference that may cause undesired operation.
European Union Compliance Statement
This Information Technologies Equipment has been tested and found to comply with the following European
directives:
z European Standard EN55022 (1998) Class B
z European Standard EN55024 (1998)
42
 Loading...