

Page 1
55”Interactive Kiosk
HD-550Z1A01 & HD-A550ZR1A01-WW
第 1 頁
Page 2

Content Management System – User’s Manual
1. Main Product Features ......................................................................................................................... 4
2.
Product installation ...................................................................................................................... 5
3. CMS Product Login-in ......................................................................................................................... 15
4. Product Setting ..................................................................................................................................... 17
6. Program Production
7. Server and Digital Signage Connection Concept ....................................................................... 49
8. Back-Up for Broadcast Programs .................................................................................................. 53
9. Terminal Management
CMS
2.1 CMS Server Installation ....................................................................................................................... 5
2.2 Digital Signage Power-On and Internet Setting .......................................................................... 9
5. Product Registration ................................................................................................................................ 20
4.1 Android Terminal Setting ............................................................................................................... 17
5.1 Confirm Terminal Registration ..................................................................................................... 20
6.1 Information Publication Programming Production ............................................................... 21
6.2 Introduction of Program Production Interface .................................................................... 26
8.1 Program Export ............................................................................................................................... 53
8.2 Program Import ................................................................................................................................ 55
8.3 Notes for importing programs to terminals ........................................................................... 56
8.4 Scenarios regarding terminal interface when importing programs .............................. 57
................................................................................................................................. 21
............................................................................................................................. 59
9.1 Attributes ........................................................................................................................................... 59
9.2 Remote Control ................................................................................................................................ 60
9.3 Monitor (screen snapshot) .......................................................................................................... 60
第 2 頁
Page 3

9.4 Download ............................................................................................................................................ 61
10. Other Features .................................................................................................................................. 62
11. CMS Function Comparison Table
12. Requirements of Computer Environment
13. Troubleshooting
14. Product Warranty
9.5 Upgrade .............................................................................................................................................. 61
10.1 Resource (Resource Management) .................................................................................... 62
10.2 Management of Authorization ............................................................................................... 64
10.3 Send & Check .............................................................................................................................. 67
10.4 Scheduling ...................................................................................................................................... 68
10.5 Schedule ......................................................................................................................................... 69
10.6 Desktop Background ................................................................................................................. 69
10.7 Desktop Shortcut........................................................................................................................ 70
.................................................................................................... 71
....................................................................................................................................... 73
................................................................................................................................... 73
...................................................................................... 72
第 3 頁
Page 4

1.
Main Product Features
● Playback of pictures, videos, music, marquee (text), date, time, week, weather, web
pages, container & RSS
● Advertising program production
● Digital signage terminal management
● Resource management
● Program Distribution / Approval
● Program Scheduling / calendar / statistics
● Clearance management (user/role/grouping)
● USB offline program update with remote content dispatch
第 4 頁
Page 5
2. CMS Product Installation
2.1 CMS Server Installation
Please prepare a PC, as the server of the digital signage, and switch off the fire-wall
of Windows:
● CPU:Intel 1037u/1.8GHz(and above)/ Memory:2GB DDR3(and above)/
Hard-disk:500GB(and above)
● Microsoft® Windows® XP (32-bit upgrade installation to Service Pack3)
7/8/10 versions (and above)
Please download CMS software of digital signage to the hard-disk of your PC,
per the following URL: http://www.aboway.com.tw/uploadfile/CMS.rar
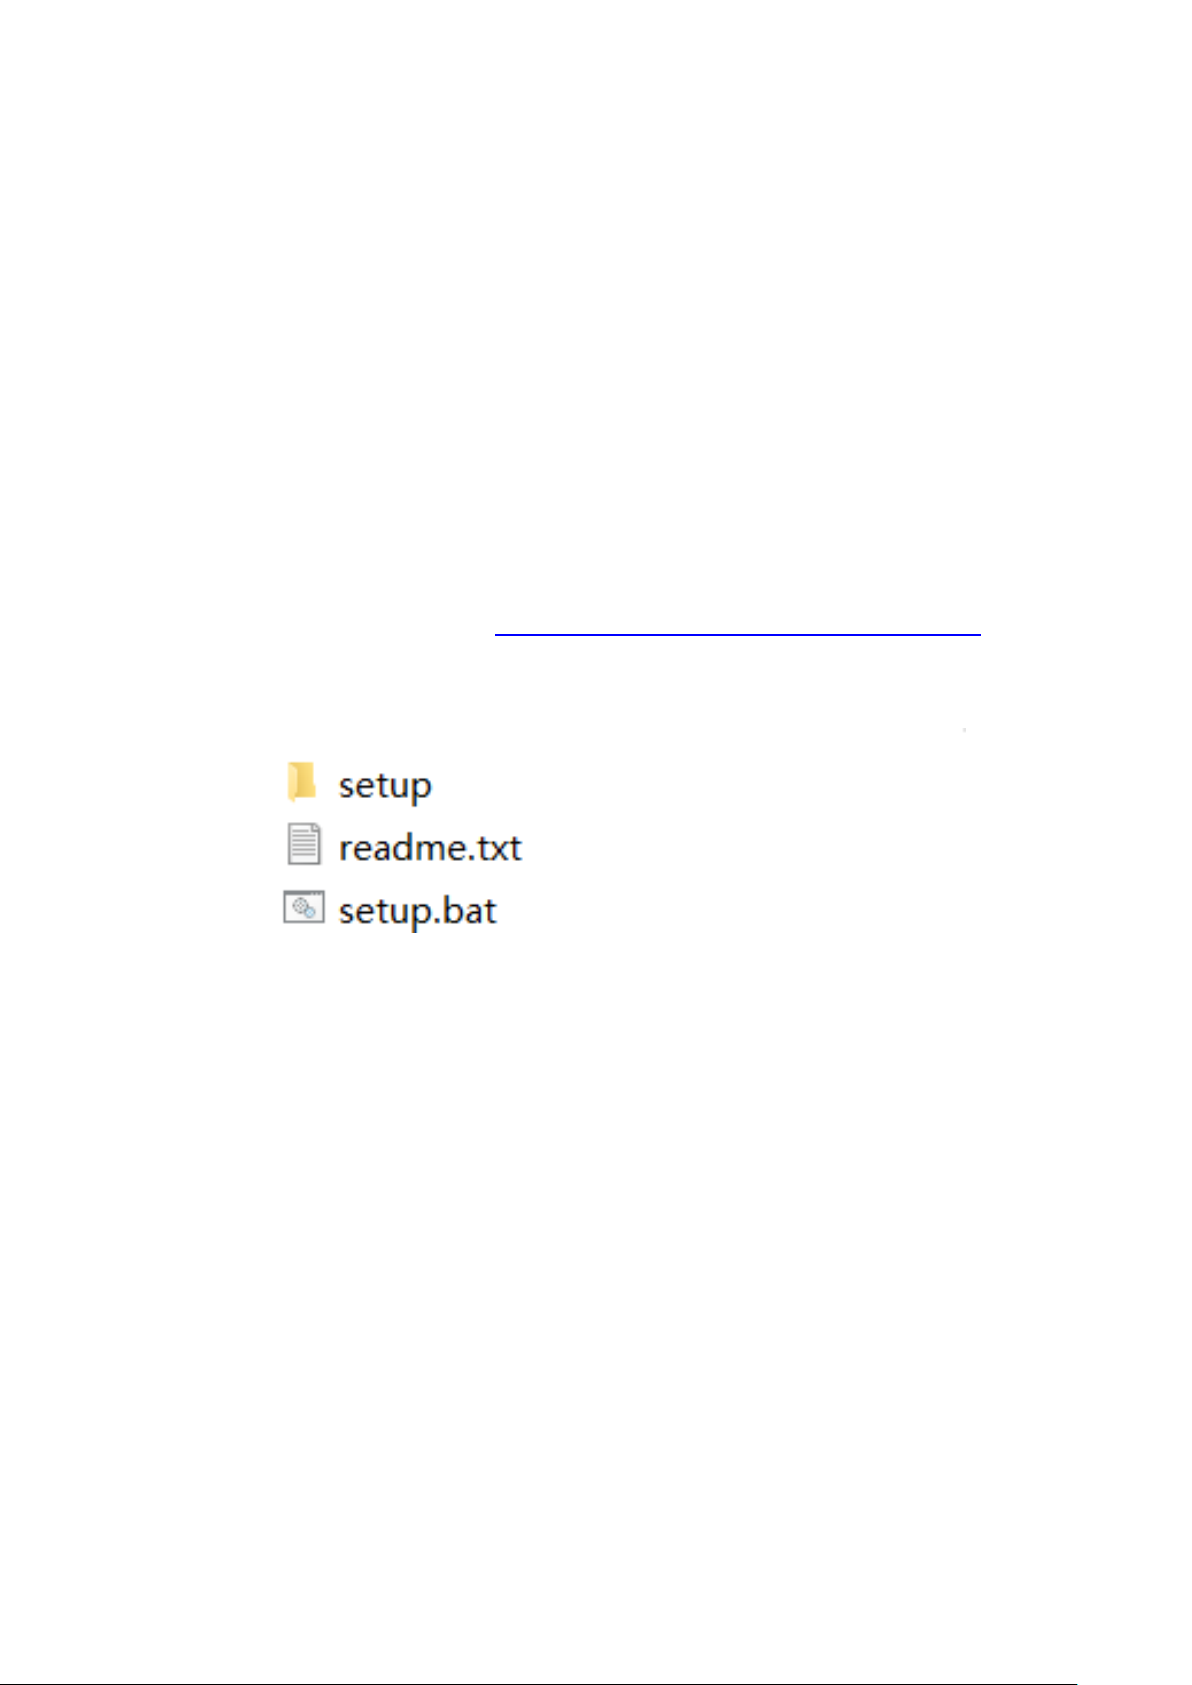
2.1.1 Once “CMS.rar” file is de-compressed, please open the folder
“CMS\ServerSoftware”
2.1.2 Double-click the “setup.bat” icon, and follow the prompt
Begin to install CMS Digital Signage Server Software
第 5 頁
Page 6
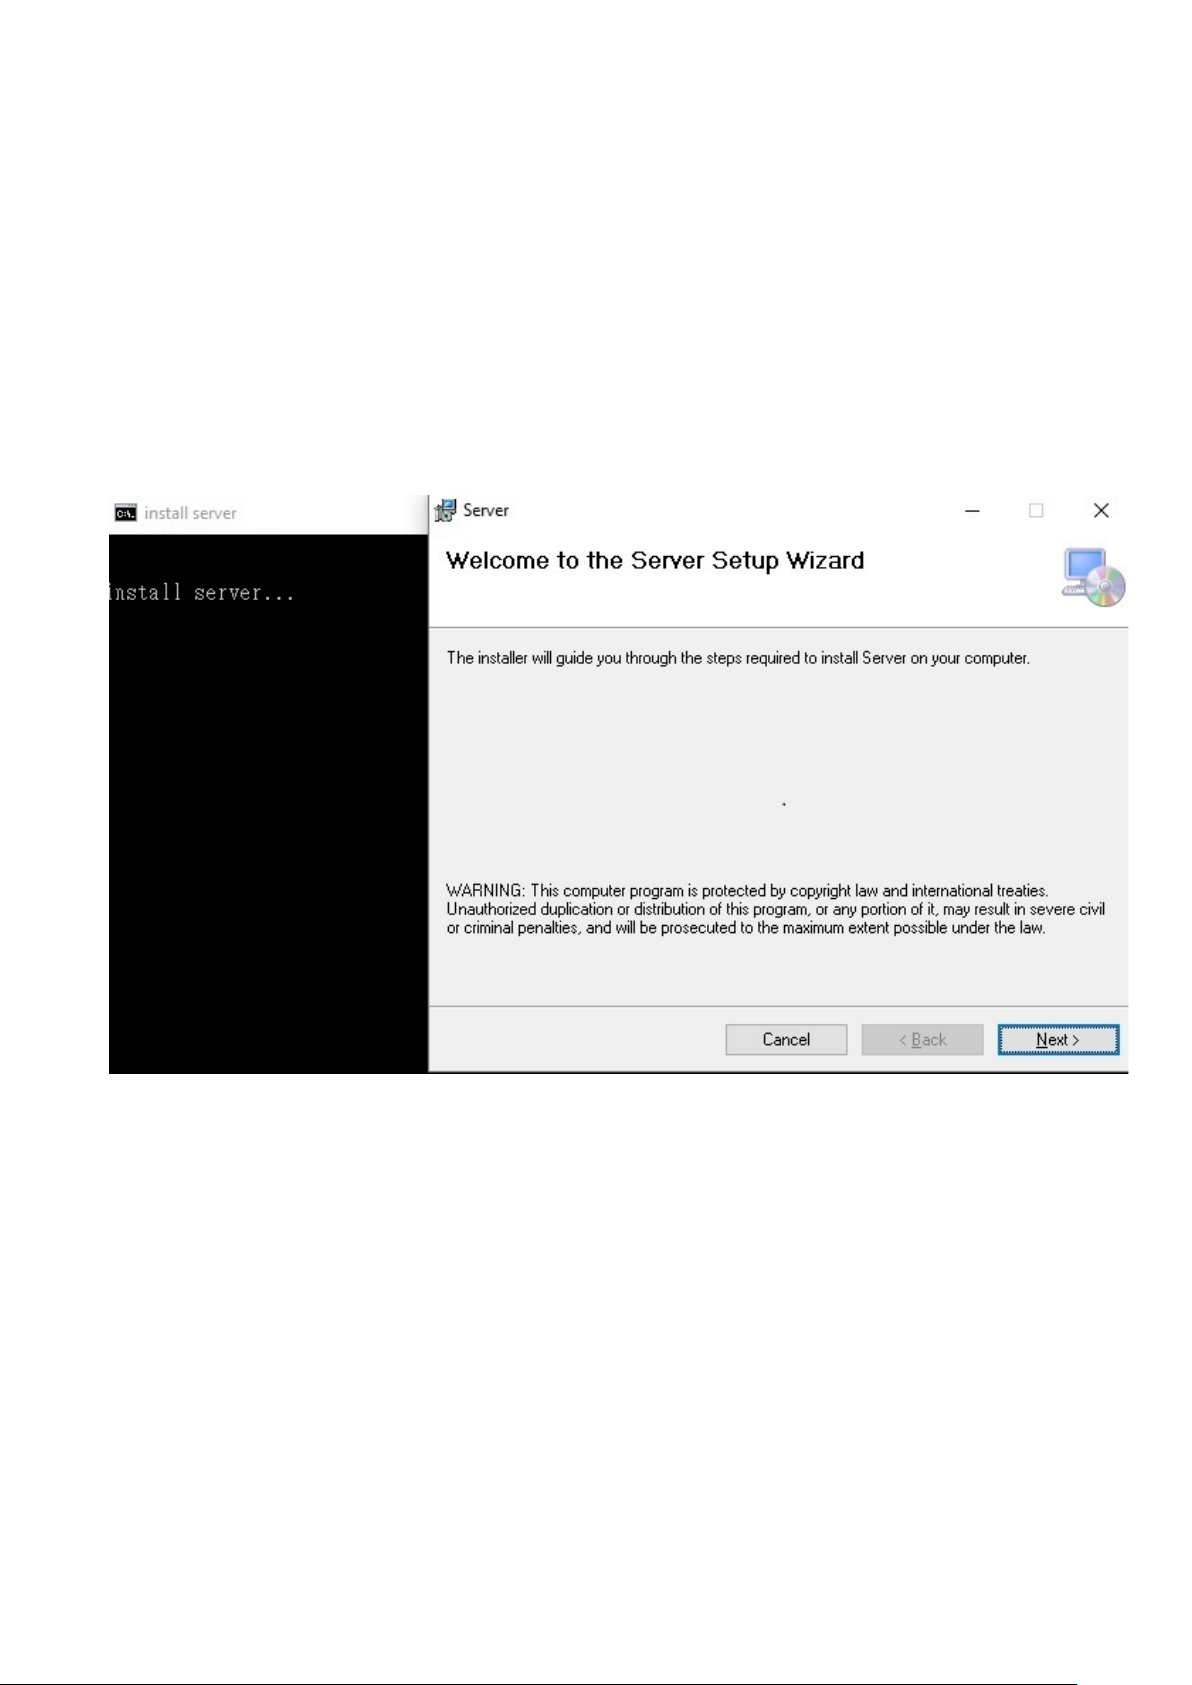
Click Next
第 6 頁
Page 7
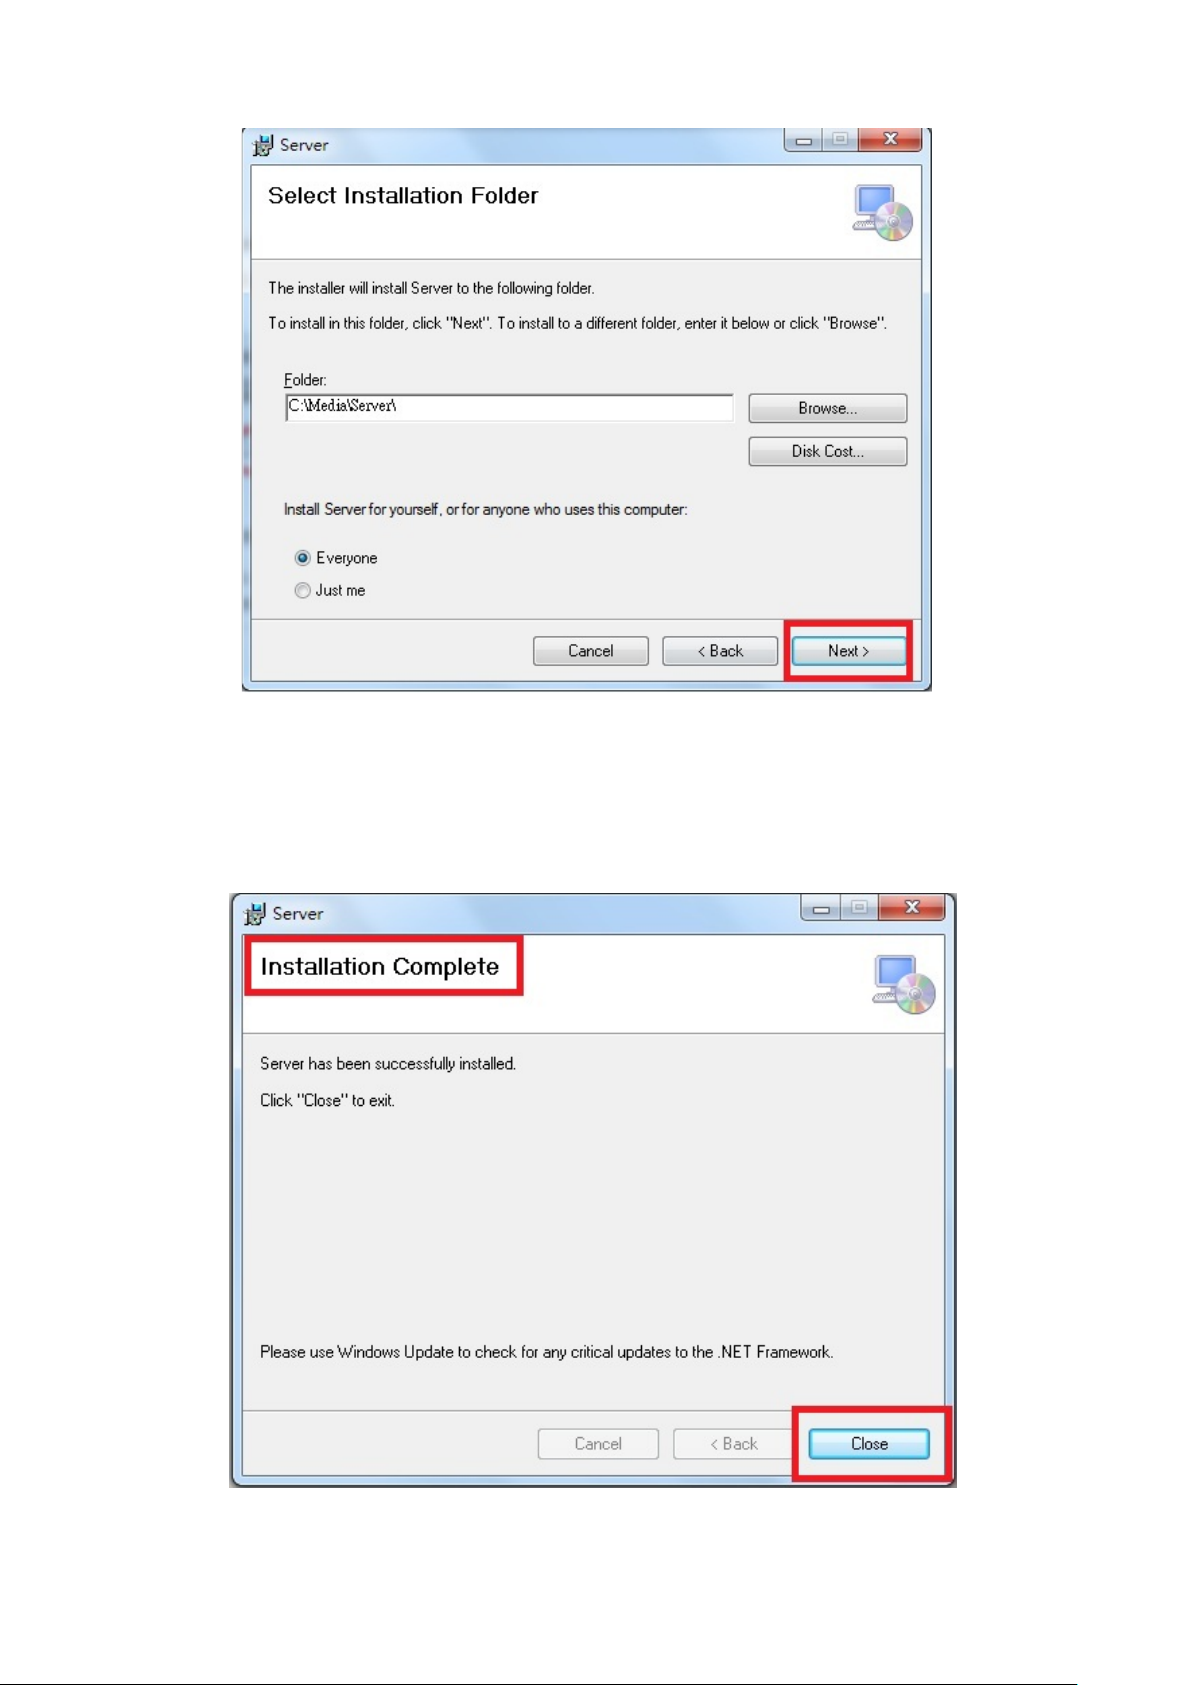
2.1.3 Please install the catalogue, and hit “next step”, hitting “Close” once
installation completion
第 7 頁
Page 8
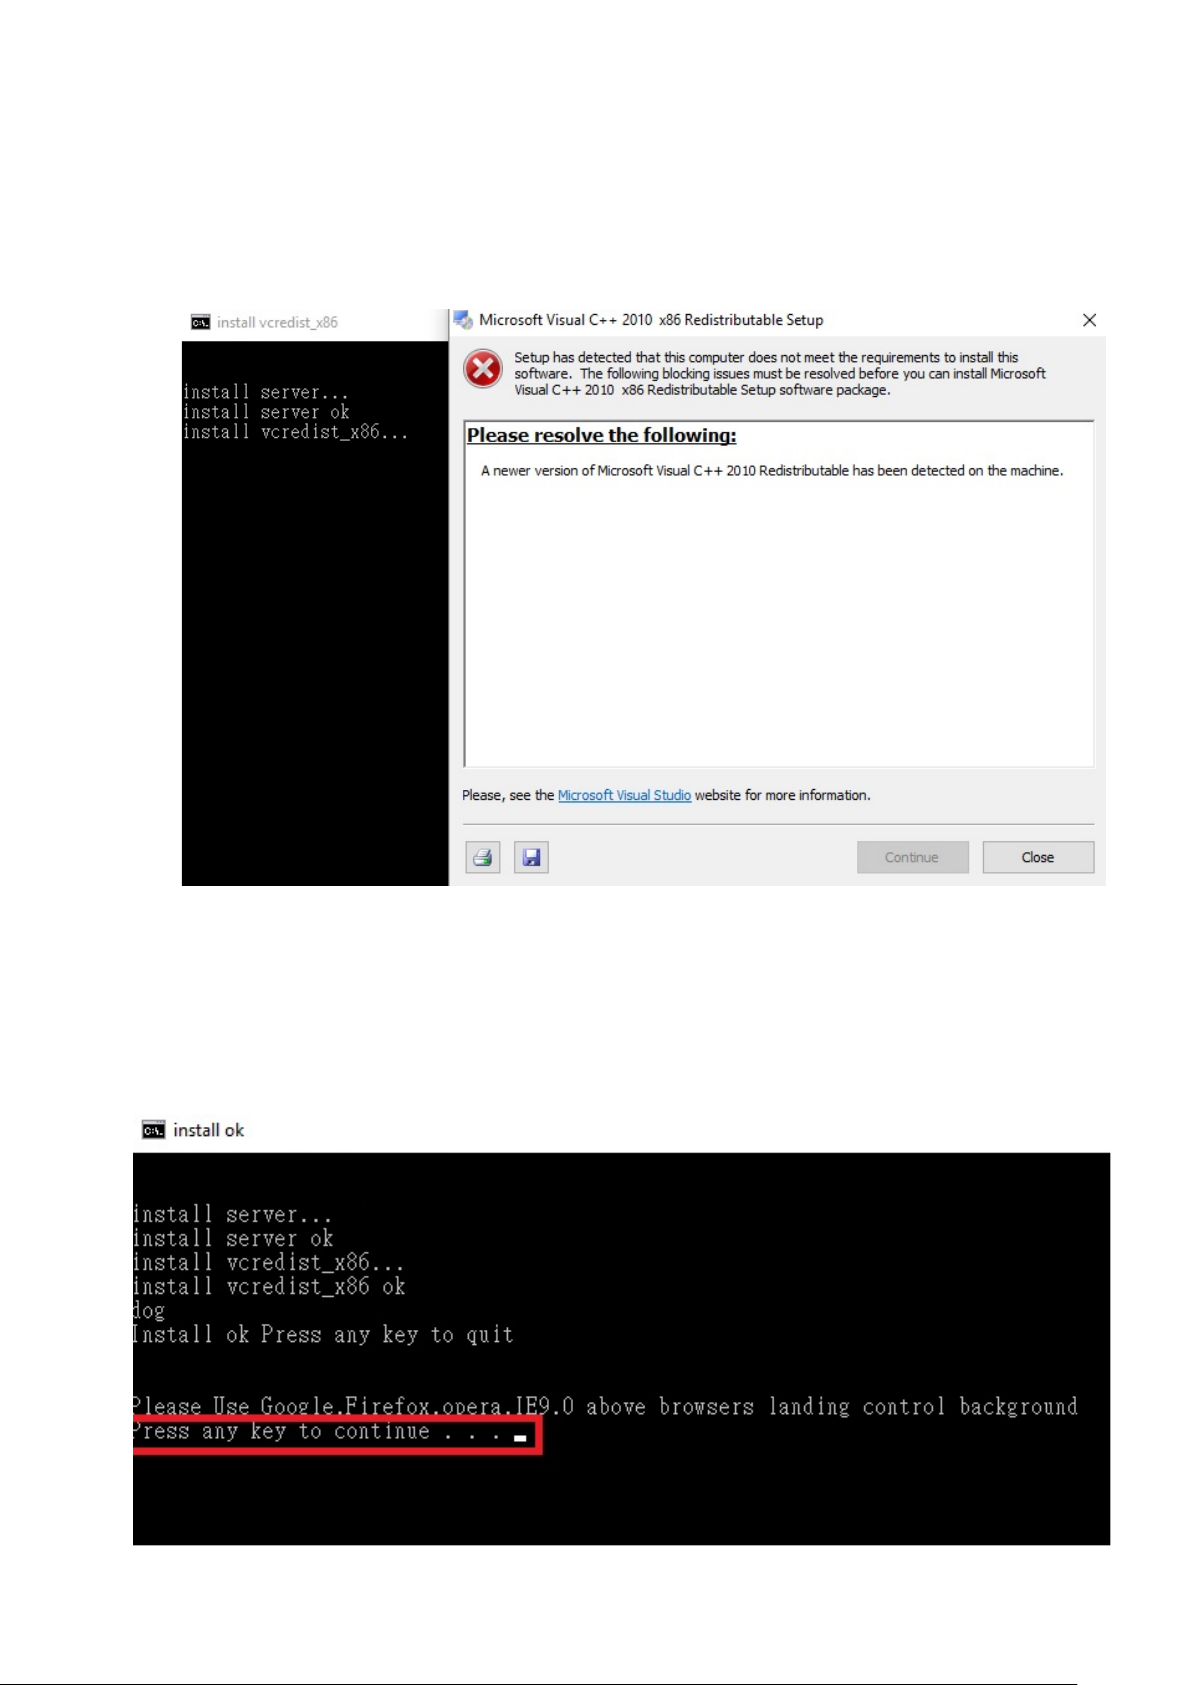
2.1.4 To begin installing “vcredist_x86”, simply click “Next” step, and if the following
diagram appears, it means the system has already been installed, just click
“Close”
2.1.5 When the window of “Press Any Key to Continue” appears, it means the
installation is successful, so please click top-right-corner cross-sign to exit
第 8 頁
Page 9
2.2 Digital Signage Power-On and Internet Setting
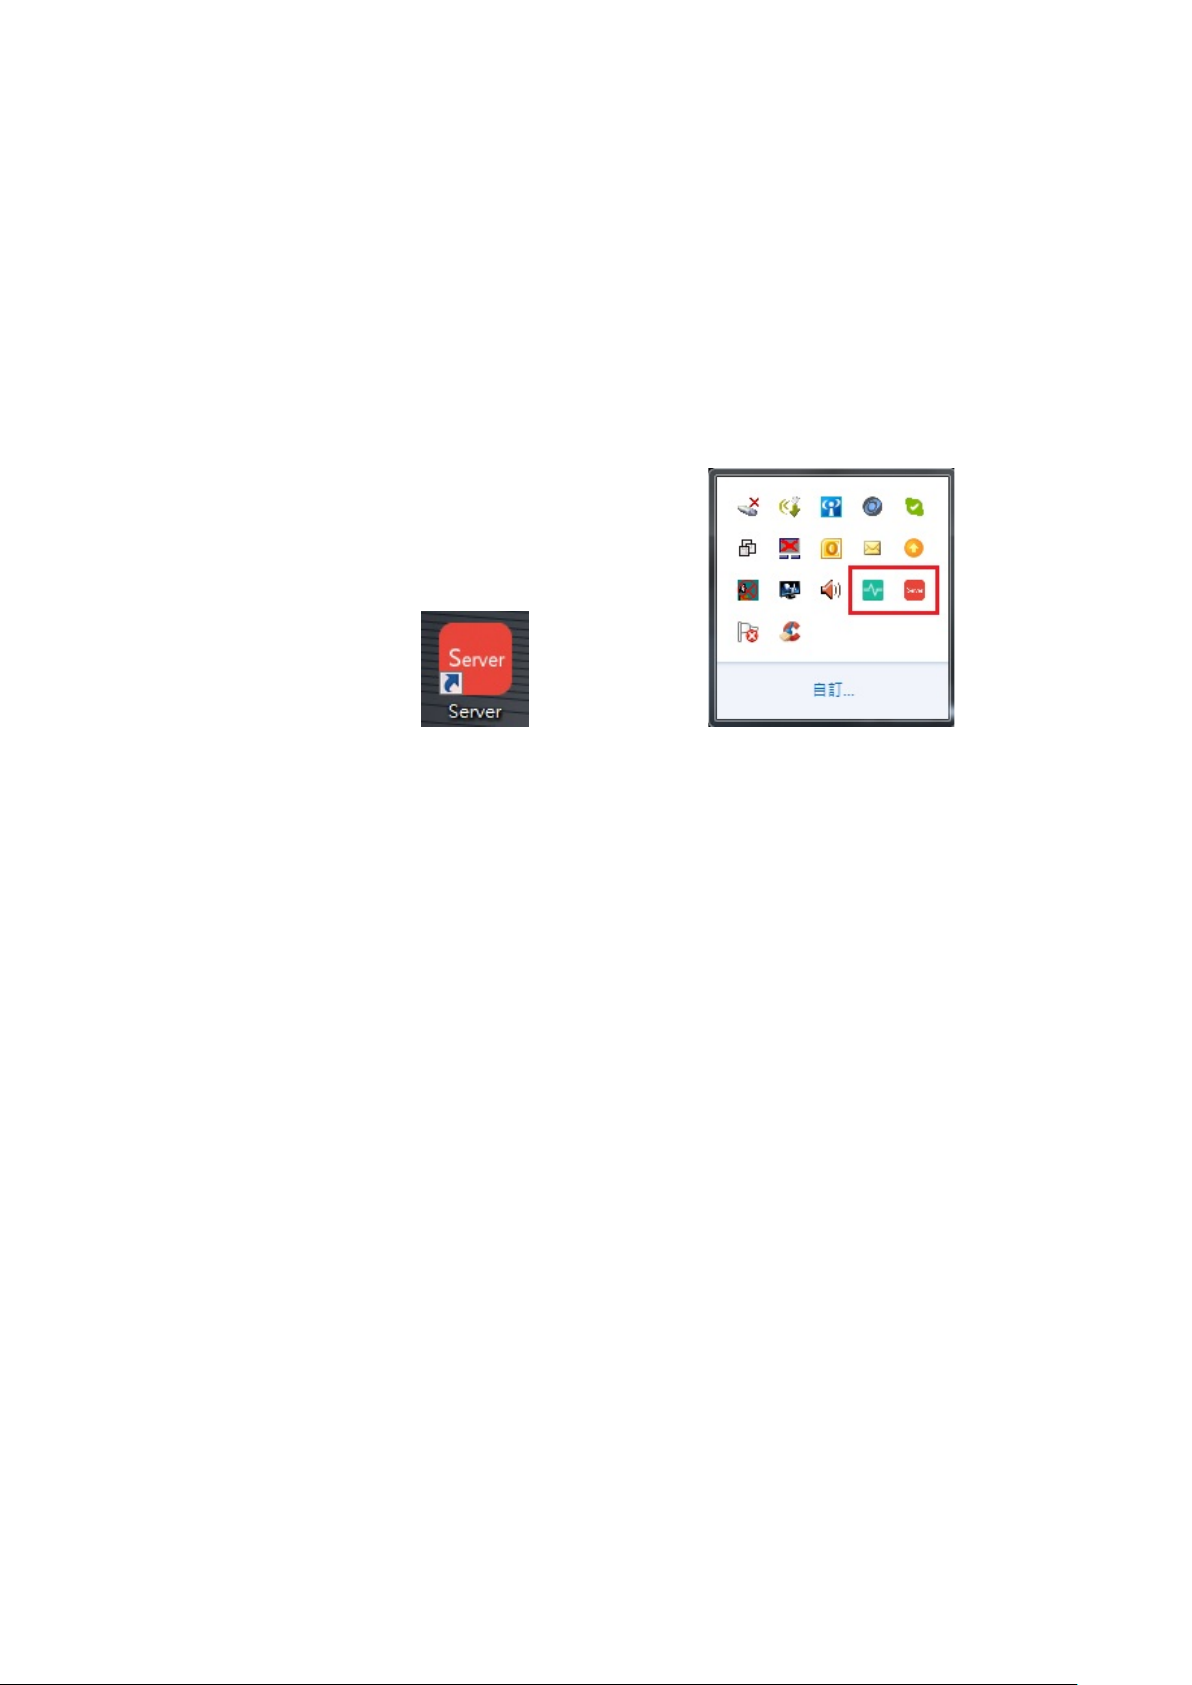
2.1.6 After successful installation, the “Server” shortcut appears on Desktop, and to
execute, simply just double-click the shortcut. If “multimedia publication” icon
appears in the task bar on the bottom right-hand corner, it means you have
successfully installed the program.
2.2.1 Once digital signage is connected to display screen and power, please wait
for approx. 1 minute of power-on procedure, as the system will automatically
activate the software of the digital signage, per diagram shown below.
第 9 頁
Page 10
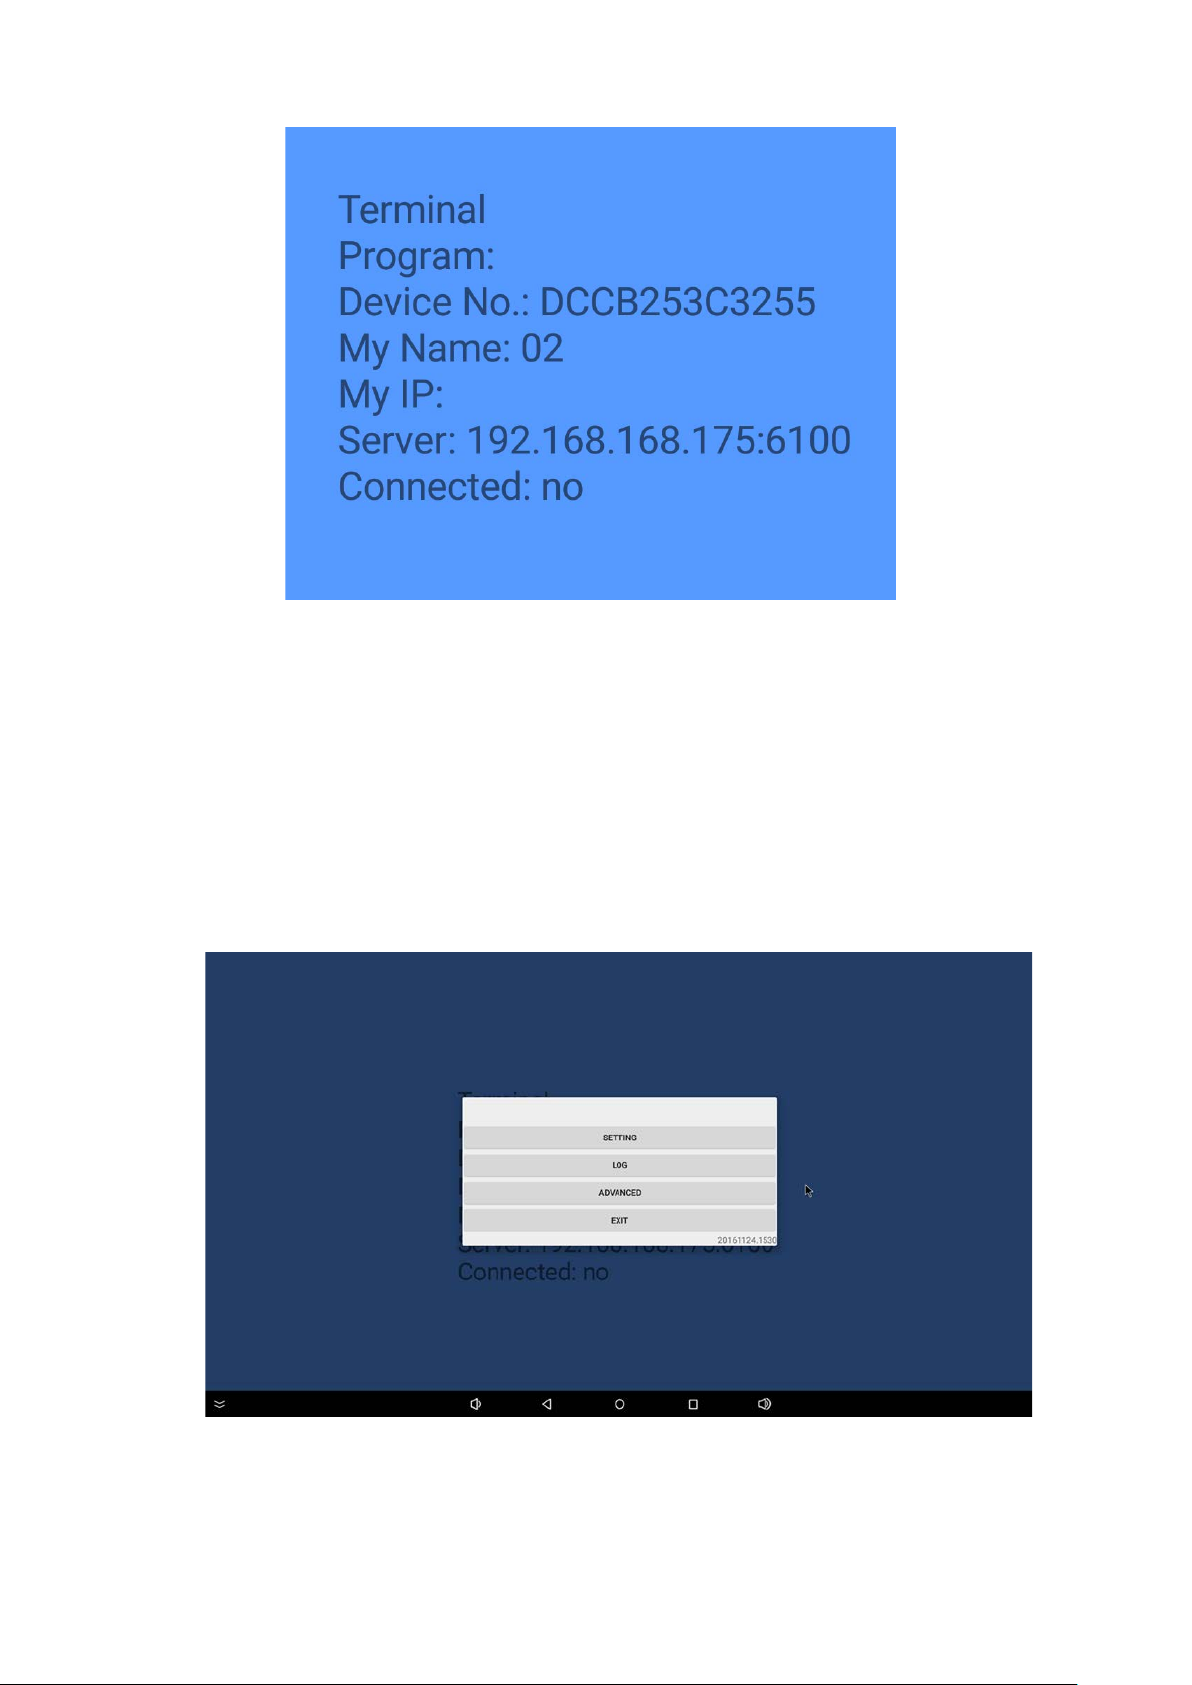
2.2.2 Software Operation:
If operating, via mouse, CMS Digital Signage Software, please
double-right-click your mouse to exit the software. If operating via
touchscreen, please directly tap the screen for setting up, per the diagram
shown below.
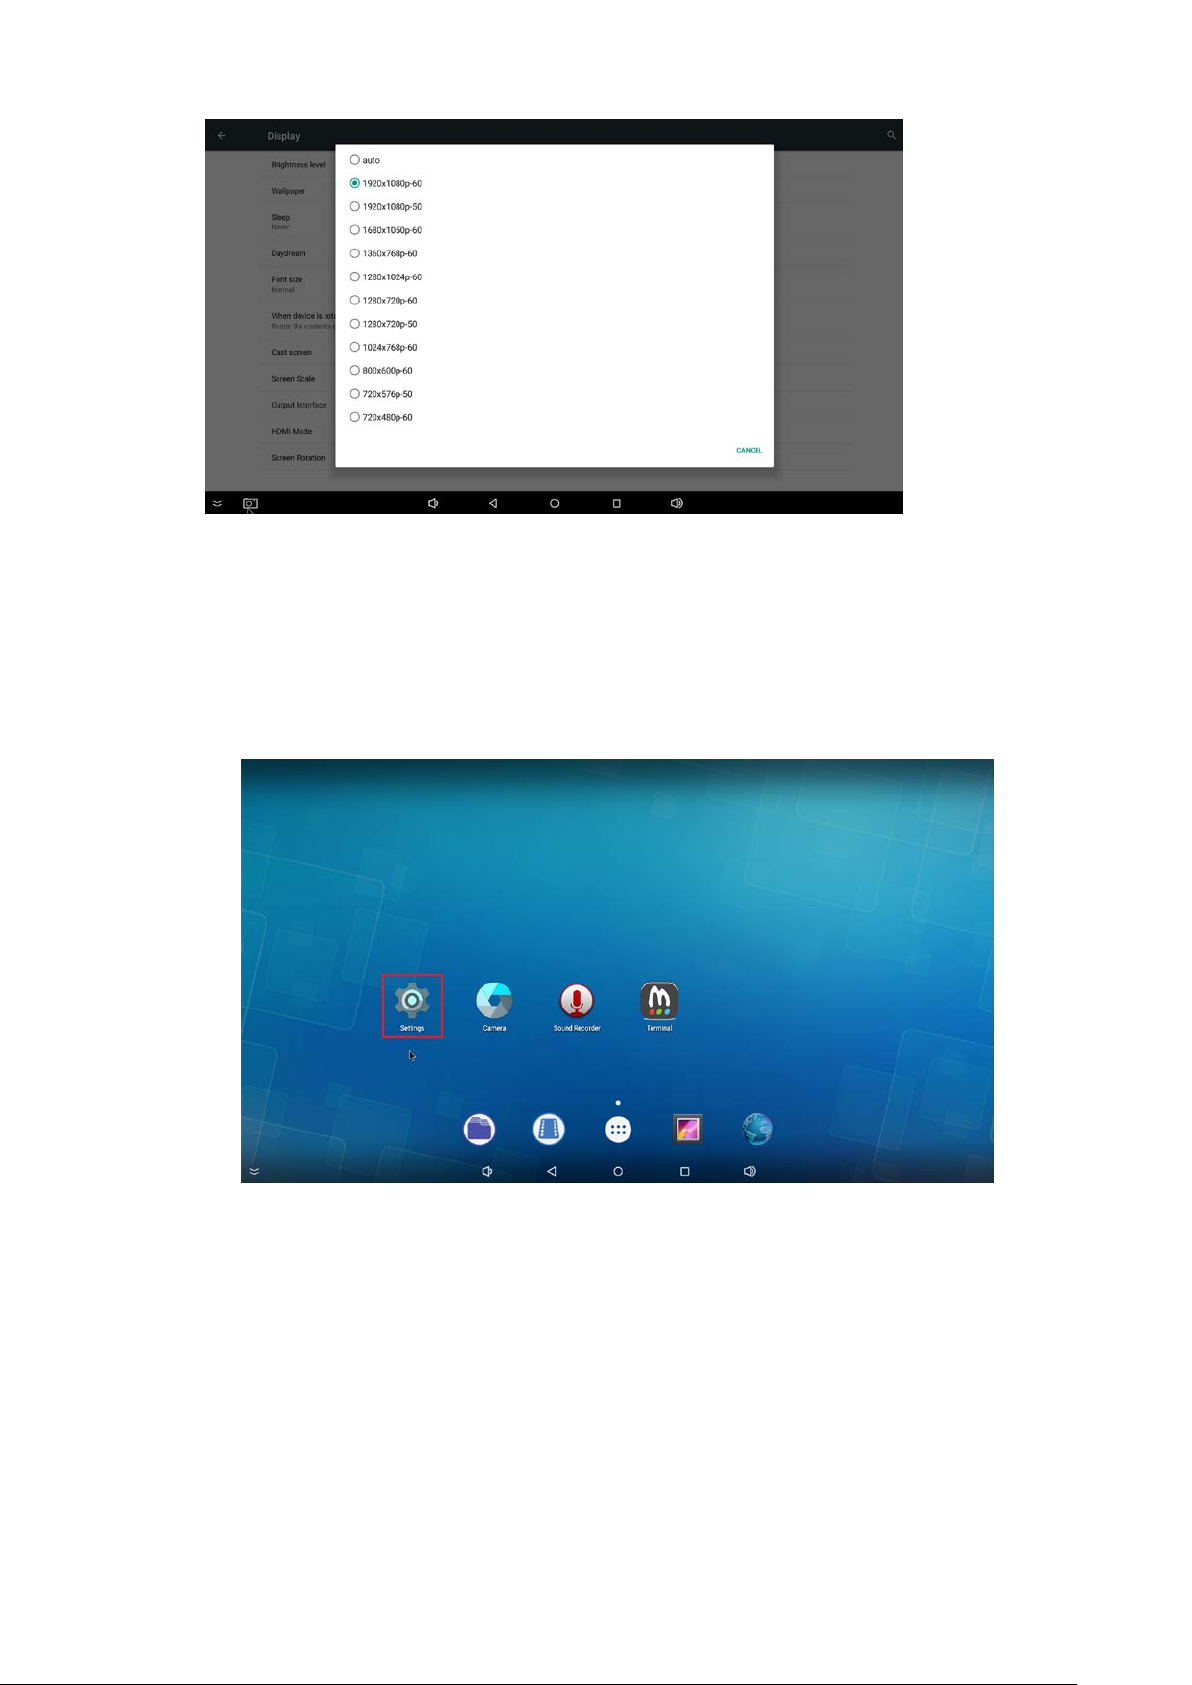
2.2.3 Display Output Resolution Setting:
第 10 頁
Page 11
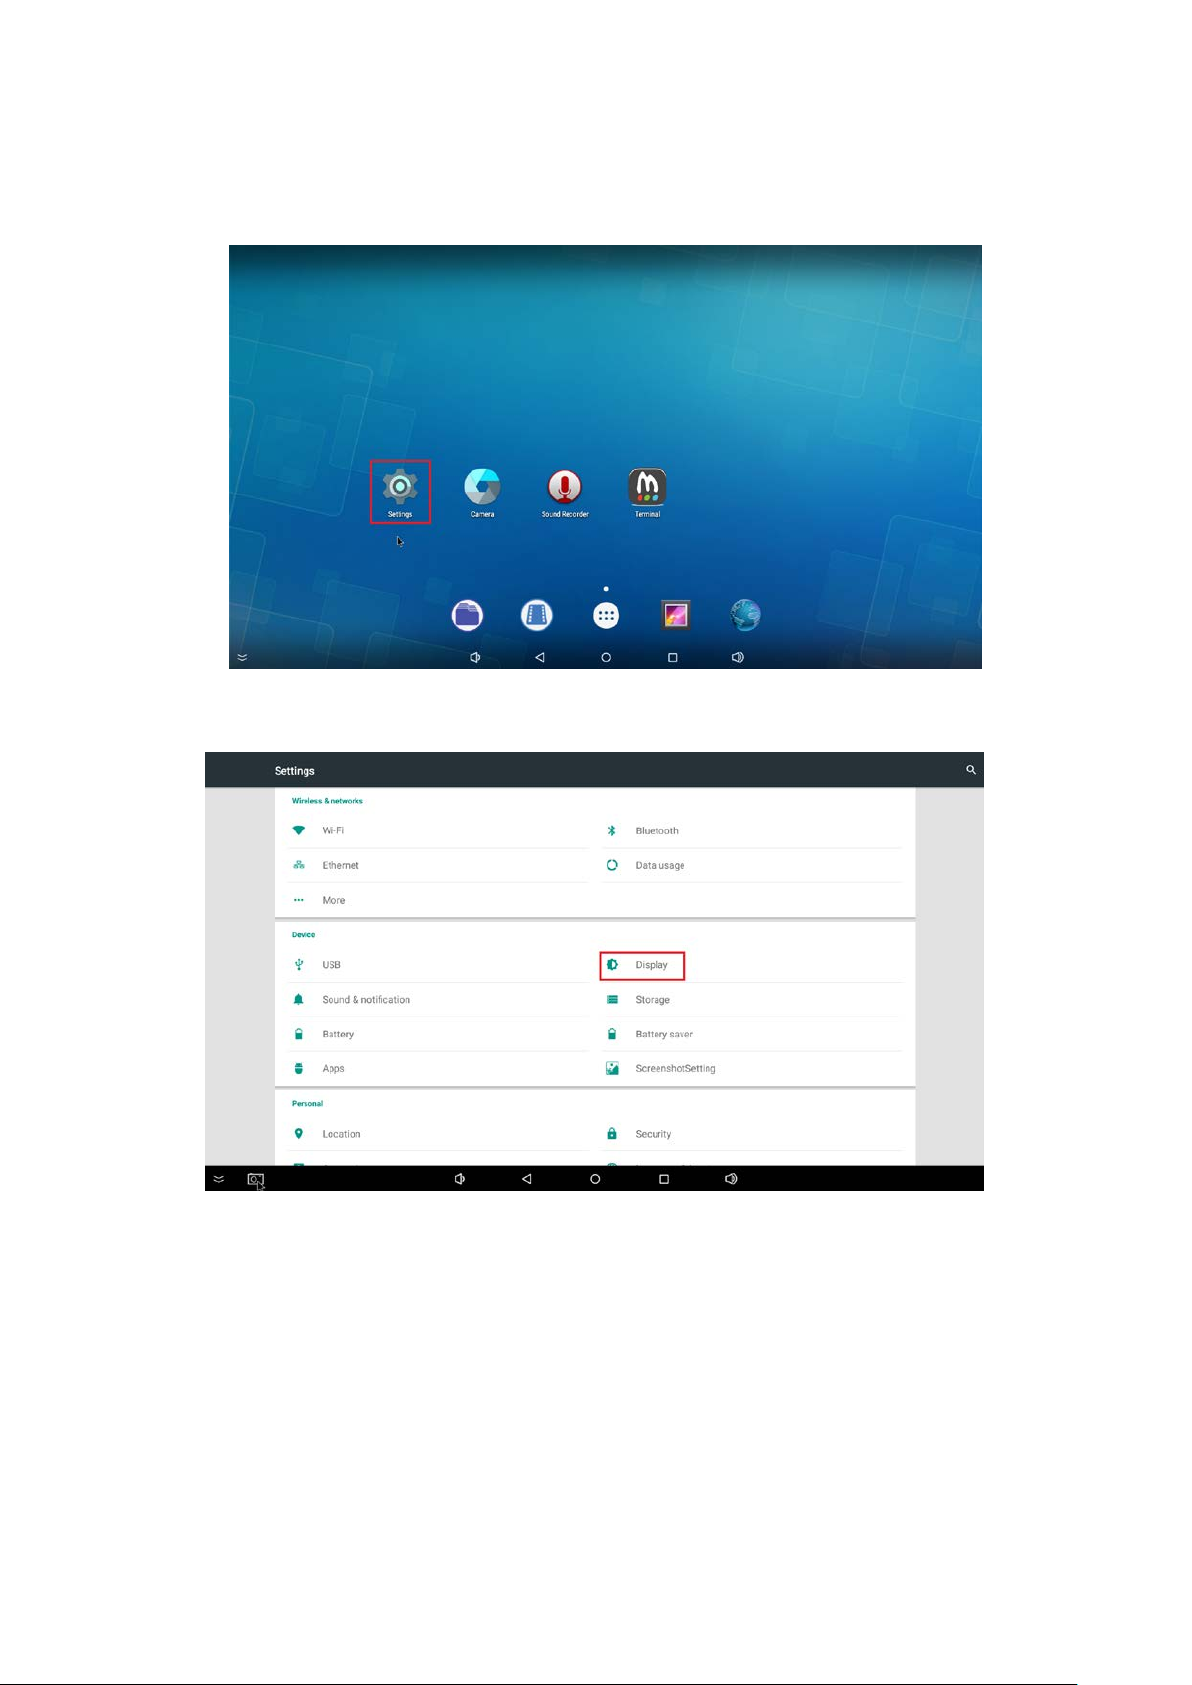
Please click the “Setting”
icon on the Digital Signage Desktop screen, per the
diagram shown below.
Click “HDMI” in “Device” icon, per the diagram shown below.
If your display supporting Full HD/1080P output resolution, please click “HDMI
Resolution” icon, and select “1920x1080p-60”, per the diagram shown below.
第 11 頁
Page 12
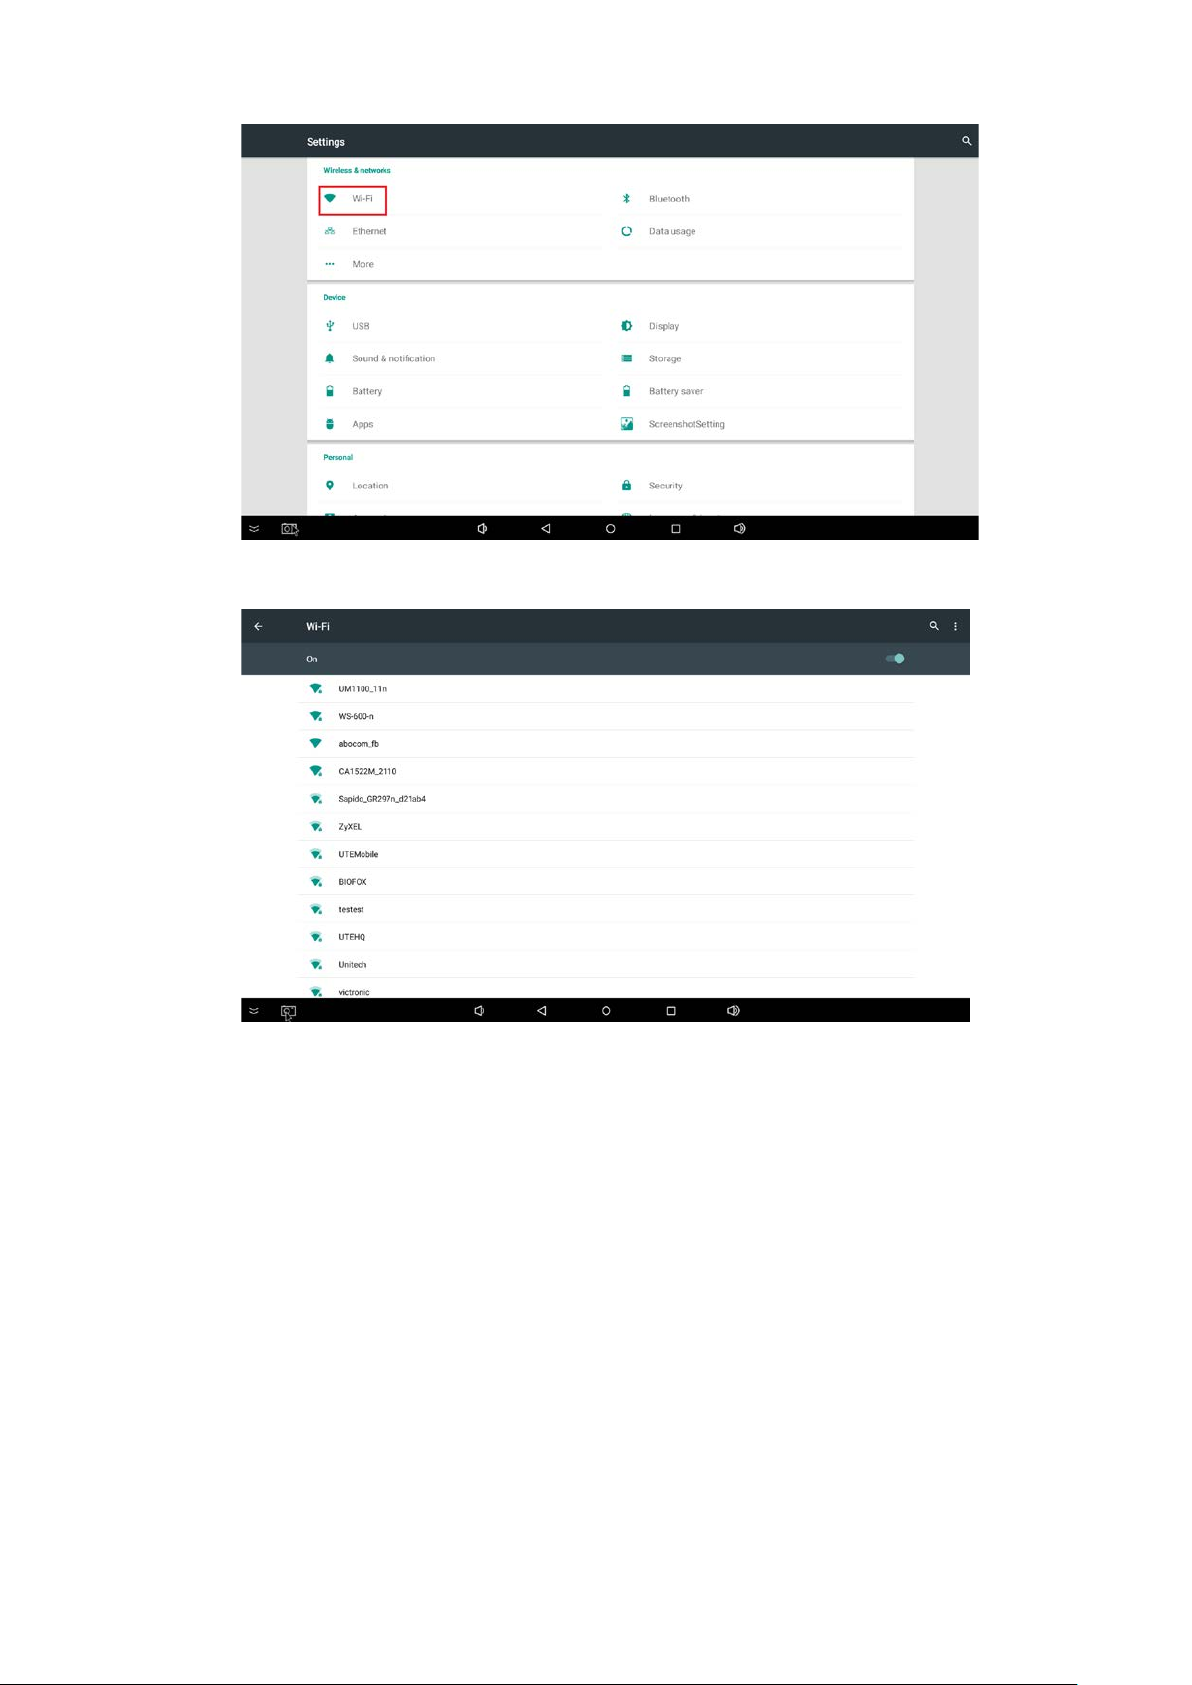
icon on the Digital Signage Desktop screen, per the
2.2.4 Network Setting:
Please click the “Setting”
diagram shown below.
If intending to use Wireless networking connection, please click “Wi-Fi” in the
“Wireless & Networks” menu, and turn on Wi Fi to ent er in to set pr ocedure s, pe r th e
diagram shown below.
第 12 頁
Page 13
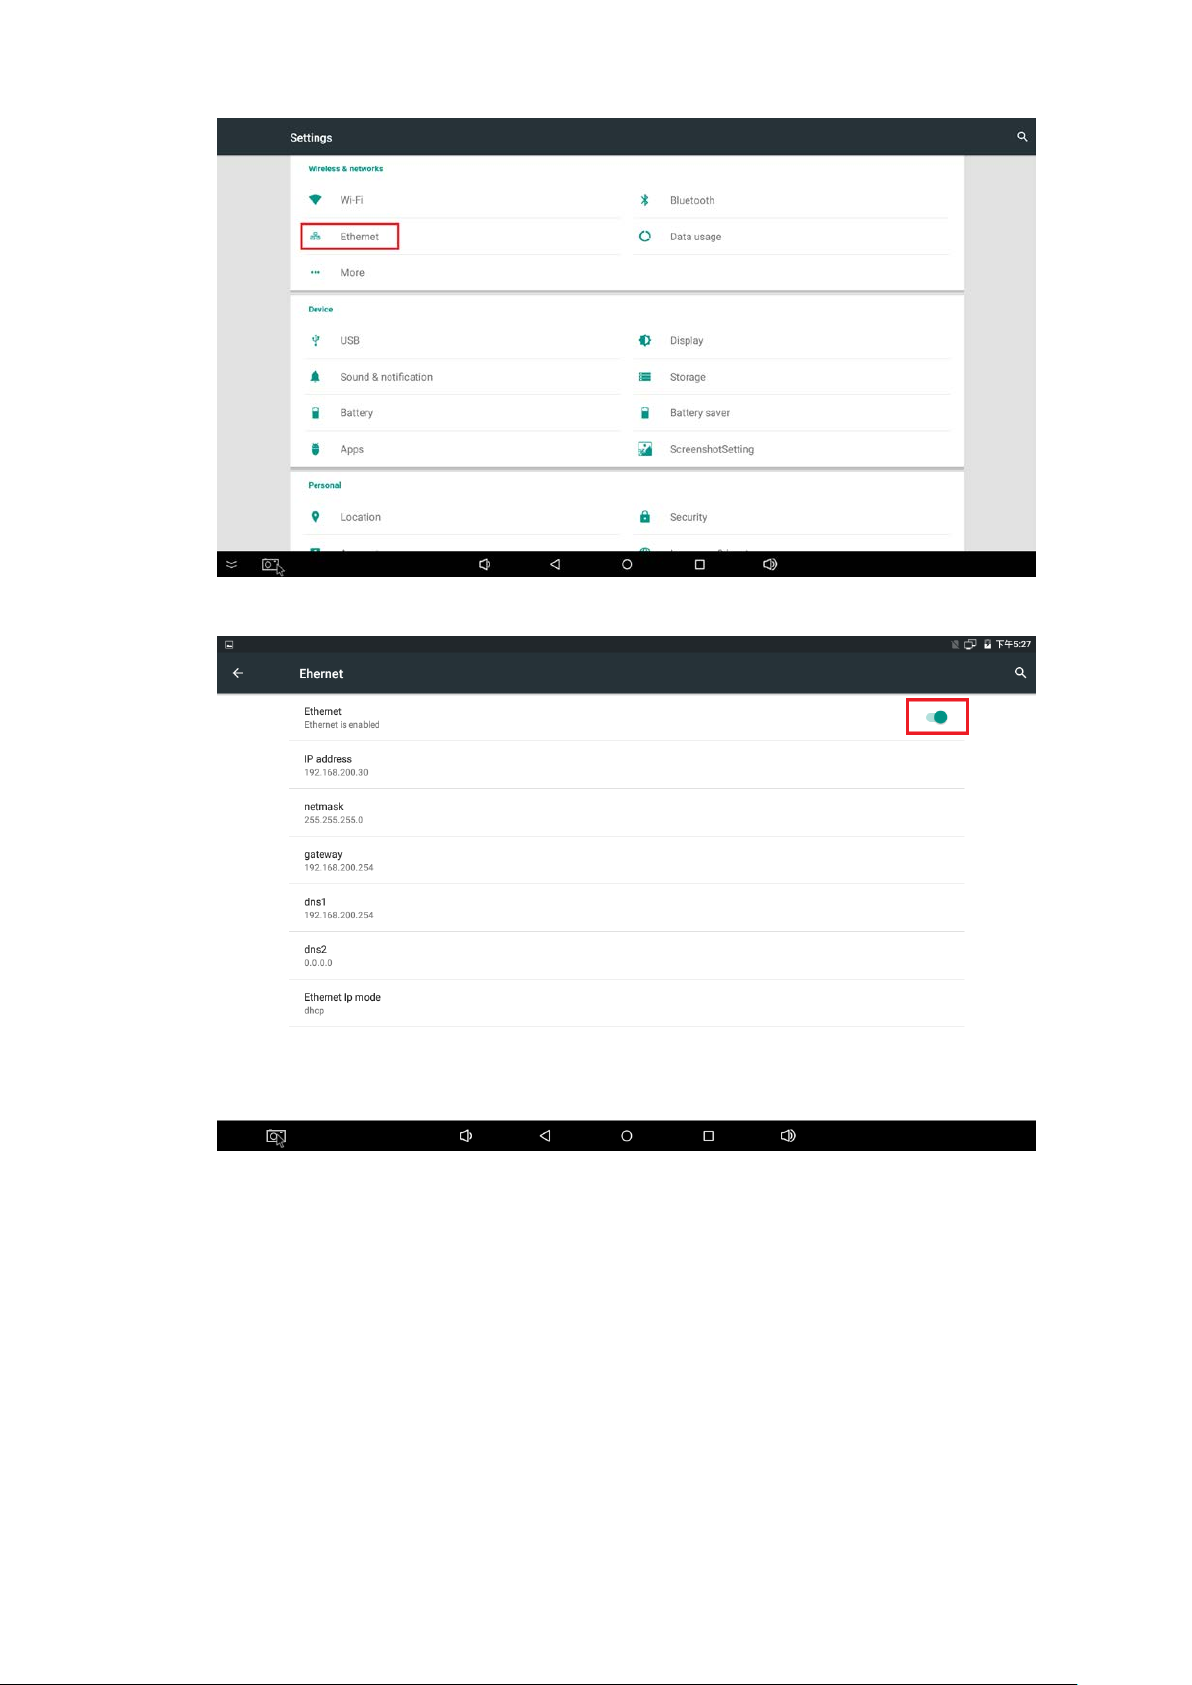
If intending to use Ethernet networking connection, please click “More Options” in the
“Wireless & Networks” menu, and click “Ethernet” to enter into set procedures, per
the diagram shown below.
第 13 頁
Page 14
第 14 頁
Page 15
3. CMS Product Login-in
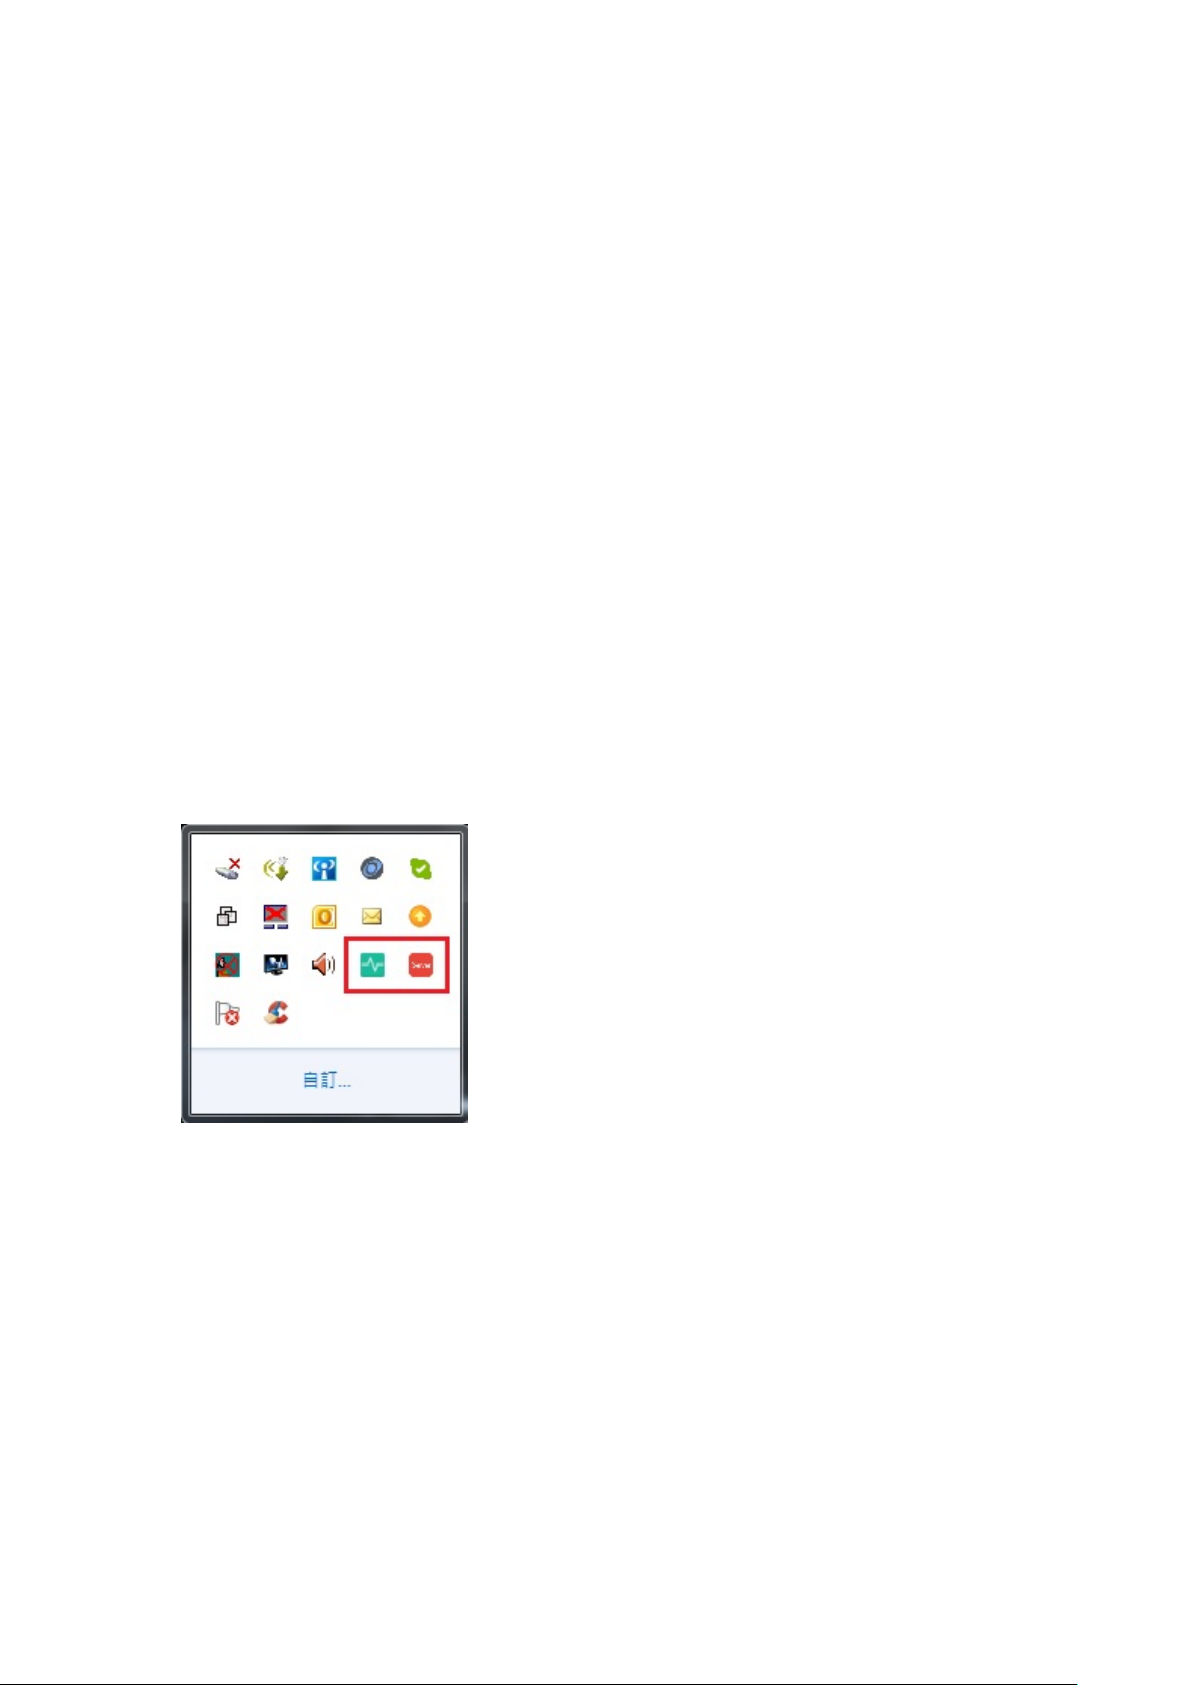
3.1 To ensure “Information publication system server” on the se rver is ope rat iona l, (per the
icon illustrated in the bottom-right-hand corner taskbar)
Please confirm that the built-in firewall of the Windows system has been turned off.
Activate “Control Panel” -> “Network & Sharing Center” -> “Local Area Network”, then
click “Details” to check IPv4 address
第 15 頁
Page 16
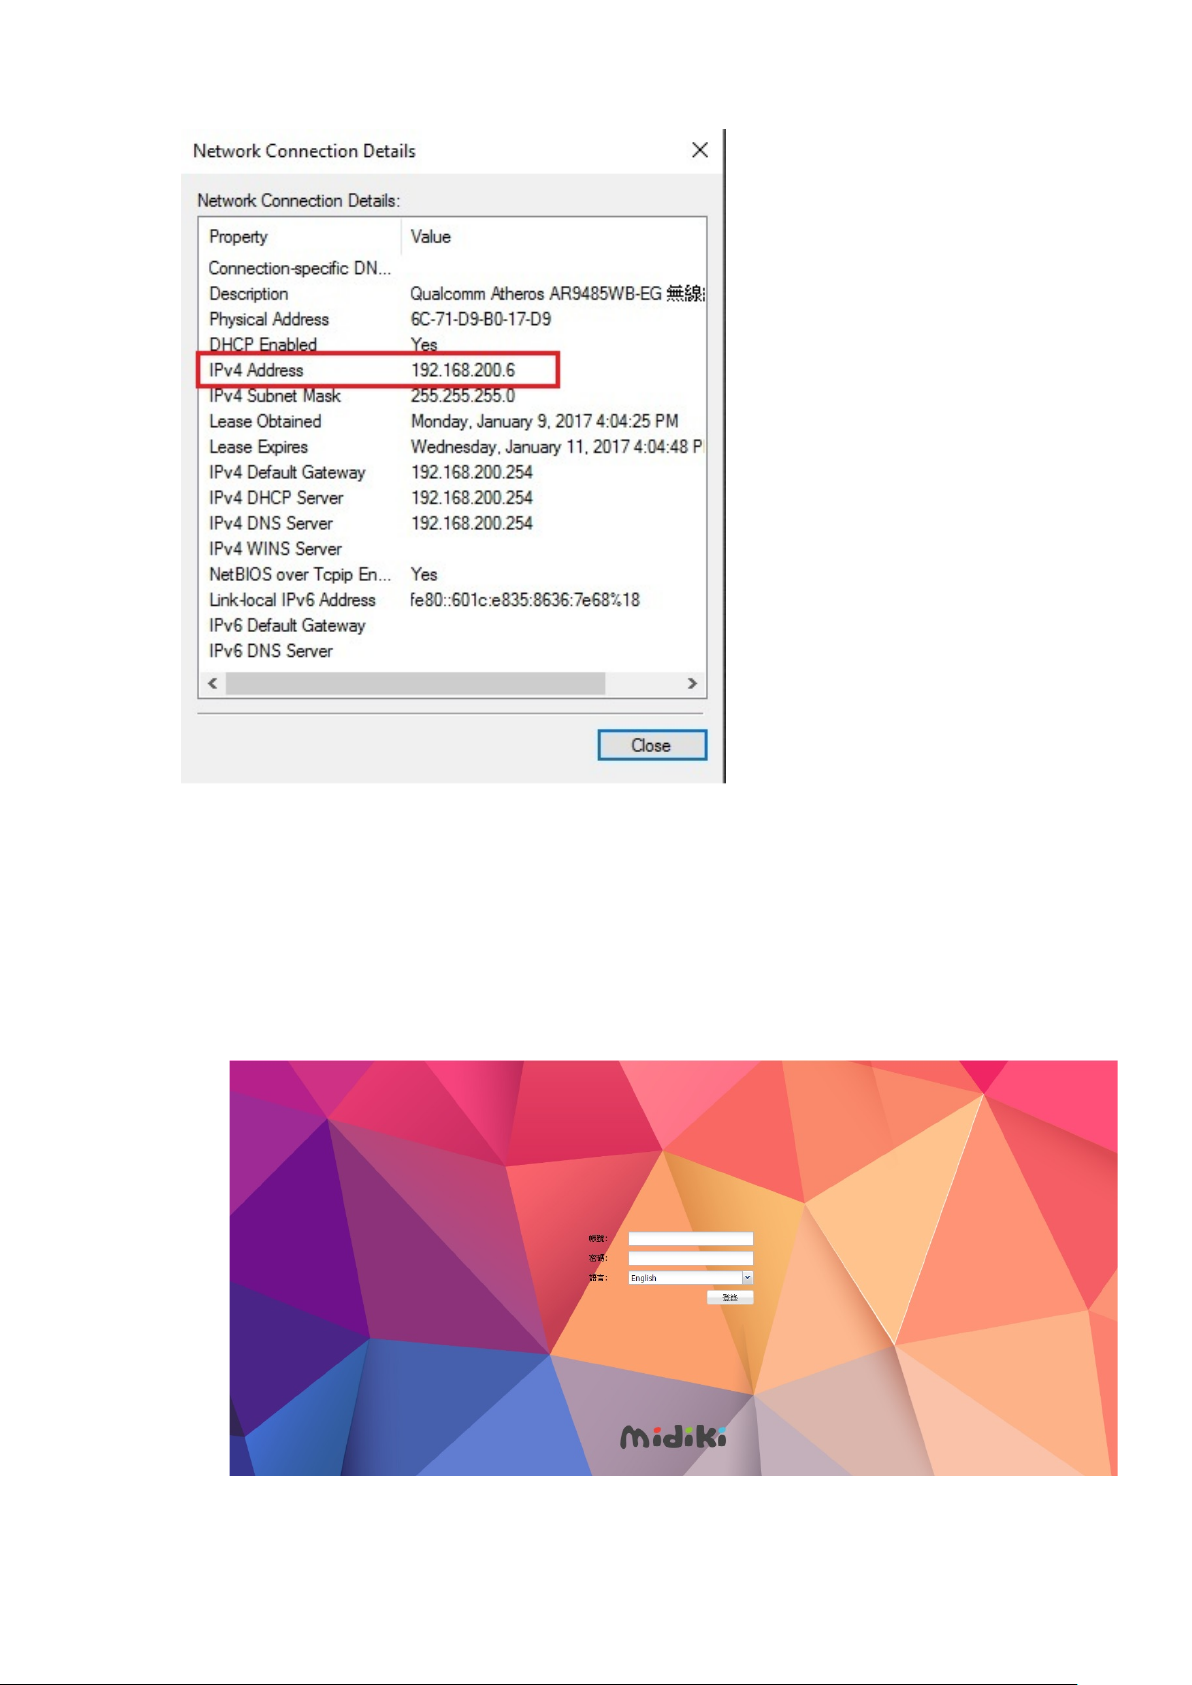
3.2 Open up Google browser, and entering the IP address confirmed by Step 3.1 :
After http://Server IP:6101 (e.g. http:/120.24.78.70:6101) is confirmed,
and login-in page appears, please fill in the preset Login-in Name: admin, and
Password: admin, before clicking to log-in.
Note: We recommend you to use “GOOGLE CHROME” browser or “FIRE FOX”
第 16 頁
Page 17
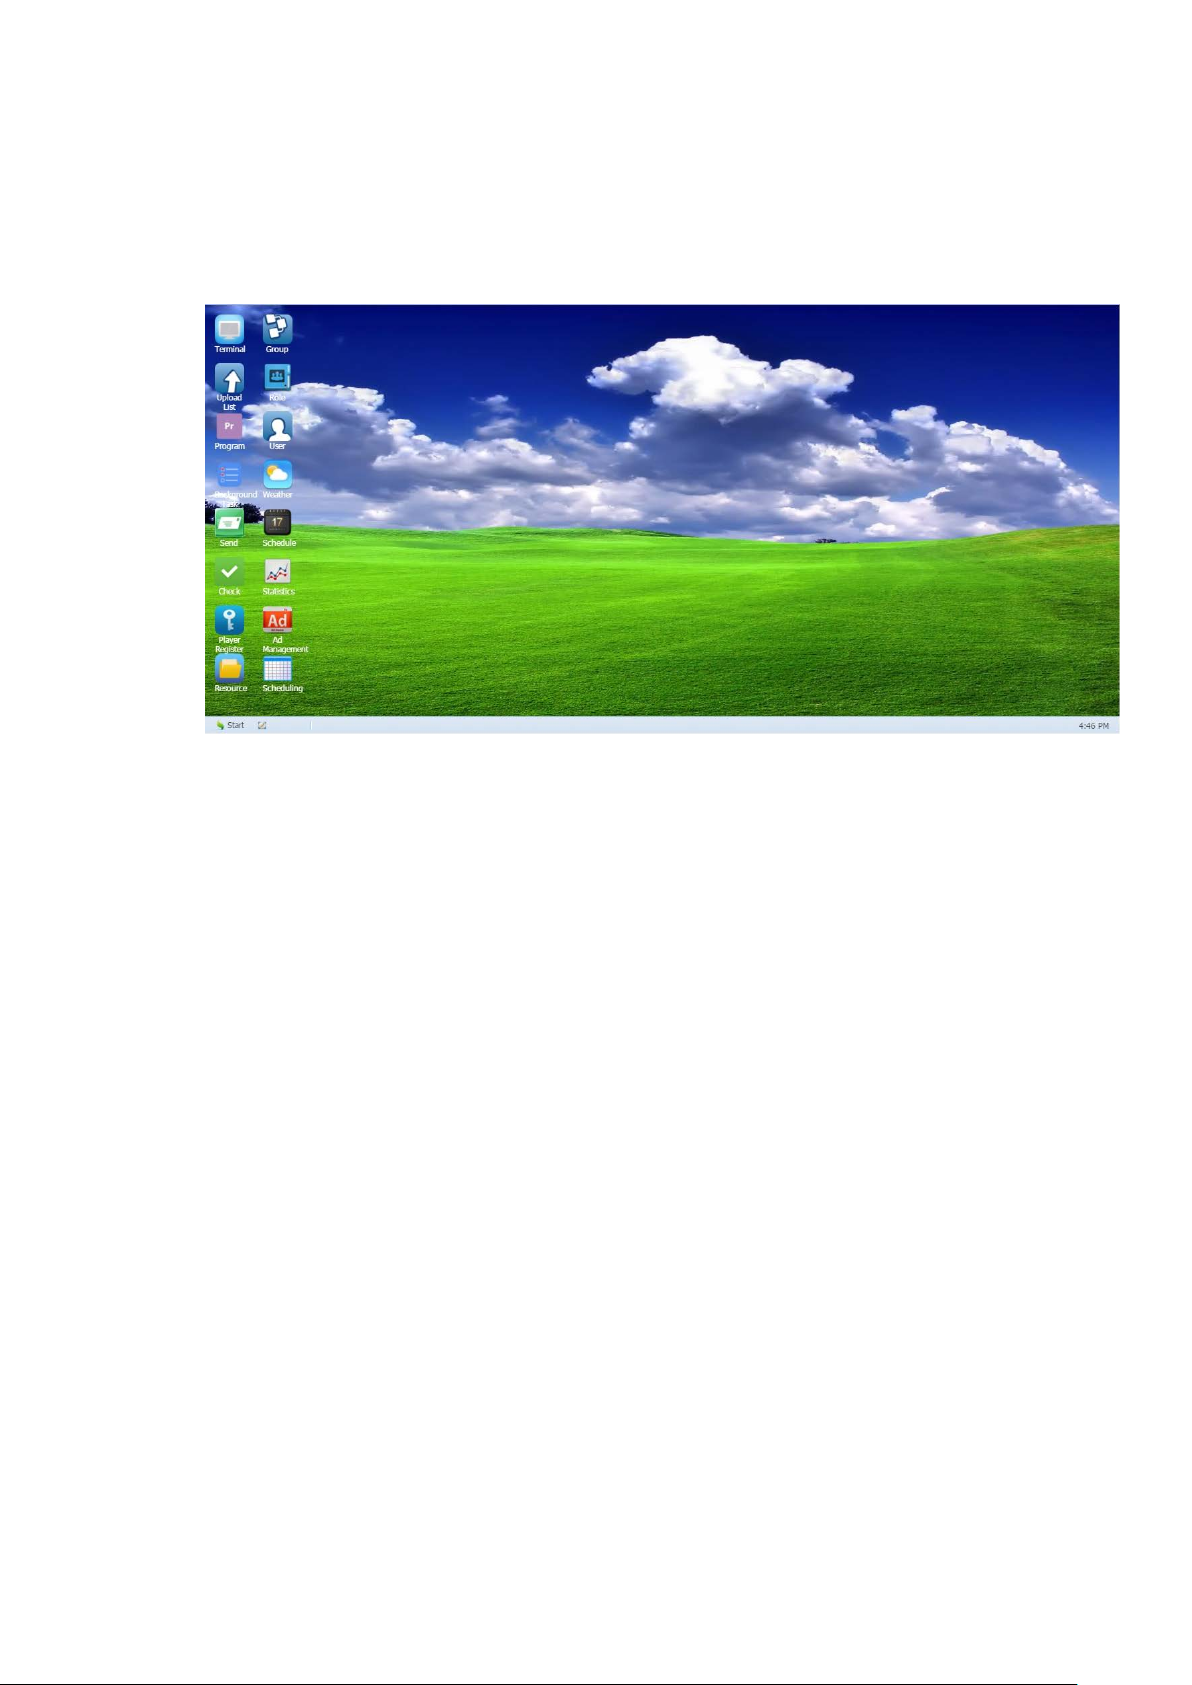
browser for system Login-in
in, the following picture shall appears, and you may begin to
4. Product Setting
4.1 Android Terminal Setting
nage needs to be connected with CMS server so as to allow CMS
3.3 After successful Log-
edit/create programs.
The Digital Sig
Management System to upload program content onto Digital Signage device-end.
Please note that, this chapter contains outlined intro for Server CP and Digital Signage
in the same “intranet segment”. For other connection format, please refer to Chapter
7 “Server and Digital Signage Connection Concept”.
4.1.1 Maintain the terminal operation
第 17 頁
Page 18
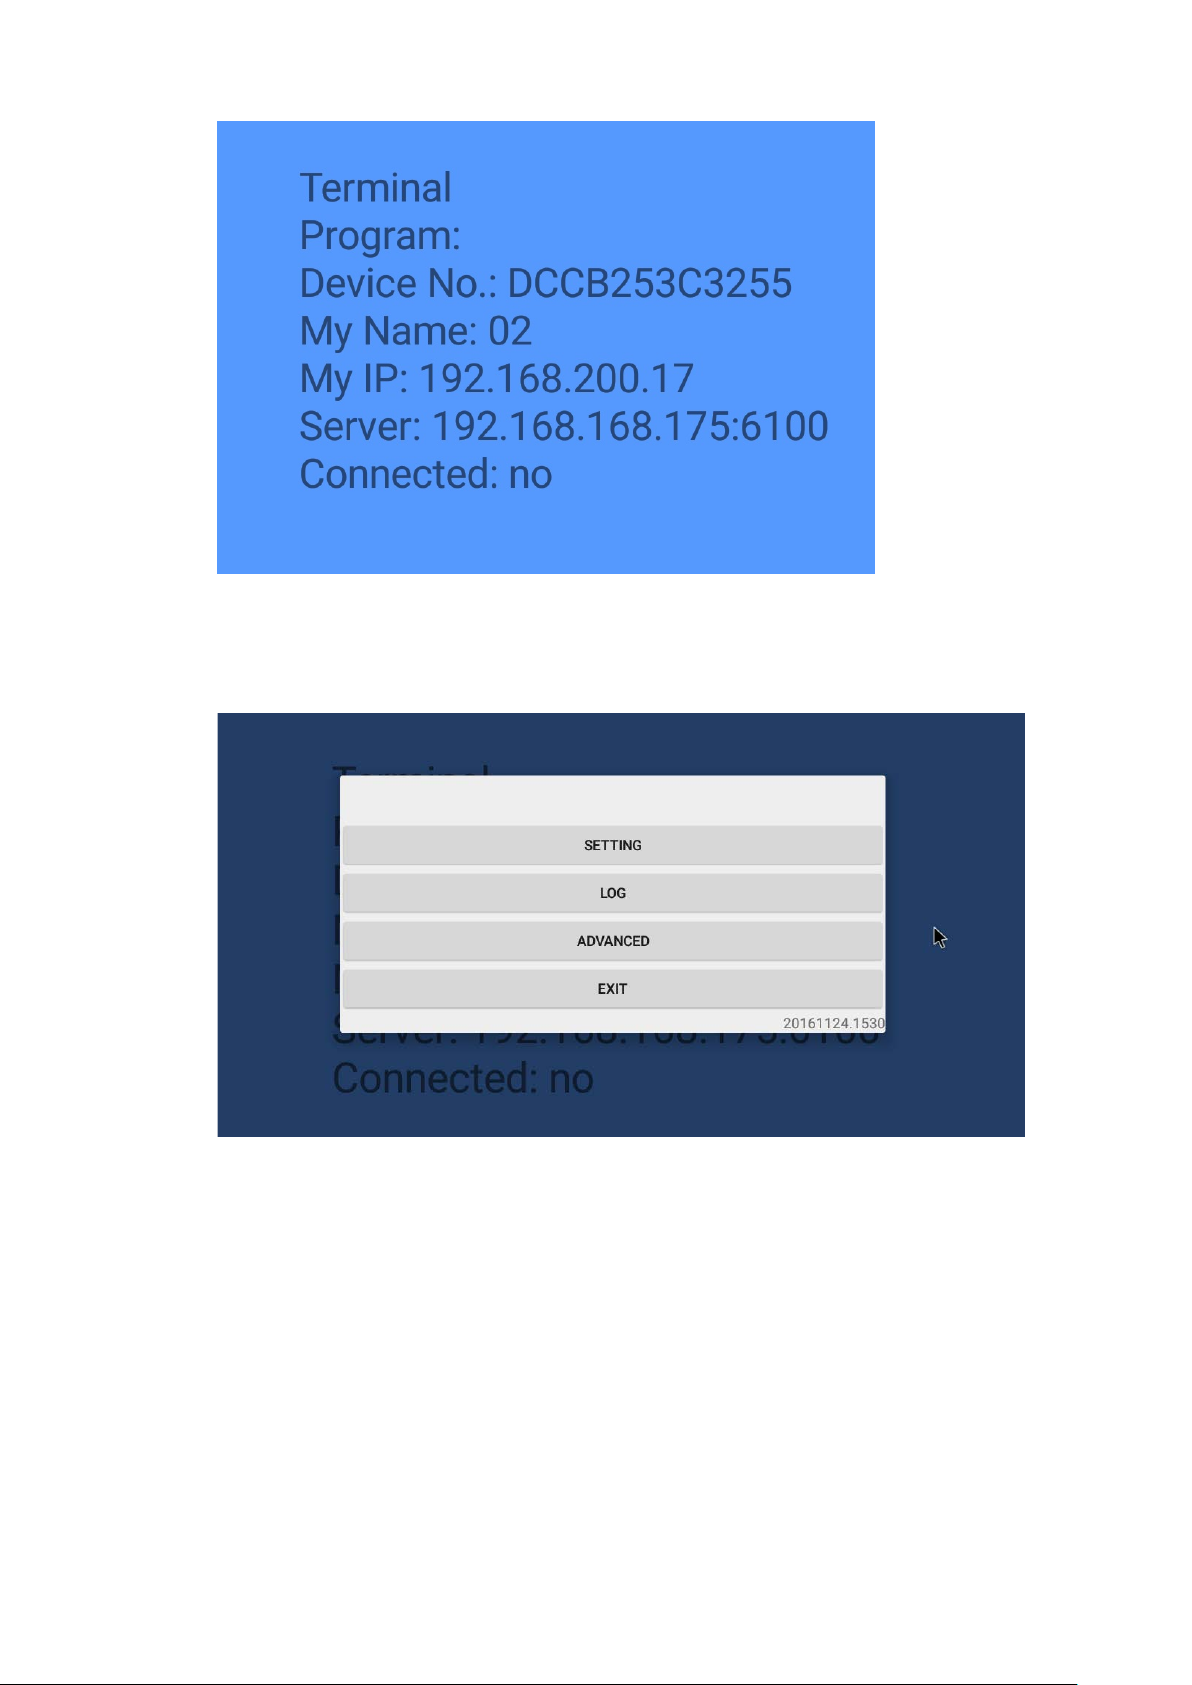
4.1.2 Quick double-click right-key of your mouse, or Return Key to have pop-up the setup
window
4.1.3 After clicking Setting, input Server IP Address and terminal name
第 18 頁
Page 19
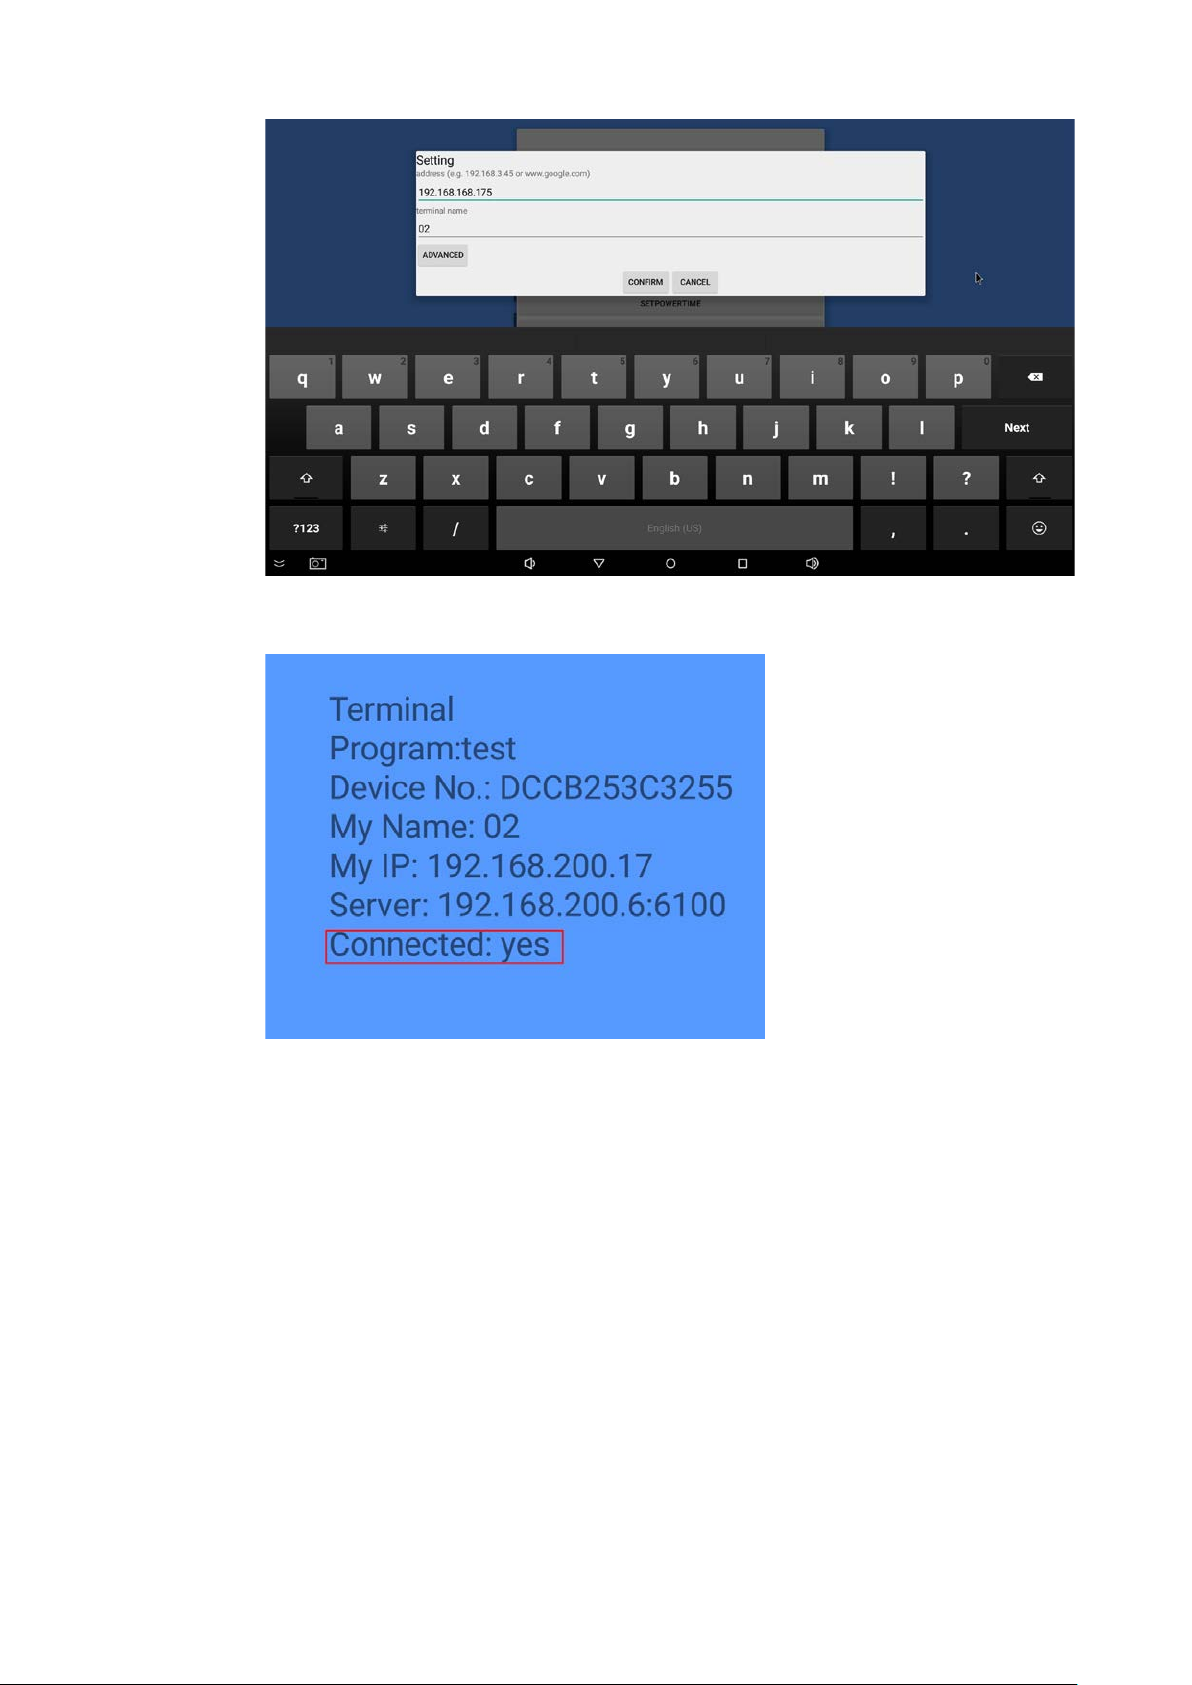
4.1.4 After successful set-up, connection status shall indicates “Yes” within one minute
NOTE: If after a while the connection status is still “No”, then please confirm
whether SERVER computer and Digital Signage terminal are connected
to internet, as well as the network is in the same subnet.
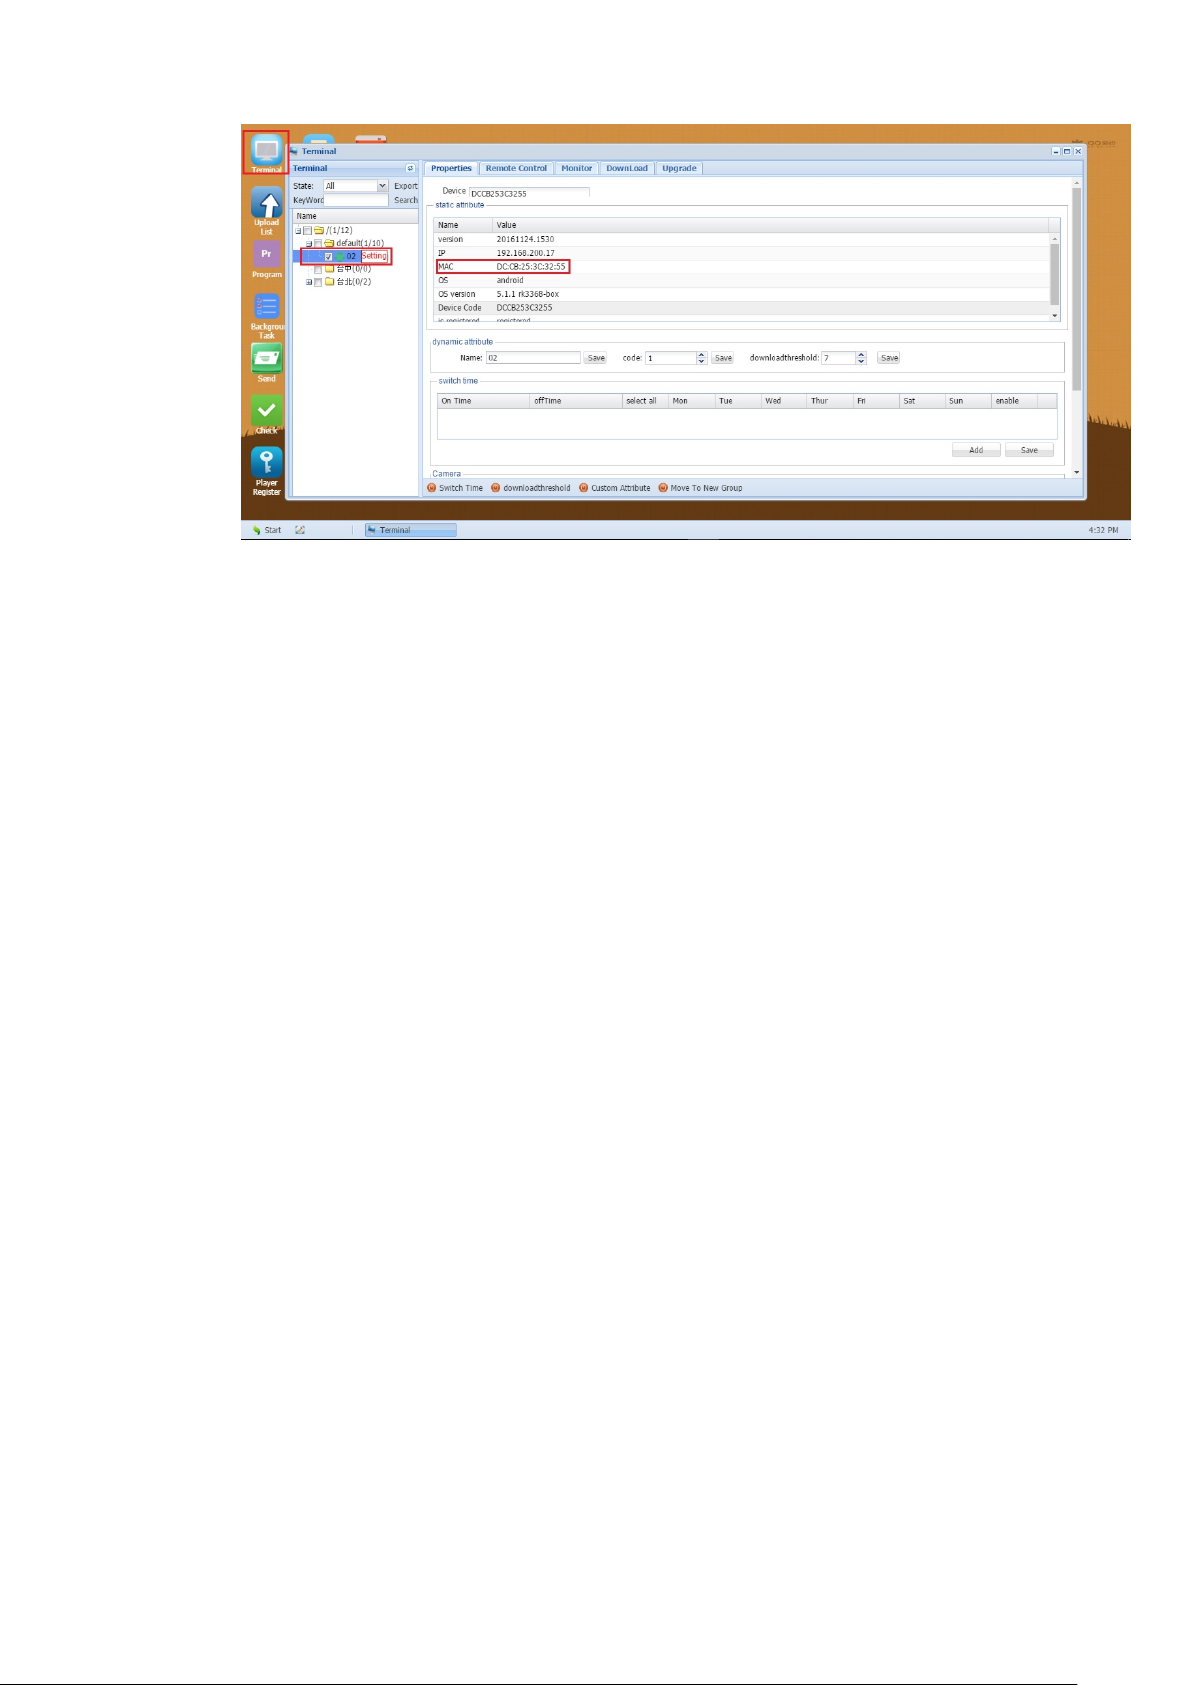
4.1.5 Please open the back-end page on the browser, and double-click “terminal
management”, and if you can see one terminal being online (as displayed in color
and kindly make sure the terminal name matches), then the set-up is complete.
第 19 頁
Page 20
5. Product Registration
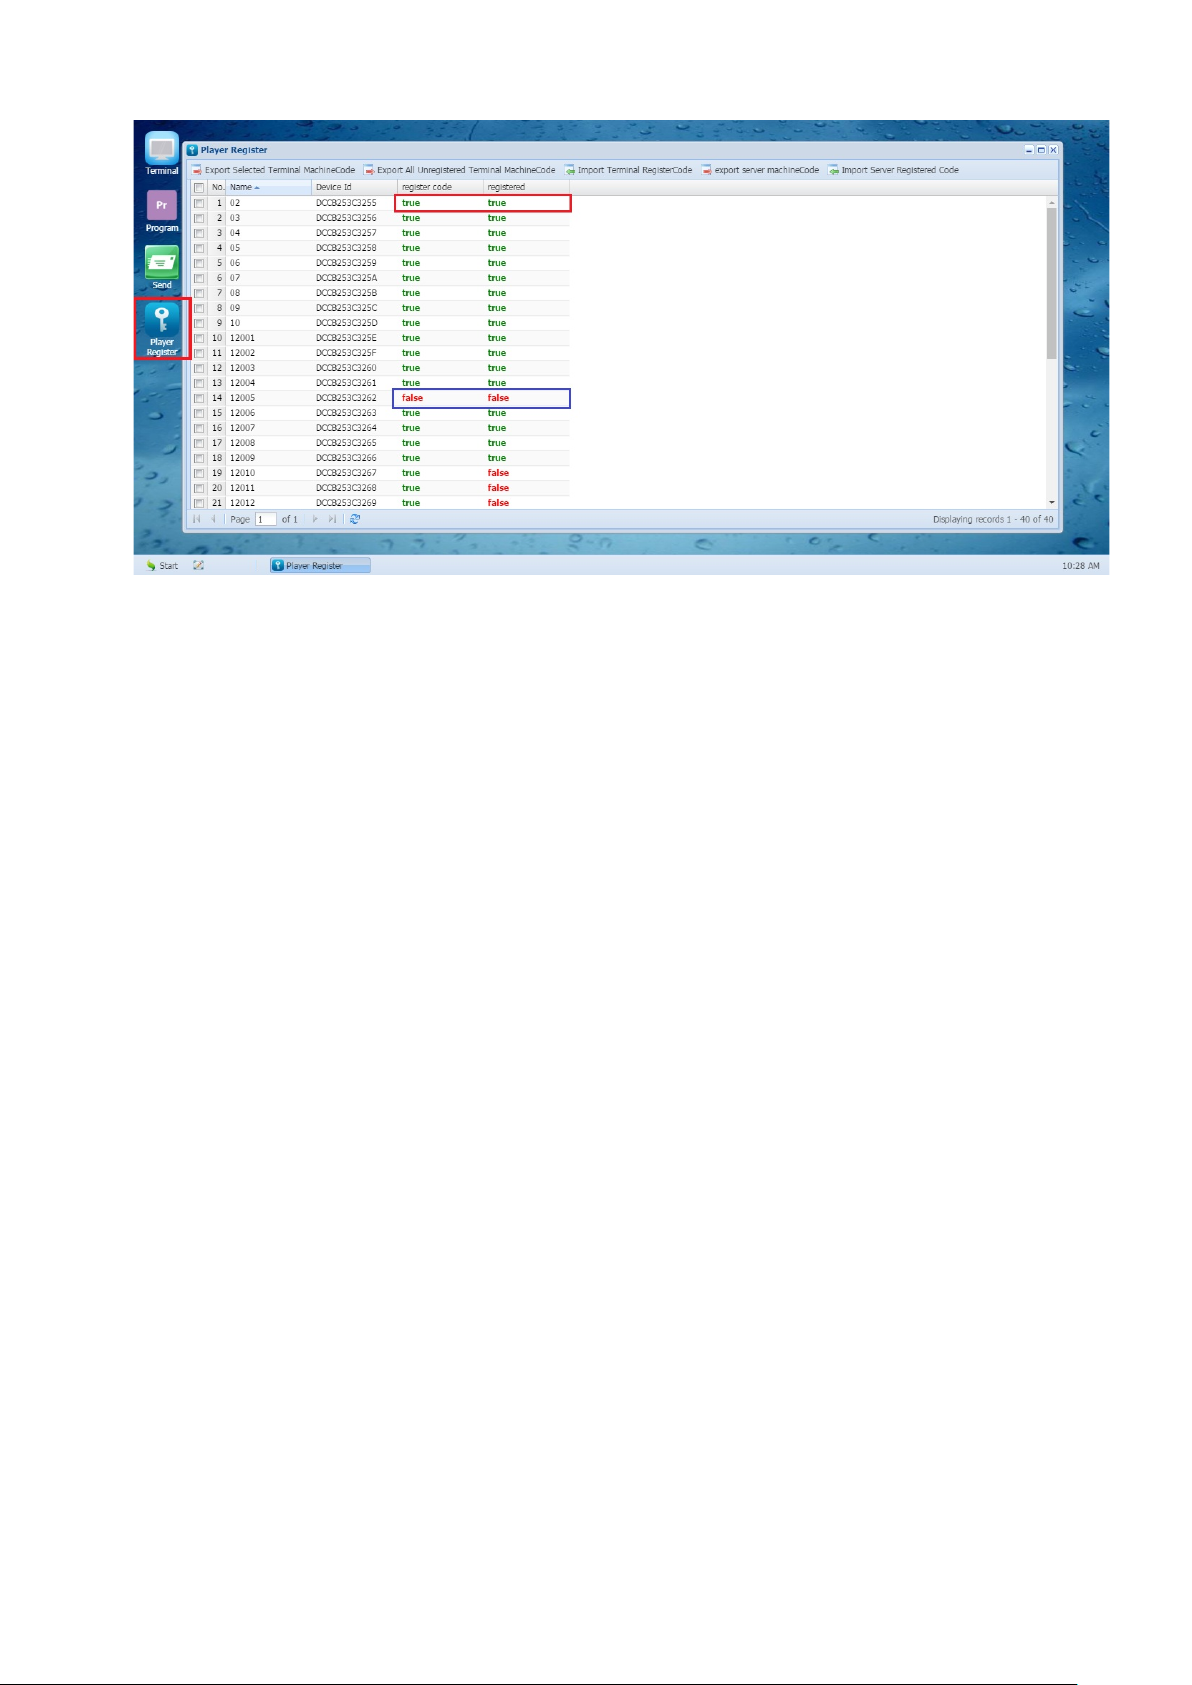
5.1 Confirm Terminal Registration
n your Desktop to confirm whether the Digital Signage terminal has been
After opening Google browser and logging- in successfully, please double-click “Terminal
Registration” o
registered. And if not, please immediately contact distributors and our company for
assistance.
第 20 頁
Page 21
6. Program Production
6.1 Information Publication Programming Production
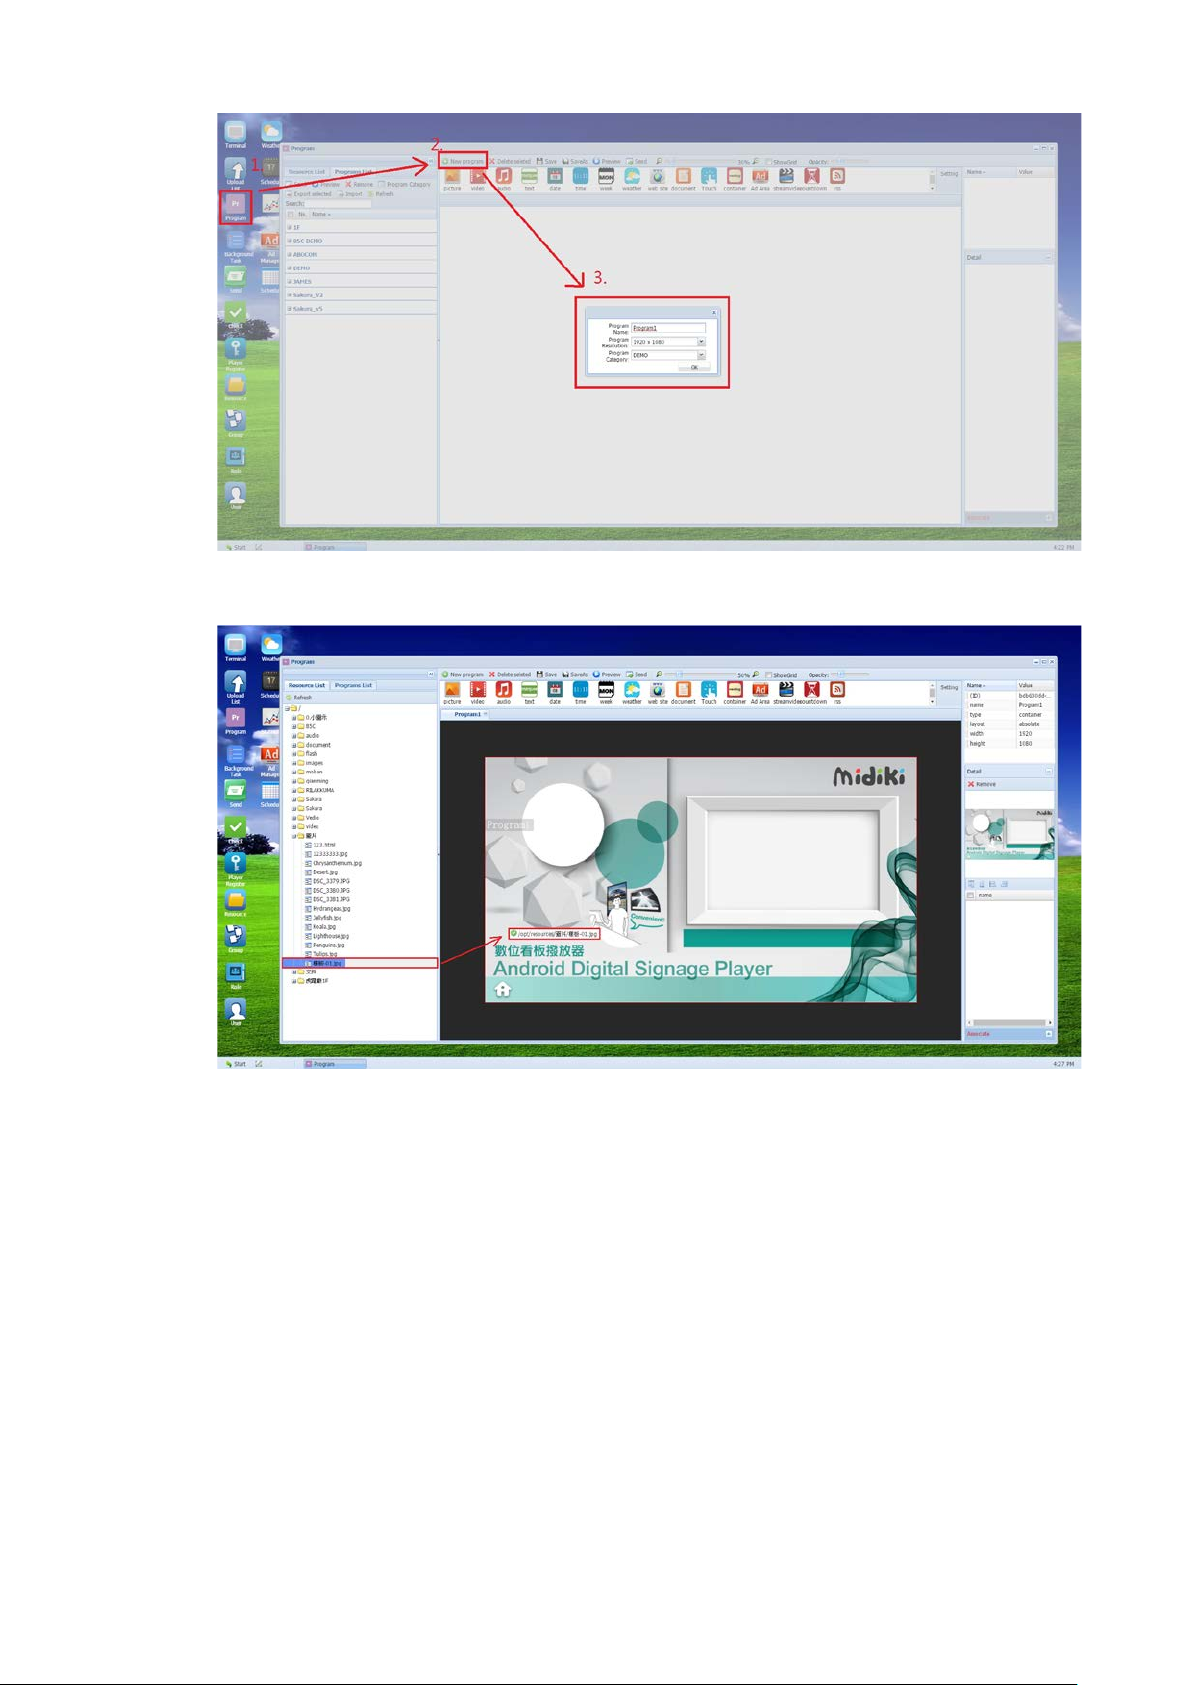
6.1.1 After successfully logging into back-end, double-click “Program Production”, click
“New Program”, entering “Program Name”, selecting “Program Resolution”,
entering “Program Category”, and click “Yes”
第 21 頁
Page 22
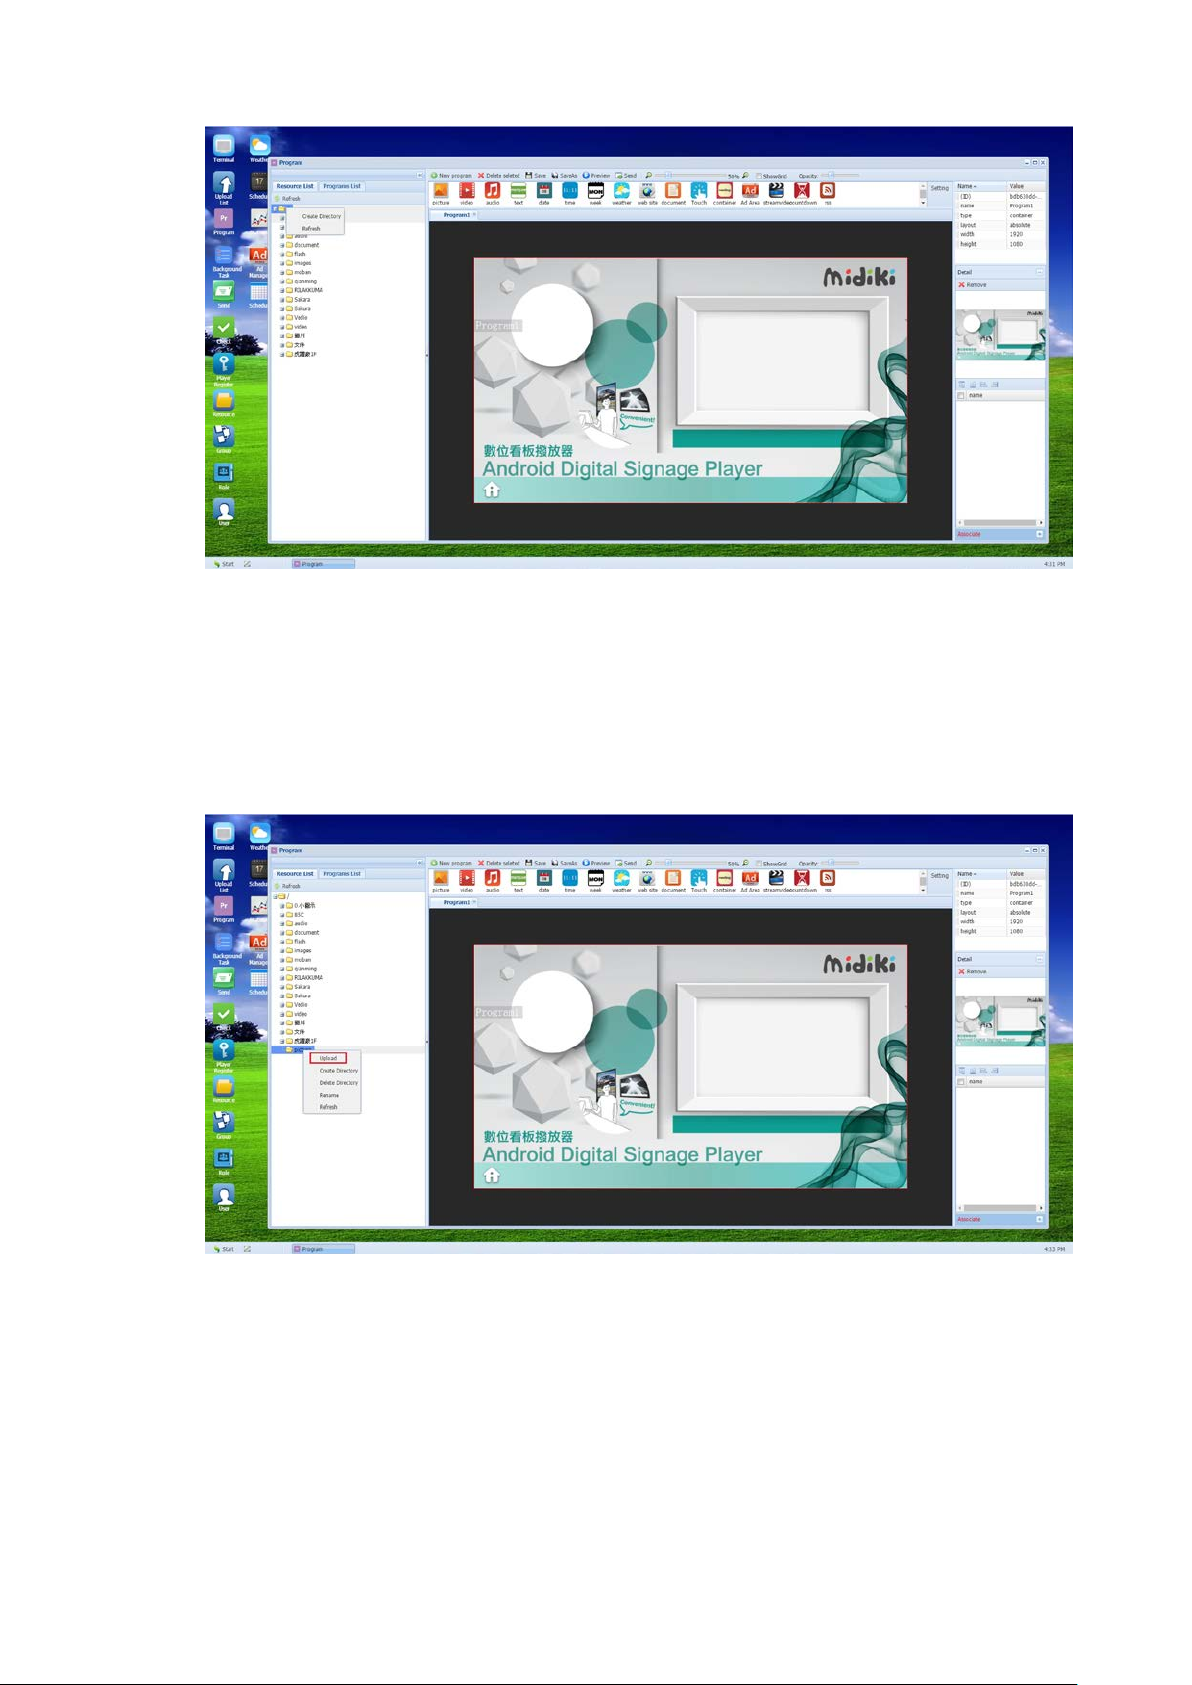
6.1.2 Dragging a built-in or uploaded background picture or frame as program background.
6.1.3 Within resource list, click Right-Mouse-Key to build “New Folder” (per the illustration)
第 22 頁
Page 23
6.1.4 Click “Pictures” folder icon with Right-Mouse-Key and click “Upload Materials” to
upload pictures.
第 23 頁
Page 24
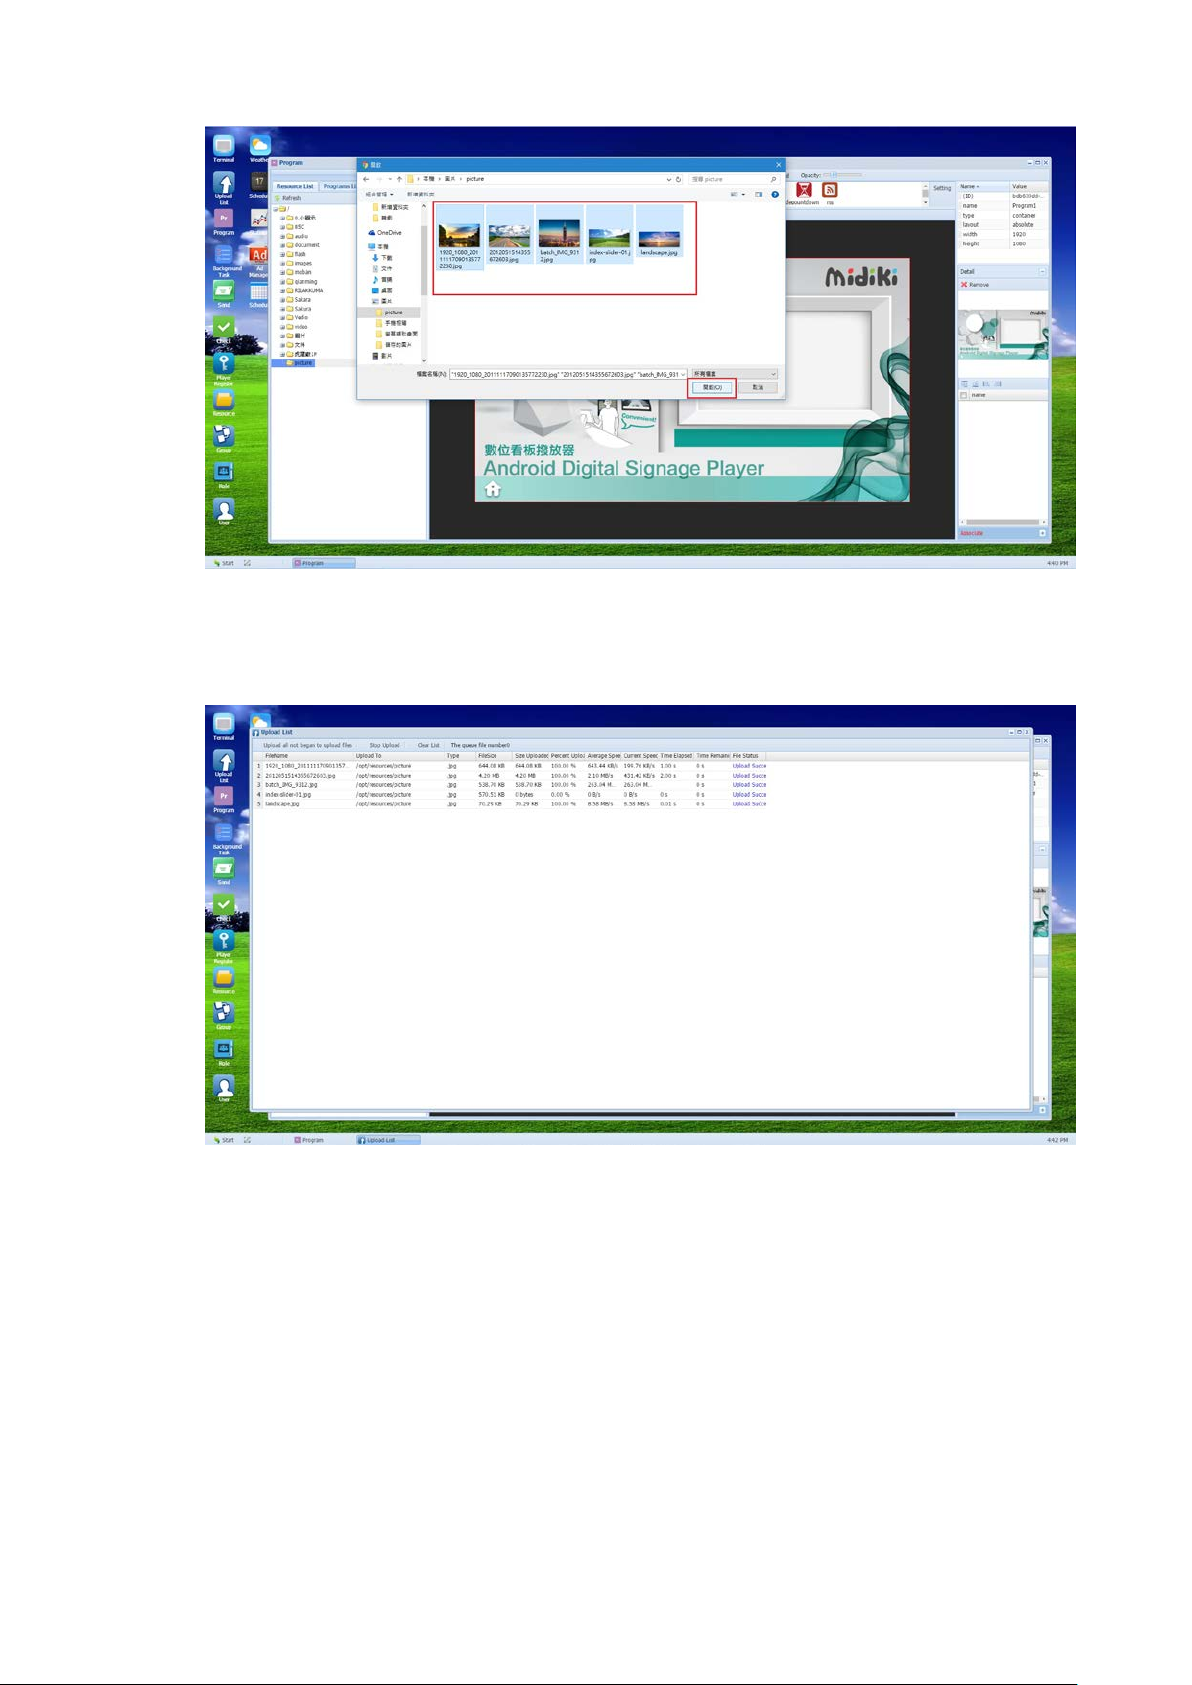
6.1.5 As the “upload list” prompt appears, click up-right-corner to close.
第 24 頁
Page 25
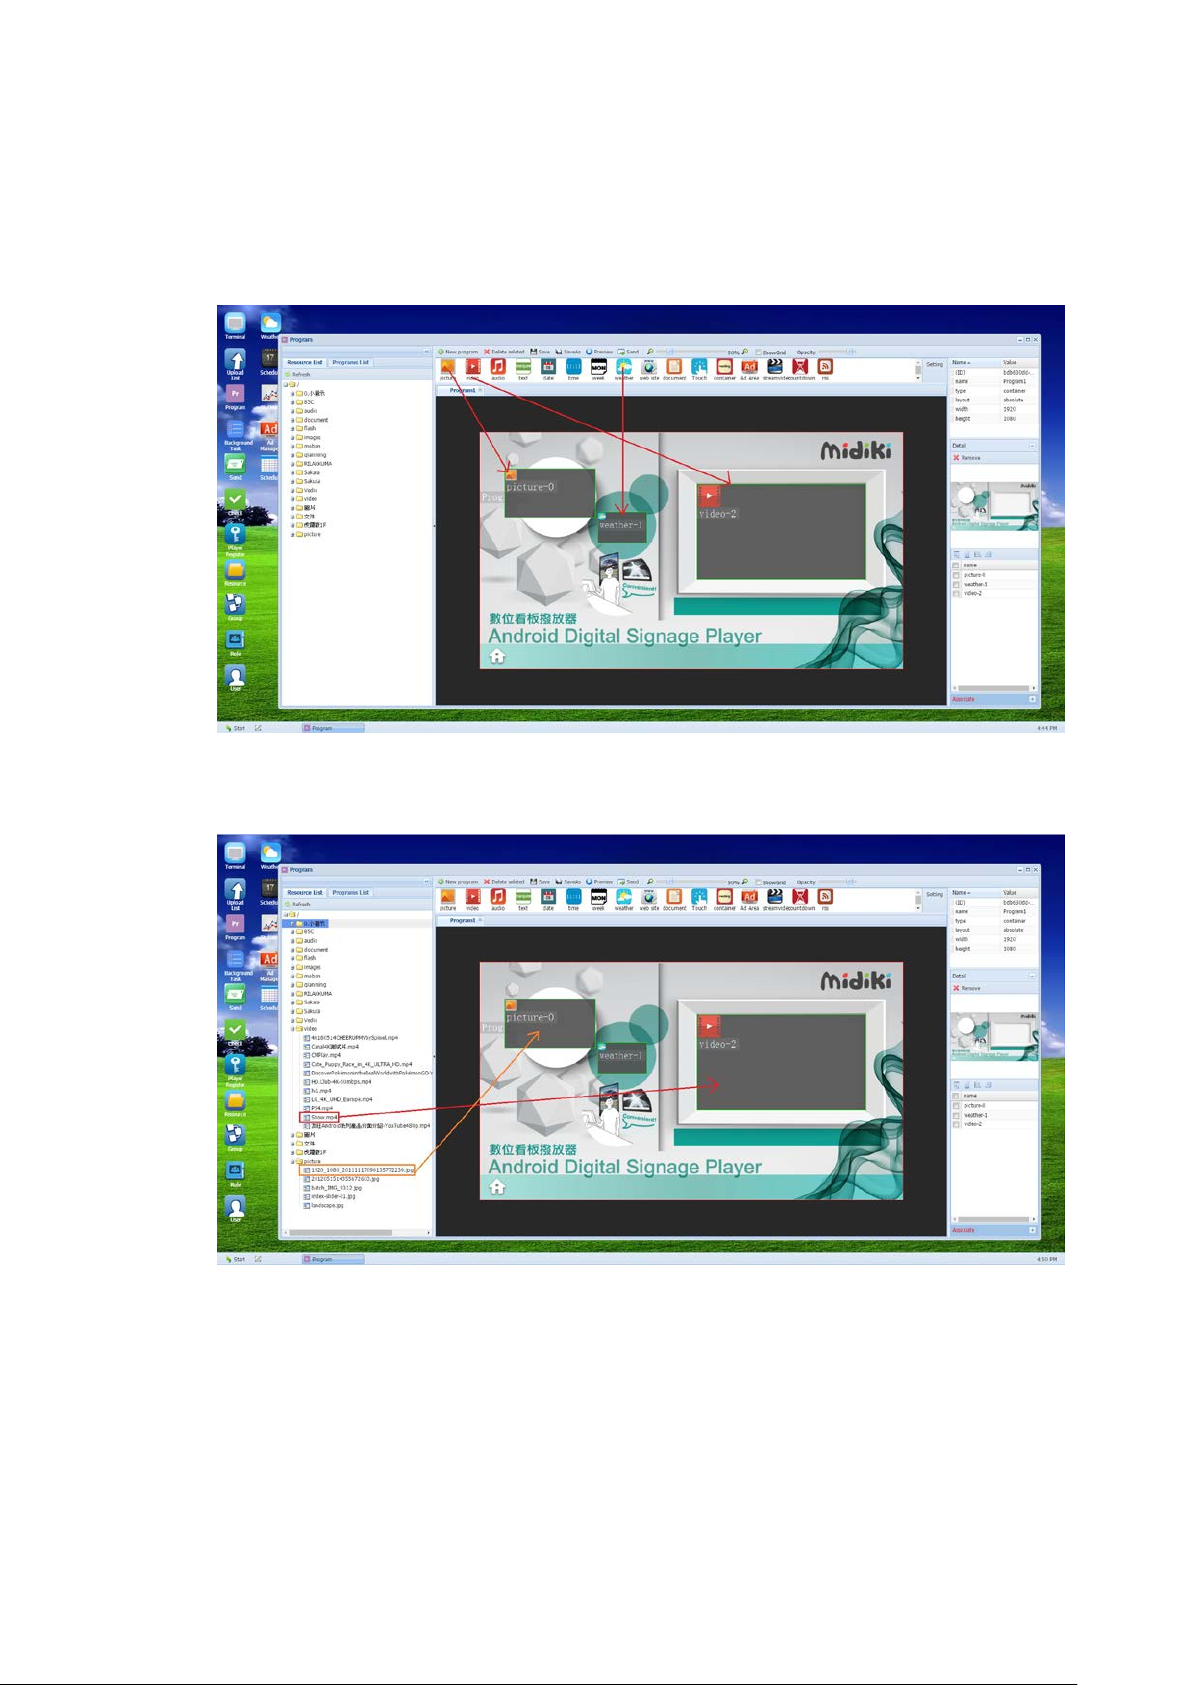
6.1.6 Click elements of “Picture”, “Video” or “Weather” and adjust them to suitable sizes
while placing them in the suitable position, while dragging the to-be-uploaded picture
or video files to the corresponding “Pictures” and “Video” frames.
第 25 頁
Page 26
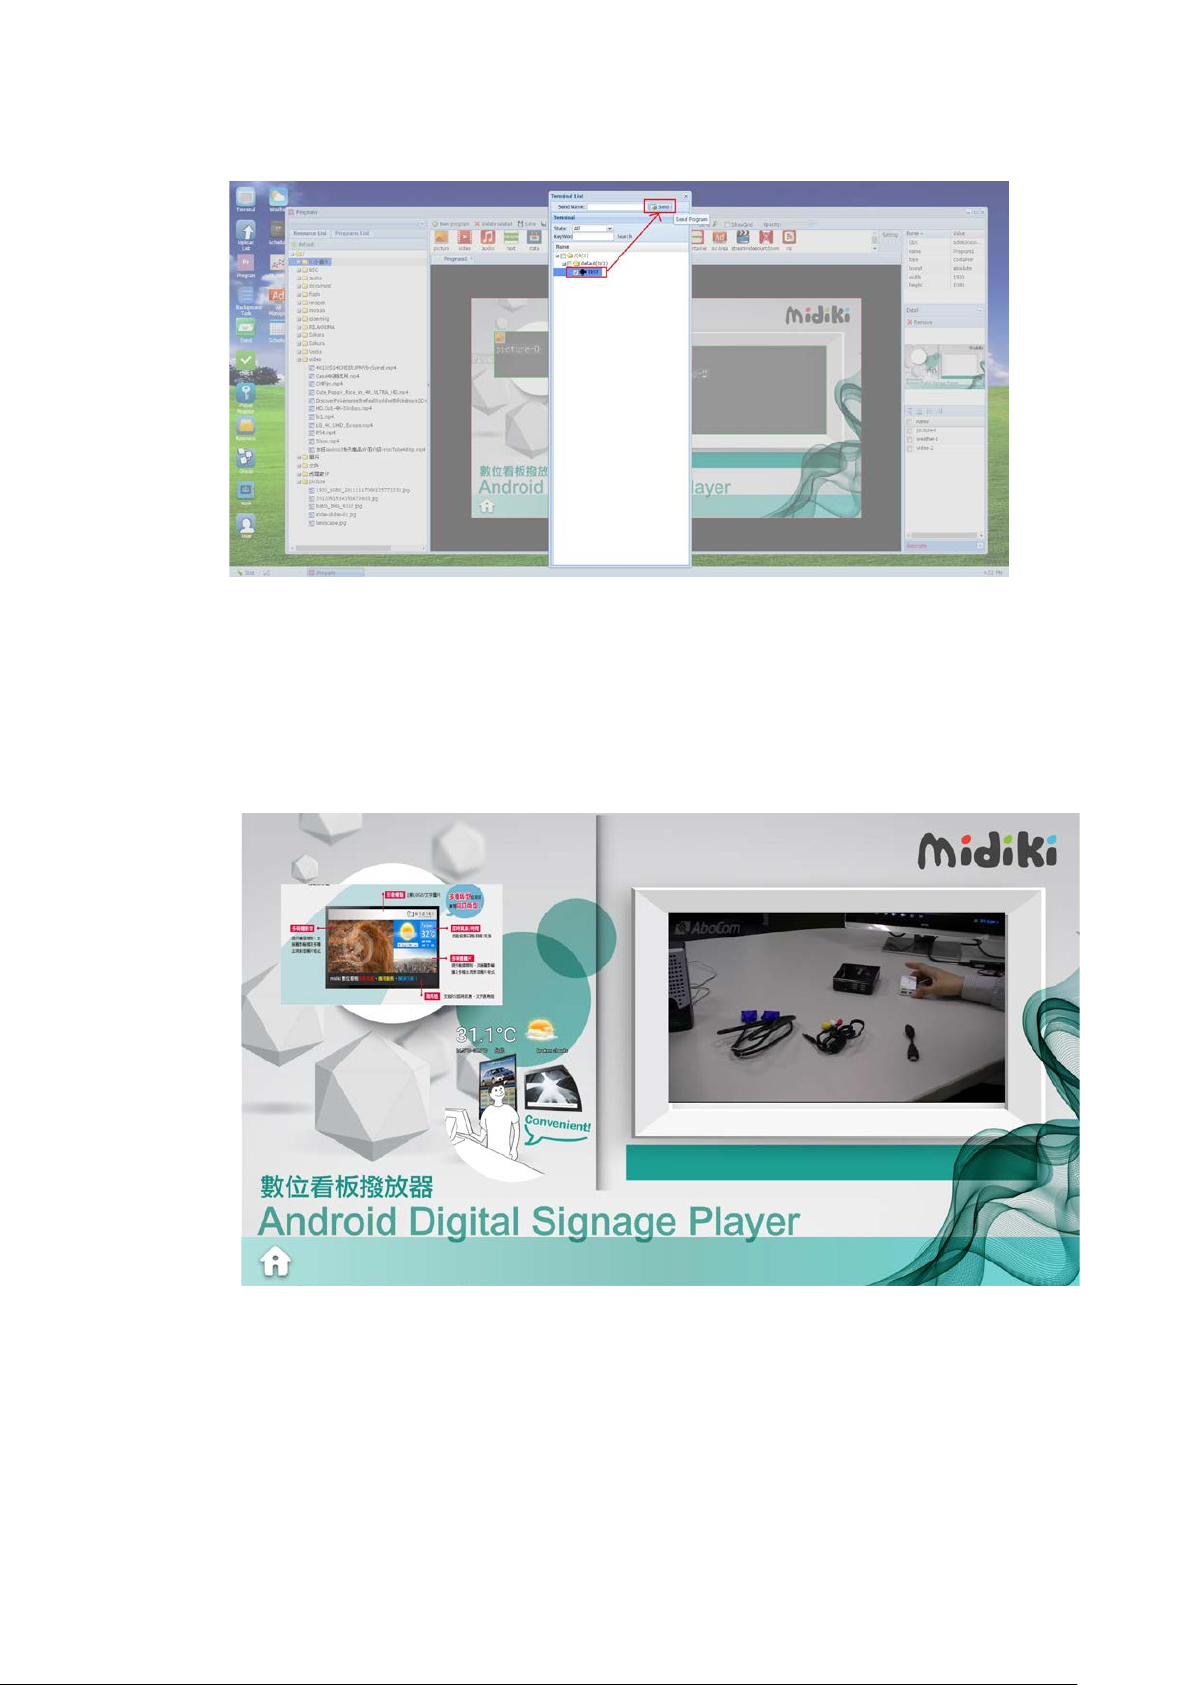
6.1.7 Clicking “Send” to the terminals selected from “ Terminal“ list.
6.1.8 The operation of terminal programming for videos, weather are similar with
pictures.
第 26 頁
Page 27
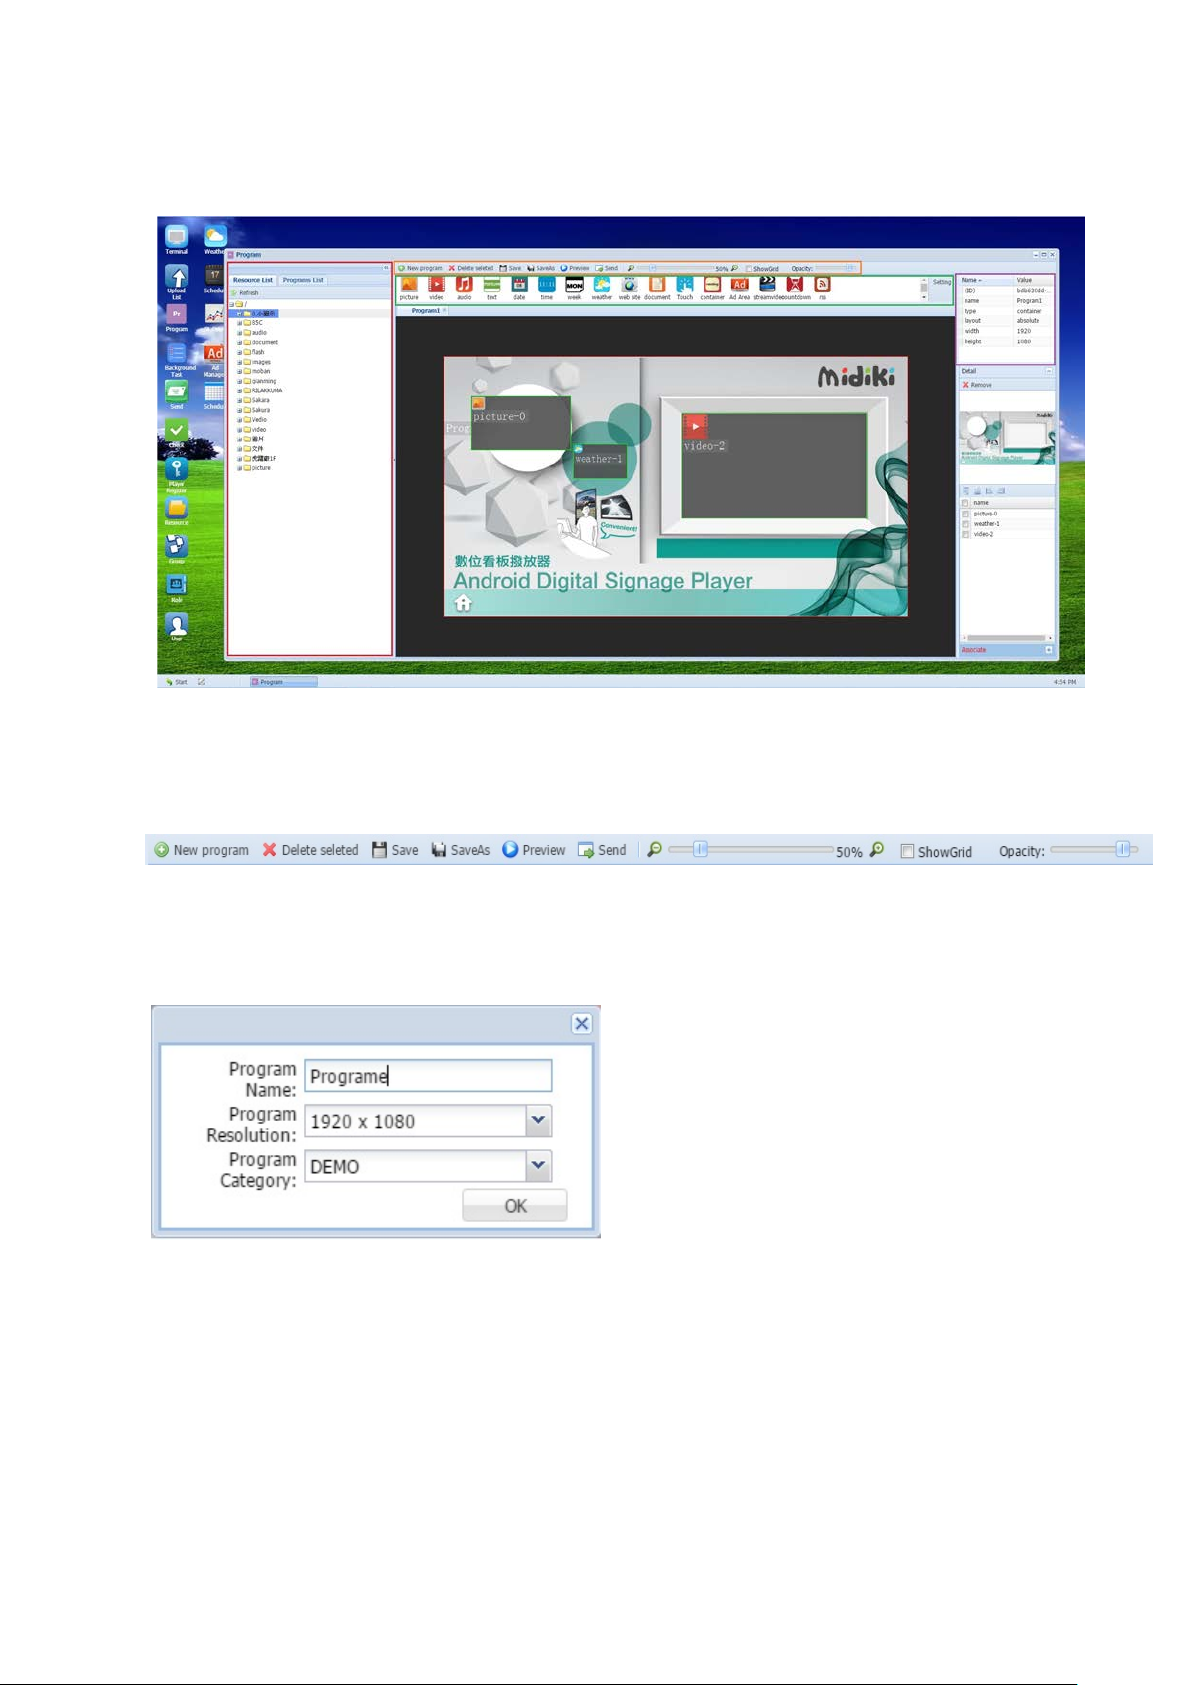
6.2 Introduction of Program Production Interface
Separate Introductions for 4 frames framed in RED, as illustrated above.
6.2.1 The top-layer functions in the program production window, as shown below:
New Program: Create one new program
The following window appears after clicking “New Program”:
”Program Name”: User to define Program Name
Program resolution: Select “Output resolution” to TV (After initial set-up, resolution can
adjust to suit)
Program Category: to set the location of program saved
Deleted Selected: To delete the selected Program Elements
第 27 頁
Page 28
Save: Saving the current program
side columns in the program production window, as shown
Save As: Save the current Program as another New Program
Preview: To create HTML page to preview the current program in focus (however, not
all the effects in the program shall be completely demonstrated)
Send: To broadcast current program in focus to the terminal player
Zoom In/Out: Zoom In & Out for the window of the program
Show Grid: Show Grid lines for the ease of aligning program elements.
Transparency: Adjusting the transparency of program elements
6.2.2 Functions in the left-hand-
below:
第 28 頁
Page 29
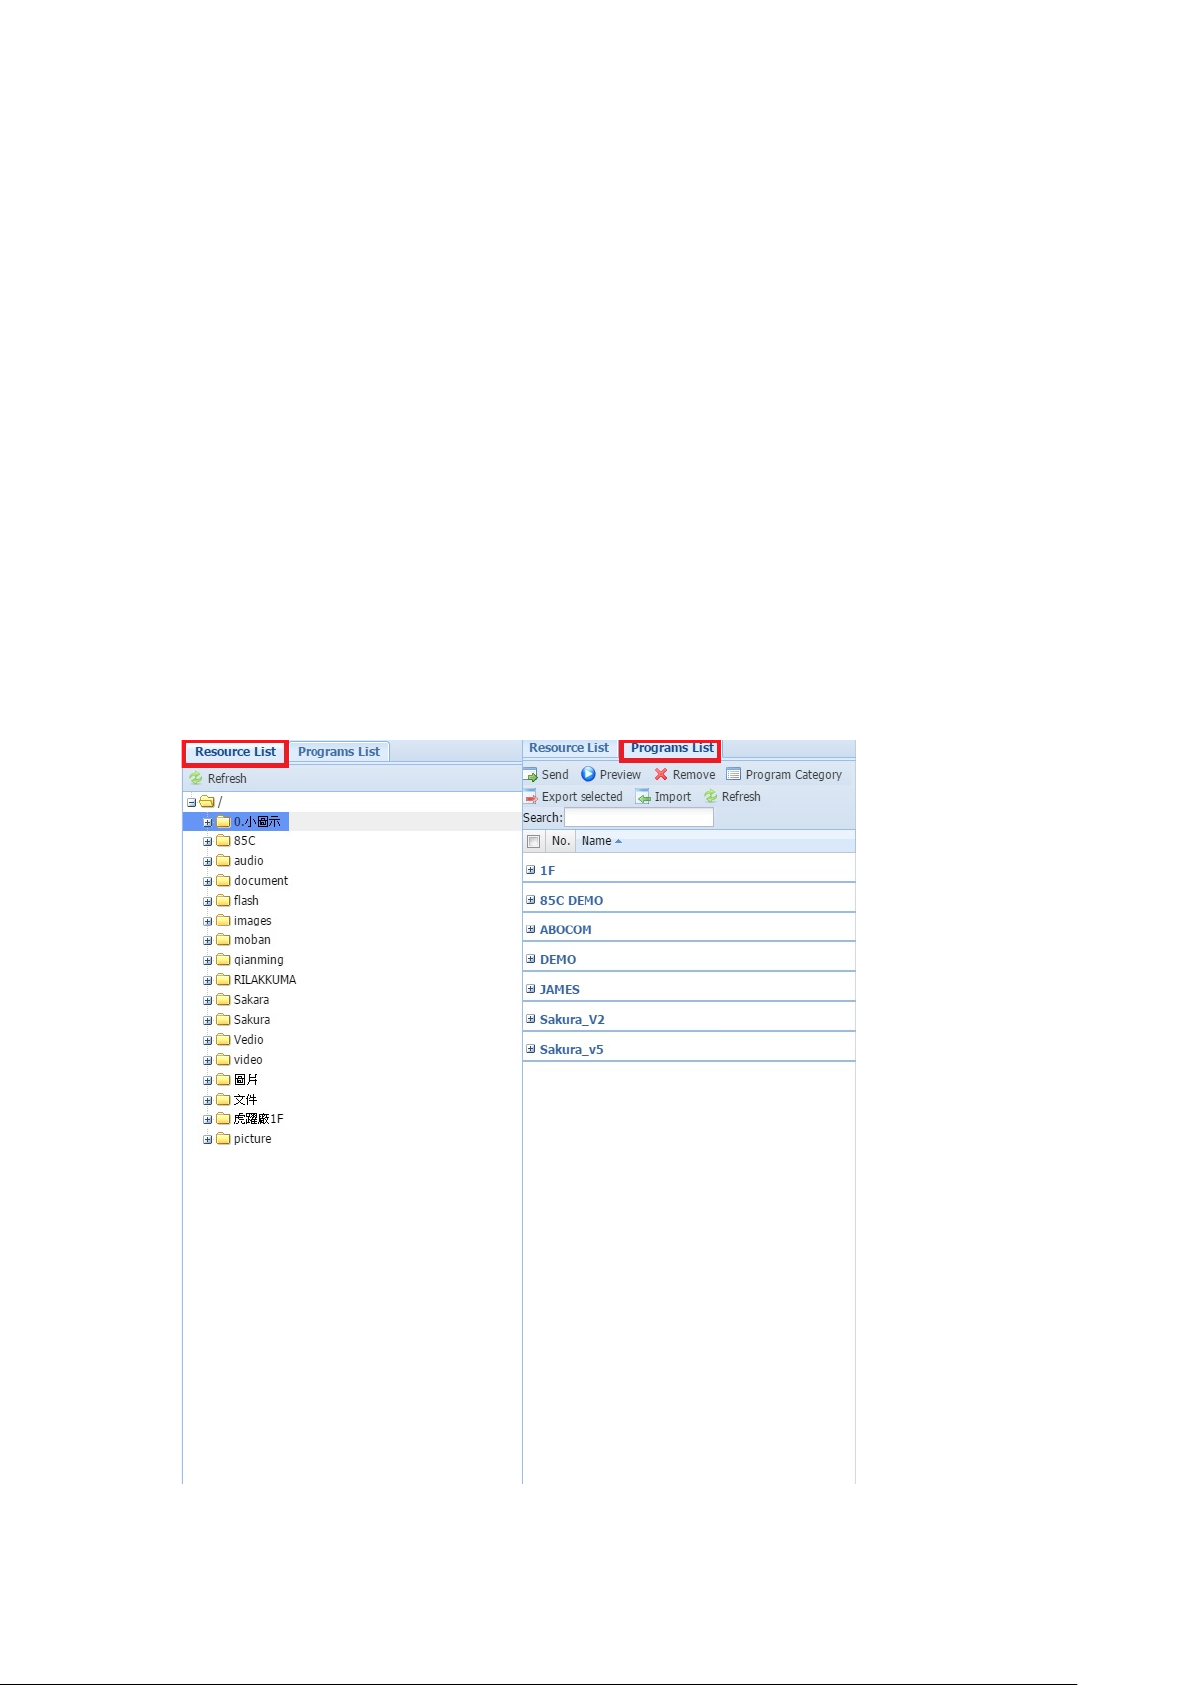
Introduction of function buttons in the column of program list:
Send: To broadcast the selected program to terminal player for playback
Preview: To create HTML page to preview the selected program (however, not all the
effects in the program shall be completely demonstrated)
Remove: To remove the selected program
Program Category: Used to create or delete different categories of programs
Export Selected: To export the selected program (Please refer to the following chapters
for detailed introduction)
Import: To import compressed file of the program
Refresh: To refresh page/content
Reource li st: All folders of us able mater ial s ar e s hown he re, and all those materials can be
dragged to be used as program elements.
6.2.3 Functions in the right-hand-side columns in the program production window, as
shown below:
第 29 頁
Page 30
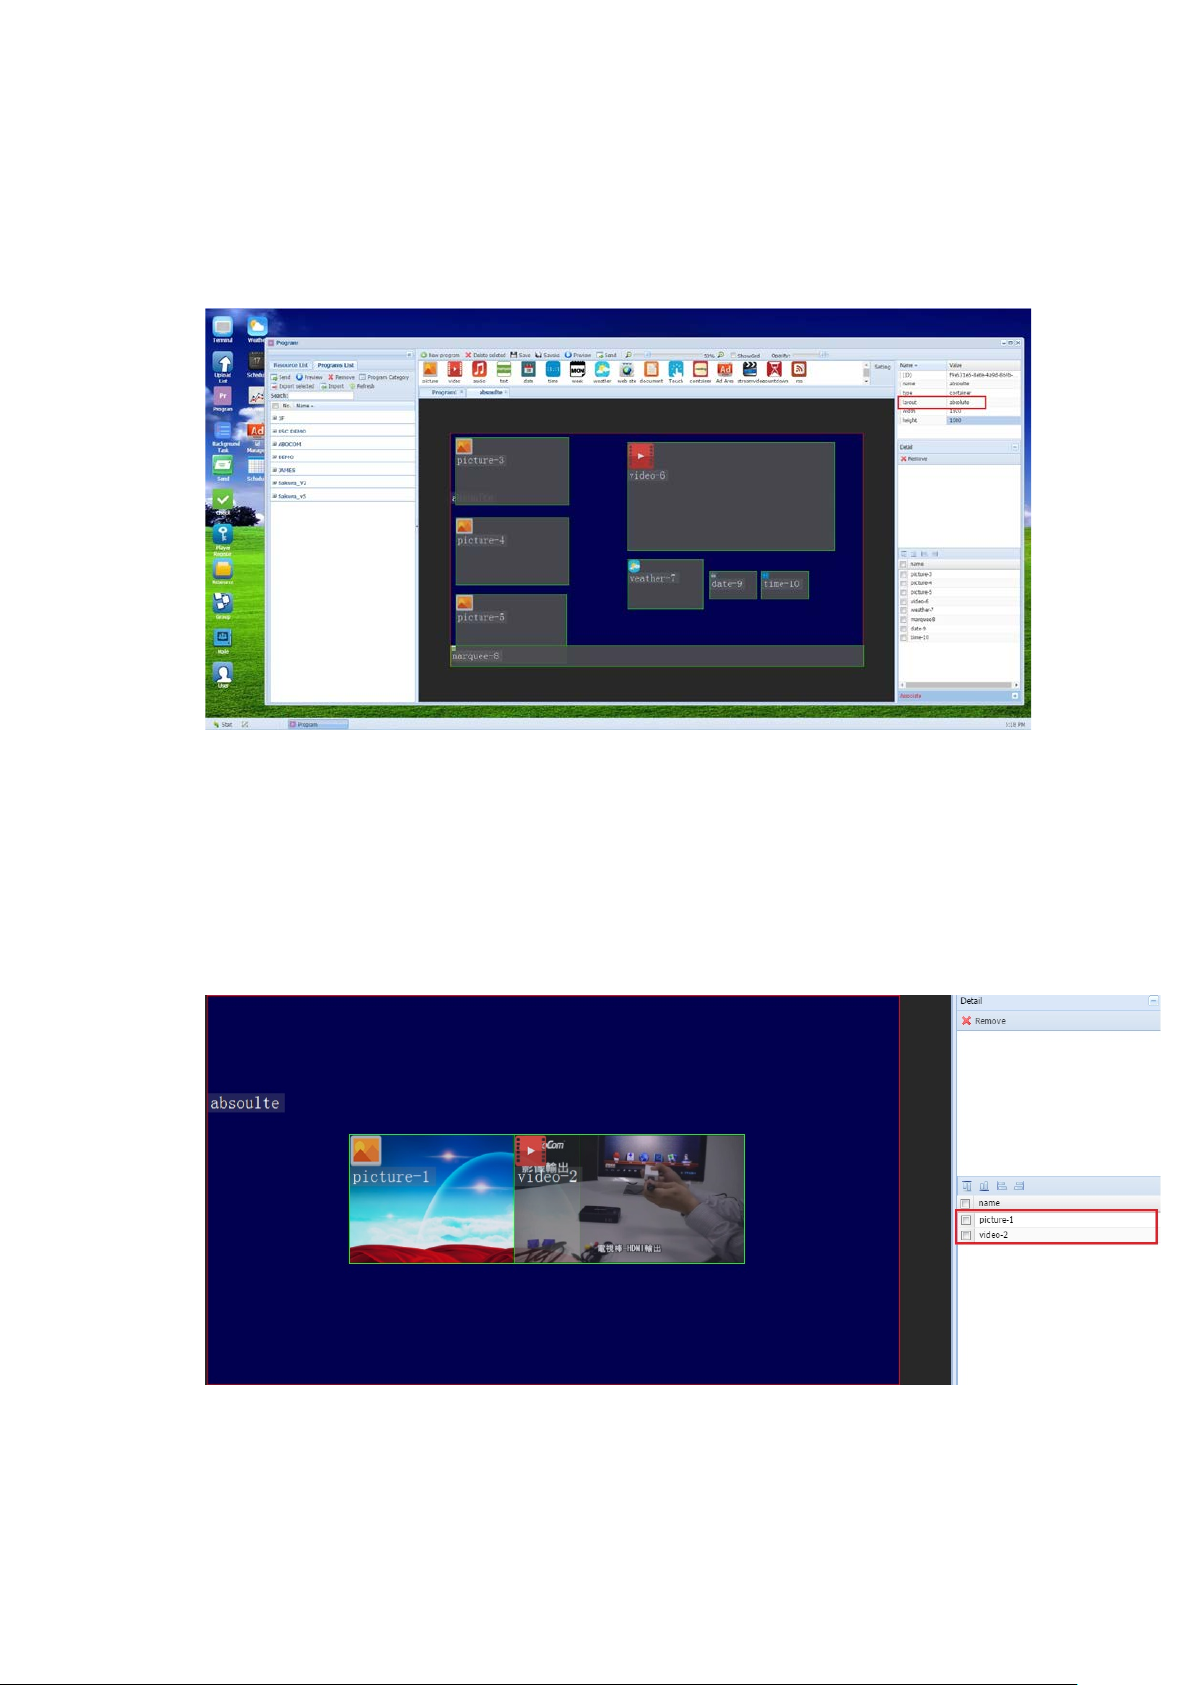
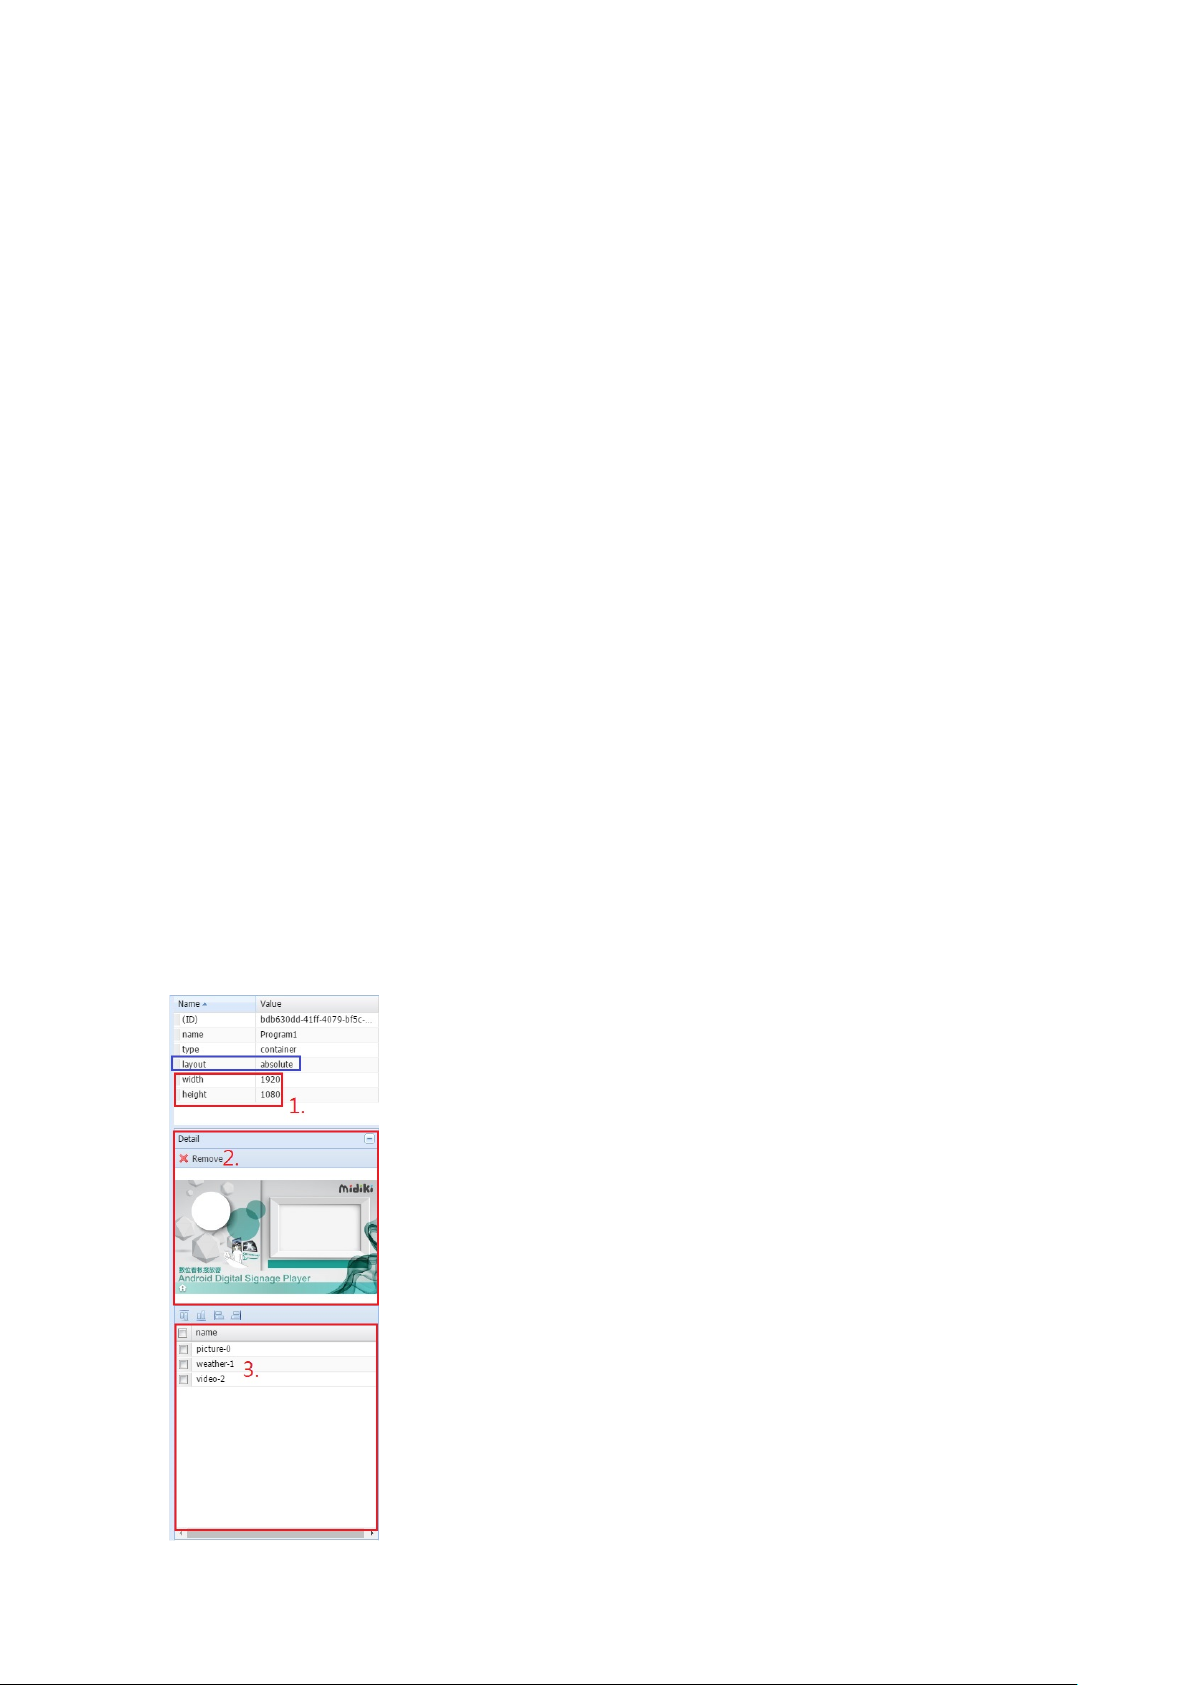
Layout: Program elements can be displayed in the programs in the following 2 ways:
1. Layout by absolute:
Users are able to freely compose program elements in program
layout, as shown below:
Please note that, elements of programs created prior will be superimposed upon by
elements created currently. In another words, if picture elements are created first,
and then video is created afterwards, the video will be displayed over the pictures, as
shown below
After modification as shown below, video is superimposed over by the pictures
第 30 頁
Page 31
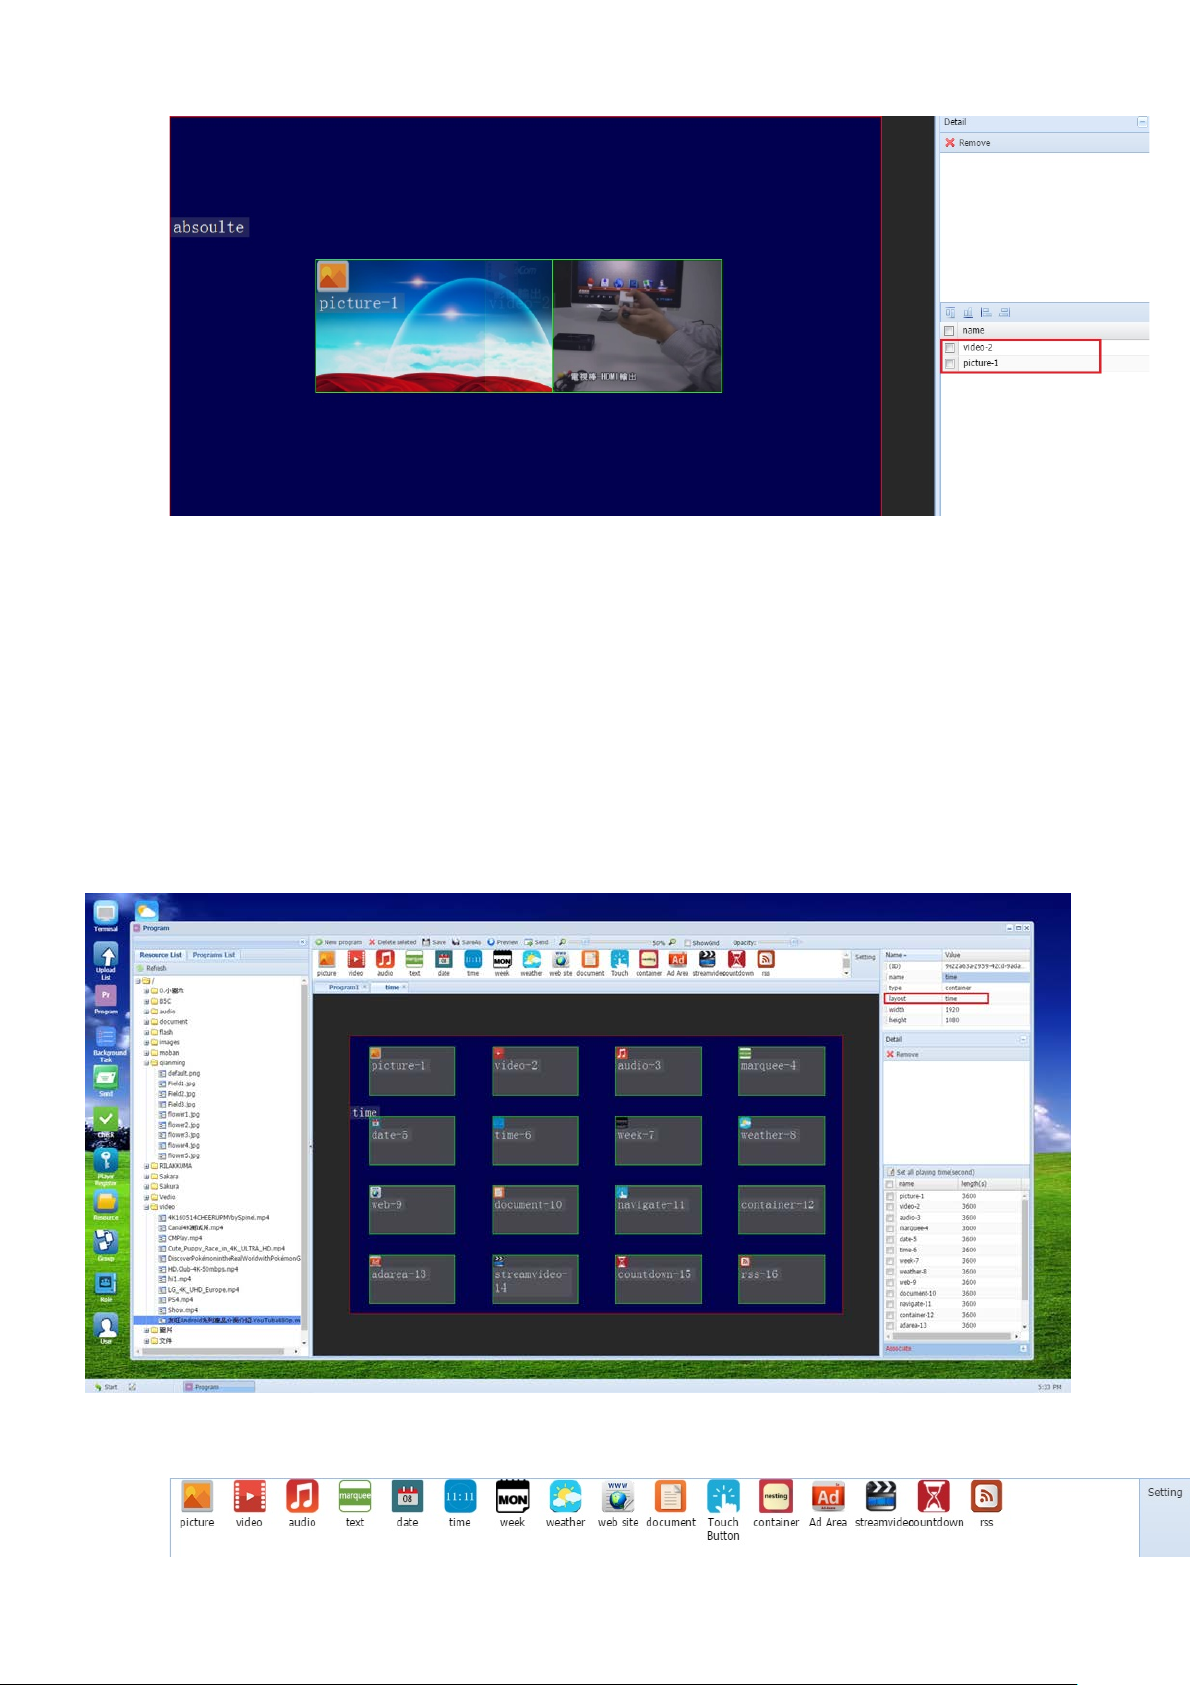
B. Layout by Time:
Elements generated will be played based on the order in which they
are generated, or the time they are set to be played. When in
playback, the heights and widths of all program elements are the
same as those of the overall program. The playback length of all
contents can be set as designated, as program rotation.
6.2.4 Introduction of functions of program elements:
第 31 頁
Page 32
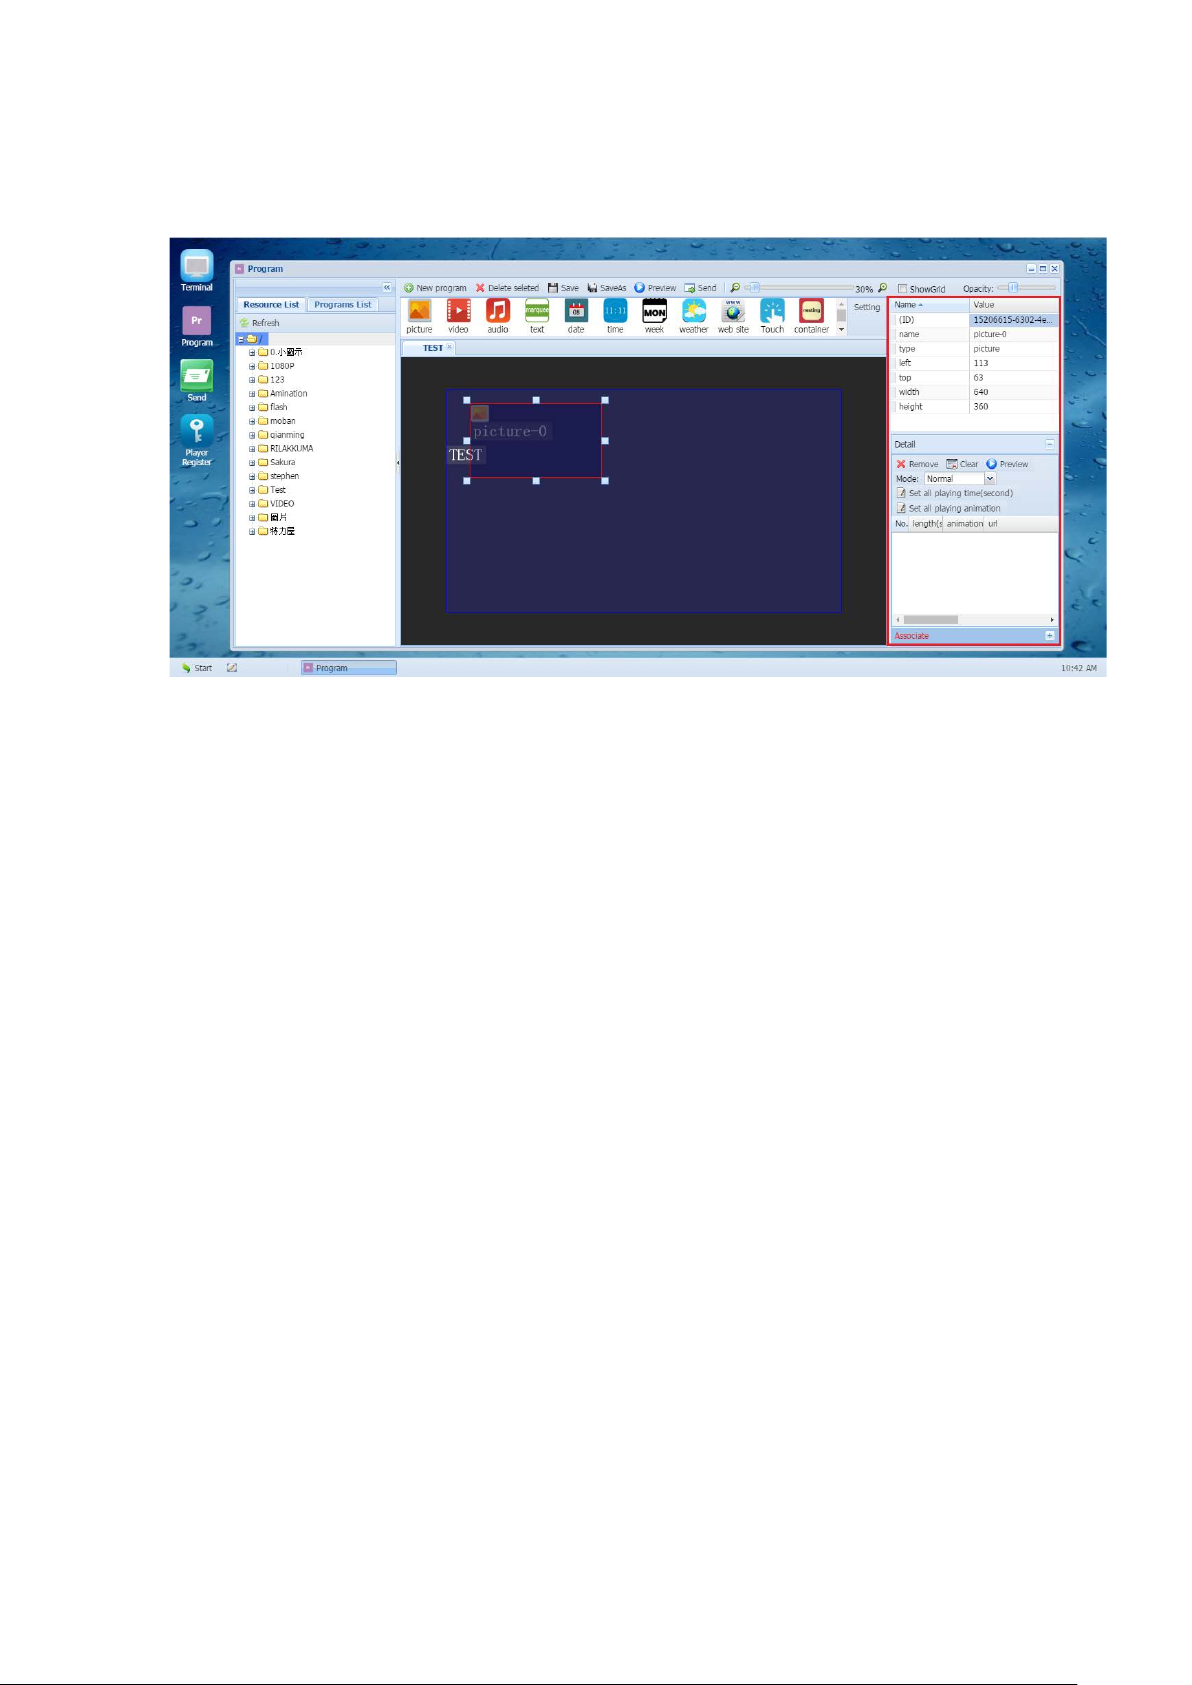
Picture:
Signage Program Element Basic Listing, per the diagram tables shown below:
6.2.4.1
ID: ID number generated for elements by the system
Name: Names of elements, which can be modified, as required
Type: Type of element frames
Left: X-Coordinates of the left-hand-top corner of element frame
Top: Y-Coordinates of the left-hand-top corner of element frame
Width: The horizontal resolution of element frame
Height: The vertical resolution of element frame
P.S. Only when the layout of program elements is “Absolute”, the width and height of
elements frame are hence changeable.
Drag material file to picture element frame showing the picture (supported
formats: png, jpg, jpeg, gif, bmp)
第 32 頁
Page 33
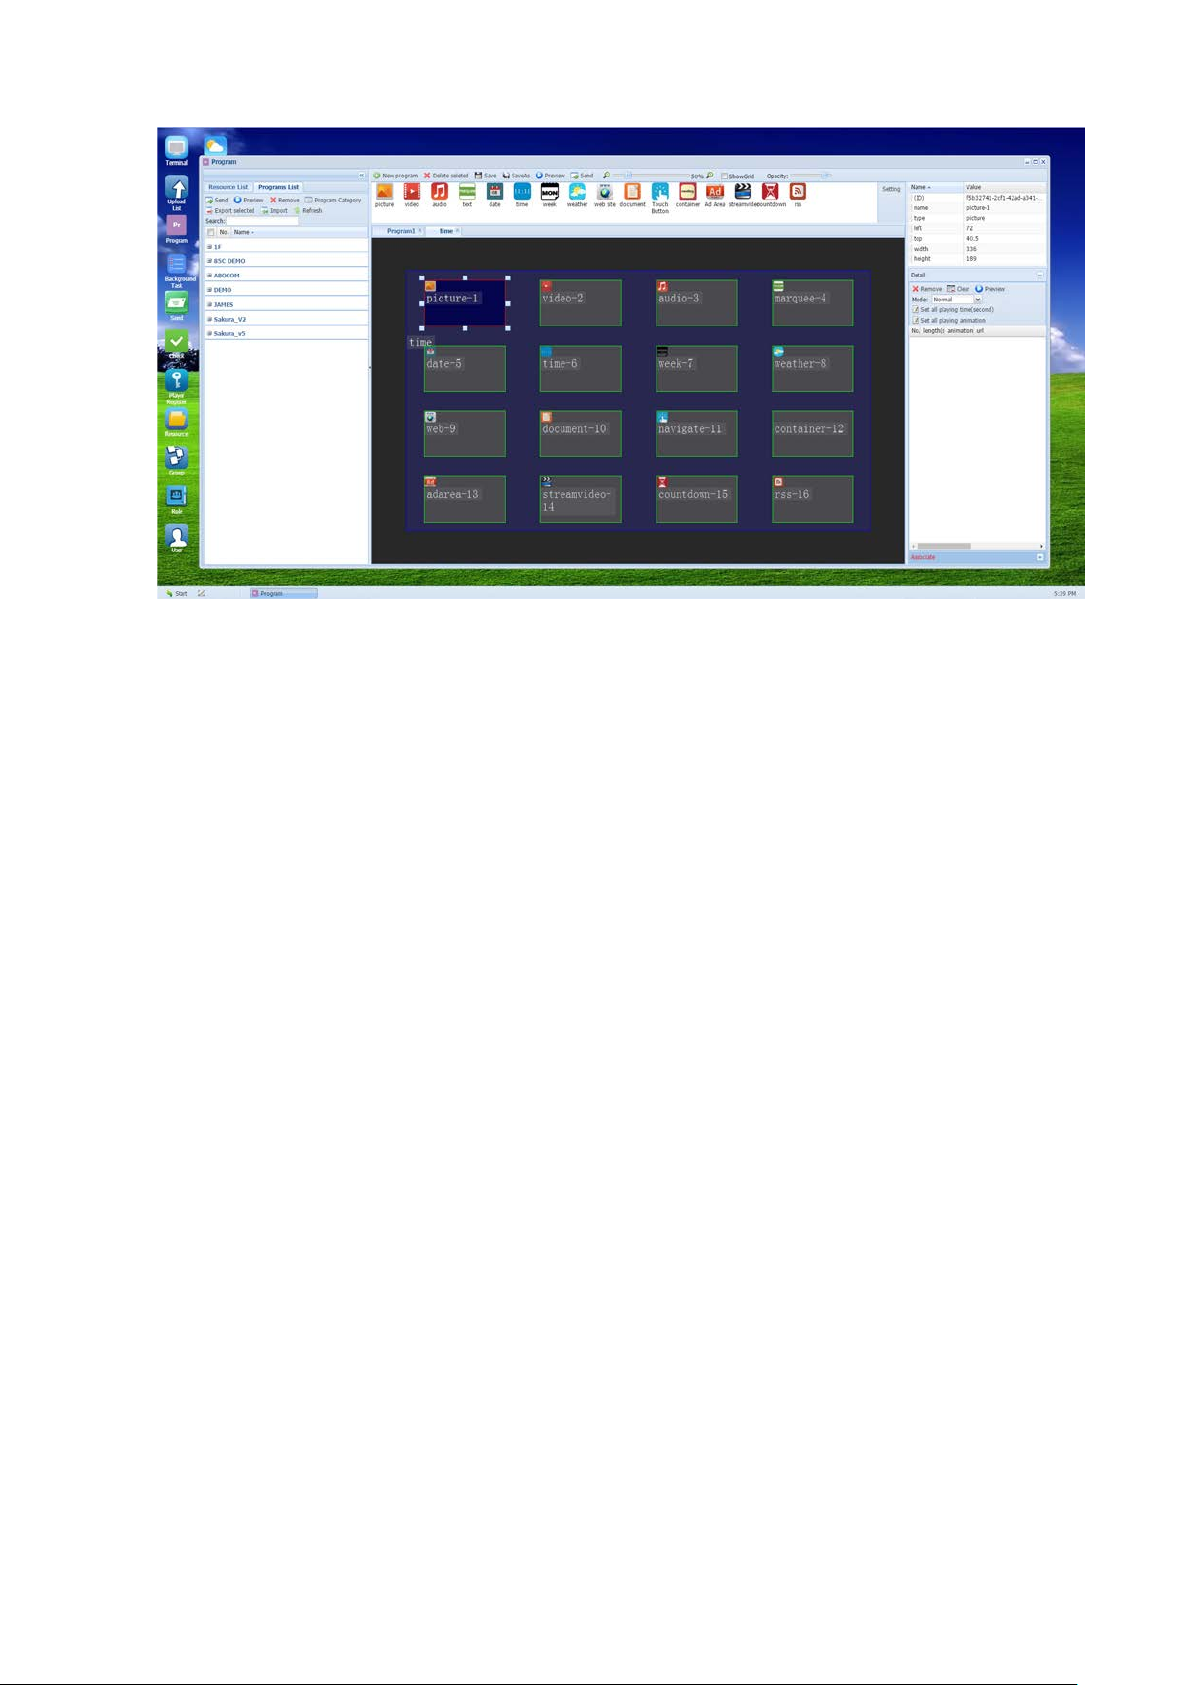
Video Setting:
Remove: To remove the selected item
Clear: To clear all the deployed materials
Preview: To preview selected items
Mode (Norm/Synchronized): If “Synchronized” is selected, it will synchronize all terminals
broadcasting this particular program
Set all playing time(second): Uniformly adjusting broadcast length of all materials
Set all playing animation: Uniformly adjusting broadcast effect of all materials
NO.: Broadcasting order can be scroll-adjusted by users
Length : Broadcast length of time of materials
Animation: The special effect for changing frame of pictures
URL: Path to Material, listed in the resource table
6.2.4.2
Drag material file to video element frame showing the video (formats of
mp4, 3gp, rmvb, avi, wmv, mkv, mpg, flv, mov are supported)
第 33 頁
Page 34
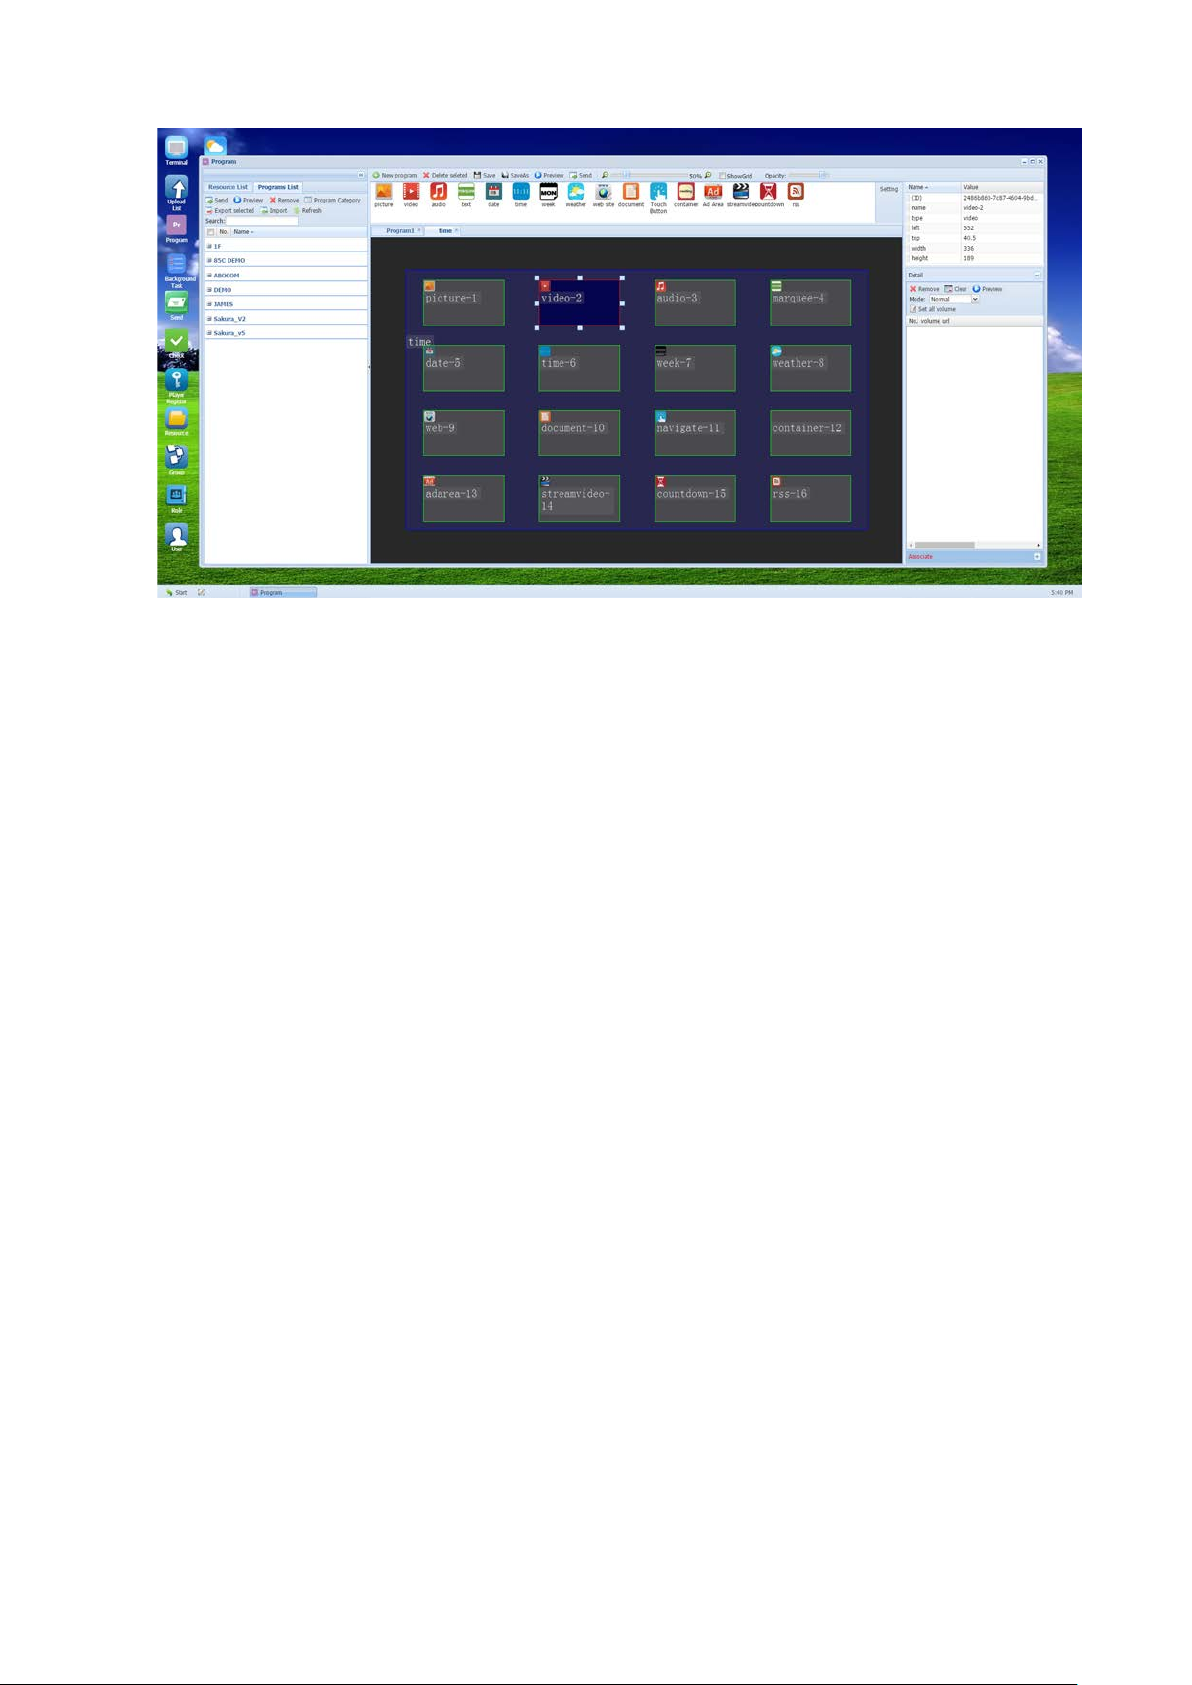
Sound Setting:
Remove: To remove the selected item
Clear: To clear all the deployed materials
Preview: To preview selected items
Mode (Norm/Synchronized): If “Synchronized” is selected, it will synchronize all terminals
broadcasting this particular program
Set all volume: Uniformly adjusting broadcast volume of all materials
NO.: Broadcasting order can be scroll-adjusted by users
Volume: To adjust volume
URL: Path to Material, listed in the resource table
6.2.4.3
Drag material file to sound element frame playing the sound (formats of
aac, arm, m4a, mp2, mp3, ogg, wav, wma are supported)
第 34 頁
Page 35
Text (Marquee Setting):
Remove: To remove the selected item
Clear: To clear all the deployed materials
Set all volume: Uniformly adjusting broadcast volume of all materials
NO.: Broadcasting order can be scroll-adjusted by users
Volume: To adjust volume
URL: Path to Material, listed in the resource table
6.2.4.4
Adding texts, as marquee text, to content
第 35 頁
Page 36
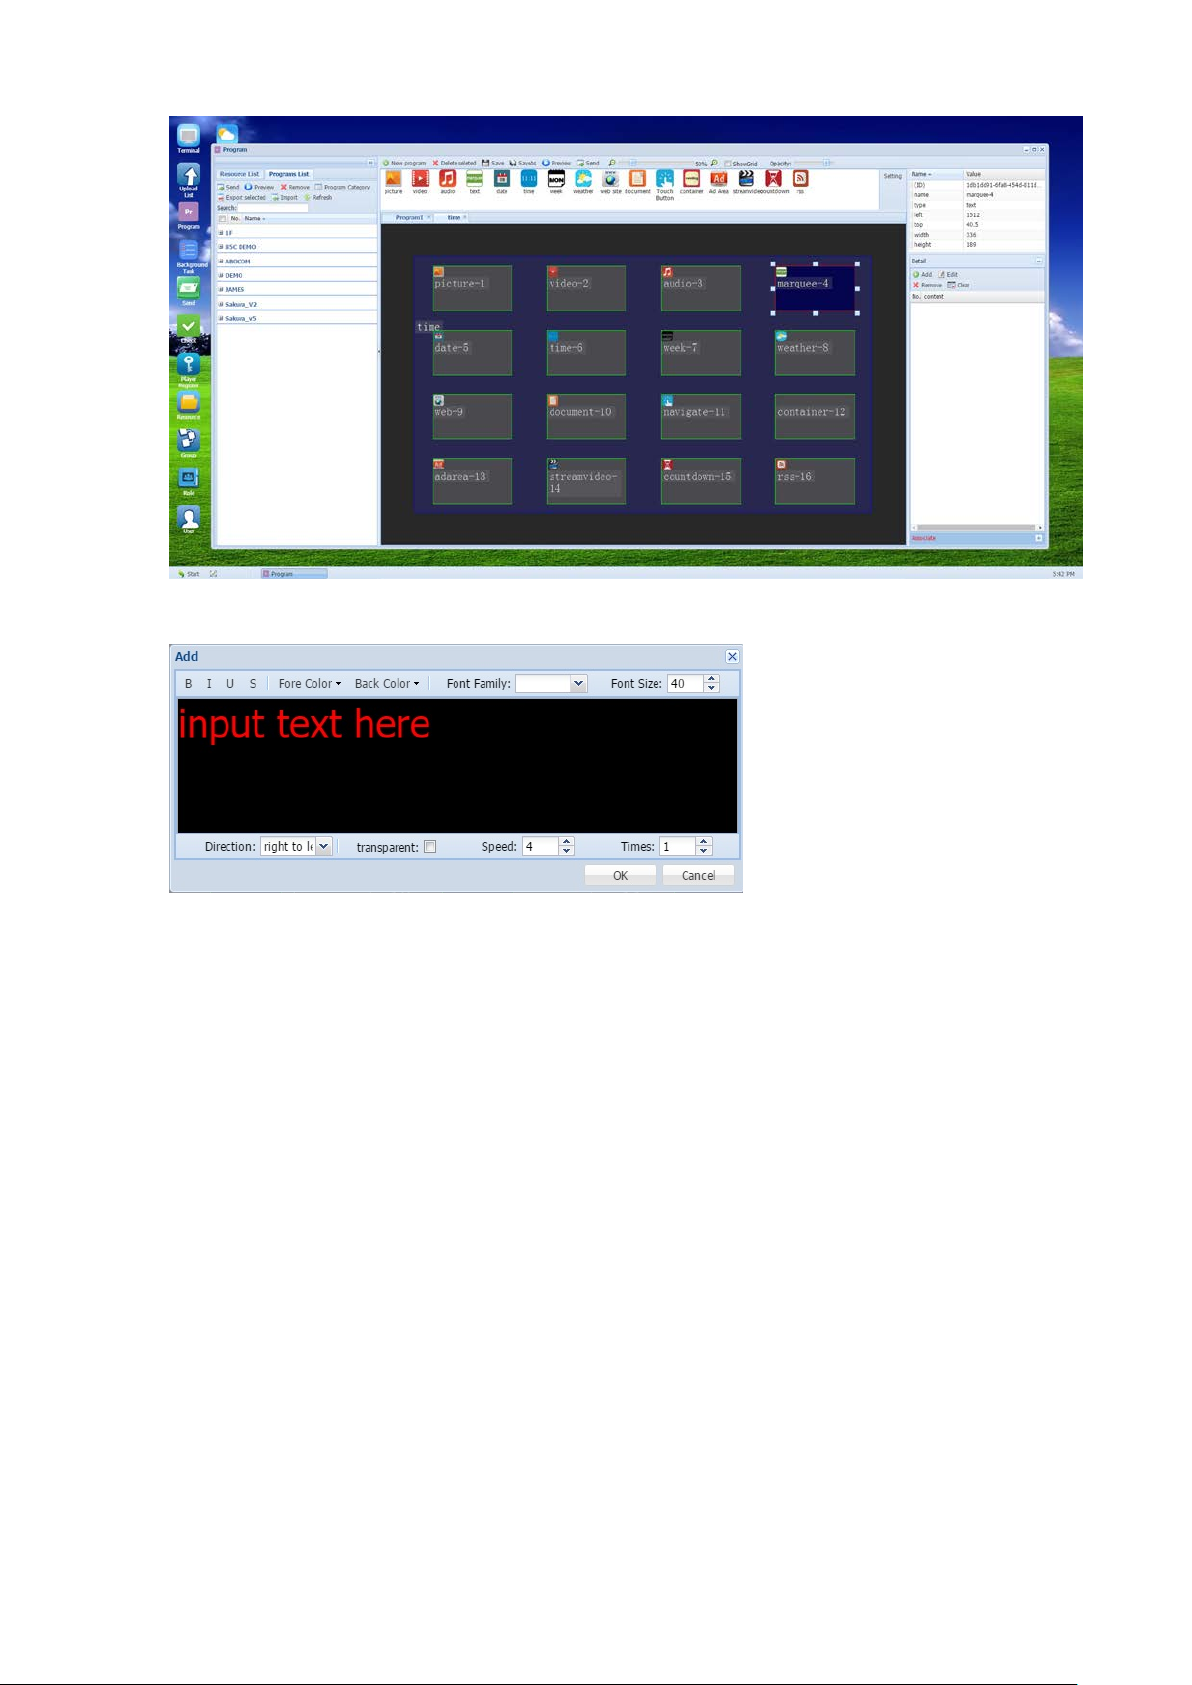
Add: To add text to current display
Date:
Direction: Can be set right to left
Background Transparency: When selected, background becomes transparent
Speed: Speed at which texts moves in display
Times: Times at which texts appear in display
6.2.4.5
Remove: To remove the selected item
Clear: To clear all shown(marquee) texts.
NO.: Broadcasting order can be scroll-adjusted by users
Content: Content of (marquee) texts
Support display of date information (provided that terminals are connected to
internet)
第 36 頁
Page 37
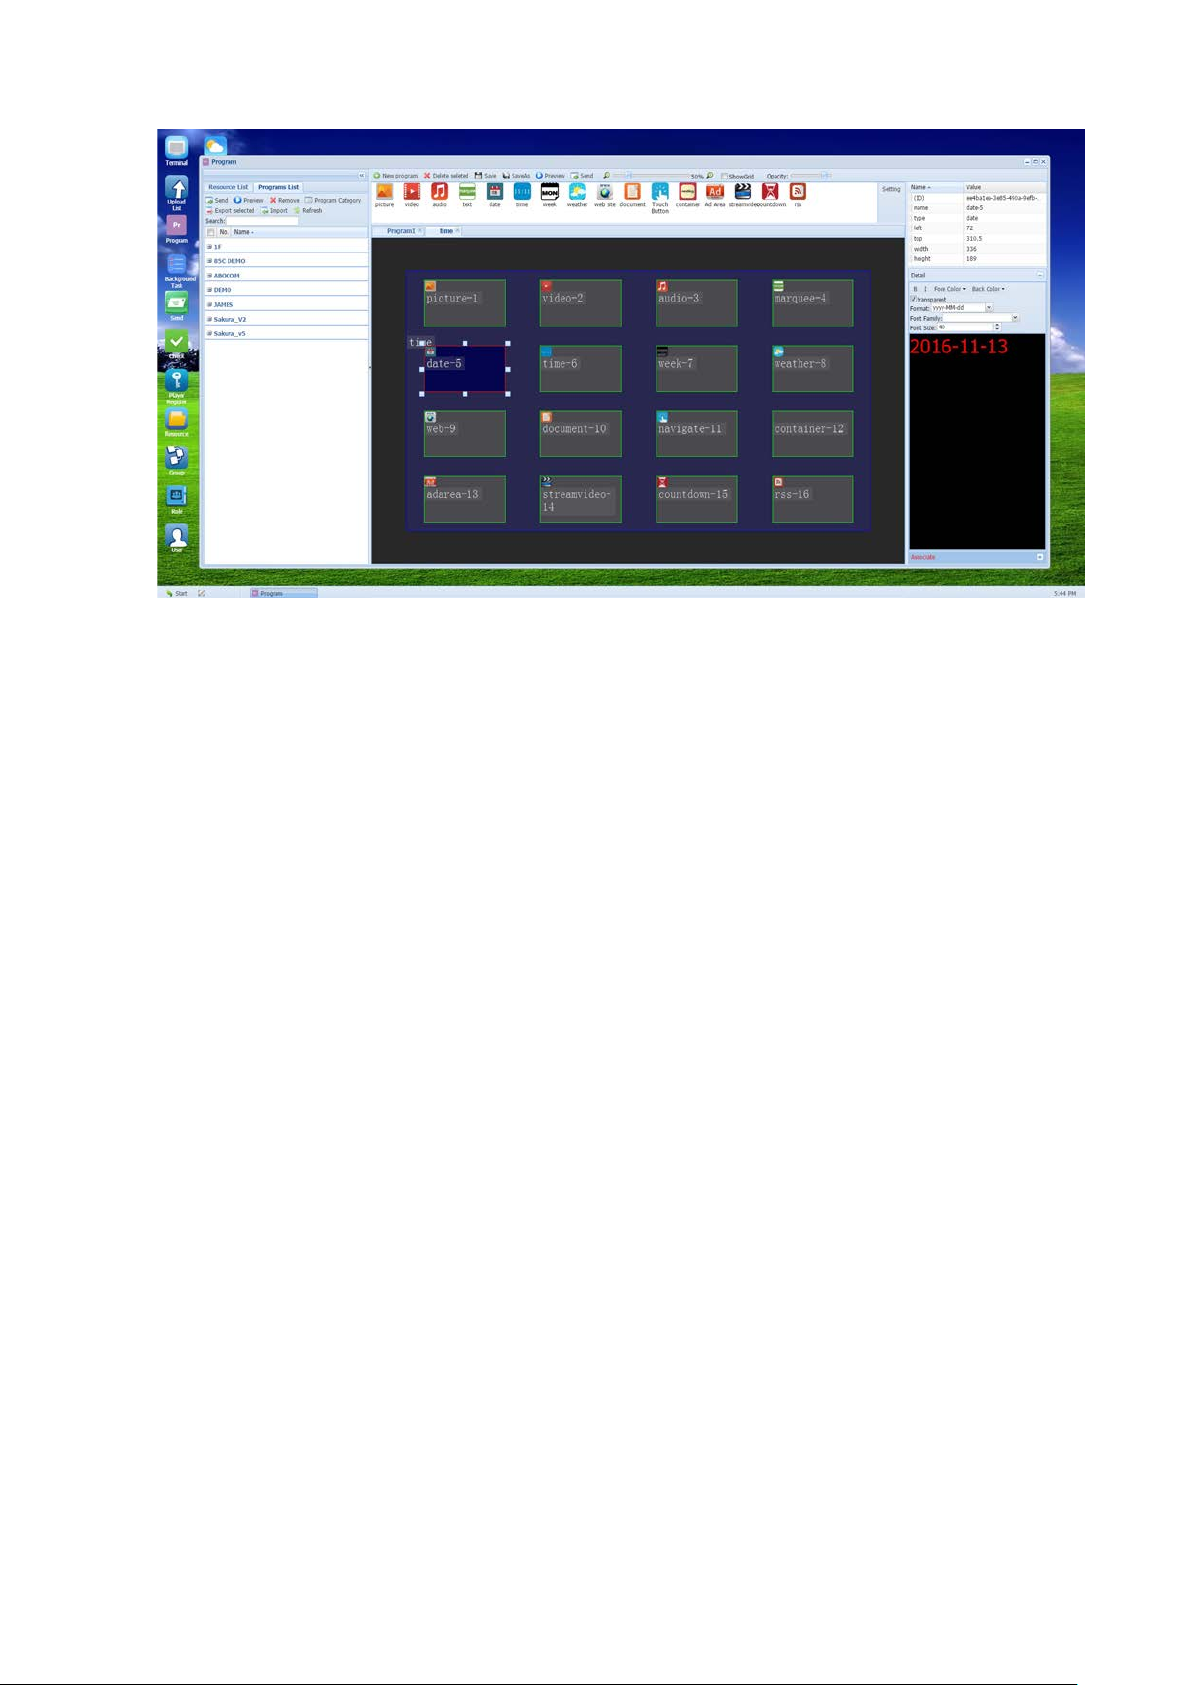
B : To embolden text
I : To italicize text
Fore Color: Setting the color of texts
Back Color: Setting the color of background
Transparent: When selected, background becomes transparent
Format: Setting the display format of date
Font family: Setting of font
Font Size: Setting font size
第 37 頁
Page 38
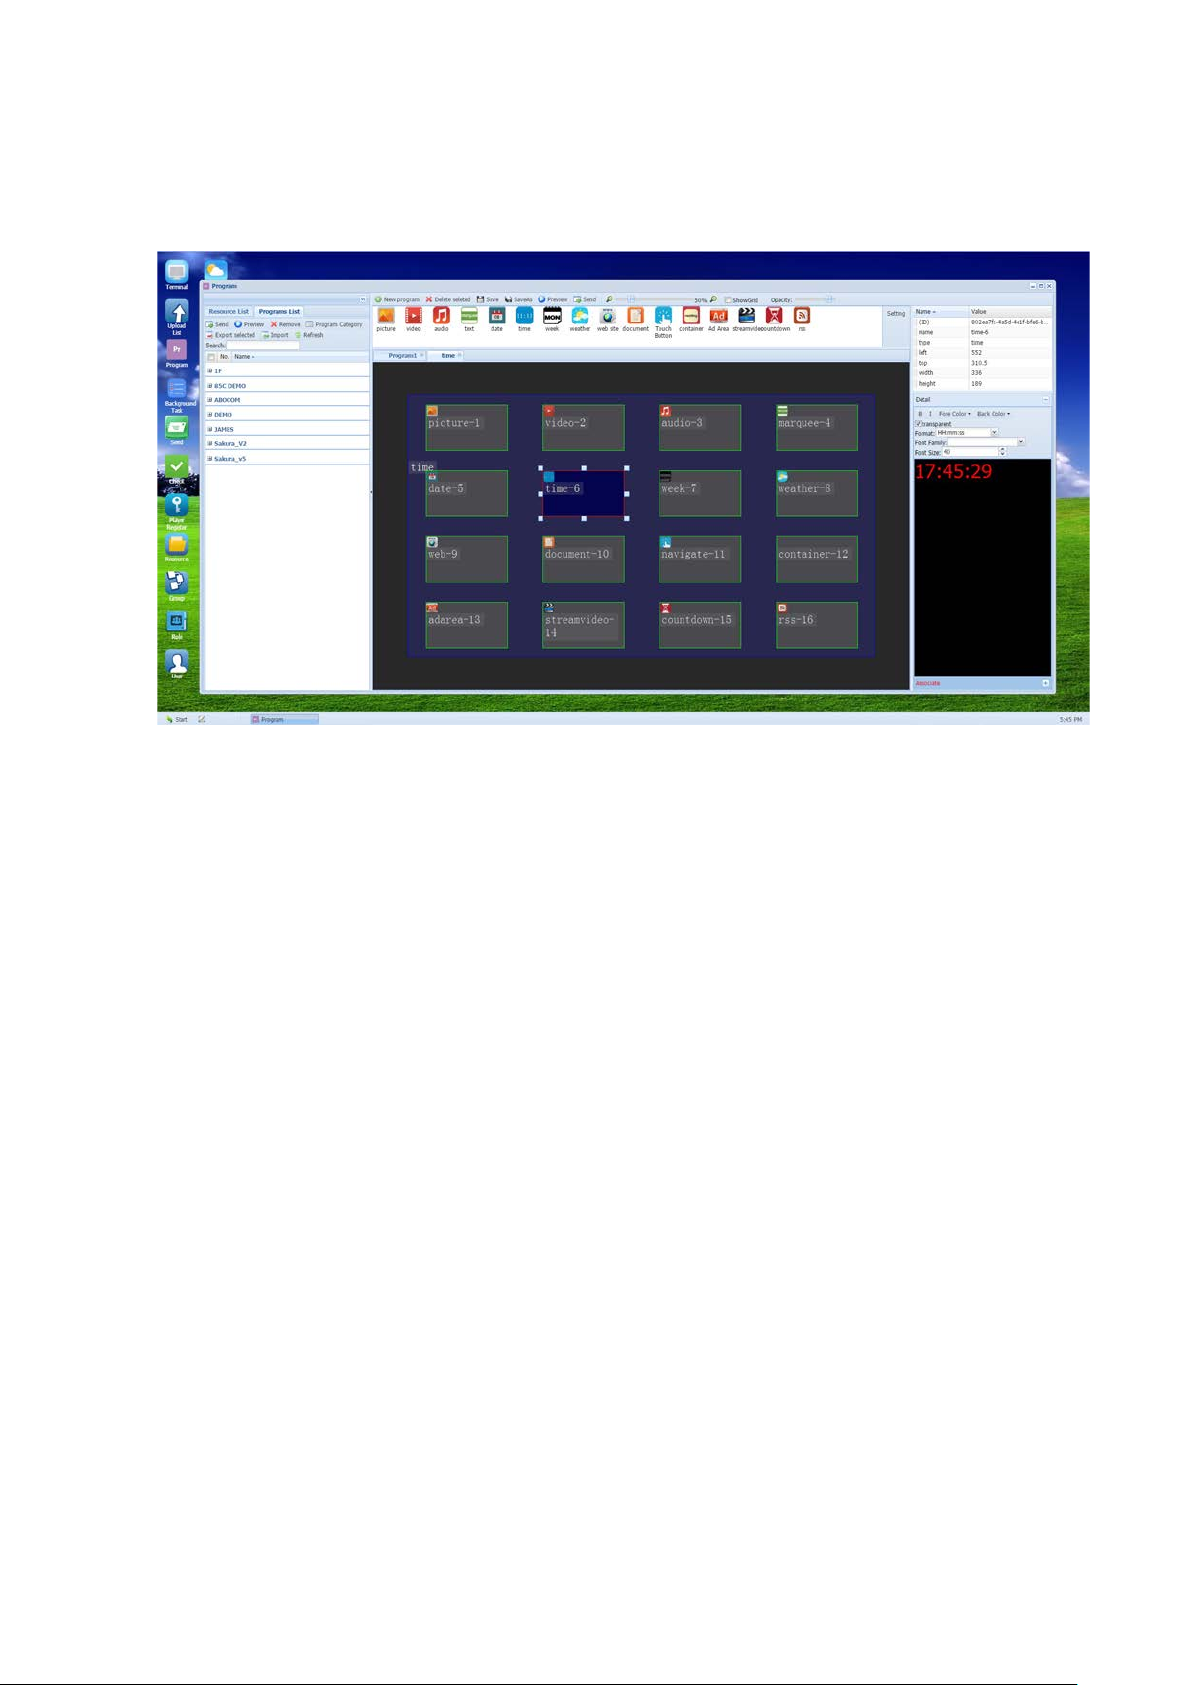
6.2.4.6
Background Transparency:
When selected, background becomes transparent (provided
that terminals are connected to internet)
B : To embolden text
I : To italicize text
Fore Color: Setting the color of texts
Back Color: Setting the color of background
Transparent: When selected, background becomes transparent
Format: Setting the display format of date
Font family: Setting of font
Font Size: Setting font size
第 38 頁
Page 39
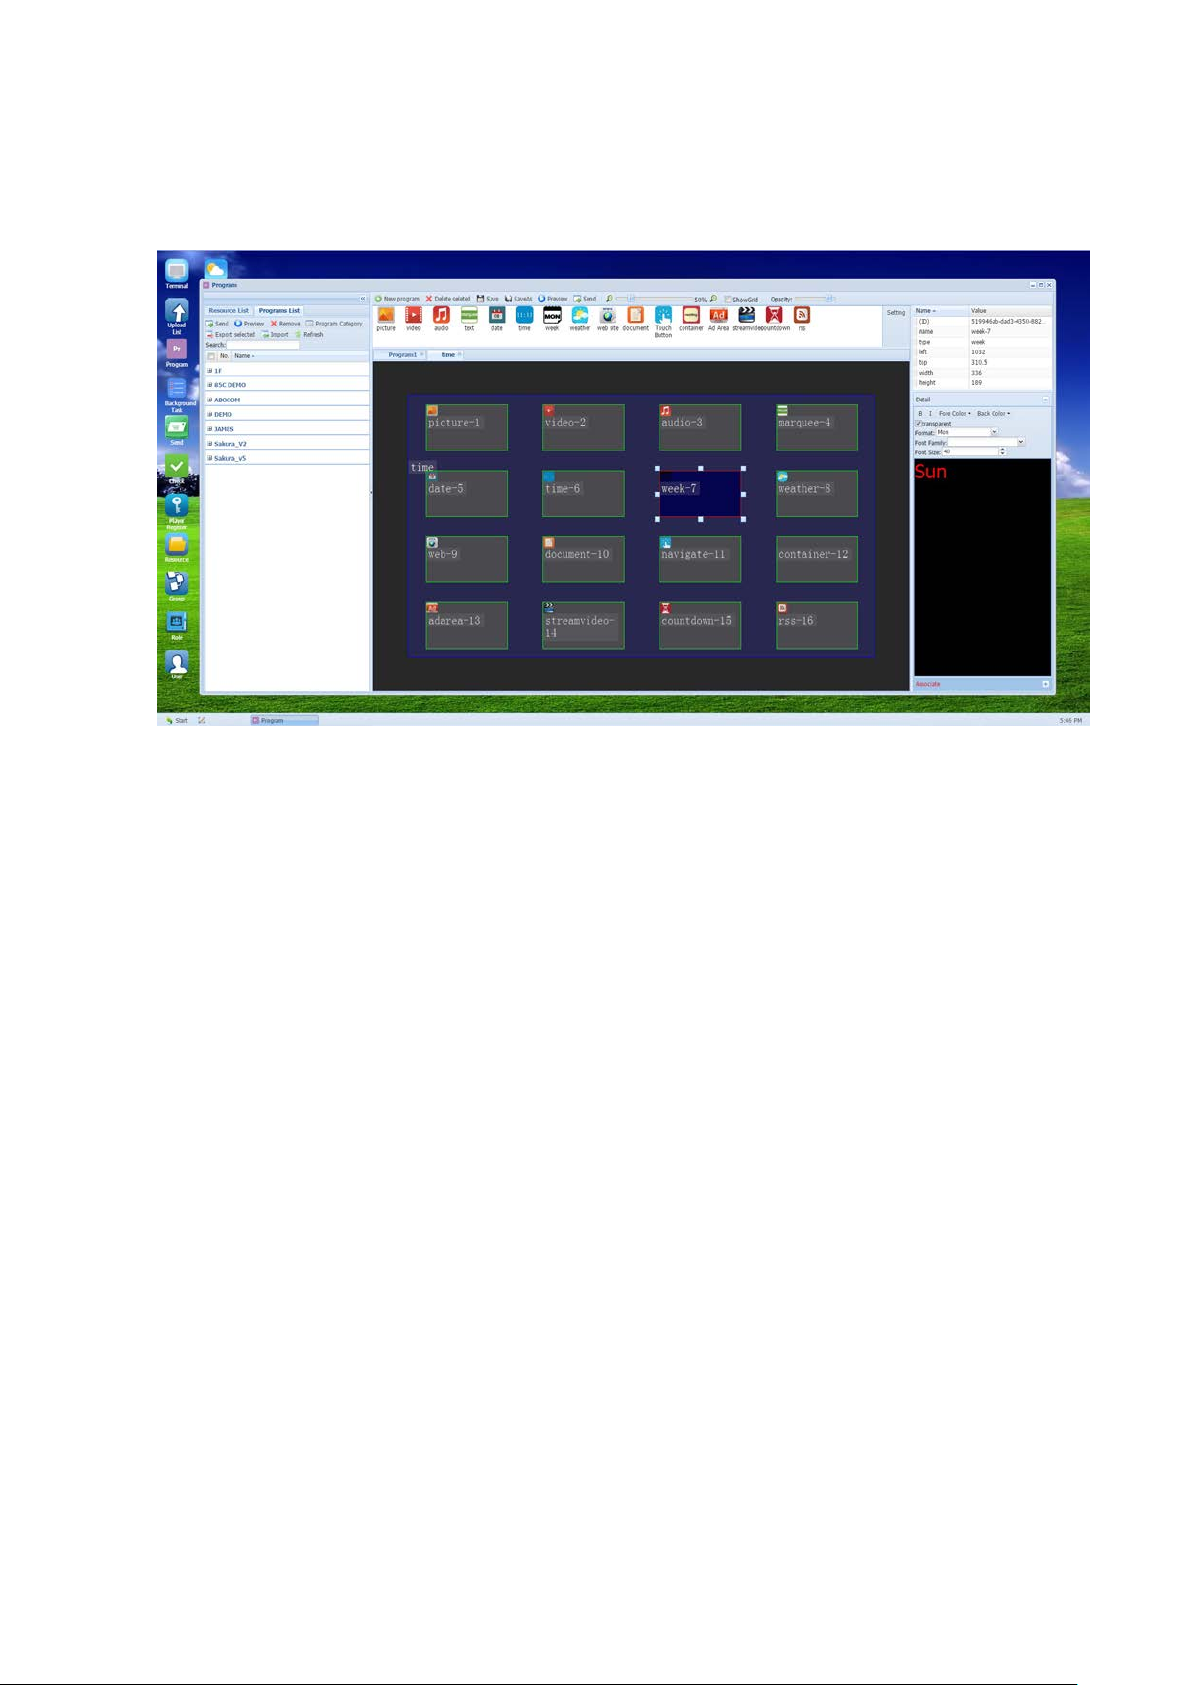
6.2.4.7
Week:
Support displaying Weekly information (provided that terminals are connected to
internet)
B : To embolden text
I : To italicize text
Fore Color: Setting the color of texts
Back Color: Setting the color of background
Transparent: When selected, background becomes transparent
Format: Setting the display format of week
Font family: Setting of font
Font Size: Setting font size
第 39 頁
Page 40
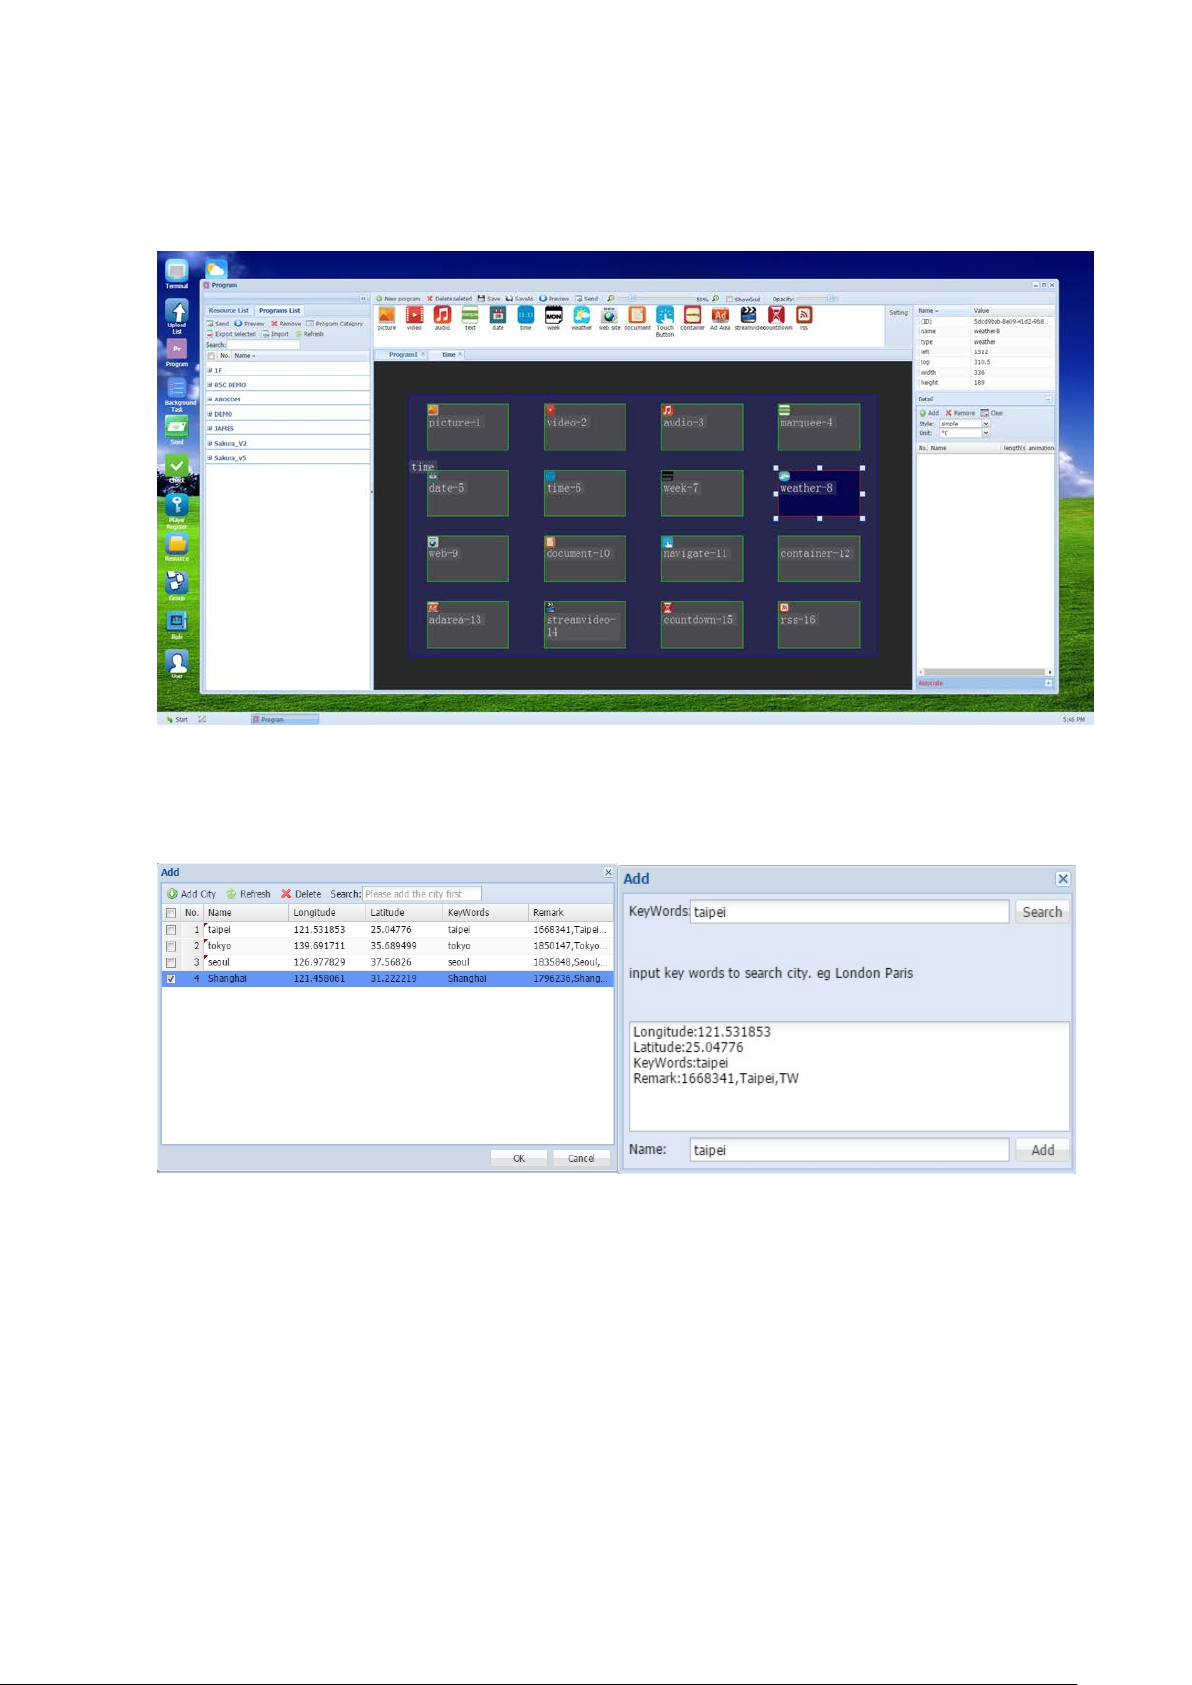
6.2.4.8
Weather:
Adding city information to display weather information of cities in each region
(provided that terminals are connected to internet)
Add: To add new city, by clicking “Add City” and key-in city name (either Chinese or English),
and once system search generated results, then the city name can be added.
Remove: To remove the selected item
Clear: To delete all items
Style: 3 Built-in display styles
Unit: Celsius/Fahrenheit
NO.: Broadcasting order can be scroll-adjusted by users
Name: City Names
Length: Time duration of display
Amination: Special effects for switching between different weather displays
第 40 頁
Page 41
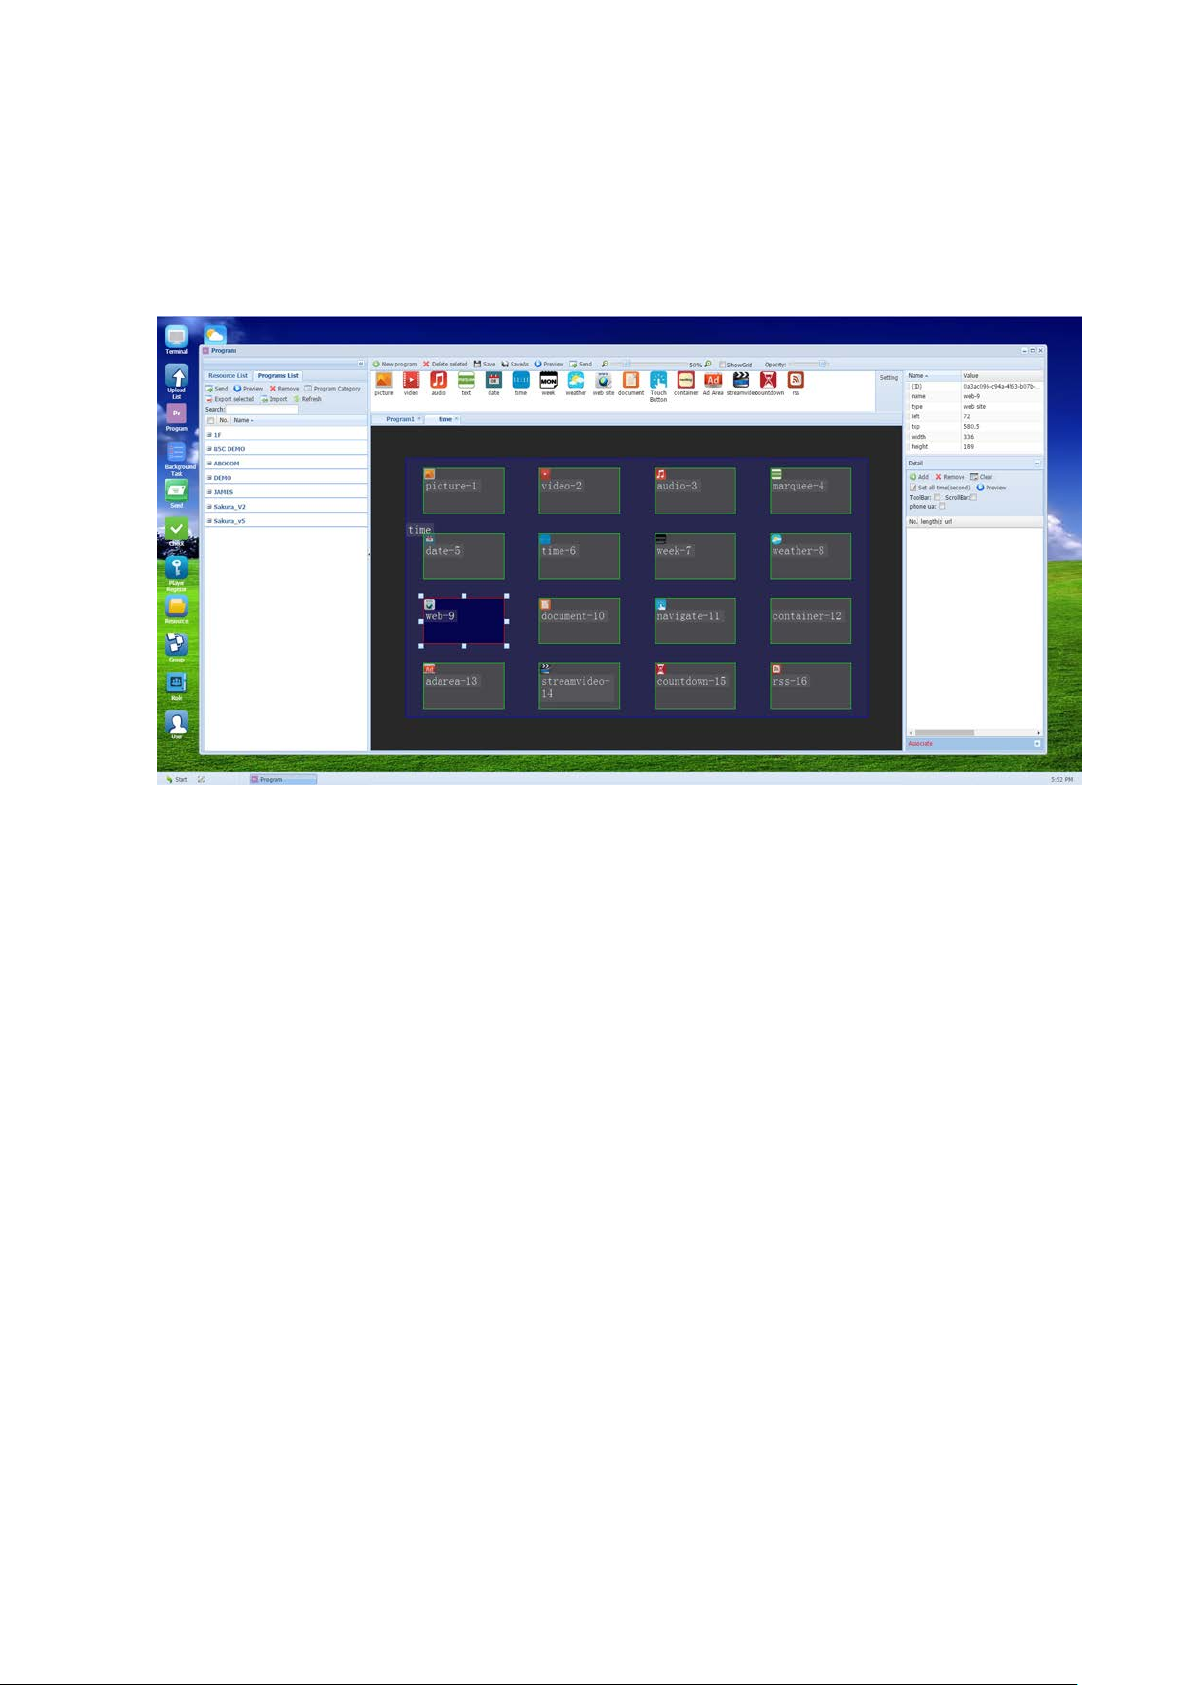
6.2.4.9
Web Page:
To add URL to show web page content, supporting formats such as, aac,
arm, m4a, mp2, mp3, ogg, wav, wma, (provided that terminals are
connected to internet.)
Add: Add new URL
Remove: To remove the selected item
Clear: To delete all items
Preview: To preview selected items
Setting all Time(Second): Synchronize all web pages time
ToolBar: Showing “Tools”
ScrollBar: To show up-and-down scroll-bar
Mobile phone: The page will be shown in mobile phone as well.
NO: Broadcasting order can be scroll-adjusted by users
Length: Time duration of web page display
URL: Web page URL Address
第 41 頁
Page 42
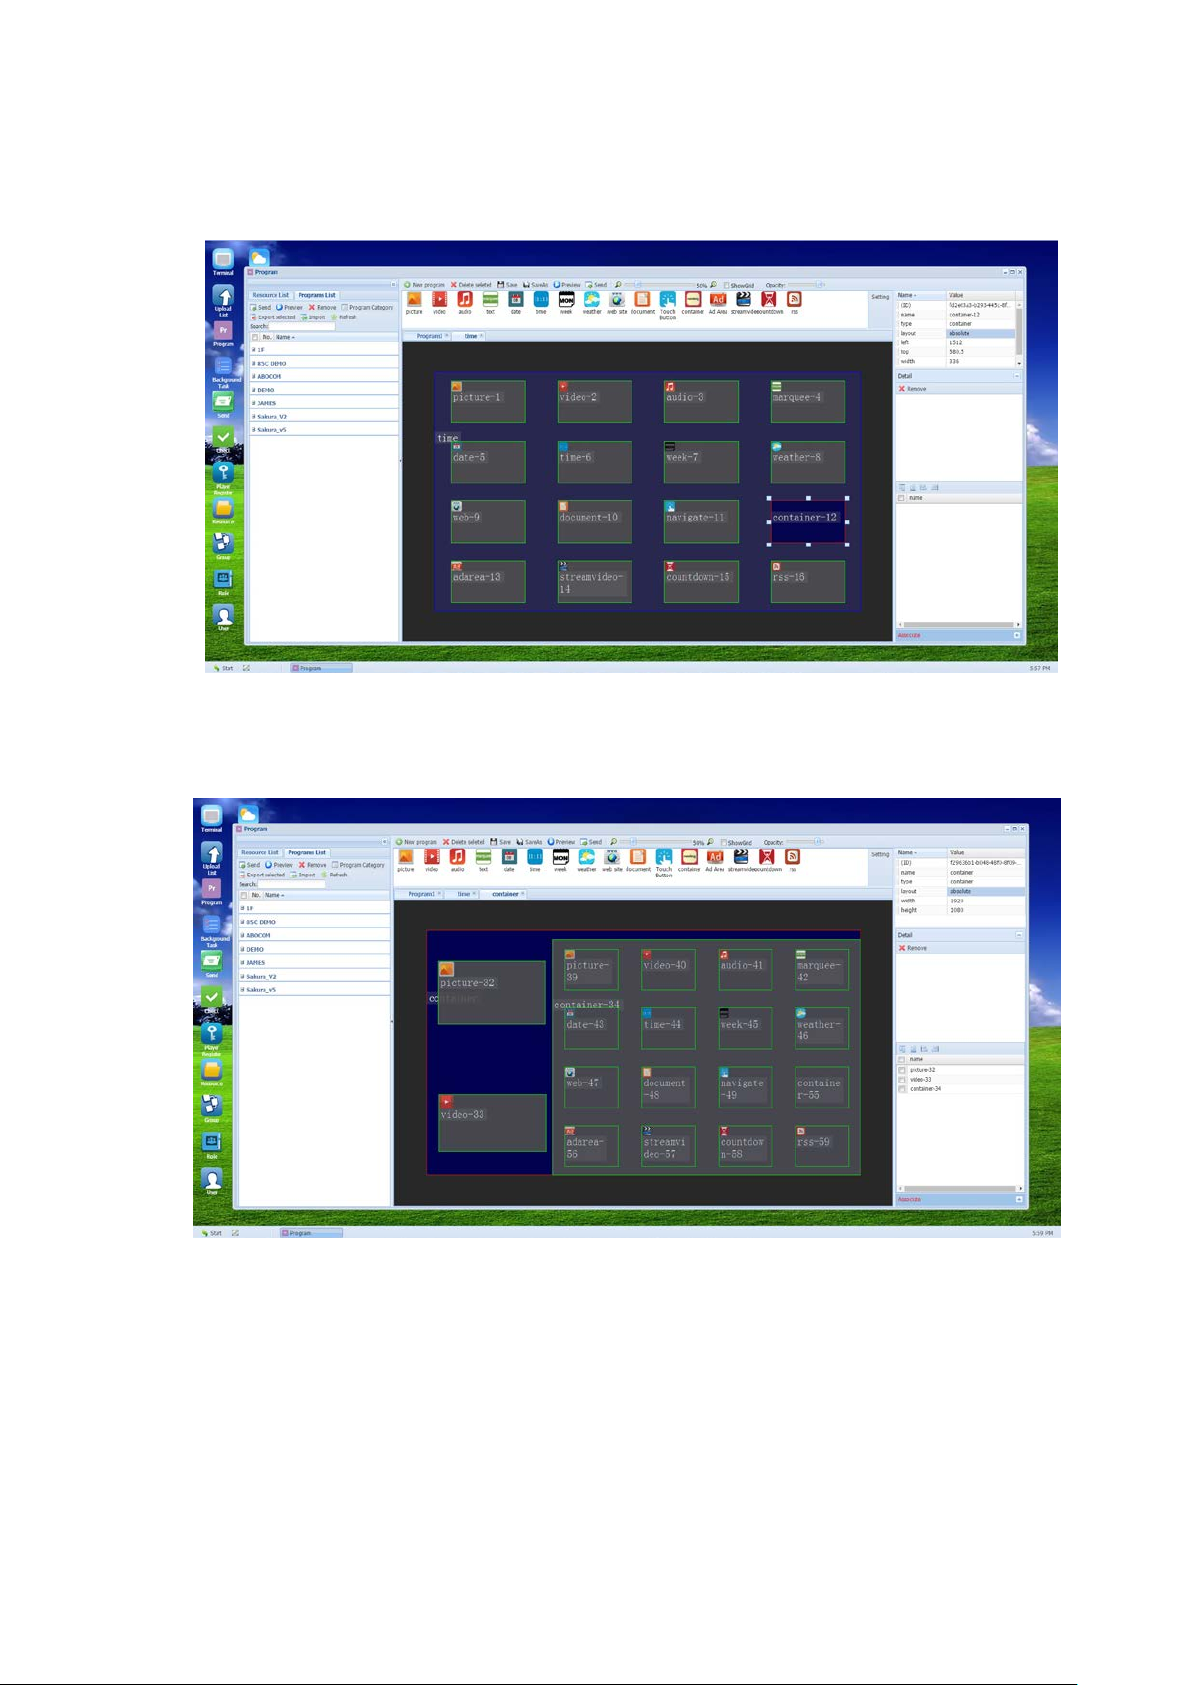
6.2.4.10
Container:
Mainly used to embed other program elements, as all kinds of elements to
be placed within the same frame.。
Simple explanation, put one program within another program
第 42 頁
Page 43
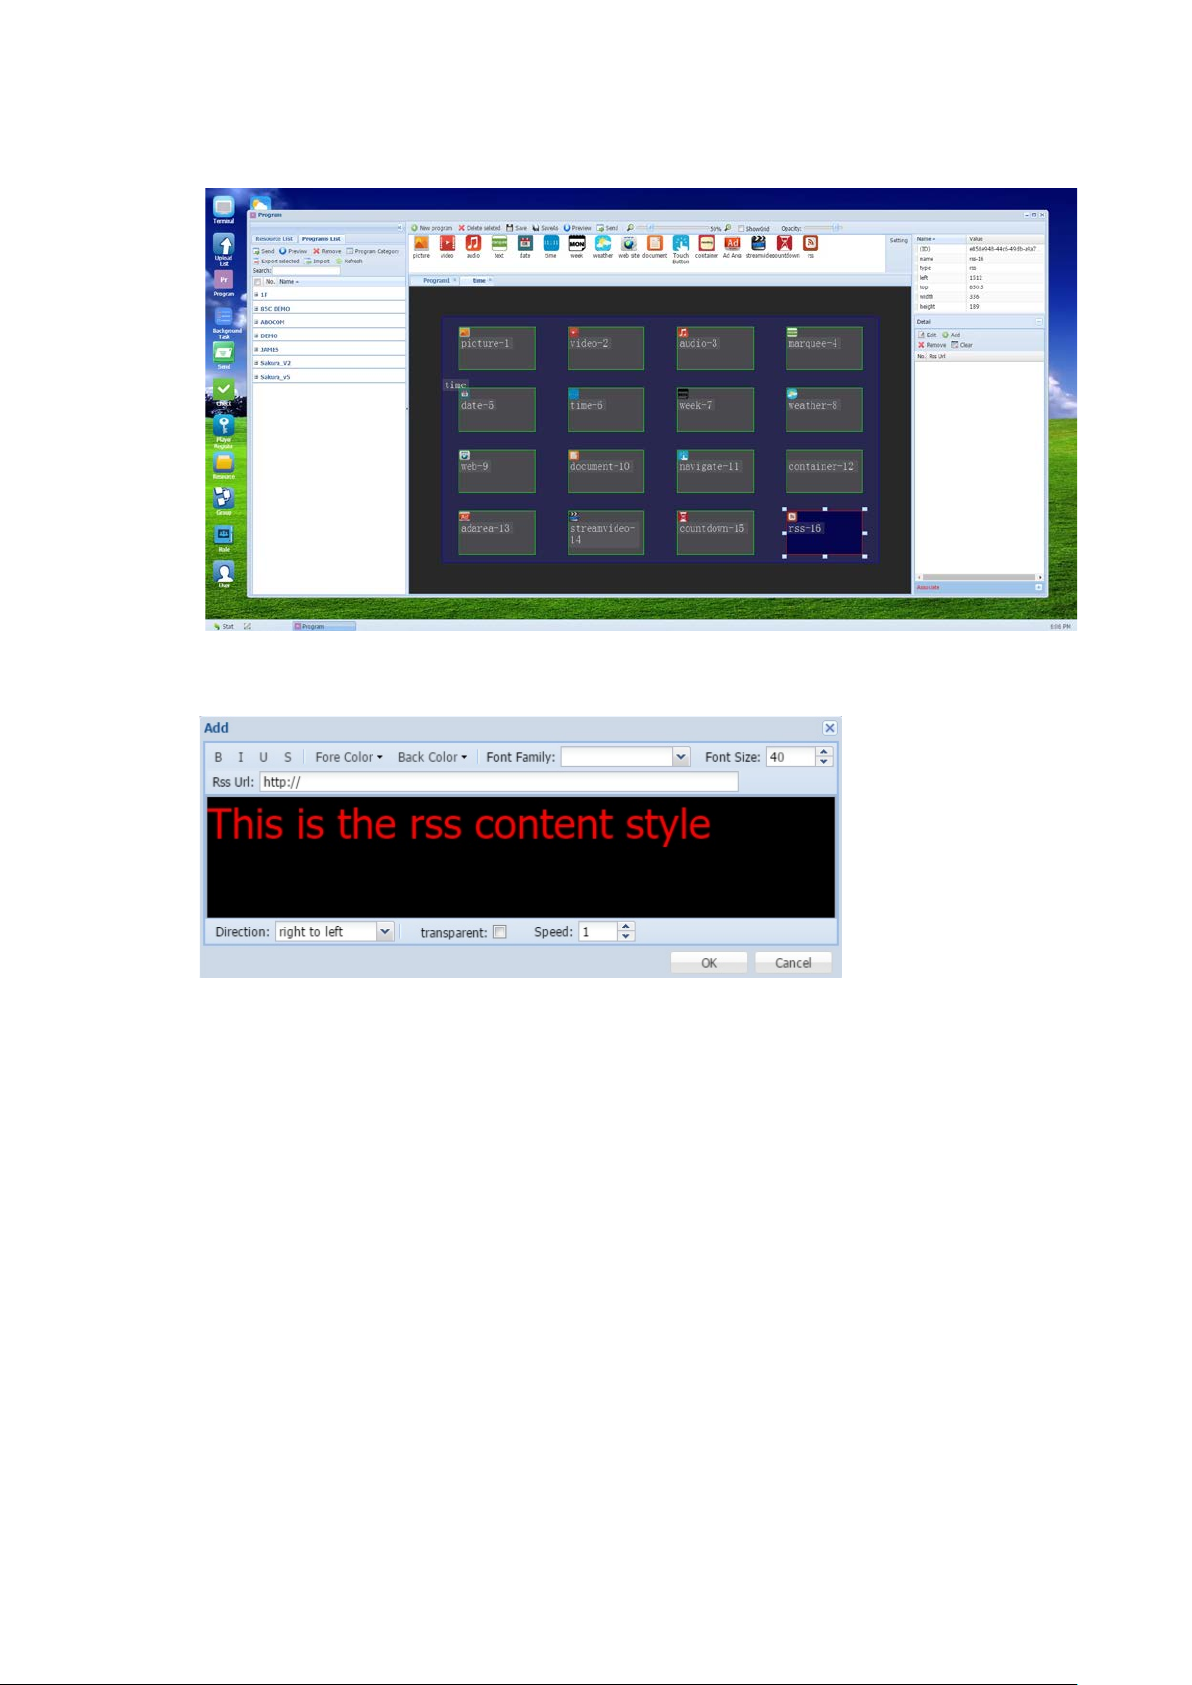
6.2.4.11
RSS:
To display content of RSS subscription
Add: Click to add new edited RSS content
Direction: To set direction of text movement
Transparent: When selected, background becomes transparent
Speed: Speed of text movement
Remove: To remove the selected item
Clear: To delete all generated items
NO.: Broadcast order can be scroll-adjusted by users
RSS URL: URL path for RSS
第 43 頁
Page 44
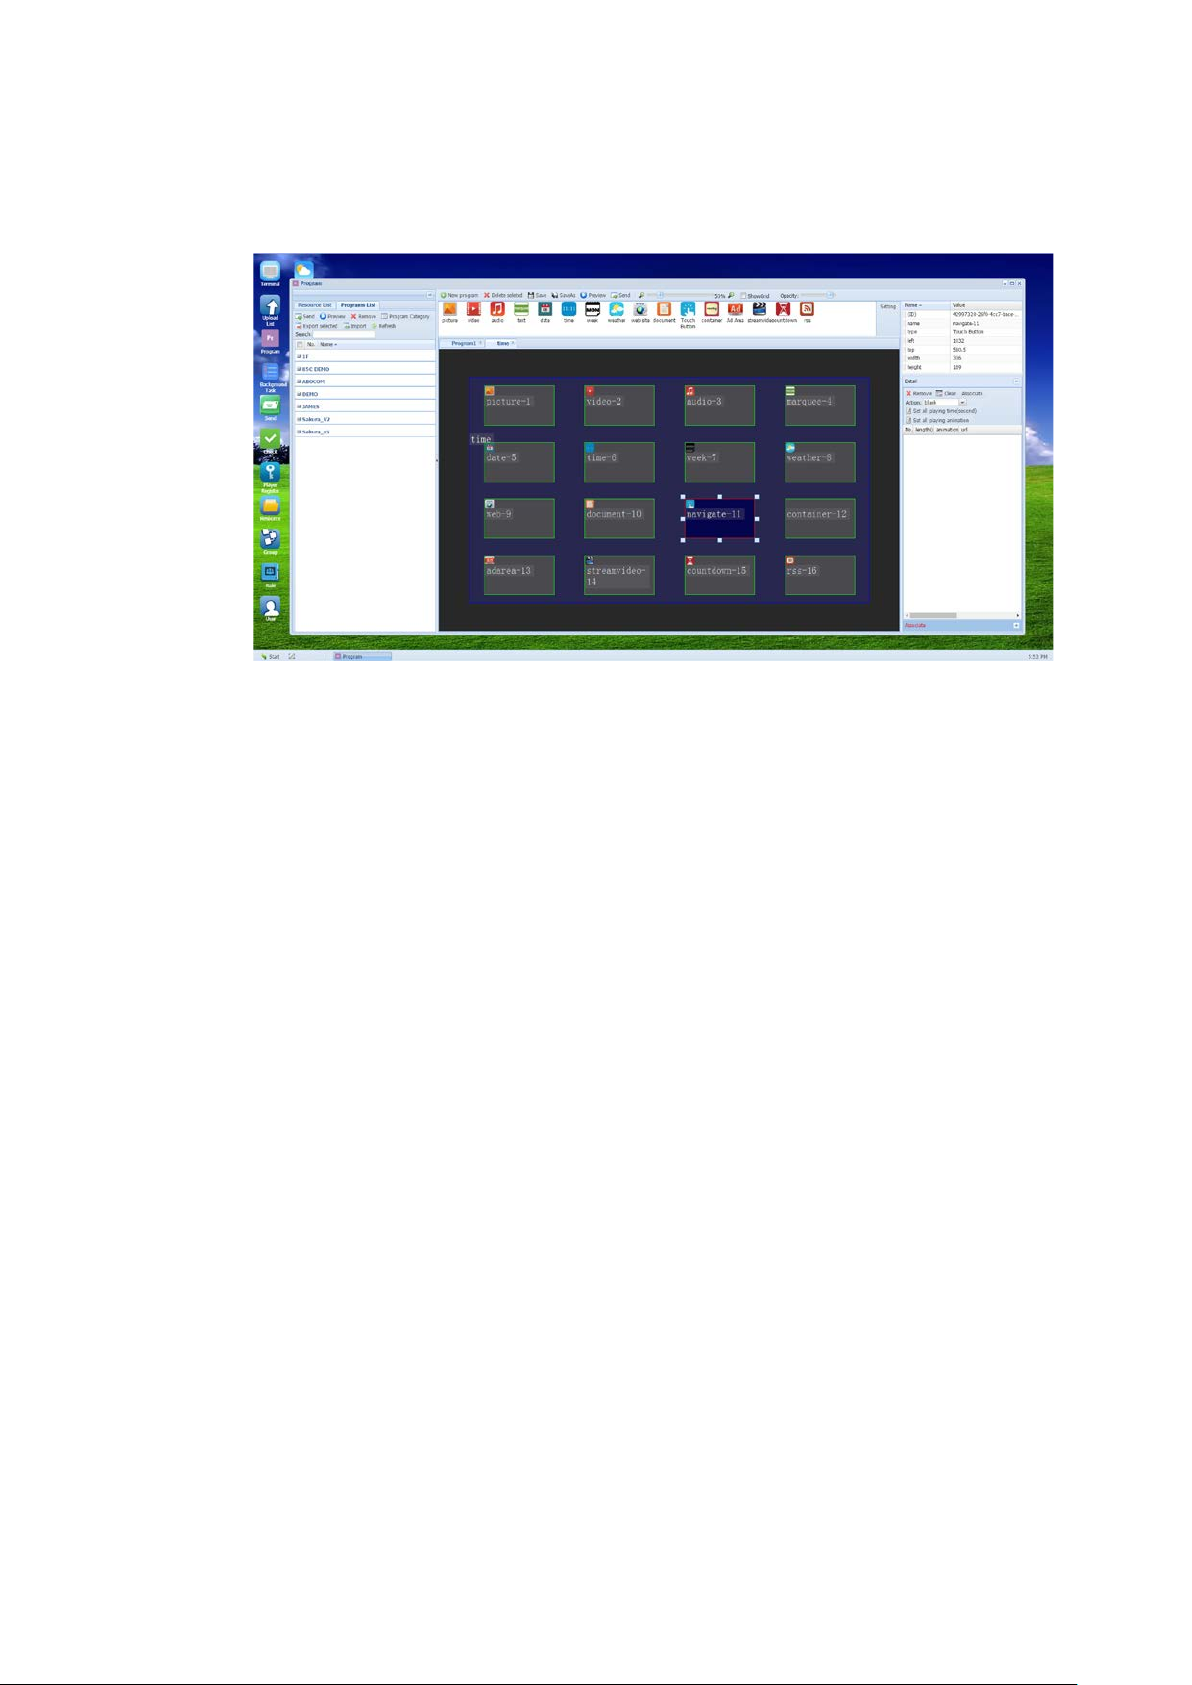
6.2.4.12 Touch Button:To design an area that can active by touch the touch-screen. (This
function apply for CMS02 and CMS03)
Only graphic file can be used for this element.
Remove:To remove the selected item
Clear:To delete all of used elements
Set all playing time:Set the display time for all of elements
Set all playing animation:Set the animation for all of elements
NO.:Playing ordering,can be adjusted by dragging the element
length:The playing time length
animation:The animation effect during the element change
url:The resource path for the element
Action:To select the interactive as ”blank” “Home Page” “Return”
Associate:Click to lunch the advance setting:
第 44 頁
Page 45
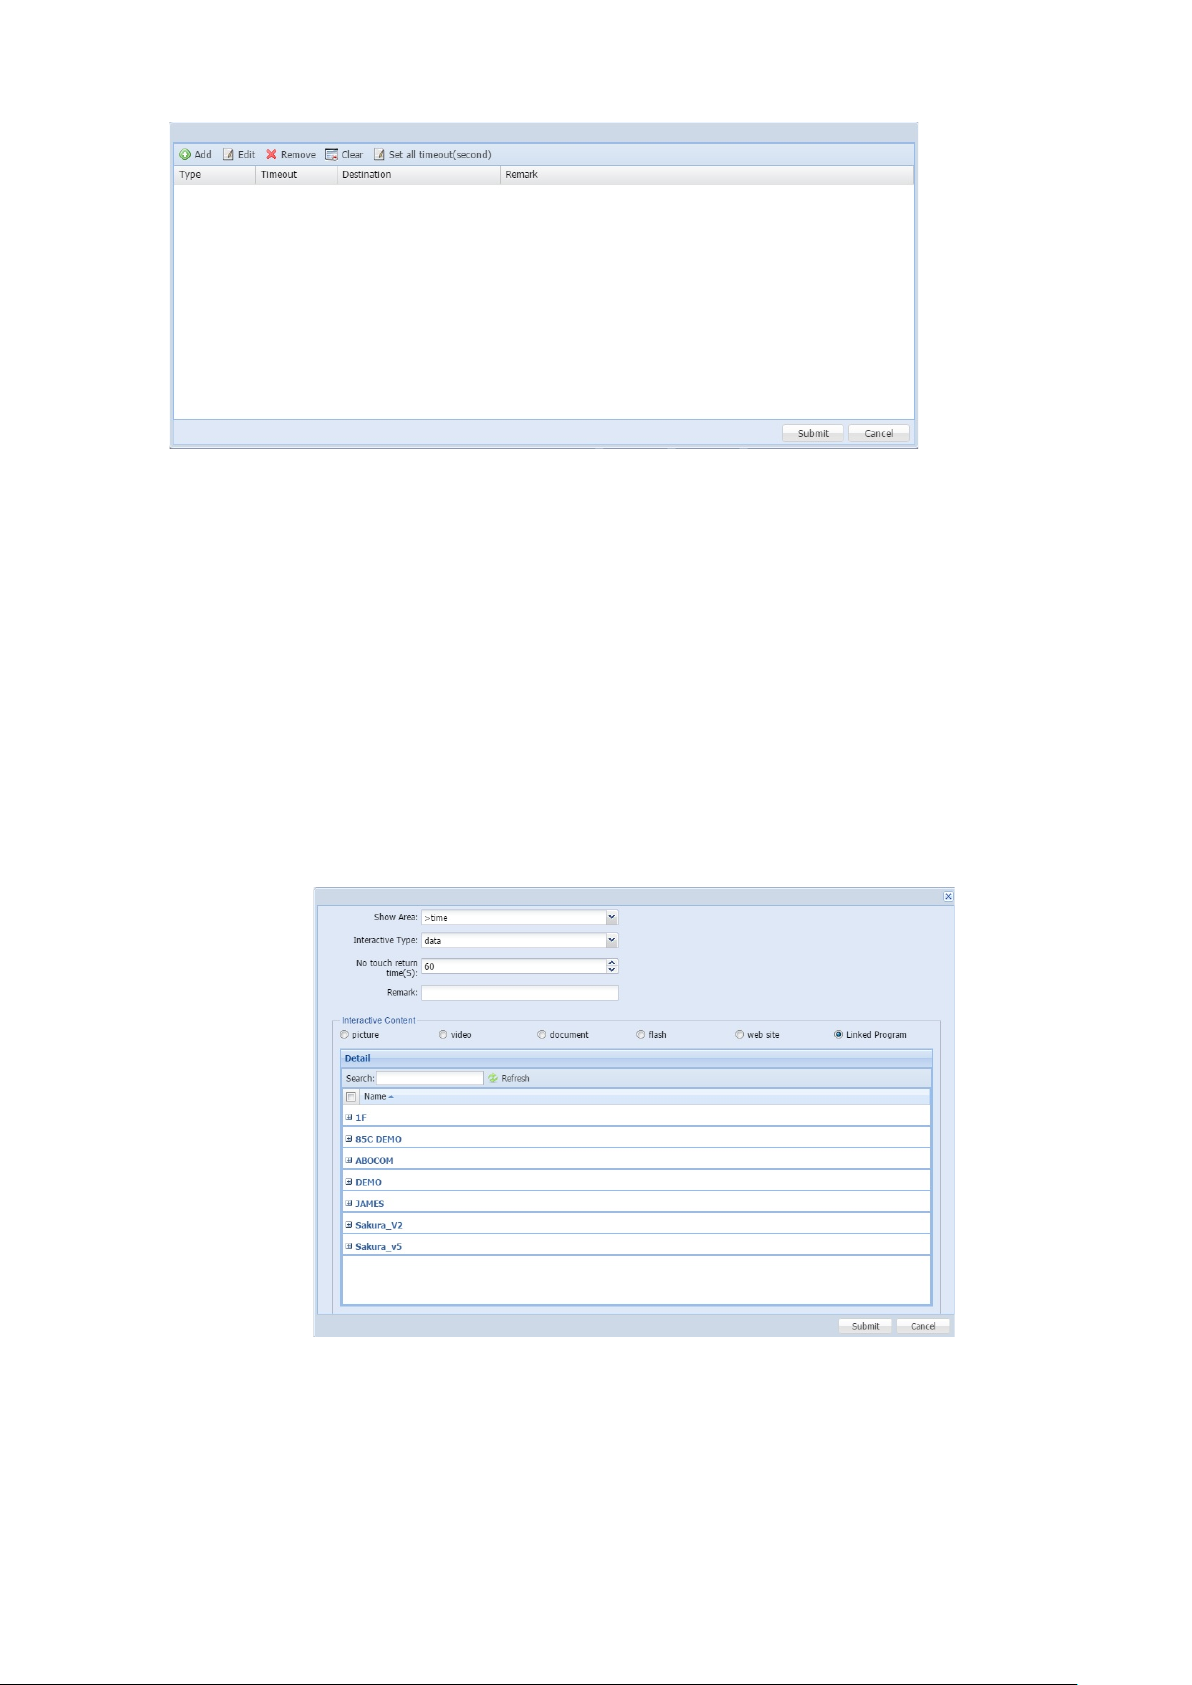
Edit:To edit the active content
Remove:To remove the selected item
Clear:To clear the item
Set all timeout:To set the time that back to home page
Add:To add the active item:
Show Area:The area to active after touch
Interactive Type:
data:To disply graphic, video, web page, program
第 45 頁
Page 46

condition:(This item only apply for windows based media player)
To select picture, video, web site, and linked Program if you
next:To display next content
previous:To display previous content
play:To display current content
pause:To pause the display
stop:To stop the display
rewind:To rewind the display
fastforward:To forward the display
No touch return:To set the time return to home page without any touch
Interactive Content:
selectthe data in Interactive Type.
第 46 頁
Page 47
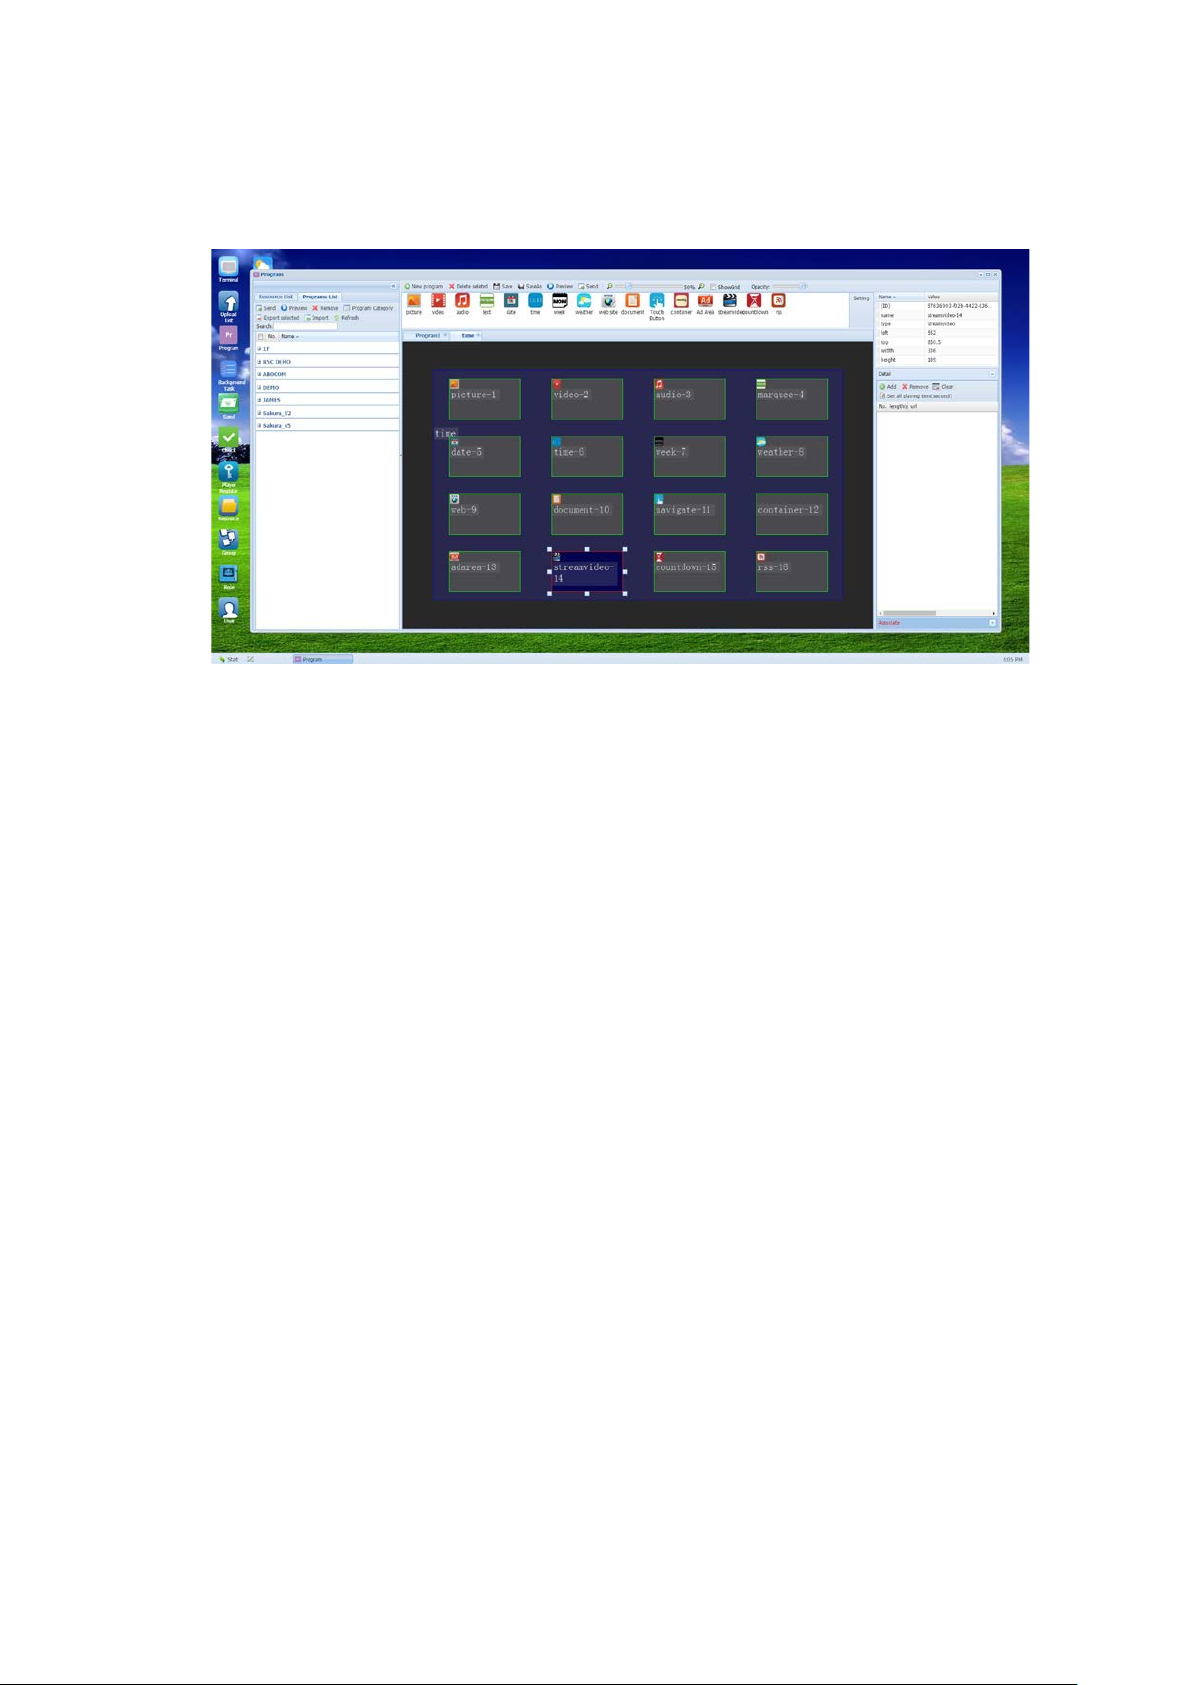
6.2.4.13 Streamvideo:To disply the stream video from the hyper link with “rtsp://” head
address. (This function only apply for CMS03)
Add:To add a new hyperlink address
Remove:To remove the selected item
Clear:To clear the used item
Set all playing time:Set the playing time for all of web page
No.:Play ordering,can be adjust by dragging the item
length:The play time length
url:The hyper link address for rtsp://
第 47 頁
Page 48
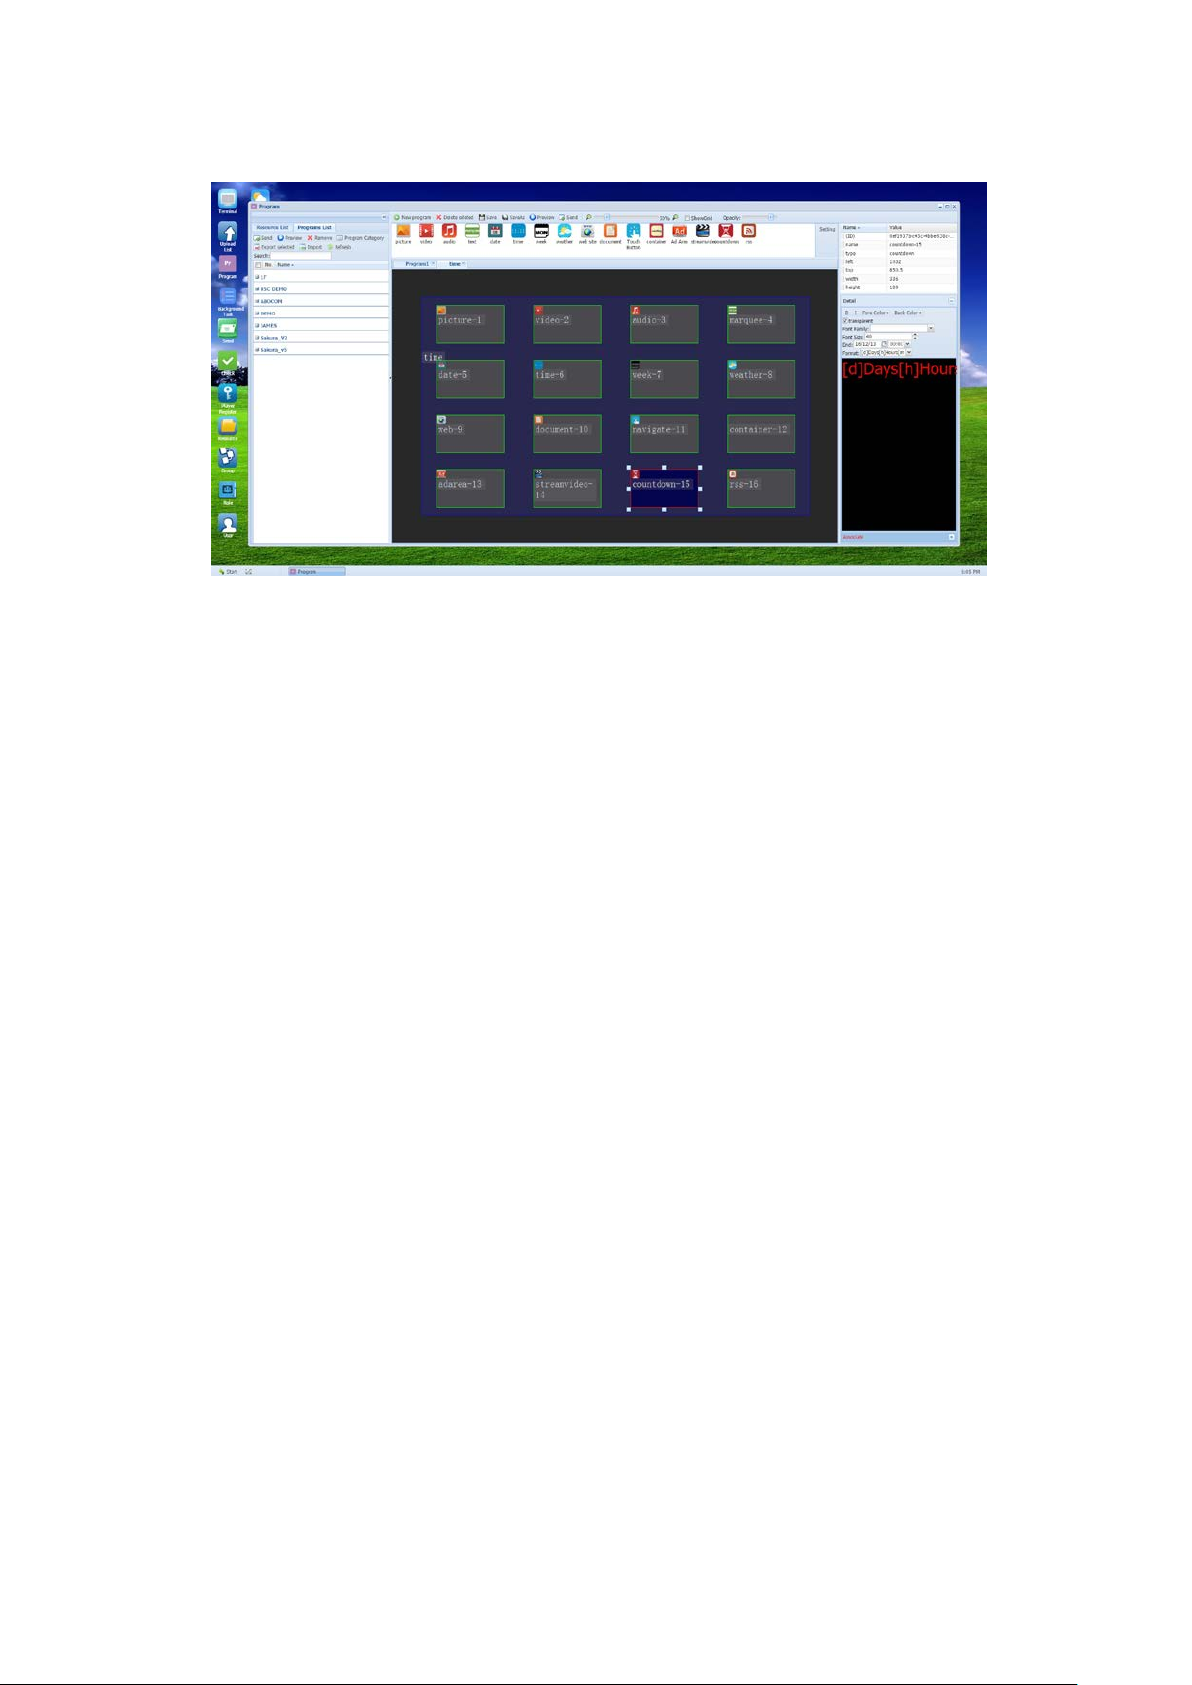
6.2.4.14 countdown:The timer for countdown (This function only apply for CMS03)
B:To set the font type with Blod
I:To set the font type with Italics
Fore color: To set the color for the prospect
Back color: To set the color for the background
Transparent :To select and make the background as transparent
Font Family:To select the font type
Font Size:To set the font size
Format:To set the date and time display format
End:To set the countdown time and date
第 48 頁
Page 49
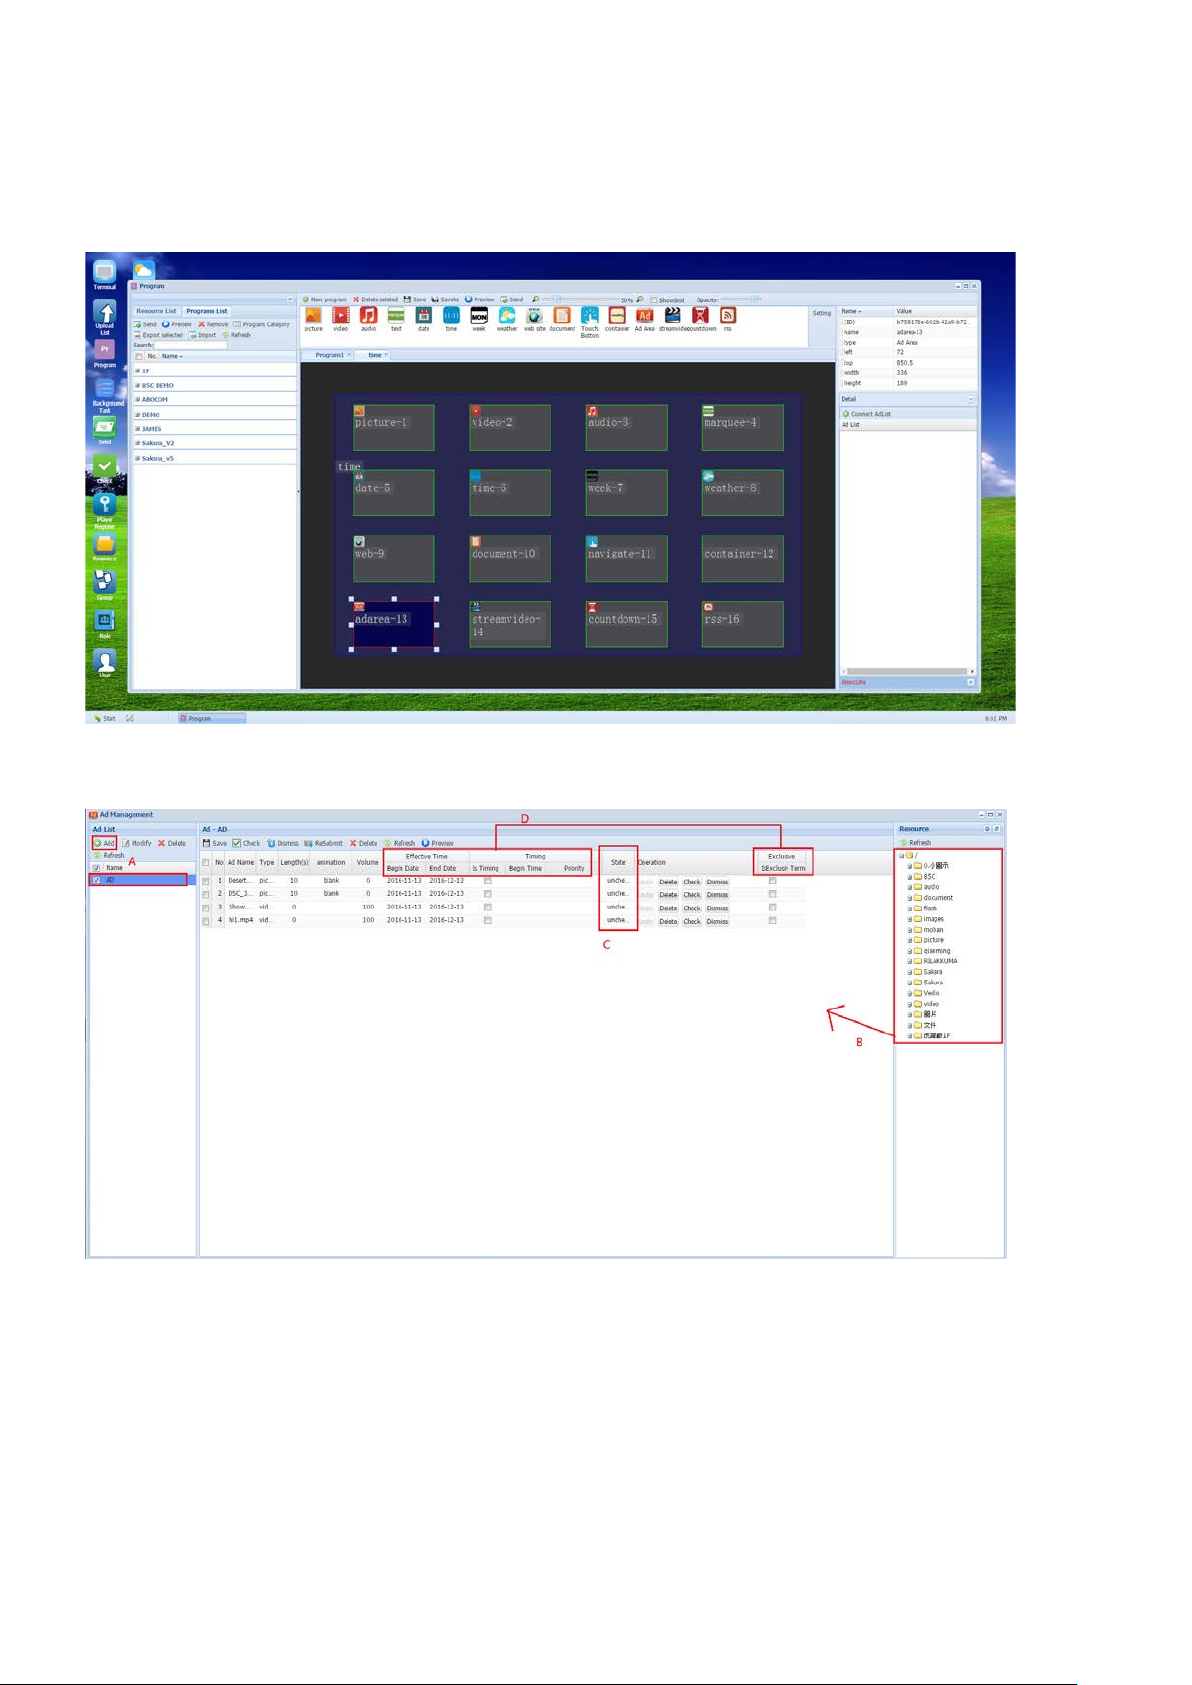
6.2.4.15 Ad Area:To create an area to display a temporary ad content during the regular
Before to push the ad to media player, please make sure the element should be in
program. (This function only apply for CMS03)
To edit the ad content in “Ad Management”
A. Click the “Add” to create a new ad,double clink the item and star edit
B. Dragging the picture or video elements
C.
“examination passed” status
第 49 頁
Page 50

D. To set the display time and date
7. Server and Digital Signage Connection Concept
Server:
Console:
Player:
CMS Signage Content Management System provides centralized CMS (Content
Management System) through internet connection. And via server control, it provides
trilateral remote-control mechanism to operate the Digital Signage under networking
connection. From that, there are 3 roles of Server-End, Console-End and Player, per the
explanation below:
management, execute console-end and Player.
provide management, design and scheduling functionalities, and also uploading to server.
Server: In charge of mission management of back-end database and operation
Connected to the operation interface of Server, mainly through web pages, to
Playback terminal device that receives program content broadcast
第 50 頁
 Loading...