

Page 1

ActivIdentity® 4TRESS AAA and Splunk®
Integration Handbook
Document Version 1.1 | Released | August 24, 2012
Page 2

ActivIdentity 4TRESS AAA and Splunk | Integration Handbook
P 2
ActivIdentity
Table of Contents
Table of Contents ....................................................................................................................................................... 2
List of Figures ............................................................................................................................................................. 3
1.0 Introduction ....................................................................................................................................................... 4
1.1 Scope of Document .................................................................................................................................... 4
1.2 Prerequisites .............................................................................................................................................. 4
2.0 ActivIdentity 4TRESS AAA Data Export ........................................................................................................... 5
2.1 Consolidate data ........................................................................................................................................ 5
2.2 Schedule Consolidation from the Command Line ...................................................................................... 6
2.3 View and Export Authentication Logs ........................................................................................................ 6
2.4 View and Export Audit Logs ....................................................................................................................... 9
3.0 Splunk installation ........................................................................................................................................... 11
3.1 Prerequisites ............................................................................................................................................ 11
3.2 Windows Installation ................................................................................................................................. 12
4.0 Splunk Configuration ....................................................................................................................................... 13
4.1 Procedure 1 : Install the App .................................................................................................................... 13
4.2 Procedure 2 : Index and Log Repositories ............................................................................................... 14
4.3 Procedure 3 : Create Indexes .................................................................................................................. 15
4.4 Procedure 4 : Assign Index Rights ........................................................................................................... 17
4.5 Procedure 5: Specify Data Inputs ............................................................................................................ 19
4.6 Procedure 6: Restart Splunk .................................................................................................................... 23
5.0 Splunk for ActivIdentity AAA: Overview .......................................................................................................... 24
5.1 View Authentication Dashboard and Reports .......................................................................................... 24
5.2 View Authentication Logs ......................................................................................................................... 28
5.3 View Audit Dashboard and Reports ......................................................................................................... 29
5.4 View Audit Logs ........................................................................................................................................ 32
External Use | August 24, 2012 | © 2012
Page 3

ActivIdentity 4TRESS AAA and Splunk | Integration Handbook
P 3
ActivIdentity
List of Figures
Figure 1 : Authentication – Per RADIUS Request Over Time .............................................................................. 25
Figure 2 : Authentication – RADIUS Requests by NAS Over Time ..................................................................... 26
Figure 3 : Authentication – Top User ID by Request ............................................................................................ 26
Figure 4 : Authentication – Top RADIUS Server by Requests (by the AAA Server) ............................................ 26
Figure 5 : Authentication – Top Status Authentication by Requests .................................................................... 27
Figure 6 : Authentication – Top Groups by Request ............................................................................................ 27
Figure 7 : Auditing – Operation Detail Over Time ................................................................................................ 29
Figure 8 : Auditing – Operation Over Time ........................................................................................................... 30
Figure 9 : Auditing – Per User Action Over Time (Actions by the Admin ID) ....................................................... 30
Figure 10 : Auditing – Top Operation ................................................................................................................... 30
Figure 11 : Auditing – Top Operation Detail ......................................................................................................... 31
Figure 12 : Auditing – Top Users (Administrators and Operators) ....................................................................... 31
External Use | August 24, 2012 | © 2012
Page 4

ActivIdentity 4TRESS AAA and Splunk | Integration Handbook
P 4
ActivIdentity
1.0 Introduction
Splunk® is a software used to search, monitor and analyze machine-generated data by applications, systems,
and IT infrastructure at scale via a Web-style interface. Splunk captures, indexes, and correlates real-time data in
a searchable database from which it can generate graphs, reports, alerts, dashboards and visualizations.
Splunk aims to make machine data accessible across an organization, identify data patterns, provide metrics,
diagnose problems, and provide intelligence for business operations. Splunk is a horizontal technology used for
application management, security and compliance, as well as business and Web analytics.
The Splunk for ActivIdentity® 4TRESS AAA is a set of field extractions, reports, lookups and dashboards which
provide visibility into the 4TRESS authentication and audit data.
ActivIdentity offers two solutions:
• ActivIdentity 4TRESS AAA Server for Remote Access—Addresses the security risks associated with
a mobile workforce remotely accessing systems and data.
• ActivIdentity 4TRESS Authentication Server (AS)—Offers support for multiple authentication methods
that are useful for diverse audiences across a variety of service channels (SAML, Radius, etc.),
including user name and password, mobile and PC soft tokens, one-time passwords, and transparent
Web soft tokens.
1.1 Scope of Document
This document explains how to set up ActivIdentity 4TRESS AAA with Splunk. Use this handbook to generate
graphs, reports, and a dashboard on ActivIdentity 4TRESS AAA solutions.
This handbook covers only the Windows® Splunk version. Configuration is similar for other systems.
1.2 Prerequisites
• The ActivIdentity 4TRESS AAA Server is up-to-date (v6.7)
• Splunk version 4.3.x
External Use | August 24, 2012 | © 2012
Page 5
ActivIdentity 4TRESS AAA and Splunk | Integration Handbook
P 5
ActivIdentity
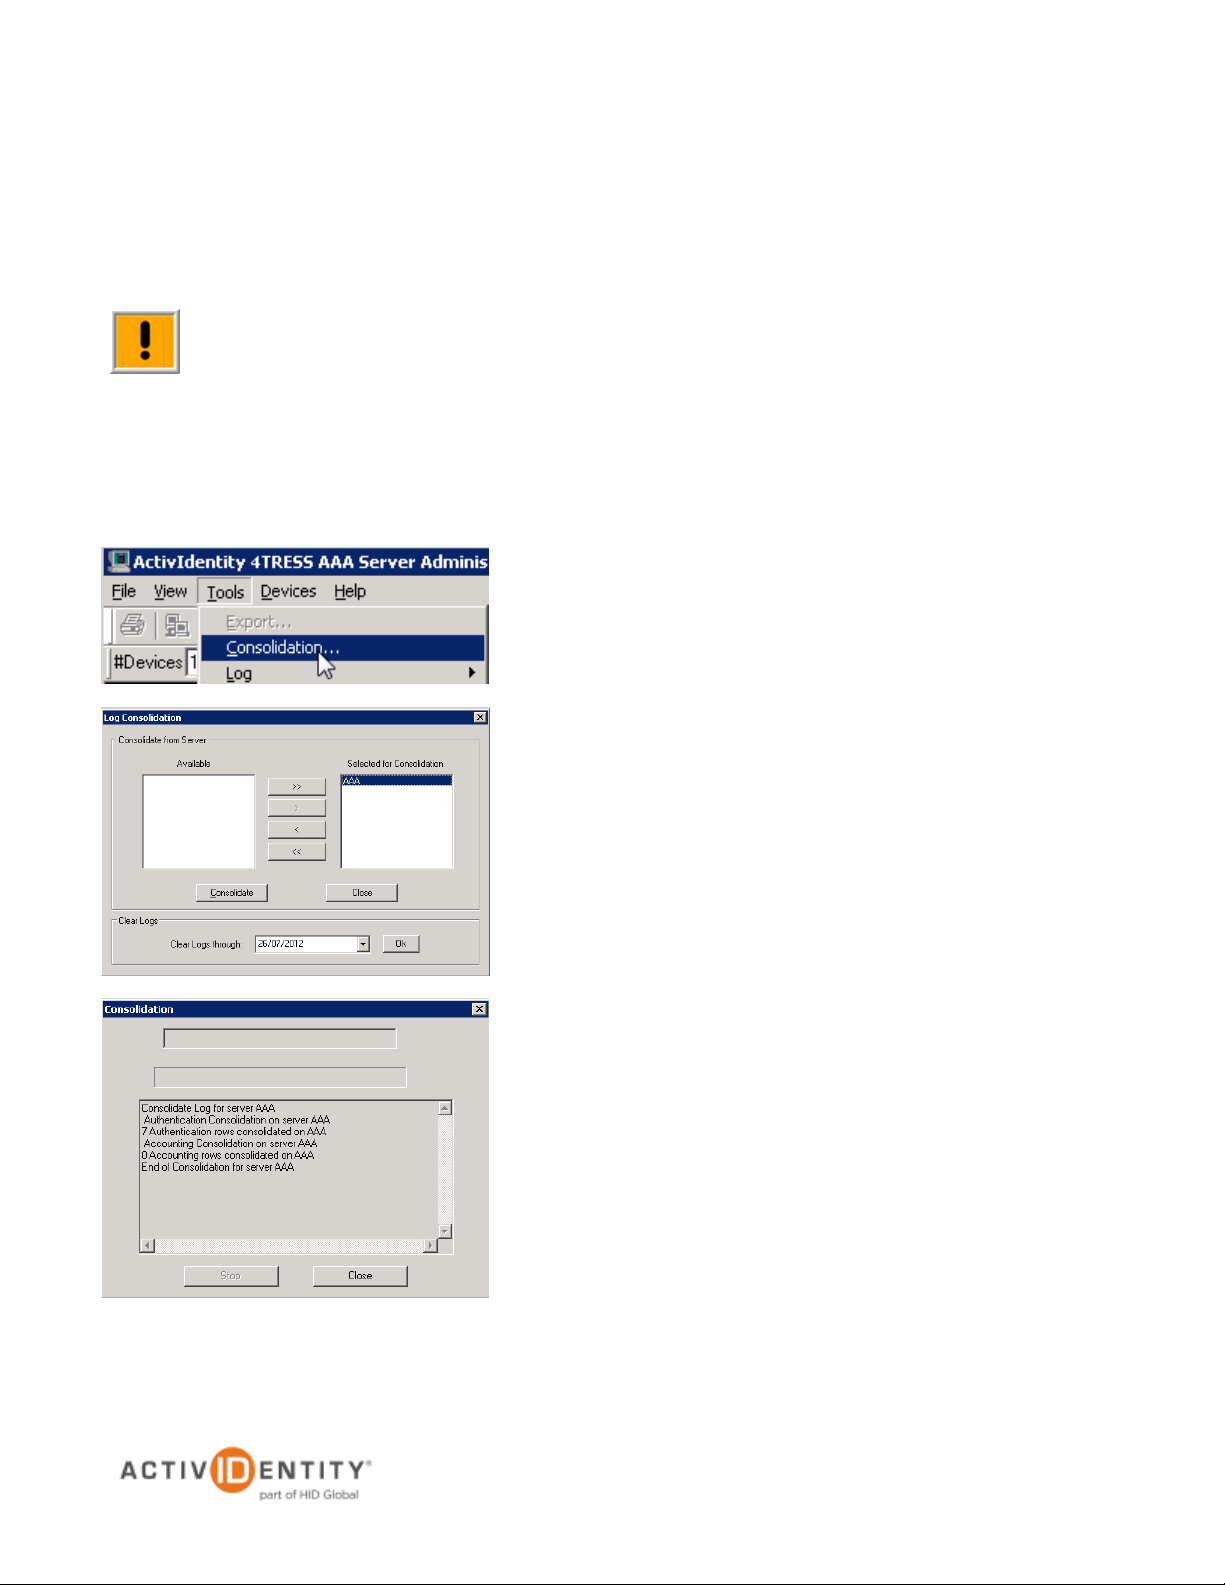
Important: To produce more sophisticated statistics, you can directly access the data from the AAA
1. Select Tools, then click Consolidation.
2.0 ActivIdentity 4TRESS AAA Data Export
This chapter describes how to manually export the ActivIdentity 4TRESS AAA Authentication and audit data to a
CSV file.
Server database. (The data is stored in the A_AHLOG and A_AULOG tables.) Use a tool that
supports ODBC.
2.1 Consolidate data
Consolidation works only with servers that have logged data in the AAA Server database.
2. In the Available column, select the server(s) from which
to consolidate data, then click >.
Use >> to consolidate data from every server.
If you have only one server, then the Administration
Console automatically sets this server in the Selected for
Consolidation column.
3. Click Consolidate.
4. Click Close.
External Use | August 24, 2012 | © 2012
Page 6
ActivIdentity 4TRESS AAA and Splunk | Integration Handbook
P 6
ActivIdentity
2.2 Schedule Consolidation from the Command Line
Please refer to the ActivIdentity 4TRESS AAA Administration Guide, specifically page 92.
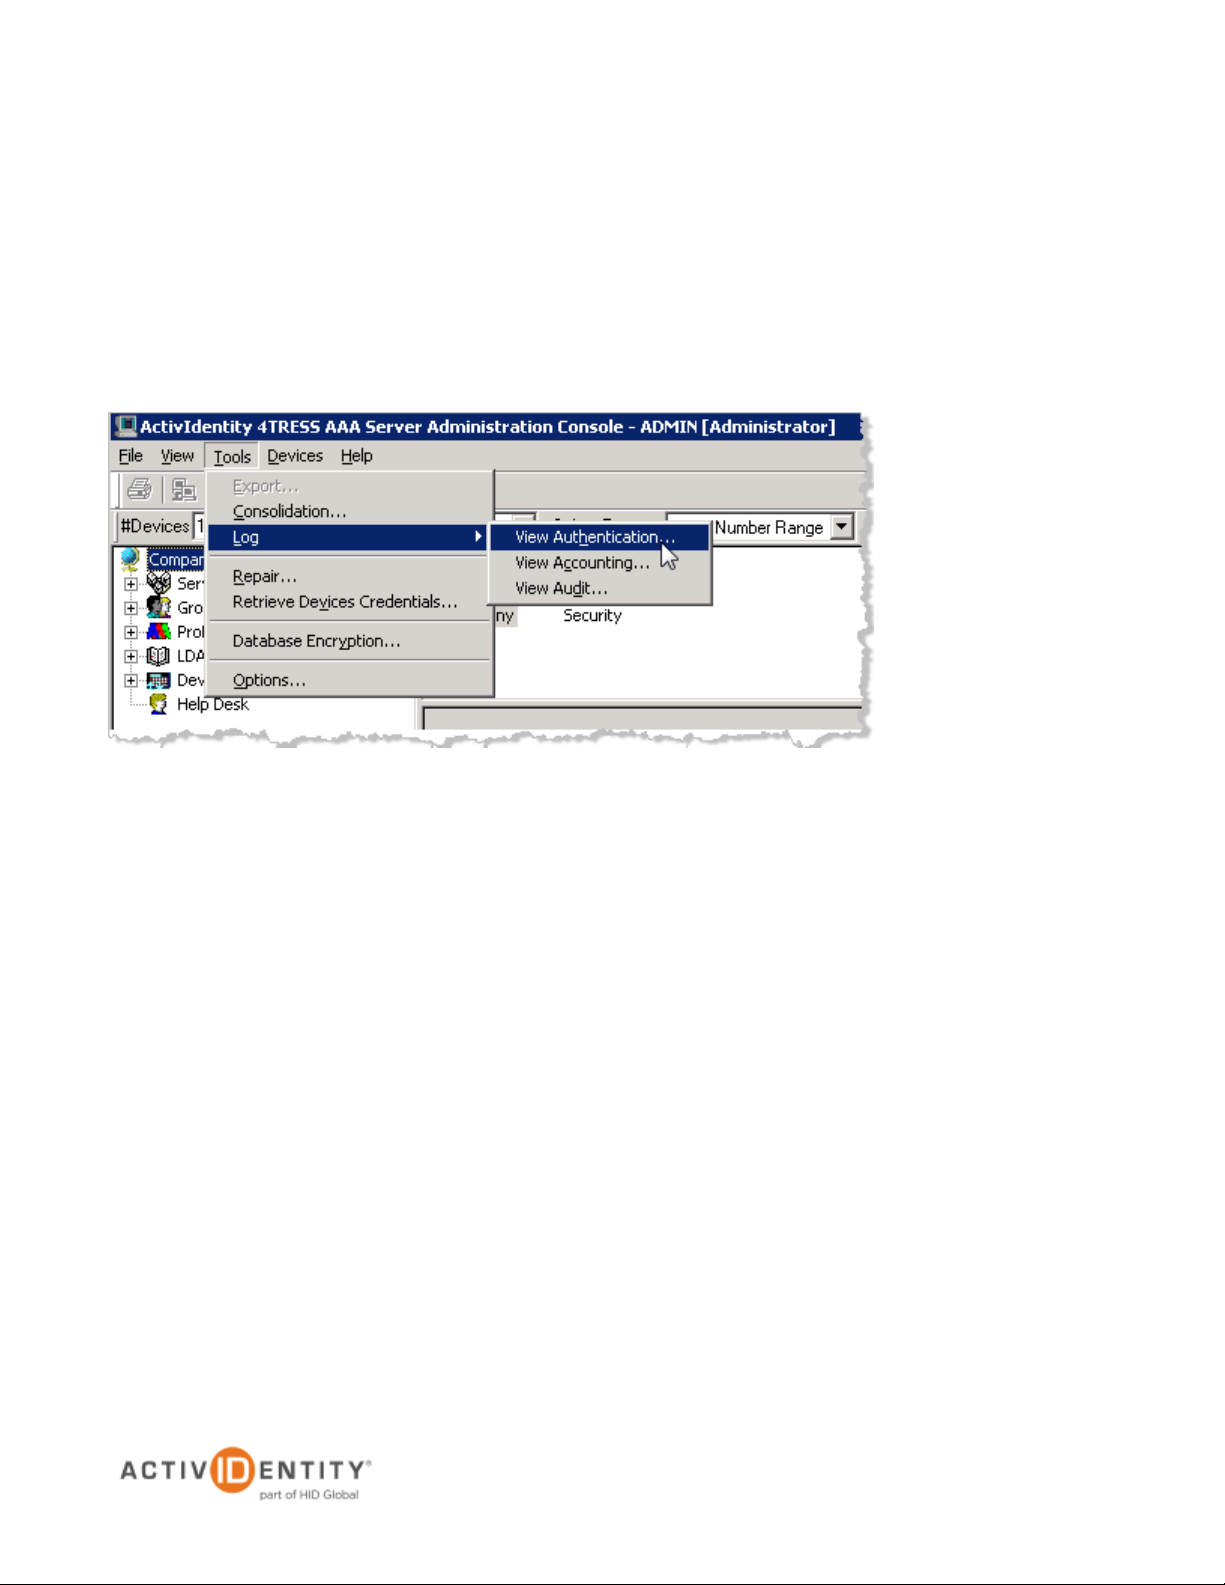
2.3 View and Export Authentication Logs
You must have administration rights to view and export authentication logs.
1. Select Tools, point to Log, then click View Authentication.
External Use | August 24, 2012 | © 2012
Page 7

ActivIdentity 4TRESS AAA and Splunk | Integration Handbook
P 7
ActivIdentity
2. For the Time Criteria, specify the From and To dates for the time period required.
3. For the General Criteria:
• Select the Server for the authentication data that you want to view.
• To view the logs for a specific server with a pool of servers, select the Server IP address for
the required server.
• To view data for a specific user, enter the User ID.
• To view only error data, select REJECTED only.
4. Click Show to display the authentication data corresponding to the specified criteria.
5. To export the authentication log to a .csv file, click Export.
External Use | August 24, 2012 | © 2012
Page 8

ActivIdentity 4TRESS AAA and Splunk | Integration Handbook
P 8
ActivIdentity
6. In the Save As window, enter a file name and location for the exported log, then click Save.
The log is exported to a text file with data values separated by commas.
External Use | August 24, 2012 | © 2012
Page 9
ActivIdentity 4TRESS AAA and Splunk | Integration Handbook
P 9
ActivIdentity
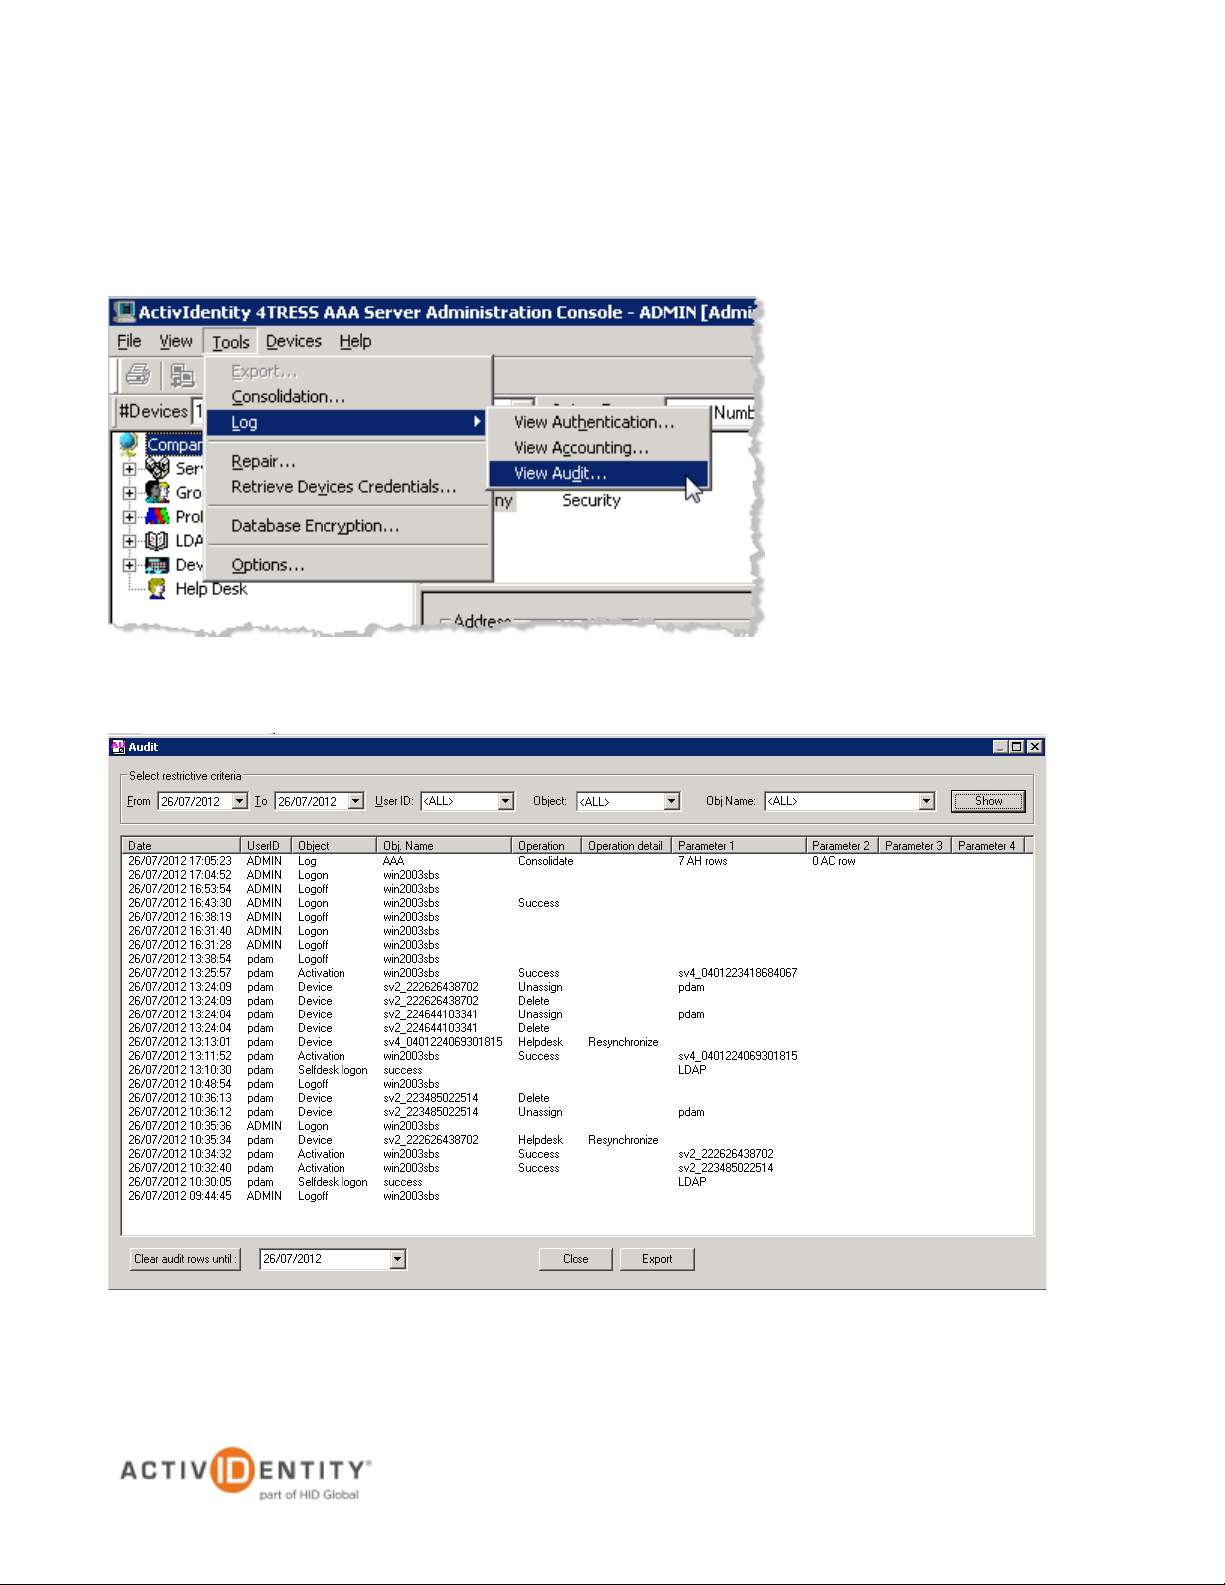
2.4 View and Export Audit Logs
You must have administration rights to view and export audit logs.
1. From the menu bar, select Tools, point to Log, then click Audit. The following dialog opens, displaying data
specific to your system.
2. In the Select restrictive criteria section, filter log entries based on dates, User IDs, Objects, Object Names,
and other criteria. You can select an option from the drop-down lists or manually enter the criteria.
External Use | August 24, 2012 | © 2012
Page 10

ActivIdentity 4TRESS AAA and Splunk | Integration Handbook
P 10
ActivIdentity
• Use the From and To fields to enter a range of dates.
• Use the User ID drop-down list to select an Administration Console operator.
• Use the Object drop-down list to select the type of object you require (ex: a serial number for
a device). The Object name list includes Device, LDAP Query, Logoff, Logon, Options, and
Security.
• Use the Object Name drop-down list to specify the name of the object.
3. Click Show at the top right of the dialog to display filter results or refresh the screen between filter choices.
4. To export the audit log to a .csv file, click Export.
5. In the Save As window, select a file name and location for the exported log, then click Save.
The log is exported to a text file with the data values separated by commas.
External Use | August 24, 2012 | © 2012
Page 11

ActivIdentity 4TRESS AAA and Splunk | Integration Handbook
P 11
ActivIdentity
3.0 Splunk installation
3.1 Prerequisites
1. Create a splunk account:
https://www.splunk.com/page/sign_up/splunkbase?redirecturl=http://splunkbase.splunk.com/account/splunk/signin/
2. Download Splunk for free:
http://www.splunk.com/download
3. Download the ActivIdentity AAA App from Splunkbase:
http://splunk-base.splunk.com/apps/54223/splunk-for-actividentity-aaa
External Use | August 24, 2012 | © 2012
Page 12

ActivIdentity 4TRESS AAA and Splunk | Integration Handbook
P 12
ActivIdentity
3.2 Windows Installation
If you're just getting started using Splunk, here are some resources that might be helpful:
1. Watch videos on installing Splunk on Windows and other platforms:
http://www.splunk.com/view/SP-CAAAFTA
2. Read the installation guide:
http://www.splunk.com/base/Documentation/latest/Installation/Chooseyourplatform
3. Take the search tutorial:
http://www.splunk.com/base/Documentation/latest/User/WelcometotheSplunktutorial
Installation on a Windows Platform:
1. To start the installer, double-click the splunk.msi file.
2. In the Welcome panel, click Next.
3. Read the licensing agreement and check the box next to "I accept the terms in the license agreement". Click
Next to continue installing.
4. For Customer Information, enter the requested details and click Next.
5. In the Destination Folder panel, click Change to specify a different location to install Splunk, or click Next to
accept the default value.
6. Splunk is installed by default into the \Program Files\Splunk directory.
7. The Logon Information panel is displayed. Select Local system user and click Next.
8. If you want to learn about the other user option, refer to the detailed instructions for installing Splunk on
Windows.
9. After you specify a user, the pre-installation summary panel is displayed. Click Install to proceed.
10. In the Installation Complete panel, select the boxes to Launch browser with Splunk and Create Start
Menu Shortcut now.
11. Click Finish. When the installation is finished, Splunk starts, and Splunk Web launches in a supported
browser.
External Use | August 24, 2012 | © 2012
Page 13

ActivIdentity 4TRESS AAA and Splunk | Integration Handbook
P 13
ActivIdentity
4.0 Splunk Configuration
4.1 Procedure 1 : Install the App
After unzipping the Splunk App for ActivIdentity AAA, copy the Splunk_AI_4TRESS_AAA directory into the
/etc/apps directory of your Splunk installation, as illustrated next.
External Use | August 24, 2012 | © 2012
Page 14

ActivIdentity 4TRESS AAA and Splunk | Integration Handbook
P 14
ActivIdentity
4.2 Procedure 2 : Index and Log Repositories
Create a repository for the logs storage and the logs index in the repository/directory of your choice, as illustrated
next.
External Use | August 24, 2012 | © 2012
Page 15

ActivIdentity 4TRESS AAA and Splunk | Integration Handbook
P 15
ActivIdentity
2. Select Manager.
3. Click Indexes.
4.3 Procedure 3 : Create Indexes
1. Log into the Splunk portal.
The Add new page is diplayed, as illustrated next.
4. Click New.
External Use | August 24, 2012 | © 2012
Page 16

ActivIdentity 4TRESS AAA and Splunk | Integration Handbook
P 16
ActivIdentity
• Specify an Index name.
• Specify the Home path of your index repository created previously.
• Specify the Max size for your index.
5. Click Save.
You will see index_aaa in the Indexes view, as illustrated next.
External Use | August 24, 2012 | © 2012
Page 17

ActivIdentity 4TRESS AAA and Splunk | Integration Handbook
P 17
ActivIdentity
1. Select Manager.
2. Click Access controls.
3. Click Roles.
4.4 Procedure 4 : Assign Index Rights
External Use | August 24, 2012 | © 2012
Page 18

ActivIdentity 4TRESS AAA and Splunk | Integration Handbook
P 18
ActivIdentity
4. Click on admin (or other role listed).
5. Scroll to the Indexes searched by default section.
6. Add your index by double-clicking on it.
7. Click Save.
External Use | August 24, 2012 | © 2012
Page 19

ActivIdentity 4TRESS AAA and Splunk | Integration Handbook
P 19
ActivIdentity
4.5 Procedure 5: Specify Data Inputs
If you have the appropriate permissions, then you can view and manage all of the data in your indexes from
Splunk Manager's data inputs configuration page. To access this page, perform the following steps.
1. Click Manager. (This link should always be available, regardless of the app you are currently using.)
2. From the list of Splunk system configuration pages, click Data inputs.
The Data inputs configuration page displays a table listing the type of data and a count of the existing inputs
for each type.
3. Click Files & Directories.
External Use | August 24, 2012 | © 2012
Page 20

ActivIdentity 4TRESS AAA and Splunk | Integration Handbook
P 20
ActivIdentity
4. Click New.
5. Select Skip preview and click Continue.
External Use | August 24, 2012 | © 2012
Page 21

ActivIdentity 4TRESS AAA and Splunk | Integration Handbook
P 21
ActivIdentity
6. In the Source section, select the option to continuously index data.
7. Enter the Full path to your data (the directory created previously).
8. Select the More settings option. (This enables you to override Splunk's default settings for Host, Source
type, and Index).
External Use | August 24, 2012 | © 2012
Page 22

ActivIdentity 4TRESS AAA and Splunk | Integration Handbook
P 22
ActivIdentity
9. For Source type, select Manual from the drop-down list, and enter ai_4tress_aaa in the Source type field.
Note : ai_4tress_aaa is hardcoded in the Splunk App and is case-sensitive.
10. From the Set the Destination index drop-down list, select the index you previously created.
11. Click Save.
External Use | August 24, 2012 | © 2012
Page 23

ActivIdentity 4TRESS AAA and Splunk | Integration Handbook
P 23
ActivIdentity
12. Copy the exported authentication and audit data of your 4TRESS AAA Server to the data repository that you
previously created.
4.6 Procedure 6: Restart Splunk
1. To apply the modifications, restart the splunk service using a DOS command line.
External Use | August 24, 2012 | © 2012
Page 24

ActivIdentity 4TRESS AAA and Splunk | Integration Handbook
P 24
ActivIdentity
2. Now, login to the Web interface, and you will see a new app listed in the App menu, as illustrated next.
5.0 Splunk for ActivIdentity AAA: Overview
This section provides an overview of the Splunk App for 4TRESS AAA dashboard functions.
5.1 View Authentication Dashboard and Reports
1. Select Authentication Statistics, and then click Authentication Dashboard.
External Use | August 24, 2012 | © 2012
Page 25

ActivIdentity 4TRESS AAA and Splunk | Integration Handbook
P 25
ActivIdentity
2. You can define filters, and specify a period of time for a report. For example, define a specific group, and then
select Last 30 days from the drop-down list.
3. Press the Enter key. The loading bar appears. If you do not specify a filter, then all data appear.
You will see the authentication status (accepted or rejected authentication) over that period of time, as
illustrated next.
Figure 1 : Authentication – Per RADIUS Request Over Time
The following illustrations show some other report examples.
External Use | August 24, 2012 | © 2012
Page 26

ActivIdentity 4TRESS AAA and Splunk | Integration Handbook
P 26
ActivIdentity
Figure 2 : Authentication – RADIUS Requests by NAS Over Time
Figure 3 : Authentication – Top User ID by Request
Figure 4 : Authentication – Top RADIUS Server by Requests (by the AAA Server)
External Use | August 24, 2012 | © 2012
Page 27

ActivIdentity 4TRESS AAA and Splunk | Integration Handbook
P 27
ActivIdentity
Figure 5 : Authentication – Top Status Authentication by Requests
Figure 6 : Authentication – Top Groups by Request
External Use | August 24, 2012 | © 2012
Page 28

ActivIdentity 4TRESS AAA and Splunk | Integration Handbook
P 28
ActivIdentity
5.2 View Authentication Logs
To view authentication logs, perform the following steps.
1. Select Authentication Statistics, and then click Authentication Logs.
2. Specify filters and time range, and then press the Enter key.
The loading bar appears. If you do not specify a filter, then all data appear.
External Use | August 24, 2012 | © 2012
Page 29

ActivIdentity 4TRESS AAA and Splunk | Integration Handbook
P 29
ActivIdentity
5.3 View Audit Dashboard and Reports
To view the Audit Dashboard, perform the following steps.
1. Select AAA Audit Statistics, and then click Audit Dashboard.
2. Specify filters and time range, and then press the Enter key.
The loading bar appears. If you do not specify a filter, then all data appear.
You will see the operation details over that period of time, as illustrated next.
Figure 7 : Auditing – Operation Detail Over Time
The following illustrations show some other examples.
External Use | August 24, 2012 | © 2012
Page 30

ActivIdentity 4TRESS AAA and Splunk | Integration Handbook
P 30
ActivIdentity
Figure 8 : Auditing – Operation Over Time
Figure 9 : Auditing – Per User Action Over Time (Actions by the Admin ID)
Figure 10 : Auditing – Top Operation
External Use | August 24, 2012 | © 2012
Page 31

ActivIdentity 4TRESS AAA and Splunk | Integration Handbook
P 31
ActivIdentity
Figure 11 : Auditing – Top Operation Detail
Figure 12 : Auditing – Top Users (Administrators and Operators)
External Use | August 24, 2012 | © 2012
Page 32

ActivIdentity 4TRESS AAA and Splunk | Integration Handbook
P 32
ActivIdentity
5.4 View Audit Logs
To view Audit Logs perform the following steps.
1. Select AAA Audit Statistics, and then click Audit Logs.
2. Specify filters and time range, and then press the Enter key.
External Use | August 24, 2012 | © 2012
Page 33

ActivIdentity 4TRESS AAA and Splunk | Integration Handbook
P 33
ActivIdentity
Legal Disclaimer
Americas +1 510.574.0100
US Federal +1 571.522.1000
Europe +33 (0) 1.42.04.84.00
Asia Pacific +61 (0) 2.6208.4888
Email info@actividentity.com
Web www.actividentity.com
ActivIdentity, the ActivIdentity (logo), and/or other ActivIdentity products or marks referenced
herein are either registered trademarks or trademarks of HID Global Corporation in the United
States and/or other countries. The absence of a mark, product, service name or logo from this
list does not constitute a waiver of the trademark or other intellectual property rights concerning
that name or logo. Cisco and the Cisco logo are registered trademarks of Cisco, Inc. in the
United States and other countries.The names of other third-party companies, trademarks, trade
names, service marks, images and/or products that happened to be mentioned herein are
trademarks of their respective owners. Any rights not expressly granted herein are reserved.
External Use | August 24, 2012 | © 2012
 Loading...