

Page 1

hidglobal.com
ActivID Appl iance
and Palo Alto Networks (GlobalProtect)
RADIUS Channel Integration Handbook
Document Version 1.3 | Released | April 2014
Page 2

ActivID Appliance RADIUS and Palo Alto Networks Integration | RADIUS Channel Integration Handbook
External Release | © 2014
2
Table of Contents
Table of Contents ....................................................................................................................................................... 2
1.0 Introduction ....................................................................................................................................................... 3
1.1 Scope of Document .................................................................................................................................... 3
1.2 Prerequisites .............................................................................................................................................. 3
2.0 GlobalProtect Configuration .............................................................................................................................. 4
2.1 Configuring User Authentication ................................................................................................................ 5
2.2 Authentication Prof ile ................................................................................................................................. 6
2.3 Configuring the SSL VPN G lobal Prot ect ................................................................................................... 7
2.3.1 Configuring the security zone ............................................................................................................ 7
2.3.2 Configuring the tunnel interface ........................................................................................................ 8
2.3.1 Configuring the SSL Certificate ......................................................................................................... 9
2.3.1 Configuring the portal ...................................................................................................................... 11
2.3.2 Configuring the gateway.................................................................................................................. 14
3.0 ActivID Appliance Configuration: Sequence of Procedures ........................................................................... 14
3.1 Configure RADIUS Channel ..................................................................................................................... 17
3.2 Managing User Repositories: An Overview ............................................................................................. 21
3.2.1 Create User Repository ................................................................................................................... 21
3.3 Configure Administration Groups, User Types, User Repositories, and Authentication Policies ............ 23
3.4 (optionally for OOB Authentication) Create OOB Delivery Gateway ....................................................... 24
3.5 (optionally for OOB Authentication) Assign An Out-of-Band Delivery Gateway ...................................... 25
3.6 (optionally for OOB Authentication) Assign An Out-of-Band Delivery Credential to An Existing
Authentication Polic y .......................................................................................................................................... 26
3.7 (Optionally for OOB authen ticati on) Ass ign An SMS T oken .................................................................... 26
4.0 Sample Authentication .................................................................................................................................... 29
HID Global Corporation/ASSA ABLOY AB. All rights reserved. Page |
Page 3

ActivID Appliance RADIUS and Palo Alto Networks Integration | RADIUS Channel Integration Handbook
External Release | © 2014
3
1.0 Introduction
Palo Alto Networks GlobalProtect provides security for host systems, such as laptops, that are used in the field by
allowing easy and secure login from anywhere in the world. With GlobalProtect, users are protected against
threats even when they are not on the enterprise network, and application and content usage is controlled on the
host system to prevent leakage of data, and other types of security breaches. This document covers the
configuration of GlobalProtect with ActivID Appliance for remote access VPN with HID Global solutions.
The HID Global ActivID solutions that work with Palo Alto Networks incorporate VPN solutions that are versatile,
with strong authentication that is flexible, scalable, and simple to manage. HID Global Identity Assurance offers
two solutions:
®
• ActivID
workforce remotely accessing systems and data.
• ActivID
audiences across a variety of service channels (SAML, Radius, etc.), including user name and
password, mobile and PC soft tokens, one-time passwords, and transparent Web soft tokens.
AAA Server for Remote Access addresses the security risks associated with a mobile
®
Appliance offers support for multiple authentication methods that are useful for diverse
1.1 Scope of Docu ment
This document expla ins ho w to s et up ActivID Appliance authentication with Palo Alto Networks GlobalProtec t via
a RADIUS channel. Use this handbook to enable authentication via a hard/soft token or an OTP received by
Email/SMS for use with an SSL-protected Palo Alto Networks VPN.
1.2 Prerequisites
• ActivID Appliance 7.2 SP1 and later
• Palo Alto Networks PAN OS 6.0 and later
• GlobalProtect is already installed
• For OOB authentication (Optional): There is an existing Short Message Peer-to-Peer Protocol /
Simple Mail Transfer Protocol (SMPP/SMTP) gateway to send one-time-password OOB codes to
users.
HID Global Corporation/ASSA ABLOY AB. All rights reserved. Page |
Page 4
ActivID Appliance RADIUS and Palo Alto Networks Integration | RADIUS Channel Integration Handbook
External Release | © 2014
4
2.0 GlobalProtect Configuration
1. Launch a supported web browser and enter the URL of the PAN management interface
https://ip_mgt_address
2. The browser automatically opens the Palo Alto Networks login page.
3. Enter admin in both the Name and Password fields, and click Login.
HID Global Corporation/ASSA ABLOY AB. All rights reserved. Page |
Page 5
ActivID Appliance RADIUS and Palo Alto Networks Integration | RADIUS Channel Integration Handbook
External Release | © 2014
5
2.1 Configuring User Authentication
Identify the authentication method that will be used to authenticate GlobalProtect users. Palo Alto Networks nextgeneration firewalls support local database, LDAP, RADIUS or Kerberos authentication servers for authenticating
users.
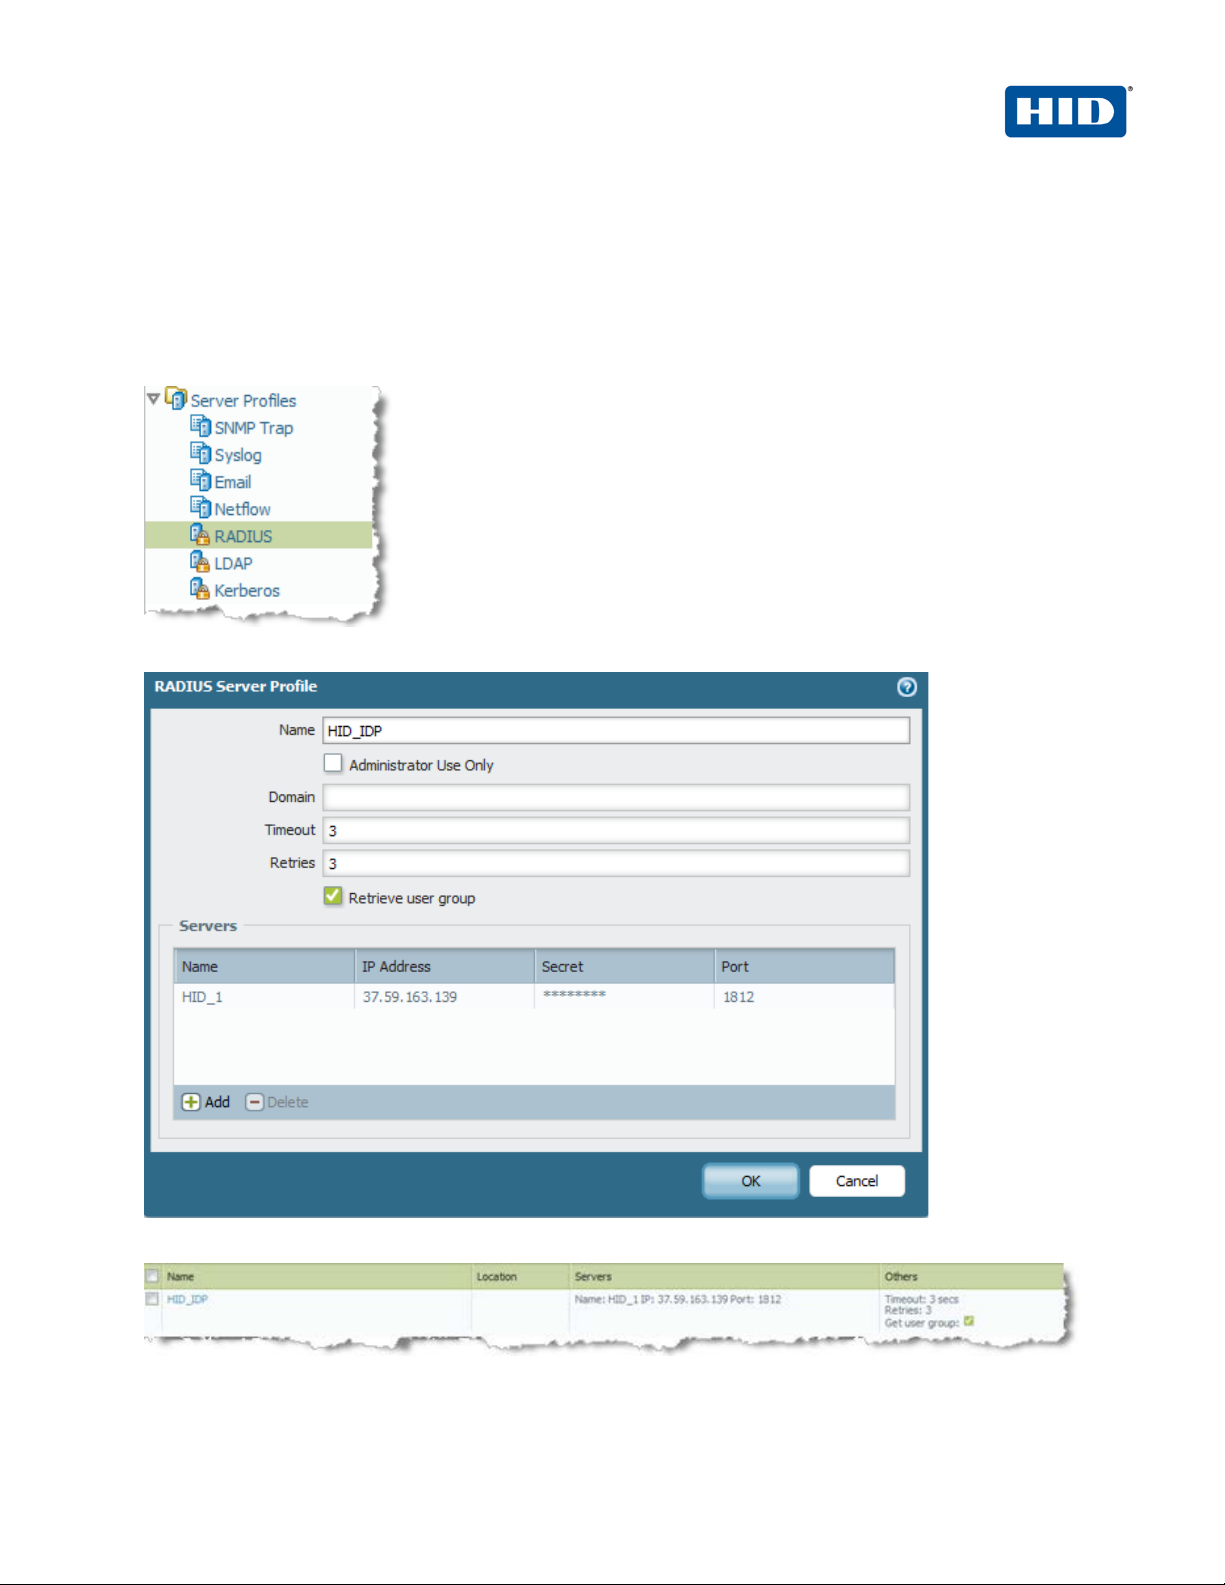
In this case we will use the ActivID AAA (Radius Server) for authenticating users.
1. Navigate to Device > Serv e r Prof il e s > Radius.
2. Specify the ActivID AAA IP address, port and the shared secret.
3. Click OK.
HID Global Corporation/ASSA ABLOY AB. All rights reserved. Page |
Page 6

ActivID Appliance RADIUS and Palo Alto Networks Integration | RADIUS Channel Integration Handbook
External Release | © 2014
6
2.2 Authenticatio n Profile
The authentication profile refers to the authentication method configured in the previous step. The authentication
profile is then used to associate the authentication method in the GlobalProtect Portal configuration.
To create an authentication profile for the radius users created above
1. Click on the Device tab
2. From the left pane, click Authentication P rofile and click Add.
3. Enter a Name for the profile.
4. Choose the authentication method as RADIUS.
5. Select the HID server created previously (e.g., HID_IDP).
6. Click OK.
HID Global Corporation/ASSA ABLOY AB. All rights reserved. Page |
Page 7
ActivID Appliance RADIUS and Palo Alto Networks Integration | RADIUS Channel Integration Handbook
External Release | © 2014
7
2.3 Configuring the SSL VPN Global Protect
You must configure the SSL connection and related attributes in order utilize the GlobalProtect functionality:
• Portal - Palo Alto Networks firewall that provides centralized management for the GlobalProtect system.
• Gateways - Palo Alto Networks firewalls that provide security enforcement for traffic from GlobalProtect
agents.
The following sections describe the steps for the attributes that must be configured:
2.3.1 Configuring the Security Zone
A security zone identifies one or more sources or destination interfaces on the firewall. When you define a
security policy rule, you must specify the source and destination security zones of the traffic.
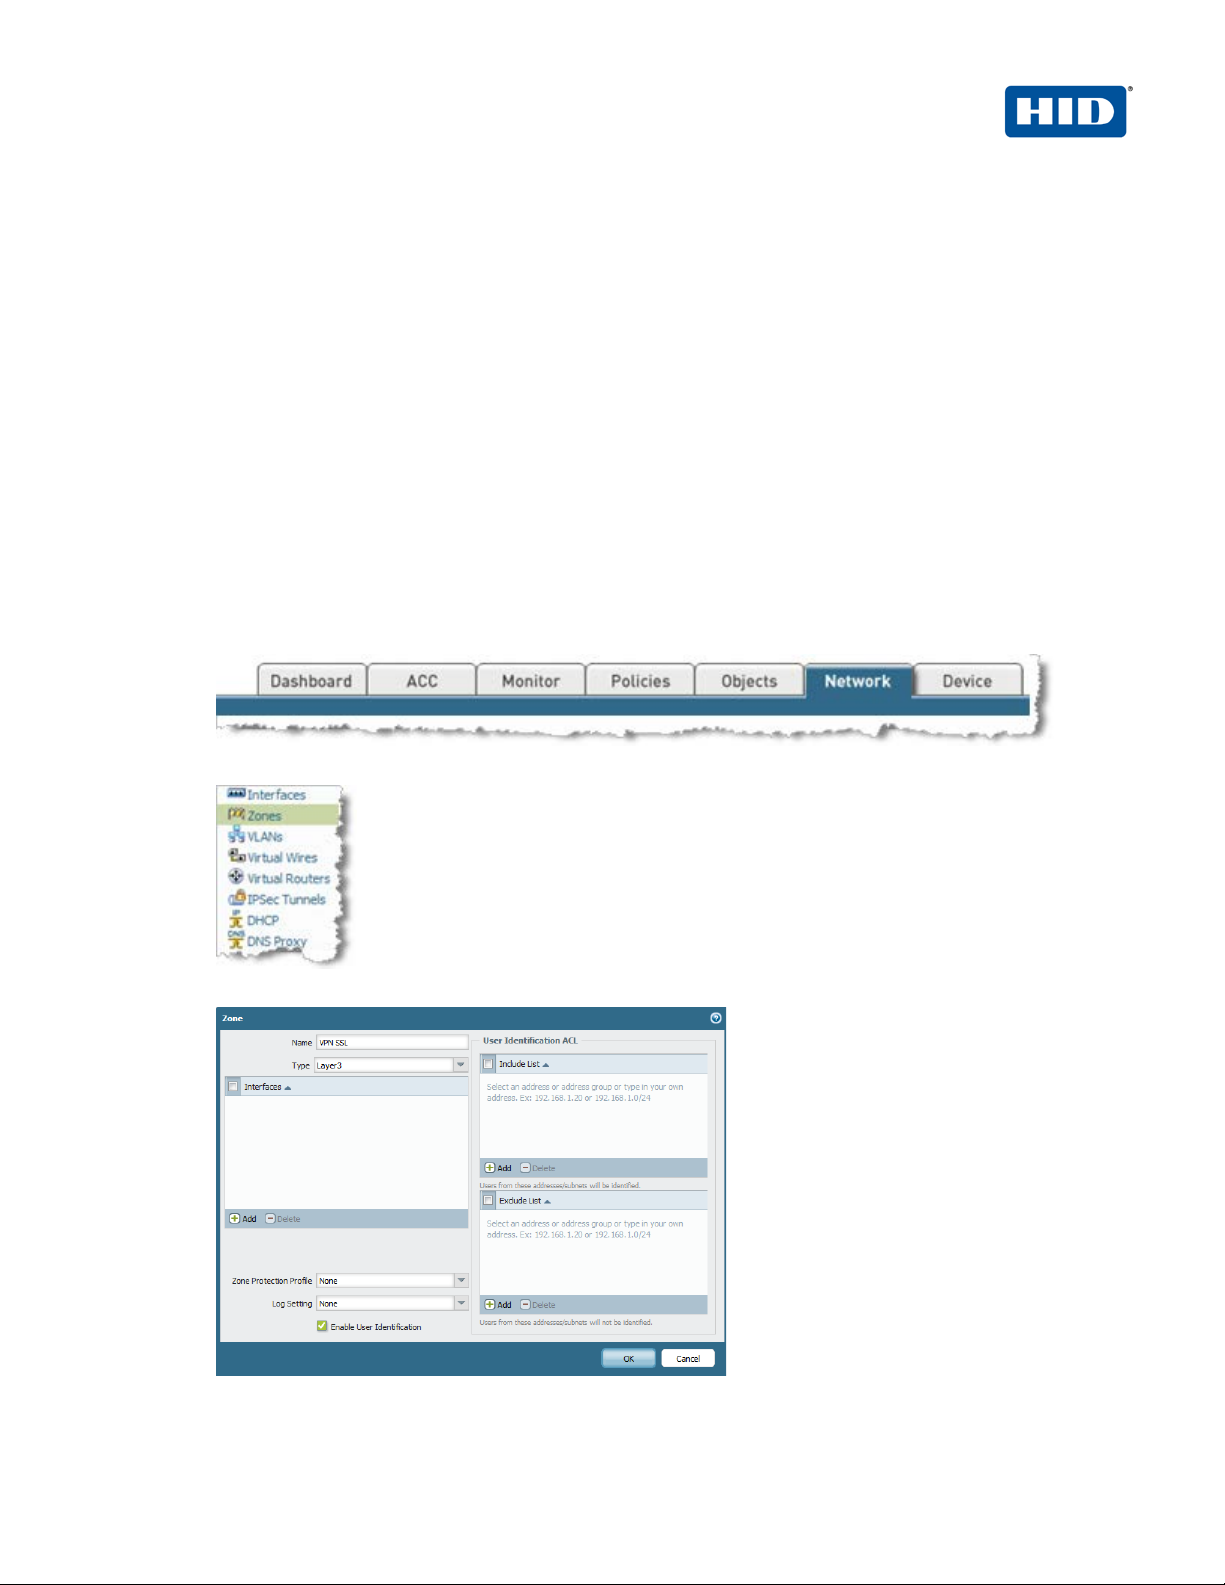
In our example, we have cr eated “layer 3” zone named “VPN S SL” in order to identif y traffic come from
VPN SSL users.
1. To create this zone, click on the tab Network.
2. From the left pane, click Zones.
3. Click Add to add a new zone.
4. Enter a Name for the zone.
HID Global Corporation/ASSA ABLOY AB. All rights reserved. Page |
Page 8
ActivID Appliance RADIUS and Palo Alto Networks Integration | RADIUS Channel Integration Handbook
External Release | © 2014
8
5. Choose Layer 3 for type.
6. Select Enable User Identification.
7. Click OK.
2.3.2 Configuring the tunnel interface
Each SSL connection (l ike a tunnel) is bound to a tunnel inter face. It is necessary to assign the tunnel
interface to the sam e virtual router as the incom ing (clear text) traffic. T his way, when a packet comes to
the firewall, the r oute lookup function can determine the appropriate tunnel to use. The tunne l interface
appears to the system as a normal interface, and the existing routing infrastructure can be applied.
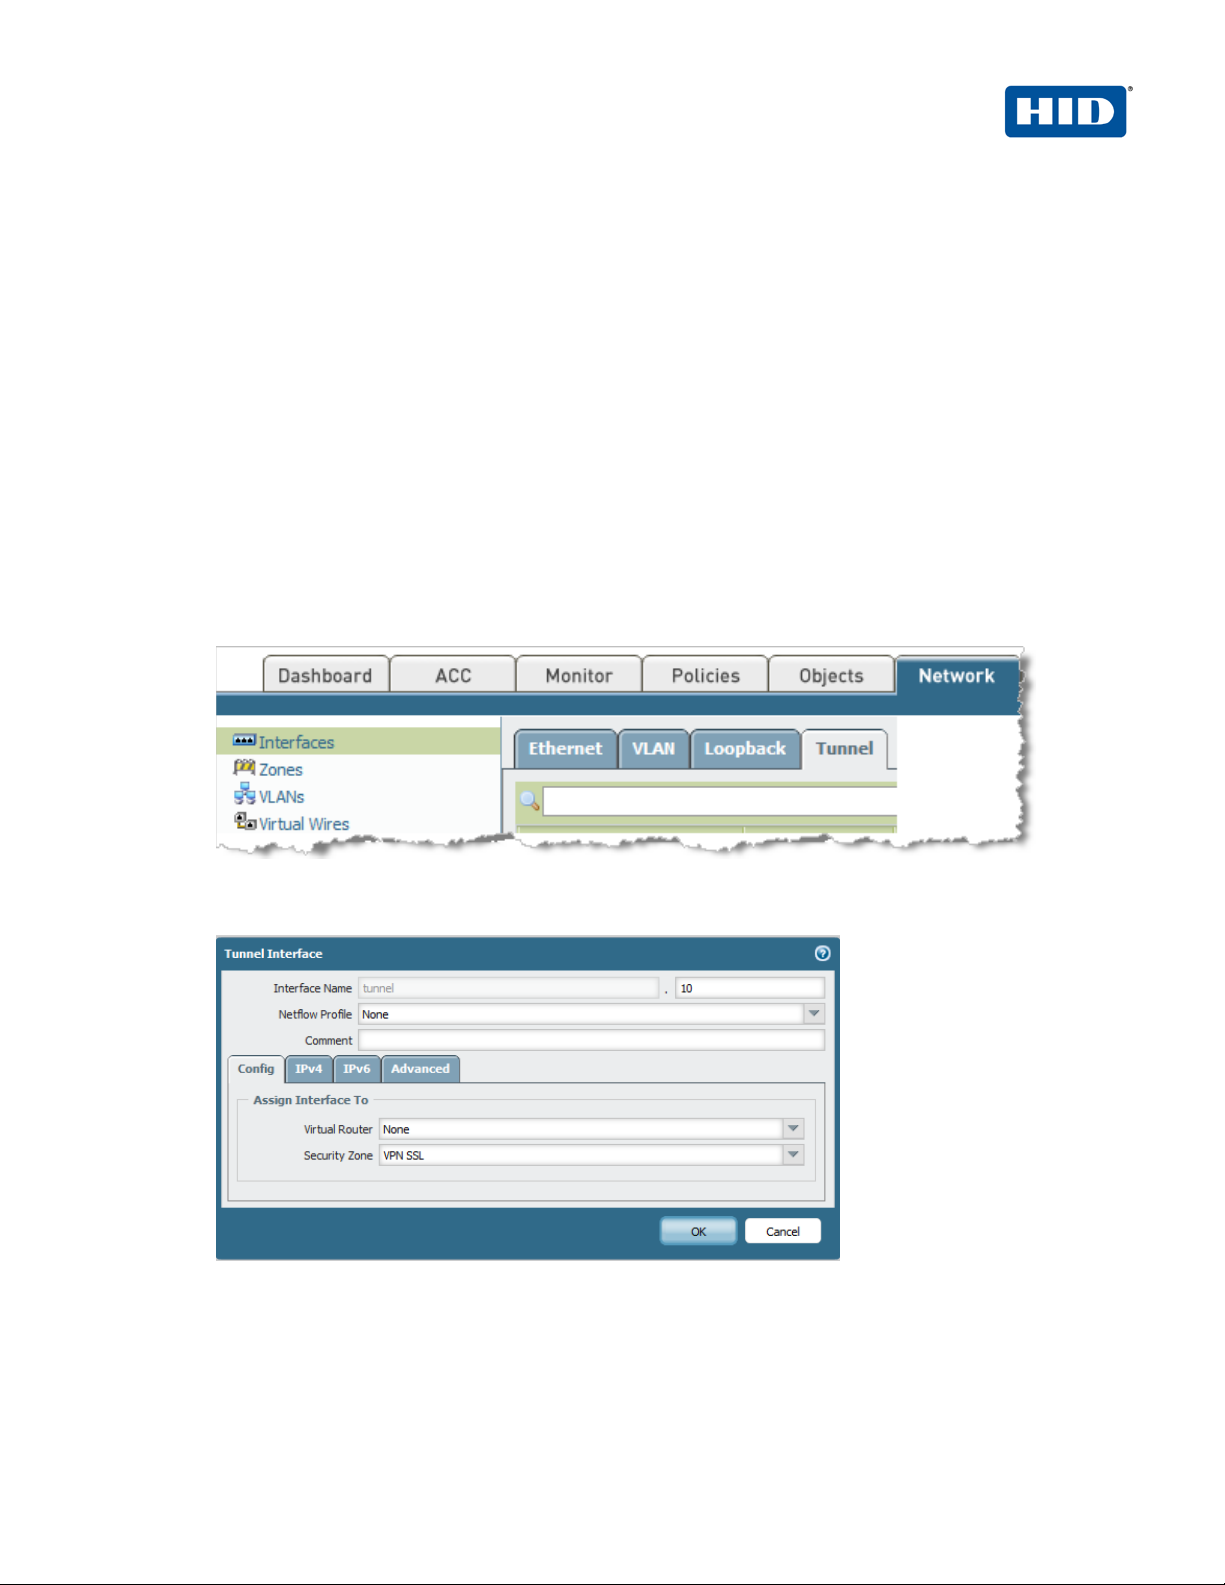
In our example, the interface “tunnel.10” will be used for the VPN SSL traffic.
1. To create this tunnel interface, click on the tab Network, then on the left pane, click Interfaces, and
then click on the sub-tab Tunnel.
2. Click Add to add a new tunnel.
3. Enter an ID for the tunnel (“10”).
4. Assign the security zone created previously (in our example “VPN SSL”).
5. Click OK.
HID Global Corporation/ASSA ABLOY AB. All rights reserved. Page |
Page 9
ActivID Appliance RADIUS and Palo Alto Networks Integration | RADIUS Channel Integration Handbook
External Release | © 2014
9
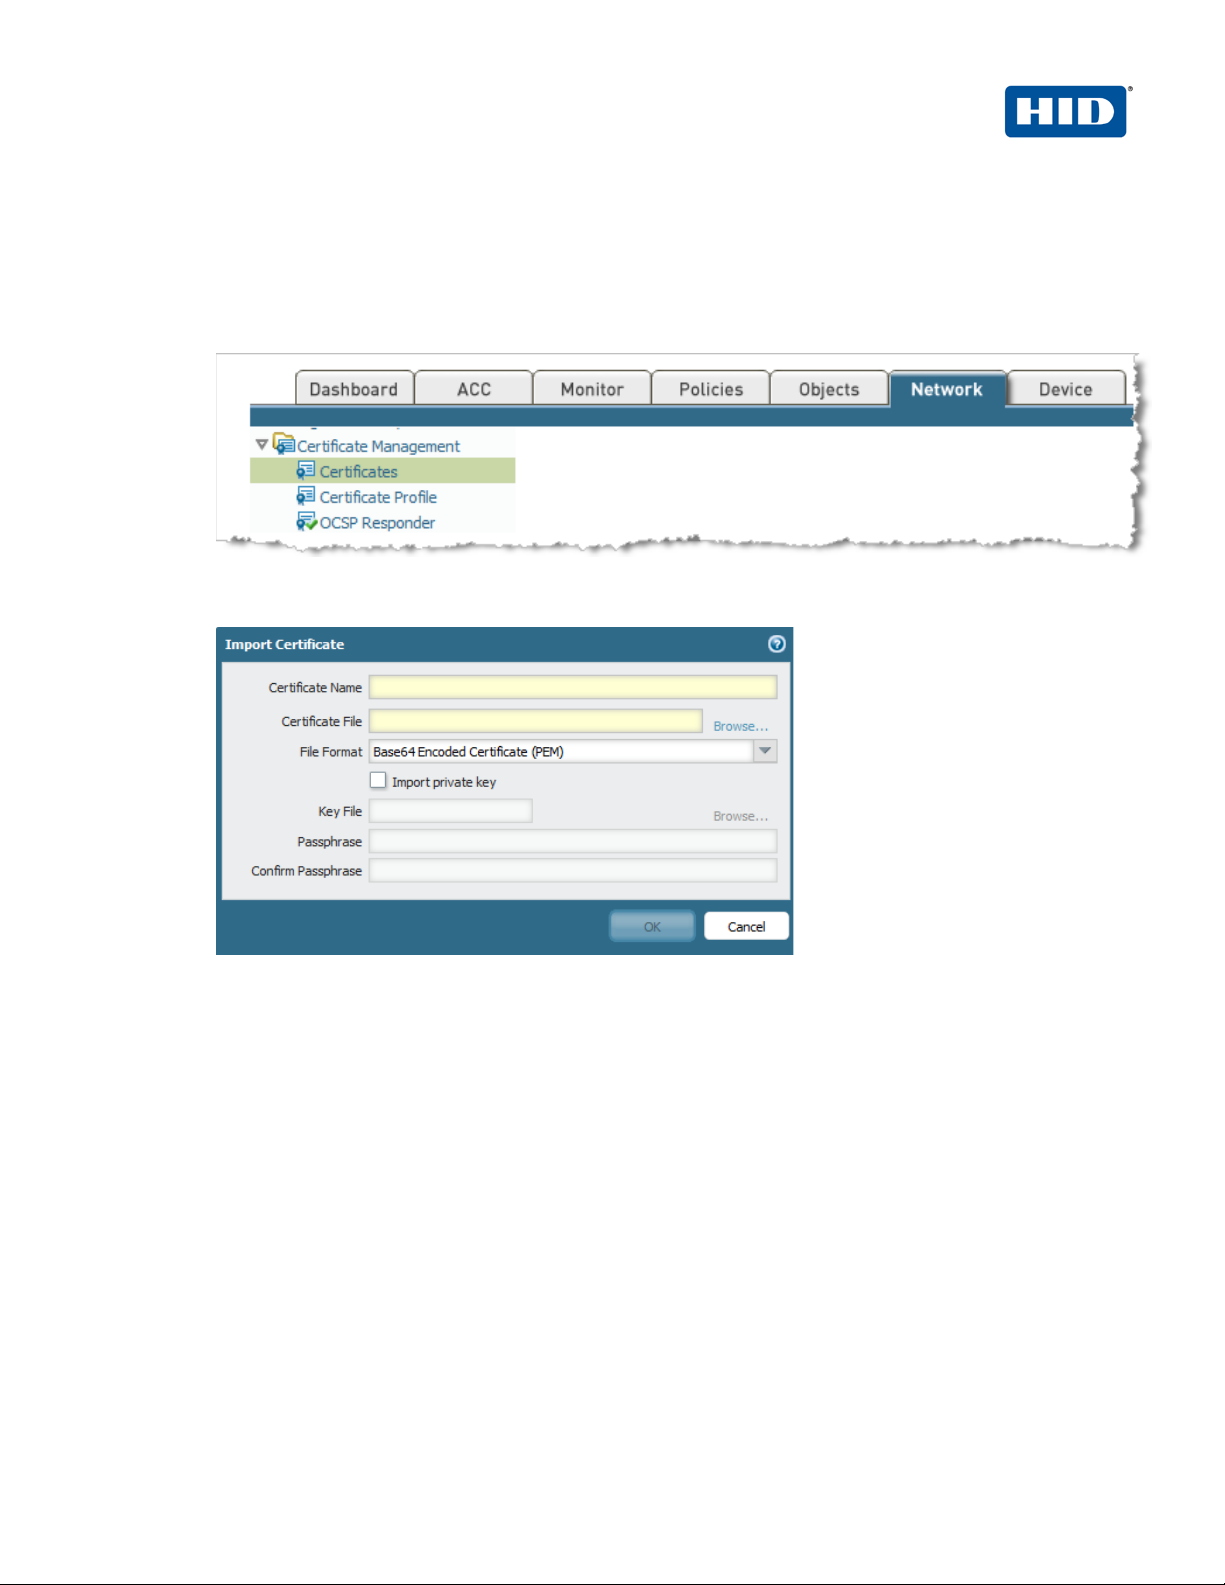
2.3.3 Configuring the SSL Certificat e
This section describes how to create the SSL certificate which is presented when the users establish the
VPN SSL connection.
1. To create or import the SSL Certificate, click on the tab Network, then from the left pane click
Certificate.
2. If you have requested a certificate to a Certification Authority (e.g., VeriSign), you can import it by
clicking Import.
OR
HID Global Corporation/ASSA ABLOY AB. All rights reserved. Page |
Page 10
ActivID Appliance RADIUS and Palo Alto Networks Integration | RADIUS Channel Integration Handbook
External Release | © 2014
10
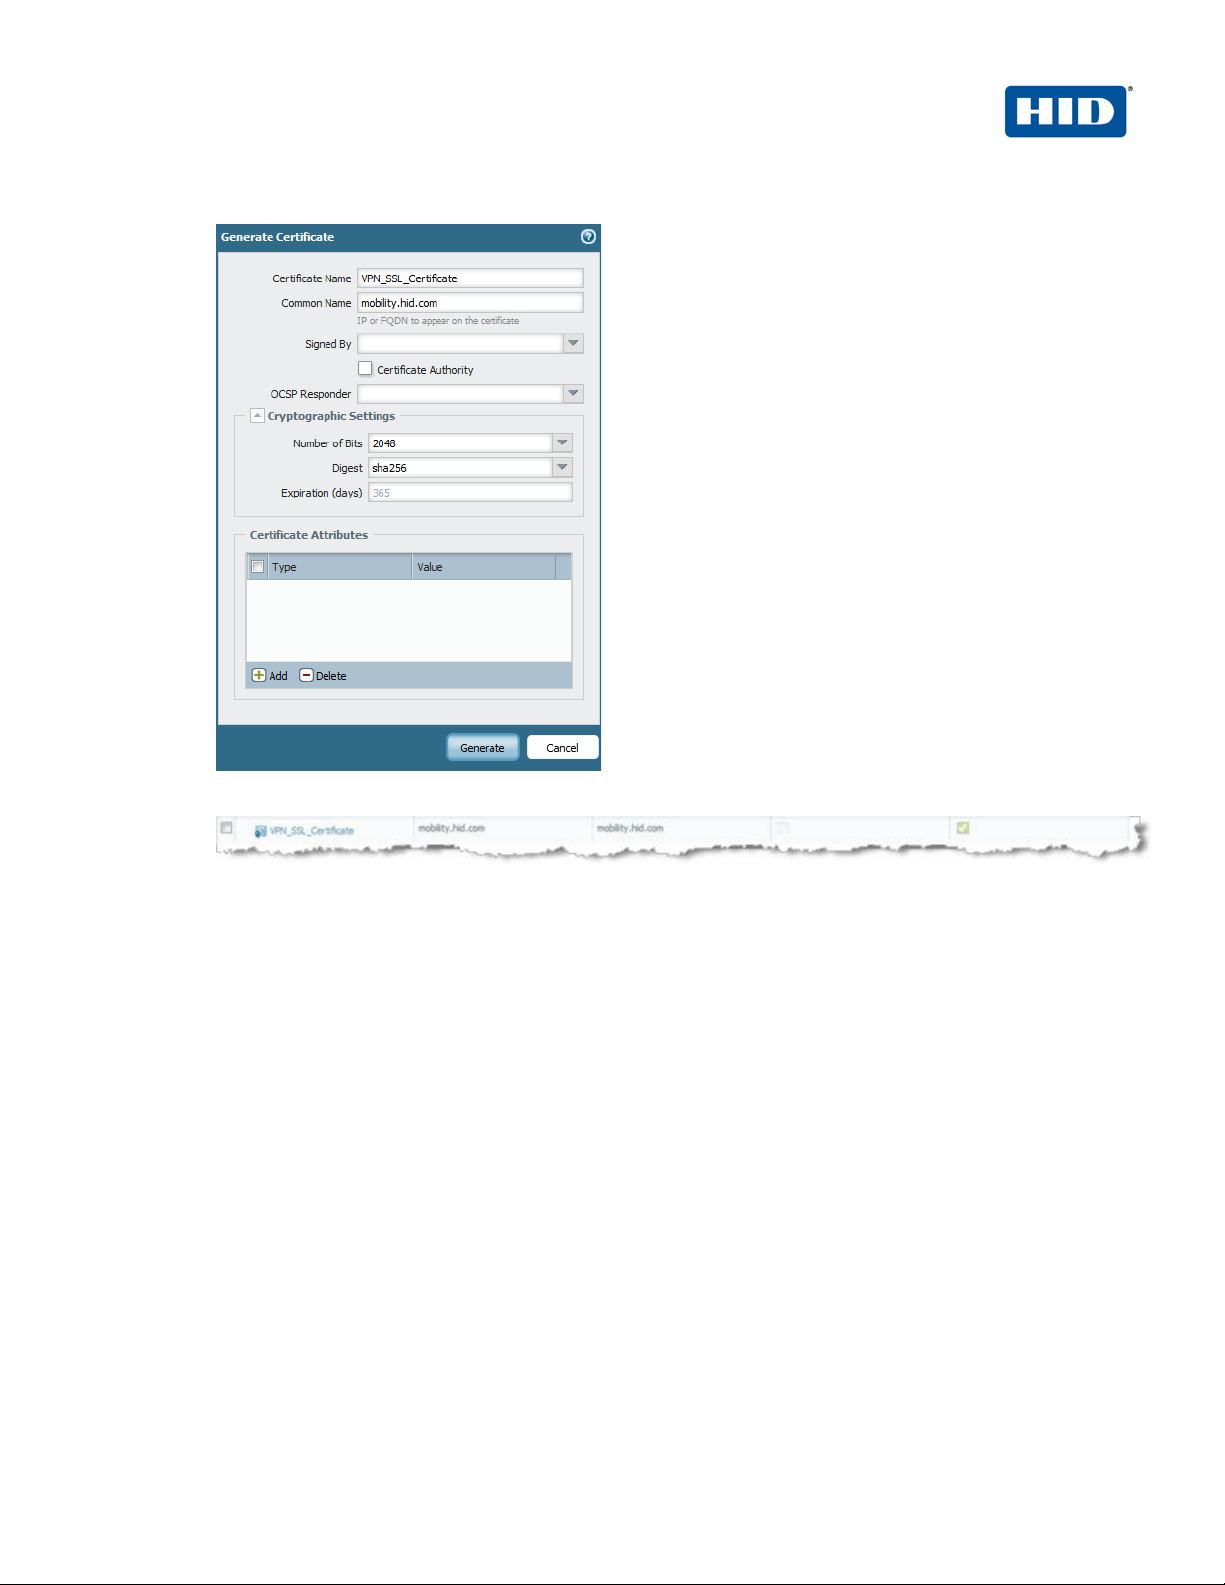
Click Generate to create a CSR for a self-signed certificate.
3. Confirm that the new certificate can be seen in the GUI.
HID Global Corporation/ASSA ABLOY AB. All rights reserved. Page |
Page 11

ActivID Appliance RADIUS and Palo Alto Networks Integration | RADIUS Channel Integration Handbook
External Release | © 2014
11
2.3.1 Configuring the portal
Portal configuration requires, specifying the certificate required by the gateway, authentication method
used by portal, and optional agent certificates.
1. Click on the tab Network, then from the left pane, click Interfaces > GlobalProtect > Portal.
2. In the Network Settings section configure the following :
• Interface: from the drop down menu, select the public interface used by end users to connect to
the VPN SSL.
• IP address: from the drop down menu, choose the IP of the interface you choose in the
precedent step.
• Server Certificate: from the drop down menu, choose the Certificate created for GlobalProtect.
HID Global Corporation/ASSA ABLOY AB. All rights reserved. Page |
Page 12

ActivID Appliance RADIUS and Palo Alto Networks Integration | RADIUS Channel Integration Handbook
External Release | © 2014
12
3. In the Authentication section, for Authentication Profile, select the authentication profile defined
previously.
4. Using the menu from the left pane, click Client Configuration.
HID Global Corporation/ASSA ABLOY AB. All rights reserved. Page |
Page 13

ActivID Appliance RADIUS and Palo Alto Networks Integration | RADIUS Channel Integration Handbook
External Release | © 2014
13
5. Click Add to define the VPN SSL policies for your users in order to assign the VPN SSL gateway
your users have to use.
• In the General tab, give a Name to the profile
• Choose the Connect Method, in this example “on-demand” is chose as client certificate
authentication is not required
6. In the User/User Group tab select the users. In this example, any users was selected
HID Global Corporation/ASSA ABLOY AB. All rights reserved. Page |
Page 14

ActivID Appliance RADIUS and Palo Alto Networks Integration | RADIUS Channel Integration Handbook
External Release | © 2014
14
7. In the Gateways tab, define the external gateway where the users selected in the precedent step are
redirected. In our example, we have only one gateway and all users are redirected to this gateway.
8. In this example, configurations under the Agent and Data Collection tab are optional.
9. Click OK.
2.3.2 Configuring the gateway
1. Click on the Network tab
2. From the left pane, click Interfaces > GlobalProtect > Gateway > General Tab .
HID Global Corporation/ASSA ABLOY AB. All rights reserved. Page |
Page 15

ActivID Appliance RADIUS and Palo Alto Networks Integration | RADIUS Channel Integration Handbook
External Release | © 2014
15
3. Choose the server certificate and the user authentication profile defined previously.
4. Click the tab Client configuration on the left pane.
5. Under the sub-tab T unn el Settings , select the Tunnel Interface created previously (“tunnel.10”).
HID Global Corporation/ASSA ABLOY AB. All rights reserved. Page |
Page 16

ActivID Appliance RADIUS and Palo Alto Networks Integration | RADIUS Channel Integration Handbook
External Release | © 2014
16
6. Under the sub-tab Network Settings:
• Define the primary and secondary DNS, the suffix DNS, the WINS servers.
• Define the IP address assigned to the devices connected via the VPN SSL.
• Define the destination network routed via the VPN SSL.
7. Under the sub-tab HIP N ot i ficati on you can optionally define the HIP notification policy.
8. Click OK.
9. Click Commit to complete the configuration .
10. Click OK to confirm
HID Global Corporation/ASSA ABLOY AB. All rights reserved. Page |
Page 17

ActivID Appliance RADIUS and Palo Alto Networks Integration | RADIUS Channel Integration Handbook
External Release | © 2014
17
3.0 ActivID Appliance Configuration: Sequence of Procedures
This chapter describes the procedures required to configure ActivID Appliance support for an RFE component
installed on an appliance.
You will perform these steps using the ActivID Management Console. Be sure you have the ActivID Appliance
Management Console Admin Guide technical publication on hand. This chapter does not provide all the details.
3.1 Configure R ADIUS Channel
A RADIUS channel for the RFE deployment defines a group of access controllers and specifies how to handle
authentication requests.
Using a policy configured for the channel, you will filter the requests according to the IP address or hostname of
the access controllers.
1. Launch the ActivID Management Console.
HID Global Corporation/ASSA ABLOY AB. All rights reserved. Page |
Page 18

ActivID Appliance RADIUS and Palo Alto Networks Integration | RADIUS Channel Integration Handbook
External Release | © 2014
18
Important: To configure the RADIUS channel policy, you can either create a new channel using the
2. When prompted, enter your User name and Password, and then click Submit.
3. Select the Configuration tab, and then in the pane to the left under Policies, click Channels..
Add or Copy options, or edit an existing channel by clicking the channel name in the list displayed to
the right of the page. HID Global Identity Assurance recommends that you use the Remote Access
channel—this is the pre-defined RADIUS channel.
4. In the list displayed to the right when you click Channels, click the VPN Remote Access channel.
5. In the VPN Remote Access Details section displayed, accept the default for Description, or change it. Make
sure the Name, Type, and Code are correct.
HID Global Corporation/ASSA ABLOY AB. All rights reserved. Page |
Page 19

ActivID Appliance RADIUS and Palo Alto Networks Integration | RADIUS Channel Integration Handbook
External Release | © 2014
19
Important: You can select either a host name—and then enter name of the machine hosting the
6. Click Channel Policy to expand the section and display the configuration options.
7. Enter and confirm the Shared secret.
The Shared secret encrypts the information exchanges between the appliance(s) and the access controllers.
The secret must be the same for each controller configured in the channel policy. The secret must not exceed
40 characters. By default, the secret for a pre-defined gate is Act ivI den tity.
8. Click Add.
The Add Authorized IP addresses or host names list is displayed. Use these settings to configure the
access controllers that are authorized to use the gate for authentication.
access controller—or you can enter an IP address, and then enter an address and range of the
access controller. HID Global Identity Assurance recommends that you use an IP address rather than
a host name. If the DNS cannot translate the host name, then the RFE will not restart.
9. For an IP address, enter the valid network range (for example, 192.168.0.0/24).
HID Global Corporation/ASSA ABLOY AB. All rights reserved. Page |
Page 20

ActivID Appliance RADIUS and Palo Alto Networks Integration | RADIUS Channel Integration Handbook
External Release | © 2014
20
Important: Make sure that each access controller is configured with the shared secret you specified
10. Optionally for OOB authentication, define the OOB prompt by clicking on Define Challenge configuration.
• In the Challenge prompt field, specify the prompt to display immediately before the challenge.
• In the Response prompt field, specify the keyword to display immediately before response.
• In the Challenge keyword field, specify the keyword to send to the authe ntication server r equesting that
it send a challenge back . The applianc e uses th is k eyword (s tring) to ge nerat e a chall enge. If you cha nge
it, be sure that you update your NAS and/or client.
• In the Out of Band Response Prompt field, specify the text sent to the NA S (RADIUS client) when using
the Activation code.
• Click OK.
11. Click Save.
The access controller is displayed in the Channel page. Now, it is authorized to use the gate for
authentication requests.
above. If necessary, repeat the steps to authorize access for additional controllers.
HID Global Corporation/ASSA ABLOY AB. All rights reserved. Page |
Page 21

ActivID Appliance RADIUS and Palo Alto Networks Integration | RADIUS Channel Integration Handbook
External Release | © 2014
21
Reminder: You will perform these steps using the ActivID Management Console. Be sure you have
3.2 Managing User Repositories: An Overview
The “User Repositories” function of the ActivID Management Console defines parameters for using LDAP servers
as the source of user data for the appliance system. By configuring the appliance to communicate with your LDAP
directory server, you enable access to user data for authentication purposes.
the ActivID_Appliance_ManageConsole_ AdminGuide technical publication on hand. This document
only presents summary steps.
3.2.1 Creat e User Reposito ry
1. Logged into the ActivID Management Console, select the Configuration tab.
2. In the pane to the left, under Environment, click User Repositories.
HID Global Corporation/ASSA ABLOY AB. All rights reserved. Page |
Page 22

ActivID Appliance RADIUS and Palo Alto Networks Integration | RADIUS Channel Integration Handbook
External Release | © 2014
22
3. In the page displayed to the right, click Add.
4. Name—Enter a meaningful name.
5. Adapter—Select the adapter from the drop-down list that corresponds to your directory type (either Novell®
eDirectory or Microsoft® Active Directory).
6. Host—Enter the IP address or hostname of the server where your LDAP directory resides.
7. Port—Enter the Port (the LDAP directory server’s listening port).
HID Global Corporation/ASSA ABLOY AB. All rights reserved. Page |
Page 23

ActivID Appliance RADIUS and Palo Alto Networks Integration | RADIUS Channel Integration Handbook
External Release | © 2014
23
8. In the Configure connection login credentials section of the page, enter the user credentials that the
appliance will use to access the LDAP database. Then enter and confirm the user’s Password. You MUST
indicate the full User DN.
9. Expand the Attributes section.
10. Select the Enabled options for the appliance attributes to be mapped to the LDAP attributes.
11. Click Save. A success message appears.
3.3 Configure Administration Group s, User Types, User Repositories, and Authentication
Policies
For details, refer to the ActivID Appliance Management Console Admin Guide technical documentation. This
section summarizes the remaining procedures to perform before Tokens can be activated.
1. Use the ActivID Management Console to create and update administration groups within user types. Then
you can add users to the administration groups.
User types define categories of users. A hierarchy of administration groups exists for each user type.
For each user type, you can define:
a. User repositories relating to the user type,
b. Authentication policies accessible to users of this type, and
c. User attributes for users of this type.
There are default user types. Installing the ActivID Appliance Server automatically sets up a number of user
types. For each user type, there are pre-defined sy stem users. Collectively, these sample users have all the
required privileges to administer the system. You can use the base data set as provided, or modify it to meet
your specific requirements.
2. Map the user repository to a user type.
3. Assign an authentication policy to a user type.
4. Map the user repository to an administration group.
Administration groups provide a way to organize (partition) users for administrative purposes, as well as a
way to assign permissions to users through membership of administration groups.
HID Global Corporation/ASSA ABLOY AB. All rights reserved. Page |
Page 24

ActivID Appliance RADIUS and Palo Alto Networks Integration | RADIUS Channel Integration Handbook
External Release | © 2014
24
3.4 (optional OOB Authentication) Creating OOB Delive ry Gatew ay
ActivID Appliance supports two OOB authentication types: SMS (Phone) and Email. The actual SMS/Email OTP
is a random number generated by the appliance and sent to the end user by SMS or Email through a delivery
gateway.
1. Logged into the 4TRESS Management Console, select the Configuration tab.
2. In the pane to the left under Environment, click OOB Delivery Gateway.
3. Enter a Name and Description.
4. Select SMS SMPP Delivery Provider from the Delivery Provider drop-down list.
HID Global Corporation/ASSA ABLOY AB. All rights reserved. Page |
Page 25

ActivID Appliance RADIUS and Palo Alto Networks Integration | RADIUS Channel Integration Handbook
External Release | © 2014
25
5. Click Next to display the set of the fields on the page.
d. SMPP hostname—Hostname or IP address of the SMPP provider.
e. SMPP port—Port number of the SMPP provider.
f. SMSC system ID—ID of the SMS Center.
g. Password for SMSC server—Password of the SMS Center.
h. Source TON—Obtain this value from your SMPP provider.
i. Source NPI— Obtain this value from your SMPP provider.
j. ESME address range— Obtain this value from your SMPP provider.
k. User Attribute that stores the phone number—User attribute for the phone number of
the user registered.
l. Name of template fo r Credential messages—By default, it is pre-popu lat ed wit h
credentialemail. Enter credential-sms.
m. Name of template for Challenge messages—Enter challenge-sms.
6. Click Save.
3.5 (optional OOB Authentication) As sig n An O ut -of-Band Del ivery Gat eway
Have the main ActivID Appliance Configurer Portal Admin Guide technical documentation handy for easy
reference. This is a summary section only.
1. Launch the ActivID Appliance Configurer, log in, and then select the Authentication Policies tab.
HID Global Corporation/ASSA ABLOY AB. All rights reserved. Page |
Page 26

ActivID Appliance RADIUS and Palo Alto Networks Integration | RADIUS Channel Integration Handbook
External Release | © 2014
26
2. Edit the AT_EMPOTP Employee One Time Password authenticati on pol ic y.
3. Add the new delivery gateway that you just created in the previous section of this document to the Selected
Delivery Gateways box.
4. Update the authentication policy.
3.6 (optional OOB Authentication) As sig n An O ut -of-Band Deliv ery Credential to An E xisting
Authentication Policy
Have the main ActivIdentity 4TRESS Authentication Appliance Administrator Guide: Configurer Portal technical
documentation handy for easy reference. This is a summary section only.
1. Launch the ActivID Appliance Configurer, log in, and then select the Authentication Policies tab.
2. Edit the AT_EMPOTP Employee One Time Password authentication policy by assigning the following
credential types.
3. Assign the CT_ACODE and CT_OOB credential types to the Selected Credential Types box.
4. Update the authentication policy.
3.7 (Optional OOB authenticat ion) Assign An SMS Token
1. Logged into the ActivID Management Console, search for the user.
HID Global Corporation/ASSA ABLOY AB. All rights reserved. Page |
Page 27

ActivID Appliance RADIUS and Palo Alto Networks Integration | RADIUS Channel Integration Handbook
External Release | © 2014
27
2. To create an OOB record, click the Register Out of Band link.
3. Select Customer One Time Password from the Authentication Policy drop-down list.
4. Select the Set Activation Code option, and then enter and confirm an Activation Code.
HID Global Corporation/ASSA ABLOY AB. All rights reserved. Page |
Page 28

ActivID Appliance RADIUS and Palo Alto Networks Integration | RADIUS Channel Integration Handbook
External Release | © 2014
28
5. Click Next.
6. Check the Set Policy Settings dialog, and match it to the one illustrated.
7. Click Save. A success message is displayed (Out of Band created successfully).
HID Global Corporation/ASSA ABLOY AB. All rights reserved. Page |
Page 29

ActivID Appliance RADIUS and Palo Alto Networks Integration | RADIUS Channel Integration Handbook
External Release | © 2014
29
4.0 Sample Authentication
Configure the PAN agent to connect to the portal. Enter the username / password and Portal IP address or
FQDN. Click on apply to connect
Then log in using your username and the One-Time Password generated by your ActivID Token (the following
illustration is using PC Token).
HID Global Corporation/ASSA ABLOY AB. All rights reserved. Page |
Page 30

ActivID Appliance RADIUS and Palo Alto Networks Integration | RADIUS Channel Integration Handbook
External Release | © 2014
30
Another example, with OOB Authentication: The user enters his username and his OOB activation code.
And in the second page, his OTP received on his Mobile or mailbox:
HID Global Corporation/ASSA ABLOY AB. All rights reserved. Page |
Page 31

hidglobal.com
Americas
+1 510.574.0100
US
Federal
+1 571.522.1000
Europe
+33 (0) 1.42.04.84.00
Asia
Pacific
+61 (0) 2.6208.4888
Web
http://www.hidglobal.com/identity-
assurance
Copyright
© 2014 HID Global. All rights reserved.
HID, the HID logo, ActivID, and/or other HID Global products or marks
e name or logo from this list does not
constitute a waiver of the HID Global trademark or other intellectual property
rights concerning that name or logo. The names of actual companies,
herein are the trademarks of their respective owners. Any rights not expressly
Trademarks
Corporate Headquarters
611 Center Ridge Drive
Austin, TX 78753
www.hidglobal.com
+1 949.732.2000
referenced herein are either registered trademarks or trademarks of HID Global
Corporation in the United States and/or other countries.
The absence of a mark, product, servic
trademarks, trade names, service marks, images and/or products mentioned
granted herein are reserved.
 Loading...