

Page 1

Asure ID
USER GUIDE
PLT-01485, Rev 2.0
July 2014
Page 2

Page 2 of 44
July 2014
Asure ID PLT-01485 Rev 2.0
to version 7.4. Updated copyright information
1.9) Addition: Language Support
Africa
M-F 7am-6pm CST
Copyright
©2014 HID Global Corporation/ASSA ABLOY AB.
All rights reserved. This document may not be reproduced, disseminated or republished in any form
without the prior written permission of HID Global Corporation.
Trademarks
HID GLOBAL, HID, the HID logo, FARGO, Asure ID, are the trademarks or registered trademarks of HID
Global Corporation or its licensors in the U.S. and other countries.
Other trademarks and registered trademarks are the property of their respective owner.
Trademark Acknowledgments
Other trademarks and trade names may be used in this document to refer to either entities claiming the
marks and names or their products.
Document History
Revision Control
Number
Date Document Title
2.0 July 2014
1.9 July 2013
1.8 August 2012
Contacts
North America
HID Corporate
611 Center Ridge Drive
Austin, TX 78753
USA
866 607-7339, #6
Europe, Middle East and
Phoenix Road,
Haverhill, Suffolk CB9 7AE,
England
+44 1440 711 822
M-F 8:30 - 17:30 GMT
(17:00 Friday)
Changed release date, updated HID address, removed reference
HID Global Asure ID 7.4 Software Application User Guide (Rev.
HID Global Asure ID 7.3 Software Application User Guide (Rev.
1.8) Addition: Laser Engraver Interface for HDP8500 Card Printer
Asia Pacific Brazil
19/F 625 King’s Road,
North Point, Island East,
Hong Kong
+852 3160 9833
M-F 9am – 6pm GMT +8
Av Guido Caloi 1985 Prédio 18
São Paulo – SP,
CEP: 05802-140
55 11 5514-7110
M-F 9am – 6pm ATC
support.hidglobal.com
www.hidglobal.com
Page 3

July 2014
Page 3 of 44
Asure ID PLT-01485 Rev 2.0
Table of Contents
1 Getting Started .......................................................................................................................... 4
1.1 Installation ...................................................................................................................... 4
1.2 Initial Login ..................................................................................................................... 9
2 Introduction to Asure ID Software 10
2.1 Product Overview ......................................................................................................... 10
2.2 Navigation within Asure ID ........................................................................................... 12
2.3 Asure ID Keyboard Shortcuts ...................................................................................... 13
3 Card Design 14
3.1 Card Design Area ......................................................................................................... 15
3.2 Basic Card Design Tutorial .......................................................................................... 15
3.3 Advanced Card Design Tutorial ................................................................................... 16
3.4 Card with a Barcode Data Field Tutorial ...................................................................... 24
3.5 Card with a Magnetic Stripe Tutorial ............................................................................ 24
3.6 Card with a Compound Field Tutorial .......................................................................... 25
4 Data Entry 26
4.1 Data Entry Window ...................................................................................................... 26
4.2 Sample Data Entry Workflow ....................................................................................... 27
4.3 Additional Data Entry Elements ................................................................................... 29
5 User Config Application 33
5.1 Add User ...................................................................................................................... 33
6 Reports Application 34
6.1 User Reports ................................................................................................................ 34
6.2 Data Entry Reports....................................................................................................... 35
6.3 Card Design Reports.................................................................................................... 35
7 Selected Asure ID Options 36
7.1 Template Options ......................................................................................................... 37
7.2 Resources and Check for Updates .............................................................................. 38
8 Licensing 39
9 Data Connection 40
9.1 Create a New Native Database – Access, SQL, Oracle .............................................. 40
Page 4
Page 4 of 44
July 2014
Asure ID PLT-01485 Rev 2.0
Step
Browse to the Setup.exe file if the CD does not run automatically.
1 Getting Started
1.1 Installation
Your license key is located on the back of the CD package.
The set-up procedure may take several moments to complete.
Procedure
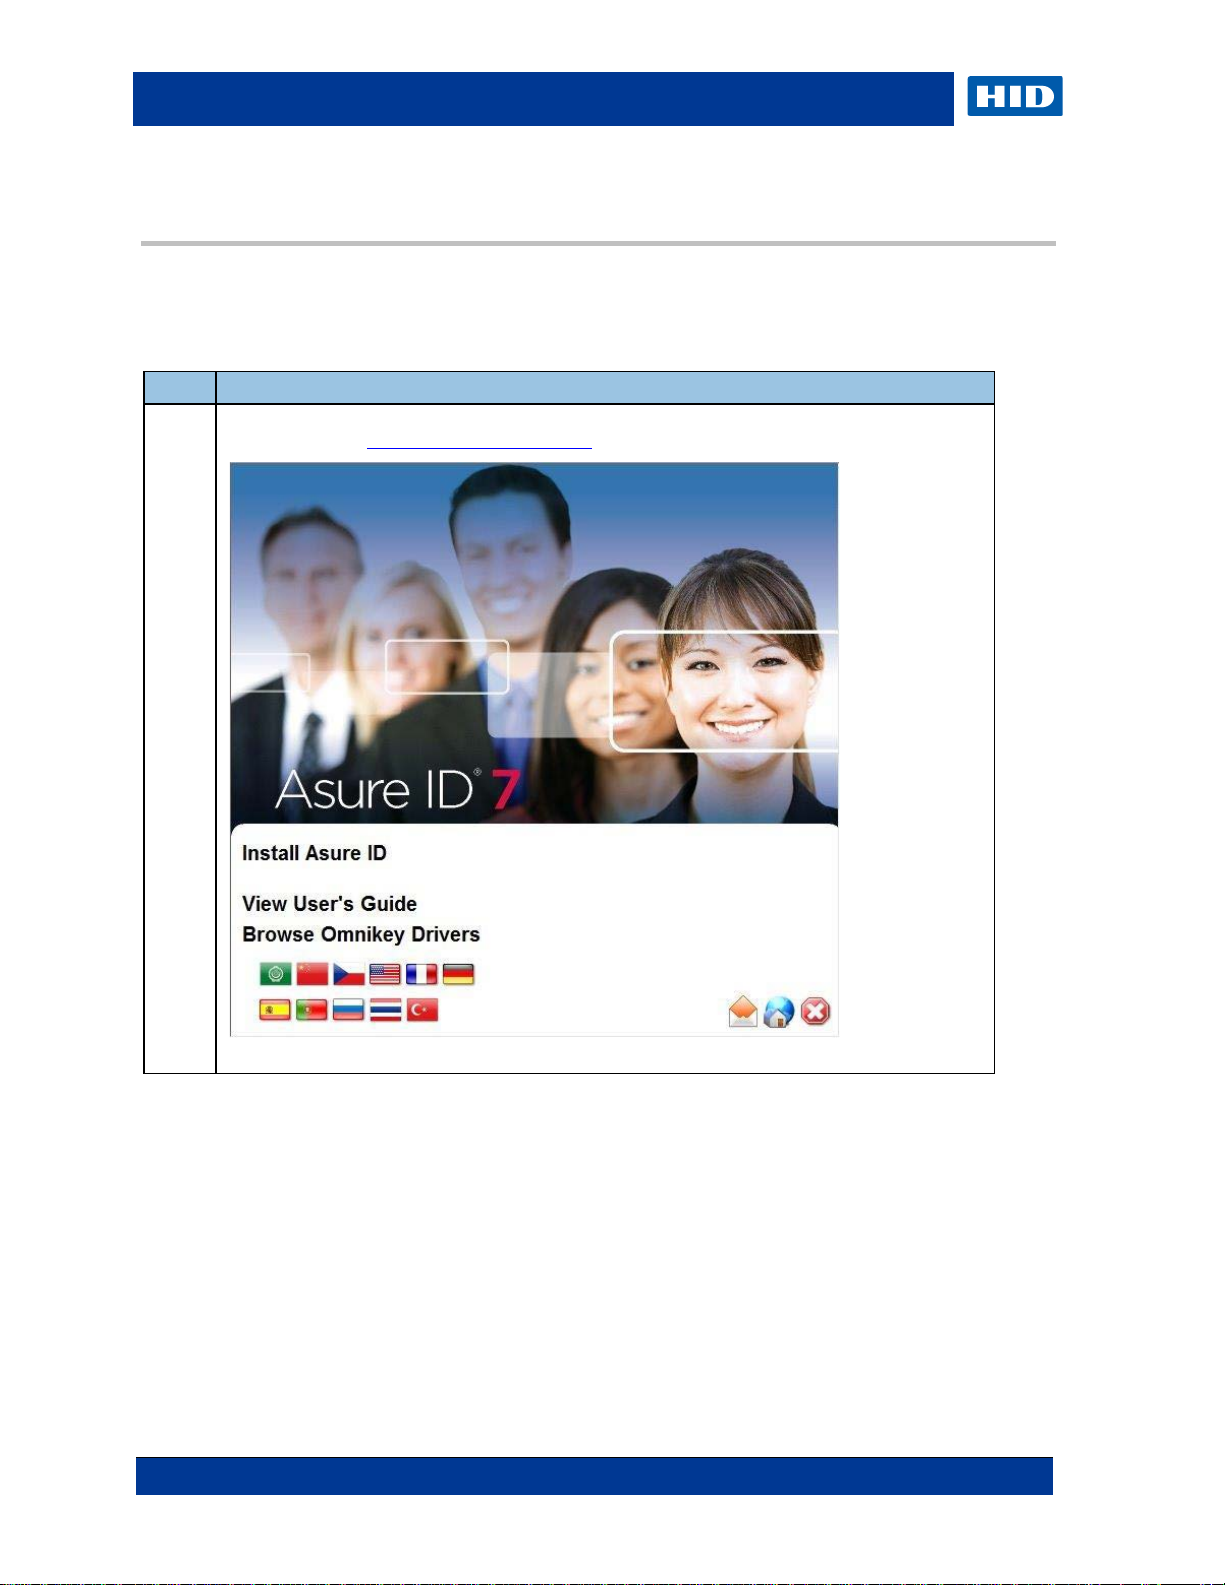
1 Insert the Asure ID CD and follow the instructions or download the softwar e from the HID
Global webpage, www.hidglobal.com/AsureID.
Page 5
July 2014
Page 5 of 44
Step
Asure ID PLT-01485 Rev 2.0
Procedure
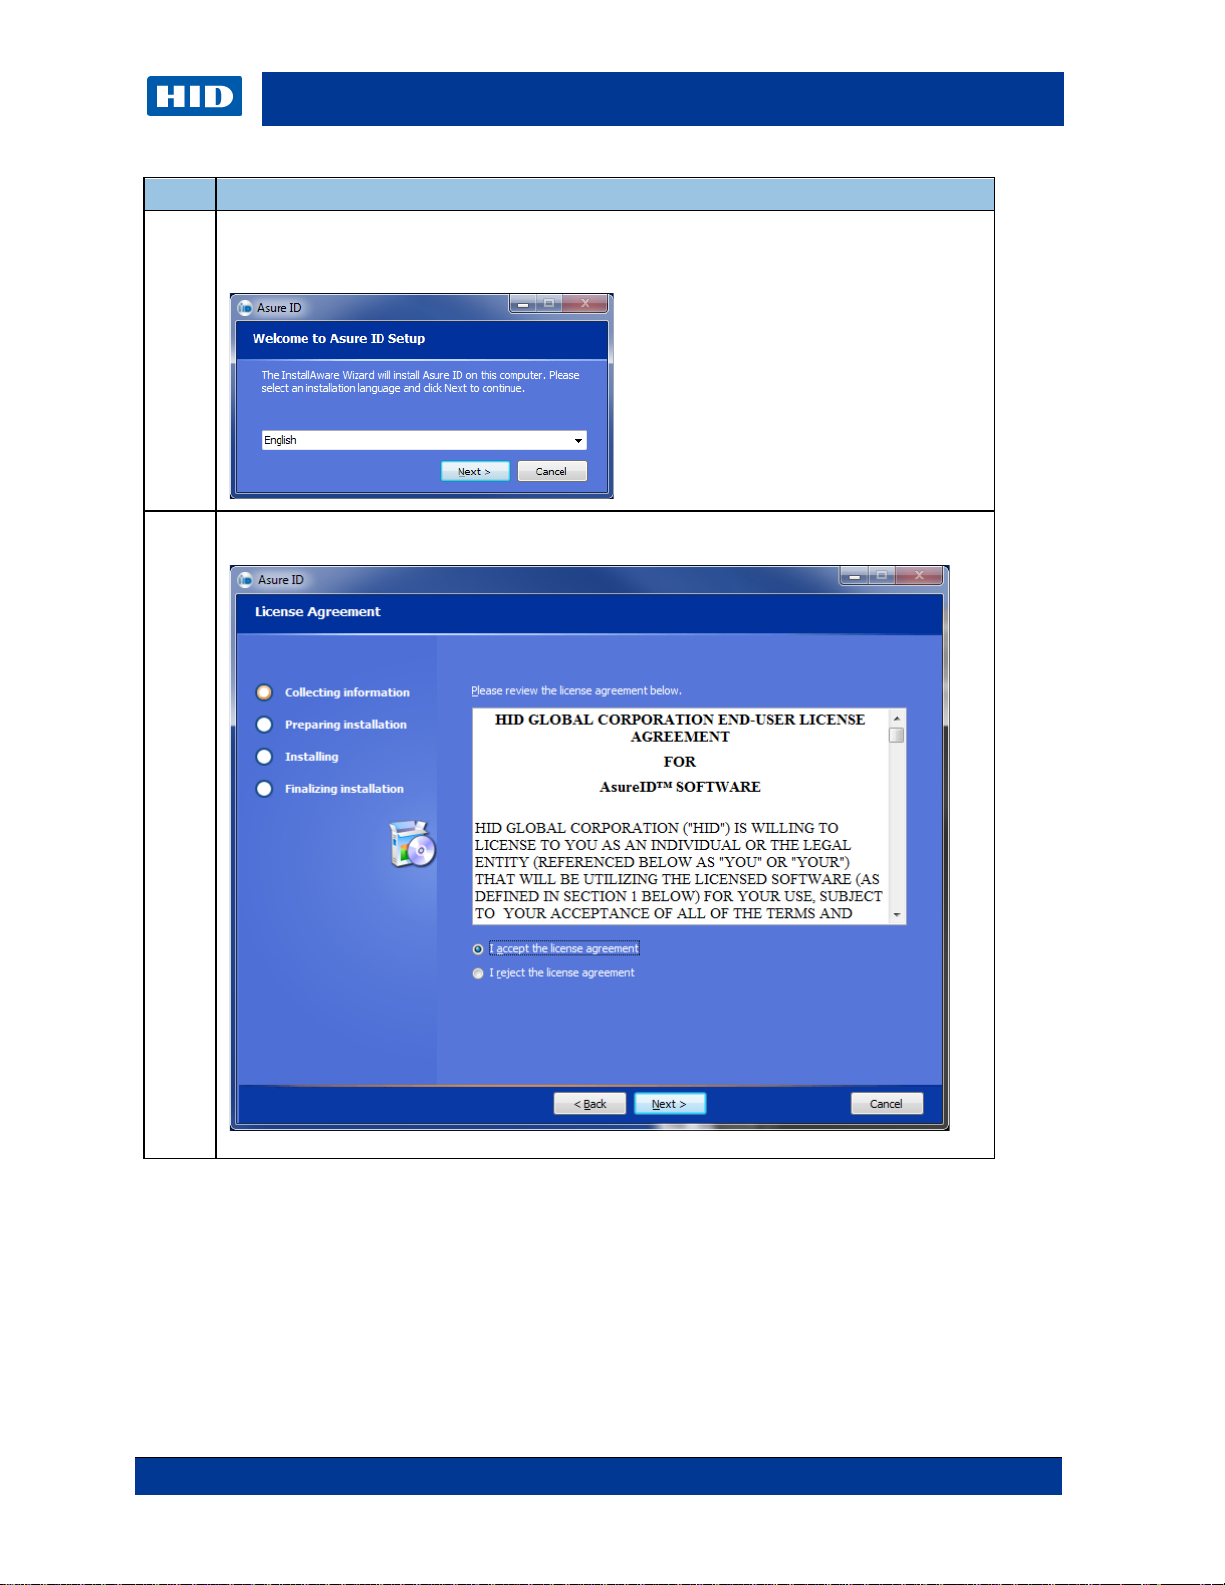
Click Install Asure ID and select your language. Click Next to continue.
2
The Asure ID – InstallAware Wizard guides you through the installation. Follow the on-screen
instructions.
Read the License Agreement and click I accept the license agreement.
3
Click Next to continue.
Page 6

Page 6 of 44
July 2014
Asure ID PLT-01485 Rev 2.0
Step
Procedure
4
Select a path to the destination for the software installation.
Click Next to continue through the installation process.
Follow on-screen instructions.
Page 7

July 2014
Page 7 of 44
Step
Asure ID PLT-01485 Rev 2.0
Procedure
5
When installation is compl ete, Asure ID allows you to perform the following installation options:
1. Activate Asure ID – If you have a license key available you can activate the Asure ID
software upon installation. If you don’t then As ure ID will be installed in trial mode
and will remain active for 30 days.
2. Select Alternate Native Data Source – Select this if you would like to configure the
native data source which stores card templates and Asure ID system information. By
default Asure ID will set the native source to an embedded MS Access data source.
Helpful Hint: We recommend configuring this for installations where Asure ID will be
used on multiple PC’s and all template and reporting information needs to be
consistent.
3. Enable Asure ID to Automatically Check for Updates – This allows the Asure ID
software to notify you of product updates that can be applied
Click Finish to run the selected installati on options.
Page 8

Page 8 of 44
July 2014
Asure ID PLT-01485 Rev 2.0
Step
of this user guide.
Procedure
If Activate Asure ID was selected, Asure ID will prompt you to enter your user information and
6
the license key. The license key is located on the back of the CD case.
Click Phone Activation or Activate Online.
If you selected Select Alternative Native Data Source, Asure ID will walk you through the
8
Data Connection Wizard to complete this process. For details on this please refer to section 9
Page 9
July 2014
Page 9 of 44
already activated their software, proceed to step 5.
Helpful Hint: Asure ID Solo users are not required to enter a User ID or Password.
1.2 Initial Login
Step
Procedure
1
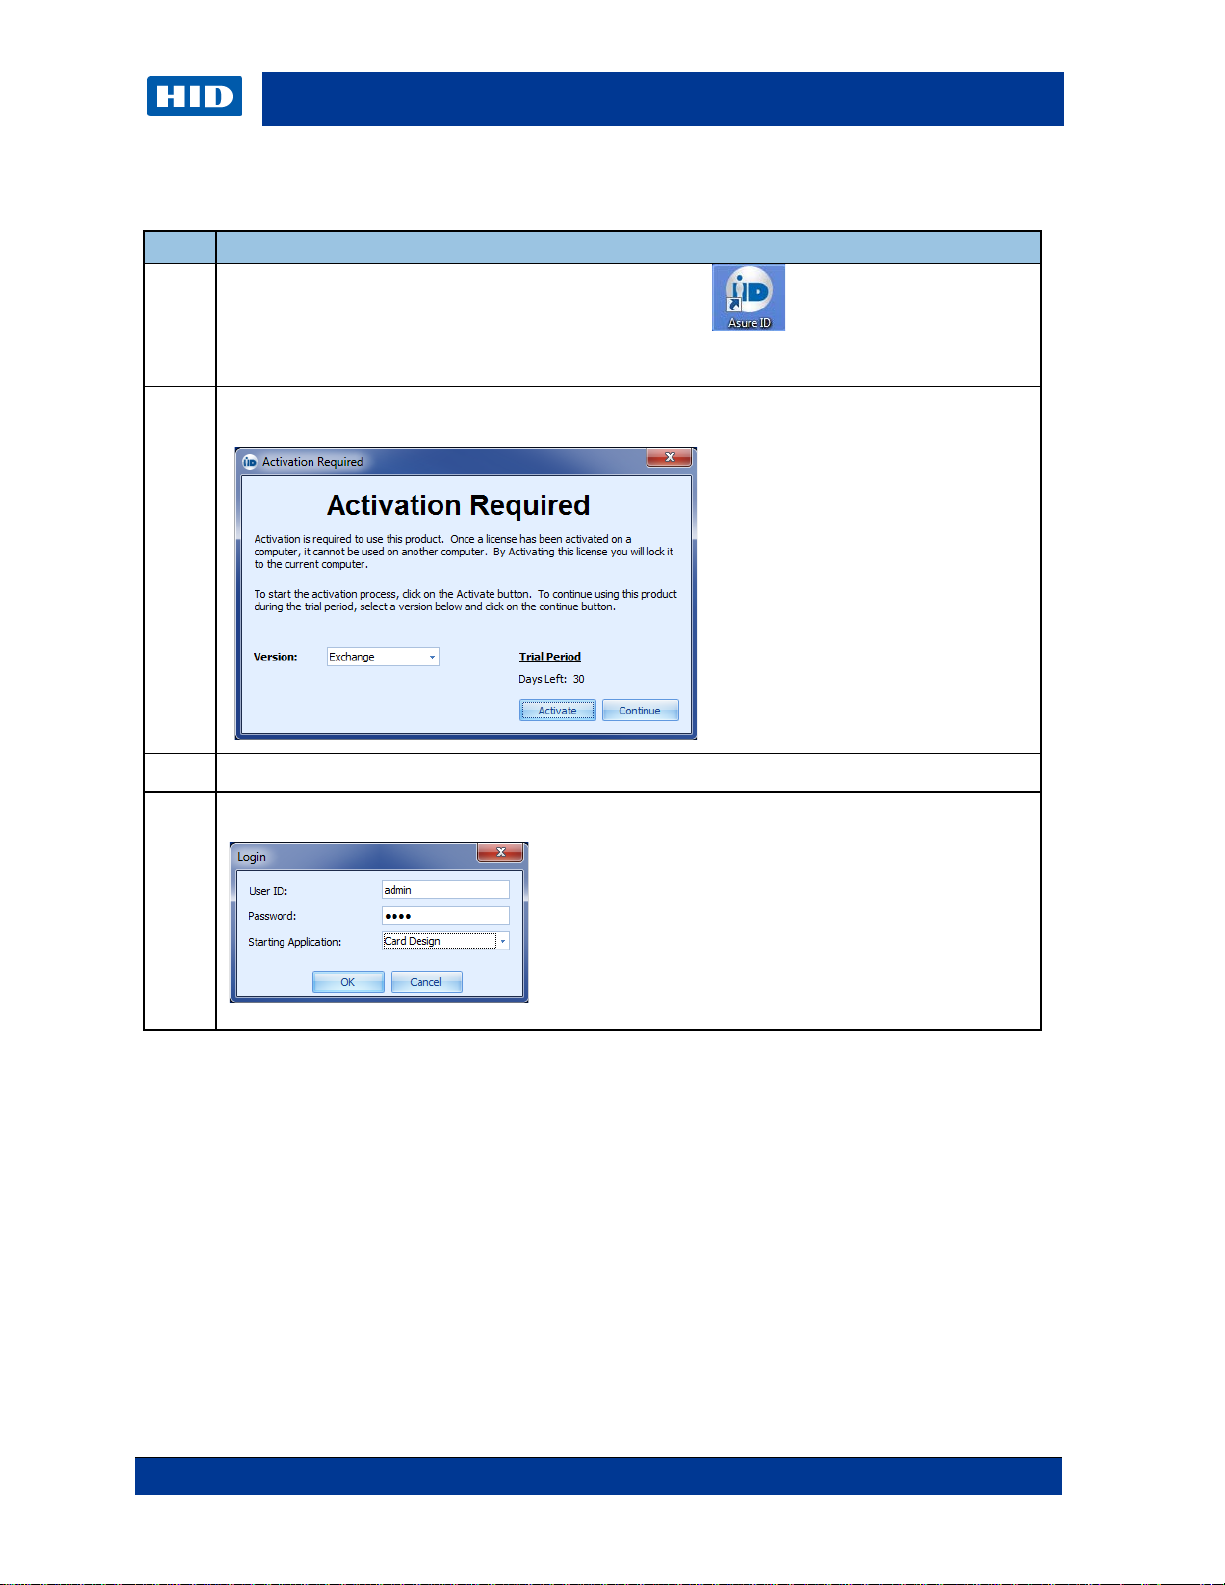
Open Asure ID 7 by double-clicking the Asure ID 7 icon.
If the software has not been activated the Activation Required dialog displays. For users that have
Click Activate. The Activate Licen se scre en disp lay s.
2
Helpful Hint: For a Trial version, click Continue.
Asure ID PLT-01485 Rev 2.0
3
To activate the software refer to step 9 and 10 in the installation section of the user guide – sect. 1.1.
For Asure ID Express editions and above, enter admin (lower case) for both the User ID and
4
Password to log onto the software.
Page 10
Page 10 of 44
July 2014
Asure ID PLT-01485 Rev 2.0
General
Tablets
Card Design
2 Introduction to Asure ID Software
2.1 Product Overview
Asure ID 7 includes a full line of card personalization applications that are simple to learn. They
are loaded with useful features and are flexible enough to improve the issuance and
management of basic-to-advanced photo I D cr eden ti als for virtually any size or type o f
enterprise. Asure ID 7 is available in the following editions for new and existing installations.
Solo Express Enterprise Exchange
Operating System Supported:
Windows® 8 / 7 / Vist a / XP,
including Wi ndow s 8 Pro
Language Support (Arabic,
Czech, English, French,
German, Indonesi an,
Portuguese (Br azil), Russian,
Simplified Chinese, Spanish,
Thai, Turkish
Microsoft® Acc ess® (2000 and
2003)
Password Log-on with
definable user privileges
Microsoft® SQL Server®
(2000, 2005, 2008)
DVTEL®
Networkable6
MySQL® (version 5)
Oracle® (9i and 11g)
Mircrosoft Active Directory /
LDAP
Dual-sided Template Designs
Add Text Field (Variable, Static)
Add Photo Fields
Import Images (s uch as, logos
and graphics)
Add a Linear Barcode
x x x x x x
x x x x x x
Native
x x x
x x
x x
Live Link
x
x x x x x x
x x x x x x
x x x x x x
x x x x x x
x x x x x x
Native,
Live Link
Native,
Live Link
Native,
Live Link
Native,
Live Link
Native,
Live Link
Native,
Live Link
Developers
Edition
Developers
Exchange
Edition
Add Magnetic Str ipe
Fluorescing Panel (F-Panel)
Support
x x x x x x
x x x x x x
Page 11
July 2014
Page 11 of 44
Developers
x x x x x
x x x x x
Data
Data Entry
x x x
x x x x
x x x x
x x x
x x x
x
x
Asure ID PLT-01485 Rev 2.0
Solo Express Enterprise Exchange
Various Card Sizes
Add Data Fields
Add Compound Data Fi eld
Add Signatures
Add 2D Barcodes (PDF 417,
QR Code and Datastripe)
Set Conditional Design and
Print Rules
Smart Card Encoding and
Management (iDIRECTOR®)
Add Laser Engraved Text,
and Photo Fields
Integrated Photo Capture
(TWAIN, DirectShow® & WIA
Save and Search Records
Global Find
Integrated Signat ure Capture
Batch Printing
Sheet Printing
Reports (Standard and
Custom)
Export Reports
ODBC Import/Export
Live Link (Real-time data
exchange)
4
SIF (Student Interoperability
Framework) Agent
Educational import/ export
(Student Photo CD)
5
CR-80 Only
1
8 Unlimited Unlimited Unlimited Unlimited Unlimited
x x
x2
x x x x x x
200 x
Import
Optional
Optional
Free Updates
Annual/multi-year support
packages
(1) Manage and control card access formats, smart cards and card applications.
(2) Available when used with FAR G O HDP8500LE.
(3) Storage limitations based on MS Access.
(4) Bi-directional data exchange with third party databa s es an d applications.
(5) Available as a purchasable add-on opt i on.
(6) Asure ID site license enable sharing of networked database information on multiple workstations
x x x x x x
Optional Optional Optional Optional Upon Request Upon Request
x x x x x
x x x x x
x x x x x
3
Unlimited Unlimited
x x x
Single DB,
Single Table
Single DB,
Multi-Table
5
5
Multi-DB,
Multi-Table
Optional5
Optional5
Asure ID Protect Plans
Developers
Edition
Exchange
Edition
Page 12
Page 12 of 44
July 2014
Asure ID PLT-01485 Rev 2.0
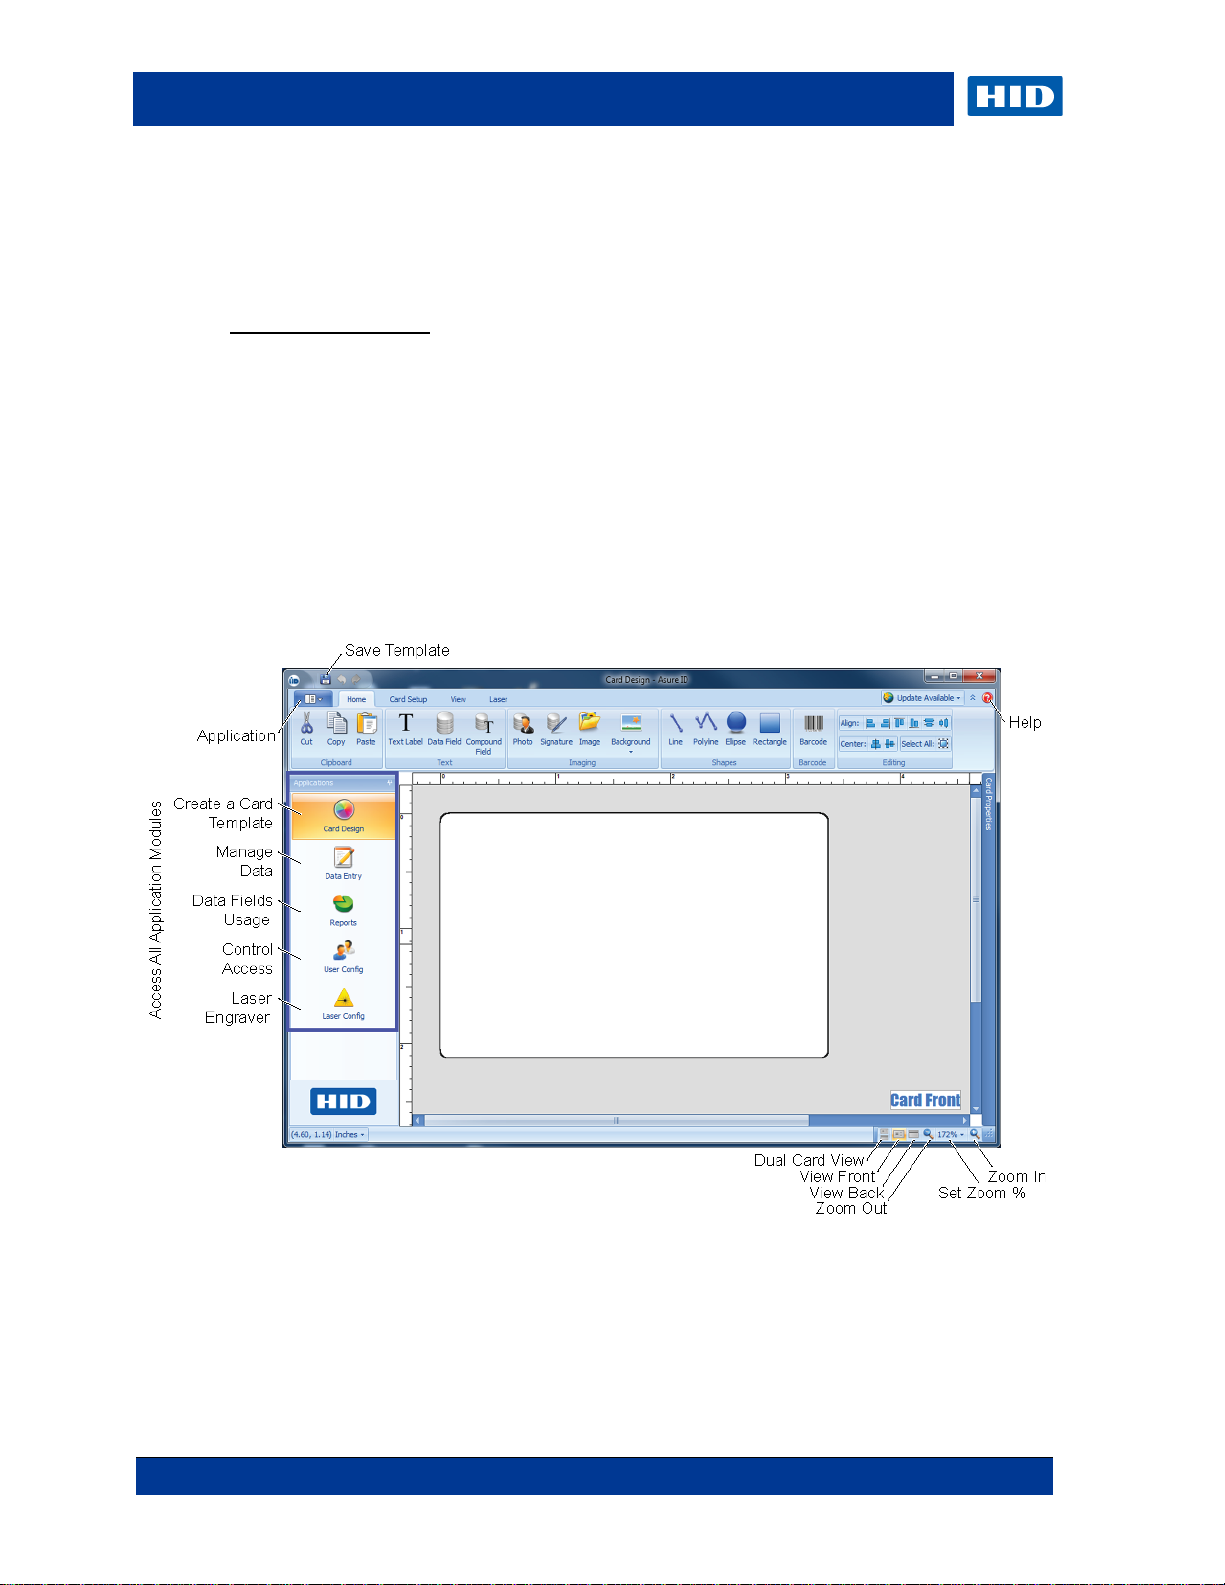
2.2 Navigation within Asure ID
If you have used the latest version of Microsoft® Office, the Asure ID user interface seems
familiar. Asure ID is based on the Microsoft Ribbon. Tab-driven navigation with convenient
tools and fly-out control palettes make Asure ID an efficient tool.
High Level Workflow:
1. Asure ID enables you to create a card template for each card type (for example,
employee card, contractor or student).
Helpful Hint: Individual cards are not printed from the Card Design application. Printing
typically occurs in the Data Entry application.
2. After a card template is complete, you change from the Card Design module to the Data
Entry application so you can add, modify and delete card records. This stage includes
acquiring photos through a webcam and printing selected cards.
3. The Reports application allows you to view standard reports (for example, user activity
and template activity reports) and custom reports.
4. The User Config application enables you to manage user privileges and login credentials
for editions of Express and above.
Page 13

July 2014
Page 13 of 44
<CTRL> + A
Select All
<CTRL> + V
Paste from Clipboard
<CTRL> + C
Copy to Clipboard
<CTRL> + W
Close Template
Dialog
<CTRL> + H
Replace
<CTRL> + Y
Redo
<CTRL> + O
Open Template
<CTRL> + Z
Undo
<CTRL> + P
Print Template
<CTRL> + <F2>
Open Preview
<CTRL> + S
Save Template
<ALT> + <F4>
Exit Application
<CTRL> + T
Toggle Preview Mode
2.3 Asure ID Keyboard Shortcuts
Data Entry Keyboard Shortcuts
<CTRL> + A
Select All
<CTRL> + T
Asure ID PLT-01485 Rev 2.0
Set View to Table View
<CTRL> + <SHIFT> + A
<CTRL> + C
<CTRL> + F
<CTRL> + H
<CTRL> + I
<CTRL> + L
<CTRL> + O
<CTRL> + P
<CTRL> + Q
<CTRL> + R
<CTRL> + S
<CTRL> + N
Deselect All
Copy to Clipboard
Find
Replace
Capture Photo
Load Photo from File
Open Template
Print Card
Quick Filter
Set View to Record View
Save Record
Card Design Keyboard Shor tc uts
Show New Template
<CTRL> + V
<CTRL> + X
<CTRL> + <Delete>
<CTRL> + <Insert>
<CTRL> + <Space>
<CTRL> + <F2>
<CTRL> + <F11>
<CTRL> + <F12>
<ALT> + <F4>
<F3>
<F5>
<CTRL> + X
Paste from Clipboard
Cut to Clipboard
Delete Record
Add Record
Toggle Select
Open Preview
Switch to Template View Mode
Switch to DataView Mode
Exit Application
Find Next
Refresh Database
Cut to Clipboard
Page 14
Page 14 of 44
July 2014
Asure ID PLT-01485 Rev 2.0
3 Card Design
You can use the Card Design application to create the card layout for printing and encoding
objects. (Note: Each card layout is saved as a template for use by the Data Entry application
for enrollment and printing.)
Helpful Hints:
• The Asure ID Solo edition is limited to 200 records. (See Product Overview for a full list
of features and capabilities for each edition.)
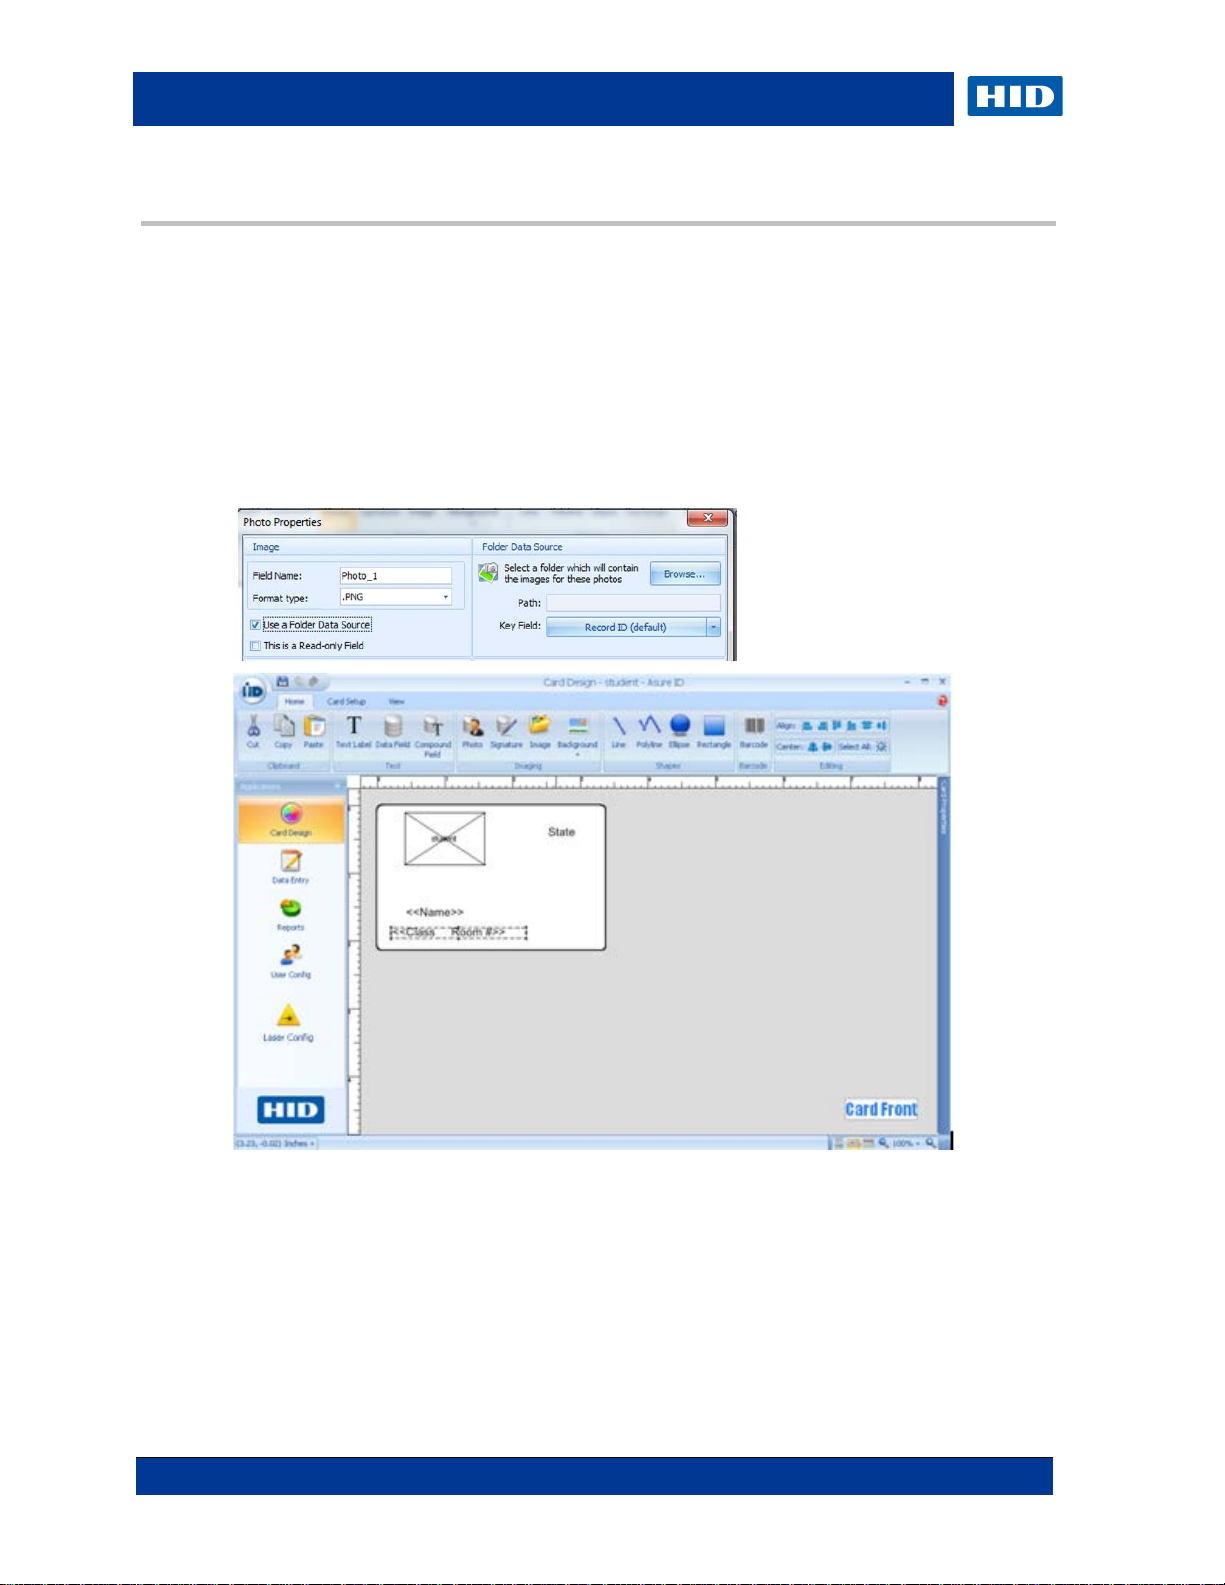
• The native database for Asure ID has a size limitation of 2GB when using MS Access,
which is a limitation of MS Access. If you have large photo files, the database may reach
its limitation and prevent the addi ti on of records. Asure ID recommends that you store
photos in a folder and use a photo field in your template, as illustrated below.
Page 15

July 2014
Page 15 of 44
selection.
Position the item on the card design area.
3.1 Card Design Area
Asure ID provides a simple drag-and-drop visual interface, while creating a custom database
for you behind the scenes. Controls are organized into logical groups. Groups are organized
onto tabs, such as Home, Card Setup and View, as shown below.
With the Asure ID's Card Design application, you can:
• Layout and design a card template.
• Add technologies, including a barcode.
• Personalize your work environment, including adding and removing grid lines and rulers
as well as modifying the Card View, Orientation, Zoom Level and Properties.
• Link Data Fields to external data sources.
• Save, edit and export your work.
3.2 Basic Card Design Tutorial
This tutorial walks you through the process of creating a basic ID card. Activities include the
following.
• Card design area
• Text labels to ill u st rat e t he company name
• Image for the organization’s logo
• Data fields for record information, such as employee name or number
• Photo field
Additional capabilities, such as data sources connected with Live Link or smart card creation
with iDIRECTOR, are discussed in the Advanced Card Tutorial in section 3.3.
Asure ID PLT-01485 Rev 2.0
3.2.1 Design a Basic Card Step Procedure
1
Click the Application icon and select New Template .
Select Create New Template and Single Sided CR-80.
• Select CR-80 for Card Size.
• Select the Portrait (vertical) button for Orientation.
• Click OK.
If using a printer without a magnetic stripe encoder, select None for the Magstripe Properties
Click Background and select Add Background.
2
Select a default background or click Browse… to choose your own background.
Click OK.
From the Text group, click Text Label.
3
Click the card design area.
The Text Label Properties window displays.
Enter your text, such as ABC Electronics, Inc. Change the Font, Color, Height and Style, as
preferred.
Click OK.
Page 16

Page 16 of 44
July 2014
Asure ID PLT-01485 Rev 2.0
Step
Procedure
Position the image precisely on the card design area.
Position the photo precisely on the card design area.
From the Imaging group, click Image.
4
Click the background image.
In the Image Properties dialog, click Load new Image from File. A standard Browse dialog displays.
Click Browse and select the image file.
Click Open.
Click OK.
From the Imaging group, select Photo.
5
Click the card design area.
Within the Image Properties dialog, change the Border Color and Border Width, as preferred.
Click OK.
From the Text group, select Data Field to add unique data fields to the card record, such as Employee
6
Name.
Click the card design area. The Data Field Properties dialog displays.
Enter First Name in Field Name.
Select Text in Field Type.
Change the Font properties as preferred.
Select Reduce to Fit or adjust the size to the correct dimensions from Option.
Click Advanced Data Field Options from Data Field.
Set Max Characters to 25.
Click OK to close the dialog.
Click OK to close Data Field Properties.
Position the text field precisely on the card design area.
Helpful Hints:
• If you would like a default value to appear in the text field if nothing is entered (such as N/A),
enter a default First Name into the Default Value field.
• Select This is a Mandatory Field from Field Options to ensure that a user adds the field to
the card record when in Dat a Entry.
From the Text group, select Data Field to add another unique data field to the card record ( i.e.
7
employee number).
Click the card design area. The Data Field Properties dialog displays.
Enter the Employee Number from Field Name.
Select Numeric as the Field Type.
Make any changes to the Font properties.
Select Reduce to Fit in Options.
Click Advanced Data Field Options.
Set Max Characters to 5.
Click OK to close the dialog.
Click OK to close Data Field Properti es.
Position the item precisely on the card design area.
8
Click the Save icon, or press Ctrl + S to save your work.
Name the file and click OK.
3.3 Advanced Card Design Tutorial
Page 17

July 2014
Page 17 of 44
the database and not within Asure ID.
database.)
Next
Follow the on-screen instructions from the Live Link wizard to set up the connection to the database.
additional data sources, see Import/Export the Asure ID Advanced User Guide (English only).
Asure ID PLT-01485 Rev 2.0
This tutorial walks you through the design of an advanced ID card template that links to a
networked database through Live Link for record information. The design also manages smart
cards through iDIRECTOR in a single in-line personalization process within a card printer.
3.3.1 Design an Advanced Card Template Step Procedure
1
Ensure a network database exists and all database information is available.
Information for Live Link includes the following.
• Acquire connection string parameters for Live Link from the Database Admi nistrator
• Database userID / password
Users may have Select, Update, Insert and/or Delete privileges.
The Administrator assigns the user Asure ID privileges to manage data integrity .
In every Live Link connection, users have access to the objects assigned. Security is managed within
2 Decide to retrieve data records from a local database or store the Asure ID system information in a
centrally networked location. The following combinations are possible:
• A single data sour ce is ass ociated with the template. The source can be a native database or a
Live Link table.
• One Live Link table is the primary data source w ith a secon d ary native database.
• Multiple Live Link tables and/or data sources are edit only. You cannot add or delete data.
• Multiple Live Link tables and/or data sources are editable. You can add, append and delete
fields using the native database application.
(Note: The DVTel solution allows for adds (new records), edits and deletes. You can delete a record
without removing the data, but the transaction changes the status of the cardholder. Do not use other
data sources with DVTel, including the native database.)
(Note: LDAP retrieval is read-only and cannot be used with any other data source, including native
Click Card Setup.
3
Click Data Sources.
Select Add a Data Source. The Live Link Data Source Connection wizard displays.
Click
4
Select the appropriate database type from the list.
.
5 In this example, we link to a Microsoft® SQL Server database. For information on connec ting to
Page 18

Page 18 of 44
July 2014
Asure ID PLT-01485 Rev 2.0
Step
Procedure
Click Next.
Finish
Field Name
6
When using Microsoft® SQL Server, you must have the following entries:
• Server Name – Indicates the SQLServer database name.
• Initial Catalog – Enter the Initial Catalog if you do not have a default database. This field may
be empty. (Optional)
• User Name – This is the username defined by the Database Administrator.
• Password – This is the password associated with the username.
7
When the database is connected, address two more dialogs, as necessary:
• Default Table – Displays automatically whenever you map data from the dropdown box. When
set the table is saved.
• Primary Table – Is the driver for data retrieved, regardless of the number of additional data
sources and tables.
The primary table is overridden with each additional data source.
When <None> is selected, the native database becomes primary.
Click Test to verify the connect ion is succe ssful.
8
Click
From the Text group, select Data Field.
9
.
Click the card design area. The Data Field Properties dialog displays.
Within
, type the word or friendly name that you intend to link in the connected database.
Page 19

July 2014
Page 19 of 44
Step
Procedure
Click Advanced Data Field Options to access the LiveLink capability.
10
Asure ID PLT-01485 Rev 2.0
Page 20

Page 20 of 44
July 2014
Asure ID PLT-01485 Rev 2.0
Step
Procedure
the card number from the card being personalized.
Select the Source, Table and Field entries to link the data field to the networked data source.
11
12 The data field is now linked to a networked data source. If you would like additional data fields or
photos, refer to Card Design.
Repeat Step 10 to link the new data fields or photos to the networked data source.
13 Inline Smart Card Personalization with iDIRECTOR enables you to read the HID Access Control
Information from a smart card (iCLASS, MIFARE, and/or Prox) and save this to a data source of your
choosing.
Helpful Hint: Ensure that a data field exists in the external data source where you would like to store
Page 21

July 2014
Page 21 of 44
Step
Procedure
With an external data source setup properly, click on Enable Smart Chips under the Card Setup tab
14
Asure ID PLT-01485 Rev 2.0
within the Card Design module.
Select the appropriate card technology that you would like to read/write. For this example, we read the
HID Access Control Application information and store the Card ID number into an ext ernal data sour ce.
Page 22

Page 22 of 44
July 2014
Asure ID PLT-01485 Rev 2.0
Step
Procedure
HID Access Control Application
continue.
Facility Code and Card ID Number to be stored within the Asure ID native source.
15 Manually select the card type, if you know it. Otherwise, use the Auto Detect feature to automatically
detect the card type.
16 With the card type selected click the Add Application link to open the iDIRECTOR Wizard, which will
walk you through the process of reading/writing information from the card. In this example, we read
the
information.
17 To read the HID Access Control Application information, iDIRECTOR must know what format the
information is stored in. Select the format manually, if you know it, or click Auto Detect. Click Next to
18 To read HID Access Control Application information and write it to an external data source, deselect
the Create a Data Field for each iDIRECTOR Field checkbox.
Helpful Hint: If you do not remove the check from the checkbox, Asure ID creates a data field for the
Page 23

July 2014
Page 23 of 44
Step
Procedure
Create New Data
data source.
is not linked to the external data source. Asure ID stores this information in the native data source.
cannot complete the in-line personalization process at the time of issuance.)
Entry.
Within the application configuration tab, double-c lick the text underneath Card ID Number that states
19
Asure ID PLT-01485 Rev 2.0
No Linkage Defined to link the Card ID Number to the external data source.
Click
20
21
Duplicate this process link the Facility Code to an ex ternal da t a source .
. Refer back to step 8 for how to properly link the data field within the external
Helpful Hint: If you do not need to use the Facility Code, you can simply create a new data field that
When both data fields are linked to the data source, click OK to complete the process for Inline Smar t
22
Card Personalization with iDIRECTOR.
(Note: If the either the Facility Code or Card ID Number are not linked to any data fields Asure ID
23 For information on how to issue cards with Asure ID using the Data Entry module, proceed to Data
Page 24

Page 24 of 44
July 2014
Asure ID PLT-01485 Rev 2.0
Add>>
populates the barcode.
Select the Dual-Sided Card icon in the Layout group.
Non-ISO or Custom) and Options.
object.
Add
Name the file and click OK to close the Save Template dialog.
3.4 Card with a Barcode Data Field Tutorial
The purpose of this Card Design element is to create a barcode.
3.4.1 Design a Card with a Barc od e Step Procedure
Select Barcode from the Barcode group.
1
Click the card design area. The Barcode Properties dialog displays.
2
Select the barcode type in the Type field under Barcode.
3
Click the pre-existing data field to link within Available or create a new field in S elect Fi eld s.
4
Click
5
Click OK.
6
7
Position the item precisely on the card design area.
. The information entered within the data field during enrollment automatically
3.5 Card with a Magnetic Stripe Tutorial
The purpose of this tutorial is to add magnetic encoded data to a card.
3.5.1 Design a Card with a Magnetic Stripe Step
Procedure
1
Launch the Asure ID software.
2
Enter your userID and password in the entry fields.
Click Card Design.
3
Click Card Setup on the menu ribbon.
4
Select Magstripe in the Technology group. The Magstripe Properties are set for Type (ISO or
5
6 Drop data objects to the card design area based on the information to be encoded on the
magnetic stripe. Designate the objects as non-printable within the Properties window of the
Select Magstripe in the Technology group to access Tracks 1, 2, and 3 (Properties).
7
8 Select fields to be added to each track of the magnetic stripe. The current field options are
displayed in the Available box.
Click
9
Click the Save icon .
to make the field active.
Page 25

July 2014
Page 25 of 44
Click OK. The card design area displays the attributes of the card properties selected.
displays.
Click OK.
Name the file and click OK.
3.6 Card with a Compound Field Tutorial
The purpose of this card design is to enter a Compound Field at data entry. A compound data
field is useful for when you would like multiple data fields to be aligned next to each other.
Helpful Hint: Use a compound data field to perfectly place a last name one space after the
first name
3.6.1 Design a Card with a Compound Field Step
Procedure
1
Launch the Asure ID software.
2
Enter your userID and password in the appropriate areas.
3
Click the Application ic on.
Select New Template.
4
5
Select the attributes for the new card.
In the Text group, click Compound Field.
6
Drag-and-drop a data object onto the card design area. The Compound Field Properties dialog
7
Asure ID PLT-01485 Rev 2.0
Designate a Field Name for the object.
8
Click Insert Data field to add data to the field through the next Properties display. An alternative
9
method is to click Insert existing data field to use a data field that is already set up on the card
template.
Designate the field name for a field inside of the Compound Field and designate the Field Type.
10
Select the Data Source as Data Entry, Clone Data Source or Add a Live Link Data Source….
11
12 Specify additional property values or use the default values. The font properties for each field
inside of the Compound Field can be set individually .
Repeat Steps 11-12 until all fields within the Compound Field are set.
13
14
Specify any additional options for the compound field (as needed) or use default values.
Select Print on Fluorescing Panel if this data should be viewed only with ultra violet light.
15
16
Click the Save icon or press Ctrl + S to save your work.
Page 26

Page 26 of 44
July 2014
Asure ID PLT-01485 Rev 2.0
4 Data Entry
The Data Entry module enables you to populate the database created in Card Design with
the appropriate data for the card and then print the designated cards.
4.1 Data Entry Window
Controls are organized into logical groups. Groups are organized onto tabs, as shown below:
Home, Database, View and Laser.
With the Asure ID's Data Entry, you can:
• Add, delete, modify, and void card records.
• Capture or load photos and signatures.
• Quickly find card records with the Global Find and Quick Filter functionality.
• Archive, import and export card record data.
• Set record viewing options with the capability to rearrange layout for the most efficient data
entry process.
Page 27

July 2014
Page 27 of 44
completed click OK to close the Options dialog.
click OK to close the E dit Image dialog.
Ctrl + F2
Printer Properties Selection window.
4.2 Sample Data Entry Workflow
The following section provides an overview of how to effectively manage and print card records
within Asure ID. We start by adding a record with a photo and printing the cards.
4.2.1 Add and Print a Record with Data and Photo Fields Step Procedure
To add a record, begin by clicking Add record.
1
When capturing a photo from a digital camera (or similar) Click the Application icon.
2
Click Options and then Devices.
Select Camera Type, TWAIN or WIA. Click the camera from the list of capture devices, when
Right-click in the Photo field to select Capture Image, Load Image from File, Edit Image, Delete
3
Image or Save Image to File.
Select Capture Image if working with a digital camera. The Select Source d ial og may appear.
Choose the camera and click Select to close the dialog.
Take the photo and then click and drag the Crop tool, redraw the rectangle around the image and
4
Enter data for the remainder of the data fiel ds.
Click Save within the Records group. When the Save button is selected, the fields with the Preview
5
are prefilled. To see a larger preview of the card, press
6
Repeat Steps 3 - 5 to create all records.
7
Click the application icon and select the Print button.
If information is read or written to a smart card during the print process, select the encoder in the
.
Asure ID PLT-01485 Rev 2.0
Page 28

Page 28 of 44
July 2014
Asure ID PLT-01485 Rev 2.0
Step
Procedure
8 The records are sent to the printer. If a smart card read or write occurs, the user selects the
encoder installed in the printer. Additionally, the user is locked out of Asure ID to ensure proper
synchronization of the print and smart card personalization information for each card.
Page 29

July 2014
Page 29 of 44
Field Links summary).
For a CSV source, import the photos to be retrieved from an external folder.
4.3 Additional Data Entry Elements
4.3.1 Import/Export
You can Import or export record information from a MS Access database, SQL Server
Database, Oracle Database, and a comma-separated values (CSV) file.
Step Procedure
1
MS Access database, SQL Server Database, Oracle Database, and a
From the Database tab, select Import Wizard. Click Next.
Select the CSV type from the list. Click Next.
2
Asure ID PLT-01485 Rev 2.0
Click the Browse button to locate the database to be imported.
3
4
Specify the delimiter in the file and whether the file has a header row.
In the Import Wizard, map the data fields from the import source (that is, the CSV file) to the fields
5
of the template by highlighting a field from each box and clicking Add (if they are not lis ted in the
6
Import photos at this time, remove any pre-existing links that came into the wizard as photos.
Page 30

Page 30 of 44
July 2014
Asure ID PLT-01485 Rev 2.0
Step
Procedure
Next
Within Template Fields, highlight the field that pertains to the photos; click Image File Import to
7
open the File Impor t window. Browse to the photo location.
Identify the column within the CSV file that referenc es the photo name.
If the name contains the full name of the file, including file type (for example, john.jpg), click
Column contains actual file names.
8
Mark one field as Unique.
After all required fields are mapped and a unique field is iden t ifie d , click Next.
9
In the Import Options dial og, choo se to update existing records, import new records, or both.
10
Click
Click Begin Import.
11
12
Records are imported.
13
Click Finish.
14
The data entry view updates with your changes.
.
Page 31

July 2014
Page 31 of 44
4.3.2 Layout View
Customize allows users to define how the fields, photos and signatures in the template are
formatted in View Layout. When saved, these changes are recalled the next time the template
loads.
Asure ID PLT-01485 Rev 2.0
Page 32

Page 32 of 44
July 2014
Asure ID PLT-01485 Rev 2.0
The Select All and Select Record options do not include voided records.
4.3.3 Void
The Records group on the Home tab contains the Void function. There is no function to unvoid a record, so the void action is permanent. Sel ect All and Select Record options do not
select voided records. Voided records cannot be printed.
Step Procedure
1
Select the record to be voided from the Data Entry application.
Confirm the Void Record verification window. There is no function to un-void a record.
If record is required later, it must be added as if it is new. If unique fields are included, delete the voided
record before adding.
2 Voided records cannot be printed. After a record has been voided, it can no longer be edited. The data
fields are disabled. The preview includes Void written across the card.
Page 33

July 2014
Page 33 of 44
5 User Config Application
The Asure ID user configuration module manages user definable privileges with a username
and password for setting each user profiles. This capability is only available in Asure ID
Express and above. Administrators limit or enable user privileges for the following Asure ID
capabilities.
• Create a userID with a friendly name
• Access the Card Design application.
• Access the Data Entry application.
• Access the card printing function within the Data Entry application.
• Access the User Configuration application.
• Access the Report application.
• Access to the Laser Engraving application (only available with Asure ID Exchange)
• Access the Program Options settings located under the application button.
5.1 Add User
Store your passwords in a secure location. For security reasons, the HID support team is
unable to retrieve your password if lost.
Asure ID PLT-01485 Rev 2.0
Step Procedure
To create a new user the Administrator, click Add User.
1
Enter the user name, set the user ID, password and privileges for the new user.
Click Save.
2
Click Change Password to set the password for the user
3
4
Repeat as necessary.
Page 34

Page 34 of 44
July 2014
Asure ID PLT-01485 Rev 2.0
6 Reports Application
The Reports application supplies you with a number of preformatted reports for application
operation. Customize preformatted reports in terms of layout, columns, and filters. When the
reports are customized, save them for quick access. The preformatted reports are grouped
into the several sections.
6.1 User Reports
• User List – This report outlines all of the Asure ID users and their capabilities.
• User Activity – This report outlines all of the activities performed by the user, which
includes adding or modifying a record.
• User Login – This report outlines the date and time of when a user logs in and out of
Asure ID.
Page 35

July 2014
Page 35 of 44
6.2 Data Entry Report s
• All Records for a Template – This report outlines all of the records for a particular
template and its associated data fields.
• Records with no Photos – This report outlines all of the records for a particular template
which do not have a photo, if applicable.
• Unprinted Records – This report outlines all of the records for a particular template which
have not been p ri nt ed .
• Voided Records – This report outlines all the records for a particular template which have
been set as void. (Note: You may not set records back that have been voided.)
• Template History – This report outlines all of the user activity for all of the templates that
are stored within Asure ID
• Template Print History – This report outlines all of the user print activity for all of the
templates stored within Asure ID
6.3 Card Design Reports
• Template List – This report outlines all of the details for each of the card templates stored
within Asure ID
• Data Fields for Template – This report outlines all of the data fields and their type for a
given template
Asure ID PLT-01485 Rev 2.0
Page 36

Page 36 of 44
July 2014
Asure ID PLT-01485 Rev 2.0
7 Selected Asure ID Options
The Application drop-down menu includes controls for actions like Save Template and Print
Template. This window also provides a list of recent documents, access to application options
and application exit.
Options provide instructions for setting or modifying settings and preferences.
Page 37

July 2014
Page 37 of 44
7.1 Template Options
The Template screen includes the Default Image Format, Database Query Options and
Advanced Options.
The Default Image Format provides the capability to override this default image format from
within the Photo and Signature property dialog. Select the preferred format for your image. It
is applied when y ou u se the Photo or Signature imaging in Card Design.
PNG is the default image format in Asure ID 7.
Asure ID PLT-01485 Rev 2.0
Page 38

Page 38 of 44
July 2014
Asure ID PLT-01485 Rev 2.0
7.2 Resources and Check for Updates
The About window has the specific version numbers for Card Design, Data Entry, Reports,
and User Config.
Select Check for software updates on startup to automatically search for software updates
when you start Asure ID.
You can manually check for updates at anytime by clicking Check for updates now. If
updates are available, the updates are installed. This update does not delete or modify any of
the card templates and card records.
(Note: Internet access is required to check for updates.)
Page 39

July 2014
Page 39 of 44
Step
Procedure
8 Licensing
Licensing stores user information and license keys that aide in troubleshooting and providing
assistance if you misplace your key.
(Note: Set this option prior to using the software.)
Click Licensing to display the Licensing window.
1
Asure ID PLT-01485 Rev 2.0
2
Select your subscription options.
Click Phone Activation or Activate Online if you would like to upgrade your Asure ID edition or add
3
additional license key configurations
Click OK.
4
Page 40

Page 40 of 44
July 2014
Asure ID PLT-01485 Rev 2.0
database is accessed.
privileges.
9 Data Connection
9.1 Create a New Native Database – Access, SQL, Oracle
When you install Asure ID, it uses an Access database that stores configuration tables,
templates and cardholder data. To use SQL Server or Oracle as the native database, follow
these steps.
Step Procedure
1
Your System or Database Administrator runs a set of scripts to create all the database
objects required for Asure ID 7.
The Administrator directs the application to the database. If not finding the database,
generate a new database by selecting the required path. Upon the next start up, the new
2
To install scripts:
Go to Program Files\HID Global\Asure ID\Scripts. Found are the following two files.
• AsureID_MSSQL.sql
• AsureID_Oracle.sql
The Administrator runs whichever set of scripts is applicable for the chosen database.
Furthermore, the Administrator creates a user that has Select, Insert, Update, Delete and Create
3
After creating the required objects in the database, access the following.
[start]
[All Programs]
[HID Global]
[Asure ID]
[Data Connection Wizard]
Page 41

July 2014
Page 41 of 44
4
Click Next.
Asure ID PLT-01485 Rev 2.0
5 Select the correct database. Li sted is the Access database for directing the system back to the Access
database installed with the application. Any other Access databases are not a valid option for a native
data source.
Page 42

Page 42 of 44
July 2014
Asure ID PLT-01485 Rev 2.0
6
Enter the parameters required to connect to the newly created database.
You must know the userID and password. They are u sed by all Asure ID users to connect to the
database. All users need one database userID and password. This userID and password are not
visible to Asure ID users.
7 This information resides in the computer registry and remains persistent, unless it is changed using the
Data Connection Wizard.
Re-linking the database location does not migrate data, you must complete data migration manually.
Any new templates added in Asure ID are saved in the new data source.
(Note: You should no longer use the Access database installed with the system.)
When using Asure ID for the first time after making the change, the only valid user is the Admin user.
Page 43

July 2014
Page 43 of 44
Asure ID PLT-01485 Rev 2.0
8
Click Finish. The connection is tested and a message is displayed.
Page 44

HID Global Headquarters:
North America: +1 949 732 2000
Toll Free: 1 800 237 7769
Europe, Middle East, Africa: +49 6123 791 0
Asia Pacific: +852 3160 9800
Latin America: +52 477 779 1492
support.hidglobal.com
hidglobal.com
 Loading...