

Page 1

ActivIdentity® 4TRESS™
Authentication Server FT2011
Web Tokens and Cisco
(Clientless SSL VPN Access)
Radius Channel Integration Handbook
Document Version 1.1 | Released | July 11, 2012
®
ASA
Page 2

ActivIdentity 4TRESS Authentication Server (FT2011) Web Tokens and Cisco ASA | Integration Handbook
P 2
External Use | July 11, 2012 | © 2012 ActivIdentity
Table of Contents
Table of Contents ....................................................................................................................................................... 2
1.0 Introduction ....................................................................................................................................................... 3
1.1 Scope of Document .................................................................................................................................... 3
1.2 Prerequisites .............................................................................................................................................. 3
2.0 Cisco ASA Configuration .................................................................................................................................. 4
2.1 Procedure 1: Create New Radius Server Instance .................................................................................... 4
2.2 Procedure 2: Configure Connection Profiles .............................................................................................. 6
2.3 Procedure 3: Configure Group Policies ...................................................................................................... 8
2.4 Procedure 4: Configure New Cisco Portal ............................................................................................... 12
2.5 Procedure 5: Web contents ...................................................................................................................... 13
2.6 Procedure 6: Customization ..................................................................................................................... 15
2.7 Procedure 7: Assign the New Portal ........................................................................................................ 18
3.0 ActivIdentity 4TRESS AS Configuration: Sequence of Procedures ............................................................... 20
3.1 Configure RADIUS Channel ..................................................................................................................... 20
3.2 Managing User Repositories: An Overview ............................................................................................. 23
3.2.1 Create User Repository ................................................................................................................... 23
3.3 Configure Administration Groups, User Types, User Repositories, and Authentication Policies ............ 25
3.4 Create and Activate Web Soft Token (Optionally without PIN) ................................................................ 26
3.5 Modify Soft Token Activation Portal to Use Web Tokens without PIN’s (Optional) ................................. 28
3.6 Activate LDAP Authentication on the Soft Token Portal .......................................................................... 30
4.0 Sample Authentication Using Web Soft Token Authentication ....................................................................... 31
4.1 Prerequisite: Activate Web Soft Token .................................................................................................... 31
5.0 Notes About Authenticating with Web Soft Token Launched in the Sign-In Page ......................................... 33
Page 3

ActivIdentity 4TRESS Authentication Server (FT2011) Web Tokens and Cisco ASA | Integration Handbook
P 3
External Use | July 11, 2012 | © 2012 ActivIdentity
Note: Using Cisco double authentication (an LDAP password plus a one-time password) is also
1.0 Introduction
The Cisco® Adaptive Security Appliances (ASA) enable remote and mobile employees, customers, and partners
to gain secure access to corporate Virtual Private Network resources and applications. Providing secure access
via a VPN over existing Internet connections requires strong, two-factor authentication to protect resources. The
ActivIdentity solutions that work with Cisco incorporate SSL VPN solutions with versatile, strong authentication
that is flexible, scalable, and simple to manage. ActivIdentity offers two solutions:
• ActivIdentity® 4TRESS™ AAA Server for Remote Access—Addresses the security risks associated
with a mobile workforce remotely accessing systems and data.
• ActivIdentity 4TRESS™ Authentication Server (AS)—Offers support for multiple authentication
methods that are useful for diverse audiences across a variety of service channels (SAML, Radius,
etc.), including user name and password, mobile and PC soft tokens, one-time passwords, and
transparent Web soft tokens.
1.1 Scope of Document
This document explains how to set up ActivIdentity 4TRESS AS FT2011 Web soft token authentication with Cisco
Adaptive Security Appliances. Use this handbook to enable authentication via a Web soft token for use with an
SSL-protected Cisco VPN.
1.2 Prerequisites
• ActivIdentity 4TRESS Authentication Server FT2011.
• Cisco ASA version 8.x installed and configured.
• The Web soft token is configured to work with or without a PIN.
• Users have static LDAP passwords for access to the Self Help Desk to enroll Web tokens.
• The Cisco login page has been customized (illustrated in this handbook).
possible. You can configure the sign-in page so that users can use a static LDAP password instead of
the Web soft token PIN.
Page 4

ActivIdentity 4TRESS Authentication Server (FT2011) Web Tokens and Cisco ASA | Integration Handbook
P 4
External Use | July 11, 2012 | © 2012 ActivIdentity
Getting Started
2.0 Cisco ASA Configuration
This chapter describes how to manage a Cisco ASA. When a user signs into a Cisco ASA appliance, the Cisco
ASA forwards the user’s credentials to this authentication server to verify the user’s identity. You will create one
authentication server (an ActivIdentity 4TRESS AS FT2011 RADIUS Server) to validate the user’s one-time
password generated by a Web soft token.
2.1 Procedure 1: Create New Radius Server Instance
When using an external RADIUS server to authenticate Cisco ASA users, you must configure the server to
recognize the Cisco ASA as a client and specify a shared secret for the RADIUS server to use to authenticate the
client request.
To configure a connection to the RADIUS server on a Cisco ASA SSL VPN appliance and to define the RADIUS
Server instance, perform the following steps.
1. In the ASDM console, navigate to Configuration-> Remote Access
VPN -> AAA/Local User, and then click AAA Server Groups.
2. Click Add at the far right of the page displayed.
The nearby dialog is displayed.
3. Enter a Server Group name, and then select RADIUS for the
Protocol.
4. Click OK.
Repeat the process to add a backup RADIUS server.
Page 5
ActivIdentity 4TRESS Authentication Server (FT2011) Web Tokens and Cisco ASA | Integration Handbook
P 5
External Use | July 11, 2012 | © 2012 ActivIdentity
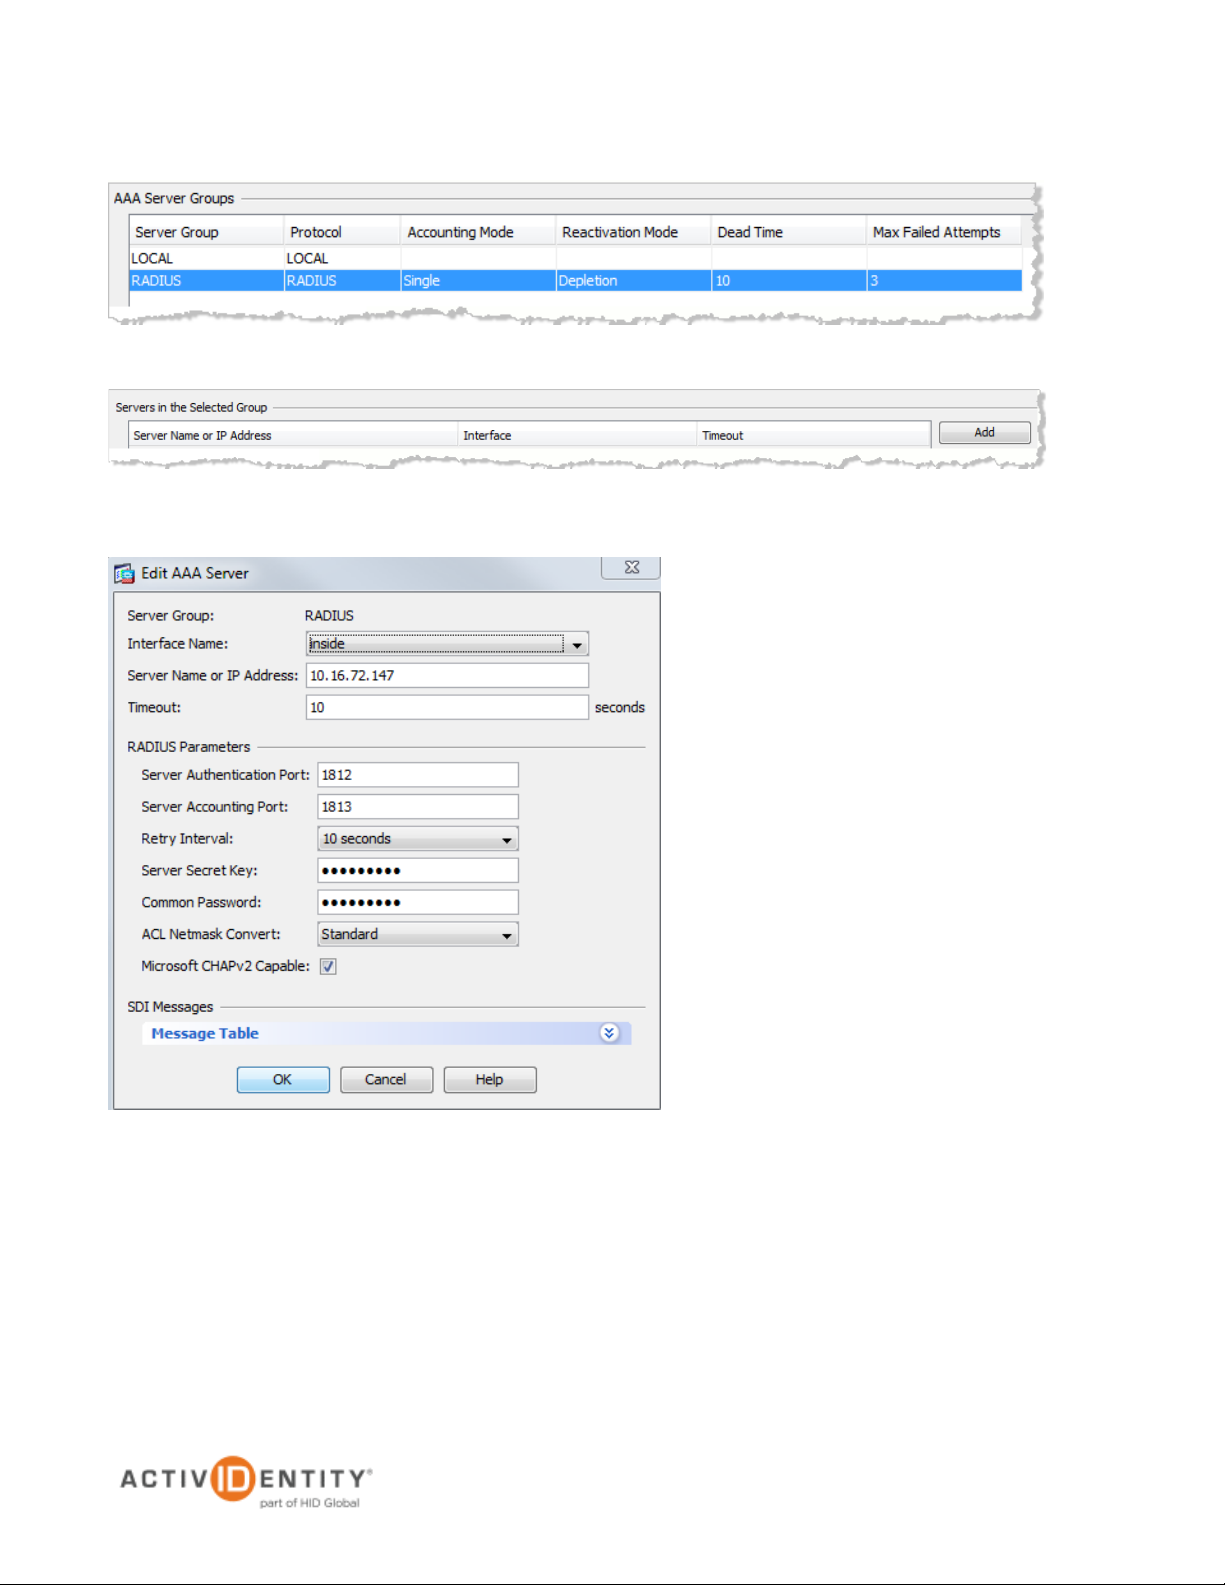
5. In the AAA Server Groups section, select the RADIUS server group you just created.
6. In the Servers in the Selected Group section, click Add next to the Server Name or IP Address line.
7. Enter the appropriate information for your configuration.
• Server Name or IP Address—Specify the name or IP address.
• Server Authentication Port—Enter the authentication port value for the RADIUS server.
Typically, this port is 1812.
• Server Shared Secret—Enter a string. You will also enter this string when configuring the
RADIUS server to recognize the SA Series SSL VPN appliance as a client.
• Accept the other default settings.
8. Click OK. The RADIUS server is displayed in the Servers in the Selected Group section, as illustrated next.
Page 6
ActivIdentity 4TRESS Authentication Server (FT2011) Web Tokens and Cisco ASA | Integration Handbook
P 6
External Use | July 11, 2012 | © 2012 ActivIdentity
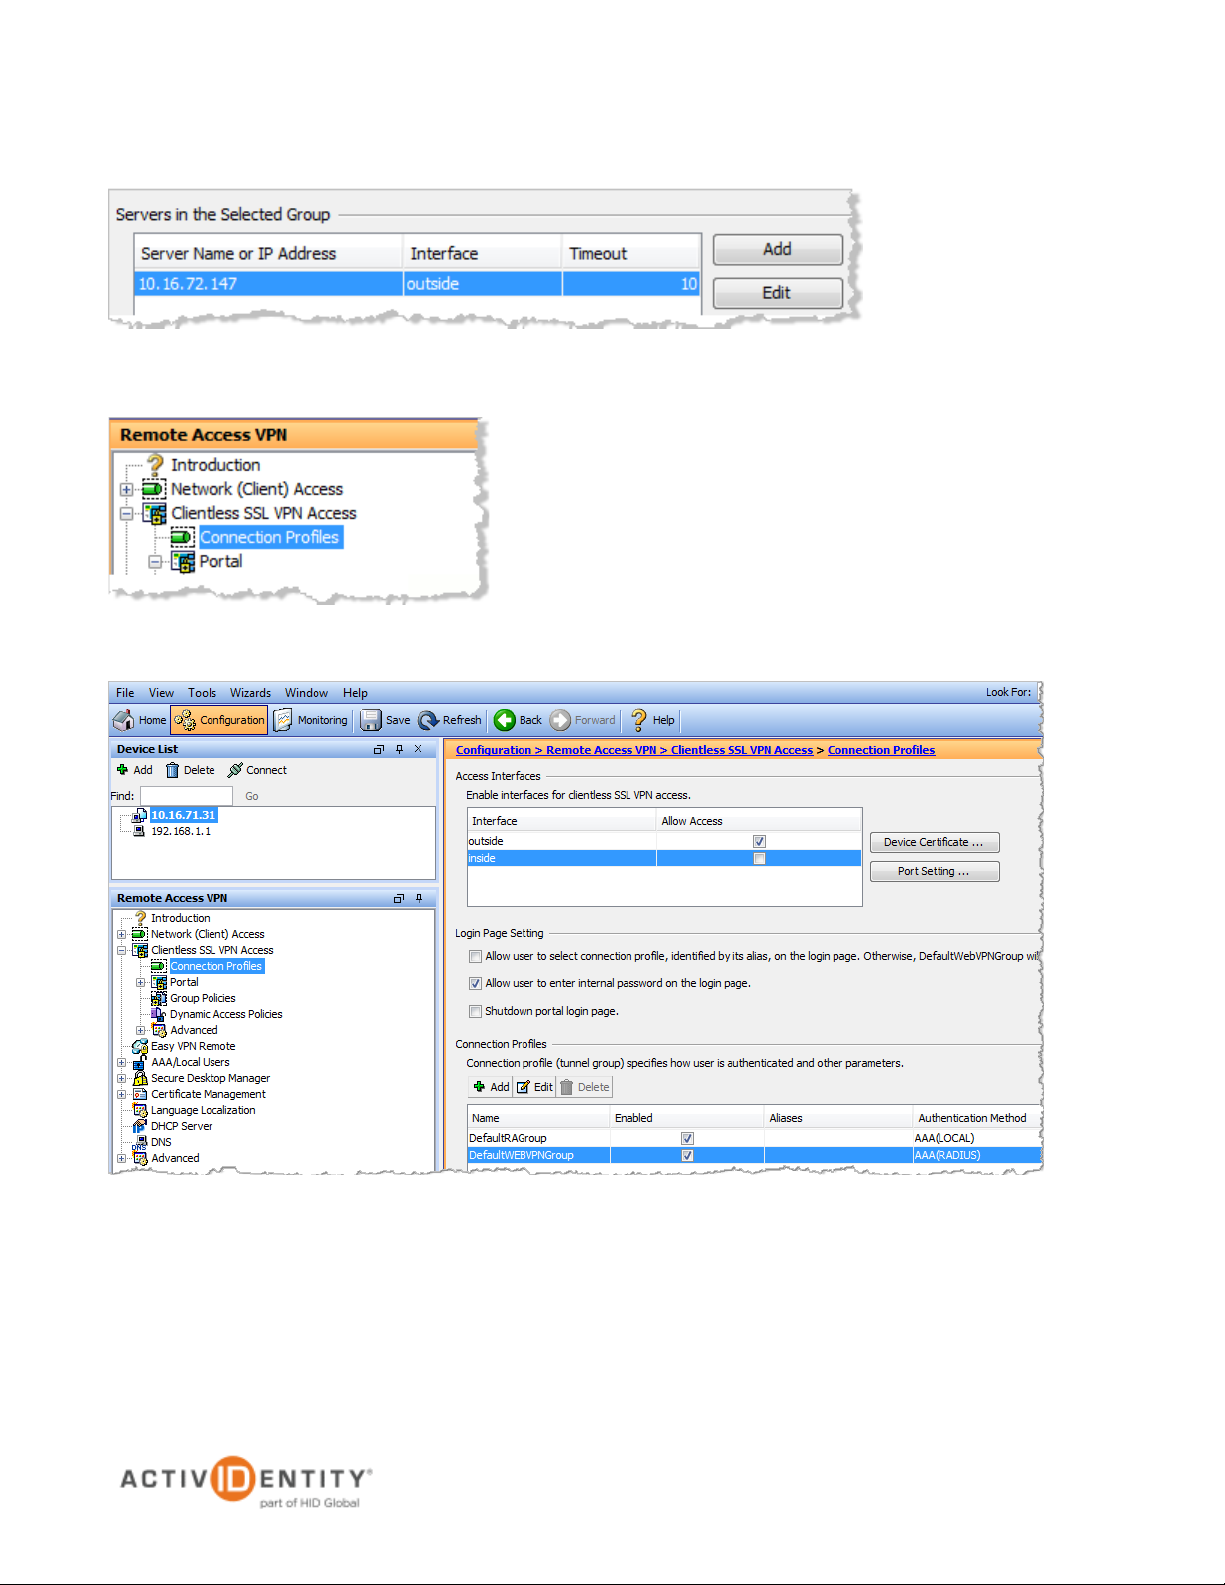
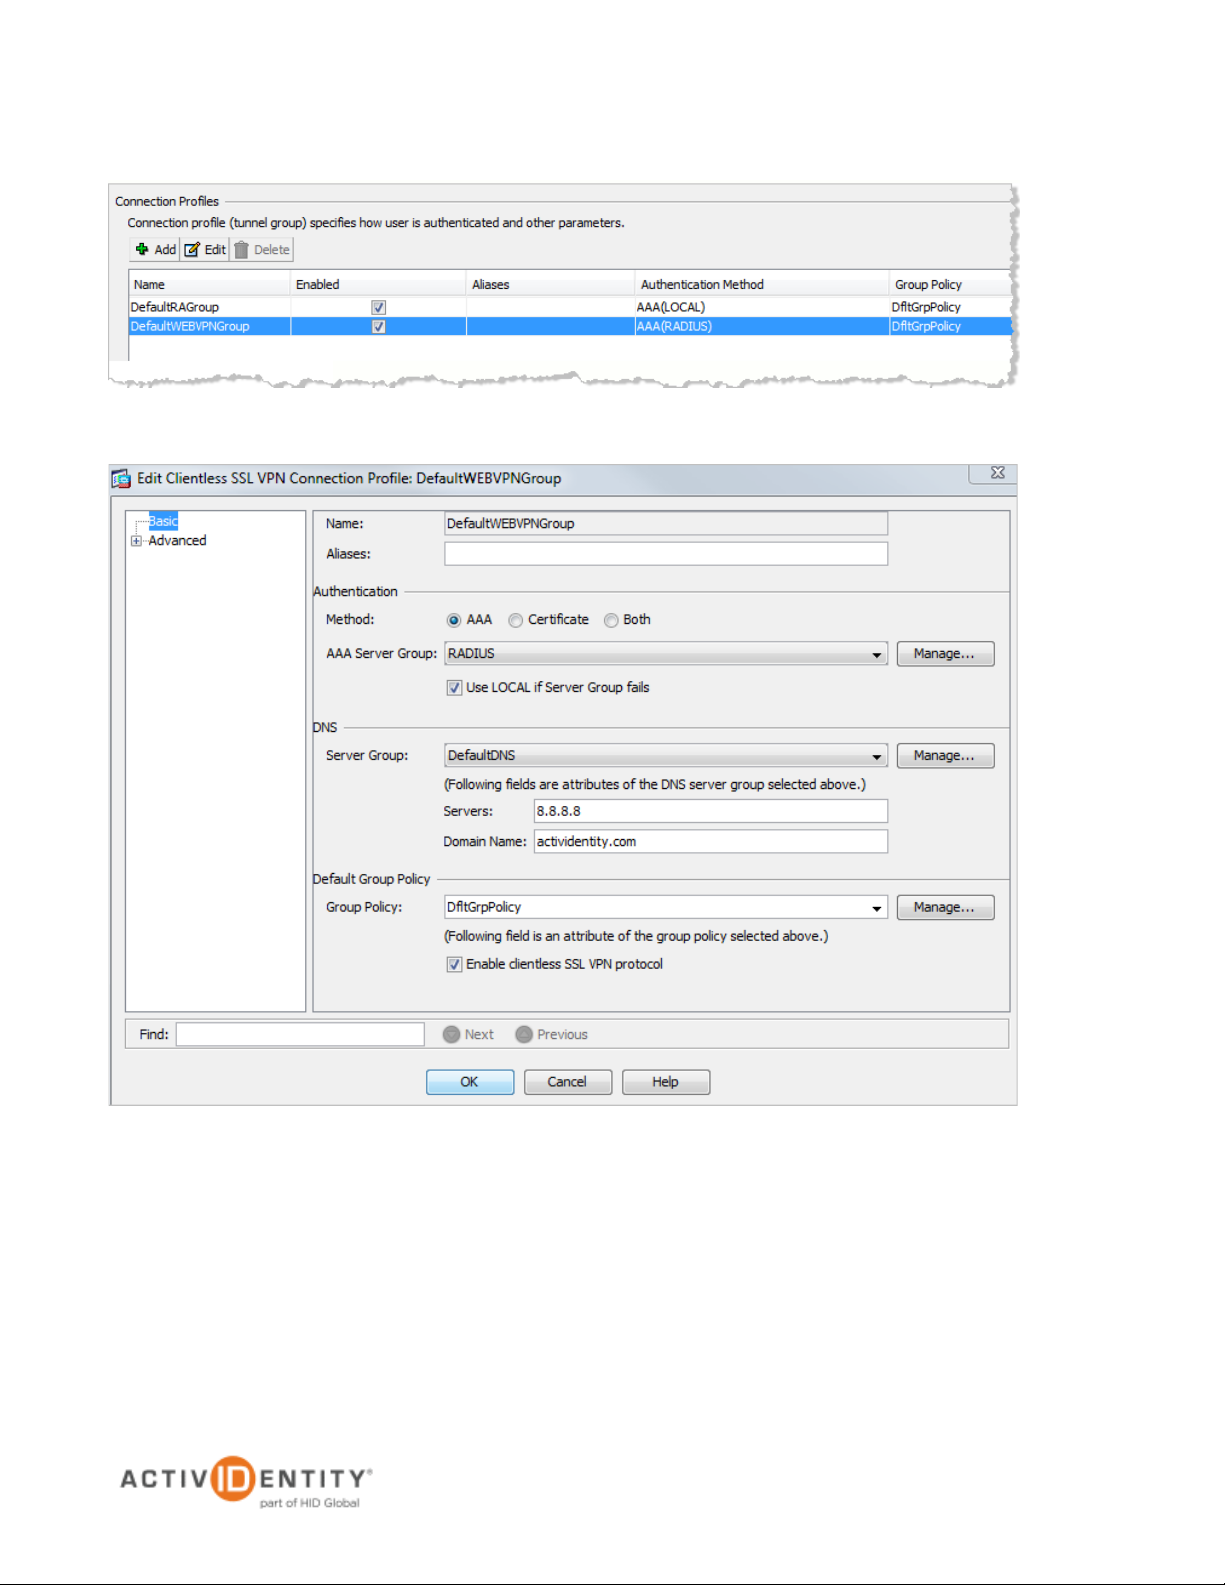
2.2 Procedure 2: Configure Connection Profiles
1. From the top menu, expand Clientless SSL VPN Access, and then click Connection Profiles from the
features menu on the left.
2. In the Access Interfaces section of the page displayed to the right, enable access to the appropriate
interface. Select the outside option.
Page 7
ActivIdentity 4TRESS Authentication Server (FT2011) Web Tokens and Cisco ASA | Integration Handbook
P 7
External Use | July 11, 2012 | © 2012 ActivIdentity
3. In the Connection Profiles section at the bottom of the page, under the Name column, select
DefaultWEBVPNGroup, and then click Edit.
4. Configure the following attributes.
• From the AAA Server Group drop-down list, select RADIUS.
• Select the Use LOCAL if Server Group fails option.
• In the DNS section, from the Server Group drop-down list, select DefaultDNS, and then in
the Servers box, specify a DNS server. Specifiy a Domain Name.
• In the Default Group Policy secion, from the Group Policy drop-down list, select
DftGrpPolicy.
• Select the Enable clientless SSL VPN protocol option.
5. Click OK.
Page 8
ActivIdentity 4TRESS Authentication Server (FT2011) Web Tokens and Cisco ASA | Integration Handbook
P 8
External Use | July 11, 2012 | © 2012 ActivIdentity
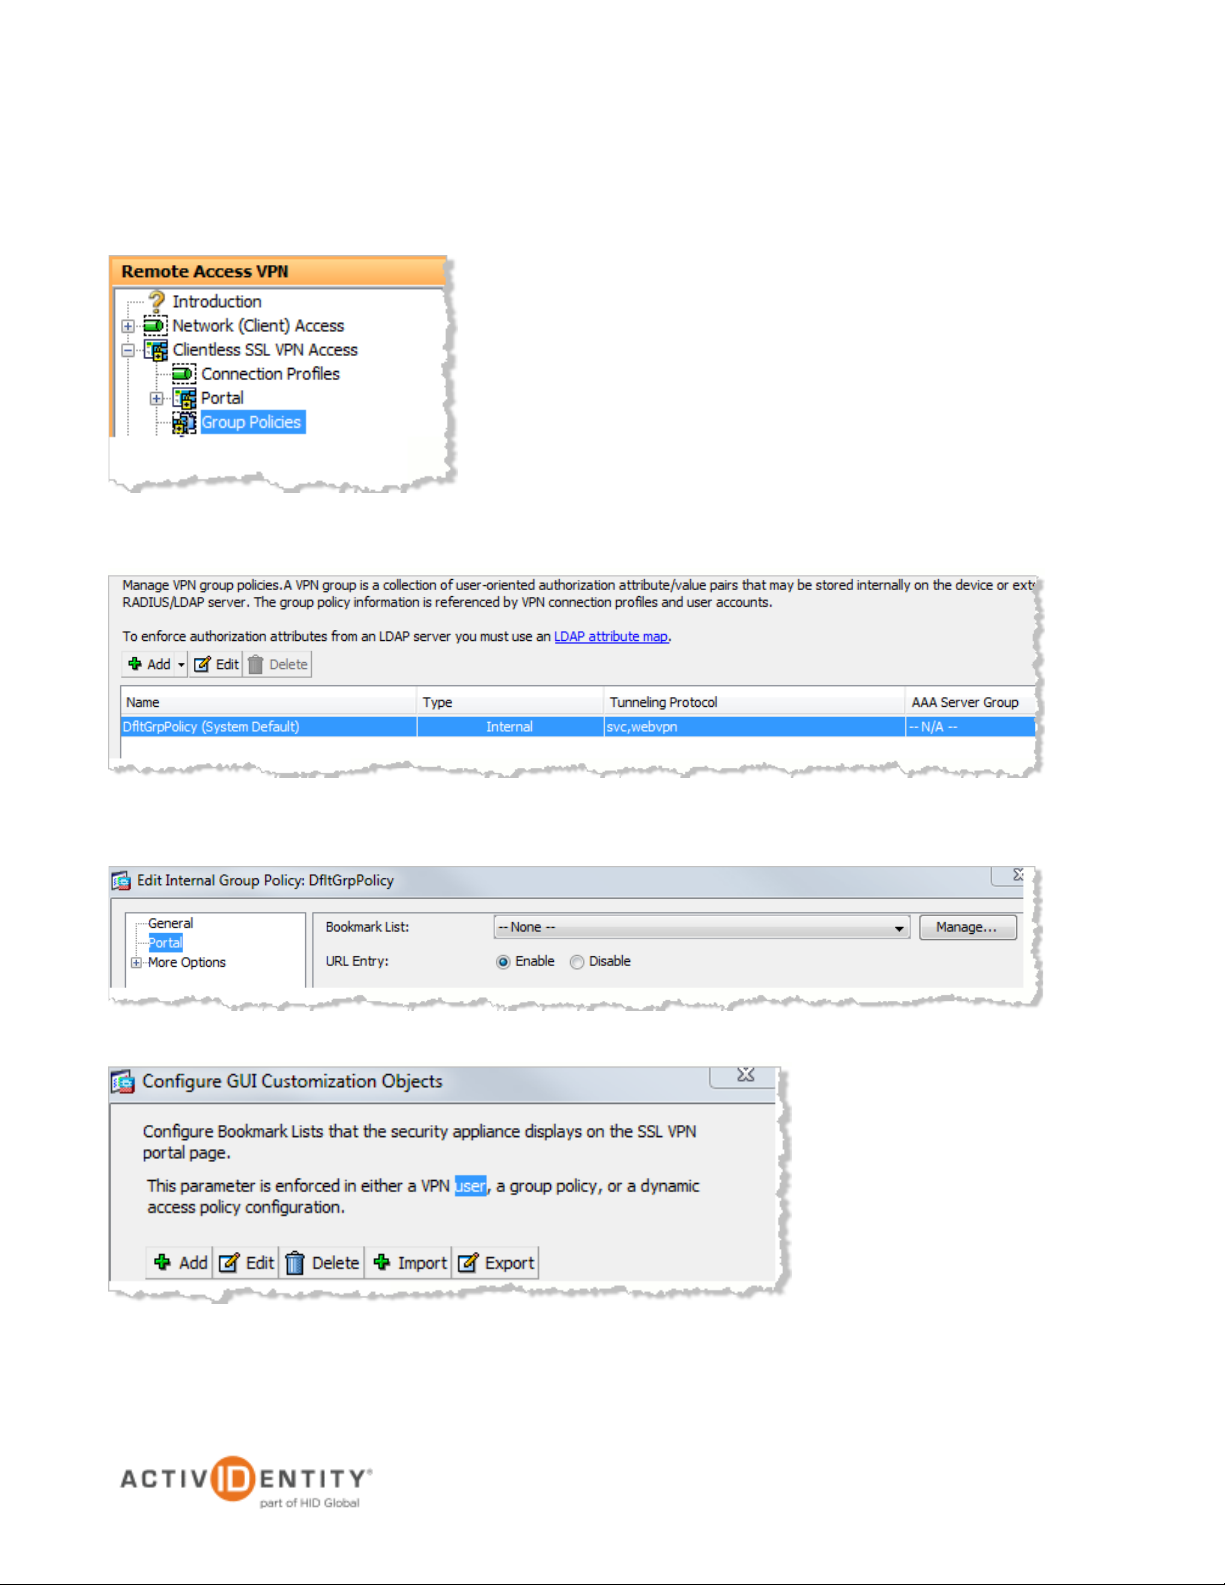
2.3 Procedure 3: Configure Group Policies
1. From the top menu, expand Clientless SSL VPN Access, and then click Group Policies from the features
menu on the left.
2. Under the Name column select DftGrpPolicy (System Default), and then click Edit.
Now, you will choose the application that you want to publish in the Cisco ASA.
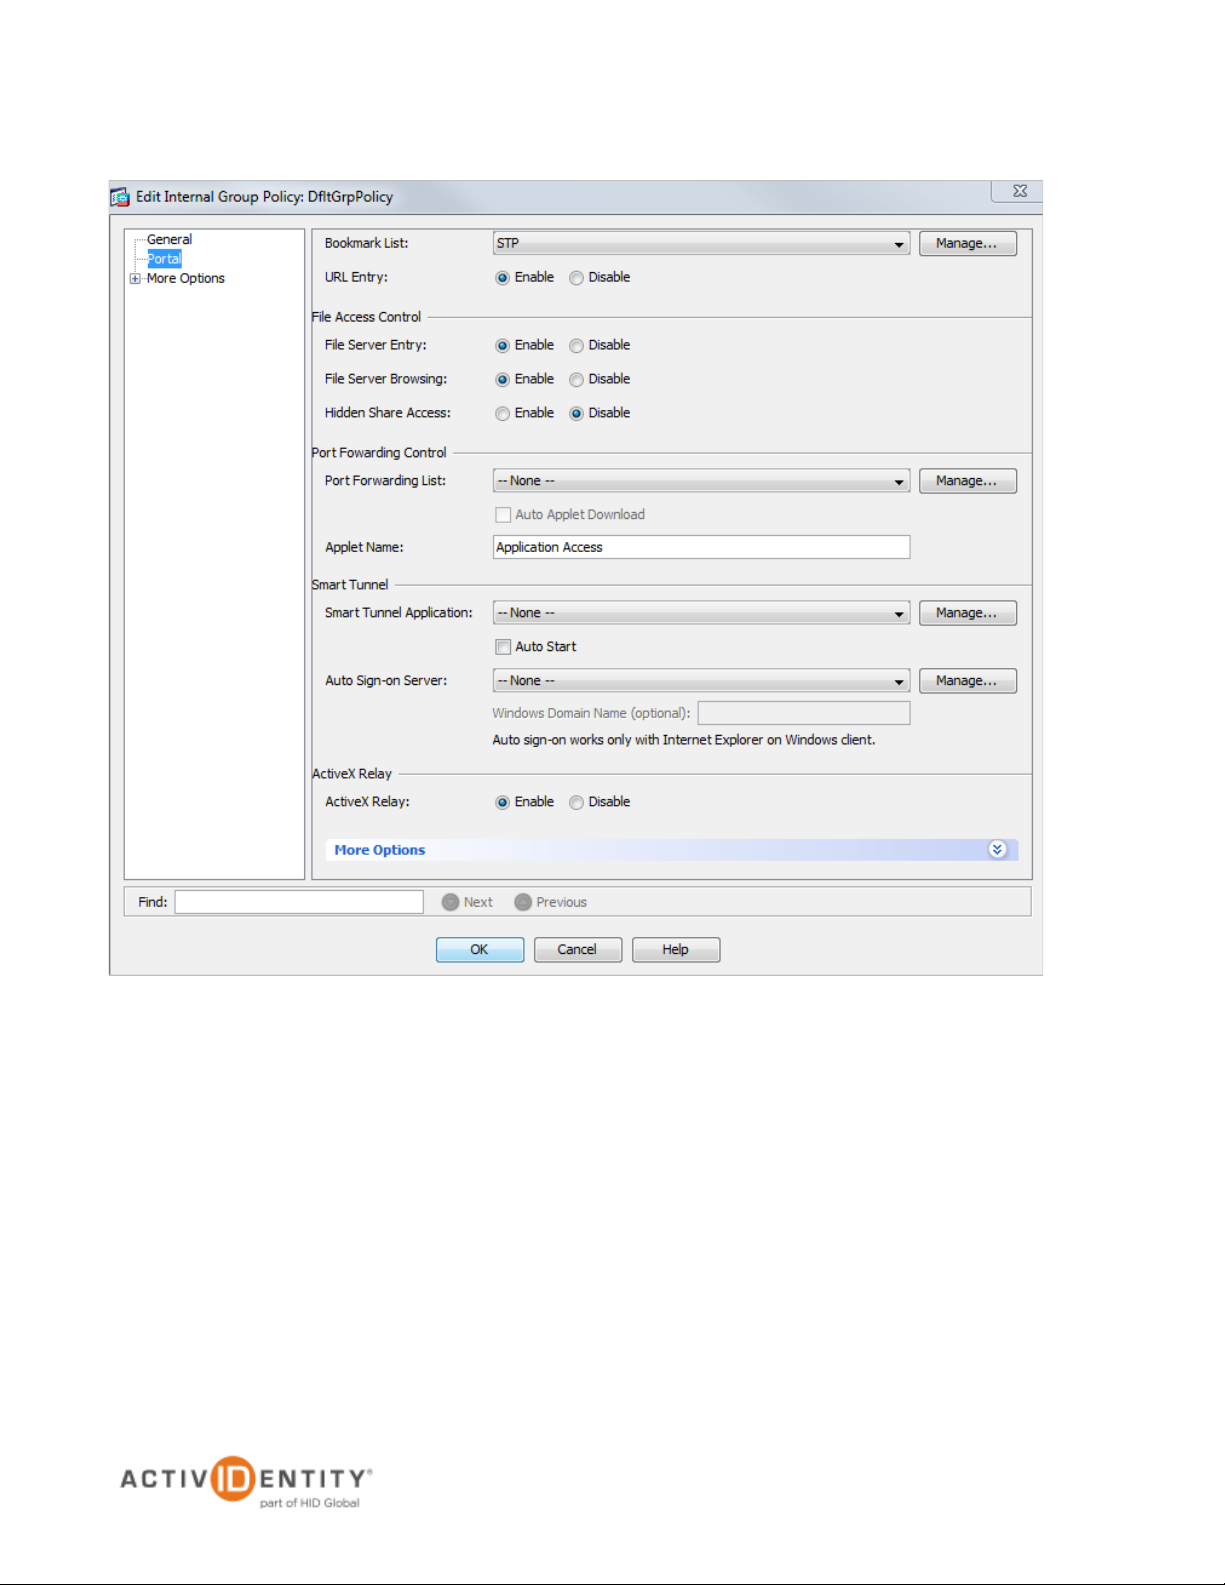
3. In the pane displayed to the left, click Portal, and then on the Bookmark List line, click Manage.
4. Click Add.
Page 9
ActivIdentity 4TRESS Authentication Server (FT2011) Web Tokens and Cisco ASA | Integration Handbook
P 9
External Use | July 11, 2012 | © 2012 ActivIdentity
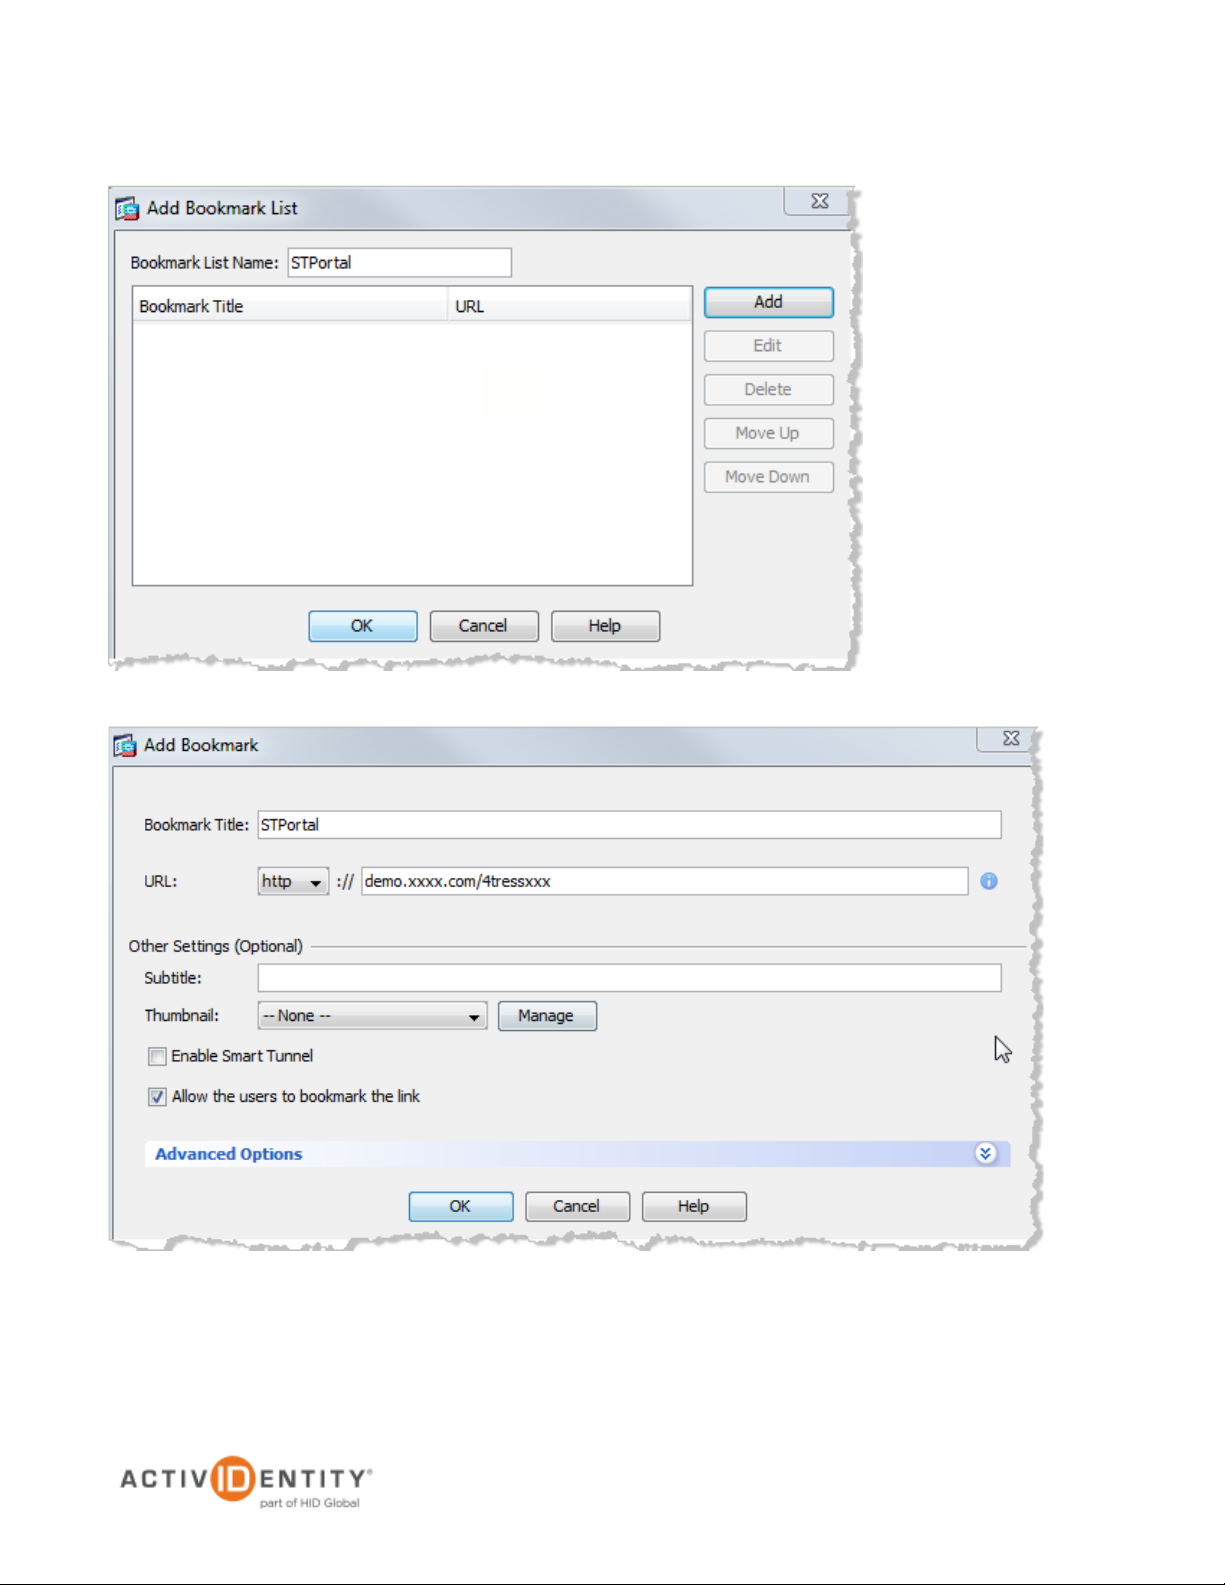
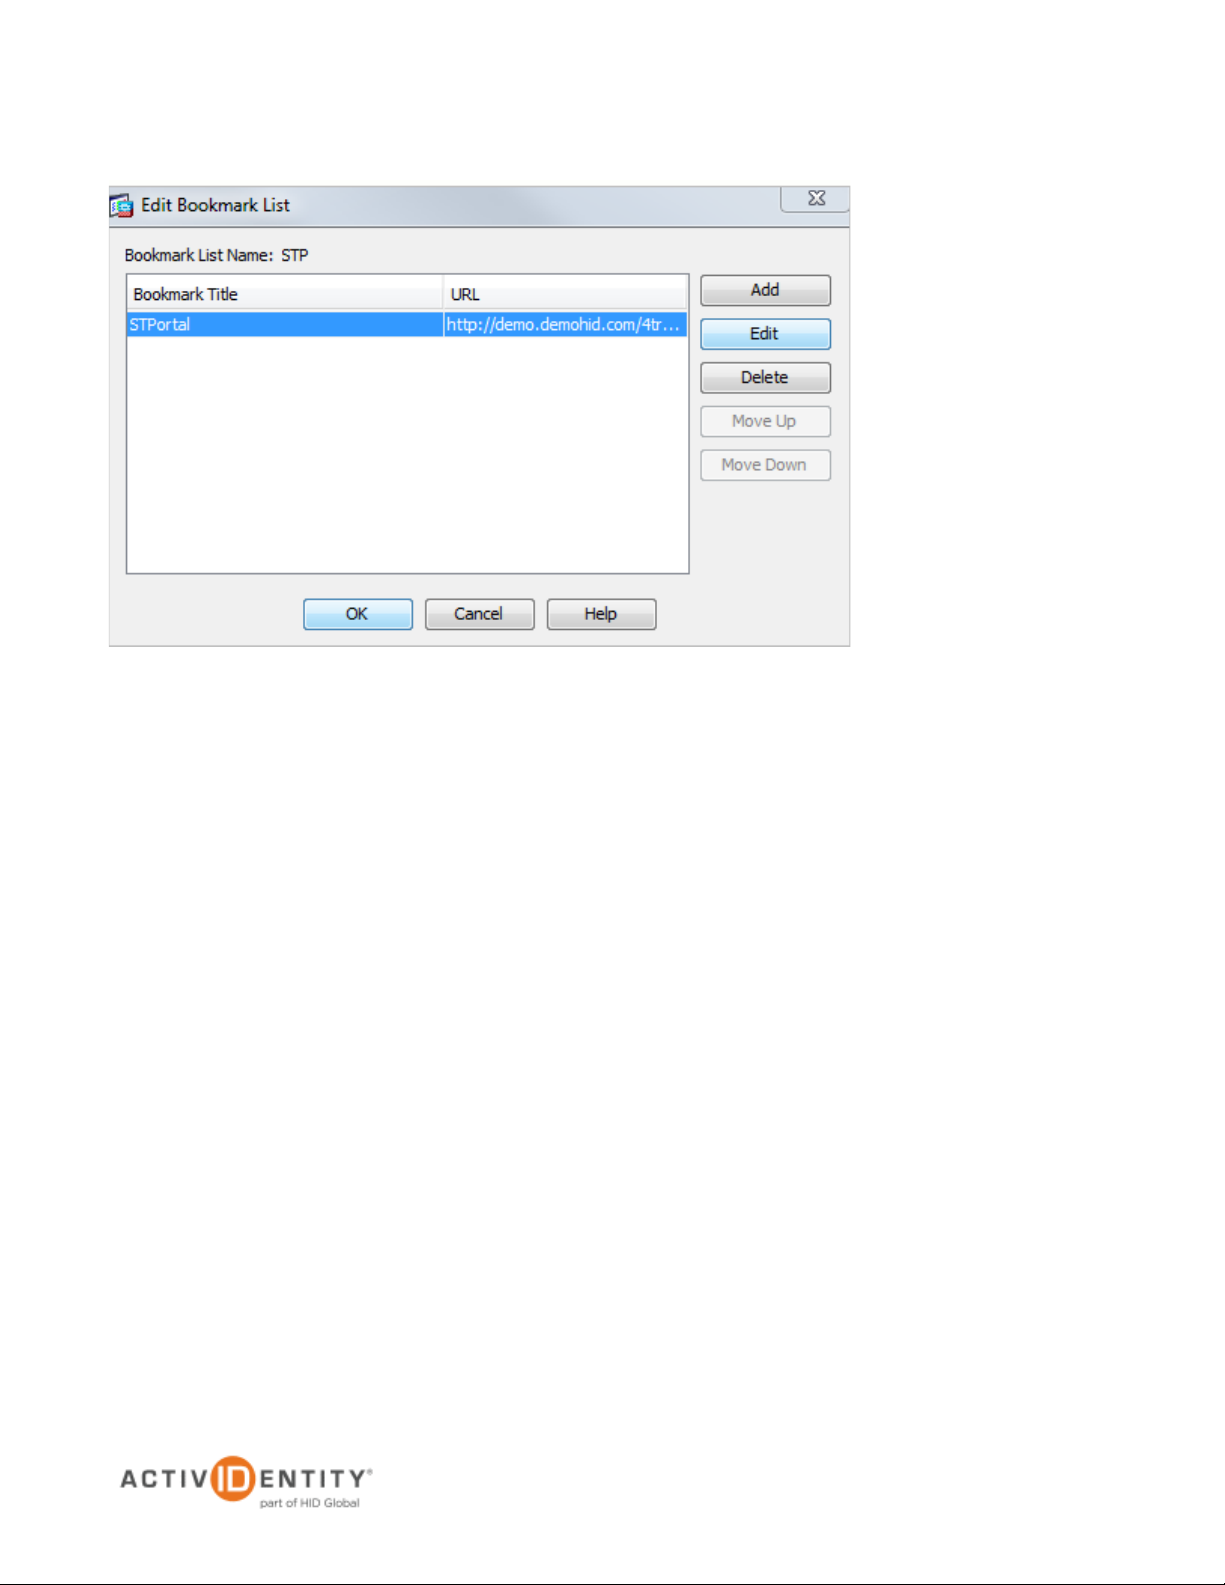
5. In the Bookmark List Name box, specify a title for your bookmark, and then click Add.
6. Specify the URL of the resource that you want to publish on the Cisco ASA, and then click OK.
Page 10
ActivIdentity 4TRESS Authentication Server (FT2011) Web Tokens and Cisco ASA | Integration Handbook
P 10
External Use | July 11, 2012 | © 2012 ActivIdentity
7. Click OK. The main dialog is displayed again, as illustrated next.
Page 11
ActivIdentity 4TRESS Authentication Server (FT2011) Web Tokens and Cisco ASA | Integration Handbook
P 11
External Use | July 11, 2012 | © 2012 ActivIdentity
8. Click OK.
Page 12

ActivIdentity 4TRESS Authentication Server (FT2011) Web Tokens and Cisco ASA | Integration Handbook
P 12
External Use | July 11, 2012 | © 2012 ActivIdentity
2.4 Procedure 4: Configure New Cisco Portal
PIN usage is dependent on the custom page deployed. It is possible to hide the Web soft token, and in this case,
it’s necessary to apply a Web soft token without use of a PIN. In this case, the PIN is replaced by the user’s LDAP
password. Please contact your ActivIdentity technical representative to obtain a sample page and to discuss the
following possible combinations of PIN usage:
• Username plus LDAP Password plus visible Web soft token plus PIN plus OTP generated by the
Web soft token.
• Username plus LDAP Password plus visible Web soft token without PIN plus OTP generated by the
Web soft token.
• Username plus LDAP Password plus hidden Web soft token without PIN plus OTP generated by the
Web soft token hidden in the page.
• Username plus visible Web soft token plus PIN plus OTP generated by the Web soft token.
Your ActivIdentity technical contact will send you images, the token applet, and the login portal page. The portal
page will be similar to the following illustration.
FIGURE 1: Sample Cisco ASA Portal
Page 13

ActivIdentity 4TRESS Authentication Server (FT2011) Web Tokens and Cisco ASA | Integration Handbook
P 13
External Use | July 11, 2012 | © 2012 ActivIdentity
2.5 Procedure 5: Web contents
1. From the top menu, expand Clientless SSL VPN Access, expand Portal, and then click Web Contents from
the features menu on the left.
2. Click Import
3. Specify all the files obtained in the last section 2.4, one-by-one following the configuration illustrated above.
Click Browse Local Files to select your first file.
Page 14

ActivIdentity 4TRESS Authentication Server (FT2011) Web Tokens and Cisco ASA | Integration Handbook
P 14
External Use | July 11, 2012 | © 2012 ActivIdentity
4. Select the first file to import, and then click Import. You will be returned to the Import Web Content page.
5. Back on the Import Web Content page, click Import Now.
6. Repeat the imports until you have finished importing the required files. When you are finished, you will see
them all listed, as illustrated next.
Page 15

ActivIdentity 4TRESS Authentication Server (FT2011) Web Tokens and Cisco ASA | Integration Handbook
P 15
External Use | July 11, 2012 | © 2012 ActivIdentity
2.6 Procedure 6: Customization
1. From the top menu, expand Clientless SSL VPN Access, and then click Customization from the features
menu on the left.
2. Click Add.
3. Specify a Customization Object Name, and then click OK.
4. Select your object, and then click Edit.
Page 16

ActivIdentity 4TRESS Authentication Server (FT2011) Web Tokens and Cisco ASA | Integration Handbook
P 16
External Use | July 11, 2012 | © 2012 ActivIdentity
5. In the Logon page menu, click Full Customization.
6. From the Mode drop-down list, select Enable.
7. From the HTML Content URL drop-down list, select login.inc.
8. In the Logon page menu, click Title Panel.
9. From the Mode drop-down list, select Disable.
Page 17

ActivIdentity 4TRESS Authentication Server (FT2011) Web Tokens and Cisco ASA | Integration Handbook
P 17
External Use | July 11, 2012 | © 2012 ActivIdentity
10. In the Logon page menu, click Logon Form.
11. Remove all the configuration settings, as illustrated. It is not necessary to remove the colors.
12. Click Save.
Page 18

ActivIdentity 4TRESS Authentication Server (FT2011) Web Tokens and Cisco ASA | Integration Handbook
P 18
External Use | July 11, 2012 | © 2012 ActivIdentity
2.7 Procedure 7: Assign the New Portal
Task 1: Assign the new custom page object on the Connection Profile DefaultWEBVPNGroup as described in
this section.
1. In the pane to the left of the Remote Access VPN dialog, expand Connection Profiles.
2. In the Name column, select the DefaultWEBVPNGroup profile, and then click Edit.
3. In the pane to the left under Advanced, click Clientless SSL VPN.
4. From the Login and Logout Page Customization drop-down list, select custom_portal, and then click Add.
Page 19

ActivIdentity 4TRESS Authentication Server (FT2011) Web Tokens and Cisco ASA | Integration Handbook
P 19
External Use | July 11, 2012 | © 2012 ActivIdentity
Task 2: Assign the custom page object on the Group Policy DftGrpPolicy as described in this section.
1. In the pane to the left of the Remote Access VPN dialog, expand Clientless SSL VPN Access, and then click
Group Policies.
2. In the Name column, select the DftGrpPolicy, and then click Edit.
3. In the pane to the left under More Options, click Customization.
4. From the Portal Customization drop-down list, select custom_portal.
5. Optionally, enter a Homepage URL, and then click OK at the bottom of the page.
Page 20

ActivIdentity 4TRESS Authentication Server (FT2011) Web Tokens and Cisco ASA | Integration Handbook
P 20
External Use | July 11, 2012 | © 2012 ActivIdentity
3.0 ActivIdentity 4TRESS AS Configuration: Sequence of Procedures
This chapter describes the procedures required to configure ActivIdentity 4TRESS Authentication Appliance
support for an RFE component installed on an appliance.
You will perform these steps using the ActivIdentity 4TRESS Management Console. Be sure you have the
ActivIdentity 4TRESS Authentication Appliance Administration Guide: Management Console technical publication
on hand. This chapter does not provide all the details.
3.1 Configure RADIUS Channel
A RADIUS channel for the RFE deployment defines a group of access controllers and specifies how to handle
authentication requests.
Using a policy configured for the channel, you will filter the requests according to the IP address or hostname of
the access controllers.
1. Launch the ActivIdentity 4TRESS Management Console.
2. When prompted, enter your User name and Password, and then click Submit.
Page 21

ActivIdentity 4TRESS Authentication Server (FT2011) Web Tokens and Cisco ASA | Integration Handbook
P 21
External Use | July 11, 2012 | © 2012 ActivIdentity
Important: To configure the RADIUS channel policy, you can either create a new channel using the
3. Select the Configuration tab, and then in the pane to the left under Policies, click Channels.
Add or Copy options, or edit an existing channel by clicking the channel name in the list displayed to
the right of the page. ActivIdentity recommends that you use the Remote Access channel—this is the
pre-defined RADIUS channel.
4. In the list displayed to the right when you click Channels, click the VPN Remote Access channel.
5. In the VPN Remote Access Details section displayed, accept the default for Description, or change it. Make
sure the Name, Type, and Code are correct.
Page 22

ActivIdentity 4TRESS Authentication Server (FT2011) Web Tokens and Cisco ASA | Integration Handbook
P 22
External Use | July 11, 2012 | © 2012 ActivIdentity
Important: You can select either a host name—and then enter name of the machine hosting the
Important: Make sure that each access controller is configured with the shared secret you specified
6. Click Channel Policy to expand the section and display the configuration options.
7. Enter and confirm the Shared secret.
The Shared secret encrypts the information exchanges between the appliance(s) and the access controllers.
The secret must be the same for each controller configured in the channel policy. The secret must not exceed
40 characters. By default, the secret for a pre-defined gate is ActivIdentity.
8. Click Add.
The Add Authorized IP addresses or host names list is displayed. Use these settings to configure the
access controllers that are authorized to use the gate for authentication.
access controller—or you can enter an IP address, and then enter an address and range of the
access controller. ActivIdentity recommends that you use an IP address rather than a host name. If the
DNS cannot translate the host name, then the RFE will not restart.
9. For an IP address, enter the valid network range (for example, 192.168.0.0/24).
10. Click Save.
The access controller is displayed in the Channel page. Now, it is authorized to use the gate for
authentication requests.
above. If necessary, repeat the steps to authorize access for additional controllers.
Page 23

ActivIdentity 4TRESS Authentication Server (FT2011) Web Tokens and Cisco ASA | Integration Handbook
P 23
External Use | July 11, 2012 | © 2012 ActivIdentity
Reminder: Have the ActivIdentity 4TRESS Authentication Appliance Administration Guide:
3.2 Managing User Repositories: An Overview
The “User Repositories” function of the ActivIdentity 4TRESS Management Console defines parameters for using
LDAP servers as the source of user data for the appliance system. By configuring the appliance to communicate
with your LDAP directory server, you enable access to user data for authentication purposes.
Management Console technical documentation on hand. This document only presents summary
steps.
3.2.1 Create User Repository
1. Logged into the ActivIdentity 4TRESS Management Console, select the Configuration tab.
2. In the pane to the left, under Environment, click User Repositories.
3. In the page displayed to the right, click Add.
Page 24

ActivIdentity 4TRESS Authentication Server (FT2011) Web Tokens and Cisco ASA | Integration Handbook
P 24
External Use | July 11, 2012 | © 2012 ActivIdentity
4. Name—Enter a meaningful name.
5. Adapter—Select the adapter from the drop-down list that corresponds to your directory type (either Novell®
eDirectory or Microsoft® Active Directory).
6. Host—Enter the IP address or hostname of the server where your LDAP directory resides.
7. Port—Enter the Port (the LDAP directory server’s listening port).
8. In the Configure connection login credentials section of the page, enter the user credentials that the
appliance will use to access the LDAP database. Then enter and confirm the user’s Password. You MUST
indicate the full User DN.
Page 25

ActivIdentity 4TRESS Authentication Server (FT2011) Web Tokens and Cisco ASA | Integration Handbook
P 25
External Use | July 11, 2012 | © 2012 ActivIdentity
9. Expand the Attributes section.
10. Select the Enabled options for the appliance attributes to be mapped to the LDAP attributes.
11. Click Save. A success message appears.
3.3 Configure Administration Groups, User Types, User Repositories, and Authentication
Policies
For details, refer to the ActivIdentity 4TRESS Authentication Appliance Administration Guide: Management
Console technical documentation. This section summarizes the remaining procedures to perform before Web soft
tokens can be activated.
1. Use the ActivIdentity 4TRESS Management Console to create and update administration groups within user
types. Then you can add users to the administration groups.
User types define categories of users. A hierarchy of administration groups exists for each user type.
For each user type, you can define:
• User repositories relating to the user type,
• Authentication policies accessible to users of this type, and
• User attributes for users of this type.
There are default user types. Installing the ActivIdentity 4TRESS Appliance Server automatically sets up a
number of user types. For each user type, there are pre-defined system users. Collectively, these sample
users have all the required privileges to administer the system. You can use the base data set as provided, or
modify it to meet your specific requirements.
2. Map the user repository to a user type.
3. Assign an authentication policy to a user type.
4. Map the user repository to an administration group.
Administration groups provide a way to organize (partition) users for administrative purposes, as well as a
way to assign permissions to users through membership of administration groups.
Page 26

ActivIdentity 4TRESS Authentication Server (FT2011) Web Tokens and Cisco ASA | Integration Handbook
P 26
External Use | July 11, 2012 | © 2012 ActivIdentity
3.4 Create and Activate Web Soft Token (Optionally without PIN)
For details and additional illustrations, refer to the ActivIdentity 4TRESS Authentication Appliance Administrator
Guide: Configurer Portal technical documentation, specifically chapter 6, “Configuring Device Types.”
1. Launch the ActivIdentity 4TRESS Configurer, and then log in.
2. Select the Device Types tab.
3. Click Add (to start with a blank slate).
4. Create a new Web token without PIN as illustrated next.
5. Click Change to change the Device Adapter.
Page 27

ActivIdentity 4TRESS Authentication Server (FT2011) Web Tokens and Cisco ASA | Integration Handbook
P 27
External Use | July 11, 2012 | © 2012 ActivIdentity
6. Edit the Device Adapter parameters (refer to the following illustration and to the main 4TRESS Configurer
guide).
7. Change the Soft Token Engine init string to:
ALGO-{HOTP|TOTP}:PIN-{0|1}:SHA-{1|256}:OTPLEN-{4|6|8}:MODE-{1|2|3|4}:ENC-{3DES|AES}:PBKD-
{0|1}:TIMESTEP-{30|60}
Page 28

ActivIdentity 4TRESS Authentication Server (FT2011) Web Tokens and Cisco ASA | Integration Handbook
P 28
External Use | July 11, 2012 | © 2012 ActivIdentity
3.5 Modify Soft Token Activation Portal to Use Web Tokens without PIN’s (Optional)
1. Log in to the ActivIdentity 4TRESS Appliance Console, and then select the Operating tab.
2. In the pane to the left, under Configuration, click Applications, and then click Soft Token Portal.
Page 29

ActivIdentity 4TRESS Authentication Server (FT2011) Web Tokens and Cisco ASA | Integration Handbook
P 29
External Use | July 11, 2012 | © 2012 ActivIdentity
3. Edit the portal.properties file. Select it from the Select file name drop-down list, and then click Edit to display
the file.
4. Modify the file as described below:
Page 30

ActivIdentity 4TRESS Authentication Server (FT2011) Web Tokens and Cisco ASA | Integration Handbook
P 30
External Use | July 11, 2012 | © 2012 ActivIdentity
# 4TRESS Activation
# -----------------
application.config.4tress.activation.token.web.device.type=DT_W_OE_NP
application.config.4tress.activation.token.web.auth.type=AT_CUSTOTP
application.config.4tress.activation.token.pc.device.type=DT_STP_OE
application.config.4tress.activation.token.pc.auth.type=AT_CUSTOTP
application.config.4tress.activation.token.mobile.device.type=DT_STM_OE
application.config.4tress.activation.token.mobile.auth.type=AT_CUSTOTP
#This value must be equal to the PIN value {0,1} contained in the "Soft Token
Engine init string" entry for the
#Device Adapter defined in the Device Types corresponding of the key
application.config.4tress.activation.token.web.device.type
application.config.4tress.activation.token.web.pin=0
5. Save your changes.
3.6 Activate LDAP Authentication on the Soft Token Portal
Edit the Soft Token Activation Portal channel settings.
1. Logged into the Management Console, under Policies in the pane to the left, click Channels.
2. Select the Soft Token Activation Portal option.
3. Select the option to enable LDAP fallback authentication when no credential exists, as illustrated next.
4. Restart the server. For details, refer to the ActivIdentity 4TRESS Authentication Appliance Setup Guide.
Page 31

ActivIdentity 4TRESS Authentication Server (FT2011) Web Tokens and Cisco ASA | Integration Handbook
P 31
External Use | July 11, 2012 | © 2012 ActivIdentity
4.0 Sample Authentication Using Web Soft Token Authentication
For details on how to authenticate with a Web Soft Token, refer to the ActivIdentity 4TRESS Authentication
Appliance Soft Token Portal Solution Guide.
4.1 Prerequisite: Activate Web Soft Token
For a person to use a Web token, the laptop must be enrolled first.
1. From the Main menu, from the Service drop-down list, select Activate Soft Token.
2. From the Soft Token Type drop-down menu, select Web Soft Token, and then click Submit.
3. Enter your User Name and Password, and then click Login.
Page 32

ActivIdentity 4TRESS Authentication Server (FT2011) Web Tokens and Cisco ASA | Integration Handbook
P 32
External Use | July 11, 2012 | © 2012 ActivIdentity
4. Click Activate. If soft token configuration has been configured to use a Web soft token with a PIN, then you
will be prompted to enter a PIN, also.
When the proper login credentials have been accepted, the following message is displayed.
Now, the Web token can be used to access Cisco ASA SSL VPN.
Page 33

ActivIdentity 4TRESS Authentication Server (FT2011) Web Tokens and Cisco ASA | Integration Handbook
P 33
External Use | July 11, 2012 | © 2012 ActivIdentity
5.0 Notes About Authenticating with Web Soft Token Launched in the Sign-In Page
• You must have customized the Sign-In Page to launch the Web soft token as an HTML page. To
receive a sample page, please contact your ActivIdentity technical representative.
• You can configure a Web soft token to be used with a PIN or without a PIN.
• You can configure so that an LDAP password either replaces the PIN or complements it (depending
on Cisco configuration).
• A user must have activated a Web soft token on his/her computer.
For details on how authenticating with a Web soft token works, please refer to ActivIdentity 4TRESS AAA
documentation.
Page 34

ActivIdentity 4TRESS Authentication Server (FT2011) Web Tokens and Cisco ASA | Integration Handbook
P 34
External Use | July 11, 2012 | © 2012 ActivIdentity
Legal Disclaimer
Americas +1 510.574.0100
US Federal +1 571.522.1000
Europe +33 (0) 1.42.04.84.00
Asia Pacific +61 (0) 2.6208.4888
Email info@actividentity.com
Web www.actividentity.com
ActivIdentity, the ActivIdentity (logo), and/or other ActivIdentity products or marks referenced
herein are either registered trademarks or trademarks of HID Global Corporation in the United
States and/or other countries. The absence of a mark, product, service name or logo from this
list does not constitute a waiver of the trademark or other intellectual property rights concerning
that name or logo. Cisco and the Cisco logo are registered trademarks of Cisco, Inc. in the
United States and other countries.The names of other third-party companies, trademarks, trade
names, service marks, images and/or products that happened to be mentioned herein are
trademarks of their respective owners. Any rights not expressly granted herein are reserved.
 Loading...