

Page 1

Web-Based Access Control Solution
ACW2-XN
Installation Guide
ACW2XN-902-EN, Rev. A.2
PLT-03474 A.2
1 Introduction
Product Description
HID Global's
Web-based Access Control Solution for small businesses,
ACW2-XN
, provides a turnkey
solution for small facilities. Meet today’s security challenges and benefit from support for state-of-the-art
identity management and reliability of an enterprise level hardware at a fraction of the cost.
Reduce risk and response time for lost or stolen credentials. Use a standard web browser to access the
intuitive management portal. The web-based portal,
HID Access Manager
, makes it convenient to
provision and revoke smart cards without the expense or difficulties of managing physical keys.
In addition to access and identity management,
ACW2-XN
provides valuable built-in business tools. Basic
reporting and full audit logs are available at the touch of a button through the web-based portal.
Reliable and backed by a strong warranty, HID Global puts access control from a trusted industry leader
within reach.
ACW2-XN
can be expanded to support up to sixteen doors with additional AW2 Wiegand door modules.
Page 2

Page 2 of 26 Installation Guide
© 2018 HID Global Corporation All rights reserved.
Web-Based Access Control Solution
ACW2-XN
2 System Specifications
Hardware Capabilities
Feature
Specification
Max People 1000
Max Cards 3 Cards per Person
Max Logs 100 000 events
# of Doors
2 Doors or 1 APB Door
(*Expandable to 16 doors, or 8 APB Doors)
*Note:
1. Additional ACW2-XN and/or AW2 modules are required.
2. See System Architecture – Best Practices on page 4 for more details.
3 What’s in the Packaging
ACW2-XN Contents
ACW2-XN
Spare
Labels
Cable Ties &
Anchor
Metal-Oxide
Varistors
Spare
Fuse
Drilling
Template
Quick Install
Guide
More
Documentation
http://hid.gl/ac-doc
Page 3

© 2018 HID Global Corporation All rights reserved.
Installation Guide Page 3 of 26
Web-Based Access Control Solution
ACW2-XN
4 Installation Preparation
System Requirements
• Compatible browser (See details on page 14)
• Access to a mains power outlet.
• Access to an Ethernet Network point or a router/switch that will allow network connectivity.
• In the absence of any network, HID Access Manager can be set up and administered by
connecting a desktop/laptop PC directly to the Controller Module with an (uncrossed) network
cable.
Suggested Tools
• Electric drill
• Drill bits (Masonry / steel – to suite the site wall materials)
• Screwdriver, small, flat
• Wire strippers
• Side cutters
• Site plan (to lay out door and reader locations)
Additional Hardware
• Electric strike locks and/or mag locks
• Power supply with sufficient capacity to power the locks (see calculations on page 19)
• Push buttons for Request-to-Exit (REX)
• Door Position Sensor (DPS) switches (if not built into the locks)
• Mains power cable with a plug on one end
• Cable for Wiegand Readers, sufficient for the site (measure the site)
• Cable for Door Position Sensor and Request-to-Exit, sufficient for the site (measure the site)
Page 4

Page 4 of 26 Installation Guide
© 2018 HID Global Corporation All rights reserved.
Web-Based Access Control Solution
ACW2-XN
5 System Architecture – Best Practices
One or two ACW2-XN enclosures?
ONE ACW2-XN enclosure
• is sufficient for up to 8 readers
• AND if all doors are within reasonable cabling distance of the enclosure
TWO ACW2-XN enclosures are needed
• for 9 to 16 readers
• OR if a second group of doors is a significant distance away from the first group. The two
enclosures are linked with an RS-485 cable, saving on long, multiple-reader cable runs.
(Remember that the total door count still cannot exceed the 16-door limit.)
How many AW2 Modules are needed?
• One
AW2
Module is needed for each door that has both entry and exit readers.
• One
AW2
Module is needed for every TWO doors that only require entry readers
NOTE:
• Any combination of single-readers and two-reader doors is permissible
• Readers may be independently allocated to any door
• Whatever the combination, no more than sixteen doors are supported
Example using three AW2 Wiegand Modules:
Any combination of single-reader or entry+exit-reader doors is possible
Page 5

© 2018 HID Global Corporation All rights reserved.
Installation Guide Page 5 of 26
Web-Based Access Control Solution
ACW2-XN
16 Reader (8 APB Door) Example
Note:
• HID Access Manager will only accommodate 16 doors in total.
Master and Slave Controlling eight anti pass-back doors
Page 6

Page 6 of 26 Installation Guide
© 2018 HID Global Corporation All rights reserved.
Web-Based Access Control Solution
ACW2-XN
6 Mounting the ACW2-XN
Mounting Location Considerations
Shelter and Security
Single ACW2-XN cable run considerations
Second/Slave ACW2-XN cable run considerations
NOTE that the Slave ACW2-XN:
• Does NOT connect to the network
• MUST connect via RS-485 to the Master ACW2-XN
• Is able to continue reading cards and controlling its doors in the event of an RS-485 cable break
AC Mains Outlet
RS-485 from Master ACW2-XN
(Up to 1 000 m)
Secure indoor location
Away from the weather
AC Mains Outlet
Network
Choose mounting location to
minimise door cabling runs
Choose mounting location to
minimise door cabling runs
< 150 m, 492 ft. Cable
< 150 m, 492 ft. Cable
Page 7

© 2018 HID Global Corporation All rights reserved.
Installation Guide Page 7 of 26
Web-Based Access Control Solution
ACW2-XN
Removal/Fitting the Lid
Mark Up Mounting Holes Using Drilling Template
1. Select fasteners that are appropriate for the mounting surface (masonry/wood/ dry wall)
2. Select the drill size appropriate for the fasteners
3. Fix the Drilling Template against the chosen vertical surface (using the supplied double-sided tape),
making sure that the top edge is horizontal. (Remember to allow 30 mm clearance on the left of the
ACW2-XN enclosure to allow the door to hinge fully open.)
4. Centre punch the two mounting hole locations
5. Drill holes of a diameter that is suitable for the fasteners
6. Remove the lid from the enclosure (as per instructions above)
7. Mount the enclosure to the surface
8. Replace the lid (and plug the lid cable back in) after the system wiring is complete
9. Place the AC and AW2 module labels in the correct positions provided on the back page of the
ACW2-XN Quick Install Guide. The information on the labels will be used during the door
configuration process via HID Access Manager.
Expanding the controller with more Wiegand Modules
The
ACW2-XN
comes assembled with one AW2 module, and can support another three AW2 modules.
Additional AW2 modules are plugged into the sides of the existing modules, and then fastened in place
with the four mounting screws that are included with each AW2 module.
Remember to place the additional AW2 Module labels on the back page of the ACW2-XN Quick Install
Guide
Note:
•
AW2
modules may be added or removed without powering down the system.
1. 2. 3.
Open the lid &
unplug the cable
Remove the lid
Slide the lid upward
Page 8
Page 8 of 26 Installation Guide
© 2018 HID Global Corporation All rights reserved.
Web-Based Access Control Solution
ACW2-XN
7 Wiring the System
AW2 Wiegand Module
AW2 Module Cable Specifications
Application
Conductors
(# of Wires)
Cross Sectional Area AWG Max Cable Length
Door Strike (12V and higher) 2 0.75 mm2, 0,0012 in2
18
150 m, 492 ft.
Card Reader 10 (8 used) 0.32 mm2, 0.0005 in2
20 150 m, 492 ft.
Door Contact 2 0.32 mm2, 0.0005 in2
20 150 m, 492 ft.
Request-to-Exit 4 0.32 mm2, 0.0005 in2 20 150 m, 492 ft.
MOV (included in the packaging) Specification
MOV Rating
25V
RMS
500A 77V
Max Clamping
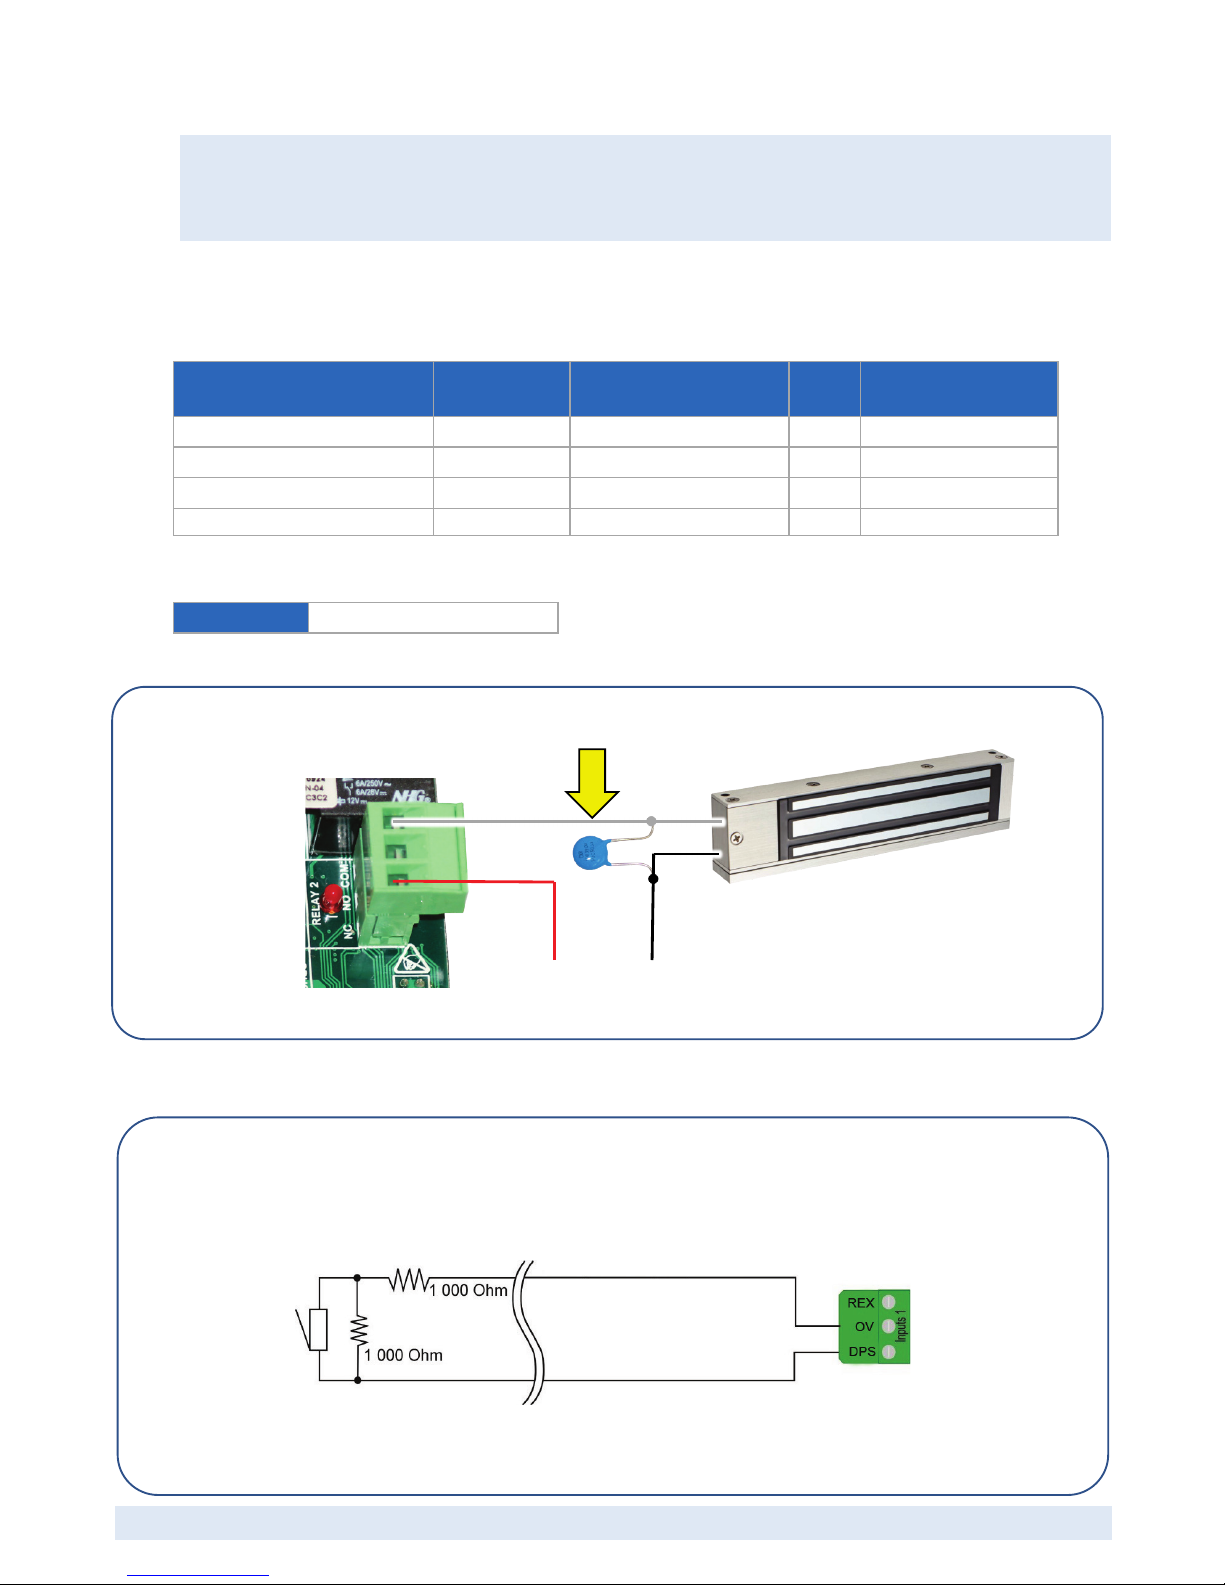
Where to use the suppled MOVs
The MOVs MUST be connected across 12V inductive loads to prevent sparking at the
relay contacts.
The supplied MOVs are only for 12V applications, and are MANDATORY
Supervised Inputs (Optional)
HID Access Manager can monitor the Door Position Sensor (DPS) circuits for tampering
when resisters are installed.
Two 1kΩ resistors are required for every sense line. These should be installed in a
location where they cannot be accessed without opening the door in question:
This feature must be activated in HID Access Manager via the door configuration
process.
0V
+12V
COM
NC
Page 9

© 2018 HID Global Corporation All rights reserved.
Installation Guide Page 9 of 26
Web-Based Access Control Solution
ACW2-XN
AW2 Key Components Diagram
* AW2 Wiegand Modules have spare Earthing Terminals – see page 12 for details
DIP-switch Position Function
1110
(Factory Set DIP Switch Position)
Wiegand 26-bit, 44-bit, 40-bit, 37-bit and card + PIN-code Mode.
Module Data LED
Relay 1 Terminals
Relay 2 Terminals
Wiegand
Reader
1
Terminals
Door Position Sensor 1
Request-to-Exit 1
Wiegand
Reader
2
Terminals
Relay Status LEDs
Input Status LEDs
Door Position Sensor 2
Request-to-Exit 2
0V
0V
Module Power
Status LED
DIP Switch 1
DIP Switch 2
*Earthing Terminal
(ETH)
Page 10

Page 10 of 26 Installation Guide
© 2018 HID Global Corporation All rights reserved.
Web-Based Access Control Solution
ACW2-XN
AW2 Wiring Example
*DPS: Some electric strike locks include Door Position Sense terminals. When they don’t, additional
sensors should be fitted if door position sensing is required.
Some strike locks and maglocks have built-in arc suppression. Consult the installation information for the
locks you are using. It is recommended that the MOVs (supplied with the Wiegand Module) are
connected across any inductive loads.
NB: The supplied MOVs are only suitable for 12V applications.
CAUTION:
• Inadequate spark suppression can result in early failure of relay contacts – and will void the
warranty on the affected AW2 module.
NC
COM
+12V
COM
NO
0V
*DPS
REX – Door #2
REX – Door #1
DPS – Door #1
Maglock – Door #1
Strike Lock – Door #2
12V DC
PSU
Wiegand Reader #1
Colour
Function
Red
12V Black
0V Green
D0 White
D1 Brown
RED
Orange
GREEN
Yellow
Buzzer
Blue
Hold
Grey
Shield
Wiegand Reader #2
Function
Colour
Shield
Grey
Hold
Blue
Buzzer
Yellow
GREEN
Orange
RED
Brown
D1
White
D0
Green
0V
Black
12V
Red
Terminal blocks unplug, giving easy
access to the terminal screw heads
Page 11

© 2018 HID Global Corporation All rights reserved.
Installation Guide Page 11 of 26
Web-Based Access Control Solution
ACW2-XN
Controller Module
Cable Specifications
Application Conductors Cross Section
Max Cable
Length
Network 8 >= 0,75 mm2 150 m
RS-485 Twisted pair, with or without screen >= 0.51 mm2 1 000 m
Key Components and Connections
Note:
• Any module that has changes made to its DIP Switch settings while already powered up must be
powered down and powered up again. This is because the settings are only read by the module
during the power up cycle.
DIP-switch Position Function MODE
0000
Slave Controller Mode
0100
Master Controller Mode
RJ45 Network Socket
12 VDC Supply
(Pre-Wired)
Device RS-485 Terminal
This is used for linking
the Master Controller to
the Slave Controller
Enclosure Anti-Tamper
(Pre-Wired)
DIP Switches
Factory set for
Master (0100)
Host RS-485 Terminal
Reserved for future expansion
Battery Tag
REMOVE before
powering up the system
Earthing Terminal
(See page 12 for details)
Page 12

Page 12 of 26 Installation Guide
© 2018 HID Global Corporation All rights reserved.
Web-Based Access Control Solution
ACW2-XN
DIP-switch Position Function MODE
1XXX
*Special Function – See notes on the next
page
Factory Default Mode
Set DIP Switch 1 to ON, cycle power to the
Module, wait for Controller restart (~20
seconds), and return DIP Switch 1 to
OFF.
(Switches 2, & 4 don’t matter)
Note:
•
FACTORY DEFAULT IS AN ABSOLUTE LAST RESORT
Defaulting the Controller Module will erase all HID Access Manager data, including any static IP
address that was set up – so this address should be noted somewhere safe for future use.
• The most likely reason for choosing to default a Control Module would be when the HID Access
Manager IP address is accidentally set outside of the mask, and HID Access Manager becomes
inaccessible.
• As long as the IP subnet of the Controller Module is the same as the PC/Laptop, the
Device
Discovery Tool
may be used to discover the address and allow you to login and set up an
appropriate IP address. The
Device Discovery Tool
is available for download from the “More
Documentation” link included on page 2.
Earthing Terminal
The Controller and Wiegand Modules are sensitive to Electrostatic Discharges (ESD). Observe
precautions while handling the circuit board assemblies by using proper grounding straps and handling
precautions at all times.
To furher protect against the harmful effects of EMC and transients, a functional earth connection point is
provided as a screw terminal (see silkscreen marking: ETH).
SYSTEM BACKUP
Always
back up the system data using the
Access Manager Utility Tool
. This could save you having to
set up the system from scratch again in the event of a system default, as described above. The
Access
Manager Utility Tool
is available for download from the “More Documentation” link included on page 2.
Connecting two ACW2-XN units via RS-485
Link the two Controller Modules by connecting their RS-485 Device terminals. Remember to set the DIP
Switches on the second Controller Module (in the remote ACW2-XN) to SLAVE (0000) – and remember
to cycle the power to the module in question if you have changed the DIP Switch Settings while it is
already in the powered up state.
Note:
• The Slave ACW2-XN is NOT connected to the Network
• The total door count (Slave + Master) may not exceed 16 doors
Page 13

© 2018 HID Global Corporation All rights reserved.
Installation Guide Page 13 of 26
Web-Based Access Control Solution
ACW2-XN
Mains supply connection
Mains Cable Specification
• Use a mains plug that is standard for the region.
• Select cable that is in accordance to National Wiring code best practices of your local authority.
Mains Cable connection
1. Lay the mains cable from the mains outlet to the IPS enclosure, ensuring that in is
NOT
plugged in to
the mains outlet.
2. Pass the mains cable through a gland in the enclosure wall and follow the route indicated by the
yellow arrow. (It should pass behind the battery, if it were installed)
3. Strip the ends mains cable, exposing 10 mm of the conductors.
4. Press down on the terminal buttons while threading each stripped wire end into its corresponding
terminal.
5. Releasing the terminal button will clamp the stripped wire end in place.
6. Take some time to thoroughly inspect all the wiring and correct any mistakes before progressing to
the next step.
7. Pull out the plastic tag from under the Lithium Button Cell on the Controller Module’s PCB.
8. Plug the mains supply cable into the outlet socket and power up the installation.
9. The STAT (Status) LEDs on the Controller and Wiegand Modules will flash rapidly for approximately
one second.
10. After one second the Controller STAT LED will turn off during the booting process. The Wiegand
Modules’ STAT LEDs will remain on constantly as long as a suitable supply voltage is present.
11. Once satisfied that here are no short circuits it is now safe to connect the recommended 12V battery
(not included) using the ACW2-XN’s integrated spade terminal plugs.
Power Supply
Battery Cables
Lid Earth
Cable Plug
Mains Cable
Route
Mains Terminal Block
Page 14

Page 14 of 26 Installation Guide
© 2018 HID Global Corporation All rights reserved.
Web-Based Access Control Solution
ACW2-XN
8 Network Setup
Compatibility
Before commencing network setup, be sure that operating system and browser are supported. At
time of writing , HID Access Manager compatibility includes the following full releases (or later):
• Firefox 52.0.2
• Chrome 58.0.3029.110
• IPhone 6 (version 10.1.1)
• Android 6
• Windows 7
DNS Name function
• The DNS Name function only works with a PC
If you wish to use DNS feature with mobile phones then you need to set the DNS setting within your
WLAN router.
(Note that the DNS setting is router-manufacturer dependent, and not all routers support this.)
First steps:
1. If you have not done so already, remove the plastic tag from under the button cell on the Controller
PCB.
2. Power up the
ACW2-XN
. (Allow a minute for it to boot up)
Note:
• Only one instance of the web interface may be opened at a time. Multiple Client connections are
not supported
Page 15

© 2018 HID Global Corporation All rights reserved.
Installation Guide Page 15 of 26
Web-Based Access Control Solution
ACW2-XN
How to connect to HID Access Manager for the first time
First option: You have a Router with an active DHCP server
1. Follow this link: http://HIDaccess/ - or type it into the browser.
2. The HID Access Manager login dialogue will launch.
3. See Logging on, on the next page.
Second option: Switch or Direct connection
• Connect a PC/Laptop directly to the
ACW2-XN
network socket using a straight (uncrossed)
Ethernet cable – or via a network switch.
• The PC needs to have an IP address in the same range as the
ACW2-XN’s
default address.
1. Click Start>Control Panel.
2. Click the “Network and Sharing Centre icon”.
3. Select “Local Area Connection”.
4. Click the “Properties button”.
5. Double-click “Internet Protocol Version 4 (TCP/IPv4)”.
6. Set the IP Address to 192.168.100.X (X being any available number between 2 and 254. Ensure that
your chosen number is not the same as the
ACW2-XN
.
7. Set the Subnet Mask to 255.255.255.0.
8. Click the OK button.
9. Follow this link: 192.168.100.1 (or type it into the browser)
10. The HID Access Manager login dialogue will launch.
Note:
• It is advised to set up a static IP address for future use.
• The DNS name function only works on a PC
If you wish to use DNS features with Mobile phones then you need to set the DNS setting within your
router.
(DNS setting is router manufacturer dependent.)
Logging on
1. Enter the default Admin Password: 12345
2. Click Logon
Page 16

Page 16 of 26 Installation Guide
© 2018 HID Global Corporation All rights reserved.
Web-Based Access Control Solution
ACW2-XN
… HID Access Manager will open on the “Live!” Screen:
Required Settings
Using the menu-driven interface (paths shown on the next page) complete these steps:
1. Set the date and time
2. Update the master password
3. Add/Configure doors and readers using the labels and door names on the back page of the ACW2XN Quick Install Guide.
4. Add/Manage people
Page 17

© 2018 HID Global Corporation All rights reserved.
Installation Guide Page 17 of 26
Web-Based Access Control Solution
ACW2-XN
Function Paths
The menu headings are displayed in the menu ribbon – these give you access to the functions:
Live!
• Displays transactions in real time, latest on top
People
• Add people and manage their access accounts and their cards
Doors
• Click on
Device Discovery
to search for connected modules
• Add Door
• Reset APB
Reports
• Access Report
• Status Report
• Audit Report
• Hours Worked Report
Settings
• Network Settings
• Date and Time
• Security (Changing the password)
• Special Days (Add public holidays, etc.)
• Language (Change language preference - Preferencia cambiar idioma)
• Advanced options:
o Access Groups
o UDP output (Destination Address setup)
o APB Settings
o Wiegand Settings
About
• Controller Module Firmware Version
• Web Application Version
System Overides
These buttons are always available on screen as long as long as you are logged in.
Button
Function
All controlled doors are UNLOCKED, allowing everybody to pass.
All controlled doors are LOCKED – and no cards will open doors.
Emergency Unlock OR Lockdown
will remain active until it is disabled by clicking on “Revert to
Normal State” – on the right hand end of the thick red stripe:
Button
Page 18

Page 18 of 26 Installation Guide
© 2018 HID Global Corporation All rights reserved.
Web-Based Access Control Solution
ACW2-XN
9 Electrical Specifications
Power Supply (A-X1)
AC Mains Input
DC Output
100-230 VAC (50/60Hz), 1.3A 12V, 5A
Optional Battery (Strongly recommended)
Not included with the ACW2-XN, this battery must be sourced separately
Note:
• Only connect the battery after all system wiring is complete and tested on the built-in power
supply
Battery Specification
Type Lead Gel
Voltage 12V
Capacity 7 Ah
Physical Dimensions
65 mm x 101 mm x 151 mm,
2.56” x 3.98” x 5.95” – or smaller
Battery Protection
Fuse
Specification
Length 20 mm, 0.787”
Type Slow-blow
Rating 6.3 A
Controller Module (AC)
Power
Conditions Current Power
Supply at 12V DC 140 mA 1.7 W
Inter-Module Communications
Connector Purpose
10-way connectors:
female on the left,
male on the right
Power and data lines to other
modules
Network
Connector Protocol
RJ45
Ethernet, 10/100 Base T, half or full
duplex
Page 19

© 2018 HID Global Corporation All rights reserved.
Installation Guide Page 19 of 26
Web-Based Access Control Solution
ACW2-XN
Controller module (AC1) continued…
RS-485 Ports (Device & Host)
Interface
Baud Rate
Data Format
RS-485 38 400 8 data bits, no parity, 1 stop bit
Wiegand Module (AW2)
Power (At 12V)
Conditions
Current
Power
Relays idle, No readers Connected 37 mA 0.44 W
Both relays activated, maximum reader load 503 mA 6 W
Relays
Contact
Rating
Configuration Contacts Operations
[10A, 28VDC]
[5A, 220VAC]
[12A, 120VAC]
Double Pole
Single Throw
NO, NC, COM
> 100 000 (with MOVs installed across
12V inductive loads – see page 8)
Inter-Module Communications
Connector Purpose
10-way connectors:
Female on the left, male on the right
Power and data lines to other modules
Wiegand Reader Port
Connector Reader Connections
10-way Screw Terminal Plugs
12V, 5V, 0V, D0, D1, LED (Red), LED (Green), Buzzer, Hold,
Shield
Battery Charging Circuit
Conditions Current Power
Supply at 12V DC, battery flat, max charge current 500 mA 6 W
Calculations
The following calculation must be performed for each additional DC power Supply, together with all locks
that are powered from that power supply.
*
Note:
See individual lock and power supply installation manuals for current consumption and maximum
current output.
12 V Power Supply max current
output
-
Maximum lock current total
Margin
(The margin may not be negative.)
Page 20

Page 20 of 26 Installation Guide
© 2018 HID Global Corporation All rights reserved.
Web-Based Access Control Solution
ACW2-XN
10 FAQ
Fail Safe versus Fail Secure
Electrically controlled locks fall in to one of two categories:
1. Locks that require power to lock (with loss of power, these are unlocked, allowing EVERYBODY
access)
2. Locks that require power to unlock (with loss of power, these are locked, allowing NOBODY
access)
The first is considered fail SAFE, as people can still escape the building, and help can get in, should some
misfortune occur.
The second is considered fail SECURE, as intruders cannot just walk in when power is lost.
Which lock to use
Mag locks are inherently Fail Safe, as they require power to lock.
Strike locks are available in Fail Safe as well as Fail Secure versions, but are most often Fail Secure.
CAUTION:
• There is another level that should also be considered:
What relay terminals to use
The relays on the AW2 module should be switching power from an independent source, and so a similar
principle also applies to your choice of Normally Open (NO) or Normally Closed (NC) relay terminals:
Use the NC and COM terminals for switching circuits that you wish to keep energised should power to the
AW2 module be lost.
Use the NO and COM terminals for switching circuits that you wish to be cut off in the event that power
to the AW2 module is lost.
Page 21

© 2018 HID Global Corporation All rights reserved.
Installation Guide Page 21 of 26
Web-Based Access Control Solution
ACW2-XN
Can HID Access Manager handle separated secure areas?
Yes it can:
All access control administration is performed via the
ACW2-XN Master
.
The
ACW2-XN Slave
is offline capable.
• This means that access control in the remote area will continue to function normally in the event
of a break in the RS-485 cable.
• The cable break event will logged on the
ACW2-XN Master.
• When the RS-485 cable is restored, the HID Access Manager’s event log will be updated with any
events that happened on the slave side while the cable was broken.
• HID Access Manager system event logs will reveal where a person has been spending their time.
INSIDE
APB Door
APB Door
APB Door
APB Door
OUTSIDE
Master
Slave
RS-485
Page 22

Page 22 of 26 Installation Guide
© 2018 HID Global Corporation All rights reserved.
Web-Based Access Control Solution
ACW2-XN
11 End User Licence Agreement
HID GLOBAL CORPORATION
HID Access Manager Embedded Webserver
END USER LICENSE AGREEMENT (“EULA”)
IMPORTANT - READ CAREFULLY: This End User License Agreement (“EULA”) is a legal agreement between you (“Licensee”),
either an individual or an entity, and HID Global Corporation. (“HID”) governing the use of the software products (“Software”) that
came with this EULA, whether provided on a standalone basis or installed or embedded on hardware products (“Hardware”), and
any associated product documentation or other written materials accompanying or provided with the Software (“Documentation”).
LICENSEE AGREES TO BE BOUND BY THE TERMS OF THIS EULA BY INSTALLING, COPYING OR OTHERWISE USING THE
SOFTWARE OR THE HARDWARE ON WHICH IT RESIDES. IF LICENSEE DOES NOT AGREE TO THE TERMS AND
CONDITIONS OF THIS EULA, LICENSEE MAY NOT INSTALL, COPY OR USE THE SOFTWARE AND MUST PROMPTLY RETURN
THE SOFTWARE AND DOCUMENTATION TO THE PARTY FROM WHOM THE SOFTWARE WAS ACQUIRED.
1. Grant of License. In consideration of payment of the applicable license fee by Licensee to HID or its authorized reseller and
subject to Licensee’s compliance with the terms and conditions of this EULA, HID grants Licensee a non-exclusive, nontransferable, non-sublicensable, worldwide right to use the Software solely for Licensee’s business operations. Licensee’s right
to use the Software is expressly subject to the limitations in the number of end users, workstations, servers or other such
limitations as indicated by the invoice or other purchasing documentation issued by HID or HID’s authorized reseller for the
Software and/or Hardware provided to Licensee (“Purchase Documents”). Except as expressly set forth in Section 2(a), only
object code, machine-readable versions of the Software are licensed to Licensee hereunder, and Licensee has no rights under
this EULA to the source code versions of the Software. Licensee may use, reproduce and internally distribute the Software and
the Documentation solely in connection with and as reasonably necessary for Licensee’s authorized use of the Software and for
backup and archive purposes; provided, however, that Licensee may not copy any Software that is installed, embedded or
otherwise resident in any Hardware products. Subject to the foregoing license grant and terms and conditions of this EULA,
Licensee may make the Software and Documentation available to a third party to operate the Software on behalf of Licensee,
provided that Licensee shall be fully liable for such third party’s compliance with the terms and conditions of this EULA.
2. Restrictions.
The license rights granted in this EULA are subject to the following restrictions:
a) Licensee may not sell, license, sublicense, lend, rent, lease, or otherwise transfer the Software to a third party;
provided, however, that if any sample code or application programming interfaces are provided by HID with or as part
of the Software (hereunder, “API’s”) for the purpose of enabling interoperability between the Software and an
application developed by or for Licensee (“Licensee App”), Licensee may distribute those portions of the API’s that
are marked or identified in the Documentation as being redistributable solely as part of a Licensee App.
b) Licensee may not use the Software for time-sharing, outsourcing, service bureau, or managed service provider
purposes, or otherwise make the Software available to third parties for their commercial purposes, unless expressly
authorized in writing by HID.
c) Licensee acknowledges that the Software in source code form remains a confidential trade secret of HID and/or its
third party licensors (“Licensors”). Licensee may not reverse engineer, decipher, decompile, modify or disassemble the
Software or otherwise attempt to derive the source code of the Software, incorporate the Software in whole or in part
in any other software or product, or develop derivative works of the Software or allow others to do so, or to attempt
to do any of the foregoing (except and only to the extent the foregoing restrictions are prohibited by applicable law
notwithstanding this limitation).
d) Licensee shall not disclose or publish the results of any performance, functional, or other evaluation or benchmarking
of the Software to any third party without the prior written consent of HID.
e) If the Software or Hardware product uses a volume license key or other method to limit the volume of use of the
product, Licensee shall not disable, bypass or otherwise circumvent the operation of such key or method.
f) For some Software or Hardware products, there are additional product-specific restrictions set forth in the applicable
product addendum attached to or referenced in this EULA. In the event of any conflict between the terms of this EULA
and the terms of any applicable product addendum, the terms of the product addendum shall be controlling.
Page 23

© 2018 HID Global Corporation All rights reserved.
Installation Guide Page 23 of 26
Web-Based Access Control Solution
ACW2-XN
3. Support.
3.1. Support. During the term of this EULA and subject to Licensee’s payment of the applicable support fees, HID or HID’s
authorized reseller will make technical support and software maintenance available to Licensee on the terms provided in
the most recent version of HID’s Support Handbook (“Support”).
3.2. Procurement and Support of System. Licensee is responsible for procuring, installing and maintaining the hardware or
software infrastructure, including a suitable operating system environment (collectively the “System”), required for the
proper operation of the Software. Licensee acknowledges that updates to the Software provided as part of Support may
require modification or upgrades to certain components of the System in order to utilize such updates, and that Licensee
is solely responsible for obtaining such software and hardware modification or upgrades from the applicable suppliers or
manufacturers.
4. Certification and Audit. Licensee shall use commercially reasonable efforts to implement measures to monitor and ensure all
users of the Software comply with the restrictions and limitations of this EULA. At HID’s written request, but not more
frequently than once annually during the term of this EULA, Licensee shall certify to HID, in a writing signed by Licensee’s
authorized representative, Licensee’s compliance with the terms of this EULA, and provide HID a list of (a) the number of users
by country, and (b) the locations and types of the systems on which it operates or has installed the Software. HID reserves the
right to audit Licensee’s use of the Software no more than once annually, per Licensee site, at HID’s expense. HID shall
schedule any audit at least fifteen (15) days in advance. Any such audit shall be conducted during regular business hours at
Licensee’s facilities and shall not unreasonably interfere with Licensee’s business activities. If such audit reveals that Licensee
has underpaid fees to HID, Licensee shall promptly pay to HID such fees at the prices previously agreed to for such Software
and, if the underpayment is greater than five percent (5%), Licensee shall also reimburse HID for its reasonable costs of the
audit.
5. Ownership. The Software is licensed under the terms of this EULA, not sold. HID and/or its Licensors own all title and
proprietary rights, including without restriction all intellectual property rights, in and to the Software and Documentation and all
copies thereof, all of which contain valuable trade secrets of HID and/or its Licensors. Licensee may not remove, modify or
otherwise tamper with any copyright, trademark, proprietary rights notices, labeling, legend, disclaimer or warning notices
included in or embedded in any part of the Software or Documentation or in any copy made of the Software or Documentation.
6. Warranty and Disclaimers.
6.1. Limited Warranty. HID warrants that for a period of ninety (90) days from the date the Software is delivered to Licensee
(FCA Origin) or downloaded by Licensee, whichever is earlier, that: (a) the media on which the Software is recorded will
be free from material defects in materials and workmanship under normal use, and (b) the Software will perform
substantially in accordance with the then-current Documentation, provided that such Software is properly used by
Licensee in accordance with such Documentation and this EULA. If Licensee discovers within this warranty period that
the Software fails to substantially conform to the Documentation, Licensee must promptly notify HID or HID’s authorized
reseller in writing and obtain a Return Material Authorization (“RMA”) and a RMA number, prior to return of the defective
Software.
6.2. Remedies. HID’s sole and exclusive liability and Licensee’s sole and exclusive remedy under this limited warranty shall be,
at HID’s election, either: (a) replacement of the media if defective, or (b) HID’s commercially reasonable effort to repair or
replace the Software to make the Software perform substantially in accordance with the accompanying Documentation, if
the Software as initially delivered is non-conforming. In the event HID is unable to remedy the non-conformity and such
non-conformity materially affects the functionality of the Software, Licensee may promptly terminate the Software license
applicable to the non-conforming Software and return such Software and any applicable Documentation to HID or HID’s
authorized reseller. In such event, Licensee will receive a refund of the license fee received by HID with respect to such
Software. The above remedies are available only if HID or HID’s authorized reseller is promptly notified in writing within
the ninety (90) day warranty period. Any replacement Software will be warranted for the remainder of the original
warranty period, or for thirty (30) days, whichever is longer.
6.3. Restrictions and Exclusions. HID does not warrant that the Software will meet Licensee’s requirements or will operate in
combination with other software or hardware which may be selected for use by Licensee, or that the operation of the
Software will be uninterrupted or error-free. This limited warranty is VOID if failure of the Software is due to accident,
negligence, abuse, improper installation or misuse of the Software.
6.4. Disclaimers. TO THE MAXIMUM EXTENT PERMITTED BY LAW, THE WARRANTIES STATED ABOVE ARE EXCLUSIVE
AND IN LIEU OF ALL OTHER WARRANTIES AND CONDITIONS, WHETHER EXPRESS, IMPLIED OR STATUTORY,
INCLUDING WITHOUT LIMITATION THE IMPLIED WARRANTIES OF MERCHANTABILITY, NON-INFRINGEMENT, FITNESS
FOR A PARTICULAR PURPOSE, TITLE OR QUALITY OF SERVICE. NO WARRANTIES SHALL ARISE UNDER THIS EULA
FROM COURSE OF DEALING OR USAGE OF TRADE. HID DOES NOT WARRANT THAT THE SOFTWARE OR
DOCUMENTATION IS FREE OF THIRD PARTY CLAIMS OF INFRINGEMENT OR MISAPPROPRIATION OF INTELLECTUAL
PROPERTY RIGHTS.
Page 24

Page 24 of 26 Installation Guide
© 2018 HID Global Corporation All rights reserved.
Web-Based Access Control Solution
ACW2-XN
7. Limitation of Liability. HID, ITS LICENSORS, AGENTS, SUPPLIERS, DISTRIBUTORS OR RESELLERS SHALL NOT BE LIABLE
WHATSOEVER FOR ANY INDIRECT, INCIDENTAL, SPECIAL, CONSEQUENTIAL OR PUNITIVE DAMAGES, INCLUDING
WITHOUT LIMITATION DAMAGES FOR LOST PROFITS, DATA OR LOSS OF USE, OR PROCUREMENT OF REPLACEMENT
SOFTWARE, HOWEVER INCURRED BY THE LICENSEE OR ANY THIRD PARTY, WHETHER IN AN ACTION IN CONTRACT OR
TORT, EVEN IF SUCH PARTY HAS BEEN ADVISED OF THE POSSIBILITY OF SUCH DAMAGES. TO THE MAXIMUM EXTENT
PERMITTED BY LAW, HID’S LICENSORS DISCLAIM ALL DAMAGES OF ANY KIND. EXCEPT FOR ANY INDEMNIFICATION
PROVIDED HEREIN, the aggregate and cumulative liability of HID for damages under this EULA shall not exceed the amount of
THE fees PAID BY LICENSEE FOR THE SOFTWARE LICENSED under this EULA.
8. IP Indemnity.
8.1. Indemnity. HID will defend Licensee from and against any claim brought by a third party against Licensee to the extent
such claim alleges that the Software directly infringes any intellectual property rights of such third party (“Claim”), and
will pay all costs, damages and expenses (including reasonable legal fees) finally awarded against Licensee by a court of
competent jurisdiction or agreed to in a written settlement agreement signed by HID arising out of such Claim; provided
that Licensee: (a) gives HID prompt written notice upon learning of a Claim or potential Claim; (b) allows HID to assume
sole control of the defense of such Claim and all related settlement negotiations; and (c) reasonably cooperates with HID,
at HID’s request and expense, in the defense or settlement of the Claim, including the provision of all assistance,
information and authority reasonably requested by HID. Notwithstanding the foregoing, HID shall have no liability for any
claim of infringement based in whole or in part on (i) the use of a superseded or altered release of the Software to the
extent that the infringement would have been avoided by the use of a current unaltered release of the Software provided
by HID or its affiliates to Licensee, (ii) the modification of the Software by anyone other than HID or its authorized agents
to the extent that the infringement would have been avoided but for such modification, (iii) the use of the Software other
than in accordance with the documentation accompanying the Software or the applicable license agreement, (iv) the
combination of the Software with other software or hardware not provided by HID, where the combination causes the
infringement and not the Software standing alone, (v) third party software, including open source software, incorporated
in the Software, or (vi) product features based on published standards where there was no non-infringing way to
implement such standards.
8.2. Additional Remedies. If the Software, or any material portion thereof, is held by a court of competent jurisdiction to
infringe, or if HID believes that the Software may be subject to a Claim or held to infringe, HID shall, in its discretion and at
its expense (a) replace or modify the Software so as to be non-infringing, provided that the replacement Software
provides substantially similar functionality; (b) obtain for Licensee a license to continue using the Software; or (c) if noninfringing product or a license to use the Software cannot be obtained upon commercially reasonable terms, as
determined solely by HID, HID may (i) terminate the license for the affected Software (as applicable) and (ii) upon return
of the Software by Licensee or certification of its destruction, refund a pro-rated portion of the license fees or other
charges paid by Licensee to HID (or its affiliate company) for such Software (for perpetual licenses, as depreciated on a
four-year straight-line basis and for term limited licenses, for the unused remainder of the term) and, if applicable, the
unused portion of any prepaid support fees that directly relate to such Software.
8.3.
Limitation and Exclusive Remedy. The indemnity provided herein states HID’s and its affiliate companies’ entire liability
and Licensee’s sole and exclusive remedy for any claim of intellectual property infringement by, or with respect to, the
Software.
9. Export. Licensee shall comply fully with all international and national laws and regulations that apply to the Software and
Documentation and to Licensee’s use thereof, including, but not limited to the U.S. Export Administration Regulations and enduser, end-use and destination restrictions issued by U.S. and other governments. Without limiting the generality of the
foregoing, Licensee expressly agrees that it shall not, and shall cause its representatives to agree not to, export, directly or
indirectly, re-export, divert, or transfer the Software or Documentation or any direct product thereof to any destination,
company or person restricted or prohibited by U.S. laws or regulations or laws or regulations of any other applicable
jurisdiction.
10. Third Party Software Component License Terms. To the extent there are any third party software components licensed to HID
by Licensors included in the Software, such components shall be licensed as part of the Software in accordance with the terms
and conditions of this EULA. Such Licensors may provide additional rights, requirements and notices (which rights,
requirements and notices can be found in a readme file or product addendum or are otherwise distributed with the Software),
and nothing herein shall alter or limit any such additional rights, requirements or notices provided to Licensee by such
Licensors.
11. U.S. Government Restricted Rights. The Software is provided with "Restricted Rights". Use, duplication or disclosure by the
U.S. Government is subject to restrictions as set forth in subparagraph (c)(1)(ii) of the Rights in Technical Data and Computer
Software clause at DFARS 252.227-7013 or subparagraphs (c)(1) and (2) of the Commercial Computer Software-Restricted
Rights at 48 CFR 52.227-19, as applicable (and the successor clauses to any of the foregoing). The contractor/manufacturer is
HID Global Corporation. All Software provided to the U.S. Government, including its civilian and military agencies, is commercial
computer software that was developed at private expense prior to its provision to any U.S. Government entity. Subject to any
applicable regulations set out in the FAR or DFARS (and any superseding regulations), the Software is provided with the
commercial license rights and restrictions described elsewhere in this EULA. For Department of Defense agencies, the
restrictions set forth in the "Technical Data - Commercial items" clause at DFARS 252.227-7015 (Nov 1995) shall also apply.
Page 25

© 2018 HID Global Corporation All rights reserved.
Installation Guide Page 25 of 26
Web-Based Access Control Solution
ACW2-XN
12. Term and Termination of License. The term applicable to Licensee’s use of the Software shall be perpetual unless indicated
otherwise in the Purchase Documents. HID reserves the right to terminate this EULA and Licensee’s corresponding right to use
the Software in the event Licensee breaches a material obligation under this EULA and fails to cure such breach within thirty
(30) days after HID sends written notice describing the breach if such breach is capable of being cured, or immediately if the
breach is not capable of being cured. Upon any termination of this EULA, or if Licensee should discontinue using the Software
or give up personal use and control of the computers or other hardware on which the Software is installed, Licensee shall
destroy all copies of the Software, Documentation, and any related materials in any form. The parties’ rights and obligations
under Sections 2, 4, 5, 6.4, and 7 through 13 shall survive any termination of this EULA.
13. General. This EULA, together with the Purchase Documents and any attached and/or referenced addenda, exhibits and
schedules, constitutes the complete agreement between the parties and supersedes all prior or contemporaneous agreements
or representations, written or oral, concerning the subject matter of this EULA. This EULA may not be modified or amended,
except in writing signed by the duly authorized representatives of Licensee and HID. No other act, document (including
Licensee’s purchase order or other Licensee document), usage or custom shall be deemed to amend or modify this EULA. If any
of these provisions are held to be unenforceable in any jurisdiction for any reason, such provision shall be reformed only to the
extent necessary to make it enforceable, and such decision shall not affect the enforceability (a) of such provision under other
circumstances or jurisdictions, or (b) of the remaining provisions hereof under all circumstances or jurisdictions. These terms
and conditions, and interpretation thereof, will be governed by the laws of the United States and the laws of the State of Texas,
without regard to conflicts of laws principles. In the event that any legal action becomes necessary to enforce or interpret the
terms of this Agreement, the parties agree that such action will be brought in the State or Federal Courts located in Travis
County, Texas, and no other place. These terms and conditions, the separate software license agreement, and Licensee’s use
will not be governed by the United Nations Convention of Contracts for the International Sale of Goods, the application of
which is hereby expressly excluded.
12 Copyright and Trademarks
Copyright
© 2018 HID Global Corporation/ASSA ABLOY AB. All rights reserved.
This document may not be reproduced, disseminated or republished in any form without the prior written
permission of HID Global Corporation.
Trademarks
HID GLOBAL, HID, the HID Brick logo, the Chain Design, ICLASS, ICLASS SE, SEOS, and OMNIKEY are
trademarks or registered trademarks of HID Global, ASSA ABLOY AB, or its affiliate(s) in the US and
other countries and may not be used without permission. All other trademarks, service marks, and
product or service names are trademarks or registered trademarks of their respective owners.
Page 26

Page 26 of 26 Installation Guide
© 2018 HID Global Corporation All rights reserved.
Web-Based Access Control Solution
ACW2-XN
13 Notes
 Loading...