


User Guide

© Copyright 2016 HP Development Company,
L.P.
AMD is a trademark of Advanced Micro Devices,
Inc. Bluetooth is a trademark owned by its
proprietor and used by HP Inc. under license.
Java is a U.S. trademark of Sun Microsystems,
Inc. Microsoft and Windows are either
registered trademarks or trademarks of
Microsoft Corporation in the United States
and/or other countries. SD Logo is a trademark
of its proprietor.
The information contained herein is subject to
change without notice. The only warranties for
HP products and services are set forth in the
express warranty statements accompanying
such products and services. Nothing herein
should be construed as constituting an
additional warranty. HP shall not be liable for
technical or editorial errors or omissions
contained herein.
First Edition: October 2016
Document Part Number: 902207-001
Product notice
This user guide describes features that are
common to most models. Some features may
not be available on your computer.
Not all features are available in all editions or
versions of Windows. Systems may require
upgraded and/or separately purchased
hardware, drivers, software or BIOS update to
take full advantage of Windows functionality.
Windows 10 is automatically updated, which is
always enabled. ISP fees may apply and
additional requirements may apply over time
for updates. See http://www.microsoft.com.
To access the latest user guides or manuals for
your product, go to http://www.hp.com/
support. Select Find your product, and then
follow the on-screen instructions.
Software terms
By installing, copying, downloading, or
otherwise using any software product
preinstalled on this computer, you agree to be
bound by the terms of the HP End User License
Agreement (EULA). If you do not accept these
license terms, your sole remedy is to return the
entire unused product (hardware and software)
within 14 days for a full refund subject to the
refund policy of your seller.
For any further information or to request a full
refund of the price of the computer, please
contact your seller.

Safety warning notice
WARNING! To reduce the possibility of heat-related injuries or of overheating the computer, do not place the
computer directly on your lap or obstruct the computer air vents. Use the computer only on a hard, at
surface. Do not allow another hard surface, such as an adjoining optional printer, or a soft surface, such as
pillows or rugs or clothing, to block airow. Also, do not allow the AC adapter to come into contact with the
skin or a soft surface, such as pillows or rugs or clothing, during operation. The computer and the AC adapter
comply with the user-accessible surface temperature limits dened by the International Standard for Safety
of Information Technology Equipment (IEC 60950-1).
iii

iv Safety warning notice

Table of contents
1 Welcome ....................................................................................................................................................... 1
Finding information ............................................................................................................................................... 2
2 Components .................................................................................................................................................. 4
Locating hardware ................................................................................................................................................. 4
Locating software .................................................................................................................................................. 4
Right ....................................................................................................................................................................... 4
Left ......................................................................................................................................................................... 6
Display .................................................................................................................................................................... 7
Top .......................................................................................................................................................................... 8
TouchPad ............................................................................................................................................. 8
Lights ................................................................................................................................................... 9
Buttons, speakers, and ngerprint reader ........................................................................................ 12
Special function keys ........................................................................................................................ 14
Using the hot keys ............................................................................................................................. 15
Bottom ................................................................................................................................................................. 17
Front ..................................................................................................................................................................... 18
Labels ................................................................................................................................................................... 18
Inserting a SIM card (select products only) ......................................................................................................... 19
3 Network connections ................................................................................................................................... 21
Connecting to a wireless network ....................................................................................................................... 21
Using the wireless controls ............................................................................................................... 21
Wireless button ............................................................................................................... 21
Operating system controls ............................................................................................. 21
Connecting to a WLAN ....................................................................................................................... 22
Using HP Mobile Broadband (select products only) .......................................................................... 22
Using HP Mobile Connect Pro (select products only) ........................................................................ 23
Using GPS (select products only) ...................................................................................................... 23
Using Bluetooth wireless devices (select products only) ................................................................. 23
Connecting Bluetooth devices ........................................................................................ 23
Connecting to a wired network ............................................................................................................................ 23
Connecting to a local area network (LAN) (select products only) .................................................... 24
4 Screen navigation ........................................................................................................................................ 25
Using the TouchPad and touch screen gestures ................................................................................................. 25
v

Tap ..................................................................................................................................................... 25
Two-nger pinch zoom ..................................................................................................................... 26
Two-nger scroll (TouchPad only) .................................................................................................... 26
Two-nger tap (TouchPad only) ........................................................................................................ 26
Four-nger tap (TouchPad only) ....................................................................................................... 27
Three-nger swipe (TouchPad only) ................................................................................................. 27
One-nger slide (touch screen only) ................................................................................................. 27
Using the keyboard and optional mouse ............................................................................................................. 28
Using the integrated numeric keypad (select products only) ........................................................... 28
5 Entertainment features ............................................................................................................................... 29
Using a webcam (select products only) ............................................................................................................... 29
Using audio .......................................................................................................................................................... 29
Connecting speakers ......................................................................................................................... 29
Connecting headphones .................................................................................................................... 29
Connecting headsets ......................................................................................................................... 30
Using sound settings ......................................................................................................................... 30
Using video .......................................................................................................................................................... 30
Connecting video devices by using a VGA cable (select products only) ........................................... 31
Connecting a DisplayPort device ....................................................................................................... 31
Discovering and connecting wired displays using MultiStream Transport ...................................... 32
Connect displays to computers with AMD graphics (with an optional hub) .................. 32
Discovering and connecting to Miracast-compatible wireless displays (select products only) ...... 32
6 Power management ..................................................................................................................................... 33
Shutting down (turning o) the computer .......................................................................................................... 33
Using HP Fast Charge (select products only) ....................................................................................................... 33
Setting power options ......................................................................................................................................... 34
Using power-saving states ................................................................................................................ 34
Initiating and exiting Sleep ............................................................................................. 34
Enabling and exiting user-initiated Hibernation (select products only) ........................ 34
Using the power meter and power settings ................................................................... 35
Setting password protection on wakeup ........................................................................ 35
Using battery power .......................................................................................................................... 35
Finding additional battery information .......................................................................... 36
Using HP Battery Check .................................................................................................. 36
Displaying the remaining battery charge ....................................................................... 36
Maximizing battery discharge time ................................................................................ 36
Managing low battery levels ........................................................................................... 37
Identifying low battery levels ...................................................................... 37
Resolving a low battery level ....................................................................... 37
vi

Conserving battery power .............................................................................................. 37
Disposing of a battery ..................................................................................................... 38
Replacing a battery ......................................................................................................... 38
Using external AC power ................................................................................................................... 38
7 Security ...................................................................................................................................................... 39
Protecting the computer ..................................................................................................................................... 39
Using passwords .................................................................................................................................................. 39
Setting passwords in Windows ......................................................................................................... 40
Setting passwords in Computer Setup ............................................................................................. 41
Managing a BIOS administrator password ........................................................................................ 41
Entering a BIOS administrator password ....................................................................... 43
Using DriveLock Security Options ..................................................................................................... 43
Selecting Automatic DriveLock (select products only) ................................................... 43
Enabling Automatic DriveLock ..................................................................... 43
Disabling Automatic DriveLock .................................................................... 44
Entering an Automatic DriveLock password ................................................ 44
Selecting manual DriveLock ........................................................................................... 44
Setting a DriveLock master password ......................................................... 45
Enabling DriveLock and setting a DriveLock user password ......................................... 45
Disabling DriveLock ........................................................................................................ 46
Entering a DriveLock password ...................................................................................... 46
Changing a DriveLock password ..................................................................................... 46
Using Windows Hello (select products only) ....................................................................................................... 47
Using antivirus software ...................................................................................................................................... 47
Using rewall software ........................................................................................................................................ 47
Installing software updates ................................................................................................................................. 48
Using HP Client Security (select products only) .................................................................................................. 48
Using HP Touchpoint Manager (select products only) ........................................................................................ 48
Using an optional security cable (select products only) ..................................................................................... 48
Using a ngerprint reader (select products only) ............................................................................................... 49
Locating the ngerprint reader ......................................................................................................... 49
8 Maintenance ............................................................................................................................................... 50
Improving performance ....................................................................................................................................... 50
Using Disk Defragmenter .................................................................................................................. 50
Using Disk Cleanup ............................................................................................................................ 50
Using HP 3D DriveGuard (select products only) ................................................................................ 50
Identifying HP 3D DriveGuard status .............................................................................. 51
Updating programs and drivers .......................................................................................................................... 51
Cleaning your computer ...................................................................................................................................... 51
vii

Cleaning procedures .......................................................................................................................... 51
Cleaning the display ........................................................................................................ 52
Cleaning the sides or cover ............................................................................................. 52
Cleaning the TouchPad, keyboard, or mouse (select products only) ............................. 52
Traveling with or shipping your computer .......................................................................................................... 52
9 Backup and recovery .................................................................................................................................... 54
Creating recovery media and backups ................................................................................................................ 54
Creating HP Recovery media (select products only) ......................................................................... 54
Using Windows tools ........................................................................................................................................... 55
Restore and recovery ........................................................................................................................................... 56
Recovering using HP Recovery Manager ........................................................................................... 56
What you need to know before you get started ............................................................. 56
Using the HP Recovery partition (select products only) ................................................. 57
Using HP Recovery media to recover .............................................................................. 57
Changing the computer boot order ................................................................................ 58
Removing the HP Recovery partition (select products only) ......................................... 59
10 Computer Setup (BIOS), TPM, and HP Sure Start ............................................................................................ 60
Using Computer Setup ......................................................................................................................................... 60
Starting Computer Setup .................................................................................................................. 60
Navigating and selecting in Computer Setup ................................................................................... 60
Restoring factory settings in Computer Setup ................................................................................. 60
Updating the BIOS ............................................................................................................................. 61
Determining the BIOS version ......................................................................................... 61
Downloading a BIOS update ........................................................................................... 62
Changing the boot order using the f9 prompt .................................................................................. 62
TPM BIOS settings (select products only) ........................................................................................................... 63
Using HP Sure Start (select products only) ......................................................................................................... 63
11 Using HP PC Hardware Diagnostics (UEFI) ..................................................................................................... 64
Downloading HP PC Hardware Diagnostics (UEFI) to a USB device .................................................................... 64
12 Specications ............................................................................................................................................ 66
Input power .......................................................................................................................................................... 66
Operating environment ....................................................................................................................................... 66
13 Electrostatic Discharge .............................................................................................................................. 67
viii

14 Accessibility .............................................................................................................................................. 68
Supported assistive technologies ....................................................................................................................... 68
Contacting support .............................................................................................................................................. 68
Index ............................................................................................................................................................. 69
ix

x

1 Welcome
After you set up and register the computer, we recommend the following steps to get the most out of your
smart investment:
●
TIP: To quickly return to the computer Start screen from an open app or the Windows desktop, press
the Windows key on your keyboard. Pressing the Windows key again will return you to the
previous screen.
●
Connect to the Internet—Set up your wired or wireless network so that you can connect to the Internet.
For more information, see Network connections on page 21.
●
Update your antivirus software—Protect your computer from damage caused by viruses. The software
is preinstalled on the computer. For more information, see Using antivirus software on page 47.
●
Get to know your computer—Learn about your computer features. See Components on page 4 and
Screen navigation on page 25 for additional information.
●
Find installed software—Access a list of the software preinstalled on the computer:
Select the Start button, and then select All apps (required on some products).
‒ or –
Right-click the Start button, and then select Programs and Features.
●
Back up your hard drive by creating recovery discs or a recovery ash drive. See Backup and recovery
on page 54.
1

Finding information
To locate resources that provide product details, how-to information, and more, use this table.
Resource Contents
Setup Instructions
HP support
For HP support, go to http://www.hp.com/support.
Safety & Comfort Guide
To access this guide:
▲ Select the Start button, select All apps (required on
some products), select HP Help and Support, and
then select HP Documentation.
‒ or –
▲ Select the Start button, select All apps (required on
some products), select HP, and then select HP
Documentation.
‒ or –
▲ Go to http://www.hp.com/ergo.
IMPORTANT: You must be connected to the Internet
to access the latest version of the user guide.
Regulatory, Safety and Environmental Notices
To access this document:
▲ Select the Start button, select All apps (required on
some products), select HP Help and Support, and
then select HP Documentation.
‒ or –
▲ Select the Start button, select All apps (required on
some products), select HP, and then select HP
Documentation.
●
Overview of computer setup and features
●
Online chat with an HP technician
●
Support telephone numbers
●
HP service center locations
●
Proper workstation setup
●
Guidelines for posture and work habits that increase your comfort
and decrease your risk of injury
●
Electrical and mechanical safety information
●
Important regulatory notices, including information about proper
battery disposal, if needed.
Limited Warranty*
To access this document:
▲ Select the Start button, select All apps (required on
some products), select HP Help and Support, and
then select HP Documentation.
‒ or –
▲ Select the Start button, select All apps (required on
some products), select HP, and then select HP
Documentation.
‒ or –
▲ Go to http://www.hp.com/go/orderdocuments.
2 Chapter 1 Welcome
●
Specic warranty information about this computer

Resource Contents
IMPORTANT: You must be connected to the Internet
to access the latest version of the user guide.
*You can nd your HP Limited Warranty located with the user guides on your product and/or on the CD or DVD provided in the box. In
some countries or regions, HP may provide a printed warranty in the box. For countries or regions where the warranty is not provided
in printed format, you can request a copy from http://www.hp.com/go/orderdocuments. For products purchased in Asia Pacic, you
can write to HP at POD, PO Box 161, Kitchener Road Post Oice, Singapore 912006. Include your product name, and your name, phone
number, and postal address.
Finding information 3

2 Components
Locating hardware
To nd out what hardware is installed on your computer:
▲
Type device manager in the taskbar search box, and then select the Device Manager app.
A list displays all the devices installed on your computer.
For information about system hardware components and the system BIOS version number, press fn+esc
(select products only).
Locating software
To nd out what software is installed on your computer:
▲
Select the Start button, and then select All apps.
‒ or –
Right-click the Start button, and then select Programs and Features.
Right
Component Description
(1) USB Type-C charging port Connects a USB device with a Type-C connector and can charge
products such as cell phones, laptops, tablets, and MP3 players,
even when the computer is o.
NOTE: Adapters (purchased separately) may be required.
(2) Dual-Mode DisplayPort Connects an optional digital display device, such as a high-
performance monitor or projector.
(3) Memory card reader Reads optional memory cards that store, manage, share, or
access information.
(4) Audio-out (headphone)/Audio-in (microphone)
4 Chapter 2 Components
combo jack
Connects optional powered stereo speakers, headphones,
earbuds, a headset, or a television audio cable. Also connects an
optional headset microphone. This jack does not support
optional standalone microphones.

Component Description
WARNING! To reduce the risk of personal injury, adjust the
volume before putting on headphones, earbuds, or a headset.
For additional safety information, refer to the Regulatory,
Safety, and Environmental Notices.
To access this guide:
1. Type support in the taskbar search box, and then select
the HP Support Assistant app.
‒ or –
Click the question mark icon in the taskbar.
2. Select My PC, select the Specications tab, and then
select User Guides.
NOTE: When a device is connected to the jack, the computer
speakers are disabled.
(5) USB 3.0 port Connects an optional USB device, such as a keyboard, mouse,
external drive, printer, scanner or USB hub.
(6) RJ-45 (network) jack/status lights Connects a network cable.
●
Green (left): The network is connected.
●
Amber (right): Activity is occurring on the network.
(7) Docking connector Connects an optional docking device.
(8) SIM card slot Supports a wireless subscriber identity module (SIM) card. The
SIM card slot is located inside the battery bay.
(9) Power connector Connects an AC adapter.
Right 5
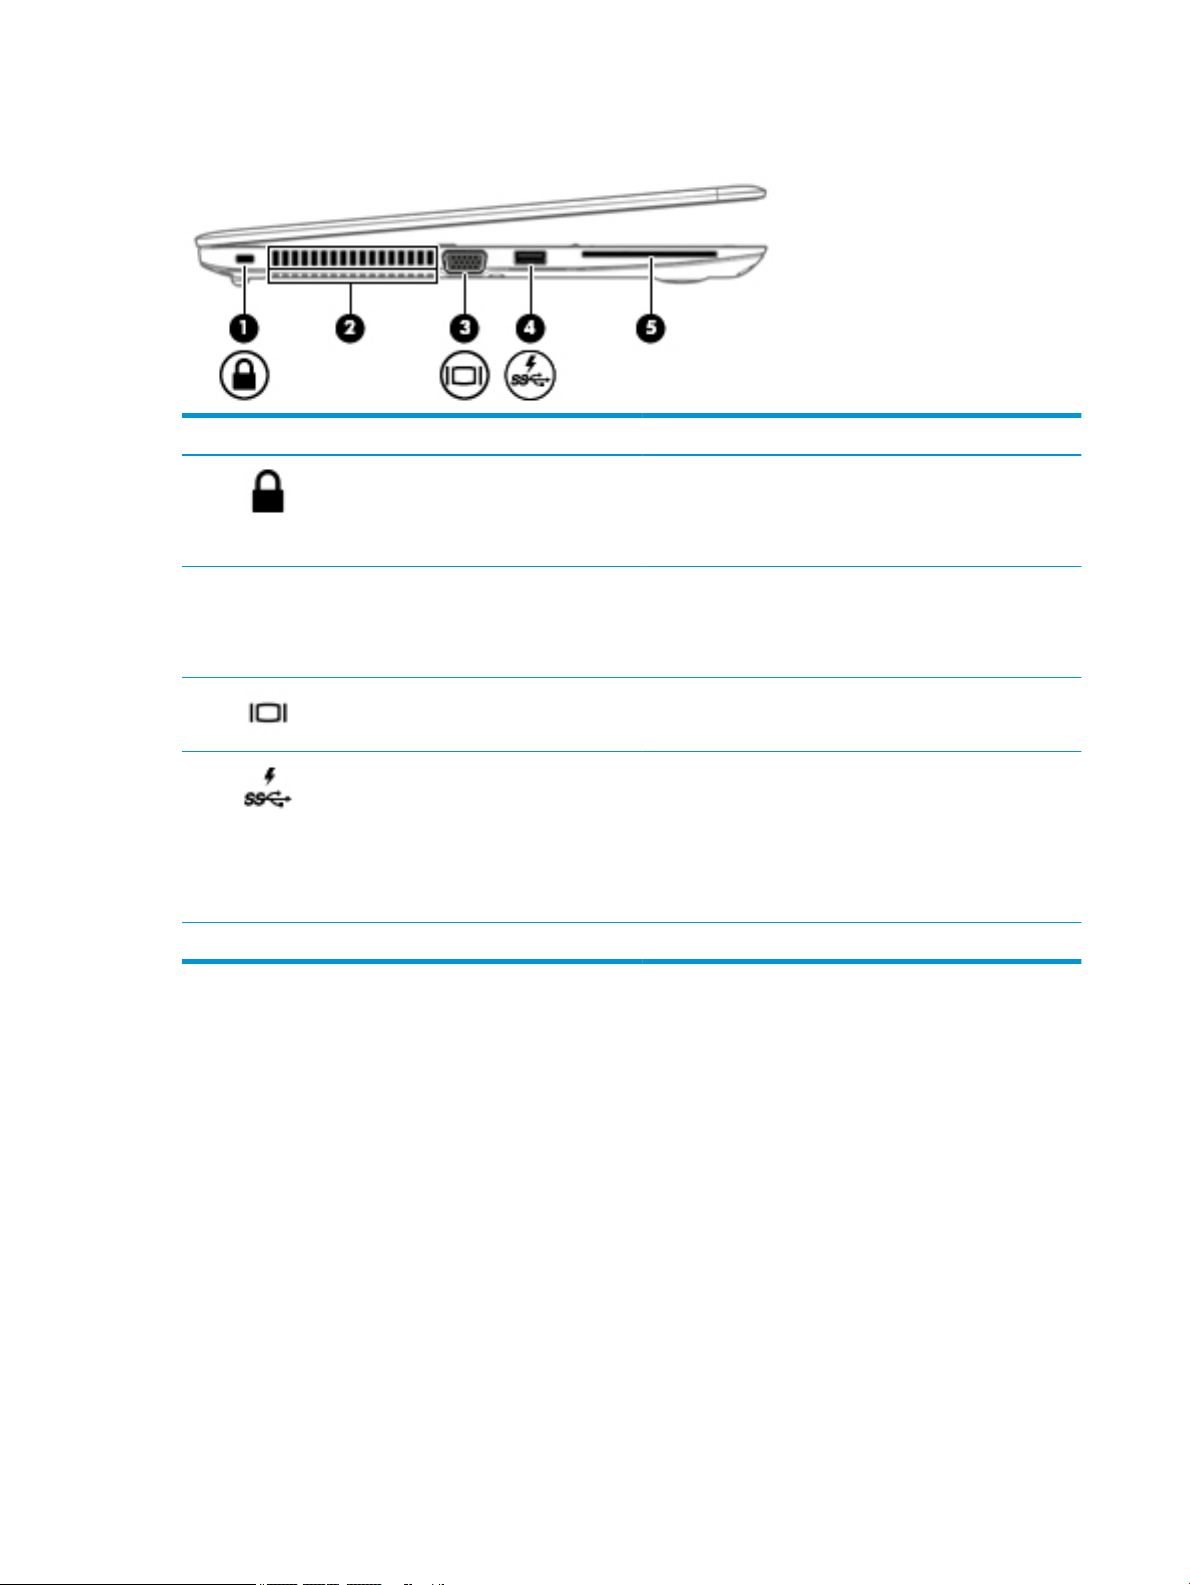
Left
Component Description
(1) Security cable slot Attaches an optional security cable to the computer.
NOTE: The security cable is designed to act as a deterrent, but
it may not prevent the computer from being mishandled or
stolen.
(2) Vents Enable airow to cool internal components.
NOTE: The computer fan starts up automatically to cool
internal components and prevent overheating. It is normal for
the internal fan to cycle on and o during routine operation.
(3) External monitor port Connects an external VGA monitor or projector.
(4) USB 3.0 charging (powered) port Connects an optional USB device, such as a keyboard, mouse,
external drive, printer, scanner or USB hub. Standard USB ports
will not charge all USB devices or will charge using a low current.
Some USB devices require power and require you to use a
powered port.
NOTE: USB charging ports can also charge select models of
cell phones and MP3 players, even when the computer is o.
(5) Smart card reader Supports optional smart cards.
6 Chapter 2 Components

Display
Component Description
(1) WLAN antennas* Send and receive wireless signals to communicate with wireless local
area networks (WLANs).
(2) WWAN antennas* Send and receive wireless signals to communicate with wireless wide
area networks (WWANs).
(3) Internal microphones Record sound.
(4) Webcam light On: The webcam is in use.
(5) Webcam Records video and captures photographs. Some models allow you to
video conference and chat online using streaming video.
To use the webcam:
▲ Type camera in the taskbar search box, and then select
Camera.
*The antennas are not visible from the outside of the computer. For optimal transmission, keep the areas immediately around the
antennas free from obstructions.
For wireless regulatory notices, see the section of the Regulatory, Safety, and Environmental Notices that applies to your country or
region.
To access this guide:
1. Type support in the taskbar search box, and then select the HP Support Assistant app.
‒ or –
Click the question mark icon in the taskbar.
2. Select My PC, select the Specications tab, and then select User Guides.
Display 7

Top
TouchPad
Component Description
(1) Pointing stick (select products only) Moves the pointer and selects or activates items on the screen.
(2) Left pointing stick button (select products only) Functions like the left button on an external mouse.
(3) TouchPad on/o button/TouchPad light Turns the TouchPad on and o.
●
On: The TouchPad is o.
●
O: The TouchPad is on.
(4) TouchPad zone Reads your nger gestures to move the pointer or activate
items on the screen.
(5) Left TouchPad button Functions like the left button on an external mouse.
(6) Right pointing stick button (select products
only)
(7) Right TouchPad button Functions like the right button on an external mouse.
Functions like the right button on an external mouse.
8 Chapter 2 Components
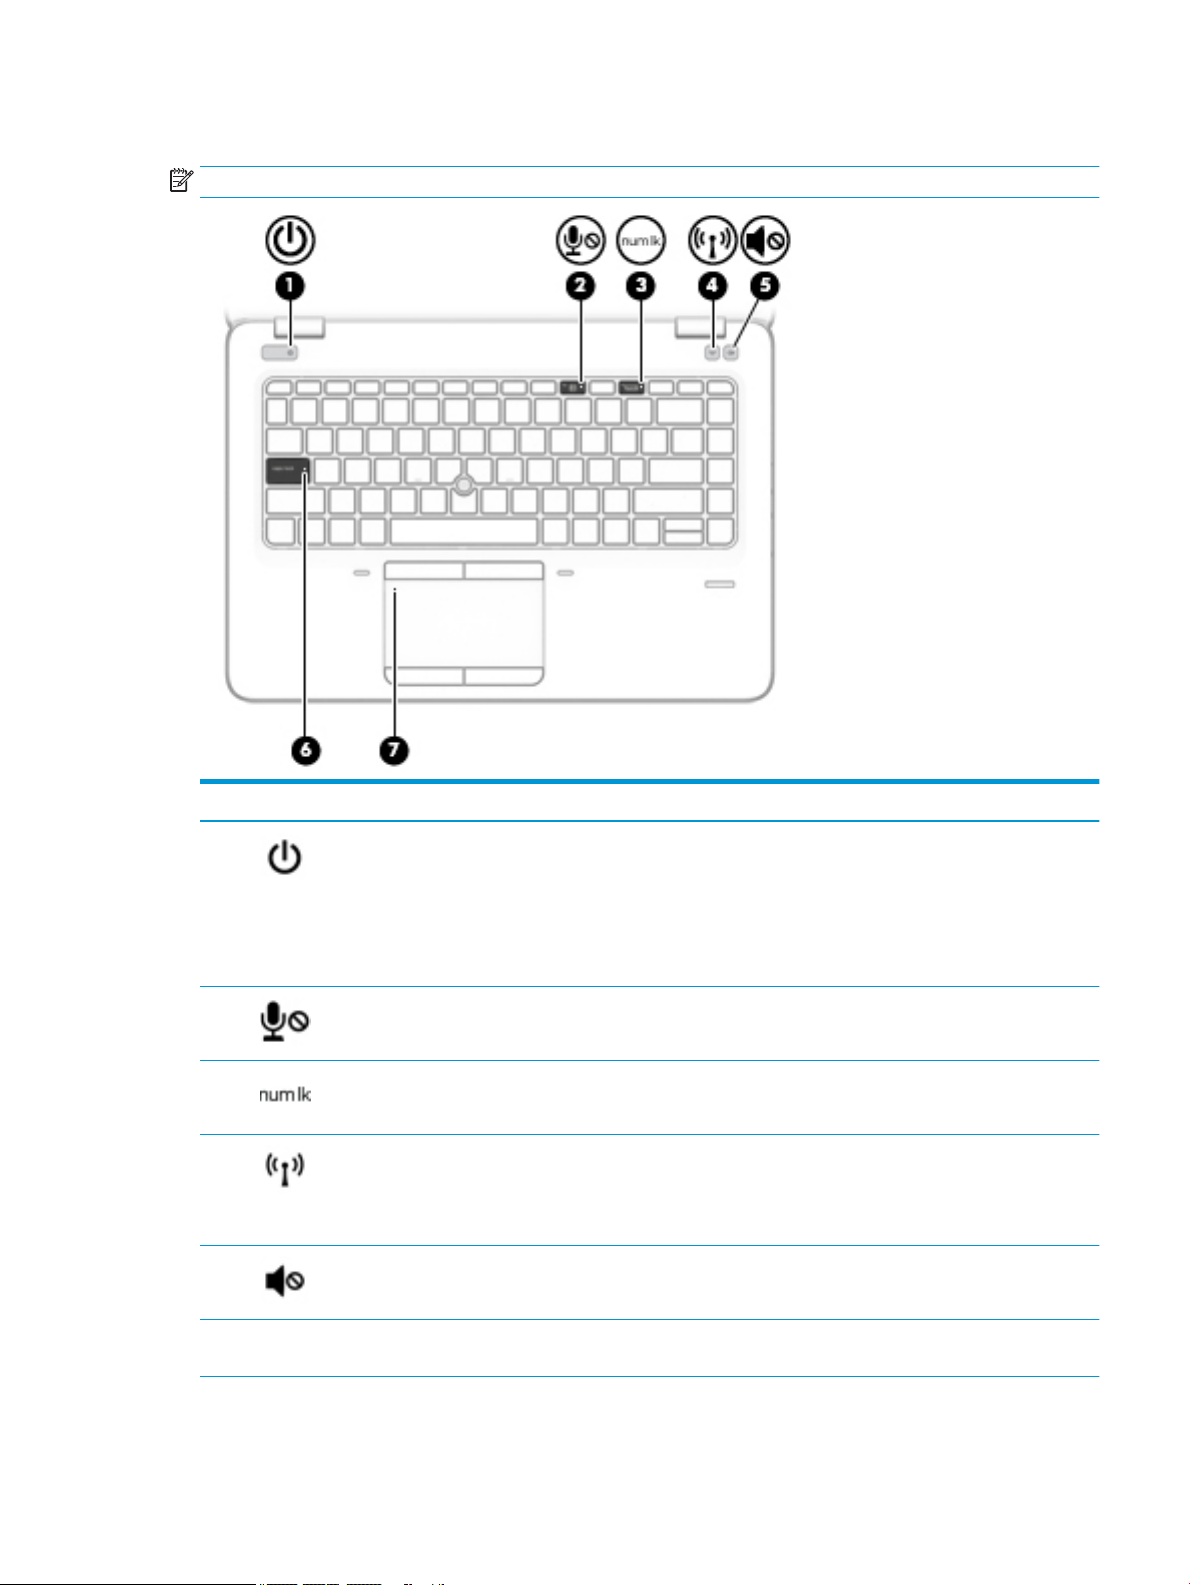
Lights
NOTE: Refer to the illustration that most closely matches your computer.
Component Description
(1) Power light
(2) Microphone mute light
(3) Num lock light On: Num lock is on.
(4) Wireless light On: An integrated wireless device, such as a wireless local area
(5) Mute light
(6) Caps lock light On: Caps lock is on, which switches the key input to all capital
●
On: The computer is on.
●
Blinking: The computer is in the Sleep state, a power-saving
state. The computer shuts o power to the display and
other unneeded components.
●
O: The computer is o or in Hibernation. Hibernation is a
power-saving state that uses the least amount of power.
●
Amber: microphone sound is o.
●
O: microphone sound is on.
network (WLAN) device and/or a Bluetooth® device, is on.
NOTE: On some models, the wireless light is amber when all
wireless devices are o.
●
Amber: Computer sound is o.
●
O: Computer sound is on.
letters.
(7) TouchPad light
●
On: The TouchPad is o.
Top 9
Component Description
●
O: The TouchPad is on.
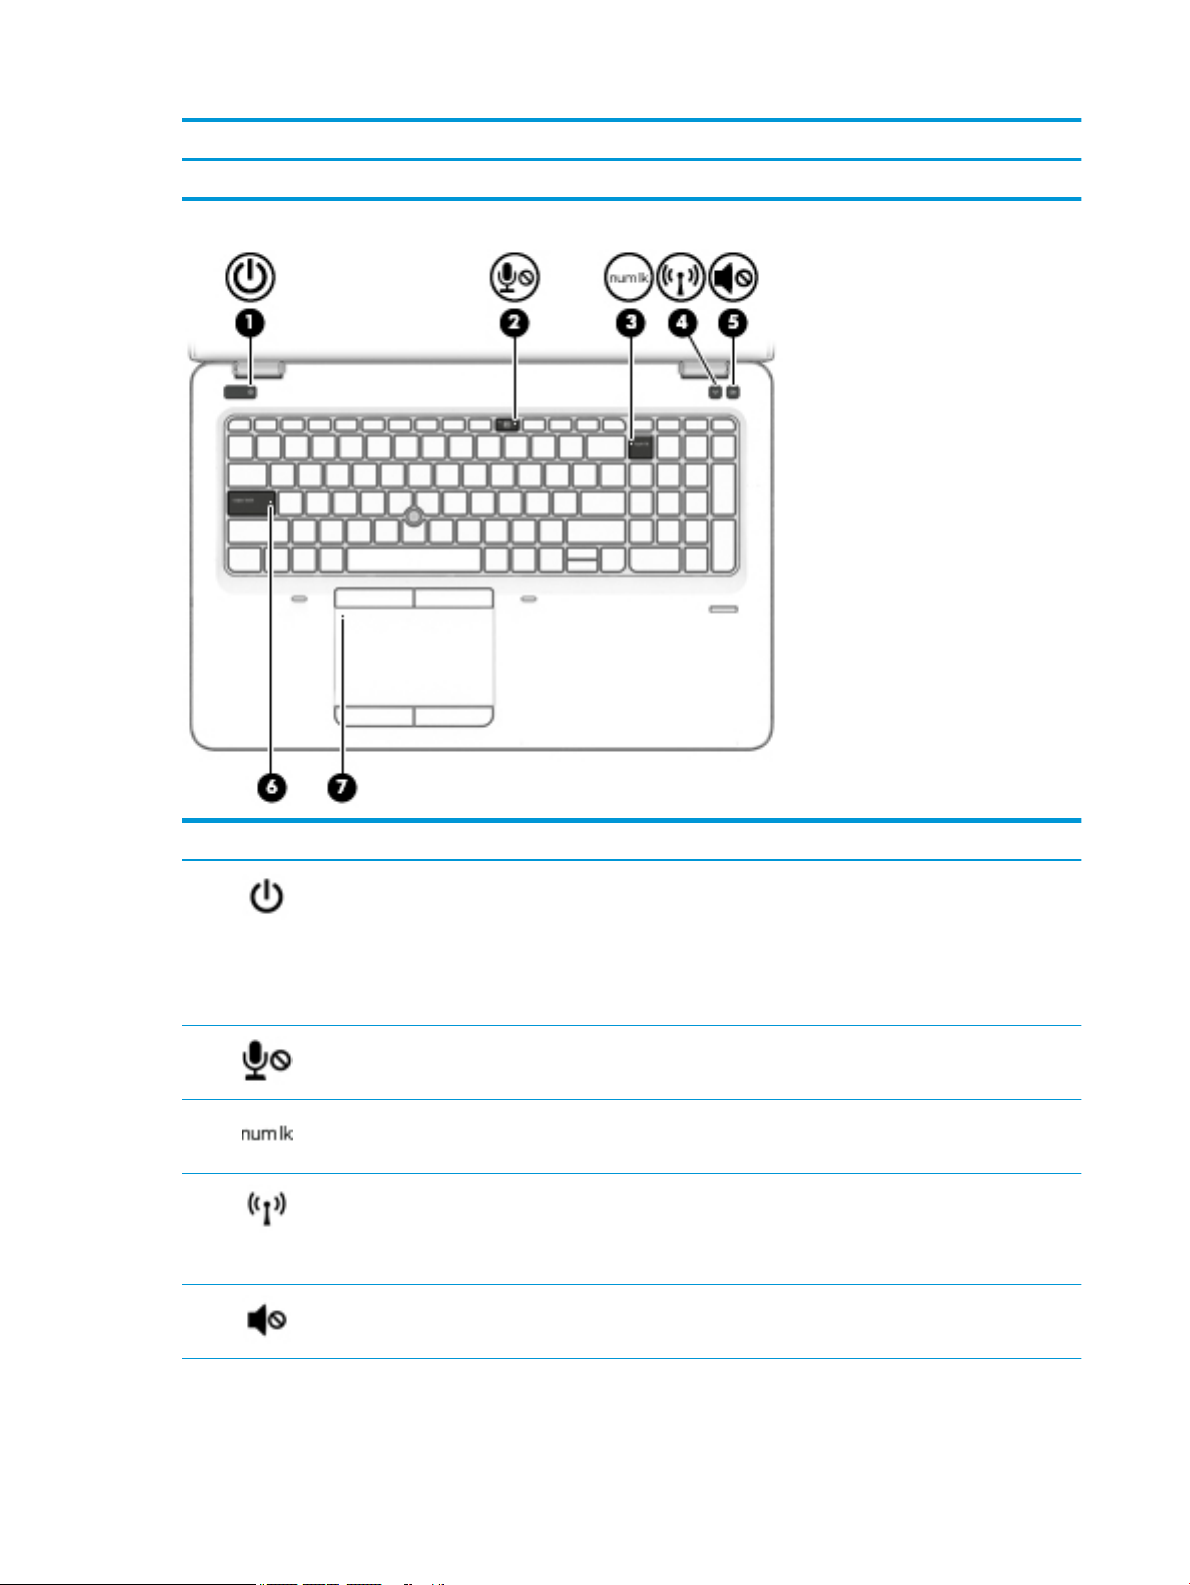
Component Description
(1) Power light
(2) Microphone mute light
(3) Num lock light On: Num lock is on.
(4) Wireless light On: An integrated wireless device, such as a wireless local area
(5) Mute light
●
On: The computer is on.
●
Blinking: The computer is in the Sleep state, a power-saving
state. The computer shuts o power to the display and
other unneeded components.
●
O: The computer is o or in Hibernation. Hibernation is a
power-saving state that uses the least amount of power.
●
Amber: microphone sound is o.
●
O: microphone sound is on.
network (WLAN) device and/or a Bluetooth® device, is on.
NOTE: On some models, the wireless light is amber when all
wireless devices are o.
●
Amber: Computer sound is o.
●
O: Computer sound is on.
10 Chapter 2 Components

Component Description
(6) Caps lock light On: Caps lock is on, which switches the key input to all capital
letters.
(7) TouchPad light
●
On: The TouchPad is o.
●
O: The TouchPad is on.
Top 11

Buttons, speakers, and ngerprint reader
Component Description
(1) Power button
●
When the computer is o, press the button to turn on the
computer.
●
When the computer is on, press the button briey to initiate
Sleep.
●
When the computer is in the Sleep state, press the button
briey to exit Sleep.
●
When the computer is in Hibernation, press the button
briey to exit Hibernation.
CAUTION: Pressing and holding down the power button results
in the loss of unsaved information.
If the computer has stopped responding and shutdown
procedures are ineective, press and hold the power button for at
least 5 seconds to turn o the computer.
To learn more about your power settings, see your power
options.
▲ Type power in the taskbar search box, and then select
Power and sleep settings.
‒ or –
Right-click the Start button, and then select Power
Options.
(2) Premium speakers (select products only) Produce sound.
(3) Wireless button Turns the wireless feature on or o but does not establish a
12 Chapter 2 Components
wireless connection.

Component Description
A wireless network must be set up before a wireless connection is
possible.
(4) Volume mute button (select products only) Mutes and restores speaker sound.
(5) Fingerprint reader (select products only) Allows a ngerprint logon to Windows, instead of a password
logon.
Top 13

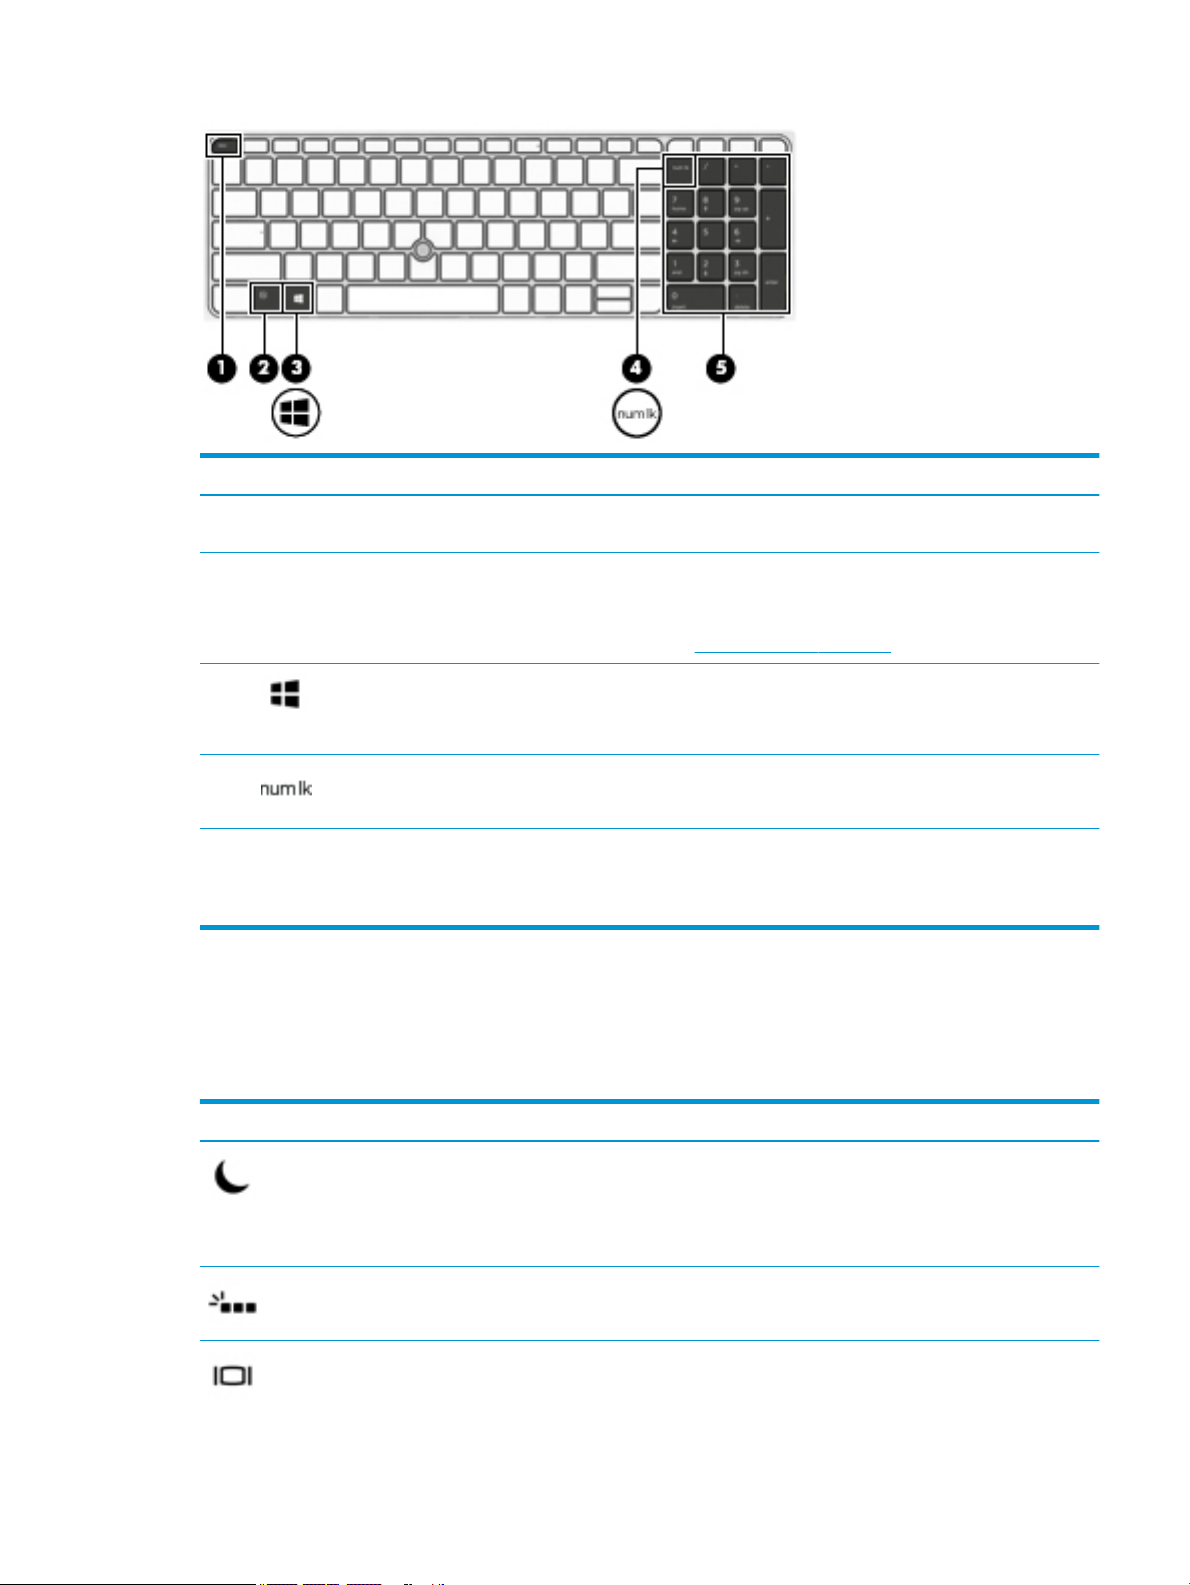
Special function keys
NOTE: Refer to the illustration that most closely matches your computer.
Component Description
(1) esc key Displays system information when pressed in combination with
(2) fn key Executes frequently used system functions when pressed in
the fn key.
combination with a function key, the num lock key, or the esc
key.
See Using the hot keys on page 15.
(3) Windows key Opens the Start menu.
NOTE: Pressing the Windows key again will close the Start
menu.
(4) Embedded numeric keypad A numeric keypad superimposed over the keyboard alphabet
(5) Windows application key Displays options for a selected object.
(6) num lock key Turns the embedded numeric keypad on and o.
keys that enables you to add, subtract, and perform other
numeric tasks. When num lock is on, the keypad can be used like
an external numeric keypad.
14 Chapter 2 Components
Component Description
(1) esc key Displays system information when pressed in combination with
(2) fn key Executes frequently used system functions when pressed in
(3) Windows key Opens the Start menu.
(4) num lock key Turns the embedded numeric keypad on and o.
(5) Integrated numeric keypad A separate keypad to the right of the alphabet keyboard that
Using the hot keys
To use a hot key:
the fn key.
combination with a function key, the num lock key, or the esc
key.
See Using the hot keys on page 15.
NOTE: Pressing the Windows key again will close the Start
menu.
enables you to add, subtract, and perform other numeric tasks.
When num lock is on, the integrated keypad can be used like an
external numeric keypad.
▲
Press the fn key, and then press the correct function key represented by the icons below.
Press fn+function key Description
Initiates Sleep, which saves your information in system memory. The display and other system components
turn o and power is conserved.
To exit Sleep, briey press the power button.
CAUTION: To reduce the risk of information loss, save your work before initiating Sleep.
Turns the keyboard backlight o or on.
NOTE: To conserve battery power, turn o this feature.
Switches the screen image among display devices connected to the system. For example, if a monitor is
connected to the computer, repeatedly pressing fn+f4 alternates the screen image from computer display to
monitor display to simultaneous display on both the computer and the monitor.
Top 15

Press fn+function key Description
Most external monitors receive video information on the computer using the external VGA video standard.
The fn+f4 hot key can also alternate images among other devices that are receiving video information on the
computer.
Decreases the screen brightness incrementally as long as you hold down the key.
Increases the screen brightness incrementally as long as you hold down the key.
Mutes or restores speaker sound.
Decreases speaker volume incrementally while you hold down the key.
Increases speaker volume incrementally while you hold down the key.
Mutes the microphone.
Turns the wireless feature on or o.
NOTE: A wireless network must be set up before a wireless connection is possible.
16 Chapter 2 Components

Bottom
Component Description
(1) Docking connectors Connect an optional docking device.
(2) Vents Enable airow to cool internal components.
NOTE: The computer fan starts up automatically to cool
internal components and prevent overheating. It is normal
for the internal fan to cycle on and o during routine
operation.
Bottom 17

Front
Component Description
(1) Wireless light On: An integrated wireless device, such as a wireless local
area network (WLAN) device and/or a Bluetooth® device, is
on.
NOTE: On some models, the wireless light is amber when
all wireless devices are o.
(2) Power light
(3) Battery light When AC power is connected:
(4) Drive light
●
On: The computer is on.
●
Blinking: The computer is in the Sleep state, a powersaving state. The computer shuts o power to the
display and other unneeded components.
●
O: The computer is o or in Hibernation.
Hibernation is a power-saving state that uses the
least amount of power.
●
White: The battery charge is greater than 90 percent.
●
Amber: The battery charge is from 0 to 90 percent.
●
O: The battery is not charging.
When AC power is disconnected (battery not charging):
●
Blinking amber: The battery has reached a low
battery level. When the battery has reached a critical
battery level, the battery light begins blinking
rapidly.
●
O: The battery is not charging.
●
Blinking white: The hard drive is being accessed.
●
Amber: HP 3D DriveGuard has temporarily parked the
hard drive.
NOTE: For more information about HP 3D DriveGuard,
see Using HP 3D DriveGuard (select products only)
on page 50.
Labels
The labels aixed to the computer provide information you may need when you troubleshoot system
problems or travel internationally with the computer.
IMPORTANT: Check the following locations for the labels described in this section: the bottom of the
computer, inside the battery bay, under the service door, or on the back of the display.
18 Chapter 2 Components

●
Service label—Provides important information to identify your computer. When contacting support, you
will probably be asked for the serial number, and possibly for the product number or the model number.
Locate these numbers before you contact support.
Your service label will resemble one of the examples shown below. Refer to the illustration that most
closely matches the service label on your computer.
Component
(1) Serial number
(2) Product number
(3) Warranty period
(4) Model number (select products only)
Component
(1) Model name (select products only)
(2) Product number
(3) Serial number
(4) Warranty period
●
Regulatory label(s)—Provide(s) regulatory information about the computer.
●
Wireless certication label(s)—Provide(s) information about optional wireless devices and the approval
markings for the countries or regions in which the devices have been approved for use.
Inserting a SIM card (select products only)
CAUTION: To prevent damage to the connectors, use minimal force when inserting a SIM card.
Inserting a SIM card (select products only) 19

To insert a SIM card, follow these steps:
1. Turn o the computer by using the Shut down command.
2. Insert the SIM card into the SIM card slot, and then press in on the SIM card until it is rmly seated.
NOTE: The SIM card in your computer may look slightly dierent from the illustration in this section.
NOTE: See the image on the battery bay to determine which way the SIM card should be inserted into
your computer.
To remove a SIM card, press in on the SIM card, and then remove it from the slot.
20 Chapter 2 Components

3 Network connections
Your computer can travel with you wherever you go. But even at home, you can explore the globe and access
information from millions of websites using your computer and a wired or wireless network connection. This
chapter will help you get connected to that world.
Connecting to a wireless network
Your computer may be equipped with one or more of the following wireless devices:
●
WLAN device—Connects the computer to wireless local area networks (commonly referred to as Wi-Fi
networks, wireless LANs, or WLANs) in corporate oices, your home, and public places such as airports,
restaurants, coee shops, hotels, and universities. In a WLAN, the mobile wireless device in your
computer communicates with a wireless router or a wireless access point.
●
HP Mobile Broadband Module (select products only)—A wireless wide area network (WWAN) device that
gives you wireless connectivity over a much larger area. Mobile network operators install base stations
(similar to cell phone towers) throughout large geographic areas, eectively providing coverage across
entire states, regions, or even countries.
●
Bluetooth® device—Creates a personal area network (PAN) to connect to other Bluetooth-enabled
devices such as computers, phones, printers, headsets, speakers, and cameras. In a PAN, each device
communicates directly with other devices, and devices must be relatively close together—typically
within 10 meters (approximately 33 feet) of each other.
Using the wireless controls
You can control the wireless devices in your computer using one or more of these features:
●
Wireless button (also called airplane mode key or wireless key) (referred to in this chapter as wireless
button)
●
Operating system controls
Wireless button
The computer may have a wireless button, one or more wireless devices, and one or two wireless lights. All
the wireless devices on your computer are enabled at the factory.
The wireless light indicates the overall power state of your wireless devices, not the status of individual
devices.
Operating system controls
The Network and Sharing Center allows you to set up a connection or network, connect to a network, and
diagnose and repair network problems.
To use operating system controls:
1. Type control panel in the taskbar search box, and then select Control Panel.
2. Select Network and Internet, and then select Network and Sharing Center.
Connecting to a wireless network 21

Connecting to a WLAN
NOTE: When you are setting up Internet access in your home, you must establish an account with an
Internet service provider (ISP). To purchase Internet service and a modem, contact a local ISP. The ISP will
help set up the modem, install a network cable to connect your wireless router to the modem, and test the
Internet service.
To connect to a WLAN, follow these steps:
1. Be sure that the WLAN device is on.
2. Select the network status icon in the taskbar, and then connect to one of the available networks.
If the WLAN is a security-enabled WLAN, you are prompted to enter a security code. Enter the code, and
then select Next to complete the connection.
NOTE: If no WLANs are listed, you may be out of range of a wireless router or access point.
NOTE: If you do not see the WLAN you want to connect to, right-click the network status icon in the
taskbar, and then select Open Network and Sharing Center. Select Set up a new connection or
network. A list of options is displayed, allowing you to manually search for and connect to a network or
to create a new network connection.
3. Follow the on-screen instructions to complete the connection.
After the connection is made, select the network status icon at the far right of the taskbar, to verify the name
and status of the connection.
NOTE: The functional range (how far your wireless signals travel) depends on WLAN implementation, router
manufacturer, and interference from other electronic devices or structural barriers such as walls and oors.
Using HP Mobile Broadband (select products only)
Your HP Mobile Broadband computer has built-in support for mobile broadband service. Your new computer,
when used with a mobile operator’s network, gives you the freedom to connect to the Internet, send e-mail,
or connect to your corporate network without the need for Wi-Fi hotspots.
NOTE: If your computer includes HP Mobile Connect, the instructions in this section do not apply. See Using
HP Mobile Connect Pro (select products only) on page 23.
You might need the HP Mobile Broadband Module IMEI and/or MEID number to activate mobile broadband
service. The number may be printed on a label located on the bottom of your computer, inside the battery bay,
under the service door, or on the back of the display.
– or –
You can nd the number following these steps:
1. From the taskbar, select the network status icon.
2. Select View Connection Settings.
3. Under the Mobile broadband section, select the network status icon.
Some mobile network operators require the use of a SIM card. A SIM card contains basic information about
you, such as a personal identication number (PIN), as well as network information. Some computers include
a SIM card that is preinstalled. If the SIM card is not preinstalled, it may be provided in the HP Mobile
Broadband information provided with your computer or the mobile network operator may provide it
separately from the computer.
22 Chapter 3 Network connections

For information about HP Mobile Broadband and how to activate service with a preferred mobile network
operator, see the HP Mobile Broadband information included with your computer.
Using HP Mobile Connect Pro (select products only)
HP Mobile Connect Pro is a prepaid, mobile broadband service that provides a cost-eective, secure, simple,
and exible mobile broadband connection for your computer. To use HP Mobile Connect Pro, your computer
must have a SIM card and the HP Mobile Connect app. For more information about HP Mobile Connect Pro and
where it is available, go to http://www.hp.com/go/mobileconnect.
Using GPS (select products only)
Your computer may be equipped with a Global Positioning System (GPS) device. GPS satellites deliver location,
speed, and direction information to GPS-equipped systems.
To enable GPS, make sure location is enabled under the Windows privacy setting.
1. Type location in the taskbar search box, and then select Location privacy settings.
2. Follow the on-screen instructions for using location settings.
Using Bluetooth wireless devices (select products only)
A Bluetooth device provides short-range wireless communications that replace the physical cable connections
that traditionally link electronic devices such as the following:
●
Computers (desktop, notebook)
●
Phones (cellular, cordless, smartphone)
●
Imaging devices (printer, camera)
●
Audio devices (headset, speakers)
●
Mouse
●
External keyboard
Connecting Bluetooth devices
Before you can use a Bluetooth device, you must establish a Bluetooth connection.
1. Type bluetooth in the taskbar search box, and then select Bluetooth settings.
2. Turn on Bluetooth, if it is not already turned on.
3. Select your device from the list, and then follow the on-screen instructions.
NOTE: If the device requires verication, a pairing code is displayed. On the device you are adding, follow the
on-screen instructions to verify that the code on your device matches the pairing code. For more information,
refer to the documentation provided with the device.
NOTE: If your device does not appear in the list, be sure that Bluetooth on that device is turned on. Some
devices may have additional requirements; refer to the documentation provided with the device.
Connecting to a wired network
Select products may allow wired connections: local area network (LAN) and modem connection. A LAN
connection uses a network cable and is much faster than a modem, which uses a telephone cable. Both cables
are sold separately.
Connecting to a wired network 23

WARNING! To reduce the risk of electric shock, re, or damage to the equipment, do not plug a modem
cable or telephone cable into an RJ-45 (network) jack.
Connecting to a local area network (LAN) (select products only)
Use a LAN connection if you want to connect the computer directly to a router in your home (instead of
working wirelessly), or if you want to connect to an existing network at your oice.
Connecting to a LAN requires an 8-pin, RJ-45 network cable or an optional docking device or expansion port, if
there is no RJ-45 port on the computer.
To connect the network cable, follow these steps:
1. Plug the network cable into the network jack (1) on the computer.
2. Plug the other end of the network cable into a network wall jack (2) or router.
NOTE: If the network cable contains noise suppression circuitry (3), which prevents interference from
TV and radio reception, orient the circuitry end of the cable toward the computer.
24 Chapter 3 Network connections

4 Screen navigation
You can navigate the computer screen in the following ways:
●
Use touch gestures directly on the computer screen (select products only)
●
Use touch gestures on the TouchPad
●
Use keyboard and optional mouse (mouse purchased separately)
●
Use the pointing stick (select products only)
Using the TouchPad and touch screen gestures
The TouchPad helps you navigate the computer screen and control the pointer using simple touch gestures.
You can also use the left and right TouchPad buttons as you would use the corresponding buttons on an
external mouse. To navigate a touch screen (select products only), touch the screen directly using gestures
described in this chapter.
You can also customize gestures and view demonstrations of how they work. Type control panel in the
taskbar search box, select
select Mouse.
NOTE: Unless noted, gestures can be used on the TouchPad or a touch screen (select products only).
Control Panel, and then select Hardware and Sound. Under Devices and Printers,
Tap
Use the tap/double-tap gesture to select or open an item on the screen.
●
Point to an item on the screen, and then tap one nger on the TouchPad zone or touch screen to select
the item. Double-tap an item to open it.
Using the TouchPad and touch screen gestures 25

Two-nger pinch zoom
Use the two-nger pinch zoom to zoom out or in on images or text.
●
Zoom out by placing two ngers apart on the TouchPad zone or touch screen and then moving your
ngers together.
●
Zoom in by placing two ngers together on the TouchPad zone or touch screen and then moving your
ngers apart.
Two-nger
scroll (TouchPad only)
Use the two-nger scroll to move up, down, or sideways on a page or image.
●
Place two ngers slightly apart on the TouchPad zone and then drag them up, down, left, or right.
Two-nger tap (TouchPad only)
Use the two-nger tap to open the menu for an object on the screen.
NOTE: The two-nger tap performs the same function as right-clicking with the mouse.
●
Tap two ngers on the TouchPad zone to open the options menu for the selected object.
26 Chapter 4 Screen navigation

Four-nger tap (TouchPad only)
Use the four-nger tap to open the action center.
●
Tap four ngers on the Touchpad to open the action center and view current settings and notications.
Three-nger swipe (TouchPad only)
Use the three-nger swipe to view open windows and to switch between open windows and the desktop.
●
Swipe 3 ngers away from you to see all open windows.
●
Swipe 3 ngers toward you to show the desktop.
●
Swipe 3 ngers left or right to switch between open windows.
One-nger slide (touch screen only)
Use the one-nger slide to pan or scroll through lists and pages, or to move an object.
●
To scroll across the screen, lightly slide one nger across the screen in the direction you want to move.
●
To move an object, press and hold your nger on an object, and then drag your nger to move the object.
Using the TouchPad and touch screen gestures 27

Using the keyboard and optional mouse
The keyboard and mouse allow you to type, select items, scroll and to perform the same functions as you do
using touch gestures. The keyboard also allows you to use action keys and key combinations to perform
specic functions.
NOTE: Depending on the country or region, your keyboard may have dierent keys and keyboard functions
than those discussed in this section.
Using the integrated numeric keypad (select products only)
The computer includes an integrated numeric keypad, and it also supports an optional external numeric
keypad or an optional external keyboard that includes a numeric keypad. For more details about the
integrated numeric keypad, see Special function keys on page 14.
Component Description
num lock key Controls the function of the integrated numeric keypad. Press the key
to alternate between the standard numeric function found on an
external keypad (this function is turned on at the factory) and the
navigational function (indicated by the directional arrows on the keys).
NOTE: The keypad function that is active when the computer is
turned o, is reinstated when the computer is turned back on.
Integrated numeric keypad Set at the factory to function like an external numeric keypad. To
alternate between this numeric function and the navigational function
(indicated by the directional arrow keys), press the num lock key.
28 Chapter 4 Screen navigation

5 Entertainment features
Use your HP computer for business or pleasure to meet with others via the webcam, mix audio and video, or
connect external devices like a projector, monitor, TV, or speakers. See Components on page 4 to locate the
audio, video and camera features on your computer.
Using a webcam (select products only)
Your computer has a webcam (integrated camera) that records video and captures photographs. Some
models allow you to video conference and chat online using streaming video.
▲
To access the camera, type camera in the taskbar search box, and then select Camera from the list of
applications.
Using audio
You can download and listen to music, stream audio content (including radio) from the web, record audio, or
mix audio and video to create multimedia. You can also play music CDs on the computer (on select models) or
attach an external optical drive to play CDs. To enhance your listening enjoyment, attach headphones or
speakers.
Connecting speakers
You can attach wired speakers to your computer by connecting them to a USB port or to the audio-out
(headphone)/audio-in (microphone) combo jack on your computer or on a docking station.
To connect wireless speakers to your computer, follow the device manufacturer's instructions. Before
connecting speakers, lower the volume setting.
Connecting headphones
WARNING! To reduce the risk of personal injury, lower the volume setting before putting on headphones,
earbuds, or a headset. For additional safety information, see the Regulatory, Safety and Environmental
Notices.
To access this document:
1. Type support in the taskbar search box, and then select the HP Support Assistant app.
– or –
Click the question mark icon in the taskbar.
2. Select My PC, select the Specications tab, and then select User Guides.
You can connect wired headphones to the audio-out (headphone)/audio-in (microphone) combo jack on your
computer.
To connect wireless headphones to your computer, follow the device manufacturer's instructions.
Using a webcam (select products only) 29

Connecting headsets
WARNING! To reduce the risk of personal injury, lower the volume setting before putting on headphones,
earbuds, or a headset. For additional safety information, see the Regulatory, Safety and Environmental
Notices.
To access this document:
1. Type support in the taskbar search box, and then select the HP Support Assistant app.
– or –
Click the question mark icon in the taskbar.
2. Select My PC, select the Specications tab, and then select User Guides.
Headphones combined with a microphone are called headsets. You can connect wired headsets to the audioout (headphone)/audio-in (microphone) combo jack on your computer.
To connect wireless headsets to your computer, follow the device manufacturer's instructions.
Using sound settings
Use sound settings to adjust system volume, change system sounds, or manage audio devices.
To view or change sound settings:
▲
Type control panel in the taskbar search box, select Control Panel, select Hardware and Sound,
and then select Sound.
– or –
Right-click the Start button, select Control Panel, select Hardware and Sound, and then select Sound.
Your computer may include an enhanced sound system by Bang & Olufsen, DTS, Beats audio, or another
provider. As a result, your computer may include advanced audio features that can be controlled through an
audio control panel specic to your audio system.
Use the audio control panel to view and control audio settings.
▲
Type control panel in the taskbar search box, select Control Panel, select Hardware and Sound,
and then select the audio control panel specic to your system.
– or –
Right-click the Start button, select Control Panel, select Hardware and Sound, and then select the
audio control panel specic to your system.
Using video
Your computer is a powerful video device that enables you to watch streaming video from your favorite
websites and download video and movies to watch on your computer when you are not connected to a
network.
To enhance your viewing enjoyment, use one of the video ports on the computer to connect an external
monitor, projector, or TV.
IMPORTANT: Be sure that the external device is connected to the correct port on the computer, using the
correct cable. Follow the device manufacturer's instructions.
For information on using your video features, refer to HP Support Assistant.
30 Chapter 5 Entertainment features

Connecting video devices by using a VGA cable (select products only)
NOTE: To connect a VGA video device to your computer, you need an VGA cable, purchased separately.
To see the computer screen image on an external VGA monitor or projected for a presentation, connect a
monitor or projector to the computer's VGA port.
1. Connect the VGA cable from the monitor or projector to the VGA port on the computer as shown.
2. Press fn+f4 to alternate the screen image between 4 display states:
●
PC screen only: View the screen image on the computer only.
●
Duplicate: View the screen image simultaneously on both the computer and the external device.
●
Extend: View the screen image extended across both the computer and the external device.
●
Second screen only: View the screen image on the external device only.
Each time you press fn+f4, the display state changes.
NOTE: For best results, especially if you choose the "Extend" option, increase the screen resolution of
the external device, as follows. Type control panel in the taskbar search box, select Control Panel,
select Appearance and Personalization. Under Display, select Adjust resolution.
Connecting a DisplayPort device
The Dual-Mode DisplayPort connects an optional high-resolution display device or a high-performance data
device. This port delivers higher performance than the VGA external monitor port and improves digital
connectivity.
1. Connect one end of the DisplayPort cable to the DisplayPort on the computer.
2. Connect the other end of the cable to the digital display device.
3. Press fn+f4 to alternate the computer screen image between 4 display states.
●
PC screen only: View the screen image on the computer only.
●
Duplicate: View the screen image simultaneously on both the computer and external device.
●
Extend: View the screen image extended across both the computer and external device.
●
Second screen only: View the screen image on the external device only.
Using video 31

Each time you press fn+f4 the display state changes.
NOTE: For best results, especially if you choose the "Extend" option, increase the screen resolution of
the external device, as follows. Type control panel in the taskbar search box, select Control Panel,
select Appearance and Personalization. Under Display, select Adjust resolution.
Discovering and connecting wired displays using MultiStream Transport
MultiStream Transport (MST) allows you to connect multiple wired display devices to your computer by
connecting to the VGA or DisplayPorts on your computer and also to the VGA or DisplayPorts on a hub or an
external docking station. You can connect in several ways, depending on the type of graphics controller
installed on your computer and whether or not your computer includes a built-in hub. Go to Device Manager to
nd out what hardware is installed on your computer.
▲
Type device manager in the taskbar search box, and then select the Device Manager app. A list
displays all the devices installed on your computer.
Connect displays to computers with AMD graphics (with an optional hub)
NOTE: With an AMD graphics controller and optional hub, you can connect up to 3 external display devices.
To set up multiple display devices, follow these steps:
1. Connect an external hub (purchased separately) to the DisplayPort on your computer, using a DP-to-DP
cable (purchased separately). Be sure that the hub power adapter is connected to AC power.
2. Connect your external display devices to the VGA ports or DisplayPorts on the hub.
3. To see all of your connected display devices, type device manager in the taskbar search box, and
then select the Device Manager app. If you don't see all of your connected displays, be sure that each is
connected to the correct port on the hub.
NOTE: Multiple display choices include Duplicate, which mirrors your computer screen on all enabled
display devices, or Extend, which spans your computer screen across all enabled display devices.
Discovering and connecting to Miracast-compatible wireless displays (select products only)
NOTE: To learn what type of display you have (Miracast-compatible or Intel WiDi), refer to the
documentation that came with your TV or secondary display.
To discover and connect to Miracast-compatible wireless displays without leaving your current apps, follow
the steps below.
To open Miracast:
▲
Type project in the taskbar search box, and then click Project to a second screen. Click Connect to a
wireless display
, and then follow the on-screen instructions.
32 Chapter 5 Entertainment features

6 Power management
NOTE: A computer may have a power button or a power switch. The term power button is used throughout
this guide to mean both types of power controls.
Shutting down (turning o) the computer
CAUTION: Unsaved information is lost when the computer shuts down.
The shutdown command closes all open programs, including the operating system, and then turns o the
display and computer.
Shut down the computer under any of the following conditions:
●
When you need to access components inside the computer
●
When you are connecting an external hardware device that does not connect to a Universal Serial Bus
(USB) port
●
When the computer will be unused and disconnected from external power for an extended period
Although you can turn o the computer with the power button, the recommended procedure is to use the
Windows shutdown command:
NOTE: If the computer is in the Sleep state or in Hibernation (select products only), you must rst exit Sleep
or Hibernation before shutdown is possible by briey pressing the power button.
1. Save your work and close all open programs.
2. Select the Start button, select the Power icon, and then select Shut down.
If the computer is unresponsive and you are unable to use the preceding shutdown procedure, try the
following emergency procedures in the sequence provided:
●
Press ctrl+alt+delete. Select the Power icon, and then select Shut Down.
●
Press and hold the power button for at least 5 seconds.
●
Disconnect the computer from external power.
●
Press and hold the power button for at least 15 seconds.
Using HP Fast Charge (select products only)
The HP Fast Charge feature allows you to quickly charge your computer battery. Depending on your computer
model and AC adapter, Fast Charge operates in one of the following ways:
●
When the battery charge remaining is between zero and 50%, the battery will charge to 50% of full
capacity in no more than 30 minutes.
●
When the battery charge remaining is between zero and 90%, the battery will charge to 90% of full
capacity in no more than 90 minutes.
To use HP Fast Charge, shut down your computer and then connect the AC adapter to your computer and to
external power.
Shutting down (turning o) the computer 33

Setting power options
CAUTION: Several well-known vulnerabilities exist when a computer is in the Sleep state. To prevent an
unauthorized user from accessing data on your computer, even encrypted data, HP recommends that you
always initiate Hibernation instead of Sleep anytime the computer will be out of your physical possession.
This practice is particularly important when you travel with your computer.
Using power-saving states
Sleep is enabled at the factory. When Sleep is initiated, the power lights blink and the screen clears. Your work
is saved to memory.
CAUTION: To reduce the risk of possible audio and video degradation, loss of audio or video playback
functionality, or loss of information, do not initiate Sleep while reading from or writing to a disc or an external
memory card.
NOTE: You cannot initiate any type of networking connection or perform any computer functions while the
computer is in the Sleep state.
Initiating and exiting Sleep
With the computer on, you can initiate Sleep in any of the following ways:
●
Briey press the power button.
●
Select the Start button, select the Power icon, and then select Sleep.
To exit Sleep, briey press the power button.
When the computer exits Sleep, the power lights turn on and the computer returns to the screen where you
stopped working.
NOTE: If you have set a password to be required on wakeup, you must enter your Windows password before
the computer will return to the screen.
Enabling and exiting user-initiated Hibernation (select products only)
You can enable user-initiated Hibernation and change other power settings and timeouts using Power
Options:
1. Type power options in the taskbar search box, and then select Power Options.
‒ or –
Right-click the Power meter icon , and then select Power Options.
2. In the left pane, select Choose what the power buttons do.
3. Select Change Settings that are currently unavailable, and then, in the When I press the power button
or When I press the sleep button area, select Hibernate.
– or –
Under Shutdown settings, select the Hibernate box to show the Hibernate option in the Power menu.
4. Select Save changes.
To exit Hibernation, briey press the power button. The power lights turn on and your work returns to the
screen where you stopped working.
34 Chapter 6 Power management

NOTE: If you have set a password to be required on wakeup, you must enter your Windows password before
your work will return to the screen.
Using the power meter and power settings
The power meter is located on the Windows desktop. The power meter allows you to quickly access power
settings and view the remaining battery charge.
●
To view the percentage of remaining battery charge and the current power plan, place the mouse
pointer over the power meter icon .
●
To use Power Options, right-click the power meter icon , and then select an item from the list. You
can also type
Dierent power meter icons indicate whether the computer is running on battery or external power. The icon
also reveals a message if the battery has reached a low or critical battery level.
power options in the task bar search box, and then select Power Options.
Setting password protection on wakeup
After you have set a password for the computer, you can set the computer to prompt for a password when the
computer exits Sleep or Hibernation.
To set a password:
1. Type power options in the taskbar search box, and then select Power Options.
‒ or –
Right-click the Power meter icon , and then select Power Options.
2. Select Start, select Settings, select Accounts, select Sign-in Options, select Password, select Add, and
then follow the on-screen instructions to set a password.
3. Close Power Options.
To set the computer to prompt for a password when the computer exits Sleep or Hibernation, follow these
steps:
1. Type power options in the taskbar search box, and then select Power Options.
‒ or –
Right-click the Power meter icon , and then select Power Options.
2. Select Start, select Settings, select Accounts, select Sign-in Options.
3. Under Require sign-in, If you’ve been away, when should Windows require you to sign in again?,
select When PC wakes from sleep.
4. Select Save changes.
Using battery power
The computer runs on battery power whenever it is not plugged into external AC power. Computer battery life
varies, depending on power management settings, running programs, display brightness, external devices
connected to the computer, and other factors. Keeping the battery in the computer whenever the computer is
Setting power options 35

plugged into AC power charges the battery and also protects your work in case of a power outage. If the
computer contains a charged battery and is running on external AC power, the computer automatically
switches to battery power if the AC adapter is disconnected on the computer or an AC power loss occurs.
NOTE: When you disconnect AC power, the display brightness is automatically decreased to save battery
life. Select computer products can switch between graphic modes to increase battery life.
Finding additional battery information
To access battery information:
1. Type support in the taskbar search box, and then select the HP Support Assistant app.
– or –
Select the question mark icon in the taskbar.
2. Select My PC, select the Diagnostics and Tools tab, and then select HP Battery Check. If HP Battery
Check indicates that your battery should be replaced, contact support.
HP Support Assistant provides the following tools and information about the battery.
●
HP Battery Check tool to test battery performance
●
Information on calibration, power management, and proper care and storage to maximize battery life
●
Information on battery types, specications, life cycles, and capacity
Using HP Battery Check
To monitor the status of your battery, or if the battery is no longer holding a charge, run HP Battery Check in
the HP Support Assistant app. If HP Battery Check indicates that your battery should be replaced, contact
support.
To run HP Battery Check:
1. Connect the AC adapter to the computer.
NOTE: The computer must be connected to external power for Battery Check to work properly.
2. Type support in the taskbar search box, and then select the HP Support Assistant app.
– or –
Select the question mark icon in the taskbar.
3. Select My PC, select the Diagnostics and Tools tab, and then select HP Battery Check. If HP Battery
Check indicates that your battery should be replaced, contact support.
Battery Check examines the battery and its cells to see if they are functioning properly, and then reports the
results of the examination.
Displaying the remaining battery charge
▲
Move the pointer over the Power meter icon .
Maximizing battery discharge time
Battery discharge time varies depending on features you use while on battery power. Maximum discharge
time gradually decreases as the battery storage capacity naturally degrades.
36 Chapter 6 Power management

Tips for maximizing battery discharge time:
●
Lower the brightness on the display.
●
Select the Power saver setting in Power Options.
Managing low battery levels
The information in this section describes the alerts and system responses set at the factory. Some lowbattery alerts and system responses can be changed using Power Options. Preferences set using Power
Options do not aect lights.
Type power options in the taskbar search box, and then select Power Options.
Identifying low battery levels
When a battery that is the sole power source for the computer reaches a low or critical battery level, the
following behavior occurs:
●
The battery light (select products only) indicates a low or critical battery level.
– or –
●
The Power meter icon shows a low or critical battery notication.
If the computer is on or in the Sleep state, the computer remains briey in the Sleep state and then shuts
down and loses any unsaved information.
Resolving a low battery level
Resolving a low battery level when external power is available
▲
Connect one of the following devices:
●
AC adapter
●
Optional docking or expansion device
●
Optional power adapter purchased as an accessory from HP
Resolving a low battery level when no power source is available
To resolve a low battery level when no power source is available, save your work and shut down the
computer.
Conserving battery power
●
Select the Power saver setting in Power Options.
●
Turn o wireless and LAN connections and exit modem applications when you are not using them.
●
Disconnect unused external devices that are not plugged into an external power source.
●
Stop, disable, or remove any external memory cards that you are not using.
●
Decrease screen brightness.
●
Before you leave your work, initiate Sleep, or shut down the computer.
Setting power options 37

Disposing of a battery
When a battery has reached the end of its useful life, do not dispose of the battery in general household
waste. Follow the local laws and regulations in your area for battery disposal.
Replacing a battery
The battery(ies) in this product cannot be easily replaced by users themselves. Removing or replacing the
battery could aect your warranty coverage. If a battery is no longer holding a charge, contact support.
Using external AC power
WARNING! To reduce potential safety issues, use only the AC adapter provided with the computer, a
replacement AC adapter provided by HP, or a compatible AC adapter purchased from HP.
NOTE: For information on connecting to AC power, see the Setup Instructions poster provided in the
computer box.
External AC power is supplied through an approved AC adapter or an optional docking or expansion device.
Connect the computer to external AC power under any of the following conditions:
●
When charging or calibrating a battery
●
When installing or modifying system software
●
When writing information to a CD, a DVD, or a BD (select products only)
●
When running Disk Defragmenter
●
When performing a backup or recovery
When you connect the computer to external AC power, the following events occur:
●
The battery begins to charge.
●
If the computer is turned on, the power meter icon in taskbar changes appearance.
When you disconnect external AC power, the following events occur:
●
The computer switches to battery power.
●
The display brightness is automatically decreased to save battery life.
38 Chapter 6 Power management

7 Security
Protecting the computer
Standard security features provided by the Windows operating system and the Windows Computer Setup
utility (BIOS, which runs under any operating system) can protect your personal settings and data from a
variety of risks.
NOTE: Security solutions are designed to act as deterrents. These deterrents may not prevent a product
from being mishandled or stolen.
NOTE: Before you send your computer for service, back up and delete condential les, and remove all
password settings.
NOTE: Some features listed in this chapter may not be available on your computer.
NOTE: Your computer supports Computrace, which is an online security-based tracking and recovery service
available in select regions. If the computer is stolen, Computrace can track the computer if the unauthorized
user accesses the Internet. You must purchase the software and subscribe to the service in order to use
Computrace. For information about ordering the Computrace software, go to http://www.hp.com.
Computer risk Security feature
Unauthorized use of the computer
Unauthorized access to Computer Setup (BIOS) BIOS administrator password in Computer Setup*
Unauthorized access to the contents of a hard drive DriveLock password (select products only) in Computer Setup*
Unauthorized startup from an optional external optical drive
(select products only), optional external hard drive (select
products only), or internal network adapter
Unauthorized access to a Windows user account Windows user password
Unauthorized access to data Windows BitLocker
Unauthorized removal of the computer Security cable slot (used with an optional security cable on select
*Computer Setup is an embedded, ROM-based utility that can be used even when the operating system is not working or will not load.
You can use a pointing device (TouchPad, pointing stick, or USB mouse) or the keyboard to navigate and make selections in Computer
Setup.
NOTE: On tablets without keyboards, you can use the touch screen.
Using passwords
●
HP Client Security software, in combination with a password,
smart card, contactless card, registered ngerprints, or
other authentication credential
●
BIOS power-on password
Boot options feature in Computer Setup*
products only)
A password is a group of characters that you choose to secure your computer information. Several types of
passwords can be set, depending on how you want to control access to your information. Passwords can be
set in Windows or in Computer Setup, which is preinstalled on the computer.
Protecting the computer 39

●
BIOS administrator, power-on, and DriveLock passwords are set in Computer Setup and are managed by
the system BIOS.
●
Windows passwords are set only in the Windows operating system.
●
If you forget both the DriveLock user password and the DriveLock master password set in Computer
Setup, the hard drive that is protected by the passwords is permanently locked and can no longer be
used.
You can use the same password for a Computer Setup feature and for a Windows security feature.
Use the following tips for creating and saving passwords:
●
When creating passwords, follow requirements set by the program.
●
Do not use the same password for multiple applications or websites, and do not reuse your Windows
password for any other application or website.
●
Use the Password Manager feature of HP Client Security to store your user names and passwords for
your websites and applications. You can securely read them in the future if they cannot be remembered.
●
Do not store passwords in a le on the computer.
The following tables list commonly used Windows and BIOS administrator passwords and describe their
functions.
Setting passwords in Windows
Password Function
Administrator password* Protects access to a Windows administrator-level account.
NOTE: Setting the Windows administrator password does not
set the BIOS administrator password.
User password* Protects access to a Windows user account.
*For information about setting a Windows administrator password or a Windows user password, type support in the taskbar search
box, and then select the HP Support Assistant app.
40 Chapter 7 Security

Setting passwords in Computer Setup
Password Function
BIOS administrator password* Protects access to Computer Setup.
NOTE: If features have been enabled to prevent removing the
BIOS administrator password, you may not be able to remove it
until those features have been disabled.
Power-on password
DriveLock master password* Protects access to the internal hard drive that is protected by
DriveLock user password* Protects access to the internal hard drive that is protected by
*For details about each of these passwords, see the following topics.
Managing a BIOS administrator password
To set, change, or delete this password, follow these steps:
Setting a new BIOS administrator password
1. Start Computer Setup.
●
Computers or tablets with keyboards:
▲ Turn on or restart the computer, and when the HP logo appears, press f10 to enter Computer
Setup.
●
Must be entered each time you turn on or restart the
computer.
●
If you forget your power-on password, you cannot turn on or
restart the computer.
DriveLock, and is set under DriveLock Passwords during the
enable process. This password is also used to remove DriveLock
protection.
DriveLock, and is set under DriveLock Passwords during the
enable process.
●
Tablets without keyboards:
▲ Turn o the tablet. Press the power button in combination with the volume down button until
the Startup menu is displayed, and then tap f10 to enter Computer Setup.
2. Select Security, select Create BIOS administrator password or Set Up BIOS administrator Password
(select products only), and then press enter.
3. When prompted, type a password.
4. When prompted, type the new password again to conrm.
5. To save your changes and exit Computer Setup, select the Save icon and then follow the on-screen
instructions.
– or –
Select Main, select Save Changes and Exit, and then press enter.
Your changes go into eect when the computer restarts.
Changing a BIOS administrator password
1. Start Computer Setup.
Using passwords 41

●
Computers or tablets with keyboards:
▲ Turn on or restart the computer, and when the HP logo appears, press f10 to enter Computer
Setup.
●
Tablets without keyboards:
▲ Turn o the tablet. Press the power button in combination with the volume down button until
the Startup menu is displayed, and then tap f10 to enter Computer Setup.
2. Enter your current BIOS administrator password.
3. Select Security, select Change BIOS administrator Password or Change Password (select products
only), and then press enter.
4. When prompted, type your current password.
5. When prompted, type your new password.
6. When prompted, type your new password again to conrm.
7. To save your changes and exit Computer Setup, select the Save icon, and then follow the on-screen
instructions.
– or –
Select Main, select Save Changes and Exit, and then press enter.
Your changes go into eect when the computer restarts.
Deleting a BIOS administrator password
1. Start Computer Setup.
●
Computers or tablets with keyboards:
▲ Turn on or restart the computer, and when the HP logo appears, press f10 to enter Computer
Setup.
●
Tablets without keyboards:
▲ Turn o the tablet. Press the power button in combination with the volume down button until
the Startup menu is displayed, and then tap f10 to enter Computer Setup.
2. Enter your current BIOS administrator password.
3. Select Security, select Change BIOS administrator Password or Change Password (select products
only), and then press enter.
4. When prompted, type your current password.
5. When prompted for the new password, leave the eld empty, and then press enter.
6. When prompted to type your new password again, leave the eld empty, and then press enter.
7. To save your changes and exit Computer Setup, select the Save icon, and then follow the on-screen
instructions.
– or –
Select Main, select Save Changes and Exit, and then press enter.
Your changes go into eect when the computer restarts.
42 Chapter 7 Security

Entering a BIOS administrator password
At the BIOS administrator password prompt, type your password (using the same kind of keys you used to
set the password), and then press enter. After two unsuccessful attempts to enter the BIOS administrator
password, you must restart the computer and try again.
Using DriveLock Security Options
DriveLock protection prevents unauthorized access to the contents of a hard drive. DriveLock can be applied
only to the internal hard drive(s) of the computer. After DriveLock protection is applied to a drive, the
appropriate password must be entered to access the drive. The drive must be inserted into the computer or an
advanced port replicator in order for it to be unlocked.
DriveLock Security Options oers the following features:
●
Automatic DriveLock—See Selecting Automatic DriveLock (select products only) on page 43.
●
Set DriveLock Master Password—See Selecting manual DriveLock on page 44.
●
Enable DriveLock—See Enabling DriveLock and setting a DriveLock user password on page 45.
Selecting Automatic DriveLock (select products only)
A BIOS administrator password must be set before you can enable Automatic DriveLock. When Automatic
DriveLock is enabled, a random DriveLock user password and a DriveLock master password derived from the
BIOS administrator password are created. When the computer is turned on, the random user password
automatically unlocks the drive. If the drive is moved to another computer, you must enter the BIOS
administrator password for the original computer at the DriveLock password prompt to unlock the drive.
Enabling Automatic DriveLock
To enable Automatic DriveLock, follow these steps:
1. Start Computer Setup.
●
Computers or tablets with keyboards:
1. Turn o the computer.
2. Press the power button, and when the HP logo appears, press f10 to enter Computer Setup.
●
Tablets without keyboards:
1. Turn o the tablet.
2. Press the power button in combination with the volume down button until the Startup menu
is displayed, and then tap f10 to enter Computer Setup.
2. At the BIOS administrator password prompt, enter the BIOS administrator password, and then press
enter.
3. Select Security, select Hard Drive Utilities, select DriveLock/Automatic DriveLock, and then press
enter.
4. Use the enter key, left mouse click, or touch screen to select the Automatic DriveLock check box.
5. To save your changes and exit Computer Setup, select the Save icon and then follow the on-screen
instructions.
– or –
Select Main, select Save Changes and Exit, and then press enter.
Using passwords 43

Disabling Automatic DriveLock
To disable Automatic DriveLock, follow these steps:
1. Start Computer Setup.
●
Computers or tablets with keyboards:
1. Turn o the computer.
2. Press the power button, and when the HP logo appears, press f10 to enter Computer Setup.
●
Tablets without keyboards:
1. Turn o the tablet.
2. Press the power button in combination with the volume down button until the Startup menu
is displayed, and then tap f10 to enter Computer Setup.
2. At the BIOS administrator password prompt, enter the BIOS administrator password, and then press
enter.
3. Select Security, select Hard Drive Utilities, select DriveLock/Automatic DriveLock, and then press
enter.
4. Select an internal hard drive, and then press enter.
5. Use the enter key, left mouse click, or touch screen to clear the Automatic DriveLock check box.
6. To save your changes and exit Computer Setup, select the Save icon, and then follow the on-screen
instructions.
– or –
Select Main, select Save Changes and Exit, and then press enter.
Entering an Automatic DriveLock password
While Automatic DriveLock is enabled and the drive remains attached to the original computer, you will not be
prompted to enter a DriveLock password to unlock the drive. However, if the drive is moved to another
computer, or the system board is replaced on the original computer, you will be prompted to provide the
DriveLock password.
If this happens, at the DriveLock Password prompt, type the BIOS administrator password for the original
computer (using the same kind of keys you used to set the password), and then press enter to unlock the
drive.
After three incorrect attempts to enter the password, you must shut down the computer and try again.
Selecting manual DriveLock
CAUTION: To prevent a DriveLock-protected hard drive from becoming permanently unusable, record the
DriveLock user password and the DriveLock master password in a safe place away from your computer. If you
forget both DriveLock passwords, the hard drive will be permanently locked and can no longer be used.
44 Chapter 7 Security

To manually apply DriveLock protection to an internal hard drive, a master password must be set, and
DriveLock must be enabled in Computer Setup. Note the following considerations about using DriveLock
protection:
●
After DriveLock protection is applied to a hard drive, the hard drive can be accessed only by entering
either the DriveLock user password or the master password.
●
The owner of the DriveLock user password should be the day-to-day user of the protected hard drive.
The owner of the DriveLock master password may be either a system administrator or the day-to-day
user.
●
The DriveLock user password and the DriveLock master password can be identical.
Setting a DriveLock master password
To set a DriveLock master password, follow these steps:
1. Start Computer Setup.
●
Computers or tablets with keyboards:
1. Turn o the computer.
2. Press the power button, and when the HP logo appears, press f10 to enter Computer Setup.
●
Tablets without keyboards:
1. Turn o the tablet.
2. Press the power button in combination with the volume down button until the Startup menu
is displayed, and then tap f10 to enter Computer Setup.
2. Select Security, make the selection for Hard Drive Utilities, select DriveLock/Automatic DriveLock,
and then press enter.
3. Select the hard drive you want to protect, and then press enter.
4. Select Set DriveLock Master Password, and then press enter.
5. Carefully read the warning.
6. Follow the on-screen instructions to set a DriveLock master password.
NOTE: You can enable DriveLock and set a DriveLock user password before exiting from Computer
Setup. For more information, see Enabling DriveLock and setting a DriveLock user password
on page 45.
7. To exit Computer Setup, select Main, select Save Changes and Exit, and then select Yes.
Enabling DriveLock and setting a DriveLock user password
To enable DriveLock, and set a DriveLock user password, follow these steps:
1. Start Computer Setup.
●
Computers or tablets with keyboards:
1. Turn o the computer.
2. Press the power button, and when the HP logo appears, press f10 to enter Computer Setup.
●
Tablets without keyboards:
Using passwords 45

1. Turn o the tablet.
2. Press the power button in combination with the volume down button until the Startup menu
2. Select Security, select Hard Drive Utilities, select DriveLock/Automatic DriveLock, and then press
enter.
3. Select the hard drive you want to protect, and then press enter.
4. Select Enable DriveLock and then press enter.
5. Carefully read the warning.
6. Follow the on-screen instructions to set a DriveLock user password and enable DriveLock.
7. To exit Computer Setup, select Main, select Save Changes and Exit, and then select Yes.
Disabling DriveLock
1. Start Computer Setup.
●
Computers or tablets with keyboards:
1. Turn o the computer.
2. Press the power button, and when the HP logo appears, press f10 to enter Computer Setup.
●
Tablets without keyboards:
is displayed, and then tap f10 to enter Computer Setup.
1. Turn o the tablet.
2. Press the power button in combination with the volume down button until the Startup menu
is displayed, and then tap f10 to enter Computer Setup.
2. Select Security, select Hard Drive Utilities, select DriveLock/Automatic DriveLock, and then press
enter.
3. Select the hard drive you want to manage, and then press enter.
4. Select Disable DriveLock, and then press enter.
5. Follow the on-screen instructions to disable DriveLock.
6. To exit Computer Setup, select Main, select Save Changes and Exit, and then select Yes.
Entering a DriveLock password
Be sure that the hard drive is inserted into the computer (not into an optional docking device or external
MultiBay).
At the DriveLock Password prompt, type your DriveLock user or master password (using the same kind of
keys you used to set the password), and then press enter.
After three incorrect attempts to enter the password, you must shut down the computer and try again.
Changing a DriveLock password
To change a DriveLock password in Computer Setup, follow these steps:
1. Turn o the computer.
2. Press the power button.
46 Chapter 7 Security

3. At the DriveLock Password prompt, type the current DriveLock user password or master password that
you are changing, press enter, and then press or tap f10 to enter Computer Setup.
4. Select Security, select Hard Drive Utilities, select DriveLock/Automatic DriveLock, and then press
enter.
5. Select the hard drive you want to manage, and then press enter.
6. Make the selection for the DriveLock password that you want to change, and then follow the on-screen
instructions to enter passwords.
NOTE: The Change DriveLock Master Password option is visible only if the DriveLock master password
was provided at the DriveLock Password prompt in step 3.
7. To exit Computer Setup, select Main, select Save Changes and Exit, and then follow the on-screen
instructions.
Using Windows Hello (select products only)
On products equipped with a ngerprint reader or an infrared camera, you can use Windows Hello to sign in by
swiping your nger or looking at the camera.
To set up Windows Hello, follow these steps:
1. Select the Start button, select Settings, select Accounts, and then select Sign-in options.
2. Under Windows Hello, follow the on-screen instructions to add both a password and a numeric PIN, and
then enroll your ngerprint or facial ID.
NOTE: The PIN is not limited in length, but it must consist of numbers only. No alphabetic or special
characters are allowed.
Using antivirus software
When you use the computer to access e-mail, a network, or the Internet, you potentially expose it to
computer viruses. Computer viruses can disable the operating system, programs, or utilities, or cause them to
function abnormally.
Antivirus software can detect most viruses, destroy them, and, in most cases, repair any damage they have
caused. To provide ongoing protection against newly discovered viruses, antivirus software must be kept up
to date.
Windows Defender is preinstalled on your computer. It is strongly recommended that you continue to use an
antivirus program in order to fully protect your computer.
For more information about computer viruses, access the HP Support Assistant.
Using rewall software
Firewalls are designed to prevent unauthorized access to a system or network. A rewall can be a software
program you install on your computer and/or network, or it can be a solution made up of both hardware and
software.
There are two types of rewalls to consider:
●
Host-based rewalls—Software that protects only the computer it is installed on.
●
Network-based rewalls—Installed between your DSL or cable modem and your home network to
protect all the computers on the network.
Using Windows Hello (select products only) 47

When a rewall is installed on a system, all data sent to and from the system is monitored and compared with
a set of user-dened security criteria. Any data that does not meet those criteria is blocked.
Your computer or networking equipment may already have a rewall installed. If not, rewall software
solutions are available.
NOTE: Under some circumstances a rewall can block access to Internet games, interfere with printer or le
sharing on a network, or block authorized e-mail attachments. To temporarily resolve the problem, disable
the rewall, perform the task that you want to perform, and then reenable the rewall. To permanently
resolve the problem, recongure the rewall.
Installing software updates
HP, Windows, and third-party software installed on your computer should be regularly updated to correct
security problems and improve software performance.
IMPORTANT: Microsoft sends out alerts regarding Windows updates, which may include security updates.
To protect the computer from security breaches and computer viruses, install all updates from Microsoft as
soon as you receive an alert.
You can install these updates automatically.
To view or change the settings:
1. Select the Start button, select Settings, and then select Update & Security.
2. Select Windows Update, and then follow the on-screen instructions.
3. To schedule a time for installing updates, select Advanced Options, and then follow the on-screen
instructions.
Using HP Client Security (select products only)
HP Client Security software is preinstalled on your computer. This software can be accessed through the HP
Client Security icon at the far right of the taskbar or Windows Control Panel. It provides security features that
help protect against unauthorized access to the computer, networks, and critical data. For more information,
see the HP Client Security software Help.
Using HP Touchpoint Manager (select products only)
HP Touchpoint Manager is a cloud-based IT solution that enables businesses to eectively manage and
secure their company assets. HP Touchpoint Manager helps protect devices against malware and other
attacks, monitors device health, and enables customers to reduce time spent solving end-user device and
security issues. Customers can quickly download and install the software, which is highly cost eective
relative to traditional in-house solutions. For more information, see http://www.hptouchpointmanager.com.
Using an optional security cable (select products only)
A security cable (purchased separately) is designed to act as a deterrent, but it may not prevent the computer
from being mishandled or stolen. To connect a security cable to your computer, follow the device
manufacturer's instructions.
48 Chapter 7 Security

Using a ngerprint reader (select products only)
Integrated ngerprint readers are available on select products. In order to use the ngerprint reader, you
must enroll your ngerprints in HP Client Security's Credential Manager. Refer to the HP Client Security
software Help.
After you enroll your ngerprints in Credential Manager, you can use HP Client Security's Password Manager to
store and ll in your user names and passwords in supported websites and applications.
Locating the ngerprint reader
The ngerprint reader is a small metallic sensor that is located in one of the following areas of your computer:
●
Near the bottom of the TouchPad
●
On the right side of the keyboard
●
On the upper-right side of the display
●
On the left side of the display
Depending on your product, the reader may be oriented horizontally or vertically. Both orientations require
that you swipe your nger perpendicular to the metallic sensor.
Using a ngerprint reader (select products only) 49

8 Maintenance
It is important to perform regular maintenance to keep your computer in optimal condition. This chapter
explains how to use tools like Disk Defragmenter and Disk Cleanup. It also provides instructions for updating
programs and drivers, steps to clean the computer, and tips for traveling with (or shipping) the computer.
Improving performance
You can improve the performance of your computer by performing regular maintenance tasks with tools such
as Disk Defragmenter and Disk Cleanup.
Using Disk Defragmenter
HP recommends using Disk Defragmenter to defragment your hard drive at least once a month.
NOTE: It is not necessary to run Disk Defragmenter on solid-state drives.
To run Disk Defragmenter:
1. Connect the computer to AC power.
2. Type defragment in the taskbar search box, and then select Defragment and optimize your drives.
3. Follow the on-screen instructions.
For additional information, access the Disk Defragmenter software Help.
Using Disk Cleanup
Use Disk Cleanup to search the hard drive for unnecessary les that you can safely delete to free up disk space
and help the computer run more eiciently.
To run Disk Cleanup:
1. Type disk in the taskbar search box, and then select Free up disk space by deleting unnecessary les
or Uninstall apps to free up disk space.
2. Follow the on-screen instructions.
Using HP 3D DriveGuard (select products only)
HP 3D DriveGuard protects a hard drive by parking the drive and halting data requests under either of the
following conditions:
●
You drop the computer.
●
You move the computer with the display closed while the computer is running on battery power.
A short time after the end of one of these events, HP 3D DriveGuard returns the hard drive to normal
operation.
NOTE: Only internal hard drives are protected by HP 3D DriveGuard. A hard drive installed in an optional
docking device or connected to a USB port is not protected by HP 3D DriveGuard.
50 Chapter 8 Maintenance

NOTE: Because solid-state drives (SSDs) lack moving parts, HP 3D DriveGuard is unnecessary for these
drives.
For more information, see the HP 3D DriveGuard software Help.
Identifying HP 3D DriveGuard status
The hard drive light on the computer changes color to show that the drive in a primary hard drive bay and/or
the drive in a secondary hard drive bay (select products only) is parked. To determine whether a drive is
currently protected or whether it is parked, view the icon on the Windows desktop in the notication area, at
the far right of the taskbar.
Updating programs and drivers
HP recommends that you update your programs and drivers on a regular basis. Updates can resolve issues
and bring new features and options to your computer. For example, older graphics components might not
work well with the most recent gaming software. Without the latest driver, you would not be getting the most
out of your equipment.
Go to http://www.hp.com/support to download the latest versions of HP programs and drivers. In addition,
register to receive automatic notications when updates become available.
If you would like to update your programs and drivers, follow these instructions:
1. Type support in the taskbar search box, and then select the HP Support Assistant app.
- or -
Click the question mark icon in the taskbar.
2. Select My PC, select the Updates tab, and then select Check for updates and messages.
3. Follow the on-screen instructions.
Cleaning your computer
Use the following products to safely clean your computer:
●
Dimethyl benzyl ammonium chloride 0.3 percent maximum concentration (for example, disposable
wipes, which come in a variety of brands)
●
Alcohol-free glass-cleaning uid
●
Solution of water and mild soap
●
Dry microber cleaning cloth or a chamois (static-free cloth without oil)
●
Static-free cloth wipes
CAUTION: Avoid strong cleaning solvents that can permanently damage your computer. If you are not sure
that a cleaning product is safe for your computer, check the product contents to make sure that ingredients
such as alcohol, acetone, ammonium chloride, methylene chloride, and hydrocarbons are not included in the
product.
Fibrous materials, such as paper towels, can scratch the computer. Over time, dirt particles and cleaning
agents can get trapped in the scratches.
Cleaning procedures
Follow the procedures in this section to safely clean your computer.
Updating programs and drivers 51

WARNING! To prevent electric shock or damage to components, do not attempt to clean your computer
while it is on.
1. Turn o the computer.
2. Disconnect AC power.
3. Disconnect all powered external devices.
CAUTION: To prevent damage to internal components, do not spray cleaning agents or liquids directly on
any computer surface. Liquids dripped on the surface can permanently damage internal components.
Cleaning the display
Gently wipe the display using a soft, lint-free cloth moistened with an alcohol-free glass cleaner. Be sure that
a display is dry before you close the computer.
Cleaning the sides or cover
To clean the sides or cover, use a soft microber cloth or chamois moistened with one of the cleaning
solutions listed previously, or use an acceptable disposable wipe.
NOTE: When cleaning the cover of the computer, use a circular motion to aid in removing dirt and debris.
Cleaning the TouchPad, keyboard, or mouse (select products only)
WARNING! To reduce the risk of electric shock or damage to internal components, do not use a vacuum
cleaner attachment to clean the keyboard. A vacuum cleaner can deposit household debris on the keyboard
surface.
CAUTION: To prevent damage to internal components, do not allow liquids to drip between the keys.
●
To clean the TouchPad, keyboard, or mouse, use a soft microber cloth or a chamois moistened with one
of the cleaning solutions listed previously or use an acceptable disposable wipe.
●
To prevent keys from sticking and to remove dust, lint, and particles from the keyboard, use a can of
compressed air with a straw extension.
Traveling with or shipping your computer
If you have to travel with or ship your computer, follow these tips to keep your equipment safe.
●
Prepare the computer for traveling or shipping:
—
Back up your information to an external drive.
—
Remove all discs and all external media cards, such as memory cards.
—
Turn o and then disconnect all external devices.
—
Shut down the computer.
●
Take along a backup of your information. Keep the backup separate from the computer.
●
When traveling by air, carry the computer as hand luggage; do not check it in with the rest of your
luggage.
CAUTION: Avoid exposing a drive to magnetic elds. Security devices with magnetic elds include
airport walk-through devices and security wands. Airport conveyer belts and similar security devices
that check carry-on baggage use X-rays instead of magnetism and do not damage drives.
52 Chapter 8 Maintenance

●
If you plan to use the computer during a ight, listen for the in-ight announcement that tells you when
you are allowed to use your computer. In-ight computer use is at the discretion of the airline.
●
If you are shipping the computer or a drive, use suitable protective packaging and label the package
“FRAGILE.”
●
The use of wireless devices may be restricted in some environments. Such restrictions may apply aboard
aircraft, in hospitals, near explosives, and in hazardous locations. If you are uncertain of the policy that
applies to the use of a wireless device in your computer, ask for authorization to use your computer
before you turn it on.
●
If you are traveling internationally, follow these suggestions:
—
Check the computer-related customs regulations for each country or region on your itinerary.
—
Check the power cord and adapter requirements for each location in which you plan to use the
computer. Voltage, frequency, and plug congurations vary.
WARNING! To reduce the risk of electric shock, re, or damage to the equipment, do not attempt
to power the computer with a voltage converter kit sold for appliances.
Traveling with or shipping your computer 53

9 Backup and recovery
This chapter provides information about the following processes. The information in the chapter is standard
procedure for most products.
●
Creating recovery media and backups
●
Restoring and recovering your system
For additional information, refer to the HP support assistant app.
▲
Type support in the taskbar search box, and then select the HP Support Assistant app.
‒ or –
Click the question mark icon in the taskbar.
IMPORTANT: If you will be performing recovery procedures on a tablet, the tablet battery must be at least
70% charged before you start the recovery process.
IMPORTANT: For a tablet with a detachable keyboard, connect the keyboard to the keyboard dock before
beginning any recovery process.
Creating recovery media and backups
The following methods of creating recovery media and backups are available on select products only. Choose
the available method according to your computer model.
●
Use HP Recovery Manager to create HP Recovery media after you successfully set up the computer. This
step creates a backup of the HP Recovery partition on the computer. The backup can be used to reinstall
the original operating system in cases where the hard drive is corrupted or has been replaced. For
information on creating recovery media, see Creating HP Recovery media (select products only)
on page 54. For information on the recovery options that are available using the recovery media, see
Using Windows tools on page 55.
●
Use Windows tools to create system restore points and create backups of personal information.
For more information, see Recovering using HP Recovery Manager on page 56.
NOTE: If storage is 32 GB or less, Microsoft System Restore is disabled by default.
Creating HP Recovery media (select products only)
If possible, check for the presence of the Recovery partition and the Windows partition. From the Start menu,
select File Explorer, and then select This PC.
●
If your computer does not list the Windows partition and the Recovery partition, you can obtain recovery
media for your system from support. See the Worldwide Telephone Numbers booklet included with the
computer. You can also nd contact information on the HP website. Go to http://www.hp.com/support,
select your country or region, and follow the on-screen instructions.
54 Chapter 9 Backup and recovery

You can use Windows tools to create system restore points and create backups of personal information,
see Using Windows tools on page 55.
●
If your computer does list the Recovery partition and the Windows partition, you can use HP Recovery
Manager to create recovery media after you successfully set up the computer. HP Recovery media can be
used to perform system recovery if the hard drive becomes corrupted. System recovery reinstalls the
original operating system and software programs that were installed at the factory and then congures
the settings for the programs. HP Recovery media can also be used to customize the system or restore
the factory image if you replace the hard drive.
—
Only one set of recovery media can be created. Handle these recovery tools carefully, and keep
them in a safe place.
—
HP Recovery Manager examines the computer and determines the required storage capacity for
the media that will be required.
—
To create recovery discs, your computer must have an optical drive with DVD writer capability, and
you must use only high-quality blank DVD-R, DVD+R, DVD-R DL, or DVD+R DL discs. Do not use
rewritable discs such as CD±RW, DVD±RW, double-layer DVD±RW, or BD-RE (rewritable Blu-ray)
discs; they are not compatible with HP Recovery Manager software. Or, instead, you can use a highquality blank USB ash drive.
—
If your computer does not include an integrated optical drive with DVD writer capability, but you
would like to create DVD recovery media, you can use an external optical drive (purchased
separately) to create recovery discs. If you use an external optical drive, it must be connected
directly to a USB port on the computer; the drive cannot be connected to a USB port on an external
device, such as a USB hub. If you cannot create DVD media yourself, you can obtain recovery discs
for your computer from HP. See the Worldwide Telephone Numbers booklet included with the
computer. You can also nd contact information on the HP website. Go to http://www.hp.com/
support, select your country or region, and follow the on-screen instructions.
—
Be sure that the computer is connected to AC power before you begin creating the recovery media.
—
The creation process can take an hour or more. Do not interrupt the creation process.
—
If necessary, you can exit the program before you have nished creating all of the recovery DVDs.
HP Recovery Manager will nish burning the current DVD. The next time you start HP Recovery
Manager, you will be prompted to continue.
To create HP Recovery media:
IMPORTANT: For a tablet with a detachable keyboard, connect the keyboard to the keyboard dock before
beginning these steps.
1. Type recovery in the taskbar search box, and then select HP Recovery Manager.
2. Select Create recovery media, and then follow the on-screen instructions.
If you ever need to recover the system, see Recovering using HP Recovery Manager on page 56.
Using Windows tools
You can create recovery media, system restore points, and backups of personal information using Windows
tools.
NOTE: If storage is 32 GB or less, Microsoft System Restore is disabled by default.
For more information and steps, see the Get started app.
▲ Select the Start button, and then select the Get started app.
Using Windows tools 55

Restore and recovery
There are several options for recovering your system. Choose the method that best matches your situation
and level of expertise:
IMPORTANT: Not all methods are available on all products.
●
Windows oers several options for restoring from backup, refreshing the computer, and resetting the
computer to its original state. For more information see the Get started app.
▲ Select the Start button, and then select the Get started app.
●
If you need to correct a problem with a preinstalled application or driver, use the Reinstall drivers and/or
applications option (select products only) of HP Recovery Manager to reinstall the individual application
or driver.
▲ Type recovery in the taskbar search box, select HP Recovery Manager, select Reinstall drivers
and/or applications
●
If you want to recover the Windows partition to original factory content, you can choose the System
Recovery option from the HP Recovery partition (select products only) or use the HP Recovery media.
For more information, see Recovering using HP Recovery Manager on page 56. If you have not already
created recovery media, see Creating HP Recovery media (select products only) on page 54.
●
On select products, if you want to recover the computer's original factory partition and content, or if you
have replaced the hard drive, you can use the Factory Reset option of HP Recovery media. For more
information, see Recovering using HP Recovery Manager on page 56.
, and then follow the on-screen instructions.
●
On select products, if you want to remove the recovery partition to reclaim hard drive space, HP
Recovery Manager oers the Remove Recovery Partition option.
For more information, see Removing the HP Recovery partition (select products only) on page 59.
Recovering using HP Recovery Manager
HP Recovery Manager software allows you to recover the computer to its original factory state by using the
HP Recovery media that you either created or that you obtained from HP, or by using the HP Recovery
partition (select products only). If you have not already created recovery media, see Creating HP Recovery
media (select products only) on page 54.
What you need to know before you get started
●
HP Recovery Manager recovers only software that was installed at the factory. For software not
provided with this computer, you must either download the software from the manufacturer's website or
reinstall the software from the media provided by the manufacturer.
IMPORTANT: Recovery through HP Recovery Manager should be used as a nal attempt to correct
computer issues.
●
HP Recovery media must be used if the computer hard drive fails. If you have not already created
recovery media, see Creating HP Recovery media (select products only) on page 54.
●
To use the Factory Reset option (select products only), you must use HP Recovery media. If you have not
already created recovery media, see Creating HP Recovery media (select products only) on page 54.
●
If your computer does not allow the creation of HP Recovery media or if the HP Recovery media does not
work, you can obtain recovery media for your system from support. See the Worldwide Telephone
Numbers booklet included with the computer. You can also nd contact information from the HP
56 Chapter 9 Backup and recovery

website. Go to http://www.hp.com/support, select your country or region, and follow the on-screen
instructions.
IMPORTANT: HP Recovery Manager does not automatically provide backups of your personal data. Before
beginning recovery, back up any personal data you want to retain.
Using HP Recovery media, you can choose from one of the following recovery options:
NOTE: Only the options available for your computer display when you start the recovery process.
●
System Recovery—Reinstalls the original operating system, and then congures the settings for the
programs that were installed at the factory.
●
Factory Reset—Restores the computer to its original factory state by deleting all information from the
hard drive and re-creating the partitions. Then it reinstalls the operating system and the software that
was installed at the factory.
The HP Recovery partition (select products only) allows System Recovery only.
Using the HP Recovery partition (select products only)
The HP Recovery partition allows you to perform a system recovery without the need for recovery discs or a
recovery USB ash drive. This type of recovery can be used only if the hard drive is still working.
To start HP Recovery Manager from the HP Recovery partition:
IMPORTANT: For a tablet with a detachable keyboard, connect the keyboard to the keyboard dock before
beginning these steps (select products only).
1. Type recovery in the taskbar search box, select Recovery Manager, and then select HP Recovery
Environment
- or-
For computers or tablets with keyboards attached, press f11 while the computer boots, or press and
hold f11 as you press the power button.
For tablets without keyboards:
Turn on or restart the tablet, and then quickly hold down the volume up button; then select f11.
- or -
Turn on or restart the tablet, and then quickly hold down the volume down button; then select f11.
- or -
Turn on or restart the tablet, and then quickly hold down the Windows button; then select f11.
2. Select Troubleshoot from the boot options menu.
3. Select Recovery Manager, and then follow the on-screen instructions.
.
Using HP Recovery media to recover
You can use HP Recovery media to recover the original system. This method can be used if your system does
not have an HP Recovery partition or if the hard drive is not working properly.
Restore and recovery 57

1. If possible, back up all personal les.
2. Insert the HP Recovery media, and then restart the computer.
NOTE: If the computer does not automatically restart in HP Recovery Manager, change the computer
boot order. See Changing the computer boot order on page 58.
3. Follow the on-screen instructions.
Changing the computer boot order
If your computer does not restart in HP Recovery Manager, you can change the computer boot order, which is
the order of devices listed in BIOS where the computer looks for startup information. You can change the
selection to an optical drive or a USB
To change the boot order:
IMPORTANT: For a tablet with a detachable keyboard, connect the keyboard to the keyboard dock before
beginning these steps.
1. Insert the HP Recovery media.
2. Access the system Startup menu.
For computers or tablets with keyboards attached:
▲
Turn on or restart the computer or tablet, quickly press esc, and then press f9 for boot options.
ash drive.
For tablets without keyboards:
▲
Turn on or restart the tablet, and then quickly hold down the volume up button; then select f9.
- or -
Turn on or restart the tablet, and then quickly hold down the volume down button; then select f9.
- or -
Turn on or restart the tablet, and then quickly hold down the Windows button; then select f9.
3. Select the optical drive or USB ash drive from which you want to boot.
4. Follow the on-screen instructions.
58 Chapter 9 Backup and recovery

Removing the HP Recovery partition (select products only)
HP Recovery Manager software allows you to remove the HP Recovery partition to free up hard drive space.
IMPORTANT: After you remove the HP Recovery partition, you will not be able to perform System Recovery
or create HP recovery media from the HP Recovery partition. So before you remove the Recovery partition,
create HP Recovery media; see Creating HP Recovery media (select products only) on page 54.
NOTE: The Remove Recovery Partition option is only available on products that support this function.
Follow these steps to remove the HP Recovery partition:
1. Type recovery in the taskbar search box, and then select HP Recovery Manager.
2. Select Remove Recovery Partition, and then follow the on-screen instructions.
Restore and recovery 59

10 Computer Setup (BIOS), TPM, and HP Sure
Start
Using Computer Setup
Computer Setup, or Basic Input/Output System (BIOS), controls communication between all the input and
output devices on the system (such as disk drives, display, keyboard, mouse, and printer). Computer Setup
includes settings for the types of devices installed, the startup sequence of the computer, and the amount of
system and extended memory.
NOTE: Use extreme care when making changes in Computer Setup. Errors can prevent the computer from
operating properly.
Starting Computer Setup
NOTE: An external keyboard or mouse connected to a USB port can be used with Computer Setup only if USB
legacy support is enabled.
▲
Turn on or restart the computer, and when the HP logo appears, press f10 to enter Computer Setup.
Navigating and selecting in Computer Setup
●
To select a menu or a menu item, use the tab key and the keyboard arrow keys and then press enter, or
use a pointing device to select the item.
●
To scroll up and down, select the up arrow or the down arrow in the upper-right corner of the screen, or
use the up arrow key or the down arrow key on the keyboard.
●
To close open dialog boxes and return to the main Computer Setup screen, press esc, and then follow
the on-screen instructions.
To exit Computer Setup menus, choose one of the following methods:
●
To exit Computer Setup menus without saving your changes:
Select the Exit icon in the lower-right corner of the screen, and then follow the on-screen instructions.
– or –
Select Main, select Ignore Changes and Exit, and then press enter.
●
To save your changes and exit Computer Setup menus:
Select the Save icon in the lower-right corner of the screen, and then follow the on-screen instructions.
– or –
Select Main, select Save Changes and Exit, and then press enter.
Your changes go into eect when the computer restarts.
Restoring factory settings in Computer Setup
NOTE: Restoring defaults will not change the hard drive mode.
60 Chapter 10 Computer Setup (BIOS), TPM, and HP Sure Start

To return all settings in Computer Setup to the values that were set at the factory, follow these steps:
1. Start Computer Setup. See Starting Computer Setup on page 60.
2. Select Main, and then select Apply Factory Defaults and Exit.
NOTE: On select products, the selections may display Restore Defaults instead of Apply Factory
Defaults and Exit.
3. Follow the on-screen instructions.
4. To save your changes and exit, select the Save icon in the lower-right corner of the screen, and then
follow the on-screen instructions.
– or –
Select Main, select Save Changes and Exit, and then press enter.
Your changes go into eect when the computer restarts.
NOTE: Your password settings and security settings are not changed when you restore the factory settings.
Updating the BIOS
Updated versions of the BIOS may be available on the HP website.
Most BIOS updates on the HP website are packaged in compressed les called SoftPaqs.
Some download packages contain a le named Readme.txt, which contains information regarding installing
and troubleshooting the le.
Determining the BIOS version
To decide whether you need to update Computer Setup (BIOS), rst determine the BIOS version on your
computer.
BIOS version information (also known as ROM date and System BIOS) can be accessed by pressing fn+esc (if
you are already in Windows) or by using Computer Setup.
1. Start Computer Setup. See Starting Computer Setup on page 60.
2. Select Main, and then select System Information.
3. To exit Computer Setup without saving your changes, select the Exit icon in the lower-right corner of the
screen, and then follow the on-screen instructions.
– or –
Select Main, select Ignore Changes and Exit, and then press enter.
To check for later BIOS versions, see Downloading a BIOS update on page 62.
Using Computer Setup 61

Downloading a BIOS update
CAUTION: To reduce the risk of damage to the computer or an unsuccessful installation, download and
install a BIOS update only when the computer is connected to reliable external power using the AC adapter. Do
not download or install a BIOS update while the computer is running on battery power, docked in an optional
docking device, or connected to an optional power source. During the download and installation, follow these
instructions:
Do not disconnect power on the computer by unplugging the power cord from the AC outlet.
Do not shut down the computer or initiate Sleep.
Do not insert, remove, connect, or disconnect any device, cable, or cord.
1. Type support in the taskbar search box, and then select the HP Support Assistant app.
– or –
Select the question mark icon in the taskbar.
2. Select Updates, and then select Check for updates and messages.
3. Follow the on-screen instructions.
4. At the download area, follow these steps:
a. Identify the most recent BIOS update and compare it to the BIOS version currently installed on your
computer. Make a note of the date, name, or other identier. You may need this information to
locate the update later, after it has been downloaded to your hard drive.
b. Follow the on-screen instructions to download your selection to the hard drive.
Make a note of the path to the location on your hard drive where the BIOS update is downloaded.
You will need to access this path when you are ready to install the update.
NOTE: If you connect your computer to a network, consult the network administrator before installing
any software updates, especially system BIOS updates.
BIOS installation procedures vary. Follow any instructions that are revealed on the screen after the download
is complete. If no instructions are revealed, follow these steps:
1. Type file in the taskbar search box, and then select File Explorer.
2. Select your hard drive designation. The hard drive designation is typically Local Disk (C:).
3. Using the hard drive path you recorded earlier, open the folder that contains the update.
4. Double-click the le that has an .exe extension (for example, lename.exe).
The BIOS installation begins.
5. Complete the installation by following the on-screen instructions.
NOTE: After a message on the screen reports a successful installation, you can delete the downloaded le
from your hard drive.
Changing the boot order using the f9 prompt
To dynamically choose a boot device for the current startup sequence, follow these steps:
1. Access the Boot Device Options menu:
62 Chapter 10 Computer Setup (BIOS), TPM, and HP Sure Start

●
Turn on or restart the computer, and when the HP logo appears, press f9 to enter the Boot Device
Options menu.
2. Select a boot device, then press enter.
TPM BIOS settings (select products only)
IMPORTANT: Before enabling Trusted Platform Module (TPM) functionality on this system, you must ensure
that your intended use of TPM complies with relevant local laws, regulations and policies, and approvals or
licenses must be obtained if applicable. For any compliance issues arising from your operation/usage of TPM
which violates the above mentioned requirement, you shall bear all the liabilities wholly and solely. HP will
not be responsible for any related liabilities.
TPM provides additional security for your computer. You can modify the TPM settings in Computer Setup
(BIOS).
NOTE: If you change the TPM setting to Hidden, TPM is not visible in the operating system.
To access TPM settings in Computer Setup:
1. Start Computer Setup. See Starting Computer Setup on page 60.
2. Select Security, select TPM Embedded Security, and then follow the on-screen instructions.
Using HP Sure Start (select products only)
Select computer models are congured with HP Sure Start, a technology that monitors the computer's BIOS
for attacks or corruption. If the BIOS becomes corrupted or is attacked, HP Sure Start automatically restores
the BIOS to its previously safe state, without user intervention.
HP Sure Start is congured and already enabled so that most users can use the HP Sure Start default
conguration. The default conguration can be customized by advanced users.
To access the latest documentation on HP Sure Start, go to http://www.hp.com/support. Select Find your
product, and then follow the on-screen instructions.
TPM BIOS settings (select products only) 63

11 Using HP PC Hardware Diagnostics (UEFI)
HP PC Hardware Diagnostics is a Unied Extensible Firmware Interface (UEFI) that allows you to run diagnostic
tests to determine whether the computer hardware is functioning properly. The tool runs outside the
operating system so that it can isolate hardware failures from issues that are caused by the operating system
or other software components.
When HP PC Hardware Diagnostics (UEFI) detects a failure that requires hardware replacement, a 24-digit
Failure ID code is generated. This ID code can then be provided to support to help determine how to correct
the problem.
NOTE: To start diagnostics on a convertible computer, your computer must be in notebook mode and you
must use the keyboard attached.
To start HP PC Hardware Diagnostics (UEFI), follow these steps:
1. Turn on or restart the computer, and quickly press esc.
2. Press f2.
The BIOS searches three places for the diagnostic tools, in the following order:
a. Connected USB drive
NOTE: To download the HP PC Hardware Diagnostics (UEFI) tool to a USB drive, see Downloading
HP PC Hardware Diagnostics (UEFI) to a USB device on page 64.
b. Hard drive
c. BIOS
3. When the diagnostic tool opens, select the type of diagnostic test you want to run, and then follow the
on-screen instructions.
NOTE: If you need to stop a diagnostic test, press esc.
Downloading HP PC Hardware Diagnostics (UEFI) to a USB device
NOTE: The HP PC Hardware Diagnostics (UEFI) download instructions are provided in English only, and you
must use a Windows computer to download and create the HP UEFI support environment because only .exe
les are oered.
There are two options to download HP PC Hardware Diagnostics to a USB device.
Download the latest UEFI version
1. Go to http://www.hp.com/go/techcenter/pcdiags. The HP PC Diagnostics home page is displayed.
2. In the HP PC Hardware Diagnostics section, select the Download link, and then select Run.
Download any version of UEFI for a specic product
1. Go to http://www.hp.com/support.
2. Select Get software and drivers.
64 Chapter 11 Using HP PC Hardware Diagnostics (UEFI)

3. Enter the product name or number.
– or –
Select Identify now to let HP automatically detect your product.
4. Select your computer, and then select your operating system.
5. In the Diagnostic section, follow the on-screen instructions to select and download the UEFI version
you want.
Downloading HP PC Hardware Diagnostics (UEFI) to a USB device 65

12 Specications
Input power
The power information in this section may be helpful if you plan to travel internationally with the computer.
The computer operates on DC power, which can be supplied by an AC or a DC power source. The AC power
source must be rated at 100–240 V, 50–60 Hz. Although the computer can be powered from a standalone DC
power source, it should be powered only with an AC adapter or a DC power source supplied and approved by
HP for use with this computer.
The computer can operate on DC power within the following specications.
Input Power Rating
Operating voltage and current 19.5 V dc @ 2.31 A – 45 W
19.5 V dc @ 3.33 A – 65 W
19.5 V dc @ 4.62 A – 90 W
19.5 V dc @ 10.25 A — Slim 200 W
19.5 V dc @ 11.79 A — Slim 230 W
NOTE: This product is designed for IT power systems in Norway with phase-to-phase voltage not exceeding
240 V rms.
NOTE: The computer operating voltage and current can be found on the system regulatory label.
Operating environment
Factor Metric U.S.
Temperature
Operating (writing to optical disc) 5°C to 35°C 41°F to 95°F
Nonoperating -20°C to 60°C -4°F to 140°F
Relative humidity (noncondensing)
Operating 10% to 90% 10% to 90%
Nonoperating 5% to 95% 5% to 95%
Maximum altitude (unpressurized)
Operating -15 m to 3,048 m -50 ft to 10,000 ft
Nonoperating -15 m to 12,192 m -50 ft to 40,000 ft
66 Chapter 12 Specications

13 Electrostatic Discharge
Electrostatic discharge is the release of static electricity when two objects come into contact—for example,
the shock you receive when you walk across the carpet and touch a metal door knob.
A discharge of static electricity from ngers or other electrostatic conductors may damage electronic
components.
To prevent damage to the computer, damage to a drive, or loss of information, observe these precautions:
●
If removal or installation instructions direct you to unplug the computer, rst be sure that it is properly
grounded.
●
Keep components in their electrostatic-safe containers until you are ready to install them.
●
Avoid touching pins, leads, and circuitry. Handle electronic components as little as possible.
●
Use nonmagnetic tools.
●
Before handling components, discharge static electricity by touching an unpainted metal surface.
●
If you remove a component, place it in an electrostatic-safe container.
67

14 Accessibility
HP designs, produces, and markets products and services that can be used by everyone, including people with
disabilities, either on a stand-alone basis or with appropriate assistive devices.
Supported assistive technologies
HP products support a wide variety of operating system assistive technologies and can be congured to work
with additional assistive technologies. Use the Search feature on your device to locate more information
about assistive features.
NOTE: For additional information about a particular assistive technology product, contact customer support
for that product.
Contacting support
We are constantly rening the accessibility of our products and services and welcome feedback from users. If
you have an issue with a product or would like to tell us about accessibility features that have helped you,
please contact us at +1 (888) 259-5707, Monday through Friday, 6 a.m. to 9 p.m. North American Mountain
Time. If you are deaf or hard-of-hearing and use TRS/VRS/WebCapTel, contact us if you require technical
support or have accessibility questions by calling +1 (877) 656-7058, Monday through Friday, 6 a.m. to 9 p.m.
North American Mountain Time.
NOTE: Support is in English only.
68 Chapter 14 Accessibility

Index
A
accessibility 68
administrator password 40
airplane mode key 21
antivirus software 47
Audio 30
audio-out (headphone)/audio-in
(microphone) combo jack,
identifying 4
Automatic DriveLock
disabling 44
enabling 43
Automatic Drivelock 43
Automatic DriveLock password
entering 44
B
backups 54
battery
conserving power 37
discharging 36
displaying remaining charge 36
disposing 38
low battery levels 37
replacing 38
battery information, nding 36
battery light 18
battery power 36
BIOS
determining version 61
downloading an update 62
updating 61
Bluetooth device 21, 23
Bluetooth label 19
boot order
changing 58
bottom 19
buttons
left pointing stick 8
left TouchPad 8
power 12, 33
right pointing stick 8
right TouchPad 8
C
caps lock light, identifying 9, 11
caring for your computer 51
cleaning your computer 51
components
bottom 17
display 7
front 18
left side 6
right side 4
top 8
Computer Setup
BIOS administrator password 41
navigating and selecting 60
restoring factory settings 60
connecting to a WLAN 22
connector, power 5
conservation, power 37
corporate WLAN connection 22
critical battery level 34
D
Disk Cleanup software 50
Disk Defragmenter software 50
display image, switching 15
docking connector, identifying 5, 17
drive light 18
drive media 34
DriveLock
description 44
disabling 46
enabling 45
DriveLock master password
changing 46
DriveLock password
changing 46
entering 46
setting 45
Dual-Mode DisplayPort, identifying
4
E
electrostatic discharge 67
embedded numeric keypad,
identifying 14
esc key, identifying 14, 15
external AC power, using 38
external monitor port 6, 31
F
ngerprint reader 49
ngerprint reader, identifying 13
ngerprints, registering 47
rewall software 47
fn key, identifying 14, 15
four-nger tap TouchPad gesture
27
G
GPS 23
H
headphones, connecting 29
headsets, connecting 30
Hibernation
exiting 34
initiating 34
high-denition devices, connecting
32
hot keys
microphone mute 16
Sleep 15
switching screen image 15
using 15
HP 3D DriveGuard 50
HP Client Security 48
HP Fast Charge 33
HP Mobile Connect 23
HP PC Hardware Diagnostics (UEFI)
using 64
HP Recovery Manager
correcting boot problems 58
starting 57
HP Recovery media
creating 54
recovery 57
HP Recovery partition
recovery 57
removing 59
HP resources 2
Index 69

HP Touchpoint Manager 48
I
input power 66
integrated numeric keypad,
identifying 15, 28
integrated webcam light,
identifying 7
internal microphones, identifying 7
J
jacks
audio-out (headphone)/audio-in
(microphone) combo 4
network 5
RJ-45 (network) 5
K
keyboard and optional mouse
using 28
keypad
embedded numeric 14
integrated numeric 15
keys
esc 14, 15
fn 14, 15
Windows application 14
Windows key 14, 15
L
labels
Bluetooth 19
regulatory 19
serial number 19
service 18
wireless certication 19
WLAN 19
legacy support, USB 60
lights
battery 18
caps lock 9, 11
drive 18
microphone mute 9, 10
num lock 9, 10
power 9, 10, 18
RJ-45 (network) 5
TouchPad 9, 11
webcam 7
wireless 9, 10, 18
locating information
hardware 4
software 4
low battery level 37
M
maintenance
Disk Cleanup 50
Disk Defragmenter 50
HP 3D DriveGuard 50
updating programs and drivers
51
memory card 34
memory card reader, identifying 4
microphone mute key, identifying
16
microphone mute light, identifying
9, 10
minimized image recovery 57
minimized image, creating 56
Miracast 32
N
network jack, identifying 5
num lock key, identifying 28
num lock light 9, 10
O
one-nger slide touch screen
gesture 27
operating environment 66
original system recovery 56
P
passwords
administrator 40
BIOS administrator 41
user 40
pointing stick 8
ports
Dual-Mode DisplayPort 4
external monitor 6, 31
Miracast 32
USB 3.0 charging (powered) 6
USB Type-C charging 4
VGA 31
power
battery 36
conserving 37
options 34
power button 33
power button, identifying 12
power connector, identifying 5
power lights 9, 10, 18
power switch 33
power-saving states 34
product name and number,
computer 19
public WLAN connection 22
R
readable media 34
recover
options 56
recovery
discs 55, 57
HP Recovery Manager 56
media 57
starting 57
supported discs 55
system 56
USB ash drive 57
using HP Recovery media 55
recovery media
creating 54
creating using HP Recovery
Manager 55
recovery partition
removing 59
regulatory information
regulatory label 19
wireless certication labels 19
RJ-45 (network) jack, identifying 5
RJ-45 (network) lights, identifying
5
S
screen image, switching 15
security cable slot, identifying 6
serial number 19
serial number, computer 19
service labels, locating 18
setting password protection on
wakeup 35
setting power options 34
setup utility
navigating and selecting 60
restoring factory settings 60
shipping the computer 52
shutdown 33
70 Index

SIM card
inserting 19
SIM card slot, identifying 5
Sleep
exiting 34
initiating 34
slots
security cable 6
SIM card 5
smart card 6
smart card slot 6
software
antivirus 47
Disk Cleanup 50
Disk Defragmenter 50
rewall 47
HP 3D DriveGuard 50
software updates, installing 48
sound settings, using 30
speakers
connecting 29
supported discs, recovery 55
Sure Start
using 63
switch, power 33
system recovery 56
system restore point
creating 55
system restore point, creating 54
T
tap TouchPad and touch screen
gesture 25
three-nger swipe TouchPad
gesture 27
touch screen gestures
one-nger slide 27
TouchPad
buttons 8
using 25
TouchPad and touch screen gestures
tap 25
two-nger pinch zoom 26
TouchPad gestures
four-nger tap 27
three-nger swipe 27
two-nger scroll 26
two-nger tap 26
TouchPad light, identifying 9, 11
TouchPad zone
identifying 8
TPM settings 63
traveling with the computer 19, 52
turning o the computer 33
two-nger pinch zoom TouchPad and
touch screen gesture 26
two-nger scroll TouchPad gesture
26
two-nger tap TouchPad gesture 26
U
unresponsive system 33
updating programs and drivers 51
USB 3.0 charging (powered),
identifying 6
USB 3.0 port 5
USB legacy support 60
USB ports, identifying 5
USB Type-C charging port,
identifying 4
user password 40
using
external AC power 38
power-saving states 34
using sound settings 30
using the integrated numeric
keypad 28
using the keyboard and optional
mouse 28
using the TouchPad 25
V
vents, identifying 6, 17
VGA port, connecting 31
video 30
W
webcam 7
using 29
webcam light, identifying 7
webcam, identifying 7
Windows
system restore point 54, 55
Windows application key,
identifying 14
Windows Hello
using 47
Windows key, identifying 14, 15
Windows tools
using 55
wireless antennas, identifying 7
wireless button 21
wireless certication label 19
wireless controls
button 21
operating system 21
wireless key 21
wireless light 9, 10, 18, 21
wireless network (WLAN)
connecting 22
corporate WLAN connection 22
functional range 22
public WLAN connection 22
WLAN antennas, identifying 7
WLAN device 19
WLAN label 19
writable media 34
WWAN antennas, identifying 7
WWAN device 21, 22
Index 71
 Loading...