

Page 1
HP iPAQ Glisten
User Manual
Page 2

© Copyright 2009 Hewlett-Packard
Development Company, L.P.
HP iPAQ Glisten products are powered by
Microsoft
®
Windows Mobile® 6.5
Professional with Messaging and Security
Feature Pack.
Microsoft Windows, the Windows logo,
Outlook, Windows Mobile Device Center,
and ActiveSync are trademarks of
Microsoft Corporation in the U.S. and other
countries.
Java and all Java-based trademarks and
logos are trademarks or registered
trademarks of Sun Microsystems, Inc. in the
U.S. and other countries.
iPod is a trademark of Apple Computer, Inc.
SD Logo is a trademark of its proprietor.
Bluetooth
®
is a trademark owned by its
proprietor and used by Hewlett-Packard
Development Company, L.P. under license.
All other product names mentioned herein
may be trademarks of their respective
companies.
Hewlett-Packard Company shall not be
liable for technical or editorial errors or
omissions contained herein. The information
is provided “as is” without warranty of any
kind and is subject to change without notice.
The warranties for Hewlett-Packard products
are set forth in the express limited warranty
statements accompanying such products.
Nothing herein should be construed as an
additional warranty.
This document contains proprietary
information that is protected by copyright.
No part of this document may be
photocopied, reproduced, or translated to
another language without the prior written
consent of Hewlett-Packard Development
Company, L.P.
First Edition November 2009
Document Part Number: 583943-001
Page 3

Table of contents
1 Welcome to your HP iPAQ Glisten ..................................................................................... 1
Product registration ................................................................................................................. 2
2 What's in the box? .......................................................................................................... 3
3 Set up your HP iPAQ Glisten ............................................................................................. 4
Remove battery cover ............................................................................................................... 4
Insert SIM card and optional microSD card ................................................................................. 5
Insert the battery ...................................................................................................................... 6
Replace battery cover ............................................................................................................... 6
Charge your HP iPAQ Glisten ................................................................................................... 7
Turn on your HP iPAQ Glisten .................................................................................................... 8
Configure your HP iPAQ Glisten ................................................................................................ 8
Transfer data from your old device (optional) ............................................................................... 9
4 Getting started with your HP iPAQ Glisten ...................................................................... 10
Start with the Today screen ..................................................................................................... 12
Using your keyboard .............................................................................................................. 14
Status icons ........................................................................................................................... 15
PIN setup and lock screen ....................................................................................................... 16
5 Make and receive phone calls ......................................................................................... 18
Make a call ........................................................................................................................... 18
Redial a number .................................................................................................................... 18
Answer a call ........................................................................................................................ 18
Mute a call ............................................................................................................................ 18
Put a call on hold ................................................................................................................... 19
Use Call Waiting .................................................................................................................. 19
Make emergency calls ............................................................................................................ 19
Make calls using Speed Dial ................................................................................................... 19
Make a call from Contacts ...................................................................................................... 20
Call voicemail ....................................................................................................................... 20
Use the speakerphone ............................................................................................................ 20
iii
Page 4

Make a call from a hyperlink phone number ............................................................................. 20
Dial international numbers ....................................................................................................... 21
Make a conference call .......................................................................................................... 21
Call history ............................................................................................................................ 21
Set up Call Forwarding ........................................................................................................... 22
Set up Call Barring ................................................................................................................. 22
Set up Caller ID ..................................................................................................................... 23
Voice Commander ................................................................................................................. 24
6 Customize Settings .......................................................................................................... 25
Name your HP iPAQ Glisten ................................................................................................... 25
Enter owner information .......................................................................................................... 25
Set the time ........................................................................................................................... 26
Change regional settings ........................................................................................................ 26
Adjust volume ........................................................................................................................ 26
Customize ring tone and notification sounds .............................................................................. 26
Customize your screen ............................................................................................................ 27
Customize your Today screen .................................................................................................. 28
Change the power management settings ................................................................................... 29
Remove programs .................................................................................................................. 30
7 Manage your HP iPAQ Glisten ........................................................................................ 31
Secure your HP iPAQ Glisten ................................................................................................... 31
Change the SIM PIN (Personal Identification Number) ................................................. 31
Lock the keyboard ................................................................................................... 32
Lock your HP iPAQ Glisten using a PIN ...................................................................... 32
File Explorer .......................................................................................................................... 33
Task Manager ....................................................................................................................... 34
SIM Manager ........................................................................................................................ 35
Backup your phone using Sprite Backup ................................................................................... 36
Update your phone using AT&T Updates ................................................................................... 36
Battery saving tips .................................................................................................................. 37
View hardware and software information about your HP iPAQ Glisten ......................................... 37
8 Set up your email accounts ............................................................................................. 39
Overview .............................................................................................................................. 39
Set up IT managed corporate email .......................................................................................... 39
Set up personal email ............................................................................................................. 40
Delete an account .................................................................................................................. 40
9 Send and receive email messages ................................................................................... 41
Overview .............................................................................................................................. 41
Send an email message .......................................................................................................... 41
iv
Page 5

Reply to or forward a message ................................................................................................ 42
Add an attachment to a message ............................................................................................. 42
Open attachments .................................................................................................................. 42
Respond to meeting requests ................................................................................................... 43
Create or change a signature .................................................................................................. 43
Keyboard shortcuts ................................................................................................................. 43
10 Send and receive text messages and multimedia messages .......................................... 44
Overview .............................................................................................................................. 44
Send a text message .............................................................................................................. 45
Send a multimedia message .................................................................................................... 46
11 Manage your contacts .................................................................................................. 47
Add contacts ......................................................................................................................... 47
Edit contact information .......................................................................................................... 48
Delete a contact ..................................................................................................................... 48
Create and assign a category ................................................................................................. 48
Find a contact ........................................................................................................................ 48
Make a call from Contacts ...................................................................................................... 49
Send a text message to a contact ............................................................................................. 49
Send an email to a contact ...................................................................................................... 49
Send a contact's information as a vCard ................................................................................... 50
Add a contact picture ............................................................................................................. 50
Assign a ring tone to a contact ................................................................................................ 50
Create email and messaging groups ........................................................................................ 51
Contact list tips ...................................................................................................................... 51
12 Set alarm clock ............................................................................................................. 52
13 Manage your calendar ................................................................................................. 55
Overview .............................................................................................................................. 55
Schedule an appointment ........................................................................................................ 55
View your appointments by category ........................................................................................ 57
Change your calendar view based on your work week ............................................................... 58
Change calendar options ........................................................................................................ 59
Update an appointment .......................................................................................................... 60
Cancel an appointment ........................................................................................................... 60
14 Create and manage tasks ............................................................................................. 61
Overview .............................................................................................................................. 61
Create a task ......................................................................................................................... 61
View your tasks by category .................................................................................................... 63
v
Page 6

Show the start and due dates in the task list ............................................................................... 64
Mark a task as complete ......................................................................................................... 64
15 Take notes .................................................................................................................... 65
Overview .............................................................................................................................. 65
Write a note .......................................................................................................................... 65
Create a voice note ................................................................................................................ 66
Create a copy of a note .......................................................................................................... 67
Copy and paste content between notes ..................................................................................... 67
Take notes during a call .......................................................................................................... 68
Rename notes ........................................................................................................................ 68
Delete notes .......................................................................................................................... 68
16 Use productivity tools ................................................................................................... 69
Microsoft® Office Mobile ....................................................................................................... 69
Work with Office Mobile Documents ......................................................................... 69
Open a file .............................................................................................. 69
Find or replace text or data ....................................................................... 69
Create a file ............................................................................................ 70
Create a template .................................................................................... 70
Create a document or workbook by using a template ................................... 71
Save a copy of a document or workbook .................................................... 71
Automatically save files on a storage card ................................................... 71
Rename a file .......................................................................................... 72
Locate a file ............................................................................................. 72
Work with Word Mobile .......................................................................................... 72
View Word files by type in the file list ......................................................... 72
Set the default Word template ................................................................... 72
Open and view a Word document ............................................................. 73
Move or copy text in a document ............................................................... 73
Create a list in a document ........................................................................ 73
Format text in a document ......................................................................... 73
Align text in a document ........................................................................... 74
Indent paragraphs in a document ............................................................... 74
Zoom in or out in a Word Mobile document ................................................ 74
Check spelling in a document .................................................................... 74
Work with Excel Mobile ........................................................................................... 75
Overview ................................................................................................ 75
Get Started .............................................................................................. 75
View Excel workbooks by type in the file list ................................. 75
Set the default Excel template ..................................................... 75
Open and view an Excel spreadsheet .......................................... 76
Enter and edit data ................................................................................... 76
vi
Page 7

Enter a value or text in a cell ...................................................... 76
Edit a value or text in a cell ........................................................ 76
Enter a sequence of values automatically ...................................... 76
Copy and paste data ................................................................. 77
Insert cells ................................................................................ 78
Insert rows ................................................................................ 78
Insert columns ........................................................................... 79
Delete cells, rows, or columns ..................................................... 79
Format Data ............................................................................................ 79
Format numbers and text ............................................................ 79
Adjust column widths and row heights ......................................... 80
Fit rows and columns to data ...................................................... 80
View the data you want ............................................................................ 80
Adjust the view of the worksheet ................................................. 80
Zoom in or out .......................................................................... 81
Hide and display rows or columns ............................................... 81
Go to a cell or region ................................................................ 81
Filter data in a worksheet ........................................................... 81
Sort data in a worksheet ............................................................ 82
Calculate ................................................................................................ 82
Calculate values automatically .................................................... 82
Add values automatically ........................................................... 82
Enter a simple formula ............................................................... 83
Enter a formula that contains a cell reference ................................ 83
Enter a formula that contains a function ........................................ 83
Work with charts ...................................................................................... 84
Overview ................................................................................. 84
Create a chart .......................................................................... 84
Add titles to a chart ................................................................... 85
Add a legend to a chart ............................................................. 85
Change the chart type ............................................................... 85
Change the scale of a chart ........................................................ 85
Delete a chart ........................................................................... 86
Work with worksheets .............................................................................. 86
Insert a worksheet ..................................................................... 86
Delete a worksheet .................................................................... 86
Rename a worksheet .................................................................. 87
Switch to another worksheet ....................................................... 87
Work with PowerPoint Mobile .................................................................................. 87
Overview ................................................................................................ 87
Open and view a slide show presentation ................................................... 87
Change the slide show orientation .............................................................. 87
Set slide show playback options ................................................................. 88
Zoom in and out in a slide ........................................................................ 88
vii
Page 8

Navigate between slides ........................................................................... 89
OneNote Mobile .................................................................................................... 89
View PDF documents .............................................................................................................. 89
Print documents and information with JetCet Print ....................................................................... 91
MSN® Money ....................................................................................................................... 92
17 Take photos and video ................................................................................................. 93
Overview .............................................................................................................................. 93
Camera capture modes .......................................................................................................... 93
Camera settings ..................................................................................................................... 94
Capture photos ...................................................................................................................... 96
Capture videos ...................................................................................................................... 97
View photos and videos .......................................................................................................... 98
Transfer your media files ......................................................................................................... 98
HP Photosmart Mobile ............................................................................................................ 99
View pictures and videos stored on your HP iPAQ Glisten or a storage card .................. 99
Attach a voice note to a picture ................................................................................ 99
Print pictures ......................................................................................................... 100
View a slide show ................................................................................................. 100
Email pictures ....................................................................................................... 100
Associate a contact with a picture ........................................................................... 101
Assign a picture to the Today screen background ...................................................... 101
Upload photos to Snapfish ..................................................................................... 101
Enhance documents ............................................................................................... 102
Set the slide show screen saver ............................................................................... 102
Organize images .................................................................................................. 103
Copy and paste an image ...................................................................................... 103
View videos ......................................................................................................... 103
18 Browse the Internet .................................................................................................... 104
Internet Explorer ................................................................................................................... 104
Navigate ............................................................................................................. 104
Add a web page to your Favorites list ..................................................................... 105
Windows Live™ ................................................................................................................... 106
Overview ............................................................................................................. 106
Sign in to Windows Live ........................................................................................ 106
Search for information ........................................................................................... 107
Check your email .................................................................................................. 107
Sign in as a different user ...................................................................................... 107
19 Use Wireless Manager ................................................................................................ 108
viii
Page 9

20 Connect to a Wi-Fi network ........................................................................................ 109
Overview ............................................................................................................................ 109
Connect using AT&T Wi-Fi .................................................................................................... 109
Open Wi-Fi settings .............................................................................................................. 110
Connect to a Wi-Fi network ................................................................................................... 110
Manually connect to a Wi-Fi network ...................................................................................... 110
Find your IP address ............................................................................................................. 111
Delete a Wi-Fi network ......................................................................................................... 111
Open Wi-Fi settings .............................................................................................................. 111
21 Use Bluetooth ............................................................................................................. 112
Overview ............................................................................................................................ 112
Open Bluetooth settings ........................................................................................................ 112
Use a Bluetooth headset ........................................................................................................ 112
Create a Bluetooth partnership .............................................................................................. 112
Delete a Bluetooth partnership ............................................................................................... 113
Accept a Bluetooth partnership .............................................................................................. 113
Change the display name of a Bluetooth partnership ................................................................ 114
Connect to a computer using Bluetooth ................................................................................... 114
Use your iPAQ as a wireless modem with Bluetooth ................................................................. 114
Set up an incoming or outgoing Bluetooth communications (COM) port ...................................... 114
Turn off Bluetooth ................................................................................................................. 115
22 Use AT&T Navigator and other GPS Applications ........................................................ 116
Login to AT&T Navigator ...................................................................................................... 116
Get Directions ...................................................................................................................... 117
Global Positioning System (GPS) on your HP iPAQ Glisten ........................................................ 117
Find your initial position faster with GPS Data .......................................................... 117
Identify the COM port for your GPS receiver ............................................................ 118
Troubleshoot frequent GPS signal loss and interference .............................................. 118
23 Synchronize your HP iPAQ Glisten .............................................................................. 119
Overview ............................................................................................................................ 119
Install synchronization software on your PC ............................................................................. 120
Connect your HP iPAQ Glisten to your PC ............................................................................... 120
Copy files between your HP iPAQ Glisten and computer ........................................................... 121
Copy data from your previous device to your HP iPAQ Glisten .................................................. 122
Troubleshoot synchronization issues ....................................................................................... 122
24 Listen to music and watch videos ................................................................................ 124
Windows Media Player ........................................................................................................ 124
Clear the Now Playing List ..................................................................................... 124
Update the library ................................................................................................. 124
ix
Page 10

ArcSoft Streaming Player ...................................................................................................... 125
AT&T Music ......................................................................................................................... 126
Shop Music .......................................................................................................... 126
Music Apps .......................................................................................................... 126
XM Radio ............................................................................................................. 126
Music ID .............................................................................................................. 126
Music Videos ........................................................................................................ 126
Mobile Video ...................................................................................................................... 127
25 Data connection types over the mobile phone network ............................................... 128
Overview ............................................................................................................................ 128
HSDPA ............................................................................................................................... 128
GPRS/EDGE ....................................................................................................................... 128
Differences between GSM and GPRS/EDGE/WCDMA/HSDPA technology ................................ 129
26 Advanced settings for data connections ...................................................................... 130
Overview ............................................................................................................................ 130
Connect to intranet URLs ....................................................................................................... 130
Change an intranet URL ........................................................................................................ 130
Set up an automatic choice for connections ............................................................................. 131
Set up a VPN server connection ............................................................................................. 131
End a connection ................................................................................................................. 132
27 Remote Desktop Mobile .............................................................................................. 133
28 Java Applications ....................................................................................................... 134
29 Use your HP iPAQ Glisten as a wireless modem .......................................................... 135
Overview ............................................................................................................................ 135
Connect to a computer using the USB sync cable ..................................................................... 135
Connect to a computer using Bluetooth ................................................................................... 135
30 Accessibility ................................................................................................................ 137
Turn on TTY Mode ................................................................................................................ 137
Turn on T-Coil mode (Hearing Aid Compliant) ......................................................................... 137
31 Accessories ................................................................................................................. 138
32 Tips and Tricks ............................................................................................................ 141
Lock the Keyboard ............................................................................................................... 141
Start the Camera .................................................................................................................. 141
Connect to a wireless network using the Wi-Fi button ................................................................ 141
x
Page 11

Open your calendar ............................................................................................................. 141
Use the Lock Screen ............................................................................................................. 142
Customize the Start menu ...................................................................................................... 143
View your complete call history .............................................................................................. 143
Use Voice Commander with a headset ................................................................................... 143
Quick access from the Today screen ....................................................................................... 143
Add a photo to a contact ...................................................................................................... 144
Assign a ring tone to contact ................................................................................................. 144
Change wallpaper ............................................................................................................... 145
Control music playback ........................................................................................................ 145
Add text quickly using My Text .............................................................................................. 145
Today screen status icons ...................................................................................................... 145
33 Frequently asked questions ........................................................................................ 146
Applications ........................................................................................................................ 146
Audio and video .................................................................................................................. 149
Battery ................................................................................................................................ 150
Bluetooth ............................................................................................................................. 152
Compatibility ....................................................................................................................... 154
Connections ........................................................................................................................ 158
34 Troubleshoot your HP iPAQ Glisten ............................................................................. 159
Battery ................................................................................................................................ 159
Connection ......................................................................................................................... 160
Synchronization ................................................................................................................... 163
Miscellaneous ...................................................................................................................... 164
35 Product Specifications ................................................................................................. 166
System specifications ............................................................................................................ 166
Physical specifications .......................................................................................................... 168
Operating environment ......................................................................................................... 169
Supported frequency bands ................................................................................................... 169
Index ............................................................................................................................... 170
xi
Page 12

xii
Page 13

1 Welcome to your HP iPAQ Glisten
Congratulations on the purchase of your new iPAQ mobile phone from Hewlett-Packard!
We suggest you make yourself familiar with the user instructions before using your iPAQ:
Quickstart (in box)—Follow the instructions in the printed Quickstart to set up your phone and to
●
become familiar with its commonly used features.
Important Product Information (in box)—Find valuable information regarding health and safety
●
precautions, environmental and regional regulations, HP Hardware Limited Warranty, and
software license agreements.
User Manual (this document)—Refer to this comprehensive User Manual for a more in-depth
●
understanding of all the versatile and advanced features and functions available on your iPAQ.
If you need information that you cannot find in this guide, please go to
http://www.hp.com/support.
1
Page 14

Product registration
Visit http://www.register.hp.com to register your iPAQ or to update your postal or email address after
registration. You must enter your user ID and registration password to edit your online profile. After
registering your iPAQ, you can elect to receive an email message about special offers and promotions.
To register, you need to provide your product name and serial number. To get this information, on your
iPAQ, press Start
information on the product label on the box, or on the label underneath the battery on your iPAQ.
NOTE: Registration is not supported in all countries or regions.
, tap Settings > System > Device Information. You can also find this
2 Chapter 1 Welcome to your HP iPAQ Glisten
Page 15
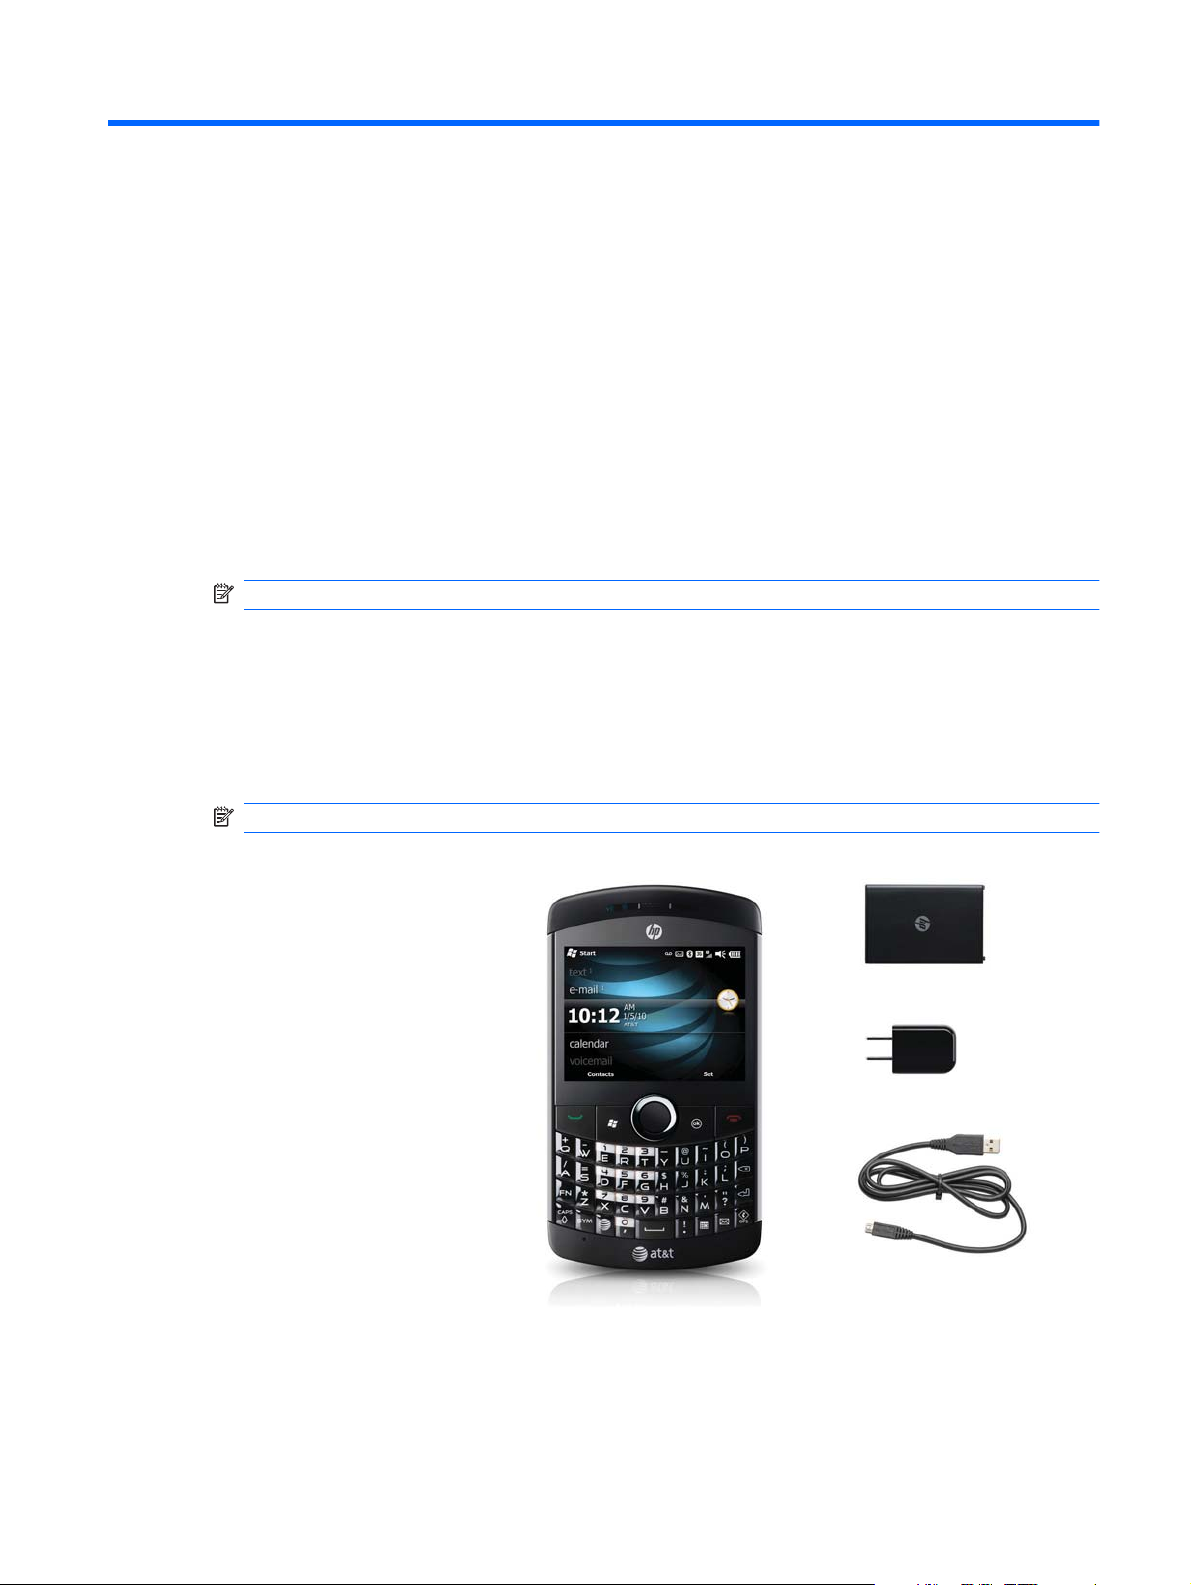
2 What's in the box?
The following items are included in the box:
HP iPAQ Glisten
●
Rechargeable battery
●
Power adapter
●
NOTE: The power adapter shipped with your iPAQ might vary depending on the country/region.
USB sync cable
●
Quickstart
●
Important Product Information
●
Stylus
●
NOTE: The stylus is located on the back panel at the bottom left corner of your iPAQ.
Rechargeable battery
Power adapter
USB sync cable
HP iPAQ Glisten
• Quickstart
• Important Product Information
3
Page 16
3 Set up your HP iPAQ Glisten
Follow these steps to set up and use your iPAQ. Carefully remove your iPAQ and all the components
from the box before beginning to set up your iPAQ.
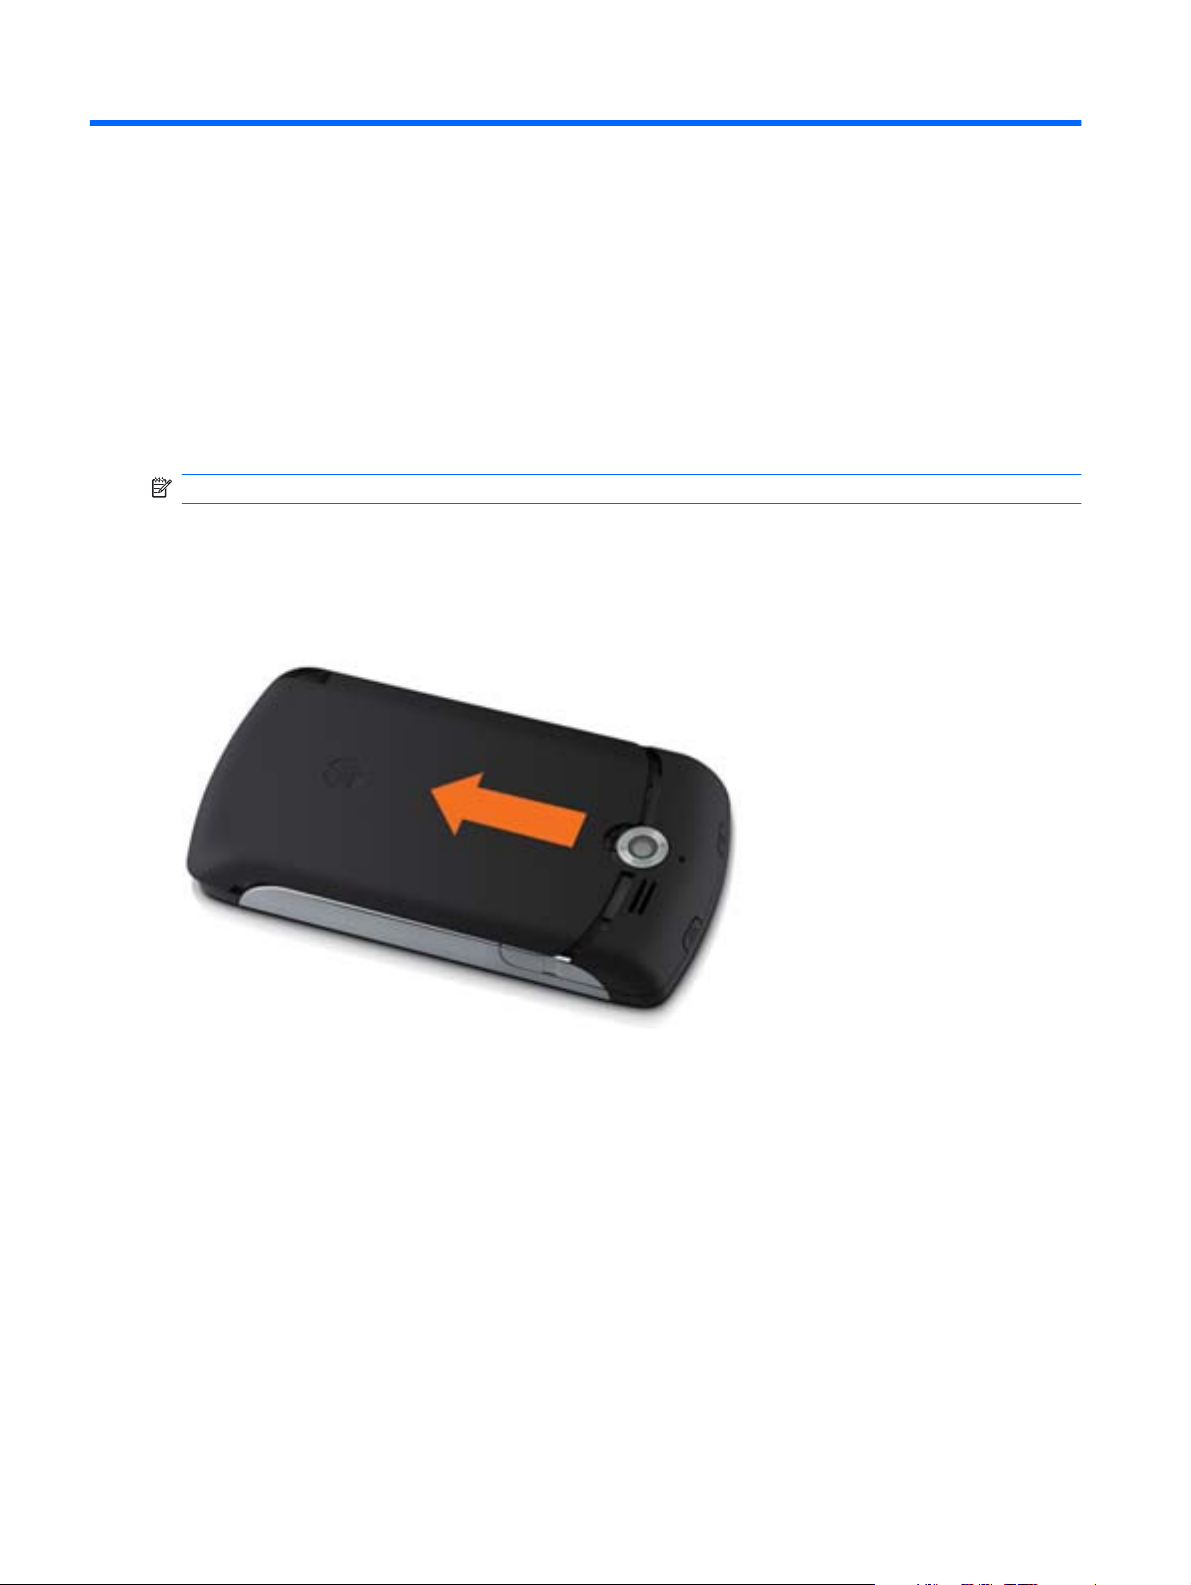
NOTE: Placing the screen on hard surfaces can cause scratches to the screen.
Remove battery cover
Press and then pull down on the back of the phone to remove the battery cover.
4 Chapter 3 Set up your HP iPAQ Glisten
Page 17
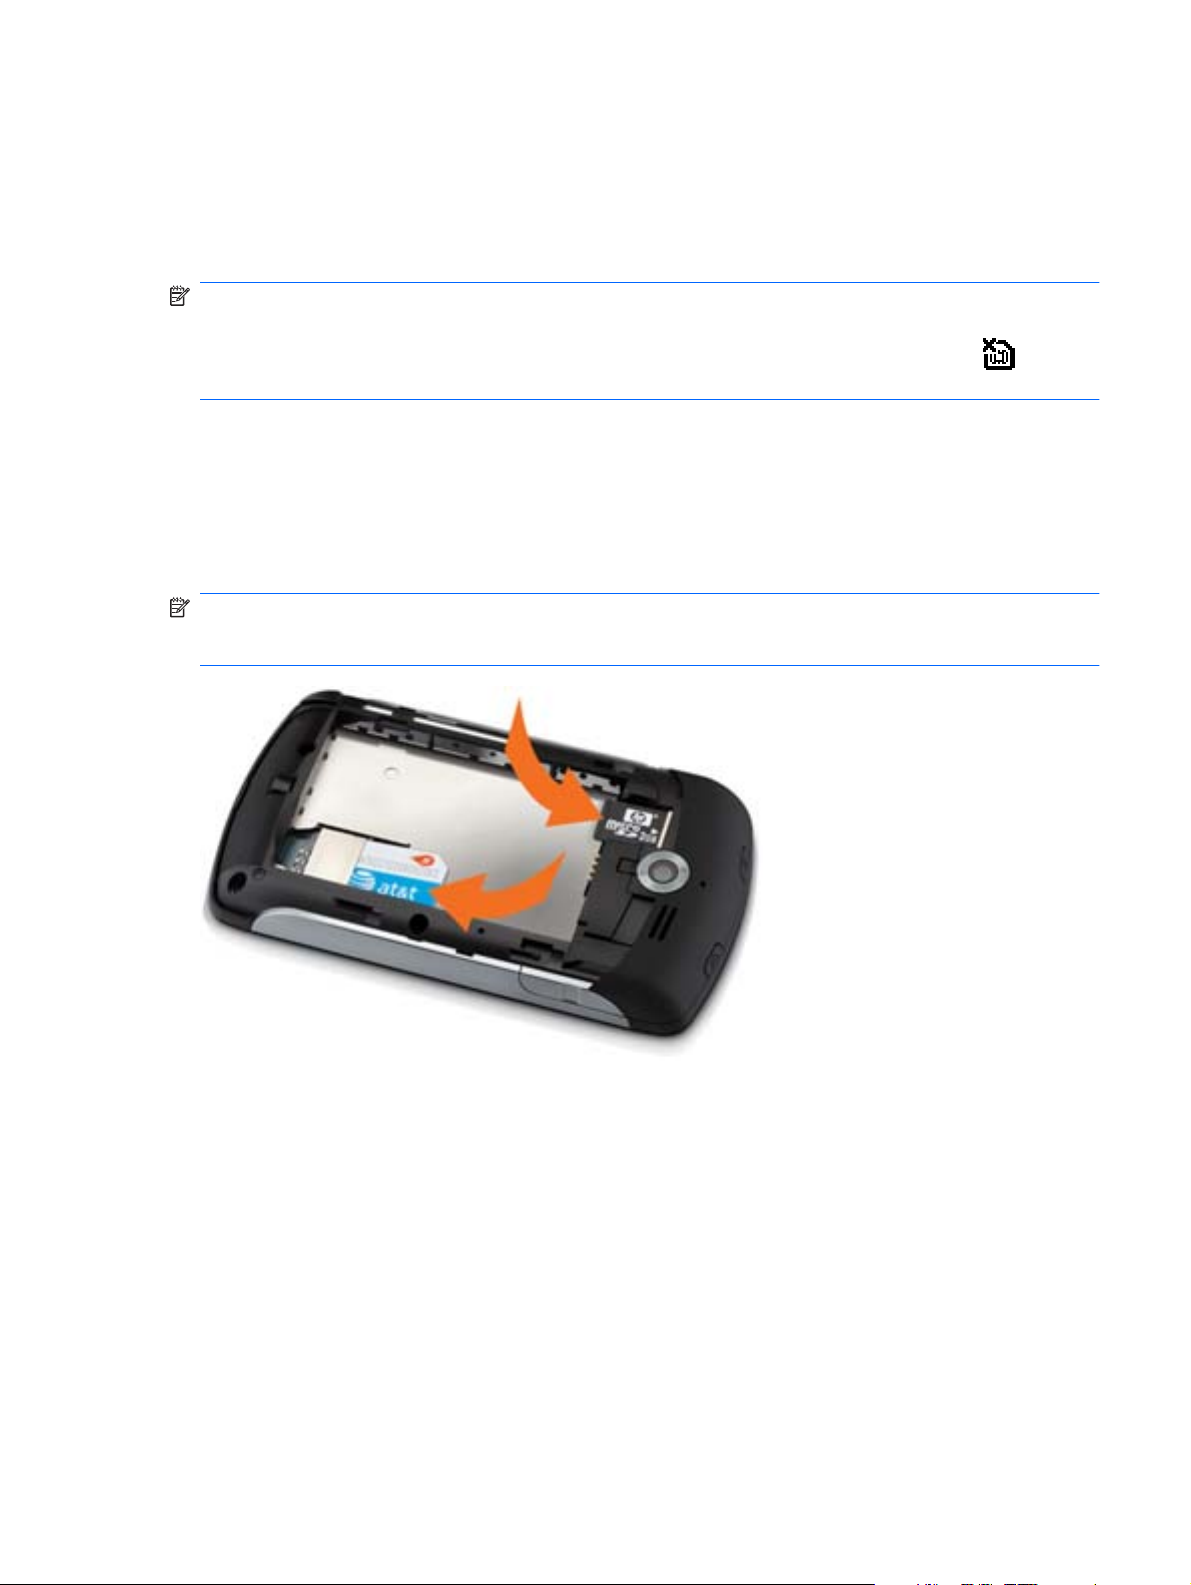
Insert SIM card and optional microSD card
Insert SIM card:
With the gold SIM card contacts facing down, press gently on the SIM card as you slide it into the slot.
NOTE: If the battery is already inserted, remove it before inserting the SIM card. Also, make sure that
the metal contacts are facing down and the notched corner is in the correct position. If the SIM card is
not correctly inserted in your iPAQ and you turn on your iPAQ, No SIM card installed
in the title bar at the upper right corner of the screen.
Insert optional microSD card:
A storage card helps you store more files on your iPAQ, such as photos, music, video, and more. You
can also use a storage card to backup data.
Insert a microSD card into the slot.
NOTE: A microSD card is not included with your iPAQ and must be purchased separately.
You can insert a microSD card only when the battery is removed.
appears
Insert SIM card and optional microSD card
5
Page 18

Insert the battery
Once you have inserted the SIM card, insert the battery.
With the HP logo facing out, push the top of the battery in first.
1.
Push the bottom of the battery into the phone.
2.
Replace battery cover
Slide the battery cover to lock it in place.
6 Chapter 3 Set up your HP iPAQ Glisten
Page 19
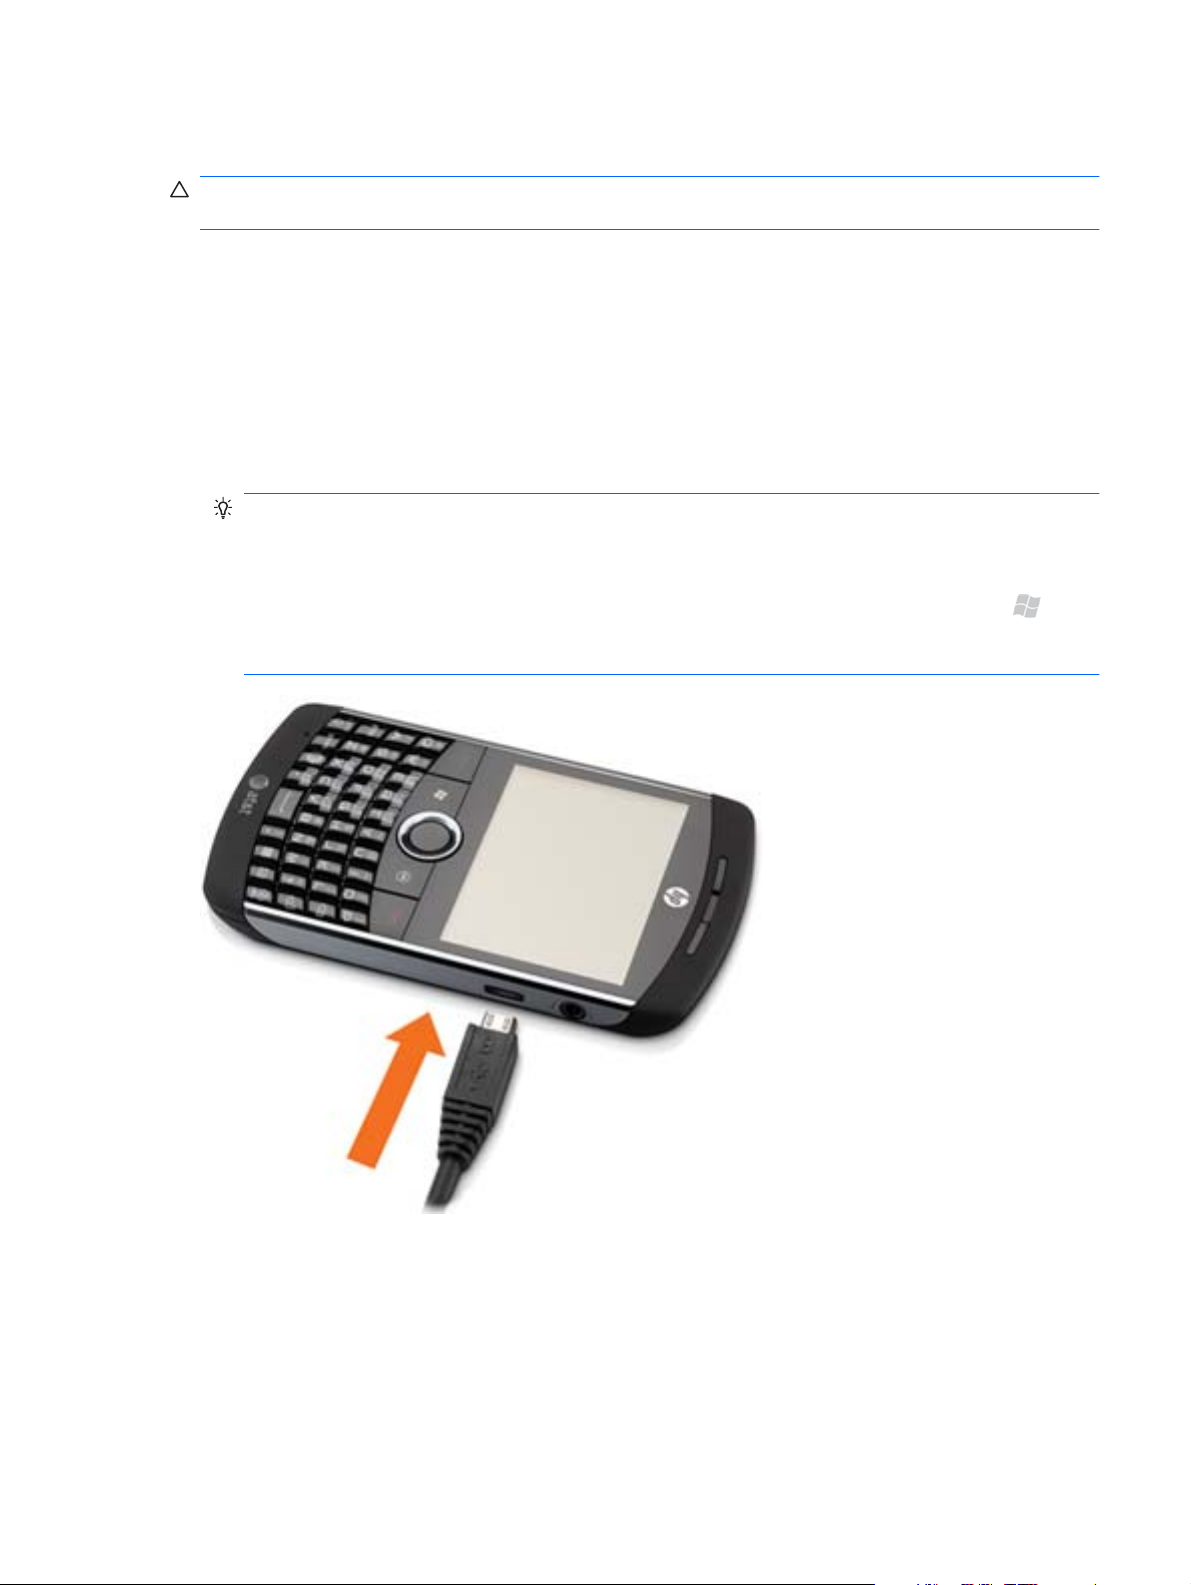
Charge your HP iPAQ Glisten
CAUTION: To avoid damaging your iPAQ or AC adapter, make sure that all the metal connectors
are correctly aligned before connecting.
Your iPAQ will fully charge in approximately 2–4 hours. Charging might take more time when your
iPAQ is connected to a powered computer or non-HP accessories.
To charge the battery:
Plug the USB sync cable into the phone.
1.
Attach the USB sync cable to the power adapter.
2.
Plug the power adapter into a standard AC outlet.
3.
TIP: Charge the battery by connecting your iPAQ to a USB port on your computer using the USB
sync cable. If Microsoft
your computer, it appears on your computer screen.
USB charging is enabled by default on your iPAQ. To disable USB charging, press Start
then tap Settings > Power > USB Charging tab. On the Power screen, clear the Use USB
Charging check box, and then tap OK.
®
ActiveSync® or Windows Mobile Device Center (WMDC) is installed on
, and
Charge your HP iPAQ Glisten
7
Page 20
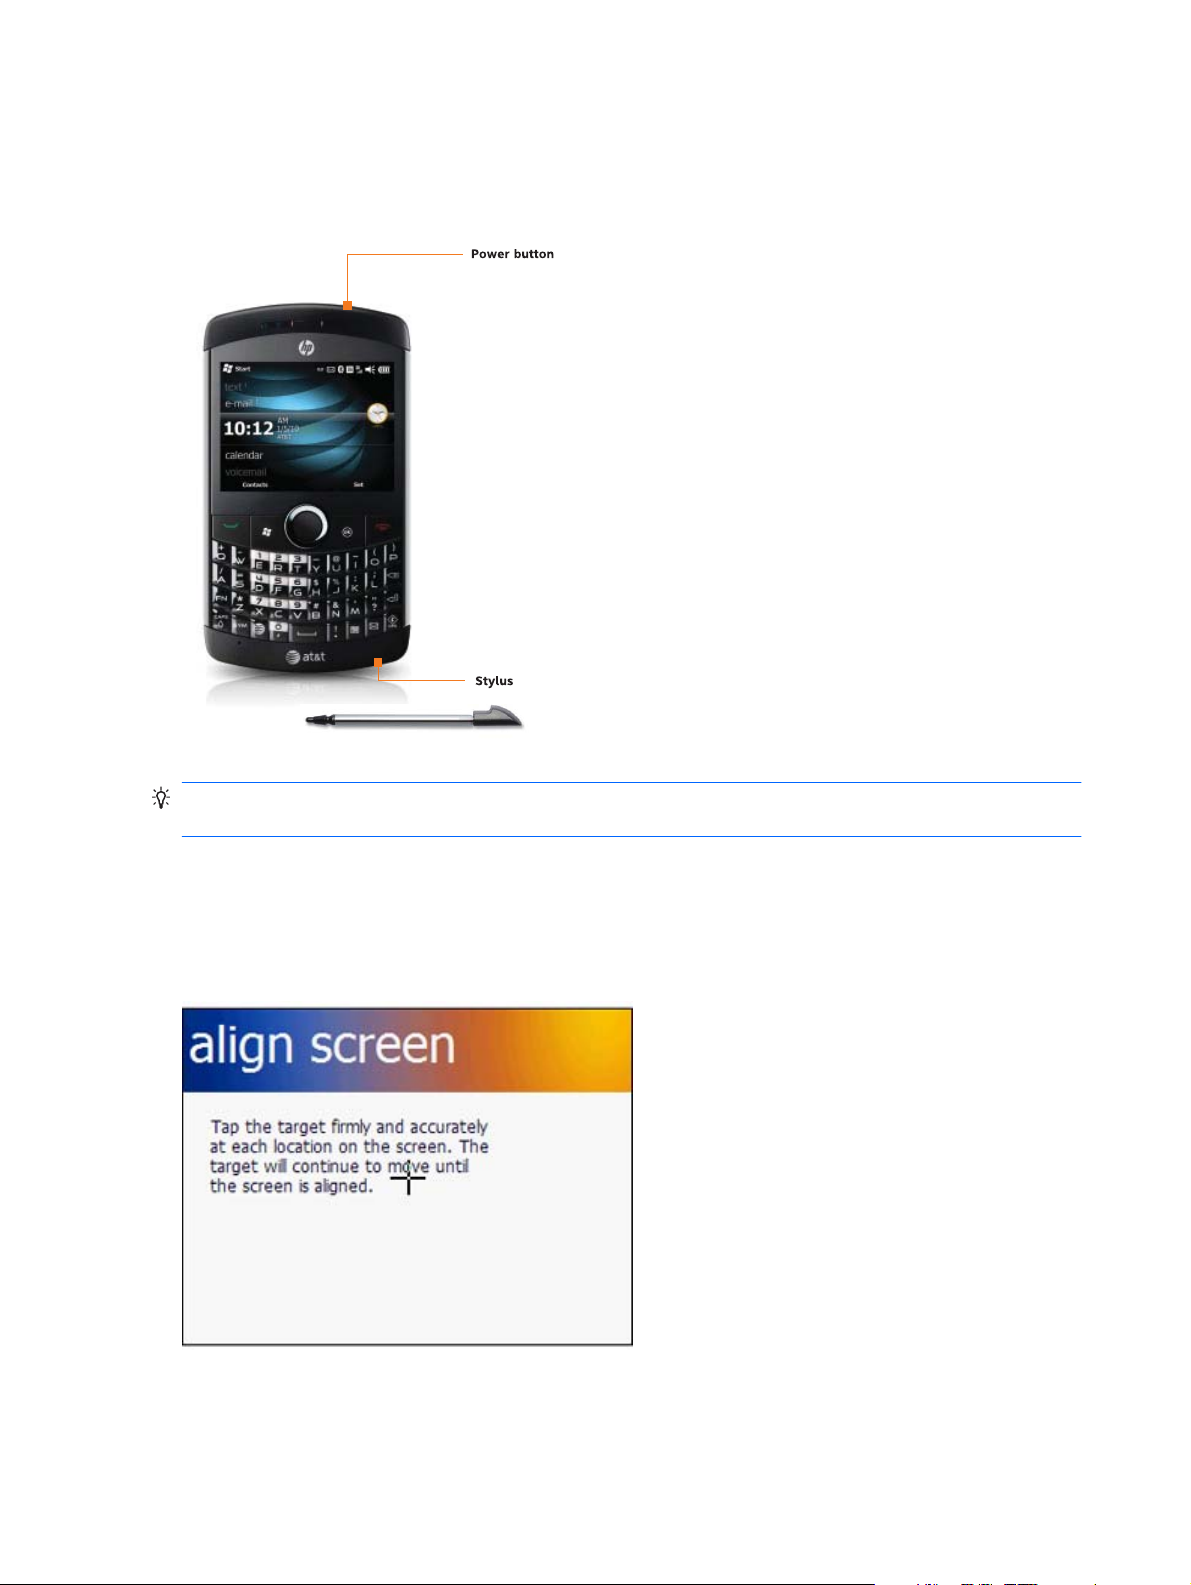
Turn on your HP iPAQ Glisten
To start exploring your device now, while the battery is charging, press and hold the power button until
your phone vibrates.
TIP: To turn off your phone, hold down the power button until you see the warning message, and
then tap Yes.
Configure your HP iPAQ Glisten
The first time you turn on your phone, you are prompted to tap the screen. Next, use the stylus or your
finger to align the screen.
After you align your phone screen, it is ready to use!
8 Chapter 3 Set up your HP iPAQ Glisten
Page 21

Transfer data from your old device (optional)
If you were using a Windows phone prior to purchasing your iPAQ, you can synchronize that phone
with your computer using Microsoft Outlook and ActiveSync or Windows Mobile Device Center. Once
you have synchronized your previous Windows phone with your computer, you can synchronize your
new iPAQ with your computer—transferring contacts, appointments, email messages, tasks, notes,
mobile Internet Explorer favorites, and files.
To transfer data to your new iPAQ:
Make sure that you have Microsoft Outlook 98 or later installed on your computer.
1.
NOTE: To synchronize, Microsoft Outlook must be set as your default email program on your
PC. If you need to change your PC settings, open Microsoft Outlook, click Tools > Options >
Other tab, and then select the Make Outlook the default program for E-mail,
Contacts, and Calendar check box. Click Apply > OK, and then restart your PC.
On your computer, install ActiveSync or Windows Mobile Device Center. For more information on
2.
installing ActiveSync or Windows Mobile Device Center, see
on page 119.
Connect your old phone to your computer, and then synchronize it with your computer. After
3.
synchronization is complete, disconnect your old phone from your computer.
Connect your new iPAQ to your computer to synchronize it.
4.
Synchronize your HP iPAQ Glisten
Once synchronization is complete, you can disconnect your iPAQ from your computer.
NOTE: If your old Windows phone supports Sprite Backup, you can copy data to your iPAQ. See
Backup your phone using Sprite Backup on page 36.
Transfer data from your old device (optional)
9
Page 22
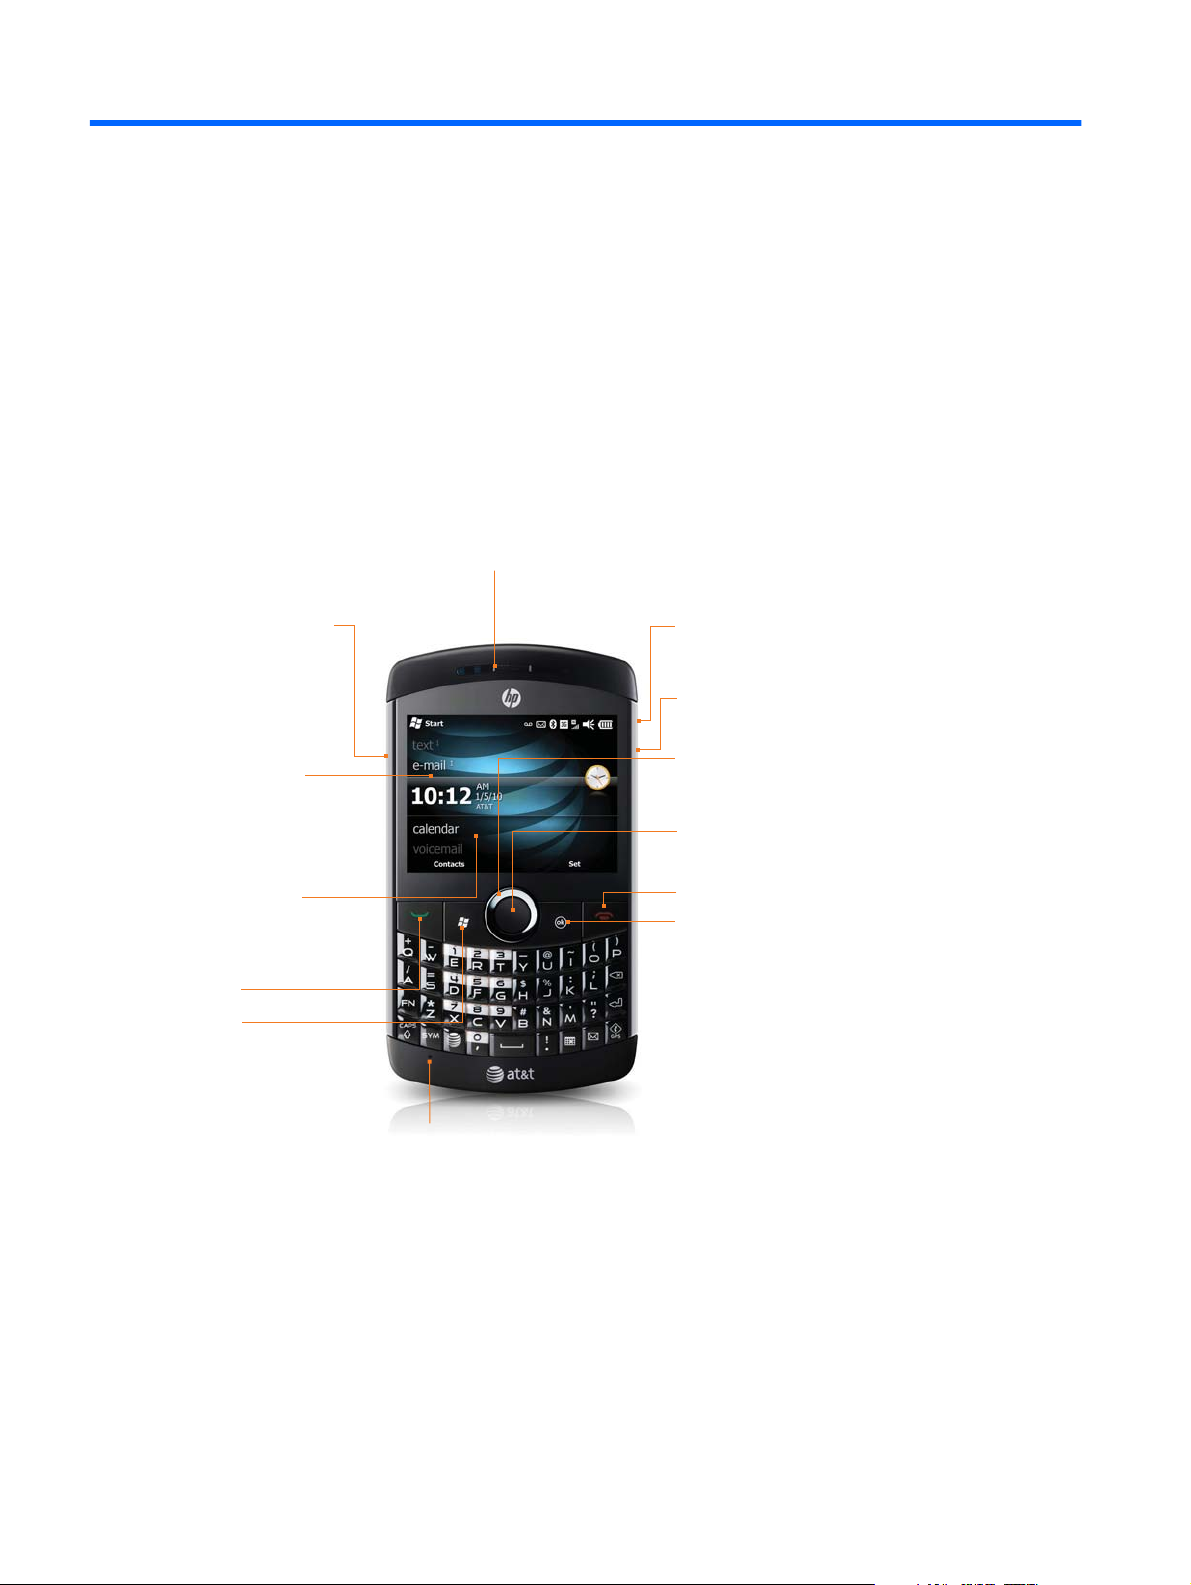
4 Getting started with your HP iPAQ
Glisten
The images below show you the basic features and controls of your new iPAQ.
Volume up/down
Today screen
Displays current
information and
alerts, such as new
email or voicemail
messages.
Touch screen
Use your finger
to scroll and
navigate.
Send
Start
Press to open the
Start menu, where
you can access
programs and
change your
iPAQ settings.
Microphone
Earpiece
Headset jack
(3.5 mm)
Micro-USB power/
sync connector
Navigation ring
Press up, down, left,
and right to navigate.
Center select
Press to select, similar
to a mouse click.
End
OK
Press and hold to
activate the camera.
Press instead of
tapping X or OK in
the upper right
corner of your
iPAQ screen.
10 Chapter 4 Getting started with your HP iPAQ Glisten
Page 23
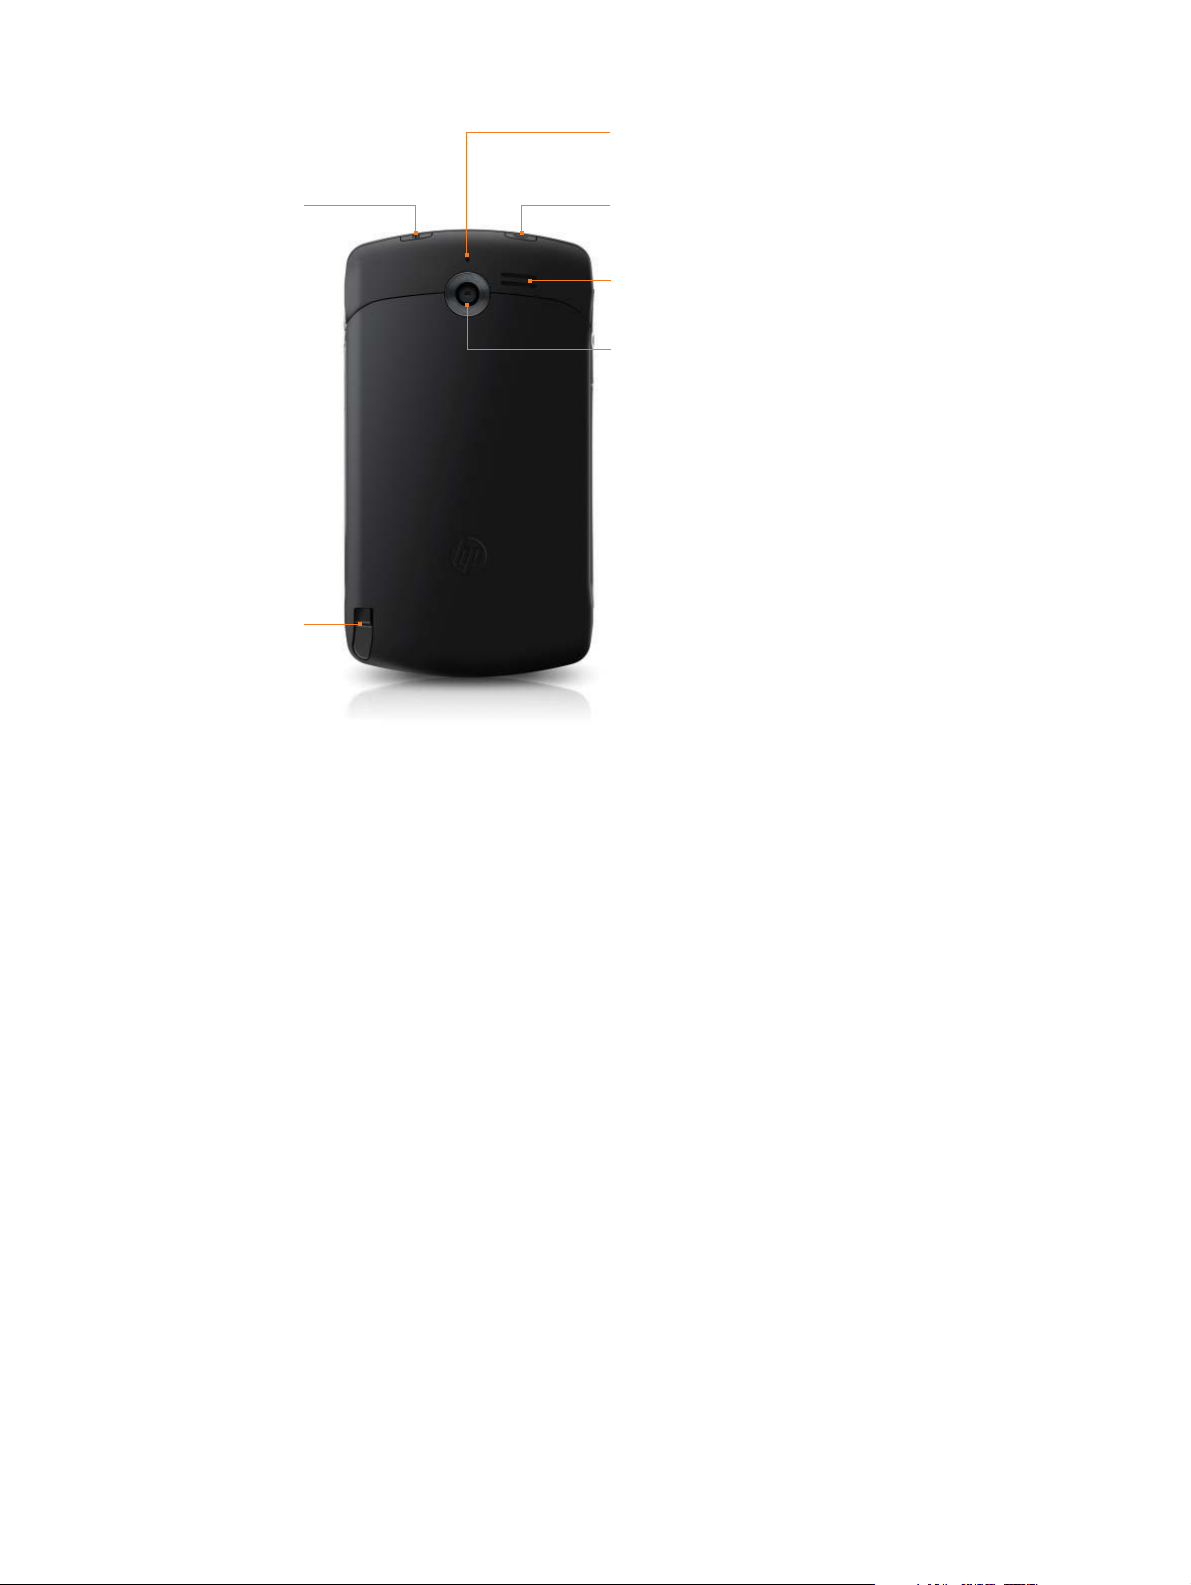
Noise-canceling
microphone
Power/sleep
on/off
Stylus
Wi-Fi on/off
Speaker
Camera
11
Page 24
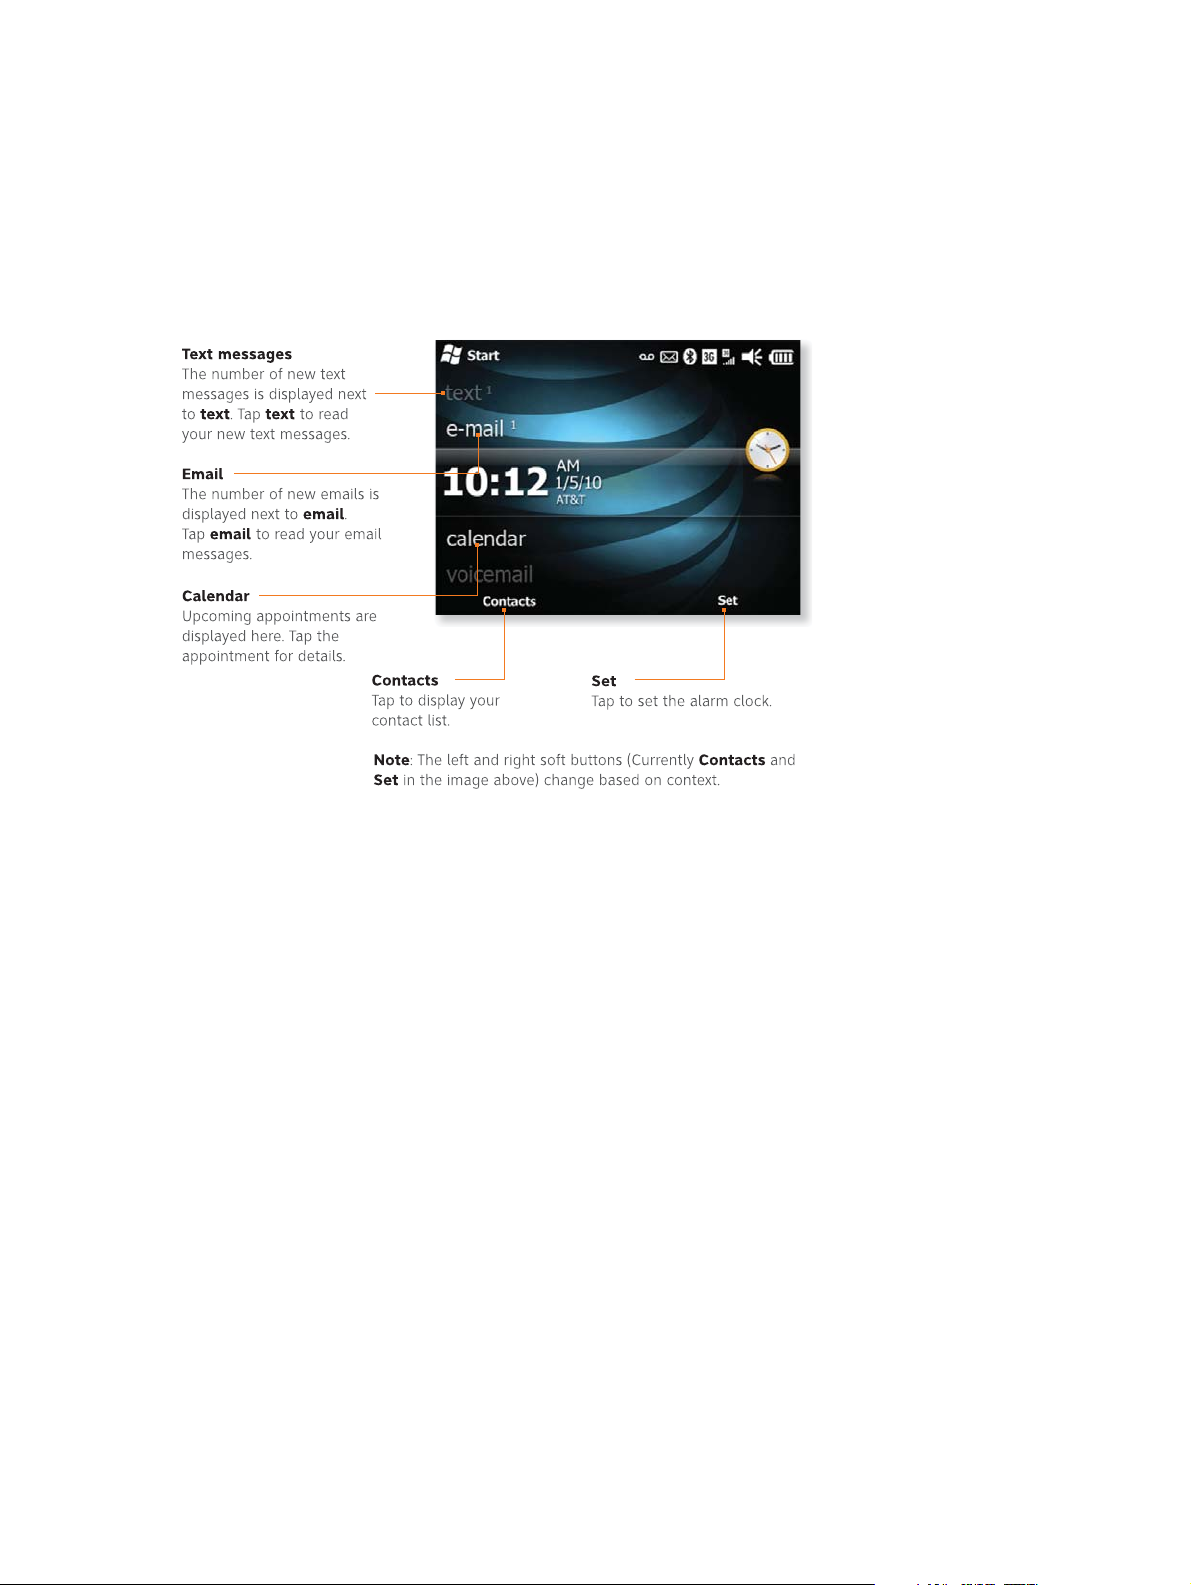
Start with the Today screen
The Today screen displays current information and alerts, including new email messages, text
messages, upcoming appointments, voicemails, and missed calls. Also, you can open items from the
Today screen. For example, scroll to calendar, and then press the Center Select key to open your
calendar and see your upcoming appointments.
You can view and access the following information and features from the Today screen:
●
voicemail—Select to view your voicemail. Tap to call your voicemail.
●
date and time—Select to view the current date and time. Tap to access the clock and alarm
settings.
●
text—Select to view your new text messages. Tap to read your text messages.
●
e-mail—Select to view your emails. Tap to set up your email or view the number of new emails. If
you have multiple email accounts set up on your phone, you can scroll left or right to switch
between accounts.
●
calendar—Select and scroll left or right to view your upcoming appointments or create a new
appointment.
●
favorites—Select and scroll left or right to launch your favorite websites. To add a favorite, scroll
right or left, and then tap Add/Remove. Select your favorite websites, and then tap Done.
●
pictures—Select to view your pictures. Scroll left or right to browse through your pictures.
●
music—Select to play your music. Tap Play All Songs to listen to all the music on your iPAQ.
Scroll left or right to browse through your music collection.
12 Chapter 4 Getting started with your HP iPAQ Glisten
Page 25

●
getting started—Select and scroll left or right to get a list of frequently used tasks. Tap a task to
learn more.
●
phone—Select to view any missed calls. Tap to get a list of incoming and outgoing calls.
Start with the Today screen
13
Page 26
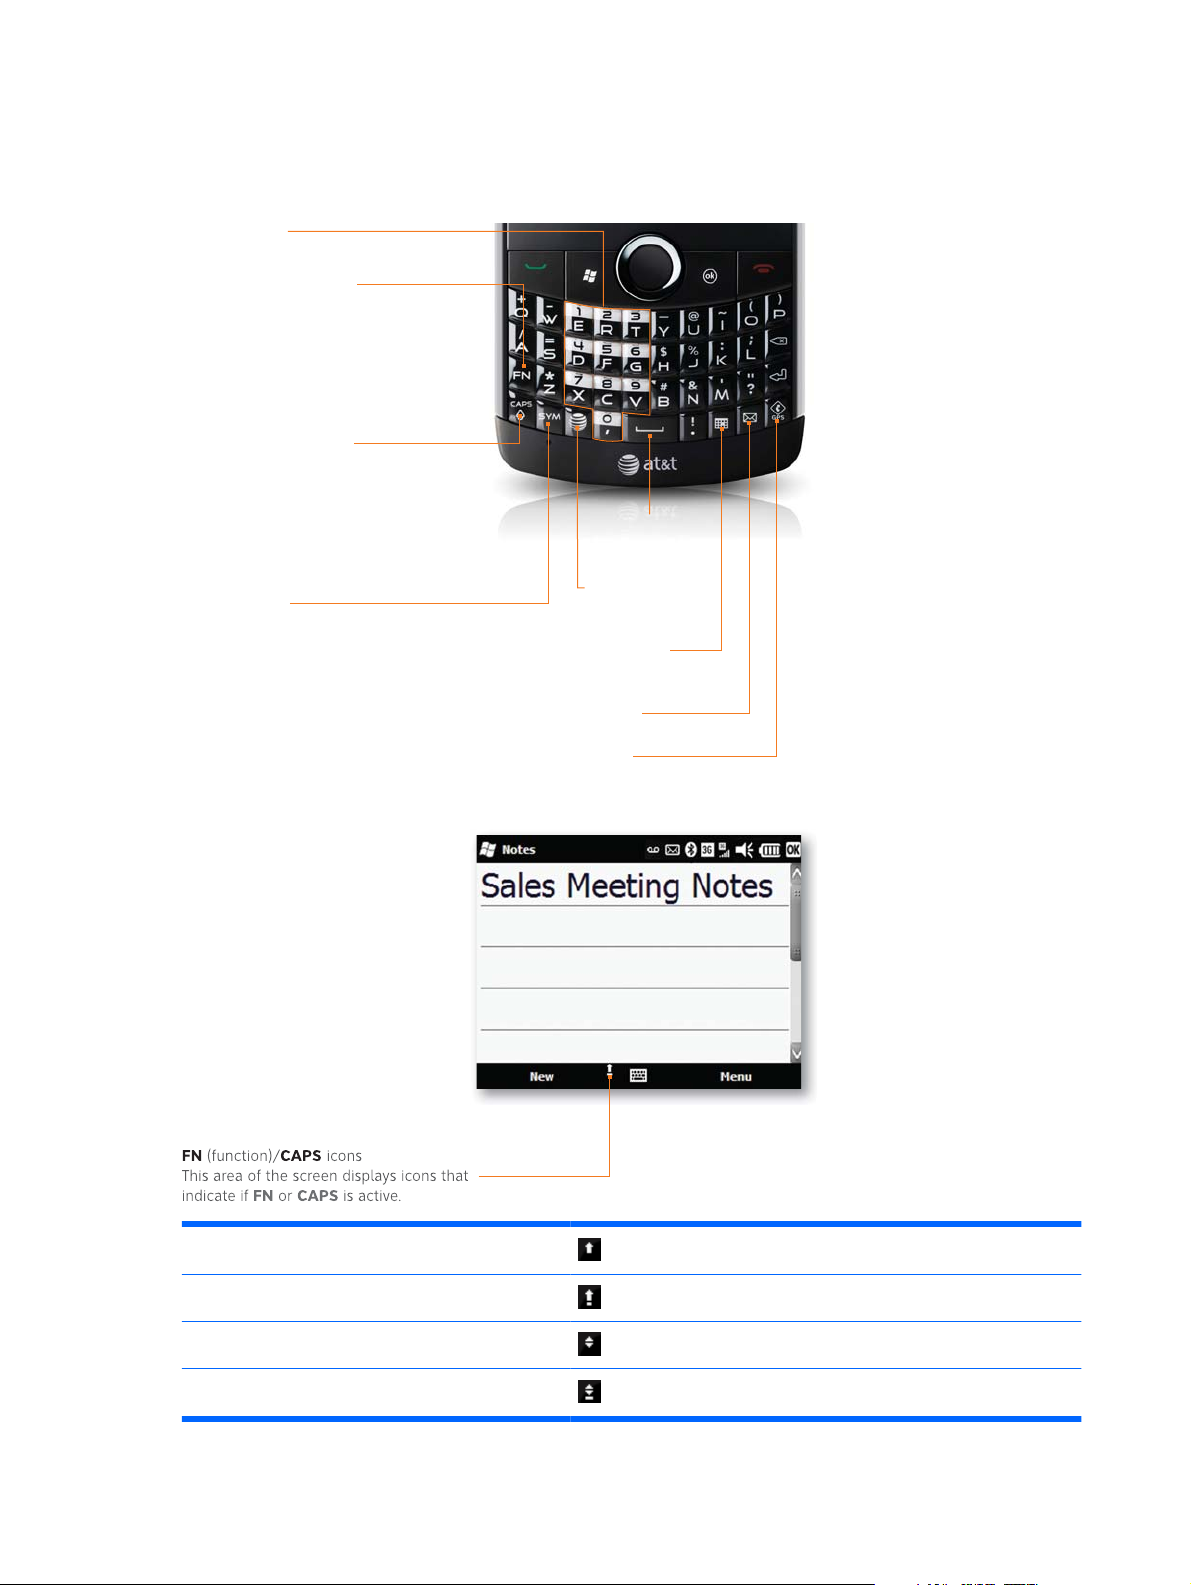
Using your keyboard
The image below shows keyboard shortcuts and how to enter letters, numbers, and symbols.
Number keys
Use these to dial a phone number.
Numbers and symbols
To enter numbers and symbols,
press FN (function), and then press
the required key.
When you press FN twice, it locks FN
and all entered characters are
numbers or symbols.
Uppercase characters
To enter uppercase characters,
press CAPS, and then press the
required key.
When you press CAPS twice, it
locks CAPS and all entered
letters are uppercase.
Symbol table
Press and hold SYM to display the symbol
table. Alternatively, press SYM repeatedly
after pressing a character to scroll
through a list of alternate symbol choices.
Spacebar
Press to add
a space.
Web
Press to launch
Internet Explorer.
Calendar
Press to launch
your calendar.
Email
Press to open your email.
GPS
Press to open AT&T Navigator.
CAPS
CAPS Lock
FN
FN Lock
14 Chapter 4 Getting started with your HP iPAQ Glisten
Press CAPS key once
Press CAPS key twice
Press FN key once
Press FN key twice
Page 27
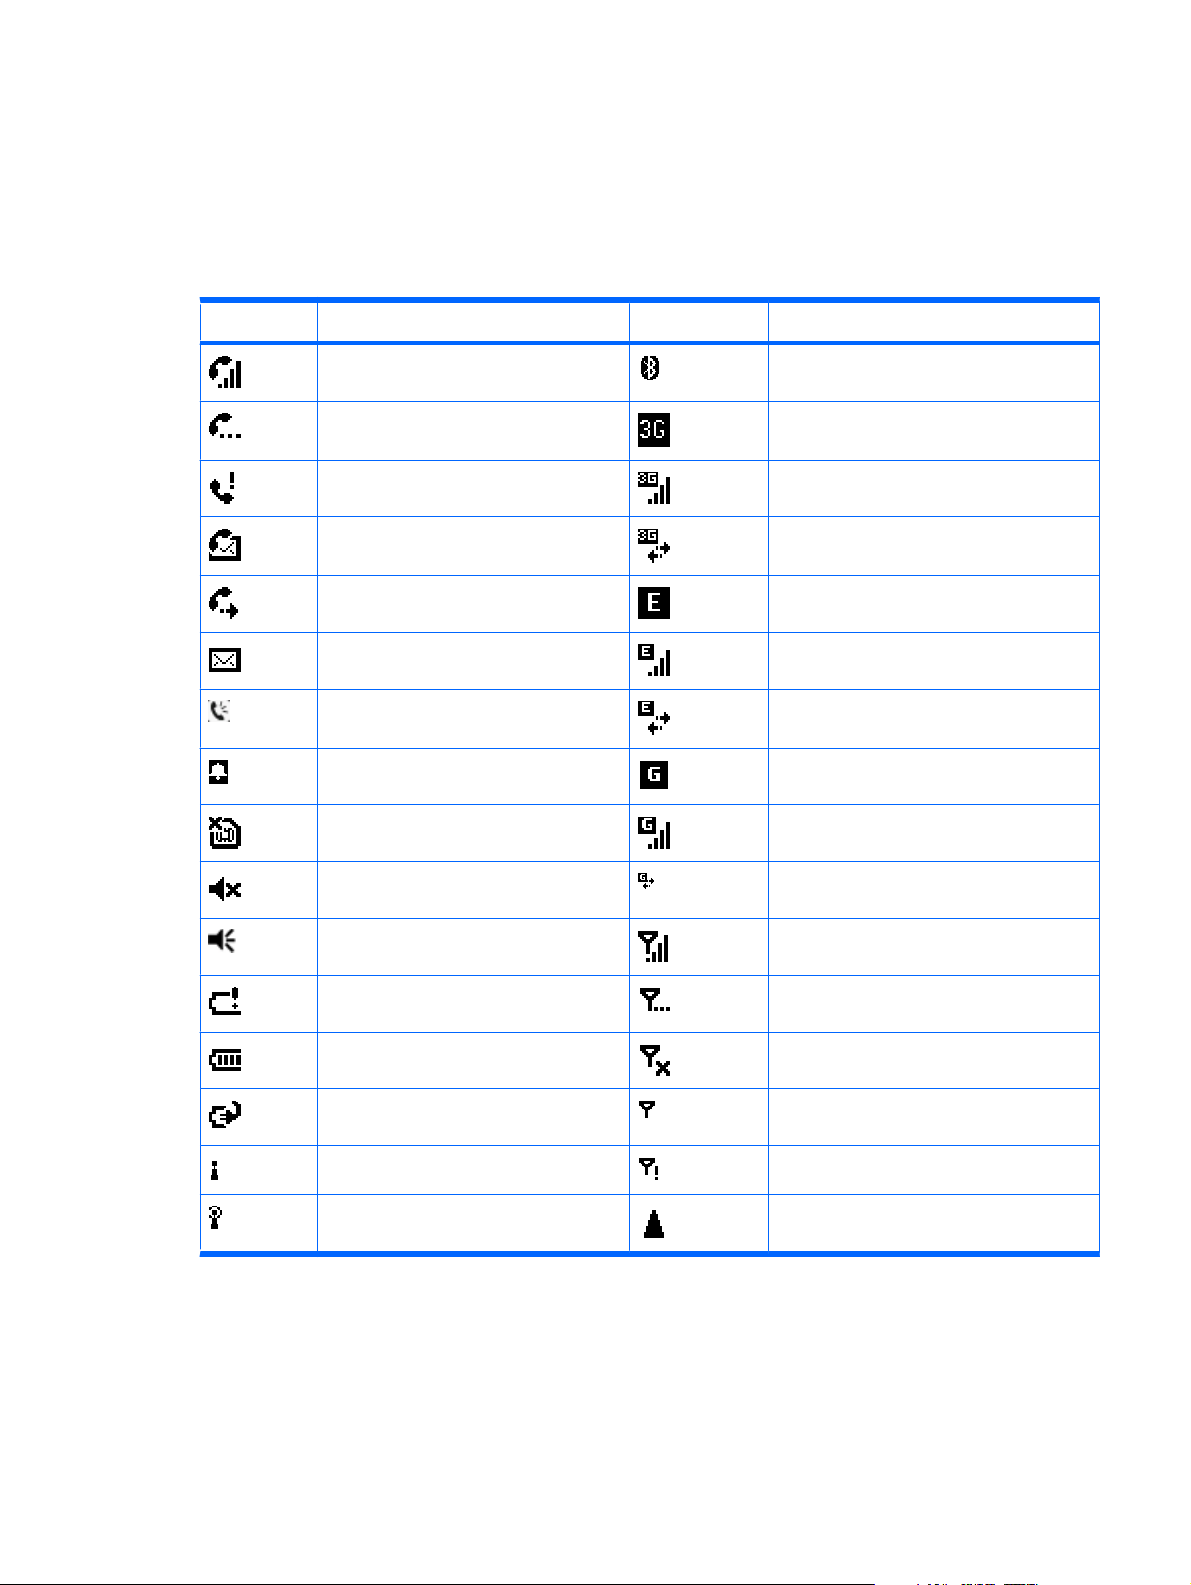
Status icons
Your iPAQ displays icons on the screen to indicate different status information. The following table
shows the common status icons and what they mean.
Icon Status Icon Status
Voice call active Bluetooth on
Call on hold 3G service available
Missed call 3G in use
New voice mail 3G connecting
Call forwarding EDGE service available
New email message EDGE in use
Speakerphone on EDGE connecting
Alarm reminder GPRS service available
No SIM card installed GPRS in use
Silent GPRS connecting
Sound on GSM service only
Battery level low Searching for service
Battery level full Radio off
Battery charging No signal
Wi-Fi on No service
Wi-Fi on and network detected Roaming
Status icons
15
Page 28
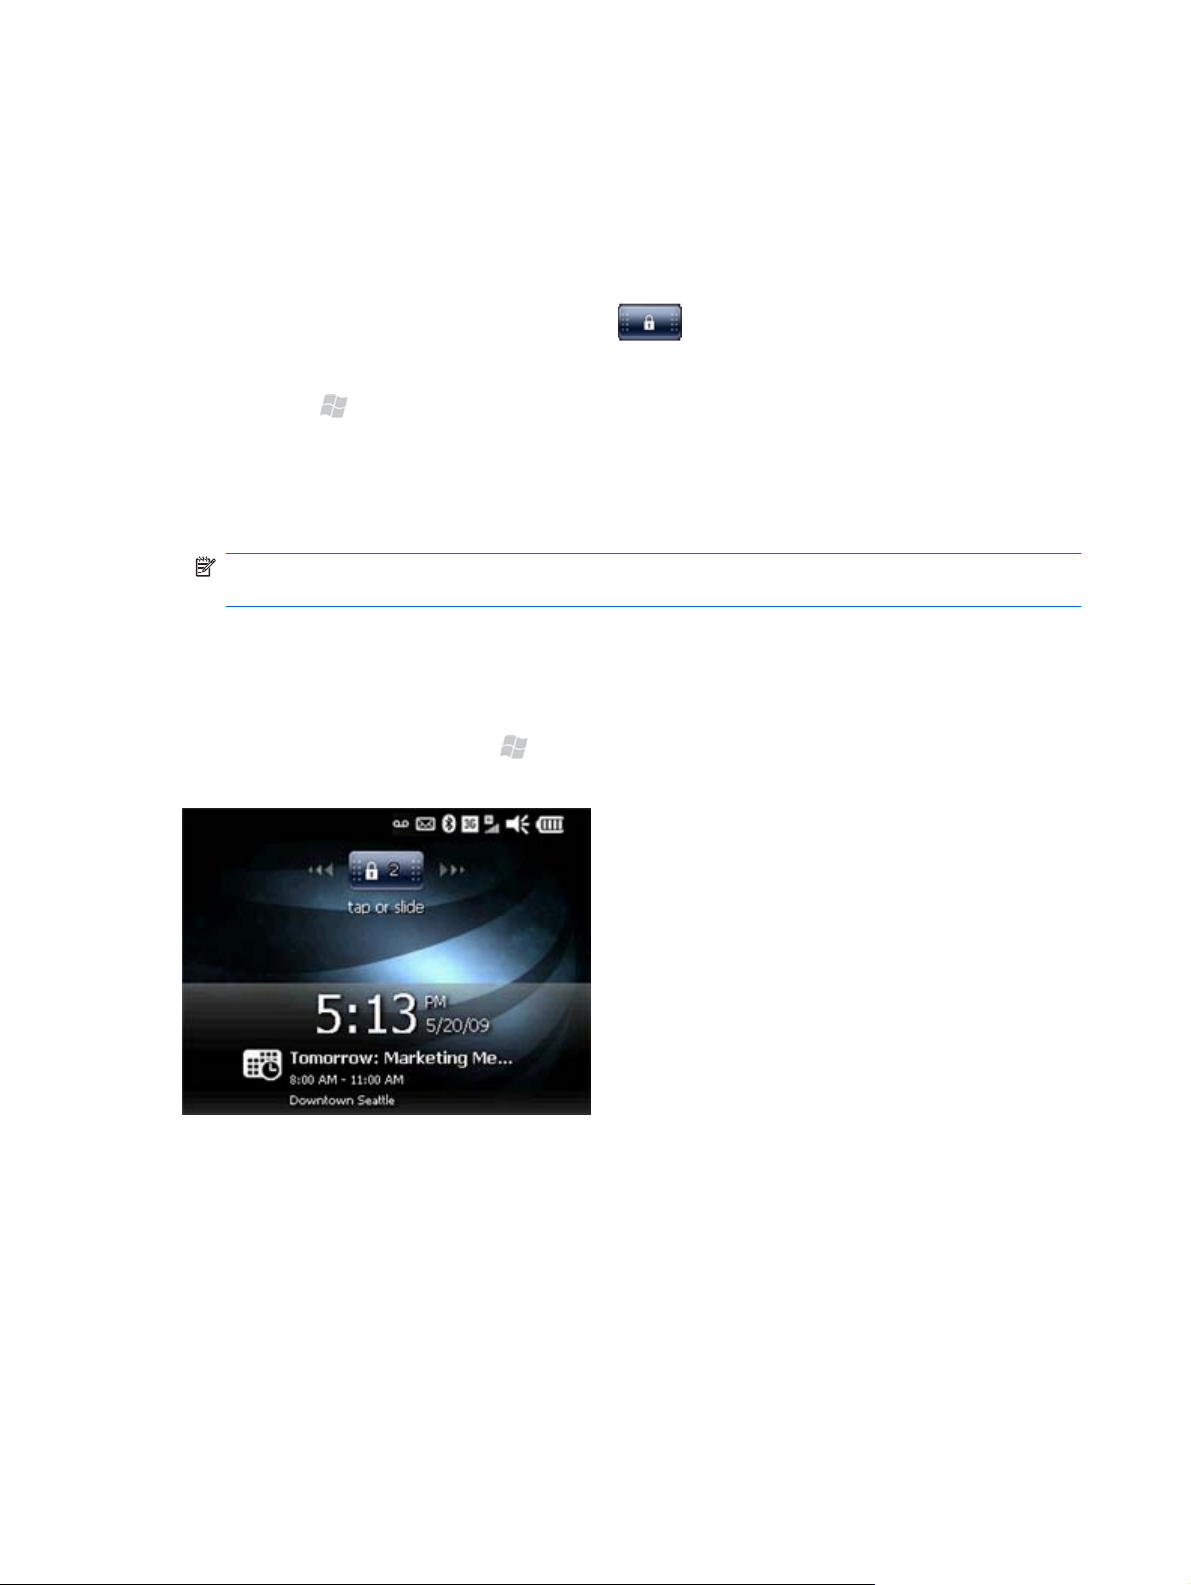
PIN setup and lock screen
You can set up a PIN (Personal Identification Number) to protect your phone. After you set up a PIN
and then lock your phone, you will need to enter the PIN you created to unlock your phone. You can
also select the amount of time that your phone is unused before it automatically locks.
When your phone is locked, you are able to answer incoming calls and view your next appointment.
From the locked screen, you can tap the lock icon
or text message icon is displayed. Tap and slide the icon to go directly to the missed call or message.
1. Press Start
2. On the Password screen, select the Prompt if phone unused for box, and then from the list
select the amount of minutes.
3. In the Password type list, select Simple PIN or Strong alphanumeric.
NOTE: The simple PIN contains numbers only. The strong alphanumeric password type contains
numbers, letters, or symbols.
4. In the Password and Confirm boxes, enter a password, and then tap OK.
5. In the Password dialog box, tap Yes.
▲
To lock your phone, press Start
is displayed.
, and then tap Settings > Lock.
, and then tap Lock. After you lock your phone, the lock screen
, and then the missed call, voicemail, email,
16 Chapter 4 Getting started with your HP iPAQ Glisten
Page 29
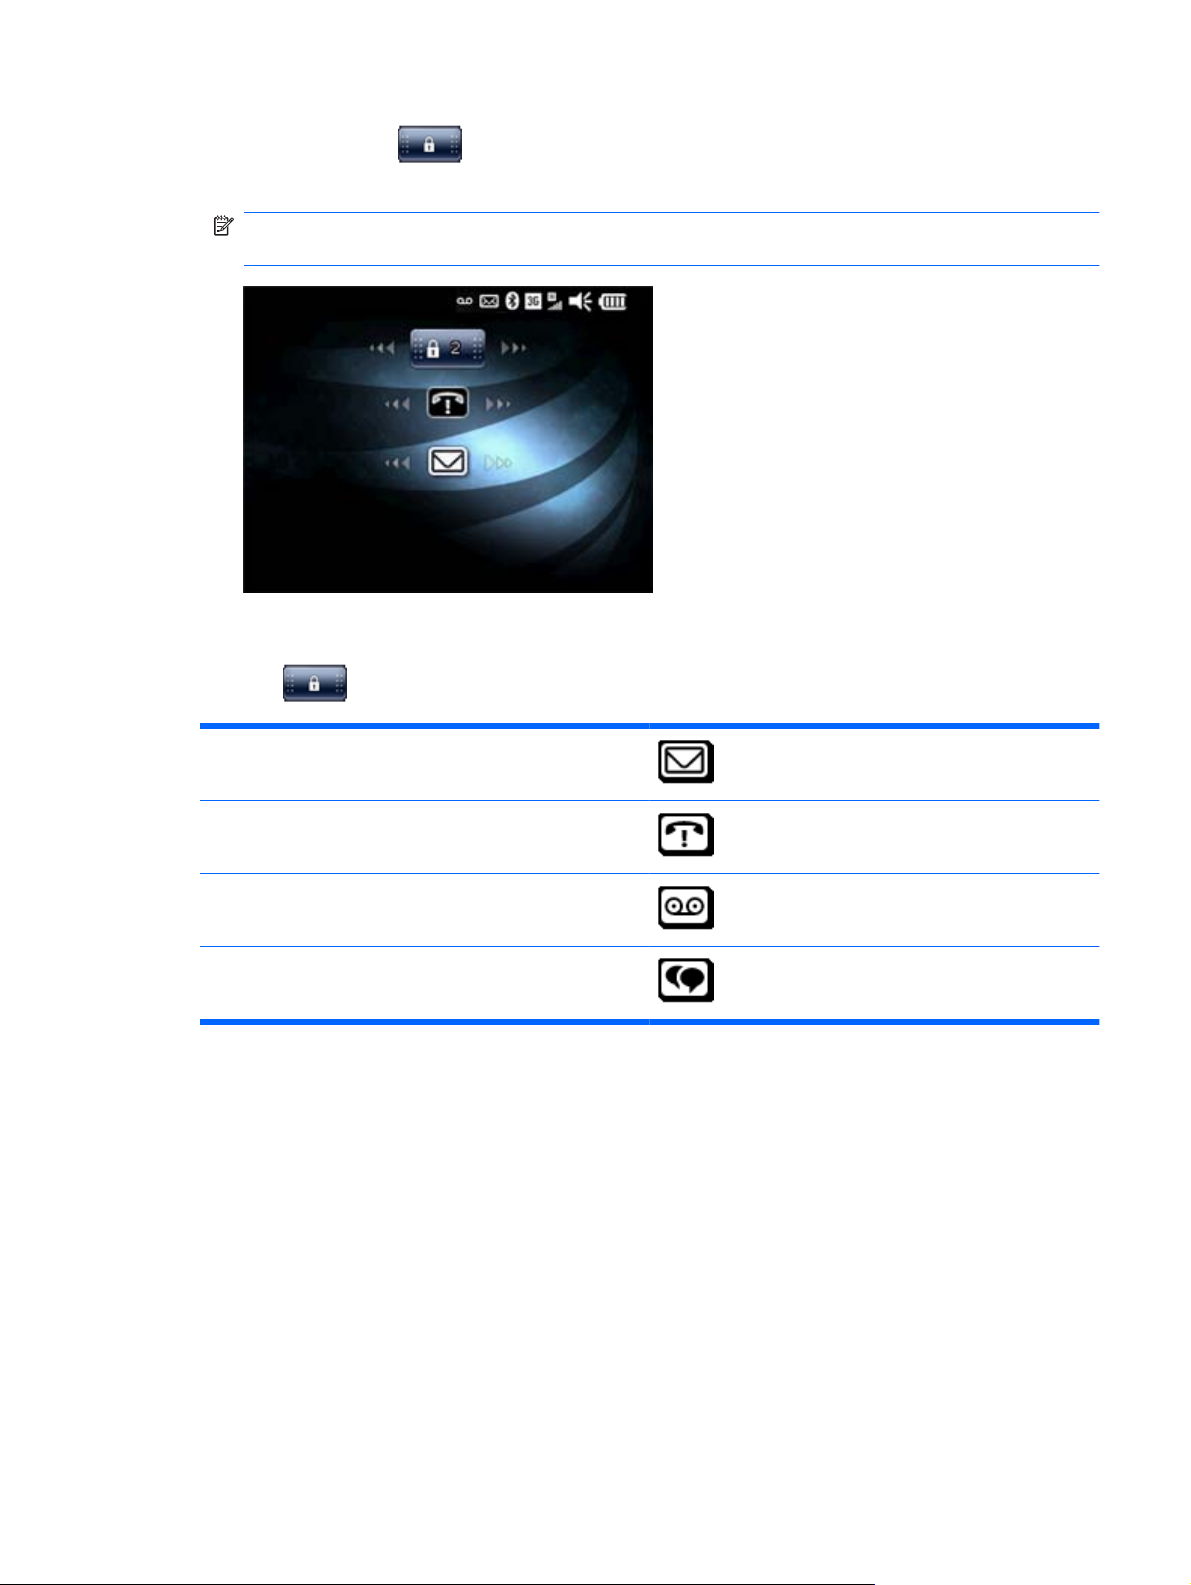
▲
Tap the lock icon
to see if you have a missed call, voicemail, email, or text message. To
view a missed call, voicemail, email, or text message, tap and slide the corresponding icon.
NOTE: When you unlock your iPAQ, you can use the keyboard or on-screen keypad to enter
your PIN or password.
The table below contains the icons that can be displayed when your phone is locked and you tap the
lock icon
New email message
Missed call
New voicemail
New text message
.
PIN setup and lock screen
17
Page 30

5 Make and receive phone calls
Make a call
1. Press Send to open the Phone screen.
If the Today screen is displayed, you do not need to press Send
Use the keypad to dial a phone number, and then press Send
2.
To end the call, press End
3.
NOTE: On the Phone screen, when you enter a number or contact's name, your iPAQ searches
Contacts, Call History, Speed Dial lists, and the SIM card to find a matching name and number.
To go to the Today screen, press End
Redial a number
To redial the last number dialed, press Send twice.
Answer a call
To answer a call, press Send .
When you receive a call, you can either answer or ignore the call. To ignore the call, tap Ignore or
press End
.
before dialing the number.
.
.
.
Mute a call
You can mute your phone microphone during an active call. When you mute a call, the microphone is
switched off. This will prevent the person you are talking to from hearing what you say or any
background noise. However, this will not prevent you from hearing the caller/recipient.
To mute the microphone during a call:
1. Tap Mute on the dialer screen.
2. To disable the mute option, tap Unmute on the dialer screen.
18 Chapter 5 Make and receive phone calls
Page 31

Put a call on hold
During a call, you can put the call on hold and dial another number or answer an incoming call. If you
have more than one call on the line, you can switch between calls.
●
To put a call on hold, tap Hold.
●
To switch between calls, tap Swap.
NOTE: The Swap feature is available only if a call has already been placed on hold.
Hold and Swap are available only on the dialer screen.
Use Call Waiting
Use the Call Waiting feature to be notified of incoming calls when you are on another call. You can
view the phone number of the person calling you, put your current caller on hold, and answer the
incoming call.
To use Call Waiting:
Press Send
1.
2. Press Send
3. Tap Swap to switch between the calls.
to move the current phone call to Call Waiting.
to answer the incoming call or tap Ignore if you do not want to answer the call.
Make emergency calls
You can make calls to emergency service numbers, even when you have locked your SIM card and/or
iPAQ, or when your iPAQ is turned off.
To dial an emergency number:
Press Send
1.
Use the keyboard to dial the local emergency number.
2.
Press Send
3.
NOTE: Emergency numbers vary by country/region. Sometimes an emergency call cannot be placed
due to network, environmental, or interference issues.
.
to place the call.
Make calls using Speed Dial
You can dial phone numbers quickly by assigning speed dial numbers. You can choose speed dial
entries from 2–99. The speed dial entry 1 is by default set up to dial your voicemail.
NOTE: The Speed Dial feature is available only for phone numbers stored in the contact list.
Put a call on hold
19
Page 32

To add a Speed Dial number:
Press Send
1.
From your contacts list, tap a contact to open it.
2.
3. Tap Menu, and then tap Add to Speed Dial.
4. On the Speed Dial screen, in the Location box, select a speed dial number, and then tap OK.
TIP: You can also assign speed dial numbers to web addresses and email addresses that are stored
in the Contacts on your iPAQ.
To make a speed dial call:
Press Send
1.
On the dialer screen, using the keyboard, hold the number you assigned as a speed dial entry.
2.
For two-digit speed dial numbers, press the first digit, release it, and then press and hold the
second digit of the number.
.
.
Make a call from Contacts
To make calls from the contacts list:
1.
Press Send
.
Select or tap the contact name, and then press Send
2.
TIP: If you have a long list of contacts, enter the first few letters of a contact's name. Your iPAQ
searches the entire contact list to display the name.
.
Call voicemail
▲
On the Today screen or dialer screen, using the keyboard, press and hold 1 to automatically call
voicemail.
NOTE: To set up your voicemail, using the keyboard, press and hold 1. Follow the voice
prompts to complete setup.
Use the speakerphone
You can turn the speakerphone on during a call.
▲
On the dialer screen, tap Speaker On to turn the speaker on and the earpiece off.
Make a call from a hyperlink phone number
Use a hyperlinked phone number to quickly dial a phone number from an email or text message. A
hyperlinked phone number is underlined in the same manner as a website address.
20 Chapter 5 Make and receive phone calls
Page 33

To dial a hyperlinked phone number from an email or text message:
Tap the phone number.
1.
Verify that the number is correct and add an area code or country code if needed.
2.
3. Tap Call or press Send
to dial the number.
Dial international numbers
Press Send
1.
2. On the dialer screen, using the keyboard, press and hold 0 until the plus (+) sign appears.
Using the keyboard, dial the country code and phone number.
3.
NOTE: You can also insert a plus (+) sign into a contact's phone number for quick dialing.
.
Make a conference call
Press Send
1.
Using the keyboard, dial the required number, and then press Send
2.
3. When you are connected, tap Hold.
4. Dial the second number, and then tap Talk.
5. When you are connected, tap Menu > Conference.
.
.
NOTE: To add more parties to the conference call, dial each number, connect, and then tap Menu
> Conference.
Call history
Call history provides the time and duration of all incoming, outgoing, and missed calls, and presents a
summary of total calls. Also, you can make calls using the call history.
View call history
▲
Press Send
received calls.
NOTE: If you want to quickly view the last 5 incoming, outgoing, or missed calls, press Send
to open up the dialer screen. The calls are displayed above the contact list. Also, on the Today
screen, you can select phone to view missed calls.
Make calls using call history
1. Press Send
2. Select the phone number, and then tap Call, or press Send
, and then tap Keypad > Call History to view the history of all dialed and
, and then tap Keypad > Call History.
to place a call.
Dial international numbers
21
Page 34

View call details
1. Press Send
Tap the phone number or contact name to view the call details.
2.
The date, time, and duration of the call are displayed.
Change the call history view
▲
In the call history list, tap Menu > Filter, and then tap All Calls, Missed, Outgoing, or
Incoming.
TIP: Tap Menu > Call Timers to view call durations. The All Calls timer cannot be reset.
Clear your call history
▲
In the call history list, tap Menu > Delete All Calls to clear your entire call history. To delete a
single call, select a call, and then tap Menu > Delete.
, and then tap Keypad > Call History.
Set up Call Forwarding
If you cannot take calls or do not want to receive certain types of calls, you can set your device to
forward incoming calls directly to your voicemail or to another phone number. Forwarded calls will not
ring on your device.
1. Press Send
2. Tap Call Forwarding > Get Settings.
Select one of the following options (the device will then download the default settings from the
3.
network):
●
Forward all incoming phone calls—Forward all calls to a phone number you specify.
●
No answer—Forward calls when your phone is not answered.
●
Unavailable—Forward calls when your device is turned off or out of service range.
●
Busy—Forward calls when your phone is busy.
For the option you select, adjust the settings and enter the phone number(s) to which you want to
4.
forward calls.
5. Tap OK.
, tap Menu > Options, and then tap the Services tab.
Set up Call Barring
The Call Barring feature lets you block incoming and outgoing calls.
NOTE: Call Barring does not allow you to block calls from or to specific phone numbers.
1. Press Send , tap Menu > Options, and then tap the Services tab.
2. Tap Call Barring > Get Settings.
22 Chapter 5 Make and receive phone calls
Page 35

3. In Block incoming calls, select one of the following:
●
All calls
●
When roaming
●
Off
4. In Block outgoing calls, select one of the following:
●
All calls
●
International
●
International except to home country
●
Off
5. Tap OK, enter your call-barring password (provided by your service provider), and then tap OK
again.
Set up Caller ID
You can use the Caller ID feature to selectively block who will see your phone number when you call.
For example, you can set up caller ID so that only your contacts can see your number.
1. Press Send
2. Tap Caller ID > Get Settings.
3. Tap Everyone > No one or Only to contacts.
, tap Menu > Options, and then tap the Services tab.
Set up Caller ID
23
Page 36

Voice Commander
Use the Voice Commander application to look up contacts, dial a contact by name, get calendar
information, play and control your music, and to launch applications on your iPAQ.
To start using Voice Commander, press Start
To Say
Call a contact saved in the contact list
Call the last number dialed
Dial a number using speed dial
Compose a message or email
Read messages or emails
Check voicemail
Check call history
View appointments for today, the next day, or the present week
Schedule a call to a specific contact
Create reminders
Record an audio note
, and then tap Apps > Voice Commander.
Call (followed by the name of the contact and home/work/
mobile)
Redial or Callback
Speed Dial (followed by the digit assigned to the phone
number)
Compose SMS / email / audio email (followed by the
contact name)
Read <SMS / email>
Call voicemail
Call History
Today's / Tomorrow's / This Week's appointments
Schedule a Call To (followed by the contact name)
Reminder
Start recording
Find a contact saved in the contact list
View the current time
Open a program
Play music
Pause music
Resume music
Play an existing music file
Play the previous or the next song in the playlist
View the different set of commands
Close the Voice Commander application
Find (followed by the name of the contact)
What time is it?
Start (followed by the program name)
Play Music
Pause
Resume
Play (followed by the name of the music file)
Previous/Next
What can I say?
Goodbye
24 Chapter 5 Make and receive phone calls
Page 37

6 Customize Settings
Name your HP iPAQ Glisten
Use the device name to identify your iPAQ in the following situations:
When synchronizing with a computer.
●
When connecting to a Wi-Fi network.
●
To identify your iPAQ during Bluetooth pairing.
●
NOTE: If you synchronize multiple devices with the same computer, make sure you create a unique
name for each device.
To change the device name:
1. Press Start
2. In the Device name box, enter a name for the device. The device name must begin with a letter.
The device name can include letters from A to Z, numbers from 0 to 9, and the special character
underscore (_). The device name cannot contain spaces.
3. If you prefer, you can add a description to your phone. In the Description box, enter a description.
4. Tap OK.
NOTE: The default device name for your phone is HP_iPAQ_Glisten.
, and then tap Settings > System > About > Device ID tab.
Enter owner information
Enter your personal information, such as your name and address, on your iPAQ so that it can be
returned if it is lost or misplaced.
1. Press Start
2. On the Identification tab, enter your personal information.
3. On the Notes tab, enter your comments or any text that you want to display on the screen when
you turn on your device.
, and then tap Settings > Personal > Owner Information.
Name your HP iPAQ Glisten
25
Page 38

4. On the Options tab, select the type of information you want to display on the screen when you
turn on your device, and then tap Identification information and/or Notes.
5. Tap OK.
Set the time
In most situations, your phone clock will automatically synchronize with the cell network, even as you
travel to different time zones. If you need to manually set the time, follow the procedure below.
1. Press Start
Specify if you are in your home country or abroad.
2.
●
Select Home when you are in your home country.
●
Select Visiting when you are traveling.
Change the time zone, local time, and date as needed.
3.
4. Tap OK.
, and then tap Settings > Clock & Alarms.
Change regional settings
Specify the display formats for numbers, currency, time, and date in regional settings.
NOTE: Changing the region automatically changes the related settings. If you want to, you can
further customize them after that.
To change the regional settings:
1. Press Start
2. In the Regional Settings screen, tap the Region, Number, Currency, Time, or Date tab,
and then change the settings.
, and then tap Settings > System > Regional Settings.
3. After you have finished changing the regional settings, tap OK.
Adjust volume
You can adjust the system volume (including notification sounds and alarms) and phone ringer volume.
To adjust the system volume, press up or down on the volume control on the side of your phone.
●
●
To change the ringer volume, press up or down on the volume control to view the Volume dialog
box. In the Volume dialog box, slide the phone volume up or down.
Customize ring tone and notification sounds
Change the ring tone and system sounds for incoming calls, alerts, and message notification.
26 Chapter 6 Customize Settings
Page 39

To change ring tone and ring type:
1. Press Send
2. Select a ring type from the Ring type list.
3. Select a ring tone from the Ring tone list.
NOTE: To play a ring tone, tap play to the right of the Ring tone list.
4. Tap OK.
To change notification sounds:
1. Press Start
2. On the Sounds tab, select the items that you would like to enable sound for.
3. On the Notifications tab, in the Event list, tap an event name, and then choose how you want
to be notified by selecting the appropriate check boxes. You can choose from several options,
such as a special sound, a message, flashing light, or vibrate.
, and then tap Menu > Options.
, and then tap Settings > Sounds & Notifications.
Customize your screen
You can customize your iPAQ screen settings—correct screen alignment problems, smooth font edges,
and adjust the text size to suit your requirements.
To correct screen alignment:
1. Press Start
2. On the Alignment tab, tap Align Screen.
Follow instructions on the screen using the stylus.
3.
4. Tap OK.
To smooth font edges:
1. Press Start
2. Select the Enable ClearType check box.
3. Tap OK.
To adjust text size:
1. Press Start
Move the slider on the screen to make the text size larger or smaller.
2.
, and then tap Settings > System > Screen.
, and then tap Settings > System > Screen, and then tap the ClearType tab.
, and then tap Settings > System > Screen > Text Size.
3. Tap OK.
Customize your screen
27
Page 40

To adjust the brightness of the display:
1. Press Start
2. Select the brightness level from the On Battery and On Power drop-down lists.
3. Tap OK.
NOTE: Setting the brightness level as Auto will turn on the light sensor. Your iPAQ will automatically
adjust the screen brightness depending on the surrounding light conditions.
To turn on the key light:
1. Press Start
2. Select the Turn on key light for when a key is pressed check box.
Select an option from the drop-down list.
3.
4. Tap OK.
To dim the backlight:
1. Press Start
External Power tab.
, tap Settings > System > Backlight, and then tap the Brightness tab.
, and then tap Settings > System > Backlight, and then tap the Key Light tab.
, tap Settings > System > Backlight, and then tap the Battery Power tab or
2. Select the Turn off backlight if device is not used for check box, and then select a time
limit from the list.
3. Tap OK.
NOTE: On the Battery Power or External Power tab, clearing the Turn off backlight if
device is not used for check box will keep the backlight on at all times and will drain the battery.
Customize your Today screen
You can customize your Today screen to fit your preferences. You can select themes and change the
background image.
To select a new theme for your iPAQ:
1. Press Start
2. On the Appearance tab, in the Select a theme for your device list, tap a theme.
3. Tap OK.
, and then tap Settings > Today.
28 Chapter 6 Customize Settings
Page 41

To change the background screen:
1. Press Start
2. On the Appearance tab, select the Use this picture as the background check box.
3. Tap Browse, and then select the picture you want to set as the background.
4. Tap OK.
, and then tap Settings > Today.
Change the power management settings
In the power settings on your device, you can view remaining battery power and change the amount of
time before your phone turns off. Also, you can disable USB charging when your phone is connected to
a laptop or other device. For example, when you connect your phone to a laptop running on battery
power, you may not want to drain the laptop battery to charge your phone.
1. Press Start
2. Tap the Advanced tab. In the On Battery Power or On External Power sections, select
the Turn off device if not used for check box, and then select the time duration.
3. Tap USB Charging and select the Use USB Charging check box to enable USB charging.
Select any of the following options:
, and then tap Settings > Power. The Main tab shows remaining battery power.
●
Fast Charging—Uses more power to quickly charge your phone.
●
Slow Charging—If you are charging from a laptop battery, you may want to charge your
phone slower to preserve the laptop battery.
NOTE: Clearing the Turn off device if not used for check box on the Advanced tab will keep
your iPAQ on at all times and drain the battery. For more information on how to make the battery last
longer between charges, see
Battery saving tips on page 37.
Change the power management settings
29
Page 42

Remove programs
You may want to remove unused programs from your iPAQ to create more available storage space.
1. Press Start
2. Tap the program you want to remove, and then tap Remove.
3. In the Remove Program warning dialog box, tap Yes.
NOTE: You can remove only the programs that you have installed after you purchased your iPAQ.
You cannot remove the default programs.
Reinstall programs
If you synchronized your iPAQ with your computer using ActiveSync or Windows Mobile Device
Center, you may be able to reinstall programs removed from your phone. Connect your phone to your
computer using the USB sync cable.
If you are using ActiveSync:
●
On your computer, after ActiveSync starts, click Tools > Add/Remove Programs. In the
program list, select the program you want to reinstall, and then click OK to start installation.
If you are using Windows Mobile Device Center:
●
On your computer, after Windows Mobile Device Center starts, click Programs and Services
> More > Add/Remove programs. In the program list, select a program you want to
reinstall, and then click OK to start installation.
, tap Settings > System > Remove Programs.
30 Chapter 6 Customize Settings
Page 43

7 Manage your HP iPAQ Glisten
Secure your HP iPAQ Glisten
Depending on your needs, you have several different security options available to you:
●
SIM PIN prevents unauthorized use of your SIM card. When the SIM card is locked, the phone
cannot be used to make or receive phone calls, or use the data connection. If your phone is lost,
and the SIM card is removed, the PIN prevents it from being used in another phone.
● Keyboard lock does not use a password or PIN, and prevents accidental dialing.
●
Device lock with a PIN allows you to create a simple PIN or strong password to protect your
iPAQ from unauthorized access.
Change the SIM PIN (Personal Identification Number)
The SIM PIN helps to prevent someone from making unauthorized phone calls from your iPAQ. Also, if
your SIM card is removed from your phone, and someone else tries to use it in another phone, the SIM
card cannot be used without entering the PIN.
After you create and activate a SIM PIN, when you turn on your phone you must enter the PIN before
making or receiving phone calls or accessing the data network.
NOTE: To change the PIN, you need to enter the default PIN first. The default SIM PIN is provided by
AT&T.
To change the SIM PIN:
1. Press Start
2. In the PIN Security section, select the Require PIN when phone is used check box. Enter
the default SIM PIN provided by AT&T, and then tap Enter.
3. In the PIN Security section, tap Change PIN.
4. Enter your old PIN, and then tap Enter.
5. Enter your new PIN (4–8 digits long), and then tap Enter. Reenter your new PIN, and tap Enter.
6. Tap OK.
, tap Settings > Personal > Phone, and then tap the Security tab.
Secure your HP iPAQ Glisten
31
Page 44

NOTE: You can place emergency calls at any time, without entering a PIN.
If you enter an incorrect PIN three times in a row, the SIM will be locked. Contact AT&T to reset your
PIN and unlock the SIM.
To disable the SIM PIN:
1. Press Start
2. In the PIN Security section, clear the Require PIN when phone is used check box. Enter
the SIM PIN, and then tap Enter.
3. Tap OK.
, tap Settings > Personal > Phone, and then tap the Security tab.
Lock the keyboard
Keyboard lock prevents accidental dialing or launching a program. This may be useful in cases where
you are carrying your iPAQ in your pocket or backpack.
To lock your keyboard:
▲
Press Start
To unlock your keyboard:
▲
On the lock screen, tap and slide the lock icon
, and then tap Lock.
left or right.
NOTE: When you unlock your iPAQ, you can use the keyboard or on-screen keypad to enter your
PIN or password.
Lock your HP iPAQ Glisten using a PIN
See PIN setup and lock screen on page 16.
32 Chapter 7 Manage your HP iPAQ Glisten
Page 45

File Explorer
Use File Explorer to view, copy, move, or delete the files stored on your iPAQ or storage card. You can
also create new folders to organize your files.
To Open File Explorer and create a new folder:
1. Press Start
NOTE: To navigate to a different top-level folder, tap My Documents at the top of the screen,
and then tap My Device.
2. To create a new folder, tap Menu > New Folder.
Using the keyboard, enter a new name for the folder, and then press the Center Select key.
3.
NOTE: To rename a folder, select the folder, and then tap Menu > Rename.
To view the contents of your storage card:
1. Press Start
2. At the top of the File Explorer screen, tap the down arrow, and then tap Storage Card.
, and then tap File Explorer. The default folder, My Documents opens.
, and then tap File Explorer.
File Explorer
33
Page 46

Task Manager
The task manager allows you to view all the tasks that are currently running on your iPAQ. You can
switch between tasks, end a task, or end all tasks. The amount of memory used by each task is included
in the Task Manager list.
To open the Task Manager, press Start
To… Do This…
Close a program
Open a program that is running in the memory
Close all open programs
View all programs running in the memory
View all processes running in the memory
Change the sorting order
Refresh the list
Close Task Manager
, tap Tools > Task Manager.
Tap the program, and then tap End Task.
Tap the program, and then tap Menu >
Switch To.
Tap Menu > End All Tasks.
Tap Menu > View > Applications.
Tap Menu > View > Processes.
NOTE: You cannot end running processes.
Tap Menu > Sort By, and then tap
Memory, CPU, or Name.
TIP: You can also tap the column name at
the top to sort.
Tap Menu > Refresh.
Tap Menu > Exit.
NOTE: Programs running in the background are not displayed in the Task Manager list. These
programs use processor power and memory.
TIP: If your iPAQ appears sluggish or slow, open the Task Manager and close applications not in use.
34 Chapter 7 Manage your HP iPAQ Glisten
Page 47

SIM Manager
Using the SIM Manager, you can copy the SIM contacts to your phone or copy phone contacts to your
SIM card, in addition to other tasks.
To open the SIM Manager, press Start
To… Do This…
Create a contact
View contact details
Edit contact details
Delete a contact
Select all contacts
Copy a contact to the phone
Copy a contact from the phone to your SIM card
Copy all contacts from the phone to your SIM card
Call a contact
Send a message to a contact
, and then tap Tools > SIM Manager.
Tap New.
Select the contact, tap Options > Open.
Select the contact, tap Options > Edit.
Select the contact, tap Options > Delete > Yes.
Tap Options > Select All.
Select the contact, tap Options > Copy to Contacts.
Tap Options > Contacts to SIM, and then select the
contact you want to copy.
Tap Options > Contacts to SIM > Copy. Next, tap
Menu > Check All, and then tap Copy.
Select the contact, tap Options > Dial Selected. If
more than one number exists for a contact, select the
required number, tap Options > Dial Selected.
Select the contact, tap Options > Send SMS.
Store your personal mobile number on the SIM card
Close SIM Manager
Tap Options >
your mobile number, and then tap Done.
Tap Options > Quit.
My Mobile Numbers > Edit. Enter
SIM Manager
35
Page 48

Backup your phone using Sprite Backup
Sprite Backup is a robust utility that helps to prevent data loss by creating a backup of files and settings
for your Windows phone. You can create a customized backup that includes only the files and settings
that you prefer to save. In addition to backing up data, you can use Sprite Backup to transfer data
between Windows Mobile 6.1 or 6.5 devices.
To open Sprite Backup:
▲
Press Start
NOTE: To get detailed information about how to use Sprite Backup, tap Menu > Help.
, and then tap Apps > Sprite Backup.
Update your phone using AT&T Updates
Using the AT&T Updates application, you can download the latest software updates for your phone.
This includes updates to the Windows Mobile operating system and applications installed on your phone.
1. Press Start
2. Tap Check.
36 Chapter 7 Manage your HP iPAQ Glisten
, and then tap Settings > System > AT&T Updates.
Page 49

Battery saving tips
To conserve battery power, take a look at the following tips:
●
Turn off Bluetooth when not in use. Press Start
uncheck Turn on Bluetooth, and then tap OK.
Turn off Wi-Fi when not in use. Press the Wi-Fi button on the top of your iPAQ.
●
●
Adjust power settings. Press Start
Turn off device if not used for box, and then from the list, select a time limit.
, tap Settings > Bluetooth > Mode tab,
, tap Settings > Power. On the Advanced tab, select the
●
Adjust backlight. Press Start
tab, select the Turn off backlight if device is not used for box, and then from the list,
select a time limit.
●
Adjust how often your iPAQ downloads email. Press Start
> Schedule. To save battery power, adjust the schedule to receive email less often.
NOTE: If your battery completely discharges, you may lose data that has not been saved on your iPAQ.
, tap Settings > System > Backlight. On the Battery Power
, tap Tools > ActiveSync > Menu
View hardware and software information about your HP iPAQ Glisten
Using the HP Device Information application, you can view your iPAQ serial number, operating system
information, and other information about memory, display, system, camera, keyboard, Bluetooth, WiFi, GSM, and GPS.
To open the Device Information application:
▲
Press Start
technical information.
, tap Settings > System > Device Information. Click on a tab to view
To view the serial number:
▲
In the Device Information application, tap the Identify tab.
To view the model number:
▲
In the Device Information application, tap the System tab.
If your phone is turned off or you are unable to turn on your phone, you can view the serial number
and model number printed under the battery of your iPAQ:
Remove the battery cover.
1.
Remove the battery.
2.
Read the label attached to the back of your iPAQ under the battery.
3.
Battery saving tips
37
Page 50

NOTE: You can also view hardware and software information about your iPAQ here: press Start ,
and then tap Settings > System > About.
38 Chapter 7 Manage your HP iPAQ Glisten
Page 51

8 Set up your email accounts
Overview
Your phone is capable of accessing your personal email messages and your corporate email
messages. You can set up multiple email accounts, all accessible from the Today screen email section.
When you set up corporate email, you may need to talk to your company’s IT administrator to get setup
information such as the Microsoft Exchange server name and settings.
NOTE: To send and receive email over your wireless data connection, you need a data plan.
Set up IT managed corporate email
To set up IT managed corporate wireless email, you will need an Exchange server address from your
corporate IT organization. Contact your IT administrator for more information about Microsoft
Push.
Microsoft Direct Push provides wireless access to your corporate email, contacts, calendar, and tasks
using your Microsoft
to activate a PDA data plan on your AT&T account before using Microsoft Direct Push.
To set up your corporate Exchange Server email on your device, you will need to obtain the
1.
following from your IT administrator:
Domain
●
Server address
●
Your corporate username
●
Your corporate password
●
2. If you have the required information available press Start
3. Once ActiveSync opens, tap Menu > Add Server Source, and then enter your credentials.
NOTE: When you sync your phone to your company’s exchange server, your company may
apply a policy that disables text messaging. When text messaging is disabled, you are unable to
receive text messages, including messages regarding your AT&T account status. For example, you
can dial *646# from your phone, and you will be sent a text message with the remaining minutes
in your plan. If you are experiencing this issue, contact your IT administrator.
®
Exchange Server. Contact your IT administrator for setup instructions. You need
, and then tap Tools > ActiveSync.
®
Direct
Overview
39
Page 52

NOTE: If your phone is lost or stolen, you or your IT department may initiate a remote wipe.
When your phone is remotely wiped, any voice calls in progress will be terminated, except for an
emergency call.
Set up personal email
You can set up your personal email using this standard process.
1. Press Start
2. On the Messaging screen, tap Setup E-mail.
3. On the E-mail Setup screen, enter your email address and password, and then tap Next.
4. On the Settings found for screen, tap Next.
5. In the Your name box, enter your name, and then tap Next.
NOTE: If you want to change the account display name, enter a new account name in the
Account display name box.
6. On the Setup is complete screen, in the Automatic Send/Receive list, select how often you
want to have your email synchronized to your device. Tap Finish. Your email will now download
to your device.
NOTE: Your iPAQ can detect personal email settings for most common email service providers.
If it does not detect your settings automatically, please refer to your email provider’s website for
server information and security settings.
, and then tap E-mail.
Delete an account
1. Press Start , and then tap E-mail > Menu > Options.
2. Tap and hold the account name, and then tap Delete.
NOTE: You cannot delete your default text message or multimedia message account.
40 Chapter 8 Set up your email accounts
Page 53

9 Send and receive email messages
Overview
Each messaging account has a set of folders with five default messaging folders:
●
Deleted Items
●
Drafts
●
Inbox
●
Outbox
●
Sent Items
The messages you receive and send through the account are stored in these folders. You can also
create additional folders for each account.
Send an email message
1. On the Today screen, scroll to e-mail, scroll left or right, and then tap an email account.
2. Tap Menu > New.
3. In the To box, enter the email address of one or more recipients, separated with a semicolon. To
add a contact, tap Menu > Add Recipient.
NOTE: If you are synchronizing your phone to a corporate account using Exchange, you can
add a contact from your company directory. In the Contacts list, tap Company Directory,
enter a full or partial name, email address or office location, and then tap Search. In the search
list, tap the contact's name.
4. Tap the Subject box, and then enter a subject.
Tap the body of the email, and then enter a message.
5.
TIP: To quickly add text to your email message, tap Menu > My Text, and then tap the
preferred text. To add your own text to the My Text list, in the My Text list, tap Edit My Text
Messages.
6. To check the spelling, tap Menu > Spell Check.
7. Tap Send.
Overview
41
Page 54

TIP: To set the email message priority, tap Menu > Message Options. In the Priority list, select
Low, Normal, or High.
NOTE: If you are working offline, email messages move to the Outbox folder and are sent the next
time you connect.
Reply to or forward a message
1. Tap the message to open it, tap Menu > Reply/Forward, and then tap Reply, Reply All, or
Forward.
TIP: If you only want to reply, after you open the message, at the bottom of the screen, tap
Reply.
2. Enter your message.
3. To check the spelling, tap Menu > Spell Check.
4. Tap Send.
Add an attachment to a message
1. In an open email message, tap Menu > Insert, and then tap Picture, Voice Note, or File.
To add the attachment, tap the picture, voice note, or file.
2.
NOTE: Embedded files cannot be attached to messages.
Open attachments
In your Inbox, an email attachment is displayed as a paperclip next to the email message. When
you open the message, the attachment is displayed below the subject line.
To download the attachment:
▲
Open the email message, and then tap the attachment. The attachment will start downloading.
TIP: Embedded images in the message body are not displayed. To download and view the images,
at the end of the email message, tap Get the rest of this message.
Embedded pictures and objects cannot be received as attachments.
To store attachments on a storage card rather than on the iPAQ, press Start
On the Select an Account screen, tap Menu > Options > Storage tab, and then select the
When available, use this storage card to store attachments box.
, and then tap E-mail.
42 Chapter 9 Send and receive email messages
Page 55

Respond to meeting requests
In your email Inbox folder, tap the meeting request to open it.
1.
2. To accept the meeting request, tap Accept.
3. To decline or accept the meeting tentatively, tap Menu, and then tap Decline or Tentative.
Create or change a signature
1. Press Start , tap E-mail, and then tap an email account.
2. Tap Menu > Tools > Options > Signatures.
3. In the Select an account list, select an email account.
4. Select the Use signature with this account box.
5. Select the Use when replying and forwarding box if required.
6. In the text box, enter a signature, and then tap OK.
TIP: To stop using a signature, clear the Use signature with this account box.
NOTE: You can use a different signature with each messaging account.
Keyboard shortcuts
From any messaging folder you can tap and hold a shortcut key on the keyboard to quickly perform the
tasks below.
Key Task
H List shortcuts
AReply all
RReply
K Mark messages as read or unread
FFlag
MMove
OForward
D Delete
L Download message
S Send and receive
Respond to meeting requests
43
Page 56

10 Send and receive text messages
and multimedia messages
Overview
Each messaging account has a set of folders with five default messaging folders:
●
Deleted Items
●
Drafts
●
Inbox
●
Outbox
●
Sent Items
The messages you receive and send through the account are stored in these folders. You can also
create additional folders for each account.
44 Chapter 10 Send and receive text messages and multimedia messages
Page 57

Send a text message
Text messaging allows you to send short messages composed of text and numbers. When you open up
or send a new text message, the message is in conversation view. This view is similar to instant messaging
—you can see the messages you sent and the replies. A single text message cannot be longer than 160
characters.
NOTE: Messages longer than 160 characters are sent as multiple text messages. A character count is
visible when you compose a text messages. The character count also shows how many text messages
are created when your message is sent.
1. On the Today screen, scroll to text, and then tap Compose.
2. To add a contact, tap Menu > Add Recipient, and then tap a contact. Or, enter the phone
numbers of one or more recipients, separating them with a semicolon.
In the message body, enter your message.
3.
TIP: To quickly add text to your message, tap Menu > My Text, and then tap the preferred
text. To add your own text to the My Text list, in the My Text list tap Edit My Text Messages.
4. To check the spelling, tap Menu > Spell Check.
5. Tap Send.
NOTE: When you sync your phone to your company’s exchange server, your company may apply a
policy that disables text messaging. When text messaging is disabled, you are unable to receive text
messages, including messages regarding your AT&T account status. For example, you can dial *646#
from your phone, and you will be sent a text message with the remaining minutes in your plan. If you
are experiencing this issue, contact your IT administrator.
Send a text message
45
Page 58

Send a multimedia message
A multimedia message is sent to and from a mobile phone, and includes a picture or video, sound clip,
and a short text message.
NOTE: You might incur extra costs when sending multimedia messages depending on your service plan.
1. Press Start , and then tap E-mail > Text/MMS > Menu > New > MMS.
2. To add a picture or video, tap the Insert
picture/video box, and then tap a
picture or video.
3. To enter text, tap the Insert text here
box. Enter a text message.
Also, at the bottom of the text box, you
can tap an icon to insert emoticons
Internet Explorer Favorites
(predefined text), contact information
from your contacts list
appointment from your calendar
, My Text
, and an
,
.
When you are finished, tap Done.
4. To add an audio clip, tap Insert audio, and then tap an audio file.
5.
To preview the multimedia message, tap the play icon
TIP: To create your own message template, after you create a message, tap Template > Save as
Template. To use an available text-message template, tap Menu > Template > Select a
template > OK, and then tap a template. To set the default template as blank, select the Always
choose custom box.
at the bottom left of the screen.
46 Chapter 10 Send and receive text messages and multimedia messages
Page 59

11 Manage your contacts
Add contacts
You can add contacts to your phone and/or to your SIM card. A SIM contact is usually limited to a
name and one phone number. Outlook contacts can contain detailed contact information and multiple
numbers. When you sync your iPAQ to an Exchange server, the Outlook contacts are backed up.
Add an Outlook contact:
1. Press Start
2. Tap Menu > New > Outlook Contact.
3. Enter contact information, and then tap OK.
Copy an Outlook contact to your SIM card:
1. Press Start
2. Select a contact, tap Menu > Copy Contact, and then tap To SIM.
Copy all SIM contacts to your phone:
1. Press Start
> All.
2. Tap Menu > Copy Contact > To Contacts.
NOTE: You can only copy SIM contacts to your phone using an AT&T 3G SIM card.
Add a contact from call history:
1. Press Send
, and then tap Contacts.
, and then tap Contacts.
, and then tap Contacts > Menu > Select Contacts
, and then tap Keypad > Call History.
2. Select a call, and then tap Save to Contacts > New Contact > Outlook Contact or SIM
Contact.
3. After you finish adding the contact information, tap Save.
NOTE: If you are filtering your contacts using a particular category, and you create a new contact, it
is assigned to that category by default unless you change it.
Add contacts
47
Page 60

Edit contact information
1. Press Start , and then tap Contacts.
Tap the contact.
2.
3. Tap Menu > Edit, and then enter the changes.
4. When finished, tap OK.
Delete a contact
1. Press Start , and then tap Contacts.
Tap the contact.
2.
3. Tap Menu > Delete Contact or Delete SIM Contact.
4. Tap Yes.
Create and assign a category
You can use categories to organize and group your contacts.
1. Press Start
Do one of the following:
2.
●
For a new contact, create the contact, and then tap the Categories box.
●
For an existing contact, open the contact, tap Menu > Edit, and then tap the Categories
box.
NOTE: You cannot assign categories to SIM contacts.
3. Select the Business, Holiday, Personal, or Seasonal box.
4. Tap OK.
NOTE: To create a new category, tap the Categories box, tap New. Enter a new category name,
and then tap Done. The new category is assigned automatically to the contact.
Find a contact
First, open your contacts list. Press Start , and then tap Contacts.
NOTE: To search for a contact by entering a name or number, or by using the alphabetical index,
you need to go to the name view. If you are not in name view, in contacts, tap Menu > View By >
Name.
, and then tap Contacts.
48 Chapter 11 Manage your contacts
Page 61

You can use the following methods:
●
In the Enter a name box, enter a partial name or phone number. To show all the contacts, tap
the Enter a name box and clear the text.
At the top of the contact list, tap the alphabetical index.
●
●
Tap Menu > Filter. Tap a category to filter your contacts list.
Make a call from Contacts
1. Press Start , and then tap Contacts.
Scroll to the contact name, and then press Send
2.
You can also tap a contact, and then tap Call.
TIP: If your contact list is long, you can enter the first few letters of a contact's name. Your iPAQ
searches the entire contact list to display the name. You can also tap the alphabetical index at the
top of the contact list.
.
Send a text message to a contact
1. Press Start , tap Contacts, and then tap a contact.
2. Tap Menu > Send Text Message.
3. Enter your text message, and then tap Send.
TIP: To check the spelling before you send the text message, tap Menu > Spell Check.
Send an email to a contact
1. Press Start , tap Contacts, and then tap a contact.
Scroll down to view the email address.
2.
3. Above the email address, tap Send e-mail. Tap the email you prefer to use.
4. In the Subject box, enter a subject.
5. Enter a message, and then tap Send.
TIP: To check the spelling before you send the email, tap Menu > Spell Check.
Make a call from Contacts
49
Page 62

Send a contact's information as a vCard
From your contact list, you can send a contact's information to someone else using the vCard format via
a multimedia message. The vCard is sent as an attachment, and can be opened in other email programs.
1. Press Start
2. Tap a contact, tap Menu > Send as vCard.
3. In the To box, enter an email address or phone number. Separate multiple phone numbers and
email addresses with semicolons.
4. In the Subject box, enter a subject. Tap Insert text here, enter a message, and then tap Send.
TIP: If you want to add a picture or video, tap Insert picture/video. To add audio, tap
Insert audio.
, and then tap Contacts.
Add a contact picture
1. Press Start , and then tap Contacts.
2. Tap the contact, and then tap Menu > Edit.
3. Tap Picture, tap a picture of your choice, and then tap OK.
NOTE: To take a picture with the camera and add it to your contact, instead of tapping a
picture, tap Camera. Press the Center Select key to take a picture. The picture is added to the
contact. Tap OK.
TIP: To remove the contact picture, tap the contact. Tap Menu > Edit, and then tap Menu >
Remove Picture.
Assign a ring tone to a contact
1. Press Start , and then tap Contacts.
2. Tap the contact, and then tap Menu > Edit.
3. In the contact information screen, tap Ring tone, and then tap a ring tone.
4. Tap OK.
NOTE: You cannot assign ring tones to SIM contacts.
50 Chapter 11 Manage your contacts
Page 63

Create email and messaging groups
Create your own email or messaging group to easily send an email, text message, or multimedia
message to a group of contacts.
1. Press Start
2. Tap E-mail Group or Messaging Group.
3. In the Group name box, enter a name for your email or messaging group.
4. To add a new contact to the group, tap Add Member, select a contact, and then tap Done.
5. When you are finished adding contacts, tap OK.
, tap Contacts, and then tap New.
Contact list tips
The following is a list of tips and shortcuts for your contact list.
●
To see a list of contacts employed by a specific company or by name, tap Menu > View By >
Name or Company.
To view the shortcut menu for a contact, tap and hold the contact.
●
●
To display more contacts on your phone screen, you can display the name only. Tap Menu >
Options. Tap the Show contact names only box.
Create email and messaging groups
51
Page 64

12 Set alarm clock
You can set up to three different alarms on your phone. With each alarm, you create your own
description and choose the day or days of the week the alarm sounds. Also, you get to select a custom
alarm sound and style.
On the Today screen, scroll to the clock, and then press the Center Select key.
1.
NOTE: Also, you can press Start , and then tap Settings > Clock & Alarms.
2. In the Clocks & Alarms section, tap Description, and then enter a name for the alarm.
To set what day(s) of the week the alarm sounds, tap a day or multiple days.
3.
52 Chapter 12 Set alarm clock
Page 65

Tap the time to open a clock, and then tap and drag the clock hands or use the box below. Tap
4.
OK.
5.
Tap
To activate the alarm, select the box on the left.
6.
NOTE: On the More tab, you can select Sound alarms even when the device is set to
silent or vibrate.
to change the alarm sound and style. In the Play sound list, select a sound.
TIP: To activate snooze, when the alarm is ringing, tap Menu, and then select a snooze time.
Turn off alarm:
▲
Tap Dismiss.
Turn on snooze:
▲
While alarm is sounding, tap Menu, and then select a snooze time.
53
Page 66

To disable an alarm:
On the Today screen, scroll to the clock, and then press the Center Select key.
1.
2. Clear the check box next to the alarm name, and then tap OK.
54 Chapter 12 Set alarm clock
Page 67

13 Manage your calendar
Overview
Use your calendar to schedule appointments, including meetings and other events. You can also
synchronize your work calendar with your iPAQ using Microsoft Exchange. If you do not sync to your
work calendar, you can use the Microsoft MyPhone service to sync your calendar to the web.
▲
To access the calendar, from the Today screen, scroll to calendar, and then press the Center
Select key.
Schedule an appointment
1. From the Today screen, scroll to calendar, and then tap Today.
TIP: On the keyboard, press Calendar to access your calendar.
2. Tap Menu > New
Appointment.
3. Next to Starts, tap the
date and time, and
then select the
appropriate start date
and time.
4. Next to Ends, tap the
date and time, and
then select the
appropriate end date
and time.
5. If you want to add attendees, tap to the right of Attendees, tap Add Required Attendee or
Add Optional Attendee, and then select a contact.
6. Add additional information to the appointment as needed. When you are finished, tap OK.
Overview
55
Page 68

TIP: To attach your own notes to the appointment, tap the Notes tab. When you open the
appointment on your calendar, your notes are displayed.
You may want to assign a category to your appointment. This allows you to filter your calendar
view by a specific category, such as business appointments only. See
View your appointments by
category on page 57.
56 Chapter 13 Manage your calendar
Page 69

View your appointments by category
When you create an appointment, you can add a category. You can choose from the default categories
—Business, Holiday, Personal, and Seasonal—or create your own. Once you have added a category
to your appointments, you can filter your calendar view by a specific category, such as business
appointments.
Add a category to an appointment:
1. From the Today screen, scroll to calendar, and then tap Today.
Tap an appointment to open it.
2.
3. Tap Menu > Edit, and then tap Categories.
4. Select Business, Holiday, Personal, or Seasonal. Tap OK.
TIP: To create your own category, tap New. Enter a new category, and then tap Done.
5. Tap OK again to close the appointment.
View appointments by category:
1. From the Today screen, scroll to calendar, and then tap Today.
2. Tap Menu > Filter, and then tap a category.
View your appointments by category
57
Page 70

Change your calendar view based on your work week
You can adjust your calendar to fit your work week schedule including number of days and the first
day, in addition to choosing the default calendar view.
1. From the Today screen, scroll to calendar, and then tap Today.
2. Tap Menu > Tools > Options.
3. On the General tab, in the Start in list,
select a default calendar view.
4. In the 1st day of week and Week
view lists, select your preferred options.
In Day view, the default view is divided
5.
into 30 minute increments. If you prefer to
view a day in hourly increments, uncheck
the Show half hour slots box.
If you prefer to view the week numbers in
6.
Week or Month view, select the Show
week numbers box.
7. Tap OK.
58 Chapter 13 Manage your calendar
Page 71

Change calendar options
You can change the reminder time before upcoming appointments and the default email account that is
used when you send an appointment request.
1. From the Today screen, scroll to calendar, and then tap Today.
2. Tap Menu > Tools > Options > Appointments tab.
3. Select the Set reminders for new items check box.
4. Select minute(s), hours(s), day(s), or week(s), and then select the duration.
In the show icons section, tap the icon or icons that you do not want displayed.
5.
6. In the Send meeting requests via list, tap the email account that you will be using to send
meeting requests.
7. Tap OK.
Change calendar options
59
Page 72

Update an appointment
1. From the Today screen, scroll to calendar, and then tap Today.
2. Tap the appointment to open it, and then tap Menu > Edit.
NOTE: If the appointment is recurring, you can make changes to a single occurrence—the
meeting you opened up—or to all occurrences. Tap All or One.
3. Make the required changes, and then tap OK.
Cancel an appointment
If you synchronize your phone with your work calendar or other calendar, the appointment that you
cancel is also removed when your phone is synchronized.
NOTE: If the appointment is recurring, you will be prompted to delete the particular appointment you
opened or all occurrences.
1. From the Today screen, scroll to calendar, and then press the Center Select key.
Tap an appointment to open it.
2.
3. Tap Menu > Delete.
4. Tap Yes to delete the appointment.
60 Chapter 13 Manage your calendar
Page 73

14 Create and manage tasks
Overview
Tasks help you create an organized to-do list. For each task you can set a reminder and add it to a
particular category, such as business or personal. You can view your tasks by category or sort your
tasks based on status, priority, subject, start date, or due date. In addition to adding a task description,
you can add your own notes.
Create a task
1. Press Start , and then tap Tools > Tasks.
2. Tap Menu > New Task.
3. In the Subject box, enter a task description.
TIP: You can also tap Tap here to add a new task and enter a task description. To add
detailed information to the task, tap the task, and then tap Edit.
4. Tap Priority, and select High, Normal, or Low.
5. Tap Status, and select Not Completed or Completed.
6. Tap Starts, and in the calendar, tap a date.
Overview
61
Page 74

7. Tap Due, and in the calendar, tap a date.
8. Add additional information to the task as needed. When you are finished, tap OK.
TIP: To attach your own notes to the task, tap the Notes tab. When you open the task, your
notes are displayed.
You may want to assign a category to your task. This allows you to filter your task view by a
specific category, such as business tasks only. See
View your tasks by category on page 63.
62 Chapter 14 Create and manage tasks
Page 75

View your tasks by category
When you create a task, you can add a category. You can choose from the default categories—
Business, Holiday, Personal, and Seasonal—or create your own. Once you have added a category to
your tasks, you can filter your task view by a specific category, such as business tasks.
Add a category to a task:
1. Press Start
Tap a task to open it.
2.
3. Tap Edit, and then tap Categories.
4. Select Business, Holiday, Personal, or Seasonal. Tap OK.
TIP: To create your own category, tap New. Enter a new category, and then tap Done.
, and then tap Tools > Tasks.
5. Tap OK again to close the task.
View tasks by category:
1. Press Start
2. Tap Menu > Filter, and then tap a category.
, and then tap Tools > Tasks.
View your tasks by category
63
Page 76

Show the start and due dates in the task list
1. Press Start , and then tap Tools > Tasks.
2. Tap Menu > Options.
3. Select the Show start and due dates check box, and then tap OK.
Mark a task as complete
1. Press Start , and then tap Tools > Tasks.
In the task list, select the check box next to the task.
2.
To mark a task as complete after you open the task:
1. Tap Edit.
2. In the Status list, select Completed.
NOTE: In the task list, you can also select a task and tap Complete. To activate a completed task,
select the completed task, and then tap Activate.
64 Chapter 14 Create and manage tasks
Page 77

15 Take notes
Overview
The Notes application is a convenient way to take notes during a meeting or conference call, or write
something down that you need to remember later. Notes are stored on your phone and you can add
text, drawings, handwriting, and audio recordings.
To add extra storage space for notes, you can expand your iPAQ memory with a microSD card
purchased separately. Visit your local AT&T wireless store or go to
accessories-store/handheld.
Write a note
1. Press Start , and then tap Tools > Notes.
http://www.shopping.hp.com/
2. Tap New.
Enter text using your keyboard or use the stylus to write text.
3.
4. When finished, tap OK.
NOTE: To easily select a drawing or handwriting, turn off the draw option. Tap Menu >
Draw. To select handwritten text, drag your finger or the stylus across the text.
Overview
65
Page 78

Create a voice note
You can record and send audio notes or memos. You can create a stand-alone recording without text
or you can add a recording to a written note.
Create a stand-alone voice note:
1. Press Start
2. To open the recording toolbar, tap Menu > View Recording Toolbar.
3.
On the recording toolbar, tap record
Speak into the microphone.
4.
When you have finished recording the note, on the recording toolbar, tap stop
5.
, and then tap Tools > Notes.
.
.
66 Chapter 15 Take notes
Page 79

Add a recording to a note:
1. Press Start
2.
Create or open a note, and then tap record
NOTE: If the Recording toolbar does not appear, tap Menu > View Recording Toolbar.
Speak into the microphone.
3.
When you have finished recording the note, on the recording toolbar, tap stop
4.
, and then tap Tools > Notes.
.
.
5. Tap OK.
NOTE: If you create a recording in an open note, this voice note icon is displayed in the note. If
you are creating a stand-alone recording from the notes list, next to the note in the note list, this voice
note icon
You can also create a voice note using the HP Photosmart program and attach the note to a picture.
Attach a voice note to a picture on page 99.
See
is displayed.
Create a copy of a note
1. Start , and then tap Tools > Notes.
2. Select the note, and then tap Menu > Create Copy.
Copy and paste content between notes
You can copy and paste text, handwriting, drawings, and audio recordings between notes.
1. Press Start
Tap a note to open it.
2.
, and then tap Tools > Notes.
Drag your finger or the stylus across the note to select the content you want to copy.
3.
Create a copy of a note
67
Page 80

NOTE: To easily select a drawing or handwriting, turn off the draw option. Tap Menu > Draw.
4. Tap Menu > Copy, and then tap OK to close the note.
NOTE: To copy all content in the note, tap Menu > Select All, and then tap Menu > Copy.
5. Open or create a new note, and then tap Paste.
Take notes during a call
1. During a call, tap Menu > Create Note.
Enter your text.
2.
3. Tap OK.
To access a note you created during a call:
Press Send
1.
2. Tap Keypad to open the dialer screen, and then tap call history
Tap and hold the name or number for the phone call entry containing the note, and then tap
3.
View Note.
A note created during a call can also be accessed from the Notes program. The note title is the contact
name or the phone number you were connected to when writing the note.
Rename notes
1. Press Start , and then tap Tools > Notes.
2. Tap and hold the note, and then tap Rename/Move.
3. In the Name box, enter a new name.
4. Tap OK.
Delete notes
1. Press Start , and then tap Tools > Notes.
to put the call on hold.
.
2. Tap and hold the note, and then tap Delete.
3. Tap Yes.
To delete a recording within a note:
1. Press Start
Open the note with an attached recording.
2.
3. Select the recording icon
68 Chapter 15 Take notes
, and then tap Tools > Notes.
, and then tap Menu > Edit > Clear.
Page 81

16 Use productivity tools
Microsoft® Office Mobile
Your iPAQ includes the Microsoft Office Mobile suite which includes Microsoft Office Word Mobile,
Microsoft Office Excel
Mobile. You can create and edit Word and Excel files, and view PowerPoint files.
®
Mobile, Microsoft Office PowerPoint® Mobile, and Microsoft Office OneNote
Work with Office Mobile Documents
Open a file
There are several ways to open an item such as a Word Mobile document, an Excel Mobile workbook,
a picture, a note, or a PowerPoint Mobile presentation:
●
To open a program, press Start
list, tap the file that you want to open. If you do not see the file in the list, make sure that you have
chosen the correct folder in the folder list (by default, labeled All Folders).
●
To open File Explorer, press Start
then tap the file that you want to open.
From an open email message, tap an attached file that you want to open.
●
NOTE: If the Word document or Excel workbook was previously saved on a computer, data and
unsupported formatting may be lost when you save the file on the device.
, tap Office Mobile, and then tap a program name. In the file
, tap File Explorer. Navigate to the appropriate folder, and
®
You can have only one document, workbook, or note open at a time. When you open a second item of
the same type, the first item is saved and closed automatically.
Find or replace text or data
1. In a document or workbook, tap Menu > Edit > Find/Replace.
2. In Find what box, enter the text you want to find.
Do one of the following:
3.
●
Tap Find to search for the text.
●
Tap Replace to replace the text. In Replace with box, enter the replacement text.
Select the appropriate search options.
●
Microsoft® Office Mobile
69
Page 82

4. Tap Find.
Do one of the following:
5.
●
●
Word and Excel select the first instance of the text in the document and display buttons that let you find
the next instance or replace the text, as you want.
TIP: To limit your search to specific cells in Excel, select those cells before you tap Menu > Edit >
Find/Replace.
Create a file
In the Word Mobile and Excel Mobile programs, you can easily create documents and workbooks.
To find the next instance of the search text, tap Next.
To replace text, tap Replace.
1. Press Start
2. From the program, tap New.
You will see either a blank document or workbook, or a template, depending on what you have
selected as the default template.
Enter text and data.
3.
4. To save the file, tap OK.
NOTE: By default, when you save a new file, a Word document is named after the first several words
in the file; an Excel workbook is named Book1, Book2, and so on. To give the file a meaningful name,
tap Menu > File > Rename/Move, and then enter the name that you want.
Create a template
If the existing templates do not meet your needs, you can create a custom template.
1. Press Start
Open or create a file.
2.
Enter text or information that you want to use in a template.
3.
, tap Office Mobile, and then tap a program name.
, tap Office Mobile, and then tap a program name.
4. Tap Menu > File > Save As.
5. In the Name box, enter a name for the new template.
Do one of the following:
6.
●
For Word, in the Type box, tap Word Template (*.dot).
●
For Excel, in the Type box, tap Excel Template (*.xlt).
7. To make the template available in the list of templates, in Folder, tap Templates. In Location,
tap Main memory.
8. Tap Save.
70 Chapter 16 Use productivity tools
Page 83

TIP: You can also create a new template by modifying an existing template and copying it to the
Templates folder.
Create a document or workbook by using a template
Templates help you save time and ensure consistency by letting you focus on the content instead of the
format of an item.
1. Press Start
2. From the program file list, tap Menu > Options.
Do one of the following to select the template to use:
3.
●
In Word, tap the template in the Default template box.
● In Excel, tap the template in the Template for new workbook box.
4. Tap OK.
5. Tap New, enter your information, and then tap OK.
, tap Office Mobile, and then tap a program name.
Save a copy of a document or workbook
1. In an open document or workbook that has been previously saved, tap Menu > File > Save As.
2. In the Name box, enter a new name for the file.
Do any of the following:
3.
●
In the Folder list, tap the folder where you want to save the file.
●
In the Location list, select where you want to store the file, in Main memory or an
optional Storage card.
4. Tap Save.
NOTE: If the Word document or Excel workbook was previously saved on a computer, data and
unsupported formatting may be lost when you save the file.
TIP: To quickly create a copy of a document or workbook, open Word or Excel. In the file list, tap
and hold the file that you want to copy, and tap Create Copy.
To cancel all unsaved changes that you made to the document or workbook, tap Menu > File, and
then tap Revert to Saved instead of Save As.
Automatically save files on a storage card
1. Press Start , tap Office Mobile, and then tap a program name.
2. From the program file list, tap Menu > Options.
3. With a storage card inserted in the device, in the Save to box, tap the appropriate storage card
to automatically save new items on the storage card.
4. Tap OK.
Microsoft® Office Mobile
71
Page 84

Rename a file
1. Press Start , tap Office Mobile, and then tap a program name.
From the program file list, tap the file that you want to rename.
2.
3. For Word and Excel, tap Menu > File > Rename/Move.
4. In the Name box, enter the new name for the item.
5. Tap OK.
Locate a file
1. Press Start , tap Office Mobile, and then tap a program name.
From the program file list, do one of the following:
2.
●
●
NOTE: If you do not see the file that you want in the program file list, you may have to open File
Explorer and navigate to the appropriate folder or use Search to locate the file.
Sort the list. In the file list, tap the sort list (by default, labeled Name), and tap a sort option.
Filter the list by folder. In the file list, tap the folder list (by default, labeled All Folders).
Then, tap the folder that you want displayed.
TIP: To show all items in the file list, tap All Folders. You can also find a note by searching for
a particular word that you know is in the note that you are looking for.
Work with Word Mobile
View Word files by type in the file list
1. Press Start , tap Office Mobile > Word Mobile.
2. From the program file list, tap Menu > Options.
3. In the Display in list view box, tap All Known File Types to view all files Word can open,
or tap Word Files, Rich Text Files, or Plain Text Files to view specific file types.
4. Tap OK.
Set the default Word template
By default, when you create a file or note in Word Mobile, the Word Document (.docx) template is
used. If there is another template that you frequently use, you may want to set that template as the default.
1. Press Start
2. In the program file list, tap Menu > Options.
, tap Office Mobile > Word Mobile.
3. In the Default template box, tap the template.
4. Tap OK.
72 Chapter 16 Use productivity tools
Page 85

NOTE: If you create your own template, you must save it in the Templates folder and in your
device's main memory to make it available for selection as a default template.
Open and view a Word document
1. Press Start , tap Office Mobile > Word Mobile.
In the program file list, tap the file that you want to open.
2.
NOTE: Word Mobile does not fully support some features, such as revision marks and file password
protection. Some data and formatting may be lost when you save the document on your device.
TIP: To change the size of the display, tap View > Zoom, and then tap a percentage.
Move or copy text in a document
In Word Mobile, you can easily move, copy, and paste text within a document and between documents.
Select the text you want to move or copy.
1.
2. Tap Menu and do one of the following:
●
To copy the text, tap Copy.
●
To move the text, tap Cut.
Tap in the document to position the pointer where you want to paste the text.
3.
4. Tap Menu > Paste.
NOTE: Word Mobile does not support moving or copying pictures.
Create a list in a document
Select the text that you want to add bullets or numbering to.
1.
2. Tap Menu > Format > Paragraph.
3. In the List field, do one of the following:
●
To create a bulleted list, tap Bulleted.
●
To create a numbered list, tap Numbered.
4. Tap OK to return to the document.
Format text in a document
Select the text you want to format.
1.
2. Tap and hold the text, and then tap Font.
Select the desired formatting options.
3.
4. Tap OK.
Microsoft® Office Mobile
73
Page 86

Align text in a document
You can center text, or align it to the right or left margin.
Position the pointer in the text you want to align.
1.
2. Tap Menu > Format > Paragraph.
3. In the Alignment box, tap Left, Right, or Center as you want.
4. Tap OK to return to the document.
TIP: You can also use the Formatting toolbar to align text. To show the toolbar, tap View >
Toolbar. A check mark appears next to Toolbar when the toolbar is visible.
Indent paragraphs in a document
Position the pointer in the paragraph you want to indent.
1.
2. Tap Menu > Format > Paragraph.
3. Under Indentation, do one of the following:
To change the left indentation of the whole paragraph, increase or decrease the number in
●
the Left box.
To change the right indentation of the whole paragraph, increase or decrease the number in
●
the Right box.
●
To indent the first line in the paragraph, in the Special box, tap First line. Then, in the By
box, increase or reduce the size of the indentation.
●
To create a hanging indent, in the Special box, tap Hanging. Then, in the By box,
increase or reduce the size of the indentation.
4. Tap OK to return to the document.
TIP: To indent text in lists, use the Formatting toolbar. To show the toolbar, tap View > Toolbar.
A check mark appears next to Toolbar when the toolbar is visible.
Zoom in or out in a Word Mobile document
In Word Mobile, you can zoom in to look more closely at a section of a document, or zoom out to see
more of the document at a reduced magnification.
●
Tap View > Zoom, and change the zoom level as you want.
Check spelling in a document
1. Tap and hold anywhere in the document, and then tap Spelling.
When an unknown or misspelled word is encountered, Word Mobile offers a list of suggested words.
2.
If the word is spelled incorrectly, tap the correct word in the list. If the word is spelled correctly,
3.
tap Ignore.
74 Chapter 16 Use productivity tools
Page 87

TIP: To check the spelling of specific text, select it, tap and hold, and then tap Spelling.
To add a new word to the spelling dictionary, tap Add in the menu that contains the list of suggested
words.
Work with Excel Mobile
Overview
You can view, create, and edit Excel workbooks and templates using your iPAQ. You can also use your
iPAQ to view and edit Excel workbooks and templates that are created using your computer.
View, edit, and create charts and graphs. These can be embedded as objects in a worksheet or
●
added to a separate worksheet.
Enter formulas and functions, and then filter data to see the subset of information that you want.
●
Split panes to view different parts of a worksheet at the same time.
●
Freeze the top and left-most panes in a worksheet to keep row and column labels or other data
●
visible as you scroll through a sheet.
When you close a newly created workbook, it is automatically named and added to the Excel
●
Mobile workbook list. You can easily rename the workbook with a more meaningful name and
move it to another folder or a storage card.
Get Started
View Excel workbooks by type in the file list
1. Press Start
2. From the program file list, tap Menu > Options.
3. In the Files to display in list view box, tap All known types to view all files Excel can
open, or tap Excel Workbooks to view specific Excel file types.
4. Tap OK.
Set the default Excel template
By default, when you create a file or note in Excel Mobile, the Blank workbook template is used. If
there is another template that you frequently use, you may want to set that template as the default.
1. Press Start
2. From the program file list, tap Menu > Options.
3. In the Template for new workbook box, tap the template.
4. Tap OK.
, tap Office Mobile > Excel Mobile.
, tap Office Mobile > Excel Mobile.
NOTE: If you create your own template, save it in the Templates folder and in your device's main
memory to make it available for selection as a default template.
Microsoft® Office Mobile
75
Page 88

Open and view an Excel spreadsheet
1. Press Start
In the program file list, tap the file that you want to open.
2.
NOTE: Excel Mobile does not fully support some features, such as formulas and cell comments. Some
data and formatting may be lost when you save the workbook on your device.
TIP: To change the size of the display, tap View > Zoom, and then tap a percentage.
, tap Office Mobile > Excel Mobile.
Enter and edit data
Enter a value or text in a cell
Tap the cell in which you want to enter a value or text.
1.
Enter the value or text, and then press the Enter key.
2.
NOTE: To enter text, you may have to tap keyboard to display the on-screen keyboard.
TIP: To quickly edit cell contents, tap the cell and replace or edit the text or value. To undo an edit,
tap Menu > Undo Typing.
Edit a value or text in a cell
Tap the cell that contains the data that you want to edit, and then tap anywhere in the formula bar
1.
(fx), near the top of the screen.
Use the left or right arrow keys on the on-screen keyboard or tap to position the insertion point
2.
next to the characters you want to edit, and then do any of the following:
●
To delete characters, tap Delete on the on-screen keyboard, or select them and then tap
Menu > Edit > Cut.
To insert characters, tap where you want to insert them, and then enter the new characters.
●
To replace specific characters, select them, and then enter the new characters.
●
To enter your changes, tap the Enter button on the on-screen keyboard.
3.
Enter a sequence of values automatically
You can save time entering data by filling data into adjacent cells automatically. For example, with
Autofill you can quickly fill cells with repetitive data such as numbers or repeated text. Autofill takes the
content of the first cell in the selected row or column and copies it down or across the rest of the selection.
Select both the range that contains the data that you want to reference and the adjacent
1.
destination cells.
2. Tap Menu > Edit > Fill.
3. In Direction list, tap the direction you want.
4. In Fill type list, tap Series.
76 Chapter 16 Use productivity tools
Page 89

5. In Series type list, tap the type of series you want, Autofill, Date, or Number.
6. If you selected Date or Number, in Step value, select the increment you want.
7. Tap OK.
TIP: To conserve memory, Fill is limited to an area of 127 rows by 31 columns. To copy information
into more rows or columns, reduce the information being copied and perform the fill procedure multiple
times.
Copy and paste data
To copy data from one cell to another:
Tap the cell that contains the data that you want to move or copy.
1.
2. Tap Menu > Copy or Cut.
Tap the cell where you want to paste the data.
3.
4. Tap Menu > Paste.
To copy data from one set of cells to adjacent cells:
Select both the range that contains the data that you want to copy and the adjacent destination cells.
1.
2. Tap Menu > Edit > Fill.
3. From the Direction list, tap the direction you want.
4. In the Fill type list, tap Copy.
5. Tap OK.
To copy data from one set of cells to nonadjacent cells:
Select the cells that you want to copy.
1.
2. Tap Menu > Copy.
Select the destination cells.
3.
Select the same number of rows and columns as the original cell group.
4. Tap Menu > Paste.
TIP: You can select Copy, Cut, and Paste from a shortcut menu that appears when you tap and
hold a cell.
Memory limitations prevent you from pasting data into an area larger than 127 rows by 31 columns in
one step. To paste data into more rows or columns, copy and paste fewer than 127 rows by 31
columns of data multiple times.
Microsoft® Office Mobile
77
Page 90

Insert cells
1.
2. Tap Menu > Insert > Cells.
3.
Select the same number of cells as you want to insert and in the same pattern as you want the new
cells to appear.
For example, if you want to insert two side-by-side cells, select two side-by-side cells. Or, if you
want to insert two stacked cells, select two stacked cells.
Select how you want the cells inserted.
●
Shift cells right: Moves the selected cells to the right by the same number of columns as
there are in the selection, and inserts the new cells. All cells to the right of the selected cells
are also shifted right.
●
Shift cells down: Moves the selected cells down by the same number of rows as there are
in the selection, and inserts the new cells. All cells below the selected cells are also shifted down.
●
Entire row: Moves the rows in which the selected cells are located down by the same
number of rows as there are in the selection, and inserts the new rows. All rows below the
selected rows are also shifted down.
●
Entire column: Moves the columns in which the selected cells are located to the right by the
same number of columns as there are in the selection, and inserts the new columns. All
columns to the right of the selected cells are also shifted right.
4. Tap OK.
NOTE: Excel Mobile keeps formulas up to date by adjusting references to the shifted cells to reflect
their new locations.
Insert rows
1.
2. Tap Menu > Insert > Cells.
NOTE: Excel Mobile keeps formulas up to date by adjusting references to the shifted cells to reflect
their new locations.
Select the row or rows above which you want to insert new rows. Make sure that you:
Select the same number of rows as you want to insert.
●
Select whole rows by tapping a single row heading or dragging across multiple row
●
headings, which are located in the column that is farthest to the left.
78 Chapter 16 Use productivity tools
Page 91

Insert columns
Select the column or columns immediately to the right of where you want to insert columns. Make
1.
sure that you:
Select the same number of columns as you want to insert.
●
Select whole columns by tapping a single column heading or dragging across multiple
●
column headings.
2. Tap Menu > Insert > Cells.
NOTE: Excel Mobile keeps formulas up to date by adjusting references to the shifted cells to reflect
their new locations.
Delete cells, rows, or columns
Select one or more cells, rows, or columns.
1.
2. Tap and hold selected area, and then tap Delete to remove rows and columns, or Delete Cells
to remove cells.
If you are deleting a cell or range of cells, tap one of the following:
3.
●
Shift cells left: Deletes the selected cell, and moves all cells located to the right one column
to the left.
●
Shift cells up: Deletes the selected cell, and moves all cells located below up one row.
●
Entire row: Deletes the whole row in which the selected cell is located, and moves all rows
located below up one row.
●
Entire column: Deletes the whole column in which the selected cell is located, and moves
all columns located to the right one column to the left.
4. Tap OK.
NOTE: Excel Mobile keeps formulas up to date by adjusting references to the shifted cells to reflect
their new locations. However, a formula that refers to a deleted cell displays the #REF! error value.
Format Data
Format numbers and text
You can easily format numbers in an Excel Mobile workbook by assigning a numeric category such as
number, currency, date, or fraction to a cell. You can also format text by changing the font type, size,
or color, applying bold or italic formatting, and underlining text.
Select the cell or range of cells in which you want to format text.
1.
2. Tap Menu > Format > Cells.
Microsoft® Office Mobile
79
Page 92

Do one of the following:
3.
●
On the Number tab, select a category and then specify the related formatting options.
●
On the Font tab, select the text formatting you want.
4. Tap OK.
Adjust column widths and row heights
Select the column or row you want to change.
1.
Do one or both of the following:
2.
If you selected a column or columns, adjust the width of the selected columns by dragging the
●
right border of the column heading.
If you selected a row or rows, adjust the height by dragging the lower border in the row
●
heading.
TIP: To specify an exact column width and row height, tap and hold the column or row, tap Format
Cells, enter the measurements on the Size tab, and then tap OK.
Fit rows and columns to data
Select the rows or columns you want to automatically fit to their contents.
1.
Double-tap the lower border of the selected rows or the right border of the selected columns.
2.
View the data you want
Adjust the view of the worksheet
In an Excel Mobile workbook, you can display and hide window elements such as scroll bars, view two
areas of a worksheet and lock rows or columns in one area by splitting or freezing panes, and use the
full screen to see as much data as possible.
▲
Do any of the following:
●
To display and hide window elements such as column headings and scroll bars, tap View >
Show, and then tap the elements you want displayed or hidden. A check mark appears next
to the element when it is visible in the workbook.
To lock rows and columns so that they remain visible while you scroll to see the rest of the
●
data, tap the cell where you want to freeze the panes. Then tap View > Freeze Panes. To
unlock the rows or columns, tap Unfreeze Panes.
●
To split the window into two scrollable areas, tap View, tap Split, and then drag the split
bar to a new location. To remove the split bar, tap View, and then tap Remove Split.
●
To see as much data on the screen as possible, tap View > Full Screen. To return to the
usual view, tap View > Full Screen again.
●
To zoom in on data, tap View > Zoom, and then tap the percentage you want.
80 Chapter 16 Use productivity tools
Page 93

Zoom in or out
In Excel Mobile, you can zoom in to look more closely at a section of a document, or zoom out to see
more of the document at a reduced magnification.
●
Tap View > Zoom, and then change the zoom level as you want.
Hide and display rows or columns
▲
Do any of the following:
●
To hide a row or column, tap a cell in the row or column you want to hide. Tap Menu >
Format > Row or Column, and then tap Hide.
To display a hidden row or column, select the cells that span the missing row or column, tap
●
Menu > Format > Row or Column, and then tap Unhide.
Go to a cell or region
1. Tap Menu > Edit > Go To.
Do one of the following:
2.
To go to a specific cell, enter the cell reference, for example: C4. If the cell has a defined
●
name, you can enter the name instead of the reference.
● To go to the selected cell or region, tap Current region.
3. Tap OK.
NOTE: The current region is the block of filled-in cells that includes the selected cell or cells. The
region extends in all directions to the first empty row or column.
TIP: To go to a specific cell, you can also enter the cell reference in the name box and then tap OK.
Filter data in a worksheet
Select a cell or range of cells that contains the type of information that you want to filter.
1.
2. Tap Menu > Tools > AutoFilter.
A drop-down arrow appears at the top of each selected column.
Tap the arrow to display a list of the data in the column.
3.
To display only rows that contain that value, select a value (filter criterion) from the list.
4.
5. Tap Custom to display the Custom AutoFilter dialog box, where you can specify comparisons.
To refine the displayed rows even more, repeat steps 3 and 4 as needed.
6.
NOTE: The data in the top row of the selected cells or range of cells will not be filtered. That row
should contain column headings.
TIP: To turn off AutoFilter, tap Menu > Tools > AutoFilter.
To display all rows again, tap All in the filter list in each selected column.
Microsoft® Office Mobile
81
Page 94

Sort data in a worksheet
You can sort data in ascending order (A-Z, or 0-9) or descending order (Z to A, or 9 to 0).
Select the range you want to sort.
1.
2. Tap Menu > Tools > Sort.
3. In the Sort by list, select the first column you want to sort on.
By default, the Ascending check box is selected. This indicates that the column will be sorted in
ascending order. If you want the column sorted in descending order, tap to clear the check box.
4. To sort on additional columns, select them in the Then by box, and then select or clear the
Ascending check boxes.
5. Tap OK.
TIP: To undo a sort, tap Menu > Undo Sort.
Calculate
Calculate values automatically
You can quickly calculate the largest number, smallest number, average number, and sum of the
numbers in a selected range of values. When you use this method, you preview the result only. The
result is not added to the worksheet.
1. Tap View > Status Bar.
Select the range of values that you want to calculate.
2.
The AutoCalculate area, on the right side of the status bar, contains a function and a value, for
example: SUM=0.
3. Tap the AutoCalculate arrow and tap the type of calculation you want to perform. The result
appears in the AutoCalculate area.
Add values automatically
You can quickly add values from a range of cells and include the result in the worksheet by using Autosum.
1. Tap View > Toolbar.
Tap the cell where you want to insert the sum of the selected values.
2.
On the toolbar, tap Autosum (the ∑ symbol near the bottom of the screen).
3.
=SUM() appears in the input box at the top of the workbook.
Drag the stylus across the range of cells you want to add. The cells will not be highlighted.
4.
However, the cell range in =SUM() is updated.
On the keyboard, press Enter. The sum appears in the selected cell.
5.
82 Chapter 16 Use productivity tools
Page 95

Enter a simple formula
Simple formulas contain operators and constants. Operators are signs or symbols that specify the type
of calculation to perform in an expression. Constants are values that are not calculated and do not
change. For example, the number 210 is a constant.
Here are some example formulas and what they do:
=128+345 adds 128 and 345.
●
=5^2 squares 5.
●
Tap the cell in which you want to enter the formula.
1.
2. On the on-screen keyboard, tap = (the equal sign).
Enter the formula.
3.
NOTE: To view additional characters on the on-screen keyboard, tap CAP or Shift.
On the keyboard, press Enter.
4.
Enter a formula that contains a cell reference
A formula can contain a cell reference. This is the location of a cell on a worksheet. For example, cell
B2 is the cell located at the intersection of column B and row 2. A formula that contains a reference to
B2 performs a calculation that is based on the value in cell B2. If the value in B2 changes, the result
calculated by the formula also changes.
Here are some example formulas with cell references and what they do:
=B2 uses the value in the cell B2.
●
=B2*C2 multiplies the value in cell B2 by the value in cell C2.
●
Tap the cell in which you want to enter the formula.
1.
On the on-screen keyboard, tap = (an equal sign).
2.
Enter the formula.
3.
TIP: To include a cell reference, tap the cell you want to include in the formula. For example, to
multiply the value in cell B2 by the value in cell C2, tap =, tap B2, tap *, and then tap C2. This
will end up looking like this in the selected cell: =B2*C2.
On the keyboard, press Enter.
4.
Enter a formula that contains a function
A formula can contain a function. A function is a prewritten formula that takes a value or values,
performs an operation, and returns a value or values. Use functions to simplify and shorten formulas on
a worksheet, especially those that perform lengthy or complex calculations.
Microsoft® Office Mobile
83
Page 96

Here are some example formulas with functions and what they do:
=SUM(A:A) adds all numbers in column A.
●
=AVERAGE(A1:B4) averages all numbers in the range from cell A1 to cell B4.
●
Tap the cell in which you want to enter the formula.
1.
2. Tap Menu > Insert > Function.
3. From the Function list, select the function you want, and then tap OK.
In the formula bar (fx), near the top of the screen, replace the text between the parentheses—for
4.
example, (number1,number2,…)—with the cell references, the numbers, and the operations that
you want.
On the keyboard, press Enter.
5.
Work with charts
Overview
Charts make it easy to see patterns and trends in data. For example, instead of analyzing several
columns of worksheet numbers, you can see at a glance whether sales are decreasing or increasing
over quarterly periods, or how the actual sales compare to the projected sales.
Create a chart
You can create a chart on its own sheet or as an embedded object on a worksheet.
1.
2.
3. Tap Menu > Insert > Chart.
4.
5. Tap Finish.
TIP: To return to a worksheet, tap View > Sheet, and then tap the worksheet name.
Arrange the data that you want to plot in a chart.
Select the cells that contain the data that you want to use for the chart.
Follow the instructions to:
Select a chart type.
●
Confirm the data range.
●
Select the data layout.
●
Add labels to the chart.
●
Insert the chart as a new sheet or as an object on the current worksheet.
●
84 Chapter 16 Use productivity tools
Page 97

Add titles to a chart
1. Tap View > Sheet, and then tap the chart. If the chart is in the open worksheet, go to step 2.
2. Tap Menu > Format > Chart.
3. On the Titles tab, do any of the following:
●
To add a name for the chart, enter a name in the Chart box.
●
To add labels for the x-axis and y-axis, enter those labels in X Axis and Y Axis.
4. Tap OK.
Add a legend to a chart
1. Tap View > Sheet, and then tap the chart. If the chart is in the open worksheet, go to step 2.
2. Tap Menu > Format > Chart.
3. On the Titles tab, select the Show Legend check box, and then tap the location where you
want the legend to appear.
4. Tap OK.
TIP: To return to a worksheet, tap View > Sheet, and then tap the worksheet name.
Change the chart type
You can easily change the chart type to present the data in a different way.
1. Tap View > Sheet, and then tap the chart. If the chart is in the open worksheet, go to step 2.
2. Tap Menu > Format > Chart.
3. On the Type tab, tap the type of chart you want.
4. Tap OK.
TIP: To return to a worksheet, tap View > Sheet, and then tap the worksheet name.
Change the scale of a chart
By default, Microsoft Excel determines the minimum and maximum scale values of the y-axis and the xaxis. The y-axis is usually the vertical axis. The x-axis is usually the horizontal axis. However, you can
customize the scale to better meet your needs.
1. Tap View > Sheet, and then tap the chart. If the chart is in the open worksheet, go to step 2.
2. Tap Menu > Format > Chart.
Microsoft® Office Mobile
85
Page 98

3. On the Scale tab, do any of the following:
●
To use automatic minimum and maximum values for an axis, select the Auto check boxes for
the axis.
To change the number at which the axis value starts and ends, enter a different number in the
●
Minimum box and Maximum box.
NOTE: A large number in the Maximum box “compresses” the chart. A small number in the
Maximum box “stretches” the chart.
4. Tap OK.
TIP: To return to a worksheet, tap View > Sheet, and then tap the worksheet name.
Delete a chart
1. Tap View > Sheet, and then tap the chart. If the chart is in the open worksheet, go to step 2.
2. Tap Menu > Edit > Clear > All.
3. Tap Yes to confirm.
Work with worksheets
Insert a worksheet
By default, an Excel Mobile workbook contains three worksheets. You can easily add more sheets if
you need them to help organize the data.
1. Tap Menu > Format > Modify Sheets.
2. Tap Insert, enter a name for the new worksheet, and tap OK.
3. To move the new worksheet to the desired location in the workbook, tap Move Up or Move
Down.
4. Tap OK to return to the workbook.
Delete a worksheet
You can delete a worksheet you no longer need from your workbook.
1. Tap Menu > Format > Modify Sheets.
2. Select the worksheet you want to delete and tap Delete.
3. Tap Yes to confirm.
4. Tap OK to return to the workbook.
86 Chapter 16 Use productivity tools
Page 99

Rename a worksheet
By default, worksheets are named Sheet1, Sheet2, and so on. You can easily rename the worksheets
with meaningful names.
1. Tap Menu > Format > Modify Sheets.
Select the worksheet you want to rename.
2.
3. Tap Rename, enter a name for the worksheet, and then tap OK.
4. Tap OK to return to the workbook.
Switch to another worksheet
In the middle of the status bar, tap the active worksheet's name, for example: Sheet1.
1.
NOTE: If you do not see the status bar, tap View > Status Bar.
In the worksheet list, tap the sheet you want to switch to.
2.
Work with PowerPoint Mobile
Overview
Using PowerPoint Mobile, you can view full presentations, rehearse timings, and check slide order and
any live links you may have in your presentation. However, you cannot use PowerPoint Mobile to
create a presentation or modify the content of individual slides.
Open and view a slide show presentation
1. Press Start , tap Office Mobile > PowerPoint Mobile.
In the presentation file list, tap the slide show you want to view.
2.
Tap the current slide to advance to the next slide.
3.
If the presentation is set up as a timed slide show, the slides advance automatically.
NOTE: To stop a presentation, tap the up arrow, and then tap End Show.
Change the slide show orientation
You can view a PowerPoint Mobile presentation in portrait and in right-handed or left-handed
landscape orientations.
1. Press Start
In the presentation file list, tap the slide show you want to view.
2.
, tap Office Mobile > PowerPoint Mobile.
3. Tap the up arrow, and then tap Show Options.
4. Tap the Orientation tab, and then select the orientation you want.
5. Tap OK.
Microsoft® Office Mobile
87
Page 100

TIP: To view the presentation in the orientation that best fits the size and shape of the device screen,
tap Default.
Set slide show playback options
You can override some playback options stored in a PowerPoint presentation.
1. Press Start
In the presentation file list, tap the slide show you want to view.
2.
3. Tap the up arrow, and then tap Show Options.
4. Tap the Playback tab, select the Override playback options for all files check box, and
do any of the following:
●
To turn off builds and other animations, select the Show without animation check box.
●
To prevent slide transitions from playing, select the Show without slide transition check
box.
●
To use the timings recorded with each slide in a presentation, select the Use timings, if
present check box.
To automatically advance to the first slide after the last slide in a presentation, select the
●
Loop continuously check box.
●
To show text only, select the Show without media check box.
5. Tap OK.
TIP: To turn the presentation into a continuously looping slide show, select both the Use timings, if
present, and the Loop continuously check boxes.
, tap Office Mobile > PowerPoint Mobile.
Zoom in and out in a slide
Zoom in to see a piece of a slide in more detail and zoom out to see the whole slide again.
In a presentation, tap the up arrow, and then tap
1.
Do one of the following:
2.
To zoom in another level, tap
●
To zoom out, tap
●
To view a piece of the slide that may have gone out of view, or to center the slide, tap and drag
3.
the red rectangle that is to the left of the zoom icons.
To return to the slide show, tap
4.
NOTE: If the presentation is set up as a timed slide show, the presentation will pause during zooming.
TIP: To view content that is not visible on the device screen during zooming, tap the slide and drag it
up, down, or to either side until the content is visible.
88 Chapter 16 Use productivity tools
.
.
.
.
 Loading...