

Page 1
Page 2

Battery warning
The battery for this car camcorder is sealed internally. DO NOT
attempt to disassemble the camcorder and remove the
battery.
Always charge using the provided system. Improper charging
of the battery may result in explosion.
The battery is designed for this camcorder and is not customer
replaceable.
Batteries may explode if exposed to open fire. Never place the
car camcorder in a fire.
Recycle the camcorder observing local regulations.
Notes on Installation
1. Install the camcorder near the rear-view mirror to obtain the
best open-field view. Do NOT install the camcorder in a
location that will obstruct your required driving view.
2. Make sure that the lens is within the wiping range of the
windscreen wiper to ensure a clear view even when it rains.
3. Do not touch the lens with your fingers. Finger grease may be
left on the lens and will result in unclear videos or snapshots.
Clean the lens on a regular basis.
4. Do not install the camcorder on a tinted window. Doing so may
damage the tint film.
5. Make sure that the installation position is not hindered by the
tinted window.
6.
For more operation details, please refer to CD-ROM.
1
Page 3

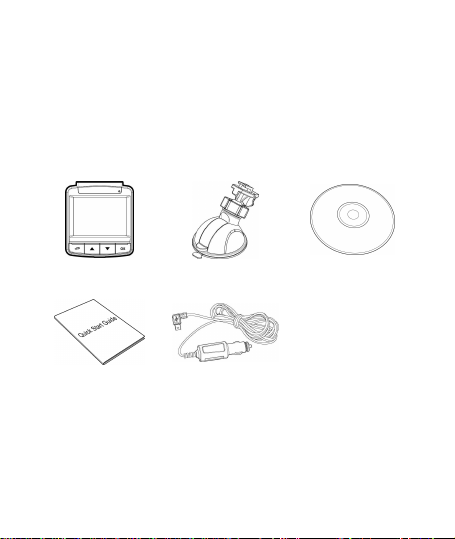
1 Introduction
1.1 Package Contents
The package contains the following items. If there are any missing or
damaged items, contact your dealer immediately.
Camcorder Bracket CD-ROM
Quick start guide Car adapter
2
Page 4
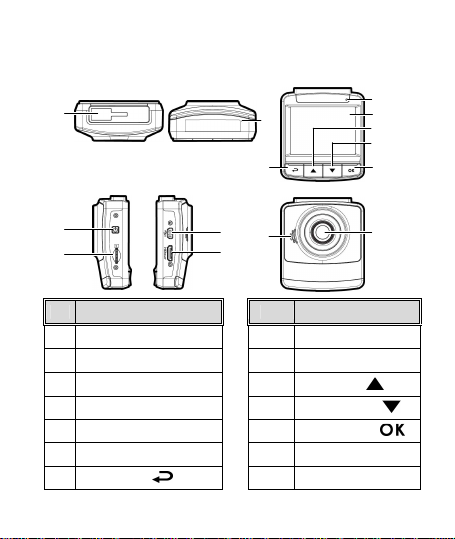
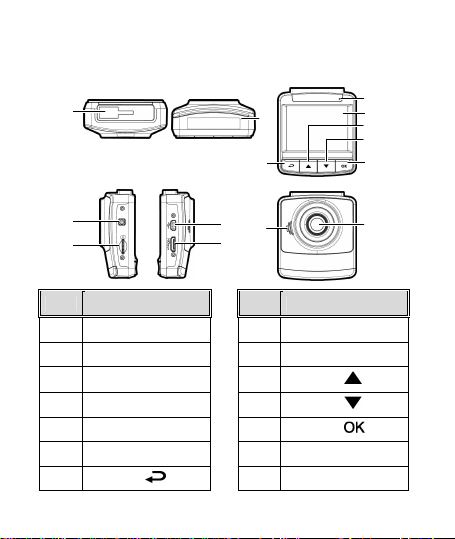
1.2 Product Overview
3
No. Item
No. Item
1 Bracket Socket
8 LED Indicator
3 Power Button
10 Up Button (
)
4 Memory Card Slot
11 Down Button (
)
6 HD(Mini HDMI) Connector
13 Wide Angle Lens
7 Back Button (
) 14
Speaker
1
Top and Bottom Views
Side (Left and Right) Views
Front View
8
2
7
Rear View
9
10
11
12
4
2 Microphone
5 USB Connector
5
14
6
9 LCD Panel
12 Enter Button ( )
3
13
Page 5
2 Getting Started
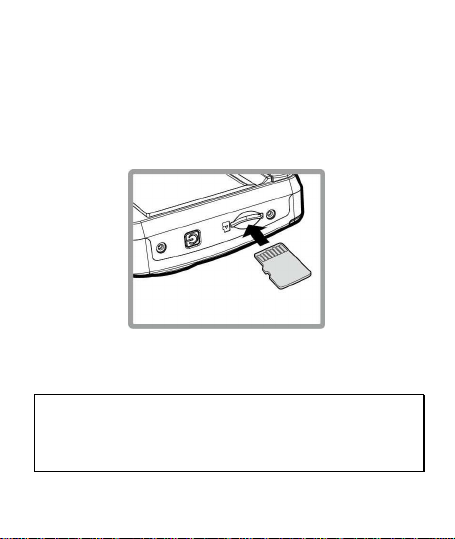
2.1 Inserting the Memory Card
Insert the memory card with the gold contacts facing the back of the
camcorder. Push the memory card until it clicks into place. (Use class
6 or above the micro SD cards for this camcorder; It is recommended
to format the micro SD cards before the initial use.)
To remove the memory card
Push the edge of the memory card inward until you hear/feel it click,
then allow it to push out until you can remove it from the slot.
Note:
1. Do not remove or insert the memory card when the camcorder is powered on. This
may damage the memory card.
2. It is recommended to use a 32 GB, Class 6 speed or above micro SD card.
3. It is recommended to format the micro SD cards before the initial use.
4
Page 6
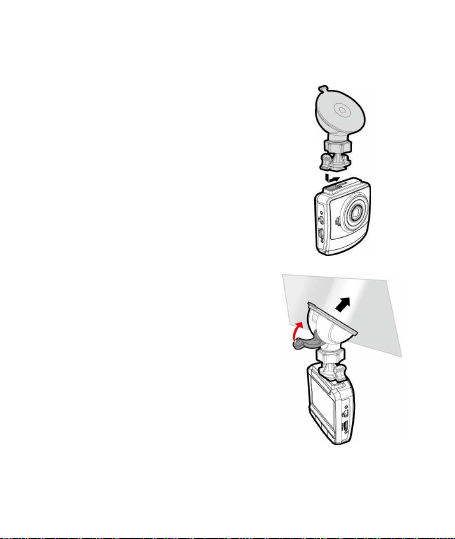
2.2 Installing in Vehicles
2.2.1 Mount to Windshield
1. Attach the bracket to the camcorder.
Slide it into the bracket holder until you
hear a click.
2. Before installing the bracket, please use
alcohol to clean the windshield and
suction cup of the bracket. Wait for
dry and press suction-cup on the
windshield.
3. Hold the base firmly on the
windshield and press down the
clamp to mount the car holder to
the windshield. Make sure the base
is securely locked in place.
Warning: Do not install the camcorder on
a tinted window. Doing so may damage the tint film.
5
Page 7
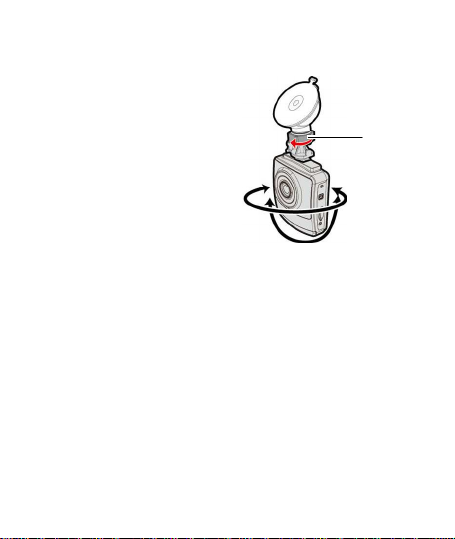
Knob
2.2.2 Adjust the camcorder position
1. Loose the knob to swivel the
device vertically or
horizontally.
2. Then tighten the knob to make sure the camcorder is securely
locked in place.
6
Page 8
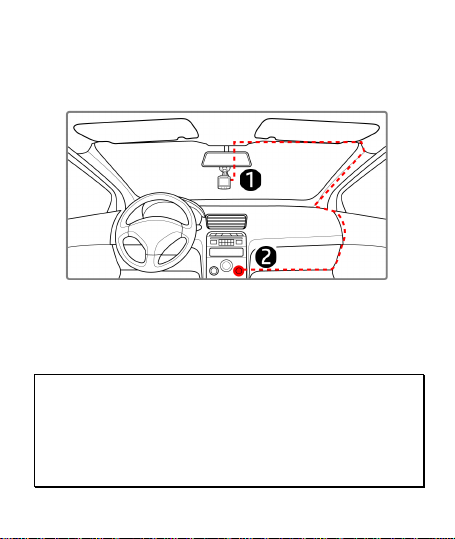
2.3 Connecting to Power
Use only the supplied car adapter to power up the camcorder and
charge the built-in battery.
1. Connect one end of the car adapter to the USB connector of the
camcorder.
2. Plug the other end of the car charger to the cigarette lighter
socket of your vehicle. Once the vehicle engine is started, the
camcorder automatically powers on.
Note:
1. Red LED light indicates the battery is charging; when devices are connecting power
cord to charge and the red light flashes, it indicates the device temperature is too high
and should unplug the power cord immediately.
2. Please take note if the environment temperature reaches 45°C or above, the car
adapter still can supply power to camcorder, but it may not charge the battery. This is
characteristic of Lithium polymer battery and is not a malfunction.
7
Page 9

2.4 Powering the Camcorder On / Off
2.4.1 Auto Power On/Off
Once the vehicle engine is started, the device automatically turns on.
If the Automatic Record function is enabled, the recording will
automatically start right away after the device turns on.
Once the v ehicle engine is shut down, the camcorder automatically
saves the recording and turns off the power within 10 seconds.
Note:
Automatic power up and shut down assumes the power socket is linked to the car
ignition.
3 Using the Camcorder
3.1 Recording Videos
3.1.1
Record videos while driving
When the vehicle engine starts up, the camcorder automatically turns
on and starts recording.
Recording will automatically stop when the engine is switched off.
8
Page 10
3.1.2
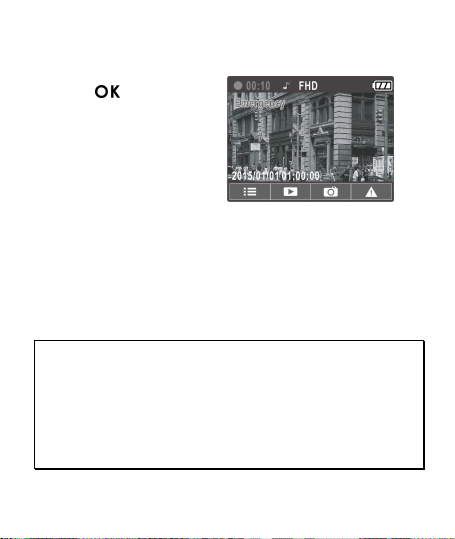
Emergency Recording
During normal video recording,
press the button to
begin emergency recording
mode.
The “Emergency” message will
be displayed immediately on
the upper left corner of the
screen, and the recorded file
will be continuous and
protected from being overwritten.
After complete the emergency recording, it will be back to normal
recording mode.
Note:
1. If the Collision Detection function is enabled and a collision is detected, the
camcorder will automatically trigger the emergency recording feature.
2. The emergency recording file is created as a new file, which will be protected to
avoid being overwritten by normal loop recording. 8 GB (or above) memory card can
save up to 10 emergency video files. The alert message of “Emergency files are full”
will pop up on the screen when the emergency recording files are full, and the oldest
emergency file will be automatically deleted when a new emergency recording file is
created.
9
Page 11
3.2 Playback Videos and Photos
1. During recording, press button to browse for the desired
video and photo file.
2. Press the / button to select the file that you want to
browse and press the button.
3. Press the / button to view the next or the previous file
and press the button to view the file in full screen.
4. When user want to playback the emergency video file, they
could check on file name as EMER.
3.2.1
Deleting Files
To delete file(s), do the following:
1. If recording is in progress, press the button to enter the
OSD menu.
2. Press the / button to select File Deletio n and press the
button.
3. Press the / button to select Delete One or Delete All,
then press the
4. After select Delete One, press the / button to select that
you want to delete, then press the
5. After select Delete All, press the / button to select Video
File or Image File that you want to delete, then select YES or NO
to delete.
Note:
1. Deleted files CANNOT be recovered. Ensure the files have backup before deletion.
2. Emergency files cannot be deleted from this operation. They can be deleted by
inserting memory card into your PC or format memory card.
button.
button.
10
Page 12

電池注意事項
電池注意事項
電池注意事項電池注意事項
僅可使用本系統充電,未正確處理電池可能會引發爆炸。
請勿自行拆裝、穿刺電池,或使電池短路。
電池接觸明火可能會引起爆炸,請勿將電池丟棄到火中。
請根據當地法規妥善處理使用過的電池。
嚴禁自行更換電池
嚴禁自行更換電池,,,,欲更換電池請洽經銷商
嚴禁自行更換電池嚴禁自行更換電池
安裝須知
安裝須知
安裝須知安裝須知
1. 本產品之安裝應靠近後視鏡,以獲得最佳的視野。
2. 確定鏡頭是在擋風玻璃雨刷的範圍內,確保視野良好,即使
雨天亦然。
3. 不要用手指碰觸鏡頭。手指上的油垢可能會留在鏡頭上,導
致錄像或攝影不清楚。定期清潔鏡頭。
4. 不要將產品安裝在有色車窗上。因為這樣會損壞淺色薄膜。
5. 確定安裝位置不會受有色車窗的阻礙。
欲瞭解更多的操作訊息
欲瞭解更多的操作訊息,,,,請參閱
欲瞭解更多的操作訊息欲瞭解更多的操作訊息
欲更換電池請洽經銷商。。。。
欲更換電池請洽經銷商欲更換電池請洽經銷商
請參閱 CD-ROM。。。。
請參閱請參閱
1
Page 13
1 導論
導論
導論導論
1.1 包裝內容
包裝內容
包裝內容包裝內容
包裝內含下列項目。若有任何項目遺漏或受損,請立即聯絡您的經
銷商。
行車記錄器 托架 CD-ROM 光碟
快速使用手冊 汽車連接器
2
Page 14
1.2 產品概要
1
3
4
7
產品概要
產品概要產品概要
頂視圖與底視圖
頂視圖與底視圖
頂視圖與底視圖頂視圖與底視圖
側視圖
側視圖 (左側與右側
左側與右側)
側視圖側視圖
左側與右側左側與右側
前視圖
前視圖
前視圖前視圖
8
視圖
視圖視圖
9
10
11
12
2
後後後後視圖
5
1
4
6
13
編號
編號
編號編號
1
2
3
4
5
6
7
項目
項目
項目項目
托架插孔
麥克風
電源按鈕
記憶卡插槽
USB 接頭
Video 接頭
返回按鈕 ( )
編號
編號
編號編號
8
9
10
11
12
13
14
項目
項目
項目項目
LED 指示燈
LCD 螢幕
向上按鈕 ( )
向下按鈕 ( )
輸入按鈕 (
廣角器
揚聲器
)
3
Page 15

2 開始
開始
開始開始
2.1 插入記憶卡
插入記憶卡
插入記憶卡插入記憶卡
以黃金接觸點面向設備的背面,插入記憶卡。推記憶卡直到咔嗒一
聲,插入定位時止。
取出
取出記憶卡
記憶卡
取出取出
記憶卡記憶卡
將記憶卡邊緣朝內推,直到聽到/感覺到卡片定位,接著再推一次
就會彈出,即可從卡槽中取出卡片。
註註註註::::
設備在開機狀態時,不要取出或插入記憶卡,以免損壞記憶卡。
1.
建議使用
2.
3.
32 GB、Class 6
初次使用前,建議先將
速度以上的
micro SD
micro SD
記憶卡格式化。
記憶卡。
4
Page 16

2.2 安裝於車內
安裝於車內
安裝於車內安裝於車內
2.2.1
置於擋風玻璃上
置於擋風玻璃上
置於擋風玻璃上置於擋風玻璃上
1. 將托架基座推入設備上方的托架插孔
中,直到聽到咔嗒聲固定。
2. 用酒精擦拭托架的吸盤及擋風玻璃
至乾淨,並等待酒精乾透,將托架
的吸盤輕壓於擋風玻璃上,再按下
托架的夾子固定托架。
3. 確認托架已牢牢固定。
警告
警告::::請勿將本裝置安裝在深色車窗上,否則將使染色膜受損。
警告警告
5
Page 17

2.2.2
調整設備位置
調整設備位置
調整設備位置調整設備位置
1. 鬆開旋鈕,將設備垂直或水平方向調整。
2. 鎖緊旋鈕,並確認設備已牢牢固定。
旋鈕
6
Page 18

2.3 連接電源
連接電源
連接電源連接電源
只使用所供應之汽車連接器,啟動設備以及為內建之電池充電。
1. 將汽車連接器的一端連接設備的USB接頭。
2. 將汽車充電器的另一端插接汽車內的香煙點火器的插孔。汽
車引擎一旦發動,設備即自動開機。
註註註註::::
色
燈亮,表示電池正在充電;如設備於關機狀態聯接電源線充電時,紅
1.
LED
紅
燈閃爍表示機器溫度過高,應拔除電源線。
請注意,若環境溫度達到
2.
電池可能不會充電。這是鋰聚合物電池的特性,並非故障。
45°C
以上,汽車變壓器會持續供電給行車記錄器,但
7
Page 19

2.4 設備開
設備開/關關關關
設備開設備開
2.4.1
自動開
自動開/關關關關
自動開自動開
汽車引擎一旦發動,則設備即自動開機並啟動
汽車引擎一旦熄火,設備會自動儲存記錄並在10秒內關掉電源。
註註註註::::
當電源線連接上車用電源時,發動汽車會使本產品自動啟動;當車子熄火時,本產
品也會自動關閉。
3 使用行車記錄器
3.1 錄影
3.1.1
當汽車引擎發動時,設備即自動開機並開始記錄。
當引擎熄火時,即自動停止記錄。
使用行車記錄器
使用行車記錄器使用行車記錄器
錄影
錄影錄影
行駛中錄影
行駛中錄影
行駛中錄影行駛中錄影
8
自動記錄
自動記錄
自動記錄自動記錄
功能。
Page 20

3.1.2
緊急錄影
緊急錄影
緊急錄影緊急錄影
在錄影期間再按一次 按
鈕將會進入緊急錄影模式,並
於螢幕左上角會顯示 "
影影影影
" 字樣,在緊急錄影模式中
緊急錄
緊急錄
緊急錄緊急錄
錄下的檔案會被保護起來。
啟動緊急錄影之該檔案錄影完
成後,下一個檔案會回到正常
錄影模式。
註註註註::::
若啟動
碰撞偵測
功能,並偵測到碰撞,則設備會自動啟用緊急錄影。
1.
緊急錄影的檔案會被另外儲存成被保護檔案,避免檔案被循環錄影覆蓋,
2.
以上) 記憶卡約可儲存10組緊急錄影檔案。當緊急錄影檔案已滿,螢幕會出現
急錄影檔案已滿
的警示, 系統並會自動刪除第一筆緊急錄影檔案。
"
9
含
(
8G
緊
"
Page 21

3.2 播放影片與照片
播放影片與照片
播放影片與照片播放影片與照片
1.
若正在錄影,按 按
鈕,進行錄影檔案及拍攝照
片的瀏覽。
2.
按 / 按鈕,選取您要
瀏覽的檔案,再按 按
鈕。
3.
按 / 按鈕,檢視下一
個或上一個檔案,再按
按鈕,檢視全螢幕中檔案。
4.
如需播放緊急錄影之檔案,需查看檔案名稱為EMER即為緊急錄
影。
3.2.1
檔案
檔案刪除
刪除
檔案檔案
檔案刪除,其方式如下:
1. 若正在錄影,須先按 按鈕,進入 OSD 目錄。
2. 按 / 按鈕,選取檔案刪除
3. 按 / 按鈕,選取刪除單檔
按鈕。
4. 若選擇刪除單檔, 則進入檔案目錄中按
按
5. 若選擇刪除全部, 則需進一步選擇是刪除視訊檔
註註註註
:
刪除之檔案不能回復。刪除前,確保檔案留有備份。
1.
緊急錄影之檔案於本操作無效, 需使用格式化記憶卡或是將記憶卡插入電腦中
2.
進行刪除。
刪除刪除
檔案刪除,再按 按鈕。
檔案刪除檔案刪除
刪除單檔或是刪除全部
刪除單檔刪除單檔
按鈕。
按鈕進行檔案刪除。
刪除全部檔案,再按
刪除全部刪除全部
/ 選擇刪除之檔案, 再
視訊檔或是圖片檔
視訊檔視訊檔
10
圖片檔, 再按
圖片檔圖片檔
Page 22

电池警告
电池警告
电池警告电池警告
请务必使用随附的系统进行充电。电池处置不当可能导致爆
炸。
切勿拆卸电池或在电池上钻孔,切勿使电池短路。
电池暴露在明火下可能爆炸。处理电池时切勿放入火中。
请按照当地法规处理废电池。
切勿自行 更换电池;请交 由经销商进行更 换。
切勿自行 更换电池;请交 由经销商进行更 换。
切勿自行 更换电池;请交 由经销商进行更 换。切勿自行 更换电池;请交 由经销商进行更 换。
安装需知
安装需知
安装需知安装需知
1. 本产品的安装应靠近后视镜,以获得最好的视野。
2. 确定镜头是在挡风玻璃雨刷的范围内,确保视野良好,即使
雨天也同样好。
3. 不要用手指触摸镜头。手指上的油脂可能会留在镜头上,导致
摄像或摄影不清楚。定期清洁镜头。
4. 不要将产品安装在有色车窗上。因为这样会损坏浅色薄膜。
5. 确定安装位置不会受有色车窗的阻碍。
欲了解更多操作信息 ,请参阅
欲了解更多操作信息 ,请参阅 CD-ROM。。。。
欲了解更多操作信息 ,请参阅欲了解更多操作信息 ,请参阅
1
Page 23

1 介绍
介绍
介绍介绍
1.1 包包包包装装装装清清清清单单单单
包装中含有以下物品。如果发现任何物品缺失或损坏,请立即联系
您的经销商。
行车记录仪 托架 光盘
快速入门手册
汽车适配器
2
Page 24

1.2 产
1
3
7
产品概要
产产
品概要
品概要品概要
顶视图与底视图
侧视图 (左侧与右侧)
前视图
8
2
后视图
9
10
11
12
编号
编号
编号编号
1
2
3
4
5
6
7
4
项目
项目
项目项目
托架插孔
麦克风
电源按钮
记忆卡插槽
USB
接头
Video
接头
返回按钮 ( )
5
14
6
编号
编号 项目
编号编号
8
9
10
11
12
13
14
LED 指示灯
LCD 屏幕
向上按钮 ( )
向下按钮 ( )
输入按钮 ( )
广角镜
扬声器
项目
项目项目
13
3
Page 25

2 入门
入门
入门入门
2.1 插入
插入记忆
记忆卡卡卡卡
插入插入
记忆记忆
以黄金接触点面向设备的背面,插入记忆卡。推记忆卡直到咔嗒的
一声,插入到位时止。
取出记忆 卡
取出记忆 卡
取出记忆 卡取出记忆 卡
向内推动存储卡边缘,直至您听到/感觉到存储卡发出咔哒声,然
后允许其推出,直至您可以将卡从插槽中取出。
注注注注::::
设备在开机状态时,不要取出或插入记忆卡,以免损坏记忆卡。
1.
建议使用
2.
32GB的6类或6
建议您初次使用微型SD卡之前先进行格式化。
3.
类以上的高速微型SD卡。
。
4
Page 26

2.2 安装在车内
安装在车内
安装在车内安装在车内
2.2.1
1. 将托架基座推入设备上方的托架插孔中,
2. 用酒精擦试托架的吸盘及挡风玻璃,
3. 确认托架已牢牢固定。
警告:
警告:请勿在有色车窗上安 装本设备。否则可能损坏着色膜。
警告:警告:
固定在挡风玻璃上
固定在挡风玻璃上
固定在挡风玻璃上固定在挡风玻璃上
直到听到咔嗒声固定。
并等待酒精干透,将托架的吸盘轻压
于挡风玻璃上,再按下托架的夹子固
定托架。
5
Page 27

2.2.2
1. 松开旋钮,将设备垂直或水平方向 调整。
2. 锁紧旋钮,并确认设备已牢牢固定。
调整设备位置
调整设备位置
调整设备位置调整设备位置
旋鈕
6
Page 28

2.3 连接电源
连接电源
连接电源连接电源
只使用所提供的汽车适配器,启动设备以及为内置的电池充电。
1. 将汽车适配器的一端连接到设备的USB接头。
2. 将汽车充电器的另一端插接汽车内的香烟点火器的插孔。汽车
引擎一旦发动,设备即自动开机。
注注注注::::
燈亮,表示電池正在充電;如設備於關機狀態聯接電源線充電時,紅燈
1.紅色LED
閃爍表示機器溫度過高,應拔除電源線。
请注意,如果环境温度达到
2.
电,但可能无法为电池充电。 这是锂离子聚合物电池的特性,而非故障。
以上,车载适配器仍能向行车记录仪供
45°C或45°C
7
Page 29

2.4 设备开
设备开/关关关关
设备开设备开
2.4.1
汽车引擎一旦发动,设备就自动开机并启动
汽车引擎一旦熄火,设备会自动保存记录并在10秒内关掉电源。
注注注注::::
當電源線連接上車用電源時,發動汽車會使本產品自動啟動;當車子熄火時,本產
品也會自動關閉。
3 使用行车记录仪
自动开
自动开/关关关关
自动开自动开
使用行车记录仪
使用行车记录仪使用行车记录仪
自动记录
自动记录
自动记录自动记录
功能。
3.1 摄摄摄摄像像像像
3.1.1
当汽车引擎发动时,设备即自动开机并开始记录。
当引擎熄火时,即自动停止记录。
行驶中摄像
行驶中摄像
行驶中摄像行驶中摄像
8
Page 30

3.1.2
在摄像期间再按一次 按钮
将会进入紧急摄像模式,并于屏
幕左上角会显示"
样,在紧急摄像模式中录下的文
件会被保护起来。
启动
后,下一个档案会回到正常摄像
模式。
注注注注::::
1.
紧急摄像的文件会被另外储存成被保护的文件,避免文件被循环摄像覆盖,
2.
(含以上)记忆卡约可储存10组紧急摄像文件。当紧急摄像的文件已满,屏幕会
出现“
紧急摄像
紧急摄像
紧急摄像紧急摄像
紧急摄像
紧急摄像
" 字
紧急摄像紧急摄像
紧急摄像
紧急摄像
之该档案摄像完成
紧急摄像紧急摄像
如果启动碰撞侦测功能并侦测到碰撞,则设备会自动启用紧急摄像。
紧急摄像文件已满
” 的警示,设备并会自动删除第一笔紧急摄像文件。
9
8G
Page 31

3.2 播放视频与照片
播放视频与照片
播放视频与照片播放视频与照片
1. 如果正在摄像,按 按钮,
进行摄像档案及拍摄照片的浏
览。
2. 按 / 按钮,选取您要浏
览的文件,再按 按钮。
3. 按 / 按钮,查看下一个
或上一个文件,再按 按
钮,查看全屏幕中文件。
4. 如需播放紧急摄像之档案,需查看文件名为EMER即为紧急摄像。
3.2.1
删除文件,其方式如下:
1. 如果正在摄像,需先按 按钮,进入 OSD 菜单。
2. 按 / 按钮,选取文件删除,再按 按钮。
3. 按 / 按钮,选取删除单档或是删除全部文件,再按 按
4.
5. 若选择删除全部
注注注注
:
1.
緊急摄像之檔案於本操作無效, 需使用格式化記憶卡或是將記憶卡插入電腦中
2.
進行刪除。
删除文件
删除文件
删除文件删除文件
钮。
若选择删除单档
删除单档,则进入档案目录中按/选择删除之文件,再
删除单档删除单档
按 按钮。
删除全部,则需进一步选择是删除 视屏文件
删除全部删除全部
按钮进行文件删除。
再按
删除的文件不能恢复。删除前,确保文件留有备份。
视屏文件或是 图片文件
视屏文件视屏文件
10
图片文件,
图片文件图片文件
Page 32

バッテリー警告
操作について詳しくは、
操作について詳しくは、操作について詳しくは、
操作について詳しくは、
CD-ROM
をご覧ください。
をご覧ください。をご覧ください。
をご覧ください。
常に付属のシステムを使用して充電してください。 バッテリー
を不適切に取り扱うと、爆発を招くおそれがあります。
バッテリーを分解したり、穴を開けたりしないでください。ま
たはバッテリーをショートさせないでください。
直火にさらされると、バッテリーは爆発することがあります。
バッテリーは絶対に火気に投じないでください。
使用済みバッテリーの廃棄は、地方条例を順守してください。
バッテリーを自分で交換することは絶対にしないでください。
交換の際は、販売店にご依頼ください。
設置における注意
1.
最高に拡がった風景を録画できるようにするため、本機はバッ
クミラーの近くに設置してください。
2.
レンズが必ず前面ガラス ワイパーのワイプ範囲内にあるよう
にして、雨の場合もクリアな表示ができるようにしてください。
3.
レンズに指で触れないでください。 指の脂がレンズに残り、
不明瞭なビデオ画像やスナップショット画 像の原因となります。
レンズは定期的にお手入れしてください。
4.
本機を色付き窓に設置しないでください。 そうすることによ
り、色付きフィルムが損傷する恐れがあります。
5.
設置場所は必ず色付き窓に妨げられない場所にしてください。
1
Page 33

1 はじめに
1.1 パッケージの内容
ッケージには次 のアイテムが入っています。 欠損品目または 破
損品目がある場合は、ただちに販売店 にお問い合わせくだ さい。
ドライブレコーダー ブラケット
クイックスタートガイ
ド
カーアダプター
2
CD-ROM
Page 34

1
3
上面図と底面図
側面図 (左と右)
正面図
背面図
1.2 製品の概要
番号
1 ブラケット
ソケット
8
LED
2 マイクロフォン
9 LCD
パネル
3 [電源]
ボタン 10 [上] ボタン()
4 メモリ カード ス
ロット 11 [下] ボタン()
5 USB
コネクタ
12 [入力]
ボタン()
6 ビデオ コネクター
13 広角
レンズ
7 [戻る] ボタン() 14
スピーカー
8
2
7
9
10
11
12
4
番号
項目
5
14
6
13
項目
インジケーター
3
Page 35

2 入門編
2.1 メモリカード の挿入
メモリカードを挿入します。この時、ゴールドの接触点が本 機の
背面に面するようにします。 カチッと音がして所定の位置に収
まるまでメモリ カ ードを押します。
メモリカード の取り外し
メモリカードの端を内側に押し込みます。カチリという音が 聞こ
える、またはカチリという感覚があると、メモリカードが押し出
されます。その後、スロットから取り出すことができます。
注意:
1. 本機の電源がオンになっているときは、メモリ カードを取り外したり、挿入
したりしないでください。 これにより、メモリ カードが損傷することがあり
ます。
2. 32 GB で Class 6 以上のスピードの micro SD カードの使用が推奨されます。
3. 初めて使用するときは micro SD カードをフォーマットすることが推奨され
ます。
4
Page 36

2.2 車内への設置
2.2.1
1. ブラケットを本機に取り付けます。 カチッ
2. ブラケットを取り付ける前に、フロントガ
3. フロントガラスに土台をしっかり当て、
警告: 本機を色付き窓に設置しないでください。
そうすることにより、色付きフィルムが損傷する恐れがあります。
フロントガラスへの取り付け
フロントガラスへの取り付け
フロントガラスへの取り付けフロントガラスへの取り付け
という音が聞こえるまでブラケット ホル
ダーに差し込みます。
ラスとブラケットの吸着カップの汚れをア
ルコールで取ってください。乾いたらフロ
ントガラスに吸着カップを押し付けま
す。
クランプを押し下げてカー ホルダーを
フロントガラスに取り付けます。 土台
が所定の位置にロックされていること
を確認します。
5
Page 37

2.2.2
1. ノブを緩め、デバイスを縦または横に回転させます。
2. それからノブを締め、本機が安全に所定の位置にロックさ
機器の位置を調整します
ノブ
れていることを確認します。
6
Page 38

2.3 電源への接続
付属の自動車用アダプターのみを使用して、機器をパワーアップ
し、内蔵バッテリーを充電します。
1. カーアダプターの一方の端を本機の USB コネクターに接続
します。
2. カーチャージャーの他方を車両のシガレットライターソケッ
トに差込みます。 自動車のエンジンが始動すると、本機の電
源が自動的に入ります。
注意:
1.赤いLEDはバッテリーの充電中を示します。デバイスに電源コードをつないで
充電しているときに赤く点滅した場合、デバイスの温度が熱くなりすぎている
ため、電源コードをすぐに抜かなければなりません。
2. 周囲温度が 45°C 以上になってもビデオカメラへの電源供給を続けられま
すが、バッテリーは充電されない場合があります。 これはリチウムバッテリー
の特性であり、故障ではありません。
7
Page 39

2.4 機器の電源オン/オフ
2.4.1
車両のエンジンが始動すると、このデバイスは自動的にオン にな
ります。自動録画機能が有効になっている場合、デバイスがオン
になった直後に録画が自動的に始まります。
車両のエンジンが停止すると、ビデオカメラは自動的に録画 を保
存し、10秒以内に電源を切ります。
注意:
自動電源オン/オフは、電源ソケットが点火装置に接続されていることを前提と
します。
自動電源オン/オフ
3 ドライブレコーダーの使用
3.1 ビデオ録画
3.1.1
車両のエンジンが始動すると、ビデオカメラは自動的にオン にな
り、録画を開始します。
エンジンが停止すると、録画が自動的に停止します。
運転中のビデオ録画
8
Page 40

3.1.2
緊急録画
通常のビデオ録画中に、
ボタンを押して
緊急録画
モー
ドを開始します。
直後に「緊急」メッセージが画
面の左上隅に表示されます。録
画されたファイルは上書きさ
れることなく保護されます。
録画を停止するには、 ボタ
ンを押します。
注意:
1. 衝突検出機能を有効化しているときに衝突が検出されると、ビデオカメラは
自動的に緊急録画機 能を始めます。
2. 緊急録画ファイルは新しいファイルとして作成され、通常のループ録画で上
書きされないように保護されます。8GB以上のメモリカードで最大10件の緊急ビ
デオファイルを保存できます。緊急録画ファイルがいっぱいになると、「緊急
ファイルがいっぱいになりました」という警告メッセージが画面に表示され、
新しい緊急録画ファイルが作成されると、最も古い緊急ファイルが自動的に削
除されます。
9
Page 41

3.2 ファイル再生
1. 録画中、 ボタンを押し、必要なビデオまたは写真ファイルを
探します。
2. ボタンを押して、OSD メニューに入ります。
3. / ボタンを押して、ブラウズしたいカテゴリを選択し、
ボタンを押します。
4. 緊急ビデオファイルを再生するとき、ファイル名の「EMER」でフ
ァイルを識別できます。
3.2.1
ファイルを削除するには、次の手順に従ってください。
1. 録画中、OSDメニューに入るには ボタンを押します。
2. / ボタンを押して、[選択を削除] を選択し、 ボタン
3. / ボタンを押して「1件削除」または「すべて削除」を選択
4. 「1件削除」を選択したら、 / ボタンを押して削除対象を選
5. 「すべて削除」を選択したら、 / ボタンを押して削除対象と
注意:
1.削除されたファイルは復元できません。削除の前に必ずファイルをバックアッ
プしてください。
2. 緊急ファイルはこの操作で削除されません。削除するにはメモリカードをPC
に挿入して削除するか、メモリカードをフォーマットします。
選択を削除
を押します。
し、 ボタンを押します。
ボタンを押します。
択し、
してビデオファイルまたはイメージファイルを選択し、「はい」
または「いいえ」を選択して削除します。
10
Page 42

배터리
배터리 경고
배터리배터리
본 시스템에서 권장하는 방식으로 항상 충전해 주십시오.
잘못된 배터리 사용은 폭발의 원인이 됩니다.
배터리를 분해하거나 구멍을 내거나 단락된 상태로
만들지 마십시오.
배터리가 화기에 노출된 경우 폭발 할 수
있습니다.배터리를 불에 폐기하지 마십시오.
배터리 폐기 시, 각 지역의 규정을 준수해 주십시오.
배터리를
배터리를 임의로
배터리를배터리를
문의해
문의해 교체해
문의해문의해
설치
설치 시시시시 주의
설치설치
1. 최상의 시야를 확보하기 위해 본 장치를 백미러 근처에
설치해 주십시오.
2. 우천 시에도 깨끗한 시야를 확보하기 위해 본 카메라의
렌즈를 와이퍼가 작동하는 범위에 맞춰 주십시오.
3. 손으로 렌즈를 만지지 마십시오. 지문이 남게 되어
선명한 영상을 확보하는데 문제가 발생할 수 있습니다.
주기적으로 렌즈를 청소해 주십시오.
4. 짙은 창문에 본 장치를 설치할 경우 화면의 색조에
영향을 미칠 수 있습니다.
5. 설치 위치가 짙은 창문에 의해 시야를 방해 받지
않는지에 대해 확인해 주십시오.
더더더더 많은
많은 작업
많은많은
경고
경고경고
임의로 교체하지
교체하지 마시고
임의로임의로
교체하지교체하지
교체해 주십시오
주십시오.
교체해교체해
주십시오주십시오
주의 사항
사항
주의주의
사항사항
작업 자세한
자세한 내용은
작업작업
자세한자세한
마시고 반드시
반드시 판매상에게
반드시반드시
참조하십시오....
참조하십시오참조하십시오
판매상에게
판매상에게판매상에게
마시고마시고
내용은 CD-ROM 을을을을 참조하십시오
내용은내용은
1
Page 43

1 소개
소개
소개소개
1.1 포장
포장 내용물
내용물
포장포장
내용물내용물
포장 내용물은 다음과 같습니다. 빠져 있거나 손상된 품목이
있을 경우 즉시 판매점에 문의하십시오.
차량 레코더 브래킷
CD-ROM
빠른 설치 가이드 차량 어뎁터
2
Page 44

1.2 제품
번호
번호번호
번호 아이템
아이템아이템
아이템
번호
번호번호
번호 아이템
아이템아이템
아이템
1
브래킷 소켓
8 LED
표시등
2
9
LCD 패널
3
전원버튼
10
위로 버튼 ()
4
메모리 카드 슬롯
11
아래로 버튼
()
5
USB
커넥터
12
엔터 버튼
()
6 HD
커텍터
13
와이드 앵클 렌즈
7
뒤로가기버튼
()
14
스피커
1
3
7
제품 미리보기
제품제품
측면
측면 ((((좌측
측면측면
미리보기
미리보기미리보기
상단
상단 및및및및 하단
하단
상단상단
하단하단
좌측 및및및및 우측
우측))))
좌측좌측
우측우측
전면
전면
전면전면
8
뒷면
9
10
11
12
2
뒷면
뒷면뒷면
4
마이크로폰
5
14
6
13
3
Page 45

2 시작하기
시작하기
시작하기시작하기
2.1 메모리카드
메모리카드 삽입하기
메모리카드메모리카드
골드 바가 장치의 후면을 향하게 하여 메모리 카드를
삽입하고, 확실히 삽입될 때까지 밀어 넣습니다.
삽입하기
삽입하기삽입하기
메모리
메모리 카드
카드 제거하기
, 클래스
마이크로
제거하기
카드카드
제거하기제거하기
속도 이상의 마이크로 SD 카드를 사용하십시오.
6
카드를 처음 사용할 때 포맷하여 사용하십시오.
SD
4
메모리메모리
메모리 카드 가장자리를 딸깍 소리가 들리거나 느껴질 때까지
밀어 넣고, 슬롯에서 제거할 때는 눌러 빼십시오.
주의
주의:
주의주의
장치가 켜져 있을 때 메모리 카드를 제거하지 마십시오, 카드 내에 있는
1.
자료들이 손상될 위험이 있습니다.
2. 32GB
3.
Page 46

2.2 받침대
받침대 설치하기
받침대받침대
2.2.1
1. 브래킷을 본 장치에 설치하기.
탈칵하는 소리가 들릴 때까지
브래킷을 밀어 넣으십시오.
2. 브래킷을 설치하기 전에 알코올로
브래킷의 윈드실드와 흡입 컵을
닦으십시오. 마를 때까지 기다렸다가
흡입 컵을 윈드실드에 눌러
끼웁니다.
3. 앞 유리에 견고하게 설치한 후,
장치와 브랫킷이 단단히
고정되어 있는지 다시 한 번
확인해 주십시오.
경고
경고:::: 장치를 틴팅한 창에 설치하지 마십 시오. 틴트 필름이
경고경고
손상될 수 있습니다.
설치하기
설치하기설치하기
앞앞앞앞 유리에
유리에 설치하기
유리에유리에
설치하기
설치하기설치하기
5
Page 47

2.2.2
장치
장치 위치를
위치를 조정합니다
장치장치
위치를위치를
1. 노브를 풀어 장치를 수직으로 또는 수평으로
회전시킵니다.
2. 이어서 장치의 위치를 확실하게 조절한 후 다시 노브를
단단히 조여 줍니다.
조정합니다.
조정합니다조정합니다
6
노브
Page 48

2.3 전원
전원 연결하기
연결하기
전원전원
연결하기연결하기
제품에 포함된 차량 어댑터만을 사용해 본 제품의 배터리를
충전해 주십시오.
1. 차량 어댑터의 USB 커넥터를 장치에 연결하십시오.
2. 차량 어댑터의 다른 한 쪽을 담배 라이터 소켓에
연결합니다. 차량에 시동이 걸리면 장치가 자동으로
켜지게 됩니다.
주의
주의:
주의주의
적색
램프는 배터리가 충전 중임을 나타냅니다. 충전을 위해 장치
1.
LED
전원 코드를 연결하고 적색 램프가 깜빡거리면, 장치 온도가 너무 높아 전원
코드를 즉시 뽑아야 한다는 것을 나타냅니다.
차내 온도가
2.
캠코더에 공급할 수 있지만 배터리를 충전하지 못할 수 있습니다. 이것은
리튬 폴리머 배터리의 특성이며 고장이 아닙니다.
이상에 도달할 경우 차량용 어댑터는 여전히 전원을
45°C
7
Page 49

2.4 전원
전원 켜기
켜기////끄기
전원전원
2.4.1
자동
자동 전원
자동자동
차량 엔진을 시동하면 장치가 자동으로 켜집니다. 자동 녹화
기능이 활성화되면, 장치가 켜진 직후 녹화가 자동으로
시작됩니다.
차량 엔진을 끄면, 캠코더가 녹화된 동영상을 자동으로
저장하고 10초 내에 전원이 꺼집니다.
주의
주의:
주의주의
자동 전원 켜짐/꺼짐 기능은 파워소켓이 차량점화장치에 연결되어야
있어야 작동합니다.
3 차량
차량 레코더
차량차량
3.1 비디오
비디오 녹화하기
비디오비디오
3.1.1
운전하는
운전하는 동안
운전하는운전하는
차량 엔진을 시동하면, 캠코더가 자동으로 켜져 녹화를
시작합니다.
녹화는 엔진이 꺼질 때까지 진행됩니다.
끄기
켜기켜기
끄기끄기
전원 켜기
켜기/끄기
전원전원
레코더 사용하기
레코더레코더
녹화하기
녹화하기녹화하기
끄기
켜기켜기
끄기끄기
사용하기
사용하기사용하기
동안 녹화하기
녹화하기
동안동안
녹화하기녹화하기
8
Page 50

3.1.2
비상상황
비상상황 녹화
비상상황비상상황
정상적 동영상 녹화 중에
긴급 녹화 모드를
시작하려면 버튼을
누릅니다.
"
긴급
긴급
" 메시자가 화면의
긴급긴급
왼쪽 위에 즉시 표시되며,
해당 녹화 파일은 녹화를
계속 저장하고 덮어쓰기되지
않습니다.
비상 녹화를 완료한 후 정상 녹화 모드로 돌아갑니다.
주의
주의:
주의주의
충돌 감지 기능이 활성화되고 충돌이 감지될 경우, 캠코더는 긴급 녹화
1.
기능을 자동으로 실행합니다.
비상 녹화 파일은 새 파일로 생성되고 정상적 루프 녹화에 의해 덮어쓰기
2.
되지 않도록 보호됩니다. 8 GB (이상의) 메모리 카드는 최대 10개의 비상
동영상 파일을 저장할 수 있습니다. 비상 녹화 파일이 꽉 차면 "비상 파일
꽉 참"이라는 경고 메시지가 화면에 표시되고, 새 비상 녹화 파일이
생성되면 가장 오래된 비상 녹화 파일이 자동으로 삭제됩니다.
녹화
녹화녹화
9
Page 51

3.2 동영상
동영상 및및및및 사진
동영상동영상
1.
녹화 중에 원하는 동영상 및 사진 파일을 찾으려면
버튼을 누릅니다.
2. 버튼을 누른 후 OSD 메뉴로 들어갑니다.
3. / 버튼으로 재생하고자 하는 파일을 선택한 후,
버튼을 누릅니다.
4. 비상 동영상 파일을 재생하려면 EMER이 포함된 파일
이름을 선택할 수 있습니다.
3.2.1
파일
파일 삭제하기
파일파일
파일(들)을 삭제하려면 다 음과 같은 방법으로 파일을 삭제하실
수 있습니다. :
1. 녹화 진행 중에 버튼을 눌러 OSD 메뉴에 들어갑니다.
2. / 버튼으로 파일 삭제 를 선택하고 버튼을
누릅니다.
3. / 버튼을 눌러 한 개 삭제 또는 모두 삭제를 선택한
다음 버튼을 누릅니다.
4. 한 개 삭제를 선택한 후
항목을 선택한 다음 버튼을 누릅니다.
5. 모두 삭제를 선택한 후 / 버튼을 눌러 삭제하려는
동영상 파일 또는 이미지 파일을 선택한 다음 '예' 또는
'아니요'를 선택하여 삭제합니다.
주의
주의:
:
주의주의
: :
삭제된 파일은 복구가 불가능합니다. 파일을 삭제하기에 앞서 반드시
1.
백업을 해 주십시오.
비상 파일은 이 작업에서 삭제할 수 없습니다. 메모리 카드를 PC에
2.
연결하거나 메모리 카드를 포맷하여 삭제할 수 있습니다.
사진 재생하기
재생하기
사진사진
재생하기재생하기
삭제하기
삭제하기삭제하기
10
/ 버튼을 눌러 삭제하려는
Page 52

 Loading...