


LASERJET ENTERPRISE 700
User Guide
2
3
M712


HP LaserJet Enterprise 700 M712
User Guide

Copyright and License
© 2012 Copyright Hewlett-Packard
Development Company, L.P.
Reproduction, adaptation, or translation
without prior written permission is
prohibited, except as allowed under the
copyright laws.
The information contained herein is subject
to change without notice.
The only warranties for HP products and
services are set forth in the express warranty
statements accompanying such products and
services. Nothing herein should be
construed as constituting an additional
warranty. HP shall not be liable for technical
or editorial errors or omissions contained
herein.
Part number: CF235-90901
Edition 2, 11/2012
Trademark Credits
®
, Adobe Photoshop®, Acrobat®, and
Adobe
PostScript
®
are trademarks of Adobe
Systems Incorporated.
Apple and the Apple logo are trademarks of
Apple Computer, Inc., registered in the U.S.
and other countries. iPod is a trademark of
Apple Computer, Inc. iPod is for legal or
rightholder-authorized copying only. Don't
steal music.
Microsoft®, Windows®, Windows® XP,
and Windows Vista® are U.S. registered
trademarks of Microsoft Corporation.
®
is a registered trademark of The
UNIX
Open Group.

Table of contents
1 Product introduction ......................................................................................................... 1
Product comparison .................................................................................................................. 2
Product views .......................................................................................................................... 4
Product front-right view .............................................................................................. 4
Product front-left view ................................................................................................. 5
Interface ports ........................................................................................................... 6
Serial number and model number location ................................................................... 7
Control panel .......................................................................................................................... 8
Control-panel layout .................................................................................................. 8
Control-panel help ..................................................................................................... 9
Product reports ...................................................................................................................... 10
2 Connect the product and install software ........................................................................ 11
Connect the product to a computer by using a USB cable and install the software (Windows) ......... 12
Connect the product to a network by using a network cable and install the software (Windows) ...... 14
Configure the IP address .......................................................................................... 14
Install the software ................................................................................................... 15
Connect the product to a computer by using a USB cable and install the software (Mac OS X) ........ 16
Connect the product to a network by using a network cable and install the software (Mac OS X) ..... 17
Configure the IP address .......................................................................................... 17
Install the software ................................................................................................... 18
3 Input trays and output bins ............................................................................................ 21
Supported paper sizes ............................................................................................................ 22
Supported paper types ........................................................................................................... 26
Configure trays ...................................................................................................................... 27
Configure a tray when loading paper ........................................................................ 27
Configure a tray to match print job settings ................................................................ 27
Configure a tray by using the control panel ................................................................ 28
Alternative letterhead mode ..................................................................................................... 29
Tray 1 .................................................................................................................................. 30
ENWW iii

Tray capacity and paper orientation .......................................................................... 30
Load Tray 1 ............................................................................................................ 31
Tray 2 and Tray 3 .................................................................................................................. 33
Tray capacity and paper orientation .......................................................................... 33
Load Tray 2 and Tray 3 ........................................................................................... 34
500-sheet trays ...................................................................................................................... 36
500-sheet tray capacity and paper orientation ............................................................ 36
Load the 500-sheet trays .......................................................................................... 37
3,500-sheet high-capacity tray ................................................................................................ 39
3,500-sheet high-capacity input capacity and paper orientation ................................... 39
Load the 3,500-sheet high-capacity tray ..................................................................... 39
Use paper output options ........................................................................................................ 41
Output bin .............................................................................................................. 41
4 Parts, supplies, and accessories ...................................................................................... 43
Order parts, accessories, and supplies ..................................................................................... 44
HP policy on non-HP supplies .................................................................................................. 45
HP anticounterfeit Web site ..................................................................................................... 46
Print when a toner cartridge is at estimated end of life ................................................................ 47
Enable or disable the Very Low Settings options from the control panel ......................................... 48
Customer self-repair parts ........................................................................................................ 49
Accessories ........................................................................................................................... 52
Toner cartridge ...................................................................................................................... 53
Toner-cartridge view ................................................................................................ 53
Toner-cartridge information ...................................................................................... 54
Recycle the toner cartridge ........................................................................ 54
Toner-cartridge storage ............................................................................. 54
HP policy on non-HP toner cartridges .......................................................... 54
Replace the toner cartridge ...................................................................................... 55
5 Print ............................................................................................................................... 59
Supported print drivers (Windows) ........................................................................................... 60
HP Universal Print Driver (UPD) ................................................................................. 60
UPD installation modes ............................................................................. 61
Change print-job settings (Windows) ........................................................................................ 62
Change the settings for all print jobs until the software program is closed ....................... 62
Change the default settings for all print jobs ............................................................... 62
Change the product configuration settings .................................................................. 62
Change print-job settings (Mac OS X) ....................................................................................... 63
Change the settings for all print jobs until the software program is closed ....................... 63
Change the default settings for all print jobs ............................................................... 63
iv ENWW

Change the product configuration settings .................................................................. 63
Print tasks (Windows) ............................................................................................................. 64
Use a printing shortcut (Windows) ............................................................................. 64
Create printing shortcuts (Windows) .......................................................................... 66
Automatically print on both sides (Windows) .............................................................. 69
Manually print on both sides (Windows) .................................................................... 71
Print multiple pages per sheet (Windows) ................................................................... 73
Select the page orientation (Windows) ...................................................................... 75
Select the paper type (Windows) .............................................................................. 77
Print the first or last page on different paper (Windows) ............................................... 80
Scale a document to fit page size (Windows) ............................................................. 83
Create a booklet (Windows) ..................................................................................... 85
Print tasks (Mac OS X) ............................................................................................................ 87
Use a printing preset (Mac OS X) .............................................................................. 87
Create a printing preset (Mac OS X) ......................................................................... 87
Automatically print on both sides (Mac OS X) ............................................................. 87
Manually print on both sides (Mac OS X) ................................................................... 87
Print multiple pages per sheet (Mac OS X) .................................................................. 88
Select the page orientation (Mac OS X) ..................................................................... 88
Select the paper type (Mac OS X) ............................................................................. 88
Print a cover page (Mac OS X) ................................................................................. 89
Scale a document to fit page size (Mac OS X) ............................................................ 89
Create a booklet (Mac OS X) ................................................................................... 89
Additional print tasks (Windows) ............................................................................................. 90
Cancel a print job (Windows) ................................................................................... 90
Select the paper size (Windows) ............................................................................... 90
Select a custom paper size (Windows) ...................................................................... 90
Print watermarks (Windows) ..................................................................................... 91
Additional print tasks (Mac OS X) ............................................................................................ 92
Cancel a print job (Mac OS X) ................................................................................. 92
Select the paper size (Mac OS X) .............................................................................. 92
Select a custom paper size (Mac OS X) ..................................................................... 92
Print watermarks (Mac OS X) .................................................................................... 93
Store print jobs on the product ................................................................................................. 94
Create a stored job (Windows) ................................................................................. 94
Create a stored job (Mac OS X) ............................................................................... 96
Print a stored job ..................................................................................................... 97
Delete a stored job .................................................................................................. 97
Add a job-separator page (Windows) ...................................................................................... 99
Use HP ePrint ....................................................................................................................... 100
Use the HP ePrint Mobile Driver ............................................................................................. 101
ENWW v

Use Apple AirPrint ................................................................................................................ 102
Connect the product to AirPrint ............................................................................... 102
Find the product AirPrint name ................................................................................ 102
Print from AirPrint .................................................................................................. 102
Change the AirPrint product name .......................................................................... 103
Solve AirPrint problems .......................................................................................... 103
Use HP Smart Print (Windows) ............................................................................................... 105
Use easy-access USB printing ................................................................................................ 106
Print easy-access USB documents ............................................................................ 107
6 Manage the product ..................................................................................................... 109
Configure IP network settings ................................................................................................. 110
Printer sharing disclaimer ....................................................................................... 110
View or change network settings ............................................................................. 110
Manually configure IPv4 TCP/IP parameters from the control panel ............................. 110
Manually configure IPv6 TCP/IP parameters from the control panel ............................. 111
HP Embedded Web Server ................................................................................................... 112
Open the HP Embedded Web Server ...................................................................... 112
HP Embedded Web Server features ......................................................................... 113
Information tab ...................................................................................... 113
General tab ........................................................................................... 113
Print tab ................................................................................................ 114
Troubleshooting tab ................................................................................ 115
Security tab ........................................................................................... 115
HP Web Services tab .............................................................................. 115
Networking tab ...................................................................................... 116
Other Links list ....................................................................................... 116
HP Utility (Mac OS X) ........................................................................................................... 117
Open HP Utility ..................................................................................................... 117
HP Utility features .................................................................................................. 117
Use HP Web Jetadmin software ............................................................................................. 119
Economy settings ................................................................................................................. 120
Print with EconoMode ............................................................................................ 120
Optimize speed or energy use ................................................................................ 120
Set sleep mode ..................................................................................................... 120
Set the sleep schedule ............................................................................................ 121
Product security features ........................................................................................................ 123
Security statements ................................................................................................ 123
IP Security ............................................................................................................ 123
Sign in to the product ............................................................................................ 123
Assign a system password ...................................................................................... 123
vi ENWW

Encryption support: HP High-Performance Secure Hard Disks ...................................... 124
Lock the formatter cage .......................................................................................... 124
Upgrade the product firmware ............................................................................................... 125
7 Solve problems ............................................................................................................. 127
Solve problems checklist ....................................................................................................... 128
Factors that affect product performance .................................................................................. 130
Restore factory-set defaults ..................................................................................................... 131
Control-panel help ................................................................................................................ 132
Paper feeds incorrectly or becomes jammed ............................................................................ 133
The product does not pick up paper ........................................................................ 133
The product picks up multiple sheets of paper ........................................................... 133
Prevent paper jams ................................................................................................ 134
Clear jams .......................................................................................................................... 135
Jam locations ........................................................................................................ 135
Auto-navigation for clearing jams ............................................................................ 135
Clear jams in the output-bin area ............................................................................ 136
Clear jams in Tray 1 .............................................................................................. 136
Clear jams in Tray 2 or Tray 3 ................................................................................ 137
Clear jams in the 500-sheet trays ............................................................................ 139
Clear jams in the 3,500-sheet high-capacity tray ....................................................... 140
Clear jams from the toner-cartridge area .................................................................. 143
Clear jams in the fuser ........................................................................................... 146
Clear jams from the duplexer .................................................................................. 148
Change jam recovery ........................................................................................................... 149
Improve print quality ............................................................................................................. 150
Print from a different software program .................................................................... 150
Set the paper-type setting for the print job ................................................................ 150
Check the paper type setting (Windows) ................................................... 150
Check the paper type setting (Mac OS X) .................................................. 150
Check the toner-cartridge status .............................................................................. 151
Print a cleaning page ............................................................................................ 152
Visually inspect the toner cartridge .......................................................................... 152
Check paper and the printing environment ............................................................... 152
Use paper that meets HP specifications ..................................................... 152
Check the environment ............................................................................ 153
Check the EconoMode settings ............................................................................... 153
Try a different print driver ....................................................................................... 154
Set the individual tray alignment ............................................................................. 155
The product does not print or it prints slowly ............................................................................ 156
The product does not print ...................................................................................... 156
ENWW vii

The product prints slowly ........................................................................................ 157
Solve easy-access USB printing problems ................................................................................ 158
The Retrieve From USB menu does not open when you insert the USB flash drive .......... 158
The file does not print from the USB flash drive ......................................................... 159
The file that you want to print is not listed in the Retrieve from USB menu ..................... 159
Solve USB connection problems ............................................................................................. 160
Solve wired network problems ............................................................................................... 161
The product has a poor physical connection ............................................................. 161
The computer is using the incorrect IP address for the product ..................................... 161
The computer is unable to communicate with the product ........................................... 162
The product is using incorrect link and duplex settings for the network ......................... 162
New software programs might be causing compatibility problems .............................. 162
The computer or workstation might be set up incorrectly ............................................. 162
The product is disabled, or other network settings are incorrect ................................... 162
Solve product software problems (Windows) ........................................................................... 163
A print driver for the product is not visible in the Printer folder .................................... 163
An error message was displayed during the software installation ................................ 163
The product is in Ready mode, but nothing prints ...................................................... 163
Solve product software problems (Mac OS X) .......................................................................... 165
The product name does not appear in the product list in the Print & Fax or the Print &
Scan list ............................................................................................................... 165
A print job was not sent to the product that you wanted ............................................. 165
When connected with a USB cable, the product does not appear in the Print & Fax or
the Print & Scan list after the driver is selected .......................................................... 165
Remove software (Windows) ................................................................................................. 167
Remove the print driver (Mac OS X) ....................................................................................... 168
Index ............................................................................................................................... 169
viii ENWW

1 Product introduction
Product comparison
●
Product views
●
Control panel
●
Product reports
●
ENWW 1

Product comparison
M712n
CF235A
Paper handling Tray 1 (100-sheet capacity)
Tray 2 (250-sheet capacity)
Tray 3 (250-sheet capacity)
Optional Tray 4 (500-sheet capacity)
Standard output bin (250-sheet capacity)
Automatic duplex printing
Connectivity Hi-Speed USB 2.0
10/100/1000 Ethernet LAN connection with IPv4
and IPv6
Easy-access USB port, for printing without a
computer and for upgrading the firmware
Memory 512 MB DIMM
Storage 16 GB Solid-State Memory module
320 GB HP High-Performance Secure Hard Disk
M712dn
CF236A
M712xh
CF238A
Control-panel
display
Print Prints 41 pages per minute (ppm) on A4-size paper
Easy-access USB printing (no computer required)
Supported
operating systems
NOTE: For a current
list of supported
operating systems, go to
www.hp.com/go/
lj700M712_software.
Windows XP SP2 or later, 64-bit (print driver only,
Windows Vista, 32-bit and 64-bit
4-line LCD with 10-key numeric keypad
and 40 ppm on Letter-size paper
Windows XP SP2 or later, 32-bit
NOTE: Microsoft retired mainstream support for
Windows XP in April 2009. HP will continue to
provide best-effort support for the discontinued XP
operating system.
not supported by the software installer)
NOTE: Microsoft retired mainstream support for
Windows XP in April 2009. HP will continue to
provide best-effort support for the discontinued XP
operating system.
NOTE: Windows Vista Starter is not supported by
the software installer or the print driver.
2 Chapter 1 Product introduction ENWW

M712n
M712dn
M712xh
Windows 7, 32-bit and 64-bit
Windows 8, 32-bit and 64-bit
NOTE: The software installer does not support the
64-bit version, but the print driver supports it.
Windows 2003 Server SP1 or later, 32-bit and 64-
bit
Windows 2008, 32-bit and 64-bit
Windows 2008 R2, 64-bit
Mac OS X 10.6, 10.7, and 10.8
CF235A
CF236A
CF238A
ENWW
Product comparison
3
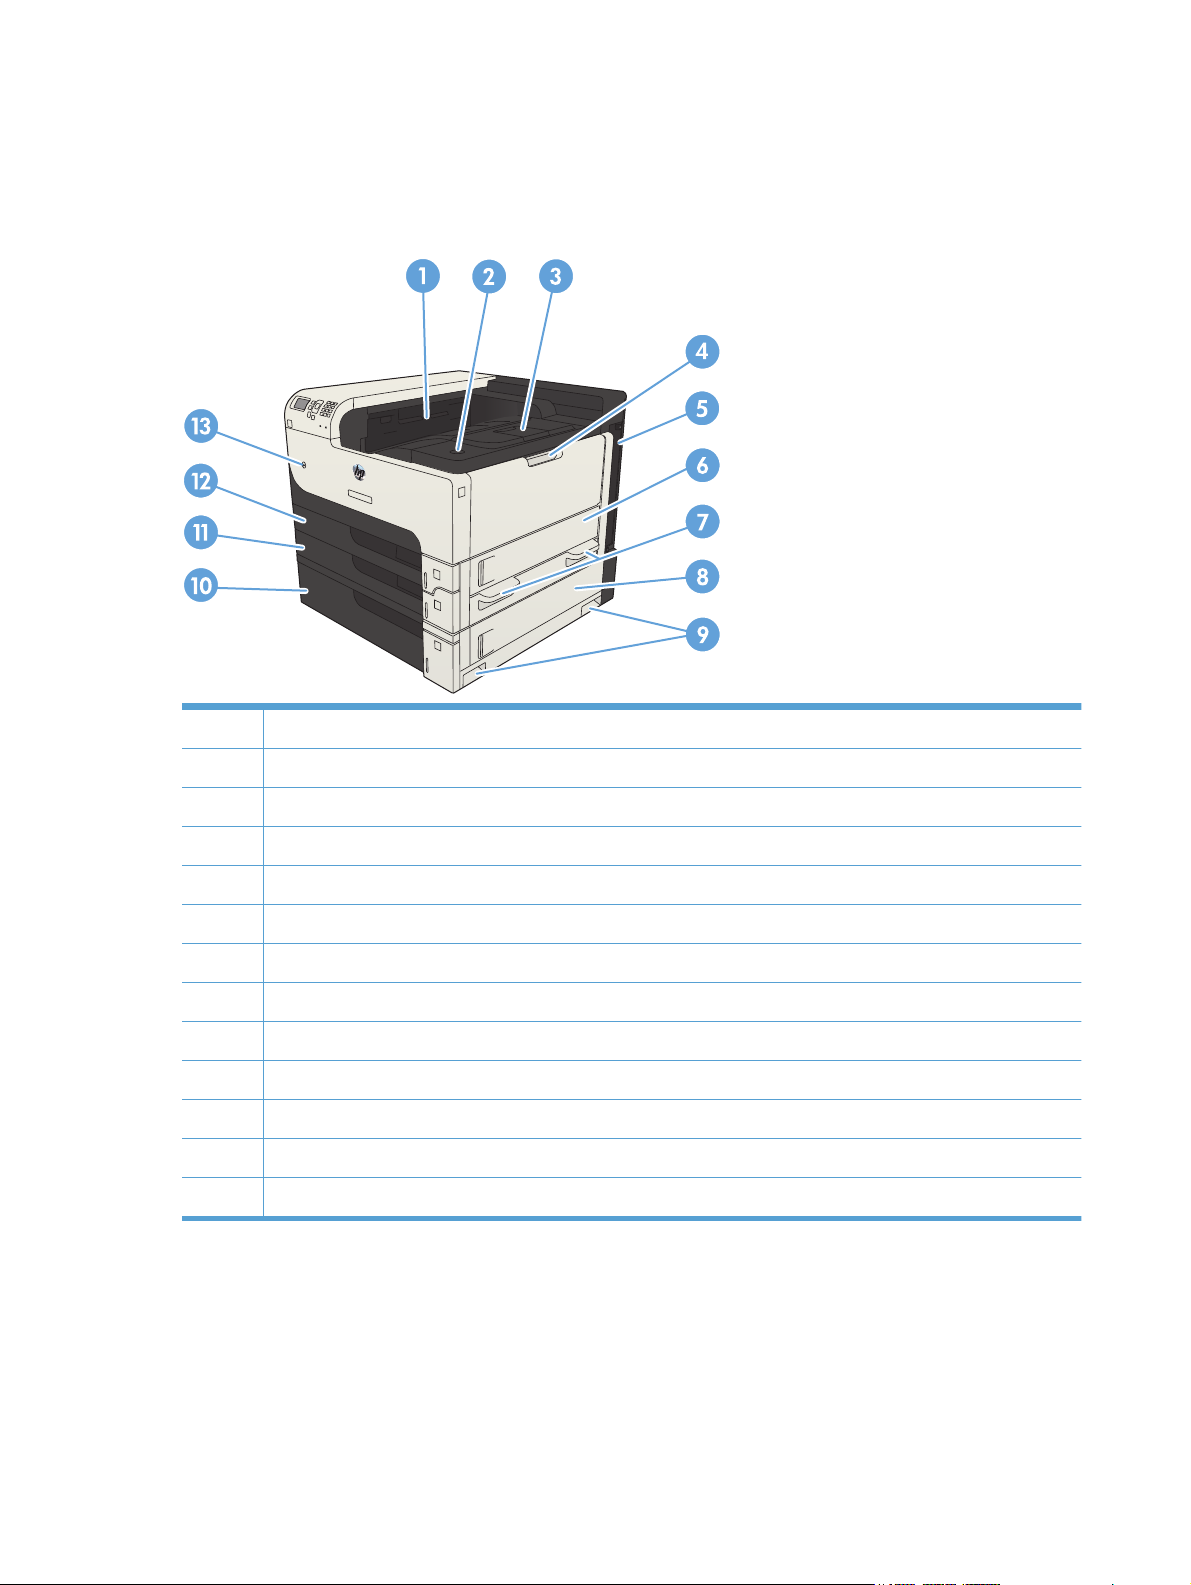
Product views
Product front-right view
1 Output bin
2 Cartridge-door-release button
3 Output-bin extension
4Tray 1
5 Formatter (contains the interface ports)
6 Right-side access door
7 Handles for lifting the product
8 500-sheet tray jam-access door
9 Handles for lifting the product
10 500-sheet tray (included with the M712xh model)
11 Tray 3
12 Tray 2
13 On/off button
4 Chapter 1 Product introduction ENWW
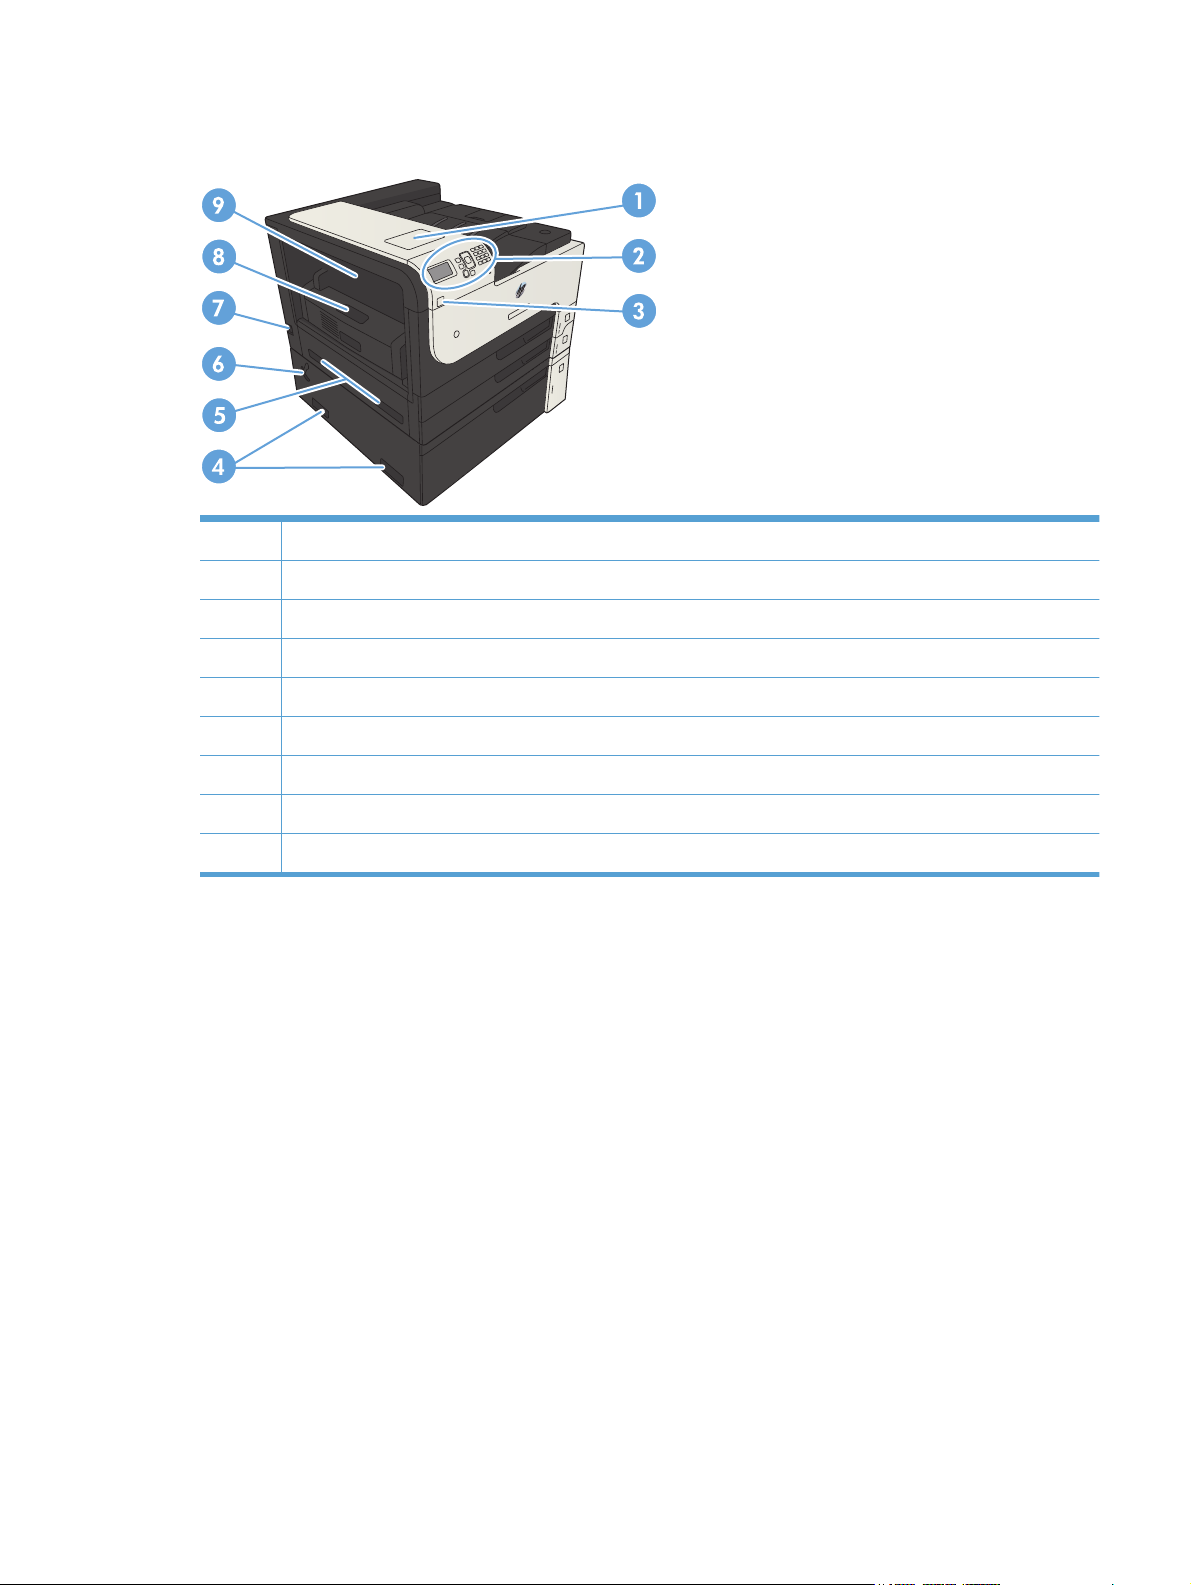
Product front-left view
1 Hardware integration pocket (for connecting third-party devices)
2 Control panel
3 Easy-access USB port (for printing without a computer and for upgrading the firmware)
4 Handles for lifting the product
5 Handles for lifting the product
6 Lever to lock the 500-sheet tray to the product
7 Power connection
8 Duplexer (included with the M712dn and M712xh models)
9 Fuser jam-access cover
ENWW
Product views
5
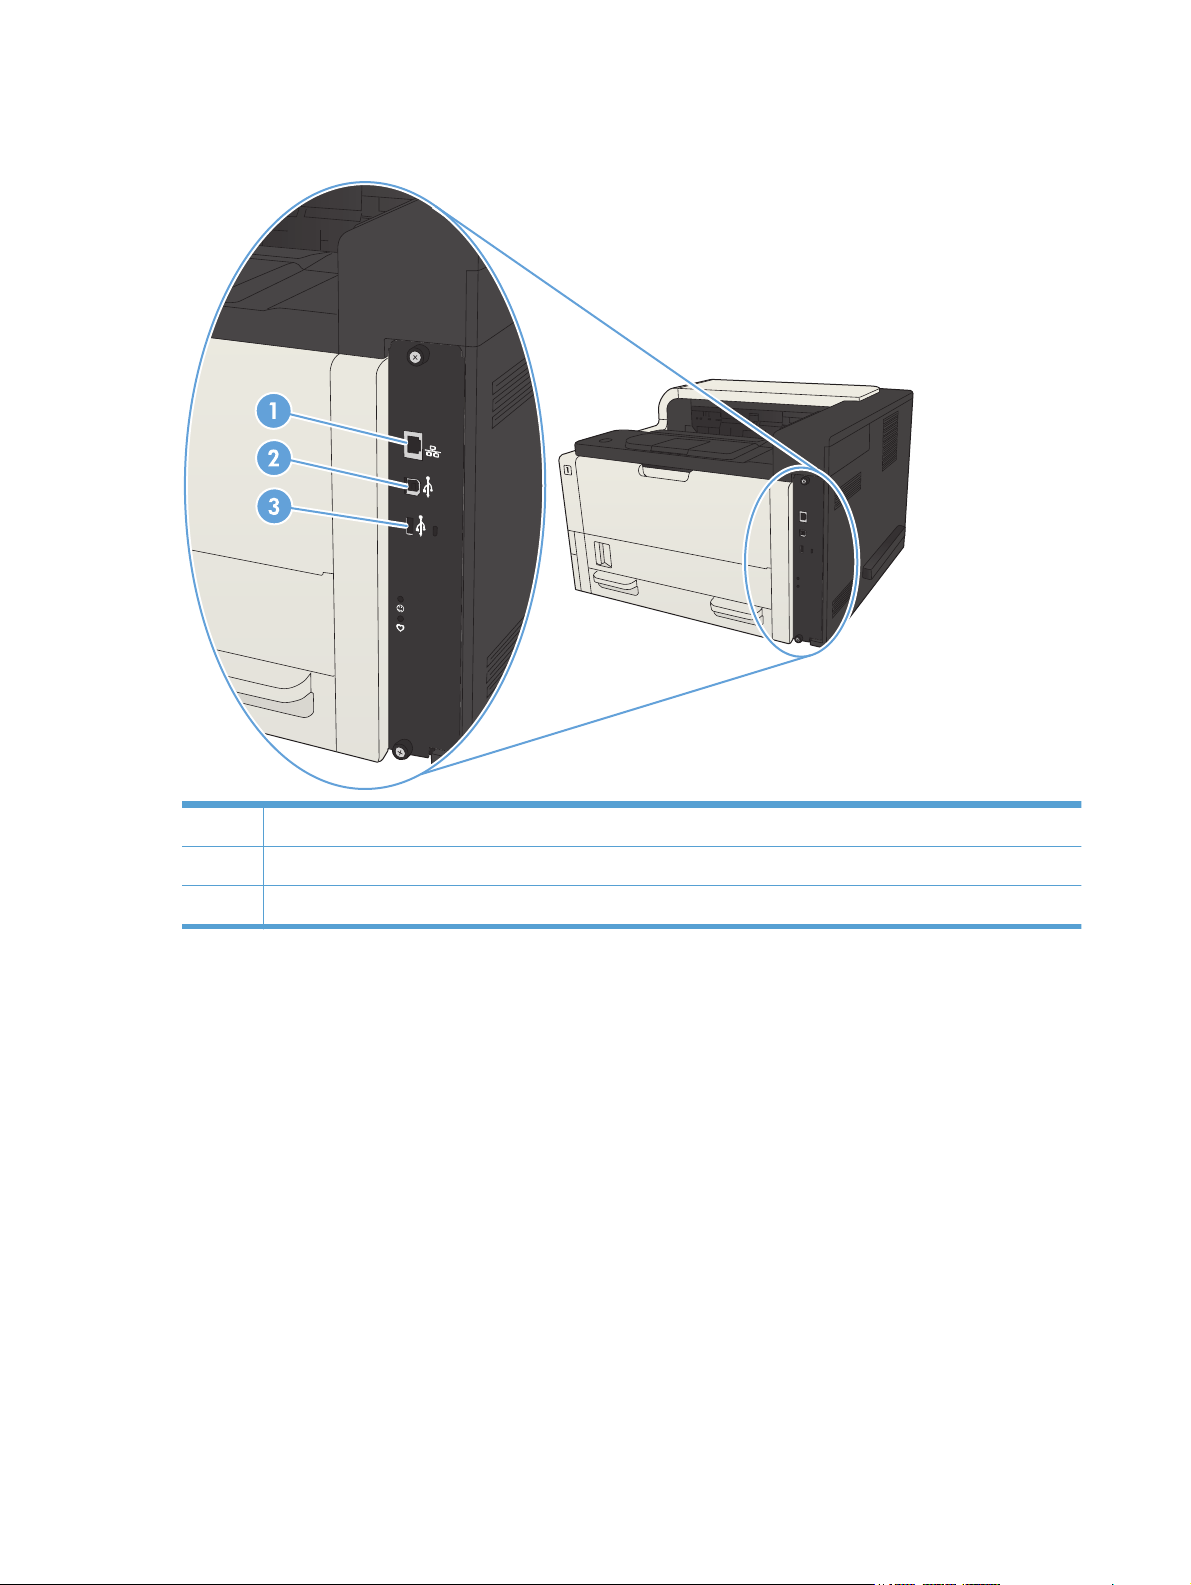
Interface ports
1 Local area network (LAN) Ethernet (RJ-45) network port
2 Hi-Speed USB 2.0 printing port
3 USB port for connecting external USB devices
6 Chapter 1 Product introduction ENWW
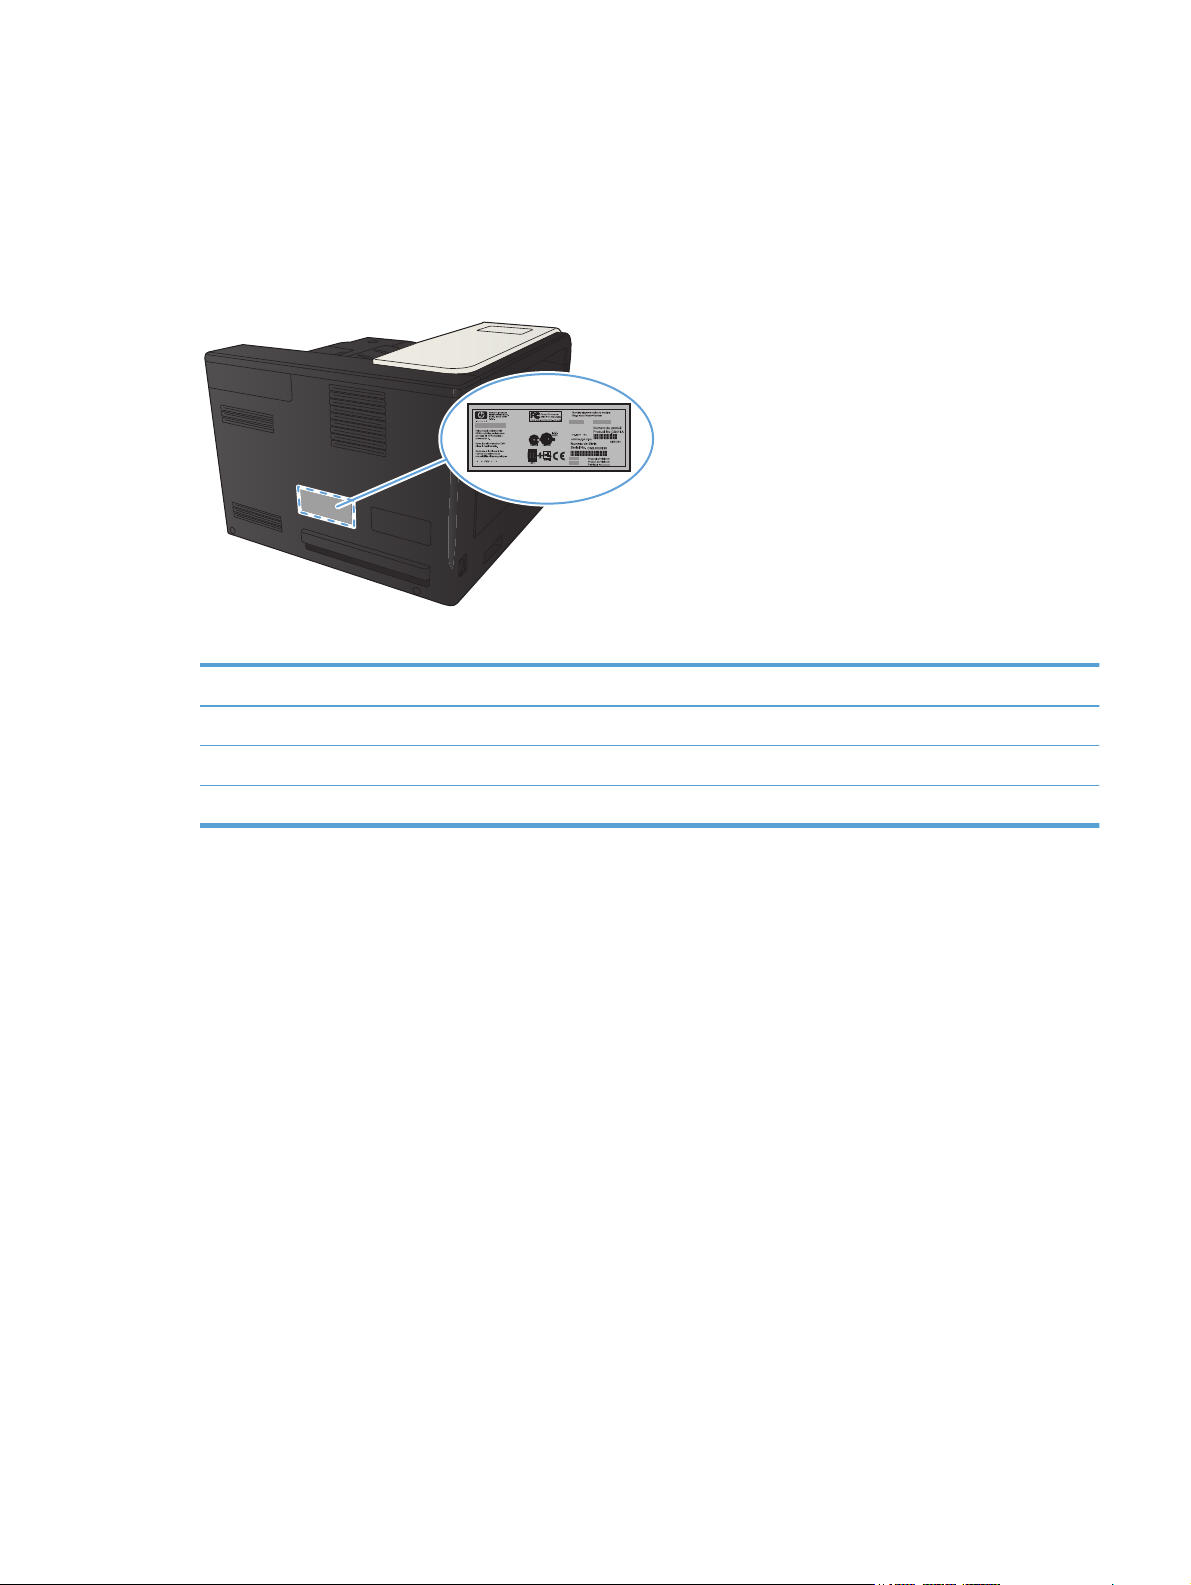
Serial number and model number location
The serial number and model number are listed on an identification label located on the back of the
product. The serial number contains information about the country/region of origin, the product
version, production code, and the production number of the product.
Model name Model number
M712n CF235A
M712dn CF236A
M712xh CF238A
ENWW
Product views
7
Control panel
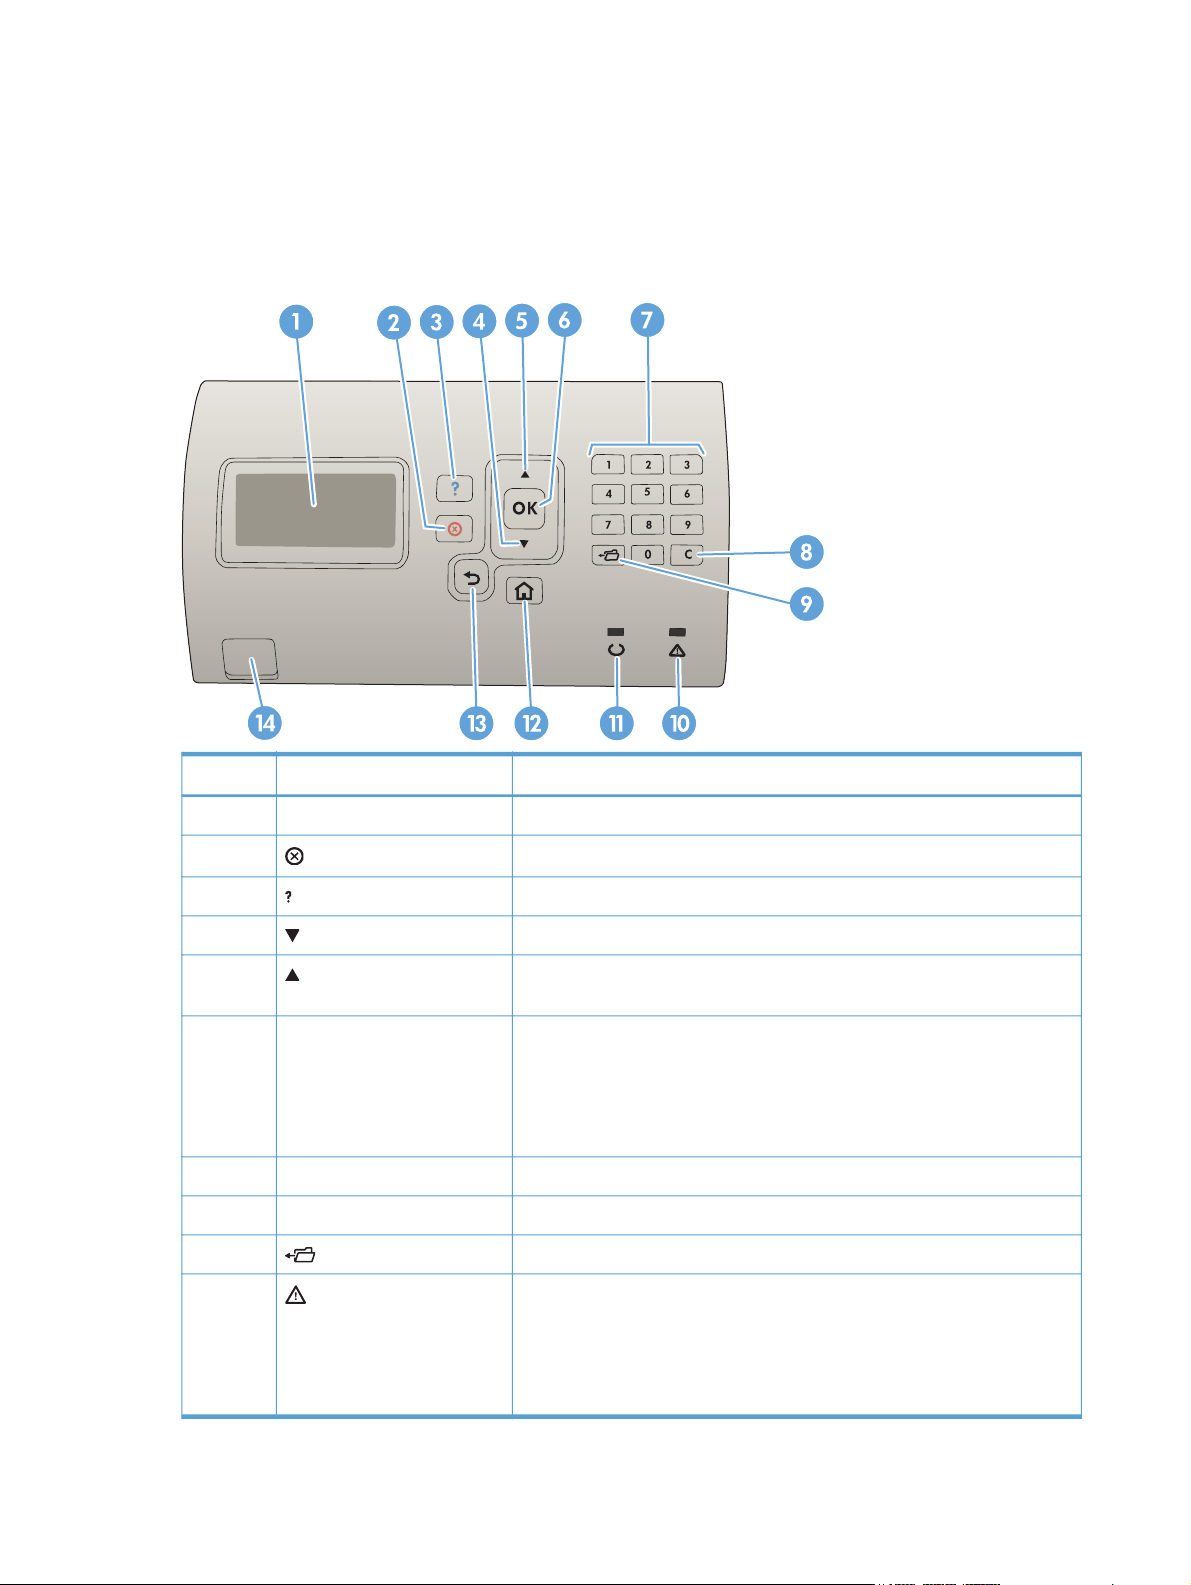
Control-panel layout
Use the control panel to obtain product and job status information and to configure the product.
Number Button or light Function
1 Control-panel display Shows status information, menus, help information, and error messages
2
3
4
5
6 OK button
7 Numeric keypad Enter numeric values
8 Clear button Returns values to their defaults and closes the help screen
9
10
Stop button
Help button Provides information about the message on the control-panel display
Down arrow Navigates to the next item in the list, or decreases the value of numeric items
Up arrow Navigates to the previous item in the list, or increases the value of numeric
Folder button Provides quick access to the Retrieve Job menu
Attention light
Cancels the current print job and clears the pages from the product
items
Saves the selected value for an item.
●
Performs the action that is associated with the item that is highlighted on
●
the control-panel display.
Clears an error condition when the condition is clearable.
●
On: The product has experienced a problem. See the control-panel
●
display.
Off: The product is functioning without error.
●
Blinking: Action is required. See the control-panel display.
●
8 Chapter 1 Product introduction ENWW

Number Button or light Function
11
12
13
14 Easy-access USB For printing without a computer
Ready light
Home button
Back button Backs up one level in the menu tree or backs up one numeric entry
Control-panel help
The product has a built-in Help system that explains how to use each screen. To open the Help system,
press the Help
For some screens, the Help
You can browse through the menu structure by pressing the arrow buttons on the control panel.
For screens that contain settings for individual jobs, the Help
the options for that screen.
button on the control panel.
On: The product is online and ready to accept data to print.
●
Off: The product cannot accept data because it is offline (paused) or has
●
experienced an error.
Blinking: The product is going offline. The product stops processing the
●
current job and expels all of the active pages from the paper path.
Opens and closes the menus
button opens to a global menu where you can search for specific topics.
button opens to a topic that explains
ENWW
Control panel
9

Product reports
Product reports provide details about the product and its current configuration. Use the following
procedure to print the reports:
1.
At the product control panel, press the Home
button.
2. Open the following menus:
Administration
●
Reports
●
3. Select the name of the report you want to review, scroll up to the Print option, and then press the
OK button to print the report.
Table 1-1 Reports menu
First level Second level Description
Configuration/Status Pages Administration Menu Map Shows the structure of the Administration
menu.
Current Settings Page Shows the current settings for each option in
the Administration menu.
Configuration Page Shows the product settings and installed
accessories.
Supplies Status Page Shows the approximate remaining life for the
supplies; reports statistics on total number of
pages and jobs processed, serial number,
page counts, and maintenance information.
HP provides approximations of the
remaining life for the supplies as a customer
convenience. The actual remaining supply
levels might be different than the
approximations provided.
Usage Page Shows a count of all paper sizes that have
passed through the product; lists whether
they were simplex or duplex, and reports the
page count.
File Directory Page Shows the file name and folder name for files
that are stored in the product memory.
Web Services Status Page Shows the detected Web Services for the
product.
Other Pages PCL Font List Prints the available PCL fonts.
PS Font List Prints the available HP postscript level 3
emulation fonts.
10 Chapter 1 Product introduction ENWW

2 Connect the product and install
software
Connect the product to a computer by using a USB cable and install the software (Windows)
●
Connect the product to a network by using a network cable and install the software (Windows)
●
Connect the product to a computer by using a USB cable and install the software (Mac OS X)
●
Connect the product to a network by using a network cable and install the software (Mac OS X)
●
ENWW 11

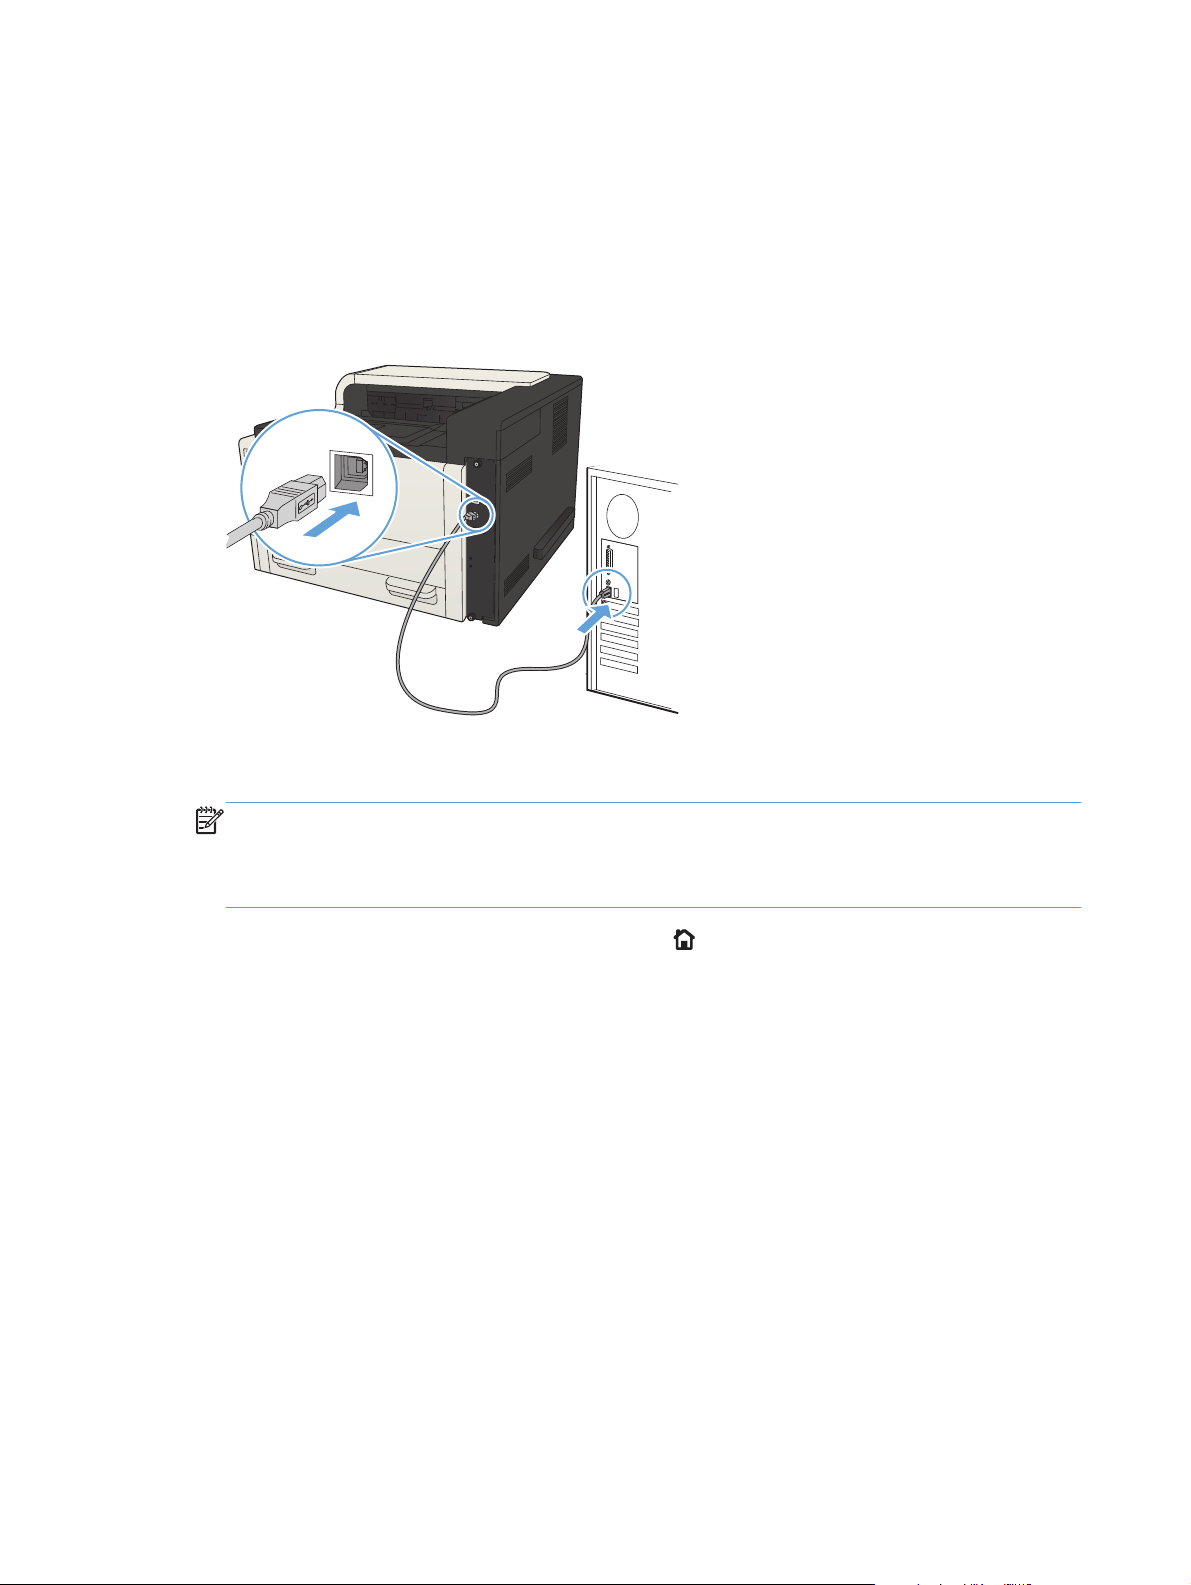
Connect the product to a computer by using a USB cable and install the software (Windows)
This product supports a USB 2.0 connection. Use an A-to-B type USB cable. HP recommends using a
cable that is no longer than 2 m (6.5 ft).
CAUTION: Do not connect the USB cable until the installation software prompts you to connect it.
1. Close all open programs on the computer.
2. Verify the product is in the Ready state.
NOTE: When the product is connected with a USB cable, the software installation process
requires that the product is turned on and in the Ready state. Configure the following setting so the
product wakes from Sleep mode during the software installation process and whenever it receives
a print job:
a. On the product control panel, press the Home button.
b. Open the following menus:
Administration
◦
General Settings
◦
Energy Settings
◦
Sleep Timer Settings
◦
Wake/Auto On Events
◦
c. Highlight the All events option and press the OK button.
3. Install the software from the CD, and follow the on-screen instructions.
4. When prompted, select the Directly connect to this computer using USB cable option,
and then click the Next button.
12 Chapter 2 Connect the product and install software ENWW

5. When the software prompts you, connect the USB cable to the product and the computer.
6. At the end of the installation, click the Finish button, or click the More Options button to install
more software or configure basic digital sending features for the product.
7. Print a page from any program to make sure that the software is correctly installed.
ENWW
Connect the product to a computer by using a USB cable and install the software (Windows)
13
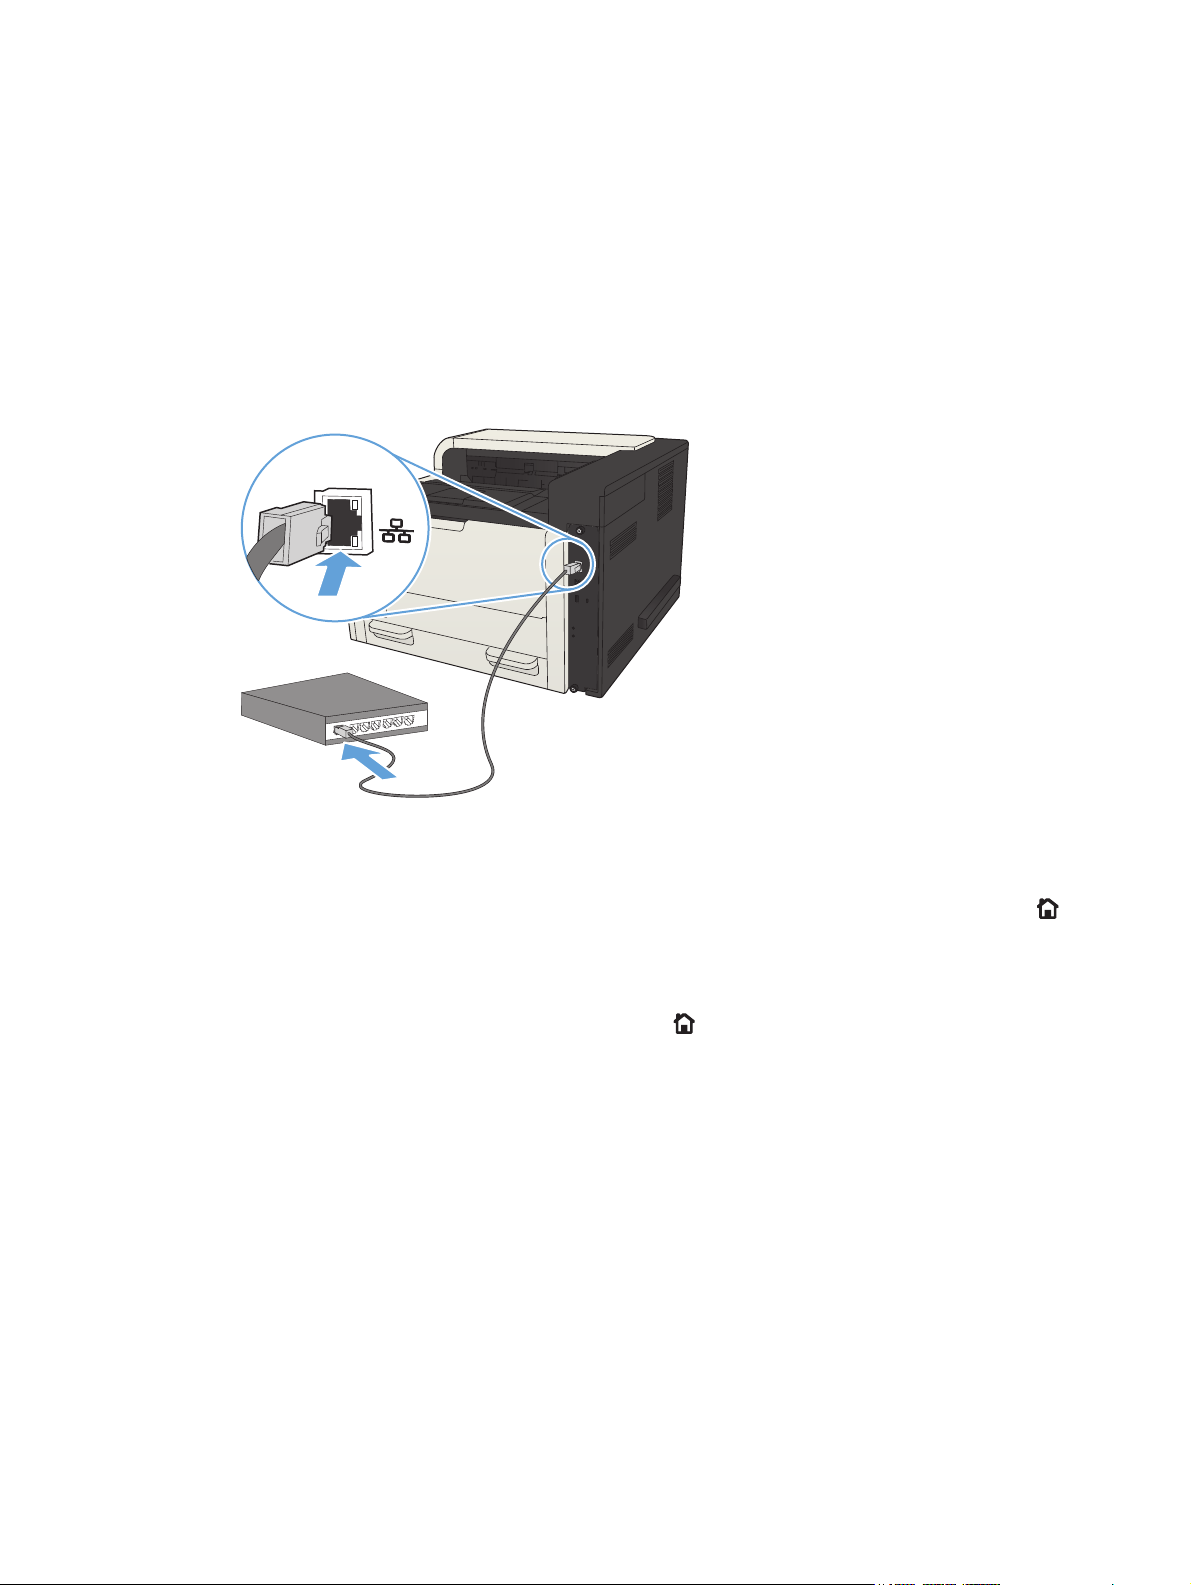
Connect the product to a network by using a network cable and install the software (Windows)
Configure the IP address
1. Make sure the product is turned on and that the Ready message displays on the product control-
panel display.
2. Connect the network cable to the product and to the network.
3. Wait for 60 seconds before continuing. During this time, the network recognizes the product and
assigns an IP address or host name for the product.
4.
To identify the product IP address or host name, on the product control panel press the Home
button, open the How to Connect menu, and select the Network Address option.
You can also find the IP address or host name by printing a configuration page.
a.
On the product control panel, press the Home
b. Open the following menus:
Administration
●
Reports
●
Configuration/Status Pages
●
c. Select the Configuration Page option.
d. Scroll up to the Print option, and then press the OK button.
button.
14 Chapter 2 Connect the product and install software ENWW

e. Find the IP address on the Jetdirect page.
Jetdirect Page
5. IPv4: If the IP address is 0.0.0.0, or 192.0.0.192, or 169.254.x.x, you must manually configure
the IP address. Otherwise, the network configuration was successful.
IPv6: If the IP address begins with "fe80:", the product should be able to print. If not, you must
manually configure the IP address.
Install the software
HP Color LaserJet
Page 1
1. Close all programs on the computer.
2. Install the software from the CD.
3. Follow the on-screen instructions.
4. When prompted, select the Connect through a wired network option.
5. From the list of available products, select the one that has the correct IP address. If the product is
not listed, manually enter the product's IP Address, Host Name, or Hardware Address.
6. At the end of the installation, click the Finish button, or click the More Options button to install
more software or configure basic digital sending features for the product.
7. Print a page from any program to make sure that the software is correctly installed.
ENWW
Connect the product to a network by using a network cable and install the software (Windows)
15
Connect the product to a computer by using a USB cable and install the software (Mac OS X)
This product supports a USB 2.0 connection. Use an A-to-B type USB cable. HP recommends using a
cable that is no longer than 2 m (6.5 ft).
1. Connect the USB cable to the product and the computer.
2. Verify the product is in the Ready state.
NOTE: When the product is connected with a USB cable, the software installation process
requires that the product is turned on and in the Ready state. Configure the following setting so the
product wakes from Sleep mode during the software installation process and whenever it receives
a print job:
a.
On the product control panel, press the Home
b. Open the following menus:
Administration
◦
General Settings
◦
Energy Settings
◦
Sleep Timer Settings
◦
Wake/Auto On Events
◦
c. Highlight the All events option and press the OK button.
3. Install the software from the CD.
4. Click the product icon, and follow the on-screen instructions.
button.
5. Click the Close button.
6. Print a page from any program to make sure that the software is correctly installed.
16 Chapter 2 Connect the product and install software ENWW
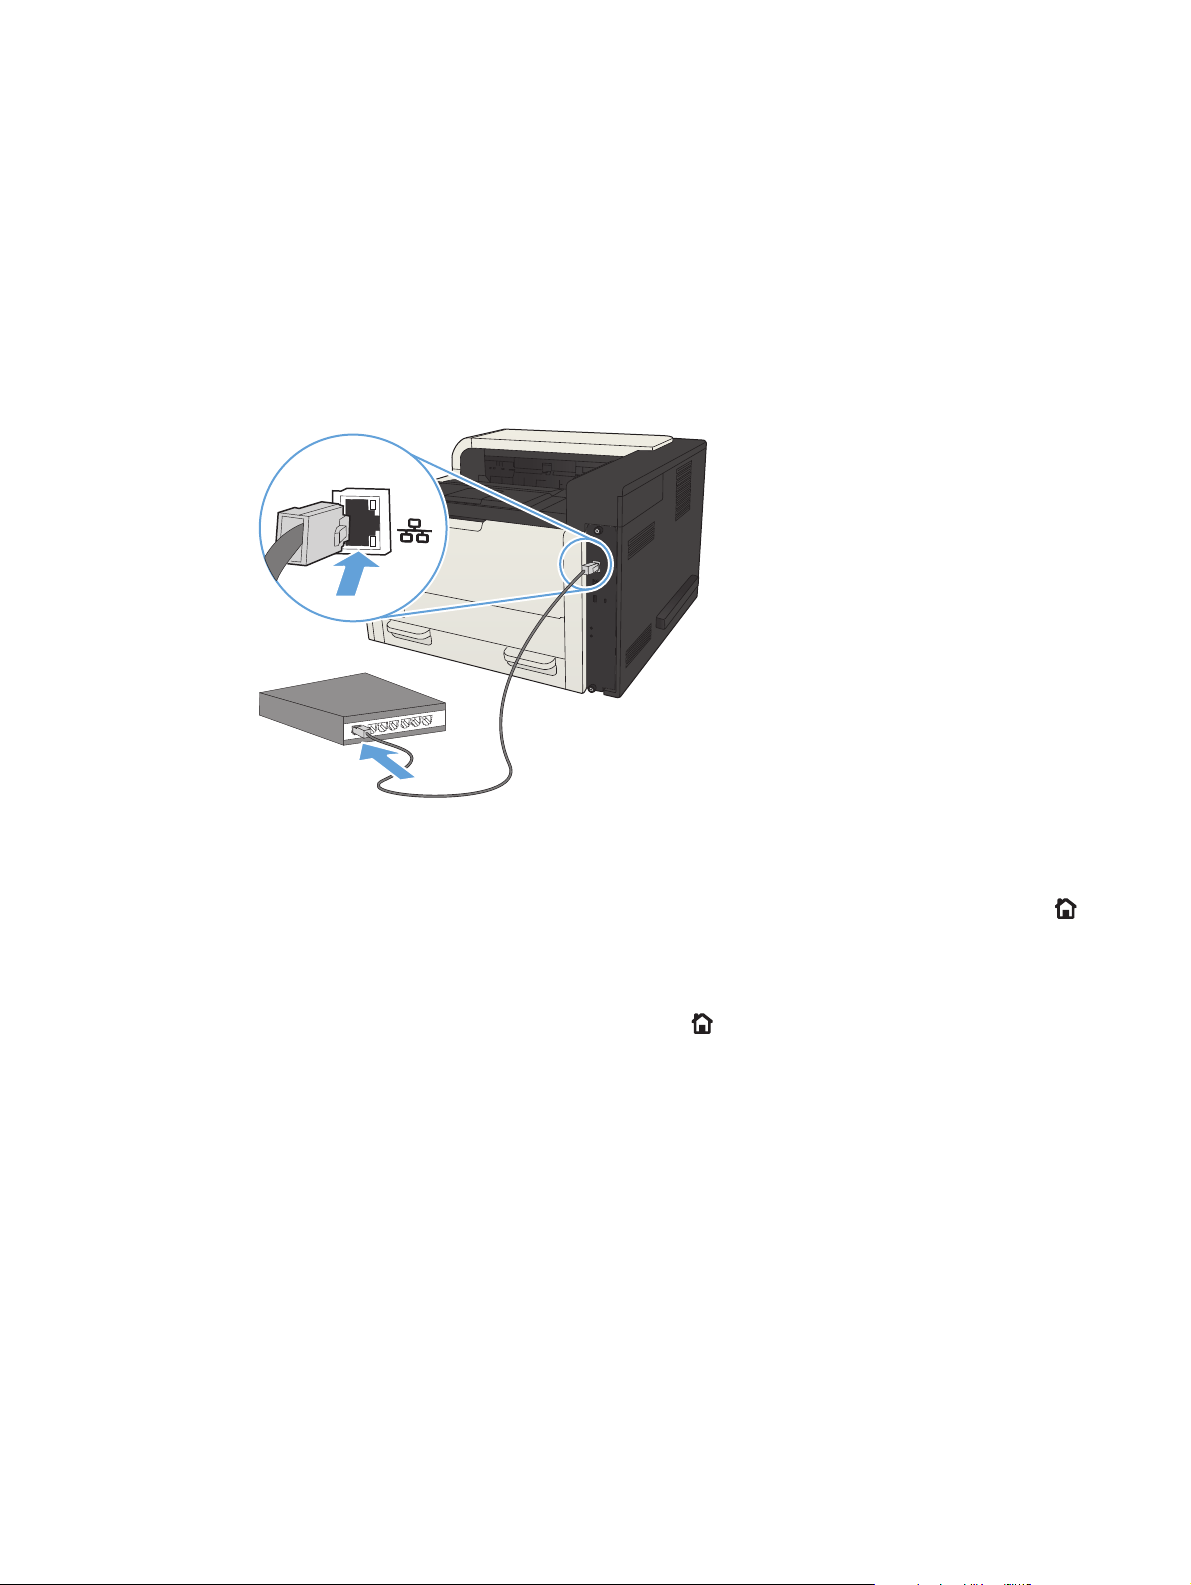
Connect the product to a network by using a network cable and install the software (Mac OS X)
Configure the IP address
1. Make sure the product is turned on and that the Ready message displays on the product control-
panel display.
2. Connect the network cable to the product and to the network.
3. Wait for 60 seconds before continuing. During this time, the network recognizes the product and
assigns an IP address or host name for the product.
4.
To identify the product IP address or host name, on the product control panel press the Home
button, open the How to Connect menu, and select the Network Address option.
You can also find the IP address or host name by printing a configuration page.
a.
On the product control panel, press the Home
b. Open the following menus:
Administration
●
Reports
●
Configuration/Status Pages
●
c. Select the Configuration Page option.
d. Scroll up to the Print option, and then press the OK button.
button.
ENWW
Connect the product to a network by using a network cable and install the software (Mac OS X)
17

e. Find the IP address on the Jetdirect page.
Jetdirect Page
5. IPv4: If the IP address is 0.0.0.0, or 192.0.0.192, or 169.254.x.x, you must manually configure
the IP address. Otherwise, the network configuration was successful.
IPv6: If the IP address begins with "fe80:", the product should be able to print. If not, you must
manually configure the IP address.
Install the software
HP Color LaserJet
Page 1
1. Close all programs on the computer.
2. Install the software from the CD.
3. Click the product icon, and follow the on-screen instructions.
4. Click the Close button when the installation is complete.
NOTE: Complete the following steps after completing the printing-system software installation
only if you did not add a printer when running the installer.
5.
At the computer, open the Apple
menu, click the System Preferences menu, and then click
the Print & Fax icon (OS X v10.5 and 10.6) or the Print & Scan icon (OS X v10.7).
6. Click the plus symbol (+).
7. Use either Bonjour (default browser) or IP Printing for the network connection.
NOTE: Bonjour is the easiest and best method to use if the product is installed on your local
network.
IP Printing must be used to install the product on a different network.
18 Chapter 2 Connect the product and install software ENWW

If you are using Bonjour, complete the following steps:
a. Click the Default Browser tab.
b. Select the product from the list. The software verifies that the product is connected to the
network. The Print Using field is automatically populated with the correct PPD for the
product.
NOTE: If you are on a network that has more than one product, print a configuration page
and match the Bonjour Printer Name to the name on the list to identify the product that you
are installing.
NOTE: If the product does not appear in the list, verify that the product is on and
connected to the network, then try turning the product off and then on again. If the product
PPD is not in the Print Using drop-down list, turn the computer off and then on again, and
then restart the setup process.
c. Click the Add button to complete the setup process.
If you are using the IP Printing method, complete the following steps:
a. Click the IP Printer tab.
b. Choose HP Jet Direct – Socket from the Protocol drop-down menu. This is the
recommended setting for HP products.
c. Type the IP address into the Address field on the add printer screen.
d. The Name, Location, and Print Using information are automatically filled in. If the
product PPD is not in the Print Using field, turn the computer off and then on again, and
then restart the setup process.
ENWW
Connect the product to a network by using a network cable and install the software (Mac OS X)
19

20 Chapter 2 Connect the product and install software ENWW

3 Input trays and output bins
Supported paper sizes
●
Supported paper types
●
Configure trays
●
Alternative letterhead mode
●
Tray 1
●
Tray 2 and Tray 3
●
500-sheet trays
●
3,500-sheet high-capacity tray
●
Use paper output options
●
ENWW 21

Supported paper sizes
NOTE: To obtain the best results, select the correct paper size and type in the print driver before
printing.
Table 3-1 Supported paper sizes
Size and dimensions Tray 1 Tray 2 Tray 3 Optional
500-sheet
trays
Letter
279 x 216 mm (11 x 8.5 in)
Letter Rotated
216 x 279 mm (8.5 x 11 in)
Legal
216 x 356 mm (8.5 x 14 in)
Executive
267 x 184 mm (10.5 x 7.3 in)
Statement
216 x 140 mm (8.5 x 5.5 in)
Oficio 8.5 x 13
216 x 330 mm (8.5 x 13 in)
11 x 17
3,500-sheet
high-capacity
tray
Automatic
duplex
printing
279 x 432 mm (11 x 17 in)
12 x 18
305 x 457 mm (12 x 18 in)
3 x 5
76 x 127 mm (3 x 5 in)
4 x 6
102 x 152 mm (4 x 6 in)
5 x 7
127 x 178 mm (5 x 7 in)
5 x 8
127 x 203 mm (5 x 8 in)
A3
297 x 420 mm
(11.7 x 16.5 in)
22 Chapter 3 Input trays and output bins ENWW

Table 3-1 Supported paper sizes (continued)
Size and dimensions Tray 1 Tray 2 Tray 3 Optional
500-sheet
trays
A4
297 x 210 mm (11.7 x 8.3 in)
A4 Rotated
210 x 297 mm (8.3 x 11.7 in)
A5
210 x 148 mm (8.3 x 5.8 in)
A6
105 x 148 mm (4.1 x 5.8 in)
RA3
305 x 430 mm (12 x 17 in)
RA4
215 x 305 mm (8.5 x 12.0 in)
SRA4
3,500-sheet
high-capacity
tray
Automatic
duplex
printing
225 x 320 mm (8.9 x 12 in)
B4 (JIS)
257 x 364 mm
(10.1 x 14.3 in)
B5 (JIS)
257 x 182 mm (10.1 x 7.2 in)
B6 (JIS)
128 x 182 mm (5.0 x 7.2 in)
10 x 15 cm
102 x 152 mm (4 x 6 in)
216 x 343 mm (8.5 x 14 in)
Oficio 216 x 347
216 x 347 mm (8.5 x 13.7 in)
8K 270 x 390 mm
270 x 390 mm
(10.6 x 15.4 in)
ENWW
Supported paper sizes
23

Table 3-1 Supported paper sizes (continued)
Size and dimensions Tray 1 Tray 2 Tray 3 Optional
500-sheet
trays
16K 195 x 270 mm
270 x 195 mm (10.6 x 7.7 in)
8K 260 x 368 mm
260 x 368 mm
(10.2 x 14.5 in)
16K 184 x 260 mm
260 x 184 mm (10.2 x 7.2 in)
8K 273 x 394 mm
273 x 394 mm (10.8 x 16 in)
16K 197 x 273 mm
273 x 197 mm (10.8 x 7.8 in)
Postcard (JIS)
100 x 148 mm (3.9 x 5.8 in)
3,500-sheet
high-capacity
tray
Automatic
duplex
printing
D Postcard (JIS)
148 x 200 mm (5.8 x 7.9 in)
Envelope #9
98 x 225 mm (3.9 x 8.9 in)
Envelope #10
105 x 241 mm (4.1 x 9.5 in)
Envelope Monarch
98 x 191 mm (3.9 x 7.5 in)
Envelope B5
176 x 250 mm (6.9 x 9.8 in)
Envelope C5
162 x 229 mm (6.4 x 9.0 in)
Envelope C6
114 x 162 mm (4.5 x 6.4 in)
Envelope DL
110 x 220 mm (4.3 x 8.7 in)
24 Chapter 3 Input trays and output bins ENWW

Table 3-1 Supported paper sizes (continued)
Size and dimensions Tray 1 Tray 2 Tray 3 Optional
500-sheet
trays
Custom
76 x 127 mm to
312 x 470 mm (3.0 x 5.0 in)
to (12.3 x 18.5 in)
Banner printing from Tray 1:
Length from 470 mm to
508 mm (18.5 in to 20 in)
Custom
148 x 210 mm to
364 x 297 mm (5.8 x 8.3 in)
to (14.3 x 11.7 in)
Custom
148 x 210 mm to
432 x 297 mm (5.8 x 8.3 in)
to (17 x 12.7 in)
3,500-sheet
high-capacity
tray
Automatic
duplex
printing
ENWW
Supported paper sizes
25

Supported paper types
For a complete list of specific HP-brand paper that this product supports, go to www.hp.com/support/
lj700M712.
NOTE: To obtain the best results, select the correct paper size and type in the print driver before
printing.
Table 3-2 Supported paper types
Paper type Tray 1 Tray 2 and
Tray 3
Plain
HP EcoSMART Lite
Light 60–74 g
Intermediate 85–95 g
Bond
Recycled
Mid-Weight 96–110 g
Heavy 111–130 g
Extra Heavy 131–175 g
Cardstock 176–220 g
Transparency
Labels
Letterhead
Optional 500sheet trays
3,500-sheet
high-capacity
tray
Automatic
duplex
printing
Envelope
Heavy Envelope
Preprinted
Prepunched
Colored
Rough
Heavy Rough
26 Chapter 3 Input trays and output bins ENWW

Configure trays
The product automatically prompts you to configure a tray for type and size in the following situations:
When you load paper into the tray
●
When you specify a particular tray or paper type for a print job through the print driver or a
●
software program and the tray is not configured to match the print-job’s settings
NOTE: The prompt does not display if you are printing from Tray 1, and Tray 1 is configured for the
Any Size paper size and the Any Type paper type settings. In this situation, if the print job does not
specify a tray, the product prints from Tray 1, even if the paper size and type settings in the print job
do not match the paper loaded in Tray 1.
Configure a tray when loading paper
1. Load paper in the tray. If you are using Tray 2 or Tray 3, close the tray.
2. The tray configuration message displays on the product control panel.
3. Do one of the following:
Press the OK button to accept the detected size and type.
●
To modify the paper size or type for the tray, select the Modify option, and then press the
●
OK button.
a. Highlight the correct size, and then press the OK button.
b. Highlight the correct type, and then press the OK button.
Configure a tray to match print job settings
1. In the software program, specify the source tray, the paper size, and the paper type.
2. Send the job to the product.
If the tray needs to be configured, a tray configuration message displays on the product control
panel.
3. Load the tray with the specified type and size of paper, and then close the tray.
4. Do one of the following:
Press the OK button to accept the detected size and type.
●
To modify the paper size or type for the tray, select the Modify option, and then press the
●
OK button.
a. Highlight the correct size, and then press the OK button.
b. Highlight the correct type, and then press the OK button.
ENWW
Configure trays
27

Configure a tray by using the control panel
You can also configure the trays for type and size without a prompt from the product.
1. On the product control panel, press the Home
2. Open the Trays menu.
3. Highlight the paper size or type setting for the tray that you want to configure, and then press the
OK button.
4. Highlight the paper size or paper type from the list of options, and then press the OK button.
button.
28 Chapter 3 Input trays and output bins ENWW

Alternative letterhead mode
Use the Alternative Letterhead Mode feature so that you can load letterhead or preprinted paper
into the tray the same way for all print or copy jobs, whether you are printing or copying to one side of
the sheet of paper or to both sides. When using this mode, load paper the same way you would for
automatic duplex printing.
To use the feature, enable it by using the product control-panel menus. To use the feature with
Windows, you also need to enable the feature in the print driver and configure the paper type in the
print driver.
Enable Alternative Letterhead Mode by using the product control-panel menus
1.
On the product control panel, press the Home
2. Open the following menus:
Administration
●
Manage Trays
●
Alternative Letterhead Mode
●
3. Select the Enable option, and press the OK button.
button.
To print with Alternative Letterhead Mode for Windows, perform the following procedure for each print
job.
Print with Alternative Letterhead Mode (Windows)
1. From the software program, select the Print option.
2. Select the product, and then click the Properties or Preferences button.
3. Click the Advanced tab.
4. Expand the Printer Features list.
5. Open the Alternative Letterhead Mode drop-down list, and click the On option.
6. Click the Apply button.
7. Click the Paper/Quality tab.
8. From the Paper type drop-down list, click the More... option.
9. Expand the list of Type is: options.
10. Expand the list of Other options, and then click the Letterhead option. Click the OK button.
11. Click the OK button to close the Document Properties dialog box. In the Print dialog box,
click the OK button to print the job.
ENWW
Alternative letterhead mode
29

Tray 1
Tray capacity and paper orientation
To prevent jams, do not overfill trays. Be sure the top of the stack is below the tray-full indicator. For
short/narrow and heavy/glossy paper, load paper to less than half of the tray-full indicators.
Table 3-3 Tray 1 capacity
Paper type Specifications Quantity
Paper Range:
2
60 g/m
Envelopes
Labels up to 0.23 mm (9 mils) thick Maximum stack height: 13 mm (0.5 in)
Transparencies 0.10 to 0.13 mm (4 to 5 mils) thick Maximum stack height: 13 mm (0.5 in)
75 g/m
(16 lb) to 199g/m2 (53 lb)
2
(20 lb) to 90 g/m2 (24 lb)
Maximum stack height: 13 mm (0.5 in)
Up to 100 sheets of 60 to 120 g/m2 (16 to
32 lb)
Fewer than 100 sheets of (120 to 199 g/m
(32 to 53 lb) paper
Up to 10 envelopes
Table 3-4 Tray 1 paper orientation
Single-sided printing Manual duplex printing and
Alternative Letterhead Mode
Face-up
Top edge leading into the product
Face-down
Long edge leading into the product, top
edge at the front of the product
Envelopes
Face-up
Short, postage end leading into the product
2
)
30 Chapter 3 Input trays and output bins ENWW

Load Tray 1
1. Open Tray 1.
2. Pull out the paper support.
3. For paper larger than Letter or A4 size, fold
out the extension.
ENWW
Tray 1
31

4. Slide the paper-width guides wider than the
paper.
5. Load the paper into the tray. Make sure that
the paper fits under the tabs and below the
maximum-height indicators.
6. Adjust the paper-width guides so that they
lightly touch the paper stack but do not bend
the paper.
32 Chapter 3 Input trays and output bins ENWW

Tray 2 and Tray 3
Tray capacity and paper orientation
To prevent jams, do not overfill trays. Be sure the top of the stack is below the tray-full indicator. For
short/narrow and heavy/glossy paper, load paper to less than half of the tray-full indicators.
Table 3-5 Tray 2 and Tray 3 capacity
Paper type Specifications Quantity
Paper Range:
2
60 g/m
(16 lb) to 130 g/m2 (35 lb)
Table 3-6 Tray 2 and Tray 3 paper orientation
Single-sided printing Automatic duplex printing and
Alternative Letterhead Mode
Face-down
Top edge at the front of the tray
Face-up
Bottom edge at the front of the tray
Equivalent to 250 sheets of 75 g/m
Envelopes
Print envelopes only from Tray 1.
2
(20 lb)
ENWW
Tray 2 and Tray 3
33

Load Tray 2 and Tray 3
1. Open the tray.
2. Adjust the paper-guides to the correct paper
size.
34 Chapter 3 Input trays and output bins ENWW

3. Load the paper into the tray. Make sure that
the stack is flat at all four corners and that the
top of the stack is below the maximum-height
indicators.
4. Close the tray.
ENWW
Tray 2 and Tray 3
35

500-sheet trays
500-sheet tray capacity and paper orientation
To prevent jams, do not overfill trays. Be sure the top of the stack is below the tray-full indicator. For
short/narrow and heavy/glossy paper, load paper to less than half of the tray-full indicators.
Table 3-7 500-sheet tray capacity
Paper type Specifications Quantity
Paper Range:
2
60 g/m
(16 lb) to 130 g/m2 (35 lb)
Table 3-8 500-sheet tray paper orientation
Single-sided printing Automatic duplex printing and
Alternative Letterhead Mode
Face-down
Top edge at the front of the tray
2
3
Face-up
Bottom edge at the front of the tray
2
3
Equivalent to 500 sheets of 75 g/m
Envelopes
Print envelopes only from Tray 1.
2
(20 lb)
36 Chapter 3 Input trays and output bins ENWW

Load the 500-sheet trays
1. Open the tray.
2
3
2. Adjust the paper-size guides to the correct
paper size.
ENWW
500-sheet trays
37

3. Load the paper into the tray. Make sure that
the stack is flat at all four corners and that the
top of the stack is below the maximum-height
indicators.
4. Close the tray.
2
3
38 Chapter 3 Input trays and output bins ENWW

3,500-sheet high-capacity tray
3,500-sheet high-capacity input capacity and paper orientation
To prevent jams, do not overfill trays. Be sure the top of the stack is below the tray-full indicator. For
short/narrow and heavy/glossy paper, load paper to less than half of the tray-full indicators.
Table 3-9 3,500-sheet high-capacity input tray capacity
Paper type Specifications Quantity
Paper Range:
2
60 g/m
(16 lb) to 130 g/m2 (35 lb)
Table 3-10 3,500-sheet high-capacity input tray paper orientation
Single-sided printing Automatic duplex printing and
Alternative Letterhead Mode
Face-up
Top edge at the back of the tray
Face-down
Top edge at the back of the tray
Load the 3,500-sheet high-capacity tray
The 3,500-sheet high-capacity tray supports only A4 and Letter-size paper.
1. Open the right and left sides of the tray.
Equivalent to 3,500 sheets of 75 g/m
lb)
Envelopes
Print envelopes only from Tray 1.
4
2
(20
ENWW
3,500-sheet high-capacity tray
39

2. On each side, adjust the paper-size lever to
the correct position for the paper you are
using.
4
3. Load full reams of paper into each side of the
tray. The right side holds 1,500 sheets of
paper. The left side holds 2,000 sheets of
paper.
NOTE: For best results, load full reams of
paper. Avoid dividing reams into smaller
sections.
4. Close the right and left sides of the tray.
4
4
40 Chapter 3 Input trays and output bins ENWW

Use paper output options
Output bin
The standard output bin collects paper face-down, in the correct order.
The standard output bin holds up to 250 sheets of 75 g/m
2
(20 lb) paper.
ENWW
Use paper output options
41

42 Chapter 3 Input trays and output bins ENWW

4 Parts, supplies, and accessories
Order parts, accessories, and supplies
●
HP policy on non-HP supplies
●
HP anticounterfeit Web site
●
Print when a toner cartridge is at estimated end of life
●
Enable or disable the Very Low Settings options from the control panel
●
Customer self-repair parts
●
Accessories
●
Toner cartridge
●
ENWW 43

Order parts, accessories, and supplies
Order supplies and paper www.hp.com/go/suresupply
Order genuine HP parts or accessories
Order through service or support providers Contact an HP-authorized service or support provider.
Order using HP software The HP Embedded Web Server contains a link to the HP
www.hp.com/buy/parts
SureSupply Web site, which provides options for purchasing
Original HP supplies.
44 Chapter 4 Parts, supplies, and accessories ENWW

HP policy on non-HP supplies
Hewlett-Packard Company cannot recommend the use of non-HP toner cartridges, either new or
remanufactured.
NOTE: For HP printer products, the use of a non-HP toner cartridge or a refilled toner cartridge does
not affect either the warranty to the customer or any HP support contract with the customer. However, if
product failure or damage is attributable to the use of a non-HP toner cartridge or refilled toner
cartridge, HP will charge its standard time and materials charges to service the product for the
particular failure or damage.
ENWW
HP policy on non-HP supplies
45

HP anticounterfeit Web site
Go to www.hp.com/go/anticounterfeit when you install an HP toner cartridge and the control-panel
message says the cartridge is non-HP. HP will help determine if the cartridge is genuine and take steps
to resolve the problem.
Your toner cartridge might not be a genuine HP toner cartridge if you notice the following:
The supplies status page indicates that a non-HP supply is installed.
●
You are experiencing a high number of problems with the cartridge.
●
The cartridge does not look like it usually does (for example, the packaging differs from
●
HP packaging).
46 Chapter 4 Parts, supplies, and accessories ENWW

Print when a toner cartridge is at estimated end of life
<Supply> Low This message displays when a supply is nearing the estimated
end of its useful life.
<Supply> Very Low This message displays when a supply is at its estimated end of
useful life. Print-quality problems can occur when using a
supply that is at its estimated end of life.
ENWW
Print when a toner cartridge is at estimated end of life
47

Enable or disable the Very Low Settings options from the control panel
You can enable or disable the default settings at any time, and you do not have to re-enable them
when you install a new cartridge.
1.
From the product control panel, press the Home
2. Open the following menus:
Administration
●
Manage Supplies
●
Supply Settings
●
3. Open one of the following options:
Black Cartridge
●
Maintenance Kit
●
4. Select the Very Low Settings option.
5. Select one of the following options:
Select the Stop option to set the product to stop printing (including printing faxes) until you
●
replace the cartridge.
Select the Prompt to continue option to set the product to stop printing (including printing
●
faxes) and prompt you to replace the cartridge. You can acknowledge the prompt and
continue printing.
button.
Select the Continue option to set the product to alert you that the cartridge is very low but to
●
continue printing.
NOTE: Using the Continue setting allows printing beyond Very Low without customer
interaction and can result in unsatisfactory print quality.
If you select the Stop or Prompt to continue option, the product stops printing when it reaches the
Very Low threshold. When you replace the cartridge, the product automatically resumes printing.
When the product is set to the Stop or Prompt to continue option, there is some risk that faxes will
not print when the product resumes printing. This can occur if the product has received more faxes than
the memory can hold while the product is waiting.
The product can print faxes without interruption when it passes the Very Low threshold if you select the
Continue option for color and black cartridges, but print quality might degrade.
Once an HP supply has reached Very Low, HP’s premium Protection Warranty on that supply has
ended.
48 Chapter 4 Parts, supplies, and accessories ENWW

Customer self-repair parts
The following customer self-repair parts are available for the product.
Parts listed as Mandatory self-replacement are to be installed by customers, unless you are
●
willing to pay HP service personnel to perform the repair. For these parts, on-site or return-to-depot
support is not provided under the HP product warranty.
Parts listed as Optional self-replacement can be installed by HP service personnel at your request
●
for no additional charge during the product warranty period.
NOTE: For more information, go to www.hp.com/go/customerselfrepair/lj700M712.
Table 4-1 Customer self-repair parts
Item Description Self-replacement
options
Hard disk drive kit Replacement 320 GB HP High-
Performance Secure Hard Disk
Replacement 320 GB HP High-
Performance Secure Hard Disk
(Government option)
Formatter assembly kit Replacement formatter assembly kit Mandatory CF235-67902
Replacement formatter assembly kit—
China
Solid-state memory (SSM) module Replacement memory module, 16 GB Optional CF235-67904
DIMM memory Replacement 512 MB DIMM memory Mandatory CF235-67919
Tray 1 pickup roller/separation pad kit Replacement pickup roller and
separation pad for Tray 1
Tray 2 and Tray 3 pickup roller/
separation pad kit
Tray 2 assembly kit Replacement for Tray 2 Mandatory CF235-67911
Tray 3 assembly kit Replacement for Tray 3 Mandatory CF235-67912
Replacement pickup roller and
separation pad for Tray 2 or Tray 3
Optional CF235-67901
Optional CF235-67920
Mandatory CF235-67903
Optional CF235-67906
Optional CF235-67909
Part number
1x500-sheet feeder Replacement 1x500-sheet feeder Mandatory CF235-67914
Tray 3, 4, 5, and 6 roller kit Replacement pickup, feed, and
separation rollers for Trays 3, 4, 5, and
6
Tray 4, 5, or 6 assembly kit Tray assembly Mandatory CF235-67917
1x500-sheet feeder with stand kit Optional 500-sheet feeder with stand Mandatory CF235-67915
3x500-sheet feeder with stand kit Optional 3x500-sheet feeder with stand Mandatory CF235-67916
3,500-sheet high-capacity input feeder
with stand kit
3,500-sheet high-capacity input feeder
left tray assembly
Optional 3,500-sheet high-capacity input
feeder with stand
Left tray for the 3,500-sheet highcapacity input feeder
ENWW
Mandatory CE710-69008
Mandatory CF235-67918
Mandatory CF235-60103
Customer self-repair parts
49

Table 4-1 Customer self-repair parts (continued)
Item Description Self-replacement
options
3,500-sheet high-capacity input feeder
right tray assembly
3,500-sheet tray roller kit Replacement pickup, feed, and
Transfer-roller kit Replacement transfer roller Mandatory CF235-67910
Duplexer kit Optional duplexer kit Mandatory CF235-67913
Fuser assembly kit (110V) Replacement 110V fuser assembly kit Mandatory CF235-67921
Fuser assembly kit (220V) Replacement 220V fuser assembly kit Mandatory CF235-67922
Maintenance kit (110V) Product maintenance kit
Right tray for the 3,500-sheet highcapacity input feeder
separation rollers for the 3,500-sheet
high-capacity input feeder
110-Volt fuser
●
Transfer roller
●
Tray 1 pickup roller and separation
●
pad
Tray 2 and 3 pickup and feed
●
rollers
Mandatory CF235-60104
Mandatory 5851-5011
Mandatory CF235-67907
Part number
Tray 2 and 3 separation pads
●
Maintenance kit (220V) Product maintenance kit
220-Volt fuser
●
Transfer roller
●
Tray 1 pickup roller and separation
●
pad
Tray 2 and 3 pickup and feed
●
rollers
Tray 2 and 3 separation pads
●
Trays 3, 4, 5, and 6 label kit Replacement labels for Trays 3, 4, 5,
and 6
Toner cartridge Standard capacity Mandatory CF214-67901
High capacity Mandatory CF214-67902
Power cable 220V – 10A Replacement cable – China Mandatory 8121-0943
Power cable 110V – 13A Replacement cable – Taiwan Mandatory 8121-0964
Power cable 220V –10A Replacement cable – Korea, EU generic Mandatory 8121-0731
Power cable 110V – 12A Replacement cable – Japan Mandatory 8121-1143
Mandatory CF235-67908
Mandatory CE707-00001
Power cable 220V – 6A Replacement cable – India Mandatory 8121-0564
50 Chapter 4 Parts, supplies, and accessories ENWW

Table 4-1 Customer self-repair parts (continued)
Item Description Self-replacement
options
Power cable 220V – 10A Replacement cable – UK/Asia Pacific Mandatory 8121-0739
Power cable 220V – 10A Replacement cable – Australia/New
Zealand
Power cable 220V – 10A Replacement cable – Israel Mandatory 8121-1004
Power cable 220V – 10A Replacement cable – Denmark Mandatory 8121-0733
Power cable 220V – 10A Replacement cable – South Africa Mandatory 8121-0737
Power cable 220V – 10A Replacement cable – Switzerland Mandatory 8121-0738
Power cable 110V – 10A Brazil Replacement cable – Brazil Mandatory 8121-1071
Power cable 220V – 10A Argentina Replacement cable – Argentina Mandatory 8121-0729
Power cable 110V – 13A North
America
Power cable 220V – 10A South
America/Chile/Peru
Power cable 220V / 110V – Thailand/
Philippines
Replacement cable – North America Mandatory 8121-0740
Replacement cable – South America/
Chile/Peru
Replacement cable – Thailand/
Philippines
Mandatory 8121-0837
Mandatory 8121-0735
Mandatory 8121-0734
Part number
ENWW
Customer self-repair parts
51

Accessories
Item Description Part number
500-sheet tray and feeder unit Optional tray to increase paper capacity CF239A
1x500-sheet feeder, cabinet, and stand Optional tray to increase paper capacity CF243A
3x500-sheet feeder and stand Optional tray to increase paper capacity CF242A
3,500-sheet high-capacity input and
stand
Duplex printing assembly Optional accessory to print on both
HP Jetdirect print servers HP Jetdirect ew2500 Wireless Print
HP Jetdirect 2700w USB Wireless Print
USB cable Standard USB-compatible device
DIMM memory Optional 512 MB DIMM memory CE483A
Optional tray to increase paper capacity CF245A
CF240A
sides of the paper
J8021A
Server
J8026A
Server
C6518A
connector, 2 m (6.5 ft)
52 Chapter 4 Parts, supplies, and accessories ENWW

Toner cartridge
Toner-cartridge view
1Imaging drum
CAUTION: Do not touch the shutter or the surface of the roller. Doing so can damage the cartridge.
2Memory chip
3 Pull-tab for the sealing tape
ENWW
Toner cartridge
53

Toner-cartridge information
Capacity Cartridge number Part number
Standard-capacity replacement black
toner cartridge
High-capacity replacement black toner
cartridge
For more information about supplies, go to www.hp.com/go/learnaboutsupplies.
The information contained herein is subject to change without notice. For the latest supplies information
www.hp.com/go/lj700M712_manuals.
go to
Recycle the toner cartridge
To recycle a genuine HP toner cartridge, place the used cartridge in the box in which the new cartridge
arrived. Use the enclosed return label to send the used supply to HP for recycling. For complete
information, see the recycling guide that is included with each new HP supply item.
Toner-cartridge storage
Do not remove the toner cartridge from its package until you are ready to use it.
CAUTION: To prevent damage to the toner cartridge, do not expose it to light for more than a few
minutes.
14A CF214A
14X CF214X
HP policy on non-HP toner cartridges
Hewlett-Packard Company cannot recommend the use of non-HP toner cartridges, either new or
remanufactured.
NOTE: Any damage caused by a non-HP toner cartridge is not covered under the HP warranty and
service agreements.
54 Chapter 4 Parts, supplies, and accessories ENWW

Replace the toner cartridge
CAUTION: If toner gets on clothing, wipe it off with a dry cloth and wash the clothes in cold water.
Hot water sets toner into fabric.
NOTE: Information about recycling used toner cartridges is on the toner-cartridge box.
1. Press the cartridge-door-release button.
2
3
2. Open the cartridge door.
2
3
ENWW
Toner cartridge
55

3. Remove the used toner cartridge from the
product.
2
3
4. Remove the new toner cartridge from the bag.
Place the used toner cartridge in the bag for
recycling.
5. Grasp the front and back of the toner
cartridge, and distribute the toner by gently
rocking the toner cartridge five or six times.
CAUTION: Do not touch the shutter or the
surface of the roller.
56 Chapter 4 Parts, supplies, and accessories ENWW

6. Remove the shipping tape from the new toner
cartridge. Recycle the tape with the used toner
cartridge.
7. Align the toner cartridge with the tracks inside
the product, and insert the toner cartridge until
it is firmly seated.
8. Close the cartridge door. After a short time,
the control panel should display the Ready
message.
2
3
ENWW
2
3
Toner cartridge
57

58 Chapter 4 Parts, supplies, and accessories ENWW

5Print
Supported print drivers (Windows)
●
Change print-job settings (Windows)
●
Change print-job settings (Mac OS X)
●
Print tasks (Windows)
●
Print tasks (Mac OS X)
●
Additional print tasks (Windows)
●
Additional print tasks (Mac OS X)
●
Store print jobs on the product
●
Add a job-separator page (Windows)
●
Use HP ePrint
●
Use the HP ePrint Mobile Driver
●
Use Apple AirPrint
●
Use HP Smart Print (Windows)
●
Use easy-access USB printing
●
ENWW 59

Supported print drivers (Windows)
Print drivers provide access to the product features and allow the computer to communicate with the
product (using a printer language). The following print drivers are available at
lj700M712_software.
www.hp.com/go/
HP PCL 6 driver
HP UPD PS driver
HP UPD PCL 5
Provided as the default driver on the in-box CD. This driver is automatically
●
installed unless you select a different one.
Recommended for all Windows environments
●
Provides the overall best speed, print quality, and product-feature support for
●
most users
Developed to align with the Windows Graphic Device Interface (GDI) for the
●
best speed in Windows environments
Might not be fully compatible with third-party and custom software programs
●
that are based on PCL 5
●
Recommended for printing with Adobe
highly graphics-intensive software programs
Provides support for printing from postscript emulation needs, or for postscript
●
flash font support
Recommended for general office printing in Windows environments
●
Compatible with previous PCL versions and older HP LaserJet products
●
The best choice for printing from third-party or custom software programs
●
The best choice when operating with mixed environments, which require the
●
product to be set to PCL 5 (UNIX, Linux, mainframe)
®
software programs or with other
Designed for use in corporate Windows environments to provide a single
●
driver for use with multiple product models
Preferred when printing to multiple product models from a mobile Windows
●
computer
HP UPD PCL 6
Recommended for printing in all Windows environments
●
Provides the overall best speed, print quality, and printer feature support for
●
most users
Developed to align with Windows Graphic Device Interface (GDI) for best
●
speed in Windows environments
Might not be fully compatible with third-party and custom software programs
●
that are based on PCL 5
HP Universal Print Driver (UPD)
The HP Universal Print Driver (UPD) for Windows is a single print driver that gives you instant access to
virtually any HP LaserJet product, from any location, without downloading separate drivers. It is built on
60 Chapter 5 Print ENWW

proven HP print driver technology and has been tested thoroughly and used with many software
programs. It is a powerful solution that performs consistently over time.
The HP UPD communicates directly with each HP product, gathers configuration information, and then
customizes the user interface to show the product’s unique, available features. It automatically enables
features that are available for the product, such as two-sided printing and stapling, so you do not need
to enable them manually.
For more information, go to
UPD installation modes
Traditional mode
Dynamic mode
www.hp.com/go/upd.
To use this mode, download UPD from the Internet. Go to www.hp.com/go/
●
upd.
Use this mode if you are installing the driver for a single computer.
●
It operates with a specific product.
●
If you use this mode, you must install UPD separately for each computer and
●
for each product.
To use this mode, download UPD from the Internet. Go to
●
upd.
Dynamic mode allows you to use a single driver installation, so you can
●
discover and print to HP products in any location.
Use this mode if you are installing UPD for a workgroup.
●
www.hp.com/go/
ENWW
Supported print drivers (Windows)
61

Change print-job settings (Windows)
Change the settings for all print jobs until the software program is closed
The steps can vary; this procedure is most common.
1. From the software program, select the Print option.
2. Select the product, and then click Properties or Preferences.
Change the default settings for all print jobs
1. Windows XP, Windows Server 2003, and Windows Server 2008 (using the
default Start menu view): Click Start, and then click Printers and Faxes.
Windows XP, Windows Server 2003, and Windows Server 2008 (using the
Classic Start menu view): Click Start, click Settings, and then click Printers.
Windows Vista: Click the Windows icon in the lower-left corner of the screen, click Control
Panel, and then click Printers.
Windows 7: Click the Windows icon in the lower-left corner of the screen, and then click
Devices and Printers.
2. Right-click the print-driver icon, and then select Printing Preferences.
Change the product configuration settings
1. Windows XP, Windows Server 2003, and Windows Server 2008 (using the
default Start menu view): Click Start, and then click Printers and Faxes.
Windows XP, Windows Server 2003, and Windows Server 2008 (using the
Classic Start menu view): Click Start, click Settings, and then click Printers.
Windows Vista: Click the Windows icon in the lower-left corner of the screen, click Control
Panel, and then click Printers.
Windows 7: Click the Windows icon in the lower-left corner of the screen, and then click
Devices and Printers.
2. Right-click the print-driver icon, and then select Properties or Printer properties.
3. Click the Device Settings tab.
62 Chapter 5 Print ENWW

Change print-job settings (Mac OS X)
Change the settings for all print jobs until the software program is closed
1. Click the File menu, and then click the Print option.
2. In the Printer menu, select the product.
3. By default, the print driver displays the Copies & Pages menu. Open the menus drop-down list,
and then open a menu for which you want to change the print settings.
4. For each menu, select the print settings that you want to change.
5. Change the settings that you want on the various menus.
Change the default settings for all print jobs
1. Click the File menu, and then click the Print option.
2. In the Printer menu, select the product.
3. By default, the print driver displays the Copies & Pages menu. Open the menus drop-down list,
and then open a menu for which you want to change the print settings.
4. For each menu, select the print settings that you want to save for reuse.
5. In the Presets menu, click the Save As... option, and enter a name for the preset.
6. Click the OK button.
These settings are saved in the Presets menu. To use the new settings, you must select the saved preset
option every time you open a program and print.
Change the product configuration settings
1.
At the computer, open the Apple
the Print & Fax icon (OS X v10.5 and 10.6) or the Print & Scan icon (OS X v10.7).
2. Select the product in the left side of the window.
3. Click the Options & Supplies button.
4. Click the Driver tab.
5. Configure the installed options.
menu, click the System Preferences menu, and then click
ENWW
Change print-job settings (Mac OS X)
63

Print tasks (Windows)
Use a printing shortcut (Windows)
1. From the software program, select the Print
option.
2. Select the product, and then click the
Properties or Preferences button.
3. Click the Printing Shortcuts tab.
64 Chapter 5 Print ENWW

4. Select one of the shortcuts. Click the OK
button to close the Document Properties
dialog box.
NOTE: When you select a shortcut, the
corresponding settings change on the other
tabs in the print driver.
5. In the Print dialog box, click the OK button to
print the job.
ENWW
Print tasks (Windows)
65

Create printing shortcuts (Windows)
1. From the software program, select the Print
option.
2. Select the product, and then click the
Properties or Preferences button.
3. Click the Printing Shortcuts tab.
4. Select an existing shortcut as a base.
NOTE: Always select a shortcut before
adjusting any of the settings on the right side
of the screen. If you adjust the settings and
then select a shortcut, all your adjustments are
lost.
66 Chapter 5 Print ENWW

5. Select the print options for the new shortcut.
6. Click the Save As button.
ENWW
Print tasks (Windows)
67

7. Enter a name for the shortcut, and then click
the OK button.
8. Click the OK button to close the Document
Properties dialog box. In the Print dialog
box, click the OK button to print the job.
68 Chapter 5 Print ENWW

Automatically print on both sides (Windows)
1. From the software program, select the Print
option.
2. Select the product, and then click the
Properties or Preferences button.
3. Click the Finishing tab.
ENWW
Print tasks (Windows)
69

4. Select the Print on both sides check box.
Click the OK button to close the Document
Properties dialog box.
5. In the Print dialog box, click the OK button to
print the job.
70 Chapter 5 Print ENWW

Manually print on both sides (Windows)
1. From the software program, select the Print
option.
2. Select the product, and then click the
Properties or Preferences button.
3. Click the Finishing tab.
4. Select the Print on both sides (manually)
check box. Click the OK button to print the
first side of the job.
ENWW
Print tasks (Windows)
71

5. Retrieve the printed stack from the output bin,
and place it with the printed-side facing down
in Tray 1.
6. If prompted, touch the appropriate control
panel button to continue.
72 Chapter 5 Print ENWW

Print multiple pages per sheet (Windows)
1. From the software program, select the Print
option.
2. Select the product, and then click the
Properties or Preferences button.
3. Click the Finishing tab.
4. Select the number of pages per sheet from the
Pages per sheet drop-down list.
ENWW
Print tasks (Windows)
73

5. Select the correct Print page borders,
Page order, and Orientation options.
Click the OK button to close the Document
Properties dialog box.
6. In the Print dialog box, click the OK button to
print the job.
74 Chapter 5 Print ENWW

Select the page orientation (Windows)
1. From the software program, select the Print
option.
2. Select the product, and then click the
Properties or Preferences button.
3. Click the Finishing tab.
ENWW
Print tasks (Windows)
75

4. In the Orientation area, select the Portrait
or Landscape option.
To print the page image upside down, select
the Rotate by 180 degrees option.
Click the OK button to close the Document
Properties dialog box.
5. In the Print dialog box, click the OK button to
print the job.
76 Chapter 5 Print ENWW

Select the paper type (Windows)
1. From the software program, select the Print
option.
2. Select the product, and then click the
Properties or Preferences button.
3. Click the Paper/Quality tab.
4. From the Paper type drop-down list, click the
More... option.
ENWW
Print tasks (Windows)
77

5. Expand the list of Type is: options.
6. Expand the category of paper types that best
describes your paper.
78 Chapter 5 Print ENWW

7. Select the option for the type of paper you are
using, and click the OK button.
8. Click the OK button to close the Document
Properties dialog box. In the Print dialog
box, click the OK button to print the job.
ENWW
Print tasks (Windows)
79

Print the first or last page on different paper (Windows)
1. From the software program, select the Print
option.
2. Select the product, and then click the
Properties or Preferences button.
3. Click the Paper/Quality tab.
4. In the Special pages area, click the Print
pages on different paper option, and
then click the Settings button.
80 Chapter 5 Print ENWW

5. In the Pages in document area, select
either the First or Last option.
6. Select the correct options from the Paper
source and Paper type drop-down lists.
Click the Add button.
7. If you are printing both the first and last pages
on different paper, repeat steps 5 and 6,
selecting the options for the other page.
ENWW
Print tasks (Windows)
81

8. Click the OK button.
9. Click the OK button to close the Document
Properties dialog box. In the Print dialog
box, click the OK button to print the job.
82 Chapter 5 Print ENWW

Scale a document to fit page size (Windows)
1. From the software program, select the Print
option.
2. Select the product, and then click the
Properties or Preferences button.
3. Click the Effects tab.
ENWW
Print tasks (Windows)
83

4. Select the Print document on option, and
then select a size from the drop-down list.
Click the OK button to close the Document
Properties dialog box.
5. In the Print dialog box, click the OK button to
print the job.
84 Chapter 5 Print ENWW

Create a booklet (Windows)
1. From the software program, select the Print
option.
2. Select the product, and then click the
Properties or Preferences button.
3. Click the Finishing tab.
4. Select the Print on both sides check box.
ENWW
Print tasks (Windows)
85

5. In the Booklet layout drop-down list, click
the Left binding or Right binding option.
The Pages per sheet option automatically
changes to 2 pages per sheet.
Click the OK button to close the Document
Properties dialog box.
6. In the Print dialog box, click the OK button to
print the job.
86 Chapter 5 Print ENWW

Print tasks (Mac OS X)
Use a printing preset (Mac OS X)
1. Click the File menu, and then click the Print option.
2. In the Printer menu, select the product.
3. In the Presets menu, select the printing preset.
4. Click the Print button.
NOTE: To use print-driver default settings, select the standard option.
Create a printing preset (Mac OS X)
Use printing presets to save the current print settings for reuse.
1. Click the File menu, and then click the Print option.
2. In the Printer menu, select the product.
3. By default, the print driver displays the Copies & Pages menu. Open the menus drop-down list,
and then open a menu for which you want to change the print settings.
4. For each menu, select the print settings that you want to save for reuse.
5. In the Presets menu, click the Save As... option, and enter a name for the preset.
6. Click the OK button.
Automatically print on both sides (Mac OS X)
1. Click the File menu, and then click the Print option.
2. In the Printer menu, select the product.
3. By default, the print driver displays the Copies & Pages menu. Open the menus drop-down list,
and then click the Layout menu.
4. Select a binding option from the Two-Sided drop-down list.
5. Click the Print button.
Manually print on both sides (Mac OS X)
1. Click the File menu, and then click the Print option.
2. In the Printer menu, select this product.
ENWW
3. Open the Manual Duplex menu.
4. Click the Manual Duplex box, and select a binding option.
Print tasks (Mac OS X)
87

5. Click the Print button.
6. Go to the product, and remove any blank paper that is in Tray 1.
7. Retrieve the printed stack from the output bin and place it with the printed-side facing down in the
input tray.
8. If prompted, press the appropriate control panel button to continue.
Print multiple pages per sheet (Mac OS X)
1. Click the File menu, and then click the Print option.
2. In the Printer menu, select the product.
3. By default, the print driver displays the Copies & Pages menu. Open the menus drop-down list,
and then click the Layout menu.
4. From the Pages per Sheet drop-down list, select the number of pages that you want to print on
each sheet.
5. In the Layout Direction area, select the order and placement of the pages on the sheet.
6. From the Border menu, select the type of border to print around each page on the sheet.
7. Click the Print button.
Select the page orientation (Mac OS X)
1. Click the File menu, and then click the Print option.
2. In the Printer menu, select the product.
3. In the Copies & Pages menu, click the Page Setup button.
4. Click the icon that represents the page orientation that you want to use, and then click the OK
button.
5. Click the Print button.
Select the paper type (Mac OS X)
1. Click the File menu, and then click the Print option.
2. In the Printer menu, select the product.
3. By default, the print driver displays the Copies & Pages menu. Open the menus drop-down list,
and then click the Finishing menu.
4. Select a type from the Media Type drop-down list.
5. Click the Print button.
88 Chapter 5 Print ENWW

Print a cover page (Mac OS X)
1. Click the File menu, and then click the Print option.
2. In the Printer menu, select the product.
3. By default, the print driver displays the Copies & Pages menu. Open the menus drop-down list,
and then click the Cover Page menu.
4. Select where to print the cover page. Click either the Before Document button or the After
Document button.
5. In the Cover Page Type menu, select the message that you want to print on the cover page.
NOTE: To print a blank cover page, select the standard option from the Cover Page Type
menu.
6. Click the Print button.
Scale a document to fit page size (Mac OS X)
1. Click the File menu, and then click the Print option.
2. In the Printer menu, select the product.
3. By default, the print driver displays the Copies & Pages menu. Open the menus drop-down list,
and then click the Paper Handling menu.
4. In the Destination Paper Size area, click the Scale to fit paper size box, and then select
the size from the drop-down list.
5. Click the Print button.
Create a booklet (Mac OS X)
1. Click the File menu, and then click the Print option.
2. In the Printer menu, select the product.
3. By default, the print driver displays the Copies & Pages menu. Open the menus drop-down list,
and then click the Layout menu.
4. Select a binding option from the Two-Sided drop-down list.
5. Open the menus drop-down list, and then click the Booklet Printing menu.
6. Click the Format Output As Booklet box, and select a binding option.
7. Select the paper size.
ENWW
8. Click the Print button.
Print tasks (Mac OS X)
89

Additional print tasks (Windows)
Cancel a print job (Windows)
NOTE: If the print job is too far into the printing process, you might not have the option to cancel it.
1. If the print job is currently printing, cancel it from the product control panel by following this
procedure:
a. On the product control panel, press the Stop
b. The product asks you to confirm the deletion. Press the OK button.
2. You can also cancel a print job from a software program or a print queue.
Software program: Typically, a dialog box is briefly displayed on the computer screen,
●
allowing you to cancel the print job.
Windows print queue: If a print job is waiting in a print queue (computer memory) or
●
print spooler, delete the job there.
Windows XP, Server 2003, or Server 2008: Click Start, click Settings, and
◦
then click Printers and Faxes. Double-click the product icon to open the window,
right-click the print job that you want to cancel, and then click Cancel.
Windows Vista: Click the Windows icon in the lower left corner of the screen, click
◦
Settings, and then click Printers. Double-click the product icon to open the window,
right-click the print job that you want to cancel, and then click Cancel.
Windows 7: Click the Windows icon in the lower left corner of the screen, and then
◦
click Devices and Printers. Double-click the product icon to open the window, rightclick the print job that you want to cancel, and then click Cancel.
Select the paper size (Windows)
button.
1. From the software program, select the Print option.
2. Select the product, and then click the Properties or Preferences button.
3. Click the Paper/Quality tab.
4. Select a size from the Paper size drop-down list.
5. Click the OK button.
6. In the Print dialog box, click the OK button to print the job.
Select a custom paper size (Windows)
1. From the software program, select the Print option.
2. Select the product, and then click the Properties or Preferences button.
90 Chapter 5 Print ENWW
 Loading...