

Page 1

HP PhotoSmart C500 Digital Camera
HP PhotoSmart C500 Digital Camera
HP PhotoSmart C500 Digital CameraHP PhotoSmart C500 Digital Camera
User’s Guide
User’s Guide
User’s GuideUser’s Guide
Page 2

Trademark and Copyright Information
© Copyright 2000 Hewlett-Packard Company
All rights are reserved. No part of this docu ment may be photocopied, reproduced, or translated to another language without the
prior written consent of Hewlett-Packard Company.
The informati on contained in this document is subject to change without notice. Hewlett-Packard shall not be liable for errors
contained herein or for consequential damages in connection with the furnishing, performance, or use of this material.
HP, the HP logo, JetSend, the JetSend logo, PhotoSmart, and the PhotoSmart logo are property of Hewlett-Packard Company.
Microsoft and Windows are registered trademarks of Microsoft Corporation.
Digita, the Digita logo, and Digita Desktop are trademarks of Flashpoint Technology, Inc.
CompactFlash, CF, and the CF logo are trademarks of SanDisk Corporation.
Mac, the Mac logo, and Macintosh are registered trademarks of Apple Computer, Inc.
Other brands and their products are trademarks or registered trademarks of their respective holders.
Page 3

Table of Contents
Chapter 1 - Introduction ...........................................................................................................................................................................1
Chapter 2 - Getting Started ............................................................................................ .......................................................................3
Camera Parts ................................................................. ...........................................................................................................................................................3
Setting Up Your Camera ..................................... ................................................................................................................................................................5
Attaching the Wrist Strap and Lens Cover Leash ..................................... .......................................................................................................5
Installing the Batteries ................................................................................................................................................................................................7
Installing the Main Batt eries ............................................................................................................................................................................7
Installing a New Coin Battery .........................................................................................................................................................................8
Checking the Battery Level ..............................................................................................................................................................................9
Charging the Batteries ........................ ...............................................................................................................................................................11
Installing the Memory Card ....................................................................................................................................................................................11
Checking the Memory Card Status ....................................................................................... ......................................................................13
Formatting a Memory Card ...........................................................................................................................................................................14
Camera Basics ......................................................................... ...............................................................................................................................................15
Turning the Camera On and Off ........................................... ...............................................................................................................................15
Sleep Mode ............................................................................................................................................................................................................16
Using the Camera Modes .........................................................................................................................................................................................17
Understanding the Viewfinder Indicator Light ...............................................................................................................................................18
HP PhotoSmart C500 Digital Camera User’s Guide i
Page 4

Table of Contents
Using the Color LCD ........................................................................................................ ..........................................................................................19
Overlay Bars ................................................. .........................................................................................................................................................21
Soft Keys .................................................................................................................................................................................................................23
Using the Camera Menus .................................................... ....................................................................................................................................23
Setting the Date and Time ................................... ...................................................................................................................................................24
Changing the Language ..........................................................................................................................................................................................27
Changing the Camera’s Name .......................... ...................................................................................................................................................28
Using an AC Power Adapter (recommended) ................................................................................................................................................29
Chapter 3 - Taking Photos ...... ............................................................................................................................................................30
Overview ..................................................................................................................................................................................................................................30
Taking a Photo .............................................................................................................................................................................................................30
Checking the Camera Status ........................................................ ..........................................................................................................................32
Using the Status LCD .................................................................... ....................................................................................................................32
Using the Color LCD .......................................................................... ...............................................................................................................33
Taking Still, Burst and Timela pse Photos ................................................................................................................................................................35
Taking Still Photos .....................................................................................................................................................................................................35
Taking Burst Photos ..................................................................................................................................................................................................36
Taking Timelapse Photos .......................................................................................................................................................................................38
HP PhotoSmart C500 Digital Camera User’s Guide ii
Page 5

Table of Contents
Adjusting the Camera Settings .....................................................................................................................................................................................42
Taking Black and White Photos ...........................................................................................................................................................................42
Changing the Flash Setting ...................................................................................................................................................................................43
Adjusting the Photo Quality ..................................................................................................................................................................................45
Using the Zoom ...........................................................................................................................................................................................................50
Using Macro Mode .....................................................................................................................................................................................................52
Using the Self-Timer ................................................................................................................................................................................................. 53
Setting the Exposure .................................... .............................................................................................................................................................56
Setting the White Balance .......................................................................................................................................................................................58
Using Instant Review ................................................................................................................................................................................................60
Setting the Eye Start ..................................................................................................................................................................................................62
Setting Hand Held .....................................................................................................................................................................................................62
Setting the Counter Reset .................................... ...................................................................................................................................................63
Setting Auto Shutoff ........... .......................................................................................................................................................................................64
Setting the Beep ..........................................................................................................................................................................................................65
HP PhotoSmart C500 Digital Camera User’s Guide iii
Page 6

Table of Contents
Chapter 4 - Viewing Photos ...............................................................................................................................................................67
Overview ..................................................................................................................................................................................................................................67
Using Review Mode ............................................................................................................................................................................................................69
Selecting Photos .......................................................................................................... ...............................................................................................69
Marking Photos .............................................. .............................................................................................................................................................70
Deleting Photos ....................................................................................................... ......................................................................................................71
Protecting Photos ........................................................................................................................................................................................................72
Categorizing Photos .......................................................... .........................................................................................................................................73
Grouping Photos ..........................................................................................................................................................................................................75
Creating and Removing Groups .................................................................................................................................................................76
Adding Photos to a Group .............................................................................................. ...............................................................................78
Opening and Closing Groups ......................................................................................................................................................................79
Expanding Burst and Timelapse Photos ....................................... ..................................................................................................................80
Searching for Photos .................................................................................................................................................................................................81
Using Play Mode .................................................................................................................................................................................................................84
Viewing Single Photos ..............................................................................................................................................................................................84
Zooming In on Your Photos ............................ ..............................................................................................................................................85
Viewing Burst, Timelapse, and Grouped Photos ..........................................................................................................................................86
Creating a Slideshow ................................................................................................................................................................................................87
Deleting Photos ....................................................................................................... ....................................................................................................89
HP PhotoSmart C500 Digital Camera User’s Guide iv
Page 7

Table of Contents
Using Your Television .......................................................................................................................................................................................................90
Selecting the Video Output Format ..................................................................................................................................................................90
Connecting the Camera to a Television ............................................................................................................................................................91
Viewing Photos on a Television ........................ ...................................................................................................................................................92
Chapter 5 - Sharing and Printing Photos .............................. ................. .................. .................. ..................................................93
Connecting the Camera to Your PC ...........................................................................................................................................................................93
System Requirements ...............................................................................................................................................................................................94
Installing the Software .............................................................................................................................................................................................95
Connecting the Camera ..........................................................................................................................................................................................95
Downloading Photos ............................................................................................ ....................................................................................................96
Printing Photos ............................................................................................................................................................................................................98
Connecting the Camera to Your Macintosh ..........................................................................................................................................................101
System Requirements ..............................................................................................................................................................................................101
Installing the Software ............................................................................................................................................................................................101
Connecting the Camera ........................................................................................................................................................................................102
Downloading Photos ............................................................................................ ..................................................................................................103
Printing Photos ..........................................................................................................................................................................................................105
HP PhotoSmart C500 Digital Camera User’s Guide v
Page 8

Table of Contents
Printing Photos Without a Comp uter .......................................................................................................................................................................106
Using a Card Reader ........................................................................................................................................................................................................106
Using a Digital Print Order Format (DPOF) File .. .................................................................................................................................................107
JetSending Photos ............................................................................................................................................................................................................109
Transmitting Photos Between Two Cameras ....................... ...................................................................................................................................112
Using Digita Scripts ............................................................................................................................................................................................................114
Chapter 6 - Troubleshooting and Maintenance .......................................................................................................................115
Problems and Solutions .................................................................................................... ...............................................................................................115
Getting Assistance ...............................................................................................................................................................................................................116
HP PhotoSmart on the Internet ......................................................... ...................................................................................................................116
Help ..................................................................................................................................................................................................................................117
Contacting HP Customer Care ..........................................................................................................................................................................117
HP Customer Care Online .............................................................................................................................................................................117
HP Customer Care by Phone .......................................................................................................................................................................118
Maintenance ..........................................................................................................................................................................................................................118
HP PhotoSmart C500 Digital Camera User’s Guide vi
Page 9

Table of Contents
Appendix A - Safety, Regulatory, and Warranty Information ...........................................................................................119
Safety Information ................................. .............................................................................................................................................................................119
Regulatory Notices ...........................................................................................................................................................................................................120
U.S.A. ..............................................................................................................................................................................................................................120
Canada ..........................................................................................................................................................................................................................120
Hewlett-Packard Limited Warranty Statement ......................................................................................................................................................121
Hewlett-Packard Year 2000 Warranty for Consumer Products Distributed Through Authorized Resellers ..........................123
Appendix B - Reference .....................................................................................................................................................................124
Menu Structure ....................................................................................................................................................................................................................124
Record (Rec) Mode .............. ......................................................................................................................................................................................124
Review (Rev) Mode .................... .................................................................................................................................................................................127
Play Mode .....................................................................................................................................................................................................................128
Icons .........................................................................................................................................................................................................................................129
Color LCD ........................................................................................................ .............................................................................................................129
Categories ..................................................... ......................................................... ..............................................................................................132
Status LCD ....................................................................................................................................................................................................................133
Error Messages .................................................................. ..................................................................................................................................................134
Color LCD ........................................................................................................ .............................................................................................................134
Status LCD ....................................................................................................................................................................................................................134
Camera Specifications .... .................................................................................................................................................................................................135
HP PhotoSmart C500 Digital Camera User’s Guide vii
Page 10

Table of Contents
Glossary ....................................................................................................................................................................................................136
Index ..........................................................................................................................................................................................................142
HP PhotoSmart C500 Digit al Camera User’s Guide viii
Page 11

Chapter 1 - Introduction
This guide complements the Basics guide that you received with your HP PhotoSmart C500 Digital Camera. It
describes the camera’s advanced features, using a step-by-step approach.
The guide is divided into the following sections:
Chapter
Chapter Title
ChapterChapter
1 Introduction How to use this guide.
2 Getting Started How to set up your camera, including installing the batteries,
3 Taking Photos How to take Still, Burst and Timelapse photos, check the camera
4 Viewing Photos How to view photos using Review mode, Play mode , or you r
Title Description
TitleTitle
Description
DescriptionDescription
using an AC power adapter, installing the memory card, setting
the date and time, changing the language, turning the camera on
and off, and using the camera modes, color LCD and menus.
status, and adjust the camera settings.
television, and how to mark, categorize, group, protect, and delete
photos.
5 Sharing and Printing
Photos
HP PhotoSmart C500 Digital Camera User’s Guide 1
How to send photos to another camera or a printer, or print
photos from a PC or Macintosh computer.
Page 12

6 Troubleshooting and
Maintenance
Solutions to problems, where to find help using the Internet, the
software Help, or HP Customer Care, and how to clean the
camera.
ASafety, Regulatory,
and Warranty
Information
B Reference Color LCD menu structures for Record, Review and Play modes,
Glossary Glossary of camera parts and terminology.
Battery and AC power adapter safety, how the camera complies
with U.S. and Canadian regulations, and the extent of the Limited
Warranty.
icons used on the color and status LCDs, error messages
displayed on the color and status LCDs, and camera
specifications.
HP PhotoSmart C500 Digital Camera User’s Guide 2
Page 13
Chapter 2 - Gett ing Started
This chapter shows you how to set up your new HP PhotoSmart C500 Digital Camera, including installing the
batteries, us in g a n A C po wer ad ap ter, installing t he m emory c a rd, setting the date a n d ti m e, ch a ngi ng t h e l an gu age,
turning the camera on and off, and using the camera modes, color LCD and menus.
Camera Parts
The following illustrati on s sh ow the parts of th e HP Ph ot oS ma rt C500 Di gi ta l Cam er a. To view a glossary of camera
parts and terminology, see “Glossary” on page136.
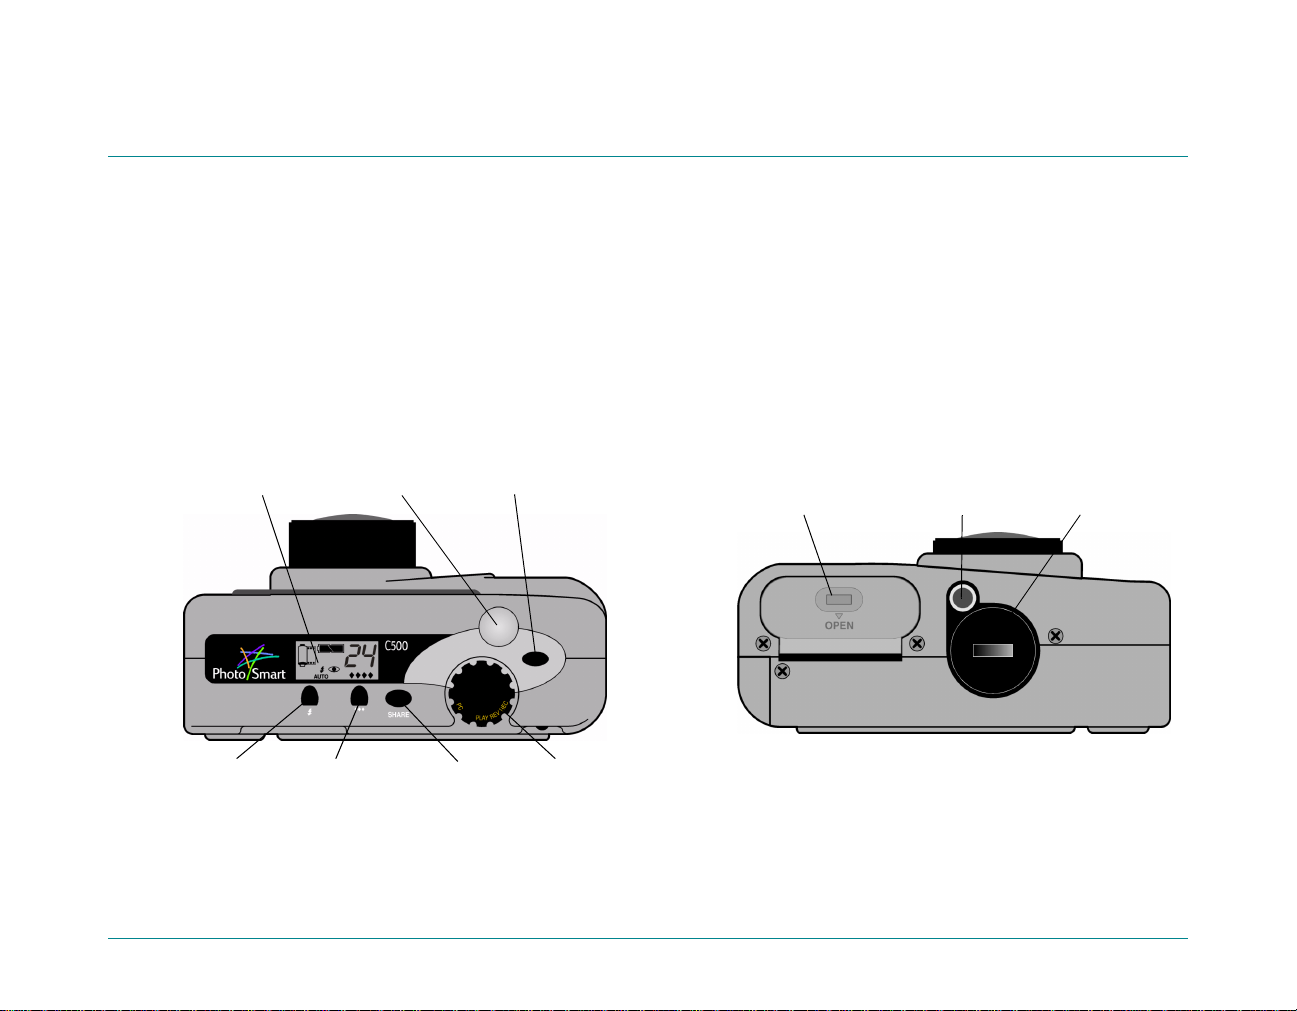
Status LCD Shutter button
button
Top
Top
TopTop
HP PhotoSmart C500 Digital Camera User’s Guide 3
On/off button
Share button
Camera mode dialFlash button Photo Quality
Main battery
compartmen t door
Tripod mount
Bottom
Bottom
BottomBottom
Coin battery
compartment cover
Page 14
Camera Parts
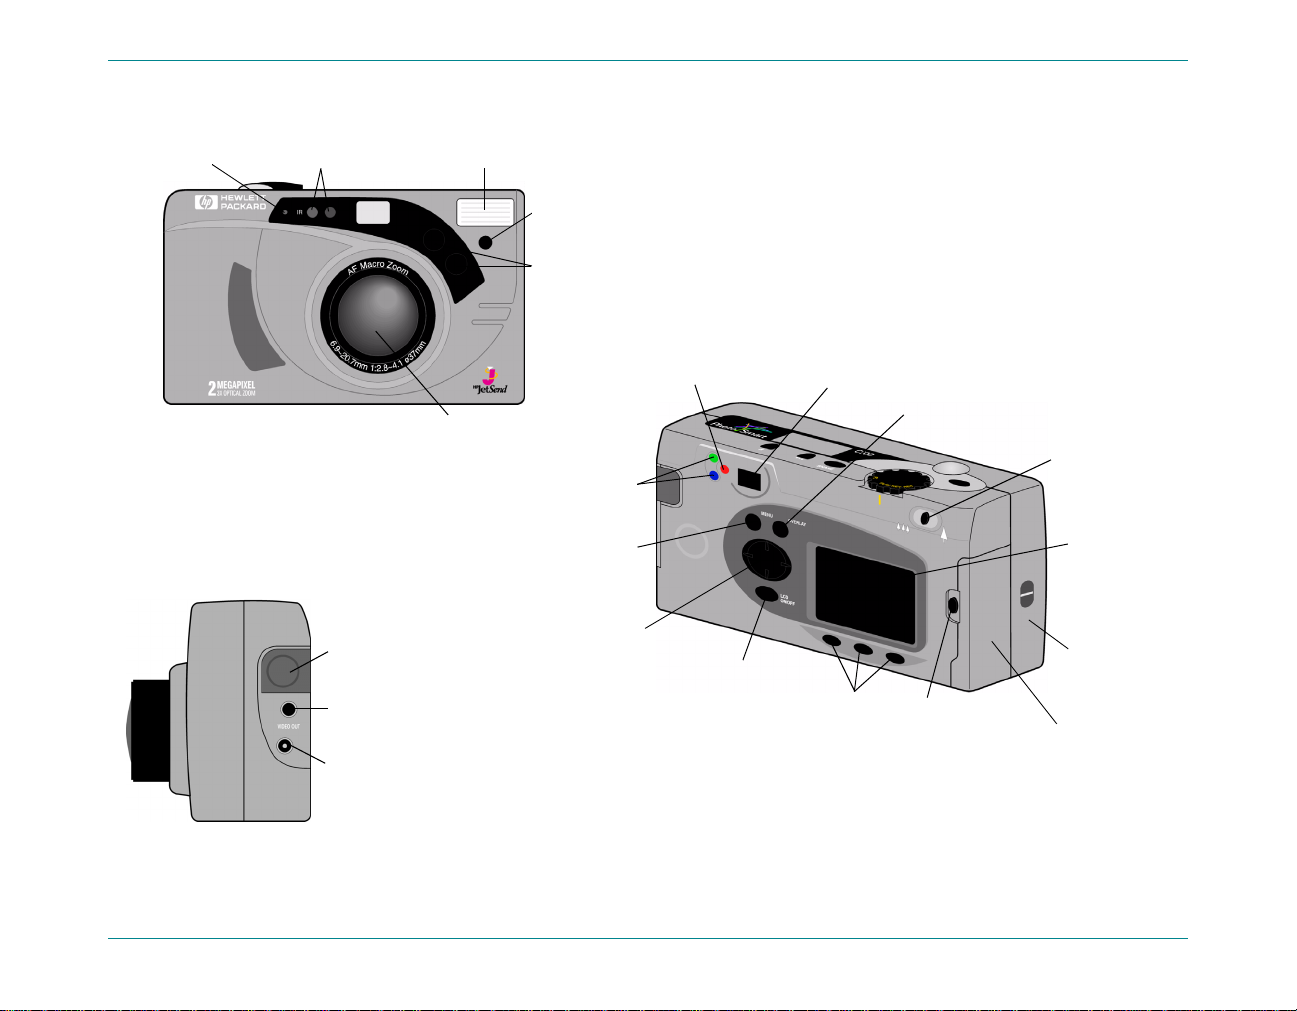
Self-timer light
Infrared sensors
Front
Front
FrontFront
Serial/USB computer
connection
Video Out
AC power
adapter
connection
Lens
Flash
Automatic
flash sensor
Automatic focus and
exposure sensors
Viewfinder indicator
light
Eye Start
sensors
Menu
button
4-way arrow
button
Color LCD
on/off button
Viewfinder
Soft keys
Back
Back
BackBack
Overlay
button
Memory card
door latch
Zoom control
Color LCD
Wrist strap
attachment
Memory
card door
Side
Side
SideSide
HP PhotoSmart C500 Digital Camera User’s Guide 4
Page 15
Setting Up Your Camera
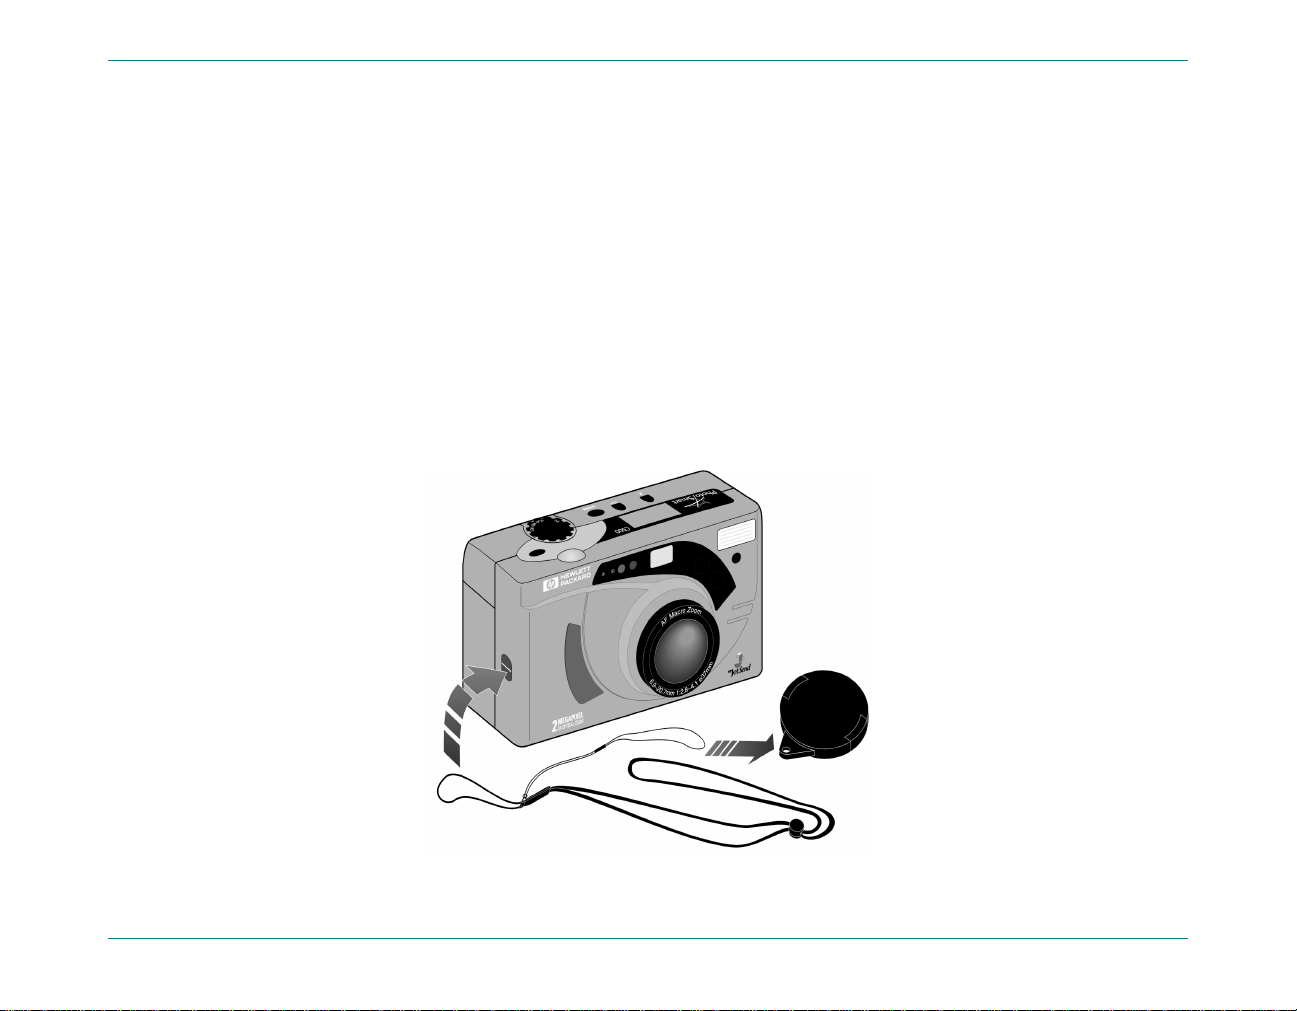
Attaching the Wrist Strap and Lens Cover Leash
The HP PhotoSmart C500 Digital Camera comes with a wrist strap and lens cover leash. The wrist strap and lens
cover leash has three loops:
1. A short loop to attach to the camera.
2. A long thin loop to attach to the lens cover.
3. The main wrist strap loop.
Setting Up Your Camera
2222
1111
HP PhotoSmart C500 Digital Camera User’s Guide 5
3333
Page 16
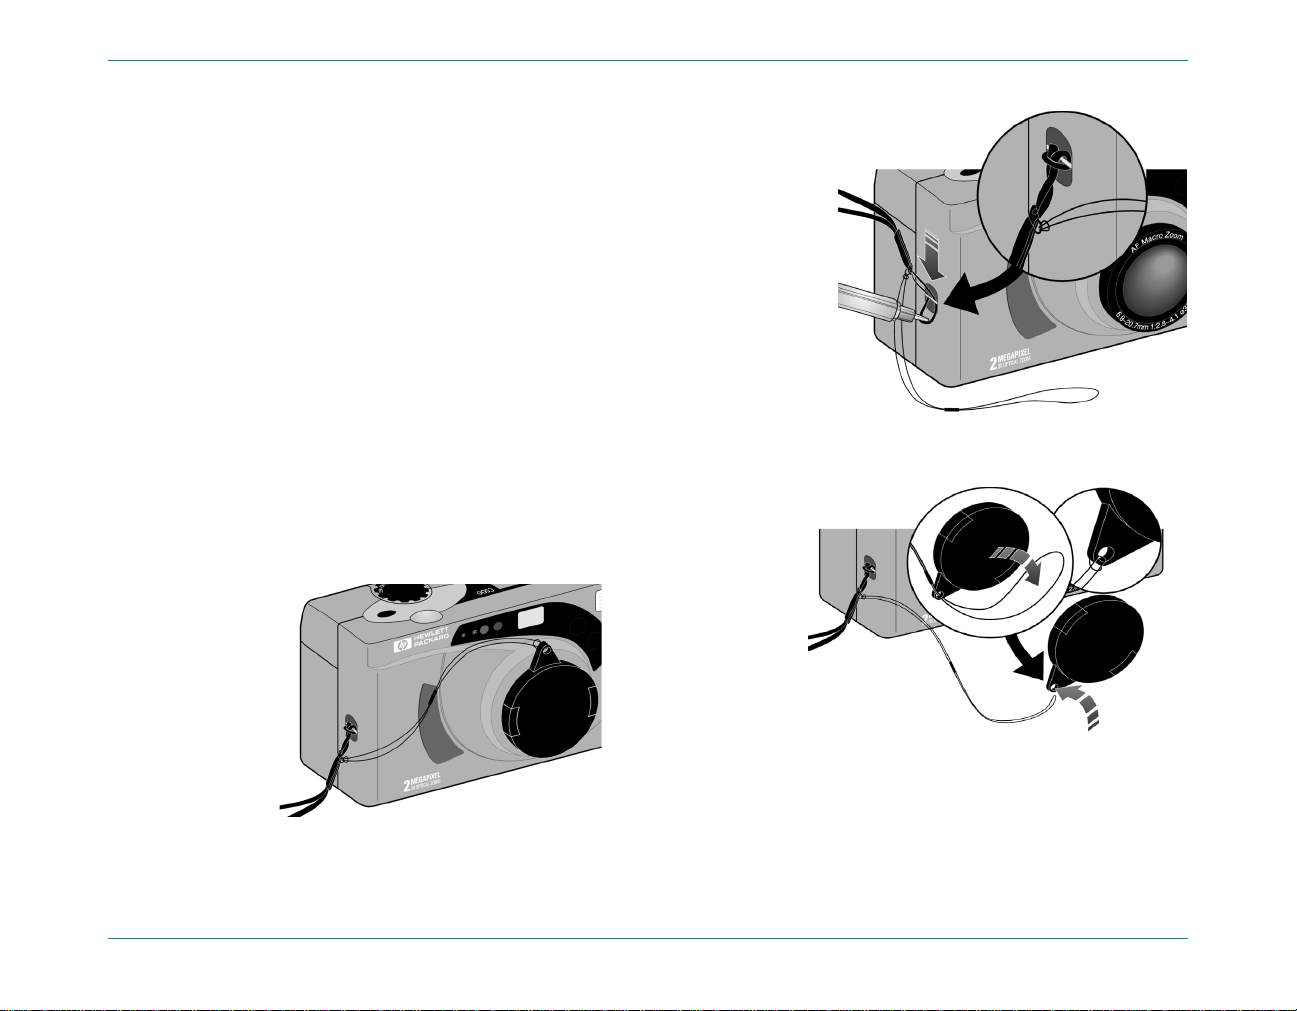
To attach the wrist strap:
To attach the wrist strap:
To attach the wrist strap:To attach the wrist strap:
1. Using the wrist strap and lens cover leash included in the box with
your camera, thread the sh ort l oop thro ugh the c amer a attach ment.
You might need to use a pencil to pull the end of the loop through.
2. Pull the strap and the lens cover leash through the loop, and then
pull the knot tight.
To attach the lens cover leash:
To attach the lens cover leash:
To attach the lens cover leash:To attach the lens cover leash:
1. Remove the lens cover from the camera.
2. Thread the long, thin loop through the hole in the lens cover.
Setting Up Your Camera
3. Pull the lens cover through the loop, and then pull the knot tight.
4. Replace the lens cover on the camera.
HP PhotoSmart C500 Digital Camera User’s Guide 6
3333
4444
2222
Page 17
Installing the Batteries
The HP PhotoSmart C500 Digital Camera uses three AA NiMH (Nickel Metal Hydride) batteries. It also uses a coin
battery for retaining the date and time information. The camera comes with a coin battery (already installed), three
NiMH batteries, and an NiMH battery charger.
Installing the Main Batteries
Caution: Use only AA NiMH batteries. Replace all three batteries at the same time. Do not replace the batteries
individually. Always follow instructions on the battery package when handling or disposing of batteries.
To install the main batteries:
To install the main batteries:
To install the main batteries:To install the main batteries:
Setting Up Your Camera
1. Make sure the camera power is off
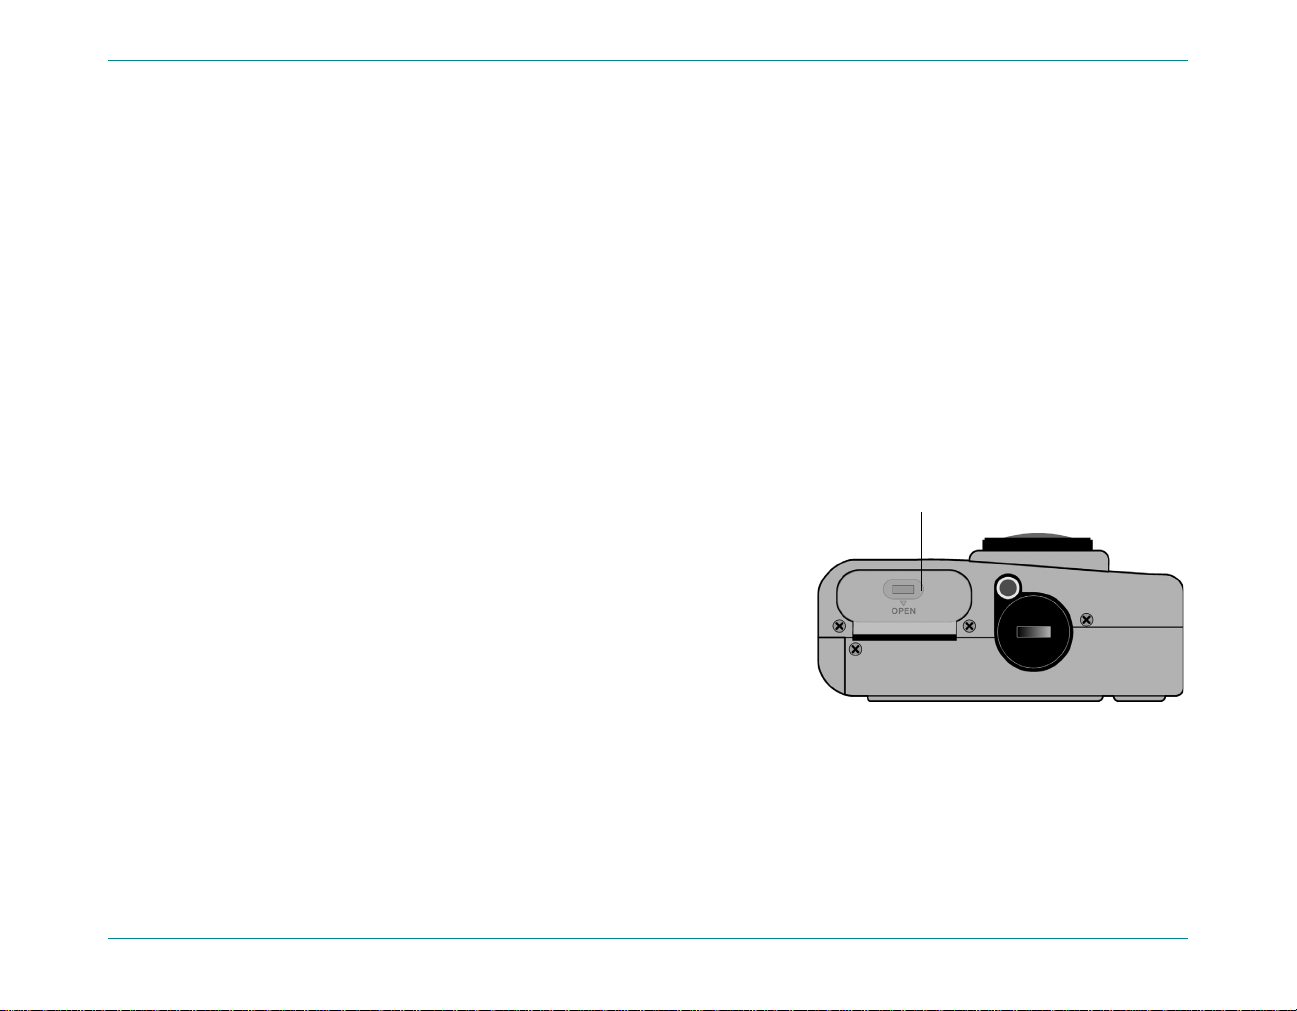
2. Open the main battery compartment door by sliding the latch in
the direction of the word OPEN.
3. Insert three batteries, making sure the +/- electrodes are facing
the proper direction (see the diagram inside the battery
compartment).
4. Close the main battery compartment door.
HP PhotoSmart C500 Digital Camera User’s Guide 7
off.
offoff
Main battery
compartment door
Page 18
Setting Up Your Camera
Installing a New Coin Battery
When you buy the camera, a coin battery is already installed. Follow these directions if you need to install a new
coin battery.
Caution: Use only a CR2025 or equivalent 3 volt coin battery. Always follow instructions on the battery package
when handling or disposing of batteries.
To install a coin battery:
To install a coin battery:
To install a coin battery:To install a coin battery:
1. Make sure the camera power is off
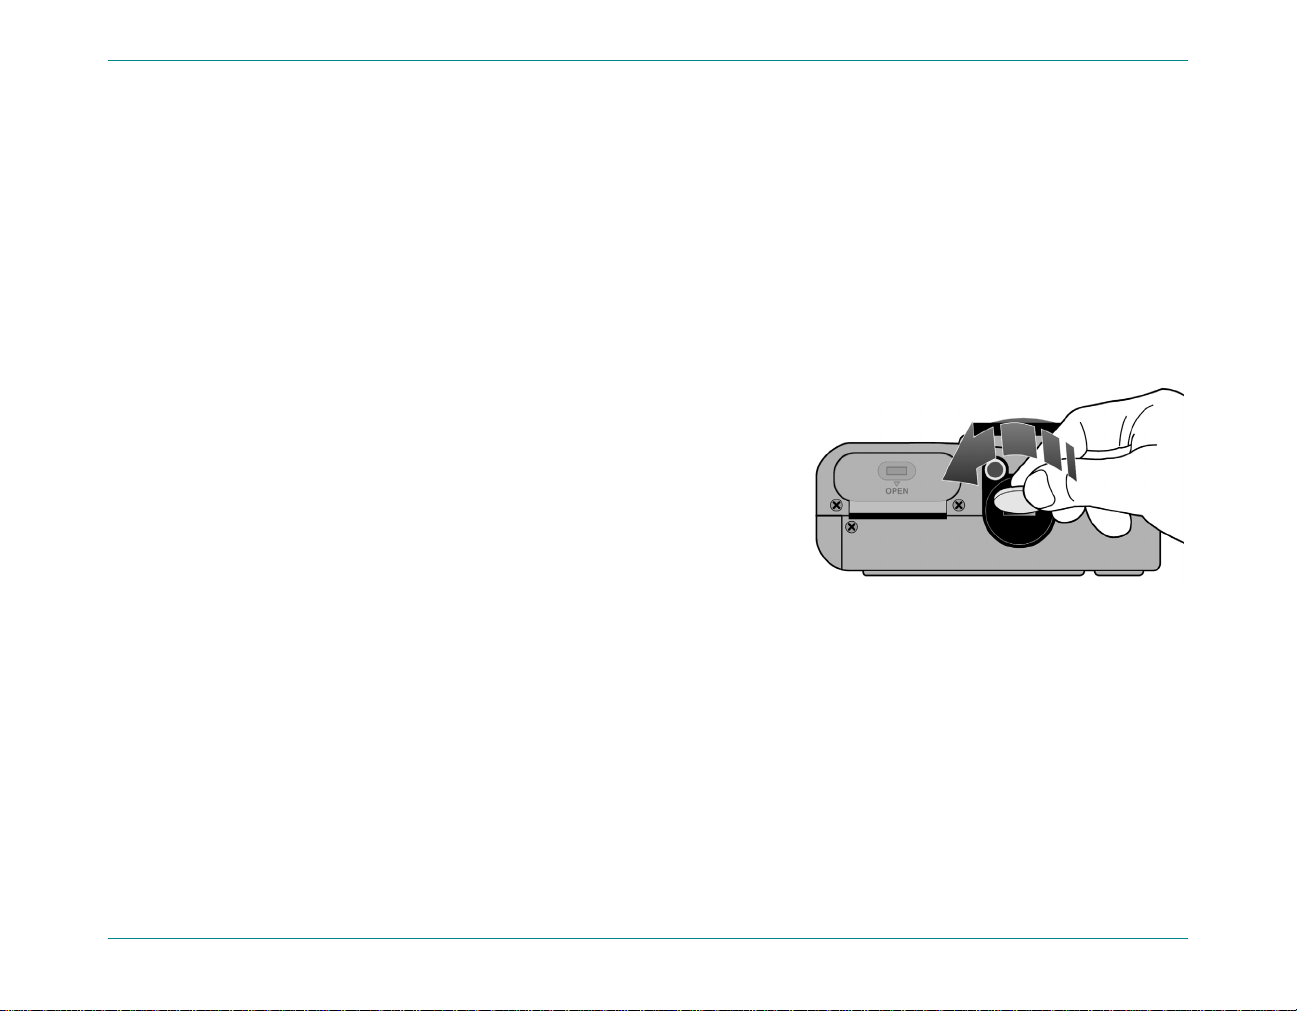
2. Remove the coin battery compartment cover by placing the ed ge
of a coin in the groove and turning it counter-clockwise until it
stops.
3. Insert the coin battery, so you see the positive (+) side facing up.
4. Replace the coin ba ttery comp artmen t co ver and tur n it cl ockwi se
until it stops.
off.
offoff
HP PhotoSmart C500 Digital Camera User’s Guide 8
Page 19

Setting Up Your Camera
Checking the B attery Level
The battery icon on the camera’s status LCD indicates the charge level for the main NiMH batteries. There are three
levels of battery charge: fully charged, partially charged, and empty. You can purchase additional NiMH batteries
from HP’s Shopping Village at www.hpshopping.com
Battery life depends on several f ac tor s. These in cl u de:
• How often and how long you use the color LCD.
• How often you use the flash and zoom.
• The number of photos you take.
• Temperature conditions (operating the camera at colder temperatures results in shorter battery life).
To preserve battery life:
• When using the came ra with a com p ut er or te lev i sio n or wh en us in g th e col or LCD for extended periods of time,
use an AC power adapter that HP has approved for use with the HP PhotoSmart C500 Digital Camera.
www.hpshopping.com, or from your local camera or electronics store.
www.hpshopping.comwww.hpshopping.com
• Limit your use of the color LCD, except when using an AC power adapter.
• Do not leave batteries in the charger for an extended period of time (such as several days).
HP PhotoSmart C500 Digital Camera User’s Guide 9
Page 20
To check the main battery level:
To check the main battery level:
To check the main battery level:To check the main battery level:
Setting Up Your Camera
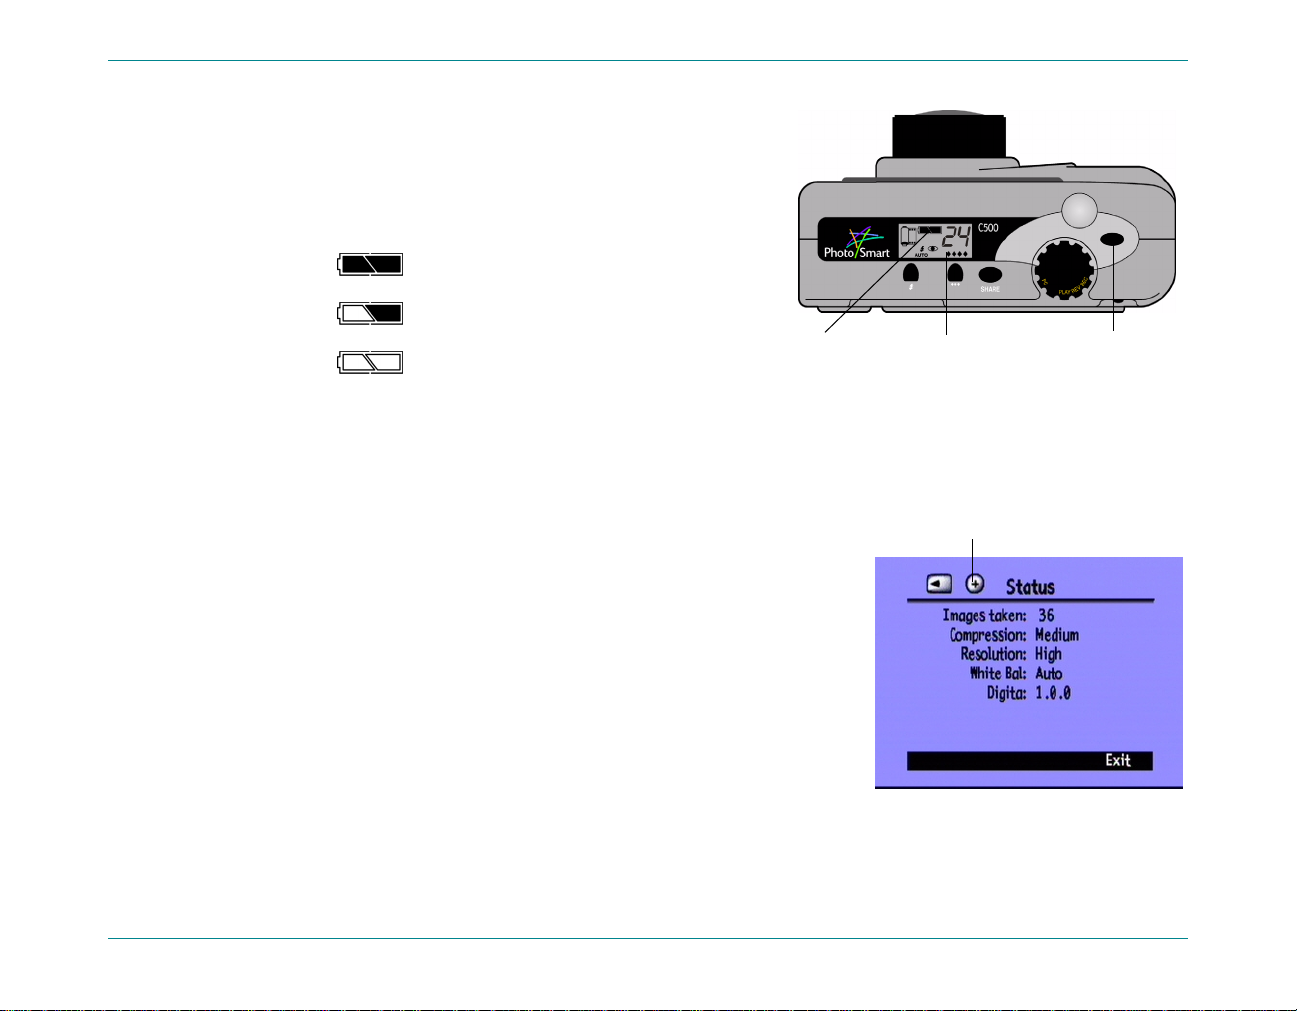
• Press the on/off
on/off button to turn the camera on.
on/offon/off
The status LCD displays the battery status icon.
Fully charged
Partially charged
Empty
On/off buttonStatus LCDBattery status icon
Note: If the batteries are low when you first turn on the camera, the camera beeps 5 times, the empty battery icon
flashes on the status LCD, the lens retracts, and the status LCD goes blank as the camera turns itself off.
To check the coin battery level:
To check the coin battery level:
To check the coin battery level:To check the coin battery level:
1. Turn the camera on and turn the camera mode dial to Rec
2. Press the color LCD on/off
3. If you do not see the overla y bars, press t he Overlay
color LCD on/off button to turn the color LCD on.
color LCD on/offcolor LCD on/off
Overlay button to turn t hem
OverlayOverlay
Rec.
Rec Rec
Coin battery icon indicates low charge
or no battery installed
on.
4. Press the Status
Status button (right soft key) to see the camera status.
StatusStatus
The coin battery icon appears on the color LCD only if the battery level
is low, or if there is no coin battery installed in the camera.
5. Press the Exit
Exit button (right soft key) to exit the Status screen.
Exit Exit
HP PhotoSmart C500 Digital Camera User’s Guide 10
Page 21
Charging the Batteries
To make sure your NiMH batteries ar e char ged when you need them, we rec ommend c har gin g them overnight using
the battery charger included in the camera package. Once the batteries are fully charged, remove them from the
charger.
Note: The batteries reach optimum charge capacity for the first time after they have been drained and charged
four times.
Installing the Memory Card
The “film” used in the HP PhotoSmart C500 Digital Camera is a removable, reusable CompactFlash memory card.
To install the memory card:
To install the memory card:
To install the memory card:To install the memory card:
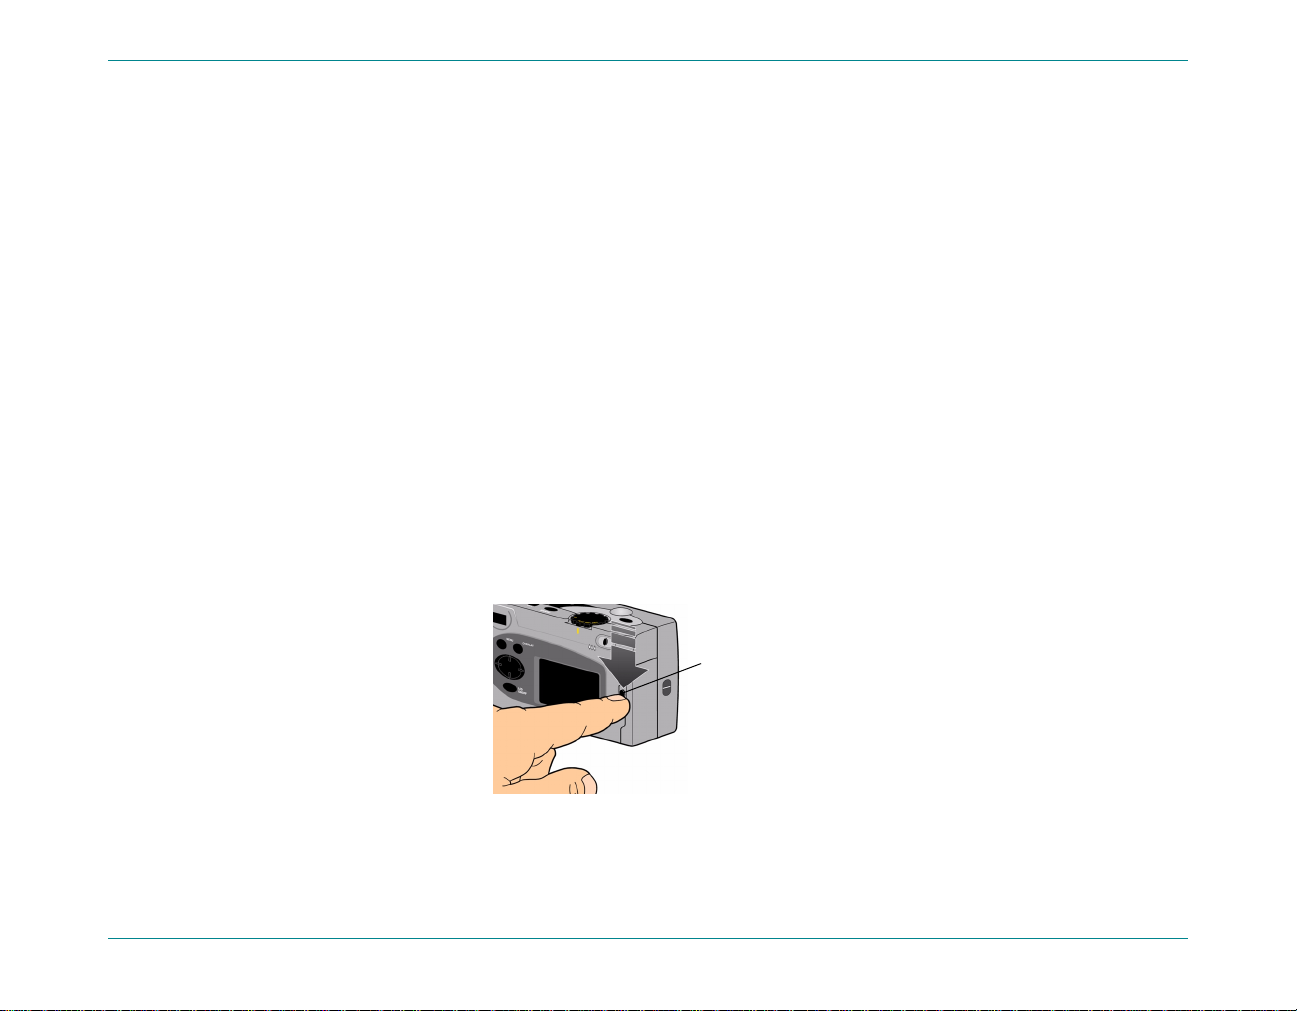
1. Slide the memory card door latch down to open the memory card door.
Setting Up Your Camera
Memory card
door latch
HP PhotoSmart C500 Digital Camera User’s Guide 11
Page 22
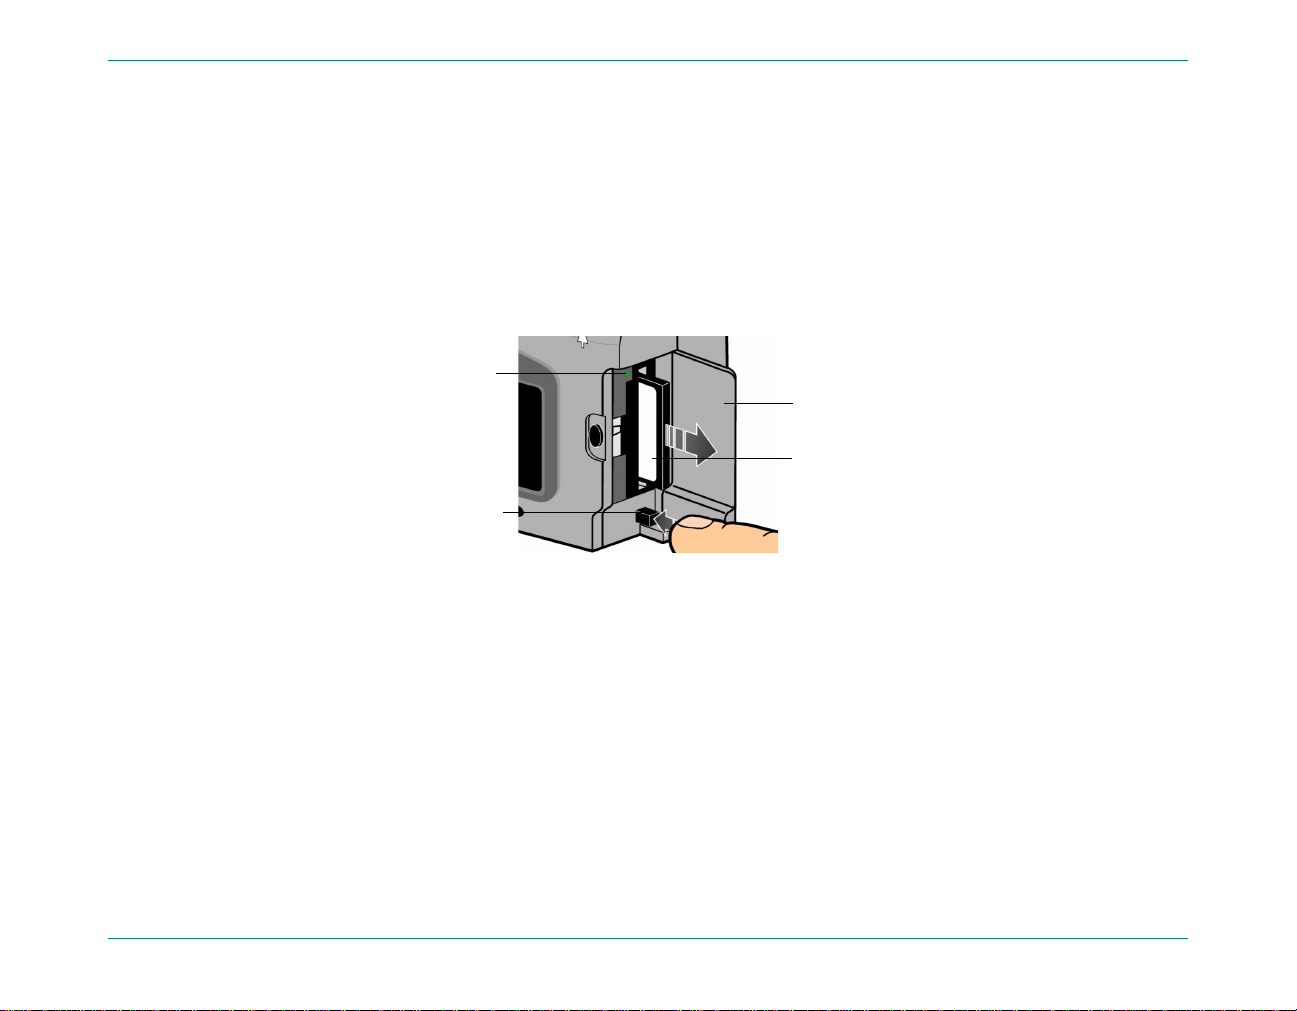
2. If you are removing an existing card:
Setting Up Your Camera
Caution: Before you remove a memory card from the camera, make sure the memory card access light is off
off
offoff
(see the picture below).
• Press the memory card release button to release the card from the slot.
• Remove the card.
Memory card
access light
Memory card
release button
Memory card door
CompactFlash
memory card
3. Insert the new memory c ard so that t he front of the card f aces the front of the ca mera an d the edge with pinholes
is placed into the camera first.
4. Gently push the memory card all the way into the camera until it stops.
5. Close the memory card door.
Tip: If you cannot close the memory card door, you may not have inserted the memory card correctly.
HP PhotoSmart C500 Digital Camera User’s Guide 12
Page 23
Setting Up Your Camera
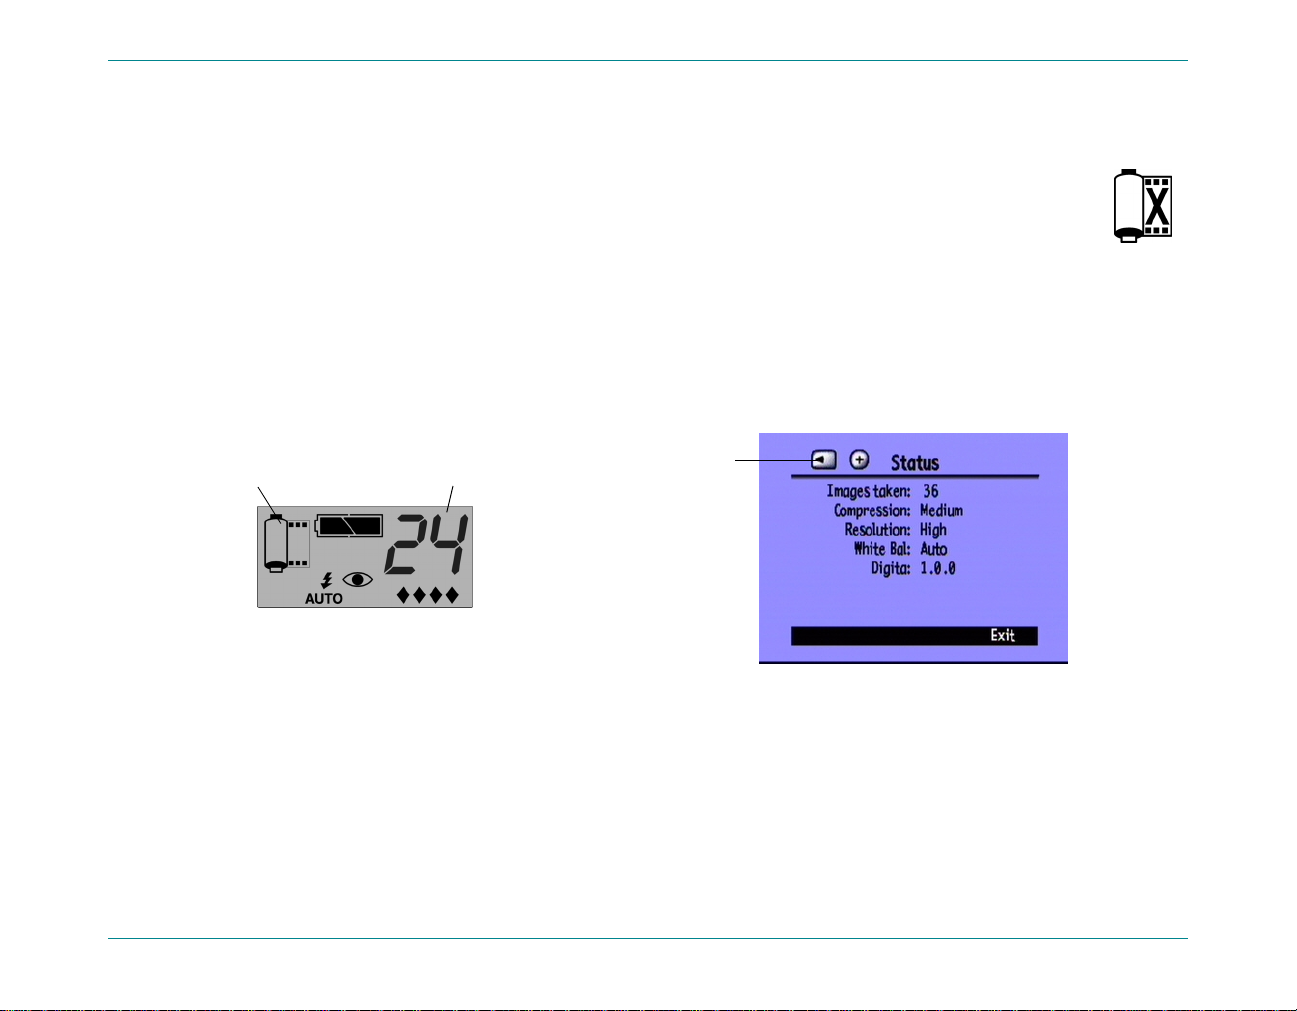
Checking the Memory Card Status
The memory card icon on the camera’s status LCD indicates the status of the memory card. If there is
not a memory card inst alle d in the came ra, the me mory card i con has a f lashing X ove r it, the nu mber of
photos remaining is 000, and a red light appears to the left of the viewfinder.
• Press the on/off
on/off button to turn the camera on.
on/off on/off
The status LCD displays the memory card status icon and the number of photos remaining. The Status menu
displays the memory card inserted icon on the color LCD. (See “Using the Color LCD” on page 33 for more
information about the Status menu.)
Memory card status Photos remaining
Memory card
inserted
HP PhotoSmart C500 Digital Camera User’s Guide 13
Page 24

Setting Up Your Camera
The number of photos a memory card can store depends on the memory
card’s storage capacity and the settings that you choose for each photo. The
number is a conservative estimate, so you might find that you can take more
photos than it indicates.
You can also check the status of the memory card using the memory card
indicator on the color LCD. For example, you can see from the indicator in the
graphic that the memory card is more than half full.
Memory card indicator
Formatting a Memory Card
Most CompactFlash memory cards are already formatted when you buy
them. But if you buy a memory card that has not been formatte d, you need to format it before you can use it in the
camera.
To format a memory card:
To format a memory card:
To format a memory card:To format a memory card:
1. Insert the memory card and turn the camera on. The camera can be in any mode.
If the memory ca rd is not fo rmat ted, the co lor LCD displays a message asking i f you w ant to fo rmat the me mory
card.
2. Press the Format
Format button (left soft key).
FormatFormat
The camera formats the memory card.
HP PhotoSmart C500 Digital Camera User’s Guide 14
Page 25
Camera Basics
Turning the Camera On and Off
To turn the camera power on:
To turn the camera power on:
To turn the camera power on:To turn the camera power on:
Camera Basics
• Press the on/off
The camera lens automatically extends, and the status LCD displays
the status of the camera.
Tip: Remember to remove the lens cover before taking a photo. To
To turn the camera power off:
To turn the camera power off:
To turn the camera power off:To turn the camera power off:
• Press the on/off
The camera lens aut omatically retracts and the status LCD goes blank.
on/off button to turn the camera power on.
on/offon/off
remind yourself, always replace the lens cover with the leash
attachment pointing up so that you see it when you look
through the viewfinder.
on/off button to turn the camera power off.
on/off on/off
Status LCD
On/off button
HP PhotoSmart C500 Digital Camera User’s Guide 15
Page 26

Camera Basics
Sleep Mode
To conserve battery power, the HP PhotoSmart C500 Digital Camera automatically “sleeps” after a period of no
activity. This period of time differs depending on the camera mode and the power source. For example, if you are
using battery power and you do n ot p ress an y came r a bu tto ns fo r 30 sec on ds, th e color LCD turns itself off and the
camera sleeps. The camera also tu rns i tself of f and retrac ts the lens aft er 10 minut es with bat tery powe r, and after 30
minutes with AC adapter power. For more information about the sleep and shutoff times, see “Setting Auto Shutoff”
on page 64.
To “wake up” the camera:
To “wake up” the camera:
To “wake up” the camera:To “wake up” the camera:
• Press any button.
HP PhotoSmart C500 Digital Camera User’s Guide 16
Page 27
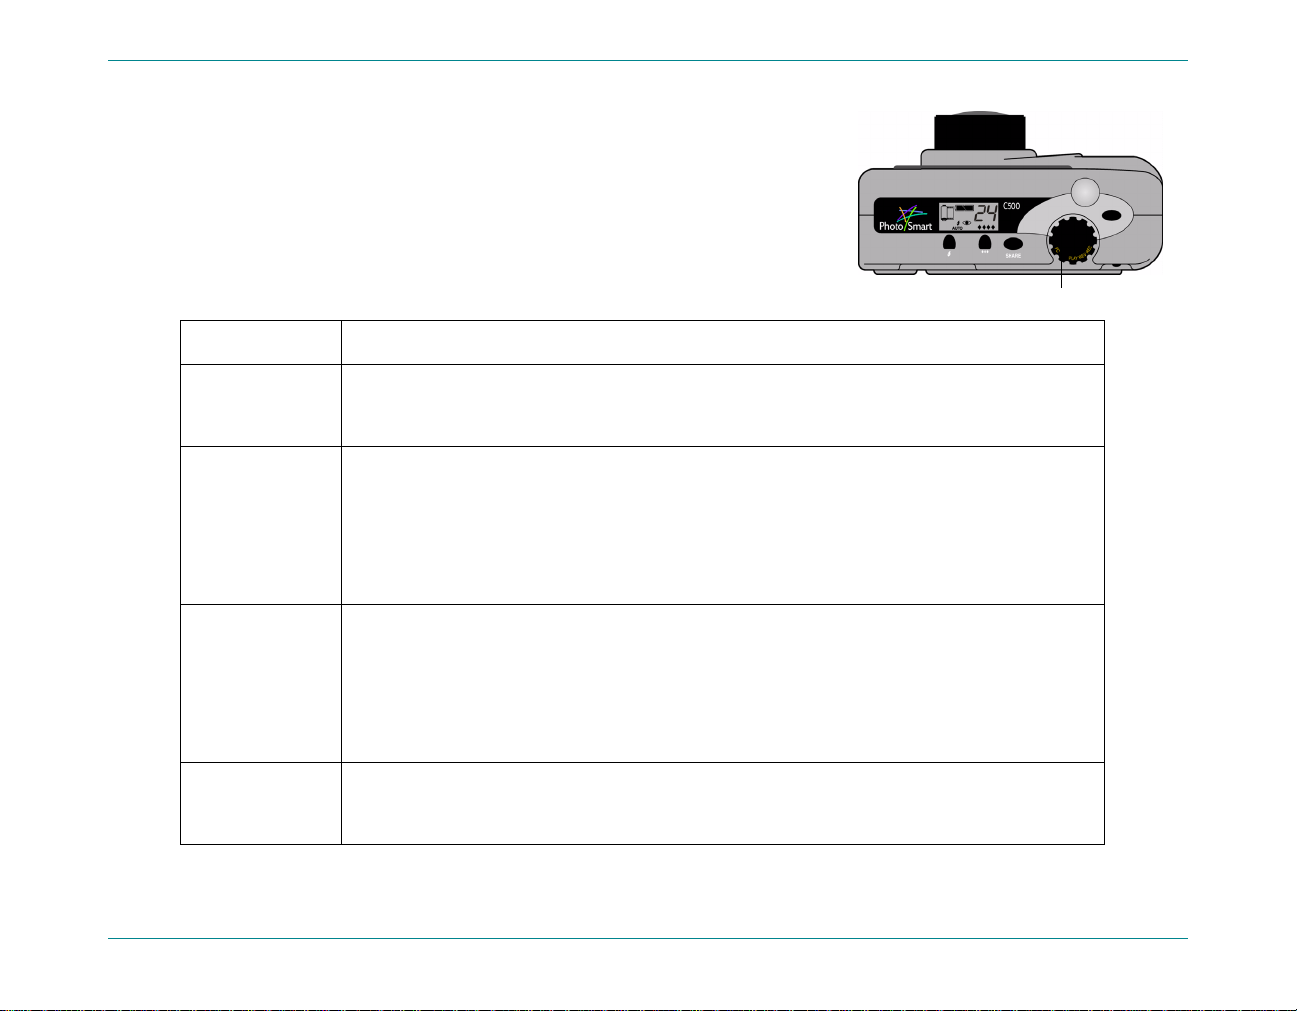
Using the Camera Modes
The HP PhotoSmart C500 Digital Camera has four modes. The camera
mode determines which features and menu options are active.
Camera Basics
Use the camera mode dial
camera mode dial to select the mode.
camera mode dialcamera mode dial
Camera mode dial
Mode
Mode Functions
ModeMode
Rec (Record)
Rec (Record) • Take photos
Rec (Record)Rec (Record)
Rev (Review)
Rev (Review) • View thumbnails of your photos
Rev (Review)Rev (Review)
Play
Play • View one photo at a time, using the entire color LCD
PlayPlay
PC
PC • View photos on a computer monitor when the camera is connected to a computer
PCPC
Functions
FunctionsFunctions
• Preview photos on the camera’s color LCD or a television
• Mark, categorize, group, protect, and delete photos
• View photos on the camera’s color LCD or a television
• Transmit photos via infrared
• Play back Burst, Timelapse, and grouped photo sequences
• Create slide shows
• View photos on the camera’s color LCD or a television
• Share, print, and download photos
HP PhotoSmart C500 Digital Camera User’s Guide 17
Page 28
Camera Basics
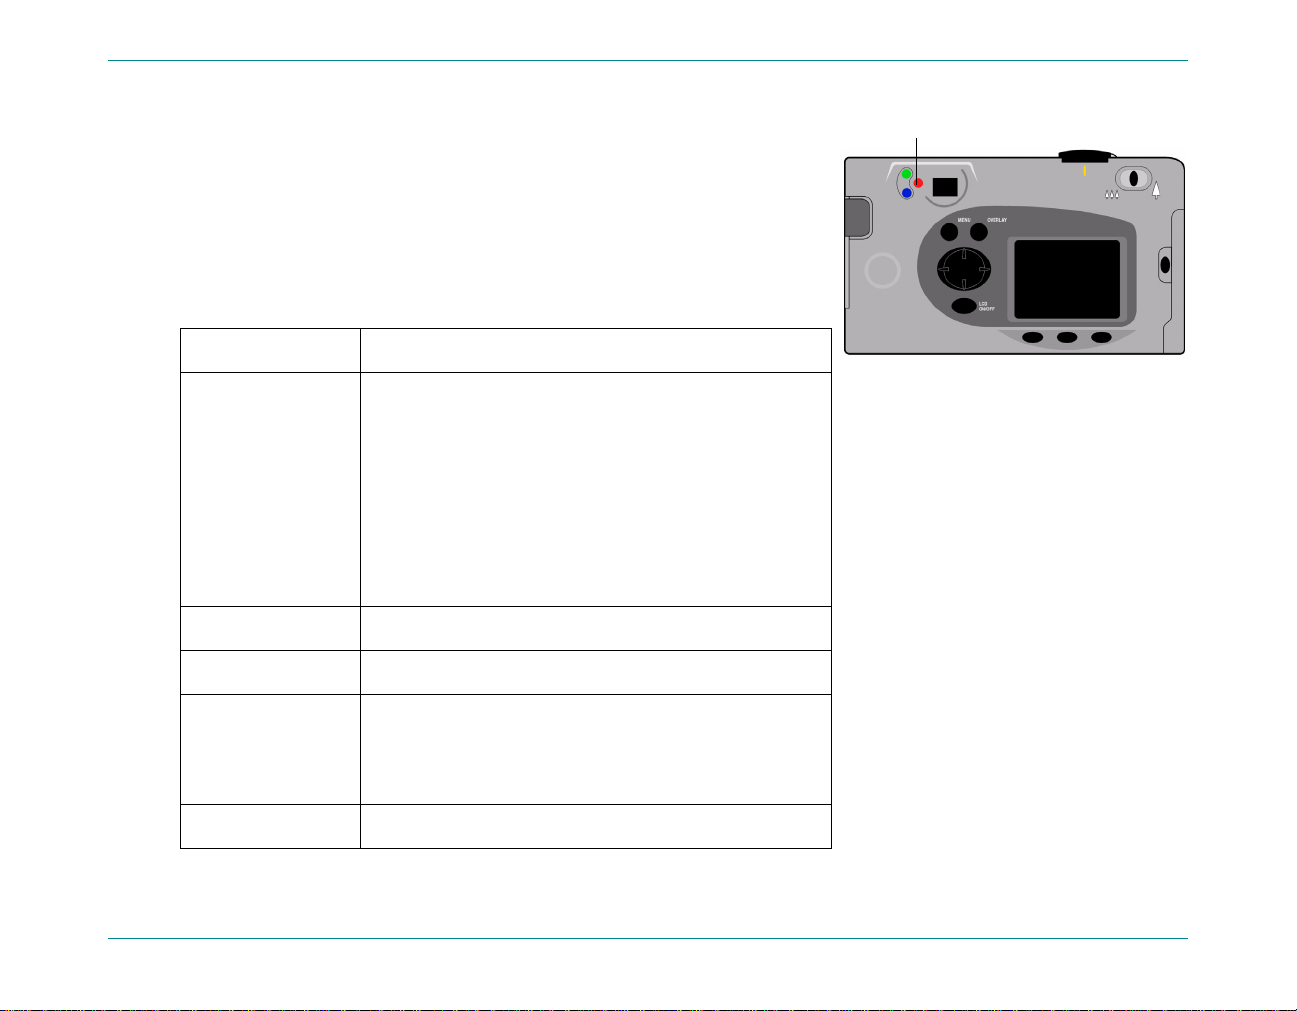
Understanding the Viewfinder Indicator Light
The indicator light appears to the left of the viewfinder.
The color of the light changes d epending on the camera mode and a t
different stages in th e ph otogr aphy pr ocess. I f the flashi ng ligh t indic ates
a camera error, a message also displays on the status or color LCD.
Light color
Light color Meaning
Light colorLight color
Red (flashing) • Memory card problem
Red (solid) • Flash charging
Orange (flashing) • Camera initializing from Sleep mode
Meaning
MeaningMeaning
• No memory card
• Full memory card
• Internal memory full (only for burst photos)
• Batteries low
• Camera error
Viewfinder indicator light
Orange (solid) • Auto Focus failed or photo underexposure will
occur (flash off and insufficient light)
• Slow shutter (not enough light or tripod needed)
Green (flashing) • Sending a photo via JetSend
HP PhotoSmart C500 Digital Camera User’s Guide 18
Page 29
Light color
Light color Meaning
Light colorLight color
Green (solid) • Camera is ready to take a photo (Auto Exposure
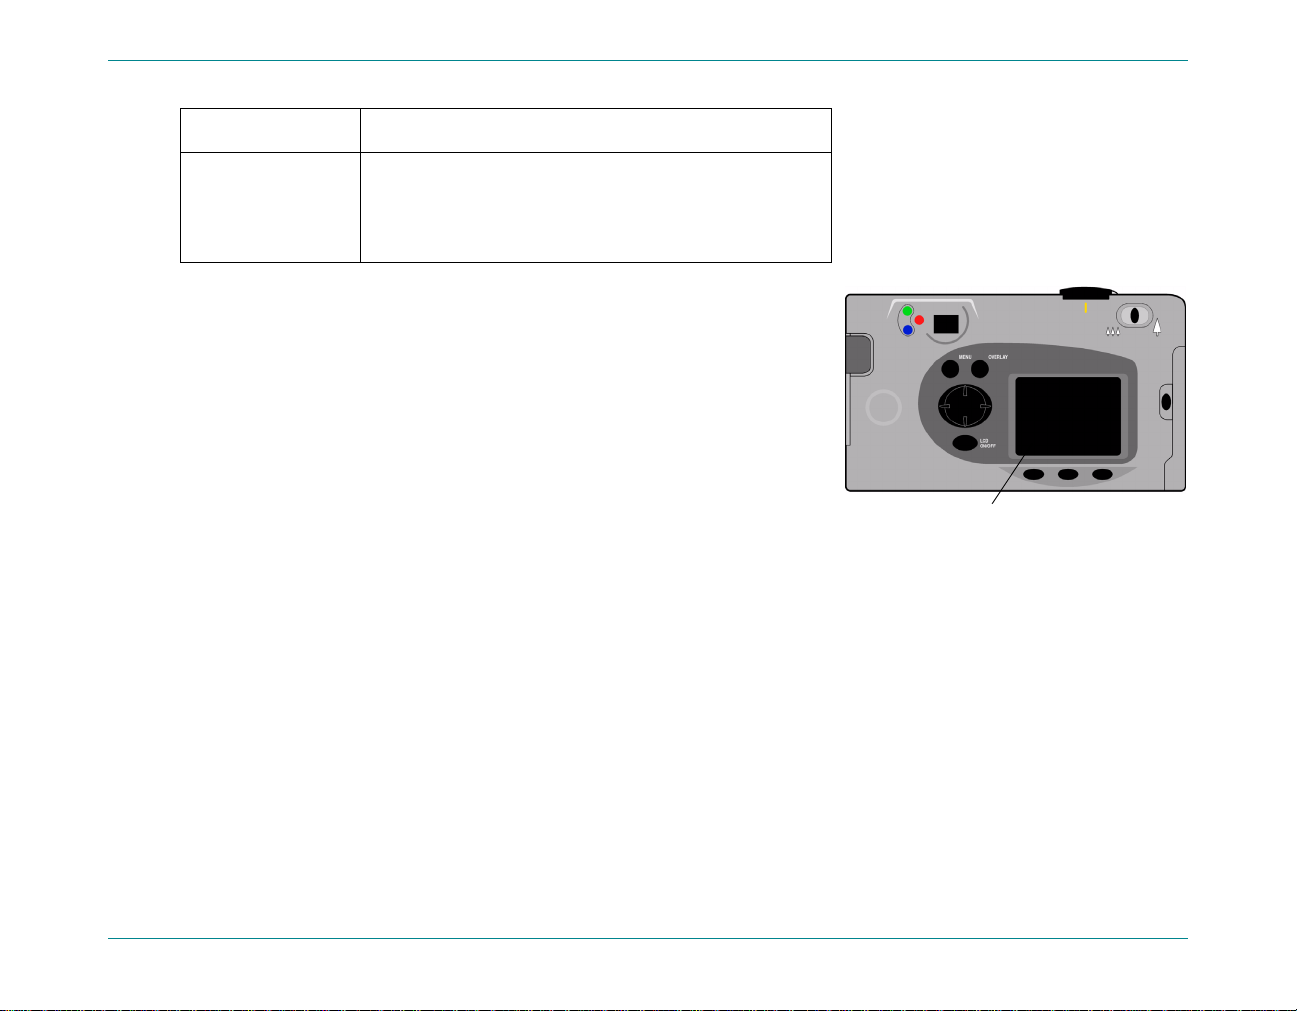
Using the Color LCD
The color LCD is located on the back of the HP PhotoSmart C500
Digital Camera. Use the color LCD to frame or view your photos and to
access the camera’s menus. You can adjust the brightness of the color
LCD to suit lighting conditions. For example, if you are using the camera
outside in bright sunlight, you can make the c olor LCD brighter (see
below).
The display on the color LCD varies with each camera mode. The
following table indicates whether the color LCD is on or off in each
mode, and the default displ ay.
Meaning
MeaningMeaning
and Auto Focus have been completed)
• Continuous A uto Exposure activated
Camera Basics
Color LCD
HP PhotoSmart C500 Digital Camera User’s Guide 19
Page 30
Camera Basics
Mode
Mode Status
ModeMode
Rec (Record)
Rec (Record) Off. You can turn the color LCD on by
Rec (Record)Rec (Record)
Rev (Review)
Rev (Review) Turns on automatically.
Rev (Review)Rev (Review)
Status Display
StatusStatus
Display
DisplayDisplay
No display unless you turn the color LCD
pressing the color LCD on/off
color LCD on/off button.
color LCD on/offcolor LCD on/off
on.
Displays thumbnails of photos stored on
Turns off auto m atically after 30 seconds if
the memory card.
you are using battery power.
Play
Play Turns on automatically.
PlayPlay
Turns off auto m atically after 30 seconds if
Displays photos stored on the memory
card using the entire color LCD screen.
you are using battery power.
PC
PC Off. No display.
PCPC
Tip: The color LCD uses a lot of battery power. If you are not using an AC power adapter, you may want to limit
your use of the color LCD.
To adjust the brightness of the color LCD:
To adjust the brightness of the color LCD:
To adjust the brightness of the color LCD:To adjust the brightness of the color LCD:
1. Tur n the ca mera on and turn the came ra mod e dial to
Rec
Rec.
RecRec
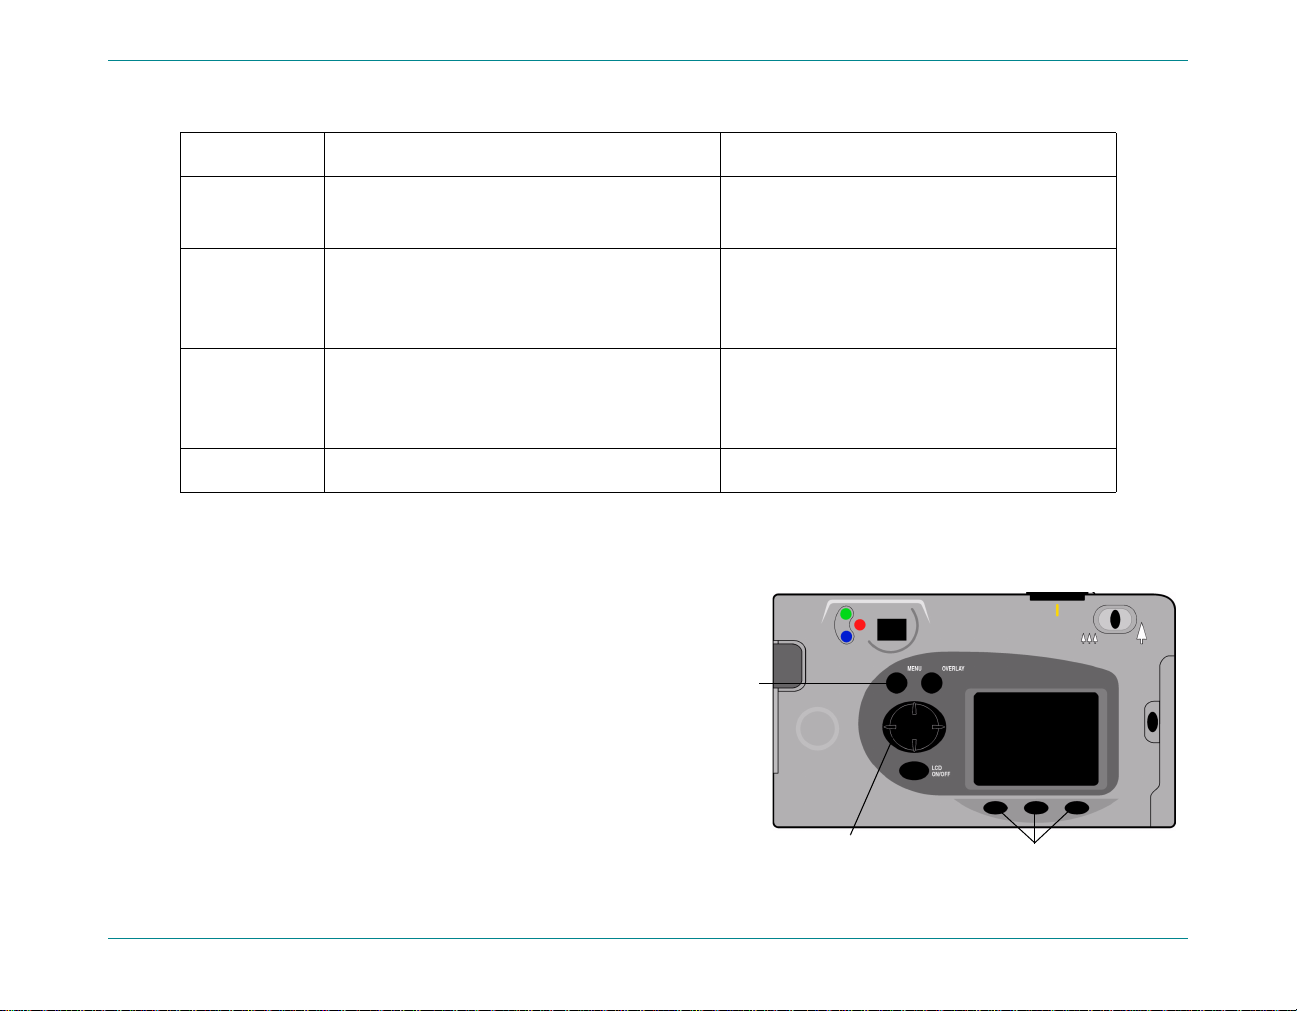
2. Press the Menu
Menu button.
MenuMenu
Menu
button
3. Use the 4-way arrow button to scroll to the
Preferences
Preferences menu. LCD Brightness is highlighted.
PreferencesPreferences
4. Press the Edit
Edit button (left soft key).
EditEdit
4-way arrow
button
Soft keys
HP PhotoSmart C500 Digital Camera User’s Guide 20
Page 31

5. Use the 4-way arrow button to adjust the color LC D brightness. A higher
number gives a brighter display.
Camera Basics
6. Press the Exit
Exit button (right soft key) twice to activate and save the new
ExitExit
settings, and exit the menus.
Tip: The brightness of the color LCD affects battery life; the brighter
the color LCD, the more power it uses. You may want to lower the
brightness level if you use the color LCD often.
Overlay Bars
Overlay bars appear at the top and bottom of the color LCD. They provide you with information about the camera
settings, such as the type of photo (Still, Burst or Timelapse). They also indicate the functions of the soft keys.
The number of overlay bars and the information they provide varies with each camera mode. In Rev (Review) mode,
the lower overlay bar is always visible. In Rec (Record) mode you can choose whether or no t to see the overlay bars.
In Play mode you can choose to see both overlay bars, just the lower bar, or neither of the bars. You can find
information about the icons that appear on the overlay bars throughout this guide.
Overlay
button
Overlay bars
Color LCD
on/off button
HP PhotoSmart C500 Digital Camera User’s Guide 21
Page 32

To turn the overlay bars on or off in Rec (Record) mode:
To turn the overlay bars on or off in Rec (Record) mode:
To turn the overlay bars on or off in Rec (Record) mode:To turn the overlay bars on or off in Rec (Record) mode:
Camera Basics
1. Turn the camera on and turn the camera mode dial to Rec
2. Press the color LCD on/off
color LCD on/off button.
color LCD on/off color LCD on/off
Rec.
RecRec
By default both the overlay bars appear.
3. Press the Overlay
To turn the overlay bars on or off in Play mode:
To turn the overlay bars on or off in Play mode:
To turn the overlay bars on or off in Play mode:To turn the overlay bars on or off in Play mode:
1. Turn the camera on and turn the camera mode dial to Play
Overlay button to turn the overlay bars off and on.
OverlayOverlay
Play.
PlayPlay
By default only the lower overlay bar appears.
2. Press the Overlay
You can continue pressing the Overlay
Overlay button once to turn off the overlay bar. Press the button again to see both the overlay bars.
OverlayOverlay
Overlay button to toggle between the three options.
OverlayOverlay
Lower overlay bar No overlay bars Both overlay bars
HP PhotoSmart C500 Digital Camera User’s Guide 22
Page 33

Soft Keys
Soft keys are buttons that change function depending on the
camera mode, s tate, and menu option. Each soft key function is
labeled on the lower overlay bar, above the key that is used to
activate the function. If the overlay bars are off, you can still use
the function by pressing a soft key. For example, if the camera is
in Play mode and the overlay bars are turned off, you can press
the center soft key (the zoom button) once to turn the lower
overlay bar on, and then a second time to zoom in on the photo.
Using the Camera Menus
The HP PhotoSmart C500 Digital Camera menus display on the color LCD. You can use these menus to adjust
camera settings and use camera features. The menus vary with each camera mode. Use the color LCD and the
controls on the back of the camera to access the camera menus and select the menu options. Menu options are
described in de tail throughout this guide. For a list of options, see “Menu Structure” on page124 in Appendix B.
Camera Basics
Soft keys
Menu button
Menus display on the
color LCD
4-way arrow
button
Soft keys
HP PhotoSmart C500 Digital Camera User’s Guide 23
Page 34

To use the camera menus :
To use the camera menus :
To use the camera menus :To use the camera menus :
1. Turn the camera on and turn the camera mode dial to the mode you want to use.
Camera Basics
2. Press the Menu
3. Use the right and left sides of the 4-way arrow button to select a menu.
4. Use the up and down sides of the 4-way arrow button to scroll through a menu’s options.
5. Press the soft keys to select or edit a menu option, or to exit the camera menus.
Note: Y ou must p ress the Exit
Menu button.
MenuMenu
Exit button to save the s etting s and exit the men us. If you change th e camera mode wh ile
ExitExit
you are selecting the menu options, the camera does not save the new settings. You must exit all menus
before you can turn the color L C D off.
Setting the Date and Time
Before you begin taking photos, set the correct date and time. The camera stores the date and time with other
information about the photo, and displays it in Rev (Review) mode. When you turn your camera on, the color LCD
prompts you to set the date and time under any of the following conditions:
• The first time you use your camera.
• After removing or replacing the coin battery when you have not installed the NiMH batteries and are not using
an AC power adapter.
• After losing power in both the coin and NiMH batteries at the same time.
You can also use the Preferences
HP PhotoSmart C500 Digital Camera User’s Guide 24
Preferences camera menu in Rec (Record) mode to change the date and time as needed.
PreferencesPreferences
Page 35

Menu button
4-way arrow
button
To set the date and time when prompted by the color LCD:
To set the date and time when prompted by the color LCD:
To set the date and time when prompted by the color LCD:To set the date and time when prompted by the color LCD:
1. Select a format for the date and time:
Camera Basics
Soft keys
• Press the Format
Format button (left soft key).
FormatFormat
• Use the 4-way arrow button to scroll to the format you want.
• Press the Select
Select button (left soft key).
SelectSelect
Note: A camera’s default date and time formats match the camera’s language. For example, cameras with the
language set to English have a default date form a t of MM /D D/Y Y a nd a de fault time fo rm at o f 1 2 h our s .
Cameras with the language set to French have a default date format of DD/MM/YY and a default time
format of 24 hours.
HP PhotoSmart C500 Digital Camera User’s Guide 25
Page 36

2. Set the date and time:
• Use the up and down sides of the 4-way arrow button to select a
value for the highlighted field.
• Use the right side of the 4-way arrow button to save the value in the
current field and to mov e to anot her field. The field s are month, d ay,
year, hour, minute, and in 12 hour format, AM or PM.
Camera Basics
3. When you have finished, press the Exit
To change the date and time using the camera menu:
To change the date and time using the camera menu:
To change the date and time using the camera menu:To change the date and time using the camera menu:
1. Turn the camera on and turn the camera mode dial to Rec
2. Press the Menu
3. Use the 4-way arrow button to scroll to the Preferences
scroll down to Date & Time
4. Press the Edit
5. If you want to change the date and time format s from th e ones di splayed
on the color LCD:
• Press the Format
• Use the 4-way arrow button to scroll to the format you want.
• Press the Select
Menu button.
MenuMenu
Date & Time.
Date & TimeDate & Time
Edit button (left soft key).
EditEdit
Format button (left soft key).
FormatFormat
Select button (left soft key).
SelectSelect
Exit button (right soft key).
ExitExit
Rec.
RecRec
Preferences menu, then
PreferencesPreferences
HP PhotoSmart C500 Digital Camera User’s Guide 26
Page 37

6. Set the date and time:
• Use the up and down sides of the 4-way arrow button to select a
value for the highlighted field.
• Use the right side of the 4-way arrow button to save the value in the
current field and to m ove to an other fiel d. The fields are mon th, day,
year, hour, minute, and in 12 hour format, AM or PM.
Camera Basics
7. Press the Exit
the menus.
Exit button (right soft key) twice to save the settings and exit
ExitExit
Changing the Language
The HP PhotoSmart C500 Digital Camera allows you to change the language used for the camera menus, overlay
bars, and default date and time formats.
To change the language:
To change the language:
To change the language:To change the language:
1. Turn the camera on and turn the camera mode dial to Rev
2. Press the Menu
3. Use the 4-way arrow button to scroll to the Preferences
4. Press the Edit
5. Use the 4-way arrow button to scroll to the language you want to use.
Menu button.
MenuMenu
Edit button (left soft key).
EditEdit
Rev.
RevRev
Preferences menu.
PreferencesPreferences
HP PhotoSmart C500 Digital Camera User’s Guide 27
Page 38

Camera Basics
6. Press the Select
A check mark appears next to the selected language and the language immediately changes.
7. When you have finished, press the right soft key, which will be labeled Exit
Select button (left soft key).
SelectSelect
Changing the Camera’s Name
The camera’s default name is HP C500. The name appears in the photo information only if you use the memory
card in another camera. For example, if you and a friend both have HP PhotoSmart C500 Digital Cameras, you can
share your photos by exchanging memory cards. Any photos that you have taken will display on your friend’s
camera with your camera’s name in the photo information.
To change the camera’s name:
To change the camera’s name:
To change the camera’s name:To change the camera’s name:
1. Turn the camera on and turn the camera mode dial to Rec
2. Press the Menu
3. Use the 4-way arrow button to scroll to the Preferences
4. Press the Edit
Menu button.
MenuMenu
Edit button (left soft key).
EditEdit
Exit in the language selected.
ExitExit
Rec.
RecRec
Preferences menu , then scroll down to Camera Name
PreferencesPreferences
Camera Name.
Camera NameCamera Name
• Use the left soft key to toggle between capital letters, lower case
letters, numbers, and special characters: A-capital letters, a-lower
case letters, 1-numbers, %-spec ial characters.
• Use the center soft k ey to add a s pace between let ters an d characte rs.
HP PhotoSmart C500 Digital Camera User’s Guide 28
Page 39

Camera Basics
• Use the up and down sides of the 4-way arrow button to select a letter, number, or special character for the
camera name.
• Use the right side of the 4-way arrow button to save the letter, number, or special character.
5. Press the Exit
Exit button (right soft key) twice to save the settings and exit the menus.
ExitExit
Using an AC Power Adapter (recommended)
To preserve battery life, use an A C power adapter that HP ha s approved for use w ith the HP P hotoSmar t C500 Digita l
Camera. Use the adapter as your power source when you connect your camera to a computer or a television, or
when using the color LCD for an extended period of time.
Note: An AC power adapter provides power to the camera. It doe s not recharge the batteries.
AC power adapters are avail able from www.hpshopping.com
PhotoSmart Web site at www.photosmart.com
To connect an AC power adapter:
To connect an AC power adapter:
To connect an AC power adapter:To connect an AC power adapter:
www.photosmart.com.
www.photosmart.comwww.photosmart.com
1. Plug the adapter into a power source (such as a wall outlet or power
strip).
2. Connect the round end of the adapter cable to the camera.
Note: If you want to use battery power, remove the AC adapter from the power source and the camera. If the AC
adapter is connected to the camera, even if it is not connected to a power source, the camera will not use
battery power.
www.hpshopping.com. For AC power adapter specifications, refer to HP’s
www.hpshopping.comwww.hpshopping.com
AC power
adapter
connection
HP PhotoSmart C500 Digital Camera User’s Guide 29
Page 40

Chapter 3 -Taking Photos
This chapter describes the process of taking photos with your HP PhotoSmart C500 Digital Camera, including how
to take Still, Burst, and Timelapse photos, and detailed descriptions of adjusting the camera settings. If you want a
quick overview, see the Basics guide that you received with your camera.
There are three settings you can use to take photos: Still, Burst, and Timelapse.
Still
Still Use this setting for taking a single color or black and white photo.
StillStill
Burst
Burst Use this setting for taking up to 4 photos in rapid succession.
BurstBurst
Timelapse
Timelapse Use this setting for taking several photos, with a set amount of time (1 minute to 24
TimelapseTimelapse
hours) between photos.
Tip: The Burst setting is ideal for taking action photos. Use the Timelapse setting for observing a subject over a
longer period of time.
Overview
Taking a Photo
The HP PhotoSmart C500 Digital Camera has a 2-step Shutter
down, the camera adjusts the focus and exposure of the photo. After these settings are adjusted, a green light
appears to the left of the viewfinder, indicating that you can press the Shutter
photo. You may want to practice to get used to the timing, before taking important photos.
HP PhotoSmart C500 Digital Camera User’s Guide 30
Shutter button. When you press the Shutter
ShutterShutter
Shutter button all the way down to take the
ShutterShutter
Shutter button 1/2 way
ShutterShutter
Page 41

To take a photo:
To take a photo:
To take a photo:To take a photo:
1. Remove the lens cover.
Overview
Shutter button
2. Turn the camera on and turn the camera mode dial to Rec
Rec.
RecRec
The camera is automatically ready to take a Still photo.
3. Frame your subject in the viewfinder.
4. Press and hold the Shutter
Shutter button 1/2 way down to allow the
ShutterShutter
Camera mode dial On/off button
camera to adjust the focus and exposur e.
5. When you see the green light to the left of the viewfinder, press the Shutter
photo. Wait for the beeps, indicating your photo has been taken, then release the Shutter
Shutter button all the way down to take the
ShutterShutter
Shutter button.
ShutterShutter
Tip: When you are taking a photo, be especially careful to keep your fingers away from the lens, flash, and
sensors on the front of the camera. The following illustrations give you examples of how to hold the camera.
HP PhotoSmart C500 Digital Camera User’s Guide 31
Page 42

Checking the Camera Status
Use the status LCD and the color LCD to check the status of the camera. Basic camera information such as battery
level, number of photos remaining, photo quality, flash status, and memory card status display on the status LCD.
The color LCD shows information such as the number of photos stored on the memory card, the current
compression level, resolution setting, and battery status.
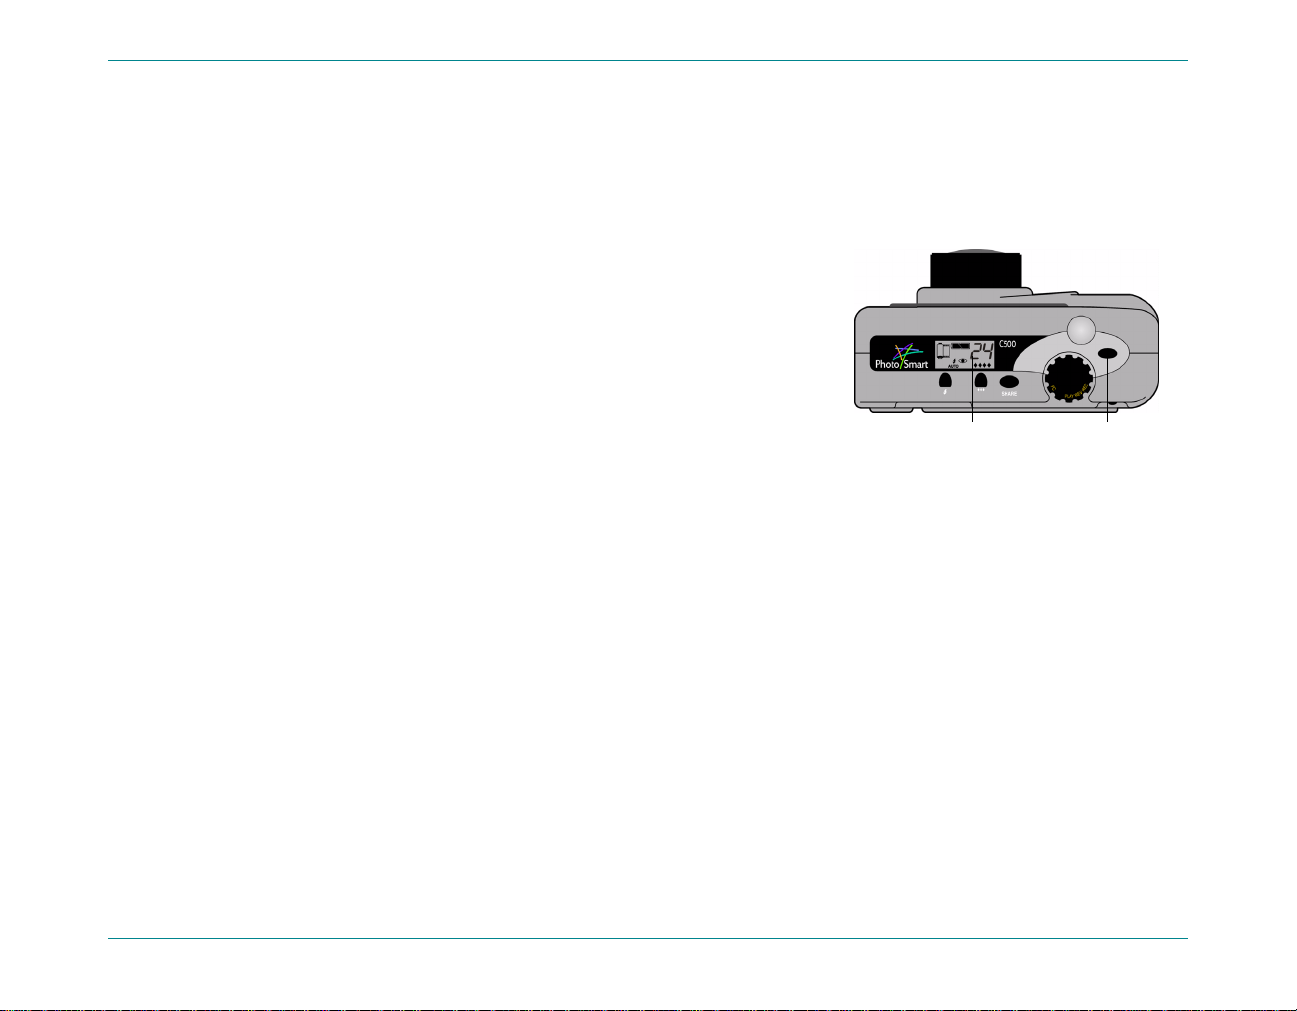
Using the Status LCD
Use the status LCD on the top of the camera to check the status of the memory card, the battery level, and the
number of photos ava ilab l e on the m em ory ca rd . T h e sta tus LCD also displays the flash and photo quali ty settings,
and any camera error messages.
Overview
Memory
card status
To view the camera status on the status LCD:
To view the camera status on the status LCD:
To view the camera status on the status LCD:To view the camera status on the status LCD:
• Press the on/off
on/off button to turn the camera on.
on/offon/off
Battery level
Flash
Photos
remaining
Photo quality
Individual icons are discussed throughout this guide or you can see a list of all the icons in Appendix B “Icons”
on page 129.
HP PhotoSmart C500 Digital Camera User’s Guide 32
Page 43

Overview
Using the Color LCD
Use the color LCD on the back of the camera to check current camera settings and status, including the number of
photos stored on the memory card, and the compres sion and resolu tion settings.
To view the camera status on the color LCD:
To view the camera status on the color LCD:
To view the camera status on the color LCD:To view the camera status on the color LCD:
1. Turn the camera on and turn the camera mode dial to
Rec
Rec.
RecRec
2. Press the color LCD on/off
color LCD on/off button to turn the color
color LCD on/offcolor LCD on/off
LCD on.
3. Press the Status
Status button (right soft key).
StatusStatus
The color LCD displays the current camera settings
and status. To change the camera settings, use the
camera menus. See the following sections of this
chapter for details. One or more icons may also
appear on the Status screen, depending on the
camera status.
Color LCD
on/off button
Color LCD
Soft keys
HP PhotoSmart C500 Digital Camera User’s Guide 33
Page 44

Images taken
Images taken The number of photos stored on the
Images takenImages taken
memory card.
Compression
Compression The current compression level.
CompressionCompression
Resolution
Resolution The current resolution setting.
ResolutionResolution
White Bal
White Bal The current white balance setting.
White BalWhite Bal
Digita
Digita The camera firmware version number.
DigitaDigita
Memory card inserted Battery status
Color LCD Status
Color LCD Status
Color LCD StatusColor LCD Status
Overview
4. When you have finished viewing the camera status, press the Exit
Exit button (right soft key).
ExitExit
HP PhotoSmart C500 Digital Camera User’s Guide 34
Page 45

Taking Still, Burst and Timelapse Photos
Taking Still Photos
Taking Still, Burst and Timelapse Photos
Use the Still
To take a Still photo:
To take a Still photo:
To take a Still photo: To take a Still photo:
1. Remove the lens cover.
2. Turn the camera on and turn the camera mode dial to Rec
3. Adjust your camera settings as needed. See “Adjusting the
4. Press the color LCD on/off
5. Frame your subject in the viewfinder, then press and hold the Shutter
Still setting to take one photo each time you press the Shutter
StillStill
The status LCD displays the approximate number of photos
available on the memory card. The camera is not ready until
this number appears.
Camera Settings” on page 42 for details.
color LCD on/off button to turn the color LCD on, then press the left soft key until the
color LCD on/offcolor LCD on/off
Still
Still icon appears on the lower ov erlay bar.
StillStill
Tip: To conserve battery power, turn the color LCD off after you choose the photo type.
to adjust the focus and exposure. If you see an orange light to the left of the viewfinder, you may need to
change the flash setting to adjust for the lighting conditions.
Shutter button.
ShutterShutter
Rec.
RecRec
Shutter button 1/2 way down to allow the camera
ShutterShutter
Status LCD
Number of
photos available
Shutter button
On/off buttonCamera mode dial
Still icon
HP PhotoSmart C500 Digital Camera User’s Guide 35
Page 46

Taking Still, Burst and Timelapse Photos
6. When you see the green light to the left of the viewfinder, press the Shutter
photo. Wait for the beeps, indicating the photo has been taken, before releasing the Shutter
7. If Instant Review is on, your photo appears briefly on the color LCD. If you are happy with the photo, press the
Save
Save button (right soft key) to save it on the memory card. If not, press the Delete
SaveSave
discard the photo and try again. If you do not press either button, the camera automatically saves the photo.
Taking Burst Photos
Use the Burst setting to take photos in rapid succession while holding the Shutter
four photos at a rate of one to three frames per second. The Burst setting is recommended for taking action photos.
The default Bur st rate is two fra mes per se cond. If you want to chan ge the Burst r ate, see below . Note that you cannot
use the flash for Burst photos; the flash button is inactive.
Note: Burst photos take longer to process than Still photos because the camera takes up to three frames per
second rather than a single photo.
To take Burst photos:
To take Burst photos:
To take Burst photos:To take Burst photos:
1. Turn the camera on and turn the camera mode dial to Rec
The status LCD displays the approximate number of photos
available on the memory card. The camera is not ready until
this number appears.
Rec.
RecRec
Shutter button all th e way dow n to tak e the
Shutter Shutter
Shutter button.
ShutterShutter
Delete button (center soft key) to
DeleteDelete
Shutter button down. You can take up to
ShutterShutter
Number of
photos available
Shutter button
2. Adjust your camera settings as needed. See “Adjusting the
Camera Settings” on page 42 for details.
3. Press the color LCD on/off
color LCD on/off button to turn the color LCD on.
color LCD on/offcolor LCD on/off
Status LCD
On/off buttonCamera mode dial
HP PhotoSmart C500 Digital Camera User’s Guide 36
Page 47

Taking Still, Burst and Timelapse Photos
4. Press the left soft key until the Burst
Burst icon appears on the lower overlay bar.
Burst Burst
Tip: To conserve battery power, turn the color LCD off after you choose the photo type.
Burst icon
If there is not enough space on the memory card for the number of photos specified, the red
light to the left of t he viewf inder flashes and th e upp er overl ay bar d isplays “Not en ough me mory. ” To solve this
problem, insert a new memory card, or try a lower photo quality setting.
5. Frame your subject in the viewfinder, then press and hold the Shutter
Shutter button 1/2 way down to allow the camera
ShutterShutter
to adjust the focus and exposure. If you see an orange light to the left of the viewfinder, there may not be
enough light on your subject. You can still take the photo.
6. When you see a green light t o the left of the viewfi nder, press the Shutter
Shutter button all the way down an d hold it fo r
Shutter Shutter
the amount of time you want to take photos, or until the camera beeps.
Tip: If you are taking an action sequence, you can move the camera to follow your subject as you hold the
Shutter
Shutter button down.
ShutterShutter
7. If Instant Review is on, your first photo appears briefly on the color LCD. If you are happy with the photo, press
the Save
Save button (right soft key) to save the seri es of ph o tos on the memory card. If not, press the Delete
SaveSave
(center soft k ey) to discard the phot os and try ag ain. Pressi ng Delete
Delete discards the entire series of phot os, not just
DeleteDelete
Delete button
DeleteDelete
the first photo. If you do not press either button, the camera automatically saves the photo.
HP PhotoSmart C500 Digital Camera User’s Guide 3 7
Page 48

To change the Burst rate:
To change the Burst rate:
To change the Burst rate:To change the Burst rate:
Taking Still, Burst and Timelapse Photos
1. Turn the camera on and turn the camera mode dial to Rec
2. Press the Menu
The color LCD displays the Media Settings
3. Use the 4-way arrow button to scroll to Burst
4. Press the Edit
5. Use the 4-way arrow button to choose the desired setting, from 1 to 3
frames per second.
6. Press the Exit
Menu button.
MenuMenu
Edit button (left soft key), and then scroll down to Burst Rate
EditEdit
Exit button (right soft key) twice to save your settings and exit the menus.
ExitExit
Taking Timelapse Photos
Use the Timelapse setting to take a series of photos at preset time intervals. You can specify the number of photos
you want the camera to take, as well as the amount of time between photos. It is recommended that you attach the
camera to a tripod, or place it on a firm surface at a n appropriate distance and height from the subject, to keep the
camera steady.
It is recommended that you use an AC power adapter for long Timelapse photo sequences. See “Using an AC Power
Adapter (recommended)” on page 29 for more information.
Media Settings menu.
Media SettingsMedia Settings
Burst.
BurstBurst
Rec.
RecRec
Burst Rate.
Burst RateBurst Rate
Tip: By default the camera takes 10 photos with 1 minute intervals between photos. If you want to change the
Timelapse settings, see below.
HP PhotoSmart C500 Digital Camera User’s Guide 38
Page 49

Taking Still, Burst and Timelapse Photos
To take Timelapse photos:
To take Timelapse photos:
To take Timelapse photos:To take Timelapse photos:
1. Turn the camera on and turn the camera mode dial to Rec
Rec.
RecRec
Number of
photos available
Shutter button
The status LCD displays the approximate number of photos
available on the memory card. The camera is not ready until
this number appears.
2. Adjust your camera settings as needed. See “Adjusting the
Camera Settings” on page 42 for details.
Status LCD
3. Press the color LCD on/off
4. Press the left soft key until the Timelapse
color LCD on/off button to turn th e co lo r LCD on.
color LCD on/offcolor LCD on/off
Timelapse icon appears on the lower overlay bar.
TimelapseTimelapse
Tip: To conserve battery power, turn the color LCD off after you choose the photo ty pe .
On/off buttonCamera mode dial
Timelapse
icon
If there is not enough space on the memory card for the number of photos specified, the
red light to the left of the view finder flashes a nd the upper overla y bar disp lays “No t enough mem ory.” To solve
this problem, insert a new memory card, try a lower photo quality setting or decrease the number of photos
specified in the Timelapse settings.
5. Frame your subject in the viewfinder, then press and hold the Shutter
Shutter button 1/2 way down to allow the camera
ShutterShutter
to adjust the focus and exposure. If you see an orange light to the left of the viewfinder, there may not be
enough light on your subject. You can still take the photo.
HP PhotoSmart C500 Digital Camera User’s Guide 39
Page 50

Taking Still, Burst and Timelapse Photos
6. When you see a green light to the left of the viewfinder, press the Shutter
first photo. Wait for the beeps, indicating the photo has been taken, before releasing the Shutter
The camera automatically takes the number of photos at the time interval specified in the Timelapse settings.
Tip: If you want to stop taking photos before the camera reaches the number of photos specified in the
Timelapse settings, press the Stop
7. If Inst ant Review is on an d you are using an AC power adapter, your first photo appears on the color LCD; an
indicator on the upper overlay bar shows the number of photos that have been taken and a timer counts down
the time until the next photo is taken.
If Instant Revi ew is on and you are using batteries, your first photo appears briefly on the color LCD. The col or
LCD turns itself off after 30 seconds.
Once the series of photos has been taken and the first photo appears on the color LCD, press the Save
(right soft key) to save the series of photos on the memory card, or press the Delete
discard the photos and try again. Pressing Delete
you do not press either button, the camera automatically saves the photos.
To change the Timelapse settings:
To change the Timelapse settings:
To change the Timelapse settings:To change the Timelapse settings:
1. Turn the camera on and turn the camera mode dial to Rec
Stop button (right soft key).
StopStop
Delete discards the entire series of photos, not just the first one. If
DeleteDelete
Rec.
RecRec
Shutter button all the way down to take the
Shutter Shutter
Shutter button.
ShutterShutter
Save button
SaveSave
Delete button (center soft key) to
DeleteDelete
2. Press the Menu
The color LCD displays the Media Settings
3. Use the 4-way arrow button to scroll down to Timelapse
4. Press the Edit
HP PhotoSmart C500 Digital Camera User’s Guide 40
Menu button.
MenuMenu
Media Settings menu.
Media SettingsMedia Settings
Edit button (left soft key).
EditEdit
Timelapse.
TimelapseTimelapse
Page 51

5. Use the 4-way arrow button to select a setting to change.
Setting
Setting Description
SettingSetting
Interval
Interval This is the amount of time you want the camera to wait before
IntervalInterval
# Images
# Images This is the number of photos you want the camera to take.
# Images# Images
6. Use the 4-way arrow button to select the desired setting.
Description Default
DescriptionDescription
taking the next photo. Select from 1 minute to 24 hours.
Select from 2 to 1000 photos.
Taking Still, Burst and Timelapse Photos
Default
DefaultDefault
1 min
10
7. Press the Exit
HP PhotoSmart C500 Digital Camera User’s Guide 41
Exit button (right soft key) twice to save your settings and exit the menus.
ExitExit
Page 52

Adjusting the Camera Settings
Taking Black and White Photos
You can take either color or black and white photos using the Still, Burst, or Timelapse settings. The default is color.
This setting remain s until you change it, even if you turn the camera of f.
To change to color or black and white photos:
To change to color or black and white photos:
To change to color or black and white photos:To change to color or black and white photos:
Adjusting the Camera Settings
1. Turn the camera on and turn the camera mode dial to Rec
2. Press the Menu
3. Select the photo type.
4. Press the Edit
5. Use the 4-way arrow button to choose B&W
color.
6. Press the Exit
Menu button.
MenuMenu
Edit button (left soft key), then scroll down to Color
EditEdit
B&W (black and white) or Full
B&WB&W
Exit button (right soft key) twice to save the settings and exit the menus.
ExitExit
Rec.
RecRec
Color.
ColorColor
Full
FullFull
HP PhotoSmart C500 Digital Camera User’s Guide 42
Page 53

Changing the Flash Setting
To change the flash setting:
To change the flash setting:
To change the flash setting:To change the flash setting:
Adjusting the Camera Settings
1. Turn the camera on and turn the camera mode dial to Rec
2. Press the Flash
displays on the status LCD. The flash setting is effective for Still
and Timelapse photos, and remains until you change it, eve n if
you turn the camera off.
Note: You cannot use the flash for Burst photos; the flash button is inactive.
The flash settings are indicated by icons on the status LCD:
Flash button repeatedly u n til th e f la sh setting you want
FlashFlash
Auto The camera determines the need for a flash based on lighting
conditions. This is the default setting.
On The flash will be used, regardless of the lighting conditions.
Off The flash will not be used, regardless of the lighting conditi on s.
Auto with red-eye
reduction
The flash will be used if needed. Red-eye reducti on minimiz es the
occurrence of red-eye in photos of people or animals by flashing
twice.
Rec.
RecRec
Flash button
Note: The flash needs to recharge between photos. When the red light next to the viewfinder is off, you can
take another flash photo.
HP PhotoSmart C500 Digital Camera User’s Guide 43
Page 54

You can also change the flash settings using the camera menus.
To select a flash setting using the camera menus:
To select a flash setting using the camera menus:
To select a flash setting using the camera menus:To select a flash setting using the camera menus:
Adjusting the Camera Settings
1. Turn the camera on and turn the camera mode dial to Rec
2. Press the Menu
3. Use the 4-way arrow button to s cro ll to the Preferences
down to Capture
4. Press the Edit
5. Scroll to Flash
6. Use the 4-way arrow bu tton to s e l ect a fl a sh setting. See the table abov e for information about each of the flash
settings.
Note: You cannot use the flash for Burst photos. If you choose a flash setting from the menu but you are
7. Press the Exit
Tip: To conserve batte ry power, turn the color LCD off after you choose the setting.
Menu button.
MenuMenu
Preferences menu, then scroll
PreferencesPreferences
Capture.
CaptureCapture
Edit button (left soft key).
EditEdit
Flash.
FlashFlash
taking Burst photos, the setting will not be effective until you take your next Still or Timelapse photo.
Exit button (right soft key) twice to save the settings and exit the menus.
ExitExit
Rec.
RecRec
HP PhotoSmart C500 Digital Camera User’s Guide 44
Page 55

Adjusting the Photo Quality
The photo quality setting determines the photo’s resolution and compression. Because of this, it also affects how
many photos can be stored on the memory card. The photo quality setting remains the same for each photo of the
same type (Still, Burst, and Timelapse) until you change it, even if you turn the camera off and on again.
When selecting the photo quality, keep in mind:
• How you plan to use the photo (on screen, printed, enlarged, etc.).
• Higher photo quality requires more space on the memory card; lower photo quality requires less space.
• Because photo quality affects the number of photos that can be stored on the memory card, the number of
available photos (di splayed on th e status LCD) changes as you change the photo quali ty. The number of photos
is a conservative estimate, so you might find that you can take more photos than it indicates.
• You can use different photo qual ity settings for different pho tos on the sam e memo ry car d.
• You can choose different photo quality settings for Still, Burst and Timelapse photos.
Adjusting the Camera Settings
• The camera processes photos with Fine or Super-fine diamond photo quality faster than those with lower photo
quality. If you want to take several photos, one after the other, in a short period of time, use the Fine or Super-
fine photo quality setting.
HP PhotoSmart C500 Digital Camera User’s Guide 45
Page 56

To adjust the photo quality:
To adjust the photo quality:
To adjust the photo quality:To adjust the photo quality:
Adjusting the Camera Settings
1. Turn the camera on and turn the camera mode dial to Rec
2. Press the Photo Quality
Photo Quality button repeatedly until the desired photo quality setting displays on the status LCD.
Photo QualityPhoto Quality
Photo quality icon Photo quality button
Rec.
RecRec
HP PhotoSmart C500 Digital Camera User’s Guide 46
Page 57

Adjusting the Camera Settings
Each of the photo quality settings corresponds to a combination of resolution and compression settings. The
diamond icons on the status LCD indicate photo quality as follows:
Photo quality
Photo quality Description
Photo qualityPhoto quality
Description Resolution
DescriptionDescription
Resolution Compression
ResolutionResolution
Compression
CompressionCompression
E-mail Is the most memory-efficient. Use this
setting for photos that you plan to send
via e-mail, place on the Internet, use for
screen savers or wallpaper, or print up to
3x5 inch prints.
Basic Produces quality photos and uses less
memory than Fine m ode . U se this setting
for photos that you plan to store on your
disk or in a database, or print up to 4x6
inch prints.
Fine Produces high-quality photos and
requires less memory than Super-fine
mode. Use this setting for photos that
you plan to print up to 5x7 inch prints.
This is the default setting.
Super-fine Produces the highest-quality photos and
uses the most memory. Use this setting
for taking photos you plan to enlarge
and print.
Low
(640x480 pixels)
Medium
(1152x864 pixels)
High
(1600x1200 pixels)
High
(1600x1200 pixels)
High
Medium
Medium
Low
HP PhotoSmart C500 Digital Camera User’s Guide 47
Page 58

Adjusting the Camera Settings
Y ou ca n also a djust the p hoto qual ity by adj usting the individual resolut ion and com pressio n settings for each of th e
three types of photos: Still, Burst and Timelapse.
To adjust the photo quality using the menus:
To adjust the photo quality using the menus:
To adjust the photo quality using the menus:To adjust the photo quality using the menus:
1. Turn the camera on and turn the camera mode dial to Rec
2. Press the Menu
3. Select the photo type.
4. Press the Edit
5. Use the 4-way arrow button to select a resolution or compression
setting to change.
Setting
Setting Description
SettingSetting
Resolution
Resolution This is the number of pixels in each photo. More pixels results in
ResolutionResolution
Compression
Compression This is the amount each photo is compressed. The compressio n level
CompressionCompression
Menu button.
MenuMenu
Edit button (left soft key).
EditEdit
Description Default
DescriptionDescription
higher photo quality. Choose from High, Medium, or Low. Select a
higher resolution for photos that you want to enlarge. Select a lower
resolution for photos that you want to email (so that the photo file
size is small).
is a trade-off between photo quality and storage space: the lower the
compression level, the higher the photo quality but the larger the
photo file size. Choose from High, Medium, or Low. Select a lower
compression level for better quality photos. Select a higher
compression level to save space on the memory card.
Rec.
RecRec
Default
DefaultDefault
High
Medium
HP PhotoSmart C500 Digital Camera User’s Guide 48
Page 59

Adjusting the Camera Settings
6. Use the 4-way arrow button to select the desired setting.
As you decide which settings to use, remember that there is a trade-off between resolution and compression.
Higher resolution photos provide better quality, but if you use high resolution and high compression, some of
the photo’s detail will be lost.
Some combinations of settings correspond to the camera’s standard settings indicated by the photo quality
diamonds on the status LCD. If you choose to use combinations of settings that do not correspond to the
camera’s standard photo quality settings, you will see no photo quality diamonds on the status LCD. This just
means that you are using a custom photo quality setting.
Tip: If you aren’t sure which settings to s el ec t, press the Default
7. Press the Exit
HP PhotoSmart C500 Digital Camera User’s Guide 49
Exit button (right soft key) twice to save your settings and exit the menus.
ExitExit
Default button (left soft key).
DefaultDefault
Page 60

Using the Zoom
The HP PhotoSmart C500 Di gital Came ra ha s opt ical z oom a nd di gital z oom. Op tic al zoom uses the len s to focus i n
on a distant object. Use it to increase the size of a subject that is distant from you. Digital zoom selects pixels from
the center of the photo and enlarges the image further. Use digital zoom once you have reached the maximum
optical zoom, to increase the size of your subject even further.
Zoom type
Zoom type When to use it
Zoom typeZoom type
Optical (3x)
Optical (3x) Use this setting when your su b je ct is di sta nt
Optical (3x)Optical (3x)
Digital (2x)
Digital (2x) Use this setting when your subject is distant
Digital (2x)Digital (2x)
If you use the digital zoom, your photos will have lower resolution t han they usually would for a particular photo
quality setti ng. It is recommended that you print these photos in smaller sizes.
When to use it Example
When to use itWhen to use it
from you and you want to increase or
decrease its size in the photo.
from you and you want to increase its size
more than you can with the optical zoom.
Example
ExampleExample
You are taking a photo of a scene and you
want to zoom in on a tree.
You are taking a photo of a scene and you
want to increase the si z e of a bird in the t ree.
Adjusting the Camera Settings
Photo quality
Photo quality Standard resolution
Photo qualityPhoto quality
HP PhotoSmart C500 Digital Camera User’s Guide 50
Standard resolu ti on Resolution with digital zoom
Standard resolutionStandard resolution
640x480 pixels 640x480 pixels
1152x864 pixels 800x600 pixels
1600x1200 pixels 800x600 pixels
1600x1200 pixels 800x600 pixels
Resolution with digital zoom
Resolution with digital zoomResolution with digital zoom
Page 61

To use optical zoom:
To use optical zoom:
To use optical zoom:To use optical zoom:
Adjusting the Camera Settings
1. Turn the camera on and turn the camera mode dial to Rec
2. As you frame your subject in the viewfinder, move the Zoom
Rec.
RecRec
Zoom control
ZoomZoom
to the right to zoom in on your subject, or to the left to zoom out.
3. Take your photo.
To use digital zoom:
To use digital zoom:
To use digital zoom:To use digital zoom:
1. Turn the camera on and turn the camera mode dial to Rec
2. Press the color LCD on/off
color LCD on/off button to turn the color LCD on.
color LCD on/offcolor LCD on/off
Rec.
RecRec
Note: The color LCD must be on for digital zoom.
3. If you do not see the overlay bars on the color LCD, press the Overlay
4. Zoom all the w ay in on your subject us ing the Zoom
Zoom control. Release the Zoom
ZoomZoom
Overlay button to turn the overlay bars on.
OverlayOverlay
Zoom control and
ZoomZoom
then press it to the right again.
The digital zoom icon displays in the top overlay bar.
5. Frame your subject on the color LCD rather than through the viewfinder. Use the Zoom
Zoom
Zoom Zoom
control to make further adjustments.
Zoom control
Digital zoom
icon
6. Take your photo.
7. Press the color LCD on/off
color LCD on/off button to turn the color LCD and digital zoom off.
color LCD on/offcolor LCD on/off
HP PhotoSmart C500 Digital Camera User’s Guide 51
Page 62

Using Macro Mode
Use macro mode to ta k e close-up photos o f small ob jects. F or exa mple, use macro mod e to tak e a cl ose-up photo of
a flower.
To turn on mac r o mod e:
To turn on mac r o mod e:
To turn on mac r o mod e:To turn on mac r o mod e:
Adjusting the Camera Settings
1. Turn the camera on and turn the camera mode dial to Rec
2. Press the color LCD on/off
color LCD on/off button to turn the color LCD on.
color LCD on/offcolor LCD on/off
Rec.
RecRec
Note: The color LCD must be on for macro mode.
3. If you do not see the overlay bars on the color LCD, press the Overlay
Overlay button to turn the overlay bars on.
OverlayOverlay
4. Press the center soft key until the macro mode icon appears in color at the center of the lower
overlay bar.
Note: The center soft key toggles between the self-timer and macro mode so that you can
Macro mode
take photos using just one of the modes, or both at the same time. The icons appear in
color if they are on. Keep pressing the button until you have selected the combination
of self-timer and macro mode that you want; one on, both on, or both off.
5. View your subject through the viewfinder, and then frame your photo on the color LCD.
Self-timer
6. Take your photo.
7. Press the center soft key twice to turn macro mode off. The macro mode icon appears in black and white,
indicating that macro mode is off.
icon
icon
HP PhotoSmart C500 Digital Camera User’s Guide 52
Page 63

Using the Self-Timer
Use the self-timer to t ak e a phot o of yoursel f or a pos ed group ph oto. Ten seconds (:10) is the default amount of ti me
the camera waits before taking the photo. You can change this delay time to 3, 5, 10, 20, or 30 seconds.
Note: The self-timer is only available for Still photos.
To use th e self-timer:
To use th e self-timer:
To use th e self-timer:To use the self-timer:
1. Attach the camera to a tripod, or place it on a firm surface at an
appropriate distance and height from the subject.
Adjusting the Camera Settings
Tripod mount
2. Turn the camera on and turn the camera mode dial to Rec
3. Press the color LCD
4. Select the Still
• Press the left soft key repeatedly until the Still
HP PhotoSmart C500 Digital Camera User’s Guide 53
color LCD on/off
color LCDcolor LCD
Still option:
StillStill
on the lower overlay bar.
on/off button to turn the color LCD on.
on/offon/off
Still icon displays
StillStill
Rec.
RecRec
Still icon
Page 64

Adjusting the Camera Settings
5. Press the center soft key until you see :10
:10 (or the number
:10:10
of seconds you have set) appear on the upper overlay
bar, and the self-timer icon appear in color on the lower
overlay bar.
Note: The center soft key toggles between the self-
timer and macro modes so that you can take
photos using just one of the modes, or both at
the same time. The icons appear in color if they
are on. Keep pressing the button unti l you have
Self-timer icon Macro mode icon
selected the combination of self-timer and
macro mode that you want; one on, both on, or
both off.
6. Frame your subject in the view finder, the n press and hold th e Shutter
Shutter
ShutterShutter
button 1/2 way down to allow the camera to adjust the focus and
exposure.
7. When you see a green light to the left of the viewfinder, press the
Shutter
Shutter button all the way down, then release it.
Shutter Shutter
The red self-timer indicator light on the front of the camera starts
blinking. The light blinks faster for the final 3 seconds, then stops
blinking just before the camera takes the photo.
Self-timer
activated
Self-timer indica to r light
HP PhotoSmart C500 Digital Camera User’s Guide 54
Page 65

To change the self-timer delay:
To change the self-timer delay:
To change the self-timer delay:To change the self-timer delay:
Adjusting the Camera Settings
1. Turn the camera on and turn the camera mode dial to Rec
2. Press the color LCD on/off
3. Press the Menu
4. Use the 4-way arrow button to scroll to the Preferences
scroll down to Capture.
5. Press the Edit
6. Scroll to Self-Timer.
7. Use the 4-way arrow button to decrease or increase the number of seconds the camera waits before taking the
photo. You can select 3, 5, 10, 20, or 30 seconds.
8. Press the Exit
color LCD on/off button to turn the color LCD on.
color LCD on/offcolor LCD on/off
Menu button.
MenuMenu
Preferences menu , then
Preferences Preferences
Capture.
Capture.Capture.
Edit button (left soft key).
EditEdit
Self-Timer.
Self-Timer.Self-Timer.
Exit button (right soft key) twice to save the settings and exit the menus.
ExitExit
Rec.
RecRec
HP PhotoSmart C500 Digital Camera User’s Guide 55
Page 66

Setting the Exposure
The HP PhotoSmart C500 Digital Camera automatically adjusts the amount of light in your photo for different
lighting conditions. It includes two automatic methods (Matrix and Spot) which calculate the exposure settin g
differently. To make the final photo lighter or darker than the automatic exposure would produce, you can also
manually adjust the exposure. Exposure can be adjusted as much as +/-1.5 EVs (Exposure Values) in 0.3 EV
increments.
To change the exposure setting:
To change the exposure setting:
To change the exposure setting:To change the exposure setting:
Adjusting the Camera Settings
1. Turn the camera on and turn the camera mode dial to Rec
2. Press the Menu
3. Use the 4-way arrow button to scroll to the Photo Assist
The Photo Assist menu displays with Exposure
4. Press the Edit
5. Use the 4-way arrow button to select an exposure option.
HP PhotoSmart C500 Digital Camera User’s Guide 56
Menu button.
MenuMenu
Edit button (left soft key).
EditEdit
Photo Ass ist menu.
Photo Ass istPhoto Ass ist
Exposure selected .
ExposureExposure
Rec.
RecRec
Page 67

Option
Option Description
OptionOption
EV
EV Select EV (Exposure Value) to manually adjust the exposure
EVEV
AE Method
AE Method Select AE (Automatic Exposure) Method to have the camera
AE MethodAE Method
6. Use the 4-way arrow button to choose a setting.
Description Default
DescriptionDescription
from -1.5 EV to +1.5 EV, in 0.3 EV increments, + values for lighter
photos, - values for darker photo s.
automatically adjust the exposure for different lighting
conditions. There are two AE methods, Matrix and Spot. Matrix
calculates the exposure by taking the average of several points
of light in the photo. Spot calculates the exposure by reading
the light from one small spot in the center of the photo.
Adjusting the Camera Settings
Default
DefaultDefault
0
Matrix
Tip: If you aren’t sure which settings to s el ec t, press the Default
7. Press the Exit
If you use the AE method
(Continuous AE), or calculates the exposure when you press the Shutter
exposure (Auto Exposure Lock). If you are taking a photo of a scene that has darker and lighter sections, (for
example, a subject standing in a shadow) Auto Exposure Lock can help you to expose the photo correctly. For
example, you can aim the camera at a darker part of the scene, press the Shutter
move the camera to include a brighter part of the scene.
HP PhotoSmart C500 Digital Camera User’s Guide 57
Exit button (right soft key) twice to save the settings and exit the menus.
ExitExit
AE method, you can als o adjust whether the camera continuously calculates the exposure
AE methodAE method
Default button (left soft key).
DefaultDefault
Shutter button 1/2 way down and then locks the
ShutterShutter
Shutter button 1/2 way down, and then
ShutterShutter
Page 68

To adjust the AE method’s meter setting:
To adjust the AE method’s meter setting:
To adjust the AE method’s meter setting:To adjust the AE method’s meter setting:
Adjusting the Camera Settings
1. Turn the camera on and turn the camera mode dial to Rec
2. Press the Menu
3. Use the 4-way arrow button to scroll to the Preferences
4. Press the Edit
5. Use the 4-way arrow button to select an exposure option.
• Continuous AE
• Auto Exposure Lock
6. Press the Select
7. Press the Exit
Menu button.
MenuMenu
Edit button (left soft key).
EditEdit
Continuous AE calculates the automatic exposure continuo usly
Continuous AEContinuous AE
when you press the Shutter
Auto Exposure Lock calculates the automatic exposure when you
Auto Exposure LockAuto Exposure Lock
press the Shutter
at that setting.
Shutter button 1/2 way down, and then locks the exposure
ShutterShutter
Select button (left soft key) to choose an option.
Select Select
Exit button (right soft key) twice to save the settings and exit the menus.
ExitExit
Shutter button.
ShutterShutter
Setting the White Balance
Rec.
RecRec
Preferences menu , then scroll down to Meter
PreferencesPreferences
Meter.
MeterMeter
For the trues t colo r r eprod uction in you r phot os, the HP P hotoS mart C 500 D igital Camera au tomati cally a djus ts th e
balance of colors to make a true white in different lighting conditions. You can manually adjust this setting to have
the camera compensate for specific lighting conditions. The white balance setting remains the same until you
change it, even if you turn the camera off.
HP PhotoSmart C500 Digital Camera User’s Guide 58
Page 69

To manually adjust the white balance setting:
To manually adjust the white balance setting:
To manually adjust the white balance setting: To manually adjust the white balance setting:
Adjusting the Camera Settings
1. Turn the camera on and turn the camera mode dial to Rec
2. Press the Menu
3. Use the 4-way arrow button to scroll to the Photo Assist
scroll down to White
4. Press the Edit
5. Use the 4-way arrow button to select a white balance option.
Setting
Setting Select this option when
SettingSetting
Auto
Auto You want the camera to automatically sense the lighting conditions and
AutoAuto
Daylight
Daylight You are taking a photo in daylight without artificial lighting.
DaylightDaylight
Fluorescent
Fluorescent You are taking a photo under flu o resc en t ligh t .
FluorescentFluorescent
Tungsten
Tungsten You are taking a photo under normal incandescent light, such as the light
TungstenTungsten
Menu button.
MenuMenu
White Balance
Balance.
WhiteWhite
BalanceBalance
Edit button (left soft key).
EditEdit
Select this option when
Select this option whenSelect this option when
adjust the white balance appr opriately for optimum color reproduction in
your photo. Auto is the default.
from tungsten filament light bulbs in household lamps.
Photo Ass ist menu, then
Photo Ass istPhoto Ass ist
Rec.
RecRec
Flash
Flash You are using the flash to illuminate the subject.
FlashFlash
6. Press the Select
7. Press the Exit
HP PhotoSmart C500 Digital Camera User’s Guide 59
Select button (left soft key).
SelectSelect
Exit button (right soft key) twice to save the settings and exit the menus.
ExitExit
Page 70

Using Instant Review
After you take a photo, Instant Review briefly displays the photo on the color LCD, even if you have not turned the
color LCD on. If you are happy with the photo, you can then save it on the memory card. If not, y ou can discard the
photo and try again. If you do not use Instant Review, the camera automatically saves the photo. Instant Review
defaults to off, so if you want to use this feature, you need to turn it on first.
Tip: If you want to take several photos in quick succession, turn Instant Review off. With Instant Review on, the
camera takes longer to process each photo.
To turn Instant Review on or off:
To turn Instant Review on or off:
To turn Instant Review on or off:To turn Instant Review on or off:
Adjusting the Camera Settings
1. Turn the camera on and turn the camera mode dial to Rec
2. Press the Menu
3. Use the 4-way arrow button to scroll to the Preferences
scroll down to Capture.
4. Press the Edit
5. Scroll to Instant Review.
6. Use the 4-way arrow button to turn Instant Review on or off.
7. Press the Exit
HP PhotoSmart C500 Digital Camera User’s Guide 60
Menu button.
MenuMenu
Preferences menu , then
Preferences Preferences
Capture.
Capture.Capture.
Edit button (left soft key).
EditEdit
Instant Review.
Instant Review.Instant Review.
Exit button (right soft key) twice to save the settings and exit the menus.
ExitExit
Rec.
RecRec
Page 71

Adjusting the Camera Settings
To use Instant Review:
To use Instant Review:
To use Instant Review:To use Instant Review:
1. Take your photo.
After a few seconds, your photo appears briefly on the color LCD.
Note: If your photo does not appear on the color LCD, you need to turn Instant Review on.
2. Press the Save
the photo.
Note: The camera automatically saves the photo if you do not specify that you want to save or delete it. You
3. If you chose to delete the photo, press the Delete
confirm that you wa nt to delet e the photo b efore the photo disa ppears f rom the colo r L CD, th e camera sa ves the
photo.
Save button (right soft key) to save your photo, or press the Delete
SaveSave
can clear the color LCD and save the photo by pressing the Shutter
Delete button (left soft key) to confirm the deletion. If you do not
DeleteDelete
Delete button (center soft key) to discard
DeleteDelete
Shutter button 1/2 way down.
ShutterShutter
HP PhotoSmart C500 Digital Camera User’s Guide 61
Page 72

Setting the Eye Start
Eye Start brings the camera out of sleep mode and starts adjusting the exposure when your eye is close to the
viewfinder. Eye Start works by using sensors located next to the viewfinder. It is on by default.
To turn Eye Start on or off:
To turn Eye Start on or off:
To turn Eye Start on or off:To turn Eye Start on or off:
1. Turn the camera on and turn the camera mode
dial to Rec
Rec.
RecRec
Adjusting the Camera Settings
Eye Start sensors
2. Press the Menu
3. Use the 4-way arrow button to scroll to the
Preferences
Preferences menu, then scroll down to Capture
PreferencesPreferences
4. Press the Edit
5. Use the 4-way arrow button to turn Eye Start on or off.
6. Press the Exit
the menus.
Menu button.
MenuMenu
Edit button (left soft key).
EditEdit
Exit button (right soft key) twice to save the settings and exit
ExitExit
Setting Hand Held
The camera ha s a H and Held setti ng whic h h elps yo u to take photos that are
clear and sharp. If the Ha nd Held setti ng is on, the camera allows you to take photos with a slowest shutter speed of
1/8 second. By default, Hand Held is on. If you turn the Hand Held setting off, the camera allows you take photos
with a shutter speed as slow as 2 seconds. It is recommended that you use the camera with a tripod, or place the
camera on a firm, stable surface if you need to use a slow shutter speed.
Capture.
CaptureCapture
HP PhotoSmart C500 Digital Camera User’s Guide 62
Page 73

To turn Hand Held on or off:
To turn Hand Held on or off:
To turn Hand Held on or off:To turn Hand Held on or off:
Adjusting the Camera Settings
1. Turn the camera on and turn the camera mode dial to Rec
2. Press the Menu
3. Use the 4-way arrow button to scroll to the Preferences
4. Press the Edit
5. Scroll down to Hand Held
6. Use the 4-way arrow button to turn Hand Held on or off.
7. Press the Exit
Menu button.
MenuMenu
Edit button (left soft key).
EditEdit
Hand Held.
Hand HeldHand Held
Exit button (right soft key) twice to save the settings and exit the menus.
ExitExit
Setting the Counter Reset
Counter Reset allows you to choose how you want to number your photos on the memory card. If you want to start
numbering photos from 1 each time you delete all the photos from the memory card, turn Counter Reset on. If you
want to continue numbering photos, even after erasing all the photos from the memory card, so that you know the
total number of photos you have taken since you bought the camera, turn Counter Reset off. It is off by default.
To set Counter Reset:
To set Counter Reset:
To set Counter Reset:To set Counter Reset:
Rec.
RecRec
Preferences menu , then scroll down to Capture
PreferencesPreferences
Capture.
CaptureCapture
1. Turn the camera on and turn the camera mode dial to Rec
2. Press the Menu
3. Use the 4-way arrow button to scroll to the Preferences
HP PhotoSmart C500 Digital Camera User’s Guide 63
Menu button.
MenuMenu
Preferences menu , then scroll down to Capture
PreferencesPreferences
Rec.
RecRec
Capture.
CaptureCapture
Page 74

Adjusting the Camera Settings
4. Press the Edit
5. Scroll down to Counter Reset
6. Use the 4-way arrow button to turn Counter Reset on or off.
7. Press the Exit
Edit button (left soft key).
EditEdit
Counter Reset.
Counter ResetCounter Reset
Exit button (right soft key) twice to save the settings and exit the menus.
ExitExit
Setting Auto Shutoff
Your HP PhotoSmart C500 Digital Camera has an automatic shutoff, which is designed to help conserve battery life
during periods of inactivity. Auto Shutoff is on by default. It is recommended that you turn Auto Shutoff off when
you are downloading photos to your com put er.
Auto Shutoff turns off camera functions after the following periods of inactivity:
Power source
Power source Camera mode
Power sourcePower source
Battery power
Battery power Rec, Rev, Play 30 seconds 10 minutes
Battery powerBattery power
AC power adapter
AC power adapter Rec, Rev, Play, PC 30 minutes
AC power adapterAC power adapter
Camera mode Sleep
Camera modeCamera mode
PC 4 minutes 10 minutes
Sleep Power off
SleepSleep
Power off
Power offPower off
• If the camera is in sleep mode, press any button to “wake up” the camera.
• If the camera has turned itself off, press the on/off
HP PhotoSmart C500 Digital Camera User’s Guide 64
on/off button to turn it back on.
on/offon/off
Page 75

To turn Auto Shutoff on or off:
To turn Auto Shutoff on or off:
To turn Auto Shutoff on or off:To turn Auto Shutoff on or off:
Adjusting the Camera Settings
1. Turn the camera on and turn the camera mode dial to Rec
2. Press the Menu
3. Use the 4-way arrow button to scroll to the Preferences
scroll down to General
4. Press the Edit
5. Scroll down to Auto Shutoff
6. Use the 4-way arrow button to turn Auto Shutoff on or off.
7. Press the Exit
Menu button.
MenuMenu
Edit button (left soft key).
EditEdit
Exit button (right soft key) to save the settings and exit the menus.
ExitExit
Setting the Beep
The camera uses a beep to communicate that an event has taken place. For example, when you take a photo, the
camera beeps to let you know that it has finished capturing the image. Beep is on by default.
The camera beeps:
• Twice after a photo has been taken.
General.
GeneralGeneral
Auto Shutoff.
Auto ShutoffAuto Shutoff
Rec.
RecRec
Preferences menu, then
PreferencesPreferences
• Once at the beginning of a Burst series, and then twice at the end of the series.
• For 3 seconds when the batteries are low.
• When you turn the camera on, if the memory card is damaged or unformatted.
HP PhotoSmart C500 Digital Camera User’s Guide 65
Page 76

Adjusting the Camera Settings
• When you press the Shutter
• If the camera is on and you insert a full memory card.
To turn the Beep on or off:
To turn the Beep on or off:
To turn the Beep on or off:To turn the Beep on or off:
1. Turn the camera on and turn the camera mode dial to Rec
2. Press the Menu
3. Use the 4-way arrow button to scroll to the Preferences
scroll down to General
4. Press the Edit
5. Use the 4-way arrow button to turn Beep on or off.
6. Press the Exit
Menu button.
MenuMenu
Edit button (left soft key).
EditEdit
Exit button (right soft key) twice to save the settings and exit the menus.
ExitExit
Shutter button, if the memory card is full.
ShutterShutter
Preferences menu, then
PreferencesPreferences
General.
GeneralGeneral
Rec.
RecRec
HP PhotoSmart C500 Digital Camera User’s Guide 66
Page 77

Chapter 4 -Viewing Photos
Overview
After you have taken some photos with your HP PhotoSmart C500 Digital Camera, you can view them on the
camera’s color LCD or on a television screen. Depending on the camera mode you use (Review or Play), you can:
• view thumbnails of your photos
• view one photo at a time using the entire screen
• play back Burst, Timelapse, and grouped photo sequences
• create a slideshow
HP PhotoSmart C500 Digital Camera User’s Guide 67
Page 78

See the table below for the features available in each mode.
Mode
Mode What you can do
ModeMode
Review
Review • View thumbnails of your photos
ReviewReview
Play
Play • View one photo at a time, using the entire screen
PlayPlay
What you can do
What you can doWhat you can do
• View Burst, Timelapse, and grouped photos
• Mark photos for further action
• Delete selected or marked photos
• Protect photos from being deleted
• Categorize photos for easy searching and finding
• Group photos for sorting and printing
• Search for a particular photo
• Play back Burst, Timelapse, and grouped photo sequences
Overview
• Zoom in on photos to see details in close-up
• Delete single or grouped Still, Burst and Timelapse photos
• Create a slideshow on the color LCD or on a television
Tip: To conserve battery life, use an AC power adapter while viewing photos on the color LC D. See “Using an AC
Power Adapter (recommended)” on page29 for details.
HP PhotoSmart C500 Digital Camera User’s Guide 68
Page 79

Using Review Mode
When you use Review mode, the color LCD automatically displays the photos saved on the memory card. Your
photos appear as small thumbnail images across the top of the display. A larger thumbnail of the selected photo
appears below the small thumbnails; the photo informat ion (the image number , the image date and time, and the
group or camera name) appears on the lower right of the display.
Using Review Mode
Selecting Photos
To select photos:
To select photos:
To select photos:To select photos:
1. Turn the camera on and turn the camera mode dial to Rev
2. Use the 4-way arrow button to scroll through the
thumbnails until the selection marker points to the photo
you want. Press and hold the button to scroll through your
photos rapidly.
Thumbnails
Selected
photo
Rev.
RevRev
Selection
marker
Photo
information
4-way arrow button
HP PhotoSmart C500 Digital Camera User’s Guide 69
Page 80

Marking Photos
You can “mark” several photos so that when you select an action, the action applies to all marked photos. For
example, you can mark several photos and delete them all at once, rather than deleting one photo at a time. If you
mark any photo that repre sent s a clo sed grou p, al l th e photos in the group are marked.
To mark photos:
To mark photos:
To mark photos:To mark photos:
1. Turn the camera on and turn the camera mode dial to
Rev
Rev.
RevRev
2. Use the 4-way arrow button to scroll to the photo you
want to mark.
Using Review Mode
3. Press the Mark
A notch appears on the lower right corner of the
selected photo and its matching thumbnail.
4. Repeat Steps 2 and 3 to mark additional photos.
OR
To mark all photos, press and hold down the Mark
overlay bar.
Note: Photos remain marked until you perform an action on them, or until you unmark them.
HP PhotoSmart C500 Digital Camera User’s Guide 70
Mark button (left soft key).
MarkMark
Mark button (left soft key) until Mark All
MarkMark
Mark All appears on the lower
Mark AllMark All
A notch indicates
a marked photo
Page 81

To unmark marked photos:
To unmark marked photos:
To unmark marked photos:To unmark marked photos:
Using Review Mode
1. Turn the camera on and turn the camera mode dial to Rev
2. Use the 4-way arrow button to scroll to the photo you want to unmark.
3. Press the Unmark
The notch disappears from the lower right corner of the selected photo and its matching thumbnail.
You can unmark all the photos on the mem ory card by p ress in g a nd h ol di ng down the Unmark
key) until Unmark All
Unmark button (left soft key).
UnmarkUnmark
Unmark All appears on the lower overlay bar.
Unmark AllUnmark All
Deleting Photos
You can delete a single photo or all mark ed photo s in Revi ew mode . You can also delete single phot os in Pl ay mode
(see “Deleting Photos” on page89).
Note: Protected photos will not be deleted. See “Protecting Photos” on page72 for more information.
To delete photos:
To delete photos:
To delete photos:To delete photos:
1. Turn the camera on and turn the camera mode dial to Rev
2. Select a photo or mark the photos you w ant to de lete. If you want to d elete all th e photos, you can c hoose “M ark
All.” See “Marking Photos” on page70 for more information.
Rev.
RevRev
Rev.
RevRev
Unmark button (left soft
UnmarkUnmark
If you want to delete all of the photos in a group, or a Timelapse or Burst series, you can close or collapse the
photos, until just the one photo that represents the group or series is showing. You can then select the photo as
you would a single Still photo, for deleting.
HP PhotoSmart C500 Digital Camera User’s Guide 71
Page 82

Using Review Mode
3. Press the Menu
4. Press the Delete
The color LCD displays a message asking you to confirm that you want to delete the photos.
5. Press the Delete
Menu button.
MenuMenu
Delete button (center soft key).
DeleteDelete
Delete button (left soft key) to delete the photos.
DeleteDelete
Protecting Photos
Protecting photo s preven ts them fr om being deleted fr om the m emory card. You also cannot change the catego ry of
protected photos.
To protect photos:
To protect photos:
To protect photos:To protect photos:
1. Turn the camera on and turn the camera mode dial to Rev
2. Select a photo or mark the photos you want to protect. See “Marking Photos” on page70 for more information.
Note: Protect acts on ma rked photos if there are any, or on th e c urren t p h ot o i f th er e a re n o m ar ked photos. If
you want to protect just the current photo, first unmark all the photos on the memory card.
3. Press the Menu
Menu button.
MenuMenu
Rev.
RevRev
4. Use the 4-way arrow button to scroll to Protect
5. Press the Protect
The Protected icon appe ars in the photo informat io n to in di ca te th a t the ph ot o is p rot ect e d.
HP PhotoSmart C500 Digital Camera User’s Guide 72
Protect button (center soft key).
ProtectProtect
Protect.
ProtectProtect
Protected icon
Page 83

To remove protection from photos:
To remove protection from photos:
To remove protection from photos:To remove protection from photos:
Using Review Mode
1. Turn the camera on and turn the camera mode dial to Rev
2. Select a photo or mark the photos you want to unprotect. See “Marking Photos” on page70 for more
information.
3. Press the Menu
4. Use the 4-way arrow button to scroll to Protect
5. Press the Unprotect
Note: You must unprotect your protected photos before you can del ete them.
Menu button.
MenuMenu
Unprotect button (left soft key).
UnprotectUnprotect
Categorizing Photos
You can assign a category to your photos, making them easier to find. You can categorize one photo at a time, or
mark photos and apply one category to all of the marked photos. Categories are also useful when you are creating
a slideshow. For example, you could create a slideshow to share your vacation photos with friends and family.
Note: You cannot assign or change categories for protected photos.
To categorize photos:
To categorize photos:
To categorize photos:To categorize photos:
Protect.
ProtectProtect
Rev.
RevRev
1. Turn the camera on and turn the camera mode dial to Rev
2. Select a photo or mark the photos you want to categorize. See “Marking Photos” on page70 for more
information.
3. Press the Category
HP PhotoSmart C500 Digital Camera User’s Guide 73
Category button (center soft key).
CategoryCategory
Rev.
RevRev
Page 84

4. Use the 4-way arrow button to scroll to the category you want to use.
You can choose from the following categories:
Using Review Mode
• Landscape
• Vacation
• Friends
5. Press the Select
Select button (left soft key).
SelectSelect
• Family
• Pets
• Work
• Triangle
• Square
• Circle
A check mark appears next to the category, and the camera
automatically exit the menus. The icon for the category you
selected app ears in the photo information .
To deselect a category:
To deselect a category:
To deselect a category:To deselect a category:
1. Turn the camera on and turn the camera mode dial to Rev
Rev.
RevRev
2. Select the photo whose category you want to deselect.
3. Press the Category
Category button (center soft key).
CategoryCategory
4. Use the 4-way arrow button to scroll to the category you want to
deselect.
5. Press the Deselect
Deselect button (left soft key).
DeselectDeselect
Category
icon
The camera automatically exits the menus . The category icon disappear s
from the photo information.
HP PhotoSmart C500 Digital Camera User’s Guide 74
Page 85

To change a category:
To change a category:
To change a category:To change a category:
Using Review Mode
1. Turn the camera on and turn the camera mode dial to Rev
2. Select the photo whose category you want to change.
3. Press the Category
4. Use the 4-way arrow button to scroll to the new category you want to select.
5. Press the Select
The camera automatically exits the menus. The new category icon appears in the photo information.
Category button (center soft key).
CategoryCategory
Select button (left soft key) to deselect the old category and select the new category.
SelectSelect
Grouping Photos
Grouping photos is similar to categorizing them. An important difference is that grouping also affects the
organization of photos on the memory card. When you create a group, you are creating a folder on the memory
card, like you would create a folder on the hard drive of your computer. As you add photos to the group, they are
organized in the group’s folder.
You can combine groups and categories. Individu al photos withi n a group can each belong to a differe nt category,
or you can put all of the photos in a group into one category.
Note: If a group is closed, marking the photo that represents the group, marks all the photos in the group.
Rev.
RevRev
HP PhotoSmart C500 Digital Camera User’s Guide 75
Page 86

Creating and Removing Groups
To create a new group:
To create a new group:
To create a new group:To create a new group:
Using Review Mode
1. Turn the camera on and turn the camera mode dial to Rev
2. Select a photo or mark the photos you want to group together. See “Marking Photos” on page70 for more
information.
3. Press the Menu
4. Use the 4-way arrow button to scroll to Group
5. Press the Create
Note: The Create
6. Name the new group. Group names must be eight characters or less and cannot contain spaces.
• Use the up and down sides of the 4-way arrow button to scroll to the letter you want to use.
• Use the right side of the 4-way arrow button to add a letter to the name.
• Use the left side of the 4-way arrow button to delete a letter from the name.
Note: The camera does not accept group names that begin with BR or TL because these letters are reserved,
Menu button.
MenuMenu
Group.
GroupGroup
Create button (left soft key).
CreateCreate
Create button is available only when th ere are no exi sting
CreateCreate
groups. If there are existing groups, press the Add
soft key), then press Create New
regardless of language, for identifying Burst and Timelapse photos on the memory card.
Create New (center soft key).
Create NewCreate New
Rev.
RevRev
Add button (left
AddAdd
HP PhotoSmart C500 Digital Camera User’s Guide 76
Page 87

Using Review Mode
7. Press the Exit
Exit button (right soft key) twice to save the settings and exit the menus.
ExitExit
The name of the gr oup appears in the photo information for all photos in the group. The
Grouped Images icon ap pears in the pho to i nformat ion for any p hoto t hat re presen ts a clo sed
group.
To dissolve a group:
To dissolve a group:
To dissolve a group:To dissolve a group:
Grouped
Images icon
Note: Dissolving a group removes all the photos from the group and deletes the group name. It does not delete
the photos from the memory card. You cannot dissolve protected grouped photos.
1. Turn the camera on and turn the camera mode dial to Rev
Rev.
RevRev
2. Use the 4-way arrow button to scroll to any photo included in the group you want to remove.
3. Press the Menu
4. Use the 4-way arrow button to scroll to Group
5. Press the Dissolve
6. Press the Exit
To delete a group of photos:
To delete a group of photos:
To delete a group of photos:To delete a group of photos:
Menu button.
MenuMenu
Group.
GroupGroup
Dissolve button (center soft key).
DissolveDissolve
Exit button (right soft key).
ExitExit
Note: Deleting grouped photo s delete s all the photo s in the group fr om the memo ry card, but do es not delete th e
group name. Once the photos are deleted, you cannot recover them.
1. Turn the camera on and turn the camera mode dial to Rev
Rev.
RevRev
2. Use the 4-way arrow button to scroll to any photo included in the group you want to delete.
HP PhotoSmart C500 Digital Camera User’s Guide 77
Page 88

Using Review Mode
3. If the group is open, showing links between the photos, close the group by pressing the Close
key).
4. Select the photo that represents the group of photos.
5. Press the Menu
The Edit
6. Press the Delete
7. Press the Delete
deleted, you cannot recover them.
Menu button.
MenuMenu
Edit menu displays with Delete
EditEdit
Delete button (center soft key).
DeleteDelete
Delete button (left soft key) to delete all of the photos in the group. Remember that once photos are
DeleteDelete
Delete highlighted.
DeleteDelete
Close button (right soft
CloseClose
Adding Photos to a Group
To add a photo to a group:
To add a photo to a group:
To add a photo to a group:To add a photo to a group:
1. Turn the camera on and turn the camera mode dial to Rev
2. Select a photo or mark the photos you want to add to the group. See “Marking Photos” on page70 for more
information.
3. Press the Menu
Menu button.
MenuMenu
Rev.
RevRev
4. Use the 4-way arrow button to scroll to Group
5. Press the Add
Note: The Add
HP PhotoSmart C500 Digital Camera User’s Guide 78
Add button (left soft key).
AddAdd
Add button is available only when there are existing groups. See “Creating and Removing Groups”
AddAdd
on page76 for details.
Group.
GroupGroup
Page 89

6. Use the 4-way arrow button to scroll to the group you want to select.
Using Review Mode
7. Press the Select
8. Press the Exit
Select button (left soft key).
SelectSelect
Exit button.
ExitExit
The name of the group appears i n the photo in formation for
all photos in the group. The Grouped Images icon appears
in the photo information for any photo that represents a
closed group.
Opening and Closing Groups
Grouped
Images icon
Group name
Once you have grouped some photos you can close the group
and view just the one photo that represents the group or you can open the group and view all the photos in the
group.
To open grouped photos:
To open grouped photos:
To open grouped photos:To open grouped photos:
1. Turn the camera on and turn the camera mode dial to Rev
Rev.
RevRev
Links
2. Use the 4-way arrow button to scroll to the photo that represents the
group you want to open.
Tip: The photo representing the group displays the Grouped Images
icon in its photo information.
3. Press the Open
Open button (right soft key).
OpenOpen
Thumbnails of all of the photos in the group are displayed with links
between them.
HP PhotoSmart C500 Digital Camera User’s Guide 79
Page 90

To close grouped photos:
To close grouped photos:
To close grouped photos:To close grouped photos:
Using Review Mode
1. Turn the camera on and turn the camera mode dial to Rev
2. Use the 4-way arrow button to scroll to any photo in the group you want to close.
3. Press the Close
Close button (right soft key).
CloseClose
Expanding Burst and Timelapse Photos
When you take Burst or Timelapse photos, the camera takes a series of photos and uses the first photo to represent
the series. You can expand the series to display all the photos on the color LCD, or you can play the series. See
“Viewing Burst, Timelapse, and Grouped Photos” on page86 for information about playing a series of photos.
To expand Burst or Timelapse photos:
To expand Burst or Timelapse photos:
To expand Burst or Timelapse photos:To expand Burst or Timelapse photos:
1. Turn the camera on and turn the camera mode dial to Rev
2. Use the 4-way arrow button to sc roll to the pho to th at re presen ts the Burs t o r Tim elapse ser ies
you want to expand.
Tip: The photo representing the series displays the Burst or Timelapse icon in its photo
information.
3. Press the Expand
Thumbnails of all of the photos in the series are displayed with links between them.
Expand button (right soft key).
ExpandExpand
Rev.
RevRev
Rev.
RevRev
Burst icon
Timelapse
icon
HP PhotoSmart C500 Digital Camera User’s Guide 80
Page 91

To collapse Burst or Timelapse photos:
To collapse Burst or Timelapse photos:
To collapse Burst or Timelapse photos:To collapse Burst or Timelapse photos:
Using Review Mode
1. Turn the camera on and turn the camera mode dial to Rev
2. Use the 4-way arrow button to scroll to any photo in the Burst or Timelapse series you want to collapse.
3. Press the Collapse
Collapse button (right soft key).
CollapseCollapse
Searching for Photos
You can use the Find
To search for photos by date:
To search for photos by date:
To search for photos by date:To search for photos by date:
1. Turn the camera on and turn the camera mode dial to Rev
2. Press the Menu
3. Use the 4-way arrow button to scroll to the Find
4. Press the Edit
5. Enter the range of dates you want the camera to use to search for
photos:
• Use the right and left sides of the 4-way arrow button to move to
the month, day, and year fields.
Find menu to search for photos by date or by category.
FindFind
Menu button.
MenuMenu
Edit button (left soft key).
EditEdit
Find menu.
FindFind
Rev.
RevRev
Rev.
RevRev
• Use the up and down sides of the 4-way ar row but ton to ch ange the
month, day, and year.
HP PhotoSmart C500 Digital Camera User’s Guide 81
Page 92

Using Review Mode
Note: The From
6. Press the Find
7. The results of your search appear on the color LCD. The Find
From date must be prior or equal to the To
FromFrom
Find button (left soft key).
FindFind
To date.
ToTo
Find icon appears in the lower r i ght
FindFind
corner to remind you that you are looking at the results of your search.
Find icon
8. Use the 4-way arrow button to scroll through the photos. When you have finished, press the Show
All
All button (center soft key) to resume viewing all photos stored on the memory card.
All All
Note: If there are no photos within the range of dates you have selected, the color LCD displays the message No
images matched search criteria
images matched search criteria. You ca n:
images matched search criteriaimages matched search criteria
• Press the Show All
Show All button (left soft key) to resume viewing all photos stored on the memory card.
Show AllShow All
Show
Show Show
No
No No
OR
• Press the Find
To search for photos by category:
To search for photos by category:
To search for photos by category:To search for photos by category:
Find button (right soft key) to select a new range of dates.
FindFind
Note: For more information on categories, see “Categ orizing Photos” on page 73.
1. Turn the camera on and turn the camera mode dial to Rev
Rev.
RevRev
2. Press the Menu
Menu button.
MenuMenu
HP PhotoSmart C500 Digital Camera User’s Guide 82
Page 93

Using Review Mode
3. Use the 4-way arrow button to scroll to the Find
to By Category
By Category.
By CategoryBy Category
4. Press the Edit
Edit button (left soft key).
EditEdit
Find menu , then scr oll do wn
FindFind
5. Use the 4-way arrow button to scroll to the category you want to view.
6. Press the Select
The results of your search appear on the color LCD. The Find
Select button (left soft key).
SelectSelect
Find icon
FindFind
appears in the lower right corner to remind you that you are looking at the results
of your search.
7. Use the 4-way arrow button to scroll through the photos. When you have finished,
press the Show All
Show All button (center soft key) to resume viewing all photos stored on
Show All Show All
Find icon
the memory card.
Note: If there are no photos within the category you have selected, the color LCD displays the message No
images matched search criteria
images matched search criteria. You ca n:
images matched search criteriaimages matched search criteria
• Press the Show All
Show All button (left soft key) to resume viewing all photos stored on the memory card.
Show AllShow All
No
No No
OR
• Press the Find
Find button (right soft key) to select a new category.
FindFind
HP PhotoSmart C500 Digital Camera User’s Guide 83
Page 94

Using Play Mode
When you use Play mod e, t he co lor LCD automatically displays your p hot os usin g the en tire s creen. Pho tos in itia lly
appear at a low resolution, and then the color LCD refreshes, from the top, to give you a clear, sharp view of your
photo. You can view information about photos on the overlay bars if you turn them on. See “Overlay Bars” on
page21 for more information.
Viewing Single Photos
To view a single photo:
To view a single photo:
To view a single photo:To view a single photo:
1. Turn the camera on and turn the camera mode dial to
Play
Play.
PlayPlay
Using Play Mode
2. Use the 4-way arrow button to scroll through your
photos.
Tip: You can press the Overlay
to turn on both overlay bars.
HP PhotoSmart C500 Digital Camera User’s Guide 84
Overlay button to turn off the overlay bar and see the entire screen, or press it twice
OverlayOverlay
Overlay bar
Page 95

Zooming In on Your Photos
Using Play Mode
If you want to see a portion of your photo in more detail, use the Zoom
zoomed in, you can use the 4-way arrow button to see different parts of the photo. You must exit Zoom before
moving to a different photo.
To zoom in and out:
To zoom in and out:
To zoom in and out:To zoom in and out:
1. Turn the camera on and turn the camera mode dial to Play
2. If the overlay bars are off, press the Overlay
3. Use the right and left sides of the 4-way arrow button to select the photo you want to view.
4. Zoom in and out:
• Press the Zoom
• Press the Zoom Out
• Use the 4-way arrow button to see different parts of the photo.
Each time you zoom in or out, the color LCD refreshes, from the top, to give you a clear, sharp view of your
photo.
5. Press the Exit
Zoom button (center soft key) to zoom in. You can zoom in three times.
ZoomZoom
Zoom Out button (left soft key) to zoom out. You can zoom out four times.
Zoom OutZoom Out
Exit button (right soft key) to finish zooming and return the display to the original photo size.
ExitExit
Overlay button to turn them on.
OverlayOverlay
Zoom button (center soft key). When you are
ZoomZoom
Play.
PlayPlay
HP PhotoSmart C500 Digital Camera User’s Guide 85
Page 96

Viewing Burst, Timelapse, and Grouped Photos
You can play back sequences of Burst, Timelapse, and grouped photos at a pre-defined rate, much like a slideshow.
You can view the photos on the ca m era ’s co lor LC D, or on th e t e le vi sion screen (see “Vi e wing Photos on a Television”
on page92).
To play back photos:
To play back photos:
To play back photos:To play back photos:
Using Play Mode
1. Turn the camera on and turn the camera mode dial to Play
2. If the overlay bars are off, pres s the Overlay
soft keys.
3. Use the 4-way arrow button to scroll to the Burst, Timelapse, or grouped photos you want to play back.
4. Press the Play
5. Press the Stop Slideshow
To change the playback rate:
To change the playback rate:
To change the playback rate:To change the playback rate:
1. Turn the camera on and turn the camera mode dial to Play
2. Press the Menu
3. Use the 4-way arrow button to scroll to Playback Rate
Play button (left soft key).
PlayPlay
Stop Slideshow button (left soft key) to stop playing back your photos.
Stop SlideshowStop Slideshow
Menu button.
MenuMenu
Overlay button to turn them on so th a t yo u ca n see the names of t he a cti v e
OverlayOverlay
Playback Rate.
Playback RatePlayback Rate
Play.
PlayPlay
Play.
PlayPlay
HP PhotoSmart C500 Digital Camera User’s Guide 86
Page 97

Using Play Mode
4. Press the Edit
5. Scroll to Timelapse
6. Use the 4-way arrow button to decrease or increase the Playback Rate.
You can choose a rate of 30, 45, or 60 seconds. T he de faul t is 3 0 secon ds.
7. Press the Exit
menus.
Edit button (left soft key).
EditEdit
Timelapse, Burst
TimelapseTimelapse
Exit button (right soft k ey) tw ice to save the s etting s an d exit the
ExitExit
Creating a Slideshow
You can create a slideshow to display your photos on the color LCD or on a television screen. Your slideshow can
include all of the photos on the memory card, or you can choose a single category of photos to use. See
“Categorizing Photos” on page73 for more information on categories.
To create and play a slideshow:
To create and play a slideshow:
To create and play a slideshow:To create and play a slideshow:
1. Turn the camera on and turn the camera mode dial to Play
Tip: Press the Overlay
2. Press the Menu
Menu button.
MenuMenu
Overlay button to turn the overlay bars off so that you can see the entire screen.
OverlayOverlay
Burst, or Group
Burst Burst
Group.
GroupGroup
Play.
PlayPlay
The Play Settings
Play Settings menu displays with Slideshow
Play SettingsPlay Settings
3. Press the Edit
HP PhotoSmart C500 Digital Camera User’s Guide 87
Edit button (left soft key).
EditEdit
Slideshow highlighted.
SlideshowSlideshow
Page 98

Using Play Mode
4. Use the 4-way arrow button to scroll to the Slideshow
Option
Option Description
OptionOption
Content
Content The content of the slideshow can include all of the photos on the
ContentContent
Duration
Duration This is the am ou nt of ti me ea ch p hoto is d ispl aye d. Sel ec t fro m 30,
DurationDuration
Loop
Loop This determines whether the sli deshow w ill begin again ( loop) w hen
LoopLoop
5. Use the 4-way arrow button to select the desired setting.
6. Press the Start
7. You can st op the sl id eshow at a ny time by press ing t he Stop S l ide s h ow
are turned off, the Stop Slideshow
8. After you have stoppe d the slide show, press th e Exit
menus.
Description Default
DescriptionD escription
memory card or a single category of photos.
45, or 60 seconds.
it reaches the last photo.
Start button (left soft key) to begin the slide show.
StartStart
Stop Slideshow label is not visible, but the soft key is still available.
Stop SlideshowStop Slideshow
Slideshow option you want to change:
SlideshowSlideshow
Stop Slide sh ow b u tton (l eft so ft key). I f th e ov erl ay ba rs
Stop Slide sh owStop Slide sh ow
Exit button (right s oft key) twice to save the setti ngs a nd e x it th e
ExitExit
Default
DefaultDefault
All
30 seconds
On
HP PhotoSmart C500 Digital Camera User’s Guide 88
Page 99

Deleting Photos
You can delete a single photo or all of the photos in a group, Burst, or Timelapse sequence in Play mode. You can
also delete photos in Review mode (see “Deleting Photos” on page71).
Note: Protected photos will not be deleted. See “Protecting Photos” on page72 for more information.
To delete photos:
To delete photos:
To delete photos:To delete photos:
Using Play Mode
1. Turn the camera on and turn the camera mode dial to Play
2. Use the 4-way arrow button to scroll to the photo you want to delete.
3. Press the Delete
The color LCD displays a message asking you to confirm that you want to delete the photo.
4. Press the Delete
Delete button (right soft key).
DeleteDelete
Delete button (left soft key) to delete the photo.
DeleteDelete
Play.
PlayPlay
HP PhotoSmart C500 Digital Camera User’s Guide 89
Page 100

Using Your Television
When the HP Phot oSmart C500 Digital Ca mera is c onnect ed to a te levi sion, the tel evisi on sc reen fu nction s the sam e
as the camera’s col or L CD. You can even use your telev ision to vie w a slide s how, maki ng it easy to sh are your photo s
with family and friends.
Selecting the Video Output Format
Before you connect the camera to the television you need to select the video output format. The format that you
choose (NTSC
To select the video output format:
To select the video output format:
To select the video output format:To select the video output format:
NTSC or PAL
NTSCNTSC
Note: Refer to your television owner’s manual for more information about the video format.
PAL), depends on your television’s video format.
PALPAL
Using Your Television
1. Turn the camera on and turn the camera mode dial to Play
2. Press the Menu
3. Use the 4-way arrow button to scroll to Video
4. Press the Edit
5. Press the left and right sides of th e 4-way arrow button to sel ect NTSC
or PAL
PAL.
PALPAL
6. Press the Exit
the menus.
HP PhotoSmart C500 Digital Camera User’s Guide 90
Menu button
MenuMenu
Video.
VideoVideo
Edit button (left soft key).
EditEdit
Exit button (right soft key) twice to save the settings and exit
ExitExit
Play.
PlayPlay
NTSC
NTSC NTSC
 Loading...