

Page 1

hp LaserJet 2300
use
2300L
2300n 2300dn 2300dtn
2300 2300d
Page 2

Page 3

hp LaserJet 2300 series printers
use
Page 4

Copyright and License
© Copyright Hewlett-Packard
Company 2002
All Rights Reserved.
Except as allowed by copyright
laws or herein, reproduction,
adaptation, or translation without
prior written permission is
prohibited.
A user of the Hewlett-Packard
printer associated with this user
guide is granted a license to: a)
print hard copies of this
user guide for PERSONAL,
INTERNAL or COMPANY use
subject to the restriction not to
sell, resell or otherwise distribute
the hard copies; and b) place an
electronic copy of this user guide
on a network server, provided
access to the electronic copy is
limited to PERSONAL,
INTERNAL users of the
Hewlett-Packard printer
associated with this user guide.
Edition 1, 10/2002
Warranty
The information contained in this
document is subject to change
without notice.
Hewlett-Packard makes no
warranty of any kind with respect
to this information.
HEWLETT-PACKARD
SPECIFICALLY DISCLAIMS
THE IMPLIED WARRANTY OF
MERCHANTABILITY AND
FITNESS FOR A PARTICULAR
PURPOSE.
Hewlett-Packard shall not be
liable for any direct, indirect,
incidental, consequential, or
other damage alleged in
connection with the furnishing or
use of this information.
Trademark Credits
Adobe, Acrobat, and PostScript
are trademarks of Adobe
Systems Incorporated.
E
NERGY STAR
®
and the Energy
Star logo are U.S. registered
service marks of the United
States Environmental Protection
Agency.
HP-UX Release 10.20 and
HP-UX Release 11.00 and later
on all HP 9000 computers are
Open Group UNIX products.
LaserWriter is a
registered trademark of
Apple Computer, Inc.
Microsoft, MS Windows,
Windows, Windows NT, and
MS-DOS
are U.S. registered
trademarks of Microsoft
Corporation.
Netscape is a U.S. trademark
of Netscape Communications
Corporation.
TrueType is a U.S. trademark of
Apple Computer, Inc.
UNIX
is a registered trademark of
The Open Group.
Page 5

Contents
1 Printer basics
Printer configurations. . . . . . . . . . . . . . . . . . . . . . . . . . . . . . . . . . . . . . . . . . . . . . . . . . . 8
Printer features . . . . . . . . . . . . . . . . . . . . . . . . . . . . . . . . . . . . . . . . . . . . . . . . . . . . . . . 9
Printer software . . . . . . . . . . . . . . . . . . . . . . . . . . . . . . . . . . . . . . . . . . . . . . . . . . . . . . 11
Operating systems and printer components . . . . . . . . . . . . . . . . . . . . . . . . . . . . . 12
Printer drivers. . . . . . . . . . . . . . . . . . . . . . . . . . . . . . . . . . . . . . . . . . . . . . . . . . . . . 14
Software for Macintosh computers. . . . . . . . . . . . . . . . . . . . . . . . . . . . . . . . . . . . . 15
Installing the printing system software. . . . . . . . . . . . . . . . . . . . . . . . . . . . . . . . . . . . . 16
Installing Windows printing system software for direct connections. . . . . . . . . . . . 16
Installing Windows printing system software for networks . . . . . . . . . . . . . . . . . . . 17
Installing Macintosh printing system software for networks . . . . . . . . . . . . . . . . . . 18
Installing Macintosh printing system software for direct connections. . . . . . . . . . . 19
Installing the software after the parallel or USB cable has been connected . . . . . 20
Uninstalling the software . . . . . . . . . . . . . . . . . . . . . . . . . . . . . . . . . . . . . . . . . . . . . . . 21
Control panel . . . . . . . . . . . . . . . . . . . . . . . . . . . . . . . . . . . . . . . . . . . . . . . . . . . . . . . . 22
Control panel layout . . . . . . . . . . . . . . . . . . . . . . . . . . . . . . . . . . . . . . . . . . . . . . . . 22
Using the printer Help system . . . . . . . . . . . . . . . . . . . . . . . . . . . . . . . . . . . . . . . . 25
Printing control panel menus . . . . . . . . . . . . . . . . . . . . . . . . . . . . . . . . . . . . . . . . . 25
Changing control panel settings. . . . . . . . . . . . . . . . . . . . . . . . . . . . . . . . . . . . . . . 25
Interface ports . . . . . . . . . . . . . . . . . . . . . . . . . . . . . . . . . . . . . . . . . . . . . . . . . . . . . . . 26
2 Printing tasks
Purchasing paper and other media . . . . . . . . . . . . . . . . . . . . . . . . . . . . . . . . . . . . . . . 28
Media input options . . . . . . . . . . . . . . . . . . . . . . . . . . . . . . . . . . . . . . . . . . . . . . . . . . . 29
Tray 1 media sizes. . . . . . . . . . . . . . . . . . . . . . . . . . . . . . . . . . . . . . . . . . . . . . . . . 29
Tray 2 (250-sheet tray) paper sizes . . . . . . . . . . . . . . . . . . . . . . . . . . . . . . . . . . . . 30
Tray 3 (500-sheet tray) paper sizes . . . . . . . . . . . . . . . . . . . . . . . . . . . . . . . . . . . . 30
Loading trays . . . . . . . . . . . . . . . . . . . . . . . . . . . . . . . . . . . . . . . . . . . . . . . . . . . . . . . . 31
Loading tray 1 (multipurpose tray) . . . . . . . . . . . . . . . . . . . . . . . . . . . . . . . . . . . . . 31
Loading tray 2 (250-sheet tray) or optional 250-sheet tray in tray 3 position . . . . . 32
Loading tray 3 (500-sheet tray) . . . . . . . . . . . . . . . . . . . . . . . . . . . . . . . . . . . . . . . 34
Media output options . . . . . . . . . . . . . . . . . . . . . . . . . . . . . . . . . . . . . . . . . . . . . . . . . . 35
Printing on special media. . . . . . . . . . . . . . . . . . . . . . . . . . . . . . . . . . . . . . . . . . . . . . . 36
Printing on envelopes. . . . . . . . . . . . . . . . . . . . . . . . . . . . . . . . . . . . . . . . . . . . . . . 37
Printing on labels . . . . . . . . . . . . . . . . . . . . . . . . . . . . . . . . . . . . . . . . . . . . . . . . . . 39
Printing on transparencies . . . . . . . . . . . . . . . . . . . . . . . . . . . . . . . . . . . . . . . . . . . 40
Printing on custom-sized media or cardstock. . . . . . . . . . . . . . . . . . . . . . . . . . . . . 41
Printing on letterhead, prepunched, or preprinted paper (single-sided) . . . . . . . . 42
Printing on both sides (duplexing) . . . . . . . . . . . . . . . . . . . . . . . . . . . . . . . . . . . . . . . . 43
Canceling a print job . . . . . . . . . . . . . . . . . . . . . . . . . . . . . . . . . . . . . . . . . . . . . . . . . . 46
Using the printer driver. . . . . . . . . . . . . . . . . . . . . . . . . . . . . . . . . . . . . . . . . . . . . . . . . 47
Changing the settings for a print job. . . . . . . . . . . . . . . . . . . . . . . . . . . . . . . . . . . . 47
Changing default settings. . . . . . . . . . . . . . . . . . . . . . . . . . . . . . . . . . . . . . . . . . . . 48
Using printer-driver features . . . . . . . . . . . . . . . . . . . . . . . . . . . . . . . . . . . . . . . . . . . . 49
Printing watermarks . . . . . . . . . . . . . . . . . . . . . . . . . . . . . . . . . . . . . . . . . . . . . . . . 49
Printing multiple pages on one sheet of paper. . . . . . . . . . . . . . . . . . . . . . . . . . . . 50
Setting a custom paper size. . . . . . . . . . . . . . . . . . . . . . . . . . . . . . . . . . . . . . . . . . 50
Using EconoMode (draft) printing . . . . . . . . . . . . . . . . . . . . . . . . . . . . . . . . . . . . . 51
Choosing print-quality settings . . . . . . . . . . . . . . . . . . . . . . . . . . . . . . . . . . . . . . . . 51
Using reduce/enlarge options. . . . . . . . . . . . . . . . . . . . . . . . . . . . . . . . . . . . . . . . . 52
ENWW Contents 3
Page 6

Selecting a paper source . . . . . . . . . . . . . . . . . . . . . . . . . . . . . . . . . . . . . . . . . . . . 52
Printing by type and size of media . . . . . . . . . . . . . . . . . . . . . . . . . . . . . . . . . . . . . 53
Printing a cover or different first page. . . . . . . . . . . . . . . . . . . . . . . . . . . . . . . . . . . 54
Adding a blank page or back cover to the end of a print job . . . . . . . . . . . . . . . . . 55
Adding a blank page to the beginning of all print jobs (job separator page). . . . . . 55
Using job-storage features. . . . . . . . . . . . . . . . . . . . . . . . . . . . . . . . . . . . . . . . . . . . . . 57
Proofing and holding a job . . . . . . . . . . . . . . . . . . . . . . . . . . . . . . . . . . . . . . . . . . . 57
Deleting a held job . . . . . . . . . . . . . . . . . . . . . . . . . . . . . . . . . . . . . . . . . . . . . . . . . 58
Printing a private job. . . . . . . . . . . . . . . . . . . . . . . . . . . . . . . . . . . . . . . . . . . . . . . . 58
Deleting a private job . . . . . . . . . . . . . . . . . . . . . . . . . . . . . . . . . . . . . . . . . . . . . . . 59
3 Managing and maintaining the printer
Using the embedded Web server. . . . . . . . . . . . . . . . . . . . . . . . . . . . . . . . . . . . . . . . . 62
Opening the embedded Web server. . . . . . . . . . . . . . . . . . . . . . . . . . . . . . . . . . . . 62
Information tab . . . . . . . . . . . . . . . . . . . . . . . . . . . . . . . . . . . . . . . . . . . . . . . . . . . . 63
Settings tab. . . . . . . . . . . . . . . . . . . . . . . . . . . . . . . . . . . . . . . . . . . . . . . . . . . . . . . 63
Networking tab . . . . . . . . . . . . . . . . . . . . . . . . . . . . . . . . . . . . . . . . . . . . . . . . . . . . 63
Other links . . . . . . . . . . . . . . . . . . . . . . . . . . . . . . . . . . . . . . . . . . . . . . . . . . . . . . . 64
Using HP Web Jetadmin software . . . . . . . . . . . . . . . . . . . . . . . . . . . . . . . . . . . . . . . . 64
Using Printer Status and Alerts . . . . . . . . . . . . . . . . . . . . . . . . . . . . . . . . . . . . . . . . . . 65
Managing and configuring printer drivers. . . . . . . . . . . . . . . . . . . . . . . . . . . . . . . . . . . 66
HP Web Jetadmin software plug-in . . . . . . . . . . . . . . . . . . . . . . . . . . . . . . . . . . . . 66
Customization utility . . . . . . . . . . . . . . . . . . . . . . . . . . . . . . . . . . . . . . . . . . . . . . . . 67
Managing the print cartridge . . . . . . . . . . . . . . . . . . . . . . . . . . . . . . . . . . . . . . . . . . . . 68
HP print cartridges . . . . . . . . . . . . . . . . . . . . . . . . . . . . . . . . . . . . . . . . . . . . . . . . . 68
Non-HP print cartridges . . . . . . . . . . . . . . . . . . . . . . . . . . . . . . . . . . . . . . . . . . . . . 68
Print-cartridge authentication . . . . . . . . . . . . . . . . . . . . . . . . . . . . . . . . . . . . . . . . . 68
Print-cartridge storage . . . . . . . . . . . . . . . . . . . . . . . . . . . . . . . . . . . . . . . . . . . . . . 68
Print-cartridge life expectancy . . . . . . . . . . . . . . . . . . . . . . . . . . . . . . . . . . . . . . . . 69
Checking the supply level. . . . . . . . . . . . . . . . . . . . . . . . . . . . . . . . . . . . . . . . . . . . 69
Cartridge low and cartridge out conditions . . . . . . . . . . . . . . . . . . . . . . . . . . . . . . . 70
Configuring e-mail alerts . . . . . . . . . . . . . . . . . . . . . . . . . . . . . . . . . . . . . . . . . . . . . . . 71
Checking the printer configuration . . . . . . . . . . . . . . . . . . . . . . . . . . . . . . . . . . . . . . . . 72
Menu map. . . . . . . . . . . . . . . . . . . . . . . . . . . . . . . . . . . . . . . . . . . . . . . . . . . . . . . . 72
Configuration page . . . . . . . . . . . . . . . . . . . . . . . . . . . . . . . . . . . . . . . . . . . . . . . . . 72
Supplies status page . . . . . . . . . . . . . . . . . . . . . . . . . . . . . . . . . . . . . . . . . . . . . . . 74
PS or PCL font list . . . . . . . . . . . . . . . . . . . . . . . . . . . . . . . . . . . . . . . . . . . . . . . . . 76
Cleaning the printer . . . . . . . . . . . . . . . . . . . . . . . . . . . . . . . . . . . . . . . . . . . . . . . . . . . 77
Cleaning the outside. . . . . . . . . . . . . . . . . . . . . . . . . . . . . . . . . . . . . . . . . . . . . . . . 77
Cleaning the paper path and print-cartridge areas. . . . . . . . . . . . . . . . . . . . . . . . . 78
Cleaning the fuser . . . . . . . . . . . . . . . . . . . . . . . . . . . . . . . . . . . . . . . . . . . . . . . . . . . . 79
4 Problem solving
Troubleshooting checklist . . . . . . . . . . . . . . . . . . . . . . . . . . . . . . . . . . . . . . . . . . . . . . 82
Troubleshooting general printing problems . . . . . . . . . . . . . . . . . . . . . . . . . . . . . . . . . 83
Printing special pages . . . . . . . . . . . . . . . . . . . . . . . . . . . . . . . . . . . . . . . . . . . . . . . . . 87
Understanding printer messages. . . . . . . . . . . . . . . . . . . . . . . . . . . . . . . . . . . . . . . . . 88
Using the printer online Help system . . . . . . . . . . . . . . . . . . . . . . . . . . . . . . . . . . . 88
Resolving persistent messages . . . . . . . . . . . . . . . . . . . . . . . . . . . . . . . . . . . . . . . 88
Interpreting control-panel messages . . . . . . . . . . . . . . . . . . . . . . . . . . . . . . . . . . . 89
Clearing jams . . . . . . . . . . . . . . . . . . . . . . . . . . . . . . . . . . . . . . . . . . . . . . . . . . . . . . . 97
Typical jam locations . . . . . . . . . . . . . . . . . . . . . . . . . . . . . . . . . . . . . . . . . . . . . . . 97
Print-cartridge area . . . . . . . . . . . . . . . . . . . . . . . . . . . . . . . . . . . . . . . . . . . . . . . . 98
Tray 2 or tray 3 paper-feed area . . . . . . . . . . . . . . . . . . . . . . . . . . . . . . . . . . . . . . 99
Output areas . . . . . . . . . . . . . . . . . . . . . . . . . . . . . . . . . . . . . . . . . . . . . . . . . . . . 100
Duplexer area. . . . . . . . . . . . . . . . . . . . . . . . . . . . . . . . . . . . . . . . . . . . . . . . . . . . 101
4 Contents ENWW
Page 7

Troubleshooting print-quality problems . . . . . . . . . . . . . . . . . . . . . . . . . . . . . . . . . . .102
Print-quality checklist. . . . . . . . . . . . . . . . . . . . . . . . . . . . . . . . . . . . . . . . . . . . . . .102
Image defect examples . . . . . . . . . . . . . . . . . . . . . . . . . . . . . . . . . . . . . . . . . . . .103
Troubleshooting network printing problems . . . . . . . . . . . . . . . . . . . . . . . . . . . . . . . .107
Troubleshooting common Windows problems . . . . . . . . . . . . . . . . . . . . . . . . . . . . . .108
Troubleshooting common Macintosh problems . . . . . . . . . . . . . . . . . . . . . . . . . . . . .109
Troubleshooting common PostScript problems . . . . . . . . . . . . . . . . . . . . . . . . . . . . .114
5 Service and support
Ordering parts, accessories, and supplies . . . . . . . . . . . . . . . . . . . . . . . . . . . . . . . . .116
Ordering directly from HP . . . . . . . . . . . . . . . . . . . . . . . . . . . . . . . . . . . . . . . . . . .116
Ordering through service or support providers . . . . . . . . . . . . . . . . . . . . . . . . . . .116
Ordering directly through the embedded Web server (for printers
with network connection) . . . . . . . . . . . . . . . . . . . . . . . . . . . . . . . . . . . . . . . . . .116
Ordering directly through the printer softw ar e (f or prin te rs dir ec tly
connected to a computer) . . . . . . . . . . . . . . . . . . . . . . . . . . . . . . . . . . . . . . . . .117
Part numbers. . . . . . . . . . . . . . . . . . . . . . . . . . . . . . . . . . . . . . . . . . . . . . . . . . . . .118
Contacting HP. . . . . . . . . . . . . . . . . . . . . . . . . . . . . . . . . . . . . . . . . . . . . . . . . . . . . . .123
Getting support . . . . . . . . . . . . . . . . . . . . . . . . . . . . . . . . . . . . . . . . . . . . . . . . . . .123
Obtaining extended service and support. . . . . . . . . . . . . . . . . . . . . . . . . . . . . . . .124
Contacting the HP fraud hotline. . . . . . . . . . . . . . . . . . . . . . . . . . . . . . . . . . . . . . .124
Guidelines for repacking the printer . . . . . . . . . . . . . . . . . . . . . . . . . . . . . . . . . . . . . .125
Service information form . . . . . . . . . . . . . . . . . . . . . . . . . . . . . . . . . . . . . . . . . . . . . . .126
HP maintenance agreements . . . . . . . . . . . . . . . . . . . . . . . . . . . . . . . . . . . . . . . . . . .127
Warranty information. . . . . . . . . . . . . . . . . . . . . . . . . . . . . . . . . . . . . . . . . . . . . . . . . .128
Hewlett-Packard limited warranty statement . . . . . . . . . . . . . . . . . . . . . . . . . . . . .129
Extended warranty. . . . . . . . . . . . . . . . . . . . . . . . . . . . . . . . . . . . . . . . . . . . . . . . .130
Limited warranty for print cartridge life . . . . . . . . . . . . . . . . . . . . . . . . . . . . . . . . .130
Appendix A Specifications
Printer specifications. . . . . . . . . . . . . . . . . . . . . . . . . . . . . . . . . . . . . . . . . . . . . . . . . .132
Physical specifications. . . . . . . . . . . . . . . . . . . . . . . . . . . . . . . . . . . . . . . . . . . . . .132
Electrical specifications . . . . . . . . . . . . . . . . . . . . . . . . . . . . . . . . . . . . . . . . . . . . .132
Power consumption. . . . . . . . . . . . . . . . . . . . . . . . . . . . . . . . . . . . . . . . . . . . . . . .132
Acoustic emissions . . . . . . . . . . . . . . . . . . . . . . . . . . . . . . . . . . . . . . . . . . . . . . . .133
Operating environment . . . . . . . . . . . . . . . . . . . . . . . . . . . . . . . . . . . . . . . . . . . . .133
Media specifications . . . . . . . . . . . . . . . . . . . . . . . . . . . . . . . . . . . . . . . . . . . . . . . . . .134
Supported sizes of media . . . . . . . . . . . . . . . . . . . . . . . . . . . . . . . . . . . . . . . . . . .134
Guidelines for using paper. . . . . . . . . . . . . . . . . . . . . . . . . . . . . . . . . . . . . . . . . . .136
Paper specifications . . . . . . . . . . . . . . . . . . . . . . . . . . . . . . . . . . . . . . . . . . . . . . .137
Printing and paper storage environment . . . . . . . . . . . . . . . . . . . . . . . . . . . . . . . .138
Envelopes . . . . . . . . . . . . . . . . . . . . . . . . . . . . . . . . . . . . . . . . . . . . . . . . . . . . . . .139
Labels . . . . . . . . . . . . . . . . . . . . . . . . . . . . . . . . . . . . . . . . . . . . . . . . . . . . . . . . . .141
Transparencies . . . . . . . . . . . . . . . . . . . . . . . . . . . . . . . . . . . . . . . . . . . . . . . . . . .141
Appendix B Control panel menus
Retrieve Job menu . . . . . . . . . . . . . . . . . . . . . . . . . . . . . . . . . . . . . . . . . . . . . . . . . . .144
Information menu . . . . . . . . . . . . . . . . . . . . . . . . . . . . . . . . . . . . . . . . . . . . . . . . . . . .145
Paper Handling menu . . . . . . . . . . . . . . . . . . . . . . . . . . . . . . . . . . . . . . . . . . . . . . . . .146
Configure Device menu. . . . . . . . . . . . . . . . . . . . . . . . . . . . . . . . . . . . . . . . . . . . . . . .148
Printing submenu. . . . . . . . . . . . . . . . . . . . . . . . . . . . . . . . . . . . . . . . . . . . . . . . . .148
PCL submenu . . . . . . . . . . . . . . . . . . . . . . . . . . . . . . . . . . . . . . . . . . . . . . . . . . . .150
Print Quality submenu . . . . . . . . . . . . . . . . . . . . . . . . . . . . . . . . . . . . . . . . . . . . . .151
System Setup submenu . . . . . . . . . . . . . . . . . . . . . . . . . . . . . . . . . . . . . . . . . . . .154
I/O submenu . . . . . . . . . . . . . . . . . . . . . . . . . . . . . . . . . . . . . . . . . . . . . . . . . . . . .157
Resets submenu . . . . . . . . . . . . . . . . . . . . . . . . . . . . . . . . . . . . . . . . . . . . . . . . . .160
ENWW Contents 5
Page 8

Diagnostics menu. . . . . . . . . . . . . . . . . . . . . . . . . . . . . . . . . . . . . . . . . . . . . . . . . . . . 161
Service menu . . . . . . . . . . . . . . . . . . . . . . . . . . . . . . . . . . . . . . . . . . . . . . . . . . . . . . . 161
Appendix C Printer memory and expansion
Printer memory. . . . . . . . . . . . . . . . . . . . . . . . . . . . . . . . . . . . . . . . . . . . . . . . . . . . . . 164
Installing memory . . . . . . . . . . . . . . . . . . . . . . . . . . . . . . . . . . . . . . . . . . . . . . . . . . . 165
Checking memory installation . . . . . . . . . . . . . . . . . . . . . . . . . . . . . . . . . . . . . . . . . . 167
Installing an HP Jetdirect EIO card . . . . . . . . . . . . . . . . . . . . . . . . . . . . . . . . . . . . . . 168
Appendix D Printer commands
Understanding PCL printer command syntax . . . . . . . . . . . . . . . . . . . . . . . . . . . . . . 170
Combining escape sequences. . . . . . . . . . . . . . . . . . . . . . . . . . . . . . . . . . . . . . . . . . 170
Entering escape characters . . . . . . . . . . . . . . . . . . . . . . . . . . . . . . . . . . . . . . . . . . . . 171
Selecting PCL 5e fonts. . . . . . . . . . . . . . . . . . . . . . . . . . . . . . . . . . . . . . . . . . . . . . . . 171
Common PCL 5e printer commands . . . . . . . . . . . . . . . . . . . . . . . . . . . . . . . . . . . . . 172
Appendix E Regulatory information
FCC regulations . . . . . . . . . . . . . . . . . . . . . . . . . . . . . . . . . . . . . . . . . . . . . . . . . . . . . 175
Environmental product stewardship program. . . . . . . . . . . . . . . . . . . . . . . . . . . . . . . 176
Declarations of conformity . . . . . . . . . . . . . . . . . . . . . . . . . . . . . . . . . . . . . . . . . . . . . 178
Declaration of Conformity. . . . . . . . . . . . . . . . . . . . . . . . . . . . . . . . . . . . . . . . . . . 178
Canadian DOC regulations. . . . . . . . . . . . . . . . . . . . . . . . . . . . . . . . . . . . . . . . . . 179
Regulatory and safety statements . . . . . . . . . . . . . . . . . . . . . . . . . . . . . . . . . . . . . . . 180
Laser safety statement . . . . . . . . . . . . . . . . . . . . . . . . . . . . . . . . . . . . . . . . . . . . . 180
LED safety statement . . . . . . . . . . . . . . . . . . . . . . . . . . . . . . . . . . . . . . . . . . . . . . 180
Japanese VCCI statement . . . . . . . . . . . . . . . . . . . . . . . . . . . . . . . . . . . . . . . . . . 180
Korean EMI statement . . . . . . . . . . . . . . . . . . . . . . . . . . . . . . . . . . . . . . . . . . . . . 180
Laser statement for Finland . . . . . . . . . . . . . . . . . . . . . . . . . . . . . . . . . . . . . . . . . 181
Index
6 Contents ENWW
Page 9

1
Printer basics
Thank you for purchasing an HP LaserJet 2300 series printer. If you have not do ne so, see the
getting started guide (start) provided with the printer for setup instructions.
Now that the printer is set up and ready to use, take a few moments to familiarize yourself with
the printer. This section pr ovides information about the following topics:
“Printer configurations” on page 8
“Printer features” on page 9
“Printer software” on page 11
“Installing the printing system software” on page 16
“Uninstalling the software” on page 21
“Control panel” on page 22
“Interface ports” on page 26
ENWW 7
Page 10

Printer configurations
The HP LaserJet 2300 printer is available in six configurations, as described below.
Note The illustrations in this guide are based on the HP LaserJet 2300 printer model unless otherwise
stated. To find out which HP LaserJet 2300 configuration you ha v e , look at the label on the front
of the printer.
HP LaserJet 2300L
The HP LaserJet 2300L printer prints letter-size paper at speeds up to 20 pages per minute
(ppm) or A4-size paper at up to 19 ppm. It comes with a built-in 250-sheet tray, both parallel
and universal serial bus (USB) ports, and 32 megabytes (MB) of random-access memory
(RAM). The printer is expandable, with one available enhanced input/output (EIO) slot and two
dual inline memory module (DIMM) slots for adding a network print server card, fonts, and
memory.
HP LaserJet 2300
The HP LaserJet 2300 printer is the same as the HP LaserJet 2300L printer, except th at it
prints at speeds up to 25 ppm with letter-size paper and 24 ppm with A4-size paper.
HP LaserJet 2300d
The HP LaserJet 2300d printer is the same as the HP LaserJet 2300 printer, except that the
printer comes with 48 MB of RAM and a built-in duplexer (for automatically printing on both
sides of paper).
HP LaserJet 2300n
The HP LaserJet 2300n printer is the same as the HP LaserJet 2300 printer, except that it is
designed for network users. It comes with a full-featured HP Jetdirect EIO print server card (for
connecting to a 10/100Base-TX network) and 48 MB of RAM.
HP LaserJet 2300dn
The HP LaserJet 2300dn printer is the same as the HP LaserJet 2300n printer, except that the
printer comes with a built-in duplexer (for automatically printing on both sides of paper).
HP LaserJet 2300dtn
The HP LaserJet 2300dtn printer is the same as the HP LaserJet 2300dn printer, except that it
also has an additional 500-sheet tray.
8 Chapter 1 Printer basics ENWW
Page 11

Printer features
The following table describes the features for the HP LaserJet 2300 series printers.
Fast pri nt
speed
Built-in duplexing
Print cartridge and status
features
Excellent print quality
Flexible paper handling
The HP LaserJet 2300L prints on letter-size paper at speeds up to 20
pages per minute (ppm) or A4-size paper at up to 19 ppm.
All other models print on letter-size paper at speeds up to 25 pages per
minute (ppm) or A4-size paper at up to 24 ppm.
Duplex (two-sided) printing is a standard feature of the
HP LaserJet 2300d printer, HP LaserJet 2300dn printer, and
HP LaserJet 2300dtn printer.
The 6,000-page HP Smart Print Cartridge detects and reports toner
status.
No-shake design maximizes toner use.
Supplies status page provides toner gauge, page count, and information
on paper sizes used.
The printer checks for authentic HP print cartridges.
FastRes 1200 produces 1200-dpi (dots per inch) print quality for fast,
high-quality printing of business text and graphics.
ProRes 1200 produces 1200-dpi printing for the best quality in line art and
graphic images.
Adjustable settings optimize print quality.
The HP Smart Print Cartridge prod uces crisp, sharp output.
Use tray 1 (multipurpose) for letterhead, envelopes, labels,
transparencies, custom-sized media, postcards, and heavy paper.
Use the adjustable 250-sheet tray (tray 2) for standard sizes of paper.
Use the 500-sheet tray (tray 3) for letter and A4-size paper.
Two output bins are available: select either the top output bin or the
rear output bin for the most appropriate output location, depending on
media type.
A straight-through paper path capability is available from tray 1 to the
rear output bin.
Built-in duplexing is available for the HP LaserJet 2300d printer,
HP LaserJet 2300dn printer, and HP LaserJet 2300dtn printer.
Expandability
A 250-sheet or 500-sheet tray is available, so that you do not have to add
paper as often.
One enhanced input/output (EIO) card slot is available for interface.
Three dual inline memory module (DIMM) slots are available, two for
adding memory and fonts.
Printer languages and
fonts
Fast printing performance, advanced font and graphics technologies, and
advanced imaging capabilities are benefits of the PCL 6 printer language.
The PCL 6 technology also includes 45 scalable TrueType™ fonts and
one bitmapped line printer font.
Other languages and fonts include HP PCL5e and PostScript® (PS) 3
emulation, which includes 35 built-in PS language fonts.
The printer automatically determines and switches to the appropriate
language for the print job.
ENWW Printer features 9
Page 12

Interface connections and
networking
The printer includes a bidirectional ECP type-B parallel port
(IEEE-1284 compliant) and a USB port (compatible with 1.1 and 2.0 low
and full speed certified devices)
The printer has an EIO slot for HP Jetdirect EIO print servers so that you
can connect quickly and easily.
Enhanced memory and
memory expansion
Energy savings
Economical printing
The HP LaserJet 2300 series printers come with either 32 MB or 48 MB
of memory and can be expanded to 288 or 304 MB, respectively, with
available memory (DIMM) slots. Most documents can be printed using the
standard amount of printer memory.
The printer automatically conserves electricity by reducing power
consumption when it is not printing.
As an ENERGY STAR® partner, Hewlett-Packard Compan y has determined
that this product meets E
N-up printing and two-sided printing with the built-in duplexer save paper
NERGY STAR
®
guidelines for energy efficiency.
(the built-in duplexer is included only with the HP LaserJet 2300d printer,
HP LaserJet 2300dn printer, and HP LaserJet 2300dtn printer).
Printing in EconoMode saves toner.
10 Chapter 1 Printer basics ENWW
Page 13

Printer software
The printer comes with helpful software, in cluding printer driv ers and opt ional soft wa re. F or ea sy
printer setup and access to the full range of printer f eatures , HP recommends th at y ou install th e
software provided.
Check the installation notes and Readme files on the printer CD-ROM for additional software
and languages (HP software is not available in all languages).
This section provides information about the following topics:
“Operating systems and printer components” on page 12
“Printer drivers” on page 14
“Software for Macintosh computers” on page 15
ENWW Printer software 11
Page 14

Operating systems and printer components
Windows
client
drivers
Network
administrator —
Windows software
Drivers
Network administrator —
Macintosh software
PPDs
Windows software
Macintosh
client
HP LaserJet Utility
Fonts
Macintosh software
PPDs
HP LaserJet Utility
The printer CD-ROM contains the software components and drivers for end users and network
administrators. The printer drivers provided on the CD-ROM m ust be installed to take full
advantage of printer features. The other programs are recommended, but are not required for
operation. Check the installation notes and Readme files on the printer CD-ROM for more
information.
The CD-ROM includes software d esigned for end users and network administrators op erating in
the following environments:
Microsoft® Windows®95, Windows 98, and Windows Me (Millennium Edition)
Microsoft Windows NT®4.0
Microsoft Windows 2000 and Windows XP
Apple Mac OS, version 8.6 to 9.xx, 10.1 or later
The most recent printer drivers for all supported operating systems are available at
http://www.hp.com/support/lj2300
. If you do not have access to the Internet, see the support
flyer that came in the printer box for information about obtaining the most recent software.
12 Chapter 1 Printer basics ENWW
Page 15

The following table lists the available software for your printer.
Software
Windows Installer xxx
PCL 6 xxx
PCL 5e xxx
PostScript emulation xxx
HP Web Jetadmin* xx x
Macintosh Installer x
Macintosh PostScript
Printer Description
(PPD) files
IBM drivers* x
Model scripts* x
*Available only on the World Wide Web.
Windows
9x/Me
Windows
NT 4.0
Windows
2000/XP
Mac OS
x
UNIX/
Linux
OS/2
ENWW Printer software 13
Page 16

Printer drivers
Printer drivers allow you to gain access to the printer features and allow the computer to
communicate with the printer (by using a printer language). Check the installation notes and
Readme files on the printer CD-ROM for additional software and languages.
The following printer drivers are included with the printer. The most recent drivers are available
at http://www.hp.com/support/lj2300
computers, the installation program for the printer software automatically checks the computer
for Internet access to obtain the latest drivers.
. Depending on the configuration of Windows-based
Operating system PCL 6 PCL 5e PS PPDs
Windows 95, 98, Me xxxx
Windows NT 4.0 xxxx
Windows 2000, XP xxxx
Mac OS xx
1. PostScript Printer Description files.
You can obtain Model Scripts for UNIX
®
and Linux by downloading them from the Internet or by
1
requesting them from an HP-authorized service or support provider. (See the support flyer that
came in the printer box.)
OS/2 drivers are available from IBM and are packaged with OS/2.
Note If the printer driver you wan t is not on the printer CD-ROM or is not listed here, check the insta llation
notes and Readme files to see if the printer driver is supported for the printer. If it is not supported,
contact the manuf acturer or distrib utor of the prog r am y ou are using and re quest a driv er for the
printer.
Select the right printer driver for your needs
Select a printer driver based on the way that you use the printer. Certain printer features are
available only in the PCL 6 drivers. See the printer driver Help for availability of features.
Use the PCL 6 driver to take full advantage of printer fe atures. F or gener al office printing, the
PCL 6 driver is recommended to provide optimum performance and print quality.
Use the PCL 5e driver if backward compatibility with previous PCL printer drivers or older
printers is necessary.
Use the PS driver if you are printing primarily from PostScript-specific programs such as
®
Adobe
support.
or Corel, for compatibility with PostScript Level 3 needs, or for PS font DIMM
Note The printer automatically switches between PS and PCL printer languages.
Printer driver Help
Each printer driver has Help screens that can be activated by using either the Help button, the
F1 button on the computer keyboard, or a question-mark symbol in the upper right corner in the
printer driver (depending on the Windows operating system used). These Help screens give
detailed information about the specific driver. Printer driver Help is separate from your program
Help.
14 Chapter 1 Printer basics ENWW
Page 17

Software for Macintosh computers
The HP installer provides PostScript Printer Description (PPD) files, Printer Dialog Extensions
(PDEs), and the HP LaserJet Utility for use with Macintosh computers.
The embedded Web server can be used by Macintosh computers if the printer is connected t o a
network. See “Using the embedded Web server” on page 62 for more information.
PPDs
PPDs, in combination with the Apple LaserWriter®8 driver for OS 8 to 9.x.x and PS Converter
for OS X 10.1 or later, allow you to gain access to the printer features and allow the computer to
communicate with the printer. An installation progr am for the PPDs, PDEs, and other software is
provided on the CD-ROM. Use the appropriate PS driver that comes with the operating system.
PDEs
PDEs (Printer Dialog Extensions), in combination with the Apple LaserWriter Driver for OS X,
allow you to gain access t o the printer features and allow the computer to communicate with the
printer. An installation program for the PPDs, PDEs, and other software is provided on the
CD-ROM. Use the Apple LaserWriter driver that comes with the operating system.
HP LaserJet Utility
Use the HP LaserJet Utility to control features that are not available in the driver. The illustrated
screens make selecting printer features by using the Macintosh computer easier than ever. Use
the HP LaserJet Utility to do the following operations:
customize the printer control panel messag es
name the printer, assign it to a zone on the network, download files and fonts, and change
most of the printer settings
set a password for the printer
use the computer to lock out function s at the printer control panel to prevent unauthorized
access (see the printer software Help)
configure and set the printer for IP printing
Note The HP LaserJet Utility currently is not supported for OS X, but the utility is supported for the
Classic environment.
ENWW Printer software 15
Page 18

Installing the printing system software
The printer comes with printing system software and printer drivers on a CD-ROM. The printing
system software on the CD-ROM must be installed to take full advantage of the printer features.
If you do not have access to a CD-ROM drive, you can download the printing system software
from the Internet at http://www.hp.com/lj2300.
Note Sample model scripts for UNIX® (HP-UX®, Sun Solaris) and Linux networks are availabl e for
download at http://www.hp.com/support.
You can download the latest software free of charge at http://www.hp.com/lj2300
After you have followed the installation instructions and loaded the software, see “Using
printer-driver features” on page 49 to get the most ou t of your prin te r.
Choose the installation procedure from the following:
“Installing Windows printing system software for direct connections” on page 16
“Installing Windows printing system software for networks” on page 17
“Installing Macintosh printing system software for networks” on page 18
“Installing Macintosh printing system software for direct connections” on page 19
“Installing the software after the par allel or USB cable has been connected” on page 20
.
Installing Windows printing system software for direct connections
This section explains how to install the printing system software for Microsoft Windows 95,
Windows 98, Windows Me, Windows NT 4.0, Windows 2000, and Windows XP.
When installing the printing software in a dir ect-connect en viro nment, always install the softw are
before connecting the parallel or USB cable. If the para llel or USB cable was connected before
the software installation, see “Installing the software after the parallel or USB cable has been
connected” on page 20
Either a parallel or USB cable can be used for the direct connection. You cannot connect
parallel and USB cables at the same time. Use an IEEE 1284-compatible cable or a standard
2-meter USB c a ble.
Windows 95 and NT 4.0 do not support USB cable connections.
To install the printing system software
1 Close all software programs that are open or running.
2 Insert the printer CD-ROM into the CD-ROM drive.
If the welcome screen does not open, star t it by using the following procedure:
a On the Start menu, click Run.
b Type the following (where X is the letter of the CD-ROM drive): X:\setup
c Click OK.
3 When prompted, click Install Printer and follow the instructions on the computer screen.
4 Click Finish when the installation has completed.
5 Restart the comp ut er.
6 Print a page from any software program to make sure that the software is correctly installed.
16 Chapter 1 Printer basics ENWW
Page 19

If installation fails, reinstall the software. If this fails, check the installation notes and
Readme files on the printer CD-ROM or the flyer that came in the printer box, or go to
http://www.hp.com/support/lj2300
for help or more information.
Installing Windows printing system software for networks
The software on the printer CD-ROM supports network installation with a Microsoft network
(except Windows 3.1x). For network installation on other operating systems, go to
http://www.hp.com/support/lj2300
The HP Jetdirect print server that is included with the HP LaserJet 2300n, HP LaserJet 2300dn
printer, or HP LaserJet 2300dtn printer has a 10/100Base-TX network port. If you need
an HP Jetdirect print server with another type of network port, see “Ordering parts, accessories,
and supplies” on page 116, or contact your local HP dealer (see “Contacting HP” on page 123).
The installer does not support printer installation or printer object creation on Novell servers. It
supports only direct-mode network installations between Windows computers and a printer. To
install your printer and create objects on a Novell server, use an HP utility (such as HP Web
Jetadmin or HP Install Network Printer Wizard) or a Novell utility (such as NWadmin).
To install the printing system software
1 If you are installing the software on Windows NT 4.0, Windows 2000, or Windows XP, make
sure that you have administrator privileges.
2 Make sure that the HP Jetdirect print server is configured correctly for the network by
printing a configuration page (see “Configuration page” on page 72). On the second page,
locate the printer IP address. You might need this address to complete network installation.
.
3 Close all software programs that are open or running.
4 Insert the printer CD-ROM into the CD-ROM drive.
If the welcome screen does not open, start it by using the following procedure:
a On the Start menu, click Run.
b Type the following (where X is the letter of the CD-ROM drive): X:\setup
c Click OK.
5 When prompted, click Install Printer and follow the instructions on the computer screen.
6 Click Finish when installation has completed.
7 Restart the computer.
8 Print a page from any software program to make sure that the software is correctly installed.
If installation fails, reinstall the software. If this fails, check the installation notes and
Readme files on the printer CD-ROM or the flyer that came in the printer box, or go to
http://www.hp.com/support/lj2300
for help or more information.
To set up a Windows computer to use the network printer using
Windows-sharing
If the printer is directly connected to a computer using a par allel cable, you can share t he p rinter
on the network so that other network users can print to it.
See your Windows documen tation to enable Windows-sharing. After the printer is shared, insta ll
the printer software on all computers that share the printer.
ENWW Installing the printing system software 17
Page 20

Installing Macintosh printing system software for networks
This section describes how to install Macintosh printing system software. The printing system
software support Mac OS 8.6 and later.
The printing system software includes the following components:
PostScript® Printer Description files
The PostScript (PS) Printer Description files (PPDs), in combination with the Apple
LaserWriter 8 printer driver , pr o vide acce ss to the printer features and allow the computer to
communicate with the printer. An installation program for the PPDs and other software is
provided on the CD-ROM that came with the printer. In addition, use the Apple LaserWriter 8
printer driver that comes with the computer.
HP LaserJet Utility
The HP LaserJet Utility provides access to features that are not available in the printer
driver. Use the illustrated screens to select printer features and complete tasks with the
printer:
• Name the printer, assign it to a zone on the network, download files and fonts, and
change many of the printer settings.
• Set a password for the printer.
• Check the levels of printer consumables.
• Configure and set the printer for Internet Protocol (IP) or AppleTalk printing.
To install printer drivers in Mac OS 9.2 or earlier
1 Connect the network cable between the HP Jetdirect print server and a network port.
2 Insert the CD-ROM into the CD-ROM drive. The CD-ROM menu runs automat ically. If the
CD-ROM menu does not run automatically, double-click the CD-ROM icon on the desktop,
and then double-click the Installer icon. This icon is located in the Installer/<language> f older
of the Starter CD-ROM (where <language> is your language preference). (For example, the
Installer/English folder contains the Installer icon for the English printer software.)
3 Follow the instructions on the screen.
4 Open the Chooser from within the Apple Menu.
5 Select LaserWriter 8 from the left side of the Chooser dialog box.
6 Select your printer from the list that app ears on the right side of the Chooser dialog box and
then select Create.
To install printer drivers in Mac OS X
1 Connect the network cable between the HP Jetdirect print server and a network port.
2 Insert the CD-ROM into the CD-ROM drive. The CD-ROM menu runs automat ically. If the
CD-ROM menu does not run automatically, double-click the CD-ROM icon on the desktop,
and then double-click the Installer icon. This icon is located in the Installer/<language> f older
of the Starter CD-ROM (where <language> is your language preference). (For example, the
Installer/English folder contains the Installer icon for the English printer software.)
3 Double-click the HP LaserJet Installers folder.
4 Double-click the Mac OS X folder.
5 Double-click the Installer icon for the desired language.
6 On your computer hard drive, double-clic k Applications, then Utilities, and then Print
Center.
7 Click Add Printer.
8 Select the connection type.
18 Chapter 1 Printer basics ENWW
Page 21

9 Select the printer name.
10 Click Add Printer.
11 Close the Print Center by clicking the close button in the upper-left corn er.
Note Some networks might not allow the printer to be set up automatically . You might need to manually
select the correct PPD when installing the printer.
Macintosh computers cannot be connected directly to the printer.
Installing Macintosh printing system software for direct connections
This section explains how to install the printing system software for Mac OS 8.6 to 9.2.x and
Mac OS X.
The Apple LaserWriter driver must be installed to use the PostScript Printer Description (PPD)
files. Use the Apple LaserWriter 8 driver that came with your Macintosh computer.
To install the printing system software
1 Connect a USB cable between the USB port on the printer and the USB port on the
computer. Use a standard 2-meter USB cable. (See “Interface ports” on page 26 for an
illustration.)
2 Close all software programs that are open or running.
3 Insert the printer CD-ROM into the CD-ROM drive and run the installer.
The CD-ROM menu runs automatically. If the CD-ROM menu does not run automatically,
double-click the CD-ROM icon on the desktop, and then double-click the Installer icon.
This icon is located in the Installer/<language> folder of the Starter CD-ROM (where
<language> is your language preference).
4 Follow the instructions on the computer screen.
5 Restart the computer.
6 For Mac OS X: From HD/Applications/Utilities/Print Center, start the Print Center. If the
printer does not set up automatically, do the following:
a Click Add Printer.
b From within the printer list, select USB as the connection type.
c Select the printer and then click Add in the lower-left corner.
For Mac OS 8.6 to 9.2.x:
a From HD/Applications/Utilities, open the Apple Desktop Printer Utility.
b Double-click Printer (USB).
c Next to USB Printer Selection, click Change.
d Select the printer, click Auto Setup, and then click Create.
e On the Printing menu, click Set Default Printer.
7 Print a page from any software program to make sure that the software is correctly installed.
If installation fails, reinstall the software. If this fails, see the installation notes or Readme
files on the printer CD-ROM or the flyer that came in the printer box, or go to
http://www.hp.com/support/lj2300
ENWW Installing the printing system software 19
for help or more information.
Page 22

Installing the software after the parallel or USB cable has been connected
If you have already connected a parallel or USB cable to a Windows computer, the New
Hardware Found dialog box appears when you turn on the computer.
To install the software for Windows 95, Windows 98, or Windows Me
1 In the New Hardware Found dialog box, click Search CD-ROM drive.
2 Click Next.
3 Follow the instructions on the computer screen.
4 Print a page from any software program to make sure that the software is correctly installed.
If installation fails, reinstall the software. If this fails, check the installation notes and
Readme files on the printer CD-ROM or the flyer that came in the printer box, or go to
http://www.hp.com/support/lj2300
To install the software for Windows 2000 or Windows XP
1 In the New Hardware Found dialog box, click Search.
2 On the Locate Driver Files screen, select the Specify a Location check bo x, clear all other
check boxes, and then click Next.
3 Type the following (where X is the letter of the CD-ROM drive):
for help or more information.
X:\2000XP
4 Click Next.
5 Follow the instructions on the computer screen.
6 Click Finish when installation has completed.
7 Select a language and follow the instructions on the computer screen.
8 Print a page from any software program to make sure that the software is correctly installed.
If installation fails, reinstall the software. If this fails, check the installation notes and
Readme files on the printer CD-ROM or the flyer that came in the printer box, or go to
http://www.hp.com/support/lj2300
for help or more information.
20 Chapter 1 Printer basics ENWW
Page 23

Uninstalling the software
This section explains ho w to uninstall the printing system software.
To remove software from Windows operating systems
Use the Uninstaller in the HP LaserJet 2300/T ools program group to select and remove an y or all
of the Windows HP printing-system components.
1 Click Start and then click Programs.
2 Point to HP LaserJet 2300 and then click Tools.
3 Click Uninstaller.
4 Click Next.
5 Select the HP printing-system components you want to uninstall.
6 Click OK.
7 Follow the instructions on the computer screen to complete t he uninstallation.
To remove software from Macintosh operating systems
Drag the HP LaserJet folder and PPDs to the trash can.
ENWW Uninstalling the software 21
Page 24
Control panel
This section provides information about the control panel and its features:
“Control panel layout” on page 22
“Using the printer Help system” on page 25
“Printing control panel menus” on page 25
“Changing control panel settings” on page 25
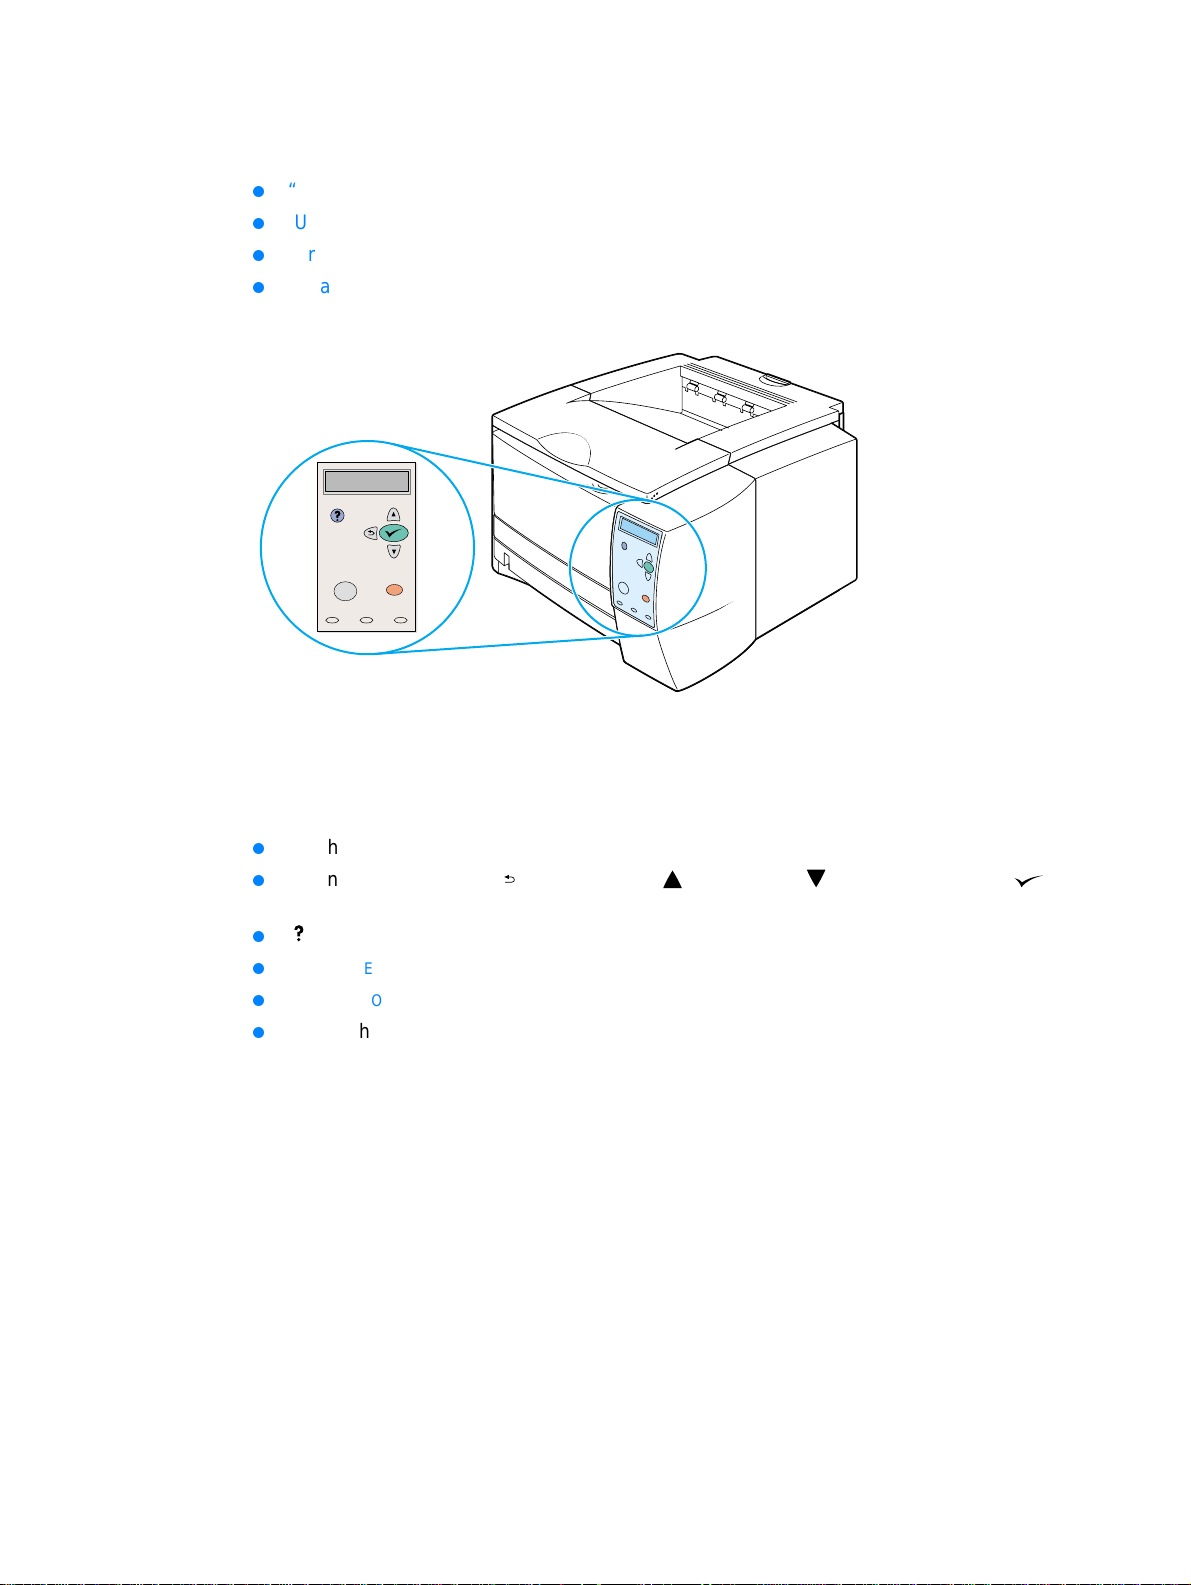
Control panel layout
The control panel includes the following controls:
graphical display that can show up to two lines of messages
four navigation buttons: (BACK button), (UP button), (DOWN button), and
(S
ELECT button)
(HELP button)
PAUSE/RESUME button
CANCEL JOB button
three light-emitting diode (LED) indicator lights: READY light, DATA light, and ATTENTION light
See “Interpreting control-panel messages” on page 89 to identify and troubleshoot control panel
messages.
22 Chapter 1 Printer basics ENWW
Page 25

Graphical display
HELP
button
B
ACK
button
PAUSE/RESUME
button
R
light
Control panel buttons
Button Function
EADY
ATA
D
light
TTENTION
A
light
UP
button
S
ELECT
button
DOWN
button
CANCEL JOB
button
(HELP)
(B
ACK)
PAUSE/RESUME
(U
P)
(S
ELECT)
(D
OWN)
CANCEL JOB
Provides information about the message on the graphical display.
Backs up one level in the menu tree or backs up one numeric entry.
Exits menus if held down for more than 1 second.
PAUSE: Causes the printer to stop printing the current job and expel
all active pages from the paper path.
RESUME: Returns the printer to the ready or busy state from the
menus or the online Help.
Navigates to the previous item in the list, or increases the value of
items that are numerical in nature.
Opens menus and navigates through menu levels.
Clears an error condition when the condition is clearable.
Saves the selected value for an item.
Performs the action associated with the item that is highlighted on the
graphical display.
Navigates to the next item in the list, or decreases the value of items
that are numerical in nature.
Cancels the current print job in process and expels all active pages
from the paper path. The time that it takes to cancel the job depends
on the size of the print job. (Press the button only once.)
Note: The control panel lights cycle while the print job is cleared from both
the printer and the computer, and then return to the ready state (
READY
light on).
ENWW Control panel 23
Page 26

Control panel lights
Light State Indication
READY On The printer is online and ready to accept data to print.
D
ATA On The printer has data to print, but is waiting to receive all of the
A
TTENTION On The printer has experienced a problem. Note the message on
Off The printer cannot accept data because it is offline (paused) or
has experienced an error.
Blinking The printer is going offline. The printer stops processing the
current print job and expels all active pages from the paper path.
data.
Off The printer has no data to print.
Blinking The printer is processing or printin g th e da ta.
the control panel display, and then turn the printer off and then
on again. See “Interpreting control-panel messages” on page 89
for help in resolving problems.
Off The printer is functioning without error.
Blinking Action is required. See the control panel display.
24 Chapter 1 Printer basics ENWW
Page 27

Using the printer Help system
This printer features a Help system at the control panel that provides instructions for resolving
most printer errors.
To view Help for a message (if available), press (H
two lines, use (U
To exit the Help system, press (H
P button) and (DOWN button) to scroll through the entire topic.
ELP button) again.
ELP button). If the Help topic is longer than
Printing control panel menus
To see the current settings for the menus and items a vailable at the control panel, print a control
panel menu map. You might want to store the menu map near the printer for reference.
To print a control panel menu map
1 Press (SELECT button) to open the menus.
2 Use (U
(S
ELECT button).
3 Use (U
(S
ELECT button).
P button) or (DOWN button) to scroll to INFORMATION, and then press
P button) or (DOWN button) to scroll to PRINT MENU MAP, and then press
Changing control panel settings
For a complete list of menu items and possible values, see “Control panel menus” on page 143.
Certain menu options appear only if the associated tray or accessory is installed. For example,
the EIO menu appears only if you have an EIO card installed.
To change a control panel setting
1 Press (SELECT button) to open the menus.
2 Use (U
(S
3 Some menus might have several submenus. Use (U
scroll to the submenu item that you want, and then press (S
4 Use (U
button). Some settings change rapidly if (U
An asterisk (*) appears next to the selection on the display, indicating that it is now the
default.
5 Press P
Note Printer-driver settings override control panel settings. Software program settings override both
printer-driver settings and control panel setti ngs.
If you cannot gain access to a menu or item, it is either not an optio n for the printer, or y o u have
not enabled the associated higher-level option. See you r netw ork administr ator if a fun ction has
been locked (Access denied menus locked appears on the printer control panel display).
P button) or (DOWN button) to scroll to the menu that you want, and then press
ELECT button).
P button) or (DOWN button) to
ELECT button).
P button) or (DOWN button) to scroll to the setting, and then press (SELECT
P button) or (DOWN button) is held down.
AUSE/RESUME to exit the menu.
ENWW Control panel 25
Page 28

Interface ports
The HP LaserJet 2300 printer has two interface ports:
The HP LaserJet 2300n printer, HP LaserJet 2300dn, and HP LaserJet 2300dtn printer also
include an HP Jetdirect EIO print server card that contains a 10/100Base-TX port. You can
purchase an HP Jetdirect EIO print server card for the other HP LaserJet 2300 series printers.
See “Ordering parts, accessories, and supplies” on page 116, or contact your local HP dealer
(see “Contacting HP” on page 123).
IEEE-1284B parallel port
USB port (compatible with 1.1 and 2.0 low and full speed certified devices)
Parallel port
(IEEE-1284B)
USB port
Network EIO port
(RJ-45)
26 Chapter 1 Printer basics ENWW
Page 29

2
Printing tasks
This section provides information about the following topics:
“Purchasing paper and other me d ia” on page 28
“Media input options” on page 29
“Loading trays” on page 31
“Media output options” on page 35
“Printing on special media” on page 36
“Printing on both sides (duplexing)” on page 43
“Canceling a print job” on page 46
“Using the printer driver” on page 47
“Using printer-driver features” on page 49
“Using job-storage features” on page 57
ENWW 27
Page 30

Purchasing paper and other media
HP LaserJet printers produce excellent print quality. You can print on a variety of print media,
such as paper (including up to 100 percent recycled fiber content paper), envelopes, labels,
transparencies, and custom-sized media.
Properties such as weight, grain, and moisture content are important factors that affect printer
performance and output quality. To achieve the best possible print quality, use only high-quality,
copier-grade paper. See “Media specifications” on page 134 for details.
Note Always test a sample of paper before purchasing large quantities. Your supplier should
understand the requirements specified in the hp LaserJet printer family print media guide. For
ordering information, see “Ordering parts, accessories, and supplie s” on page 116 or go to
http://www.hp.com/support/ljpaperguide.
28 Chapter 2 Printing tasks ENWW
Page 31

Media input options
The printer comes with up to three paper trays. The printer automatically selects the requested
media from the correct tray if that media is loaded in any of the trays. If the media is not
available, a message on the control panel prompts you to select the media or tray that you want
instead.
Tray 1
(pull-down)
Tray 2
(250-sheet tray)
Tray 3
(500-sheet tray,
if installed)
Tray 1 media sizes
Tray 1, a multipurpose tray, adjusts for sizes from 76 by 127 mm (3 by 5 inches) to a legal-size
sheet, 216 by 356 mm (8.5 by 14 inches). Tray 1 should be used when printing the following
types of media:
envelopes (see “Printing on envelopes” on page 37)
labels (see “Printing on labels” on page 39)
transparencies (see “Printing on transparencies” on page 40)
custom-sized media or cardstock (see “Printing on custom-sized media or cardstock” on
page 41)
postcards (see “Printing on custom-sized media or cardstock” on page 41)
ENWW Media input options 29
Page 32

Tray 2 (250-sheet tray) paper sizes
A 250-sheet tray can be purchased as an accessory if the printer did not come with a tray 3. It
has settings for the following paper sizes:
A4
A5
B5 (ISO)
B5 (JIS)
Letter
Legal
Executive
8.5 by 13 inches (FoolsCap, Folio, JIS Exec)
See “Loading tray 2 (250-sheet tray) or optional 250-sheet tray in tray 3 position” on page 32 to
change the paper size. See “Supported sizes of media” on page 134 for specific dimensions.
CAUTION Load only paper in the 250-sheet tray. Other types of print media, such as labels or
transparencies, can jam if you try to print on them from either the 250-sheet tray or the
500-sheet tray.
Tray 3 (500-sheet tray) paper sizes
A 500-sheet tray can be purchased as an accessory if the printer did not come with a tray 3. It
has settings for the following paper sizes:
A4
Letter
See “Loading tray 3 (500-sheet tray)” on page 34 to change the paper size. See “Supported
sizes of media” on page 134 for specific dimensions.
CAUTION Load only paper in the 500-sheet tray. Other types of print media, such as labels or
transparencies, can jam if you try to print on them from either the 250-sheet tray or the
500-sheet tray.
30 Chapter 2 Printing tasks ENWW
Page 33

Loading trays
Loading tray 1 (multipurpose tray)
3
1
2
Tray 1 holds up to 100 sheets of paper or up to 10 envelopes. See the
following sections for printing on special media:
preprinted material—“Printing on letterhead, prepunched, or
preprinted paper (single-sided)” on page 42
envelopes—“Printing on envelopes” on page 37
labels—“Printing on labels” on page 39
To load tray 1
1 Open tray 1 by pulling the front cover down.
2 Slide out the plastic tray extender. If the media that is being loaded
is longer than 229 mm (9 inches), also flip open the additional tray
extender.
3 Slide the paper-width guides slightly wider than the media.
4 Place media into the tray (short-edge in, print-side up). The media
should be centered between the paper-width guides and under the
tabs on the paper-width guides.
5 Slide the paper-width guides inward until they lightly touch the
media stack on both sides without bending it. Make sure that the
media fits under the tabs on the paper-width guides.
Note
Do not add media to tra y 1 while the printer is printing. This could cause
a paper jam. Do not close the front door when the printer is printing.
5
4
ENWW Loading trays 31
Page 34

Loading tray 2 (250-sheet tray) or optional
250-sheet tray in tray 3 position
1
2
Tray 2 supports only paper (A4, A5, B5 ISO, B5 JIS, Letter, Legal,
Executive, and 8.5 by 13 inches).
To load tray 2
1 Pull the tray out of th e printer and remove any paper.
2 Move the side width guides outward to match the paper size you
are loading.
3 On the rear paper-length guide, press on the blue tab and adjust it
so that the pointer matches the paper size tha t you are loading.
Paper sizes
Continued on the next page.
3
32 Chapter 2 Printing tasks ENWW
Page 35

5
6
4
4 Place the paper in the tray and make sure that it is flat at all four
corners. Keep the paper below the height tabs on the paper-length
guide in the rear of the tray.
5 Push down on the paper to lock the metal paper-lift plate in place.
6 Slide the tray back into the printer.
Note
Whenever you remove a 250-sheet tray from the printer, always push
down on the paper to lock the metal paper-lift plate in place befor e you
replace the tray. The metal paper-lift plate releases and lifts the paper
up when you push the tray into the printer.
ENWW Loading trays 33
Page 36

Loading tray 3 (500-sheet tray)
1
2
Tray 3 supports only paper (A4 and Letter).
To load tray 3
1 Pull the tray out of th e printer and remove any paper.
2 To adjust for letter-size paper, pull up on the rear paper stop.
To adjust for A4-size paper, push the rear paper stop down.
3 For letter-size paper, move the side width guides outward as far as
possible.
For A4-size paper, move the side width guides inward as far as
possible.
4 Place the paper in the tray and make sure that it is flat at all four
corners. Keep the paper be low the hooks on the side and rea r of the
tray.
5 Slide the tray back into the printer.
3
4
5
34 Chapter 2 Printing tasks ENWW
Page 37

Media output options
The printer comes with two output bins. The top output bin is used when the rear output bin is
closed. The rear output bin is used when the rear output bin is open.
Top output bin
(face down)
Note When tray 1 and the rear output bin are used together , they provide a straig ht-through paper path
for your print job. Using a straight-through paper path can sometimes reduce curling.
Rear output bin
(face up)
ENWW Media output options 35
Page 38

Printing on special media
This section discusses printing on types of media that require special handling:
“Printing on envelopes” on page 37
“Printing on labels” on page 39
“Printing on transparencies” on page 40
“Printing on custom-sized media or cardstock” on page 41
“Printing on letterhead, prepunched, or preprinted paper (single-sided)” on page 42
36 Chapter 2 Printing tasks ENWW
Page 39

Printing on envelopes
You can print envelopes from tray 1. Tray 1 holds up to 10 envelopes and supports standard or
custom sizes.
For printing on any size of envelope, make sure to set the margins in your program at least
15 mm (0.6 in ch) fro m th e ed ge of th e envelope.
The printer might print at a slower speed when printing envelopes. In addition, printing
performance depends on the construction of the envelope. Always test a few sample envelopes
before purchasing a large quantity. For envelope specifications, see “Envelopes” on page 139.
WARNING! Never use envelopes with coated linings, exposed self-stick adhesives, or other synthetic
materials. These items can emit no xious fumes.
CAUTION Envelopes with clasps, snaps, windows, coated linings, exposed self-stick adhesives , or other
synthetic materials can severely damage the printer.
To avoid jamming and possible printer damage, never try to print on both sides of an envelope.
Before you load envelopes, ma ke that sure they are flat and not dam age d or stuck together. Do
not use envelopes with pressure-sensitive adhesive.
ENWW Printing on special media 37
Page 40

1
To load envelopes in tray 1
Many types of envelopes can be printed from tray 1. Up to 10 can be
stacked in the tray.
1 Open tray 1 by pulling the front cover down.
2 Open the rear output bin by pulling down on the top section of the
bin. Slide out the extender until it extends fully.
2
3
4
Note
Using the rear output bin reduces envelope curl.
3 Slide the width guides on tray 1 outward to a position that is slightly
wider than the media.
4 Place the envelopes into the tray short-edge in, print-side up. The
stamp end must enter the printer first.
5 Slide the width guides inward until they lightly touch the envelope
stack without bending it. The envelopes should be centered
between the paper guides and under the tabs on the paper-width
guides.
Note
If the envelope has a flap on the short edge, this edge must enter the
printer first.
You might experience some jams when using any media with a length
less than 178 mm (7 inches). This might be caused by paper that has
been affected by environmental conditions. For optimum performance,
make sure that you are storing and handling the paper correctly (see
“Printing and paper storage en vironment” on page 138). Using media
from another manufacturer might also help.
5
38 Chapter 2 Printing tasks ENWW
Page 41

Printing on labels
Use only labels recommended for laser printers. For label specifications, see “Labels” on
page 141.
Guidelines for printing on labels
Print labels from tray 1.
Load labels print-side up.
Use the rear output bin for labels.
Remove label sheets from the output bin as they are printed to prevent them from sticking
together.
Do not use labels that are separating from the backing sheet or are wrinkled or damaged in
any way.
Do not use label sheets that have the backing sheet exposed, and do not reuse partially
used label sheets.
Do not feed a sheet of labels through the printer more than once. The adhesive backing is
designed for one pass through the printer.
Label orientation
(print-side up, top in first)
CAUTION If a sheet of labels becomes jammed in the printer, see “Clearing jams” on page 97.
ENWW Printing on special media 39
Page 42

Printing on transparencies
Use only transparencies recommended f o r use in laser p rinters. For transparency specifications ,
see “Transparencies” on page 141.
Guidelines for printing on transparencies
Print transparencies from tra y 1.
Use the top output bin to reduce curling (this is for transparencies only; for other media use
the rear output bin to reduce curling).
Remove transparencies from the output bin as they are printed to prevent them from
sticking.
Place transparencies on a flat surface after removing them from the printer.
Set the printer driver for transparencies (see “Printing by type and siz e of media” on
page 53).
For Macintosh computers, go to the HP LaserJet Utility and select transparencies.
40 Chapter 2 Printing tasks ENWW
Page 43

Printing on custom-sized media or cardstock
Postcard s, 3-by-5 inch (index) cards, and other custom-sized media can be printed from tray 1.
The minimum media size is 76 by 127 mm (3 by 5 inches) and the maximum media size is 216
by 356 mm (8.5 by 14 inches).
Note You might experience some jams when using any media with a length less than
178 mm (7 inches). This might be caused by paper that has been affected by environmental
conditions. F or optimum performance, ma ke sure you are storing and handlin g the paper correctly
(see “Printing and paper storage environment” on page 138). Using media from another
manufacturer might also help.
Printing on odd sizes or weights of media (for example, small, long, or narrow paper) can decr ease
print speed. The decreased speed helps to prolong the lif e of internal printer parts. It also improves
print quality with these types of media.
Guidelines for printing on custom-sized media and cardstock
Always insert the short-edge first into tray 1. If you want to print in landscape mode, make
this selection through your software. Inserting paper long-edge first might cause a jam.
Use the rear output bin to reduce curl.
Do not print on media smaller than 76 mm (3 inches) wide or 127 mm (5 inches) long.
In your software applicatio n, set m argins at le ast 6.4mm (0.25 inch) away from the edges of
the media.
ENWW Printing on special media 41
Page 44

Printing on letterhead, prepunched, or preprinted paper
(single-sided)
When printing letterhead, prepunched, or preprinted paper, it is important to orient the paper
correctly. Follow the guidelines in this section for printing on one side only. For duplexing
guidelines, see “Printing on both sides (duplexing)” on page 43.
Tray 1 orientation: print-side up, top edge toward the printer.
Tray 2 or tray 3 orientation: print-side down, top edge toward you.
Guidelines for printing on letterhead or preprinted forms
Do not use letterhead paper that is printed with low- temp er a tu re inks, such as those used in
some types of thermography.
Do not use raised or embossed letterhead.
The printer uses heat and pressure to fuse toner to the paper. Make sure that any colored
paper or preprinted forms use inks that are compatible with this fusing temperature (200° C
or 392° F for 0.1 second).
42 Chapter 2 Printing tasks ENWW
Page 45

Printing on both sides (duplexing)
You can print on both sides of a sheet of paper (called duplexing or two-sided printing) in two
ways—automatic and manual. Letter, A4, and 8.5 by13 inches, and Legal paper sizes are
supported for duplexing.
Automatic duplexing
The HP LaserJet 2300d, HP LaserJet 2300dn, and HP LaserJet 2300dtn printers contain a
built-in duplexer that can automatically print on both sides of paper.
Manual duplexing
You can perform manual duplexing for the HP LaserJet 2300L, HP LaserJet 2300, and
HP LaserJet 2300n printers. The printer prints the first side of each page, waits for you to
insert the paper into the printer, and then prints the second side of each page. Other
documents cannot be printed while the printer waits f or you to insert the paper f or the se cond
side to be printed.
Even if your printer includes a built-in duplexer, manual dup lexing is necessary for the following:
if you want to duplex paper other than the supported sizes or weights—for example, paper
heavier than 105 g/m
if you select Straight Paper Path in your printer driver
Guidelines for printing on both sides
2
(28 lb) or very thin paper
Do not print on both sides of labels, transparencies, or vellum. Damage to the printer and jams
might result.
Paper orientation for printing on both sides
Duplex on the second side of the sheet of paper first. The paper needs to be oriented as shown
in the following illustration.
For tray 1, load the first side facing down with the bottom, short edge toward the printer.
For all other trays, load the first side facing up with the top, short edge toward the printer.
Tray 1
All other trays
ENWW Printing on both sides (duplexing) 43
Page 46

Layout options for printing on both sides
The four print-orientation options are shown below. These options are available when Print on
Both Sides is selected from the Finishing tab in the printer driver.
1
1
1 Flip Pages Up
(long-edge landscape)
2 Flip Pages Sideways
(short-edg e lan dscape)
1
2
This layout is of ten u sed in accoun ting, da ta pr ocessing , and
spreadsheet applications. Every other printed image is
oriented upside-down. Facing pages are read continuously
from top to bottom.
Each printed image is oriented right-side up. Facing pages
are read from top to bottom on the lef t pag e , the n from top to
bottom on the right page.
1
3
1
4
3 Flip Pages Sideways
(long-edge portrait)
4 Flip Pages Up
(short-e dg e po rtrait)
This is the default and most common layout, with every
printed image oriented right-side up. Facing pages are read
from top to bottom on the left page, then from top to bottom
on the right page.
This layout is often used with clipboards. Every other printed
image is oriented upside-down. Facing pages are read
continuously from top to bottom.
44 Chapter 2 Printing tasks ENWW
Page 47

To duplex with the built-in duplexer
The built-in duplexer is included only with the HP LaserJet 2300d printer, HP LaserJet 2300dn
printer, and HP LaserJet 2300dtn printer.
1 Insert enough paper into one of the trays to accommodate the print job. If you are loading
special paper such as letterhead, load it in one of the following ways:
• For tray 1, load the letterhead paper with the first side down, bottom in first.
• For tray 2 (250-sheet tray) or tray 3 (either a 250-sheet tray or a 500-sheet tray), load the
letterhead paper with first side up, top edge toward the back of the tray.
CAUTION Do not load paper that is heavier than 105 g/m2 (28-lb bond). Jamming could result.
2 Open the printer driver (see “Changing the settings for a print job” on page 47).
3 On the Finishing tab, select Print on Both Sides.
4 Click OK.
5 Send the print job to the printer.
Note The paper you are printing on will partially come out of the top output bin during the duplexing.
Do not pull on the paper until duple xing is complete.
During duplexing, the duplexer will not function if the rear output bin is open.
To duplex manually
1 Insert enough paper into one of the trays to accommodate the print job. If you are loading
special paper such as letterhead, load it in one of the following ways:
• For tray 1, load the letterhead paper with the first side down, bottom in first.
• For tray 2 (250-sheet tray) or tray 3 (either a 250-sheet tray or a 500-sheet tray), load the
letterhead paper with first side up, top edge toward the back of the tray.
2 Open the printer driver (see “Changing the settings for a print job” on page 47).
3 On the Finishing tab, select Print on Both Sides.
4 Click OK.
5 Send the print job to the printer.
6 Go to the printer. Remo ve any b lank paper from tra y 1. Insert the printed stack with the blank
side up, top edge in first. You must print the second side from tray 1.
7 If prompted by a message at the controil panel display,
Note If total sheets e xceed t he t r ay 1 capacity for manual duplex jobs, you must r epeat st eps 6 a nd 7
each time paper is inserted until the duplexing job is complete.
press (SELECT button).
ENWW Printing on both sides (duplexing) 45
Page 48

Canceling a print job
You can stop a print job from a softwar e progr am or a p rint queue, or by pressing the CANCEL JOB
button on the printer control panel.
If the printer has not started printing, first try to cancel the job within the software program
that sent the print job.
If the print job is waiting in a print queue or print spooler such as the Printers group on a
Windows computer or Print Monitor on a Macintosh computer, delete the job there.
If the print job is already printing, press the CANCEL JOB button. The printer will finish printing
any pages that are already moving through the printer and delete the rest of the print job.
If the control panel status lights continue to cycle after a job has been canceled, the computer is
still sending the job to the printer. Either delete the job from the print queue or wait until the
computer has finished sending data (the printer will return to the ready state, with the R
on).
EADY light
Pressing C
ANCEL JOB cancels only the current job in the printer. If more than one print job is in
printer memory, C
ANCEL JOB must be pressed once for each job.
46 Chapter 2 Printing tasks ENWW
Page 49

Using the printer driver
The printer driver provides access to the prin te r features and allows the comput er to
communicate with the printer. This section provides instructions for printing when setting options
are set from the printer driver.
If possible, try to set printing features from the software program in which you are working or
from the Print dialog box. You can set the printer features this way for most Windows and
Macintosh software progr ams. If a setting is not available in the software program or printer
driver , you must set it at the printer control panel.
For more information about printer-driver features, see the printer-driver online Help. For more
information about printing from a specific software program, see the documentation for the
program.
Note Printer-driver settings override control panel settings. Software program settings override both
printer-driver settings and control panel setti ngs.
Changing the settings for a print job
If you want printing settin gs to be used only in the software program you are using, change the
settings from the program. After you quit the program, the printer settings return to the defaults
that are configured in the printer driver.
To change print settings for a print job on Windows computers
1 In the software program, click File.
2 Click Print.
3 Click Setup or Properties. (The options might be different for your program.)
4 Change the print settings.
5 When you are finished, clic k OK.
To change print settings for a print job on Macintosh computers
1 In the software program, click File.
2 Click Print.
3 In the dialog box that appears , select the print settings that you want to change and mak e the
changes.
4 When you are finished, clic k OK.
ENWW Using the printer driver 47
Page 50

Changing default settings
If you want printing settings to be used in all software programs you use on the computer,
change the default settings in t he printer driver.
Choose the procedure for your operating system:
“To change default settings in Windows 95, Windows 98, and Windows Me” on page 48
“To change default settings in Windows NT 4.0” on page 48
“To change default settings in Windows 2000 and Windows XP” on p age48
“To change default settings in Macintosh operating systems” on page 48
To change default settings in Windows 95, Windows 98, and Windows Me
1 Click the Start button.
2 Point to Settings.
3 Click Printers.
4 Right-click the HP LaserJet 2300 series printer icon.
5 Click Properties.
6 Change any of the settings on the tabs. These settings are now the defaults for the printer.
7 Click OK to save your settings and to close the printer driver.
To change default settings in Windows NT 4.0
1 Click the Start button.
2 Point to Settings.
3 Click Printers.
4 Right-click the HP LaserJet 2300 series printer icon.
5 Click Document Defaults.
6 Change any of the settings on the tabs. These settings are now the defaults for the printer.
7 Click OK to save your settings and to close the printer driver.
To change default settings in Windows 2000 and Windows XP
1 Click the Start button.
2 Point to Settings.
3 Point to Printers (Windows 2000) or Printers and Faxes (Windows XP).
4 Right-click the HP LaserJet 2300 series printer icon.
5 Click Properties.
6 On the Advanced tab, click Printing Defaults.
7 Change any of the settings on the tabs. These settings are now the defaults for the printer.
8 Click OK to return to the Advanced tab.
9 Click OK to save your settings and to close the printer driver.
To change default settings in Macintosh operating systems
Depending on the Macintosh operating system version that you have, use either the Apple
Desktop Printer Utility or the Print Center to change printer driver defaults.
48 Chapter 2 Printing tasks ENWW
Page 51

Using printer-driver features
This section provides instructions for common printing features that are controlled through the
printer driver.
“Printing watermarks” on page 49
“Printing multiple pages on one sheet of paper” on page 50
“Setting a custom paper size” on page 50
“Using EconoMode (draft) printing” on page 51
“Choosing print-quality settings” on page 51
“Using reduce/enlarge options” on page 52
“Selecting a paper source” on page 52
“Printing by type and size of media” on page 53
“Printing a cover or different first page” on page 54
“Adding a blank page or back cover to the end of a print job” on page 55
“Adding a blank page to the beginning of all print jobs (job separator page)” on page 55
Printing watermarks
A watermark is a marking, such as “Top Secret,” “Draft,” or someone’s name, printed in the
background of selected pages in a document.
Note If you are using Windows NT 4.0, Windows 2000, or Windows XP, you must have administrator
privileges to create waterm arks.
To print a watermark on Windows computers (all versions)
1 Open the printer driver (see “Changing the settings for a print job” on page 47).
2 On the Effects tab, select a watermark from the Watermarks drop-down list. To edit or
create a watermark, click Edit.
3 Click OK.
To print a watermark on Macintosh computers
Select Custom and specify the text that you want, depending on your printer-driver version.
ENWW Using printer-driver features 49
Page 52

Printing multiple pages on one sheet of paper
You can print more than one document page on a single sheet of paper (this is sometimes called
2-up, 4-up , or n-up printing). The pages will appear decreased in size and arranged on the sheet.
You can specify that up to 16 pages are to be printed on a single sheet. This feature provides a
cost-effective and environmentally friendly way to print draft pages, especially when combined
with duplex printing (see “Printing on both sides (duplexing)” on page 43).
To print multiple pages on one side of a sheet of paper on Windows
computers (all versions)
1 Open the printer driver (see “Changing the settings for a print job” on page 47).
2 On the Finishing tab, select the number of Pages per sheet.
3 If you want border s around the pages, select Print Page Borders.
4 Select the page order from the Page Order drop-down list.
5 Click OK.
Setting a custom paper size
Use the custom paper feature to print on paper sizes other than stan d ar d sizes.
To set a custom paper size on Windows computers
1 Open the printer driver (see “Changing the settings for a print job” on page 47).
2 On the Paper tab, click Custom.
3 Specify the custom width and height.
4 Click Close.
5 Click OK.
To set a custom paper size on Macintosh computers
1 On the File Menu, select Page Setup.
2 From the Page Attributes drop-down menu, select Custom Page Size.
3 Click New to create a named custom page size. The new custom page is automatically
added to the Page Size menu in Page Setup.
50 Chapter 2 Printing tasks ENWW
Page 53

Using EconoMode (draft) printing
EconoMode (draft) printing allows the printer to use less toner on each page. Selecting this
option might extend the life of your print cartridge and reduce your cost per page, but will reduce
print quality.
EconoMode is not available if you are using a non-HP print cartridge.
To use EconoMode (draft) printing on Windows computers
1 Open the printer driver (see “Changing the settings for a print job” on page 47).
2 On the Paper/Quality tab, select EconoMode.
3 Click OK.
Choosing print-quality settings
If you need advanced print qualit y, you can choose custom settings.
Resolution options:
Best Quality—use ProRes 1200 for the best print quality.
Faster Printing—use FastRes 1200 as an alternative resolution for complex graphics or
faster output.
Custom—use this option to specify print-quality settings.
Note Changing resolution can change the formatting of your text.
To choose print-quality settings on Windows computers
1 Open the printer driver (see “Changing the settings for a print job” on page 47).
2 On the Finishing tab, select the resolution or print-quality settings that you want.
3 Click OK.
ENWW Using printer-driver features 51
Page 54

Using reduce/enlarge options
Use the reduce/enlarge options to scale your document to a percentage of its normal size. You can
also choose to scale your document to fit on any size of paper that the printer supports.
To set reduce/enlarge options on Windows computers
1 Open the printer driver (see “Changing the settings for a print job” on page 47).
2 On the Effects tab, use the % of Normal Size box or slider scale to reduce or enlarge the
scale.
3 Click OK.
Selecting a paper source
If your software program supports printing paper by source, make the selections from the
program. Program settings override printer-driver sett ings.
To select a paper source on Windows computers
1 Open the printer driver (see “Changing the settings for a print job” on page 47).
2 On the Paper/Quality tab, select the source from the Source is drop-down list.
3 Click OK.
To select a paper source on Macintosh computers
Select a paper source from the General options in the printer driver.
52 Chapter 2 Printing tasks ENWW
Page 55

Printing by type and size of media
You can configure the printer to select media by Type (such as plain, glossy, or letterhead) and
Size (such as letter or A4), rather than by Source (a tray).
Printing by type or size m eans t hat you want the printer to pull p aper or print me dia fr om t he f i rst
tray that is loade d with the type or siz e t hat y ou ch oose. Selecting med ia b y type and siz e re sults
in significantly better print quality for hea vy pap er and gl ossy paper. Using the wrong setting can
result in unsatisfactory print quality. Alw a ys print by type f o r special print media such as labels or
grayscale transparencies. Always print by size for envelopes.
If you want to print by type or size and the trays have not been configured for a certain type or
size, load the paper or print media into tray 1, and then select the type or size from the Page
Setup dialog box, the Print dialog box, or the Print Properties dialog box.
Note The type and size settings can also be configured from the HP Web JetAdmin software for
networked printers (see “Using HP Web Jetadmin software” on page 64). For Macintosh
operating systems, these settings can be configured by using the HP LaserJet Utility (see
“HP LaserJet Utility ” on page 15).
To print by type and size of paper (tray 1)
1 Load and adjust the tray. (See “Loading tray 1 (multipurpose tray)” on page 31.)
2 At the printer control panel, press (S
3 Use (U
(S
ELECT button).
P button) or (DOWN button) to scroll to PAPER HANDLING, and then press
ELECT button).
4 Do one of the following:
• To allow the printer to print automatically from tray 1, if it is loaded: Set TRAY 1 SIZE=ANY
SIZE and TRAY 1 TYPE=ANY TYPE (First mode).
• To print by type and size from tray 1, but to have the printer prompt you to load paper
before printing: Set TRAY 1 SIZE to th e size that is loaded and set TRAY 1 TYPE to
anything except ANY TYPE (Cassette mode).
5 In the software program, click File.
6 Click Print.
7 Click Properties.
8 In the printer driver, select a type other than Auto Select.
To print by type and size of paper (tray 2 or 3)
1 Load and adjust the tray. (See “Loading tray 2 (250-sheet tray) or optional 250-sheet tray in
tray 3 position” on page 32 or “Loading tray 3 (500-sheet tray)” on page 34.)
2 At the printer control panel, press (S
detected) and/or the type.
ELECT button) to change the size (if it was not
3 Use (U
PAPER HANDLING, and then press (S
P button) or (DOWN button) to scroll to the size you want and/or to the type
ELECT button).
Note To print by type and size, it might be necessary to unload or close tray 1. For more information,
see “Paper Handling menu” on page 146.
4 In the software program, click File.
5 Click Print.
6 Click Properties.
7 In the printer driver, select a type other than Auto Select.
ENWW Using printer-driver features 53
Page 56

Printing a cover or different first page
Use the following procedure to print the first page of a document on a different media type than
the rest of the document (f or example, to print the first page of a document on letterhead paper
and the rest on plain paper, or to print a cover on card stock and the subsequent pages on plain
paper).
This option might not be available in all printer drivers.
To print a cover or different first page for Windows 95, Window 98,
Windows Me, and Windows NT 4.0 computers
1 Open the printer driver (see “Changing the settings for a print job” on page 47).
2 On the Paper tab, select Use differen t pa per for first page. First Page, Other Pages, and
Back Cover tabs appear.
Note The Back Cover tab is not available in the PS printer driver.
3 Select the Size, Source is, and Type is for the first page and other pages. The first page is
the cover of the document. The other pages are the interior pages of the document.
4 Click OK.
To print a cover or different first page on Windows 2000 and Windows XP
computers
1 Open the printer driver (see “Changing the settings for a print job” on page 47).
2 On the Paper/Quality tab, select Use Different Paper. First Page, Other Pages, and Back
Cover become active (are no longer gray).
3 Select First Page.
4 Select the Source is and Type is for the first page.
5 Select Other P ages and then select the Source is and Type is. The first page is the cover of
the document. The other pages are the interior pages of the document.
6 Click OK.
Note The preceding procedures for Windows computers change the printer’s settings for a print job.
To change the printer’s default settings, see “Changing default settings” on page 48.
To print a cover or different first page on Macintosh computers
In the Print dialog box, select First from and Remaining from.
54 Chapter 2 Printing tasks ENWW
Page 57

Adding a blank page or back cover to the end of a print job
Use this option to add a blank page to the end of a print job.
To print a blank page in Windows 95, Windows 98, Windows Me, and
Windows NT 4.0 (PCL only)
Note This option is not available in the PS printer driver.
1 Open the printer driver (see “Changing the settings for a print job” on page 47).
2On the Paper tab, select Use different paper for first page. Fir s t Page, Other Pa ges, and
Back Cover tabs appear.
3 Select the Size, Source is, and Type is for the back cover.
4Click OK.
To print a blank page in Windows 2000 and Windows XP
1 Open the printer driver (see “Changing the settings for a print job” on page 47).
2On the Paper/Quality tab, select Use Different Paper. First Page, Other P a ges, and Back
Cover become active (are no longer gray).
3 Select Back Cover.
4 Select Add a blank bac k cover.
5 Select the Source is and Type is for the back cover.
6Click OK.
Note The preceding procedures change the printer’s settings for a print job. To change the printer’s
default settings, see “Changing default settings” on page 48.
Adding a blank page to the beginning of all print jobs (job separator page)
This option allows you to add a blank page to the beginning of all print jobs. This separates print
jobs, making each print job easier to find.
To add a blank page to the beginning of all print jobs in Windows 95,
Windows 98, Windows Me, and Windows NT 4.0
1 Click the Start button.
2 Point to Settings.
3Click Printers.
4 Right-click the HP LaserJet 2300 series printer icon.
5Click Properties.
6 On the General tab, click Separator Page.
7 Browse to find a separator page. Any printable document can be used as a separator page.
8Click OK to select a separator page.
9Click OK to return to the General tab.
10 Click OK to save your settings.
ENWW Using printer-driver features 55
Page 58

To add a blank page to the beginning of all print jobs in Windo ws 2000 and
Windows XP
1 Click the Start button.
2Point to Settings.
3Point to Printers (Windows 2000) or Printers and Faxes (Windows XP).
4 Right-click the HP LaserJet 2300 series printer icon.
5 Click Properties.
6 On the Advanced tab, click Separator Page.
7 Browse to find a separator page. Any printable document can be used as a separator page.
8 Click OK to select a separator page.
9 Click OK to return to the Advanced tab.
10 Click OK to save your settings.
Note The preceding procedures change the printer’s settings for a print job. To change the printer’s
default settings, see “Changing default settings” on page 48.
56 Chapter 2 Printing tasks ENWW
Page 59

Using job-storage features
The printer supports two distinct job-storage features that allow printing to be initiated from the
printer control panel after the print job is sent from the computer:
proof and hold jobs
private jobs
Make sure that you identify your jobs in the printer driver before printing. Using default names
might override previous jobs with the same default name or cause the job to be deleted.
Note The job-storage features require 48 MB of RAM. You can add 16 MB to the base HP
LaserJet 2300L printer and HP LaserJet 2300 printer so that they can support the features (see
“Memory” on page 118).
If you turn the printer power off , all p roof and hold and priv ate jobs are delete d. A job can also be
deleted at the printer control panel.
Proofing and holding a job
The proof and hold feature provides a quick and easy way to print one copy of a job for proofing
before printing the additional copies.
Note If you turn the printer power off, all quick copy, proof and hold, and private jobs are deleted.
To print the remaining copies of a held job
1 Press SELECT ( ) to open the menus.
2 Use U
3 Use U
4 Use U
5 Use U
6 Use U
P ARROW () or DOWN ARROW ( ) to scroll to RETRIEVE JOB, and the n press SELECT
().
P ARROW () or DOWN ARROW ( ) to scroll to the user name, and then press SELECT
().
P ARROW () or DOWN ARROW ( ) to scroll to the user or job name, and then press
S
ELECT ( ).
P ARROW () or DOWN ARROW ( ) to scroll to PRINT, and then press SELECT ().
P ARROW () or DOWN ARROW ( ) to scroll to the number of copies, and then press
S
ELECT ().
ENWW Using job-storage features 57
Page 60

Deleting a held job
When you send a proof and hold job, the printer automatically deletes your previous proof and
hold job. If no proof and hold job already exists with that job name, and the printer needs
additional space, the printer might delete other proof and hold jobs starting with the oldest one.
Note If you turn the printer power off, all quick copy, proof and hold , and private jobs are deleted. A
held job can also be deleted at the printer control panel.
To delete a held job
1 Press SELECT ( ) to open the menus.
2 Use U
P ARROW () or DOWN ARROW ( ) to scroll to RETRIEVE JOB, and then press SELECT
().
3 Use U
P ARROW () or DOWN ARROW ( ) to scroll to the user name, and then press SELECT
().
4 Use U
5 Use U
P ARROW () or DOWN ARROW ( ) to scroll to the user or job name, and then press
S
ELECT ( ).
P ARROW () or DOWN ARROW ( ) to scroll to DELETE, and then press SELECT ().
Printing a private job
The private printing feature lets you specify that a job is not printed until you release it using a
four-digit personal identification number (PIN) at the printer control panel. You specify the PIN in
the printer driver, and it is sent to the printer as part of the print job.
To specify a private job
To specify in the driver that a job is private, select the Private Job option and type a 4-digit PIN.
To print a private job
1 Press SELECT ( ) to open the menus.
2 Use U
P ARROW () or DOWN ARROW ( ) to scroll to RETRIEVE JOB, and then press SELECT
().
3 Use U
P ARROW () or DOWN ARROW ( ) to scroll to the user name, and then press SELECT
().
4 Use U
5 Use U
6 You are prompted to enter the PIN number. Use U
P ARROW () or DOWN ARROW ( ) to scroll to the user or job name, and then press
S
ELECT ( ).
P ARROW () or DOWN ARROW ( ) to scroll to PRINT. A lock symbol appears next to
PRINT. Press S
change the first number of the PIN, and then press S
ELECT ( ).
P ARROW () or DOWN ARROW ( ) to
ELECT ( ). An * appears in place of
the number. Repeat these steps to change the remaining three numbers of the PIN.
7 Use U
P ARROW () or DOWN ARROW ( ) to scroll to the number of copies, and then press
ELECT ().
S
58 Chapter 2 Printing tasks ENWW
Page 61

Deleting a private job
A private job is automatically deleted after the user releases it for printing, unless the user
selects the Stored Job option in the printer driver. (In order to store a job, the printer must have
an optional hard disk installed.)
Note If you turn the printer power off, all quick copy, proof and hold, and private jobs are deleted. A
private job can also be deleted at the printer control panel before it is ever printed.
To delete a private job
1 Press SELECT ( ) to open the menus.
2 Use U
P ARROW () or DOWN ARROW ( ) to scroll to RETRIEVE JOB, and the n press SELECT
().
3 Use U
P ARROW () or DOWN ARROW ( ) to scroll to the user name, and then press SELECT
().
4 Use U
5 Use U
P ARROW () or DOWN ARROW ( ) to scroll to the user or job name, and then press
S
ELECT ( ).
P ARROW () or DOWN ARROW ( ) to scroll to DELETE, and then press SELECT ().
(A lock symbol appears next to DELETE.)
6 You are prompte d to en te r th e PIN number. Use U
change the first number of the PIN, and then press S
P ARROW () or DOWN ARROW () to
ELECT ( ). An * appears in place of
the number. Repeat these steps to change the rema ining three numbers of the PIN.
ENWW Using job-storage features 59
Page 62

60 Chapter 2 Printing tasks ENWW
Page 63

Managing and maintaining the
3
printer
This section provides information about the following topics:
“Using the embedded Web server” on page 62
“Using HP Web Jetadmin software” on page 64
“Using Printer Status and Alerts” on page 65
“Managing and configuring printer drivers” on page 66
“Managing the print cartridge” on page 68
“Configuring e-mail alerts” on page 71
“Checking the printer configuration” on page72
“Cleaning the printer” on page 77
“Cleaning the fuser” on page 79
ENWW 61
Page 64

Using the embedded Web server
The embedded Web server allo ws y ou to vie w printer and netwo rk status and to manage printing
functions from your computer instead of from the printer control panel. Below are examples of
what you can do using the embedded Web server:
view printer control status information
set the type of media loaded in each tray
determine the remaining life on all supplies and order new ones
view and change tray configurations
view and change the printer control panel menu configuration
view and print internal pages
receive notification of printer and supplies events
view and change network configuration
The embedded Web server feature requires at least 48 MB of RAM and an HP Jetdirect print
server in order to connect to your network. The HP LaserJet 2300n printer HP LaserJet 2300dn
printer, and HP LaserJet 2300dtn printer already meet these requirements. The
HP LaserJet 2300d printer requires an HP Jetdirect print server, and the HP LaserJet 2300L
printer and HP LaserJet 2300 printer require 16 MB of RAM and an HP Jetdirect print server.
To use the embedded Web server, you must have Microsoft Internet Explorer 5.01 and later or
Netscape 6.2 and later for Wind ows, Mac OS, and Linux (Netscape only). Netscape Navigator
4.7 is required for HP-UX 10 and HP-UX 11. The embedded Web server works when the printer
is connected to an IP-based network. The embedded Web server does not support IPX-based
printer connections. You do not have to have Internet access to open and use the embedded
Web server.
When the printer is directly connected to a computer, the embedded Web server is supported for
Windows 95 and later. In order to use the embedded Web server with a direct connection, you
must choose the Custom installation option when you install the printer driver. Select the option
to load Printer Status and Alerts. The proxy server is installed as part of the Printer Status and
Alerts software.
When the printer is connected to the network, the embedded Web server is automatically
available.
Opening the embedded Web server
1 In a supported Web browser on your computer, type the IP address for the printer. (To find
the IP address, print a configuration page. For more information about printing a
configuration page, see “Configuration page” on page 72.)
Note Once you open the URL, you can bookmark it so that you can return to it quickly in the future.
2 The embedded Web server has t hree tabs that contain settings and information about the
printer: the Information tab, the Settings tab, and the Network tab. Click the tab that you
want to view.
3 See the following sections for more information about each tab.
62 Chapter 3 Managing and maintaining the printer ENWW
Page 65

Information tab
The Information pages group consists of the following pages.
Device Status. This page shows the printer status and shows the life remaining of HP
supplies, with 0 percent representing that a supply is empty. The page also shows the type
and size of print media set for each tray. To change the default settings, click Change
Settings.
Configuration page. This page shows the information found on the printer configuration
page.
Supplies Status. This page shows the life remaining of HP supplies, with 0 percent
representing that a supply is empty. This page also provides supplies part numbers. To
order new supplies, click Order Supplies in the Other Links area of the window. To visit
any website, you must have Internet access.
Event log. This page shows a list of all printer events and errors.
Device information. This page also shows the printer network name, address, and model
information. To change these entries, click Device Information on the Settings tab.
Control panel. Click this button to view the current status of the printer’s control panel.
Settings tab
This tab allows you to configure the printer from your computer. The Settings tab can be
password protected. If this printer is networked, always consult with the printer administrator
before changing settings on this tab.
The Settings tab contains the following pages.
Configure Device. Configure all printer settings from this pa ge. This page contains the
traditional menus found on printers using a control panel display. These menus include
Information, P aper Handling, and Configure Device.
Alerts. Network only. Set up to receive e-mail alerts for various printer and supplies events.
Email. Network only. Used in conjunction with the Alerts page to set up incoming and
outgoing e-mail.
Security. Set a password that must be entered to gain access to the Settings and
Networking tabs. Enable and disable certain features of the EWS.
Other Links. Add or customize a link to another website. This link is shown in the Other
Links area on all embedded Web server pages. These permanent links always appear in
the Other Links area: HP Instant Support™, Order Supplies, and Product Support.
Device Information. Name the printer and assign an asset number to it. Enter the name
and e-mail address for the primary contact who will receive information about the printer.
Language. Determine the language in which to display the embedded Web server
information.
Time Services. Set the printer to retrie v e the date and tim e from a n etwo rk server at regu lar
intervals.
Networking tab
This tab allows the network administrator to contr ol network-related settings for the printer when
it is connected to an IP-based network. This tab will not appear if the printer is directly connected
to a computer, or if the printer is connected to a network using anythi ng other than an
HP Je td ire ct print server card.
ENWW Using the embedded Web server 63
Page 66

Other links
This section contains links that connect you to the Internet. You must have Internet access in
order to use any of these links . If y ou use a dial- up connection and did not connect whe n you fi rst
opened the embedded Web server, you must connect before you can visit these websites.
Connecting might require that you close the embedded Web server and reopen it.
HP Instant Support™. Connects you to the HP website to help you find solutions. This
service analyzes your printer error log and configuration information to provide diagnostic
and support information specific to your printer.
Order Supplies. Click this link to connect to the HP w ebsite and order genuine HP supplies ,
such as print cartridges and media.
Product Support. Connects to the support site for the HP color LaserJet 9500 series
printer. Then, you can search for help regarding general topics.
Using HP Web Jetadmin software
HP Web Jetadmin 7.0 is a Web-based software solution for remotely installing, monitoring, and
troubleshooting network-connected peripherals. The intuitive browser interface simplifies
cross-platform management of a wide range of devices, including HP and non-HP printers.
Management is proactive, allowing network administrators the ability to resolv e printer issues
before users are affected. Download this free, enhanced-management software at
http://www.hp.com/go/webjetadmin_software
plug-ins, and then click applications.
. To obtain plug-ins to HP Web Jetadmin, click
If installed on a host server , HP Web Jetadmin is availab le to an y client through a supported Web
browser (such as Mi cr osoft I nternet Explorer 4.x or Netscap e Navigator 4.x or later) by browsing
to the HP Web Jetadmin host.
64 Chapter 3 Managing and maintaining the printer ENWW
Page 67

Using Printer Status and Alerts
The Printer Status and Alerts software is available to users of both networked and directly
connected printers. This softw are allo ws y ou to vie w the embedded W eb server in f o rmation for a
particular printer. It also generates messages on the computer regardin g the status of the printer
and print jobs. Depending on how the printer is connected, you can receive different messages.
Networked printers
You can receive alert messages that appear when you are printing to a particular printer if
that printer experiences a problem but it can continue to print. Example problems include a
tray that is open, a print cartridge that is low, or a condition that prevents printing (such as
paper is out, or a print cartridge is empty).
Directly connected printers (parallel and USB)
You can receive alert messages that appear when the printer experiences a problem but it
can continue printing or a problem that prevents it from printing. You can also receive
messages just when supplies are low.
You can set alert options for a single printer that supports Printer Status and Alerts, or you can
set alert options for all printers that support Printer Status and Alerts. For networked printers,
these alerts only appear for your jobs.
Note that even if you are setting alert options for all printers, not all options you select can apply
to all printers. For example, if you select the option for notifying you when the print cartridge is
low, then all directly connected printers that support Printer Status and Alerts will generate a
message when the print cartridge is low. However, none of the networked printers will generate
this message, nor will directly connected printers that do not support Printer Status and Alerts.
To choose which status messages appear
1 Open Printer Status and Alerts in one of these ways:
• Double-click the Printer Status and Alerts tray icon, which is in the Tray Manager.
• On the Start menu, point to Programs, point to Printer Status and Alerts, and click
Printer Status and Alerts.
2 Click the Options icon in the left pane.
3 In the For field, select the printer driver for this printer, or select All Printe rs.
4 Clear the options for the messa ges you do not want to appear, and select the options for the
messages you do want to appear.
5 Under Status check rate, select how frequently you want the software to update the printer
status information that the software uses to generate the messages. Status Check Rate
might not be available if the printer administrator has restricted the rights to this function.
To view status messages and information
On the left side of the window, select the printer for which you want to see information.
Information provided includes status messages, supplies status, and printer capabilities. You can
also click the Job History (clock) icon at the top of the Printer Status and Alerts window to view
a list of previous jobs sent to the printer from your computer.
ENWW Using Printer Status and Alerts 65
Page 68

Managing and configuring printer drivers
Your system or network administrator can use the driver managemen t and configur atio n solution
to configure printer drivers before you install and deploy them within your environment. This is
helpful when you configure printer drivers for multiple workstations or printers that share the
same configuration.
When you preconfigure y our printer driv er to match the printer har dwa re , y ou can gain acce ss to
all of the printer accessories through the driver. You can also configure most driver feature
settings. Five of the driver features can be “locked.” This means that you can choo se not t o allo w
users to change the duplex, print color as gray, input tray, output tray, and media type settings.
(Some features might not apply to all printers. For example, some printers do not include color
printing or duplexing.)
The driver management and configuration solution saves time and reduces management costs.
Previously, if an administrator wanted to configure printer drivers, the configuration had to be
completed at each client workstation. Because the driver management and configuration
solution offers multiple configuration options, administrators can create a single configuration, in
a central location, that best fits their software installation and deployment strategy.
The driver management and configuration solution also gives administrators more control over
their printing environment, because they can deploy drivers that share the same configuration
across an entire organization. They can use the “lock” f e at ure to suppo rt organization initiatives.
For e xample , if a printer inclu des a duplexer, locking the duplex setting ensures that all print jobs
are printed on two sides to save paper. All of the controls can be deployed from a single
computer.
Two methods are available:
HP Web Jetadmin software plug-in
customization utility
Regardless of the configuration method that is used, one configuration can be shared by all
printer drivers for a given printer model with one pass through either the plug-in or the utility. The
single configuration provides support for multiple operating systems, printer driver languages,
and localized language versions.
A single configuration file is associated with all supported drivers, and can be modified by using
either the plug-in or the utility.
HP Web Jetadmin software plug-in
A driver management and configuration plug-in is available for the HP Web Jetadmin software.
You can use the plug-in to configure the printer drivers before installati on and deployment. This
method for managing and controlling printer drivers provides a complete, end-to-end solution
that you can use to set up and configure the printer, the print path (queue), and the client
computers or workstations. The following activities are included in the workflow:
Discover and configure the printer(s).
Discover and configure t he print path on the server(s). You can have multiple servers
configured in a batch, or multiple printers (of the same model type) using a single server.
Obtain the printer driver(s). You can install multiple drivers for each print queue that is
connected to a server in environments that support multiple operating systems.
Run the configuration editor (the editor is not supported for some older drivers).
Deploy the configured printer drivers to the server(s).
Instruct the end-users to connect to the print server. The configured driver for their operating
system is automatically deployed to their computer.
66 Chapter 3 Managing and maintaining the printer ENWW
Page 69

Administrators can use the HP Jetadmin software plug-in to deploy configured printer drivers
using a silent, batch, or remote process. Obtain the HP Web Jetadmin software plug-in from
http://www.hp.com/go/webjetadmin_software
.
Customization utility
Administrators can use a customization utility to create a custom inst allation package that
includes only the components that are needed within a specific organization or operating
environment. The customization utility is available in two places:
on the CD-ROM that comes with the printer (the utility is one of the installer options)
in the printing system software that is available for downloading from the HP website for the
printer model (http://www.hp.com/lj2300
The installation procedure prompts the administrator to select components from the contents of
the printing system. During this process, the administrator is prompted to configure the printer
driver settings, if the selected driv er s support preconfiguration. Th e process yields a cust omiz ed
installation package that the administrator can deploy to install the configured printer drivers on
the client computers and workstations. The customization utility supports silent and batch
operations.
)
ENWW Managing and configuring printer drivers 67
Page 70

Managing the print cartridge
This section provides information about HP print cartridges, how to store them, how to identify
genuine ones, and their life expectancy. Information also appears about non-HP print cartridges.
“HP print cartridges” on page 68
“Non-HP print cartridges” on page 68
“Print-cartridge authentication” on page 68
“Print-cartridge storage” on page 68
“Print-cartridge life expectancy” on page 69
“Checking the supply level” on page 69
“Cartridge low and cartridge out conditions” on page 70
HP print cartridges
When you use a genuine new HP print cartridge, part number Q2610A (6,000-page cartridge),
you can obtain several types of information, such as the following:
amount of toner remaining
estimated number of pages remaining
number of pages printed
other supplies information
Non-HP print cartridges
Hewlett-Packard Company cannot recommend use of non-HP print cartridges, either new or
remanufactured. Because they are not HP products, HP cannot influence their design or control
their quality. Service or repair required as a result of using a non-HP print cartridge will not be
covered under th e printer warranty.
If you use a non-HP print cartridge, the printer is unable to report the levels of the supplies f or the
printer, calculation of the number of pages remaining, and cartridge-usage information. The
printer does report a non-HP print cartridge with a message on the control panel display (Non-HP
cartridge detected).
If the non-HP print cartridge was sold to you as a genuine HP product, please call the HP fraud
hotline. (See “Contacting the HP fraud ho tlin e” on page 124.)
Print-cartridge authentication
The printer will let you know that a print cartridge is not a genuine HP print cartridge when you
insert it into the printer.
If the printer control panel message states that this is not a genuine HP print cartridge and you
believe you purchased an HP print cartridge, call the HP fraud hotline. See “Contacting the
HP fraud hotline” on page 124.
Print-cartridge storage
Do not remove t he print cartridge from its package until you are ready to use it. The shelf life of a
print cartridge in an unopened package is approximately 2.5 years.
CAUTION To prevent damage to the print cartridge, do not expose it to light for more than a few minutes.
68 Chapter 3 Managing and maintaining the printer ENWW
Page 71

Print-cartridge life expectancy
The life of the print cartridge depends on the amount of toner that print jobs require and the
length of life for the components inside the cartridge. When printing text at 5 percent coverage
(typical for a business lett er), an HP print cartridge lasts an average of 6,000 pages. This
assumes that toner density is set to 3 and EconoMode is off. (These are the default settings. F or
details about these settings, see the description of
Quality submenu” on page 151.)
At any time, you can verify life expectancy by checking the supply level, as described in
“Checking the supply level” on page 69.
ECONOMODE and TONER DENSITY in “Print
Checking the supply level
You can check the supply (toner) level using the printer control panel, the embedded Web server,
printer software, or HP Web Jetadmin.
To check the supply level using the control panel
1 Press (SELECT button) to open the menus.
2 Use (U
S
ELECT ().
3 Use (U
then press (S
about the supplies status page.
P button) or (DOWN button) to scroll to INFORMATION, and then press
P button) or (DOWN button) to scroll to PRINT SUPPLIES STATUS PAGE, and
ELECT button). See “Supplies status page” on page 74 for in formation
To check the supply level using the embedded Web server
1 In your Web browser, enter the IP address for the printer home page. This takes you to the
printer status page. (See “Opening the embedded Web server” on page 62.)
2 On the left side of the screen, click Supplies Status. This takes you to the supplies status
page, which provides supply level information. (See “Supplies status page” on page 74 for
information about the supplies status page.)
To check the supply level using the printer software
Three things are required to use this feature:
The Printer Status and Alerts software on the CD-ROM that came with the printer must be
enabled on your computer. (See “Using Printer Status and Alerts” on page 65.)
The printer must be directly connected to your computer with a parallel cable.
You must have access to the Internet.
1 At the bottom right of your screen, double-click the Printer icon. This opens the status
window.
2 On the left side of the status window, click the Printer icon from which you want to obtain
status.
3 At the top of the status window, click the Supplies link. You can also scroll down to Supplies
Status.
Note If you want to order supplies, click Order Supplies. This opens a browser that p roduces a URL
from which to purchase supplies. Select the supplies you wish to order and finish the ordering
process.
ENWW Managing the print cartridge 69
Page 72

To check the supply levels using HP Web Jetadmin
In HP Web Jetadmin, select the printer device. The device status page shows supply-level
information.
Cartridge low and cartridge out conditions
The printer alerts you if the print cartridge is low on toner or out of toner.
When the cartridge is low on toner
When the cartridge is low on toner, the printer contr ol panel shows the ORDER CARTRIDGE
message. The
remains in the print cartridge (at 5 percent coverage, about 600 pages remaining).
The default is for the printer to continue printing until the toner runs out, but you might prefer to
have the printer stop instead of continuing when the
for ex ample , if y ou w ant print quality to remain consist ently high during print jobs, or if y ou do not
want the cartridge to run out during a long print job. To configure the printer to stop, set
CARTRIDGE LOW=STOP (in the System Setup submenu of the Configure Device menu). (See
“CARTRIDGE LOW” on page 155.) Then, when
printing. You can resume printing by pressing (S
When the cartridge is out of toner or drum life
ORDER CARTRIDGE message first appea rs wh en abo u t 10 percent of the toner
ORDER CARTRIDGE message first appear s —
ORDER CARTRIDGE appears, the printer will stop
ELECT button) for each print job.
The REPLACE CARTRIDGE message appears in one of these situations:
When the print cartridge is out of toner. If CARTRIDGE OUT is set to CONTINUE (in the
System Setup submenu of the Configure Device menu), the printer continues printing
without interaction until the cartridge reaches the end of drum life. HP does not guarantee
print quality after the REPLACE CARTRIDGE message is first displayed. Replace the print
cartridge as soon as possible. (See “Ordering parts, accessories, and supplies” on
page 116.)
CARTRIDGE OUT is set to STOP, the printer stops printing until you replace the print cartridge or
resume printing by pressing (S
When the drum life of the print cartridge is out. You must replace the print cartridge to
continue printing. No override is possible, even if toner remains in the cartridge. (See
“Ordering parts, accessories, and supplies” on page 116.)
the printer.
The REPLACE CARTRIDGE message remains until you repl ace the print cartridge. If
ELECT button) for each print job.
This situation occurs to protect
70 Chapter 3 Managing and maintaining the printer ENWW
Page 73

Configuring e-mail alerts
You can use HP Web Jetadmin or the embedded Web server to configure the syst em to alert you
of problems with the printer . The alerts take the f orm of e-mail messages to the e-mail account or
accounts that you specify.
You can configure the following:
the device that you want to monitor (in this case, the printer)
what alerts are to be received (for example, alerts for jams, paper out, ORDER CARTRIDGE,
REPLACE CARTRIDGE, and cover open)
the e-mail account to which the alerts should be forwarded
For See the following section
HP Web Jetadmin
Embedded Web server
“Using HP Web Jetadmin software” on page 64 for general information
about HP Web Jetadmin
HP Web Jetadmin online Help for details about alerts and how to set
them up
“Using the embedded Web server” on page 62 for general information
about the embedded Web server
Embedded Web server online Help for details about alerts and how to
set them up
ENWW Configuring e-mail alerts 71
Page 74

Checking the printer configuration
At the printer control panel, you can print pages that give details about the printer and its current
configuration. The following information pages are described here:
“Menu map” on page 72
“Configuration page” on page 72
“Supplies status page” on page 74 (includes information about print-cartridge use)
“PS or PCL font list” on page 76
For a complete list of printer information pages, see the Inf ormation men u at the printer control
panel (“Information menu” on page 145).
Keep these pages nea rby for troubleshooting. They are also useful if you contact HP Customer
Care.
Menu map
Print the menu map to see the current settings for the menus and items available at the printer
control panel.
To print a menu map
1 Press (SELECT button) to ope n the menus.
2 Use (U
(S
ELECT button).
3 Use (U
(S
ELECT button).
P button) or (DOWN button) to scroll to INFORMATION, and then press
P button) or (DOWN button) to scroll to PRINT MENU MAP, and then press
You might want to store the menu map near the printer for reference. The content of the menu
map varies, depending o n the options curren tly installed in the p rinter . (Man y of these v alues ca n
be overridden in the program or printer driver.)
For a complete list of control panel items and possible values, see “Control panel menus” on
page 143. To change a control panel setting, see “Changing control panel settings” on page 25.
Configuration page
Use the configuration page to vie w current printer sett ings, to help troub leshoot printer prob lems ,
or to verify installation of optional accessories, such as memory (DIMMs), trays, and printer
languages.
Note If an HP Jetdirect print server is installed, an HP Jetdirect configuration page prints as well. The
IP address of the HP Jetdirect print server appears on this page.
To print a configuration page at the control panel
1 Press (SELECT button) to open the menus.
2 Use (U
(S
ELECT button).
3 Use ( ) (U
(S
P button) or (DOWN button) to scroll to INFORMATION, and then press
P button) or (DOWN button) to scroll to PRINT CONFIGURATION, and then pr ess
ELECT button).
An example of the configuration page follows. The content of the configuration page varies,
depending on the options currently installed in the printer.
72 Chapter 3 Managing and maintaining the printer ENWW
Page 75

Note Y ou can also ob tain configuration information in the embedde d Web server. F or details, see “Using
the embedded Web server” on page 62.
1
2
3
4
5
6
1 Printer Information Lists the model, serial number, page counts, and other
information for the printer.
2 Event Log Lists the number of entries in the event log, the maximum number
of entries viewable, and the last three entries.
3 Installed Personalities
and Options
Lists all printer languages that are installed (such as PS and PCL)
and lists options that are installed in each DIMM slot and EIO slot.
4 Memory Lists printer memory, PCL Driver Work Space (DWS), and
resource saving information.
5 Security Lists the status of the printer control panel lock, control panel
password, and disk drive (if one is installed in the printer).
6 Paper Trays and
Options
Lists the size settings for all trays and lists optional
paper-handling accessories that are installed.
ENWW Checking the printer configuration 73
Page 76

Supplies status page
Use the supplies status page to obtain information about the print cartridge installed in the
printer, the amount of life left in the print cartridge, and the number of pages and jobs that have
been processed.
Note You can also obtain supplies status information in the embedded Web server. For details, see
“Using the embedded Web server” on page 62.
To print a supplies status page at the control panel
1 Press (SELECT button) to open the menus.
2 Use (U
(S
ELECT button).
3 Use (U
then press (S
P button) or (DOWN button) to scroll to INFORMATION, and then press
P button) or (DOWN button) to scroll to PRINT SUPPLIES STATUS PAGE, and
ELECT button).
74 Chapter 3 Managing and maintaining the printer ENWW
Page 77

1
2
3
4
5
1 Supplies website Lists the local website for ordering supplies through the Internet.
2 Cartridge
information
Provides information about the esti mated number of pages
remaining for the amount of toner left in the cartridge, status of the
toner supply, and print-cartridge serial number.
3 Printing statistics Lists statistics about total number of pages and jobs processed
using this print cartridge and page count by paper size.
4 Manufacture
Shows the installation date and last use date for this print cartridge.
information
5 Recycling website Lists the website for information about returning used HP print
cartridges.
ENWW Checking the printer configuration 75
Page 78

PS or PCL font list
Use the font lists to see which fonts are currently installed in the printer. (The font lists also sh o w
which fonts are resident on an optional hard disk accessory or flash DIMM.)
To print a PS or PCL font list
1 Press (SELECT button) to open the menus.
2 Use (U
ELECT button).
(S
3 Use (U
FONT LIST, and then press (S
P button) or (DOWN button) to scroll to INFORMATION, and then press
P button) or (DOWN button) to scroll to PRINT PS FONT LIST or PRINT PCL
ELECT button).
The PS font list shows the PS fonts installed, and gives a sample of those fonts. The following
information can be found on the PCL font list:
Font gives the font names and samples.
Pitch/Point indicates the pitch and point size of the font.
Escape Sequence (a PCL 5e programming command) is used to select the designated f ont.
(See the legend at the bottom of the font list page.)
Note For information about using printer commands to select a font with MS-DOS® programs, see
“Selecting PCL 5e fonts” on page 171.
Font # is the number used to select fonts at the printer co ntrol panel (not in the prog ram). Do
not confuse the font # with the f ont ID, described below. The number indicates the DIMM slot
where the font is stored.
• SOFT: Downloaded fonts, which stay resident in the printer until other fonts are
downloaded to replace them, or until the printer power is turned off.
• INTERNAL: Fonts that permanently reside in the printer.
Font ID is the number you assign to soft fonts when you download them through software.
76 Chapter 3 Managing and maintaining the printer ENWW
Page 79

Cleaning the printer
Over time, particles of toner and paper accumulate inside the printer. This can cause print-quality
problems during printing. Cleaning the printer eliminates or reduces these problems.
Clean the paper path and print-cartridge areas every time that you change the print cartridge or
whenever print-quality problems occur. As much as possible, keep the printer from dust and
debris.
Cleaning the outside
Clean the outside of the printer with a cloth that has been dampened with water.
CAUTION Do not use ammonia-based cleaners on or around the printer.
ENWW Cleaning the printer 77
Page 80

Cleaning the paper path and print-cartridge areas
3
4
2
Over time, particles of toner and paper accum ulate inside the printer.
This can cause print-quality problems during printing. Cleaning the
printer eliminates or reduces these problems.
To clean the inside of the printer
1 Turn the printer off and unplug th e power cord.
2 Open the top cover.
3 Remove the print cartridg e.
CAUTION
To prevent damage to the print cartridge, do not expose it to light for
more than a few minutes.
Be careful not to touch the transfer roller (the black, rubber roller located
underneath the print cartridge). Skin oils on the roller can cause
print-quality problems.
4 With a dry , lint-free clot h, wipe any residue from the paper path area
and the print cartridge cavity.
5 Reinstall the print cartridge and close the top cover.
Note
If the print cartridge is difficult to reinstall, make sure that the registr ation
plate has been flipped back down into position and that you have
pushed the print cartridge firmly in place.
5
6 Plug in the power cable and turn the printer on.
78 Chapter 3 Managing and maintaining the printer ENWW
Page 81

Cleaning the fuser
Run the printer cleaning page to keep the fuser free of toner and paper particles that can
sometimes accumulate. Accumulation of toner and particles can cause specks to appear on the
front or back side of your print jobs. (See “Toner specks” on page 104.)
To ensure optimum print quality , HP recommends that you use the cleaning page every time that
you replace the print cartridge or on an automatic interval that you can set up.
The cleaning procedure takes about 2.5 minutes to complete. A message (either CREATING
CLEANING PAGE or CLEANING) appears on the printer control panel display while the cleaning is
taking place.
To run the cleaning page
In order for the cleaning page to work properly, print the page on copier-grade paper (not bond,
heavy, or rough paper).
1 If your printer model includes a duple xer, open the rear output bin.
2 Press (S
3 Use (U
(S
ELECT button).
4 Use (U
(S
ELECT button).
5 Use (U
(S
ELECT button) to open the menus.
P button) or (DOWN button) to scroll to CONFIGURE DEVICE, and then press
P button) or (DOWN button) to scroll to PRINT QUALITY, and then press
P button) or (DOWN button) to scroll to CREATE CLEANING PAGE, and then press
ELECT button).
6 Follow the instructions on the cleaning page to complete the cleaning process.
7 If your printer model includes a duplexer, close the rear output bin.
ENWW Cleaning the fuser 79
Page 82

80 Chapter 3 Managing and maintaining the printer ENWW
Page 83

4
Problem solving
This section will help you troubleshoot and solve minor printer problems.
“Troubleshooting checklist” on page 82
“Troubleshooting general printing problems” on page 83
“Printing special pages” on page 87
“Understanding printer messages” on page 88
“Clearing jams” on page 97
“Troubleshooting print-quality problems” on page 102
“Troubleshooting network printing problems” on page 107
“Troubleshooting common Windows problems” on page 108
“Troubleshooting common Macintosh problems” on page 109
“Troubleshooting common PostScript problems” on page 114
ENWW 81
Page 84

Troubleshooting checklist
If the printer is not responding properly, complete the following checklist in order. If the printer
does not pass a step, follow the corresponding tro ubleshooting suggestions.
Make sure that the printer READY
light is on.
Print a short document from a
software application to verify that
the computer and printer are
connected and are
communicating correctly.
If the problem persists, check
these troubleshooting sections:
If no lights are on, check the power cord connections. Check the
power switch. Check the power source by plugging into another
outlet.
If other lights are on, note the message in the control panel display
and go to “Interpreting control-panel messages” on page 89.
If the page does not print, check the cable connection between the
printer and computer. Make sure that you are using the proper
cable.
Check the print queue or the print spooler (the print monitor on a
Macintosh computer) to see if the printer has been paused.
Verify that you have installed the HP LaserJet 2300 series printer
driver.
Check the software application to make sure that you are using an
HP LaserJet 2300 series printer driver and port.
If the page is interrupted during printing, go to “Troubleshooting
general printing problems” on page 83.
“Printing special pages” on page 87
“Troubleshooting general printing problems” on page 83
“Troubleshooting network printing problems” on page 107
“Troubleshooting commo n Windows problems” on page 108
“Troubleshooting co mmon Macintosh problems” on page 109
“Troubleshooting common PostScript problems” on page 114
82 Chapter 4 Problem solving ENWW
Page 85

Troubleshooting general printing problems
Symptom Possible cause Solution
Control panel display is hard
to read.
Printer selects media from
the wrong tray.
Printer does not pull paper
from tray 2 or tray 3.
The contrast is too high or too low
for your office environment.
The tray selection in the software
application might be incorrect.
The configured size does not match
the size of the media loaded in the
tray.
The rear paper-length guide is set
incorrectly (tray 2 or tray 3).
The rear paper stop is set
incorrectly (tray 3).
Adjust the contrast on the control
panel display (see “DISPLAY
BRIGHTNESS” on page 154).
For many software applications, the
paper tray selection is found under
the Page Setup menu within the
application.
Remove any media in other tra ys to
make the printer select from the
desired tray.
For Macintosh computers, use the
HP LaserJet Utility to change the
priority of the tray.
Change the configured size to
match the size of the media loaded
in the tray through the control panel.
To properly set the rear guides, see
“Loading tray 2 (250-sheet tray) or
optional 250-sheet tray in tray 3
position” on page 32 or “Loading
tray 3 (500-sheet tray)” on page 34.
For tray 3, make sure that the
leading edge of the paper stack is
even. An un even edge can prevent
the lift plate from rising.
Paper curls when it exits the
printer.
First sheet of media jams in
the print cartridge area.
The paper curls when exits the
top output bin.
A combination of high humidity and
high temperature is a ffecting the
media.
Open the rear output bin to allow
the paper to exit in a straight path
through the printer.
Turn over the paper that you are
printing on.
Reduce the fusing temperature to
reduce the curling (see “FUSER
MODES” on page 152).
Adjust the printer for high humidity
and high temperature conditions
(see “MORE SEPARATION” on
page 152).
ENWW Troubleshooting general printing problems 83
Page 86

Symptom Possible cause Solution
Print job is extremely slow. The job might be very complex.
The maximum speed of the printer
cannot be exceeded even when
more memory is added.
Printing speeds might be
automatically reduced when printing
on special-sized media.
You are printing a PDF or
PostScript (PS) file using a PCL
printer driver.
In the printer driver, Optimize for:
is set to cardstock, heavy, rough, or
bond paper.
Print job prints on both sides
of the paper.
The printer is set for duplexing. See “Changing the settings for a
Reduce the complexity of the page
or try adjusting the print-quality
settings. If this problem occurs
frequently, add memory to the
printer.
Try using the PS printer driver
rather than the PCL printer driver.
(You can usually do this from a
software program.)
In the printer driver, set the type to
plain paper (see “Printing by type
and size of media” on page 53).
Note: If you change the setting to
plain paper, the print job will print
faster. However, if you are using
heavy media, for best results leave
the printer driver set to heavy even
though printing might be slower.
print job” on page 47 to change the
setting, or see the online Help.
Print job contains only one
page but the printer
processes the back side of
the page as well (the page
comes part of the way out,
and then goes back into the
printer).
Pages print, but are totally
blank.
The printer is set for duplexing.
Even if the print job contains only
one page, the printer processes the
back side as well.
The sealing tape might still be in the
print cartridge.
The file might have blank pages. Check the file to make sure that it
See “Changing the settings for a
print job” on page 47 to change the
setting, or see the online Help.
Do not try to pull the page out of the
printer before duplexing is
complete. Jamming might result.
Remove the print cartridge and pull
out the sealing tape. Reinstall the
print cartridge.
does not contain blank pages.
84 Chapter 4 Problem solving ENWW
Page 87

Symptom Possible cause Solution
The printer prints, but the
text is wrong, garbled, or
incomplete.
The printer cable is loose or
defective.
The printer is on a network or
sharing device and is not receiving
a clear signal.
The wrong driver was selected in
the software.
The software program is
malfunctioning.
Disconnect the printer cable and
reconnect it. Try a print job that you
know works. If possible, attach the
cable and printer to another
computer and try a print job that you
know works. Finally, try a new
cable.
Disconnect the printer from the
network and use a parallel or USB
cable to attach it directly to a
computer. Print a job that you know
works.
Check the software’s printer
selection menu to make sure that
an HP LaserJet 2300 series printer
is selected.
Try printing a job from another
program.
ENWW Troubleshooting general printing problems 85
Page 88

Symptom Possible cause Solution
The printer does not respond
when you select Print in the
software.
The printer is out of paper. Add paper.
The printer might be in manual feed
mode.
The cable between the co mp ut er
and the printer is not connected
properly .
The printer cable is defective. If possible, attach the cable to
The wrong printer was selected in
the software.
There might be a jam. Cl e ar any jams, paying care fu l
The software for the printer is not
configured for the printer port.
Change the printer from manual
feed mode (see “MANUAL FEED” on
page 149).
Disconnect and reconnect the
cable.
another computer and print a job
that you know wo rks . You might
also try using a different cable.
Check the software printer selection
menu to make sure that an
HP LaserJet 2300 series printer is
selected.
attention to the duplexer area. See
“Clearing jams” on page 97.
Check the software’s printer
selection menu to make sure that it
is using the correct port. If the
computer has more than one port,
make sure that the printer is
attached to the correct one.
The printer is on a network and is
not receiving a signal.
The printer is not receiving power. If no lights are on, check the power
The printer is malfunctioning. Check the control panel display for
Disconnect the printer from the
network and use a parallel or US B
cable to attach it directly to a
computer. Reinstall the printing
software. Print a job that you know
works.
Clear any stopped jobs from the
print queue.
cord connections. Check the power
switch. Check the power source.
messages and lights to determine if
the printer is indicating an error.
Note any message and see
“Interpreting control-panel
messages” on page 89.
86 Chapter 4 Problem solving ENWW
Page 89

Printing special pages
Special pages within the memory of the printer can help you to diagnose and learn about
problems with your printer.
Configuration page
The configuration page lists many of the current settings and properties of the printer. For
information about how to print the configuration page, see “Configuration page” on
page 72. If you have an EIO print server card installed, a second page (the Jetdirect page)
prints that lists all of the HP Jetdirect information.
Font list
You can print a font list using the control panel (see “PS or PCL font list” on page 76) or (for
Macintosh computers) the HP LaserJet Utility (see “HP LaserJet Utility” on page 15).
Supplies status page
Use the supplies status page to obtain information about the print cartridge installed in the
printer, the amount of life left in the print cartridge, and the number of pages and jobs that
have been processed (see “Supplies status page” on page 74).
ENWW Printing special pages 87
Page 90

Understanding printer messages
Printer messages appear on the printer control panel display to relay the normal status of the
printer (such as Processing job) or an error condition (su c h as CLOSE FRONT DOOR) that needs
attention. “Interpreting control-panel messages” on page 89 lists the most common messages
that require attention or that might raise questions. Messages are listed in alphabetical order
first, with numeric messages at the end of the list.
Using the printer online Help system
This printer features an online Help system on the control panel that provides instructions for
resolving most printer errors. Certain control panel messages alternate with instructions about
gaining access to the online Help system.
Whenever a me ssage alternates with For help press ?, press (H
and use (U
To exit the online Help system, press (H
P button) and (DOWN button) to scroll through the message.
ELP button).
ELP button) to view the help
Resolving persistent messages
Some messages (for example, requests to load a tray or a message that a previous print job is
still in the printer memory) allow you to press (S
J
OB to clear the job and eliminate the message.
If a message persists after performing all of the recommended actio ns, contact an HP- authorize d
service or support provider. (See “Contacting HP” on page 123 or go to http://www.hp.com/
support/lj2300.)
ELECT button) to print, or to press CANCEL
88 Chapter 4 Problem solving ENWW
Page 91

Interpreting control-panel messages
Message Description Recommended action
Access denied
menus locked
Canceling...
[JOBNAME]
Checking paper path
Checking printer
CHOSEN PERSONALITY NOT
AVAILABLE
alternates with
To continue press
The printer control panel function
you are trying to use has been
locked to prevent unauthorized
access.
The printer is canceling a job. The
message continues while the job is
stopped, the paper path is cleared,
and any remaining incoming data
on the active data channel is
received and discarded.
The printer is checking for possible
jams or paper that was not cleared
from the printer.
The printer is checking for possible
jams or paper that was not cleared
from the printer.
The printer received a request for a
personality (printer language) that
does not exist in the printer. The
print job is canceled.
See your network administr at or.
No action necessary.
No action necessary.
No action necessary.
Print the job using a printer driver
for a different printer language, or
add the requested language to the
printer (if available).
To see a list of available
personalities, print a configuration
page. (See “Configuration page” on
page 72.)
Clearing paper path
Event log empty
Cartridge installed
INSTALL CARTRIDGE
alternates with
For help press
LOAD TRAY [XX]
[TYPE] [SIZE]
The printer jammed or the printer
was turned on and media was
detected in a wrong location. The
printer is automatically attempting to
eject the pages.
You are attempting to view an
empty event log by selecting SHOW
EVENT LOG
This message appears for
approximately 10 seconds after you
install a new, genuine HP cartridge.
The print cartridge is missing and
must be reinstalled for printing to
continue.
The tray that is indicated is
configured for a specific type and
size of media needed by a print job,
but the tray is empty. All other trays
are also empty.
from the control panel.
Wait for the printer to finish trying to
clear the pages. If it cannot, a jam
message will appear on the control
panel display.
No action necessary.
No action necessary.
Replace or correctly reinstall the
print cartridge.
Load the requested media in the
tray that is indicated.
ENWW Understanding printer messages 89
Page 92

Message Description Recommended action
LOAD TRAY [XX]
[TYPE] [SIZE]
alternates with
To use another
tray press
or
For help press
or
To continue press
MANUALLY FEED
[TYPE] [SIZE]
alternates with
To use another
tray press
or
For help press
or
To continue press
No job to cancel
A job is sent that requires a specific
type and size that is not available in
the tray that is indicated.
The printer is waiting for media to
be loaded in tray 1 for manual feed.
The CANCEL JOB button was
pressed, but there is no active job or
buffered data to cancel.
The message is displayed for
approximately 2 seconds before the
printer returns to the ready state.
Perform one of these steps:
Load the requested media into
the indicated tray and press
ELECT button).
(S
Press to use a type and
size that are available in
another tray.
Perform one of these steps:
Load the requested media into
the tray 1 and press
ELECT button).
(S
Press (SELECT butto n) to
use a type and size that are
available in another tray.
No action necessary.
ORDER CARTRIDGE
LESS THAN [XXXX] PAGES
Paused
alternates with
To return to ready
press RESUME key
SIZE MISMATCH
TRAY [XX]= [SIZE]
alternates with
Ready
For help press
TRAY [XX] EMPTY
[TYPE] [SIZE]
alternates with
Ready
For menus press
This message appears when the
CARTRIDGE LOW setting in the
System Setup submenu is set to
CONTINUE and the cartridge has
only 10 percent of its toner
remaining (see “CARTRIDGE LOW” on
page 155).
The printer is paused but continues
to receive data until the memory is
full. The printer is not experiencing
an error.
The tray indicated is loaded with a
different size of paper than the size
configured for the tray.
The tray is out of media. Load paper in the empty tray to
Make sure that you have a new
cartridge re ady (see “Ordering
parts, accessories, and supplies” on
page 116).
Press PAUSE/RESUME.
Load the tray with the size
configured for the tray.
Make sure that the guides are
positioned correctly in the tray, and
then make sure that the switch in
the tray is set correctly to Custom or
Standard.
clear the message.
If you do not load the specified tray,
the printer will continue printing from
the next available tray with the
same paper size and type, and the
message will continue to appear.
90 Chapter 4 Problem solving ENWW
Page 93

Message Description Recommended action
TYPE MISMATCH
TRAY [XX]=[TYPE]
alternates with
Ready
For help press
USE TRAY [XX]
[TYPE] [SIZE]
alternates with
To change press /
To continue press
10.XX.YY SUPPLIES
MEMORY ERROR
For help press
The system detected a different
type of media from the type
specified for the tray in the paper
path coming from tray
The printer did not detect the type
and size of media requested. The
message shows the most likely type
and size available and the tray in
which they are available.
An error has occurred in one or
more of the printer’s supplies.
Values of
below:
XX and YY are listed
XX.
XX
00 = memory is defective
01 = memory is missing
YY
00 = black print cartridge
1 Verify that the correct media is
loaded in the tray.
2 Check the driver settings to
make sure that the expected
media type is selected.
3 Check the media-type settings
on the printer control panel to
make sure that the printer is set
for the media type that is in the
tray.
4 Refer to the printer software
online Help for more
information.
Press (SELECT button) to
accept the values in the message,
or use (U
(DOWN button) to scroll through the
available choices.
1 Turn the printer power off , and
then turn the printer power on to
clear the message.
2 If the message persists, contact
an HP-autho rized service or
support provider (see
“Contacting HP” on page 123).
P button) and
13.XX.YZ JAM IN
[LOCATION]
20 INSUFFICIENT MEMORY
alternates with
To continue press
21 PAGE TOO COMPLEX
alternates with
To continue press
A jam has occurred in the specified
location.
The printer received more data than
can fit in its available memory. You
might have tried to transfer too
many macros, soft fonts, or complex
graphics.
The data (dense text, rules, raster
or vector graphics) sent to the
printer was too complex.
Remove jammed media from the
specified location. (See “Clearing
jams” on page 97.)
If the message persists after all
jams have been cleared, a sensor
might be stuck or broken. Contact
an HP-autho rized service or support
provider (see “Contacting HP” on
page 123).
Press (SELECT button) to print
the transferred data (some data
might be lost), and then simplify the
print job or install additional
memory. (See“Installing memory”
on page 165.)
1 Press (SELECT button) to
print the transferred data.
(Some data might be lost.)
2 If this message appears often,
simplify the print job or install
additional memory. (See
“Installing memory” on
page 165.)
ENWW Understanding printer messages 91
Page 94

Message Description Recommended action
22 EIO [X]
BUFFER OVERFLOW
alternates with
To continue press
22 PARALLEL I/O
BUFFER OVERFLOW
alternates with
To continue press
Too much data was sent to the EIO
card in the specified slot [X]. An
improper communications protocol
might be in use.
Too much data was sent to the
parallel port.
1 Press (SELECT button) to
clear the message. (The job will
not be printed.)
2 Check the host configuration. If
the message persists, contact
an HP-authorized service or
support provider (see
“Contacting HP” on page 123).
1 Check for a loose cable
connection and be sure to use a
high-quality cable. Some
non-HP parallel cables might be
missing pin connections or
might otherwise not conform to
the IEEE-1284 specification.
(See “Ordering parts,
accessories, and supplies” on
page 116.)
2 This error can occur if the driver
you are using is not IEEE-1284
compliant. For best results, use
an HP driver that came with the
printer. (See “Printer software”
on page 11.)
3 Press (S
clear the error message. (The
job will not be printed.)
4 If the message persists, contact
an HP-authorized service or
support provider (see
“Contacting HP” on page 123).
ELECT button) t o
22 SERIAL I/O
BUFFER OVERFLOW
alternates with
To continue press
22 USB I/O
BUFFER OVERFLOW
40 EIO [X] BAD
TRANSMISSION
alternates with
To continue press
41.X PRINTER ERROR
alternates with
To continue press
Too much data was sent to the
serial port.
Too much data was sent to the USB
port.
The connection has been broken
between the printer and the EIO
card in the specified slot [X].
A temporary printing error occurred. 1 Press (SELECT b utton). The
Press (SELECT button) to clear
the error message. (The job will not
be printed.)
Press (SELECT button) to clear
the error message. (The job will not
be printed.)
Press (SELECT button) to clear
the error message and continue
printing.
page containing the error
automatically reprints if jam
recovery is enabled.
2 Turn the printer power off, and
then turn the printer power on.
3 If the message persists, contact
an HP-authorized service or
support provider (see
“Contacting HP” on page 123).
92 Chapter 4 Problem solving ENWW
Page 95

Message Description Recommended action
41.3 UNEXPECTED
SIZE IN TRAY [XX]
alternates with
LOAD TRAY [XX]:
[TYPE] [SIZE]
41.5 UNEXPECTED
TYPE IN TRAY XX
alternates with
LOAD TRAY [XX]:
[TYPE] [SIZE]
This is typically caused if two or
more sheets stick together in the
printer or if the tray is not properly
adjusted.
The printer detected a paper type
different than what it was expecting.
1 Reload the tray with the correct
paper size.
2 Press (S
scroll to TRAY XX SIZE=.
Reconfigure the size in a tray so
that the printer will use a tray
that contains the size required
for the print job.
3 If the error does not clear, turn
the printer power off, then turn
the printer power on.
4 If the message persists, contact
an HP-autho rized service or
support provider (see
“Contacting HP” on page 123).
1 Reload the tray with the correct
paper type.
2 Press (SELECT button) to
scroll to
Reconfigure the size in a tray so
that the printer uses a tray that
contains the type required for
the print job.
3 If the error does not clear, turn
the printer power off, and then
turn the printer power on.
4 If the message persists, contact
an HP-autho rized service or
support provider (see
“Contacting HP” on page 123).
ELECT button) to
TRAY XX TYPE=.
49.XXXXX
PRINTER ERROR
50.X FUSER ERROR
For help press
51.X
PRINTER ERROR
alternates with
To continue
turn off then on
52.X
PRINTER ERROR
alternates with
To continue
turn off then on
A critical firmware error has
occurred.
A fuser error has occurred. 1 Turn the printer power off and
A temporary printing error occurred. 1 Turn the printer power off , an d
A temporary printing error occurred. 1 Turn the printer power off , an d
1 Turn the printer power off, leav e
it off for 20 minutes, and then
turn the printer power on.
2 If the message persists, contact
an HP-autho rized service or
support provider (see
“Contacting HP” on page 123).
then turn the printer power on.
2 If the message persists, contact
an HP-autho rized service or
support provider (see
“Contacting HP” on page 123).
then turn the printer power on.
2 If the message persists, contact
an HP-autho rized service or
support provider (see
“Contacting HP” on page 123).
then turn the printer power on.
2 If the message persists, contact
an HP-autho rized service or
support provider (see
“Contacting HP” on page 123).
ENWW Understanding printer messages 93
Page 96

Message Description Recommended action
53.XY.ZZ
PRINTER ERROR
55.X
PRINTER ERROR
alternates with
To continue
turn off then on
56.X
PRINTER ERROR
alternates with
To continue
turn off then on
There is a problem with the printer
memory. The DIMM that caused the
error will not be used. Values of
Y, and ZZ are as follows:
X = DIMM type
0 = ROM
1 = RAM
Y = Device location
0 = Internal memory (ROM or
RAM)
1 to 3 = DIMM slot 1, 2, or 3
1 You might need to reseat or
replace the specified DIMM.
X,
Turn the printer power off and
then reseat the DIMM that
caused the error.
2 Try using a different printer
driver or printing a smaller file.
3 If the message persists, contact
an HP-authorized service or
support provider (see
“Contacting HP” on page 123).
ZZ = Error number
A temporary printing error occurred. 1 Turn the printer power off and
then turn the printer power on.
2 Try using a different printer
driver or printing a smaller file.
3 If the message persists, contact
an HP-authorized service or
support provider (see
“Contacting HP” on page 123).
A temporary printing error occurred
as a result of an incorrect input or
output request.
1 Turn the printer power off, and
then turn the printer power on.
2 If the message persists, contact
an HP-authorized service or
support provider (see
“Contacting HP” on page 123).
57.X
PRINTER ERROR
alternates with
To continue
turn off then on
58.X
PRINTER ERROR
alternates with
To continue
turn off then on
A temporary printing error occurred
in one of the printer fans.
A printer error has occurred where a
memory tag CPU error was
detected, or there is a problem with
the air sensor or power supply.
1 Turn the printer power off, and
then turn the printer power on.
2 If the message persists, contact
an HP-authorized service or
support provider (see
“Contacting HP” on page 123).
To resolve problems with the power
supply:
1 Remove the printer from any
UPS supplies, additional power
supplies, or power strips. Plug
the printer into a wall outlet and
see if this resolves the problem.
2 If the printer is already plugged
into a wall outlet, try another
power source in the building
that is independent of the one
currently being used.
The line voltage and current source
at the printer location might need to
be inspected to ensure that they
meet the electrical specifications for
the printer. (See “Electrical
specifications” on page 132.)
If the message persists, contact an
HP-authorized service or support
provider (see “Contacting HP” on
page 123).
94 Chapter 4 Problem solving ENWW
Page 97

Message Description Recommended action
59.X
PRINTER ERROR
alternates with
To continue
turn off then on
62 NO SYSTEM
64 PRINTER ERROR
alternates with
To continue
turn off then on
A temporary printing error occurred. 1 Turn the printer power off , an d
then turn the printer power on.
2 If the message persists, contact
an HP-autho rized service or
support provider (see
“Contacting HP” on page 123).
This message indicates that no
system was found. The printer
software system is corrupt.
A temporary printing error occurred
in the scan buffer.
1 Turn the printer power off , and
then turn the printer power on.
2 If the message persists, contact
an HP-autho rized service or
support provider (see
“Contacting HP” on page 123).
1 Turn the printer power off , and
then turn the printer power on.
2 If the message persists, contact
an HP-autho rized service or
support provider (see
“Contacting HP” on page 123).
ENWW Understanding printer messages 95
Page 98

Message Description Recommended action
79.XXXX
PRINTER ERROR
alternates with
To continue
turn off then on
The printer detected a critical
hardware error.
1 Press CANCEL JOB to clear the
print job from the printer
memory. Turn the printer power
off, and then turn the printer
power on.
2 Try printing a job from a
different program. If the job
prints, go back to the first
program and try printing a
different file. (If the message
appears only with a certain
program or print job, contact the
software vendor for assistance.
If the message persists with
different programs and print jobs, try
these steps.
1 Turn the printer power off.
2 Disconnect all cables to the
printer that connect it to the
network or computer.
3 Remove all memory DIMMs or
third-party DIMMs from the
printer. (See “Installing
memory” on page 165.)
4 Remove all EIO devices from
the printer. (See “Installing an
HP Jetdirect EIO card” on
page 168.)
5 Turn the printer power on.
If the error no longer exists, follow
these steps.
1 Install each DIMM and EIO
device one at a time, making
sure to turn the printer power off
and back on as you install each
device.
2 Replace a DIMM or EIO device
if you determine that it causes
the error.
3 Reconnect all cables that
connect the printer to the
network or computer.
8X.YYYY
EIO ERROR
The EIO accessory card in slot [X]
has encountered a critical error.
1 Turn the printer power off, and
then turn the printer power on.
2 Turn the printer power off,
reseat the EIO accessory in slot
[X], and then turn the printer
power on.
3 Turn the printer power off,
remove the EIO accessory from
[X], install it in a different
slot
EIO slot, and then turn the
printer power on.
4 Replace the EIO accessory in
[X].
slot
96 Chapter 4 Problem solving ENWW
Page 99

Clearing jams
Occasionally, media can become jammed during a print job. The following are some of the
causes:
Typical jam locations
Jams can occur at four locations:
Trays are loaded improperly or overfilled.
Tray 2 or tray 3 is removed during a print job.
The top cover is opened during a print job.
The media that is being used does not meet HP specif ications (see “Media specifications” on
page 134).
The media that is being used is outside of the supported size range (see “Media
specifications” on page 134.)
1
3
2
1 Print-cartridge area (see “Print-cartridge area” on page 98)
2 Input-tray areas (see “Tray 2 or tray 3 paper-feed area” on page 99)
3 Output-bin areas (see “Output areas” on page 100)
4 Duplexer area (applies only to the HP LaserJet 2300d printer,
HP LaserJet 2300dn printer, and HP LaserJet 2300dtn printer) (see “Duplexer
area” on page 101)
Note Find and remove the jammed media by using the instructions provided in this section. If the
location of the jam is not obvious, look first in the print cartridge area.
Be sure to remove all torn pieces of media that remain in the printer.
Loose toner might remain in the printer after a jam. This should clear after a few sheets have
been printed. See “Loose toner” on page 105.
4
ENWW Clearing jams 97
Page 100

1
Print-cartridge area
Jams in this area might result in loose toner on the page . If y ou get an y
toner on your clothes or hands, wash them in cold water. (Hot water will
set the toner into the fabric.)
1 Open the top cover.
2 Remove the print cartridge.
2
3
4
CAUTION
To prevent damage, do not expose the print cartridge to light for more
than a few minutes. Place a piece of paper over the top of the print
cartridge to shield it while it is out of the printer.
3 Carefully lift up the registration plate. If t he lead ing e dge of t h e print
media is visible, gently pull the media toward the rear of the printer
to remove it from the printer.
If the media is difficult to remove or has already entered the output
area, remove th e jam as described in “Output areas” on page 100.
4 When the jammed media has been removed, gently flip down the
registration plate. Reinstall the print cartridge and shut the top
cover.
Note
If the print cartridge is difficult to reinstall, make sure that the
registration plate has been flipped b ac k do wn into p osition and th at y ou
have pushed the print cartridge firmly in place.
If the A
the printer. Check the paper-feed and re ar-output areas for jams. For
printers that include a built-in duplexer (HP LaserJet 2300d printer,
HP LaserJet 2300dn printer, and HP LaserJet 2300dtn printer), check
the duplexer area.
TTENTION light does not go out, jammed media remains inside
98 Chapter 4 Problem solving ENWW
 Loading...