

Page 1
HP LaserJet 1100A
Printer•Copier•Scanner
User Guide _________________
Page 2

© Copyright HewlettPackard Company 1998
All Rights Reserved.
Reproduction,
adaptation, or translation
without prior written
permission is prohibited,
except as allowed under
the copyright laws.
Publication number:
C4224 On-Line
First Edition: October,
1998
Warranty
The information
contained in this
document is subject to
change without notice.
Hewlett-Packard makes
no warranty of any kind
with respect to this
information.
HEWLETT-PACKARD
SPECIFICALLY
DISCLAIMS THE
IMPLIED WARRANTY
OF MERCHANTABILITY
AND FITNESS FOR A
PARTICULAR
PURPOSE.
Hewlett-Packard shall
not be liable for any
direct, indirect,
incidental,
consequential, or other
damage alleged in
connection with the
furnishing or use of this
information.
Trademark Credits
Adobe is a trademark of
Adobe Systems
Incorporated.
CompuServe is a U.S.
trademark of
CompuServe, Inc.
Windows and Windows
NT are U.S. registered
trademarks of Microsoft
Corporation.
NERGY STAR
E
is a U.S.
registered service mark
of the U.S.
Environmental Protection
Agency.
Hewlett-Packard Company
11311 Chinden Boulevard
Boise, Idaho 83714 U.S.A.
Page 3

Contents
1 Getting to know the printer
Printer features and benefits . . . . . . . . . . . . . . . . . . . . . . . . . . . . .10
Print with excellent quality. . . . . . . . . . . . . . . . . . . . . . . . . . . .10
Save money . . . . . . . . . . . . . . . . . . . . . . . . . . . . . . . . . . . . . .10
Create professional documents . . . . . . . . . . . . . . . . . . . . . . .10
Printer components . . . . . . . . . . . . . . . . . . . . . . . . . . . . . . . . . . . .11
Printer control panel . . . . . . . . . . . . . . . . . . . . . . . . . . . . . . . .12
Printer paper input trays . . . . . . . . . . . . . . . . . . . . . . . . . . . . .13
Printer paper guides . . . . . . . . . . . . . . . . . . . . . . . . . . . . . . . .13
Printer paper output paths . . . . . . . . . . . . . . . . . . . . . . . . . . .14
Printer door. . . . . . . . . . . . . . . . . . . . . . . . . . . . . . . . . . . . . . .15
Choosing paper and other media . . . . . . . . . . . . . . . . . . . . . . . . .16
Loading paper into the printer . . . . . . . . . . . . . . . . . . . . . . . . . . . .17
Specific types. . .. . . . . . . . . . . . . . . . . . . . . . . . . . . . . . . . . . .17
Turning the power off . . . . . . . . . . . . . . . . . . . . . . . . . . . . . . . . . .18
Voltage conversions . . . . . . . . . . . . . . . . . . . . . . . . . . . . . . . . . . .18
Accessing printer properties (driver) and help. . . . . . . . . . . . . . . .19
Printer properties (driver) . . . . . . . . . . . . . . . . . . . . . . . . . . . .19
Printer online help. . . . . . . . . . . . . . . . . . . . . . . . . . . . . . . . . .20
Printing a self-test page. . . . . . . . . . . . . . . . . . . . . . . . . . . . . . . . .21
EN
2 Getting to know the Copier/Scanner
Scanner features and benefits . . . . . . . . . . . . . . . . . . . . . . . . . . .23
Scan . . . . . . . . . . . . . . . . . . . . . . . . . . . . . . . . . . . . . . . . . . . .23
Copy . . . . . . . . . . . . . . . . . . . . . . . . . . . . . . . . . . . . . . . . . . . .23
Getting to know the software. . . . . . . . . . . . . . . . . . . . . . . . . . . . .24
Document Assistant (Windows 9x & NT 4.0) . . . . . . . . . . . . .25
LaserJet Document Desktop
(Windows 3.1x, 9x, NT 4.0) . . . . . . . . . . . . . . . . . . . . . . .26
Quick Copy settings . . . . . . . . . . . . . . . . . . . . . . . . . . . . . . . .27
Copier Control Panel. . . . . . . . . . . . . . . . . . . . . . . . . . . . . . . .27
LaserJet Toolbox . . . . . . . . . . . . . . . . . . . . . . . . . . . . . . . . . .28
Copier/Scanner components. . . . . . . . . . . . . . . . . . . . . . . . . . . . .29
Scanner control panel. . . . . . . . . . . . . . . . . . . . . . . . . . . . . . .29
Scanner paper input tray, guides, and output path. . . . . . . . .30
Scanner door . . . . . . . . . . . . . . . . . . . . . . . . . . . . . . . . . . . . .30
Supported paper sizes and types (media). . . . . . . . . . . . . . . . . . .31
Precautions for copying and scanning . . . . . . . . . . . . . . . . . . . . .32
Loading Copier/Scanner originals . . . . . . . . . . . . . . . . . . . . . . . . .33
Accessing the online help . . . . . . . . . . . . . . . . . . . . . . . . . . . . . . .34
Contents
3
Page 4

3 Printing media
Printing transparencies . . . . . . . . . . . . . . . . . . . . . . . . . . . . . . . . .36
Printing envelopes. . . . . . . . . . . . . . . . . . . . . . . . . . . . . . . . . . . . .37
Printing labels . . . . . . . . . . . . . . . . . . . . . . . . . . . . . . . . . . . . . . . .38
Printing letterhead . . . . . . . . . . . . . . . . . . . . . . . . . . . . . . . . . . . . .39
Printing cards . . . . . . . . . . . . . . . . . . . . . . . . . . . . . . . . . . . . . . . .40
4 Printing tasks
Printing with manual feed . . . . . . . . . . . . . . . . . . . . . . . . . . . . . . .42
Printing on both sides of the paper (manual duplexing) . . . . . . . .43
Manual duplex using the paper output bin (standard). . . . . . .44
Manual duplex (special) heavy-media, card stock . . . . . . . . .45
Printing watermarks. . . . . . . . . . . . . . . . . . . . . . . . . . . . . . . . . . . .46
Accessing the watermark feature . . . . . . . . . . . . . . . . . . . . . .46
Printing multiple pages on a single sheet of paper (N-up printing) 47
Accessing the multiple pages per sheet feature . . . . . . . . . . .47
Printing booklets . . . . . . . . . . . . . . . . . . . . . . . . . . . . . . . . . . . . . .48
Canceling a print job . . . . . . . . . . . . . . . . . . . . . . . . . . . . . . . . . . .50
Changing print quality settings . . . . . . . . . . . . . . . . . . . . . . . . . . .51
Print using EconoMode (save toner). . . . . . . . . . . . . . . . . . . . . . .51
5 Scanning tasks
Scanning to fax . . . . . . . . . . . . . . . . . . . . . . . . . . . . . . . . . . . . . . .53
Using the Fax feature . . . . . . . . . . . . . . . . . . . . . . . . . . . . . . .53
Scanning to e-mail. . . . . . . . . . . . . . . . . . . . . . . . . . . . . . . . . . . . .54
Using the E-Mail feature . . . . . . . . . . . . . . . . . . . . . . . . . . . . .54
Editing scanned text (OCR). . . . . . . . . . . . . . . . . . . . . . . . . . . . . .55
Using the OCR feature . . . . . . . . . . . . . . . . . . . . . . . . . . . . . .55
Storing scanned text or images. . . . . . . . . . . . . . . . . . . . . . . . . . .57
Using the Store feature. . . . . . . . . . . . . . . . . . . . . . . . . . . . . .57
Acquiring an image . . . . . . . . . . . . . . . . . . . . . . . . . . . . . . . . . . . .58
Contrast sensitive originals . . . . . . . . . . . . . . . . . . . . . . . . . . . . . .58
Accessing the contrast feature . . . . . . . . . . . . . . . . . . . . . . . .58
Enhancing the scanned image . . . . . . . . . . . . . . . . . . . . . . . . . . .59
Accessing image enhancement features . . . . . . . . . . . . . . . .59
Adding annotations to scanned images . . . . . . . . . . . . . . . . . . . .60
Accessing the annotation features . . . . . . . . . . . . . . . . . . . . .60
Canceling scan or copy jobs . . . . . . . . . . . . . . . . . . . . . . . . . . . . .60
4 Contents
EN
Page 5

6 Copying tasks
Copy overview. . . . . . . . . . . . . . . . . . . . . . . . . . . . . . . . . . . . . . . .62
Making Quick Copies . . . . . . . . . . . . . . . . . . . . . . . . . . . . . . . . . .62
Quick Copy settings . . . . . . . . . . . . . . . . . . . . . . . . . . . . . . . .63
Using the Copier Control Panel. . . . . . . . . . . . . . . . . . . . . . . . . . .64
Accessing the Copier Control Panel . . . . . . . . . . . . . . . . . . . .64
Canceling copy jobs . . . . . . . . . . . . . . . . . . . . . . . . . . . . . . . . . . .64
7 Managing the toner cartridge
HP toner cartridges . . . . . . . . . . . . . . . . . . . . . . . . . . . . . . . . . . . .66
HP policy on non-HP toner cartridges. . . . . . . . . . . . . . . . . . .66
Toner cartridge storage. . . . . . . . . . . . . . . . . . . . . . . . . . . . . .66
Toner cartridge life expectancy. . . . . . . . . . . . . . . . . . . . . . . .66
Recycling toner cartridges . . . . . . . . . . . . . . . . . . . . . . . . . . .66
Saving toner . . . . . . . . . . . . . . . . . . . . . . . . . . . . . . . . . . . . . .66
Redistributing toner . . . . . . . . . . . . . . . . . . . . . . . . . . . . . . . . . . . .67
Changing the toner cartridge. . . . . . . . . . . . . . . . . . . . . . . . . . . . .68
8 Troubleshooting the printer
Finding the solution. . . . . . . . . . . . . . . . . . . . . . . . . . . . . . . . . . . .70
Pages did not print . . . . . . . . . . . . . . . . . . . . . . . . . . . . . . . . .70
Pages printed; however . . . . . . . . . . . . . . . . . . . . . . . . . . . . .70
Printer light patterns . . . . . . . . . . . . . . . . . . . . . . . . . . . . . . . .71
Error messages on screen . . . . . . . . . . . . . . . . . . . . . . . . . . .74
Paper handling problems . . . . . . . . . . . . . . . . . . . . . . . . . . . .76
Printed page is different than what appeared on screen . . . .77
Improving print quality . . . . . . . . . . . . . . . . . . . . . . . . . . . . . . . . . .79
Image defect examples. . . . . . . . . . . . . . . . . . . . . . . . . . . . . .79
Correcting print defects. . . . . . . . . . . . . . . . . . . . . . . . . . . . . .81
Cleaning the printer. . . . . . . . . . . . . . . . . . . . . . . . . . . . . . . . . . . .84
Cleaning the toner cartridge area . . . . . . . . . . . . . . . . . . . . . .85
Cleaning the printer paper path . . . . . . . . . . . . . . . . . . . . . . .86
Clearing printer paper jams. . . . . . . . . . . . . . . . . . . . . . . . . . . . . .87
Removing a jammed page . . . . . . . . . . . . . . . . . . . . . . . . . . .88
Paper jam: removing torn pieces of paper . . . . . . . . . . . . . . .90
Changing the pickup roller . . . . . . . . . . . . . . . . . . . . . . . . . . .91
Cleaning the pickup roller . . . . . . . . . . . . . . . . . . . . . . . . . . . .93
Resetting the printer . . . . . . . . . . . . . . . . . . . . . . . . . . . . . . . . . . .94
EN
5
Page 6

9 Troubleshooting the Copier/Scanner
Finding the solution. . . . . . . . . . . . . . . . . . . . . . . . . . . . . . . . . . . .96
Scanning problems. . . . . . . . . . . . . . . . . . . . . . . . . . . . . . . . .96
Copying problems. . . . . . . . . . . . . . . . . . . . . . . . . . . . . . . . . .96
The scanner did nothing. . . . . . . . . . . . . . . . . . . . . . . . . . . . .97
No preview appeared on screen. . . . . . . . . . . . . . . . . . . . . . .99
Scanned image is of poor quality . . . . . . . . . . . . . . . . . . . . .100
Part of the image did not scan or is missing text . . . . . . . . .101
The text cannot be edited . . . . . . . . . . . . . . . . . . . . . . . . . . .102
The scan takes too long . . . . . . . . . . . . . . . . . . . . . . . . . . . .103
Error messages appear on the screen . . . . . . . . . . . . . . . . .104
No copy came out or the scanner did nothing . . . . . . . . . . .105
Copies are blank, missing images, or faded. . . . . . . . . . . . .106
Improving scan/copy quality . . . . . . . . . . . . . . . . . . . . . . . . . . . .107
Preventative steps . . . . . . . . . . . . . . . . . . . . . . . . . . . . . . . .107
Image defect examples. . . . . . . . . . . . . . . . . . . . . . . . . . . . .108
Correcting scan/copy defects . . . . . . . . . . . . . . . . . . . . . . . .109
Calibrating the scanner . . . . . . . . . . . . . . . . . . . . . . . . . . . . . . . .111
Accessing the Calibration utility . . . . . . . . . . . . . . . . . . . . . .111
Cleaning the scanner . . . . . . . . . . . . . . . . . . . . . . . . . . . . . . . . .112
Clearing scanner jams. . . . . . . . . . . . . . . . . . . . . . . . . . . . . . . . .113
Clearing jams . . . . . . . . . . . . . . . . . . . . . . . . . . . . . . . . . . . .114
Clearing hard-to-reach jams . . . . . . . . . . . . . . . . . . . . . . . . .115
Removing the scanner . . . . . . . . . . . . . . . . . . . . . . . . . . . . . . . .116
6 Contents
10 Service and support
Availability . . . . . . . . . . . . . . . . . . . . . . . . . . . . . . . . . . . . . . . . . .118
Obtaining hardware service. . . . . . . . . . . . . . . . . . . . . . . . . . . . .118
Guidelines for repacking the printer . . . . . . . . . . . . . . . . . . . . . .119
Guidelines for repacking the scanner . . . . . . . . . . . . . . . . . . . . .120
Service information form . . . . . . . . . . . . . . . . . . . . . . . . . . . . . . .121
HP Support . . . . . . . . . . . . . . . . . . . . . . . . . . . . . . . . . . . . . . . . .122
Customer Support and product repair assistance (U.S. and
Canada) . . . . . . . . . . . . . . . . . . . . . . . . . . . . . . . . . . . . .122
European Customer Support Center . . . . . . . . . . . . . . . . . .123
Online services . . . . . . . . . . . . . . . . . . . . . . . . . . . . . . . . . . .126
Obtaining software utilities and electronic information . . . . .127
HP direct ordering for accessories or supplies . . . . . . . . . . .128
HP Support Assistant compact disc . . . . . . . . . . . . . . . . . . .128
HP service information . . . . . . . . . . . . . . . . . . . . . . . . . . . . .128
HP SupportPack . . . . . . . . . . . . . . . . . . . . . . . . . . . . . . . . . .128
HP FIRST . . . . . . . . . . . . . . . . . . . . . . . . . . . . . . . . . . . . . . .128
Worldwide sales and service offices . . . . . . . . . . . . . . . . . . . . . .130
EN
Page 7

Appendix A Printer specifications
Specifications . . . . . . . . . . . . . . . . . . . . . . . . . . . . . . . . . . . . . . .135
FCC compliance . . . . . . . . . . . . . . . . . . . . . . . . . . . . . . . . . . . . .137
Environmental Product Stewardship Program . . . . . . . . . . . . . .138
Protecting the Environment. . . . . . . . . . . . . . . . . . . . . . . . . .138
Material safety data sheet . . . . . . . . . . . . . . . . . . . . . . . . . . . . . .140
Regulatory statements . . . . . . . . . . . . . . . . . . . . . . . . . . . . . . . .141
Declaration of Conformity . . . . . . . . . . . . . . . . . . . . . . . . . . .141
Laser safety statement . . . . . . . . . . . . . . . . . . . . . . . . . . . . .142
Canadian DOC regulations. . . . . . . . . . . . . . . . . . . . . . . . . .142
Korean EMI statement . . . . . . . . . . . . . . . . . . . . . . . . . . . . .142
Laser statement for Finland . . . . . . . . . . . . . . . . . . . . . . . . .143
Appendix B Scanner specifications
Specifications . . . . . . . . . . . . . . . . . . . . . . . . . . . . . . . . . . . . . . .145
FCC compliance . . . . . . . . . . . . . . . . . . . . . . . . . . . . . . . . . . . . .148
Environmental product stewardship . . . . . . . . . . . . . . . . . . . . . .149
Protecting the Environment. . . . . . . . . . . . . . . . . . . . . . . . . .149
Regulatory statements . . . . . . . . . . . . . . . . . . . . . . . . . . . . . . . .150
Declaration of Conformity . . . . . . . . . . . . . . . . . . . . . . . . . . .150
Laser safety statement . . . . . . . . . . . . . . . . . . . . . . . . . . . . .151
Canadian DOC regulations. . . . . . . . . . . . . . . . . . . . . . . . . .151
Korean EMI statement . . . . . . . . . . . . . . . . . . . . . . . . . . . . .151
Laser statement for Finland . . . . . . . . . . . . . . . . . . . . . . . . .152
EN
Appendix C Paper specifications
Printer paper specifications. . . . . . . . . . . . . . . . . . . . . . . . . . . . .154
Supported paper sizes (printer). . . . . . . . . . . . . . . . . . . . . . . . . .154
Guidelines for using paper . . . . . . . . . . . . . . . . . . . . . . . . . . . . .155
Labels . . . . . . . . . . . . . . . . . . . . . . . . . . . . . . . . . . . . . . . . . .156
Transparencies. . . . . . . . . . . . . . . . . . . . . . . . . . . . . . . . . . .156
Envelopes. . . . . . . . . . . . . . . . . . . . . . . . . . . . . . . . . . . . . . .157
Card stock and heavy media . . . . . . . . . . . . . . . . . . . . . . . .159
Appendix D Memory (DIMMs)
Installing DIMMs (memory) . . . . . . . . . . . . . . . . . . . . . . . . . . . . .161
Test DIMM installation. . . . . . . . . . . . . . . . . . . . . . . . . . . . . . . . .163
Removing DIMMs . . . . . . . . . . . . . . . . . . . . . . . . . . . . . . . . . . . .164
Appendix E Warranty and licensing
Hewlett-Packard software license agreement. . . . . . . . . . . . . . .166
Hewlett-Packard limited warranty statement. . . . . . . . . . . . . . . .168
Limited warranty for toner cartridge life. . . . . . . . . . . . . . . . . . . .170
7
Page 8

Appendix F Accessories and ordering information
Appendix G Scanner resolution and gray scale
Overview . . . . . . . . . . . . . . . . . . . . . . . . . . . . . . . . . . . . . . . . . . .176
Resolution and gray-scale guidelines . . . . . . . . . . . . . . . . . . . . .177
Resolution . . . . . . . . . . . . . . . . . . . . . . . . . . . . . . . . . . . . . . . . . .178
Gray scale. . . . . . . . . . . . . . . . . . . . . . . . . . . . . . . . . . . . . . . . . .179
Index
8 Contents
EN
Page 9

Getting to know the
Note
1
For installation instructions, see the
Guide”
printer
This chapter provides information on the following topics:
●
Printer features and benefits
●
Printer components
●
Choosing paper and other media
●
Loading paper into the printer
●
Turning the power off
●
Voltage conversions
●
Accessing printer properties (driver) and help
●
Printing a self-test page
“HP LaserJet Quick Reference
that came with your printer.
EN
9
Page 10

Printer features and benefits
Congratulations on the purchase of your new printer. You can . . .
Print with excellent quality
●
Print at 600 dots per inch (dpi) with Resolution Enhancement
technology (REt).
Save money
●
Use EconoMode to save toner.
●
Print on both sides of the paper to save paper (manual
duplexing).
●
Print multiple pages on a single sheet of paper to save paper
(N-up printing).
Create professional documents
●
Protect your documents by using Watermarks such as
“confidential.”
●
Print Booklets. This feature enables you to easily print the pages
required to create cards or books. Once printed, all you have to
do is fold and staple the pages.
●
Print the first page on different paper/media than the following
pages.
10 Chapter 1 Getting to know the printer
EN
Page 11
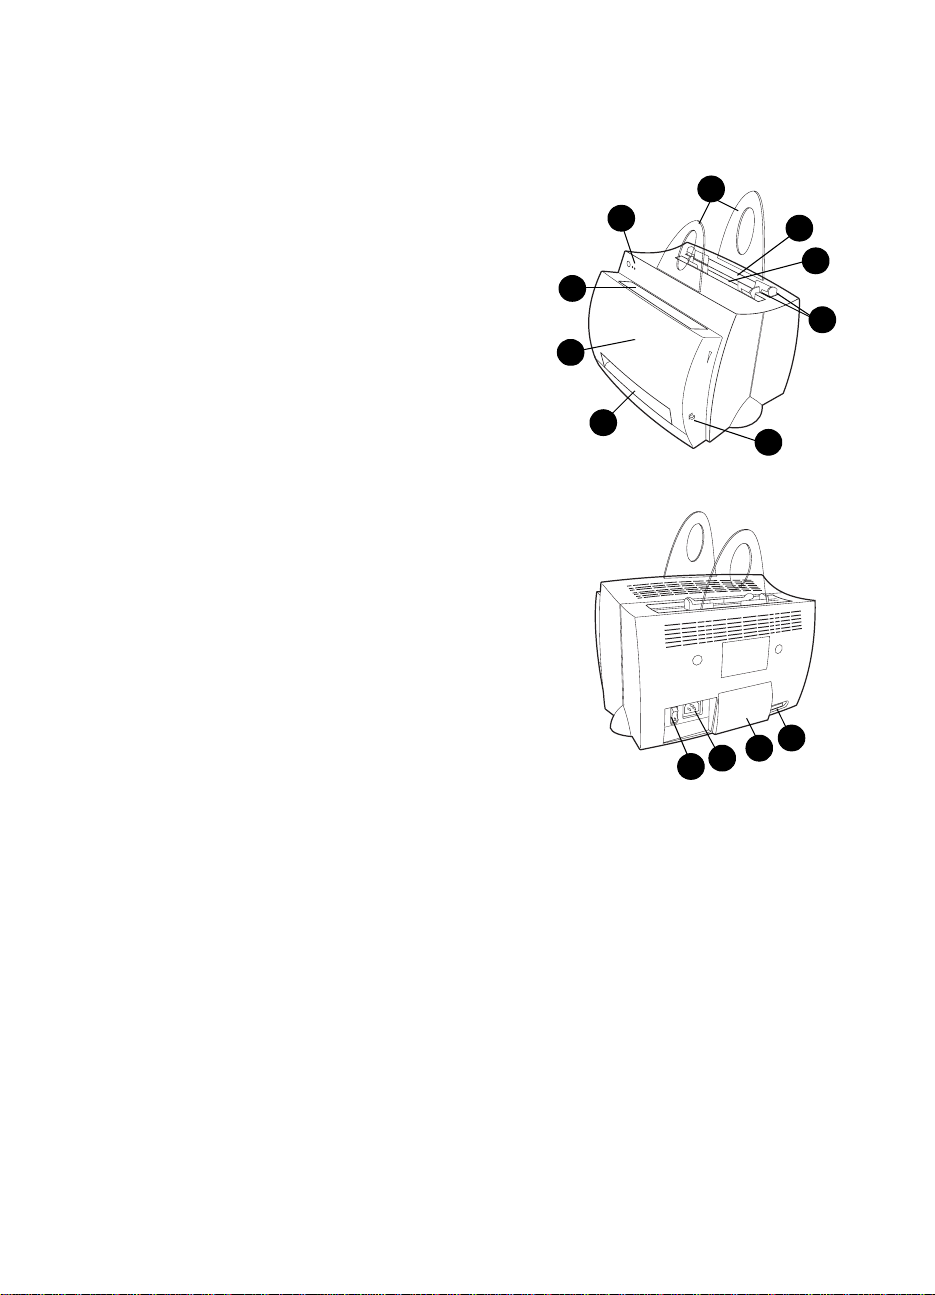
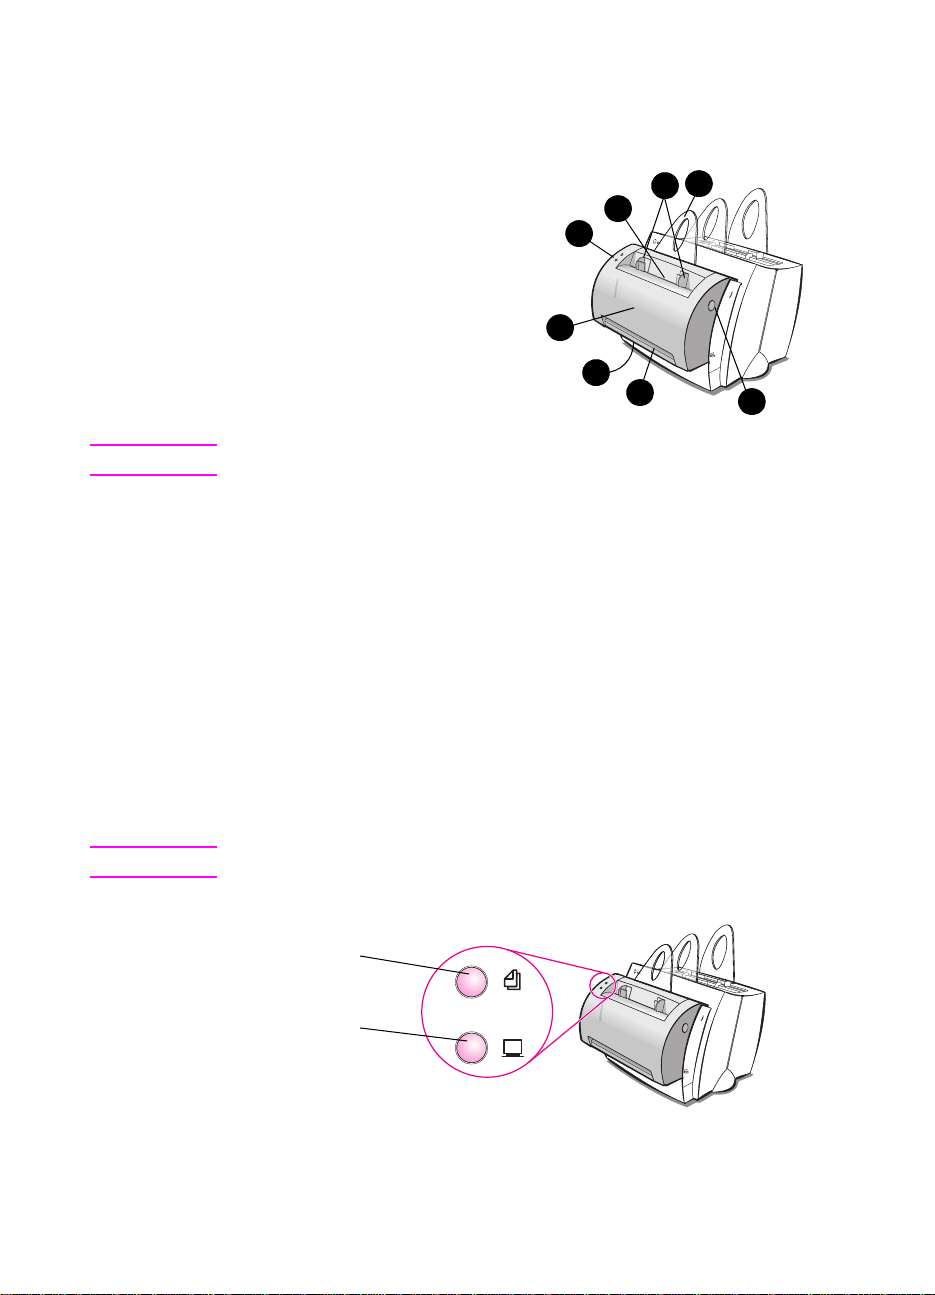
Printer components
1. Printer control panel
2. Paper supports
3. Paper input tray
4. Single-sheet paper input tray (priority feed)
5. Paper guides
6. Paper-output lever
7. Straight-through output path
8. Printer door
9. Paper output bin
1. Power switch (220-240 volt printers)
2. Power receptacle
3. Memory door
4. Parallel port
2
1
9
8
7
3
4
5
6
EN
4
3
2
1
Printer components
11
Page 12
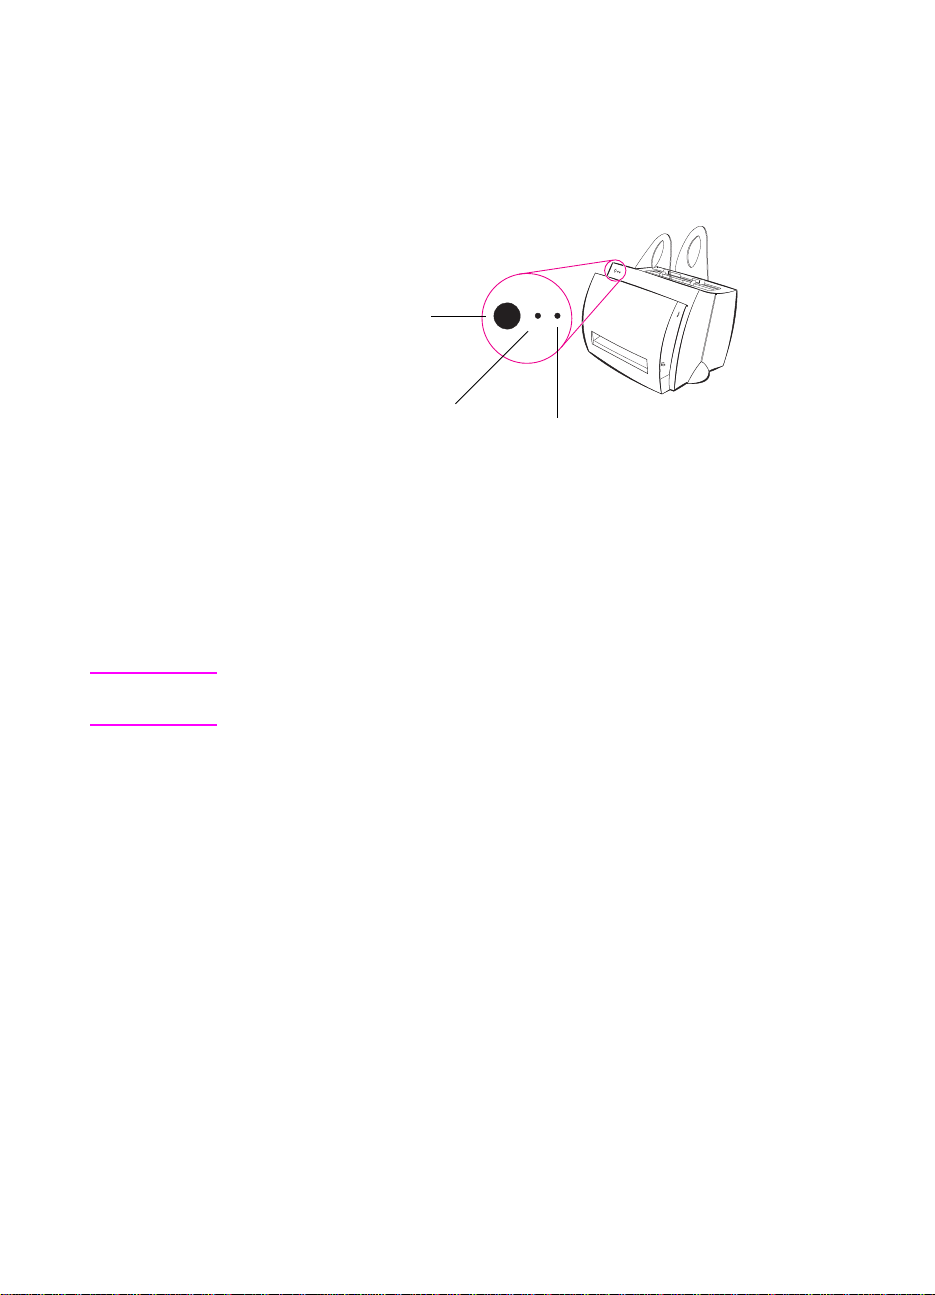
Printer control panel
The printer control panel is comprised of two lights and one lighted
button. These lights produce patterns that identify the status of your
printer.
Go button and light
Ready light
Attention light
●
Go button and light: Press and release to print a self-test page
or when in manual-feed mode, or press and hold for 5 seconds to
reset the printer.
●
Ready light: Indicates the printer is ready to print.
●
Attention light: Indicates printer initialization, reset, and errors.
Note See “Printer light patterns” for functional descriptions of all the light
patterns.
12 Chapter 1 Getting to know the printer
EN
Page 13
Printer paper input trays
Rear paper input tray
The paper input tray located closest to the back of the printer can hold
up to 125 sheets of 20 lb. paper or it can hold multiple envelopes.
Front (single-sheet) paper input tray
The single-sheet paper input tray should be used when feeding single
pages or media such as envelopes. You can print the first page on
different media than the rest using the single-sheet paper input tray.
Note
The printer will automatically (priority feed) print from the single-sheet
paper input tray before printing from the paper input tray .
Printer paper guides
Both input trays have paper guides. Paper guides are used to ensure
the paper is correctly fed into the printer and that the print is not
skewed (crooked text on the page). When loading paper, adjust the
paper guides to match the width of the paper being printed.
EN
Printer components
13
Page 14
Printer paper output paths
Paper output bin
The paper output bin is located on the front of the printer. Printed
paper will be collected here in the correct sequence when the paperoutput lever is in the up position. Use the output bin when printing
large, collated documents or when copying documents so that the
original is separated from the copies.
Straight-through paper output path
The straight through paper output path is useful when printing
envelopes, transparencies, heavy media, or anything that tends to
curl when printed. Printed paper will stack in reverse order with the
paper-output lever down.
14 Chapter 1 Getting to know the printer
EN
Page 15
Printer door
Open the printer door to access the toner cartridge, clear jams, and
clean the printer. The printer door is located on the front of the printer.
Open and close the printer door by firmly grasping the top left and
right sides of the printer door and pulling it towards you.
Note
If the scanner is attached, it may be necessary to move the printer to
the edge of your workstation before opening the printer door in order
to get the full range of motion.
EN
Printer components
15
Page 16

Choosing paper and other media
HP LaserJet printers produce excellent print quality documents. You
can print on a variety of print media, such as paper (including up to
100% recycled fiber content paper), envelopes, labels,
transparencies, and custom-sized media. Properties such as weight,
grain, and moisture content are important factors, affecting printer
performance and quality. To achieve the best possible print quality,
use only high-quality paper designed for laser printers. See “Printer
paper specifications” for detailed paper and media specifications.
Note Always test a sample of paper before purchasing large quantities.
Your paper supplier should understand the requirements specified in
the
HP LaserJet Printer Family Paper Specification Guide
number 5021-8909). See “Printer paper specifications.”
●
Maximum supported paper size: 216 by 356 mm (8.5 by 14 in.)
●
Minimum supported paper size: 76 by 127 mm (3 by 5 in.)
(HP part
16 Chapter 1 Getting to know the printer
EN
Page 17

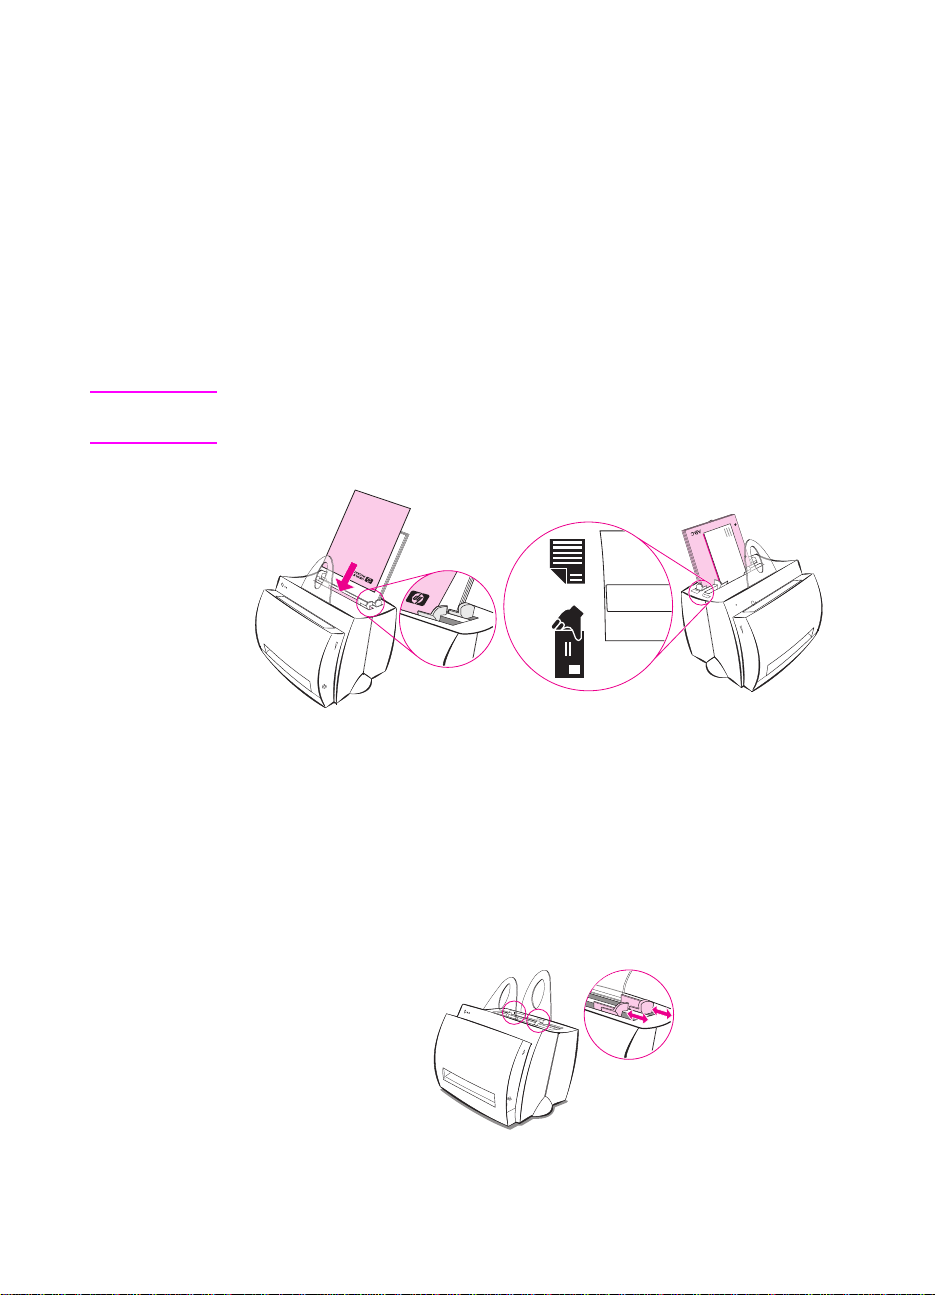
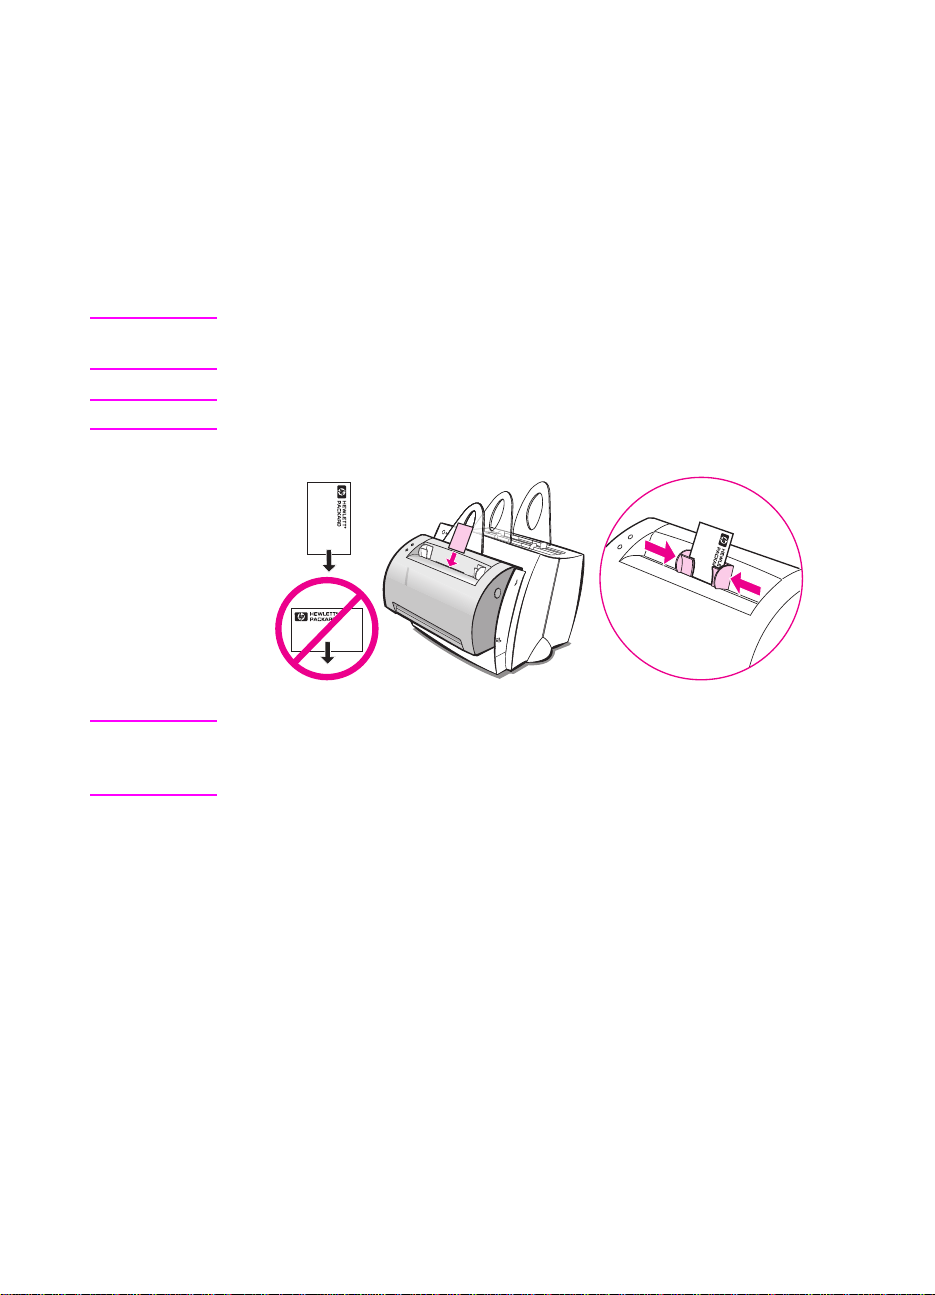
Loading paper into the printer
Paper should be loaded with the top down and the side-to-be printed
facing forward. Always adjust the paper guides to prevent jams and
skewing.
CAUTION
Attempting to print on paper that is wrinkled, folded, or damaged in any
way may cause a jam to occur. See “Printer paper specifications.”
Note Always remove all paper fro m the paper input tray and straighten
the stack when new paper is added.
This helps prevent multiple
sheets of paper from feeding through the printer at one time and
reduces paper jams. See the sticker which you placed on the printer
while setting up the hardware.
Specific types. . .
●
Transparencies:
side-to-be-printed facing toward the front of the printer. See
“Printing transparencies.”
●
Envelopes:
to-be-printed facing toward the front of the printer. See “Printing
envelopes.”
●
Labels:
Load with the top down and the side-to-be-printed facing
toward the front of the printer. See “Printing labels.”
●
Letterhead:
facing toward the front of the printer. See “Printing letterhead.”
●
Cards:
Load with the narrow side down and the side-to-be-
printed facing toward the front of the printer. See “Printing cards.”
Load transparencies with the top down and the
Load with the narrow, stamp side down and the side-
Load with the top down and the side-to-be-printed
EN
Loading paper into the printer
17
Page 18
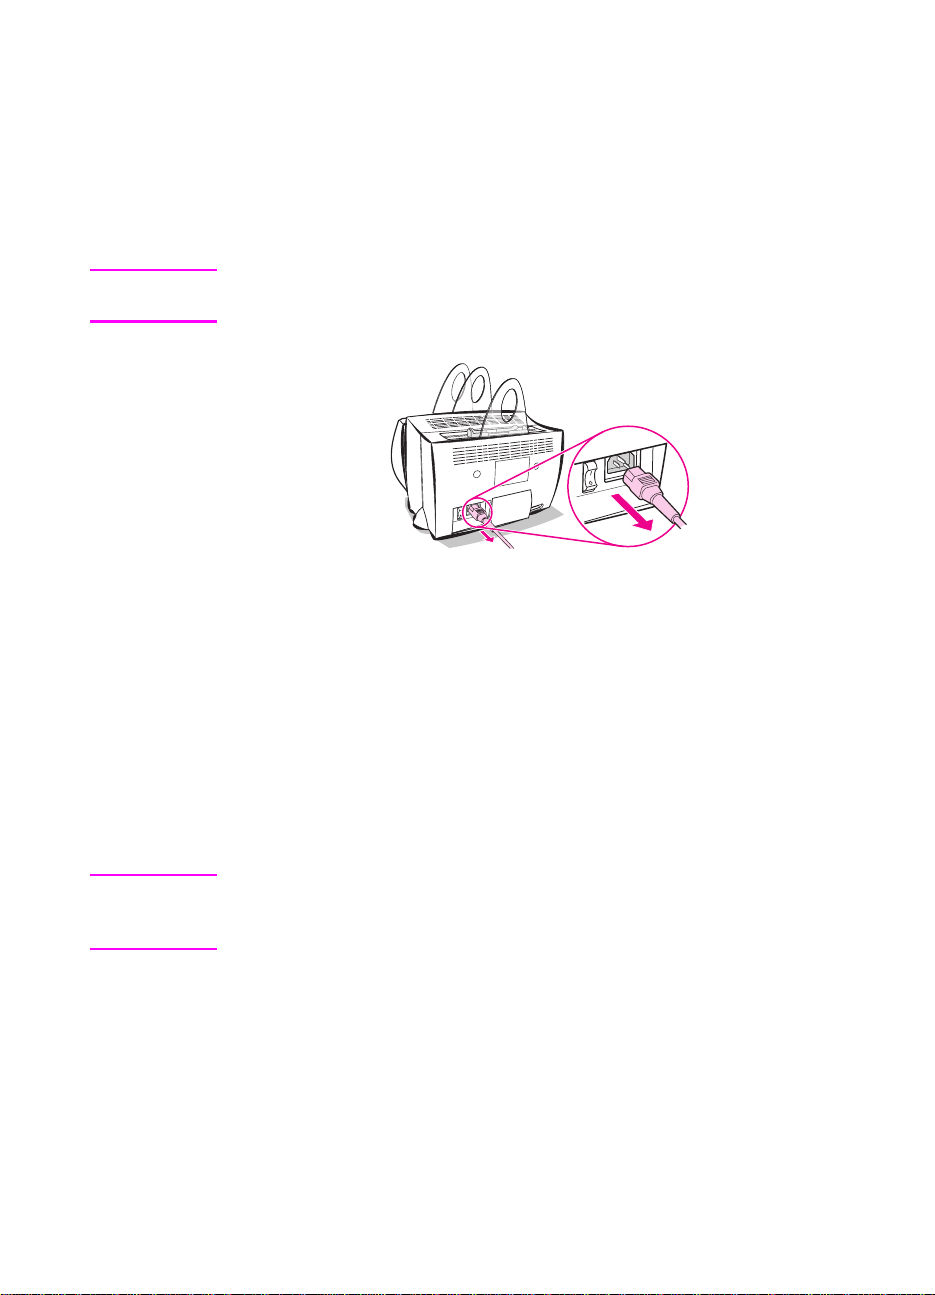
Turning the power off
Printers that require 100-127 volts of power must be unplugged to
turn the power off. Printers that require 220-240 volts can be switched
off (the switch is located on the left side of the power plug) or
unplugged.
Note To ensure safety when working inside the printer for any reason, it is
best to unplug the printer.
Voltage conversions
HP LaserJet printers are manufactured to different specifications for
different countries. Because of these differences, HP does not
recommend transporting products sold within the United States to
another country.
In addition to the concerns about the differing power system voltages,
the country of final destination may have different import and export
restrictions, power frequencies, and regulatory requirements.
Note The HP LaserJet family printers must be serviced by an authorized
repair depot or reseller within the country where the printer was
originally purchased.
Because of the different specifications and warranty coverage
limitations, Hewlett-Packard does not offer a conversion, or support
the conversion, of U.S . version HP LaserJet family printers for foreign
use. We advise those customers planning to transport equipment
outside the United States to purchase the products in the country of
final destination.
18 Chapter 1 Getting to know the printer
EN
Page 19

Accessing printer properties (driver) and help
This section provides information on the following topics:
●
Printer properties (driver)
●
Printer online help
Printer properties (driver)
Printer properties control the printer and allow you to change default
settings, such as paper size, printing on both sides of the page
(manual duplexing), printing multiple pages on a single sheet of paper
(N-up printing), resolution, watermarks, and printer memory. You can
access the printer properties in two ways:
●
Through the software application from which you are printing.
(Change settings for current software application use.)
●
Using the Windows® operating system. (Change default settings
for all future print jobs.)
Note
Because many software applications use a different method of
accessing the printer properties, we will describe common methods
used in Windows 9x & NT® 4.0, and Windows 3.1x.
Windows 9x & NT 4.0
●
Change settings for current software application use:
File
the
then click
menu within the software application, click
Properties.
(The steps can vary between software
Print,
From
and
applications; this is the most common method.)
●
Change defaults for all future print jobs:
click
Settings,
and then click
Printers.
Right-click the printer icon
Click the
Start
button,
for which you would like to change properties, and then choose
Properties.
on the
Many of the features in Windows NT are also located
Document Defaults
menu.
Windows 3.1x
●
Change settings for current software application use:
File
the
Printers,
menu within the software application, click
and then click
Options.
(The steps can vary between
software applications; this is the most common method.)
●
Change defaults for all future print jobs:
control panel, double-click
Setup.
click
Printers,
highlight the printer, and then
From the Windows
Print,
From
EN
Accessing printer properties (driver) and help
19
Page 20

Printer online help
Printer properties online help
The printer properties (driver) online help includes information
specific to the functions within the printer properties. This online help
will guide you when changing default settings for your printer.
Access the printer properties help system by opening the printer
properties and then clicking on the Help button.
Online help
The HP LaserJet 1100 online help include s information for all of the
printing, copying, and scanning software applications.
See “Accessing the online help.”
20 Chapter 1 Getting to know the printer
EN
Page 21
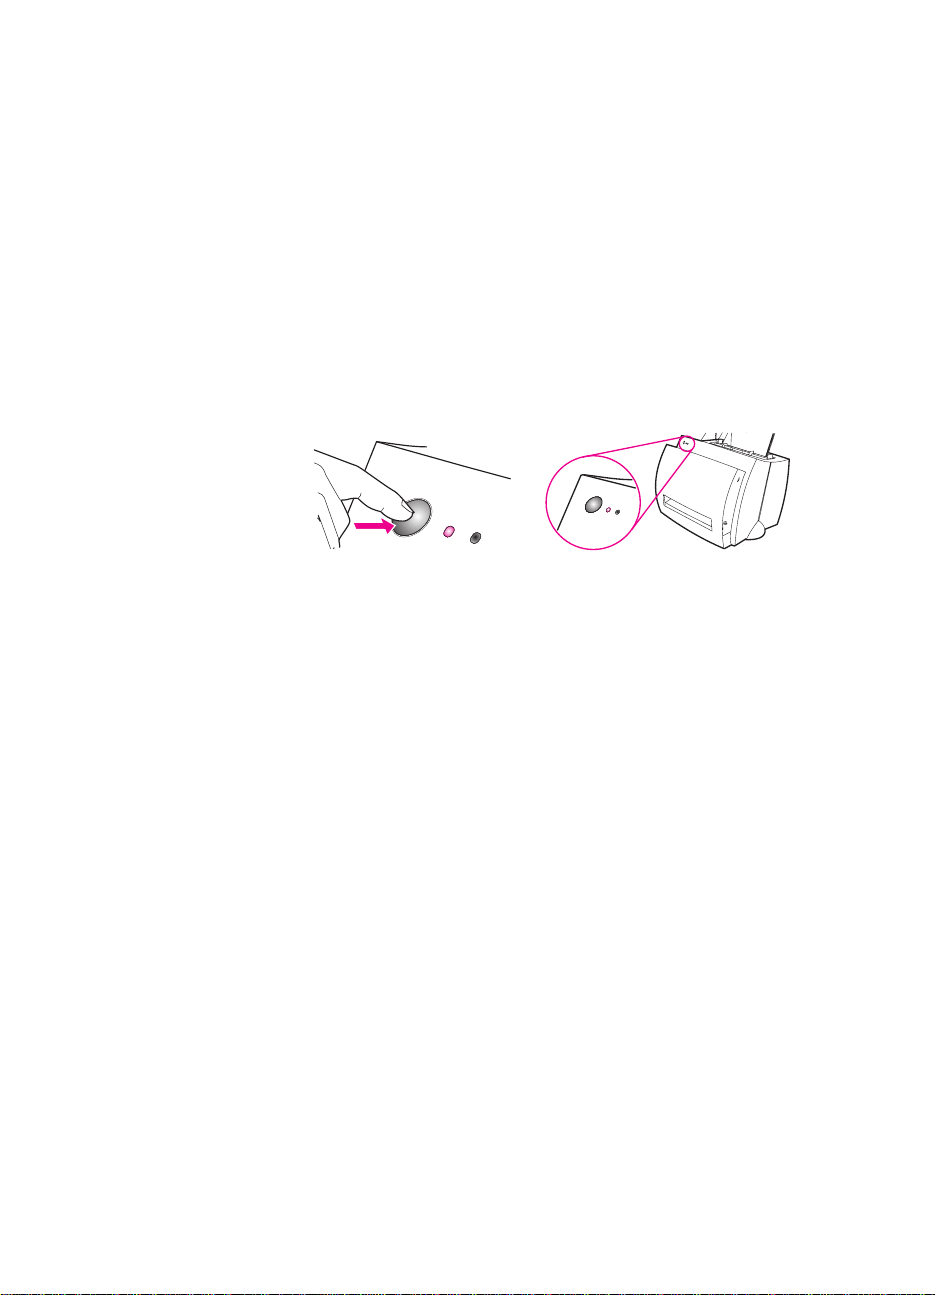
Printing a self-test page
Among other items, a self-test page provides all of the printer
configuration settings, scanner attachment verification, a sample of
the print quality, and provides information for printer page counts as
well as scan and copy page counts. A self-test page can also help
you verify the printer is printing correctly.
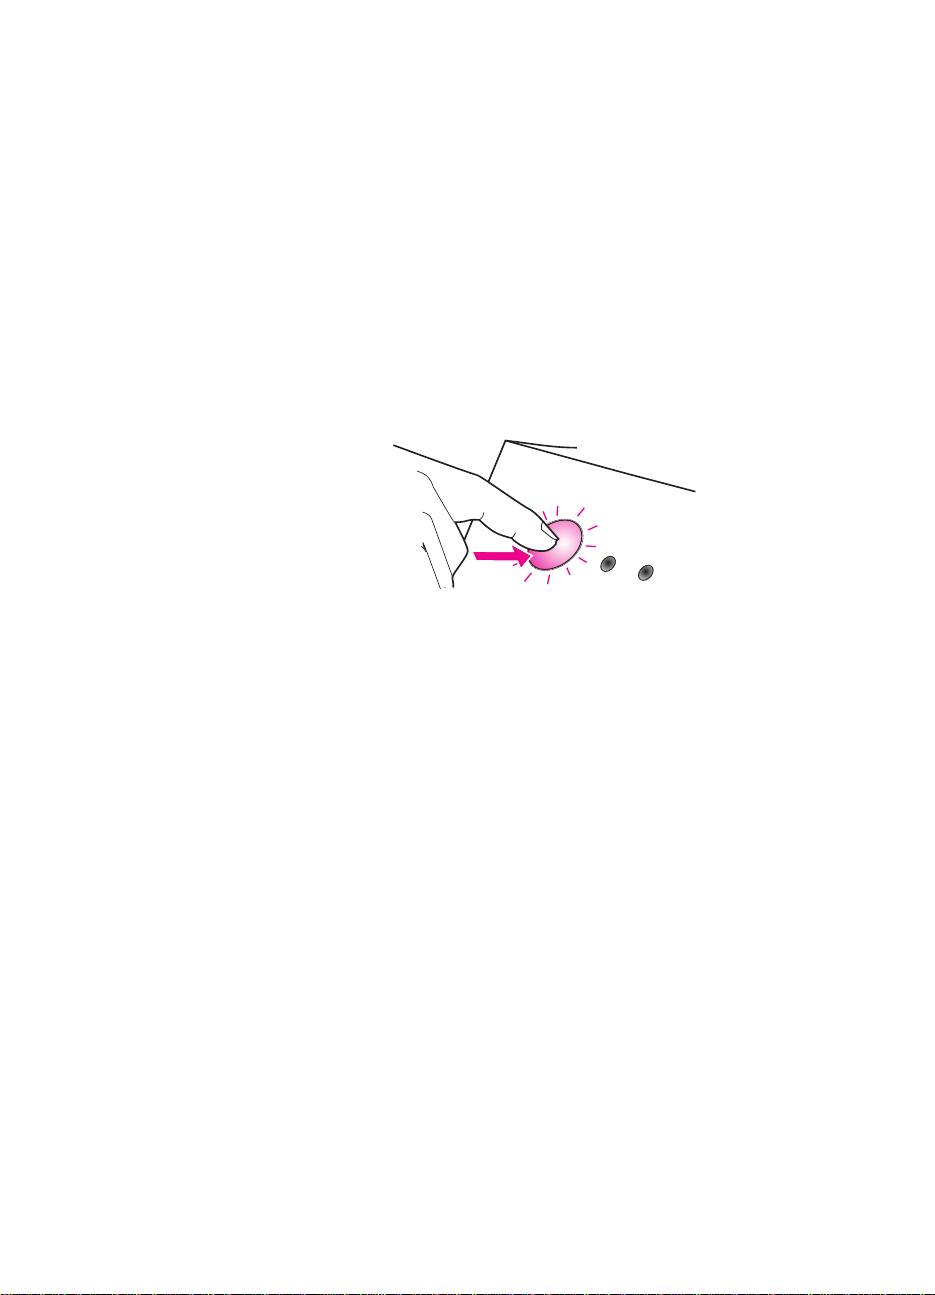
To pr int a self-test page, press and release the Go button on the
printer control panel while the printer is in the Ready state. If the
printer is in PowerSave mode, press and release the Go button once
to awaken it, and then press and release the Go button a second
time.
EN
Printing a self-test page
21
Page 22

Getting to know the
Note
2
For hardware and software installation instructions, see the
“HP LaserJet Quick Reference Guide”
Copier/Scanner
This chapter provides information on the following topics:
●
Scanner features and benefits
●
Getting to know the software
●
Copier/Scanner components
●
Supported paper sizes and types (media)
●
Precautions for copying and scanning
●
Loading Copier/Scanner originals
●
Accessing the online help
that came with your scanner.
EN
22
Page 23

Scanner features and benefits
Scan
Use HP software to simplify your office tasks:
●
Faxing
●
E-Mailing
●
Editing text (OCR)
●
Storing documents electronically
Copy
Make Quick Copies when copying your most frequent type of original.
Use the Copier Control Panel to customize and make multiple copies.
●
Simple and convenient (Quick Copy)
• Load the original and press a single button
●
Powerful copier software (Copier Control Panel)
• Make multiple copies
• Remove speckles
• Straighten
• Adjust contrast
EN
Scanner features and benefits
23
Page 24
Getting to know the software
Bring the world to your fingert ips by using the full-featured software
solution included with your
HP LaserJet 1100A Printer•Copier•Scanner.
LASERJET TOOLBOX
- Document Assistant properties
- LaserJet Document Desktop
- Quick Copy settings
- Online help
- Online user guide
CONVENIENT
- Document Assistant
- Quick Copy
FULL FEATURED
- LaserJet Document Desktop
- Copier Control Panel
SCAN
- E-Mail
- Fax
- Edit text (OCR)
- Store and manage
COPY
- Quick Copies
- Full-featured copies
24 Chapter 2 Getting to know the Copier/Scanner
EN
Page 25

Document Assistant (Windows 9x & NT 4.0)
The Document Assistant is quick and convenient, and can facilitate
many of your routine office tasks:
●
Copying
●
Storing or managing scanned text and images
●
Scanning to e-mail
●
Scanning to fax
●
Editing scanned text (OCR)
Take full advantage of the Document Assistant.
Note
Note
The Document Assistant is not available for Windows 3.1x operating
systems.
Accessing the Document Assistant
1
2
3
4
5
To close the Document Assistant, right click on the HP icon and click
Close Document Assistant.
Start,
Click
Click
Click
Click
located in the system tray.
Programs.
HP LaserJet 1100.
Document Assistant.
An HP icon will appear in your system tray. Click on the HP icon
to display the Document Assistant on your computer screen.
EN
Getting to know the software
25
Page 26

LaserJet Document Desktop
(Windows 3.1x, 9x, NT 4.0)
The LaserJet Document Desktop is a full-featured desktop application
for your scanning and copying capabilities of HP LaserJet 1100. From
the HP 1100 Document Desktop, you can perform the following tasks
and more:
●
Copy
●
Scan images (or acquire an image from a TWAIN-compliant
device)
●
Store and manage scanned images
●
Send scanned images to fax (a fax software application must be
installed on your PC)
●
Send scanned images to e-mail (an e-mail software application
must be installed on your PC)
●
Send scanned text to a word processing application to edit (OCR)
●
Make image enhancements
●
Add annotations
Note You can print (electronically) to the LaserJet Document Desktop from
any software application. This feature allows you to use any of the
functions within the LaserJet Document Desktop on documents
created in your favorite desktop publishing or word processing
application, saving you the time of first printing and then scanning a
hard copy version. The online help provides more information about
the LaserJet Document Desktop. See “Accessing the online help.”
Accessing the LaserJet Document Desktop
(Windows 9x & NT 4.0)
1 Click Start, located in the Windows system tray.
2 Click Programs.
3 Click HP LaserJet 1100.
4 Click LaserJet Document Desktop.
Accessing the LaserJet Document Desktop
(Windows 3.1x)
1 From the Progr am Manager, double-click the HP LaserJet 1100
icon.
2 Double-click LaserJet Document Desktop.
26 Chapter 2 Getting to know the Copier/Scanner
EN
Page 27

Quick Copy settings
The Quick Copy feature enables you to make consistent and
convenient copies. Your PC does not even have to be turned on.
Adjust the settings to reflect the most common type of original that
you copy, and you do not have to change them again.
For instructions on making Quick Copies and adjusting the default
Quick Copy settings, see “Making Quick Copies.”
Copier Control Panel
Use the Copier Control Panel when full-featured copying capabilities
are necessary or when your original differs from your most frequent
copy job. Consider the Copier Control Panel as your personal copy
machine. You can have the copy machine at your fingertips with the
Copier Control Panel.
For instructions on accessing and using the Copier Control Panel,
see “Using the Copier Control Panel.”
EN
Getting to know the software
27
Page 28

LaserJet Toolbox
The LaserJet Toolbox enables you to customize your software
solution to meet your needs.
●
Change the Quick Copy settings
●
Configure properties for the Document Assistant
●
Configure properties for the LaserJet Document Desktop
●
Connect network scanner
The LaserJet Toolbox also enables you to do the following:
●
Calibrate the scanner
●
Access the online user guide (this guide)
●
Access the online help
Note The LaserJet Toolbox is not available for Windows 3.1x operating
systems. However, many of the features within the LaserJet Toolbox
can be accessed through the HP LaserJet 1100 Program Group.
Accessing the LaserJet Toolbox
(Windows 9x & NT 4.0)
You can access the LaserJet Toolbox from the Document Assistant:
Click Tools.
28 Chapter 2 Getting to know the Copier/Scanner
EN
Page 29
Copier/Scanner components
1. Scanner control panel
2. Paper input tray
3. Paper guides
4. Paper support
5. Door release button
6. Paper output path
7. Scanner attachment lever
8. Scanner door
4
3
2
1
8
7
6
5
Note
Note
To remove the scanner from the printer, see “Removing the scanner.”
Scanner control panel
●
Copy:
does not have to be turned on.
●
Scan:
correctly, you can perform the following tasks:
• Scan to fax
• Scan to e-mail
• Store documents electronically
• Edit text (OCR)
• Make multiple and customized copies
To cancel a scan or copy job, press both buttons simultaneously.
Press the Copy button to perform Quick Copies—your PC
Press the Scan button to launch the software. If configured
Copy
Scan
EN
Copier/Scanner components
29
Page 30

Scanner paper input tray, guides, and output path
The scanner paper input tray is located on the front, top side of the
scanner. The paper guides are located inside the paper input tray and
are used to ensure that the paper or media is correctly fed into the
scanner and to prevent skewing (crooked image).
CAUTION Paper and media can jam if not correctly loaded, causing damage to
the original you are scanning or copying. See “Loading Copier/Scanner
originals.”
Scanner door
Open the scanner door to remove jams or clean the scanner. The
scanner door is located on the front of the scanner. Open the scanner
door by first pressing the button located on the upper-right side to
release the latch, and then gently grasping the door and pulling it
towards you. To close the door, simply push the door up and towards
the scanner until it clicks.
30 Chapter 2 Getting to know the Copier/Scanner
EN
Page 31

Supported paper sizes and types (media)
The Copier/Scanner for the HP LaserJet 1100 can handle a broader
range of paper sizes and more types of media than the printer:
●
Maximum:
●
Minimum:
In addition, you can scan and copy many different types of paper and
media that are typically not used for printing, such as news print,
photographs, business receipts, and business cards.
216 by 762 mm (8.5 by 30 in.)
50.8 by 90 mm (2 by 3.5 in.)
Note
Small or delicate originals, such as business cards or newsprint, may
require a carrier sheet to correctly feed through the Copier/Scanner.
You can make a carrier sheet by simply taping the leading edge of the
original to a standard sheet of paper.
See “Precautions for copying and scanning.”
EN
Supported paper sizes and types (media)
31
Page 32

Precautions for copying and scanning
You should not put anything in the Copier/Scanner that could get
stuck in or damage the feed mechanism. Observe the following
precautions to minimize the possibility of jamming or damaging the
feed mechanism:
●
Remove self-stick notes.
●
Remove staples and paper clips.
●
Straighten any curls or wrinkles in the original to be scanned.
●
Do not scan or copy any original with glue, correction fluid, or wet
ink on it.
●
Do not scan or copy gummed-backed paper, labels, or originals.
●
Avoid scanning or copying originals with tears, perforations, or
any defect that may cause a jam.
●
Feed irregularly-sized originals one at a time.
●
Do not scan originals that are larger or smaller than the
supported size. See “Supported paper sizes and types (media).”
Note Small or delicate originals, such as business cards or newsprint, may
require a carrier sheet to correctly feed through the Copier/Scanner.
You can make a carrier sheet by simply taping the leading edge of the
original to a standard sheet of paper.
Note Scanning or copying with the correct resolution and gray scale settings
for your job is important in order to obtain good results. To learn more
about resolution and gray scale, see “Scanner resolution and gray
scale.”
32 Chapter 2 Getting to know the Copier/Scanner
EN
Page 33
Loading Copier/Scanner originals
Note
CAUTION
1
Load the original with the
scanned facing toward the front of the scanner.
2
Adjust the paper guides.
3
Press the
for a Quick Copy.
Always remov e all originals from the input tray and straighten the stack
when new originals are added.
Small originals will cause a jam if not loaded correctly.
Scan
button on the scanner or press the
narrow side down
and the side-to-be-
Copy
button
Note
EN
If editing text (OCR), the original must be loaded with the text positioned
horizontally and upside down. See “Editing scanned text (OCR)” for
more information.
Loading Copier/Scanner originals
33
Page 34

Accessing the online help
To access the HP LaserJet 1100 Online Help, use any of the three
methods below:
●
Program Group:
• Windows 9x & NT 4.0: Click Start, Programs, HP LaserJet
1100, and then LaserJet 1100 Online Help.
• Windows 3.1x: From the Program Manager, double-click the
HP LaserJet 1100 icon, and then double-click LaserJet 1100
Online Help.
Note The Document Assistant is not available for Windows 3.1x operating
systems.
●
Document Assistant: Click Tools, and then click Help.
●
LaserJet Document Desktop: Click Help from the main menu.
34 Chapter 2 Getting to know the Copier/Scanner
EN
Page 35

3
Printing media
This chapter provides information on the following topics:
●
Printing transparencies
●
Printing envelopes
●
Printing labels
●
Printing letterhead
●
Printing cards
EN
35
Page 36

Printing transparencies
Only use transparencies recommended for use in laser printers, such
as HP transparency film. Se e “Printer paper specifications.”
CAUTION Inspect the transparencies to ensure they are not wrinkled or curled,
and that they do not have any torn edges.
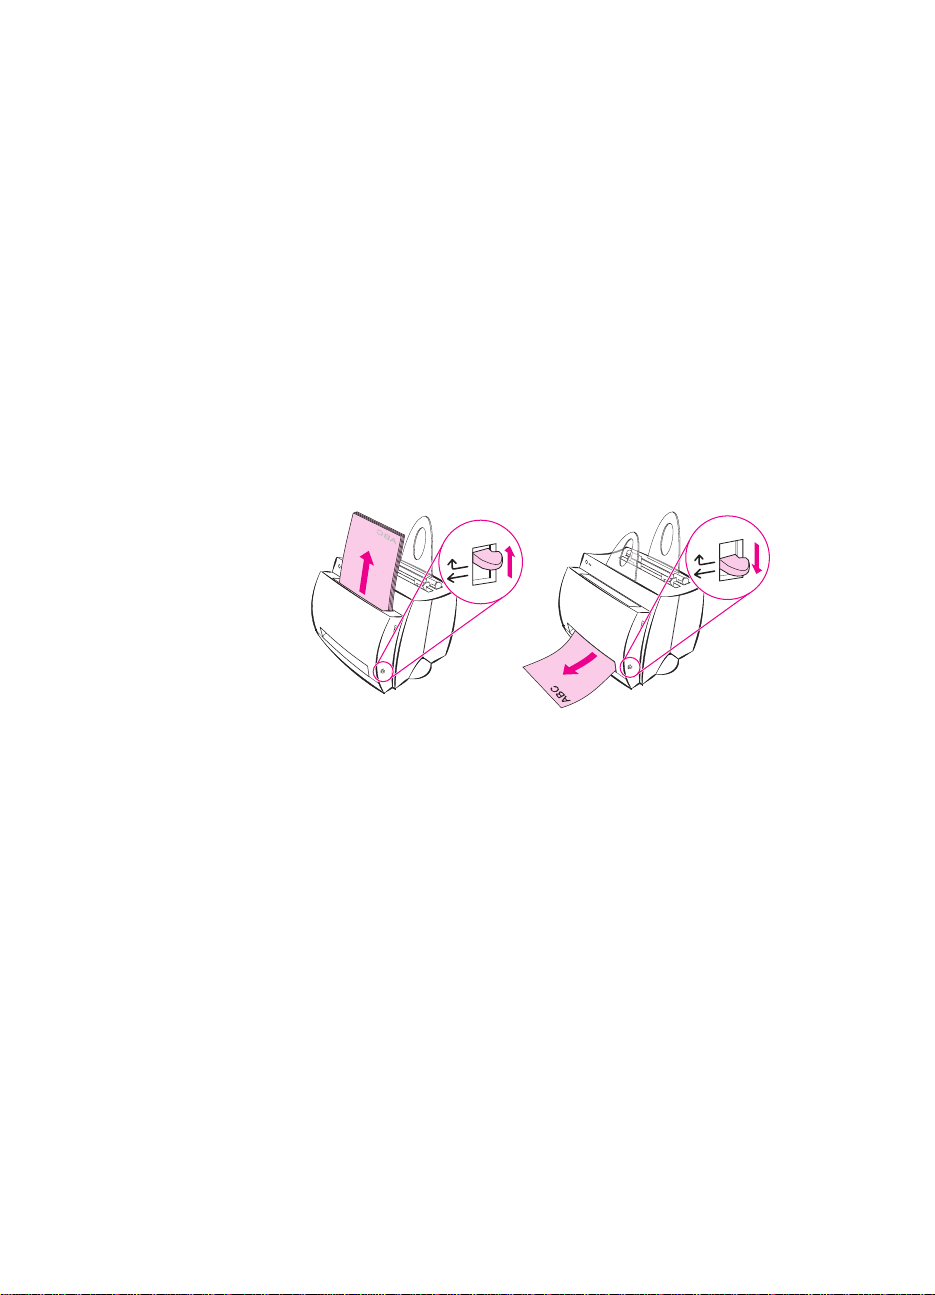
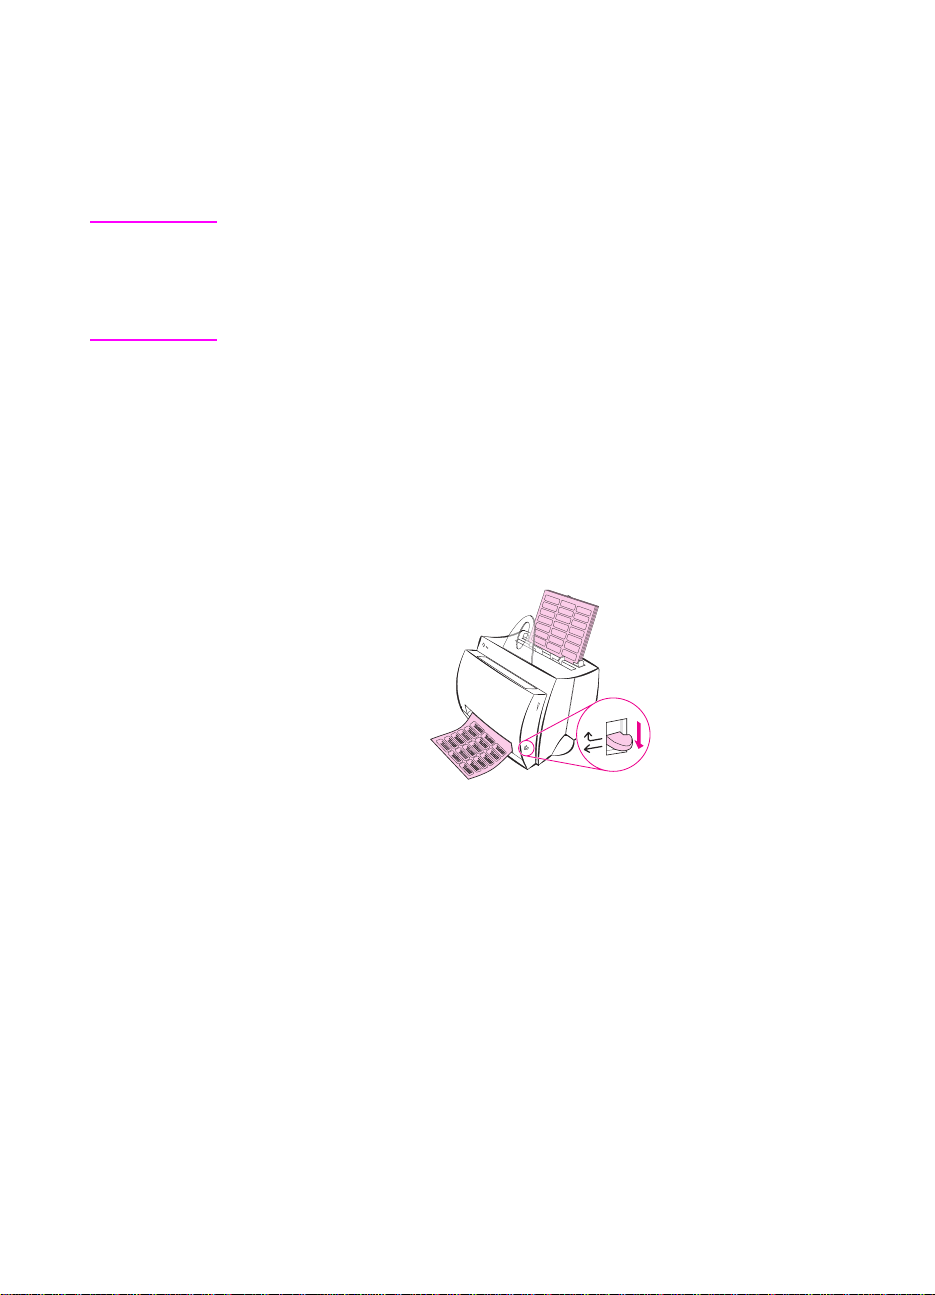
1 Adjust the paper-output lever to the down position.
2 Load with the top down and the side-to-be-printed (rough side)
facing toward the front of the printer. Adjust the paper guides.
3 Print, and then remove the transparencies from the front of the
printer to prevent them from sticking together. Place the printed
transparencies on a flat surface.
36 Chapter 3 Printing media
EN
Page 37

Printing envelopes
CAUTION
Only use envelopes recommended for laser printers. See “Printer
paper specifications.”
1
Adjust the paper output-lever to the down position.
2
Load with the narrow, stamp-side down and the side-to-bepr i n t e d fa c i n g t o wa r d t h e f r o n t o f th e p r i n t e r. Adjust the
paper guides to fit the envelope.
3
Select the correct envelope size in the software application. This
setting can be accessed through the printer properties. See
“Printer properties (driver).”
4
Print.
EN
Printing envelopes
37
Page 38
Printing labels
Only use labels recommended for laser printers, such as HP LaserJet
labels. See “Printer paper specifications.”
CAUTION Do not use labels that are separating from the backing sheet, wrinkled,
or damaged in any way . Do not feed a sheet of labels through the printer
twice. The adhesive backing is designed for one pass through the
printer. Also, do not use continuous feed labels or labels that require
moisture to stick.
1 Adjust the paper output-lever to the down position.
2 Load with the top down and the side-to-be-printed facing
toward th e front of the printer. Adjust the paper guides to fit
the width of the label sheet.
3 Print, and then remove the printed label sheets from the front of
the printer as they are printed to prevent them from sticking
together.
38 Chapter 3 Printing media
EN
Page 39

Printing letterhead
1
Load with the top down and the side-to-be-printed facing toward
the front of the printer. Adjust the paper guides to fit the width of
the paper.
2
Print.
To pr int a single page cover letter, using letterhead, followed by a
multi-page document, load the letterhead in the single-sheet paper
input tray and load the standard paper in the multi sheet paper input
tray. By default, the printer prin ts from the single sheet paper input
tray first.
Cover letter follo wed by document.
Use both input trays.
EN
Printing letterhead
39
Page 40

Printing cards
The HP LaserJet 1100 does not support paper smaller than 76 by
127 mm (3 by 5 in.). Verify cards are not stuck together before
loading.
1 Adjust the paper output-lever to the down position.
2 Load with the narrow side down and the side-to-be-printed
fa c i ng t oward t he f ro nt o f t h e p ri nt er. Adjust the paper guides
to fit the card.
3 Select the correct card size in the software application being
used. (Software settings can override printer properties.)
4 Print.
40 Chapter 3 Printing media
EN
Page 41

4
Printing tasks
This chapter provides information on the following topics:
●
Printing with manual feed
●
Printing on both sides of the paper (manual duplexing)
●
Printing watermarks
●
Printing multiple pages on a single sheet of paper
(N-up printing)
●
Printing booklets
●
Canceling a print job
●
Changing print quality settings
●
Print using EconoMode (save toner)
EN
41
Page 42
Printing with manual feed
Use manual feed when printing mixed media; for example, an
envelope, then a letter, then an envelope, and so forth. Load an
envelope in the single sheet paper input tray and load letterhead in
the multiple-page paper input tray. Also, use manual feed to protect
your privacy when printing to a network printer.
To print using manual feed, you must access the printer properties or
printer setup in your software application and select Manual Feed
from the Source drop down list. See “Printer properties (driver).”
After the setting has been enabled, you must press the Go button
(blinking) each time to print.
42 Chapter 4 Printing tasks
EN
Page 43

Printing on both sides of the paper
(manual duplexing)
To print on both sides of the paper (manual duplexing), you must run
the paper through the printer twice. You ca n print using the paper
output bin or the straight-through output path. HP recommends using
the paper output bin for light-weight paper. Use the straight-through
output path for any heavy media or media that tends to curl when
printed, such as envelopes and card stock.
●
Manual duplex using the paper output bin (standard)
●
Manual duplex (special) heavy-media, card stock
Note
Manual duplexing can cause the printer to become dirty more quickly
and reduce print quality. See “Cleaning the printer” if the printer
becomes dirty.
EN
Printing on both sides of the paper (manual duplexing)
43
Page 44

Manual duplex using the
paper output bin
(standard)
1
2
3
1 Adjust the paper-output lever to the
up position.
2 Access the printer properties. See
“Printer properties (driver).” On the
Finishing tab, click Manual Duplex
(standard), and then click OK. Print
the document.
3 After side one has been printed,
remove the remaining paper from
the
paper input tray
until after you finish your manual
duplexing job.
4 Gather up the printed pages from
side one, rotate the stack clockwise,
and then straighten the stack before
placing it back in the paper input
tray. Once reloaded, page one
should be oriented upside down and
located closest to the back of the
printer. (The printed side should be
facing toward the back of the
printer.)
and set it aside
4
44 Chapter 4 Printing tasks
Click OK (on screen), and then wait
for the pages to print.
EN
Page 45

Manual duplex (special)
heavy-media, card stock
For heavy media (card stock, etc.), use
the straight-through output path.
1
1
2
3
Adjust the paper-output lever to the
down position.
2
Access the printer properties. See
“Printer properties (driver).” On the
Finishing
(special),
the document.
3
After side one has been printed,
remove the remaining paper from
the
until after you finish your manual
duplexing job.
4
Gather up the printed pages from
side one, flip the stack, and then
straighten the stack before placing it
back in the paper input tray. Once
reloaded, page one should be
oriented upside down and located
closest to the front of th e printer.
(The printed side should be facing
toward the back of the printer.)
tab, click
and then click
paper input tray
Manual Duplex
OK.
and set it aside
Print
EN
OK
Click
for the pages to print.
4
Printing on both sides of the paper (manual duplexing)
(on screen), and then wait
45
Page 46

Printing watermarks
The watermark option allows you to print text “undernea th” (in the
background) of an existing document. For example, you may want to
have large gray letters reading “draft” or “confidential” printed
diagonally across the first page or all pages of a document.
Accessing the watermark feature
1 From your software application, access the printer properties.
See “Printer properties (driver).”
2 On the Finishing tab, you can specify the type of W atermark you
would like to have printed on your document.
46 Chapter 4 Printing tasks
EN
Page 47

Printing multiple pa ges on a single sheet of paper
(N-up printing)
You can select the number of pages you want to print on a single
sheet of paper. If you choose to print more than one page per sheet,
the pages will appear decreased in size and will be arranged on the
sheet in the order that they would otherwise be printed. Specify up to
9 pages per sheet of paper.
Accessing the multiple pages per sheet feature
1
From your software application, access the printer properties.
See “Printer properties (driver).”
EN
2
On the
the number of
printed.
Printing multiple pages on a single sheet of paper (N-up printing)
Finishing
Pages per sheet
tab and
Document Options,
that you would like to have
you can specify
47
Page 48

Printing booklets
You can print booklets on letter, legal,
executive, or A4 size paper.
1
2
3
1 Load the paper, and then adjust the
paper-output lever to the up position.
2 From your software application,
access the printer properties. See
“Printer properties (driver).” On the
Finishing tab click Booklet
printing, and then click OK. Print
the document.
3 After side one has been printed,
remove the remaining paper from
the paper
until your booklet job is complete.
4 Gather up the pages from side one,
rotate them clockwise, and then
straighten the stack of paper.
Continued on next page.
input tray,
and set it aside
4
48 Chapter 4 Printing tasks
EN
Page 49

5
5
Place the pages from side one back
in the paper input tray. The printed
text should be oriented sideways
and facing toward the back of the
printer. Click
OK
(on screen). The
printer will finish printing.
6
Fold and staple the pages.
6
EN
Printing booklets
49
Page 50

Canceling a print job
A print job can be canceled from a software application or a print
queue:
●
Remove remaining paper from the printer: This will stop the
printer immediately. Use either of the next two options after the
printer is stopped.
●
Software application: Typically, a dialog box will briefly appear
on your screen allowing you the option to cancel the print job.
●
Print queue: If a print job is waiting in a print queue (PC memory)
or print spooler, delete the job there. Go to your Printer screen,
either though the Windows
through
click on the HP LaserJet 1100 icon to open the window, select
your print job, and then press Delete.
If the control panel status lights continue to blink after a print job has
been canceled, the computer is still sending the job to the printer.
Either delete the job from the print que ue or wait until the computer
has finished sending data. The printer will return to the Ready state.
Start, Settings, Printers
Control Panel
(Windows 3.1x) or
in Windows 9x & NT 4.0. Double-
50 Chapter 4 Printing tasks
EN
Page 51

Changing print quality settings
Print quality settings affect such things as how light or dark the print
on the page is and the style in which you would like graphics printed.
You can change the settings in printer properties to accommodate the
types of jobs you are printing. The possible settings are as follows:
●
Best Quality
●
Faster Printing
●
LaserJet III Compatibility
●
Custom
●
EconoMode (Save Toner)
Finishing
Print Setup
Note
These settings can be accessed on the
Quality
To change the print quality settings for all future print jobs, access the
propertie s through the
print quality settings only for the current software application use,
access the properties through the
from which you are printing. See “Printer properties (driver).”
settings in the printer properties.
Start
menu in your system tray. T o change the
Print using EconoMode (save toner)
An excellent way to extend the life of your toner cartridge is by using
EconoMode. EconoMode uses substantially less toner than normal
printing. The printed image is much lighter, but is adequate for
printing drafts or proofs.
Properties
EconoMode.
Note
To enable EconoMode, access the printer
Finishing
To enable EconoMode for all future jobs, see “Printer properties
(driver).”
tab under
Print Quality,
click
tab under
menu in the application
. On the
Print
EN
Changing print quality settings
51
Page 52

5
Scanning tasks
This chapter provides information on the following topics:
●
Scanning to fax
●
Scanning to e-mail
●
Editing scanned text (OCR)
●
Storing scanned text or images
●
Acquiring an image
●
Contrast sensitive originals
●
Enhancing the scanned image
●
Adding annotations to scanned images
●
Canceling scan or copy jobs
Note
EN
Scanning with the correct resolution and gray scale settings for your
job is important in ord er to obtain good results. To learn more about
scanner resolution and gray scale, see “Scanner resolution and gray
scale.” Also, see the online help: “Accessing the online help.”
52
Page 53

Scanning to fax
Scan to fax using the Document Assistant or the LaserJet Document
Desktop. You can change the properties for this feature within the
LaserJet Toolbox. See “LaserJet Toolbox.”
Using the Fax feature
1
Load the original with the narrow-side down and the side-to-bescanned facing toward the front of the scanner.
2
Adjust the paper guides.
3
Press the
Scan
button on the scanner.
Windows 9x & NT 4.0
The Document Assistant will launch automatically after the Scan
button is pressed.
1
2
Fax
Click
The original will scan, and your PC fax software application will
launch automatically and prompt for a sending address. Once
specified, the fax software application will then print
(electronically) the document to the fax port on your PC.
in the Document Assistant.
Windows 3.1x
After the Scan button is pressed, the LaserJet Document Desktop will
launch automatically and the original will scan.
1
Change the image if necessary: crop, scale, add annotations, and
etc.
2
Click on the image and drag it to the fax icon, or click
to,
and then
prompt for a sending address. Once specified, the fax software
application will then print (electronically) the document to the fax
port on your PC.
Fax.
Your PC fax software application will launch and
File, Send
Note
EN
If the fax icon is not present or is not active, either you do not have a
fax software application installed on your PC or the application was not
recognized by the scanner software during installation. See the online
help to create a link to your fax software application: “Accessing the
online help.”
Scanning to fax
53
Page 54

Scanning to e-mail
Scan to e-mail using the Document Assistant or the LaserJet
Document Desktop. You can change the properties for this feature
within the LaserJet Toolbox. See “LaserJet Toolbox.”
Using the E-Mail feature
1 Load the original with the narrow-side down and the side-to-be-
scanned facing toward the front of the scanner.
2 Adjust the paper guides.
3 Press the Scan button on the scanner.
Windows 9x & NT 4.0
The Document Assistant will launch automatically after the Scan
button is pressed.
1 Click E-Mail in the Document Assistant.
2 The original will scan, and your PC e-mail software application
will launch with the scanned image automatically attached as a
file.
Windows 3.1x
After the Scan button is pressed, the LaserJet Document Desktop will
launch automatically and the original will scan.
1 Change the image if necessary: crop, scale, add annotations, and
etc.
2 Click on the image and drag it to the e-mail icon or click File,
Send to, and then E-Mail. Your e-mail software application will
launch with the scanned image automatically attached as a file.
Note If the e-mail icon is not present or is not active, either you do not have
an e-mail software application installed on your PC or the application
was not recognized by the scanner software during installation. See
the online help to create a link to your e-mail software application:
“Accessing the online help.”
54 Chapter 5 Scanning tasks
EN
Page 55

Editing scanned text (OCR)
Use the “Edit” feature to edit text. You can edit faxes, letters, meeting
notes, newspaper clippings, and many other documents. When
editing scanned text, an Optical Character Recognition (OCR)
application will read the text and enable you to import it into a word
processing program where you can make your edits. You can change
the properties for this feature within the LaserJet Toolbox. See
“LaserJet Toolbox.”
Using the OCR feature
1
Load the original with the narrow-side down and the side-to-bescanned facing toward the front of the scanner. If possible, load
so that the text is positioned horizontally and upside down;
otherwise, you will need to rotate the image.
2
Adjust the paper guides.
3
Press the
Scan
button on the scanner.
Windows 9x & NT 4.0
The Document Assistant will launch automatically after the Scan
button is pressed.
1
2
3
OCR
Click
The original will scan, and your word processing software
application will launch automatically with the scanned image
optically read and ready to edit.
Check the spelling in your document.
in the Document Assistant.
EN
Editing scanned text (OCR)
55
Page 56

Windows 3.1x
After the Scan button is pressed, the LaserJet Document Desktop will
launch automatically and the original will scan.
1 Rotate the image, if necessary.
2 Click on the image and drag it to the word processing icon or click
File, Send to, and then the name of your word processing
application. Your word processing software application will launch
with the scanned image optically read and ready to edit.
3 Check the spelling in your document.
Note If the word processing icon is not present or is not active, either you do
not have a word processing software application installed on your PC
or the application was not recognized by the scanner software during
installation. See the online help to create a link to your word processing
software application: “Accessing the online help.”
56 Chapter 5 Scanning tasks
EN
Page 57

Storing scanned text or images
Your HP software enables you to quickly store scanned images in a
directory of your choice, saving you time by providing direct access to
your file management system. Store scanned images using the
Document Assistant or the LaserJet Document Desktop. You can
change the properties for this feature within the LaserJet Toolbox.
See “LaserJet Toolbox.”
Using the Store feature
1
Load the original with the narrow-side down and the side-to-bescanned facing toward the front of the scanner.
2
Adjust the paper guides.
3
Press the
Scan
button on the scanner.
Windows 9x & NT 4.0
The Document Assistant will launch automatically after the Scan
button is pressed.
1
2
Continued on next page.
3
4
Store
Click
The original will scan, and your word processing software
application will launch automatically with the scanned image
stored on the desktop.
Change the image if necessary: crop, scale, add annotations, and
etc.
Drag the image to the directory of your choice located on the left
side of the LaserJet Document Desktop, or click
then select a directory to store the file.
in the Document Assistant.
File, Move,
and
Windows 3.1x
After the Scan button is pressed, the LaserJet Document Desktop will
launch automatically and the original will scan.
1
Change the image if necessary: crop, scale, add annotations, and
etc.
EN
2
Click on the image and drag it to the directory of your choice
located on the left side of the LaserJet Document Desktop, or
File, Move,
click
and then select a directory to store the file.
Storing scanned text or images
57
Page 58

Acquiring an image
You can start a scan from the HP LaserJet Document Desktop. You
can also acquire an image from any TWAIN-compliant device, such
as a TWAIN-compliant digital camera or scanner (other than the
Copier/Scanner). The online help provides more information on how
to acquire an image. See “Accessing the online help.”
Contrast sensitive originals
If scanning or copying an original that has a
colored background and text that does not stand
out very well, you may need to adjust the contrast.
For example, if you scan or copy a yellow receipt
with light-gray print, the text may not be legible.
Increase the contrast (darken the text) to make the
text more legible.
Accessing the contrast feature
Scanning
●
Using the Document Assistant: Click the More >> button.
●
Using the LaserJet Document Desktop: Select the To ols tab,
select Image Enhancement, and then Contrast.
Copying
●
Quick Copies: From the Document Assistant click the Tools
button, and then click Quick Copy Settings. These settings will
remain for all Quick Copies until changed.
●
Full featured copies: Open the Copier Control Panel.
58 Chapter 5 Scanning tasks
EN
Page 59

Enhancing the scanned image
You can make enhancements to scanned images using the LaserJet
Document Desktop:
●
Rotate and flip
●
Straighten
●
Invert
●
Sharpen
●
Clean
●
Convert to gray scale
●
Adjust contrast
●
Crop
Note
The online help provides instructions on how to use these features. See
“Accessing the online help.”
Accessing image enhancement features
From the LaserJet Document Desktop, click
Image Enhancement.
Tools,
and then click
EN
Enhancing the scanned image
59
Page 60

Adding annotations to scanned images
HP software enables you to modify and create annotations on your
scanned images. You can do any of the following to your scanned
image:
●
Add text
●
Add sticky notes
●
Highlight text or graphics
●
Rubber stamp the image (for example: “confidential”)
●
Draw lines and arrows
Note The online help provides instructions on how to use these features. See
“Accessing the online help.”
Accessing the annotatio n feature s
From the LaserJet Document Desktop, click Tools, and then click
Annotations.
Note To change the ann otations se ttings, click Tools, and then click
Annotation Properties.
Canceling scan or copy jobs
●
Cancel copy jobs by pressing both buttons on the scanner control
panel simultaneously.
●
Click cancel in the dialog box on the PC screen.
60 Chapter 5 Scanning tasks
EN
Page 61

6
Copying tasks
This chapter provides information on the following topics:
●
Copy overview
●
Making Quick Copies
●
Using the Copier Control Panel
●
Canceling copy jobs
EN
61
Page 62

Copy overview
There are two methods you can use to make copies:
●
Making Quick Copies
●
Using the Copier Control Panel
Each method is intended to be used for different purposes.
Making Quick Copies
Quick Copies enable you to quickly make a single cop y of a document
(up to 20 pages), and your PC does not have to be turned on. You can
change the default Quick Copy settings, if necessary , to yield the best
looking copies for the type of original you copy most. These settings
will be applied to every Quick Copy job until you change them.
Note For making multiple copies or copies that differ from your most common
type of original, use the Copier Control Panel. See “Using the Copier
Control Panel.”
See “Quick Copy settings” or the online help for more information on
changing the default Quick Copy settings. See “Accessing the online
help.”
1 Ensure the printer is loaded with paper.
2 Load the original document (up to 20 pages) in the scanner paper
input tray with the narrow side down and the side-to-becopied facing toward the front of the scanner. Adjust the
paper guides to fit the original. See “Loading Copier/Scanner
originals.”
3 Adjust the paper output lever on the printer to accommodate the
copy job. Use the paper output bin (le ver up) if you are copying to
standard weight media. Use the straight-through output path
(lever down) if you are copying heavy media.
4 Press the Copy button on scanner.
62 Chapter 6 Copying tasks
EN
Page 63

Quick Copy settings
You can change the default Quick Copy settings. Quick Copy settings
will remain the same for all future Quick Copy jobs, e ven when the PC
is turned off, until you change the defaults again (the PC must be
turned on to change the settings). Quick Copy settings include the
following:
●
Type of originals (combination, text, or photograph)
●
Paper size (select the size of your most common original to be
copied)
●
Contrast
Accessing the Quick Copy settings
●
WIndows 9x & NT 4.0:
Document Assistant:
•
Settings.
Program Group:
•
and then
●
Windows 3.1x:
HP LaserJet 1100
Settings.
Click
Quick Copy Settings.
From the
icon, and then double-click
Click
Tools,
and then
Quick Copy
Start, Programs, HP LaserJet 1100,
Program Manager,
double-click the
Quick Copy
EN
Making Quick Copies
63
Page 64

Using the Copier Control Pa nel
Use the Copier Control Panel when you wish to do any of the
following tasks with your original to be copied:
●
Print multiple copies of the same document (load up to 20 pages)
●
Deskew
●
Remove speckles
●
Specify the type of original (the software automatically selects
optimum settings for the type of original you specified)
●
Scale the image
●
Adjust the contrast
Note The online help provides instructions on how to use these features. See
“Accessing the online help.”
Accessing the Copier Control Panel
Access the Copier Control Panel from the following locations:
Windows 9x & NT 4.0
●
Document Assistant: Click Copy.
●
Program Group: Clic k Start, Pr ograms, HP LaserJet 1100, and
then Copier Control Panel.
●
LaserJet Document Desktop: Click Tools, and then Copier
Utility.
Canceling copy jobs
Cancel copy jobs by pressing both buttons on the scanner control
panel simultaneously.
64 Chapter 6 Copying tasks
EN
Page 65

Managing the toner
7
cartridge
This chapter provides information on the following subjects:
●
HP toner cartridges
●
Redistributing toner
●
Changing the toner cartridge
EN
65
Page 66

HP toner cartridges
HP policy on non-HP toner cartridges
Hewlett-Packard Company cannot recommend use of non-HP toner
cartridges, either new, refilled, or remanufactured. Since they are not
HP products, HP cannot influence their design or control their quality.
Note Warranty does not apply to defects resulting from software, interf acing,
parts, or supplies not supplied by HP.
Toner cartridge storage
Do not remove the toner cartridge from its package until you are
ready to use it. The shelf life of a cartridge in an unopened package is
approximately 2.5 years. The shelf life of a cartridge in an opened
package is approximately 6 months.
CAUTION To prevent damage to the toner cartridge, do not expose it to light for
more than a few minutes.
Toner cartridge life expectancy
The life of the toner cartridge depends on the amount of toner that
print jobs require. When printing text at 5% coverage, an
HP LaserJet 1100 toner cartridge lasts an average of 2,500 pages.
This assumes the print density is set to 3 and Econo Mode is off.
(These are the default settings.)
Recycling toner cartridges
To install a new HP toner cartridge, see “Changing the toner
cartridge” or follow the instructions included in the toner cartridge
box. Also, see the recycling information on the toner cartridge box
and “HP Cartridge Recycling Program information.”
Saving toner
To save toner, select the EconoMode option in your printer properties
settings. EconoMode (Save Toner) allows the printer to use less toner
on each page. Selecting this option will extend the life of the toner
cartridge and reduce your cost per page, but will reduce print quality.
See “Print using EconoMode (save toner).”
66 Chapter 7 Managing the toner cartridge
EN
Page 67

Redistributing toner
1
When toner is low, faded or light areas
may appear on a printed page. You may
be able to temporarily improve print
quality by redistributing the toner. The
following procedure may allow you to
finish the current print job before
replacing the toner cartridge.
Note
If the scanner is attached, it may be
necessary to move the printer to the
edge of the work space before opening
the printer door in order to get the full
range of motion.
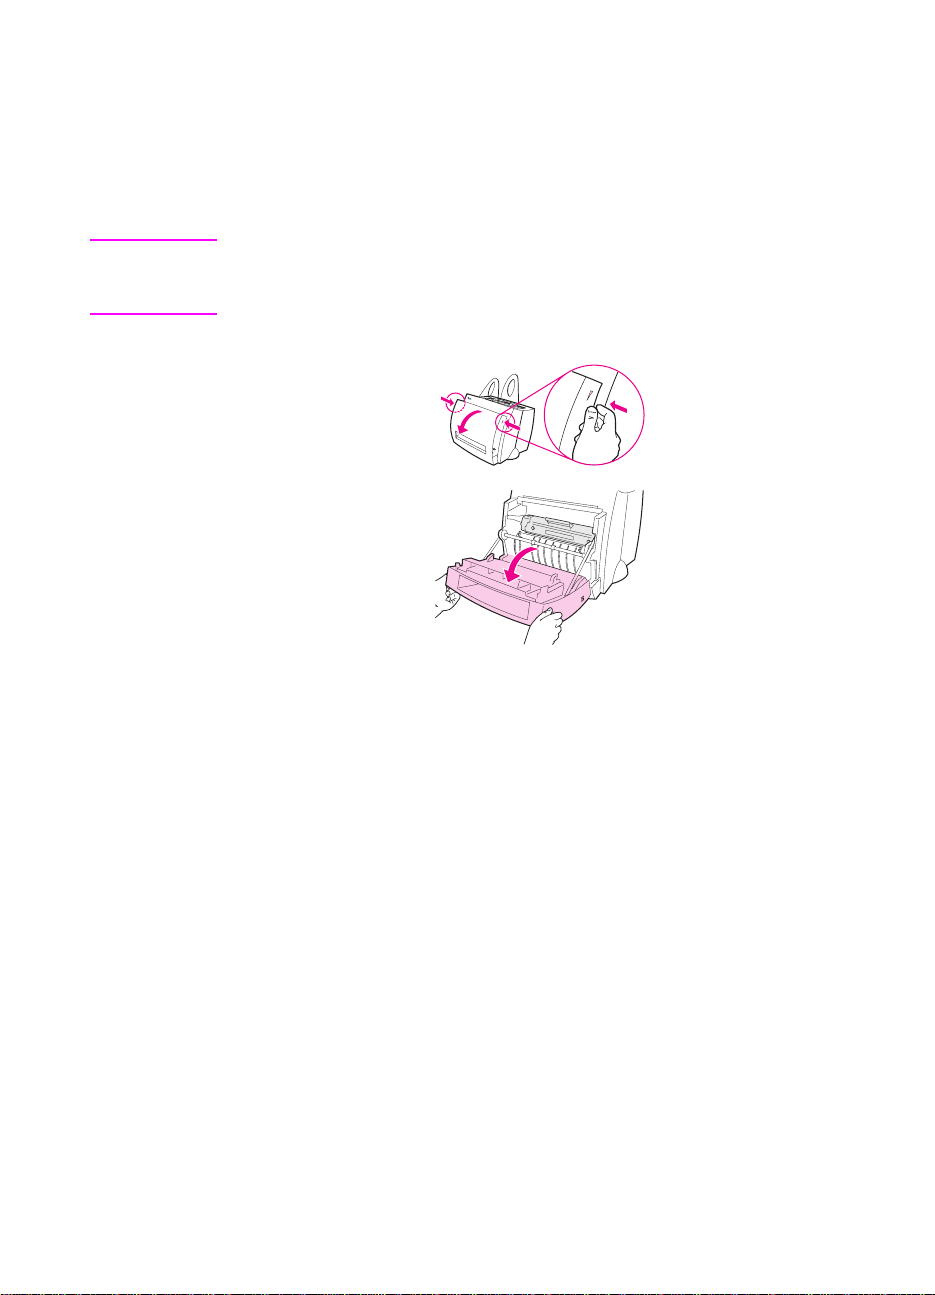
1
Open the printer door and remove
the toner cartridge from the printer.
CAUTION
To prevent damage, do not expose the
toner cartridge to light for more than a
few minutes. Cover it with a sheet of
paper.
EN
2
3
2
Gently shake the toner cartridge
from side-to-side to redistribute the
toner.
CAUTION
If toner gets on your clothing, wipe it off
with a dry cloth and wash clothing in cold
Hot water sets toner into fabric.
water.
3
Reinsert the toner cartridge into the
printer and close the printer door.
If the print remains light, install a new
toner cartridge. See “Changing the toner
cartridge.”
Redistributing toner
67
Page 68

Changing the toner cartridge
1
2
3
To change the toner cartridge, follow the
instructions below:
Note
If the scanner is attached, it may be
necessary to move the printer to the
edge of the work space before opening
the printer door in order to get the full
range of motion.
1 Open the printer door and remove
2 Remove the new toner cartridge
the old toner cartridge. See
“Recycling toner cartridges” for
recycling information.
from the packaging, and then gently
shake it from side to side in order to
distribute the toner evenly inside the
cartridge.
4
5
68 Chapter 7 Managing the toner cartridge
CAUTION
To prevent damage, do not expose the
toner cartridge to light for more than a
few minutes. Cover it with a piece of
paper.
3 Bend the tab on the right side of the
cartridge to break it loose.
CAUTION
If toner gets on your clothing, wipe it off
with a dry cloth and wash clothing in cold
water.
Hot water sets toner into fabric.
4 Pull the tab until all the tape is
removed from the cartridge.
5 Insert the toner cartridge in the
printer. Be certain that the toner is
firmly in position, and then close the
printer door.
EN
Page 69

Troubleshooting the
Note
8
See HP’s Web site for software and printer driver updates, frequently
asked questions, and additional troubleshooting information. See
“Online services” for your specific Web address.
printer
This chapter provides information on the following subjects:
●
Finding the solution
●
Improving print quality
●
Cleaning the printer
●
Clearing printer paper jams
●
Resetting the printer
EN
69
Page 70

Finding the solution
Use this section to find the solution to common printer problems. For
copying or scanning problems, see “Finding the solution” in the
scanner troubleshooting chapter.
Pages did not print . . .
●
Light patterns: What light pattern is displayed on the printer
control panel? See “Printer light patterns.”
●
Error messages on screen: Is there a message on the screen?
See “Error messages on screen.”
●
Paper handling: Is paper being pulled into the printer
incorrectly? Are there paper jams? See “Paper handling
problems.”
Pages printed; however . . .
●
The print quality was poor: See “Improving print quality.”
●
The printed pages do not always appear the same as the
screen (print preview): See “Printed page is different th an what
appeared on screen.”
70 Chapter 8 Troubleshooting the printer
EN
Page 71

Printer light patterns
Light status legend
Symbol for “light off”
Symbol for “light on”
Symbol for “light blinking”
Control panel light messages
Light status Condition of the printer Action
PowerSave mode
(or the printer is off)
The printer us es PowerSave
mode to conserve energy.
Ready
The printer is re ad y to print.
Processing
The printer is re ce iv i ng or
processing data.
Pressing the Go button on the printer co ntr o l
panel or printing will awaken the printer from
PowerSave mode. Check the power cord if
the above actions do not generate a
response (and the power switch if your
printer is powered with 220-240 volts).
No action is necessary; howe v er , if y ou press
and release the Go button on the printer
control panel, a self-test page will print.
Wait for the job to print.
EN
Buffered data
The printer memory is retaining
unprinted data.
Press and release the Go button on the
printer control panel to print the remaining
data.
Finding the solution
71
Page 72

Control panel light messages (continued)
Light status Condition of the printer Action
Manual feed
The printer is in ma nua l feed
mode.
Door open, no toner cartridge,
or paper jam
The printer is in an erro r sta t e.
Paper out
The printer is ou t o f pa pe r.
Memory out
The printer ran out of memory in
the middle of a pr in t job.
Check that you have loaded the correct
paper, then press and release the Go button
on the printer control panel to print. Manual
feed is controlled by the software. If you do
not want to be in manual feed mode, change
the setting from you r printer properties. See
“
Printer properties (driver)
Check the following:
The printer door is closed.
●
The toner cartridge is correctly installed
●
in the printer . See “
cartridge
There are no paper jams. Se e “
●
.”
printer paper jams
Load paper into the printer. See “
paper into the printer
The page being printed may have been too
complex for the memory capacity of the
printer.
See “
●
●
Memory (DIMMs)
memory.
Press and release the Go button to print.
.”
Changing the toner
Clearing
.”
Loading
.”
” to add
Reset/Printe r in it ia li za t io n
The printer me mory is being
reset and all previously sent
print jobs are being purged. Or,
a printer initia lization is taking
place. All lights blink for 1/2 of a
second or longer if in it ia lizing.
72 Chapter 8 Troubleshooting the printer
No action is necessary. However, you can
reset the printer if you press and h old th e Go
button for 5 seconds.
EN
Page 73

Control panel light messages (continued)
Light status Condition of the printer Action
Fatal error
All lights are on.
●
Reset the printer.
●
Turn the printer off and then back on.
●
Contact HP Support. See “
Support
.”
HP
EN
Finding the solution
73
Page 74

Error messages on screen
Error messages on screen
Error Message Solution
Printer not responding/
error writing to LPT1
Cannot access port (in
use by another
application)
Verify the following:
Ready light is on.
●
Pow er cord and parallel cable are correctly
●
connected.
Try the following:
Disconnect and reconnect the power cord
●
and parallel cable at both ends.
Use another IEEE-1284 compliant parallel
●
cable.
There is a device conflict. This can occur if
another printer connected to your computer is
running status software. The status software
dominates the parallel port on the computer and
will not allow the HPLaserJet 1100 to access the
port.
Try the following:
Disable all status windows for other printers.
●
Verify the port setting is correct for the
●
printer. Access the printer properties; see
“
Printer properties (driver)
settings can be accessed under the
properties
Properties screen.
tab in the Printer
Details
.” The port
74 Chapter 8 Troubleshooting the printer
EN
Page 75

Error messages on screen (continued)
Error Message Solution
Illegal operation/General
protection fault/Spool 32
error
This error indicates that a problem occurred in
Windows with your computer system resources
(memory or hard disk).
To clear this error, restart your PC.
To help prevent this error from occurring in the
future, use some or all of the following
recommendations:
●
Run fewer applications at the same time.
Close (rather than minimi z e ) the appli cat io ns
that you are not using at the current time.
Programs such as screen savers, virus
checkers, status software, fax/answering
software, and menu programs use the
resources that you might need in order to
print.
●
Avoid performing memory intensive tasks
such as sending a fax or running a video clip
while printing.
●
Delete all temp (“file_name .tmp”) files from
the
subdirectory
●
Print at 300 dpi rather than 600 dpi.
●
Use an alternate print driver (printer
subdirectorie s. For example, the
Temp
C:\Windows\Temp.
software), such as software for the
HP LaserJet III.
Using a different driver
Note:
will remove access to some product features.
EN
Finding the solution
75
Page 76

Paper handling problems
Paper handling problems
Problem Solution
Paper jam
Print is skewed
(crooked )
More than one sheet of
paper feeds throu gh
the printer at one time
Printer does not pull
paper from the paper
input tra y
Printer made my paper
curl
Verify you are printing with paper that meets
●
specifications. See “
specifications
Verify you are printing with paper that is not
●
wrinkled, folded, or damaged.
See “
●
●
Clearing printer paper jams
Adjust the paper guides to the width of the
paper being printed and try reprinting. See
“
Printer paper guides
into the printer
See “
●
●
●
●
Page skew
The paper input tray may be overfilled. See
“
Loading paper into the printer
paper is not wrinkled, folded, or damaged.
Verify the printer is not in Manual Feed mode.
See “
Printer light patterns
The pickup ro ller may be dirty or damaged. See
“
Cleaning the pickup roller
the pickup roller
Adjust the paper output lever to the down
●
position to print using the straight-through
output path. See “
or “
Printing media
See “
●
Curl or wave
Printer paper
.”
.”
” or “
Loading paper
.”
.”
.” Verify the
.”
” or “
Changing
.”
Printer paper output paths
.”
.”
”
The printer does not
output the printed
paper to the correct
path
Adjust the paper output lever to reflect your desired
paper output path. See “
paths
76 Chapter 8 Troubleshooting the printer
Printer paper output
.”
EN
Page 77

Printed page is different than what appeared
on screen
Printed page problems
Problem Solution
Print job prints
ext remely slow
Garbled,
incorrect, or
incomplete text
The maximum speed of the printer is 8 page s per mi n ut e,
which cannot be ex ceeded. This speed is me asured using
“Letter” sized pap er . “Lette r” is a U .S. standard paper size,
which is smaller than European A4. Your print job may be
very complex. Try the following:
●
Reduce the complexity of your document (reduce the
number of multiple graphics, and etc.).
●
Change setting in the printer properties to “Faster
Printing.” See “
●
Add printer memor y. See “
(memory)
The parallel cable may be loose or defective. Try the
following:
●
Disconnect the parallel cable and reconnect it.
●
Try printing a print job that you know works.
●
If possible, attach the cable and printer to another
computer and try printing a print job that you know
works.
●
Try using a new IEEE-1284 c om p l ia nt pa ralle l c able.
See “
Accessories and ordering information
The wrong printer driver may have been selected while
installing the software. Verify the HP LaserJet 1100 is
selected in the printer properties.
Printer properties (driver)
Installing DIMMs
.”
.”
.”
EN
The software application may be malfunctioning. Try
printing from another software application.
Finding the solution
77
Page 78

Printed page problems (continued)
Problem Solution
Missing graphics
or text
Page format
changed
The file may have blank pages. Try the following:
Check the file to make sure that your file does not
●
contain blank pages.
The graphic settings in the printer properties may not be
correct for the type of job you are printing:
Try a different gr aphic set ting in the print er properties.
●
To access the printer properties, see “
properties (driver)
.”
Printer
The printer driver may not work for t he typ e o f job you are
printing.
Try using a different printer driver (software) such as
●
the driver for the HP LaserJet III.
Note:
Using a
different driver will remove access to some product
features.
If the document was created while using an older or
different printer driver (printer software) or the printer
properties settings in the software are different, the page
format may change when t rying to print using your new
printer driver or settings. To help eliminate this problem,
try the following:
Create documents and print them using the same
●
printer driver (printer software) and printer property
settings regardless of the HP LaserJet printer to
which you are printing.
Change your printer property settings. Try changing
●
resolution, paper size, font settings, and other
settings. See “
Printer properties (driver)
.”
Graphics quality The graph ics sett ings ma y be uns uitab le f or yo ur print job.
Check graphic settings in the printer properties and
●
adjust them as necessary, such as resolution. See
“
Printer properties (driver)
Try using a different printer driver (software) such as
●
the driver for the HP LaserJet III.
different driver will remove access to some product
features.
78 Chapter 8 Troubleshooting the printer
.”
Using a
Note:
EN
Page 79

Improving print quality
This section provides information on the following topics:
●
Image defect examples
●
Correcting print defects
Image defect examples
Light print or fade DropoutsToner specks
EN
Toner smearGray backgroundVertic al lines
Improving print quality
79
Page 80

Loose toner
Vertical repetitive
defects
Misformed
characters
Page skew Curl or wave Wrinkles or
creases
80 Chapter 8 Troubleshooting the printer
EN
Page 81

Correcting print defects
Light print or fade
●
The toner supply is low. You may be able to temporarily extend
the toner cartridge life. See “Managing the toner cartridge.”
●
The paper may not meet HP’s paper specifications (for example,
the paper is too moist or too rough). See “Printer paper
specifications.”
●
If the whole page is light, the print density adjustment is too light
or EconoMode may be on. Adjust the print density and disable
EconoMode within the printer properties. See “Print using
EconoMode (save toner).”
Toner specks
●
The paper may not meet HP’s paper specifications (for example,
the paper is too moist or too rough). See “Printer paper
specifications.”
●
The printer may need to be cleaned. See “Cleaning the printer” or
“Cleaning the printer paper path.”
Note
EN
Dropouts
●
A single sheet of paper may be defective. Try rep rinting the job.
●
The moisture content of the paper is uneven or the paper has
moist spots on its surface. Try printing with new paper. See
“Printer paper specifications.”
●
The paper lot is bad. The manufacturing processes can cause
some areas to reject toner. Try a different kind or brand of paper.
●
The toner cartridge may be defective. See “Managing the toner
cartridge.”
If these steps do not correct the problem, contact an HP-authorized
dealer or service representative.
Vertical lines
●
The photosensitive drum inside the toner cartridge has probably
been scratched. Install a new HP toner cartridge. See “Changing
the toner cartridge.”
Improving print quality
81
Page 82

Gray background
●
Decrease the print density setting. This will decrease the amount
of background shading. Access this setting under “Printer
properties (driver).”
●
Change the paper to a lighter basis weight. See “Printer paper
specifications.”
●
Check the printer’s environment; very dry (low humidity)
conditions can increase the amount of background shading.
●
Install a new HP toner cartridge. See “Changing the toner
cartridge.”
Toner smear
●
If toner smears appear on the leading edge of the paper, the
paper guides may be dirty. Wipe the paper guides with a dry, lintfree cloth. See “Printer components” or “Cleaning the printer.”
●
Check the paper type and quality.
●
Try installing a new HP toner cartridge. See “Changing the toner
cartridge.”
Loose toner
●
Clean the inside of the printer. See “Cleaning the printer.”
●
Check the paper type and quality. See “Printer paper
specifications.”
●
Try installing a new HP toner cartridge. See “Changing the toner
cartridge.”
Vertical repetitive defects
●
82 Chapter 8 Troubleshooting the printer
The toner cartridge may be damaged. If a repetitive mark occurs
at the same spot on the page, install a new HP toner cartridge.
See “Changing the toner cartridge.”
●
Internal parts may have toner on them. See “Cleaning the
printer.” If the defects occur on the back of the page, the problem
will likely be corrected after a few more printed pages.
EN
Page 83

Misformed characters
●
If characters are improperly formed, producing hollow images, the
paper stock may be too slick. Try a different paper. See “Printer
paper specifications.”
●
If characters are improperly formed, producing a wavy effect, the
laser scanner may need service. Verify that characters are
improperly formed on a self-test page. If so, contact an HPauthorized dealer or service representative. See “Service and
support.”
Page skew
●
Make sure the paper or other media is loaded correctly and that
the guides are not too tight or too loose against the paper stack.
See “Loading paper into the printer.”
●
The paper input bin may be too full. See “Loading paper into the
printer.”
●
Check the paper type and quality. See “Printer paper
specifications.”
Curl or wave
●
Check the paper type and quality. Both high temperature and
humidity will cause paper to curl. See “Printer paper
specifications.”
●
The paper may have sat for too long in the paper input tray. Turn
over the stack of paper in the tray. Also, try rotating th e paper
180° in the paper input tray.
●
Try printing using the straight-through output path. See “Printer
paper output paths.”
EN
Wrinkles or creases
●
Make sure that paper is loaded properly. See “Loading paper into
the printer.”
●
Check the paper type and quality. See “Printer paper
specifications.”
●
Try printing using the straight-through output path. See “Printer
paper output paths.”
●
Turn over the stack of paper in the tray or try rotating the paper
180° in the input tray.
Improving print quality
83
Page 84

Cleaning the printer
During the printing process, paper, toner, and dust particles can
accumulate inside the printer. Over time, this buildup can cause print
quality problems, such as toner specks or smearing. The printer has
two cleaning modes that can correct and prevent these types of
problems:
●
Cleaning the toner cartridge area
●
Cleaning the printer paper path
84 Chapter 8 Troubleshooting the printer
EN
Page 85

Cleaning the toner cartridge area
1
2
3
Cleaning the toner cartridge area is not
necessary on a regular basis. Before
cleaning, look for excessive toner in the
compartment.
WARNING!
Before cleaning the printer, turn the
printer off by unplugging the power cord,
and then wait for the printer to cool.
1
Turn the printer off by unplugging it,
and then wait for the printer to cool.
2
Open the printer door and remove
the toner cartridge.
CAUTION
To prevent damage, do not expose the
toner cartridge to light for more than a
few minutes. Cover it if necessary. Also,
do not touch the black-sponge, transfer
roller inside the printer. By doing so, you
can damage the printer.
EN
3
With a
4
5
residue from the paper path area
and the toner cartridge cavity.
4
Replace the toner cartridge and
close the printer door.
5
Plug the power cord back into the
printer.
dry,
lint-free cloth, wipe any
Cleaning the printer
85
Page 86

Cleaning the printer paper path
This process uses copier-grade paper to remove dust and toner from
the paper path. Do not use bond or rough paper. Use this process if
you are experiencing toner specks or dots on printouts. This process
will produce a page with toner debris, which should be discarded.
1 Ensure the printer is loaded with paper.
2 Ensure the printer is in the Ready state.
3 Press and hold the GO button for 20 seconds (if released before
20 seconds the printer will perform a reset). Paper will feed
through the printer.
Note After holding the GO button for 20 seconds, each of the three printer
lights will blink until the cleaning process is complete.
86 Chapter 8 Troubleshooting the printer
EN
Page 87

Clearing printer paper jams
Occasionally, paper becomes jammed during a print job. Some of the
causes include the following:
●
The paper input trays are loaded improperly or overfilled. See
“Loading paper into the printer.”
●
The paper output path is changed during rather than before a
print job.
●
Media that does not meet HP specifications is used. See “Printer
paper specifications.”
Note Always remove all paper fro m the paper input tray and straighten
the stack when new paper is added.
sheets of paper from feeding through the printer at one time and
reduces paper jams. See the sticker which you placed on the printer
while setting up the hardware.
You will be notified of a paper jam by an error in the software and the
printer control panel lights. See “Printer light patterns.”
Typical paper jam locations
This helps prevent multiple
Note
EN
●
Toner cartridge area:
●
Paper input tray areas:
See “Removing a jammed page.”
If the page is still sticking out of the
paper input tray, pull the page from the paper input tray until it is
fully removed. If the page cannot be removed in this way, see
“Removing a jammed page.”
●
Paper output paths:
If the page is sticking out of the paper
output bin or path, pull it until it is fully removed. If the page
cannot be removed in this way, se e “Removing a jammed page.”
Loose toner may remain in the printer after a paper jam. This will clear
after a few sheets have printed.
Clearing printer paper jams
87
Page 88

Removing a jammed page
If the scanner is attached to the printer,
you may need to pull the printer to the
edge of the work space so the door
hangs over the edge to enable full door
extension.
1
2
1 Open the printer door. If the paper
can be removed without removing
the toner cartridge, do so; see step
3. Otherwise, continue with step 2.
2 Remove the toner cartrid ge and
place it aside, covering it with a
sheet of paper.
CAUTION
Paper jams in this area may result in
loose toner on the page. If you get any
toner on your clothes, wash them in cold
water.
Hot water will permanently set the
toner into fabric.
CAUTION
To prevent damage to the toner
cartridge, do not expose it to light for
more than a few minutes. Cover it with a
sheet of paper.
Continued on next page.
88 Chapter 8 Troubleshooting the printer
EN
Page 89
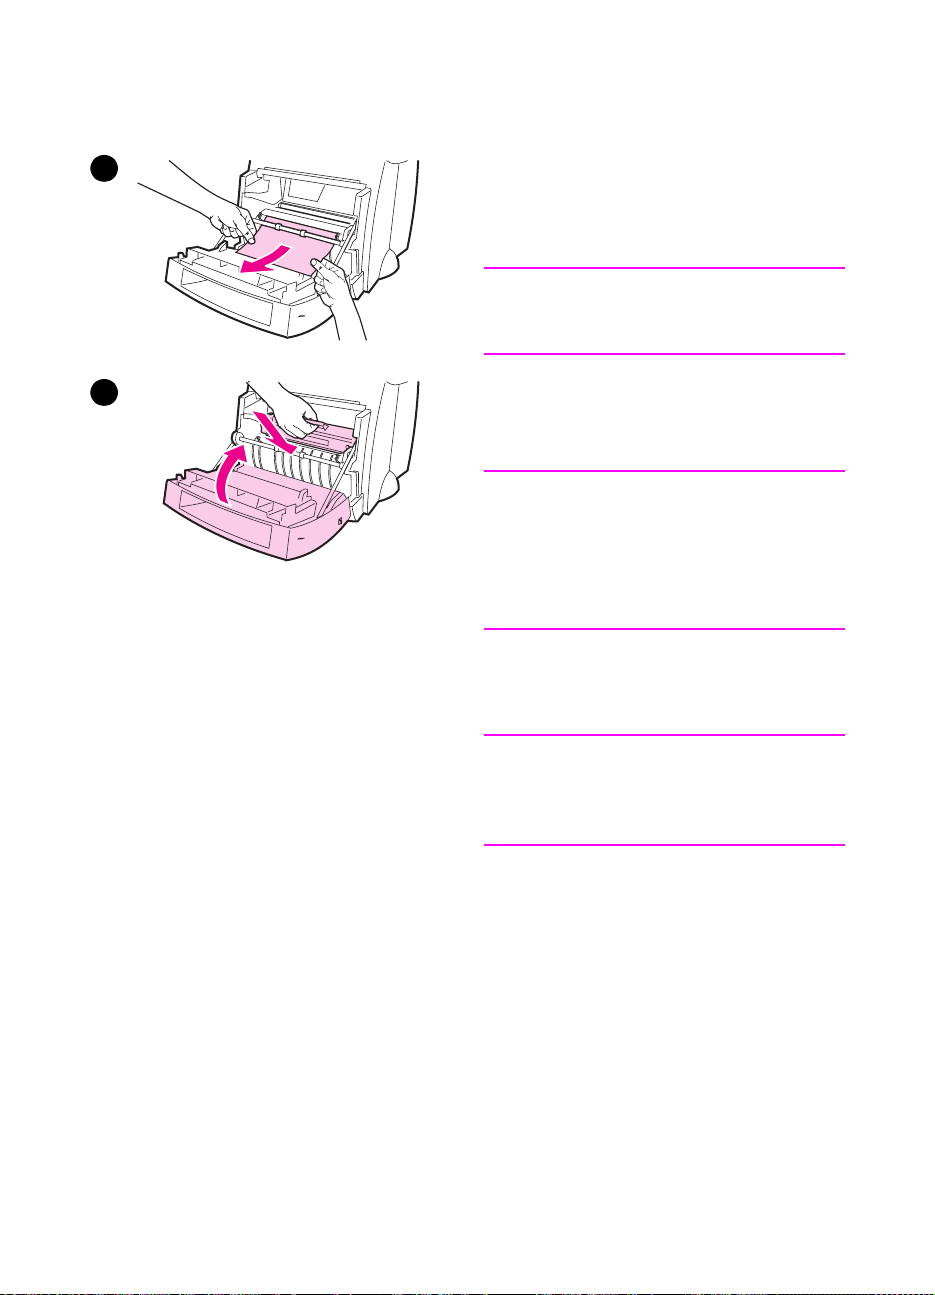
3
3
With both hands, grasp the side of
the paper that is most visible (this
includes the middle) and then
carefully pull it free from the printer.
Note
If the paper tears, see “Paper jam:
removing torn pieces of paper.”
4
4
When the jammed paper has been
removed, replace the toner cartridge
and close the printer door.
Note
If you had to move the printer to the edge
of the desk to accommodate the
scanner, check the printer cable and
power connections to ensure they are
securely fastened.
You may need to reset the printer after
clearing a paper jam. See “Resetting the
printer.”
EN
Note
Remove all paper from the paper input
tray and straighten the stack when new
paper is added.
Clearing printer paper jams
89
Page 90
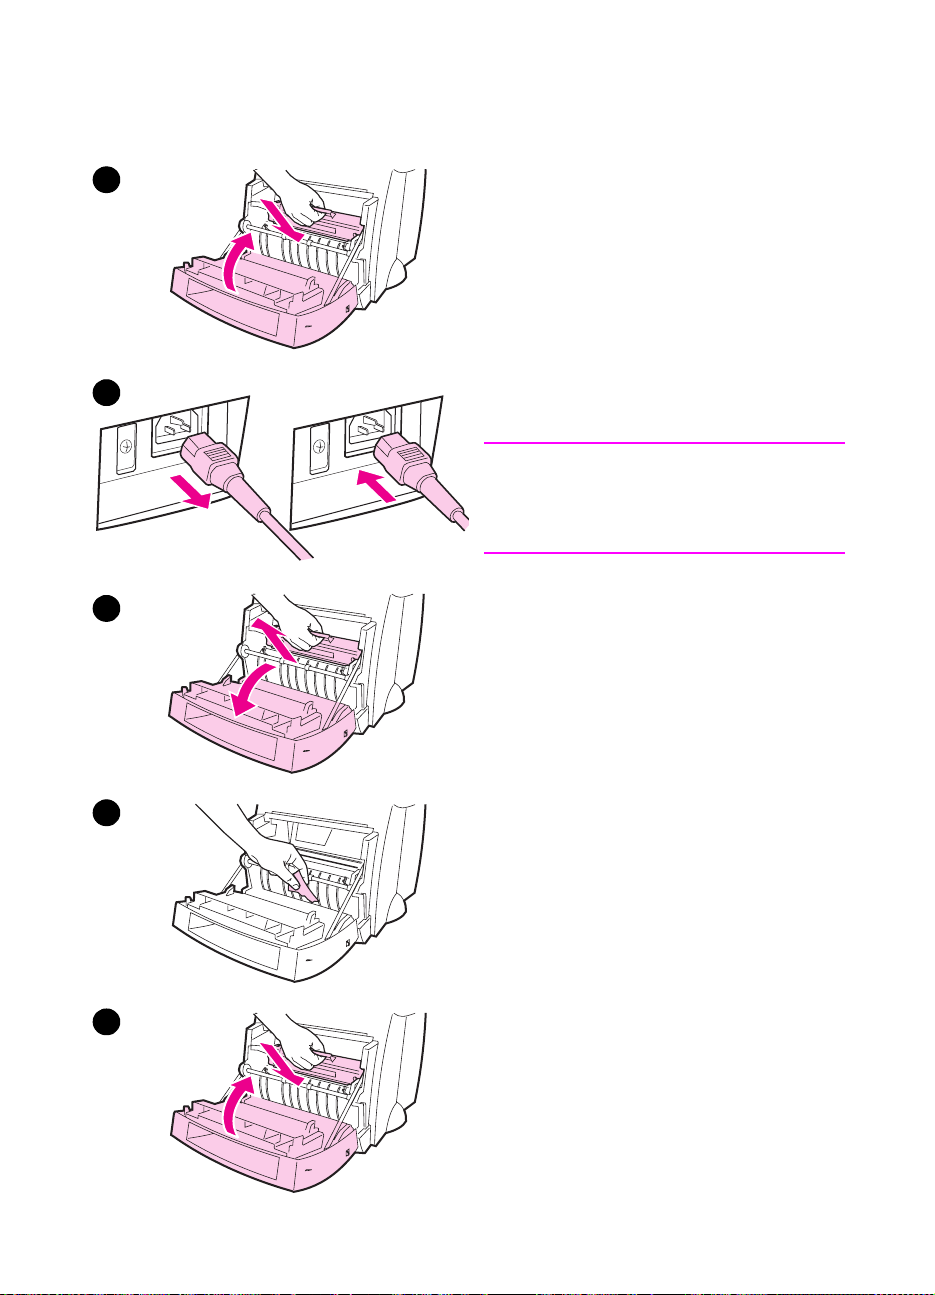
Paper jam: removing torn pieces of paper
1
2
Sometimes a piece of jammed paper can
tear when being removed. Use the
following procedure to remove any small
pieces of paper left in the printer.
1 Make sure the toner cartridge is
installed and the printer door is
closed.
2 Turn the printer off and then back on.
As the printer restarts, the rollers will
advance the piece(s) of paper.
Note
Printers powered by 220-240 volts can
be turned off and on with the switch. See
“Tur ning the power off.”
3
4
5
3 Open the printer door and remove
the toner cartridge.
4 Remove the piece(s) of paper.
5 Reinstall the toner cartridge and
close the printer door.
If the paper does not come out, repeat
steps 1 through 5.
90 Chapter 8 Troubleshooting the printer
EN
Page 91

Changing the pickup roller
If the printer regularly mispicks (no paper
is fed through or more than one sheet
feeds through), you may need to change
or clean the pickup roller. See
“Accessories and ordering information”
to order a new pickup roller.
1
1
Unplug the power cord from the
printer, and then allow the printer to
cool.
2
Open the door and remove the toner
cartridge.
3
Locate the pickup roller.
4
Rotate the bottom of the pickup roller
towards the front of the printer.
2
3
4
Continued on next page.
EN
Clearing printer paper jams
91
Page 92

5
5 Gently pull the pickup roller straight
out.
6 Position the new part within the slot
of the old pickup roller.
7 Rotate the bottom of the new pickup
roller towards the back of the printer.
8 Reinstall the toner cartridge and
close the printer door.
6
Note
Plug the printer in to turn it back on.
7
8
92 Chapter 8 Troubleshooting the printer
EN
Page 93

Cleaning the pickup roller
If you wish to clean the pickup roller
rather than replace it, follow the
instructions below:
Remove the pickup roller as described in
“Changing the pickup roller.”
1
1
2
Dab a lint-free cloth in isopropyl
alcohol, and then scrub the roller.
WARNING!
Alcohol is flammable. Keep the alcohol
and cloth away from open flame. Allow
alcohol to dry completely before closing
the printer and plugging in the power
cord.
2
Using a dry, lint-free cloth, wipe the
pickup roller to remove loosened
dirt.
3
Allow the pickup roller to completely
dry before reinstalling it in the
printer.
EN
3
Clearing printer paper jams
93
Page 94

Resetting the printer
To reset the printer, press and hold the Go button on the printer
control panel for 5 seconds.
94 Chapter 8 Troubleshooting the printer
EN
Page 95

Troubleshooting the
9
Copier/Scanner
This chapter provides information on the following subjects:
●
Finding the solution
●
Improving scan/copy quality
●
Calibrating the scanner
●
Cleaning the scanner
●
Clearing scanner jams
●
Removing the scanner
EN
95
Page 96

Finding the solution
Use this section to find the solution to common scanner problems.
Scanning problems
●
The scanner did nothing
●
No preview appeared on screen
●
Scanned image is of poor quality
●
Part of the image did not scan or is missing text
●
The text cannot be edited
●
The scan takes too long
●
Error messages appear on the screen
Copying problems
●
No copy came out or the scanner did nothing
●
Copies are blank, missing images, or faded
96 Chapter 9 Troubleshooting the Copier/Scanner
EN
Page 97

The scanner did nothing
CAUTION
Is the scanner correctly connected and latched to the printer?
The scanner must be connected and the attachment lever latched.
See the Quick Reference Guide for attachment instructions. See
“Removing the scanner” for instructions on removing the scanner.
To prevent damage, unplug the printer before checking the scanner
connection.
Have you printed a self-test page to verify the scanner is
recognized by the printer?
Verify the scanner is installed by printing a self-test page. See
“Printing a self-test page.” On the lower-left hand corner of the self-
test page, the text will read: “Scanner Installed: Yes.” If the text reads
“No” instead, reboot your PC. If that does not work, reinstall the
HP LaserJet 1100 software. See the Quick Reference Guide included
with the HP LaserJet 1100A Printer• Copier•Scanner for software
installation instructions.
Is the wrong printer selected?
Verify the HP LaserJet 1100 is selected as the current printer when
you print. You may have to click
Setup
in the print screen to see
which printer is being used. Specify HP LaserJet 1 100 if necessary.
Did you send a print or copy job before attempting to scan?
If a print or copy job was sent before attempting to scan, the scan will
occur after the other job is finished. The print job may still be in the
queue. Check the light status on the printer. See “Printer light
patterns.”
EN
Is the printer parallel cable working and connected correctly?
The parallel cable may be defective. Try the following:
●
Disconnect and then reconnect the parallel cable.
●
Try printing a print job you know prints.
●
If possible, attach the cable and printer to another PC and print
the job that you know prints.
●
Try using a new IEEE-1284 compliant parallel cable. See
“Accessories and ordering information.”
Finding the solution
97
Page 98

Do you have other devices running on your computer?
The HP LaserJet 1100A Printer•Copier•Scanner may not share a
parallel port. If you have a sound card, external hard drive, or network
switchbox connected to the same parallel port as the
HP LaserJet 1100A, the other devices may be interfering. You must
disconnect the other devices to connect and use the
HP LaserJet 1100A or you must use two parallel por ts on the
computer. You may need to add another parallel interface card. An
ECP parallel interface card is strongly recommended. Please see the
documentation that came with your PC for information on installing an
additional parallel interface card or resolving device conflicts.
98 Chapter 9 Troubleshooting the Copier/Scanner
EN
Page 99

No preview appeared on screen
CAUTION
Are you currently copying or printing?
Wait for the cop y or print job to be completed before scanning.
Is the original loaded correctly?
V erify the original is loaded correctly: narrow side first, top down in the
scanner paper input tray with the side-to-be scanned facing forward.
See “Loading Copier/Scanner originals.”
Is the scanner correctly connected and latched to the printer?
The scanner must be connected and the attachment lever latched.
See the Quick Reference Guide included with your scanner for
attachment instructions. See “Removing the scanner” for instructions
on removing the scanner.
To prevent damage, unplug the printer before checking the scanner
connection.
Is the wrong printer selected?
Verify the HP LaserJet 1100 is selected as the current printer when
you print.
EN
Finding the solution
99
Page 100

Scanned image is of poor quality
Is the original a second generation photo or picture?
Reprinted photographs, such as in newspapers or magazines, are
printed using tiny dots of ink that make an interpretation of the original
photograph; thus, the quality is dramatically decreased. Often, the ink
dots form unwanted patterns that, when scanned and reprinte d or
displayed, can be detected. If the following suggestions do not
provide a solution, you may need to use a better-quality version of the
original.
●
Try to eliminate the patterns by reducing the scanned image size.
See “Enhancing the scanned image.”
●
Print the scanned image to see if the quality is better. See below.
●
Try recalibrating the scanner. See “Calibrating the scanner.”
●
Verify your resolution and gray-scale settings are correct for the
type of scan job you are performing. See “Scanner resolution and
gray scale.”
Is the image quality better when printed?
The image displayed on screen is not always an accurate
representation of the quality of the scan.
●
Try adjusting the settings on your PC monitor to display more
colors (or levels of gray). Typically, this is adjusted by selecting
“Display” found in the Control Panel. See the documentation that
came with your PC.
●
Try adjusting the resolution and gray-scale settings in the scanner
software. To learn more about these settings, see “Scanner
resolution and gray scale.”
Is the image skewed (crooked)?
The original may have been loaded incorrectly. It is important to use
the paper guides when loading originals. See “Loading Copier/
Scanner originals.”
Does the scanned image have unwanted blots, lines, vertical
white stripes, or any other defect?
See “Improving scan/copy quality.”
Is the scanner dirty?
If the scanner is dirty, the image produced will not have optimum
clarity. See “Cleaning the scanner.”
Do graphics appear different from the original?
The graphics settings may not be suitable for the type of scan job you
are performing. Try changing the graphics settings. Access these
settings through the printer properties (driver). See “Printer
properties (driver).”
100 Chapter 9 Troubleshooting the Copier/Scanner
EN
 Loading...