

Page 1

HP LaserJet 1010 series printer
Software Technical Reference
Page 2

ii ENWW
Page 3

Contents
1 Purpose
2 Software overview
Printer configurations. . . . . . . . . . . . . . . . . . . . . . . . . . . . . . . . . . . . . . . . . . . . . . . . . . . . . . . . 9
HP LaserJet 1010 . . . . . . . . . . . . . . . . . . . . . . . . . . . . . . . . . . . . . . . . . . . . . . . . . . . . . . 10
HP LaserJet 1012 . . . . . . . . . . . . . . . . . . . . . . . . . . . . . . . . . . . . . . . . . . . . . . . . . . . . . . 10
HP LaserJet 1015 . . . . . . . . . . . . . . . . . . . . . . . . . . . . . . . . . . . . . . . . . . . . . . . . . . . . . . 10
Printer software components. . . . . . . . . . . . . . . . . . . . . . . . . . . . . . . . . . . . . . . . . . . . . . . . . 11
Host-based printing. . . . . . . . . . . . . . . . . . . . . . . . . . . . . . . . . . . . . . . . . . . . . . . . . . . . . 12
PCL printing . . . . . . . . . . . . . . . . . . . . . . . . . . . . . . . . . . . . . . . . . . . . . . . . . . . . . . . . . . 12
Mac software. . . . . . . . . . . . . . . . . . . . . . . . . . . . . . . . . . . . . . . . . . . . . . . . . . . . . . . . . . 13
Printer drivers for Windows. . . . . . . . . . . . . . . . . . . . . . . . . . . . . . . . . . . . . . . . . . . . . . . 13
Additional information about software features . . . . . . . . . . . . . . . . . . . . . . . . . . . . . . . . . . . 14
Printer driver only for Windows 95 and Windows NT 4.0 . . . . . . . . . . . . . . . . . . . . . . . . 14
Product comparison with HP LaserJet 1000, 1005, and 1200 series printers. . . . . . . . . . . . 15
3 Product requirements
Supported platforms . . . . . . . . . . . . . . . . . . . . . . . . . . . . . . . . . . . . . . . . . . . . . . . . . . . . . . . 19
Supported configurations. . . . . . . . . . . . . . . . . . . . . . . . . . . . . . . . . . . . . . . . . . . . . . . . . . . . 20
Direct (local) connections . . . . . . . . . . . . . . . . . . . . . . . . . . . . . . . . . . . . . . . . . . . . . . . . 20
Network connections. . . . . . . . . . . . . . . . . . . . . . . . . . . . . . . . . . . . . . . . . . . . . . . . . . . . 20
Wireless connections . . . . . . . . . . . . . . . . . . . . . . . . . . . . . . . . . . . . . . . . . . . . . . . . . . . 20
System requirements for HP LaserJet 1010 series printer software . . . . . . . . . . . . . . . . . . . 21
For Windows systems. . . . . . . . . . . . . . . . . . . . . . . . . . . . . . . . . . . . . . . . . . . . . . . . . . . 21
For Mac OS systems. . . . . . . . . . . . . . . . . . . . . . . . . . . . . . . . . . . . . . . . . . . . . . . . . . . . 22
Requirements for network connection. . . . . . . . . . . . . . . . . . . . . . . . . . . . . . . . . . . . . . . . . . 23
Requirements for end-user client computers . . . . . . . . . . . . . . . . . . . . . . . . . . . . . . . . . 23
Network requirement. . . . . . . . . . . . . . . . . . . . . . . . . . . . . . . . . . . . . . . . . . . . . . . . . . . . 23
HP Jetdirect print servers . . . . . . . . . . . . . . . . . . . . . . . . . . . . . . . . . . . . . . . . . . . . . . . . 24
4 Installing the HP LaserJet 1010 series software
Overview of software installation. . . . . . . . . . . . . . . . . . . . . . . . . . . . . . . . . . . . . . . . . . . . . . 25
Installation options for Windows . . . . . . . . . . . . . . . . . . . . . . . . . . . . . . . . . . . . . . . . . . . . . . 26
Installation text options (Windows 98 SE, Me, 2000, and XP only) . . . . . . . . . . . . . . . . 28
Installation log files (Windows systems) . . . . . . . . . . . . . . . . . . . . . . . . . . . . . . . . . . . . . . . . 35
Other log files . . . . . . . . . . . . . . . . . . . . . . . . . . . . . . . . . . . . . . . . . . . . . . . . . . . . . . . . . 35
Installation for Mac OS (Network or Direct). . . . . . . . . . . . . . . . . . . . . . . . . . . . . . . . . . . . . . 36
HP LaserJet 1010 series. . . . . . . . . . . . . . . . . . . . . . . . . . . . . . . . . . . . . . . . . . . . . . . . . 36
Installation instructions for networked computers. . . . . . . . . . . . . . . . . . . . . . . . . . . . . . . . . 38
Using an HP Jetdirect external print server. . . . . . . . . . . . . . . . . . . . . . . . . . . . . . . . . . . 38
Network installation for Windows systems . . . . . . . . . . . . . . . . . . . . . . . . . . . . . . . . . . . 38
Network installation for Mac systems (HP LaserJet 1010 printer) . . . . . . . . . . . . . . . . . 39
Discovery process during installation . . . . . . . . . . . . . . . . . . . . . . . . . . . . . . . . . . . . . . . 39
Configuration for Windows sharing . . . . . . . . . . . . . . . . . . . . . . . . . . . . . . . . . . . . . . . . . . . . 40
Installing the printer driver only . . . . . . . . . . . . . . . . . . . . . . . . . . . . . . . . . . . . . . . . . . . . . . . 41
Windows . . . . . . . . . . . . . . . . . . . . . . . . . . . . . . . . . . . . . . . . . . . . . . . . . . . . . . . . . . . . . 41
Installing the customization utility . . . . . . . . . . . . . . . . . . . . . . . . . . . . . . . . . . . . . . . . . . . . . 42
ENWW 1
Page 4

5 Configuration
Software configuration settings . . . . . . . . . . . . . . . . . . . . . . . . . . . . . . . . . . . . . . . . . . . . . . . 43
Windows 95, Windows 98 SE, Windows NT 4.0, and Windows Me. . . . . . . . . . . . . . . . 43
Windows 2000 and Windows XP . . . . . . . . . . . . . . . . . . . . . . . . . . . . . . . . . . . . . . . . . . 43
Mac OS 9.x . . . . . . . . . . . . . . . . . . . . . . . . . . . . . . . . . . . . . . . . . . . . . . . . . . . . . . . . . . . 43
Mac OS X . . . . . . . . . . . . . . . . . . . . . . . . . . . . . . . . . . . . . . . . . . . . . . . . . . . . . . . . . . . . 44
Printing preferences . . . . . . . . . . . . . . . . . . . . . . . . . . . . . . . . . . . . . . . . . . . . . . . . . . . . . . . 45
Gaining access to printing preferences through the current software application. . . . . . 45
Gaining access to printing preferences through the printer driver . . . . . . . . . . . . . . . . . 45
Host-based printing preference tabs in Windows 98 SE, Me, 2000, and XP . . . . . . . . . . . . 46
Printing preferences tabs using PCL 5e printer drivers in Windows 95, NT 4.0, 98, and Me 56
Printing preferences tabs using PCL 5e printer drivers in Windows 2000 and XP . . . . . . . . 67
HP Toolbox . . . . . . . . . . . . . . . . . . . . . . . . . . . . . . . . . . . . . . . . . . . . . . . . . . . . . . . . . . . . . . 77
Supported operating systems . . . . . . . . . . . . . . . . . . . . . . . . . . . . . . . . . . . . . . . . . . . . . 77
Supported browsers . . . . . . . . . . . . . . . . . . . . . . . . . . . . . . . . . . . . . . . . . . . . . . . . . . . . 77
HP Toolbox components. . . . . . . . . . . . . . . . . . . . . . . . . . . . . . . . . . . . . . . . . . . . . . . . . 77
Viewing HP Toolbox . . . . . . . . . . . . . . . . . . . . . . . . . . . . . . . . . . . . . . . . . . . . . . . . . . . . 77
Viewing HP Toolbox using the system tray icon . . . . . . . . . . . . . . . . . . . . . . . . . . . . . . . 78
HP Toolbox sections. . . . . . . . . . . . . . . . . . . . . . . . . . . . . . . . . . . . . . . . . . . . . . . . . . . . 78
HP Toolbox Links . . . . . . . . . . . . . . . . . . . . . . . . . . . . . . . . . . . . . . . . . . . . . . . . . . . . . . 78
Other links. . . . . . . . . . . . . . . . . . . . . . . . . . . . . . . . . . . . . . . . . . . . . . . . . . . . . . . . . . . . 78
Status tab . . . . . . . . . . . . . . . . . . . . . . . . . . . . . . . . . . . . . . . . . . . . . . . . . . . . . . . . . . . . 78
Troubleshooting tab . . . . . . . . . . . . . . . . . . . . . . . . . . . . . . . . . . . . . . . . . . . . . . . . . . . . 79
Alerts tab. . . . . . . . . . . . . . . . . . . . . . . . . . . . . . . . . . . . . . . . . . . . . . . . . . . . . . . . . . . . . 79
Documentation tab . . . . . . . . . . . . . . . . . . . . . . . . . . . . . . . . . . . . . . . . . . . . . . . . . . . . . 80
Advanced Printer Settings window . . . . . . . . . . . . . . . . . . . . . . . . . . . . . . . . . . . . . . . . . 80
6 System changes through installation
Installation changes to Windows systems. . . . . . . . . . . . . . . . . . . . . . . . . . . . . . . . . . . . . . . 87
Changes to *.INI and Windows registry changes . . . . . . . . . . . . . . . . . . . . . . . . . . . . . . 87
Win.ini changes after installation. . . . . . . . . . . . . . . . . . . . . . . . . . . . . . . . . . . . . . . . . . . 87
Windows registry changes . . . . . . . . . . . . . . . . . . . . . . . . . . . . . . . . . . . . . . . . . . . . . . . 87
Installation changes to Mac systems. . . . . . . . . . . . . . . . . . . . . . . . . . . . . . . . . . . . . . . . . . . 87
7 Uninstallation
Uninstall in Windows 95 and Windows NT 4.0 . . . . . . . . . . . . . . . . . . . . . . . . . . . . . . . . . . . 89
Uninstall methods in Windows 98 SE, Me, 2000, and XP. . . . . . . . . . . . . . . . . . . . . . . . . . . 89
Uninstallation text options using the program group method . . . . . . . . . . . . . . . . . . . . . 90
Files not removed, and manual uninstall. . . . . . . . . . . . . . . . . . . . . . . . . . . . . . . . . . . . . 90
Scrubber Utility . . . . . . . . . . . . . . . . . . . . . . . . . . . . . . . . . . . . . . . . . . . . . . . . . . . . . . . . 91
Software uninstall (Mac) . . . . . . . . . . . . . . . . . . . . . . . . . . . . . . . . . . . . . . . . . . . . . . . . . . . . 91
Uninstall for Mac OS 9.x and Mac OS X v10.1 and v10.2 . . . . . . . . . . . . . . . . . . . . . . . 91
8 Software availability and fulfillment
Ordering software . . . . . . . . . . . . . . . . . . . . . . . . . . . . . . . . . . . . . . . . . . . . . . . . . . . . . . . . . 93
Languages. . . . . . . . . . . . . . . . . . . . . . . . . . . . . . . . . . . . . . . . . . . . . . . . . . . . . . . . . . . . . . . 94
Localization and part numbers . . . . . . . . . . . . . . . . . . . . . . . . . . . . . . . . . . . . . . . . . . . . 94
9 Port communication
Parallel port connections . . . . . . . . . . . . . . . . . . . . . . . . . . . . . . . . . . . . . . . . . . . . . . . . . . . . 97
Other parallel port devices. . . . . . . . . . . . . . . . . . . . . . . . . . . . . . . . . . . . . . . . . . . . . . . . . . . 97
Changing parallel port modes . . . . . . . . . . . . . . . . . . . . . . . . . . . . . . . . . . . . . . . . . . . . . . . . 98
USB port connections . . . . . . . . . . . . . . . . . . . . . . . . . . . . . . . . . . . . . . . . . . . . . . . . . . . . . . 98
HP Toolbox and embedded Web server communication . . . . . . . . . . . . . . . . . . . . . . . . . . . 99
2 Contents ENWW
Page 5

HP Toolbox communication . . . . . . . . . . . . . . . . . . . . . . . . . . . . . . . . . . . . . . . . . . . . . . 99
Appendix
Index
ENWW 3
Page 6

4 Contents ENWW
Page 7

1Purpose
This technical reference guide provides information about the HP LaserJet 1010 series printer
software and troubleshooting tips. This reference is also presented in an electronic format to serve
as a quick reference tool for Customer Care Center (CCC) agents, support engineers, system
administrators, and second-level management information system (MIS) personnel.
Copyright
© 2003 Copyright Hewlett-Packard Development Company, LP
Reproduction, adaptation or translation without prior written permission is prohibited, except as
allowed under the copyright laws.
The information contained herein is subject to change without notice.
The only warranties for HP products and services are set forth in the express warranty statements
accompanying such products and services. Nothing herein should be construed as constituting an
additional warranty. HP shall not be liable for technical or editorial errors or omissions contained
herein.
Part number: Q2460-90930
First Edition: 8/2003
Trademark notices
Adobe®, Acrobat™ and PostScript® are registered trademarks of Adobe Systems Incorporated.
TrueType™ is a registered trademark of Apple Computer, Inc.
Microsoft
Explorer
Netscape
Java™ is a U.S. trademark of Sun Microsystems, Inc.
UNIX
®
, MS-DOS®, Windows®, Windows NT®, Windows 2000®, Windows XP®, and Internet
®
are U.S. registered trademarks of Microsoft Corporation.
®
is a registered trademark of Netscape, Inc.
®
is a registered trademark of The Open Group.
Notice
The information contained in this document is subject to change without notice.
ENWW Purpose 7
Page 8

8 Chapter 1 - Purpose ENWW
Page 9

2Software overview
The HP LaserJet 1010 series printers deliver LaserJet printing through a direct (local) universal
serial bus (USB) (or a parallel port on the HP LaserJet 1015). Network connections are supported
for the 1012 and 1015 models only via HP Jetdirect devices.
The printer comes with software for the following operating systems:
! Windows 95 (HP LaserJet 1015 only, printer driver only, not USB compatible)
! Windows 98 first edition (printer driver only)
! Windows 98 Second Edition (SE)
! Windows NT 4.0 (Service Pack 3 or higher, HP LaserJet 1015 only, printer driver only, not
USB compatible)
! Windows Me
! Windows 2000
! Windows XP (32-bit)
! Mac OS 9.x (v 9.1 and higher)
! Mac OS X v10.1 and v10.2 (Apple encourages OS X v10.0 users to upgrade to v10.1)
! Linux and Unix (drivers for the HP LaserJet 1015 are available on the web at http://
www.linuxprinting.org)
! DOS is supported only by the HP LaserJet 1015
The most recent printer drivers, additional printer drivers, and other software and documentation
are available from http://www.hp.com/support/lj1010. Not all software is available in all languages.
See the Late-breaking Readme document for the latest software information.
Note Linux drivers for the HP LaserJet 1015 are supported by the Linux community. See http://
www.linuxprinting.org for more information.
Note Unix drivers are model scripts. See http://www.hp.com/go/unixmodelscripts for more information.
Note HP does not support networking for the 1010 model, even through HP Jetdirect devices.
Note Because the 1010 and 1012 models have no parallel port, they are not usable with DOS, Windows
95, 98 (first edition), or NT. These operating systems do not support USB connections.
ENWW 9
Page 10

Printer configurations
The HP LaserJet 1010 series printers include the following configurations.
HP LaserJet 1010
! 12 ppm for letter-size paper, 12 ppm for A4-size paper
! First page out in less than 8 seconds
! 600 x 600 dpi with HP Resolution Enhancement technology (REt)
! 150-sheet enclosed input tray
! Priority input tray
! 8 MB RAM
! 2000-page print cartridge
! Host-based printing
! USB version 2.0
! Windows 98SE, Me, 2000, and XP
! Mac OS 9.x
! Mac OS X v10.1 and v10.2
! HP Toolbox provides printer status information, troubleshooting information, and printer
configuration information (Windows only)
HP LaserJet 1012
The HP LaserJet 1012 printer includes all the features of the 1010 model, plus:
! 14 ppm for letter-size paper, 15 ppm for A4-size paper
! 1200 dpi effective output quality [600 x 600 x 2 dpi with HP Resolution Enhancement
technology (REt)]
HP LaserJet 1015
The HP LaserJet 1015 printer includes all the features of the 1012 model, plus:
! Parallel port
! 16 MB RAM
! PCL5e printing
! Windows 95, 98 (first edition), DOS, and Windows NT 4.0 driver-only install
10 Chapter 2 - Software overview ENWW
Page 11

Printer software components
The following tables indicate which printer drivers are supported by each operating system. In the
tables:
T = Typical Installation
A = Add Printer Installation
W = Web Download
HP LaserJet 1010 and 1012
Printer drivers (installation type)
Win 95 Win 98
SE/Me
Win NT
4.0
Win
2000
Win
XP-32
Mac
OS 9.x
Mac
OS X
Linux/
Unix
Host-based driver (custom) T T T
Mac Host-based driver (typical) T T
HP LaserJet 1015
Win
Win
Win
Win
Win
Win
Mac
Mac
Printer drivers (installation type)
95/98/
DOS
98 SE/
Me
NT 4.0
2000
XP-32
XP-64
OS
9.x
OS X
Linux/
Unix
Host-based driver (custom) T T T
Mac Host-based driver (typical) T T
PCL 5e driver (custom) A A A W W W
Linux/Unix PCL 5e W
Note Printer software for Windows 95 and Windows NT 4.0 must be installed on the HP LaserJet 1015
printer u sing the Add Printer installation method.
Note In a network environment where the HP LaserJet 1015 printer has been installed on a Windows
2000 or Windows XP operating system, driver vending to a Windows NT 4.0 operating system is
not supported. That is, the printer driver cannot be installed from the Windows 2000 or Windows XP
operating system to the Windows NT 4.0 operating system. However, the printer driver can be
installed to a Windows 98 SE, Windows Me, or Window 95 operating system. Refer to “Configuration
for Windows sharing” on page 40.
ENWW Printer software components 11
Page 12
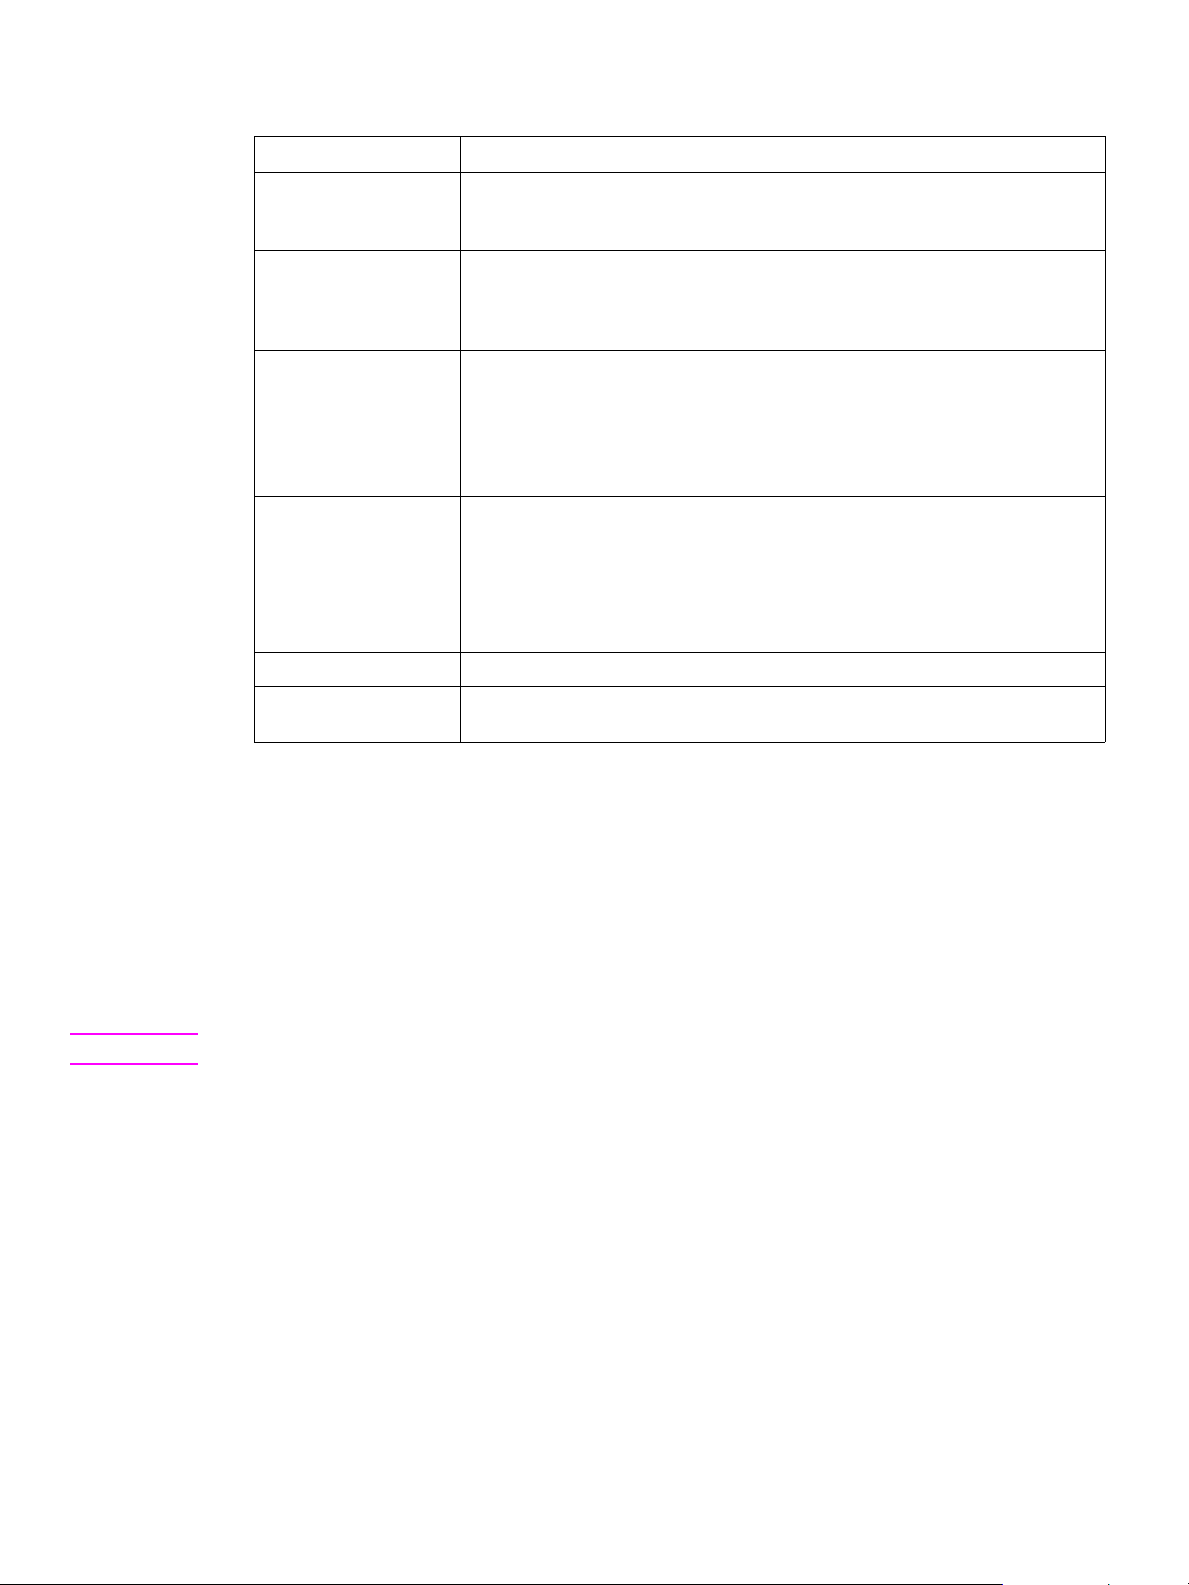
The HP LaserJet 1010 series printer software includes the following components.
Windows software components
Components Description
Add/modify/remove
utility
HP Toolbox Provides printer status , configur ation, t roublesho oting, and alert con figuration for
Printer driver software Allows the computer to communicate with and configure the HP LaserJet 1010
Online Help Provides help for using the HP LaserJet 1010 series software.
Online user guide Provides additional information about the HP LaserJet 1010 series printer.
PDF version of user
guide
Installs, adds components, or uninstalls software for the HP LaserJet 1010
series printer software based on the hardware it detects from the host computer
(Windows 95 and NT 4.0).
the HP LaserJet 1010 series printer. It can also be used to print configuration
reports and save custom configuration settings in customer-defined INI files for
later use.
series printer. This software includes the following printer drivers:
! Host-based printer driver
! The HP LaserJet 1015 printer drivers for PCL 5e
(HP LaserJet 1015 only)
The HP LaserJet 1010 series printer documentation is included on the
installation CD-ROM as both CHM (online Help) files and Adobe Acrobat PDF
files. The CD-ROM us es a versi on of Adobe Acrobat Rea der tha t remai ns o n the
CD-ROM and does not need to be installed. However, you will need a Web
browser installed on your PC to view the contents from any CHM file.
Provides additional information about the HP LaserJet 1010 series printer.
Host-based printing
Host-based printing differs from PCL printing by computing the print job on the host computer,
rather than computing the print job in the formatter as in PCL printing.
PCL printing
Use the PCL 5e printer driver (HP LaserJet 1015 only) if you need print results to look consistent
with those from older HP LaserJet printers. Certain features are not available in this printer driver.
Note Do not use the PCL 5e printer driver for this printer with previous printer models.
12 Chapter 2 - Software overview ENWW
Page 13

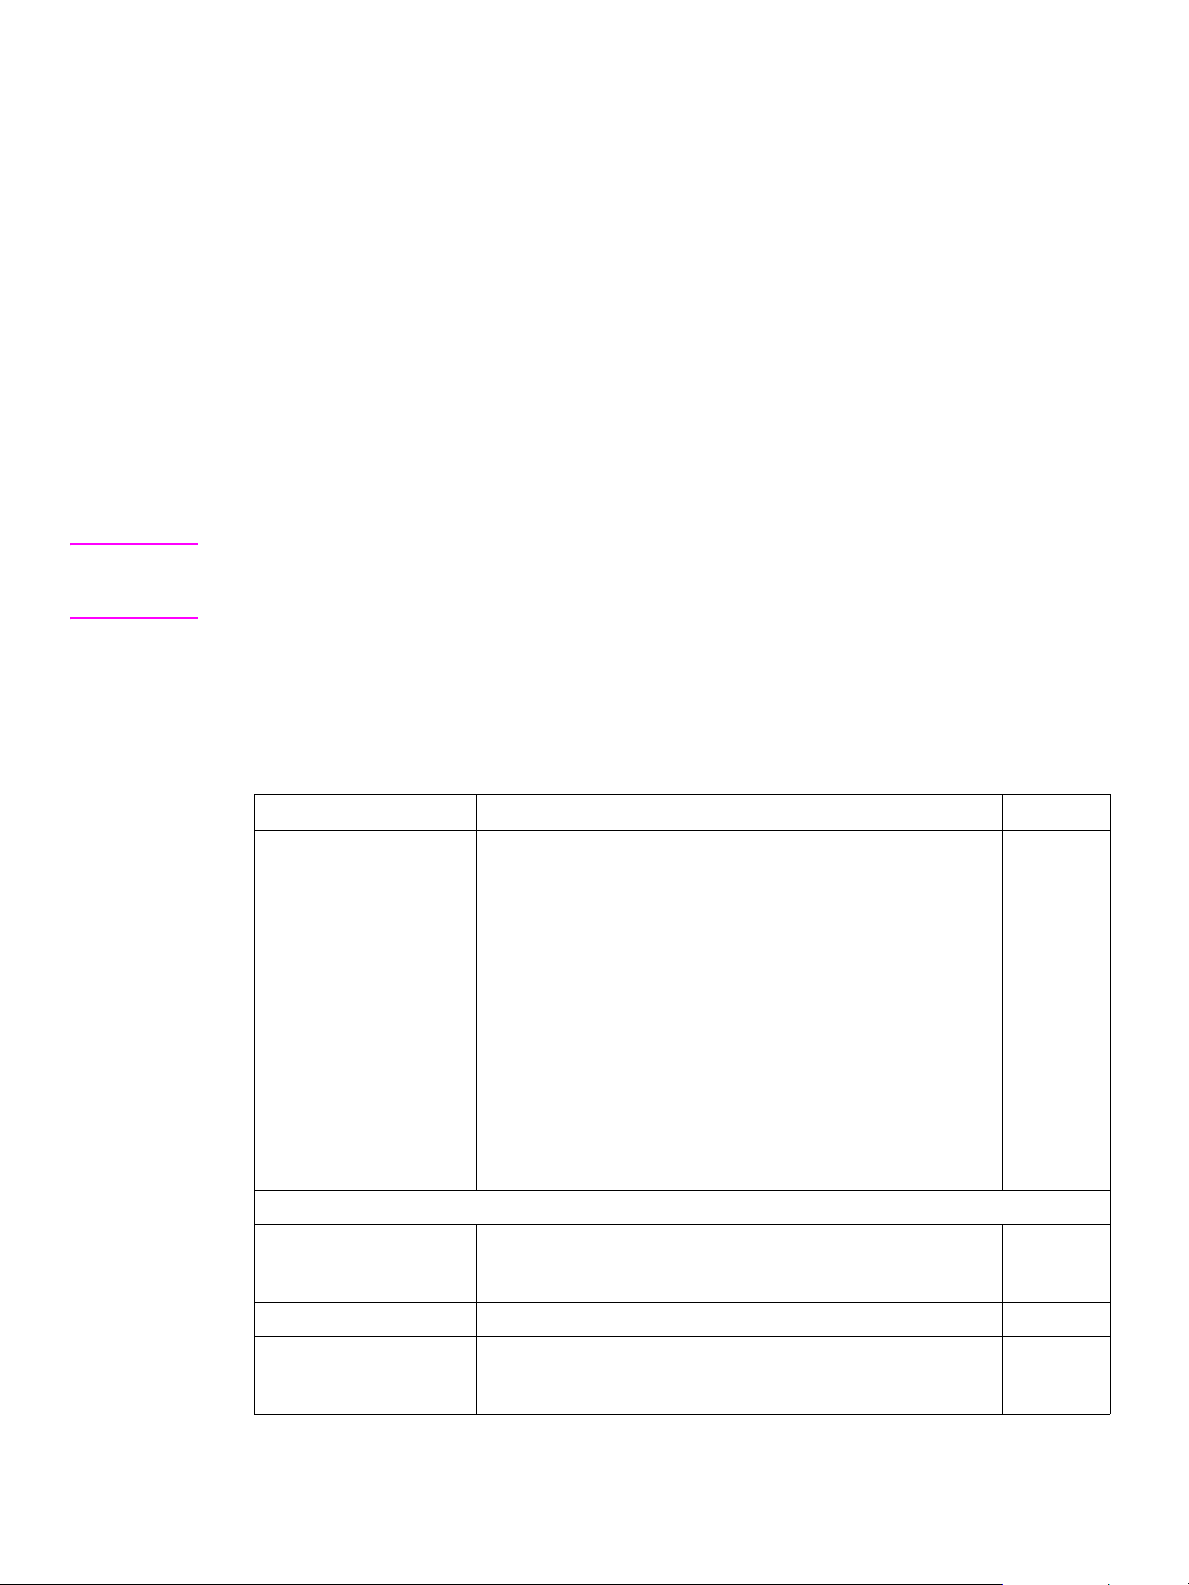
Mac software
The HP LaserJet 1010 series printers include the following software components for Apple
Computer's Mac OS 9.x, Mac OS X v10.1, and Mac OS X v10.2 (Macintosh) operating systems.
Mac software components
Components Description
Printer driver software This software includes the following printer drivers:
! Host-based driver
USB components This software includes the following USB components:
! HP IO
Mac documentation This software includes the following documentation:
! HP LaserJet Utility Help
! Installation notes
! HP LaserJet printing help
HP LaserJet Manual
Duplex & Booklet
printing application
PDF versio n of user
guide
This application all ows the use r to do ma nual du plexi ng and cre ate book lets with
the HP LaserJet 1010 series printer
Provides additional information about the HP LaserJet 1010 series printer
Printer drivers for Windows
The following printer drivers are included with the printer.
Available printer drivers
HP LaserJet 1010 and 1012 printer HP LaserJet 1015 printer
! host-based ! host-based
! PCL 5e*
*Default printer driver, Windows only
ENWW Printer software components 13
Page 14

Additional information about software features
Printer driver only for Windows 95 and Windows NT 4.0
The HP LaserJet 1015 printer offers printer driver only support for Windows 95 and Windows NT
4.0.
Note Because USB is not available for Windows 95 and Windows NT 4.0, HP LaserJet 1015 is required
for these operating systems.
To install printer software for Windows 95 and Windows NT 4.0
To install the printer software for Windows 95 and Windows NT 4.0, you must use the Add Printer
Wizard.
1 Click Start, and then point to Settings.
2 Click Printers.
3 Double-click Add Printer.
4 Select the port that the printer is connected to, and then click Next.
5 Click Have Disk, and then click Browse.
6 On the CD-ROM, perform the following procedure to browse to the printer driver you want to
install:
a From the directory tree, double-click the language.
b From the directory tree, double-click drivers.
c From the directory tree, double-click the operating system.
d From the directory tree, double-click the printer driver.
e Click OK to select the INF file.
f Click the HP LaserJet 1010 series printer, and click OK to begin the installation.
7 Follow the on-screen instructions to complete the software installation.
14 Chapter 2 - Software overview ENWW
Page 15

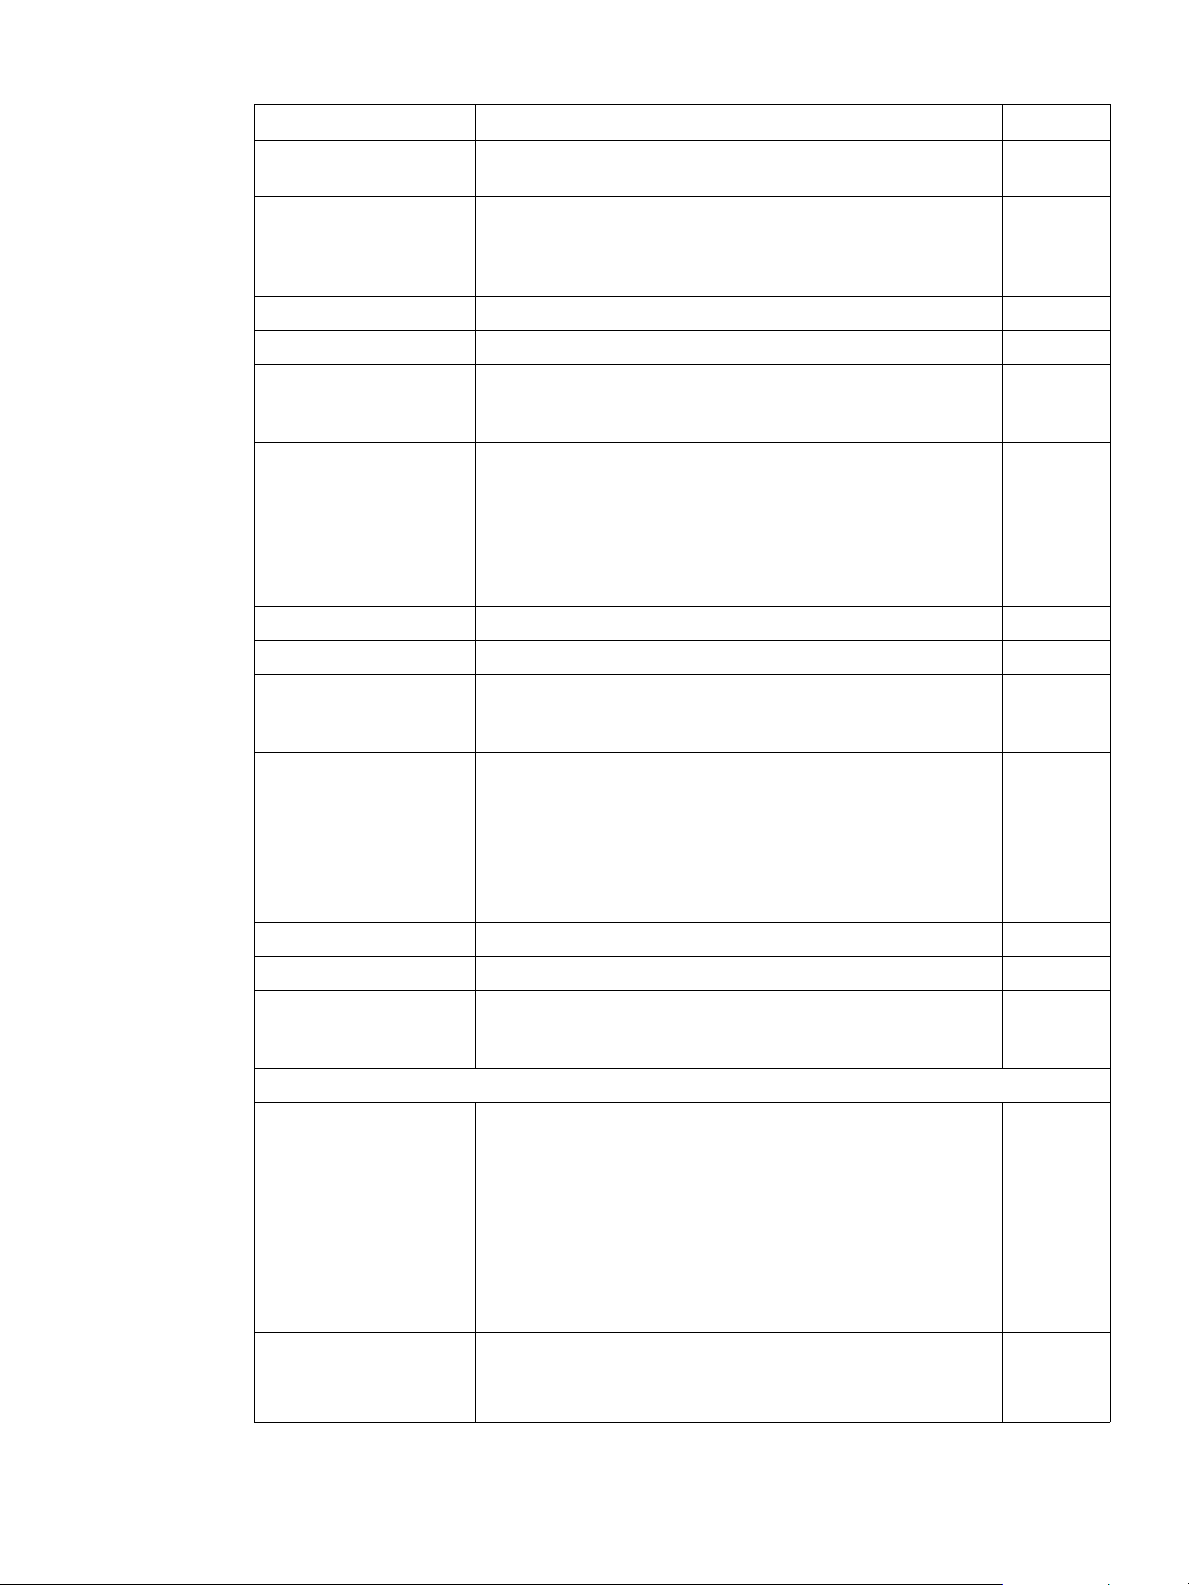
Product comparison with HP LaserJet 1000, 1005, and 1200 series printers
The following table highlights some of the differences in features among the HP LaserJet 1000
series printer, the HP LaserJet 1005 series printer, the HP LaserJet 1200 series printer, and the
HP LaserJet 1010 series printers .
Note Not all printers are available in all areas.
General features
Feature HP LaserJet
1000 series
HP LaserJ et
1005 series
HP LaserJet
1200 series
HP LaserJet 1010
series
(Europe and
Asia only)
Standard device
memory
Printer languages Windows host-
Connectivity
options
Networking Direct (local)
Jetdirect support None None Jetdirect support Jetdirect support
Cable 2 -meter USB
Formatter Resides in an
Control panel Two LEDs Two LEDs Two LEDs and
Power switch No power switch Power switch Power switch on
1 MB of RAM (not
expandable)
based printing
PCL 5e emulation
for MS-DOS
printing
USB cable pod 1284-B parallel
connection with
network sharing
through Windowssharing only
cable with
attached formatter
pod
attachable pod
connected to USB
cable
1MB of RAM (not
expandable)
Windows hostbased printing
PCL 5e emulation
for MS-DOS
printing
and USB
Direct (local)
connection with
network sharing
through Windowssharing only
No cable in box No cable in box No cable in box
Resident in printer Resident in printer Resident in printer
8 MB of RAM on
HP LaserJet 1200
and HP LaserJet
1220 (expandable
to 72 MB)
HP LaserJet
1200n comes wi th
16 MB standard
PCL 6
PCL 5e
PostScript
2 emulation
1284-B parallel
and USB
Networking
through an
optional Jetdirect
print server
one lighted button
220 and 240-volt
printers only
®
Level
8 MB of RAM
16 MB of RAM on
the HP LaserJet
1015
(not expandable)
Host-based printing
PCL 5e printing on
the HP LaserJet
1015
USB
USB and parallel on
the HP LaserJet
1015
Networking through
an optional Jetdirect
print server
No networking
supported on the HP
LaserJet 1010
Three LEDs and two
buttons
Power switch
ENWW Product comparison with HP LaserJet 1000, 1005, and 1200 series printers 15
Page 16

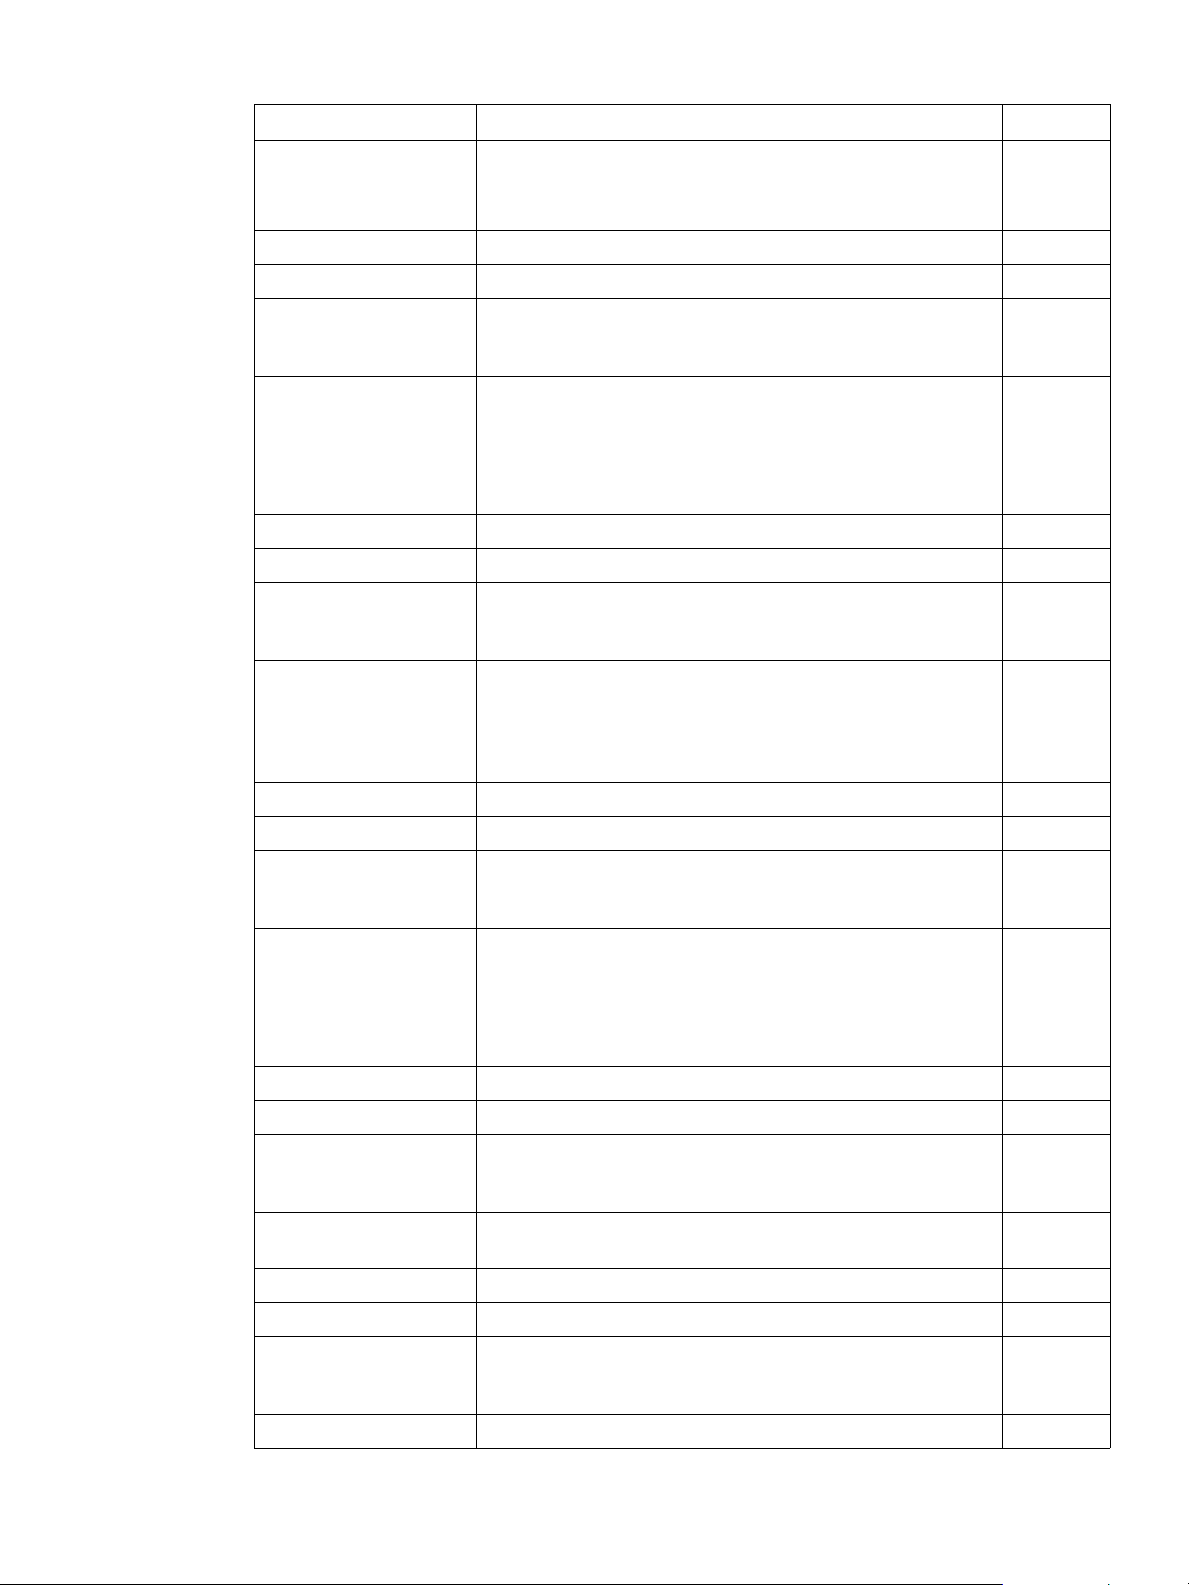
General features (continued)
Feature HP LaserJet
1000 series
HP LaserJet
1005 series
HP LaserJet
1200 series
(Europe and
Asia only)
Upgradability None None One DIMM slot for
memory, fonts,
and printer
languages
Supported
operating systems
Windows 98 SE
Windows Me
Windows 2000
Windows XP (32bit)
Windows 95
Windows 98 SE
Windows Me
Windows NT 4.0
Windows 2000
Windows XP (32bit)
Windows 95
(printer driver
only)
Windows 98 SE
Windows 2000
Windows Me
Windows NT 4.0
Mac OS 9.x, Mac
OS X v10.1 and
v10.2
Linux/Unix
Print features
HP LaserJet 1010
series
None
Windows 98 SE
Windows 2000
Windows Me
Windows XP
Mac OS 9.x
Mac OS X v10.1 and
v10.2
In addition, on the
HP LaserJet 1015:
Linux/Unix
Windows 95/98
(printer driver only)
DOS
Windows NT 4.0
(printer driver only)
Feature HP LaserJet
1000 series
Print speeds
Print quality
Paper handling
capabilities
Duty cycle (pages
per month)
Print cartridge
10 pages per
minute (ppm)
<15 seconds, first
page out
600 dpi 600 dpi 1200 dpi 600 x 600 x 2 dpi
250-sheet paper
input tray
Up to 7000 pages
maximum
Averages 1000
pages per month
2500-page
cartridge included
HP LaserJet
1005 series
14 ppm
<10 seconds, first
page out
250-sheet paper
input tray
10-sheet priority
feed tray
Up to 7000 pages
maximum
Averages 1000
pages per month
2500-page
cartridge included
3500-page
cartridge available
HP LaserJet
1200 series
15 ppm on U.S.
letter sheets
14 ppm on A4
<10 seconds, first
page out
250-sheet paper
input tray
10-sheet priority
feed tray
Up to 10,000
pages maximum
Averages 1000
pages per month
2500-page
cartridge included
3500-page
cartridge available
HP LaserJet 1010
series
14 ppm on U.S.
letter sheets. 15
ppm on A4
HP LaserJet 1010:
12 ppm on U.S.
letter sheets. 12
ppm on A4
<8 seconds, first
page out
(effective 1200 dpi)
HP LaserJet 1010:
600 dpi
150-sheet enclosed
input tray
priority input tray
Up to 7,000 pages
maximum
Averages 1000
pages per month
2000-page print
cartridge included
16 Chapter 2 - Software overview ENWW
Page 17

Print features (continued)
Feature HP LaserJet
1000 series
Paper path
Dimensions
Enclosed, Cshaped horizontal
main paper path
Straight-through
horizontal optional
paper path
Width: 415 mm
(16.3 in.)
Depth: 486 mm
(19.1 in.)
Height: 253 mm
(10.0 in.)
HP LaserJet
1005 series
Enclosed, Cshaped horizontal
main paper path
Straight-through
horizontal optional
paper path
Width: 415 mm
(16.3 in.)
Depth: 486 mm
(19.1 in.)
Height: 253 mm
(10.0 in.)
HP LaserJet
1200 series
Enclosed, C-
shaped horizontal
main paper path
Straight-through
horizontal optional
paper path
Width: 415 mm
(16.3 in.)
Depth: 486 mm
(19.1 in.)
Height: 253 mm
(10.0 in.)
HP LaserJet 1010
series
Enclosed, C-sha ped
horizontal main
paper path
Width: 370 mm
(14.6 in.)
Depth: 230 mm
(9.1 in.)
Height: 208 mm
8.2 in.)
ENWW Product comparison with HP LaserJet 1000, 1005, and 1200 series printers 17
Page 18

18 Chapter 2 - Software overview ENWW
Page 19

3Product requirements
This section lists the supporting operating systems and configurations for the HP LaserJet 1010
series software, and the requirements needed to run the software on a network.
Supported platforms
For easy printer setup and access to the full range of printer features, HP strongly recommends
that you install the software provided. Not all software is available in all languages. Install the
software before setting up the printer. See the Readme for the latest software information.
The most recent printer drivers, additional printer drivers, and other software are available from
www.hp.com\support\lj1010 and HP Software Fulfillment.
See page 9 for a list of the operating systems supported by printer software.
ENWW Product requirements 19
Page 20

Supported configurations
Direct (local) connections
The HP LaserJet 1010 series printer is connected directly to the host computer with Universal
Serial Bus (USB) cable or a parallel (HP LaserJet 1015 only) cable. In this configuration, the
printer is not shared; a single user has complete physical control over the printer. Most users are
familiar with using peripherals that are directly connected to their computers. A user can gain
access to all of the capabilities of the printer in this configuration.
Network connections
The HP LaserJet 1010 series printer also supports network connections with an HP Jetdirect print
server. This print server is optional for the HP LaserJet 1010 series printer.
Wireless connections
The HP LaserJet 1010 series printer models also support the IEEE 802.11b standard for wireless
networking and Bluetooth™ wireless connectivity options. The available HP Jetdirect wireless
print servers and HP Bluetooth printer adapters attach on the back of the printer to either the USB
or parallel port.
IEEE 802.11b standard
With the wireless HP Jetdirect 802.11b print server, HP peripherals can be placed anywhere in the
office or home and connected to a wireless network running Microsoft, Apple, Netware, UNIX, or
Linux network operating systems. This wireless technology provides a high-quality printing
solution without the physical constraints of wiring. Data transmission rates vary according to
system architecture and distance from the access point.
Use the HP Install Network Printer Wizard to install the network software.
Note HP Jetdirect 802.11b print servers are available for USB and parallel connections.
20 Chapter 3 - Product requirements ENWW
Page 21

System requirements for HP LaserJet 1010 series printer software
For both direct and network connection, all of the computers that use the printer must meet the
following minimum requirements as listed below.
IBM-compatible computer with an available USB or parallel port (HP LaserJet 1015 only) and the
following:
! Windows 95 (printer driver only, parallel connections only, HP LaserJet 1015 only): Pentium
90 MHz processor or faster and 32 MB or more of RAM
! Windows NT 4.0 (Service Pack 3 or higher, printer driver only, parallel connections only, HP
LaserJet 1015 only): Pentium 90 MHz processor or faster and 32 MB or more of RAM
! Windows 98: Pentium 90 MHz processor or faster and 32 MB or more of RAM
! Windows Me: Pentium 150 MHz processor or faster and 32 MB or more of RAM
! Windows 2000: Pentium 133 MHz processor or faster and 64 MB or more of RAM
! Windows XP (32-bit): Pentium II 300 MHz processor or faster and 128 MB or more of RAM
Note Windows 95 and Windows NT 4.0 do not support USB. You must use a parallel connection (HP
LaserJet 1015 only) or network connection to use one of these operating systems.
For Windows systems
The HP LaserJet 1012 and 1015 series software has the following additional requirements for
network connections:
! TCP/IP protocol installed
ENWW System requirements for HP LaserJet 1010 series printer software 21
Page 22

For Mac OS systems
Any Macintosh computer using the HP LaserJet 1010 series software has the following minimum
system requirements:
! Mac OS 9.1 and higher: PowerPC processor and 96 MB of RAM.
! Mac OS X v10.1 and v10.2: Power Mac G3, G4, iBook, or eMac and 128 MB or more of
physical RAM. A built-in display or a display connected to Apple-supplied video card is
required.
! 100 MB or more of free hard disk space
! A USB port
Note For a direct connection to a Macintosh computer, the computer must have a USB port. Parallel cable
connections are not supported.
! A CD-ROM drive (required for installation)
Note Mac OS X does not support PowerBook G3 or processor upgrade cards.
22 Chapter 3 - Product requirements ENWW
Page 23

Requirements for network connection
Requirements for end-user client computers
The network computers that will be using the HP LaserJet 1010 series software need to meet the
minimum system requirements listed in the previous section.
Note Certain Novell NetWare configurations are not supported by the HP LaserJet 1010 software.
Note Windows Terminal Server and Citrix MetaFrame should use the latest Windows 2000, Windows XP,
or Windows 9X PCL drivers available from http://www.hp.com.
Network requirement
The following are required for the HP LaserJet 1010 series printer to work on a network:
For Windows systems
! A cable for your type of network connection (not included). (This cable is used to connect the
HP Jetdirect print server to a network port.)
! An installed network using the TCP/IP or IPX/SPX network protocol.
If the TCP/IP protocol will be used, you must configure the HP Jetdirect print server for a direct
peer-to-peer connection from the computer to the printer for network users to have the full
print functionality of the HP LaserJet 1010 series printer.
If the IPX/SPX protocol will be used, you must configure the HP Jetdirect print server for a
direct peer-to-peer connection (sometimes called IPX direct mode) from the computer to the
printer for network users to have the only print functionality of the HP LaserJet 1010 series
printer.
In order to have full functionality, including the HP Toolbox, you also need TCP/IP.
Note Novell NetWare server configurations (Queue Server, IPX NDPS, IP NDPS, and so on) are not
supported.
ENWW Requirements for network connection 23
Page 24

For Mac systems
! A cable for your type of network connection (not included). This cable is used to connect the
HP Jetdirect print server to a network port.
Note Peer-to-peer sharing may work but is not supported on Mac OS systems.
HP Jetdirect print servers
The following table shows the HP Jetdirect print servers that are supported by the HP LaserJet
1010 series printers.
HP Jetdirect print servers
HP Jetdirect
model
HP Jetdirect 500x
(J3265A)
HP Jetdirect 500x
TR (J3264A TR)
HP Jetdirect 310X
(J6038A)
HP Jetdirect 300x
(J3263A)
HP Jetdirect 170X
(J3258B or later)
HP Jetdirect 380x
(J6061A)
HP Jetdirect WP110
(J6061A)
Description Firmware
This model connects the HP LaserJet 1015 printer to a
10Base-T or 100Base-TX Ethe rnet network via a bi -direction al
parallel port. It supports Windows, Novell, Apple, and OS/2
operating systems.
This model connects the HP LaserJet 1015 pr inte r to a Tok en
Ring network via a direct-to-networ k connection using a
parallel port. It supports Windows, Novell, Apple, and OS/2
operating systems.
This model connects the HP LaserJet 1012 printer to a 10/
100Base-TX Ethernet network. It is an external network print
server that connects to the printe r via the printer’ s USB po rt. It
supports several Windo ws, Appl e, No vell, and oth er opera ting
systems.
This model connects the HP LaserJet 1015 printer to a 10/
100Base-TX Ethernet network. It is an external print server
that connects to the printer via a parallel port. It supports
Windows, Apple, Novell, and OS/2 operating systems.
This model connects the HP LaserJet 1015 printer via a
parallel port. It is an external print server that has a highspeed, bi-directional parallel port (IEEE 1284) that connects
the device. It supports Ethernet or IEEE 802.3 type 10Base-T
networks using unshielded twisted-pair cable and RJ-45
connectors. It supports Windows and several Novell network
environments, but does not support a Macintosh environment.
This model connects the HP LaserJet 1012 printer to a
802.11b wireless network. It is an external network print
server that connects to the printer’s USB port.
This model connects the HP LaserJet 1015 printer to a
802.11b wireless network. It is an external network print
server that connects to the printer’s parallel port.
Version 9.x or
later upgradable
Version 9.x or
later upgradable
Upgradable
Version 9.x or
later upgradable
Version 8.x or
later. Not
upgradable
Upgradable
Upgradable
24 Chapter 3 - Product requirements ENWW
Page 25

Installing the HP LaserJet 1010
4
Note HP recommends installing the HP LaserJet 1010 series software before connecting the printer to
series software
the computer. Wait for the prompt to connect the printer.
Overview of software installation
This section provides information for installing the HP LaserJet 1010 series printing system
software using Windows and Macintosh operating systems. See page 9 for a list of the operating
systems supported by printer software.
The HP LaserJet 1010 series software is shipped on one CD-ROM. On Windows systems, the
Setup program installs the HP LaserJet 1010 series software from the CD-ROM to the hard disk
and updates Windows files. On Mac OS systems, the HP LaserJet 1010 series Installer program
installs the HP LaserJet 1010 series software from the CD-ROM to the hard disk.
On installation, you are presented with the following options:
! Typical installation (installs all of the basic components in the default locations)
! Custom installation (allows you to specify components and locations for installation)
On Mac OS systems, the HP LaserJet 1010 series printers use the HP LaserJet 1010 Installer.
Also, printer software will only install on the current system startup drive that contains the active
System folder.
Note Moving the HP LaserJet Software folder after installation may cause the program not to work.
On all of the supported platforms, each install option presents you with a series of query dialog
boxes that guide you through the installation. The Installer will guide you through the installation,
whether you are configuring a directly-connected or networked HP LaserJet 1010 series printer.
The installer has the ability to detect hardware and network connections and help guide the
installation. For instance, if the installer detects an HP LaserJet 1010 series printer, it can
automatically configure the software’s connection to that printer. This saves the user several
steps.
ENWW Installing the HP LaserJet 1010 series software 25
Page 26

Installation options for Windows
To install the printer driver for Windows 95
To install the printer driver for Windows 95 and Windows NT 4.0, you must use the Add Printer
Wizard.
1 Click Start, and then point to Settings.
2 Click Printers.
3 Double-click Add Printer.
4 Select local printer, and then click Next.
Note Windows 95 does not support USB connections. You must use a parallel connection (HP LaserJet
1015 only) to use this operating system.
5 Click Have Disk, and then click Browse.
6 On the CD-ROM, perform the following procedures to browse to the printer driver you want to
install:
a From the directory tree, double-click the language.
b From the directory tree, double-click drivers.
c From the directory tree, double-click the Win9X_ME folder.
d From the directory tree, double-click the PCL 5e driver folder.
e Click hp130025.inf to select the INF file.
f Click OK to begin the installation.
7 Follow the on-screen instructions to complete the software installation.
To install the printer driver for Windows NT 4.0
To install the printer driver for Windows NT 4.0, you must use the Add Printer Wizard.
Note Windows NT 4.0 does not support USB connections. You must use a parallel connection (HP
LaserJet 1015 only) to use this operating system.
1 Click Start, and then point to Settings.
2 Click Printers.
3 Double-click Add Printer.
4 Select My Computer, and then click Next.
5 Select the appropriate port, and click Next.
Note For a local connection, the port is LPT1.
6 Click Have Disk.
7 Click Browse and select the appropriate letter for the CD-ROM drive. If the letter for the CD-
ROM drive does not appear in the drop down list, type the correct letter followed by a colon
and a forward slash. For example, type E:/.
8 Double-click the folder for your language.
9 Double-click Drivers.
26 Chapter 4 - Installing the HP LaserJet 1010 series software ENWW
Page 27

10 Double-click the WinNT folder.
11 Double-click the PCL 5e driver folder.
12 Click hp130025.inf to select the INF file.
13 Click Open.
14 In the Install from Disk dialog box, click OK.
15 Click Next.
16 Choose the printer name (this is optional), and the default printer options. Click Next.
17 Select whether the printer will be shared, and click Next.
18 Select Yes, print a test page, and click Finish to complete the driver installation.
To install printer software for all other Windows operating systems
1 Close all programs.
2 Place the HP LaserJet 1010 series printer software CD-ROM into the CD-ROM drive.
3 Wait for autorun to begin the software installation. If the Welcome screen does not open, click
Start on the Windows task bar, click Run, type Z:\hpsetup (where Z is your CD-ROM drive
letter), and then click OK.
4 Read the information on the Welcome screen, and then click install printer.
5 Read the software licensing agreement, and then click Next.
6 Select the printer connection method, and then click Next.
7 Select the connector type, and then click Next.
8 Select the installation type, and then click Next.
9 To accept the default printer name and default printer, click Next, or type a new name and
select a different default printer, and then click Next.
10 Select a shared printer option, and then click Next.
11 In the text box, type a location and comment (optional), and then click Next.
12 Click Install to install the software.
13 Connect the printer to the computer.
Note New Hardware Found messages are not visible in Windows XP.
14 On-screen check boxes allow you to print a printer driver test page, read release notes, check
for Web updates, and register the printer online. The print a driver test page check box is
selected by default. You can accept one or all of these settings, and then click Finish. The
following options are available:
• To print a test page, a dialog box asks if the test page printed correctly. Click Yes to close
the dialog box and finish the installation, or click Troubleshoot (or click No in Windows 98
SE and Windows Me) to launch the Windows print-troubleshooting tool.
• If you chose to read release notes, select the read release notes check box.
• To check for Web updates, select the check for web updates check box.
• If you chose to register the printer online, your browser launches and displays the online
registration screen at http://www.hp.com. Follow the on-screen directions to register your
printer.
ENWW Installation options for Windows 27
Page 28
Once you have completed the registration or if you did not choose to register the printer
online, and a dialog box that describes the benefits of registering the printer appears, click
OK to finish.
15 You must restart the computer for the configuration changes to be made to the HP LaserJet
1010 series printer to take effect. Click Yes to restart now, or click No to restart later.
For Windows XP
HP recommends installing the HP LaserJet 1010 series software before connecting the printer to
the computer. However, if you do connect the hardware first on Windows XP using a USB
connection, it is recommended that you accept the default settings that appear in the New
Hardware wizard for correct installation.
For Windows 2000
HP recommends installing the HP LaserJet 1010 series software before connecting the printer to
the computer. However, if you do install the hardware first on Windows 2000 using a parallel port,
a warning dialog box may appear that states that the software you are installing has not passed
Windows Logo testing. Click Continue Anyway, and a signed printer driver will be installed
successfully.
Note If the New Hardware Found message appears on the screen, click Cancel. Insert the software CD-
ROM that came with the printer into the computer CD-ROM drive. Follow the on-screen installation
instructions.
Installation text options (Windows 98 SE, Me, 2000, and XP only)
After inserting the CD-ROM, the Welcome screen appears. The following text options are
available during installation in Windows operating systems.
Windows installation text options
Screen/Field Description Default
Welcome screen Use this screen to select from the following options:
! install printer
Click this option to start th e installa tion pro cess, and ope n the
HP LaserJet 1010 Setup Wizard.
! customization utility
Click this option to start the customization utility.
! register product
Click this option to register the HP LaserJet 1010 series
printer software.
! view documentation
Click this option to vie w the H P L ase rJet 1010 series product
documentation.
! support
Click this option to access HP online support and order
supplies online.
HP LaserJet 1010 Series Setup
Software License
Agreement
Next Click Next to continue to the next screen. N/A
Click this button to view the HP Software License Agreement.
Click OK to accept or close the window to return to the HP
LaserJet 1010 Setup window.
N/A
N/A
Cancel Click this button to cance l the ins tallati on pr ocess and displa y the
HP LaserJet 1010 Setup Interrupted screen. Click Finish to exit
the Setup Wizard.
Finish
28 Chapter 4 - Installing the HP LaserJet 1010 series software ENWW
Page 29
Windows installation text options (continued)
Screen/Field Description Default
Installation Notes Click this button to open the Printing System Late-breaking
N/A
Readme file.
Printer Connection To connect the printer, select one of the following options:
! Connected directly to this computer
! Connected via the network
Connected
directly to
this
computer
Back Click Back to return to the previous screen. N/A
Next Click Next to continue to the next screen. N/A
Cancel Click this button to cancel the insta llatio n proces s and di splay the
Finish
HP LaserJet 1010 Setup Interrupted screen. Click Finish to exit
the Setup Wizard.
Connector Type To select a connector type, select one of the following options:
! Parallel Cable
Parallel
Cable
Select the port from the drop-down list.
! USB Cable
! Other
Select the port from the drop-down list.
Back Click Back to return to the previous screen. N/A
Next Click Next to continue to the next screen. N/A
Cancel Click this button to cancel the insta llatio n proces s and di splay the
Finish
HP LaserJet 1010 Setup Interrupted screen. Click Finish to exit
the Setup Wizard.
Installation Type To select an installation type, select one of the following options:
! Typical Installation
Typical
Installation
Includes: Screen Fonts, HP LaserJet Toolbox, and an hp
1010 Series LaserJet printer driver (printer driver varies
depending on printer model)
! Custom Installation
Lists all available installation options
Back Click Back to return to the previous screen. N/A
Next Click Next to continue to the next screen. N/A
Cancel Click this button to cancel the insta llatio n proces s and di splay the
Finish
HP LaserJet 1010 Setup Interrupted screen. Click Finish to exit
the Setup Wizard.
Custom Installation group
Features Select the features you want to install from the drop-down list.
N/A
Click the arrow to the left of each feature, and then select one of
the following options:
! This feature will be installed on local hard drive.
! This feature, and all subfeatures, will be installed on the
local hard drive.
! This feature will not be available.
Clicking this option will prevent the feature from being
installed.
Help Click Help to open the Custom Setup Tips window. This window
N/A
describes and contains information about the install state icons.
Click OK to return to the Setup Wizard.
ENWW Installation options for Windows 29
Page 30
Windows installation text options (continued)
Screen/Field Description Default
Space Click this button to view the disk space requirements and
N/A
available space for the selected features.
Click OK to return to the Setup Wizard.
Back Click Back to return to the previous screen. N/A
Next Click Next to continue to the next screen. N/A
Cancel Click this button to cance l the ins tallati on pr ocess and displa y the
Finish
HP LaserJet 1010 Setup Interrupted screen. Click Finish to exit
the Setup Wizard.
Replace Drivers If HP LaserJet 1010 s eries softw are has previo usly bee n install ed
and uninstalled, this window may appear. Select one of the
following options:
! Keep existing drivers
! Replace existing drivers
Replace
existing
drivers
Back Click Back to return to the previous screen. N/A
Next Click Next to continue to the next screen. N/A
Cancel Click this button to cance l the ins tallati on pr ocess and displa y the
Finish
HP LaserJet 1010 Setup Interrupted screen. Click Finish to exit
the Setup Wizard.
Printer Name Specify a name for this printer or use the default name.
Clear the check box if you do not want this printer as the default
printer.
Varies
depending
on the
printer
model.
Back Click Back to return to the previous screen. N/A
Next Click Next to continue to the next screen. N/A
Cancel Click this button to cance l the ins tallati on pr ocess and displa y the
Finish
HP LaserJet 1010 Setup Interrupted screen. Click Finish to exit
the Setup Wizard.
Printer Sharing Select one of the following options:
! Not Shared
! Share as:
Not Shared
If this option is selected, specify a name for each printer
driver type.
Back Click Back to return to the previous screen. N/A
Next Click Next to continue to the next screen. N/A
Cancel Click this button to cance l the ins tallati on pr ocess and displa y the
Finish
HP LaserJet 1010 Setup Interrupted screen. Click Finish to exit
the Setup Wizard.
Printer Location and
Enter a text description of the printer and location if desired. N/A
Comment
Back Click Back to return to the previous screen. N/A
Next Click Next to continue to the next screen. N/A
Cancel Click this button to cance l the ins tallati on pr ocess and displa y the
Finish
HP LaserJet 1010 Setup Interrupted screen. Click Finish to exit
the Setup Wizard.
Ready to Install Click Install to begin the installation N/A
30 Chapter 4 - Installing the HP LaserJet 1010 series software ENWW
Page 31

Windows installation text options (continued)
Screen/Field Description Default
Back Click Back to return to the previous screen. N/A
Cancel Click this button to cancel the insta llatio n proces s and di splay the
HP LaserJet 1010 Setup Interrupted screen. Click Finish to exit
the Setup Wizard.
Installing HP LaserJet
1010 status window
This window displays the status of the installation process. This
process may take several minutes.
Finish
N/A
Cancel Click this button to cancel the insta llatio n proces s and di splay the
HP LaserJet 1010 Setup Interrupted screen. Click Finish to exit
the Setup Wizard.
Looking for new
hardware
If this window appears, connect the printer to the computer and
turn the printer on.
Cancel Clicking this button cancels the installation process and displays
the HP LaserJet 1010 Setup Interrupted screen. Click Finish to
exit the Setup Wizard.
Finish This window displays the following options:
! Print Driver Test Page
To print a test page, select this option.
! Read Release Notes
To display the Late-breaking Readme file, select this option.
! Check for W eb Updates
To open the HP Software Update Wizard, select this option.
! Register Product
To register this product, select this option.
Select or clear any or all check boxes, and then click Finish.
Test Page This window appears if Print Driver Test Page was selected. If
the test page printed correctly, click OK. If the test page did not
print, click Troubleshoot. The Windows Print Troubleshooter
opens.
HP LaserJet 1010
Installer Information
This screen prompts the user to resta rt the co mpute r to make the
configuration changes. To restart now, click Yes. To res tart la ter,
click No.
Finish
N/A
Finish
Selected
N/A
N/A
customization utility Click this option to start the customization utility. N/A
Customization Utility group
HP LaserJet 1010 Setup
Wizard
To continue, click Next. To stop the installation process, click
Cancel. The HP LaserJet 1010 Setup Interrupted screen
N/A
displays. Click Finish to exit the Setup Wizard.
Language From the drop-down list, select the language. English
Back Click Back to return to the previous screen. N/A
Next Click Next to continue to the next screen. N/A
Cancel Click this button to cancel the insta llatio n proces s and di splay the
Finish
HP LaserJet 1010 Setup Interrupted screen. Click Finish to exit
the Setup Wizard.
Printer Port To select the printer port, select one of the following options:
! Queue Name\Path
NA
Browse and select the printer name and path.
! Local Port
! New TCP/IP Port
! New IPX Port
ENWW Installation options for Windows 31
Page 32

Windows installation text options (continued)
Screen/Field Description Default
Back Click Back to return to the previous screen. N/A
Next Click Next to continue to the next screen. N/A
Cancel Click this button to cance l the ins tallati on pr ocess and displa y the
Finish
HP LaserJet 1010 Setup Interrupted screen. Click Finish to exit
the Setup Wizard.
Connector Type To select the connector type, select one of the following options:
! Parallel Cable
Parallel
Cable
Select the port from the drop-down list.
! USB Cable
! Other
Select the port from the drop-down list.
Back Click Back to return to the previous screen. N/A
Next Click Next to continue to the next screen. N/A
Cancel Click this button to cance l the ins tallati on pr ocess and displa y the
Finish
HP LaserJet 1010 Setup Interrupted screen. Click Finish to exit
the Setup Wizard.
Features Select the program features to install from the following HP
N/A
LaserJet 1010 series options:
! HP LaserJet 1010 Series Driver
! HP LaserJet Toolbox
! Screen Fonts
Note: These options vary depending on the printer model.
Back Click Back to return to the previous screen. N/A
Next Click Next to continue to the next screen. N/A
Cancel Click this button to cance l the ins tallati on pr ocess and displa y the
Finish
HP LaserJet 1010 Setup Interrupted screen. Click Finish to exit
the Setup Wizard.
Printer Name Specify a name for this printer, or use the default name.
Clear the check box if you do not want this printer as the default
printer.
From the drop-down list, select the default printer driver.
Varies
depending
on the
printer
model.
Back Click Back to return to the previous screen. N/A
Next Click Next to continue to the next screen. N/A
Cancel Click this button to cance l the ins tallati on pr ocess and displa y the
Finish
HP LaserJet 1010 Setup Interrupted screen. Click Finish to exit
the Setup Wizard.
Printer Sharing Select one of the following options:
! Not Shared
! Share as:
Not Shared
Specify a name for each printer driver type.
Back Click Back to return to the previous screen. N/A
Next Click Next to continue to the next screen. N/A
Cancel Click this button to cance l the ins tallati on pr ocess and displa y the
Finish
HP LaserJet 1010 Setup Interrupted screen. Click Finish to exit
the Setup Wizard.
32 Chapter 4 - Installing the HP LaserJet 1010 series software ENWW
Page 33

Windows installation text options (continued)
Screen/Field Description Default
Printer Location and
Enter a text description of the printer and location (optional). N/A
Comment
Back Click Back to return to the previous screen. N/A
Next Click Next to continue to the next screen. N/A
Cancel Click this button to cancel the insta llatio n proces s and di splay the
Finish
HP LaserJet 1010 Setup Interrupted screen. Click Finish to exit
the Setup Wizard.
Custom Installer
Location
Enter the location for the cus to mi zed ins ta ller, or click Change to
browse to the location.
N/A
Back Click Back to return to the previous screen. N/A
Install Click Install to start the installation process . N/A
Cancel Click this button to cancel the insta llatio n proces s and di splay the
Finish
HP LaserJet 1010 Setup Interrupted screen. Click Finish to exit
the Setup Wizard.
Change Current
Destination Folder
Browse to and then click the desti nation fold er, and then click OK.
The Custom Installer Location window displays again. To start
N/A
the installation process, click Install.
Back Click Back to return to the previous screen. N/A
Next Click Next to continue to the next screen. N/A
Cancel Click this button to cancel the insta llatio n proces s and di splay the
Finish
HP LaserJet 1010 Setup Interrupted screen. Click Finish to exit
the Setup Wizard.
Finish Click View readme file to open and display the HP LaserJet
N/A
Installer Customization Wizard Readme File Contents.
Click FInish to complete installation of the customization utility
and return to the Welcome screen.
register product To register a product, select one of the following options:
! WWW Registration
Click this opti on to open the HP registratio n Web page in your
browser. Follow the instructions on the Web page to register
your HP LaserJet 1010 series software.
! Exit
Click this opti on to ope n a window . Select one of th e follow ing
options:
• Continue
Continues the registration process.
• Exit
Click to return to the Welcome screen.
! Electronic Registration
Click this option to start the electronic HP registration
process.
N/A
ENWW Installation options for Windows 33
Page 34

Windows installation text options (continued)
Screen/Field Description Default
view documentation To view the documentation, select one of the following options:
! view user guide
This option opens the online user guide.
! print user guide
This option allows the user to print the user guide from an
Adobe Acrobat PDF file.
Note: Adobe Acrobat must be installed on the computer to
use this feature.
! release notes
This option displays the Printing system Late-breaking
Readme file.
support Select one of the following options:
! hp.com
This option opens the Web browser to the hp.com Web site.
! product information
This option allows the user to select online support for either
the HP LaserJet 1010 series printer and opens the
HP customer care Web page.
! supplies
This option opens the Web browser to the HP order supplies
Web page.
N/A
N/A
34 Chapter 4 - Installing the HP LaserJet 1010 series software ENWW
Page 35

Installation log files (Windows systems)
The main logging file (product monitoring file) for the HP LaserJet 1010 series installer is
hplj1010.his. If multiple installs are attempted or completed, the older log files will be designated
hplj1010.hi1 or .hi2, and so on. This file is located in the Windows or WinNT directory, depending
on the operating system. The file contains a list of actions performed during the installation
process.
Other log files
During the installation process, the following two additional files are created that may be useful for
troubleshooting.
! hpgeneral.ini (contains a log of settings selected by the user during installation)
! compdata.ini (contains driver setting information)
Note These files are only available while the installer is running and the installer deletes them during
cleanup.
Since their location varies from system to system, the best way to locate these files is to perform a
file search. They are placed in the temp directory, defined by the %TEMP% variable.
ENWW Installation log files (Windows systems) 35
Page 36

Installation for Mac OS (Network or Direct)
HP LaserJet 1010 series
Mac OS 9.1 or later
To install the software on a Mac computer running Mac OS 9.1 or higher, perform the following
procedure:
1 Connect the HP LaserJet 1010 series printer to the computer.
2 Insert the printer software CD-ROM into your CD-ROM drive.
3 If the CD-ROM does not auto-launch, go to the desktop, and then double-click the HP
LaserJet 1010 CD-ROM icon.
4 Double-click the HP LaserJet 1010 folder.
5 Double-click the HP LaserJet Installer Classic icon.
6 Click Continue, click Accept, clic k Continue, and then click Install.
7 From the Apple menu, select the Chooser.
8 On the top-left side of the Chooser dialog box, click the HP LaserJet icon.
9 Do one of the following, depending on how the computer and printer are connected:
a TCP/IP: Select yes to scan for TCP/IP network printers in the pop-up dialog.
bUSB: Go to step c.
c AppleTalk: In the lower left side of the Chooser dialog box, select the correct AppleTalk
Zone for your printer. On the right side of the Chooser dialog box, click the HP LaserJet
1010 printer name.
10 Close the Chooser.
Mac OS X v10.1 or higher
To install the software on a Mac computer running Mac OS X v10.1 or higher, perform the
following procedure:
1 Connect the HP LaserJet 1010 series printer to the computer.
2 Insert the printer software CD-ROM into your CD-ROM drive.
3 If the CD-ROM does not auto-launch, go to the desktop, and then double-click on the HP
LaserJet 1010 CD-ROM icon.
4 Double-click the HP LaserJet 1010 folder.
5 Double-click the HP LaserJet Installer OS X icon.
6 Enter your password and click Continue.
7 Click Continue, click Accept, clic k Continue, and then click Install.
8 Print Center should launch automatically. If it does not:
a Double-click the hard drive icon.
b Click Applications, and then click Utilities.
c Double-click Print Center.
9 Click Add Printer. The Add Printer List dialog box appears.
10 Do one of the following, depending on how the computer and printer are connected:
36 Chapter 4 - Installing the HP LaserJet 1010 series software ENWW
Page 37

aUSB: Go to step 11.
b AppleTalk: Select the correct AppleTalk Zone.
cTCP/IP: Select "hp ip printing" for connecting to your TCP/IP printer.
11 Select the printer name from the printer list.
12 Click Add.
ENWW Installation for Mac OS (Network or Direct) 37
Page 38

Installation instructions for networked computers
This section contains instructions for installing the HP LaserJet 1012 or 1015 printer software on
network computers running Windows 95, 98, Me, NT 4.0, 2000, XP, or Mac OS 9.x, or OS X
(version 10.1 or later).
Note Each computer system must have the appropriate printer driver for the operating system installed.
PCL 5e printer drivers can be shared between Windows 2000 and Windows XP operating systems
and between Windows 95, Windows NT 4.0, Windows 98 SE, and Windows Me operating systems.
However, the printer drivers cannot be shared between the two groups of operating systems. For
more information, see information in “Printer software components” on page 11.
Using an HP Jetdirect external print server
The HP LaserJet 1010 series printer must be set up and connected to the network through an HP
Jetdirect print server, and turned on before installing the HP LaserJet 1010 series software.
Also, if you are using HP Web Jetadmin to set up the HP Jetdirect print server, make sure you do
not create an HP Jetdirect port when you connect the printer to the print server.
To connect an HP LaserJet 1010 series printer to a network using an HP Jetdirect external print
server, perform the following procedure:
Note You must complete the procedure in order, or the Installer's discovery utility will fail to see the printer.
1 Turn off power to the printer before connecting the HP Jetdirect print server.
2 Connect the HP Jetdirect print server to the printer’s appropriate port (parallel or USB).
3 Plug in the HP LaserJet 1010 series printer to a power source.
4 To print an HP Jetdirect test page, press the Test button on the HP Jetdirect print server.
5 To complete the printer installation, install the HP LaserJet 1010 series1010 series software.
Use the information from the test pages to complete the network variables during installation.
Network installation for Windows systems
This software is available only when the printer is connected to a network.
1 If the welcome screen does not open, click Start, click Run, type X:\SETUP (where X is the
letter of your CD-ROM disk drive), and then click OK.
2 When the installation is nearly complete, a setup screen appears that asks whether or not you
want to print a test page. Click Yes.
38 Chapter 4 - Installing the HP LaserJet 1010 series software ENWW
Page 39

Network installation for Mac systems (HP LaserJet 1010 printer)
To install the software on a Mac computer for a printer connected to a network through an HP
Jetdirect print server, see page 39.
Discovery process during installation
During the HP LaserJet 1010 series software installation, the software searches for an HP
LaserJet 1010 series printer on the network. If the HP Jetdirect print server does not have the
supported firmware, the print server will not be detected during discovery. After the discovery
process is complete, the printer will appear to be connected to the HP Jetdirect print server.
ENWW Installation instructions for networked computers 39
Page 40

Configuration for Windows sharing
This section contains instructions for using Windows sharing to make the printer available to
network users when the printer is directly connected to a computer.
Note Peer-to-peer sharing is not available for Mac OS systems.
Once the printer is shared, install the printer drivers on all the computers you want to print to the
printer. For Windows 95, 98, Me, NT 4.0, 2000, or XP, perform the following procedure to enable
sharing.
Note You might need the printer software CD-ROM to complete the printer driver installations.
Perform the following procedure at the computer directly connected to the printer:
1 Click Start, click Settings, and then click Printers.
2 From the File menu, select the HP LaserJet 1010 series printer, and then click Properties.
3 On the Sharing tab, type a name for the printer in the Share Name field, and then click OK.
4 For Windows XP only: On the Port tab, click to clear the enable bi-directional support
check box.
Perform the following procedure at the computers of other network users who want to use the
printer:
1 From the Start menu, click Settings, and then click Printers.
2 Double-click Add Printer, and then click Next.
3 Follow the directions on the screen.
a When asked if the printer is a local or network printer, select Network Printer.
b Click Browse, locate the printer name that was assigned to the shared printer, and then
click OK.
c When prompted, print a test page to ensure the printer driver is installed properly.
Note A host-based printer driver must be installed on each computer accessing the printer. The printer
driver cannot be shared between computers.
40 Chapter 4 - Installing the HP LaserJet 1010 series software ENWW
Page 41

Installing the printer driver only
Windows
Note If the printer is directly connected to another user’s computer, the printer must be shared from that
computer using Windows sharing.
To install the printer driver, perform the following procedure:
1 From the Start menu, click Settings, and then click Printers.
2 Double-click Add Printer, and then click Next.
3 When asked if the printer is a local or network printer, select Network Printer, and then click
Next.
4 To copy printer files onto your system, complete one of the following options:
• If using Windows 2000 or XP, you may need to first choose your printer from the list of
printers or enter an IP address. If the printer driver is not available, the Add Printer Wizard
dialog box will appear. Click Have Disk from the wizard screen.
• If using Windows NT, Me, 98, or 95, click Have Disk from the wizard screen that appears.
5 Insert the CD-ROM into the drive. Complete one of the following options:
• For Windows 95 and Windows 98 SE: Double-click the INF file located on the CD-ROM
in X:\<language>\DRIVERS\9X_ME (replace the “X” with the letter of your CD-ROM drive).
• For Windows NT 4.0 and Window 2000: Double-click the INF file located on the CD-ROM
in X:\<language>\DRIVERS\WinNT40 (replace the “X” with the letter of your CD-ROM
drive).
• For Windows XP: Double-click the INF file located in the CD-ROM in
X:\<language>\DRIVERS\Win2000_XP (replace the “X” with the letter of your CD-ROM
drive).
6 Complete the installation. When prompted, print a test page to ensure the printer driver is
installed properly.
ENWW Installing the printer driver only 41
Page 42

Installing the customization utility
To install the customization utility, perform one of the following procedures:
Procedure 1
1 If the Welcome screen does not open, click Start on the Windows task bar.
2 Click Run.
3 Type Z:\hpsetup (where Z is your CD-ROM drive letter).
4 Click OK.
Procedure 2
1 Quit all programs.
2 Place the HP LaserJet 1 010 series printer software CD-ROM into the CD-ROM drive.
3 Wait for autorun to begin the software installation.
Note If the Welcome screen does not open, click Start on the Windows task bar, click Run, type ó (where
Z is your CD-ROM drive letter), and then click OK.
4 On the Welcome screen, click customization utility.
5 The HP LaserJet 1010 Setup screen appears. To continue, click Next.
6 In the Language window, select the language from the drop-down list, and then click Next.
7 In the Printer Port window, select the type of printer port from the list of options, or browse to
select another port in the field. Click Next.
8 In the Connector Type window, select the type of printer connection, and then click Next.
9 From the list of printer models, select your printer, and then click Next.
10 From the Features window, select the features you wish to install, and then click Next.
11 Click Next to accept the default printer name, or type a new printer name in the field.
12 If you want this printer to be the default printer, make sure the check box is checked, and then
click Next.
13 In the Printer Sharing window, select from the list of options, and then click Next. (If you select
Share as:, type the name for the shared printer in the field.)
14 Type in the location and a comment if you wish, and then click Next.
15 In the Custom Installer Location window, type in the location or click Change to browse to the
location, and then click Install.
16 When installation of the customization utility is complete, click Finish. The Welcome screen
displays again.
42 Chapter 4 - Installing the HP LaserJet 1010 series software ENWW
Page 43

5Configuration
Software configuration setting s
Software configuration settings, such as sharing properties and port management, apply to the
printer in general. To alter software configuration settings after installation, you must gain access
to the printer properties by opening the printer driver. Follow these steps to access configurations
settings:
Windows 95, Windows 98 SE, Windows NT 4.0, and Windows Me
1 Click Start, select Settings, and then click Printers.
2 Right-click the HP LaserJet 1010 series printer icon.
3 Click Printer Properties (Document Defaults... in Windows NT.4.0).
Windows 2000 and Windows XP
1 Click Start, select Settings, click Printers (in Windows XP, click Printers and Faxes), and
then right-click the HP LaserJet 1010 series pr int er icon .
2 Click Printing Preferences.
Mac OS 9.x
In the application you wish to print from, use the following steps to configure the HP LaserJet 1010
series printer settings:
1 Click File, and then click Print.
2 Using the drop-down list, select the printing options to configure and make changes to the
print settings.
3 To use these settings for the current job only, after making printing option selections, click
Print.
4 To use these setting for the current and future jobs, click Save Set ti ng s, and then click Print.
ENWW Configuration 43
Page 44

Mac OS X
In the application you wish to print from, use the following steps to configure the HP LaserJet 1010
series printer settings :
1 Click File, and then click Print.
2 Using the drop-down list, select the printing options to configure and make changes to the
print settings.
3 To use these settings for the current job only, after making printing option selections, click
Print.
4 To use these setting for the current and future jobs, select Save As from the presets menu,
type in a name, click OK, then click Print.
44 Chapter 5 - Configuration ENWW
Page 45

Printing preferences
Printing preferences are a subset of the software configuration settings. These settings control
specific instructions for each print job such as media size and type, resolution, and watermarks.
You can gain access to printing preferences through the software application you are using or
through the printer driver.
Gaining access to printing preferences through the current software application
This changes the settings only for the current software application. Follow these steps to gain
access to printing preferences through the software application:
Note The steps for gaining access to printer preferences can vary among software applications. The
following steps cover the most common methods for applications running on Windows 95,
Windows 98 SE, Windows Me, Windows NT 4.0, Windows 2000, and Windows XP.
1 From the File menu in the software application, click Print.
2 On the print dialog box, verify that the HP LaserJet 1010 series printer is the selected printer.
If it is not, click the drop-down arrow, and click the printer name to select it.
3 Click Properties.
Gaining access to printing preferences through the printer driver
Windows 95, Windows 98 SE, and Windows Me
1 Click Start, select Settings, click Printers, and then right-click the HP LaserJet 1010 series
printer icon.
2 Click Printer Properties to open the printer driver dialog box.
Windows NT 4.0
Note In Windows NT 4.0, this feature is called "Document Defaults" rather than "Printing Preferences".
1 Click Start, select Settings, click Printers, and then right-click the HP LaserJet 1010 series
printer icon.
2 Click Document Defaults to open the printer driver dialog box.
Note To access the Configure tab, right-click the HP LaserJet 1010 series printer icon, and then click
Properties.
Windows 2000 and Windows XP
1 Click Start, select Settings, click Printers (in Windows XP, click Printers and Faxes), and
then right-click the HP LaserJet 1010 series pr int er icon .
2 Click Printing Preferences.
ENWW Printing preferences 45
Page 46

Host-based printing preference tabs in Windows 98 SE, Me, 2000, and XP
The following tabs are available in the Printing Properties:
! Finishing
! Effects
! Paper
! Basics
Paper
Field Description Default
Quick Sets group
Quick Sets This drop-down list displays a list of user-defined
Quick Sets. This control als o allows you to typ e a new
Quick Sets name.
Quick Sets allow you to save the current printer
driver settings, such as page orien t ati on , resol uti on,
and paper source, for reuse. After choosing the
settings, type a name for the qui ck s et, and then click
Save. When you save Quick Sets, all current printer
driver setti ngs are saved.
You can also restore pri nter dr iv er def aul t se ttin gs by
selecting Defaults from the Quick Sets drop-down
list.
Save To save the new or changed Print Task Quick Set,
click Save.
Untitled
N/A
Delete To delete the selected Print Task Quick Set, click
Delete.
This button becomes available for all Print Task
Quick Set selections except Defaults.
N/A
46 Chapter 5 - Configuration ENWW
Page 47

Paper (continued)
Field Description Default
Paper Options group
Size is This drop-down list contains the following options:
! Letter
! Legal
! A4
! Executive
! B5 (ISO)
! Envelope #10
! Envelope Monarch
! Envelope C5
! Envelope DL
! Envelope B5
! A5
! A6
! B5 (JIS)
! Post Card (JIS)
! Double Post Card (JIS)
! 8.5 x 13
! 16K
Note: Paper sizes larger than what the printer
supports (such as 11 x 17) are scaled to fit.
Letter
Custom To open the Custom Paper Size window, click
Custom.
Source Tray is This drop-down list contains the following options:
! Automatically Select
! Manual Feed
N/A
Automatically Select
ENWW Host-based printing preference tabs in Windows 98 SE, Me, 2000, and XP 47
Page 48

Paper (continued)
Field Description Default
Type is This drop-down list contains a list of supported
media. You can use this list to select the type of
media you want to use.
This setting adjusts the printer speed and fuser
temperature for the paper or other print media that
you select.
CAUTION: Using inappropriate media settings can
cause damage to the printer. Options to select are:
! Plain Paper
! Preprinted
! Letterhead
! Transparency
! Prepunched
! Labels
! Bond Paper
! Envelope
! Recycled
! Color
! Light <75 g/m
! Heavy (90 -105 g/m
! Cardstock (105 - 76 g/m
! Rough Paper
2
2
)
2
)
Note: For a list of suppo rted me dia ty pes, s ee the HP
media guide at http://www.hp.com/support/
ljpaperguide.
Plain
Custom Paper Size details
Name This drop-down list co ntai ns f ive opt ion s yo u ca n us e
Custom 1
to customize the document paper size.
Save To save the new or changed Print Task Quick Set,
N/A
click Save.
Size group
Width Enter the desired paper width in this field. 8.5
Length Enter the desired paper length in this field. 11.0
Use Inches/Use
Millimeters
Help Click this button bef ore closin g the dialog box to open
To change units from inches to millimeters, or vice
versa, click Use Inches/Use Millimeters.
Inches
N/A
the online Help.
OK To update any changed settin gs on the prin ter and
N/A
close the dialog box, click OK.
Cancel To close the dialog box without saving the changes
N/A
you have made, click Cancel.
Apply Clicking this button applies the new settings, leaving
N/A
the dialog box open.
48 Chapter 5 - Configuration ENWW
Page 49

Finishing tab
Field Description Default
Quick Sets group
Quick Sets This drop-down list displays a list of user-defined
Quick Sets. This control also allows you to type a
new Print Task Quick Set name.
Quick Sets allows you to save the current printer
driver settings, such as page orientation, resolution,
and paper source, for reuse. After choosing the
settings, type a name for th e quic k set, an d then cl ick
Save. When you save Quick Sets, all current printer
driver settings are saved.
You can also restore printer driver default settings by
selecting Defaults from the Quick Sets drop-down
list.
Save To save the new or changed Print Task Quick Set,
click Save.
Delete To delete the selected Print Task Quick Set, click
Delete.
This button becomes available for all Print Task
Quick Set selections except Default Print Settings.
Document Options group
Print on Both Sides
(Manually)
Note: This option is
sometimes called
"manual duplexing."
This setting allows you to print a document on both
sides of a page.
The printer will print the first side of each page, then
wait for you to put the pa per b ac k i nto t he p rint er and
then print the second side of the page.
Type new Quick Set
name here
N/A
N/A
Unselected
When this check box is selected, the following opti on
becomes available:
! Flip Pages Up
Pages can be flipped up like a notebook.
Booklet Printing This option becomes available when Print on Both
Sides (Manually) is selected and Pages per Sheet
is set for 1. From the drop-down list, you can select
from the following options:
! Off
! Letter (Left Binding)
! Letter (Right Binding)
Unselected
Unselected
Off
ENWW Host-based printing preference tabs in Windows 98 SE, Me, 2000, and XP 49
Page 50

Finishing tab (continued)
Field Description Default
Pages per Sheet This drop-down l ist specifie s the number o f pages per
sheet to be printed on one sheet of paper. The
supported selections are:
! 1
! 2
! 4
! 6
! 9
! 16
Note: This feature is also known as N-up printing.
Print Page Borders This control becom es a vaila ble i f Pa ges pe r Sheet is
set for more than 1.
Selecting this check box prints a border around each
page on the sheet.
Page Order This control becomes available when Pages per
Sheet is set for more than 1.
This drop-down list allow s you to select th e o rder an d
placement of the pages on the sheet .
The supported options are:
! Right, then Down
! Down, then Right
! Left, then Down
! Down, then Left
1
Unselected
Unselected
Print Quality group
Print quality field Use this drop-down list to select the print quality:
either 600 dpi or FastRes 1200
EconoMode Selecting this check box allows the pri nter to use le ss
toner on each page. Selecti ng this option ext ends the
life of your print cartridges and reduces costs per
page. However, using Ec onoMo de als o reduc es pri nt
quality.
Print all Text as Black Selecting this check box allows the printer to print all
text characters as black, regardless of the
document's text color setting. The exception is white
text, which stays white.
Help Clicking this button before closing the dialog box
opens the online Help.
OK To update any changed settings on the printer and
close the dialog box, click OK.
Cancel Clicking Cancel to close the dialog box without
saving the changes you have made.
Apply Clicking this button applies the new settings, leaving
the dialog box open.
600dpi
Unselected
N/A
N/A
N/A
N/A
50 Chapter 5 - Configuration ENWW
Page 51

Effects tab
Field Description Default
Quick Sets group
Quick Sets This drop-down list displays a list of user-defined
Quick Sets. This co ntrol also allows yo u to typ e a new
Print Task Quick Set name.
Quick Sets allows you to save the current printer
driver settings, such as page orientation, resolution,
and paper source, for reuse. After choosin g the
settings, type a name fo r the qu ic k s et, a nd th en c lic k
Save. When you save Quick Sets, all current printer
driver settings are saved.
You can also restore printer driver default settings by
selecting Defaults from the Quick Sets drop-down
list.
Save To save the new or changed Print Task Quick Set,
click Save.
Type new Quick Set
name here
N/A
Delete To del ete the selected Print Task Quick Set, click
Delete.
This button become s available for all Print Task Quic k
Set selections except Default Print Settings.
Fit to Page group
Print Document On Selecting this check box causes the document to be
printed on a pap er size other tha n t he one fo r w h ich i t
is formatted.
When Print Document On is selected, a drop-down
list displays the types of media available. The
supported media types are:
! Letter
! Legal
! A4
! Executive
! B5 (ISO)
! Envelope #10
! Envelope Monarch
! Envelope C5
! Envelope DL
! Envelope B5
! A5
! A6
! B5 (JIS)
! Post Card (JIS)
! Double Post Card (JIS)
! 8.5 x 13
! 16K
N/A
Unselected
Letter
Scale to Fit This control becomes available if the Print
Unavailable
Document On check box is selected. Select ing this
check box enables the printer to reduce or enlarge a
document to fit on the selected paper size.
ENWW Host-based printing preference tabs in Windows 98 SE, Me, 2000, and XP 51
Page 52

Effects tab (continued)
Field Description Default
% of Normal Size This control becomes available when Print
Document On is clear.
This field allows you to specify the percentage of
normal size that the printer will enlarge or reduce the
document on the page.
-Or Move the slider right or left to increase or decrease
the percentage of norm al size.
Normal size refers to the document page size (check
the application's page size settings). You can also
use the slider bar beneath the field to choose a
percentage.
Watermarks group
Watermarks This drop-down list di sp lays a li st of words or phras es
that the printer can then use to print a watermark on
the document. The supported options are:
! (none)
! DRAFT
! CONFIDENTIAL
! SAMPLE
First Page Only This control box becomes available when text other
than (none) is shown in the Watermarks drop-down
list.
Available
100
(none)
Unselected
Selecting this check box enables the printer to print
the specified watermark on only the first page of the
document. No watermarks are printed on the second
and subsequent pages.
Edit Clicking this button opens the Watermark Details
screen.
Watermark Details
Current Watermarks This control lists the available watermarks.
The watermark that is highlighted in this list box also
shows up as alterable text in the Watermark
Message control.
New Clicking this button allows you to create a new
watermark by highlig hting the (Untitled) option and
allowing you to ty pe text f or your ne w waterma rk. This
text then appears in the current watermarks list.
Delete To delete the selected watermark from the current
watermarks list, click Delete.
Watermark Message Allows you to change the text of any highlighted
watermark listed in the Current Watermarks list, or
type the text for your new watermark.
N/A
N/A
N/A
N/A
(none)
52 Chapter 5 - Configuration ENWW
Page 53

Effects tab (continued)
Field Description Default
Message Angle This control consists of three options and a spin box:
! Diagonal: Selecting this option causes the
selected watermark to print diagonally on the
page.
! Horizontal: Selecting this option causes the
selected watermark to print horizontally on the
Angle
(Windows 2000 and
Windows XP)
Diagonal
(Windows 98 SE and
Windows Me)
page.
! Angle: Selecting this o ption en ables t he spin box,
which you can use to choose the angle of the
watermark on the printed page.
45
Font Attributes group
Name Clicking a font name from this drop-do wn list spec ifies
which font to use for the selected watermark.
Default font for the
document
The supported font options con si st of all the ins tal le d
fonts on your computer.
Color Gray is the only supported color option. Gray
Shading Clicking a setting from this drop-down list specifies
Very Light
how dark the selected watermark appe ars on the
printed page. The supported shading options are:
! Lightest
! Very Light
! Light
! Medium Light
! Medium
! Medium Dark
! Dark
! Very Dark
! Darkest
Size Use this spin box to specify the font size for the
selected watermark.
Style Clicking a setting from this drop-down list specifies
the specific style for the selected font you chose for
this watermark. The supported options available in
this list depend on the fon ts installed on the computer.
Typical choices include:
! Regular
! Bold
! Italic
! Bold Italic
OK To update any changed settin gs on the prin ter and
close the dialog box, click OK.
Cancel To close the dialog box without saving the changes
you have made, click Cancel.
Help C l icking this button bef ore closing the dialog box
opens the online Help.
150
Regular
N/A
N/A
N/A
ENWW Host-based printing preference tabs in Windows 98 SE, Me, 2000, and XP 53
Page 54

Basics tab
Field Description Default
Quick Sets group
Quick Sets This drop-down list displays a list of user-defined
Quick Sets. This con trol als o all ows you to type a new
Quick Sets name.
Quick Sets allows you to save the current printer
driver settings, such as page orientation, resolution,
and paper source, for reuse. After choosing the
settings, type a name for the quick set, and then click
Save. When you save Quick Sets, all current printer
driver settings are saved.
You can also restore printer driver default settings by
selecting Defaults from the Quick Sets drop-down
list.
Save To save the new or changed Print Task Quick Set,
click Save.
Type new Quick Set
name here
N/A
Delete To delete the selected Print Task Quick Set, click
Delete.
This button becomes avail able for all Pr int Task Quick
Set selections except Defaults.
Orientation group
Portrait Selecting this option enables the prin ter to print a
page or envelope that is taller than it is wide when
viewing the text right-side-up.
Feed the paper as usual; the image is rotated on the
page if necessary.
Landscape Selecting this opti on ena ble s the prin ter to print a
page or envelope that is wider than it is tall when
viewing the text right-side-up.
Feed the paper as usual; the image is rotated on the
page if necessary.
Rotated Selecting this check box enables the printer to reverse
the image or document top to bottom.
Copies group
Copy This spin box allows you to use the up and down
arrows to choose a number or to type the number of
copies you want to print (1 to 999).
N/A
Selected
Unselected
Unselected
1
The copies setting i n the application us ual ly ov erri des
the copies setting in the printer driver.
Collated This control box becomes available when more than
one copy is shown in the Copy spin box. Selecting
this box enables the printer to collate your copies.
54 Chapter 5 - Configuration ENWW
Page 55

Basics tab (continued)
Field Description Default
About group
About... To view the About This Driver window, including
copyright and software versions, click About.
N/A
Software Update To automatically open your browser and go to http://
www.hp.com, click Software Update.
OK To close the dialog box, click OK.N/A
Help C l icking this button bef ore closing the dialog box
opens the online Help.
Cancel To close the dialog box without saving the changes
you have made, click Cancel.
Apply Clicking this button applies the new settings, leaving
the dialog box open.
OK To update any changed settin gs on the prin ter and
close the dialog box, click OK.
N/A
N/A
N/A
N/A
N/A
ENWW Host-based printing preference tabs in Windows 98 SE, Me, 2000, and XP 55
Page 56

Printing preferences tabs using PCL 5e printer drivers in Windows 95, NT 4.0, 98, and Me
The followi ng t abs are a vai labl e in the Properties dialog box (Document Defaults... in Windows
NT 4.0):
! Finishing tab
! Effects tab
! Paper tab
! Basics tab
Finishing tab
Field Description Default
Quick Sets group
Quick Sets This drop-down list displays a list of user-defined
Quick Sets. This control also all ows you to type a new
Print Task Quick Set name.
Quick Sets allows you to save the current printer
driver settings, such as page orientation, resolution,
and paper source, for reuse. After choosing the
settings, type a n am e fo r the quick set, and then click
Save. When you save Quick Sets, all current printer
driver settings are saved.
You can also restore printer driver de fault settings by
selecting Default Print Settings from the Qu ick Sets
drop-down list.
Save To save the new or changed Print Task Quick Set,
click Save.
Type new Quick Set
name here
N/A
Delete To delete the selected Print Task Quick Set, click
Delete.
This button becomes available f or all Print Ta sk Quick
Set selections except Default Print Settings.
Document Options group
Print on Both Sides
(Manually)
Note: This option is
sometimes called
"manual duplexing."
Booklet Printing This option requires and automatically selects 2
This setting allows you to print a document on both
sides of a page.
The printer will print the first side of each page, then
wait for you to put the paper back into th e pr inter, a nd
then print the second side of the page.
When this check box is select ed, the fo llowing op tions
become available:
! Flip Pages Up
Pages can be flipped up like a notebook.
Pages per Sheet and Print on Both Sides. From the
drop-down list, select from the following options:
! Off
! Letter (Left Binding)
! Letter (Right Binding)
N/A
Unselected
Unselected
Off
56 Chapter 5 - Configuration ENWW
Page 57

Finishing tab (continued)
Field Description Default
Pages per Sheet This dro p-down lis t specifies the num ber of pa ges per
sheet to be printed on one sheet of paper. The
supported selections are:
! 1
! 2
! 4
! 6
! 9
! 16
Note: This feature is also known as N-up printing.
Print Page Borders This control becom es av ailab le if Pages pe r Sheet is
set for more than 1.
Selecting this check box prints a border around each
page on the sheet.
Page Order This control becomes available when Pages per
Sheet is set for more than 1.
This drop-down l is t allows you t o se lec t the order and
placement of the pages on the sheet.
The supported options are:
! Right, then Down
! Down, then Right
! Left, then Down
! Down, then Left
Print Quality group
1
Unselected
Unselected
Best Quality Selecting this option enables the printer to print a
document at its optimal resolution.
This option (600 dpi) provides the best print quality.
Changing resolution might change the formatting of
text documents.
300 dpi Selectin g this opti on specifi es that the printer is us ing
the 300 dpi setting for printing.
Use this option if the document was formatted for an
earlier model HP LaserJet pri nter and you are get ting
unexpected results.
Changing resolution might change the formatting of
text documents.
Custom Clicking this button opens the Print Quality Details
window and allows you to select custom print quality
settings.
Details Clicking this button opens the Print Quality Details
screen.
EconoMode
(Save Toner)
Selecting this chec k box allow s th e printe r to us e les s
toner on each page. Se lecti ng this option extend s the
life of your print cartridges and reduces costs per
page. However, us in g Ec on oM ode also reduces prin t
quality.
Selected default for
PCL 5e printer driver
Unselected
Unselected
N/A
Unselected
Print Quality Details screen
ENWW Printing preferences tabs using PCL 5e printer drivers in Windows 95, NT 4.0, 98, and Me 57
Page 58

Finishing tab (continued)
Field Description Default
Current S etting This read-only control denotes the quality setting
currently applied to the printer.
Graphic Settings group
Complex Graphics This control consists of two options:
! Use HP MEt
! Use More Memory
Note: The Use More Memory option is not intended
for general use. Use it only if you receive printer
memory err or messages while printing complex
pages.
Rendering Mode This control consists of the following options:
! Automatic
! Send Graphics as Vector
! Send Graphics as Raster
! Send Page as Raster
Output Settings group
Resolution Clicking this drop-down list allows you to select from
the following options:
! 600 dpi
! FastRes 120 0
N/A
Use HP MEt
Automatic
600 dpi
As resolution is increased, the quality of print on the
page is improved. However, using higher resolution
might also result in longer printing times.
Resolution
Enhancement
technology (REt)
This control consists of two options:
! On
Selecting this option allows the printer to refine
On
the print quality of the characters by smoothing
out jagged edges that can occur with longer
printing times.
! Off
Selecting this option disables the REt function of
the printe r. Use this option if gr aphics or images,
particularly scanned images, are not printing
clearly.
Scale Patterns
(WYSIWYG)
Select this check box for the most reliable printing.
Clearing this check box may cause differences
Selected
between on-screen appearance and printed output.
Print all Text as Black Selecting this check box allows the printer to print all
Unselected
text characters as black, regardless of the
document's text color setting. The exception is white
text, which stays white.
Font Settings Select this check box to print TrueType as Bitmaps. Unselected
OK To update any changed settings on the printer and
N/A
close the dialog box, click OK.
Cancel To close the dialog box without saving the changes
N/A
you have made, click Cancel.
58 Chapter 5 - Configuration ENWW
Page 59

Finishing tab (continued)
Field Description Default
Help Clicking this button before closing the dialog box
opens the online Help.
N/A
Effects tab
Field Description Default
Quick Sets group
Quick Sets This drop-down list displays a list of user-defined
Quick Sets. This control also allows you to type a
new Print Task Quick Set name.
Quick Sets allows you to save the current printer
driver settings, such as page orientation, resolution,
and paper source, for reuse. After choosing the
settings, type a name for th e quick set, and then cli ck
Save. When you save Quick Sets, all current printer
driver settings are saved.
You can also restore printer driver default settings by
selecting Default Print Settings from the Quick
Sets drop-down list.
Save Click Save to save the new or changed Print Task
Quick Set
Delete To delete the selected Print Task Quick Set, click
Delete.
Type new Quick Set
name here
N/A
N/A
This button becomes available for all Print Task
Quick Set selections except Default Print Settings.
ENWW Printing preferences tabs using PCL 5e printer drivers in Windows 95, NT 4.0, 98, and Me 59
Page 60

Effects tab (continued)
Field Description Default
Fit To Page group
Print Document On Selecting this check box causes the document to be
printed on a paper siz e othe r than the on e for w hich it
is formatted.
When Print Document On is selected, a drop-down
list displays the types of media available. The
supported media types are:
! Letter
! Legal
! Executive
! A5
! A4
! B5 (ISO)
! Envelope #10
! Envelope DL
! Envelope C5
! Envelope B5
! Envelope Monarch
! B5 (JIS)
! A6
! Double Post Card
! Post Card
! 8.5 by 13 inch
! 16K
Scale to Fit This control becomes available if the Print
Document On check box is selected. Selecting this
check box enables the printer to reduce or enlarge a
document to fit on the selected paper size.
Unselected
Letter
Unavailable
% of Normal Size This control becomes available when Print
Document On is clear.
This field allows you to specify the percentage of
normal size that the printer will enlarge or reduce the
document on the page.
-Or Move the slider right or left to increase or decrease
the percentage of normal size.
Normal size refers to the document page size (check
your application's page size settings). You can also
use the slider bar beneath the field to choose a
percentage.
Watermarks group
Watermarks This drop-down lis t display s a list of words or p hrases
that the printer can then use to print a watermark on
the document. The supported options are:
! (none)
! Confidential
! Draft
! SAMPLE
Available
100
(none)
60 Chapter 5 - Configuration ENWW
Page 61

Effects tab (continued)
Field Description Default
First Page Only This control box becomes available when text other
than (none) is shown in the Watermarks drop-down
list.
Selecting this check box enables the printer to print
the specified watermark on only the first page of the
document. No watermark s are prin ted on the se cond
and subsequent pages.
Edit Clicking this button opens the Watermark Details
screen.
Watermark Details
Current Watermarks This control lists the available watermarks.
The watermark that is highlighted in this list box also
shows up as alterable text in the Watermark
Message control.
New Clicking this button allows you to create a new
watermark by highlighting the (Untitled) option and
allowing you to type text for your new watermark.
This text then appears in the current watermarks list.
Delete Clicking this button allows you to delete the selected
watermark from the Current Watermarks list.
Watermark Message Allows you to change the text of any highlighted
watermark listed in the Current Watermarks list.
Message Angle This control consists of three options and a spin box:
Unavailable
N/A
N/A
N/A
N/A
(none)
Diagonal
! Diagonal
Selecting this option causes the selected
watermark to print diagonally on the page.
! Horizontal
Selecting this option causes the selected
watermark to print horizontally on the page.
! Angle
Selecting this option enables the spin box, which
you can use to choose the angle of the
watermark on the printed page.
Font Attributes group
Name Clicking a font name from this drop-down list
specifies which font to use for the selected
Default font for the
document
watermark.
The supported font options consist of all the installed
fonts on the computer.
Color Gray is the only supported color option. Gray
ENWW Printing preferences tabs using PCL 5e printer drivers in Windows 95, NT 4.0, 98, and Me 61
Page 62

Effects tab (continued)
Field Description Default
Shading Clicking a setting from this drop-do wn list sp ecifies
how dark the selected watermark appears on the
printed page. The supported shadi ng opt ion s are:
! Lightest
! Very Light
! Light
! Medium Light
! Medium
! Medium Dark
! Dark
! Very Dark
! Darkest
Size Use this spin box to specify the font size for the
selected watermark.
Style Clicking a setting from this drop-do wn list sp ecifies
the specific style for the font chosen for this
watermark. The supported options available in this
list depend on the fonts installed on the computer.
Typical choices include:
! Regular
! Italic
! Bold
! Bold Italic
OK To update any changed settings on the printer and
close the dialog box, click OK.
Very Light
150
Regular
N/A
Cancel To close the dialog box without saving the changes
N/A
you have made, click Cancel.
Help Clicking this button before closing the dialog box
N/A
opens the online Help.
Paper tab
Field Description Default
Quick Sets group
Quick Sets This drop-down list displays a list of user-defined
Quick Sets. This control also all ows you to type a new
Quick Sets name.
Quick Sets allows you to save the current printer
driver settings, such as page orientation, resolution,
and paper source, for reuse. After choosing the
settings, type a n am e fo r the quick set, and then click
Save. When you save Quick Sets, all current printer
driver settings are saved.
You can also restore printer driver de fault settings by
selecting Default Print Settings from the Qu ick Sets
drop-down list.
Save To save the new or changed Print Task Quick Set,
click Save.
Type new Quick Set
Name here
N/A
62 Chapter 5 - Configuration ENWW
Page 63

Paper tab (continued)
Field Description Default
Delete To delete the selected Print Task Quick Set, click
Delete.
This button beco mes availa ble for all Pri nt Task Quick
Set selections except Default Print Settings.
All Pages group
Size is This drop-down list allows you to select the paper
size for the document from the list of supported paper
sizes, which includes saved cust om paper sizes.
The paper size for all pages of a print jo b must b e the
same.
The application settings override the settings in the
printer driver.
The supported paper-size options are:
! Letter
! Legal
! Executive
! A5
! A4
! B5ISO (JIS)
! Envelope #10
! Envelope DL
! Envelope C5
! Envelope B5
! Envelope Monarch
! B5 (JIS)
! A6
! Double Post Card
! Post Card
! 8.5 by 13 inches
! 16K
Custom Clicking this button allows you to create or modify
custom paper-size information.
N/A
Letter
Note: Varies by
country/region.
N/A
Source is This drop-down list contains the following options:
! AutoSelect
! Manual Feed
! Tray 1
ENWW Printing preferences tabs using PCL 5e printer drivers in Windows 95, NT 4.0, 98, and Me 63
AutoSelect
Page 64

Paper tab (continued)
Field Description Default
Type is This drop-dow n list con tains a list o f supported m edia.
You can use this list to select the type of media you
want to use.
This setting adjusts the printer speed and fuser
temperature for the paper or other print media that
you select.
CAUTION: Using inappropriate media settings can
cause damage to the printer. Options to select are:
! Unspecified
! Plain
! Preprinted
! Letterhead
! Transparency
! Prepunched
! Labels
! Bond
! Recycled
! Color
! Cardstock (105 -176 g/m
! Rough
! Heavy (90 -150 g/m
! Envelope
! Light < 75 g/m
2
2
)
2
)
Note: For a list of supported media types, see the
HP media guide at http://www.h p.com/su pport/
ljpaperguide.
OK To update any changed settings on the printer and
close the dialog box, click OK.
Plain
N/A
Cancel To close the dialog box without saving the changes
you have made, click Cancel.
Apply Clicking this button applies the new settings, leaving
the dialog box open.
Help Clicking this button before closing the dialog box
opens the online Help.
Custom Paper Size Details
Name Clicking th is dro p-dow n li st al lows y ou to t ype a n ame
for your custom paper size.
Save Clicking this button allows you to save the custom
settings you have specified on this dialog box.
Click OK and then Close to go ba ck to the Paper tab.
The custom size now appears in the Size is dropdown list.
Delete Clicking this button allows you to delete the custom
setting you specified in this dialog box.
This button is available only when there are custom
paper sizes in the drop-down list.
N/A
N/A
N/A
Untitled
N/A
N/A
64 Chapter 5 - Configuration ENWW
Page 65

Paper tab (continued)
Field Description Default
Width Use this spin box to select the width of a custom
paper size.
If you enter a size that is too small or too large, the
printer driver automatically adjusts the size for you.
Height Use this spin box to select the length of a custom
paper size.
If you enter a size that is too small or too large, the
printer driver automatically adjusts the size for you.
Use Millimeters/Use
Inches
Close Clicking this button closes the Custom Paper Size
Help Clicking this button before closing the dialog box
Clicking this button allows you to view custom-size
dimensions in either inches or millimeters.
window and returns to the Paper tab.
opens the online Help.
Basics tab
8.5 inches (if Size is
set to Letter)
- Or -
216.0 mm (if Size is
set to A4)
11.0 inches (if Size is
set to Letter)
- Or -
279.0 mm (if Size is
set to A4)
Inches (if Size is set
to Letter)
- Or -
Millimeters (if Size is
set to A4)
N/A
N/A
Field Description Default
Quick Sets group
Quick Sets This drop-down list displays a list of user-defined
Quick Sets. This control also allows you to type a
new Quick Sets name.
Quick Sets allows you to save the current printer
driver settings, such as page orientation, resolution,
and paper source, for reuse. After choosing the
settings, type a name for th e quick set, and then cli ck
Save. When you save Quick Sets, all current printer
driver settings are saved.
You can also restore printer driver default settings by
selecting Default Printer Settings from the Quick
Sets drop-down list.
Save To save the new or changed Print Task Quick Set,
click Save.
Delete To delete the selected Print Task Quick Set, click
Delete.
This button becomes available for all Print Task
Quick Set selections except Default Print Settings.
Copies group
Copies This spin box allows you to use the up and down
arrows to choose a number or to type in the number
of copies you want to print (1 to 999).
Type new Quick Set
name here
N/A
N/A
1
The copies setting in your application usually
overrides the copies setting in the prin ter driver.
ENWW Printing preferences tabs using PCL 5e printer drivers in Windows 95, NT 4.0, 98, and Me 65
Page 66

Basics tab (continued)
Field Description Default
Orientation group
Portrait Selecting this option enables the printer to print a
page or envelope that is taller than it is wide when
viewing the text right-side-up.
Feed the paper as usual; the image is rotated on the
page if necessary.
Selected
Landscape Selecting this option enables the printer to print a
page or envelope that is wider than it is tall when
viewing the text right-side-up.
Feed the paper as usual; the image is rotated on the
page if necessary.
Rotate by 180 degrees
Note: This feature is
unavailable if Print on
Both Sides or Pages per
Sheet is selected.
About Clicking this button displays printer driver version
OK To update any changed settings on the printer and
Cancel To close the dialog box without saving the changes
Apply Clicking this button applies the new settings, leaving
Help Clicking this button before closing the dialog box
Selecting the Rotate by 180 degrees check box
enables the printer to rotate the document image on
the paper 180 degrees.
If the return address on an envelope is smudged, try
this setting and feed the envelope so that the return
address area is fed first into the printer.
information.
close the dialog box, click OK.
you have made, click Cancel.
the dialog box open.
opens the online Help.
Unselected
Unselected
N/A
N/A
N/A
N/A
N/A
Note In Windows NT 4.0, Windows 2000, and Windows XP, the Configure tab is grouped with the main
printer driver tabs, not in the Printing Preferences or Document Defaults group.
66 Chapter 5 - Configuration ENWW
Page 67

Printing preferences tabs using PCL 5e printer drivers in Windows 2000 and XP
The following tabs are available in the Printing preferences:
! Advanced
! Paper/Quality
! Finishing
! Effects
Advanced tab
Field Description Default
HP LaserJet 1010 PCL 5e Advanced Document Settings
Paper Output group
Paper Size Click Paper Size to display a drop-down list and
select from the following options:
! 11 x 17
! 16K
! 8.5 x 13 inches
! 8K
! A3
! A4
! A5
! A6
! B4 (JIS)
! B5 (ISO)
! B5 (JIS)
! Double Postcard (JIS)
! Envelope #10
! Envelope B5
! Envelope C5
! Envelope DL
! Envelope Monarch
! Executive
! Legal
! Letter
! Postcard (JIS)
Note: Paper sizes larger than what the printer
supports (such as 11 x 17) are scaled to fit.
Letter
Copy Count Click Copy Count to display a spin box to specify the
1 Copy
number of copies printed.
When 2 or more is selected, a Collated check box
becomes availab le . S ele ct th is che ck box if y ou w an t
the pages collated.
ENWW Printing preferences tabs using PCL 5e printer drivers in Windows 2000 and XP 67
Page 68

Advanced tab (continued)
Field Description Default
Document Options group
Advanced Printing
Features
Click Advanced Printing Fea tures to display a drop-
down list. Select either Enable or Disable.
When this feature is enabled, Page Order, Booklet
Printing, and Pages Per Sheet are available. If
disabled, some of these options might not be
available.
Enabled
Print Optimizations Click Print Optimization to display a dr op-down list.
Select either Enable or Disable.
When this feature is disabled, some features might
not be available.
Printer Features group
Print All Text as Black Click Print All Text as Black to display a drop-down
list to enable or disable this feature.
Selecting Enable allows the printer to print all text
characters as black, regardless of the document's
text color setting. The exception is white text, which
stays white.
Send TrueType as
Bitmap
Click S end TrueTy pe as Bitmap to displ ay a dr opdown list. Select Enabled to print TrueType as
Bitmaps.
Graphics Mode Click Grap hics M ode to display a drop-down list and
select from the following options:
! Send Graphics as Vector
This setting may produce higher quality graphics
output.
! Send Graphics as Raster
Use this setting if the file is not printing correctly.
REt Click REt to display a drop-down lis t and select either
On or Off.
! On
Selecting this option allows the printer to refine
the print quality of the characters by smoothing
out jagged edges that can occur with longer
printing times.
! Off
Selecting this option disables the REt function of
the printer. Use this option if graphics or images,
particularly scanned images, are not printing
clearly.
Enabled
Disabled
Disabled
Send Graphics As
Raster
On
68 Chapter 5 - Configuration ENWW
Page 69

Advanced tab (continued)
Field Description Default
Layout Options group
Orientation Click Orientation to display a drop-down list. The
following options are avail abl e:
! Portrait: Selecting thi s option ena bles the pri nter
to print a page or envelope that is taller than it is
wide when viewing the text right-sid e-up.
Feed the paper as usual; the im ag e is rota ted o n
the page if necessary.
! Landscape: Selecting this option enables the
printer to print a page or envelope that is wider
than it is tall when viewing the text right-side-up.
Feed the paper as usual; the im ag e is rota ted o n
the page if necessary.
Portrait
Page Order Click Page Order to display a drop-down list with the
Front to Back
following options:
! Front to Back
(Page 1 is on the top of the stack)
! Back to Front
(Page 1 is on the bottom of the stack)
Paper/Quality tab
Field Description Default
Quick Sets group
Quick Sets This drop-down list displays a list of user-defined
Quick Sets. This control also allows you to type a
new Quick Sets name.
Quick Sets allows you to save the current printer
driver settings, such as page orientation, resolution,
and paper source, for reuse. After choosing the
settings, type a n ame f or the q uick set, an d then clic k
Save. When you save Quick Sets, all current printer
driver settings are saved.
You can also restore printer driver default settings by
selecting Default Print Settings from the Quick
Sets drop-down list.
Untitled
Save To save the new or changed Print Task Quick Set,
N/A
click Save.
Delete To delete the selected Print Task Quick Set, click
N/A
Delete.
This button becomes availab le for all Print Task
Quick Set selections except Default Print Settings.
ENWW Printing preferences tabs using PCL 5e printer drivers in Windows 2000 and XP 69
Page 70

Paper/Quality tab (continued)
Field Description Default
Paper Options group
Use different paper Selecting this check box allows you to select a
different page source and type settings for the
following options:
! First Page
! Other Pages
! Back Cover
The paper size settings should be made within the
application.
Unselected
Source is This drop-down list contains the following options:
! Automaticall y Select
! Manual Feed (Tray 1)
! Printer Auto Select
! Tray 1
Type is This drop-down list contains a list of supported
media. You can use this list to select the type of
media you want to use.
This setting adjusts the printer speed and fuser
temperature for the paper or other print media that
you select.
CAUTION: Using inappropriate media settings can
cause damage to the printer. Options to select are:
! Unspecified
! Plain
! Preprinted
! Letterhead
! Transparency
! Prepunched
! Labels
! Bond
! Recycled
! Color
! Light <75 g/m
! Heavy (90 -105 g/m
! Cardstock (105 -176 g/m
! Envelope
! Rough
2
2
)
2
)
Note: For a list of supported media types, see the
HP media guide at http://www.hp.com/support/
ljpaperguide.
Automatically Select
Plain
Note: If Print on Both Sides is selected, a warning
icon will appear next to Transparency, Labels, and
Envelope to warn the user that there are limitations
when doing manual duplexing.
70 Chapter 5 - Configuration ENWW
Page 71

Paper/Quality tab (continued)
Field Description Default
Print Quality group
Print quality field
Not available with PCL 5e
printer driver in Windows
2000 and XP
EconoMode Selecting this ch eck box allows th e printe r to use les s
Use this drop-down list to s elect the p rint qua lity fr om
the following options:
! ProRes 1200 (141 lpi)
! ProRes 1200 (180 lpi)
! FastRes 1200
! 600 dpi
toner on each page. Selecting this opti on ext ends the
life of the print cartridge s an d redu ce s y our c ost s pe r
page. However, using EconoMode also reduces
quality.
600 dpi
Unselected
Help Clicking this button before closing the dialog box
N/A
opens the online Help.
OK To update any changed settings on the printer and
N/A
close the dialog box, click OK.
Cancel To close the dialog box without saving the changes
N/A
you have made, click Cancel.
Apply Clicking this butt on app lie s t he new sett ing s, lea vi ng
N/A
the dialog box open.
Finishing tab
Field Description Default
Quick Sets group
Quick Sets This drop-down list displays a list of user-defined
Quick Sets. This control also allows you to type a
new Quick Sets name.
Quick Sets allows you to save the current printer
driver settings, such as page orientation, resolution,
and paper source, for reuse. After choosing the
settings, type a name for th e quick set, and then cli ck
Save. When you save Quick Sets, all current printer
driver settings are saved.
You can also restore printer driver default settings by
selecting Default Print Settings from the Quick
Sets drop-down list.
Save To save the new or changed Print Task Quick Set,
click Save.
Type new Quick Set
name here
N/A
Delete To delete the selected Print Task Quick Set, click
N/A
Delete.
This button becomes available for all Print Task
Quick Set selections except Default Print Settings.
ENWW Printing preferences tabs using PCL 5e printer drivers in Windows 2000 and XP 71
Page 72

Finishing tab (continued)
Field Description Default
Document Options group
Print On Both Sides
(Manually)
This setting allows you to print a document on both
sides of a page.
Unselected
Note: This option is
sometimes called
"manual duplexing."
The printer will print the first side of each page, then
wait for you to put the paper back into th e printer, and
then print the second side of the page.
When this check box is selected, the following
options become available:
! Flip Pages Up
Pages can be flipped up like a notebook.
Booklet Layout This option requires and automatically selects
2 Pages per Sheet and Print on Both Sides. From
the drop-down list, you can select from the following
options:
! Off
! Left Edge Binding
! Right Edge Binding
Pages per Sheet This drop-down list spe cifies the nu mber of pages p er
sheet to be printed on one sheet of paper. The
supported selections are:
! 1
! 2
! 4
! 6
! 9
! 16
Unselected
Off
1
Note: This feature is also known as N-up printing.
Print Page Borders This control becomes available if Pages per Sheet is
set for more than 1.
Selecting this check box prints a border around each
page on the sheet.
Page Order This control becomes available when Pages per
Sheet is set for more than 1.
This drop-down li st all ows yo u to s elect the order and
placement of the pages on the sheet .
The supported options are:
! Right, then Down
! Down, then Right
! Left, then Down
! Down, then Left
Rotate
Selecting the Rotate by 180 degrees check box
enables the printer to rotate the document image on
Note: This feature is
unavailable if Print on
Both Sides or Pages per
Sheet is selected.
the paper 180 degrees.
If the return address on an envelope is smudged, try
this setting and feed the envelope so that the return
address area is fed first into the printer.
Unselected
Unselected
Unselected
72 Chapter 5 - Configuration ENWW
Page 73

Finishing tab (continued)
Field Description Default
Help Clicking this button before closing the dialog box
opens the online Help.
OK To update any changed settings on the printer and
close the dialog box, click OK.
Cancel To close the dialog box without saving the changes
you have made, click Cancel.
Apply Clicking this button applies the new settings, leaving
the dialog box open.
N/A
N/A
N/A
N/A
Effects tab
Field Description Default
Quick Sets group
Quick Sets This drop-down list displays a list of user-defined
Quick Sets. This control also allows you to type a
new Print Task Quick Set name.
Quick Sets allows you to save the current printer
driver settings, such as page orientation, resolution,
and paper source, for reuse. After choosing the
settings, type a name for the quic k set, and th en clic k
Save. When you save Qu ick Sets , all current printer
driver settings are saved.
Type new Quick Set
name here
You can also restore pri nte r dri ve r de faul t s etti ng s b y
selecting Default Print Settings from the Quick
Sets drop-down list.
Save To save the new or changed Print Task Quick Set,
click Save.
Delete To delete the selected Print Task Quick Set, click
Delete.
This button becomes availab le for all Print Task
Quick Set selections except Default Print Settings.
N/A
N/A
ENWW Printing preferences tabs using PCL 5e printer drivers in Windows 2000 and XP 73
Page 74

Effects tab (continued)
Field Description Default
Resizing Options group
Print Document On Selecting this check box causes the document to be
printed on a pape r siz e othe r than t he one for whi ch it
is formatted.
When Print Document On is selected, a drop-down
list displays the types of media available. The
supported media types are:
! 16K
! 8.5 by 13 inch
! A4
! A5
! A6
! B5 (ISO)
! B5 (JIS)
! Double Postcard (JIS)
! Envelope #10
! Envelope B5
! Envelope C5
! Envelope DL
! Envelope Monarch
! Executive
! Legal
! Letter
! Postcard (JIS)
Scale to Fit This control becomes available if the Print
Document On check box is selected. Selecting this
check box enables the printer to reduce or enlarge
the document to fit on the selected paper size.
Unselected
Letter
Unavailable
% of Normal Size This control becomes available when Print
Document On is clear.
This field allows you to specify the percentage of
normal size that the printer will enlarge or reduce the
document on the page.
-Or Move the slider right or left to increase or decrease
the percentage of normal size.
Normal size refers to the document page size (ch eck
the application's page size settings). You can also
use the slider bar beneath the field to choose a
percentage.
Watermarks group
Watermarks This drop-down list displays a list of words that the
printer can then use to print a watermark on the
document. The supported options are:
! (none)
! Confidential
! Draft
! SAMPLE
Available
100
(none)
74 Chapter 5 - Configuration ENWW
Page 75

Effects tab (continued)
Field Description Default
First Page Only This control box becomes available when text other
Unavailable
than (none) is shown in the Watermarks drop-down
list.
Selecting this check box enables the printer to print
the specified watermark on only the first page of the
document. No watermarks are printed on the second
and subsequent pages.
Edit Click Edit to open the Watermark Details scree n. N/A
Watermark Details
Current Watermarks This control lists the available watermarks.
N/A
The watermark that is highlighted in this list box also
shows up as alterable text in the Watermark
Message control.
New Clicking this button allows you to create a new
N/A
watermark by highligh ting the (Untitled) opti on and
allowing you to type in text for your new watermark.
This text then appears in the Current Watermarks
list.
Delete Clicking this button allows you to delete the selected
N/A
watermark from the Current Watermarks list.
Watermark Message Allows you to change the text of any highlighted
(none)
watermark listed in the Current Watermarks list.
Message Angle This control consists of three options and a spin box:
Diagonal
! Diagonal
Selecting this option cause s the sel ec ted
watermark to print diagonally on the page.
! Horizontal
Selecting this option cause s the sel ec ted
watermark to print horizontally on the page.
! Angle
Selecting this option enables the spin box, which
you can use to choose the angle of the
watermark on the printed page.
Font Attributes group
Name Clicking a font name from this drop-down list
specifies which font to use for the selected
Default font for the
document
watermark.
The supported font options consist of all the installed
fonts on the computer.
Color Gray is the only supported color option. Gray
ENWW Printing preferences tabs using PCL 5e printer drivers in Windows 2000 and XP 75
Page 76

Effects tab (continued)
Field Description Default
Shading Clicking a setting from this drop-down list specifies
how dark the selected watermark appe ars on the
printed page. The supported shading options are:
! Lightest
! Very Light
! Light
! Medium Light
! Medium
! Medium Dark
! Dark
! Very Dark
! Darkest
Size Use this spin box to specify the font size for the
selected watermark.
Style Clicking a setting from this drop-down list specifies
the specific style for the font chosen for this
watermark. The supported options available in this
list depend on the fonts installed on the computer.
Typical choices include:
! Regular
! Italic
! Bold
! Bold Italic
OK To update any changed settings on the printer and
close the dialog box, click OK.
Very Light
80
Regular
N/A
Cancel To close the dialog box without saving the changes
you have made, click Cancel.
N/A
76 Chapter 5 - Configuration ENWW
Page 77

HP Toolbox
Note The HP LaserJet 1010 series printers introduce with HP Toolbox 2.0.
CAUTION To avoid HP Toolbox conflicts, when installing the HP LaserJet 1010 series printer on a system with
an HP Color LaserJet 2500, install the HP Color LaserJet 2500 first, and then install the HP LaserJet
1010 series printer.
The HP Toolbox is a Web application that you can use for the following tasks:
! Check the printer status.
! Configure the printer settings.
! View troubleshooting information.
! View online documentation.
You can view the HP Toolbox when the printer is directly connected to your computer or when it is
connected to a network. You must have performed a complete software installation to use the
HP Toolbox.
Note You do not have to have Internet access to open and use the HP Toolbox. However, if you click a
link in the Other Links area, you must have Internet access in order to go to the site associated
with the link. See “Other links” on page 78 for more information. TCP/IP i s requi red for HP Toolbo x.
Note Toolbox features a debug mode for troubleshooting. To enable debug mode, see page 112.
Supported operating systems
HP Toolbox is supported for Windows 98 SE, 2000, Me, and XP.
Supported browsers
To use the HP Toolbox, you must have one of the following browsers:
! Microsoft Internet Explorer 5.5 or later recommended
! Netscape Navigator 6.3 or later
! Opera version 7 or later
All pages can be printed from the browser.
HP Toolbox components
HP Toolbox has the following components:
! HP Toolbox utility
! Apache Tomcat Web server
! Java Runtime Environment
! Status Client
Viewing HP Toolbox
1 On the Start menu, point to Programs, point to HP LaserJet 1010 series, and choose the
HP LaserJet Toolbox.
ENWW HP Toolbox 77
Page 78

2 The HP Toolbox opens in a Web browser.
OR
1 Double-click the icon in the system tray.
Viewing HP Toolbox using the system tray icon
When viewing the HP Toolbox using the system tray icon, the following operations are available:
! If you double-click the icon when there is no alert, the browser opens the main page of HP
Toolbox.
! If you double-click the icon when there is an existing alert, the browser opens the HP Toolbox
current alerts page.
! If you right-click the icon and select Exit, the icon in the system tray disappears. This operation
does not effect the HP Toolbox. (This shuts down only the UI/graphics part of the Status
Client, but does not shut down Status Client completely. Status Client will still be able to
enumerate printers.)
Note Once you open the URL, you can bookmark it so that you can return to it quickly in the future.
HP Toolbox sections
The HP Toolbox software contains the following sections:
! Status tab
! Troubleshooting tab
! Alerts tab
! Documentation tab
! Advanced Printer Settings window
HP Toolbox Links
Each page in the HP Toolbox contains links to these main pages:
! Select a Device.Switch to a different printer.
! View Current Alerts.View printer status information.
! Text Only Page.View links to the main pages of the Toolbox as text.
Other links
Each page in the HP Toolbox contains links to the HP Web site for product registration, product
support, and for ordering supplies. You must have Internet access in order to use any of these
links. If you use a dial-up connection and did not connect when you first opened the HP Toolbox,
you must connect before you can visit these Web sites.
Status tab
The Status tab has links to these main pages:
! Device Status. View printer status information. This page will indicate printer conditions such
as a paper jam or an empty tray. After you correct a problem with the printer, click Refresh to
update the device status.
! Print Info pages. Print the configuration page, PCL Font List, and various other information
pages that are available for the printer.
78 Chapter 5 - Configuration ENWW
Page 79

Troubleshooting tab
The Troubleshooting tab provides links to these main pages:
! Problem Solving: Provides various printer troubleshooting information. Click the arrow
buttons to scroll through steps to troubleshoot printing problems.
! Status Light Patterns: Provides illustrations and a table of status light conditions.
! Print Quality Tools: Enter Cleaning Mode.Click the arrow buttons to scroll through steps in
Cleaning Mode.
Alerts ta b
The Alerts tab allows you to configure the printer to automatically notify you of printer alerts. The
Alerts tab has links to this main page:
! Set up status alerts
Note Status alerts are only sent during printing to the person who sends the print job.
Set up status alerts
On the Set up status alerts page you can choose to turn alerts on or off, specify when the printer
should send an alert when they occur, and choose from two different types of alerts:
! a pop-up message
! a task bar icon
Click Apply to activate the settings.
ENWW HP Toolbox 79
Page 80

Documentation tab
The Documentation tab contains links to these information sources:
! User Guide. Contains the information about the printer usage, warranty, specifications, and
support that you are currently reading. The user guide is available in both HTML and PDF
format.
! Read Me. Contains late-breaking information about the printer, discovered after other
documentation such as the user guide was developed. In English only.
Advanced Printer Settings window
When you click the Advanced Printer Settings link, a new window opens. The Advanced Printer
Settings window has two tabs:
! Information tab
! Settings tab
To access the HP Toolbox Information tab and Settings tab, on any HP Toolbox page, click
Advanced Printer Settings. See the text options below for features in the HP Toolbox
Information tab and Settings tab.
Information tab
The Information tab provides quick links to the following information:
! Device status
! Configuration
! Event log
! Print Info pages
Settings tab
The Settings tab has links to several pages that allow you to view and change the printer’s
configuration.
Note Software application settings can override settings made in the HP Toolbox.
! Device Information. View basic information about the printer.
! Paper Handling. View and change the settings for the printer’s input tray.
! Printing. View and change the default printer job settings.
! PCL. View and change the PCL font information.
! Print Quality. View and change the print quality settings.
! Print Modes. View and change the print modes for various media types.
! System Setup. View and change system information.
! I/O. View and change the I/O timeout setting.
! Service. Access service related functions, such as cleaning mode and resets.
80 Chapter 5 - Configuration ENWW
Page 81

Settings tab text options
Item Description Default
Device Information Group
Device Description The printer name is displayed in the text box. Printer model
Asset Number In the text box, type the asset number. N/A
Company Name In the text box, type the company name. N/A
Contact Person In the text box, type the name of contact person. N/A
Apply To save any settings changed, click Apply.N/A
Cancel To cancel any changes made, click Cancel.N/A
Paper Handling group
Default Paper Size From the drop-down list, select from the following
options:
! A4
! A5
! B5 (Envelope)
! B5 (ISO)
! C5
! COM10
! Custom
! DL
! Exec
! Foolscap
! JB5
! JDoublePostcard
! JPostcard
! Legal
! Letter
! Monarch
! 16K
Letter
Default Paper Type From the drop-down list, select from the following
Plain
options:
! Bond
! Card Stock (105-176g/m
! Colored
! Envelope
! Heavy (90-105 g/m
! Labels
! Letterhead
! Light (<75 g/m
! Plain
! Preprinted
! Prepunched
! Recycled
! Rough
! Transparency
2
)
Manual Feed To set the manual feed option, from the drop-down
2
)
2
)
Off
list, select either On or Off.
ENWW HP Toolbox 81
Page 82

Settings tab text options (continued)
Item Description Default
Apply To save any settings changed, click Apply.
Cancel To cancel any changes made, click Cancel.
Printing Group
Copies In the text box, type the number of copies to print (1-
999).
Wide A4 From the drop-down list, select either Yes or No.No
Courier Font From the drop-down list, select either Regular or
Dark.
Orientation To sele ct the paper orientation , se lec t ei the r Portrait
or Landscape.
Apply To save any settings changed, click Apply.N/A
Cancel To cancel any changes made, click Cancel.N/A
1
Regular
Portrait
82 Chapter 5 - Configuration ENWW
Page 83

Settings tab text options (continued)
Item Description Default
Symbol Set From the drop-down list, select from the following
PC-8
options:
! ARABIC8
! GREEK8
! DESKTOP
! LEGAL
! PC-1004
! PC-8TK
! PS TEXT
! Roman-8
! HPWARA
! HEBREW7
! HEBREW8
! ISO-11
! ISO-15
! ISO-17
! ISO-21
! ISO-4
! ISO-6
! ISO-60
! ISO-69
! ISOCYR
! ISOGRK
! ISOHEB
! ISO L1
! ISO L2
! ISO L5
! ISO L6
! MC TEXT
! PC-775
! PC-8
! PC-850
! PC851GRK
! PC862HEB
! PC864ARA
! PC866CRY
! PC866UKA
! PC-8 DN
! PC8GRK
! PC-852
! WINCYR
! WINGRK
! WINBALT
! WIN 3.0
! WIN L1
! WIN L2
! WIN L5
Append CR to LF From the drop-down list, select either Yes or No.No
Form Length In the text box, type the form length value (5-128). 60
ENWW HP Toolbox 83
Page 84

Settings tab text options (continued)
Item Description Default
Apply To save any settings changed, click Apply.N/A
Cancel To cancel any changes made, click Cancel.N/A
Print Quality group
Resolution From the drop-down list, select from the following
FastRes 1200
options:
! FastRres1200
! 600
RET From the drop-down list, select either On or Off.On
Density From the drop-down list, select the density value (1=
3
Light; 5=Dark).
Economode From the drop-down list, select either On or Off.Off
Apply To save any settings changed, click Apply.N/A
Cancel To cancel any changes made, click Cancel.N/A
Print Modes group
Color From the drop-down list, select from the following
Plain
options:
! Bond
! Card Stock (105-176 g/m
! Heavy (90-105 g/m
! Light (<75 g/m
! Plain
! Rough
2
)
Letterhead From the drop-down list, select from the following
2
)
2
)
Plain
options:
! Bond
! Card Stock (105-176 g/m
! Heavy (90-105 g/m
! Light (<75 g/m
! Plain
! Rough
2
)
2
)
2
)
Preprinted From the drop-down list, select from the following
options:
! Bond
! Card Stock (105-176 g/m
! Heavy (90-105 g/m
! Light (<75 g/m
! Plain
! Rough
2
)
2
)
2
)
Plain
84 Chapter 5 - Configuration ENWW
Page 85

Settings tab text options (continued)
Item Description Default
Prepunched From the drop-down list, select from the following
Plain
options:
! Bond
! Card Stock (105-176 g/m
! Heavy (90-105 g/m
! Light (<75 g/m
! Plain
! Rough
2
)
Recycled From the drop-down list, select from the following
2
)
2
)
Plain
options:
! Bond
! Card Stock (105-176 g/m
! Heavy (90-105 g/m
! Light (<75 g/m
! Plain
! Rough
2
)
2
)
2
)
Restore Modes To restore the print modes, select the check box. Unchecked
Apply To save any settings changed, click Apply.N/A
Cancel To cancel any changes made, click Cancel.N/A
System Setup group
Jam Recovery From the drop-down list, select from the following
Auto
options:
! Auto
! Off
! On
Auto Continue From the drop-down list, select either Off or On.Off
Apply To save any settings changed, click Apply.N/A
Cancel To cancel any changes made, click Cancel.N/A
I/O group
I/O Timeout In the text box, type the number of seconds (5-300). 15 seconds
Apply To save any settings changed, click Apply.N/A
Cancel To cancel any changes made, click Cancel.N/A
ENWW HP Toolbox 85
Page 86

Settings tab text options (continued)
Item Description Default
Service group
Cleaning Mode To start the cleaning mode, click Start.N/A
Resets To restore all ad va nced printer setting s to t he fac tory
defaults, select the check box and click Apply.
Apply To save any settings changed, click Apply.N/A
Cancel To cancel any changes made, click Cancel.N/A
Unchecked
86 Chapter 5 - Configuration ENWW
Page 87

System changes through
6
installation
Installation changes to Windows systems
The tables in the following sections detail the changes to the system as new folders and files are
added when the HP LaserJet 1010 series software is installed on computers running Windows
operating systems.
Note This listing does not include files that are created, and then deleted, during the installation process.
For a complete list of files installed to Windows systems, see the HP LaserJet 1010 series
software technical reference addendum.
Changes to *.INI and Windows registry changes
For a complete list of these files, see the HP LaserJet 1010 series software technical reference
addendum.
Win.ini changes after installation
For a complete list of these files, see the HP LaserJet 1010 series software technical reference
addendum.
Windows registry changes
For a complete list of these files, see the HP LaserJet 1010 series software technical reference
addendum.
Registry entries are made based upon a ROOTKEY\Key\Name = value format. The root keys are:
Root key Description
HKLM HKEY_LOCAL_MACHINE
HKCR HKEY_CLASSES_ROOT
HKCU HKEY_CURRENT_USER
HKU HKEY_USERS
Installation changes to Mac systems
For a complete list of these files, see the HP LaserJet 1010 series software technical reference
addendum.
ENWW System changes through installation 87
Page 88

88 Chapter 6 - System changes through installation ENWW
Page 89

7Uninstallation
Uninstall in Windows 95 and Windows NT 4.0
To uninstall the software from Windows 95 and Windows NT, use the following method:
1 Click Start, click Settings, and then click Printers.
2 In the Printers window, right-click the printer icon, and click Delete.
Note To uninstall the software from Windows NT 4.0, you must log on with administrator privileges.
Uninstall methods in Windows 98 SE, Me, 2000, and XP
Two methods are available to uninstall the HP LaserJet 1010 series software using the Add/
Remove Programs feature:
! Program group method
! Control panel method
Program group method
To uninstall using this method, click Start, select Programs, select HP LaserJet 1010, and then
click Add or Remove. This starts the uninstallation program. Follow the instructions on the
screen. When all the files are removed, you are prompted to restart the computer.
Note If using the program group method for uninstalling the HP LaserJet 1010 series software, you need
the software CD-ROM.
ENWW Uninstallation 89
Page 90

Control panel method
To uninstall using this method, click Start, select Settings, click Control Panel, and then doubleclick Add/Remove Programs (Add or Remove Programs in Windows XP). Select HP LaserJet
1010 series from the list of programs, and then click Remove. This starts the uninstallation
program. Follow the instructions on the screen. When all the files are removed, you are prompted
to restart the computer.
Uninstallation text options using the program group method
Windows 98 SE, Me, 2000, and XP
After inserting the CD-ROM, the Welcome screen appears. The following text options are
available during uninstallation in Windows operating system:
Screen/Field Description Default
Welcome sc reen This screen indicates that Setup has detected that there is
already an HP LaserJet 1010 series printer installed.
Next Click Next to continue to the next screen. N/A
Cancel Clicking this button cancels the uninstallation process and
displays the HP LaserJet 1010 Setup Interrupted screen. Click
Finish to exit the Setup Wizard.
Setup Maintenance Select from the following options and then click Next:
! Add an additional printer or printer driver
Use this option to run the HP LaserJet 1010 series Setup
Wizard.
! Modify the existing installation
Use this option to add or remove features.
! Remove All
Use this option to uninstall the HP LaserJet 1010 series
software.
Back Click Back to return to the previous scree n. N/A
Next Click Next to continue to the next screen. N/A
Cancel Clicking this button cancels the uninstallation process and
displays the HP LaserJet 1010 Setup Interrupted screen. Click
Finish to exit the Setup Wizard.
Remove the Program This screen lists the printer software installed on the computer. N/A
Back Click Back to return to the previous scree n. N/A
N/A
Finish
N/A
Finish
Remove Click Remove to start the uninstallation process. N/A
Cancel Clicking this button cancels the 1010 Setup Interrupted screen.
Click Finish to exit the Setup Wizard.
Finish Click Finish to complete the uninstallation process. N/A
HP LaserJet 1010 Inst aller
Information
This screen prompts th e user to restart the comput er to make the
configuration changes. To restart now, click Yes. To restart later,
click No.
Finish
N/A
Files not removed, and manual uninstall
For a complete list of these files, see the HP LaserJet 1010 series software technical reference
addendum.
90 Chapter 7 - Uninstallation ENWW
Page 91

Scrubber Utility
A scrubber utility is provided to remove files and entries that may not be properly handled by the
uninstaller. The scrubber runs in the followi ng ope ratin g system s: Windows 95, 98, Me, NT 4.0,
2000, and XP.
The scrubber program ("scrubber.exe") is an ini file driven program. The ini file ("scrubber.ini")
contains the specific information the scrubber executable needs in order to "scrub" any trace of a
product from the PC. The scrubber goes through the following functions in the order below.
1 Run the uninstaller - The scrubber checks the system to see if it should first launch the
uninstaller. If so, the uninstaller is launched and run before the scrubber finishes.
2 End problem applications - Any "problem" applications which are known can be added to this
list and ended when the scrubber runs.
Then the scrubber procedes to remove any remaining items. In steps 3-11, only the items that are
specific to the HP LaserJet 1010 series printers are removed.
3 Remove printers and drivers - The scrubber enumerates the printers on the system and
removes any printers that use the specified driver. Print jobs pending for those printers are
canceled before attempting to delete the printer. After the printer is deleted the printer driver
is removed. The spooler is restarted on NT systems if an error is returned stating that the
printer driver is in use. The scrubber then reattempts to delete the printer driver.
4 Remove language monitors.
5 Remove print processors.
6 Remove devices from the device manager.
7 Remove inf files.
8 Remove directories.
9 Remove file s.
10 Remove strings from the device path key.
11 Remove registry keys.
The scrubber utility is available in the HewlettPackard directory on the Software CD. The ini file
and the exe file must be in the same location when running the scrubber. Execute the scrubber
from the DOS command line or Windows Run line.
When the scrubber is executed, no dialogs appear. It takes just a few seconds to run. The user
must restart after running the scrubber. If the scrubber is run from the host machine, a
scrubber.log file is created in the same location as the scrubber which helps diagnose issues if
they occur.
Software uninstall (Mac)
The Uninstall program removes the HP LaserJet 1010 software from the computer.
Uninstall for Mac OS 9.x and Mac OS X v10.1 and v10.2
Use the instructions below to uninstall the software on a Mac computer running Mac 9.x, OS X
v10.1 and higher:
1 Insert the printer software CD-ROM into your CD-ROM drive.
2 If the CD-ROM does not auto-launch, on the desktop, double-click the HP LaserJet 1010 CD-
ROM icon.
3 Double-click the HP LaserJet 1010 folder.
ENWW Software uninstall (Mac) 91
Page 92

4 Double-click the HP LaserJet Installer (Classic or OS X) for the appropriate OS.
5 Click Continue, click Accept, and then click Continue.
6 From the drop-down list, select UnInstall.
7 For OS X only, Print Center will auto-launch to give you the opportunity to delete the HP
LaserJet 1010 print queue after uninstalling the software.
92 Chapter 7 - Uninstallation ENWW
Page 93

Software availability and
8
fulfillment
Ordering softwa re
To order the software if your CD-ROM is damaged or missing, contact Hewlett-Packard Support.
Part numbers for the software CD-ROMs for the HP LaserJet 1010 series printers, and which
languages are on them, are given in the table below.
The CD-ROM Key refers to the software and documentation language sets included on the CD..
CD-ROM ordering information
CD-ROM key
Number
For HP LaserJet 1010 series
1 1.0 English, French, German, Italian,
2 1.0 English, Swedish, Finnish, Danish,
3 1.0 English, Polish, Hungarian, Czech,
Version Languages included on CD-ROM Part number
Q2460-60101
Spanish, Dutch, Portuguese, Greek,
Arabic, *Farsi
Q2460-60102
Norwegian, *Estonian, *Lithuanian,
*Latvian
Q2460-60103
Slovakian, *Slovenian, *Croatian,
*Romanian, Russian, *Kazakh,
*Ukrainian , Turkish, *Bulgarian,
Hebrew, Arabic
4 1.0 English, Traditional Chinese, Simplified
Chinese, Korean, Thai, *Bahasa
Indonesian
5 1.0 English, Simplified Chinese Q2460-60105
*Denotes partial localization
Note The complete software for this printer is not provided on the Web due to licensing restrictions. If a
replacement CD-ROM or newer version of the software than what shipped with the printer is needed,
go to http://www.hp.com/support/lj1010 and click the CD-ROM orde r page to order.
For a current list of telephone numbers to use for ordering software, go to
http://search1.external.hp.com:8087/
krs?method=viewfile&filename=c00001126&application=csso_web and select HP Hardcopy
Support -Worldwide Software Fulfillment Support Phone List and document number
c00001126.
ENWW Software availability and fulfillment 93
Q2460-60104
Page 94

Languages
The following tables detail the language options for the HP LaserJet 1010 series printers.
Localization and part numbers
User guides for HP LaserJet 1010 series printers
Languages included in the guides Part number
English Q2460-90909
French Q2460-90910
Italian Q2460-90911
German Q2460-90912
Spanish Q2460-90913
Danish Q2460-90914
Greek Q2460-90915
Finnish Q2460-90916
Hebrew Q2460-90917
Hungarian Q2460-90918
Korean Q2460-90919
Dutch Q2460-90920
Norwegian Q2460-90921
Polish Q2460-90922
Portuguese Q2460-90923
Russian Q2460-90924
Swedish Q2460-90925
Simplified Chinese Q2460-90926
Traditional Chinese Q2460-90927
Croatian Q2460-online
Czech Q2460-online
Romanian Q2460-online
Slovak Q2460-online
Slovenian Q2460-online
Turkish Q2460-online
Arabic Q2460-online
Farsi Q2460-online
Bahasa Indonesian Q2460-online
Thai Q2460-online
94 Chapter 8 - Software availability and fulfillment ENWW
Page 95

Welcome mats for HP LaserJet 1010 printers
Languages included in the
welcome mats
English
French
German
Italian
Spanish
Dutch
Portuguese
Greek
English
Danish
Finnish
Norwegian
Swedish
Estonian
Latvian
Lithuanian
English
Polish
Hungarian
Czech
Slovakian
Slovenian
Croatian
Romanian
Part number
Q1336-90901
Q1336-90902
Q1336-90903
English
Russian
Kazakh
Ukrainian
Bulgarian
Turkish
Hebrew
English
French
Arabic
Farsi
English
Bahasa Indonesian
Traditional Chinese
Korean
Thai
Vietnamese
English
Simplified Chinese
English
Spanish
Portuguese
French
Q1336-90904
Q1336-90905
Q1336-90906
Q1336-90907
Q1336-90908
ENWW Languages 95
Page 96

96 Chapter 8 - Software availability and fulfillment ENWW
Page 97

9Port communication
The HP LaserJet 1015 printer includes both an IEEE-1284 (parallel) port and a USB port.
Note Do not connect the printer to the computer using both ports because printing results may be
unpredictable and this configuration is not supported.
Parallel port connections
If you are connecting the HP LaserJet 1015 using the parallel port, then the computer must
include a bidirectional data bus and cable. Ports are designated as enhanced capabilities port
(ECP), IEEE-1284, or PS/2 qualify.
Extended parallel port only (EPP-only) or unidirectional ports are not supported. However, some
ports can be set to EPP/ECP through the CMOS setup or a jumper setting, which is supported.
See Troubleshooting (page 105) in this document for parallel port issues and solutions.
Other parallel port devices
If connecting the HP LaserJet 1015 directly to the computer’s parallel port, then it is recommended
that you do not use devices such as a switch box, security dongle, or other device connected to
the same parallel port. Disconnect such devices prior to connecting and using the HP LaserJet
1015 series printer. Another option would be to have two parallel ports installed in the computer.
Parallel port expansion cards may be used, but they are not supported by Hewlett-Packard.
ENWW Port communication 97
Page 98

Changing parallel port modes
This section provides the steps to make sure that the parallel port is configured to provide the best
performance with the HP LaserJet 1015 printers.
The mode for the parallel port determines how the parallel port performs with the HP LaserJet
1015 series printers. This mode can default to a number of different settings. Unfortunately, the
HP LaserJet 1015 software cannot automatically select the best setting. (ECP mode generally
provides the best printing and scanning performance.) Therefore, you need to check this setting
yourself.
Different basic input/output system (BIOS) options frequently exist within the computer
manufacturer’s range of products. Changing the parallel port mode is similar for all computers if
they have the capability built in. However, see the computer documentation for specific
instructions on changing the parallel mode for the computer.
Even though the label on the parallel port mode says ECP, it might not follow the protocol. If the
port mode option you choose does not work, then try another option in the Setup. If the computer
does not have the ECP capability built in, an external parallel port card can be installed to add this
functionality.
In addition to the parallel port mode being set incorrectly, there might be other areas of potential
parallel port conflict involving software and hardware from other manufacturers. If none of the
options in the Setup allow the HP LaserJet 1015 printer to talk to the computer, or you have other
devices that need a parallel port, you can add an external ECP parallel port card to your computer.
Then, connect the HP LaserJet 1015 printer to one of the parallel ports and connect the other
devices you have to the other parallel port. These parallel port cards are available at computer
stores and allow your HP LaserJet 1015 printer to communicate with the computer without
conflicting with other devices. For basic information on identifying and resolving device conflicts,
see “
To receive the most current printer status in HP Toolbox, on the Status tab, click Refresh
Status. To run Toolbox with debugging enabled, see page 112.” on page 99.
USB port connections
The Universal Serial Bus (USB), version 2.0 full speed, is also available for both PCs and Macs.
There is a distinction between a “USB Host” and a “USB Device.” The HP LaserJet 1010 series
printer is a “USB Device.” It can connect only to a USB Host or a USB Hub.
Note Windows 95 and Windows NT 4.0 do not support USB cable connections and require HP LaserJet
1015.
98 Chapter 9 - Port communication ENWW
Page 99

HP Toolbox and embedded Web server communication
The HP Toolbox includes an embedded Web server to provide the Advanced Printer Settings
functions of the HP Toolbox.
An embedded Web server resides in the HP LaserJet 1010 series printers and the HP Toolbox
communicates with this embedded Web server. The HP Toolbox is installed during the standard
install process and runs in the Apache Tomcat Server (v. 4.03) and the Sun™ Java Runtime
Environment (JRE) version 1.3.1, allowing the HP Toolbox status and device configuration to
simulate an embedded Web server in a printer that does not contain a Web server. Status Client is
a native application that is part of the HP Toolbox software and runs on the user’s computer. It
communicates with the main HP Toolbox application. In addition to the HP Toolbox and Status
Client applications, the installer installs the Tomcat server and the JRE v.1.3.1, if it is not already
installed on the user’s computer. For more information on the Apache Tomcat Server, go to http://
jakarta.apache.org/tomcat/index.html. The Apache Tomcat Server is open source software. For
more information on the Sun™ Java Runtime Environment (JRE) v. 1.3.1, go to http://
java.sun.com/j2se/1.3./.
HP Toolbox embedded Web server features
Description HP Toolbox
Supported browsers The following browsers are supported:
! Microsoft Internet Explorer 5.0 and later
! Netscape Navigator 4.75 and later
Supported operating
systems
Connection Any direct or network connection method.
! Windows 98 SE
! Windows Me
! Windows 2000
! Windows XP
! Mac OS X v10.1 and v10.2
Access Requires a supported browser and network or Internet access.
Note: If the HP LaserJet 1010 series printer is behind a firewall, Internet
access may not be possible.
Supported languages For HP Toolbox supported languages, see “
Installation HP Toolbox software must be installed.
Status alerts Status alert available.
Documentation and
troubleshooting
information
Available.
Ordering software” on page 93.
HP Toolbox communication
HP Toolbox is available for Windows 98 SE, Windows Me, Windows 2000, and Windows XP.
HP Toolbox works with a Web browser to provide information about the printer status, as well as
configure and send alerts, provide troubleshooting, and provide user documentation. You can also
register the printer, order supplies, and access the user guide and product support.
To receive the most current printer status in HP Toolbox, on the Status tab, click Refresh Status.
To run Toolbox with debugging enabled, see page 112.
ENWW HP Toolbox and embedded Web server communication 99
Page 100

100 Chapter 9 - Port communication ENWW
 Loading...